

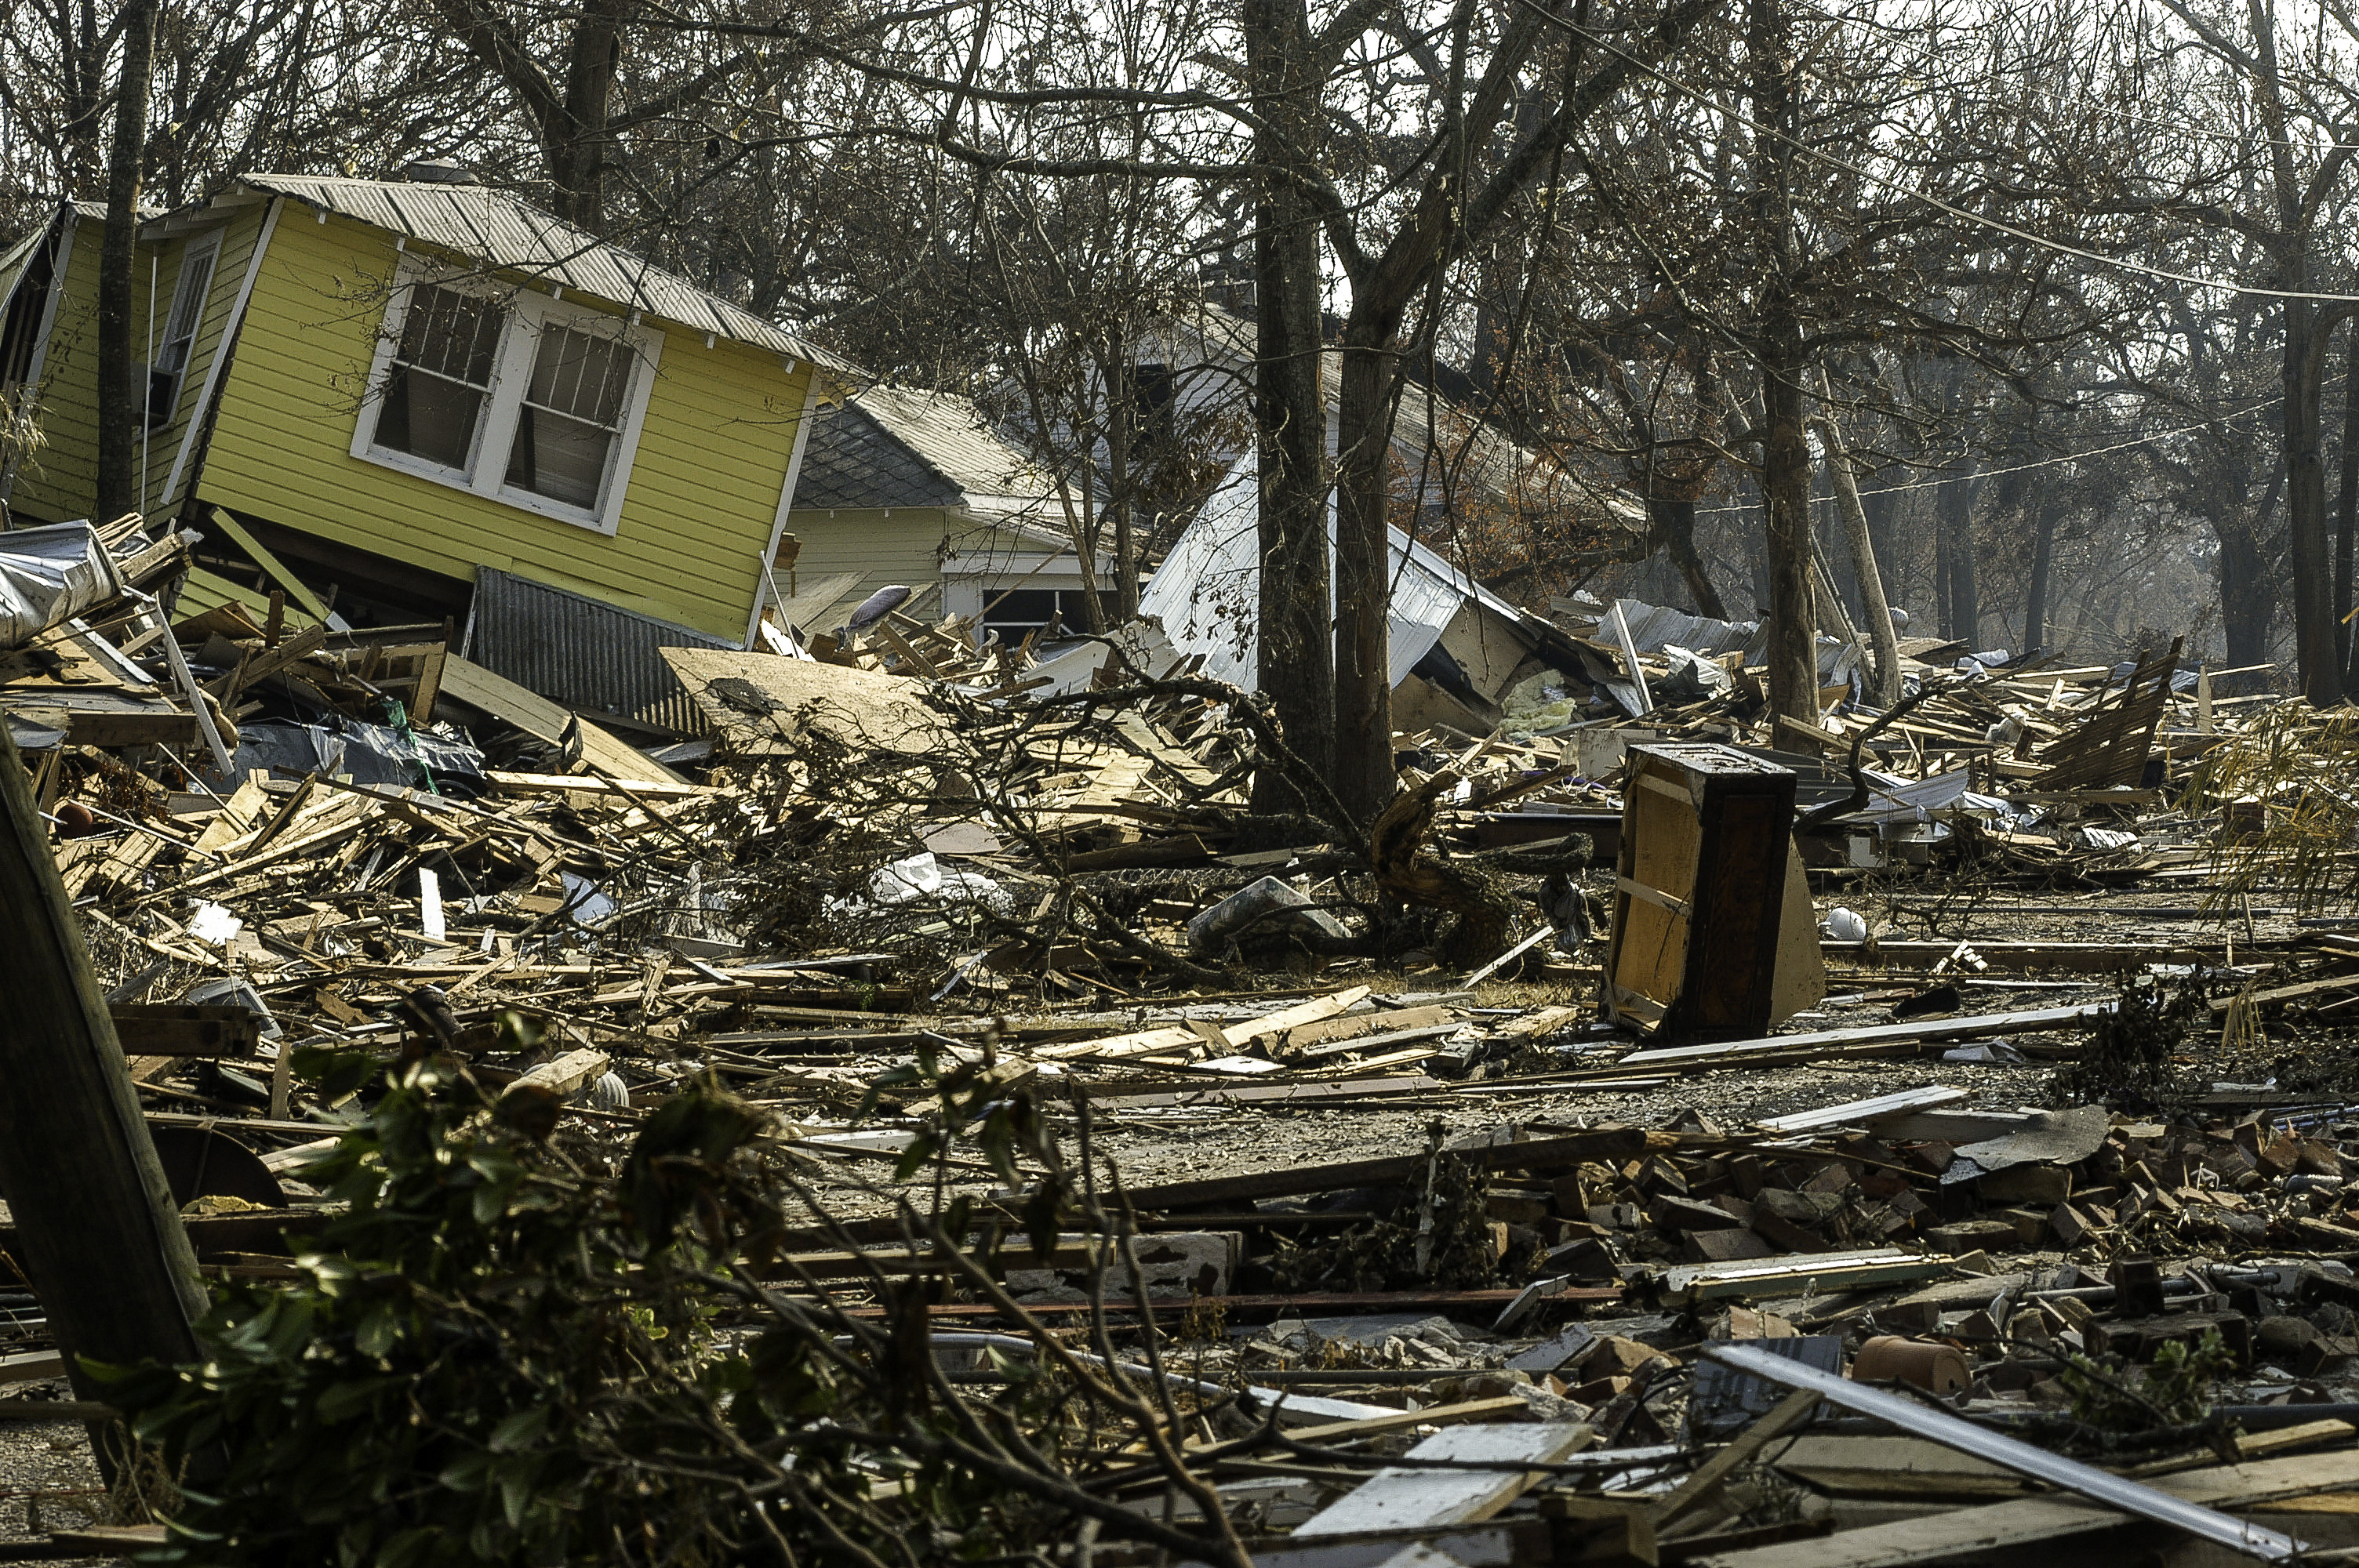
The devastating effects of hurricanes, high winds, and tornados are seen across nearly every part of the United States. Figure 1 shows the immense damage to homes caused by Hurricane Katrina in Mississippi. Key practices in new and existing home design can mitigate much of the potential damage to homes caused by these events. The main spots to consider when getting a home ready for wind events are roofs and walls, openings such as windows and doors, and the continuous load path connections from the roof, through the walls, to the foundation (FEMA P-804, 2010). No matter where a home is located, taking these steps will ensure that the home is ready for any type of high wind or even seismic event.
IBHS Fortified HOME
The Insurance Institute for Business & Home Safety (IBHS) has developed a set of standards for home resiliency and durability under hurricane and high wind conditions through its Fortified Home program, which consists of three levels of resiliency, each building on the previous:
- Fortified Roof aims to strengthen and protect the roof first, as it is a home’s first line of defense against high winds.
- Fortified Silver focuses on roof overhangs and protecting openings such as windows and doors, gable ends, and attached structures.
- Fortified Gold ties all components of the structure together to create a continuous load path.
Fortified ROOF
The roof system of a home is an important protective barrier protecting the home from the high winds and rain that can accompany hurricanes, storms, and tornados. The following construction practices are recommended by IBHS Fortified Roof to strengthen roofs.
IBHS Fortified Roof Requirements
|
Roof deck (thickness) |
Roof decking material must be at least 7/16-inch OSB or plywood. |
|
Roof deck (attachment) |
Roof deck must be attached using 8d ring shank nails spaced according to Fortified Roof requirements. |
|
Roof deck (sealing) |
Roof deck must be sealed from the top side using one of three methods: Method 1: Install a full layer of self-adhering polymer-modified bitumen membrane. Method 2: Tape horizontal and vertical joints between roof sheathing panels and apply an underlayment over the entire roof deck. Method 3: Install two layers of underlayment in shingle fashion. |
|
Drip edge |
Must be installed at eaves and rakes and mechanically fastened to the roof. Drip edge should be installed over the underlayment. |
|
Shingles |
Shingles must be rated for high winds and exposure. |
|
Gable end vents |
Must be protected against water intrusion. |
|
Roof vents (ridge vents, off-ridge vents, and turbines |
Must meet Florida Building Code TAS 100 (A) requirements. |
IBHS Fortified Roof requires the following steps (IBHS Fortified Hurricane Checklist):
Roof Deck
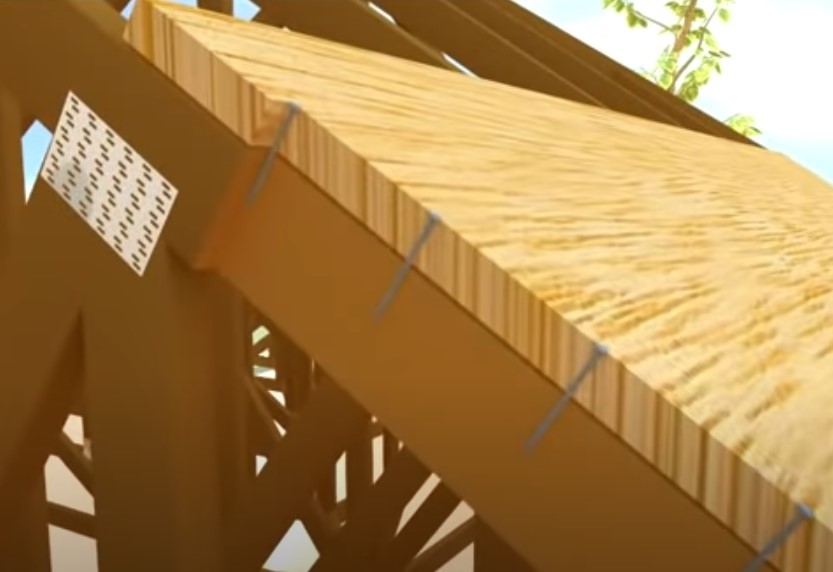
- Roof deck must be at least 7/16-inch thick.
- The roof deck must be attached using minimum 8d ring shank nails.
- Nail spacing should be no more than 6 inches on center along the edges of the panels and 12 inches in the field.
- Nails must penetrate directly into the roof framing as shown in Figure 2.
Sealing the Roof Deck
- For new construction or when installing a new roof covering, the roof deck must be sealed to keep water from entering the home, using one of three methods defined above:
using one of three methods:
Method 1: Install a full layer of self-adhering polymer-modified bitumen membrane.
Method 2: Tape horizontal and vertical joints between roof sheathing panels with an approved self-adhering flashing or bitumen tape and install an underlayment over the entire roof deck that is attached using annular ring shank roofing fasteners with at least 1-inch diameter caps, spaced every 6 inches along edges and every 12 inches in the field.
Method 3: Install two layers of underlayment in shingle fashion.
- For existing homes where the roof covering will not be removed, seal the roof deck from inside the attic using a closed-cell spray-foam adhesive on the joints as shown in Figure 3.
- For specific guidance on materials that comply with these IBHS Fortified Roof requirements, see the IBHS Fortified Hurricane Technical Summary report.

Drip Edge
A drip edge is a metal flashing installed at the roof's edges to help control water flow away from the fascia and protect the underlying roofing components. The drip edge overhangs the sides of the roof and has a small metal flange bent away from the fascia.
- Drip edge must extend 0.5 inches below the roof sheathing and at least 2 inches up the roof.
- Install the drip edge with nails 12 inches on center in a staggered pattern.
- IBHS Fortified requires drip edge be installed over the roof underlayment to help hold down underlayment in high winds along both rakes and eave edges of the roof. Other entities recommend that the underlayment overlap the drip edge at the eave edges of the roof to minimize the chance of water getting under the drip edge. IBHS specifies that the drip edge's upper seam should be sealed to the underlayment with flashing cement.
Roof Covering
Roof coverings are the outermost layer of the roof, providing the first layer of defense against moisture, wind, and impact. Asphalt shingles are the most common roof covering in the United States, but other types of coverings such as metal or clay tile may be used.
- Install ASTM D3161 Class F or ASTM 7158 Class G/H rated shingles.
- UL 2218 Class 4 impact-rated shingles should be used if the home is located in a hail-prone area.
- Install with a minimum of four nails per shingle.
Attic Vents
- Attics are either sealed, unvented, and conditioned or unsealed and vented.
- Sealed, unvented, and conditioned attics don’t have attic vents that provide air change between the attic and the outside. Sealed attics are part of the conditioned space of the home.
- Unsealed and vented attics have attic vents, usually located at the soffits and the ridge or just off the ridge that allow for air change between the attic and the outside. The attic vents need to be designed in a way that keeps out rain, snow, fire embers, bugs, and birds. All vents need to comply with Florida Building Code TAS 100 A.
IBHS Fortified Silver Requirements
The following list is an overview of the requirements specific to Fortified Silver compliance (IBHS Fortified Hurricane Technical Summary 2019). Before complying with the following Fortified Silver requirements, all Fortified Roof requirements outlined above must be satisfied.
|
Gable ends |
Must have minimum of 7/16 inches structural sheathing using OSB or plywood installed on the vertical face. |
|
Gable end vents |
Must be blocked to prevent wind-driven rain from entering the attic. |
|
Gable overhangs greater than 12 inches deep |
Must be framed using cantilevered blocking, rafters, or purlins (“outlookers”) that have an adequate connection at the top of the gable end and at the interior roof framing members. |
|
Box-type soffit overhangs (eave) and gable overhangs with a depth of greater than 12 inches and covered with aluminum or vinyl material |
Must have a brace or support installed so that the soffit vent covering is supported at least every 12 inches. The support must provide resistance that prevents the soffit covering from being displaced by wind forces. |
|
Gable end walls on gables greater than 48 inches tall |
Must be laterally braced at the top and bottom of the gable. |
|
Porches and carports |
Must have adequate connections for uplift pressures. Metal connectors should be installed at the roof framing to the beam/wall, beam to column, and column to structure below. |
|
Garage doors |
Must be pressure rated or have glazing that is pressure and impact rated, or the door must be pressure rated and protected with an impact-resistant system. |
|
Windows, exterior doors, and skylights |
Must be impact rated or protected with a qualified opening protection system. |
These requirements must include the following details:
Gable Ends
- Gable end vents should not be included in new construction as they are susceptible to intrusion by wind-driven rain and wind-blown embers.
- If gable end vents are already in place, cover the vents with a permanent shutter or 7/16-inch plywood when severe weather threatens, as shown in Figure 4.
- Gable overhangs are more significant than 12 inches deep. They must be framed using cantilevered blocking, rafters, or purlins ("outlookers") with an adequate connection at the top of the gable end and the interior roof framing members.

Walls
Walls are the intermediate link between the roof and the foundation. They are an important part of the continuous load path discussed below. Walls must accomplish the following three important functions:
1. Resist uplift forces.
- As shown below, the roof-wall connections must take the uplift forces and drive them down into the foundation.
- Roof-wall connections are typically metal connectors for wood-frame construction.
2. Resist Shear Forces.
Shear forces are unaligned forces pushing one part of a body in one specific direction and another in the opposite direction. A shear wall is a wall or portion of a wall used to counter the effects of lateral load acting on a structure in a direction parallel to the wall (in-plane shear). Wind and earthquake loads are the most common loads that shear walls are designed to counteract.
- Install "shear wall" panels as the code requires to resist shear forces acting on the home's exterior walls. Shear walls are constructed by sheathing wood-framed exterior walls with 7/16-inch wood structural panels (plywood or OSB) on both wall faces.
- Fasten the panels to the wall studs with 8d common nails, 10d box nails, or 8d ring-shank nails at a minimum of 6 inches in center along all edges and 12 inches in center to framing members in the field of the panels.
- For the bottom story of a two-story building, wood structural panels should be fastened to the wall studs with 8d common nails, 10d box nails, or 8d ring shank nails at a minimum of 3 inches on center along all edges and 12 inches on center to framing members in the field of the panels.
- Use anchors to secure the walls to the foundation.
3. Resist Lateral Forces.
- Studs should be sized/spaced to resist lateral forces.
- Studs should be secured at the top and bottom plates with anchors.
Windows
The openings are another important design consideration for high-wind-resistant construction (see FLASH StrongHomes 2008). Openings such as doors, windows, and garage doors are weak points in a home's exterior. Just like the exterior of the home, openings must resist impact from flying objects and hold up to high wind forces. Failure of a window or door can allow high winds to enter and overpressurize the home, causing roofs and/or walls to fail. Glazing in windows and doors must be impact resistant, or the windows and doors should be protected with impact-resistant coverings or shutters.
- Windows will have a proof-of-compliance stamp in the corner or frame if the windows are impact-resistant.
- If not indicated, the window will likely not be impact-resistant and will need shutters or coverings.
To meet the hurricane rating classification, shutters must meet the impact, wind pressure, and pressure cycle testing requirements. They must also be tested and approved by the Florida Building Code product approval system (FLASH StrongHomes 2008).
To meet the hurricane rating classification, shutters must meet the impact, wind pressure, and pressure cycle testing requirements. They also need to be tested and approved by the Florida Building Code product approval system (FLASH StrongHomes 2008).

Doors
Exterior doors must be impact and pressure rated.
- If not impact-rated, the doors should be fitted with shutters or protective coverings.
- One door must stay operable if sheltering in the home during a storm.
Garage Doors
Garage doors must be impact-rated or protected. Compliant doors have these features:
- Horizontal and vertical bracing.
- Track brackets anchored to the wall.
- Steel door panels.
- Stronger rollers, hardware, and hinges.
IBHS Fortified Gold
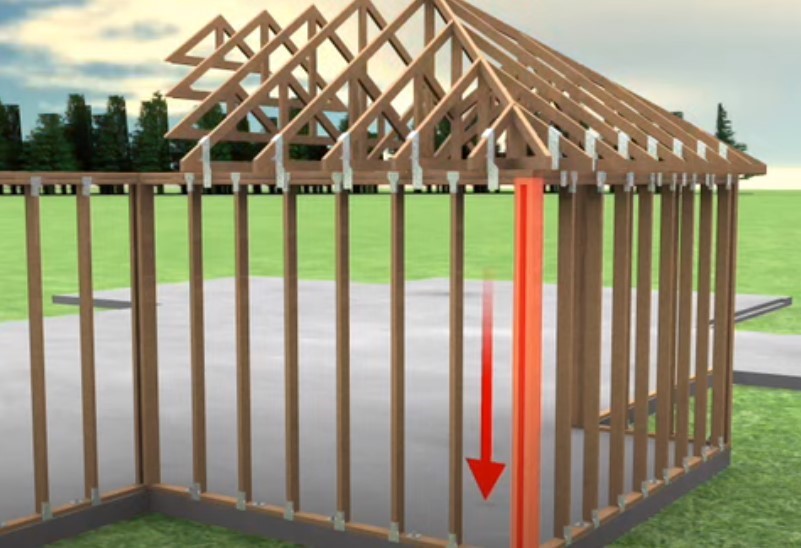
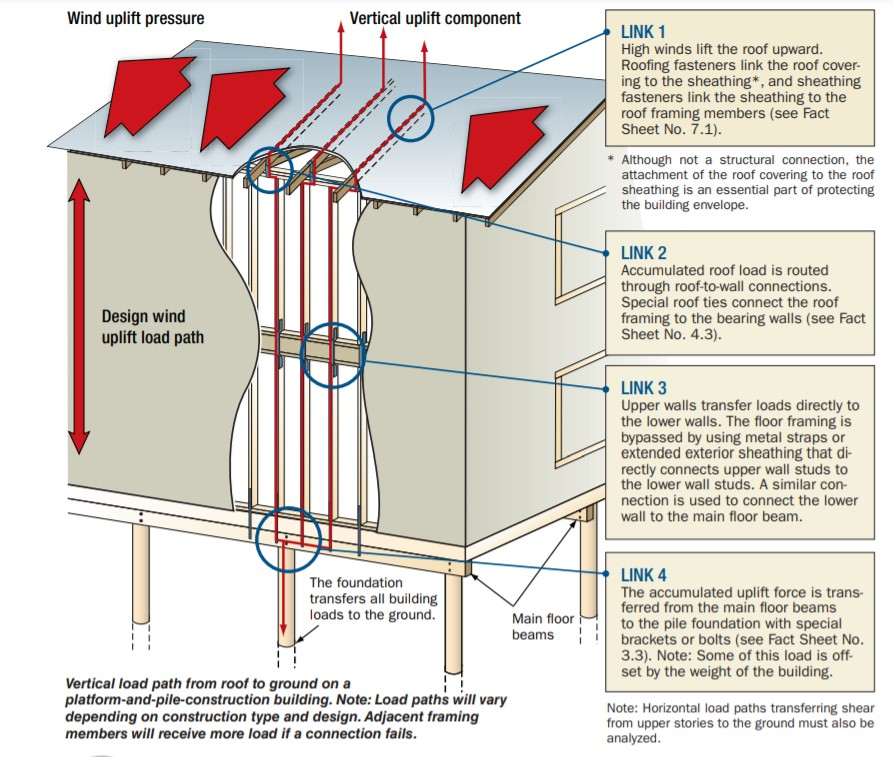
Building the home to the latest International Residential Code for new construction will ensure its structural integrity during a high wind event (Fortified Home New Construction Hurricane Technical Summary - New Construction). The basis of all high-wind construction should be a continuous load path. The continuous load path ties the home together from the roof to the foundation using metal connectors to withstand the stress of lateral forces from earthquakes and high winds. The important connection points within the continuous load path, such as roof-wall connections, walls to supporting structure, and supporting structure to the foundation from IBHS Fortified Gold, states that the following measures must be taken.
|
Continuous load path |
Continuous load path must be designed and installed with connections from the roof to walls, walls to supporting structure, and supporting structure to foundation. |
|
Chimneys |
Must be adequately connected to the roof structure and able to resist loads from the site’s wind and exposure. |
|
Windows, skylights, and glass doors |
Windows and glass doors must be pressure and impact rated. |
|
Exterior walls |
Must have a minimum of 7/16-inch structural sheathing using either OSB or plywood. |
Figure 7 illustrates the critical connection points for a home's continuous load path. Note that the same construction techniques apply for high winds and earthquakes since both are lateral loads on the home's exterior (FEMA P-499, 2010). When high winds blow, the roof is a big weak spot, as mentioned above. Strengthen the roof-to-wall connections using hurricane straps or clips at every wall-rafter connection. Securing these key links will significantly strengthen the home's continuous load path, as shown in Figure 7.
Hurricane and High Wind Guides
The following Building America Solution Center guides provide information on making the components and assemblies of a home more resistant to hurricanes and high winds.
Roof Type
Roof Sealing, Sheathing, Vented vs. Unvented
- Roof Deck Sheathing and Sealing for Sloped Roofs
- Roof Deck Valleys and Penetrations Sealed
- Step and Kick-Out Flashing at Roof-Wall Intersections
- Flashing of Roof-Wall Intersections in Existing Homes
- Roof Edge Protection
- Roof Vents
- Framing of Gable Roof Overhangs
- Unvented Insulated Sloped Roofs
Roof Attachments
- Roof Anchor System for Solar Panels
- Flashing of Penetrations in Existing Roofs
- Gutters and Downspouts
- Chimneys Connected to Roof Structure
- Bracing of Roofs for Hurricane, High Wind, and Seismic Resistance
- Retrofit of Existing Roofs for Hurricane, High Wind, and Seismic Resistance
Attics
Walls/Windows/Doors
- Structural Sheathing (Plywood/OSB) in Exterior Walls
- Wind-, Impact-, Moisture, Fire, and Pest-Resistant Exterior Siding
- Lateral Bracing in Gable End Walls
- Drainage Plane Behind Exterior Wall Cladding
- Taped Insulating Sheathing Drainage Planes
- Rigid Foam Insulation for Existing Exterior Walls
- Flashing of Wall Penetrations in Existing Homes
- Windows Have Impact-Rated Glass or Protective Coverings
- Windows and Doors are Fully Flashed
- Exterior Doors are Impact Rated and Fire Rated
- Air Sealing Doors Adjacent to Unconditioned Space
- Garage Doors are Pressure Rated
Building Attachments
Foundation/Site
- Continuous Load Path Provided with Connections from the Roof through the Wall to the Foundation
- Final Grade Slopes away from Foundation
- Patio Slabs, Porch Slabs, Walkways, and Driveways Slope Away from House
- Swales, Drains, and Site Grading Stormwater Control
- Erosion Control for Slopes, Stream Banks, and Dunes
Operations and Equipment
Design
- Hip Roof versus Gable Roof
- Safe Rooms and Storm Shelters
- Design for Windstorm and Tornado Protection
- Vented vs Unvented Attic
In addition to these guides, the Solution Center contains an extensive collection of references, training videos, images, and webinars on disaster-resistant construction related to hurricanes and high winds. These can be found by searching “hurricane” in the Solution Center.
More Info
References and Resources*
* For non-dated media, such as websites, the date listed is the date accessed.
Contributors to this Guide
The following authors and organizations contributed to the content in this Guide.