

Scope
This guide provides an overview of metal roofing with a focus on installation considerations for homes in coastal high-wind areas. Properly select and install metal roofing to minimize the risk of damage from wind, water intrusion, hail, seismic activity, wildfires, and severe winter weather.
Key steps:
- Enhance roof deck attachment and roof framing attachments, as needed (roof replacement).
- Seal the roof deck using one of the following three options, per the IBHS Fortified Hurricane and High Wind Standards:
- install a self-adhered (peel and stick) membrane over the entire roof deck (recommend a #15 felt bond break between membrane and shingles);
- install a nominal 4-inch wide roof deck flashing tape over all roof sheathing panel seams and cover with #30 felt or equivalent synthetic underlayment;
- install a two-layer #30 felt underlayment system (recommended best practice).
- Install drip edges at eaves and rakes.
- Install metal roof panels and other roofing products that provide uplift resistance equal to or greater than the design uplift pressure for the roof based on the site design wind speed and exposure category, as required by the IBHS Fortified Home Hurricane and High Wind Standards.
- Install metal roofing in accordance with manufacturer’s installation instructions, all applicable building codes, and selected best practices.
- Install flashing at roof penetrations and wall-intersections, properly integrated with roofing and wall underpayments and coverings.
See the Compliance Tab for links to related codes and standards and voluntary federal energy-efficiency program requirements.
Description
Description
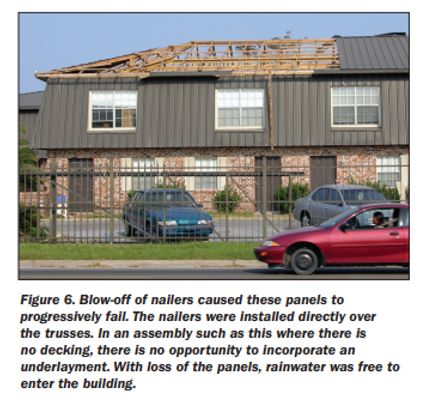
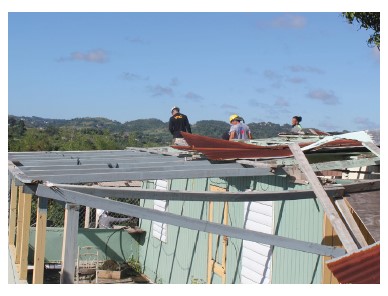
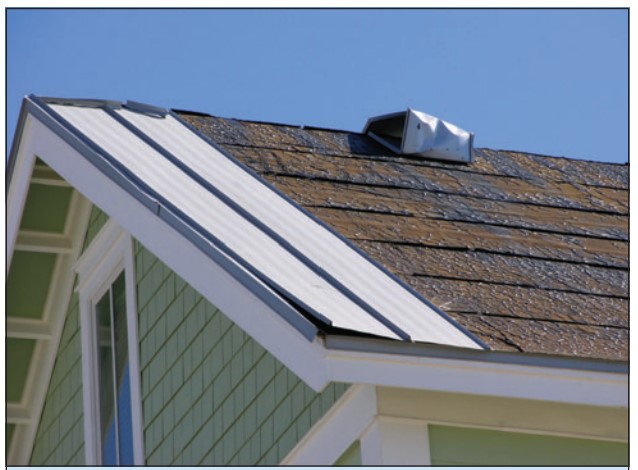
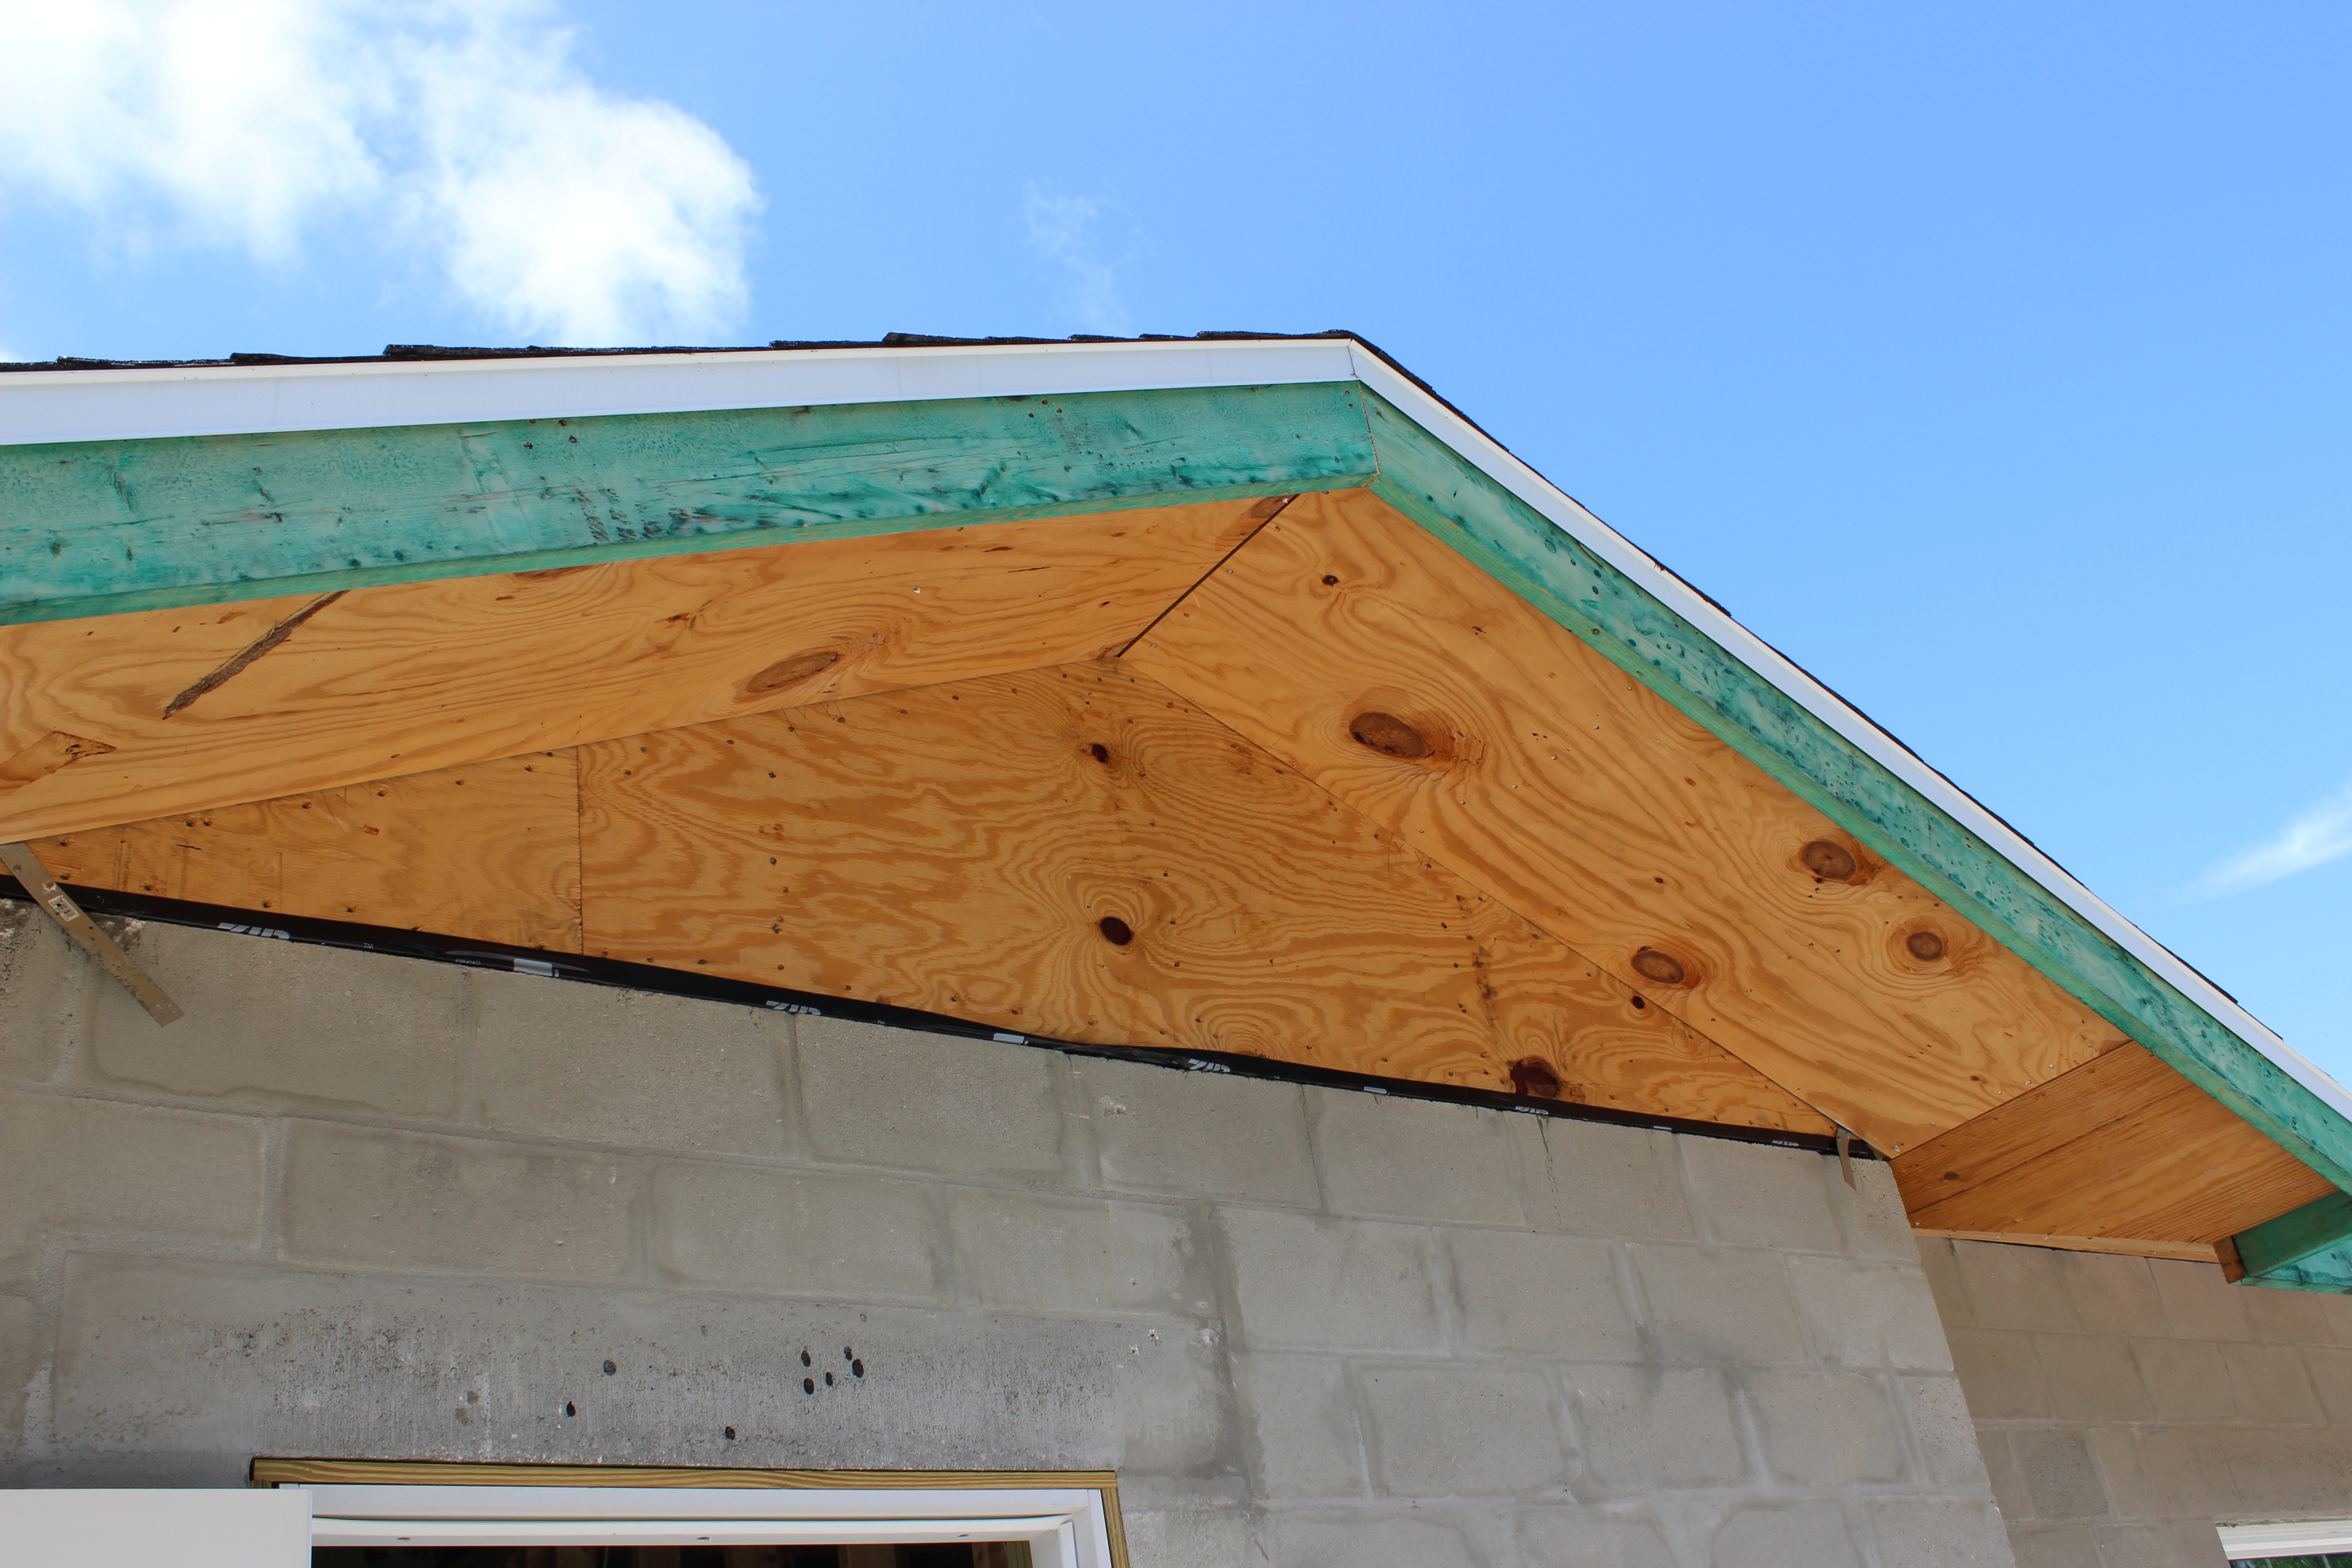
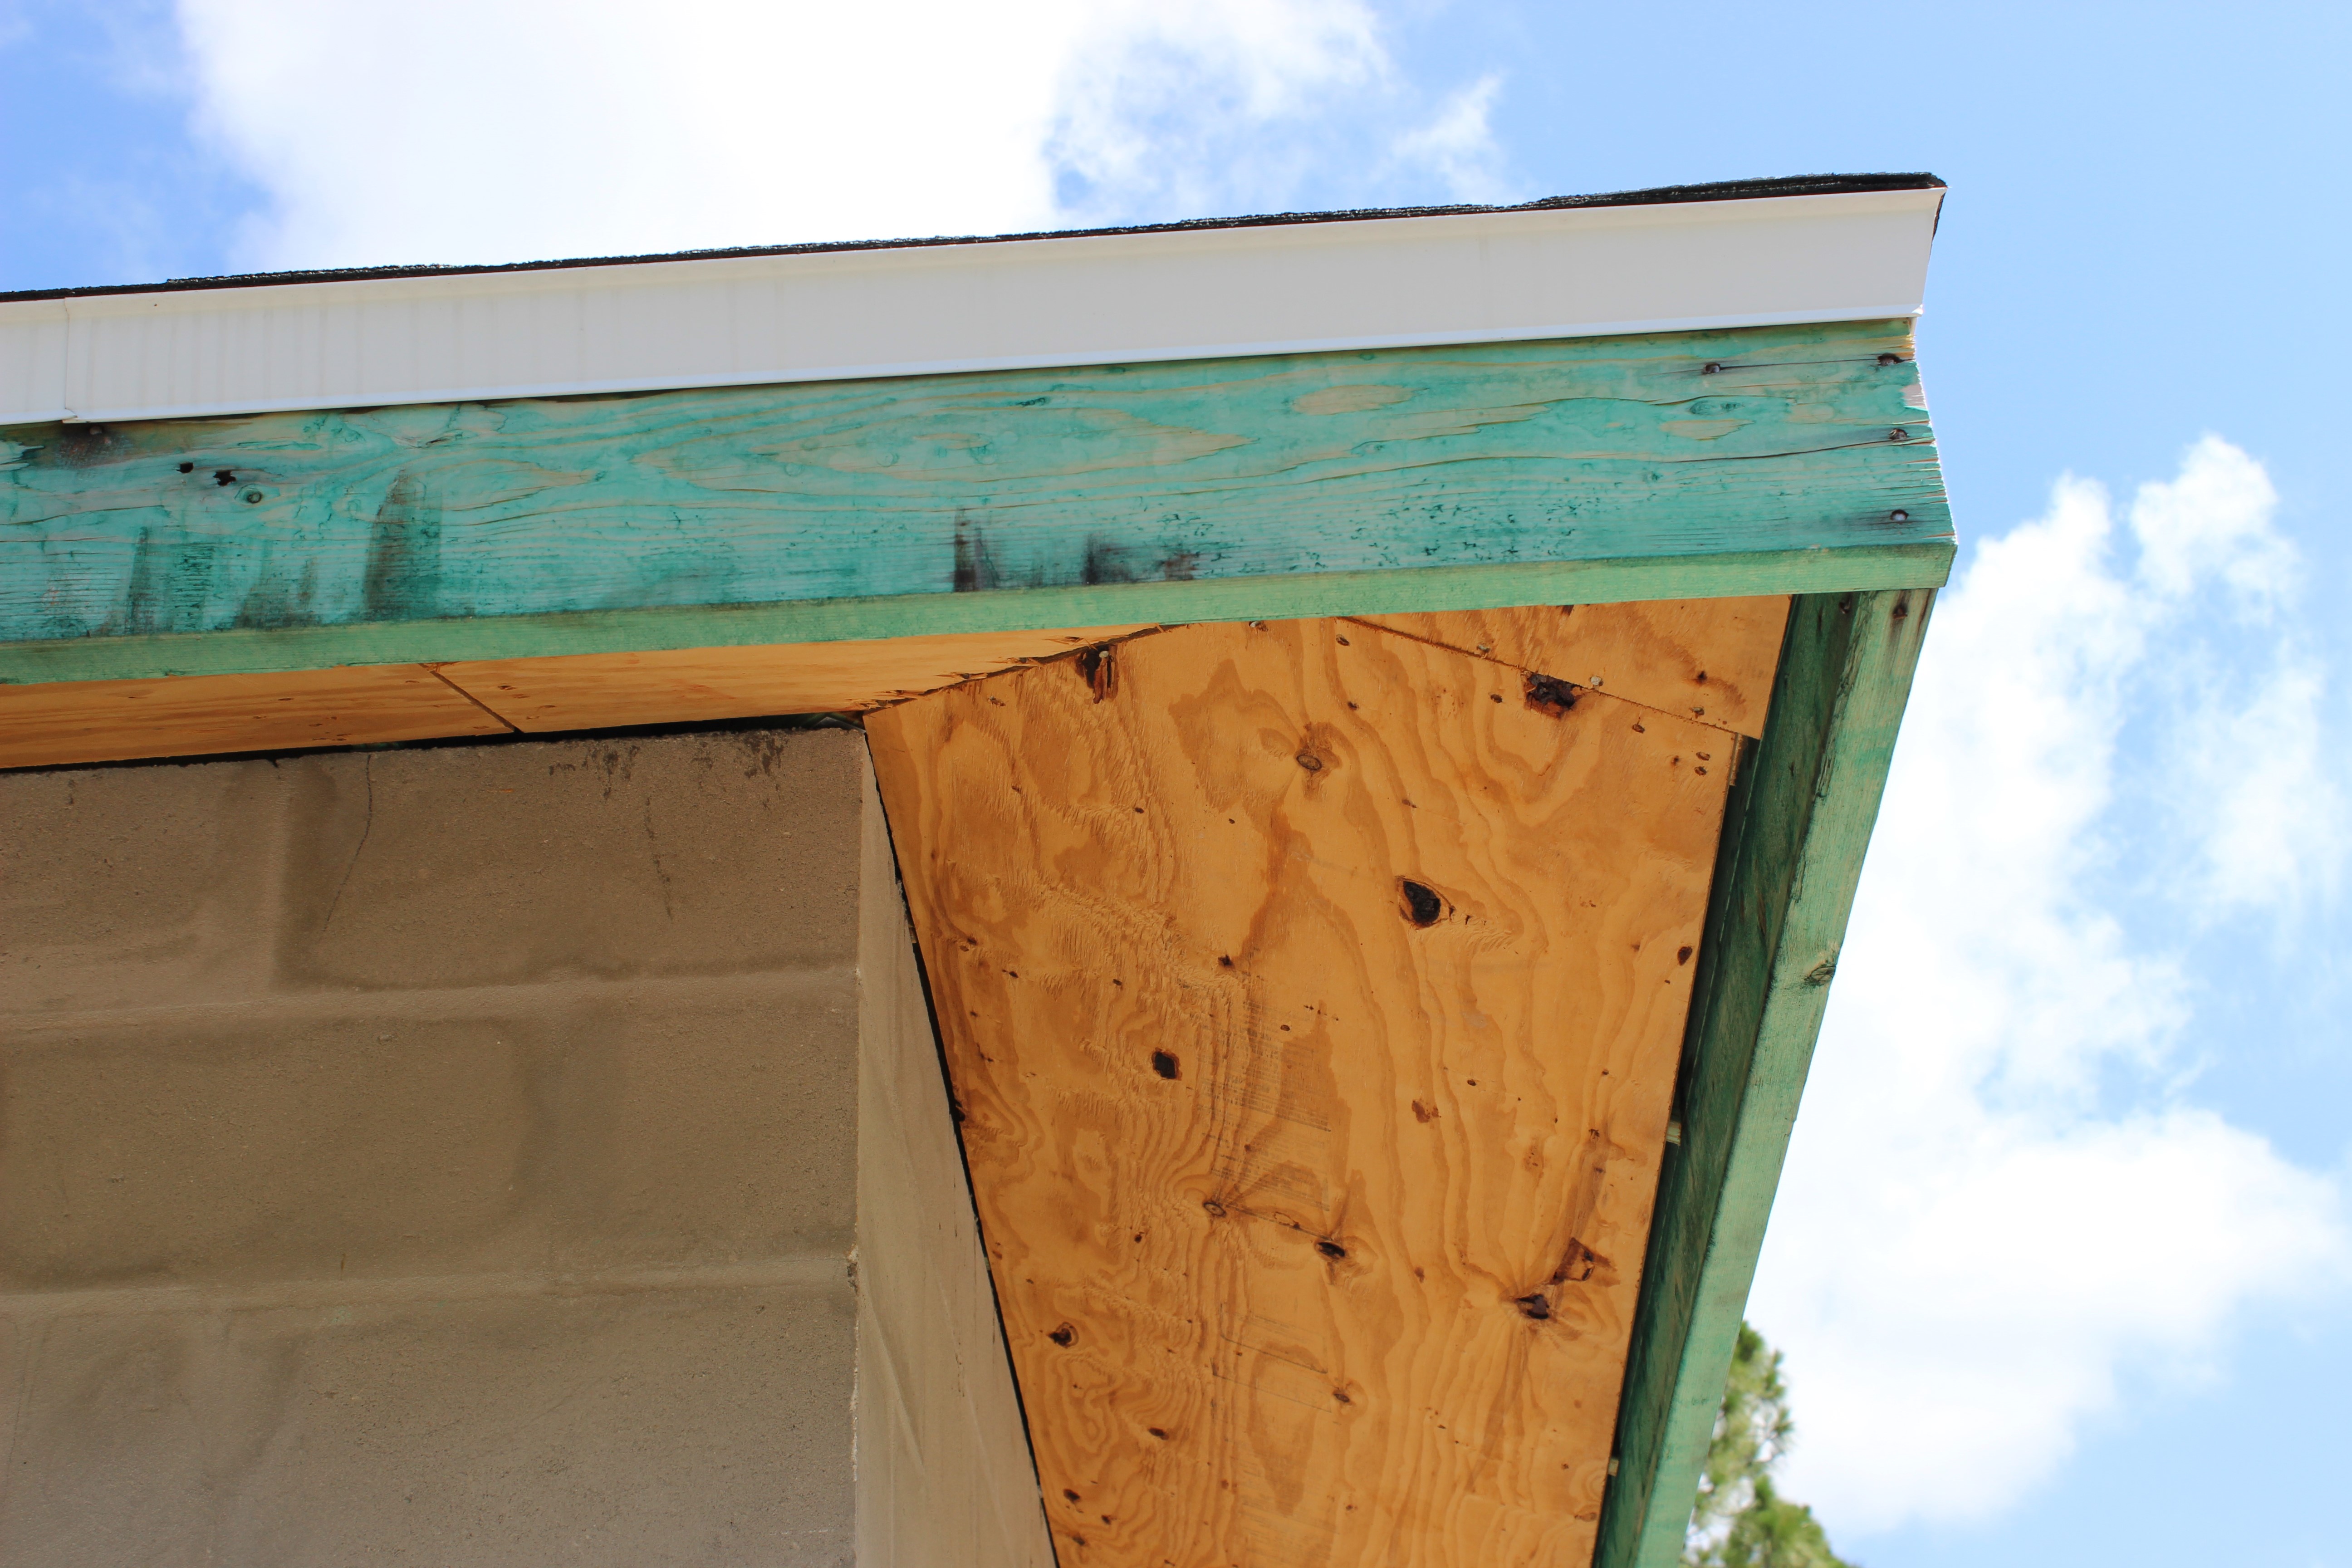
During a hurricane, tornado, high winds, or hailstorm, metal roofing can be damaged or blown off the roof (see Figure 1), exposing the underlayment, flashing, and sheathing as the only protection against rainwater. Exposed sheathing will eventually succumb to water damage. Unsealed joints or penetrations in the roof sheathing or storm damage can allow rainwater to enter the building, causing severe damage, including saturation of insulation and ceiling drywall, potentially leading to collapsed ceilings and extensive damage to interior finishes and household contents.

Metal roofing that is selected and installed for high-wind applications is much less likely to be damaged or blown off the roof during a storm. Impact-resistant roofing is also available to help protect against damage by windborne debris and hail. Metal roofing is also fire-resistant.
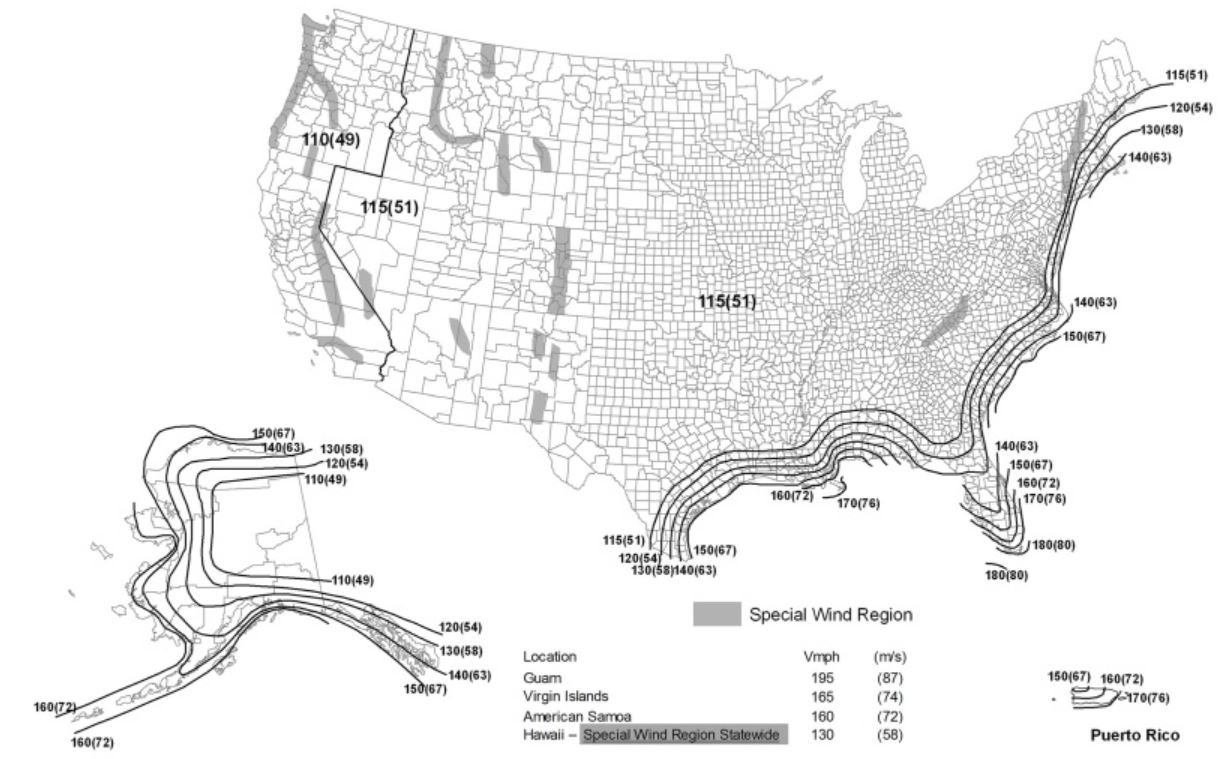
Building codes require roofing to be rated for the local wind zone. Homes located in coastal high-wind areas, including hurricane-prone regions (defined in the IRC as areas along the Atlantic and Gulf Coasts where wind velocity is >115 mph, and Hawaii, Puerto Rico, Guam, the Virgin Islands, and American Samoa), generally require products and attachments that can withstand greater wind speeds than the rest of the country (see the wind map from the IRC in the Climate tab). A roof replacement is an opportunity to enhance roof deck attachment, roof framing connections, roofing underlayment, and flashing as needed to meet new standards and building codes.
The International Residential Code (IRC) specifies minimum requirements for design wind loads (2018 IRC R301.2.1), metal roofing underlayment (R905.1.1), metal roof shingles (R905.4), and metal roof panels (R905.10), including deck and slope requirements, material standards and thickness, corrosion resistance, and attachment. Local requirements may exceed the IRC requirements or may require specific product approvals.
There are two broad categories of metal roofing types: metal shingles and metal panels. The metal shingle category includes simulated shakes that resemble wood shakes and simulated tiles that resemble concrete or clay tiles. There are two general types of metal panels: “exposed fastener” panels and “standing seam” panels. Exposed fastener panels are factory-made, typically 3 feet wide and 8 to 16 feet long, ribbed to provide stiffness, and attached using color-matching, gasketed screws. Exposed fastener panels are usually stiff enough to be installed over spaced wood battens or purlins. Standing seam panels, also known as vertical seam panels, are site made, attached to the roof with concealed fasteners, and highly resistant to wind and wind-driven rain. Standing seam panels are attached to clips that are attached to the roof. Standing seam panels typically must be installed on roof decks with sheathing (i.e., not over wood strapping or battens). Standing seam roofs are custom-made and seamed to lock the panels together, with specialized tools on-site; individual panels, typically 16 inches wide, are normally installed as one long, continuous piece from the roof ridge to the eave.
Metal roofs are durable, low maintenance, and can be repainted. The most common materials for metal roofing are steel, aluminum, and copper. These materials are either naturally corrosion-resistant or made corrosion-resistant when manufactured in accordance with building code-referenced standards. Manufacturers rate products for impact resistance; some materials resist impact better than other materials, and heavier gauge metal resists damage from hail better than lighter gauge metal. Metal roofing tends to cost more than asphalt shingles, but a metal roof can last up to 50 years or more. Panels are also available with reflective coatings to reduce heat gain during the cooling season.
Metal roofing manufacturers normally provide a report on individual products with specific details on product materials, installation requirements, fire classification, wind uplift resistance, and impact rating. The report is known as an Evaluation Service Report (ESR) and is available on the ICC Evaluation Service site.
The Insurance Institute for Business and Home Safety® (IBHS) Fortified Home program offers guidance, best practices, and voluntary construction standards and programs for building in disaster-prone areas, including hurricane and high-wind zones. The IBHS FORTIFIED HOME™ Hurricane and High Wind Standards provide guidance for making new and existing homes more resilient and durable in hurricane and high-wind zones. There are three levels of FORTIFIED Home: FORTIFIED Roof™ focuses on the roof; FORTIFIED Silver focuses on roof overhangs, opening protection, gable ends, and attached structures; FORTIFIED Gold focuses on tying all components of the structure together. The IBHS FORTIFIED Roof™ program includes guidance on sealed roof decks, flashing, and roofing attachment.
The Fortified Home High Wind Standards require metal panel roofing systems and their attachments to be installed in accordance with the manufacturer’s instructions and to provide uplift resistance equal to or greater than the design uplift pressure for the roof based on the design wind speed for Exposure B. The IBHS Fortified Hail Supplement to the IBHS High-Wind Standards requires metal roofing panels to be UL 2218 Class 4 impact-resistant. Fortified Home standards also require stainless steel fasteners or clips for metal roofs within 3,000 feet of a saltwater coastline.
For areas prone to wildfires, metal roofs are generally considered a fire-resistant roof covering. Roof coverings have fire classifications of Class A, Class B, or Class C or are unclassified. Class A has the highest resistance to fire, and unclassified have the least. Class A, B, and C roofing must be tested in accordance with UL 790 (Fire Tests of Roof Coverings) or ASTM E108 (Standard Test Methods for Fire Tests of Roof Coverings). Metal roofs usually require a noncombustible roof deck or fire-resistant underlayment for the roof assembly to qualify as Class A. An example of a noncombustible roof deck is gypsum panels installed above a wood structural panel deck. Fire-resistance-rated underlayment products are recommended in all wildfire areas and may be required by local jurisdictions.
How to Install Metal Roofing for New Construction:
Step 1: Install the roof deck using fasteners nailed as required to meet current requirements for nail type, size, and spacing.
Step 2: Seal the roof deck using one of the following three options, per the IBHS Fortified Hurricane and High Wind Standards, and in accordance with the product manufacturer installation instructions:
- Install a self-adhered (peel and stick) membrane over the entire roof deck (recommend a #15 felt bond break between membrane and shingles).
- Install a nominal 4-inch-wide roof deck flashing tape over all roof sheathing panel seams and cover with #30 felt or equivalent synthetic underlayment.
- Install a two-layer #30 felt underlayment system.
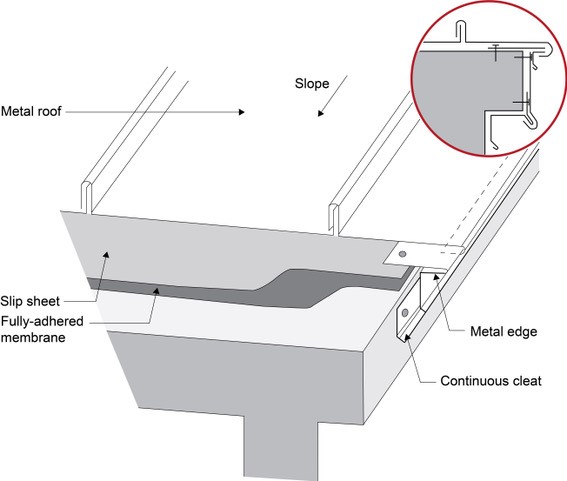
Step 3: Install metal drip edge at eaves and rakes.
Step 4: Install flashing at all roof penetrations and roof-wall intersections.
Step 5: Select and install metal panels for roofing.
- Install roofing in accordance with the manufacturer’s installation instructions, all applicable building codes, and selected best practices.
- IRC does not permit metal roof shingles to be installed on roof slopes below three units vertical in 12 units horizontal (25 % slope), and minimum slopes for metal roof panels should comply with the following provisions:
- For lapped, non-soldered-seam metal roofs without applied lap sealant, the minimum slope is three units vertical in 12 units horizontal (25%).
- For lapped, non-soldered-seam metal roofs with applied lap sealant, the minimum slope is one-half unit vertical in 12 units horizontal (4%).
- For standing-seam roof systems, the minimum slope is one-quarter unit vertical in 12 units horizontal (2%).
- Metal roof shingles are applied to solid, closely fitted roof decks, whereas metal roof panels are applied to solid or spaced sheathing.
- See the manufacturer’s ICC-ES Evaluation Report (ESR) for specific details on product material, installation requirements, fire classification, wind uplift resistance, and impact rating.
- For cooling energy savings in hot climates, select metal roofs with a solar reflectance Index (SRI) equal to or greater than 78 for low-slope and 29 for steep-sloped roofs (ENERGY STAR Cool Roof certified products are recommended).
- Fasteners:
- Use stainless steel fasteners where within 3,000 feet of a saltwater coastline.
- Use galvanized fasteners for steel roofs.
- Use copper, brass, bronze, copper alloy, or 300-series stainless steel fasteners for copper roofs. Stainless steel fasteners are acceptable for metal roofs.
- Don’t underdrive or overdrive the fasteners. The rubber washer in the fastener should seal the metal surface but should not be pressed.
- Fasteners should not be angled. Take the fasteners off the roof and re-nail if angled.
- Standing seam panels are typically attached to corrosion-resistant clips that are attached to the roof using corrosion-resistant fasteners (screws) as specified by the manufacturer.
- It is important to lay the panels straight on the eave-to-ridge course. Ensure that the first metal panel is straight; the rest of the panels will follow the layout of the first panel.
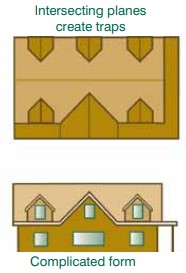
- Install metal roof panels to avoid rainwater puddling or being trapped by seams so that rainwater can drain freely into the gutters.
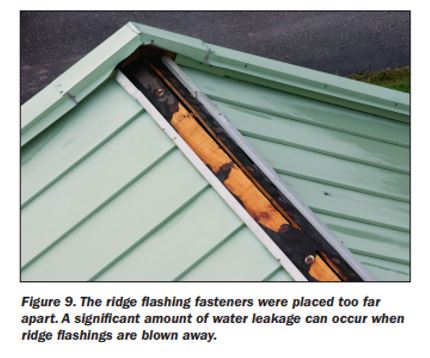
- Ensure all roofing and flashing are installed shingle-fashion, where the top layer of the panel or flashing laps over the bottom layer to prevent water from draining behind the bottom layer.
Step 5: Install flashing
- Valley flashing should be of corrosion-resistant metal of the same material as the roof and should extend at least 8 inches from the center and have a splash diverter rib 3/4 inch high at the flow line formed as part of the flashing.
- Pipe flashing should be sealed with tube sealant and attached using adequate screws.
- Sections of flashing should have an end lap of at least 4 inches.
Step 7: Install eave clips at the eaves.
- Eave clips for eave closure should have a smooth finish and allow the water to flow into the gutter.
Step 8: Clean the surface of the roof to remove any debris from construction.
Ensuring Success
Roofing should be inspected and installed by a professional roofing contractor to ensure that the roof system provides robust protection from rainwater and ice dams and that proper flashing is in place. A building permit may be required for a roof replacement. Ask the local building department. For disaster resistance, comply with the roofing requirements defined by IBHS Fortified Home Technical Resources. For metal roofing, precautions should be taken to avoid damage in the long term due to corrosion and galvanization. Corrosion can be caused by ponding water and debris accumulation. Corrosion-resistant material should be selected for roofing in coastal areas. Proper flashing and drainage plane should be installed to avoid ponding water, and the roof should be cleaned after installation to minimize debris accumulation. To avoid galvanization, the contractor must not use different metals on the roof. Select screws and other metal accessories that match or are chemically compatible with the material of the roofing panel.
Region
Hurricane and High-Wind Areas
Roofing is more likely to be damaged or lost in hurricane-prone regions and other high-wind areas (see Figure 1), leaving flashing and underlayment exposed and more susceptible to wind and water intrusion. Selection of high-wind and impact-rated metal roofing is required in high-wind and hurricane regions. Proper installation of roofing is even more important in these areas to protect against storm damage.
The Insurance Institute for Business and Home Safety® (IBHS) offers guidance, best practices, voluntary construction standards, and programs for building in disaster-prone areas, including hurricanes and other high-wind zones. The IBHS FORTIFIED Roof™ program includes guidance on sealed roof decks, flashing, and shingle attachment.
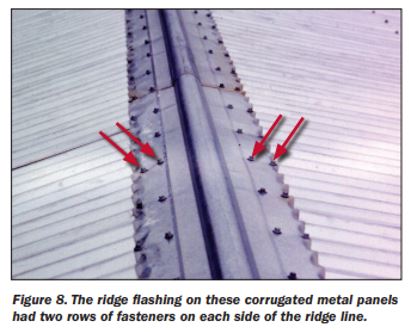
Metal panel roof covering systems are rated by design pressure. Fortified requires that design pressure ratings for metal panel roof cover systems must come from one of the approved certified test reports and/or testing standards listed in the Fortified Technical Bulletin: Metal Panel Roof Covering Guidance. However, it should be noted that the design pressure ratings are dependent on the proper attachment of the metal panel attachment, including the type, size, and spacing of fasteners or clips, and should comply with those requirements during installation.
Cold Climate and High Snow Load Regions
In regions of cold or nighttime subcooling (where the roof temperature falls below air temperature), condensation can occur on the underside of the metal roofing. Adequate roof venting should be provided, either with a vented attic or venting of the roof assembly through the use of battens between the roof decking and roof cladding. To protect the roof sheathing should condensation occur, a continuous layer of roof underlayment (felt, synthetic underlayment, or membrane) is needed. In cold climates and high-snow-load regions, install self-adhering bituminous membranes along roof eaves, and ensure proper air sealing, insulating, and ventilation of the attic or roof assembly to reduce the risk of ice dam formation and damage. The International Residential Code 2018 requires an ice barrier to be installed in areas where there has been a history of ice forming along the eaves. The ice barrier should consist of at least two layers of underlayment cemented together or a self-adhering polymer-modified bitumen and should extend from the lowest edges of all roof surfaces to a point not less than 24 inches inside the exterior wall line of the building. If the slope of the roof is greater than 67%, the ice barrier should not be less than 36 inches measured along the slope from the eave edge of the building.
In areas of high snow load, design roofs with proper slopes to encourage snow to slide off safely on a continuous basis. If there are areas of the roofline where falling snow would cause a danger (i.e., over a doorway), a variety of snow guards or snow slide protection products are available. Homeowners should be aware of the potential overloading of roof structures in locations on the home where snow guards have been installed.
If a vented attic design is used and high snow loads are anticipated that may block roof vents, consider adding cupola vents.
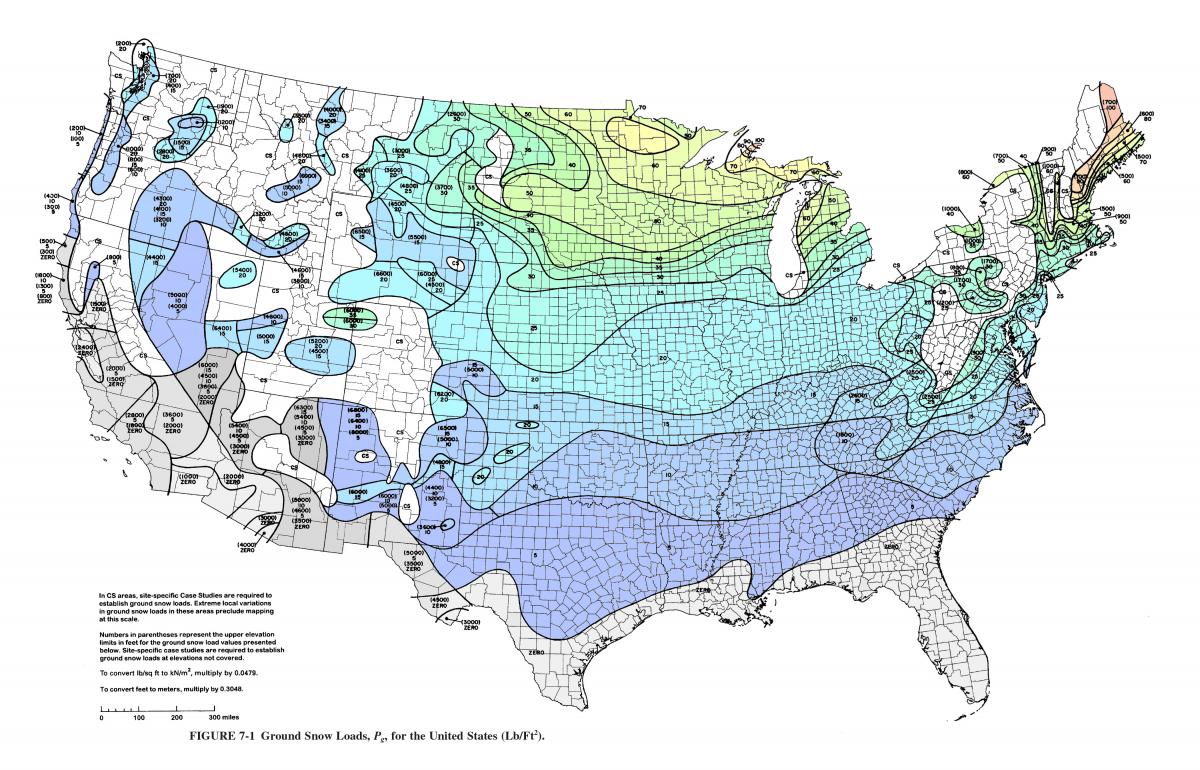
The roof must also be designed to structurally support heavy snow loads as required in the code. Roof snow loads are based on the historical records for ground snow loads for a given location; however, the local building authority should always be consulted to determine the correct roof snow load to use for a given site and application. Most building codes in the United States reference the procedures found in ASCE 7-16 - Minimum Design Loads and Associated Criteria for Buildings and Other Structures, Chapter 7: Snow Loads. The ground snow load map shown in Figure 2 is based on ASCE 7 (Figure 7-1; see also 2021 IRC Figure R301.2(4)). Ground snow loads for the contiguous United States can be generally determined using this map. Ground snow loads for sites at elevations above the limits indicated and for all sites labeled "CS" require site-specific case studies and approval from the governing building authority. Ground snow loads for Alaska are listed in Table 7.1 of ASCE 7. Ground snow loads for Hawaii are zero, except in mountainous regions as determined by the authority having jurisdiction. The American Society of Civil Engineers offers a web-based mapping tool that provides a quick way to look up key design parameters specified in Standard ASCE 7-10 or 7-16, including snow load data, by address, latitude/longitude, or map location, for a small fee.
Wildfires
For areas prone to wildfires, metal roofs are generally considered a fire-resistant roof covering. (See the Description.)
Training
Right and Wrong Images
Source
A Recovery Advisory guide reccomending practices for designing and installing metal roof systems that will enhance wind resistance in high-wind regions (i.e., greater than 90-miles per hour [mph] gust design wind speed).
Source
A Recovery Advisory guide reccomending practices for designing and installing metal roof systems that will enhance wind resistance in high-wind regions (i.e., greater than 90-miles per hour [mph] gust design wind speed).
Source
A Recovery Advisory guide reccomending practices for designing and installing metal roof systems that will enhance wind resistance in high-wind regions (i.e., greater than 90-miles per hour [mph] gust design wind speed).
Source
Guide describing tools for island and hurricane-prone communities on redevelopment and rehabilitation of homes to prepare for future natural disasters.
Source

Source
A Recovery Advisory guide reccomending practices for designing and installing metal roof systems that will enhance wind resistance in high-wind regions (i.e., greater than 90-miles per hour [mph] gust design wind speed).

Source
A Recovery Advisory guide reccomending practices for designing and installing metal roof systems that will enhance wind resistance in high-wind regions (i.e., greater than 90-miles per hour [mph] gust design wind speed).

Source
Wildfire construction guidelines from the Colorado State Forest Service focusing on site design and building materials to mitigate damage to homes in wildfire-prone areas.
Source
Wildfire construction guidelines from the Colorado State Forest Service focusing on site design and building materials to mitigate damage to homes in wildfire-prone areas.
Source
Report containing 37 fact sheets that provide technical guidance and recommendations concerning the construction of coastal residential buildings.
Source
Source
Source
Videos


Compliance
Retrofit
Retrofit
For a roof replacement:
- Remove all existing roofing (claddings and underlayment).
- Replace any rotten or damaged wood sheathing.
- Inspect and replace any damaged flashing; Where flashing is missing, inspect and replace damaged sheathing and framing.
- Inspect the roof deck attachment fasteners and re-nail as required to meet current requirements for nail type, size, and spacing.
How to Install Metal Roofing for an Existing Roof:
Step 1: Assess the roof decking and fix any area that may show signs of rot or wear. Ensure the underlayment, eave protection, and drip edges are adequately nailed and installed correctly.
Step 2: Install metal panels or shingles following the manufacturer’s instructions and instructions for new construction provided in this guide.
Step 3: Integrate the metal roofing with flashings at roof-wall intersections and roof penetrations.
Step 4: Apply sealant between the metal roof and drip edge.
More Info
References and Resources
*For non-dated media, such as websites, the date listed is the date accessed.
Contributors to this Guide
The following authors and organizations contributed to the content in this Guide.
Home Innovation Research Labs
Questions? Comments? Contact our webmaster.