

Scope
This guide provides an overview of clay and concrete tile roofing with a focus on installation considerations for homes in coastal high-wind areas. Properly select and install clay or concrete tiles to minimize the risk of damage from high winds, wildfire, insect infestation, cold weather, and water intrusion due to the tiles being damaged or blown off the roof during a storm.
For new roof construction:
- Ensure that the underlayment attachment and tile attachment meet the requirements of the site design wind speed and exposure category, as recommended by the IBHS Fortified Hurricane and High Wind Standards.
- Seal the roof deck using one of the following three options, per the IBHS Fortified Hurricane and High Wind Standards:
- Install a self-adhered (peel and stick) membrane over the entire roof deck (recommend a #15 felt bond break between membrane and shingles).
- Install a nominal 4-inch-wide roof deck flashing tape over all roof sheathing panel seams and cover with #30 felt or equivalent synthetic underlayment.
- Install a two-layer #30 felt underlayment system.
- Install drip edges at eaves and rakes.
- Install flashing at roof penetrations and wall intersections.
- Install clay or concrete roof tiles and other roofing products that are rated for the local wind zone and meet any local-specific approval requirements.
- Install impact-resistant tiles to help protect against damage by hail.
- Install clay or concrete roof tiles in accordance with manufacturer’s installation instructions, applicable building codes, required product approvals, and best practices.
For wildfire-prone areas:
- Choose roofing materials that are fire-resistant or non-combustible Class A rated roof materials such as slate, concrete, or clay tile.
- Install bird stopping.
- Install metal drip edge.
- Choose a simple roof design that is less likely to trap embers.
See the Compliance Tab for links to related codes and standards and voluntary federal energy-efficiency program requirements.
Description
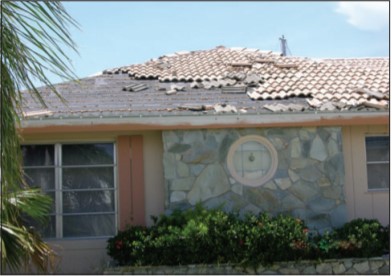
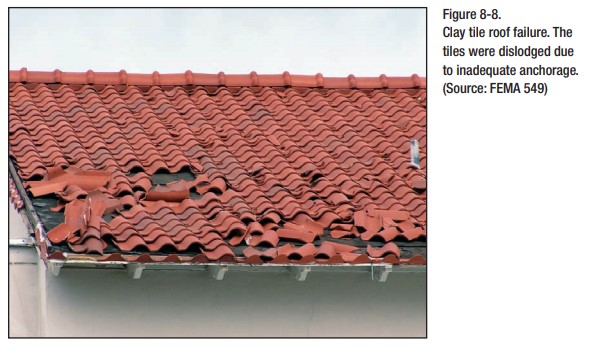
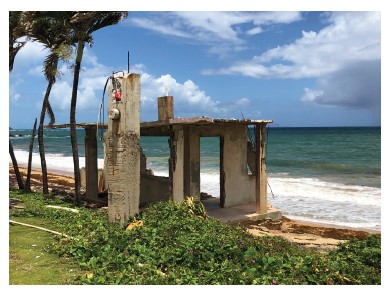
During a hurricane, tornado, high winds, or hailstorms, clay or concrete roof tiles can be damaged or blown off the roof, exposing the underlayment, flashing, and sheathing as the only protection against rainwater. Exposed sheathing will eventually succumb to water damage. Unsealed joints or penetrations in the roof sheathing or storm damage can allow rainwater to enter the building, causing severe damage, including saturation of insulation and ceiling drywall, potentially leading to collapsed ceilings and extensive damage to interior finishes and household contents. Although clay and concrete tiles are durable, they are vulnerable to breakage from windborne debris. If a tile is broken, debris from the tile can impact other tiles, which can lead to a progressive cascading failure (See Figure 1).
Source
Report containing 37 fact sheets that provide technical guidance and recommendations concerning the construction of coastal residential buildings.
Fact sheet outlining best design and construction practices for tile roofing in high wind areas; also published in FEMA P-499 “Home Builder’s Guide to Coastal Construction: Technical Fact Sheet Series.”
Clay or concrete roof tiles that are selected and installed for high-wind applications are much less likely to be damaged or blown off the roof during a storm. Impact-resistant tiles are also available to help protect against damage by windborne debris and hail. Building codes require roofing to be rated for the local wind zone. Homes located in coastal high-wind areas, including hurricane-prone regions (defined in the International Residential Code (IRC) as areas along the Atlantic and Gulf Coasts where wind velocity is >115 mph, and Hawaii, Puerto Rico, Guam, the Virgin Islands, and American Samoa) generally require products and attachments that can withstand greater wind speeds than the rest of the country (See the wind map from the IRC on the Climate tab). A roof replacement is an opportunity to enhance roof deck attachment, roof framing connections, roofing underlayment, and flashing as needed to meet new standards and building codes.
Traditionally, tiles were made from clay or terra cotta, but modern tiles are often made from molded, tinted concrete. Clay and concrete roof tiles are available in a wide variety of colors, styles, and profiles (e.g., round, curved, flat, interlocking). Tiles are heavy, approximately three times heavier than asphalt roofing, so roof framing and sheathing must be structurally adequate to support the weight (If replacing asphalt shingles, consult with an engineer to see if structural reinforcement is necessary). The heavy tiles do provide greater thermal mass that can help to regulate indoor temperatures in hot climates. Tiles are impervious to rot and insect damage. Although durable, tiles can be brittle and susceptible to breakage from a heavy impact, such as falling tree branches (Figure 2). Tile roofing, particularly clay, is relatively expensive but also has a long life expectancy that can exceed 100 years.
Source
Guide describing sound mitigation measures to lower building natural disaster vulnerability to assist local officials and community decision makers in coastal areas.
The IRC specifies minimum requirements for installing clay and concrete tile roofing (2018 IRC R905.3). Note that local requirements may exceed the IRC requirements and may require specific product approvals.
- Deck requirements: tiles must be installed only over solid sheathing or spaced structural sheathing boards.
- Deck slope: minimum roof slope 2.5 in 12; for roof slopes from 2.5 in 12 to 4 in 12, two layers of underlayment are required.
- Underlayment: type, application, and attachment provisions (R905.1.1).
- Clay roof tile must comply with ASTM C1167.
- Concrete roof tile must comply with ASTM C1492.
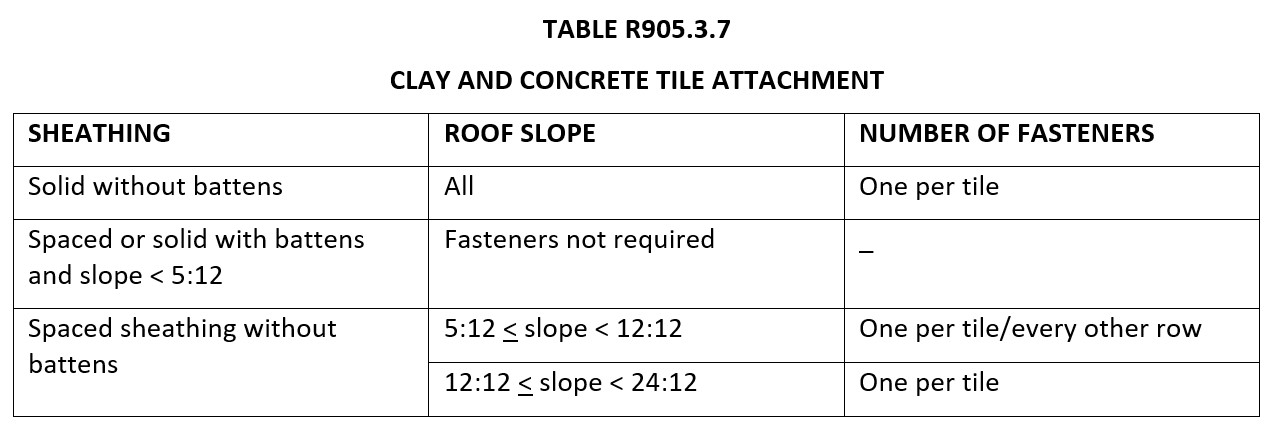
- Fasteners: nails must be corrosion resistant, minimum 11-gauge, 5/16-in. Head, sufficient length to penetrate through the deck or ¾-in. into the deck; attaching wire minimum 0.083-in.; perimeter fastening areas include three tile courses but not less than 36 inches from either side of hips or ridges and edges of eaves and gable rakes.
- Application: in accordance with this section and the manufacturer’s installation instructions, perimeter tiles have a minimum of one fastener per tile regardless of the slope; in accordance with the manufacturer’s installation instructions, in areas where the design wind speed is greater than 130 mph and on buildings where the roof is more than 40 feet above grade; in areas subject to snow minimum two fasteners per tile; in other areas, attach in accordance with IRC Table R905.3.7.
- Flashing: requirements are specific to tile roofing (IRC R905.3.8).
Source
2018 edition of code for residential buildings that creates minimum regulations for one- and two-family dwellings of three stories or less, bringing together all building, plumbing, mechanical, fuel gas, energy and electrical provisions for one- and two-family residences.
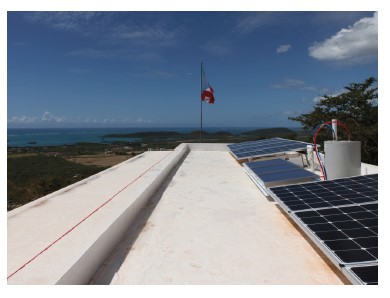
The Insurance Institute for Business and Home Safety® (IBHS) offers guidance, best practices, and voluntary construction standards and programs for building in disaster-prone areas, including hurricane and high-wind zones. The IBHS Fortified Home™ standard is designed to make homes more resilient and durable; guidance is available for new construction and existing homes in hurricane zones and high-wind zones. There are three levels of IBHS Fortified Home: Fortified Roof™ focuses on the roof; Fortified Silver focuses on roof overhangs, opening protection, gable ends, and attached structures; Fortified Gold focuses on tying all components of the structure together. The IBHS Fortified Roof™ program includes guidance on sealed roof decks, flashing, and shingle attachment. The IBHS Fortified Home Hail Supplement to its High-Wind Standard requires clay and concrete tiles to meet a class 4 impact rating, and the Fortified Home Hurricane and Fortified Home High-Wind standards require them to meet the requirements of the site design wind speed and exposure category in compliance with the International Residential Code. Note that even where roofing with enhanced wind resistance is not required by building code, roof resiliency can be improved by implementing the above-code best practices recommended by the IBHS programs.
The Fortified Home Hail Supplement requires clay and concrete roof tiles to meet a Class 4 impact rating when tested in accordance with FM 4473. FM 4473 is a test standard used to evaluate the impact resistance of rigid roof covering materials. The test involves firing ice balls at the tile; Class 4 is the highest rating and requires the tile to still be functioning following two impacts in the same spot with 2-inch ice balls.
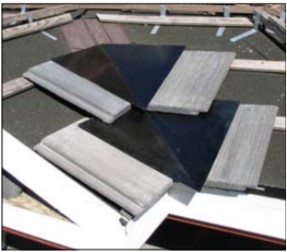
For areas prone to wildfires, clay and concrete tiles are generally considered a fire-resistant roof covering. Roof coverings have fire classifications of Class A, Class B, or Class C or are unclassified. Class A has the highest resistance to fire, and unclassified have the least. Class A, B, and C roofing must be tested in accordance with UL 790 (Fire Tests of Roof Coverings) or ASTM E108 (Standard Test Methods for Fire Tests of Roof Coverings). Some clay or concrete tiles require a noncombustible roof deck or fire-resistant underlayment for the roof assembly to qualify as Class A. An example of a noncombustible roof deck is gypsum panels installed above a wood structural panel deck. Fire-resistance-rated underlayment products are recommended in all wildfire areas and may be required by local jurisdictions.
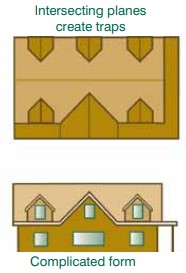
Roofs are very susceptible to embers in a wind-driven fire. A simple roof form, such as a hip or straight gable, is best. Complicated roofs with intersecting planes and valleys form dead air pockets and areas where air currents eddy and can trap burning embers (Colorado State Forest Service (CSFS) 2012). Clay tile designs with open ends must be filled with bird stop to keep embers from entering the opening and to keep out nesting birds or insects who could fill the openings with combustible debris.
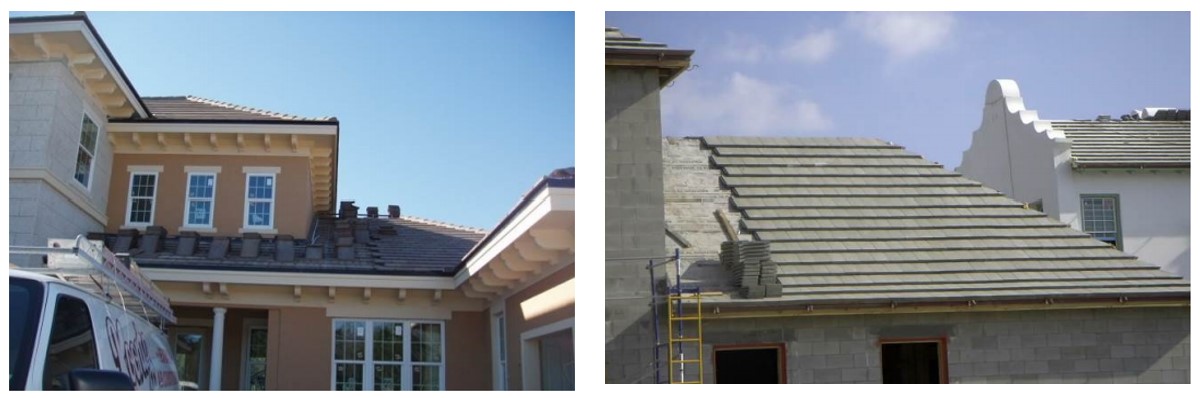
How to Install Clay or Concrete Tiles for New Construction
Step 1: Install the roof deck using fasteners nailed as required to meet current requirements for nail type, size, and spacing.
Step 2: Seal the roof deck using one of the following three options, per the IBHS Fortified Hurricane and High Wind Standards, and in accordance with the product manufacturer installation instructions:
- Install a self-adhered (peel and stick) membrane over the entire roof deck (recommend a #15 felt bond break between membrane and shingles).
- Install a nominal 4-inch wide roof deck flashing tape over all roof sheathing panel seams and cover with #30 felt or equivalent synthetic underlayment.
- Install a two-layer #30 felt underlayment system.
See the IBHS Fortified Roof program for information about sealed roof decks and underlayment options.
Step 3: Install drip edge at eaves and rakes.
Step 4: Flash roof penetrations and roof-wall intersections.
Step 5: Install clay or concrete roof tiles.
The IBHS Fortified Home Hurricane Standard provides the following guidance and program requirements for installing clay and concrete roof tiles:
- Tile systems and their attachments must meet the requirements of the site design wind speed and exposure category.
- Tiles must be installed in accordance with the manufacturer’s product approval for the site design wind speed, roof height, and Exposure Category.
- The FRSA/TRI installation guideline, the Florida High Wind Concrete and Clay Tile Installation Manual (Fifth Edition Revised, FRSA/TRI 2012), provides additional guidance for installation incorporating ASCE 7-10 wind loads for mechanically attached tile.
- Roof tiles may be installed with roof tile adhesives that are recognized and installed in accordance with an ICC-ES Evaluation Report, a Florida Product Approval, a Miami-Dade County Notice of Acceptance (NOA), or a Texas Department of Insurance (TDI) Evaluation Report.
- Mortar-set tile or mortar-set hip and ridge ties are not permitted.
- Hip and ridge boards or metal must be attached to the roof framing to resist the uplift pressure for the site design wind speed and exposure or in accordance with the tile manufacturer’s product approval.
- Hip and ridge tiles must be secured to the hip and ridge boards or metal with mechanical fasteners and/or an approved roof tile adhesive.
- ASCE 7-16 wind loads are not addressed in the Florida High Wind Concrete and Clay Tile Installation Manual (Fifth Edition Revised, FRSA/TRI 2012) guidelines. In jurisdictions that require ASCE 7-16 wind loads, follow the tile manufacturer installation guidance and product approvals for the design wind pressures and, if the roof tile is installed with adhesives, the adhesive manufacturer’s product approval for those wind pressures.
- Tiles must be installed over a minimum of 15/32-in.-thick plywood and one of the acceptable sealed roof deck underlayment options.
Ensuring Success
Roofing should be inspected and installed by a professional roofing contractor to ensure that the roof system provides robust protection from rainwater and ice dams and that proper flashing is in place.
A building permit may be required for a roof replacement. Ask the local building department. For disaster resistance, comply with the roofing requirements defined by the IBHS Fortified Home Program.
Quality control personnel should always be present on the roof when installing clay or concrete tiles. Take maximum safety measures and precautions when working on the roof.
Ensure that the open ends of barrel-shaped tiles are closed up with bird stop to keep out nesting birds, bugs, and wildfire embers.
Region
Hurricane and High-Wind Areas
Building codes require tile roofing to be rated for the local wind zone. Homes located in coastal high-wind areas, including Hurricane-Prone Regions (see Figure 1), generally require enhanced attachment that can withstand greater wind speeds than the rest of the country. Ask the local building department if your house is in a high-wind or hurricane-prone region or if local requirements exceed those of the national code.
Roofing and wall cladding are more likely to be damaged or lost in hurricane-prone regions and other high-wind areas, leaving flashing and underlayment exposed and more susceptible to wind and water intrusion. Selection of high wind- and impact-rated clay and concrete tile is required in high wind and hurricane regions. Proper installation of roof tiles is even more important in these areas to protect against storm damage.

Source
2018 edition of code for residential buildings that creates minimum regulations for one- and two-family dwellings of three stories or less, bringing together all building, plumbing, mechanical, fuel gas, energy and electrical provisions for one- and two-family residences.
The Insurance Institute for Business and Home Safety® (IBHS) offers guidance, best practices, and voluntary construction standards and programs for building in disaster-prone areas, including hurricanes and other high-wind zones. The IBHS Fortified Roof™ program includes guidance on sealed roof decks, flashing, and roofing tile attachment. See additional details in the Compliance tab.
Wildfire-Prone Areas
In wildfire-prone areas, ensure that the open ends of barrel-shaped tiles are closed up with bird stop to keep out nesting birds, bugs, and wildfire embers. Install a metal drip edge to protect against embers that may lodge at the roof edge or in gutters.
Cold Climate Areas
Clay tile roofs are not common in very cold climates. In high-snow-load regions, clay tile roofs are not recommended due to the risk of damage should snow removal become necessary. Due to freeze-thaw conditions and wind-driven snow, design specification and installation of clay and concrete tiles require special considerations in very cold climates. In areas where snow accumulation is possible, install a self-adhering bituminous membrane along roof eaves, and ensure proper air sealing, insulating, and ventilation of the attic or roof assembly to reduce the risk of ice dam formation and damage. The International Residential Code (IRC) 2018 requires an ice barrier to be installed in areas where there has been a history of ice forming along the eaves. The ice barrier should consist of at least two layers of underlayment cemented together or a self-adhering polymer-modified bitumen and should extend from the lowest edges of all roof surfaces to a point not less than 24 inches inside the exterior wall line of the building. If the slope of the roof is greater than 67%, the ice barrier should not be less than 36 inches measured along the slope from the eave edge of the building.
Training
Right and Wrong Images
Source
Guide describing sound mitigation measures to lower building natural disaster vulnerability to assist local officials and community decision makers in coastal areas.
Source
Guide describing tools for island and hurricane-prone communities on redevelopment and rehabilitation of homes to prepare for future natural disasters.
Source
Guide describing tools for island and hurricane-prone communities on redevelopment and rehabilitation of homes to prepare for future natural disasters.

Source
Wildfire construction guidelines from the Colorado State Forest Service focusing on site design and building materials to mitigate damage to homes in wildfire-prone areas.
Source
Wildfire construction guidelines from the Colorado State Forest Service focusing on site design and building materials to mitigate damage to homes in wildfire-prone areas.
Source
Report providing a collection of fact sheets describing guidance for constructing homes in wildfire zones.
Source
Source
Videos


CAD Files
Compliance
Retrofit
For a roof replacement:
- Remove all existing roofing (claddings and underlayment).
- Replace any rotten or damaged wood sheathing.
- Inspect the roof deck attachment fasteners and re-nail as required to meet current requirements for nail type, size, and spacing.
How to Install Clay or Concrete Tiles on Existing Roofs
Step 1: Assess the existing roof structure and roof deck to ensure they can support the load of clay or concrete tiles. A minimum of 15/32-inch-thick plywood sheathing is required for clay or concrete tiles. Assess the roof decking and fix any area that may show signs of rot or wear. Ensure the underlayment, eave protection, and drip edges are adequately fastened and installed correctly.
Step 2: Install roof tiles following the manufacturer’s instructions and instructions for new construction provided in this guide.
Step 3: Integrate the tiles with flashings at the roof-wall intersection and roof penetrations.
Step 4: Attach metal clips on the row of tiles at the eaves for both mechanically attached and adhesive foam-attached tiles.
See the FEMA guide, FEMA P-804, Wind Retrofit Guide for Residential Buildings for more information.
More Info
References and Resources
*For non-dated media, such as websites, the date listed is the date accessed.
Contributors to this Guide
The following authors and organizations contributed to the content in this Guide.
Home Innovation Research Labs
Questions? Comments? Contact our webmaster.