
Gutters and Downspouts

    Scope
    Scope Images
    Image
    Good water management practices like sloping grade away from house, and installing gutters, perimeter drain pipe, a capillary break, and free-draining soils or drainage mat protect the foundation from water saturation.
    Scope

    Install gutters and downspouts on homes to direct rainwater down and away from the home, to reduce the chances of saturating the soil around the foundation.

    • Install adequately sized gutters and downspouts.
    • Connect the downspouts to piping that will carry the water to a sloping final grade ≥ 5 ft. from the foundation or to an underground catchment system ≥ 10 ft. from the foundation that is not connected with the foundation drain system (EPA Indoor airPLUS).
    • Or, install a rainwater harvesting system that includes a drainage system to handle overflow.
    • Or, construct a grade-level rock bed with a waterproof liner and drain pipe to collect water that drains from the roof.

    ENERGY STAR does not require gutters for homes that have a slab-on-grade foundation or are in a dry climate. (See the Compliance Tab for other ENERGY STAR exceptions.)

    For homes without gutters, install protection from water splash damage (per EPA Indoor airPLUS) in one of the following ways:   

    • Extend the foundation walls at least 16 in. above final grade; OR
    • Design the home with overhangs to provide a drip line that is horizontally 16 in. away from the edge of the foundation wall and maintain siding clearance above grade at least 8 inches; OR
    • Use cladding material that can tolerate regular wetting and install a well-sealed, continuous drainage plane that extends at least 16 in. above the final grade (e.g., brick veneer or stone cladding over a self-adhering moisture control membrane and air gap).

    See the Compliance Tab for related codes and standards requirements, and criteria to meet national programs such as DOE’s Zero Energy Ready Home programENERGY STAR Single-Family New Homes, and Indoor airPLUS.

    Description
    Description

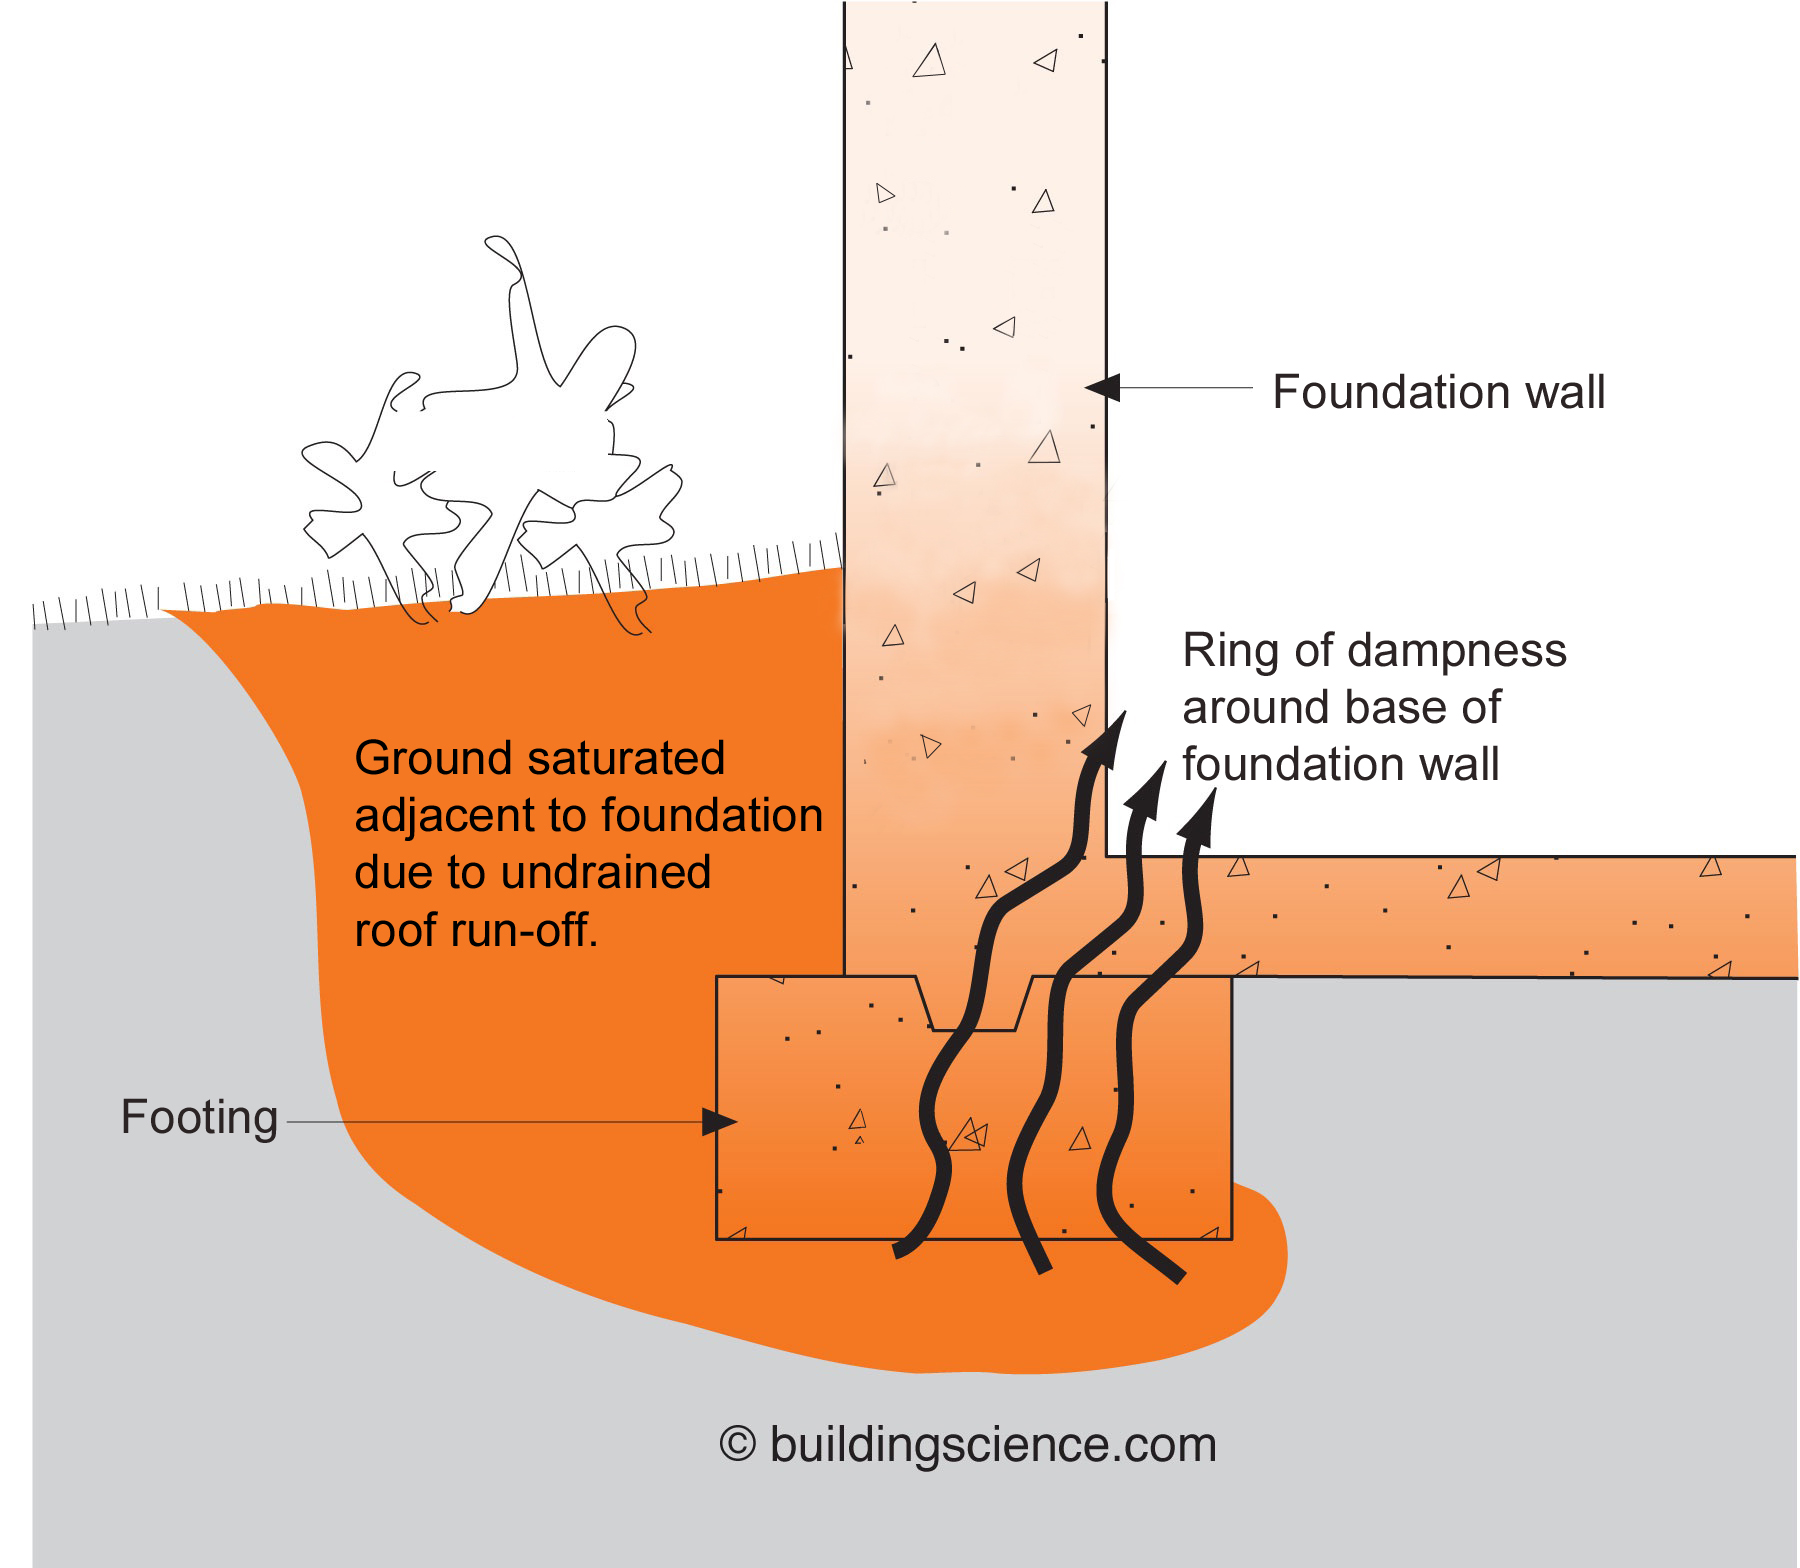
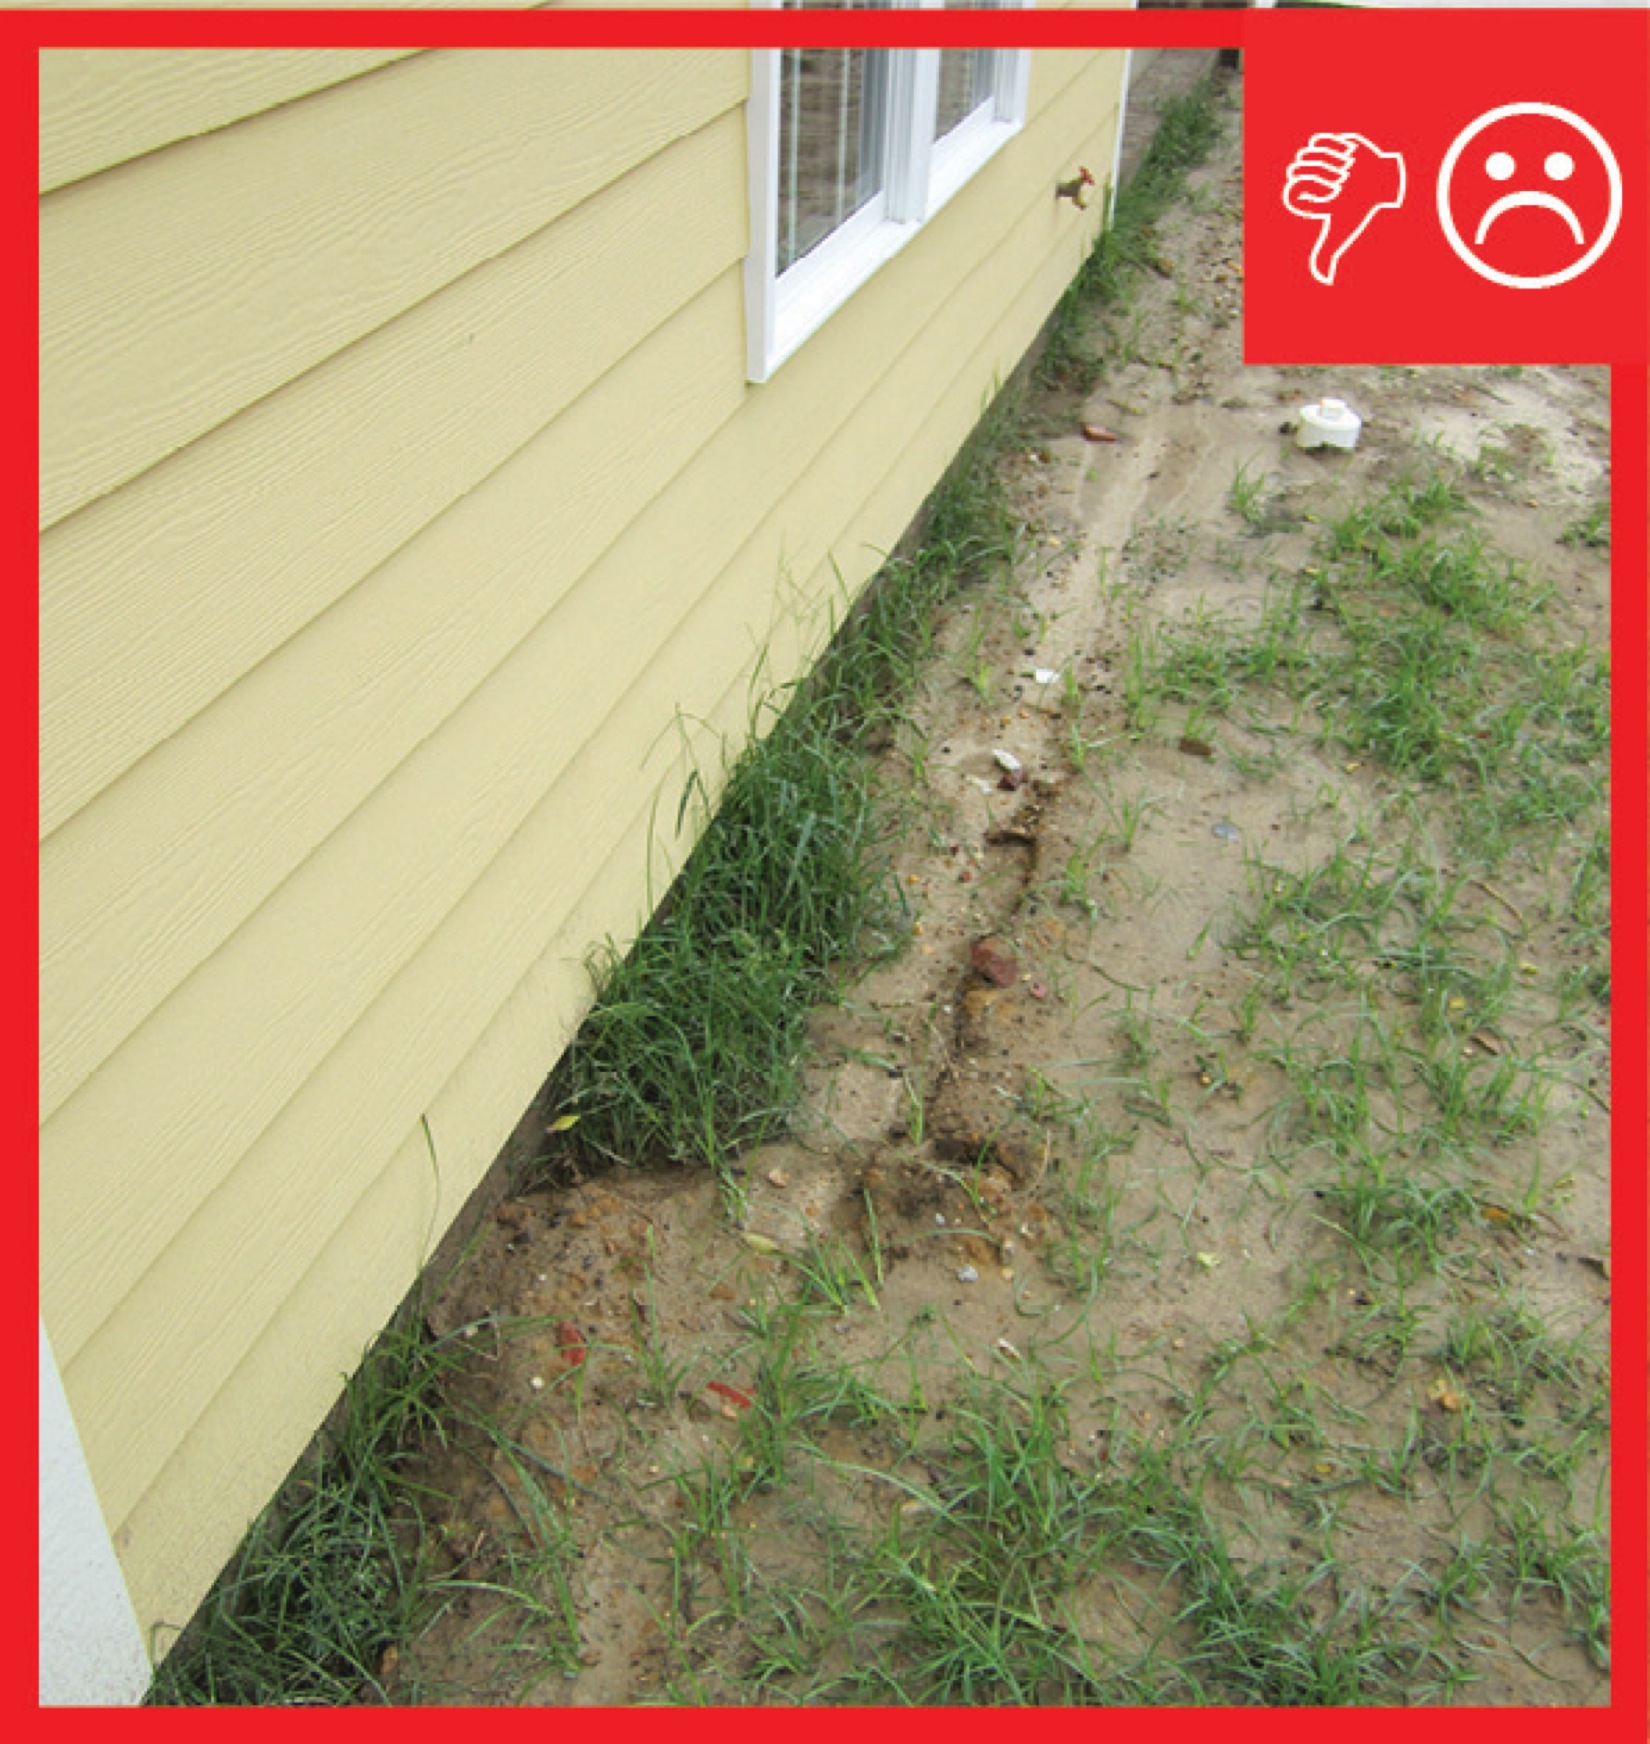
    A few inches of rain falling on the roof of a house can produce several thousand gallons of water runoff (EPA 2015). This runoff must be channeled away from the building foundation to keep the basement or crawlspace dry and to prevent water from seeping into the building interior where it may create moisture problems. If not drained away from the house, the immense volume of water coming off the roof can quickly saturate the soil surrounding the building and wick through the foundation to the interior. (See Figure 1.) Once inside, this moisture can lead to a variety of problems, including mold and rot. Moisture in homes is both a cause of indoor air quality problems and an important factor affecting the durability of the building (Lstiburek and Brennan 2001).

    Saturated ground water. If not drained away from the house, the sheer volume of the water coming off a roof can quickly saturate the soil and wick through the foundation into the interior of a building.
    Figure 1. If not drained away from the house, the volume of water coming off a roof in a large rainstorm can quickly saturate the soil and wick through the foundation into the interior of the building (Source: Courtesy of Building Science Corporation).


    As a whole-house best practice, it is important to design the house exterior with climate-appropriate flashing, overhangs, gutters, downspouts, and drainage planes to shed rainwater and conduct it away from the house (Baechler et al. 2010). A system of gutters and downspouts is particularly important to keep water away from the building foundation in areas with expansive and/or collapsible soils.

    Expansive soils swell when they get wet and can put extreme pressure on foundations, even to the point of causing cracking or uplift of foundation materials. Collapsible soils are loose soils that shrink in volume when they become wet, causing the ground to collapse. At the very least, when these soils get wet around a building, they can create a trough that collects water, increasing the likelihood of that water seeping into the foundation. In extreme cases, some collapsible soils can sink to the point of dislodging or cracking a building foundation (Colorado Geological Survey 2011). The assessment of whether the soil is expansive or collapsible needs to be completed by a certified hydrologist, soil scientist, or engineer.

    Controlling Roof Runoff

    As outlined in the scope, builders have four options for dealing with rain water runoff from a roof:

    • Install gutters and downspouts that terminate at least 5 feet away from foundations. OR
    • Install gutters and downspouts that terminate to an underground catchment system at least 10 feet away from foundations. OR
    • Install a rainwater harvesting system that has a properly designed drain to adequately manage the overflow and meet discharge-distance requirements. OR
    • Instead of gutters install a grade-level rock bed around the home with a drain pipe in a lined trench beneath the bed to carry water to a sloping finish grade at least 5 feet from the foundation, or to a drywell, or other approved location; the house must be protected from splashback damage as described below.

    Gutters System Basics

    Gutter systems consist of two parts: 1) gutter channels that run horizontally along the roof edge to collect runoff and 2) the downspouts that carry the collected water down to grade level. Gutters or other drainage systems are needed in all but the driest climates of the United States. In cold climates, gutters will freeze and should be avoided. Instead, in cold climates, grade-level drainage systems should be installed (as described below).

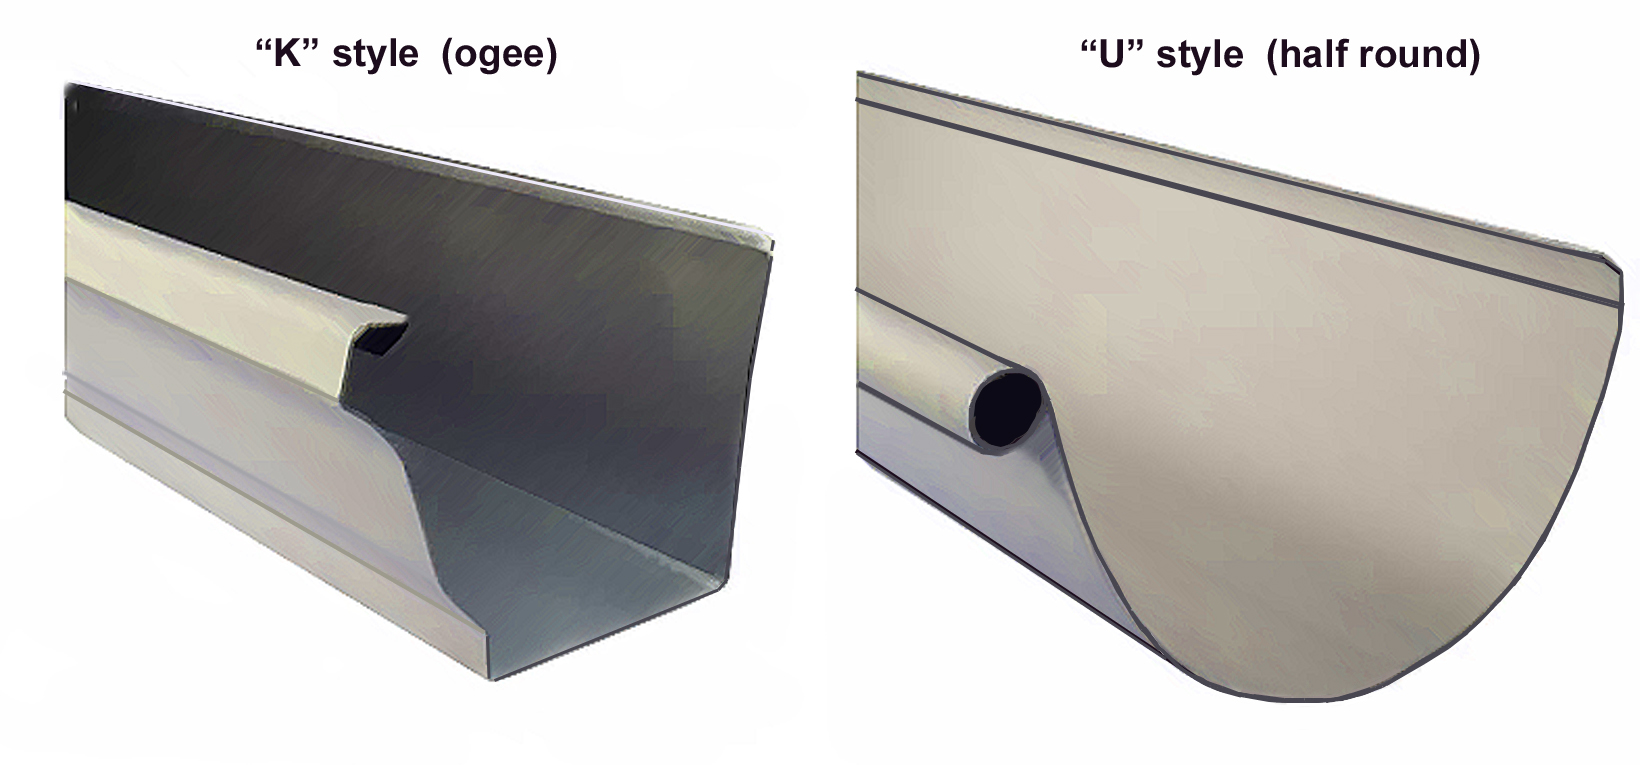
    Gutter channels are typically available in 4-, 5-, and 6-inch sizes. They are referred to by their shape. There are K-style gutters (also known as "ogee" style gutters because the shape resembles this molding type) and U-style gutters (or half round), as shown in Figure 2. The style is principally aesthetic; there is no substantial difference in performance. A larger size will conduct more water at a faster rate, provided there are enough downspouts to drain the gutter channels (EPA 2015).

    Standard gutter styles found in building supply centers include the 'K' and 'U' styles. The difference is purely aesthetic.
    Figure 2. Gutter channel. Stock gutter material's found in building supply centers are often listed as "K" or "U" styles. The difference in styles is purely aesthetic (Source: EPA Indoor airPLUS). 


    Both styles are readily available in vinyl, aluminum, galvanized steel, and copper. All materials weather well, although copper and galvanized steel have the advantage of withstanding impacts from ladders and tree branches better than vinyl and aluminum, which can crack or dent.

    Install gutters along the roof eaves so they slope at least 1/16 inch per foot of run. This will provide positive drainage to direct water toward the downspouts.

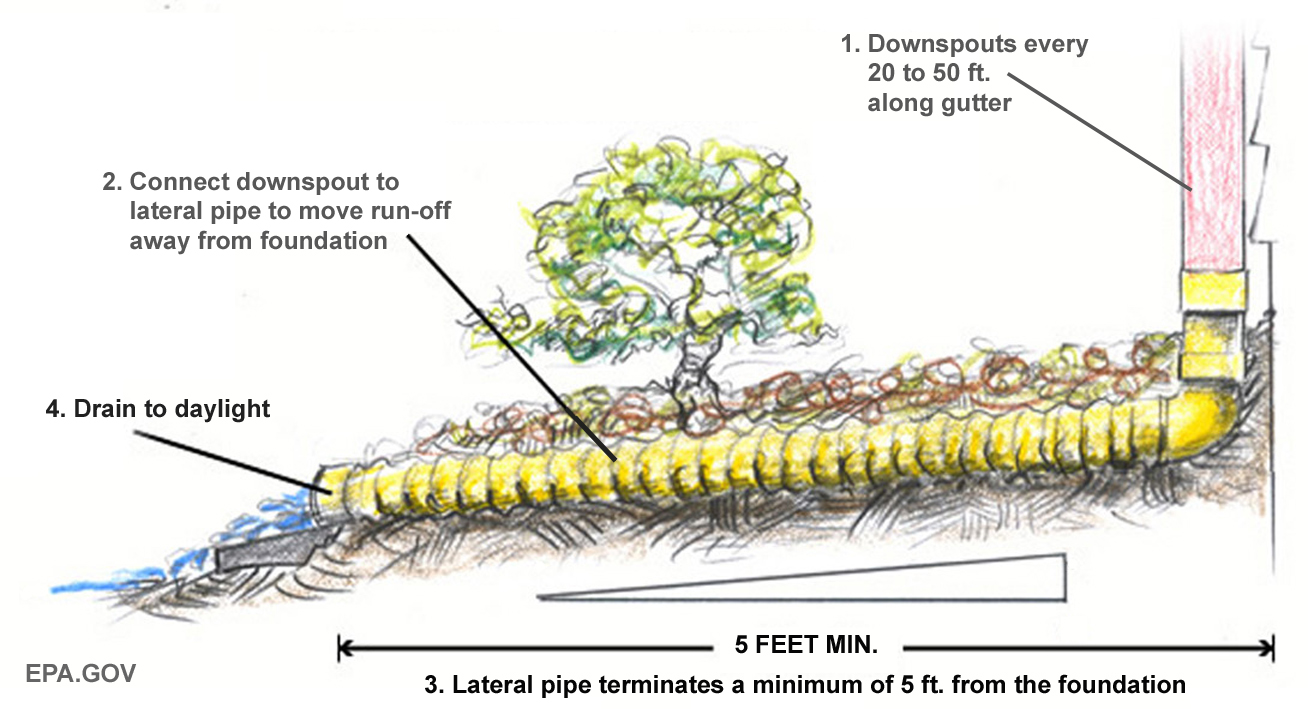
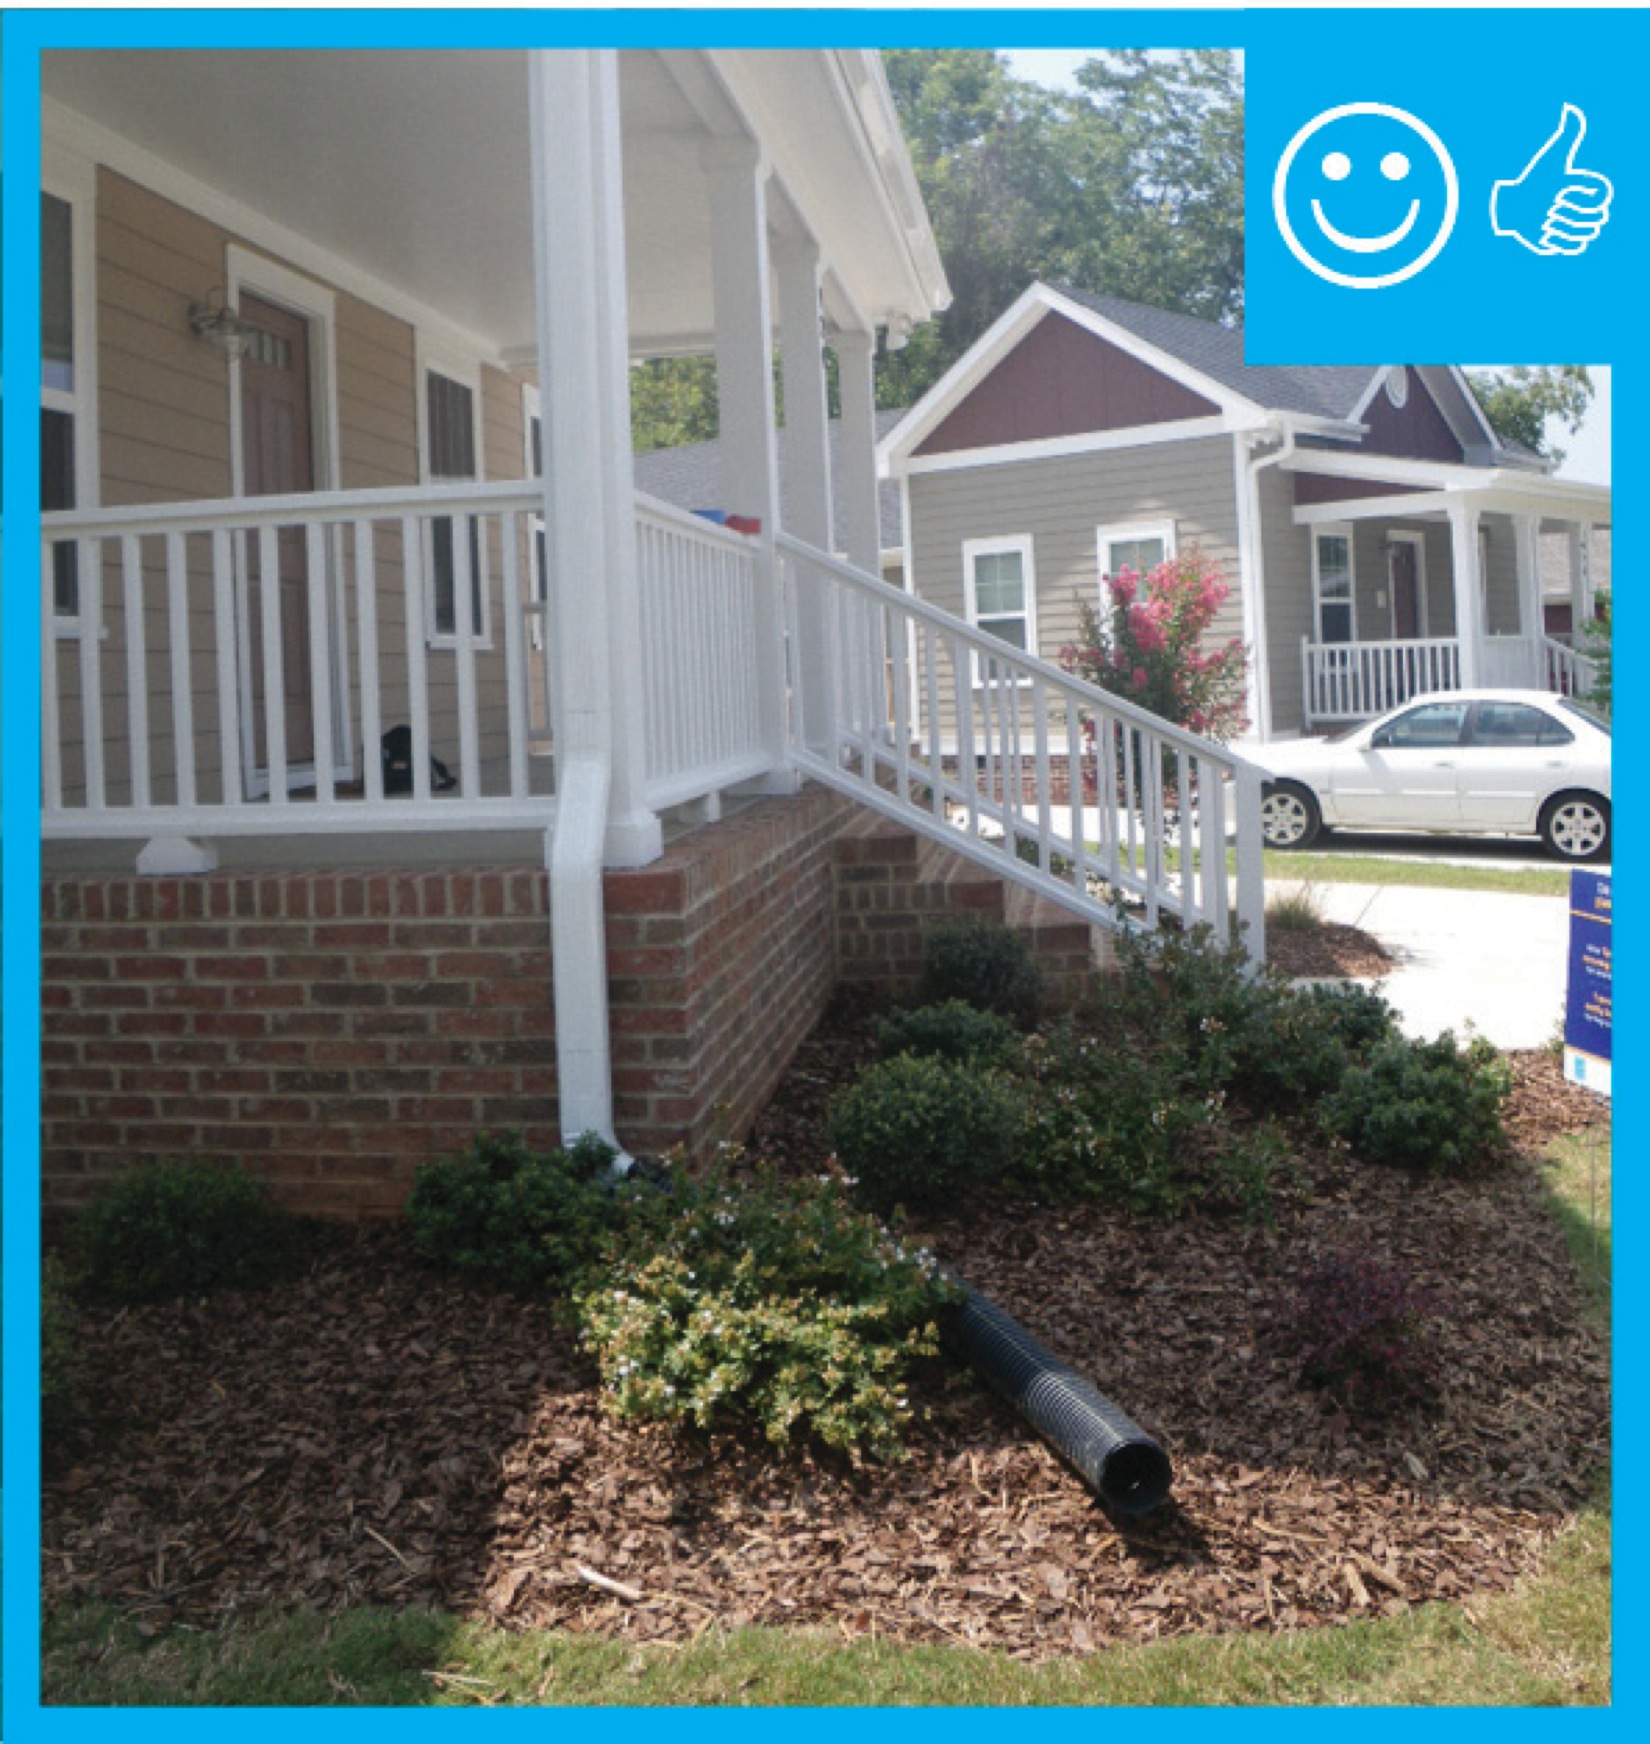
    Downspouts conduct water from the roof to grade-level. They should terminate at least 5 feet from the foundation or to an underground catchment system located at least 10 feet from the foundation (Figure 3).

    Downspout termination. Unless downspouts are connected to an underground catchment system or storm sewer system, they should drain to daylight at least 5 feet from the foundation.
    Figure 3. Unless downspouts are connected to an underground catchment system or storm sewer system, they should drain to daylight at least 5 feet from the foundation (Source: EPA Indoor airPLUS). 


    How to Install Downspouts

    1. Install downspouts every 20 to 50 feet along the gutter. The more closely downspouts are spaced along the gutter, the more water can be conducted away during peak rainstorms. 
    2. Connect the end of the downspout to lateral piping made from non-perforated flexible ABS or Schedule 40 PVC pipe.
    3. Extend the lateral piping at least 5 feet from the building. Use a level and tape measure to ensure that the pipe is pitched away from the foundation at a minimum 5/8-inch per foot (a 5% slope).
    4. Terminate the lateral pipe to daylight (or to a catchment system or storm sewer). It is critical that a daylight drain empty onto a sloped grade that directs water away from the building and does not allow water to drain back towards the building. A splash block placed at the end of the lateral pipe will help control erosion to this location (EPA 2012).

    How to Install a Downspout Drain

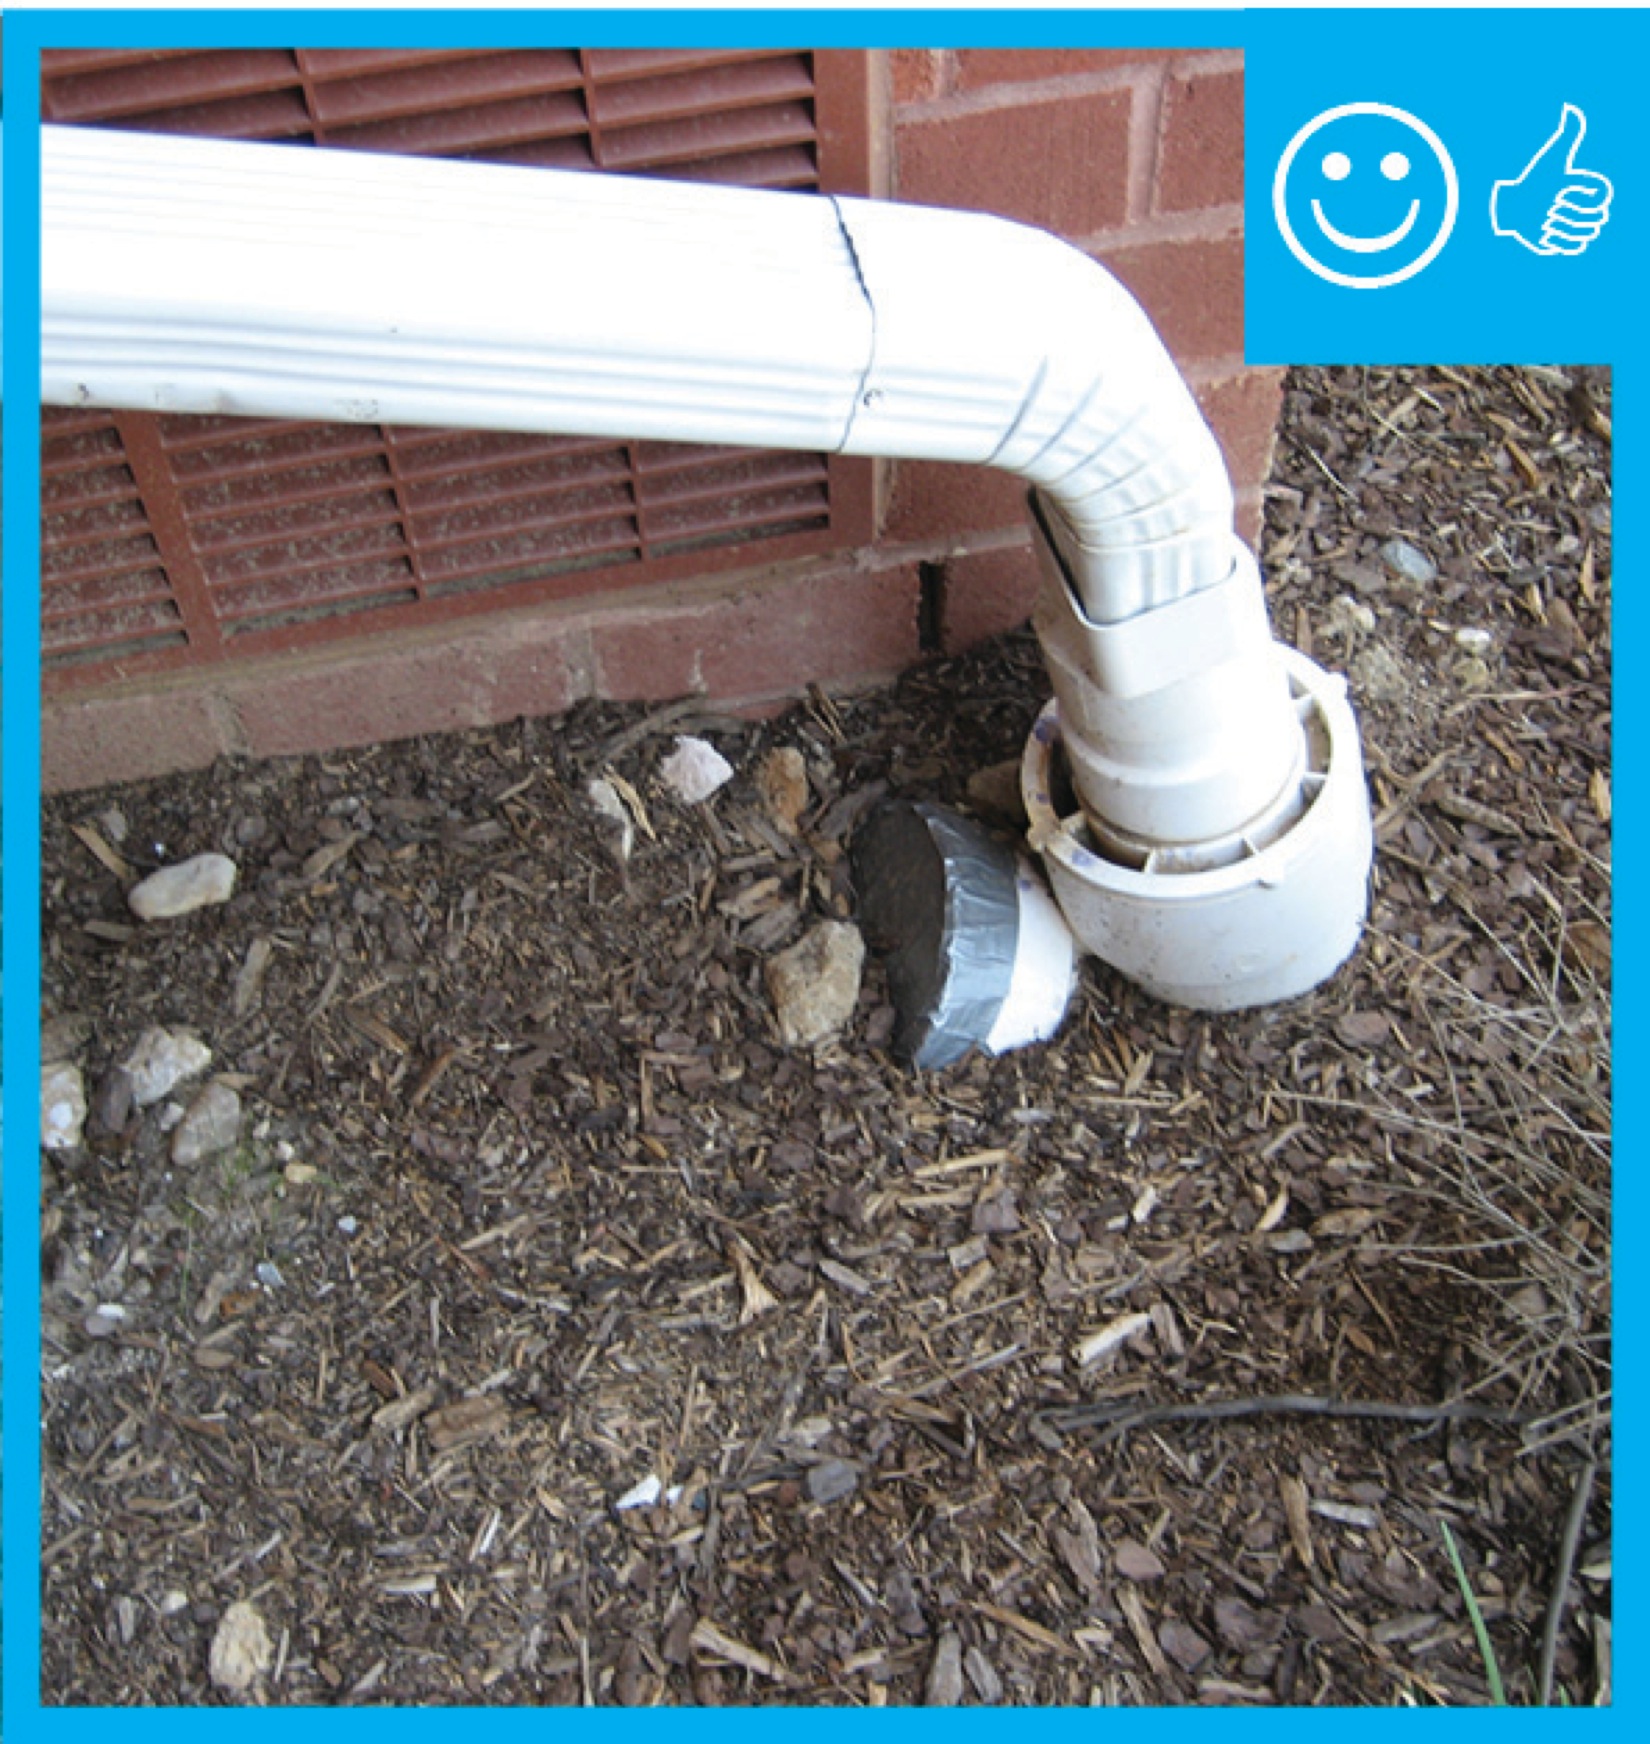
    1. Install drains for the gutters and downspouts that terminate to an underground catchment system at least 10 feet away from foundations or direct water to an underground storm sewer or other approved discharge point. Use a non-perforated, smooth or corrugated plastic pipe as the drain.
    2. If a rainwater harvesting system is installed, properly design the drain to adequately manage the overflow and meet the discharge-distance requirement of 10 feet.
    3. Connect and seal the pipe directly to the downspout.
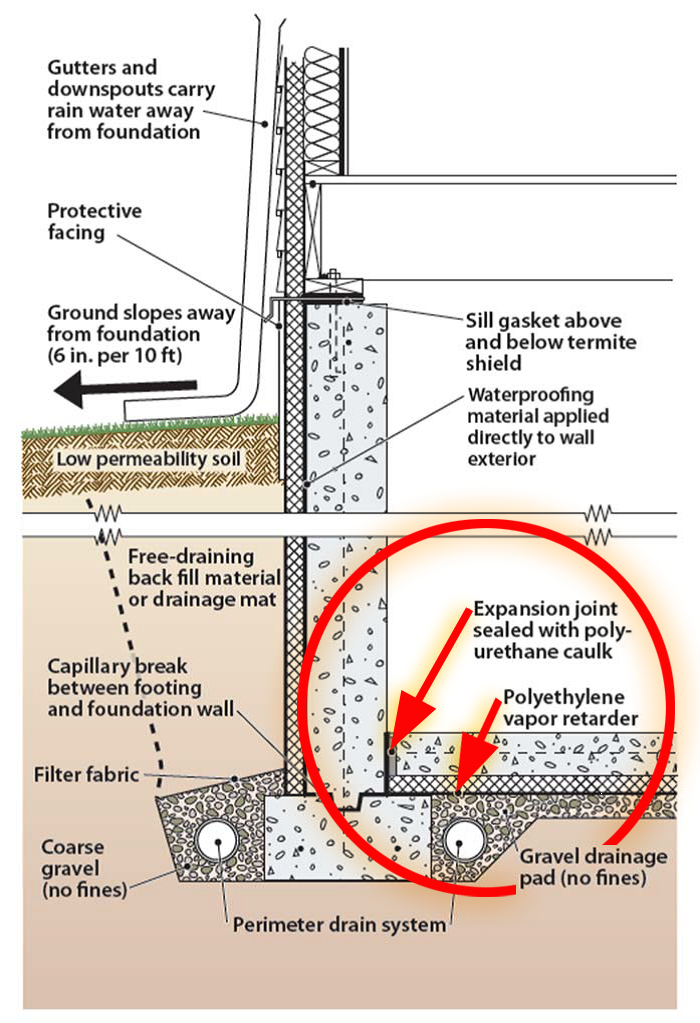
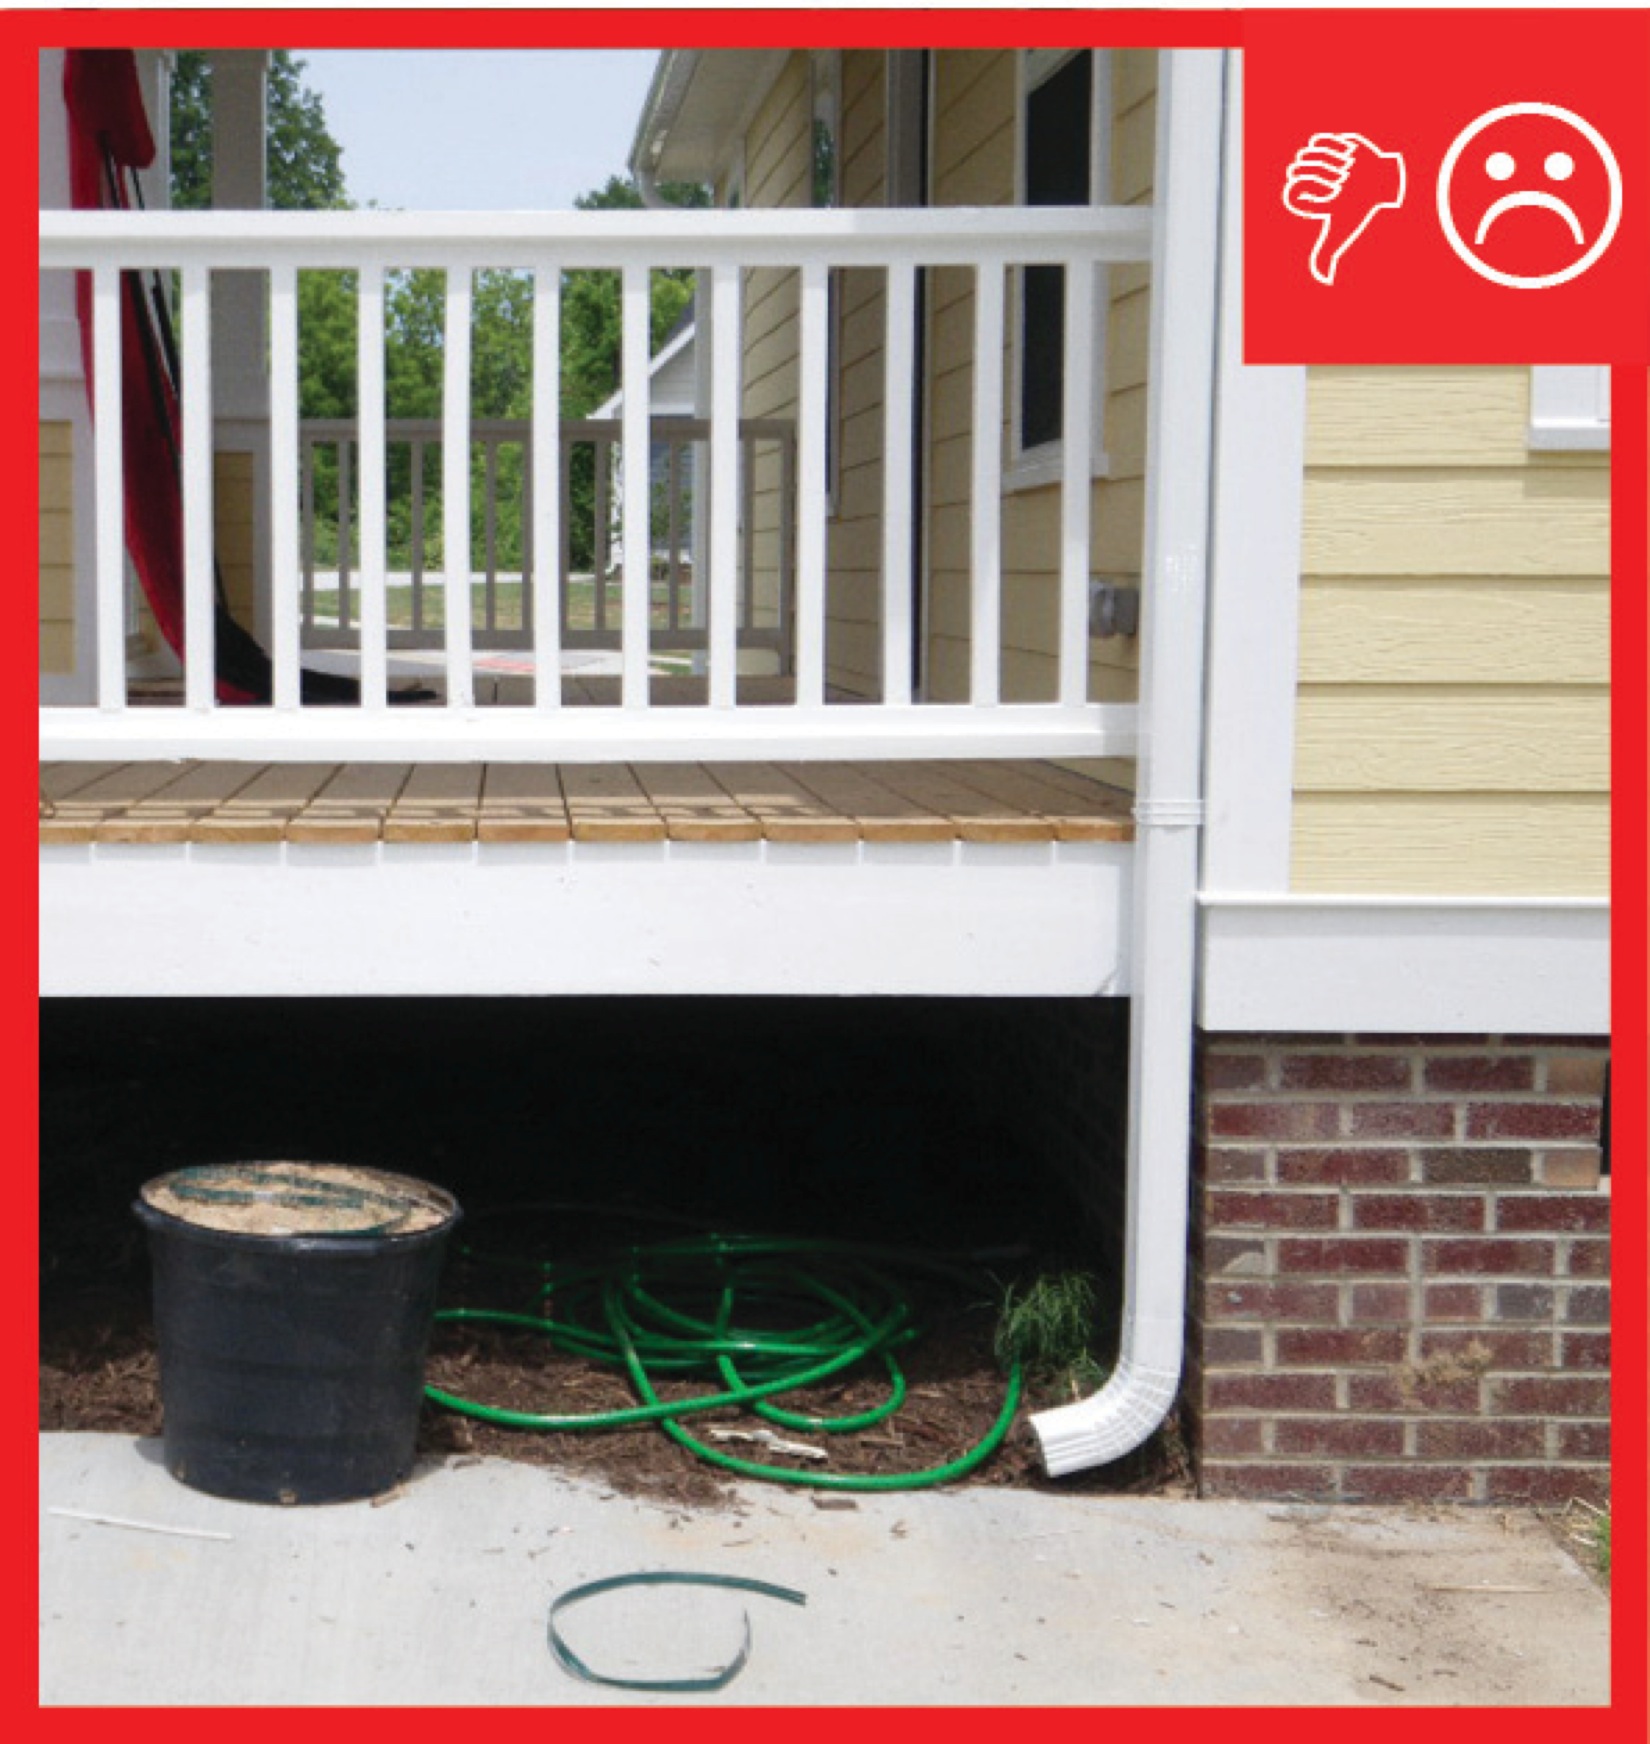
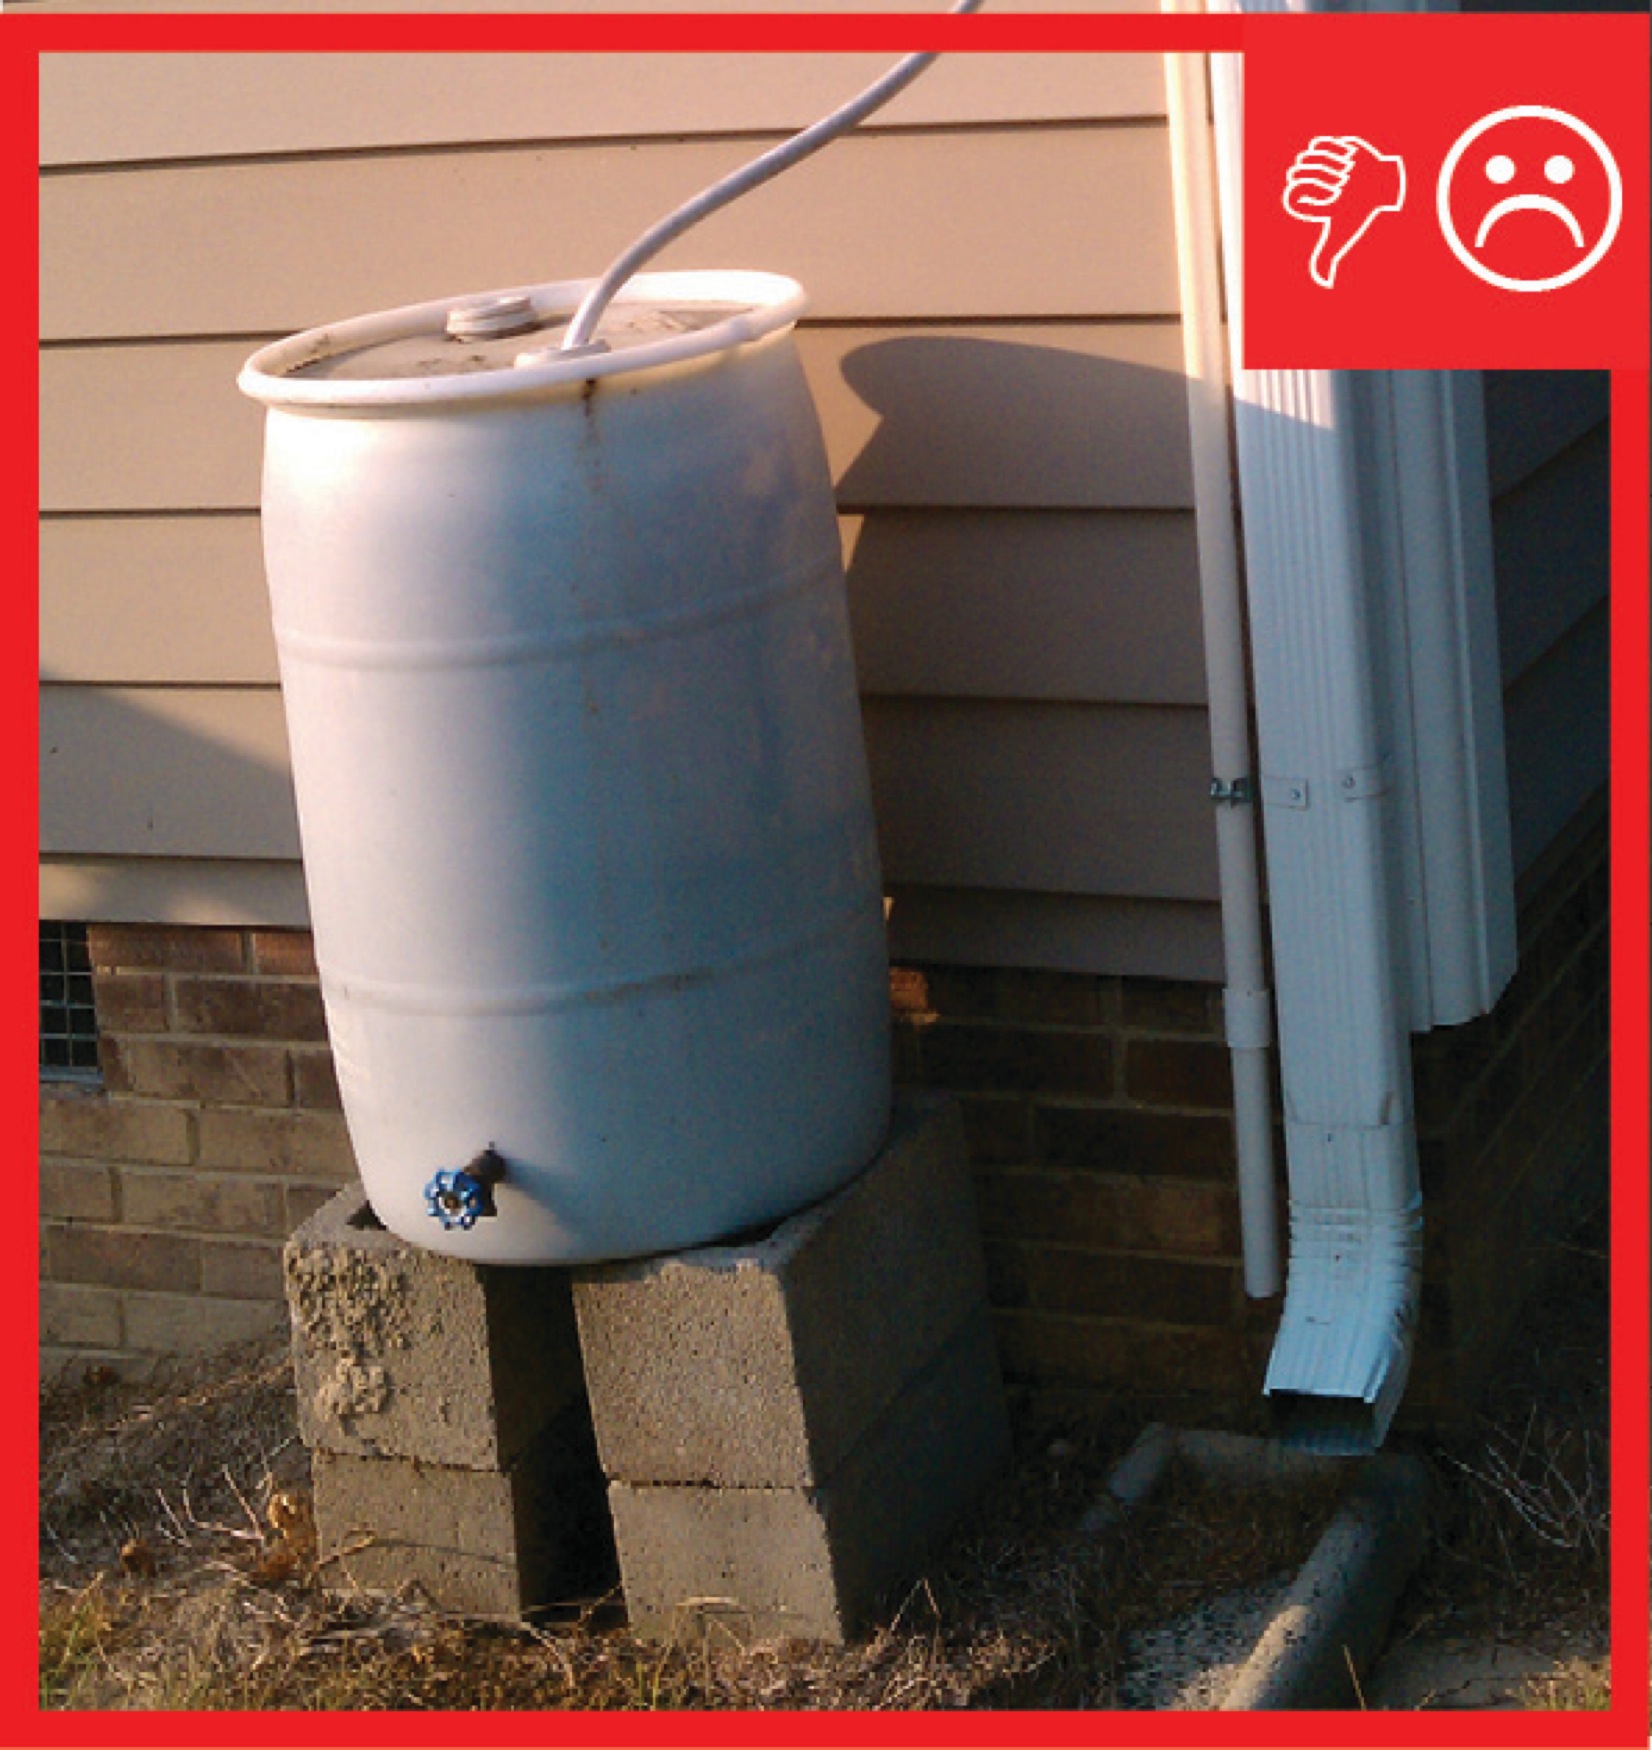
    4. Bury the drain pipe at a slope consistent with the final grade around the home (i.e., sloped ≥ 0.5 inch per foot away from home for ≥ 10 feet). Do not connect the gutter drain pipe to the perforated foundation drain pipe; this practice will soak the foundation (see Figure 4).
    Proper gutter and downspout system terminates with final grade sloping away from the home
    Figure 4. Proper gutter and downspout system terminates with final grade sloping away from the home (Source: Courtesy of Building Science Corporation). 

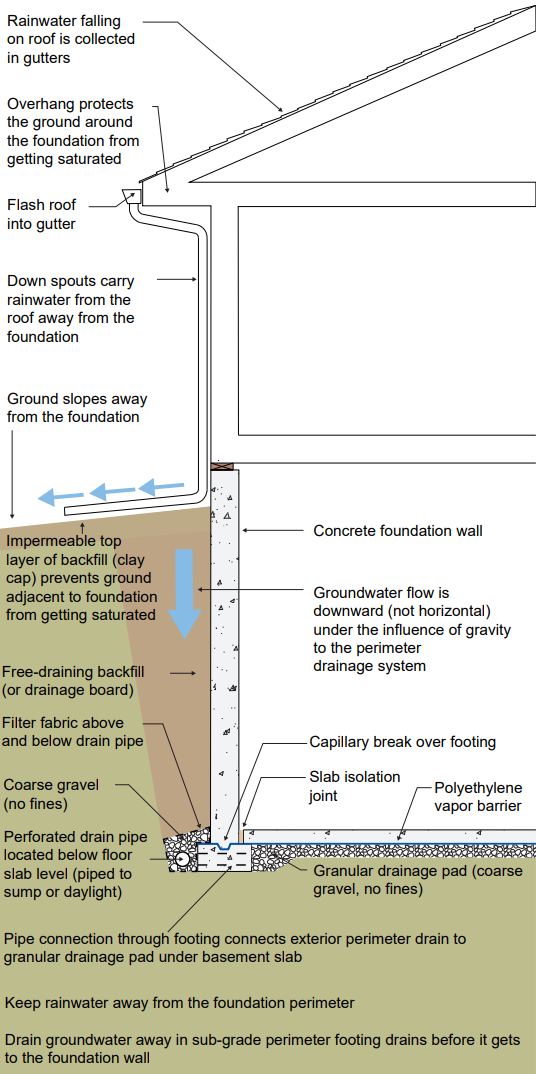
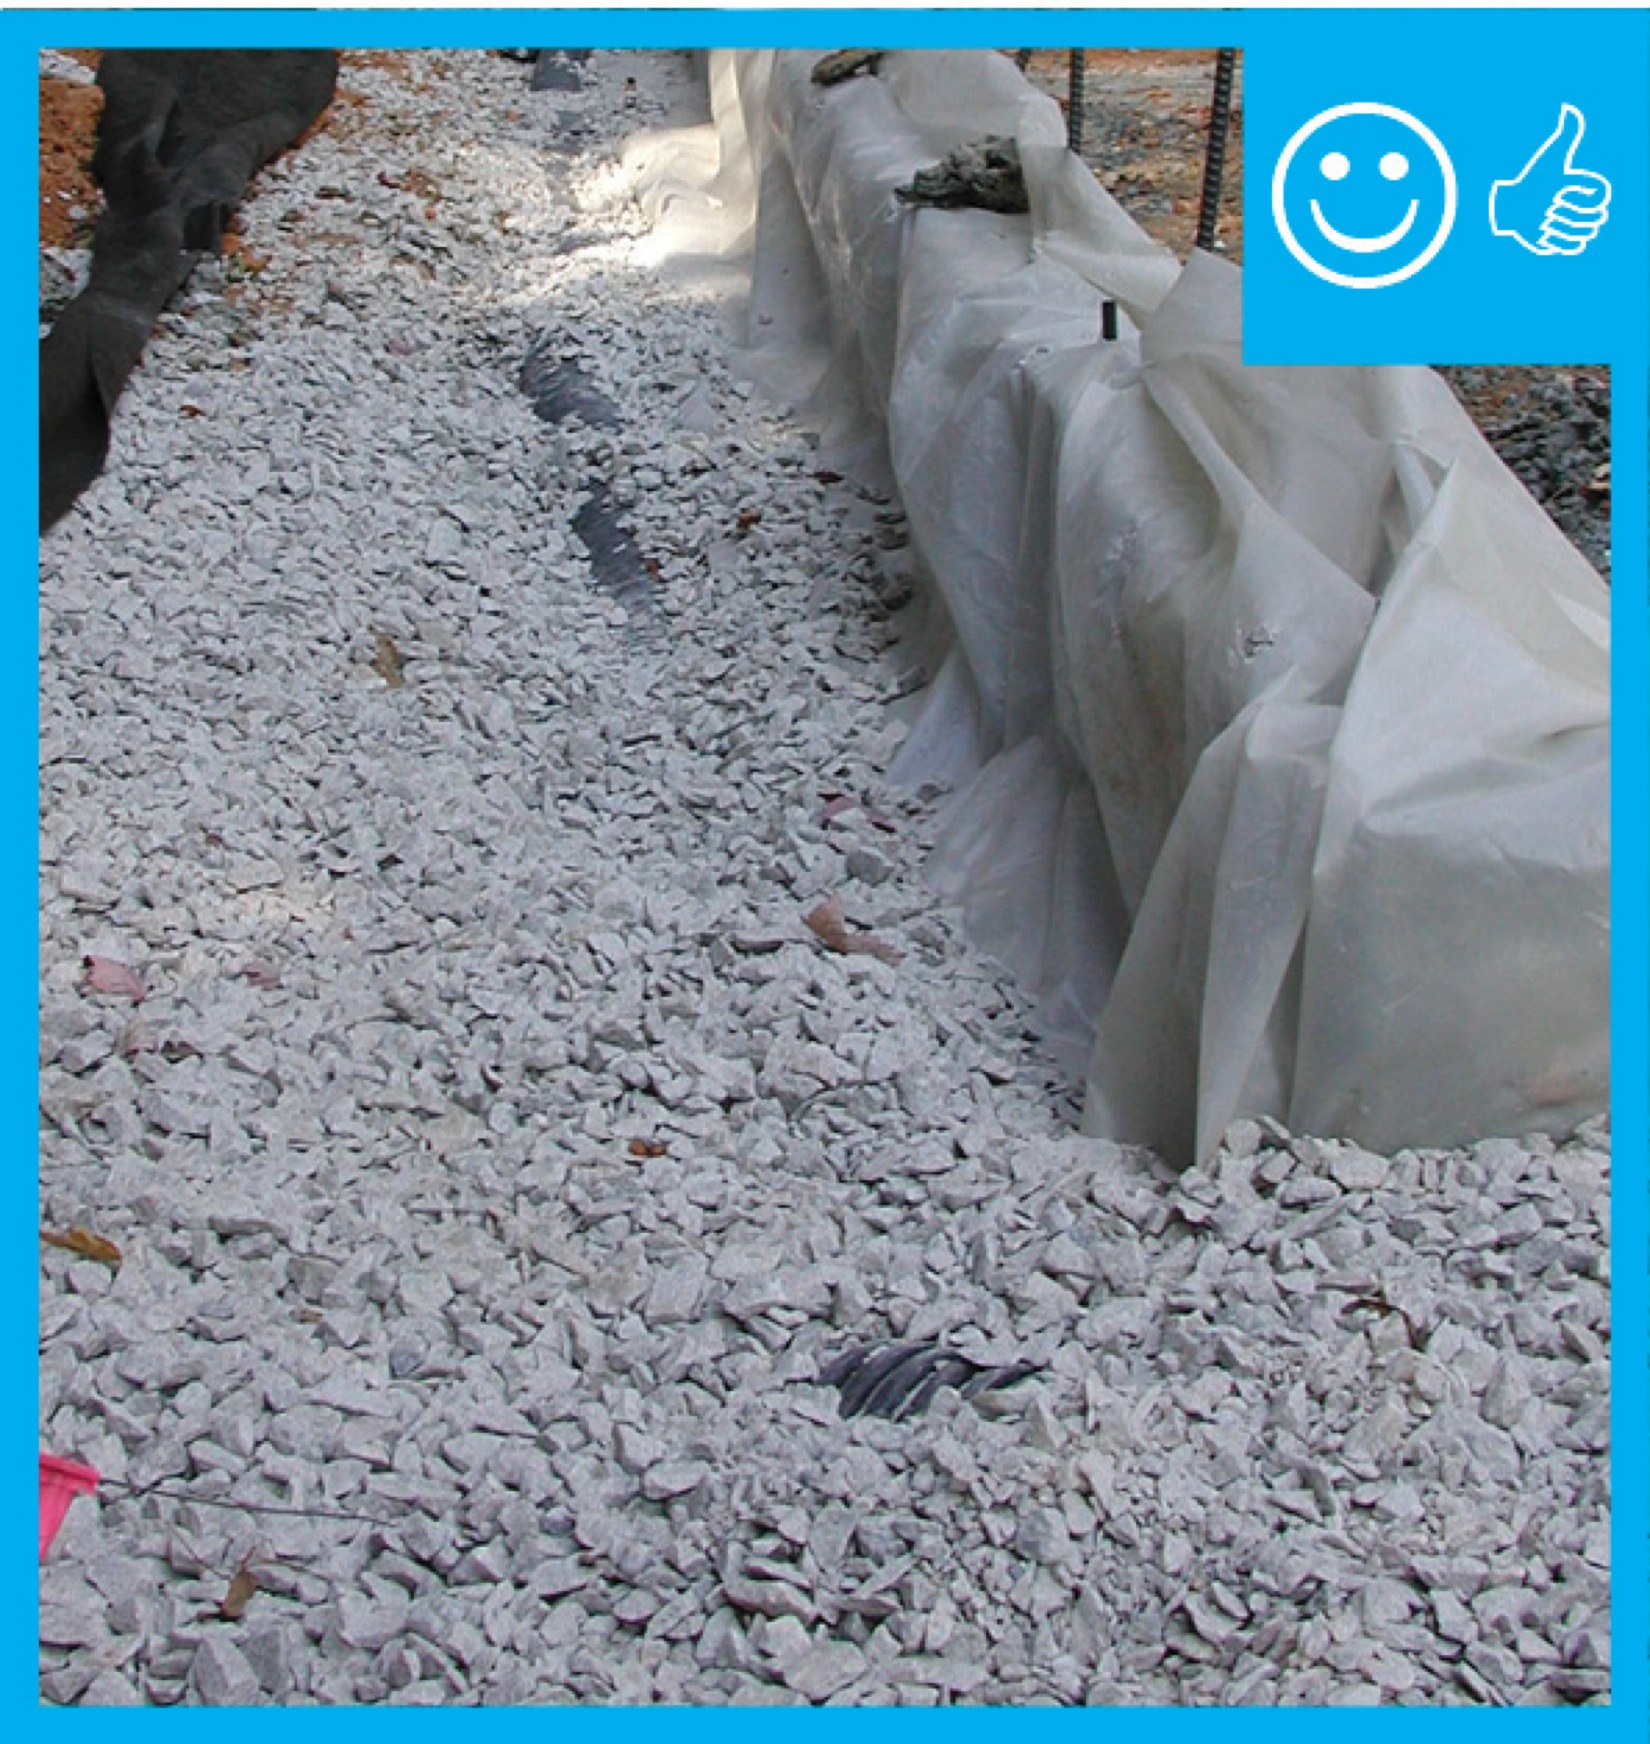
    Grade-Level Drainage System

    In cold and very cold climates, where snow can accumulate on roofs, the water in gutters can freeze. Therefore, gutters should be avoided in cold and very cold climates. Instead, install a grade-level drainage system that conducts roof run-off away from the foundation, as shown in Figure 5.

    Grade-level drainage. Gutters can freeze in cold and very cold climates. Therefore, in these climates, install a grade-level drainage system, as shown here.
    Figure 5. Gutters can freeze in cold and very cold climates. Therefore, in cold climates, install a grade-level drainage system instead of gutters, as shown here (Source: EPA Indoor airPLUS). 


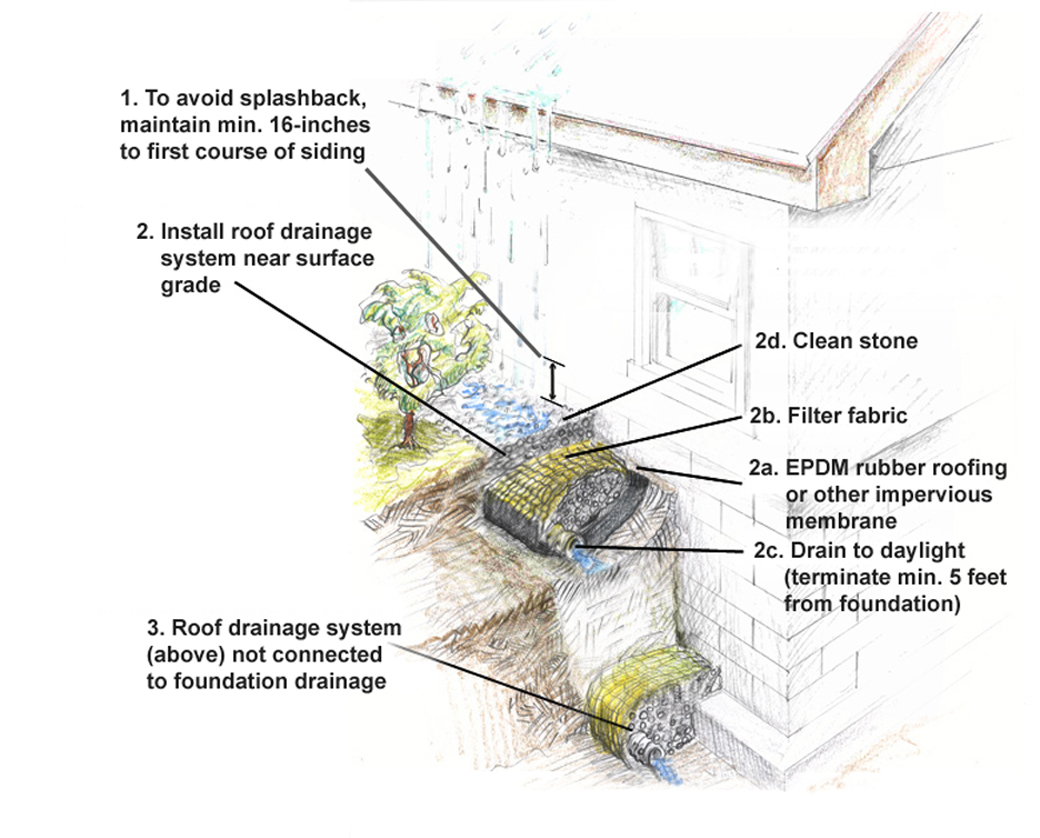
    How to Install Grade-Level Drainage

    1. Design and install the foundation so that there will be 8 to 16 inches of foundation wall showing between the ground at grade level and the first course of siding. This will prevent splash back from damaging siding materials.
    2. Install a perimeter foundation drain at the footing level as described in the guide Footing Drain Pipe. The standard foundation drainage system shown in the graphic above consists of Schedule-40 perforated piping and clean stone that is isolated from the surrounding soils by filter fabric.
    3. Backfill the foundation drainage system with a well-draining backfill material. Stop backfilling 16 to 18 inches from grade level.
    4. Lay a piece of EPDM rubber roofing or other impervious membrane in the trench to isolate the grade-level drainage system from the foundation drainage system below.
    5. Lay landscape fabric and 1 or 2 inches of clean rock or gravel in the pipe.
    6. Install Schedule-40 PVC or ABS perforated pipe, or similar perimeter drainage piping with the perforations facing down. This piping should extend past the corner of the foundation at least 5 feet and drain to daylight or connect to a catchment system or storm sewer.
    7. Backfill around the drainage pipe with 4 to 6 inches of addition clean stone and wrap the filter fabric over the rock with 4 to 6 inches of overlap. Bring the sides of the EPDM isolation membrane up the sides of the trench to create a contained channel so water is drained off by the perforated piping and does not overflow and saturate the foundation backfill.
    8. Install an additional 4 to 6 inches of clean stone over the landscape fabric (EPA 2012).

    Underground Catchment System

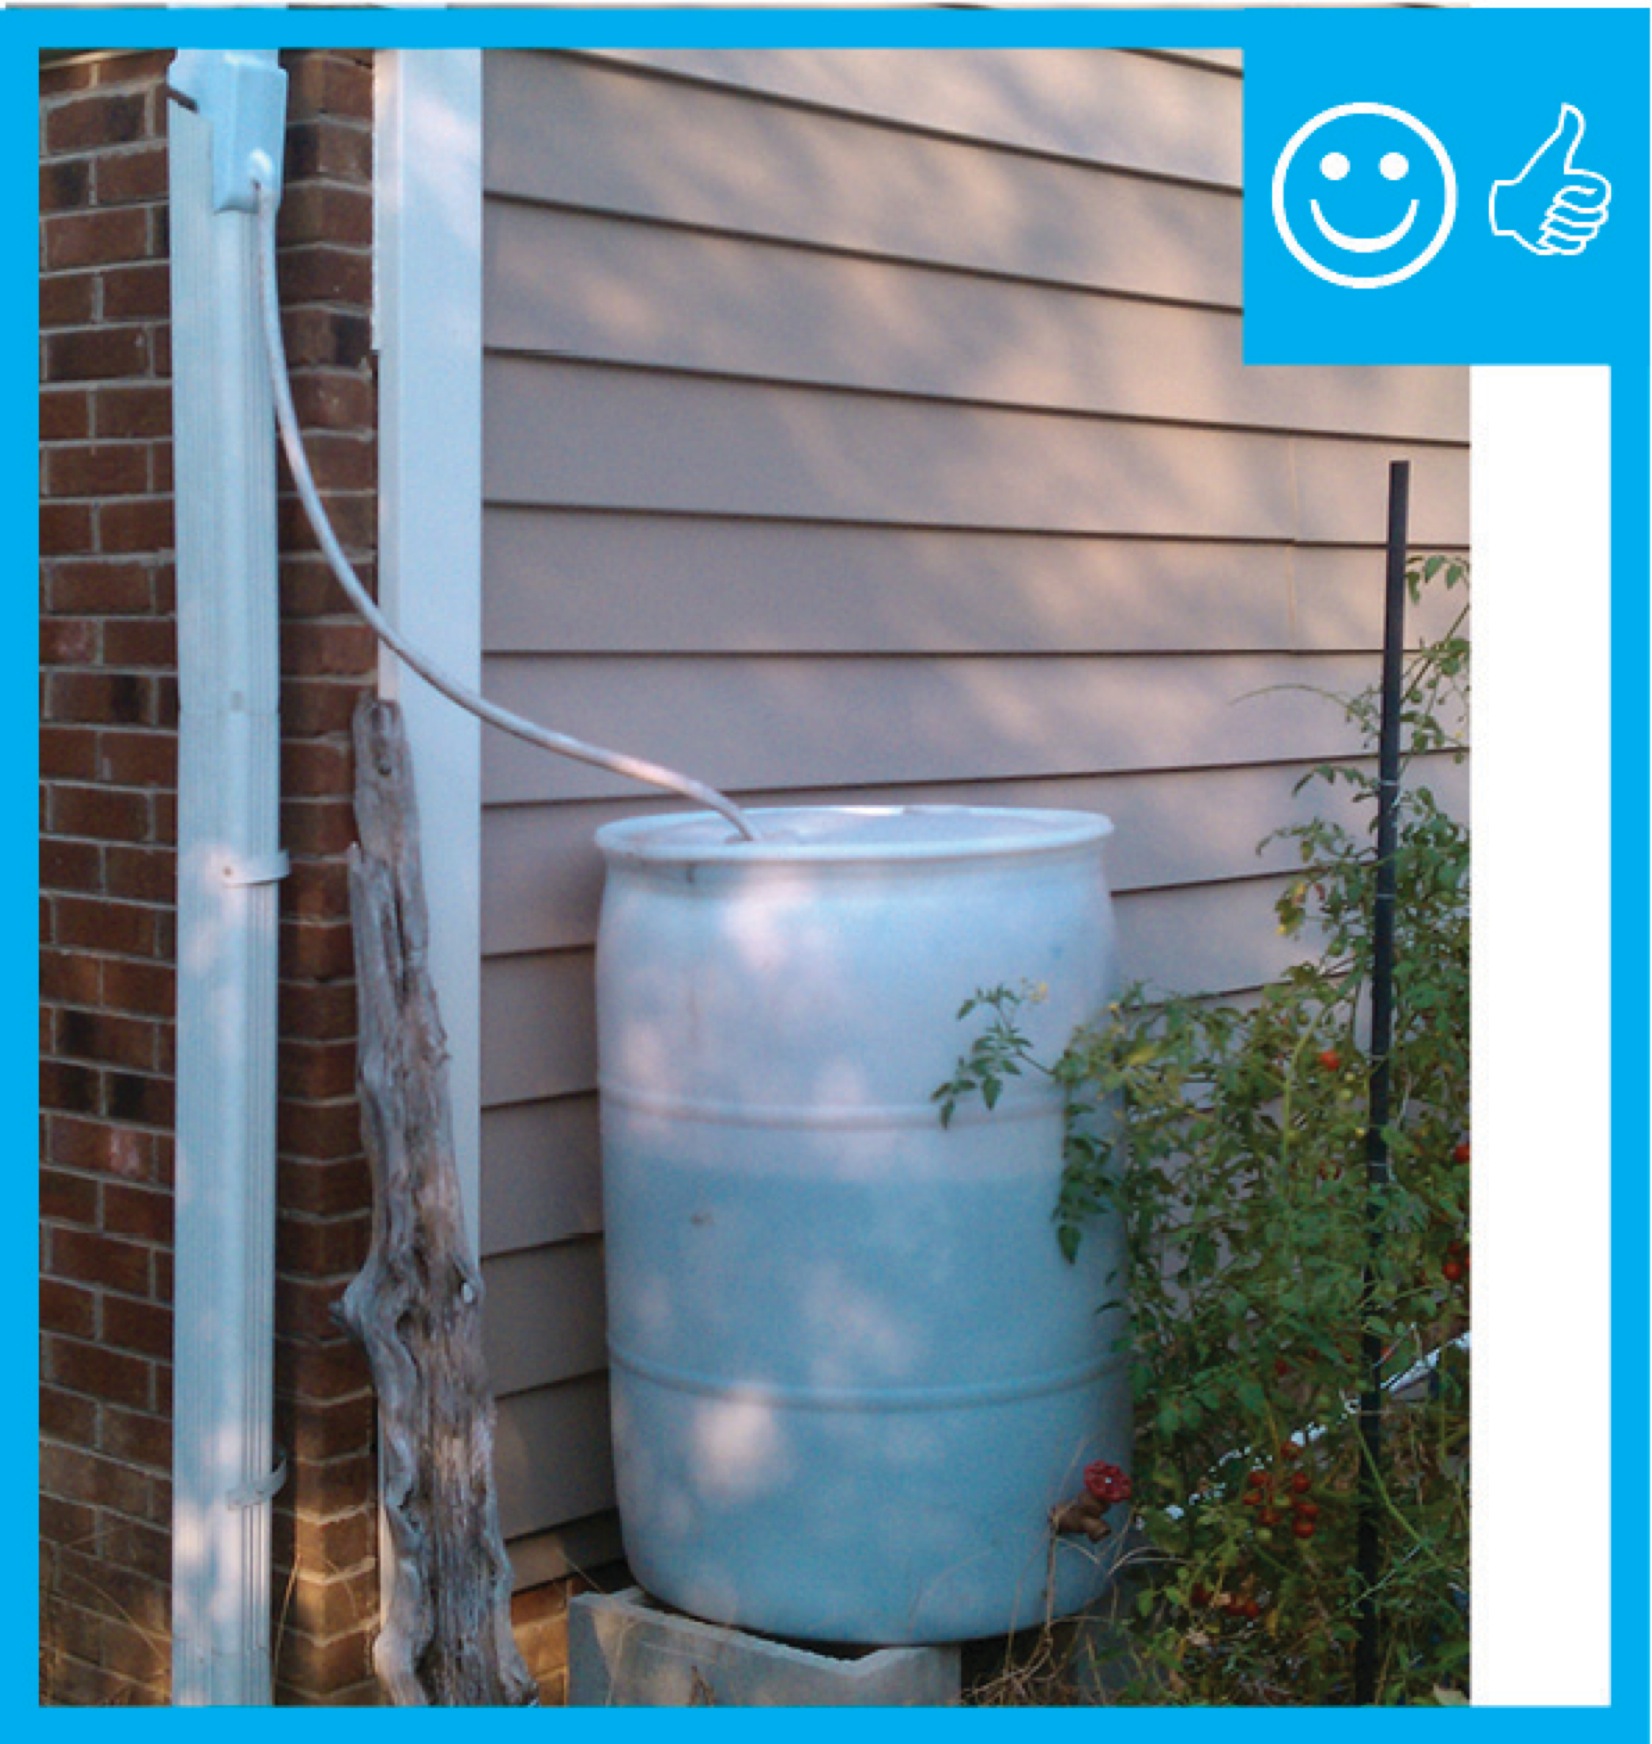
    As an alternative to draining roof runoff to daylight, the downspout can connect to a catchment system, storm sewer, or rainwater harvesting system. Figure 6 depicts one type, known as a drywell, that can be installed, but other types of both underground and above-grade catchment systems are available. When designed to collect roof runoff and properly drain overflow, rainwater harvesting systems, which retain the water in a tank for use in watering landscaping, may also be used to meet roof drainage requirements.

    Catchment system. A roof runoff catchment system, such as the drywell shown here, must be located at least 10 feet from the building foundation.
    Figure 6. A roof runoff catchment system, such as the drywell shown here, must be located at least 10 feet from the building foundation (Source: EPA Indoor airPLUS). 


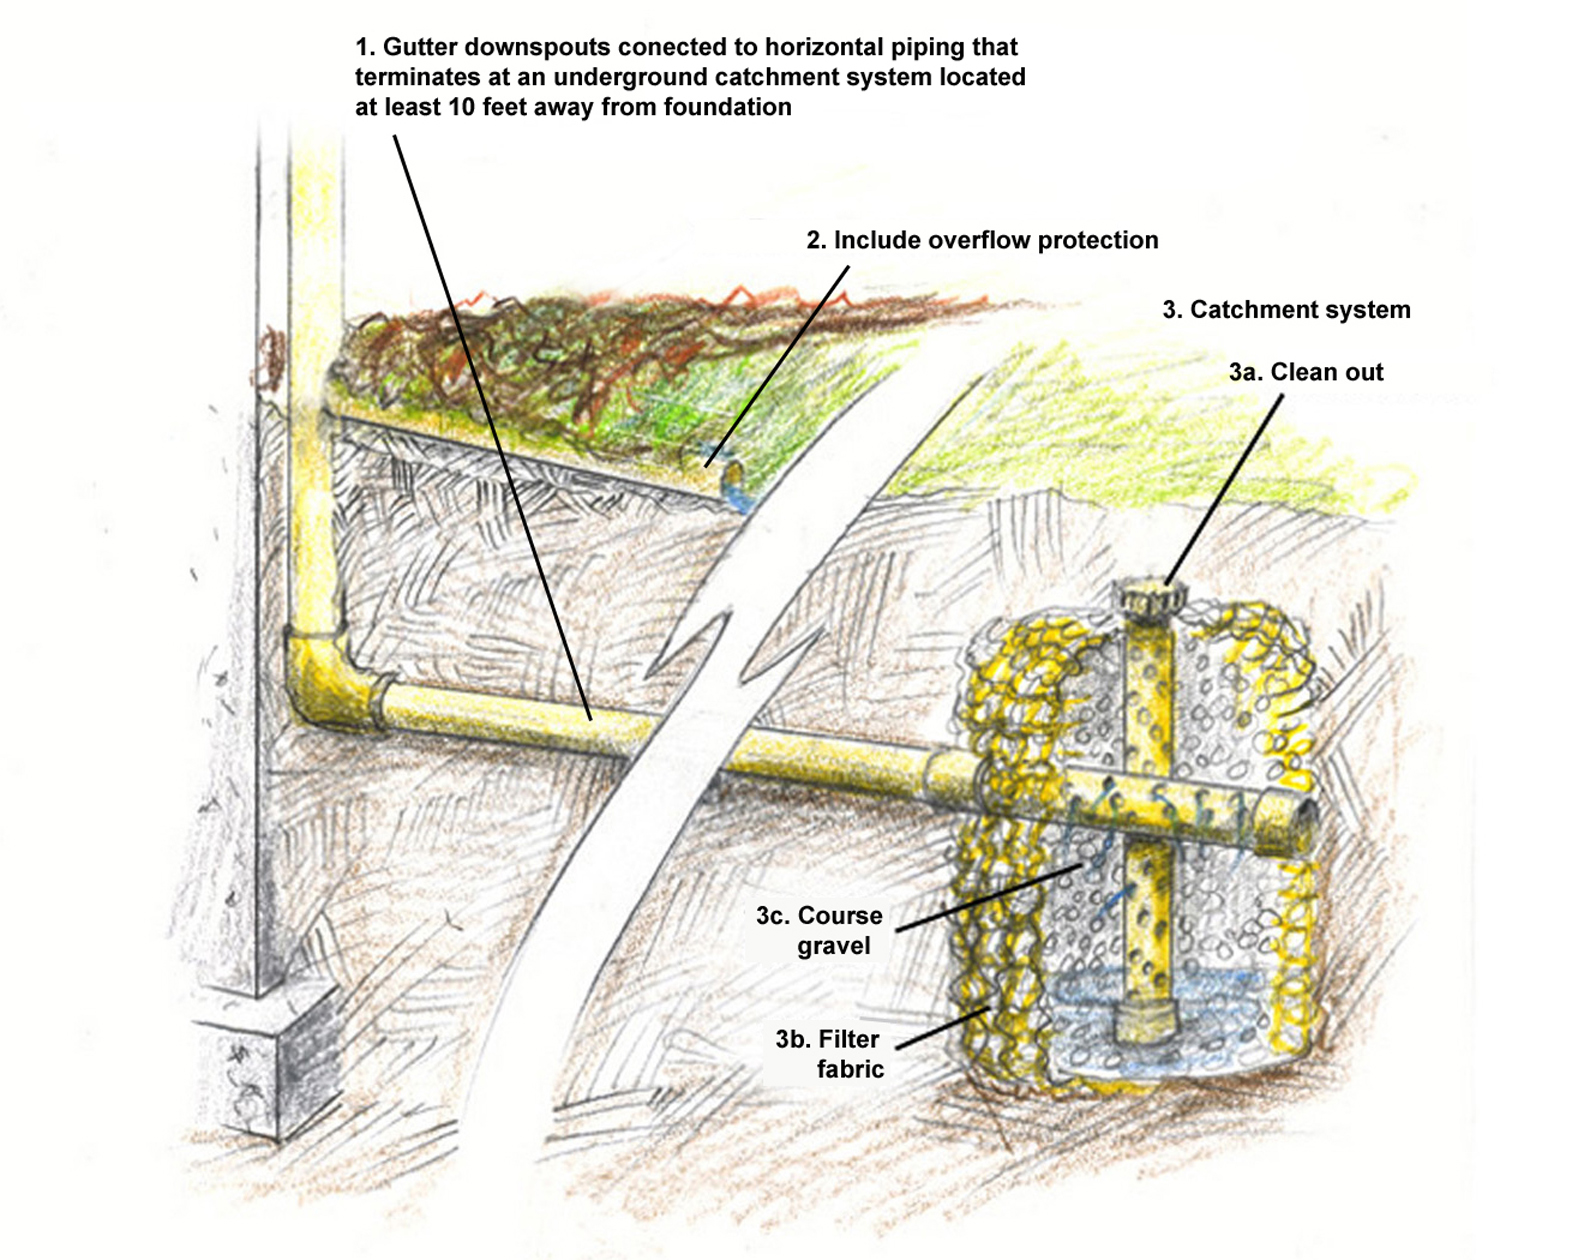
    How to Install a Catchment System

    1. Connect downspouts to lateral piping that extends at least 10 feet from the foundation.
    2. Provide overflow protection to alleviate the water load during peak rain events. Locate overflow pipe at a branch in the downspout, or tee-off near the top of the catchment basin. If it branches off the downspout, as shown in this illustration, it must extend at least 5 feet from the building foundation and drain to daylight.
    3. Install a clean-out in the catchment basin. In a drywell, as shown here, this clean-out consists of a perforated pipe through the center of the gravel that allows the basin to be flushed out periodically. The clean-out should also connect to the lateral pipe to allow leaves and other debris to be removed.
    4. Isolate the catchment basin with a geotextile filter fabric to prevent soil intrusion from clogging the system.
    5. Fill the basin area with coarse gravel. One to 1½-inch gravel is typical. Small gravel will tend to clog too quickly (EPA 2012).

    A Note about Kick-Out Diverters for Climates with Heavy Rainfalls

    In climate zones that have heavy rainfalls which can overwhelm gutter capacity, a diverter (also known as “kick-out flashing”) should be integrated with the house wrap. Step-by-step instructions for kick-out diverters can be found in the guide Step and Kick-Out Flashing at Roof-Wall Intersections and in Chapter 12 of Baechler et al. (2010).

    Success
    Ensuring Success

    Gutters and downspouts need to be sized to accommodate anticipated water loads. The number of downspouts will depend on the cross-section dimension of the downspout material. Allow 1 square inch of downspout cross-section for every 100 square feet of roof area. Place downspouts at least 20 feet apart but no more than 50 feet apart. Foresight in the design of the building façade may be necessary to accommodate this downspout spacing (JLC 2003). Lateral piping at the end of each downspout should also be given careful design consideration because typically a 5-foot lateral channel will get in the way of lawn mowing and other yard activities. 

    Climate
    Climate

    The following are some climate-specific considerations:

    • Hot-Dry and Mixed-Dry Climates. Gutters are not necessary in dry climates. However, do install a wide roof overhang to keep the drip line from occasional rainwater and melted snow away from the structure and do slope the grade away from the building.
    • Hot-Humid and Mixed-Humid Climates. In areas with heavy rains, increase gutter and rain leader capacity (Baechler et al. 2011a; Baechler et al. 2011b). Install kick-out diverter flashing to prevent high water volumes from spilling over the gutter and running down the wall. Step-by-step instructions for kick-out diverters can be found in the guide Step and Kick-Out Flashing at Roof-Wall Intersections.
    • High-Wind and Rain Areas. In areas with potentially high winds and heavy rains (especially along the Gulf of Mexico and Atlantic seaboard), increase gutter and rain leader capacity to accommodate heavy rain and large roof areas. Structurally strong gutters, downspouts, and attachments are recommended.
    • Areas Susceptible to Wildfires:
      • Use metal rather than vinyl gutters and downspouts in areas susceptible to forest fire (Baechler et al. 2010).
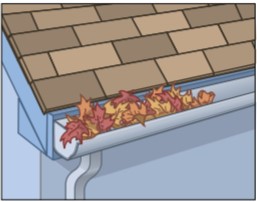
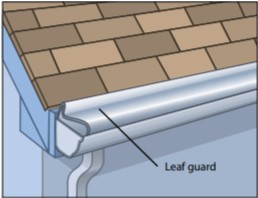
      • Install leaf guard screening to keep leaves, pine needles, and other plant debris from accumulating in gutters where it can dry out and form a fire hazard as a source of fuel for wind-borne embers or flames from a wildfire. 
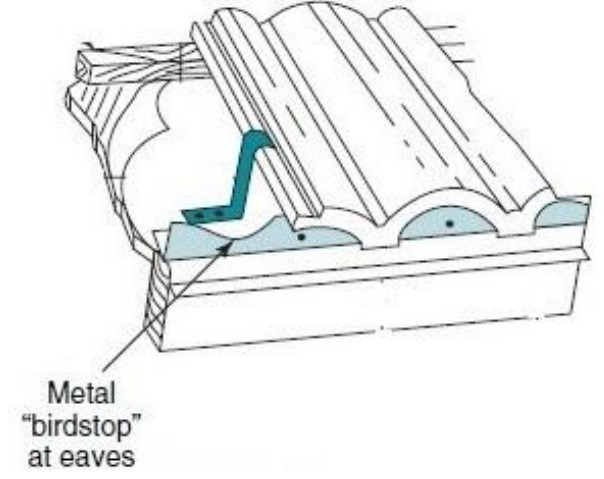
      • Inspect the roof edge to determine if a metal drip edge is installed or included as part of the gutter. Some metal gutters have an integral flashing piece that serves the function of a stand-alone drip edge. If a drip edge is not present, install one. The drip edge will serve two purposes: (1) it will help protect the roof edge (sheathing and fascia) from exposure to flames that could occur if debris in the gutters or on the roof is ignited by wind-blown embers, and (2) it will minimize the entry of embers into the gap that can exist between the edge of the roof sheathing and the top of the fascia (IBHS 2018 Protect your Property from Wildfire-California Edition). 

    • Cold and Very Cold Climates. If gutters are installed on the home, advise the homeowner to make sure the gutters are clean as winter approaches, or install screen leaf guards so that gutters can drain effectively and not fill with water that could freeze when temperatures drop. In high snow-load locations, while gutters will not cause ice dams, they can fill with snow, which may freeze and become part of an already forming roof ice dam. Employ steep-sloped roofs and slope the grade away from the building as recommended in the guide “Final Grade Slopes Away from Foundation.”

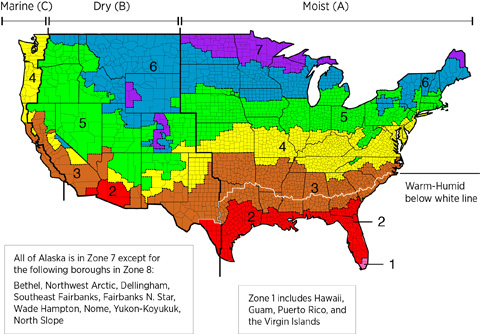
    According to ENERGY STAR, gutters and downspouts are not required in Dry (B) climates as shown in the IECC climate zone map (2009 IECC Figure 301.1 and Table 301.1).

    The map in Figure 1 shows the climate zones for states that have adopted energy codes equivalent to the International Energy Conservation Code (IECC) 2009, 12, 15, and 18. The map in Figure 2 shows the climate zones for states that have adopted energy codes equivalent to the IECC 2021. Climate zone-specific requirements specified in the IECC are shown in the Compliance Tab of this guide. 

    Climate Zone Map from IECC 2009, 12, 15, and 18.
    Figure 1. Climate Zone Map from IECC 2009, 12, 15, and 18 (Source: 2012 IECC).


    Climate Zone Map from IECC 2021.
    Figure 2. Climate Zone Map from IECC 2021 (Source: 2021 IECC).


    Pests

    Install gutters and downspouts to direct water away from foundation. Pooling water attracts a variety of pests. 

    Put leaf guards over gutters to prevent accumulation of leaves and plant debris which can encourage nesting by animals.

    If rodent infestation is likely:

    • In areas of high-rodent infestation, install cones or discs (typically metal) around the outside of downspouts and attach to the wall to prevent rodents from traveling up downspouts and pipes. Cones should be 12 inches in diameter and 12 inches long. Discs should be 18 inches in diameter.
    • Prevent mice and Norway rats from climbing on exterior vertical pipes by applying a 12-inch band of glossy paint around the pipe.
    • Use flap valves, screens, or bulb-shaped metal screen leaf guards in the bottom end of downspouts to prevent entry by rodents. Flap valves are preferred as screens require regular cleaning to avoid clogging the downspouts.


    Training
    Right and Wrong Images
    Image
    Wrong – The downspout terminates too close to the foundation of the house
    Wrong – The downspout terminates too close to the foundation of the house
    Image
    Right – The downspout pipe is far enough away from the foundation to prevent moisture problems
    Right – The downspout pipe is far enough away from the foundation to prevent moisture problems
    Image
    Right – The downspout terminates into a catchment system that moves water away from the foundation of the house
    Right – The downspout terminates into a catchment system that moves water away from the foundation of the house
    Image
    Wrong – There are no gutters installed and there is not a proper gravel bed located at the foundation
    Wrong – There are no gutters installed and there is not a proper gravel bed located at the foundation
    Image
    Right – House without gutters has waterproof liner, drain tile, and gravel bed extending more than 5 feet from foundation
    Right – House without gutters has waterproof liner, drain tile, and gravel bed extending more than 5 feet from foundation
    Image
    Wrong – Rain barrel installed without an overflow spout that terminates away from foundation
    Wrong – Rain barrel installed without an overflow spout that terminates away from foundation
    Image
    Right – Rain barrel installed with an overflow spout terminating at least 5 feet from foundation
    Right – Rain barrel installed with an overflow spout terminating at least 5 feet from foundation
    Image
    Wrong - This surface downspout run-out is directed toward the foundation instead of away from it.
    Wrong - This surface downspout run-out is directed toward the foundation instead of away from it.
    Image
    Wrong - Debris in these open gutters can ignite from wind-borne embers and lead to ignition of the roof or fascia board; use leaf screens to keep debris out of gutters in wildfire-prone areas.
    Wrong - Debris in these open gutters can ignite from wind-borne embers and lead to ignition of the roof or fascia board; use leaf screens to keep debris out of gutters in wildfire-prone areas.
    Image
    Right - Leaf guards allow rainwater into the gutter but keep combustible debris out, increasing the home's resistance to wildfires.
    Right - Leaf guards allow rainwater into the gutter but keep combustible debris out, increasing the home's resistance to wildfires.
    Image
    A cone or disc of plastic or sheet metal can be installed on pipes and downspouts to prevent rodents from climbing up the outside and gaining access to the roof
    A cone or disc of plastic or sheet metal can be installed on pipes and downspouts to prevent rodents from climbing up the outside and gaining access to the roof
    Image
    Metal birdstop is installed at the eaves of a tile roof to keep out birds, bats, rodents, and flying insects
    Metal birdstop is installed at the eaves of a tile roof to keep out birds, bats, rodents, and flying insects
    Image
    Right – The basement contains four 5,000-gallon rainwater holding tanks for this home which meets all of its water needs with rainwater.
    Right – The basement contains four 5,000-gallon rainwater holding tanks for this home which meets all of its water needs with rainwater.
    Image
    Wrong - The gutter is missing kick-out flashing causing wall and window damage beneath it.
    Wrong - The gutter is missing kick-out flashing causing wall and window damage beneath it.
    Image
    Wrong - Down spout is detached from gutter and cannot carry bulk water away from building.
    Wrong - Down spout is detached from gutter and cannot carry bulk water away from building.
    Presentations
    Videos
    Publication Date
    Author(s)
    Cold Climate Housing Research Center
    Organization(s)
    CCHRC
    Description
    Video from Cold Climate Housing Research Center explaining how to correctly 'fur' and outside wall for maximum insulation protection.
    Publication Date
    Author(s)
    Guertin Mike
    Organization(s)
    Fine Homebuilding Magazine
    Description
    When flashing one of a house’s biggest potential leaks — where the eave overhang meets a vertical wall — editorial advisor Mike Guertin chooses to err on the side of caution to control water flow and not rely solely on step flashing.
    Compliance

    Compliance

    The Compliance tab contains both program and code information. Code language is excerpted and summarized below. For exact code language, refer to the applicable code, which may require purchase from the publisher. While we continually update our database, links may have changed since posting. Please contact our webmaster if you find broken links.


    ENERGY STAR Single-Family New Homes, Version 3/3.1 (Rev. 11)

    National Water Management System Builder Requirements

    3. Water-Managed Roof Assembly.
    3.2 For homes that don’t have a slab-on-grade foundation and do have expansive or collapsible soils, gutters & downspouts provided that empty to lateral piping that discharges water on sloping final grade ≥ 5 ft. from foundation, or to underground catchment system not connected to the foundation drain system that discharges water ≥ 10 ft. from foundation. Alternatives & exemptions in Footnote.4, 14, 15

    Footnote 4) Not required in Dry (B) climates as shown in 2009 IECC Figure 301.1 and Table 301.1.

    Footnote 14) The assessment of whether the soil is expansive or collapsible shall be completed by a certified hydrologist, soil scientist, or engineer.

    Footnote 15) Any of the following are permitted to be used as alternatives to Item 3.2: a) a roof design that deposits rainwater to a grade-level rock bed with a waterproof liner and a lateral drain pipe that meets discharge requirements per Item 3.2; b) a rainwater harvesting system that drains overflow to meet discharge requirements per Item 3.2; or c) a continuous rubber membrane (e.g. EPDM) that is aligned with the foundation wall from final grade to ≥ 8 in. below grade and then slopes ≥ 0.5 in. per ft. away from the home for at least 5 ft., with Group I Soils (as defined in Footnote 9) covering the membrane to within 3 in. of final grade.

    Please see the ENERGY STAR Single-Family New Homes Implementation Timeline for the program version and revision currently applicable in your state.


    DOE Zero Energy Ready Home (Revision 07)

    Exhibit 1 Mandatory Requirements.
    Exhibit 1, Item 1) Certified under the ENERGY STAR Qualified Homes Program or the ENERGY STAR Multifamily New Construction Program.
    Exhibit 1, Item 6) Certified under EPA Indoor airPLUS.


    EPA Indoor airPLUS (Revision 04)

    1.7 Gutters, Downspouts and Site Drainage.

    • Provide extra protection for water splash damage on homes meeting one of the following ENERGY STAR exceptions for gutters and downspouts: slab on grade homes, homes that deposit rainwater to a grade-level rock bed with a waterproof liner and drain pipe, or homes that use a continuous rubber membrane system. Protection for water splash damage shall be met by one of the following:
      • Extend the foundation walls at least 16 in. above final grade; OR
      • Provide a drip line at eaves that is horizontally 16 in. away from the edge of the foundation wall; OR
      • Use cladding materials that are decay and rot resistant and can tolerate regular wetting extending at least 16 in. above final grade and install a well-sealed, continuous drainage plane per manufacturer’s instructions.
      • Advisory: The use of self-adhering moisture membranes directly on exterior sheathing should be limited in these applications to encourage drying potential of moisture vapor through the wall assembly. A moisture resistant, non-perforated, and vapor permeable housewrap is preferred. (However, this may not be true for all wall assemblies where 50% or more of the insulation is outboard the structural assembly.)

    Exceptions to Indoor airPLUS requirements: Dry climates, as defined by 2015 IECC Figure 301.1. Homes with rainwater harvesting systems that are designed to properly drain overflow, meeting discharge-distance requirements outlined in ENERGY STAR Builder-W Item number 3.2.

    The Indoor airPLUS Construction Specifications document notes that completion of the ENERGY STAR Water Management System checklist now satisfies the following Indoor airPLUS requirements:

    • Direct roof water away from the house using gutters and downspouts that empty into lateral piping on a sloping finish grade (Builder-W 3.2); OR
    • Direct roof water to an underground catchment system not connected to the foundation drain system that discharges water ≥ 10 ft. from foundation (Builder-W 3.2). 


    2009, 2012, 20152018, and 2021 International Residential Code (IRC)

    Section R905.1.2 (Section R905.2.7.1 in 2012 and 2009) specifies ice barrier requirements for geographic areas where there has been a history of ice dams. Requirements apply to asphalt shingle roofs, metal roof singles, mineral-surfaced roll roofing, slate and slate-type shingles, wood shingles and wood shakes. An exception is included for detached accessory structures not containing conditioned floor area.

    Section R905.7.1.1 (Section R905.8.1.1 in 2009) states that in areas where the average daily temperature in January is 25°F (-4°C) or less, solid sheathing is required on that portion of the roof requiring the application of an ice barrier.

    Section R908.3 (Section R907.3 in 2009) states that roof replacement shall include the removal of existing layers of roof coverings down to the roof deck except where the existing roof assembly includes an ice barrier membrane in which case the existing ice barrier membrane shall be permitted to remain in place and covered with an additional layer of ice barrier membrane.

    Retrofit:  2009, 2012, 2015, 2018,  and 2021 IRC

    Section R102.7.1 Additions, alterations, or repairs. Additions, alterations, renovations, or repairs shall conform to the provisions of this code, without requiring the unaltered portions of the existing building to comply with the requirements of this code, unless otherwise stated. (See code for additional requirements and exceptions.)

    Appendix J regulates the repair, renovation, alteration, and reconstruction of existing buildings and is intended to encourage their continued safe use.


    2009, 2012, 2015, 2018, and 2021 International Wildland-Urban Interface Code (IWUIC)

    Chapter 5 of the IWUIC provides regulations that establish minimum standards for the location, design and construction of buildings and structures based on fire hazard severity in the wildland-urban interface. These provisions are intended to supplement the requirements of the International Building Code and address mitigation of the unique hazards posed to buildings by wildfire and to reduce the hazards of building fires spreading to wildland fuels.

    Section 504.3 Protection of Eaves. Eaves and soffits shall be protected on the exposed underside by ignition-resistant materials or by materials approved for not less than 1-hour fire-resistance-rated construction, 2-inch (51 mm) nominal dimension lumber, or 1-inch (25 mm) nominal fire-retardant-treated lumber or ¾-inch (19.1 mm) nominal fire-retardant-treated plywood, identified for exterior use and meeting the requirements of Section 2303.2 of the International Building Code. Fascias are required and shall be protected on the backside by ignition-resistant materials or by materials approved for not less than 1-hour fire-resistance-rated construction or 2-inch (51 mm) nominal dimension lumber.

    Sections 504.4, 505.4, and 506.4 (Class 1, 2, and 3 Ignition-Resistant Construction). Gutters and downspouts. Gutters and downspouts shall be constructed of noncombustible material. Gutters shall be provided with an approved means to prevent the accumulation of leaves and debris in the gutter.


    National Fire Protection Association (NFPA) 1144 Standard for Reducing Structure Ignition Hazards from Wildland Fire  

    5.3.2 Roof gutters, downspouts, and connectors shall be noncombustible, and roof gutters shall be covered with an approved noncombustible means to minimize the accumulation of debris.

    5.3.4 Eaves shall be enclosed with exterior fire-retardant-treated wood, ignition-resistant materials, noncombustible materials, or materials exhibiting resistance to wildfire penetration when tested to ASTM E2957-15 Standard Test Method for Resistance to Wildfire Penetration of Eaves, Soffits, and Other Projections.

    5.3.7 Metal drip edge shall be installed at all rake and eave edges.

    Retrofit
    Existing Homes

    If you are retrofitting an older home with no gutters, see the Description tab for guidance.

    The U.S. Department of Energy’s Standard Work Specifications has additional information on gutters and site drainage.

    See Compliance tab. 

    More

    More Info.

    Access to some references may require purchase from the publisher. While we continually update our database, links may have changed since posting. Please contact our webmaster if you find broken links.

    Case Studies
    References and Resources*
    Author(s)
    U.S. Environmental Protection Agency
    Organization(s)
    EPA
    Publication Date
    Description
    Guide describing details that serve as a visual reference for each of the line items in the Water Management System Builder Checklist.
    Author(s)
    Baechler Michael C,
    Gilbride Theresa L,
    Hefty Marye G,
    Cole Pam C,
    Williamson Jennifer,
    Love Pat M
    Organization(s)
    Pacific Northwest National Laboratory,
    PNNL,
    Oak Ridge National Laboratory,
    ORNL
    Publication Date
    Description
    Report providing builders in marine climates with guidance for building homes that have whole-house energy savings of 40% over the Building America benchmark with no added overall costs for consumers.
    Author(s)
    Baechler Michael C,
    Gilbride Theresa L,
    Hefty Marye G,
    Cole Pam C,
    Love Pat M
    Organization(s)
    Pacific Northwest National Laboratory,
    PNNL,
    Oak Ridge National Laboratory,
    ORNL
    Publication Date
    Description
    Guide describing measures that builders in the cold and very cold climates can take to build homes that have whole-house energy savings of 40% over the Building America benchmark with no added overall costs for consumers.
    Author(s)
    Baechler Michael C,
    Gilbride Theresa L,
    Hefty Marye G,
    Cole Pam C,
    Adams Karen T,
    Butner Ryan S,
    Ortiz S J,
    Love Pat M
    Organization(s)
    Pacific Northwest National Laboratory,
    PNNL,
    Oak Ridge National Laboratory,
    ORNL
    Publication Date
    Description
    Report describing measures that builders in mixed-humid climates can use to build homes that have whole-house energy savings of 40% over the Building America benchmark with no added overall costs for consumers.
    Author(s)
    Lstiburek Joseph,
    Brennan Terry
    Organization(s)
    Building Science Corporation,
    BSC
    Publication Date
    Description
    Document with important building science considerations, designed for members of the residential construction and remodeling industries, as well as owners and managers who work in affordable housing.
    Author(s)
    Colorado Geological Survey
    Organization(s)
    Colorado Geological Survey
    Publication Date
    Description
    Website discussing building foundation problems caused by settling soil in Colorado.
    Author(s)
    Baechler Michael C,
    Gilbride Theresa L,
    Hefty Marye G,
    Cole Pam C,
    Adams Karen T,
    Noonan Chrissy F,
    Love Pat M
    Organization(s)
    Pacific Northwest National Laboratory,
    PNNL,
    Oak Ridge National Laboratory,
    ORNL
    Publication Date
    Description
    A guidebook helping builders design and construct homes that are among the most energy efficient available, while addressing issues such as building durability, indoor air quality, and occupant health, safety, and comfort. Measures described in this guide can help builders in the hot-humid climate...
    Author(s)
    Bueche David,
    Foley Tim
    Organization(s)
    Colorado State Forest Service,
    CSFS
    Publication Date
    Description
    Wildfire construction guidelines from the Colorado State Forest Service focusing on site design and building materials to mitigate damage to homes in wildfire-prone areas.
    Author(s)
    California Department of Forestry and Fire Protection
    Organization(s)
    State of California,
    Cal Fire
    Publication Date
    Description
    Webpage offering recommendations to homeowners and contractors for retrofitting a home to make it more resistant to wildfires.
    Author(s)
    Insurance Institute for Business & Home Safety,
    National Fire Protection Association
    Organization(s)
    IBHS,
    NFPA
    Publication Date
    Description
    Webpage listing 10 factsheets describing research by IBHS into wildfire causes and construction tips for reducing the risk of ignition.
    *For non-dated media, such as websites, the date listed is the date accessed.
    Contributors to this Guide

    The following authors and organizations contributed to the content in this Guide.

    Last Updated

    Mobile Field Kit

    The Building America Field Kit allows you to save items to your profile for review or use on-site.

    Sign Up  or  Log In

    Did you find this information helpful?

    If you have questions and/or would like a reply to this feedback, please include your e-mail address in the message.
    This question is for testing whether or not you are a human visitor and to prevent automated spam submissions.