

Scope
Properly select and install asphalt shingles when installing roofing on new construction or when repairing or replacing roofing on existing homes to minimize the risk of water intrusion due to shingles being damaged or blown off of the roof during high winds or hurricanes, as well as to minimize risks from wildfires and severe winter weather.
For new construction:
- Seal the roof deck using one of the following three options, per the IBHS Fortified Hurricane and High Wind Standards:
- Install a self-adhered (peel and stick) membrane over the entire roof deck (recommend a #15 felt bond break between membrane and shingles);
- Install a nominal 4-inch-wide roof deck flashing tape over all roof sheathing panel seams and cover with #30 felt or equivalent synthetic underlayment; or
- Install a two-layer #30 felt underlayment system.
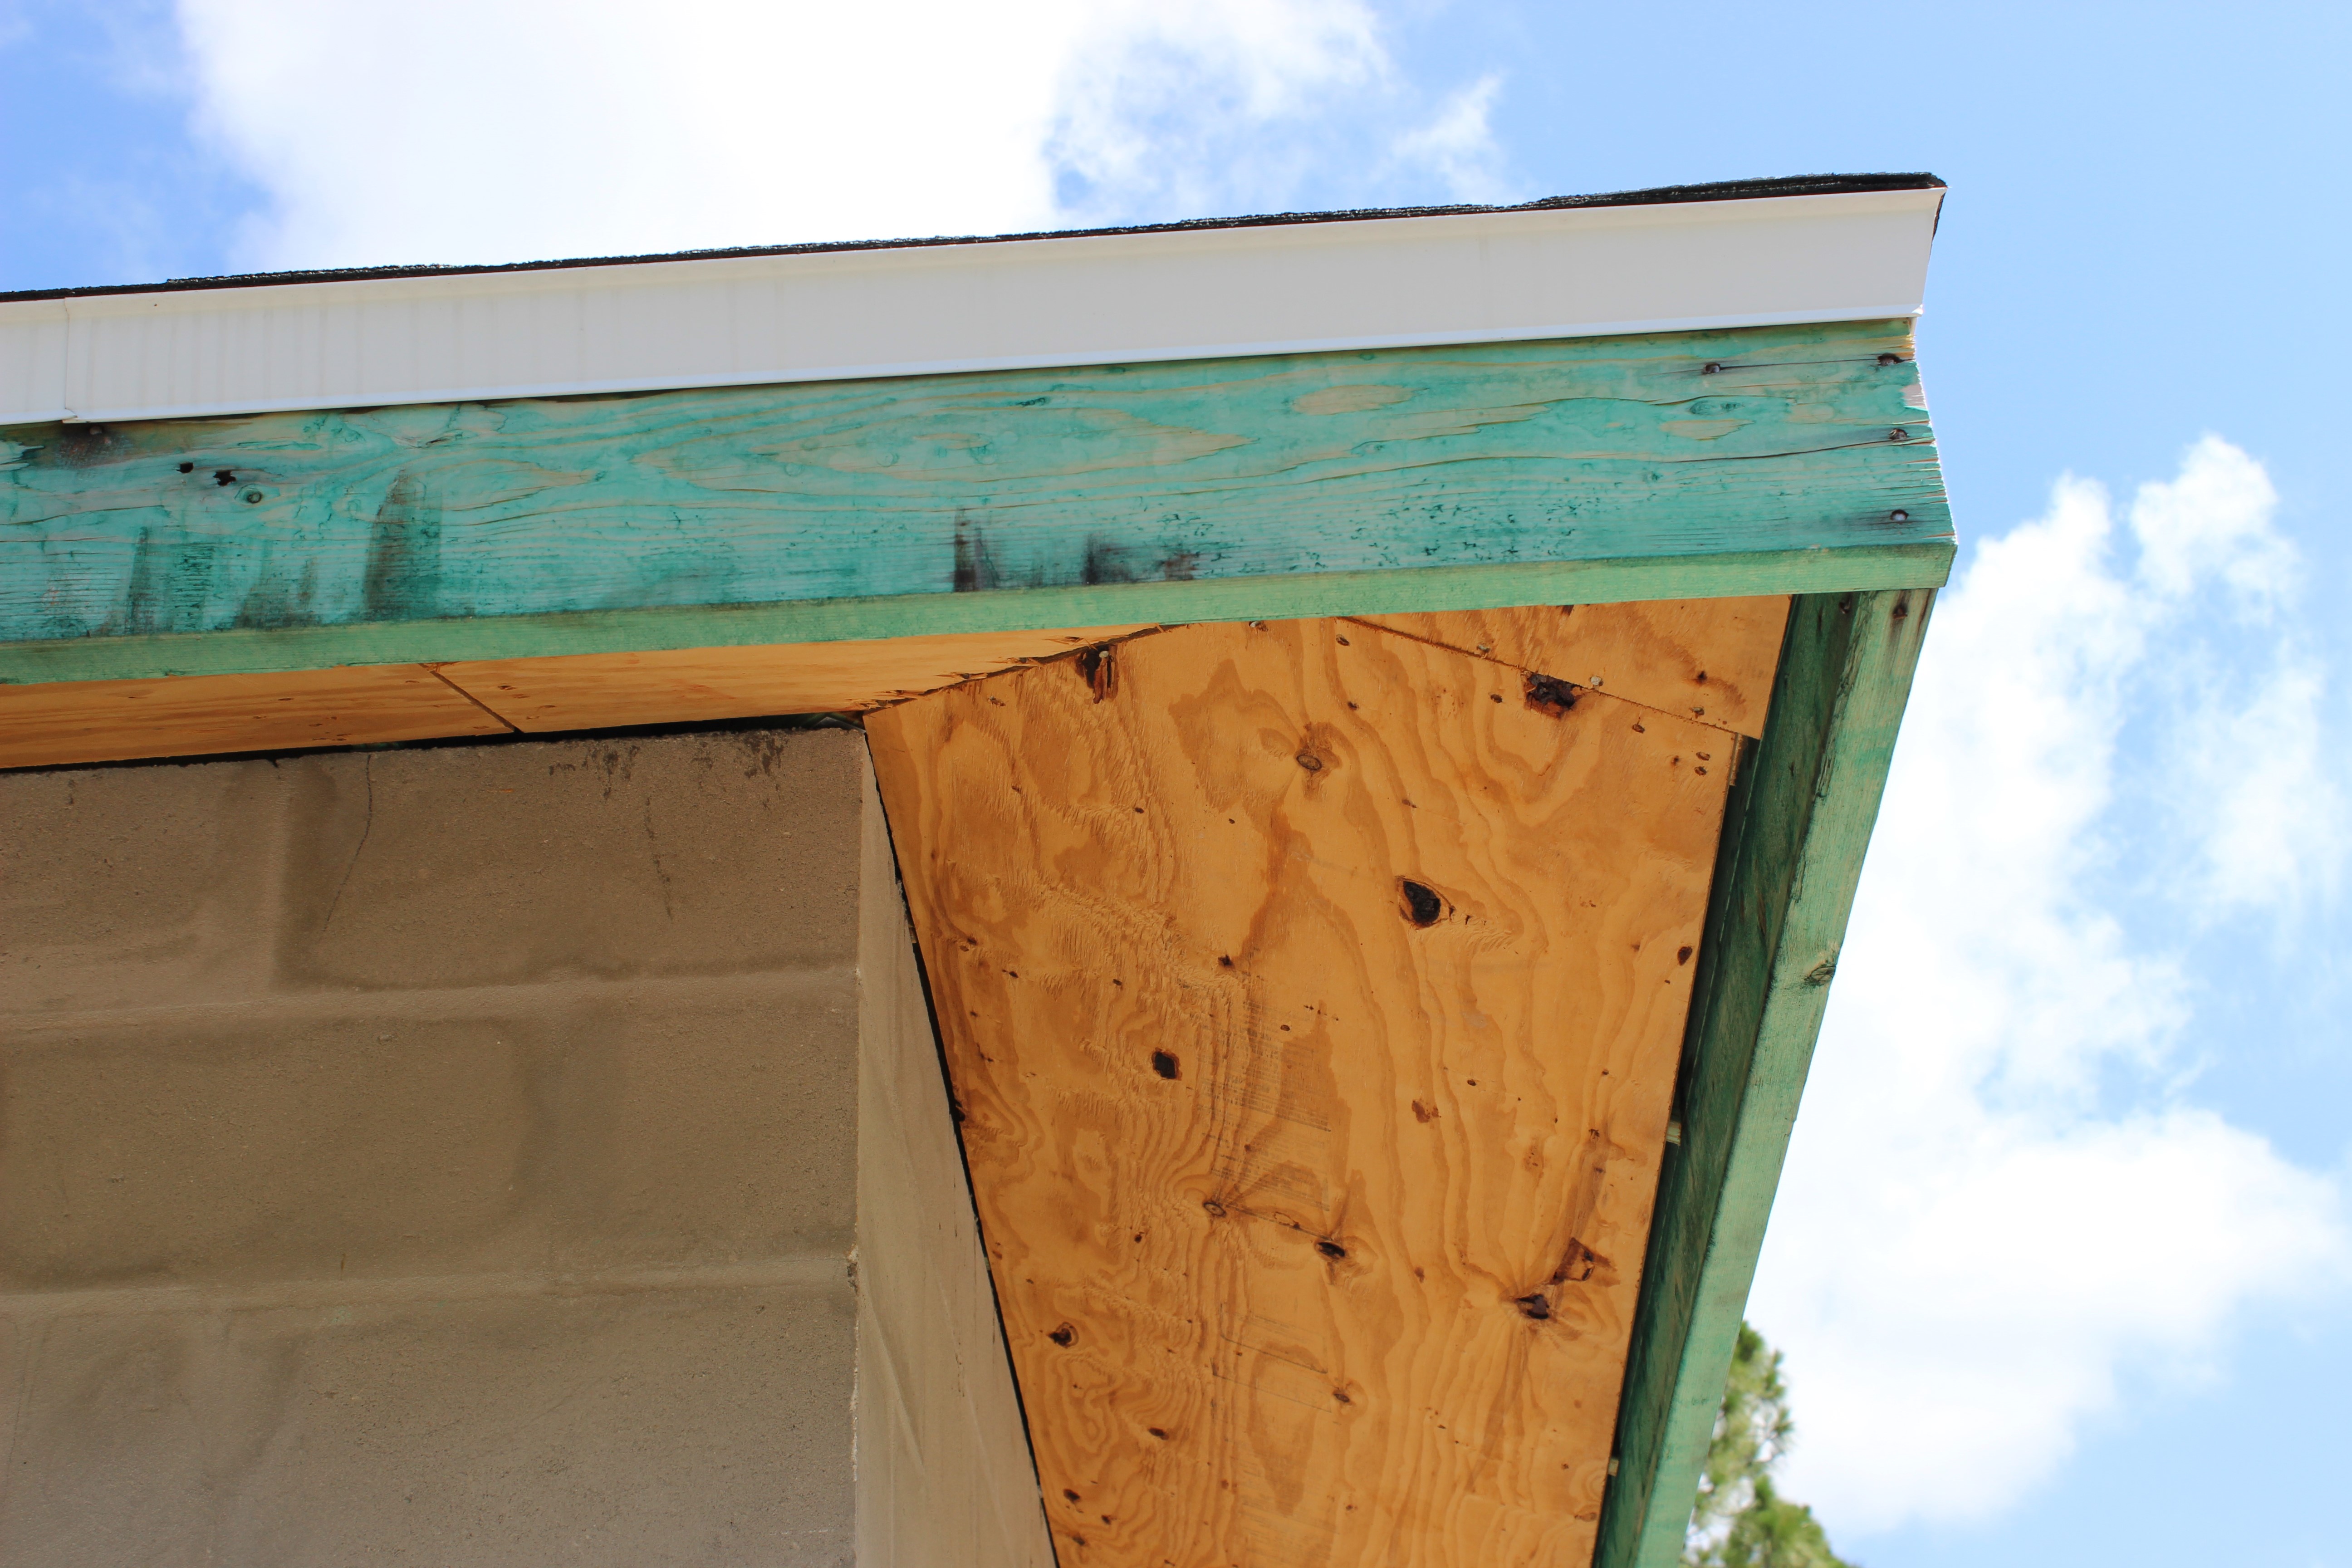
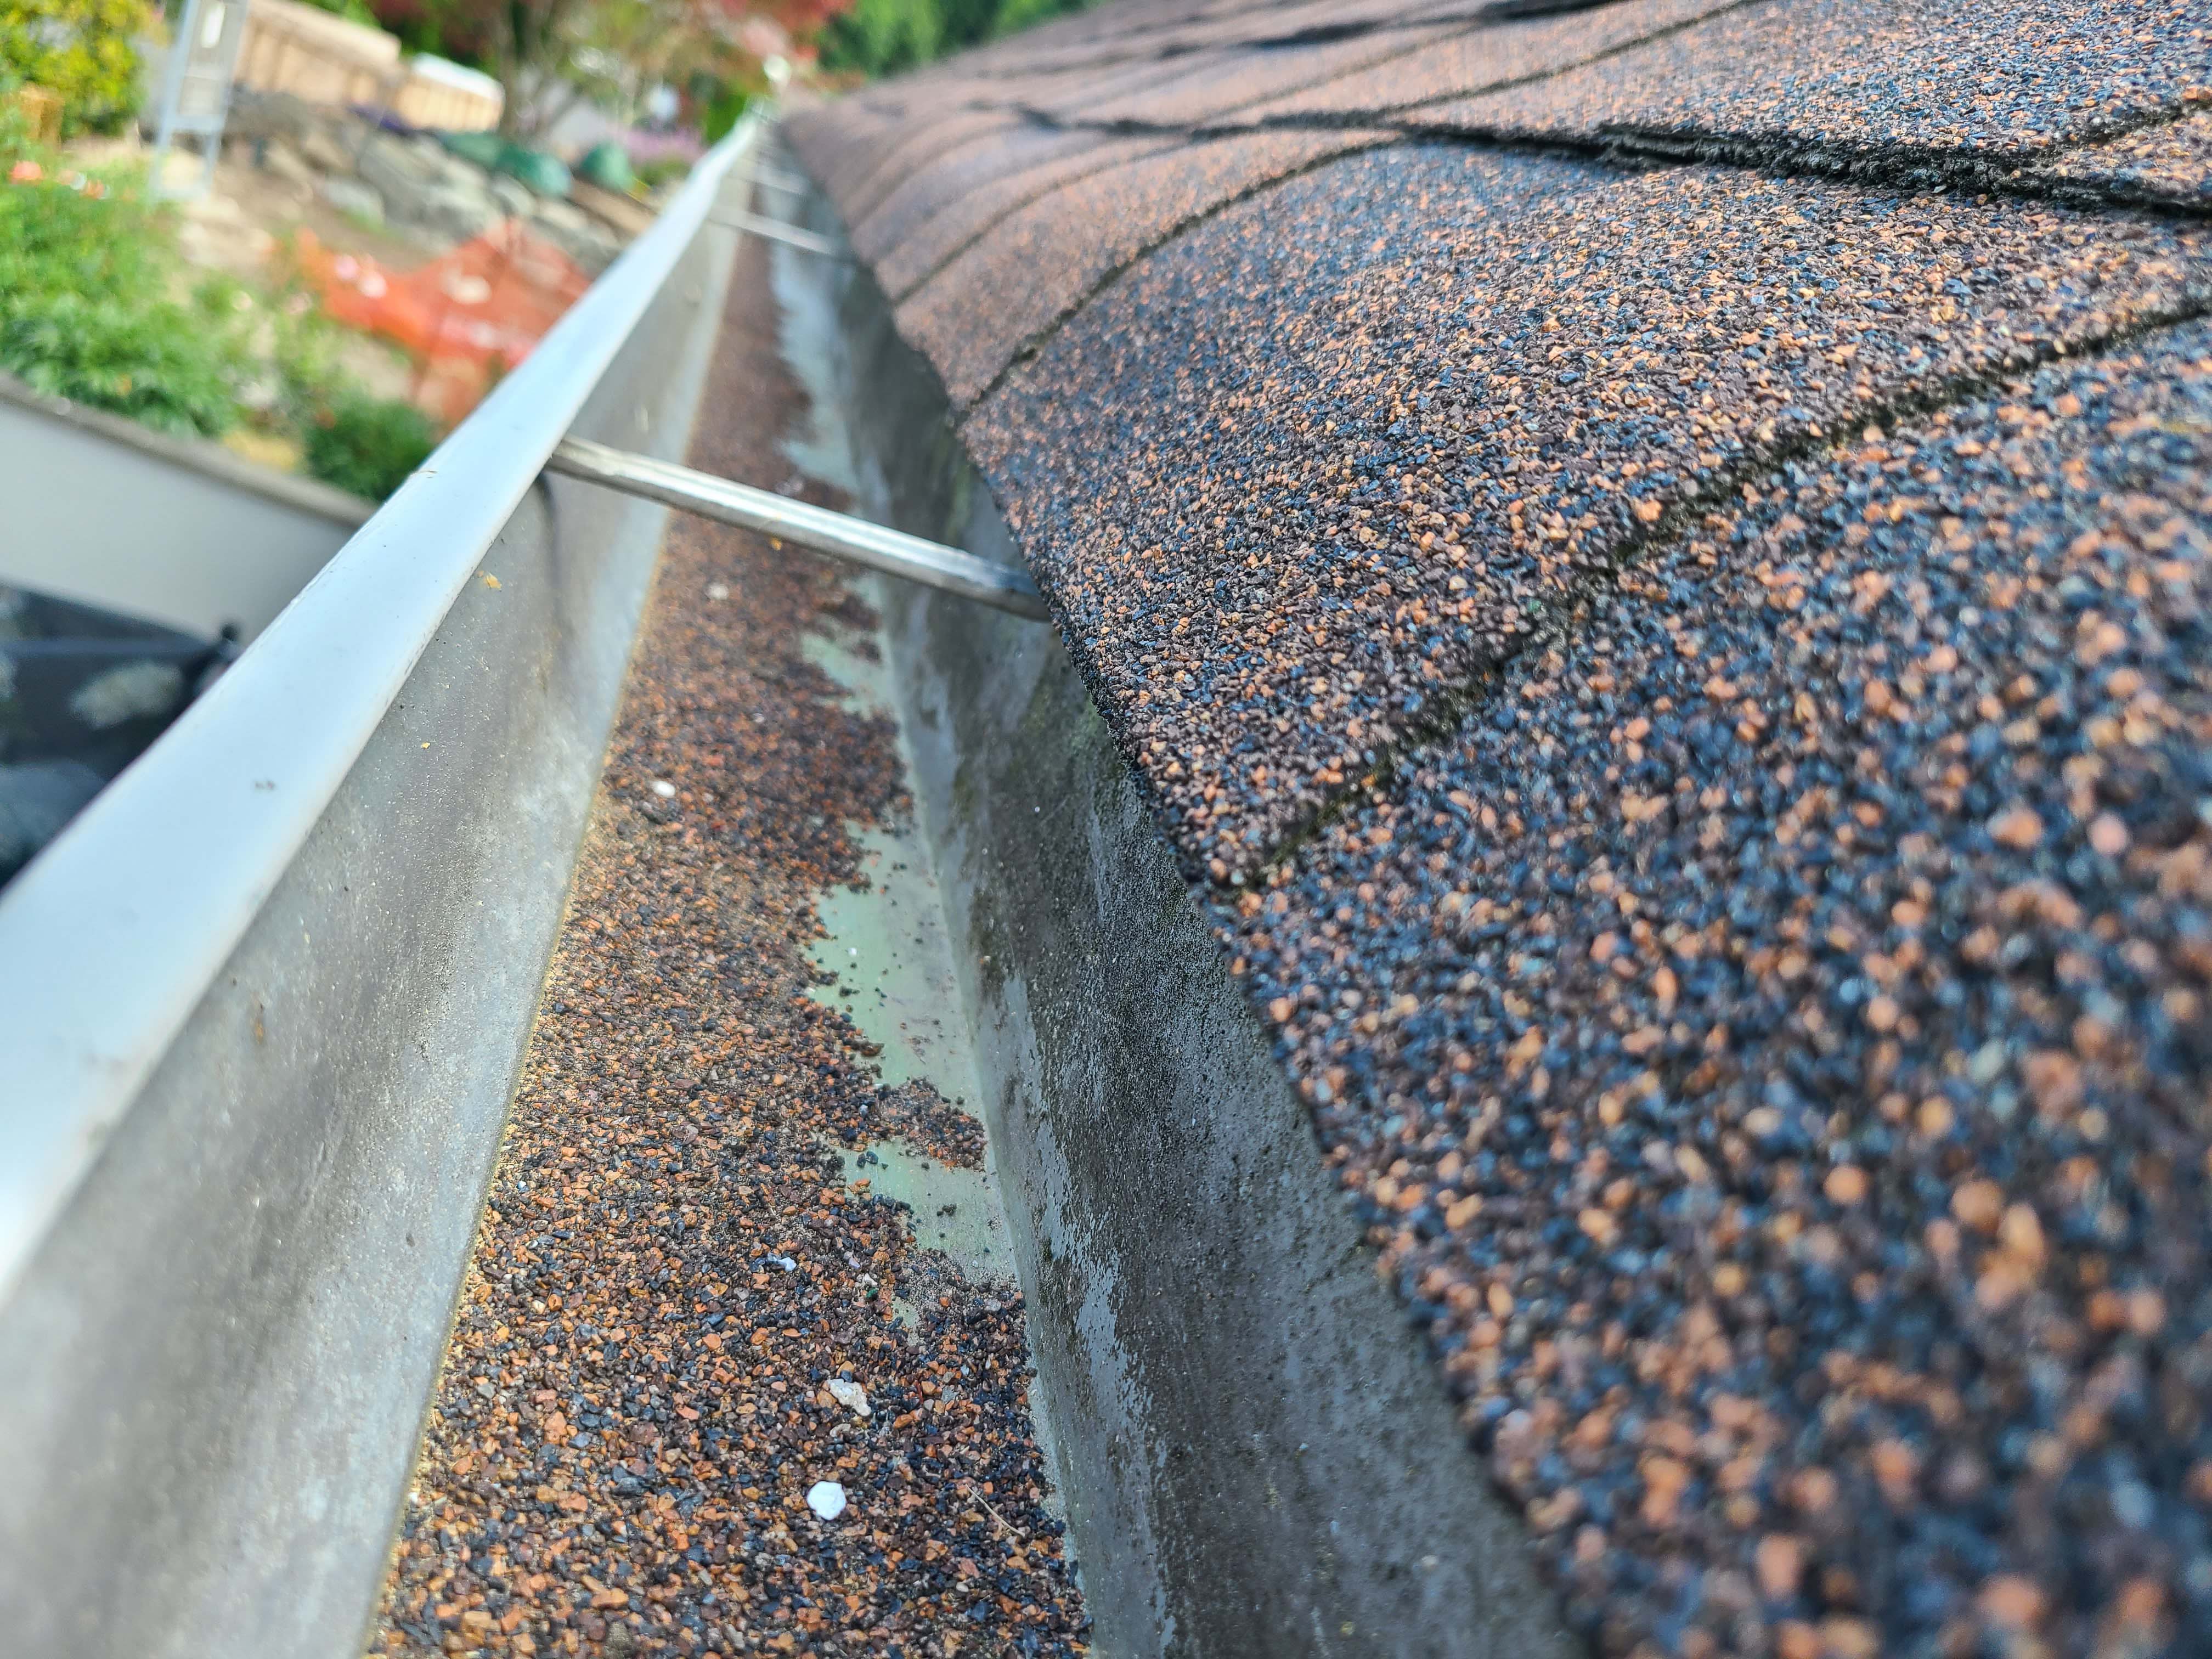
- Install drip edge at eaves and rakes.
- Install flashing at roof penetrations and roof-wall intersections, properly integrated with roofing and wall underlayment and coverings.
- Install shingles and other roofing products that are high-wind rated based on the design wind speed for the location, per the requirements of the IBHS Fortified Home Hurricane and High Wind Standards.
- Consider impact-resistant shingles to help protect against damage by windborne debris and hail.
- Consider solar reflective shingles for a cooler roof and energy savings in a warmer climate.
- Install shingles in accordance with the manufacturer’s instructions for high-wind locations:
- Use 6 nails per shingle.
- Properly locate nails within the nailing zone of the shingle.
- Drive nails properly (do not over-drive or under-drive).
- Do not use staples.
- Install with hot-dip galvanized and/or stainless steel fasteners when the home is within 3,000 feet of salt or brackish water, as required by the IBHS Fortified Home program.
- Apply continuous bands of asphalt roof cement beneath shingles and starter strips along eaves rakes, hips, ridges, and open valleys to enhance shingle securement.
For wildfire-prone areas:
- Choose roofing materials that are fire-resistant or non-combustible Class A-rated roof materials such as fiberglass-reinforced asphalt shingles, fiber-cement shingles, galvanized metal underlaid with gypsum, slate, or concrete or clay tile with bird-stopping.
- Choose a simple roof design that is less likely to trap embers.
For cold climates and high-snow-load regions,
- Install self-adhering bituminous membrane along roof eaves, and ensure proper air sealing, insulating, and ventilation of the attic or roof assembly to reduce the risk of ice dam formation and damage.
For roof installation guidance for existing homes, see the Retrofit tab of this guide.
See the Compliance Tab for links to related codes and standards and voluntary federal energy-efficiency program requirements.
Description
Hurricane and High Wind Areas
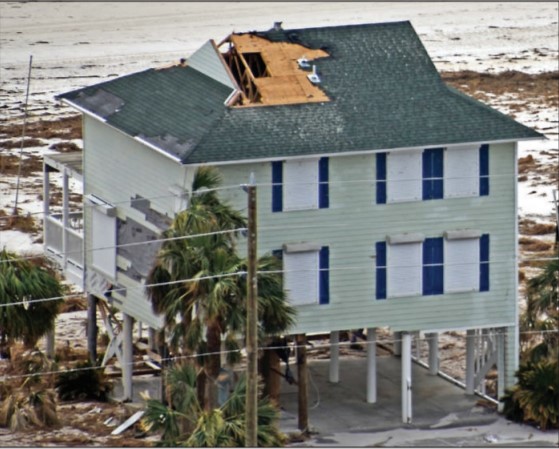
During a hurricane, tornado, high winds, or hail storm, roof shingles can be damaged or blown off the roof, exposing the underlayment and the sheathing as the only protection against rainwater (Figure 1). Exposed sheathing will eventually succumb to water damage. Unsealed joints or holes in the roof sheathing due to storm damage can allow rainwater to enter the building, causing severe damage, including saturation of insulation and ceiling drywall, potentially leading to collapsed ceilings and extensive damage to interior finishes and household contents.
Source
Roof installation and roof replacements are prime opportunities to upgrade shingles and shingle attachments to meet new standards and building codes and to decide if selecting an above-code strategy for an added level of protection is the right choice for the project. A roof replacement is also an opportunity to enhance roof deck attachment, roof framing connections, roofing underlayment, and flashing, as needed.
The Insurance Institute for Business and Home Safety® (IBHS) offers guidance, best practices, and voluntary construction standards and programs for building in disaster-prone areas, including hurricane and high-wind zones. The IBHS FORTIFIED HOME™ standards are designed to make homes more resilient and durable; guidance is available for new construction and existing homes in hurricane zones and high-wind zones. There are three levels of FORTIFIED Home: FORTIFIED Roof™ focuses on the roof; FORTIFIED Silver focuses on roof overhangs, opening protection, gable ends, and attached structures; and FORTIFIED Gold focuses on tying all components of the structure together. The IBHS FORTIFIED Roof™ program includes guidance on sealed roof decks, flashing, and shingle attachment. Note that even where roofing with enhanced wind resistance is not required by building code, roof resiliency can be improved by implementing IBHS recommendations.
Asphalt shingles properly selected and installed for high-wind applications are much less likely to be damaged or blown off the roof during a storm. Building codes require asphalt shingles to be rated for the local wind zone. Impact-resistant shingles are also available to help protect against damage by windborne debris and hail. Lighter-colored asphalt shingles tend to last longer as they absorb less heat than darker shingles and are less likely to be damaged by prolonged heat. ENERGY STAR certifies roofing products through its Cool Roof designation for reflectivity to reduce solar heat gain into the home.
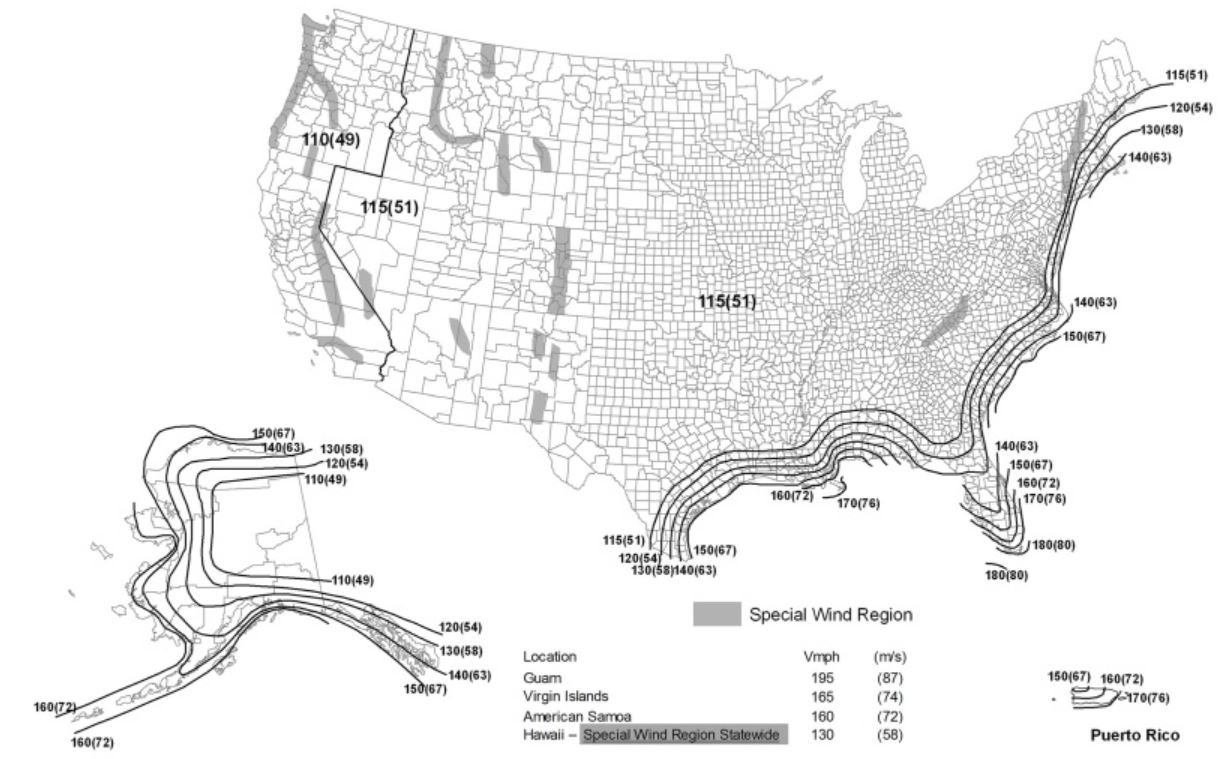
Homes located in coastal high-wind areas, including hurricane-prone regions (defined in the IRC as areas along the Atlantic and Gulf coasts where wind velocity is >115 mph, and Hawaii, Puerto Rico, Guam, Virgin Islands, and American Samoa) generally require enhanced attachment that can withstand greater wind speeds than the rest of the country. Ask the local building department if your house is in a high-wind or hurricane-prone region or if local requirements exceed those of the national code. Also, see the wind map from the International Residential Code (IRC Figure R301.2(5)A), shown on the Climate tab.
Building codes require asphalt shingles, including hip and ridge shingles, to be tested and classified for wind resistance in accordance with ASTM D7158 or D3161 (see Table 1). Codes also specify the type and minimum size of fasteners (nails) and mandate that the number of fasteners is per manufacturer installation instructions but not less than four fasteners per strip shingle. Local jurisdictions may also require specific approval for roofing products (e.g., ridge vents tested and labeled to show resistance to water intrusion) or specific installation enhancements.
| ASCE 7-05 Wind Speed (Vasd) | ASCE 7-10/7-16 Wind Speed (Vult) | Shingle Wind Testing Standard/Classification |
| 100 MPH | 129 MPH | ASTM D3161 (Class F) or ASTM D7158 (Class G or H)1 |
| 110 MPH | 142 MPH | |
| 120 MPH | 155 MPH | |
| 130 MPH | 168 MPH | ASTM D3161 (Class F) or ASTM D7158 (Class H)1 |
| 140 MPH | 180 MPH | |
| 150 MPH | 194 MPH | |
| 1. The standard calculations contained in ASTM D7158 assume Exposure Category B or C and a building height of 60 ft or less. Additional calculations are required for conditions outside of these assumptions. | ||
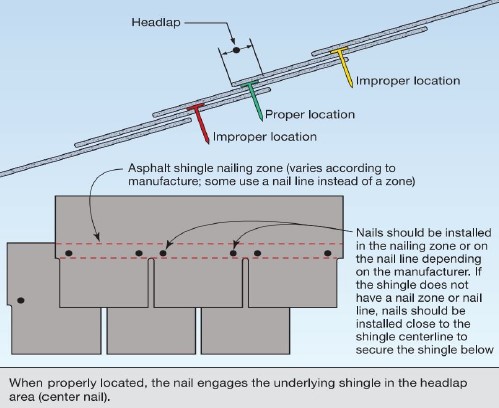
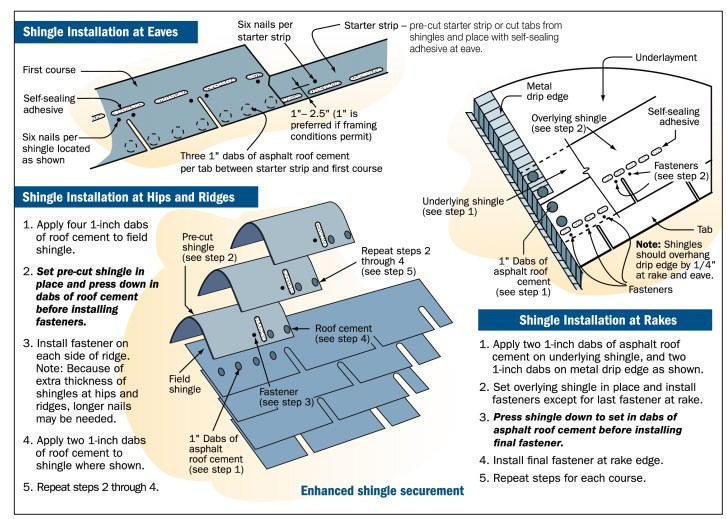
Generally, each shingle strip should be installed with six nails in high-wind areas, and the location of the fasteners on the shingle is also important for a durable installation (see Figure 2 and Figure 3). Use nails, properly driven, instead of staples. Apply dabs or continuous bands of asphalt roof cement beneath shingles along eaves, rakes, hips, and ridges to enhance shingle securement. (This may be required in some jurisdictions.)
Many shingle manufacturers rate their entire product line as Class H or F (per Table 1) for all shingle types, including strip (3-tab), dimensional (architectural/laminate), and premium (luxury) shingles.
Manufacturers now offer shingles that are impact-rated in accordance with UL 2218 (Class 1 through 4, with 4 being the highest rating) and known as SBS polymer-modified asphalt shingles. The rubberizing aspects of the SBS polymers also improve granule adhesion, tear strength, nail pull resistance, and cold flexibility. IBHS testing has demonstrated that asphalt shingles fabricated using SBS polymer-modified asphalt consistently perform better than standard shingles. The IBHS Fortified Home Hail Supplement and Impact Resistance Test Protocol requires that asphalt shingles be ranked Good or Excellent for the roof to qualify for program certification. See the IBHS Fortified Home high Wind Standards 2015 and the IBHS Fortified Home Hail Supplement.
Asphalt shingles should only be installed on roof slopes of 2 in 12 or greater. For roof slopes from 2 in 12 up to 4 in 12, a double underlayment application is required.
Source
A recovery advisory guide presenting important recommendations to reduce wind and water infiltration damage to new and existing residential buildings.

Source
A recovery advisory guide presenting important recommendations to reduce wind and water infiltration damage to new and existing residential buildings.
Wildfire Areas
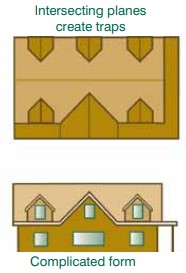
For areas prone to wildfires, asphalt shingles are generally considered a fire-resistant roof covering. Roof coverings have fire classifications of Class A, Class B, or Class C or are unclassified. Class A has the highest resistance to fire, and unclassified have the least. Class A, B, and C roofing must be tested in accordance with UL 790 (Fire Tests of Roof Coverings) or ASTM E108 (Standard Test Methods for Fire Tests of Roof Coverings). Most asphalt shingle roofs have a Class A fire rating and do not require a noncombustible roof deck or fire-resistant underlayment; that is, the asphalt shingles provide a “stand-alone” Class A fire rating. Other Classes A roof materials include fiberglass reinforced asphalt shingles, fiber-cement shingles, galvanized metal underlaid with gypsum, slate, or tiles with bird stopping. Roofs are very susceptible to embers in a wind-driven fire. A simple roof form, such as a hip or straight gable, is best. Complicated roofs with intersecting planes and valleys form dead air pockets and areas where air currents eddy and can trap burning embers (Colorado State Forest Service 2012).
How to Install Asphalt Shingles for New Construction:
- Install the roof deck using fasteners nailed as required to meet current requirements for nail type, size, and spacing.
- Seal the seams in the roof sheathing using tape, roof membrane, or synthetic underlayment. If tape, then cover the decking with underlayment (See Roof Deck Sheathing and Sealing and the IBHS Fortified Hurricane Technical Summary, New Construction.
- Properly flash all roof penetrations and at roof-wall intersections.
- Install drip edge at eaves and rakes.
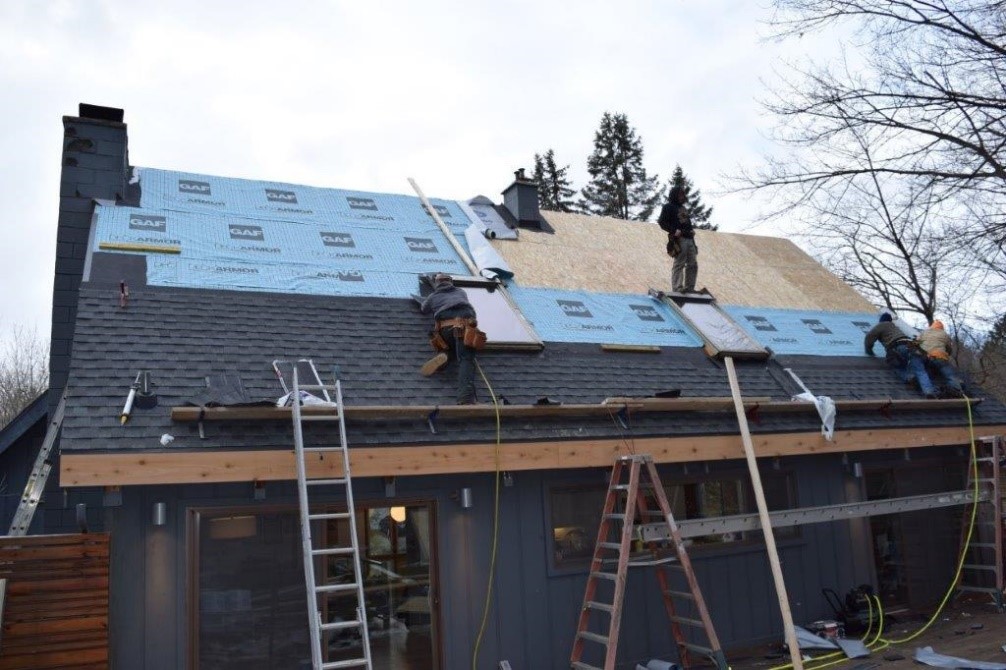
- Select high-wind-rated shingles (see Compliance tab for more detail) and familiarize yourself with the manufacturer’s installation instructions. There are three major categories of asphalt shingles - strip shingles, dimensional shingles, and luxury shingles. They vary in aesthetic value, cost, durability (warranty), and installation technique, including laying and nailing patterns. Although all shingles may have some commonality for application, each type will have specific installation features. Different layouts are used for different types of shingles.
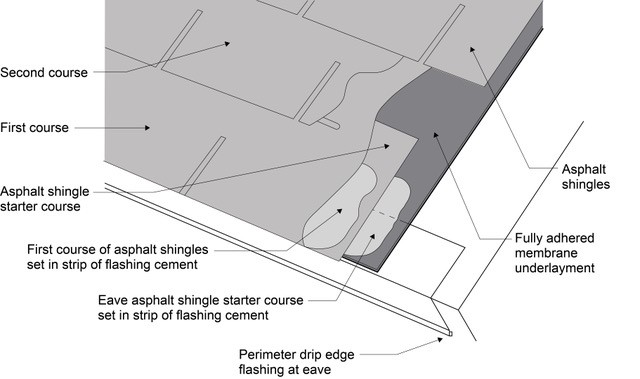
- Install the starter strip at the eave and rake and secure it with nails (See Figures 4 and 5). Use a self-adhered starter strip or embed the strip in roofing cement for sealing (See the guide Roof Edge Protection).
- The starter strip is usually packaged as two pieces per shingle that need to be separated in the middle.
- The self-adhesive seal strip at the starter strip should face up and be positioned toward the eave edge (or toward the rake edge for starter strips at the rake). The adhesive seal strip bonds to the shingle above it, sealing them together and reducing the chance of wind damage and water infiltration.
- The starter strip should overhang ¼ to ¾ inches past the drip edge for drainage.
- The starter strip at the rake should overlap 3 inches with the starter strip at the eave.
- Starter strips should be nailed 2 to 3 inches up from the bottom of the eave.
- Install the next course of asphalt shingles on top of the starter strip according to the manufacturer’s instructions. Follow the same direction as the starter strip for installing shingles. (If the starter strip was installed left to right, install the shingles from left to right.) Generally, six nails are required to attach one strip of shingle to the roof deck. (See the manufacturer’s instructions for the type and minimum nails required.)
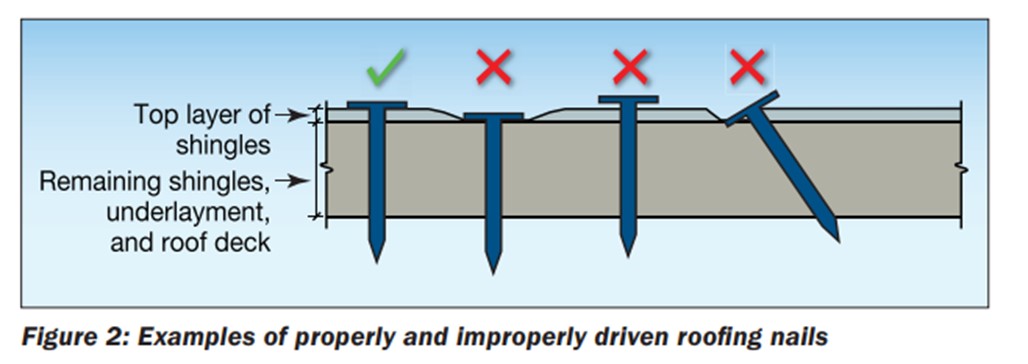
- One of the common errors in shingle installation is improper nailing. High nails, low nails, overdriven nails, underdriven nails, angled nails, and inadequate nails are all examples of improper nailing. If pneumatic nailing guns are used, test and adjust the pressure until the nails are in line with the surface of the shingle and not underdriven or overdriven.
Source
A recovery advisory guide presenting important recommendations to reduce wind and water infiltration damage to new and existing residential buildings.
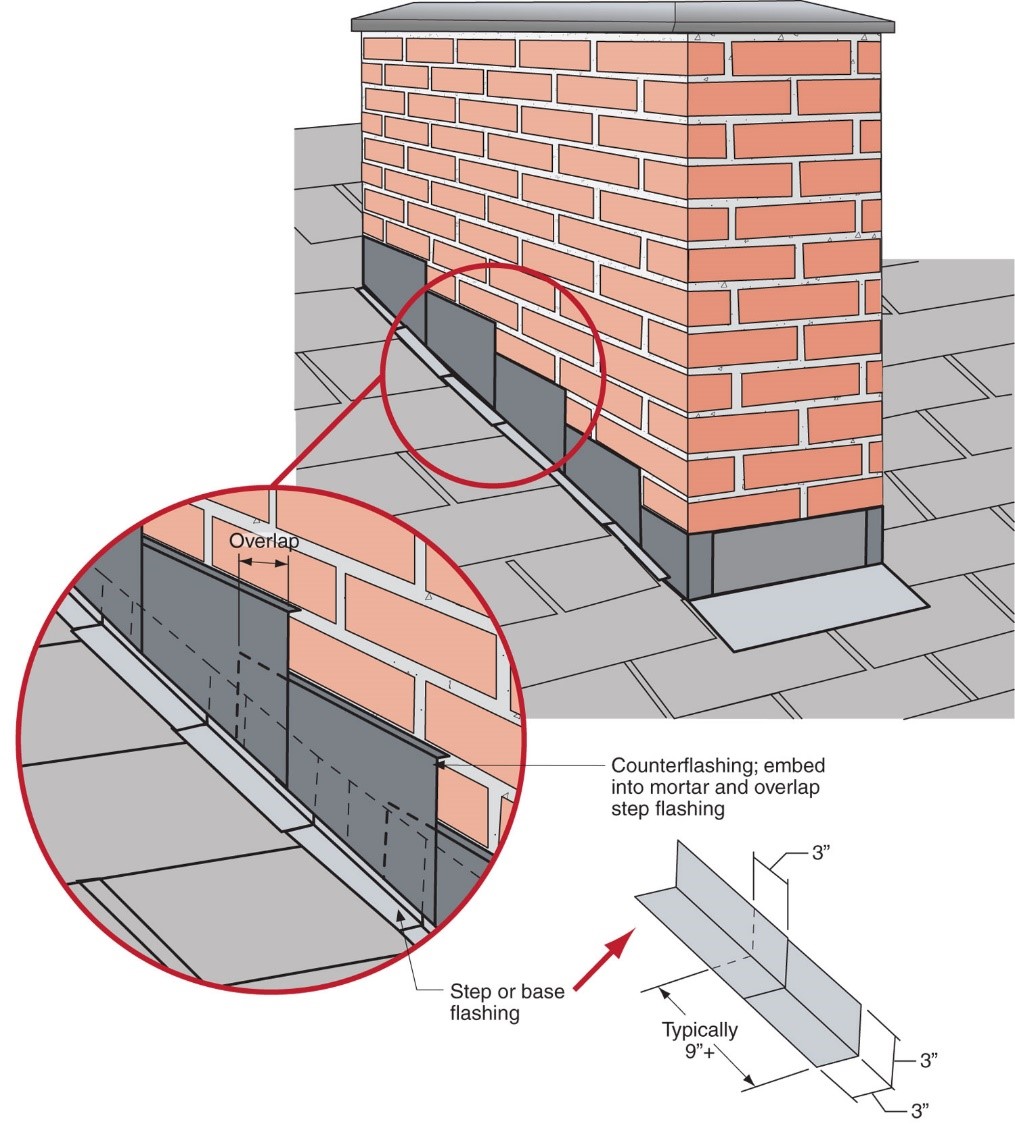
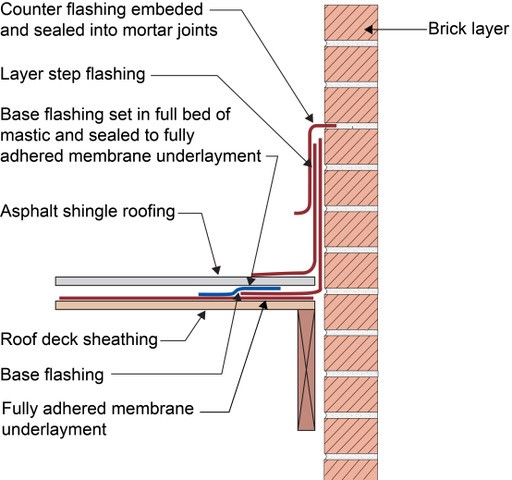
- If the edge of the roof lies on the roof-wall intersection, properly install the step or continuous flashing and integrate it with the underlayment and shingles. See the Step and Kickout Flashing guide for detailed flashing steps.
- Install ridge cap shingle along the roof ridge. See Figure 5.
- Integrate shingles with roof penetration flashings while installing the shingles. See Flashing of Penetrations in Existing Roofs for more detail.
Source
Technical fact sheet describing ways to construct asphalt shingle roofs to be more resistant to high winds and hurricanes; also published in FEMA P-499 “Home Builder’s Guide to Coastal Construction: Technical Fact Sheet Series.”
Ensuring Success
Roofing should be inspected and installed by a professional roofing contractor, licensed and insured, to ensure that the roof system provides robust protection from rainwater, including ice barriers where required, and that proper flashing is in place. A building permit may be required for a roof replacement. Ask the local building department. For disaster resistance, comply with the roofing requirements defined by IBHS Fortified Home. In wildfire-prone areas, use asphalt shingles that are Class A rated.
Region
Hurricane and High Wind Prone Areas
- Building codes require asphalt shingles to be rated for the local wind zone. Homes located in coastal high-wind areas, including Hurricane-Prone Regions (see Figure 1), generally require enhanced attachment that can withstand greater wind speeds than the rest of the country. Ask the local building department if your house is in a high-wind or hurricane-prone region or if local requirements exceed those of the national code.
Source
2018 edition of code for residential buildings that creates minimum regulations for one- and two-family dwellings of three stories or less, bringing together all building, plumbing, mechanical, fuel gas, energy and electrical provisions for one- and two-family residences.
The Insurance Institute for Business and Home Safety® (IBHS) offers guidance, best practices, and voluntary construction standards and programs for building in disaster-prone areas, including hurricanes and other high-wind zones. The IBHS FORTIFIED Roof™ program includes guidance on sealed roof decks, flashing, and shingle attachment.
Requirements for Compliance with the IBHS Fortified Roof Program
Installation of Starter Strips at Eaves (Drip Edge Installed Over Underlayment): Manufacturer-approved starter strips at Eaves shall be set in a minimum 8-in.-wide strip of compatible flashing cement. The maximum thickness of flashing cement shall be ⅛ in. Fasten starter strips parallel to the eaves along a line above the eave line according to the manufacturer's specifications. Position fasteners to ensure they will not be exposed under the cutouts in the first course. Starter strips and shingles must not extend more than ¼ in. beyond the drip edge.
Approved Option: Shingle manufacturer-approved ASTM D1970 fully adhered (peel-and-stick) starter strip with an asphaltic adhesive strip at eave-installed so that the starter strip adheres to and covers the drip edge top surface.
Installation of Shingles at Rakes (Drip Edge Installed Over Underlayment): Install shingles at rakes set in a minimum 8-inch-wide strip of compatible flashing cement. The maximum thickness of flashing cement shall be ⅛ in. Fasten shingles at the rakes according to the manufacturer's specifications.
Optional Installation of Starter Strips at Rakes (Drip Edge Installed Over Underlayment): Manufacturer-approved starter strips at rakes shall be set in a minimum 8-inch-wide strip of compatible flashing cement. The maximum thickness of the flashing cement shall be ⅛ in. Fasten starter strips parallel to the rakes according to the manufacturer's specifications. Position fasteners to ensure they will not be exposed. Starter strips and shingles must not extend more than ¼ in. beyond the drip edge.
Approved Option: Shingle manufacturer-approved ASTM D1970 fully adhered (peel-and-stick) starter strip with an asphaltic adhesive strip at rake-installed so that the starter strip adheres to and covers the drip edge top surface.
Attachment of Shingles at Intersections and Valley: Shingles installed at all intersections and both sides of open valleys shall be set in a minimum 8-inch-wide strip of flashing cement. The maximum thickness of flashing cement shall be ⅛ in. Cut side of closed valleys shall be set in a minimum 2-in.-wide, ⅛-in.- thick strip of flashing cement. Woven valleys to be according to the manufacturer's specifications.
See Hurricane Technical Summary by the IBHS Fortified Home program for additional information.
The roofing and wall cladding is more likely to be damaged or lost in hurricane-prone regions and other high-wind areas, leaving flashing and underlayment exposed and more susceptible to wind and water intrusion. Selection of high wind-rated asphalt shingles is required in high wind and hurricane regions. Proper installation of shingles is even more important in these areas to protect against storm damage.
Cold Climates
The International Residential Code (IRC) 2018 requires an ice barrier to be installed along the eaves in cold climate regions where there has been a history of ice dam formation. The ice barrier should consist of at least two layers of underlayment cemented together or a self-adhering polymer-modified bitumen and should extend from the lowest edges of all roof surfaces to a point not less than 24 inches inside the interior plane of the exterior wall of the building. If the slope of the roof is greater than 8/12, the ice barrier should not be less than 36 inches measured along the slope from the eave edge of the building.
Use good roof design and installation practices, including good air sealing and insulation, especially over the top plates, and install baffles to ensure ventilating airflow from soffit vents to ridge vents. In cold climates, ventilation is needed to cool the roof surface to minimize snow melt and protect against ice dam formation, which can increase the likelihood of water infiltration.
Unvented attic designs are not recommended in cold climates. In cold climates with high snow loads at risk of ice dams, if the attic is unvented, the roof assembly must be vented above the roof deck with an air space between the above-roof deck rigid insulation and the roof cladding to minimize the likelihood of condensation (Lstiburek 2014).
If a vented attic design is used and high snow loads are anticipated that may block roof vents, consider adding cupola vents.
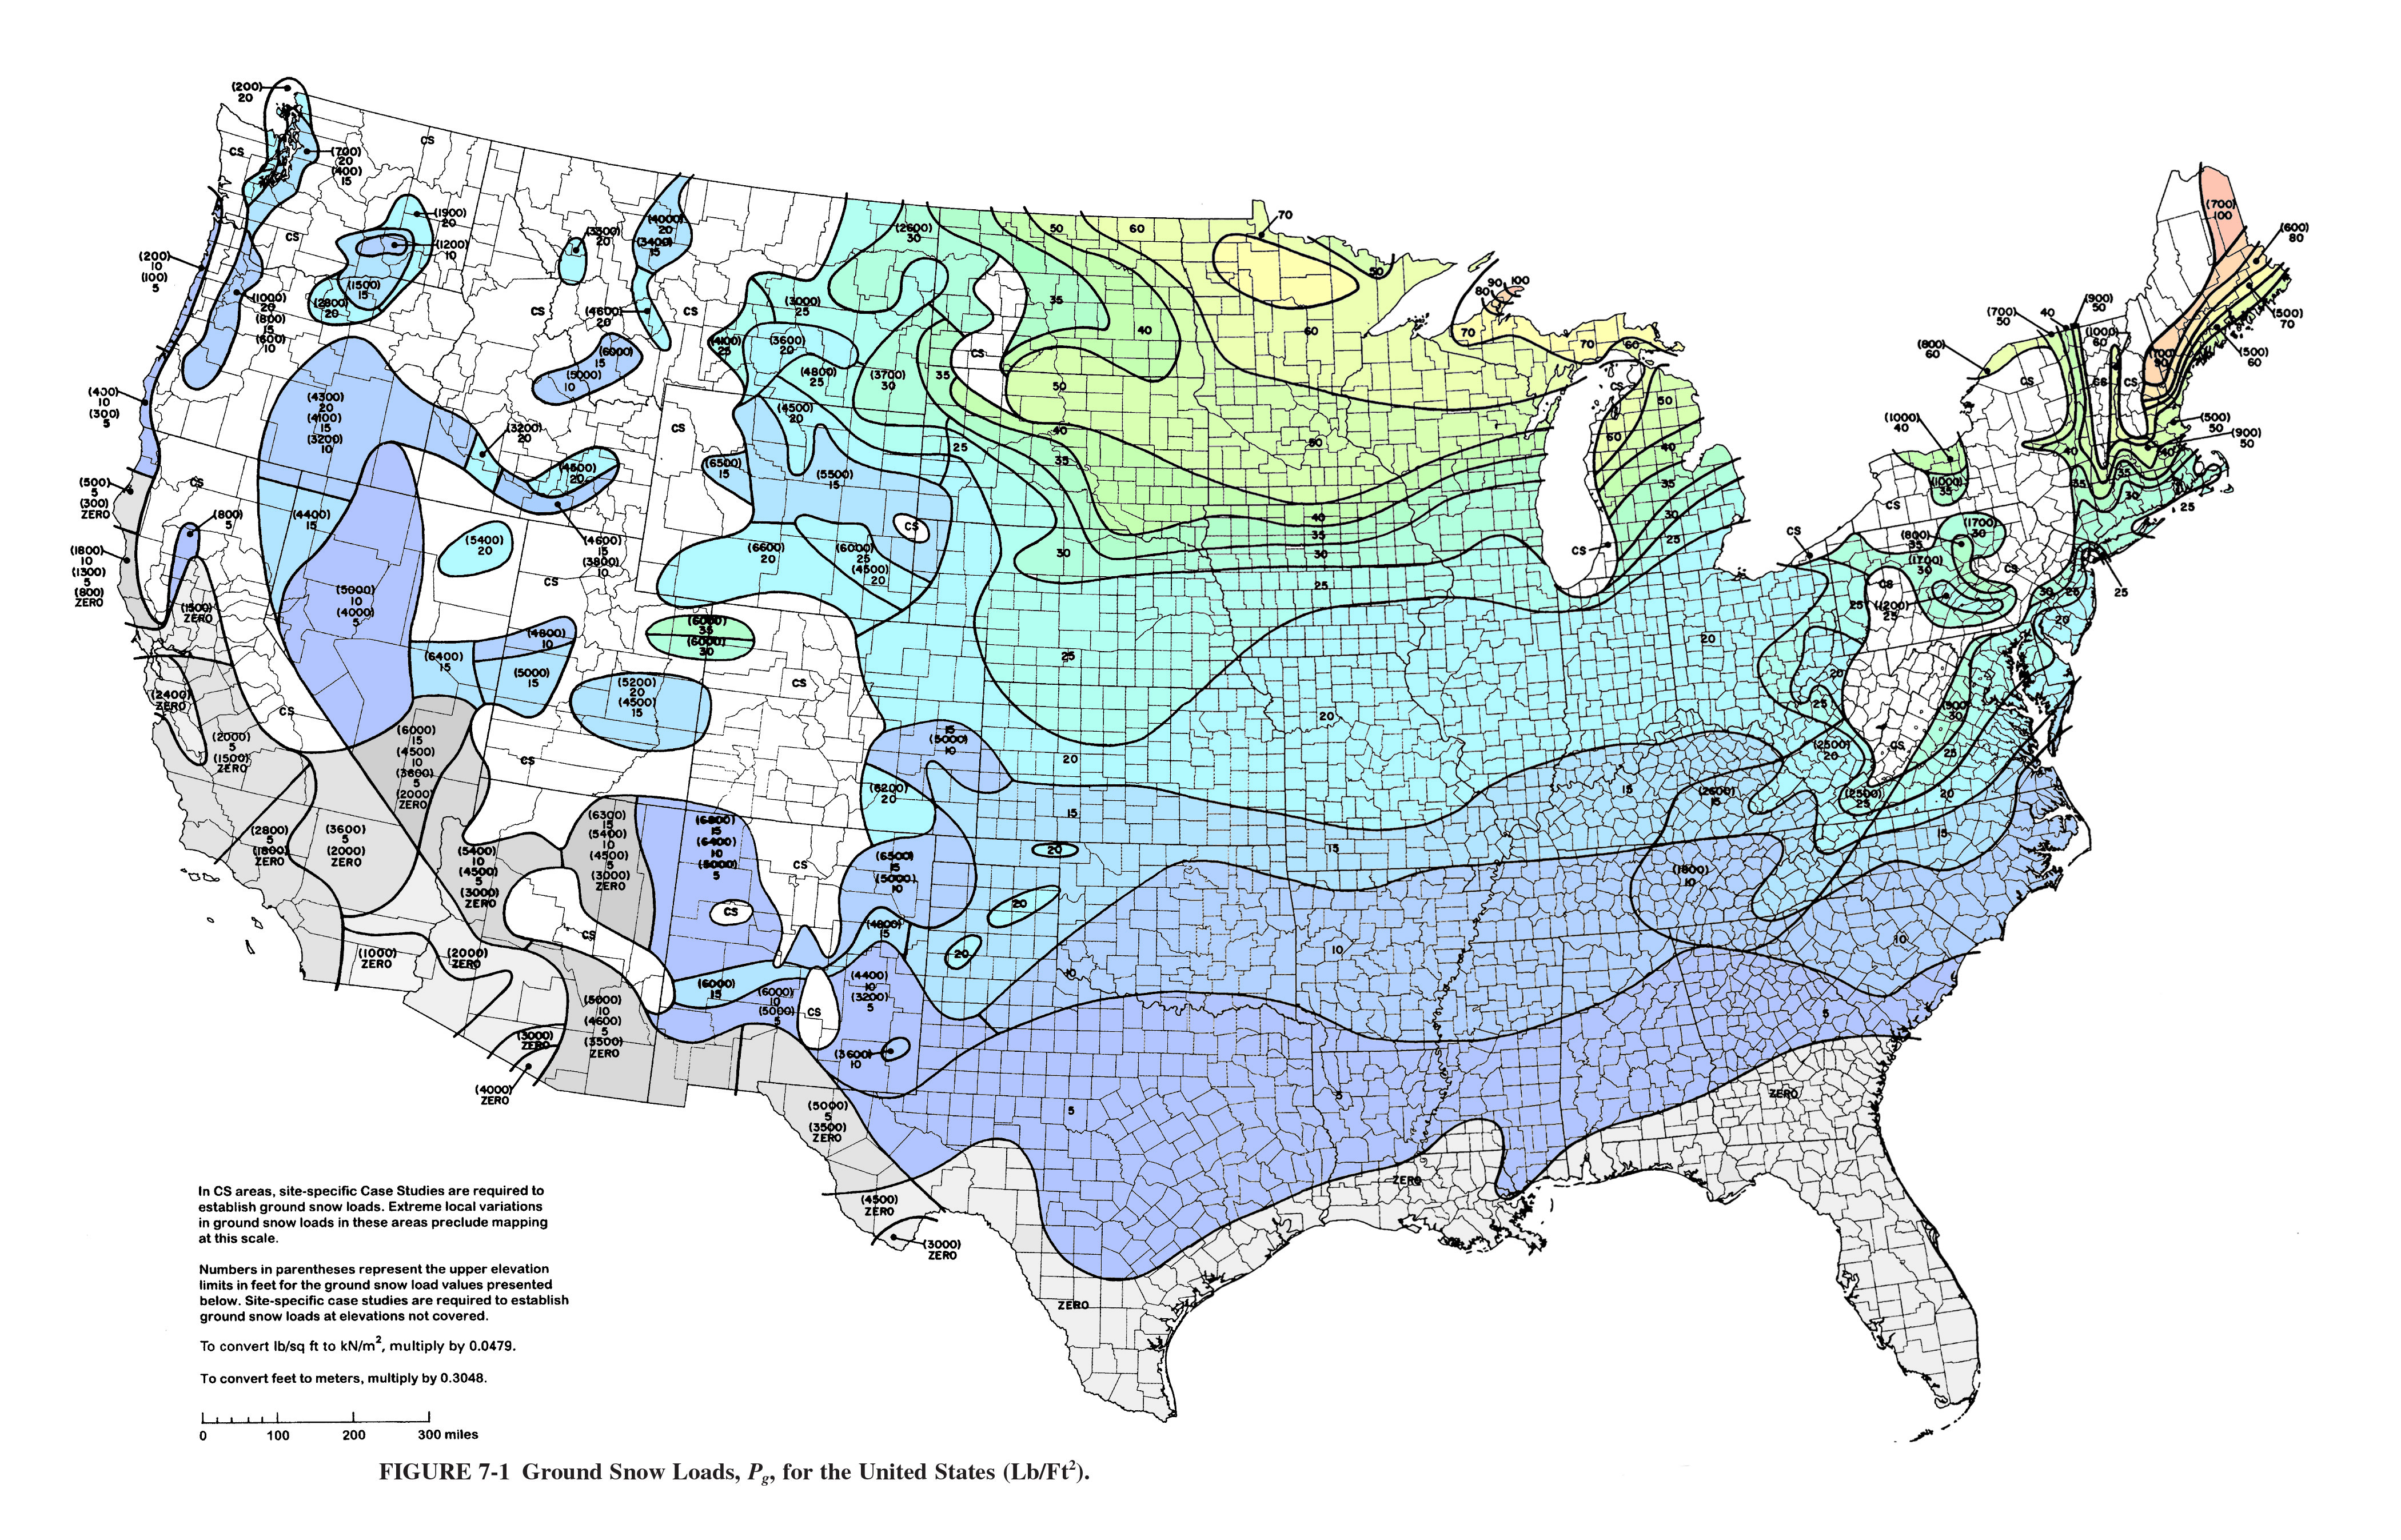
- The roof must also be designed to structurally support heavy snow loads as required in the code. Roof snow loads are based on the historical records for ground snow loads for a given location; however, the local building authority should always be consulted to determine the correct roof snow load to use for a given site and application. Most building codes in the United States reference the procedures found in ASCE 7-16 - Minimum Design Loads and Associated Criteria for Buildings and Other Structures, Chapter 7: Snow Loads. The ground snow load map shown in Figure 2 is based on ASCE 7 (Figure 7-1; see also 2021 IRC Figure R301.2(4)). Ground snow loads for the contiguous United States can be generally determined using this map. Ground snow loads for sites at elevations above the limits indicated and for all sites labeled "CS" require site-specific case studies and approval from the governing building authority. Ground snow loads for Alaska are listed in Table 7.1 of ASCE 7. Ground snow loads for Hawaii are zero, except in mountainous regions as determined by the authority having jurisdiction. The American Society of Civil Engineers offers a web-based mapping tool that provides a quick way to look up key design parameters specified in Standard ASCE 7-10 or 7-16, including snow load data, by address, latitude/longitude, or map location, for a small fee.
Source
Webpage providing information about design snow loads and a free interactive ground snow load mapping tool for the contiguous United States, as well as snow load calculation methods.
Wildfire-Prone Areas
In wildfire-prone areas, use asphalt shingles that are Class A rated. Install metal drip edge to protect wood fascia from embers and fires that might start in gutters.
Training
Right and Wrong Images
Source
Technical fact sheet describing ways to construct asphalt shingle roofs to be more resistant to high winds and hurricanes; also published in FEMA P-499 “Home Builder’s Guide to Coastal Construction: Technical Fact Sheet Series.”
Source
A recovery advisory guide presenting important recommendations to reduce wind and water infiltration damage to new and existing residential buildings.
Source
A recovery advisory guide presenting important recommendations to reduce wind and water infiltration damage to new and existing residential buildings.

Source
Source
Source
Source
Source
Wildfire construction guidelines from the Colorado State Forest Service focusing on site design and building materials to mitigate damage to homes in wildfire-prone areas.

Source
Wildfire construction guidelines from the Colorado State Forest Service focusing on site design and building materials to mitigate damage to homes in wildfire-prone areas.
Source
Source
Source
Videos


CAD Files
Compliance
Retrofit
The following information is specific to roof replacements for existing homes. The information presented in other tabs is still relevant for existing homes.
Scope
For a roof replacement:
- Remove all existing roofing (shingles and underlayment).
- Replace any damaged wood sheathing.
- Inspect the roof deck attachment fasteners and re-nail as required. to meet current requirements for nail type, size, and spacing.
Description
How to Install Asphalt Shingles for Existing Roofs
When reroofing, the existing roof structure should be strong enough to support the additional load of the shingles. Ensure the surface of the roof is flat; sagging roofs could indicate structural problems.
1. Remove all existing roofing (shingles and underlayment) and replace any damaged wood sheathing.
2 Inspect the roof deck attachment fasteners and re-nail as required to meet current requirements for nail type, size, and spacing.
3. Seal the seams in the decking, install underlayment, and replace flashing around penetrations, at valleys, and at any roof-wall intersections as needed and integrate with new roof underlayment as described in the Description tab for new construction.
4. Select and install asphalt shingles following the same steps followed for new construction roofing. Integrate shingles with roof flashings. Install ridge cap shingles along the roof ridge (See manufacturer’s instructions for pattern, nail size, spacing, etc.).
More Info
Case Studies
References and Resources
*For non-dated media, such as websites, the date listed is the date accessed.
Contributors to this Guide
The following authors and organizations contributed to the content in this Guide.
Home Innovation Research Labs
Questions? Comments? Contact our webmaster.