

Scope
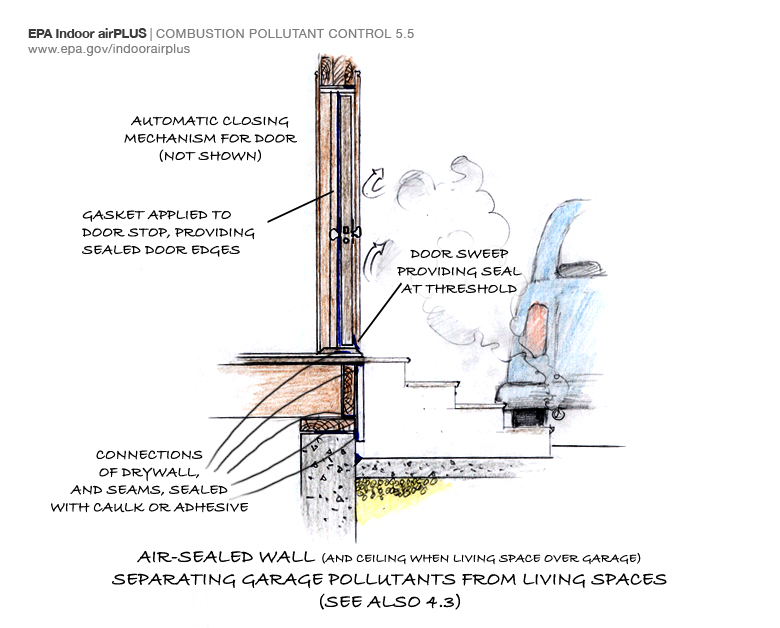
Air-seal doors adjacent to unconditioned space (e.g., outdoors, garages, vented attics, unconditioned basements, cellars, crawlspaces) to minimize air leakage and water intrusion. Weatherstripping and sealants (e.g., gaskets, caulk, fire-retardant caulk, etc.) should be compatible with all adjoining surfaces and meet the fire and air barrier specifications according to code.
- Install a continuous gasket, such as weather stripping, around the interior perimeter of the door frame.
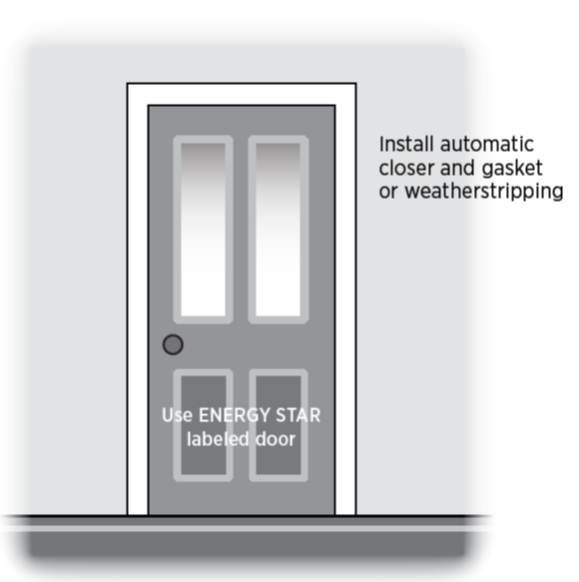
- Select an automatic closing door that is metal or fiberglass with an insulated foam-core and an ENERGY STAR rating if possible.
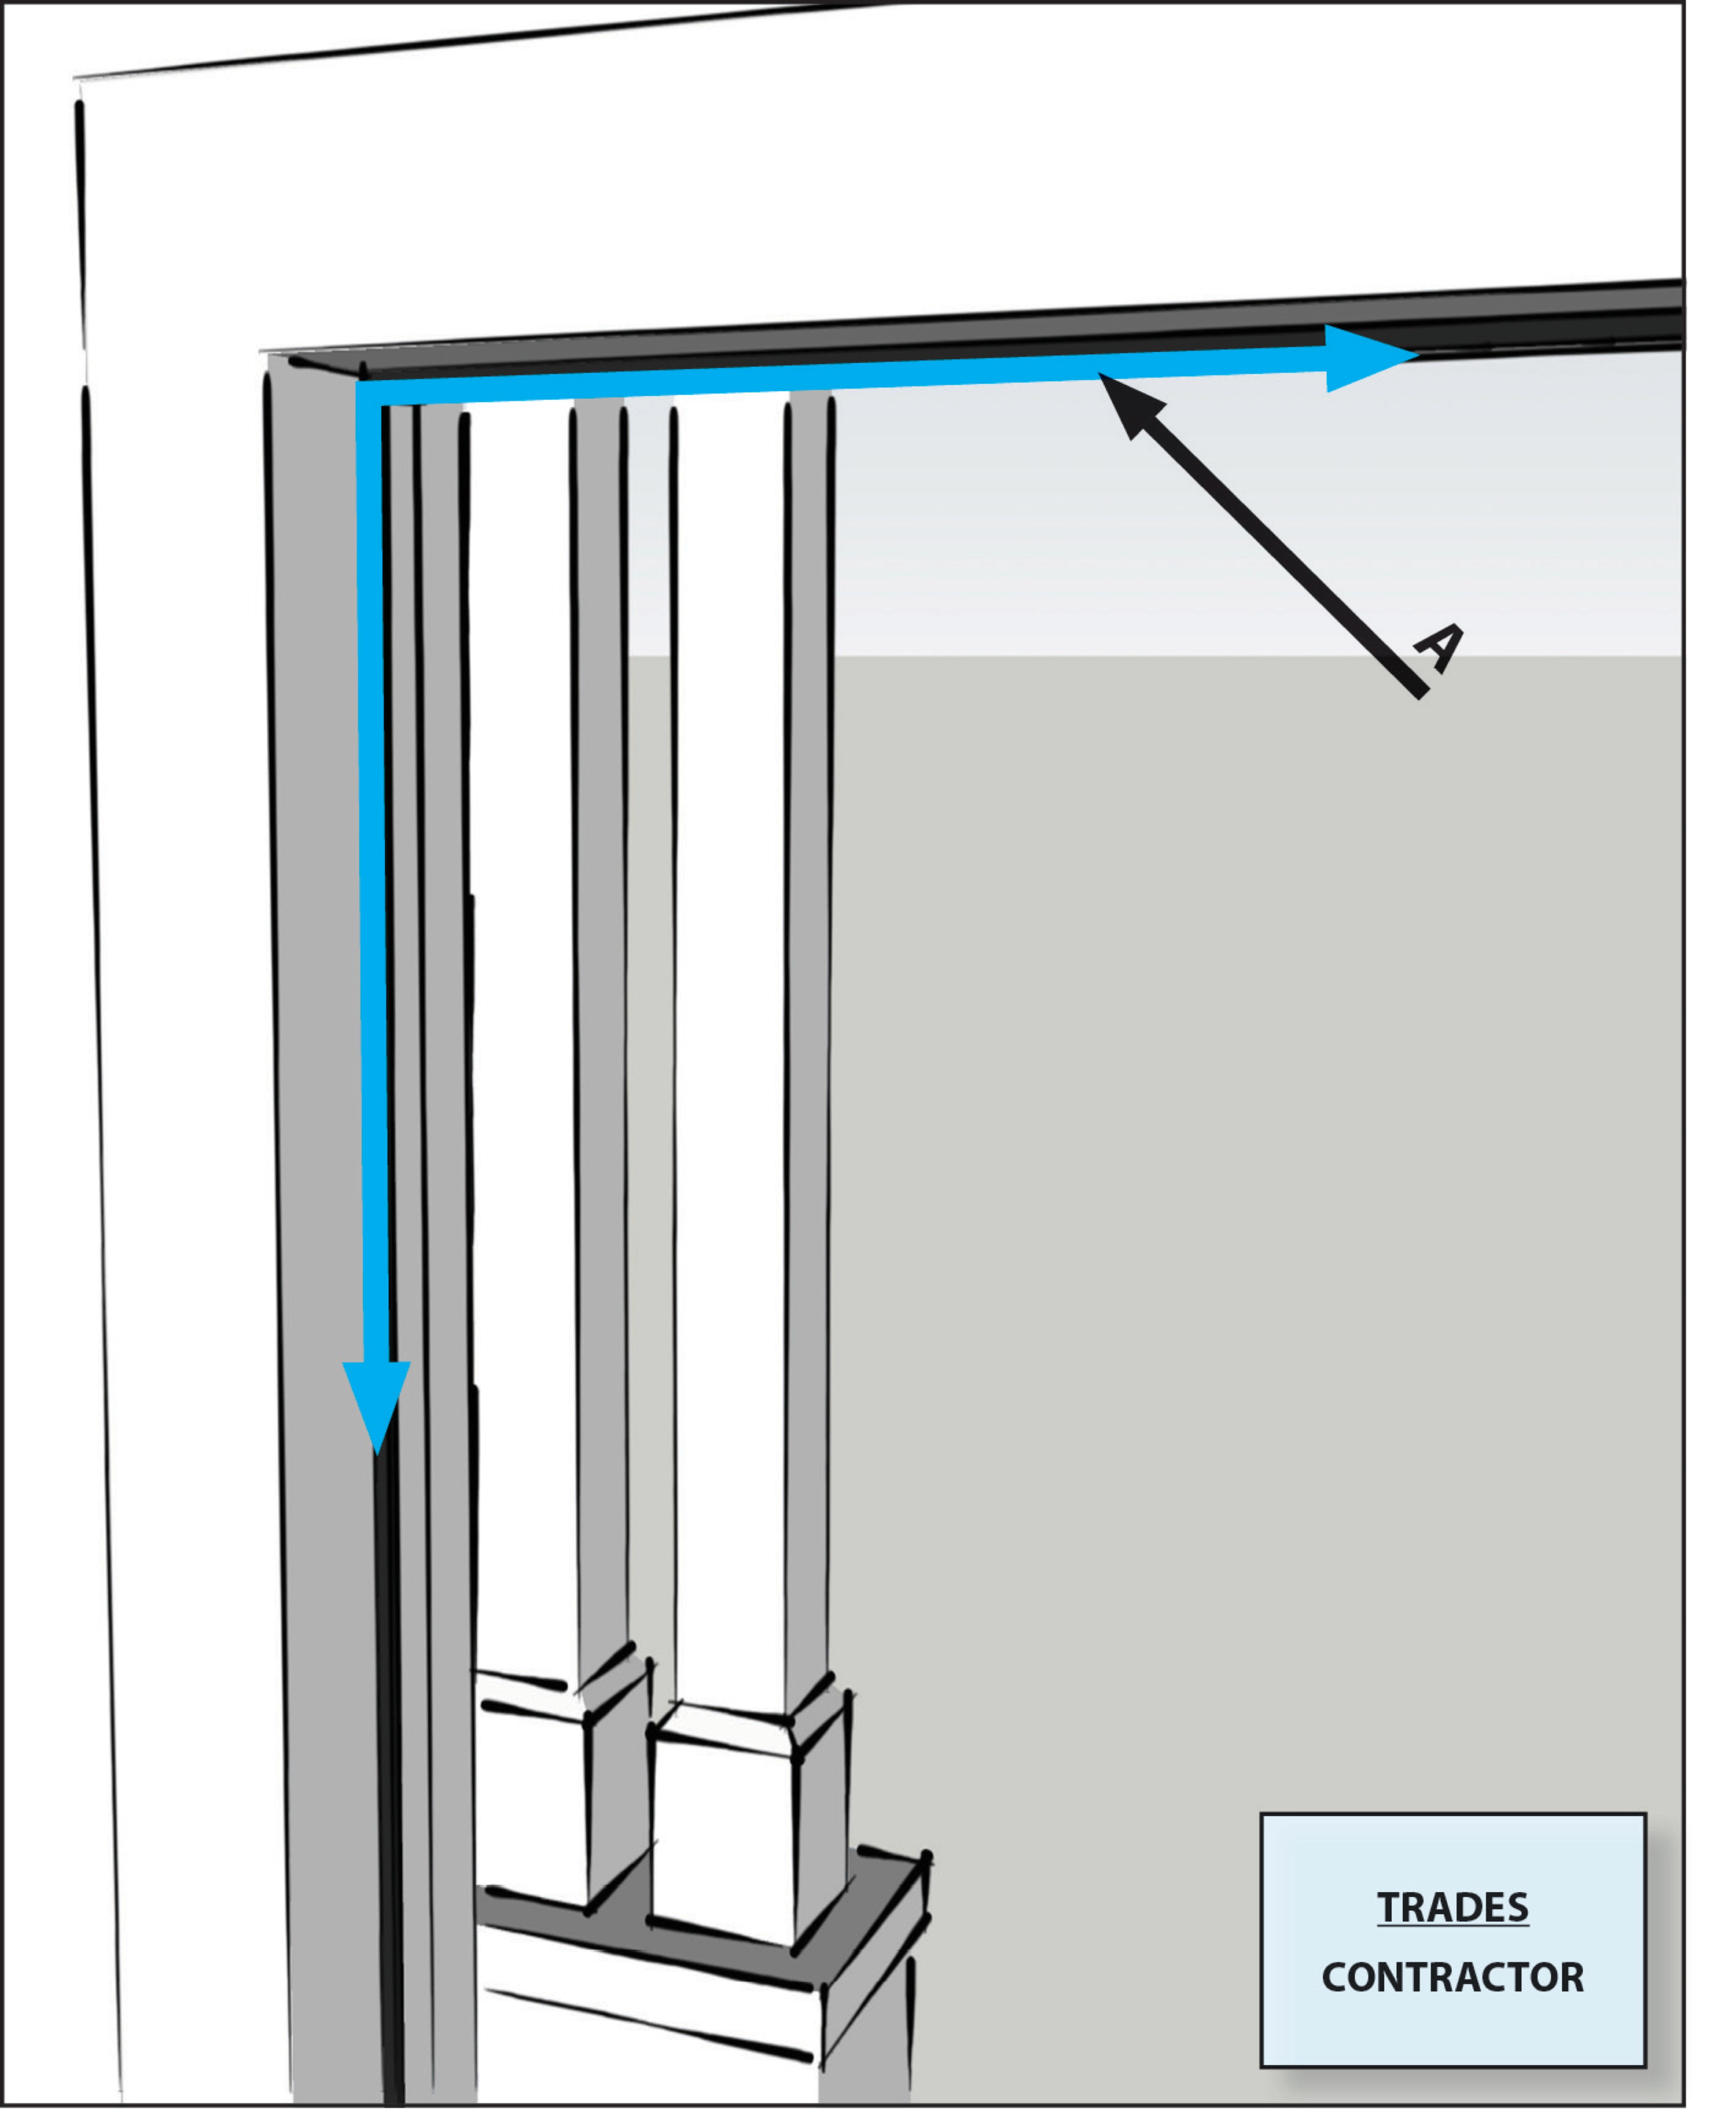
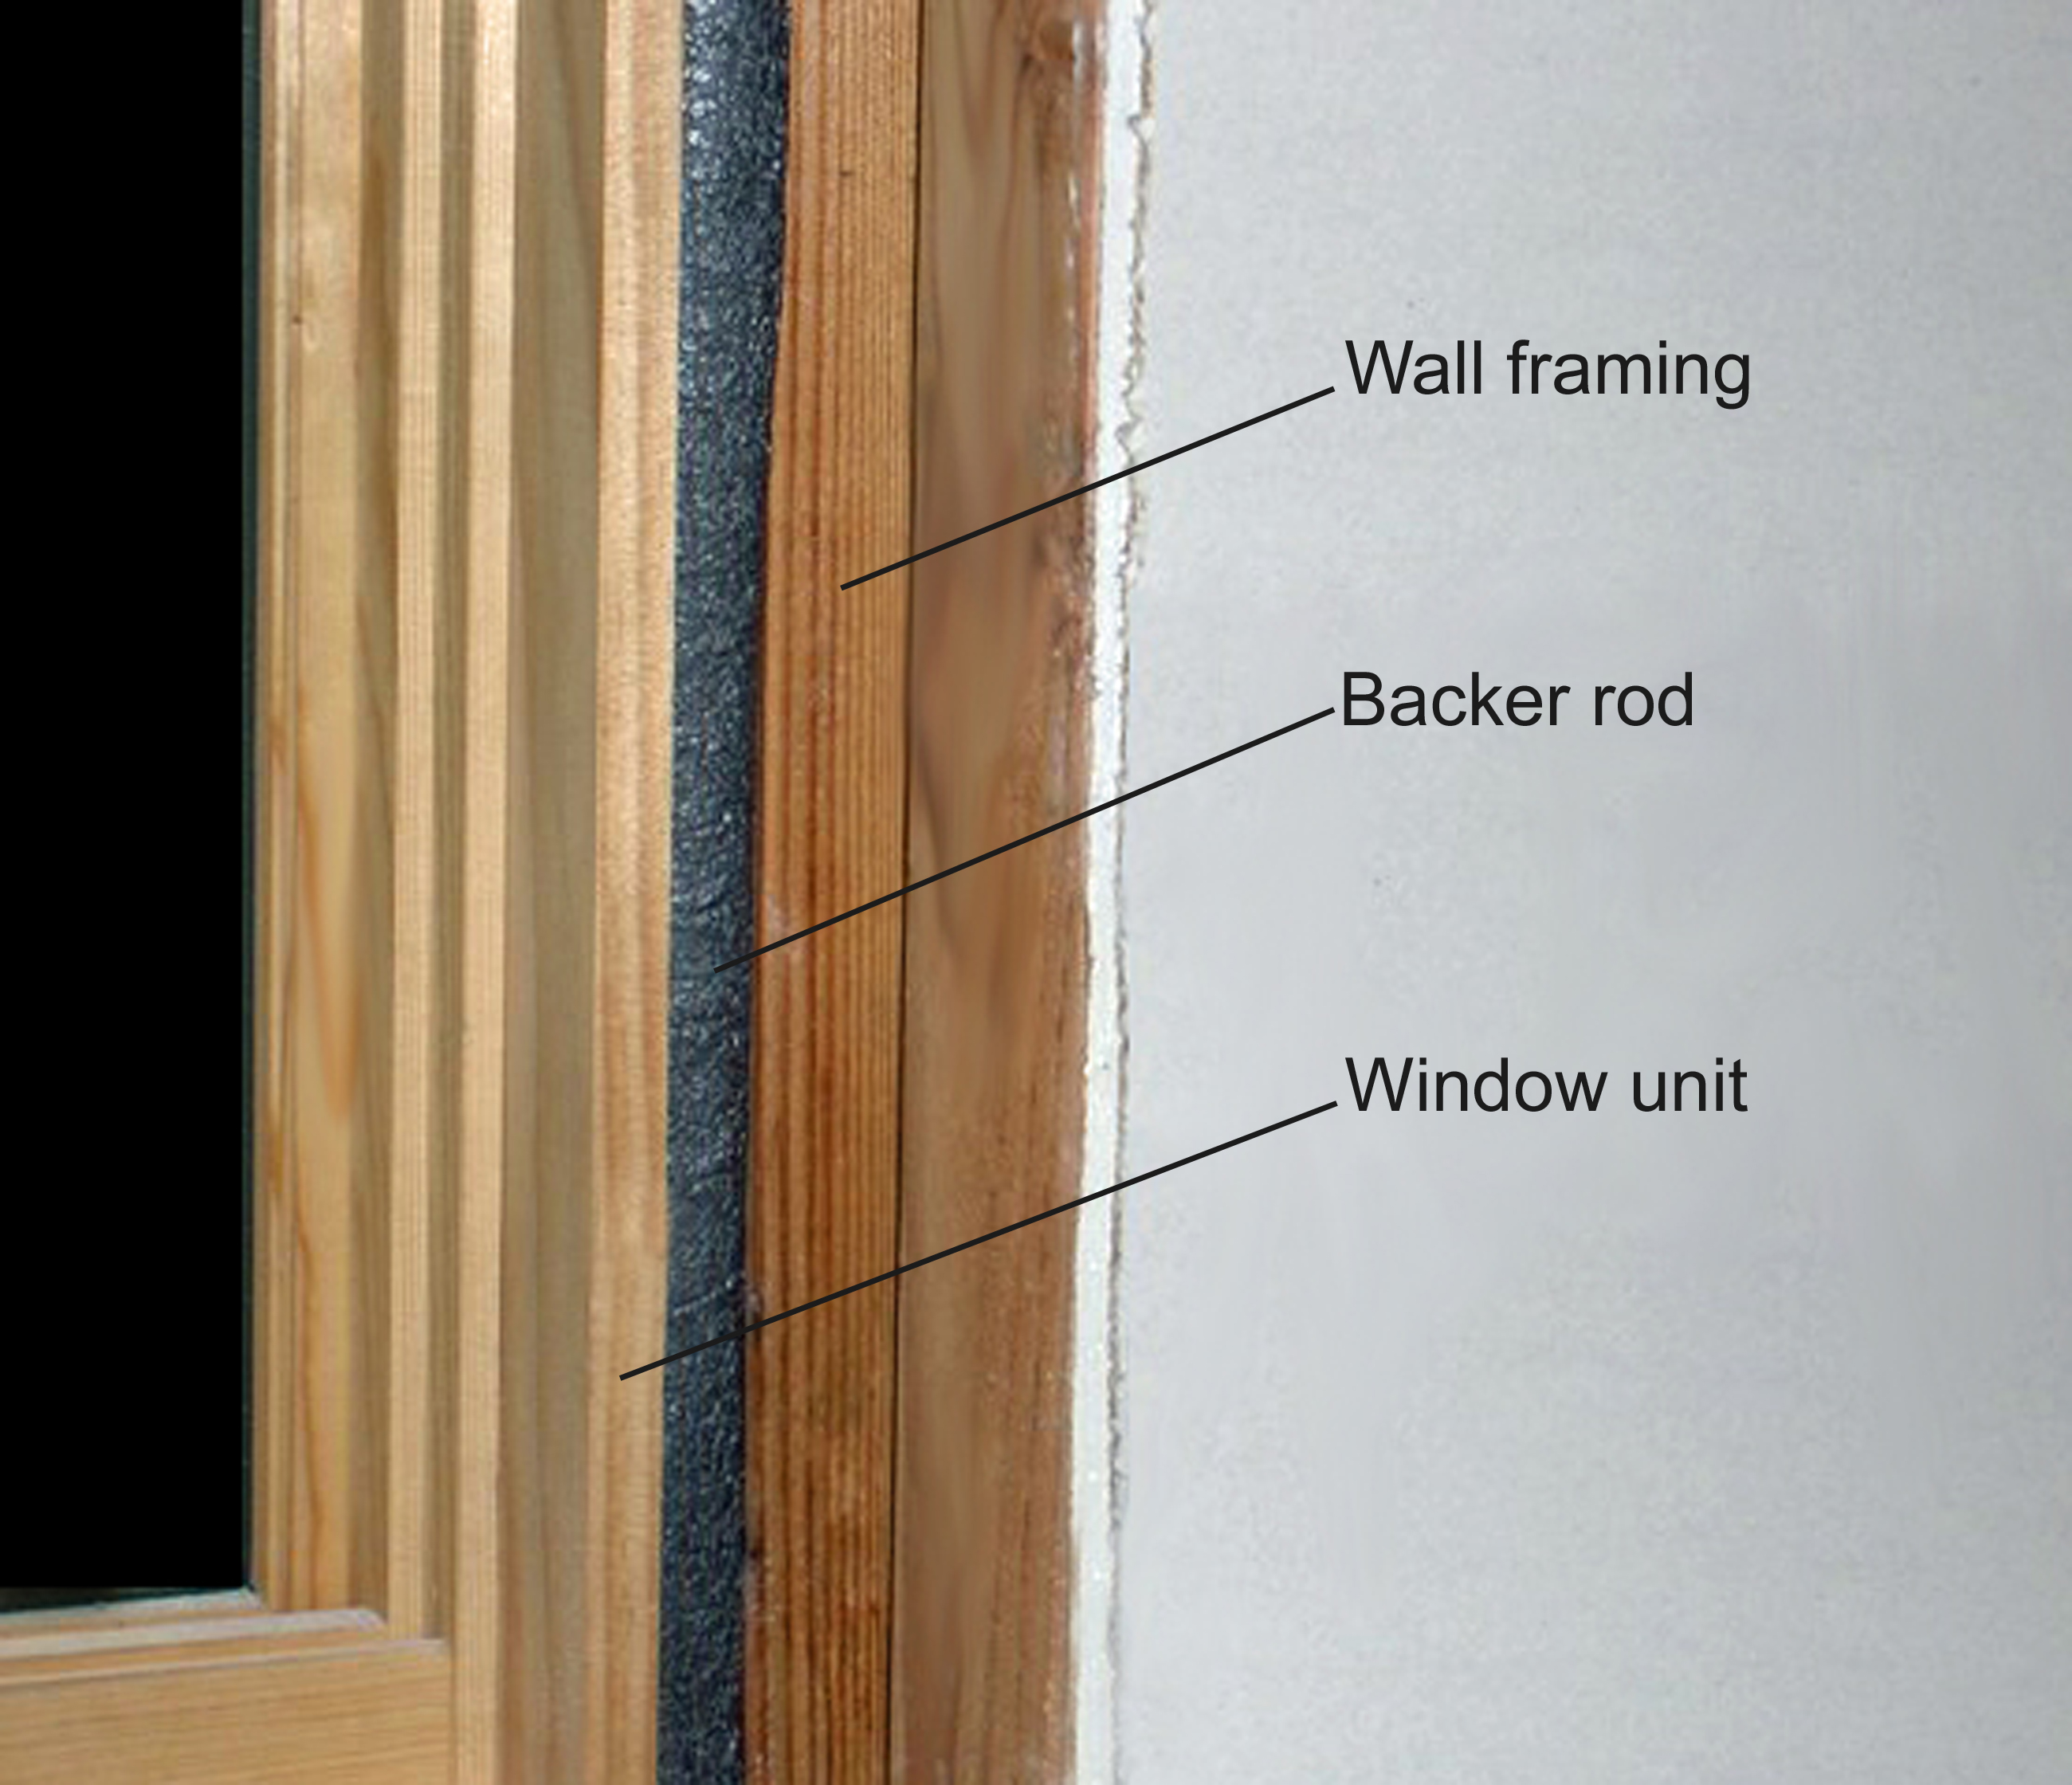
- Air seal the rough opening around the door with foam backer rod, non-expanding spray foam, and/or caulk.
- Flash around the exterior of the door frame with adhesive or liquid-applied waterproof flashing.
- Install a tight-fitting door sweep along the bottom of the door.
See the Compliance Tab for links to related codes and standards and voluntary federal energy-efficiency program requirements.
Description
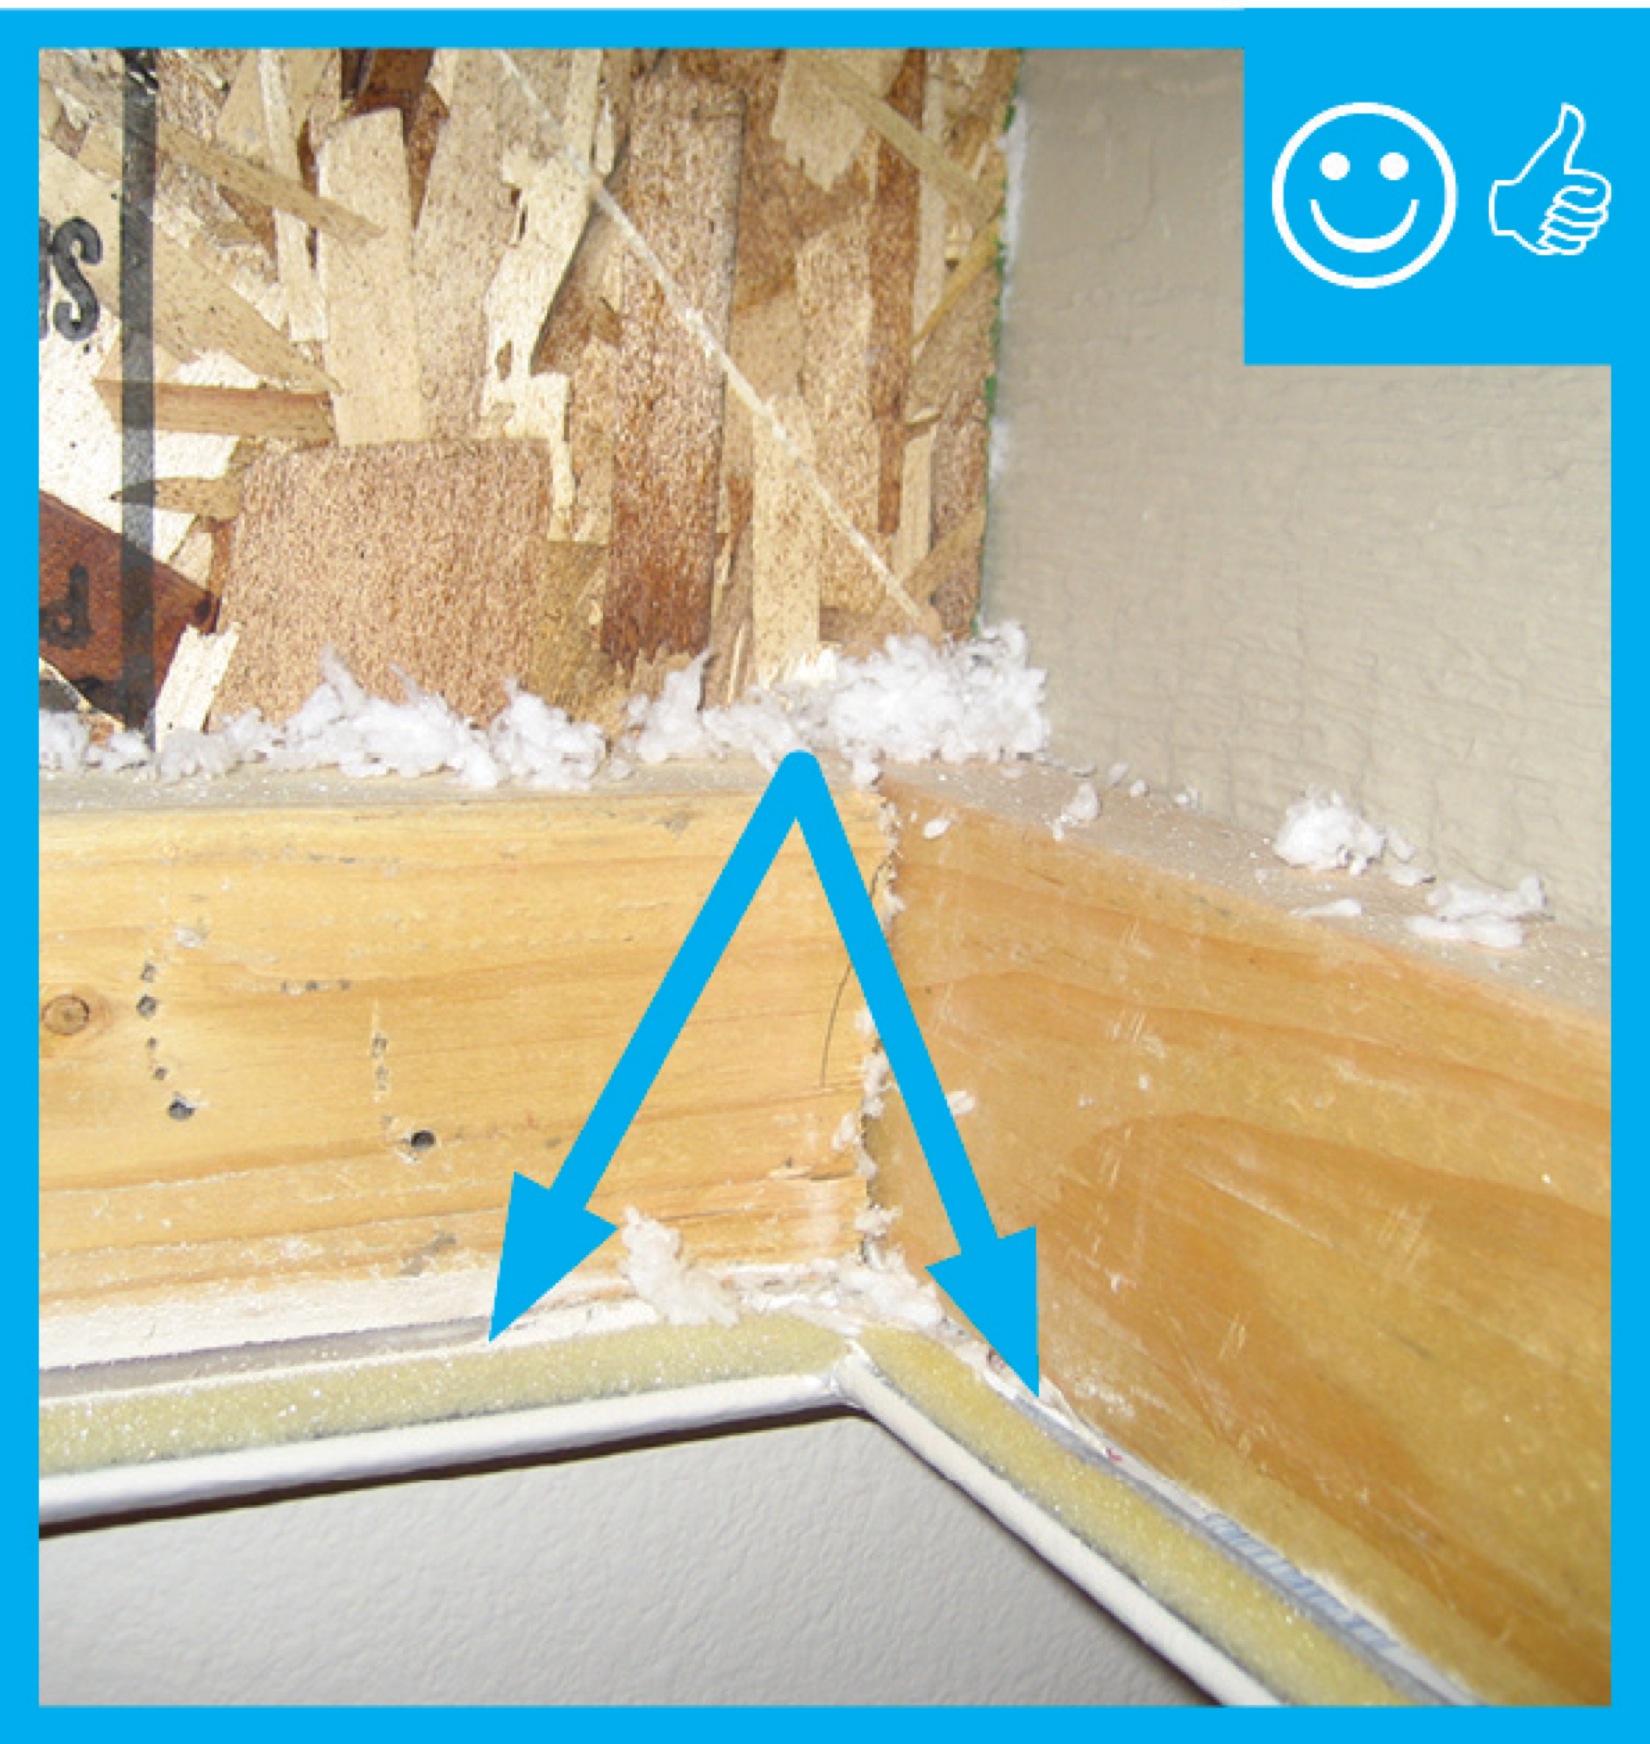
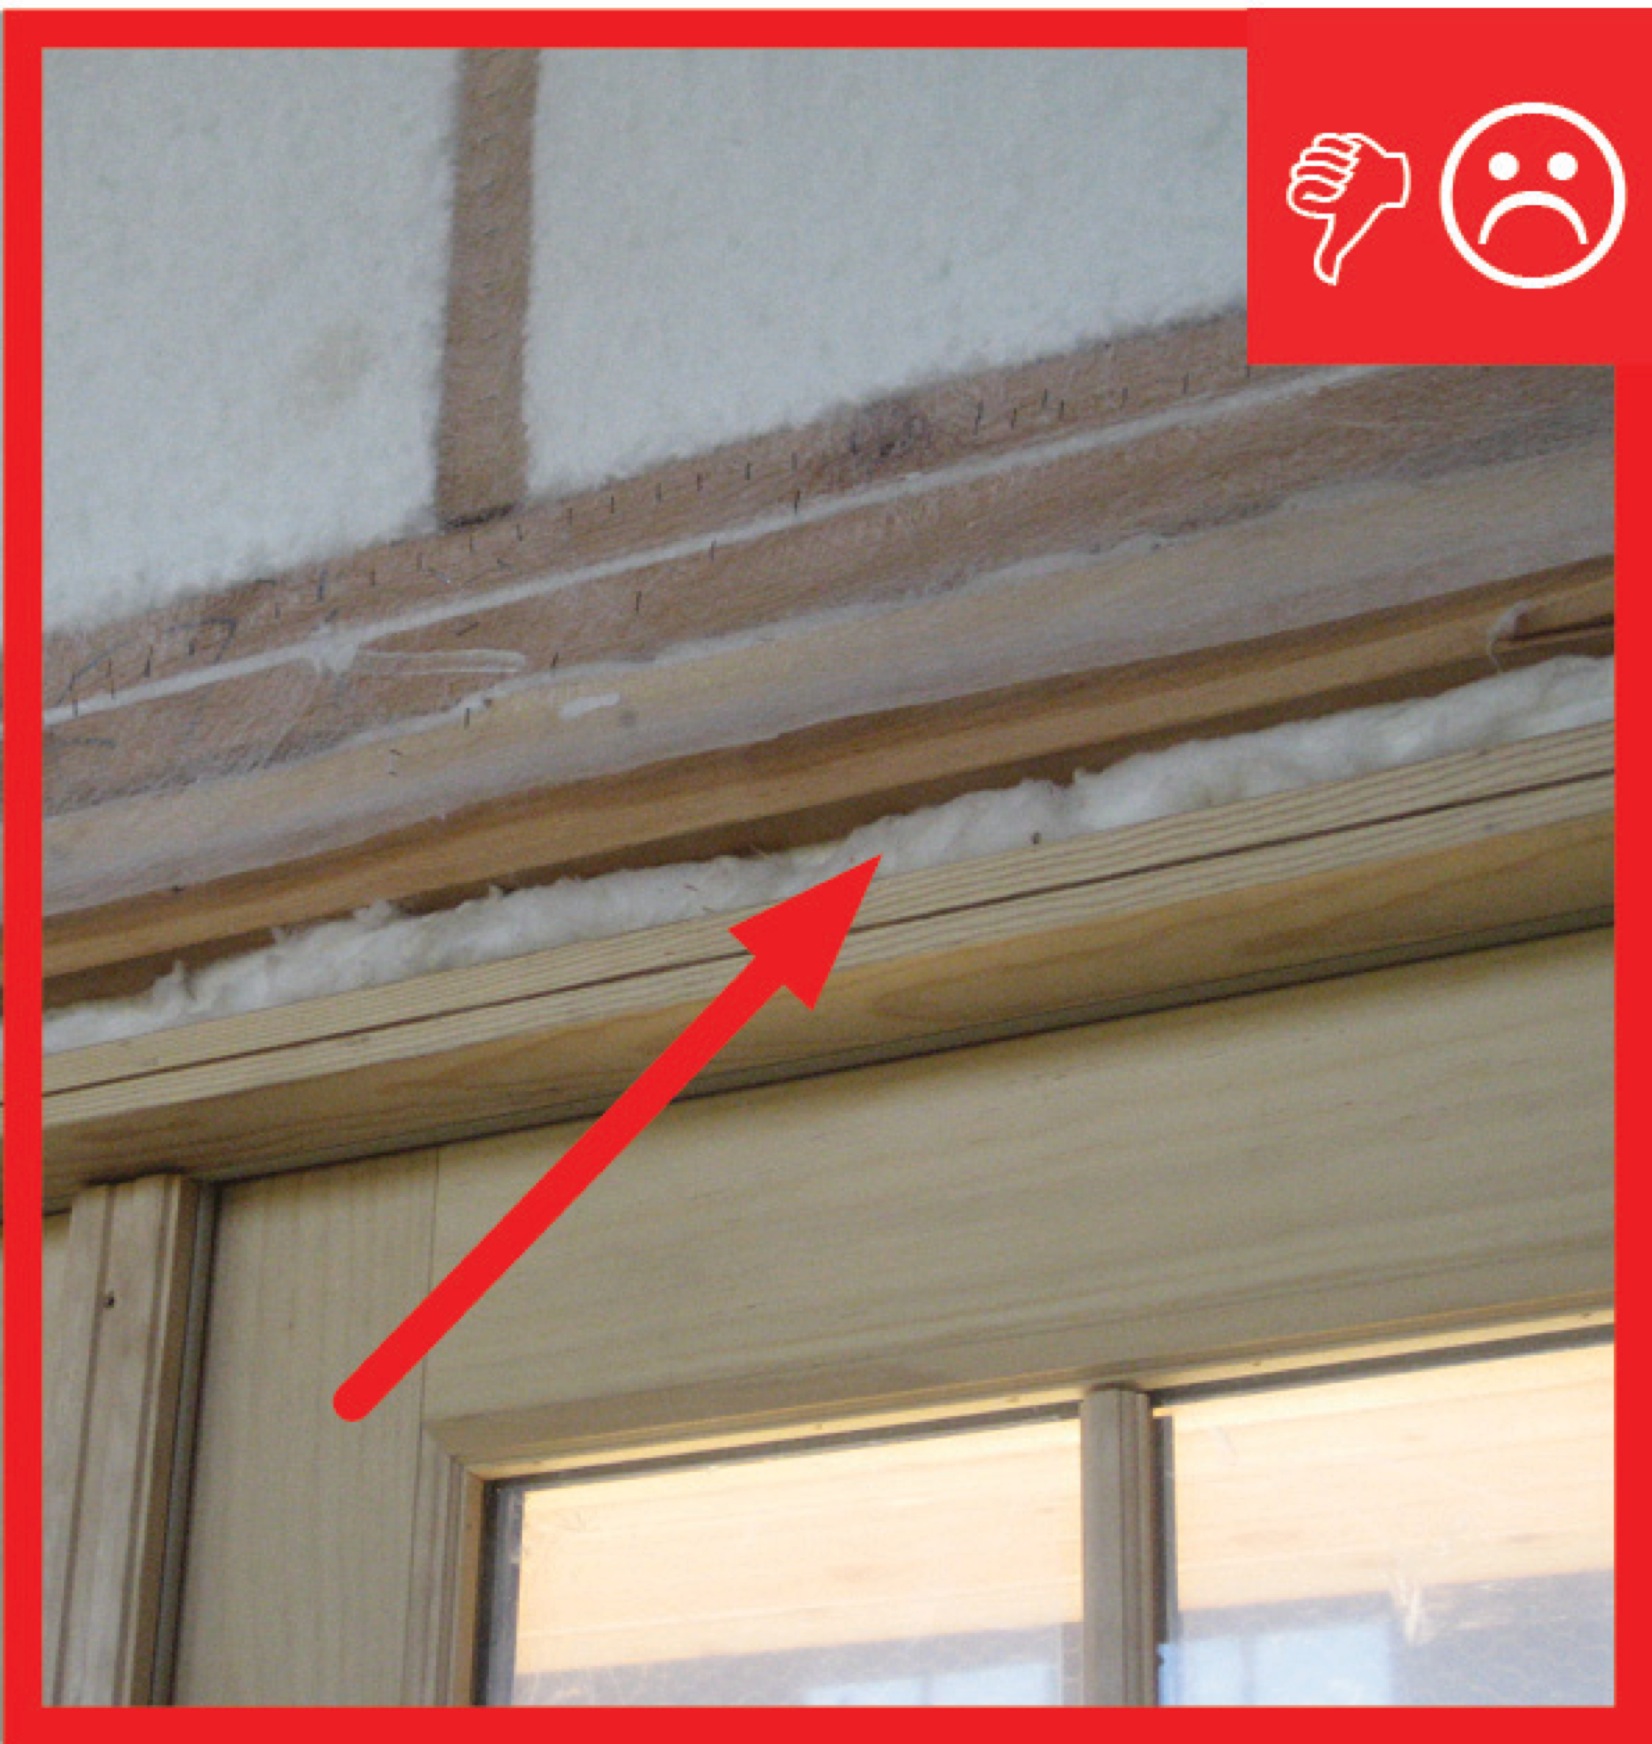
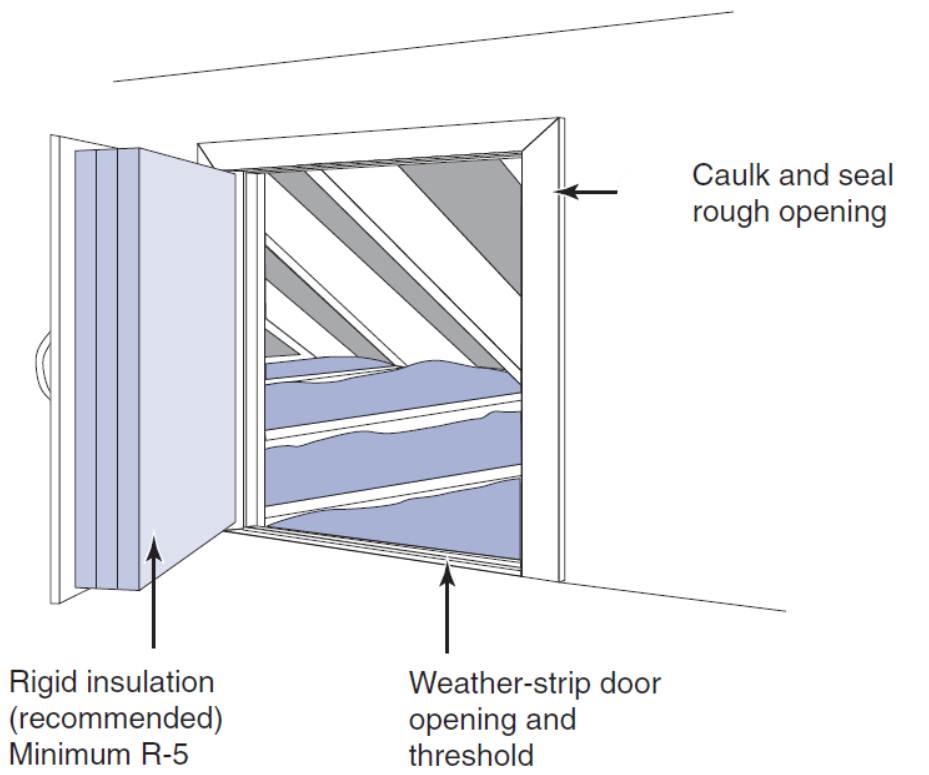
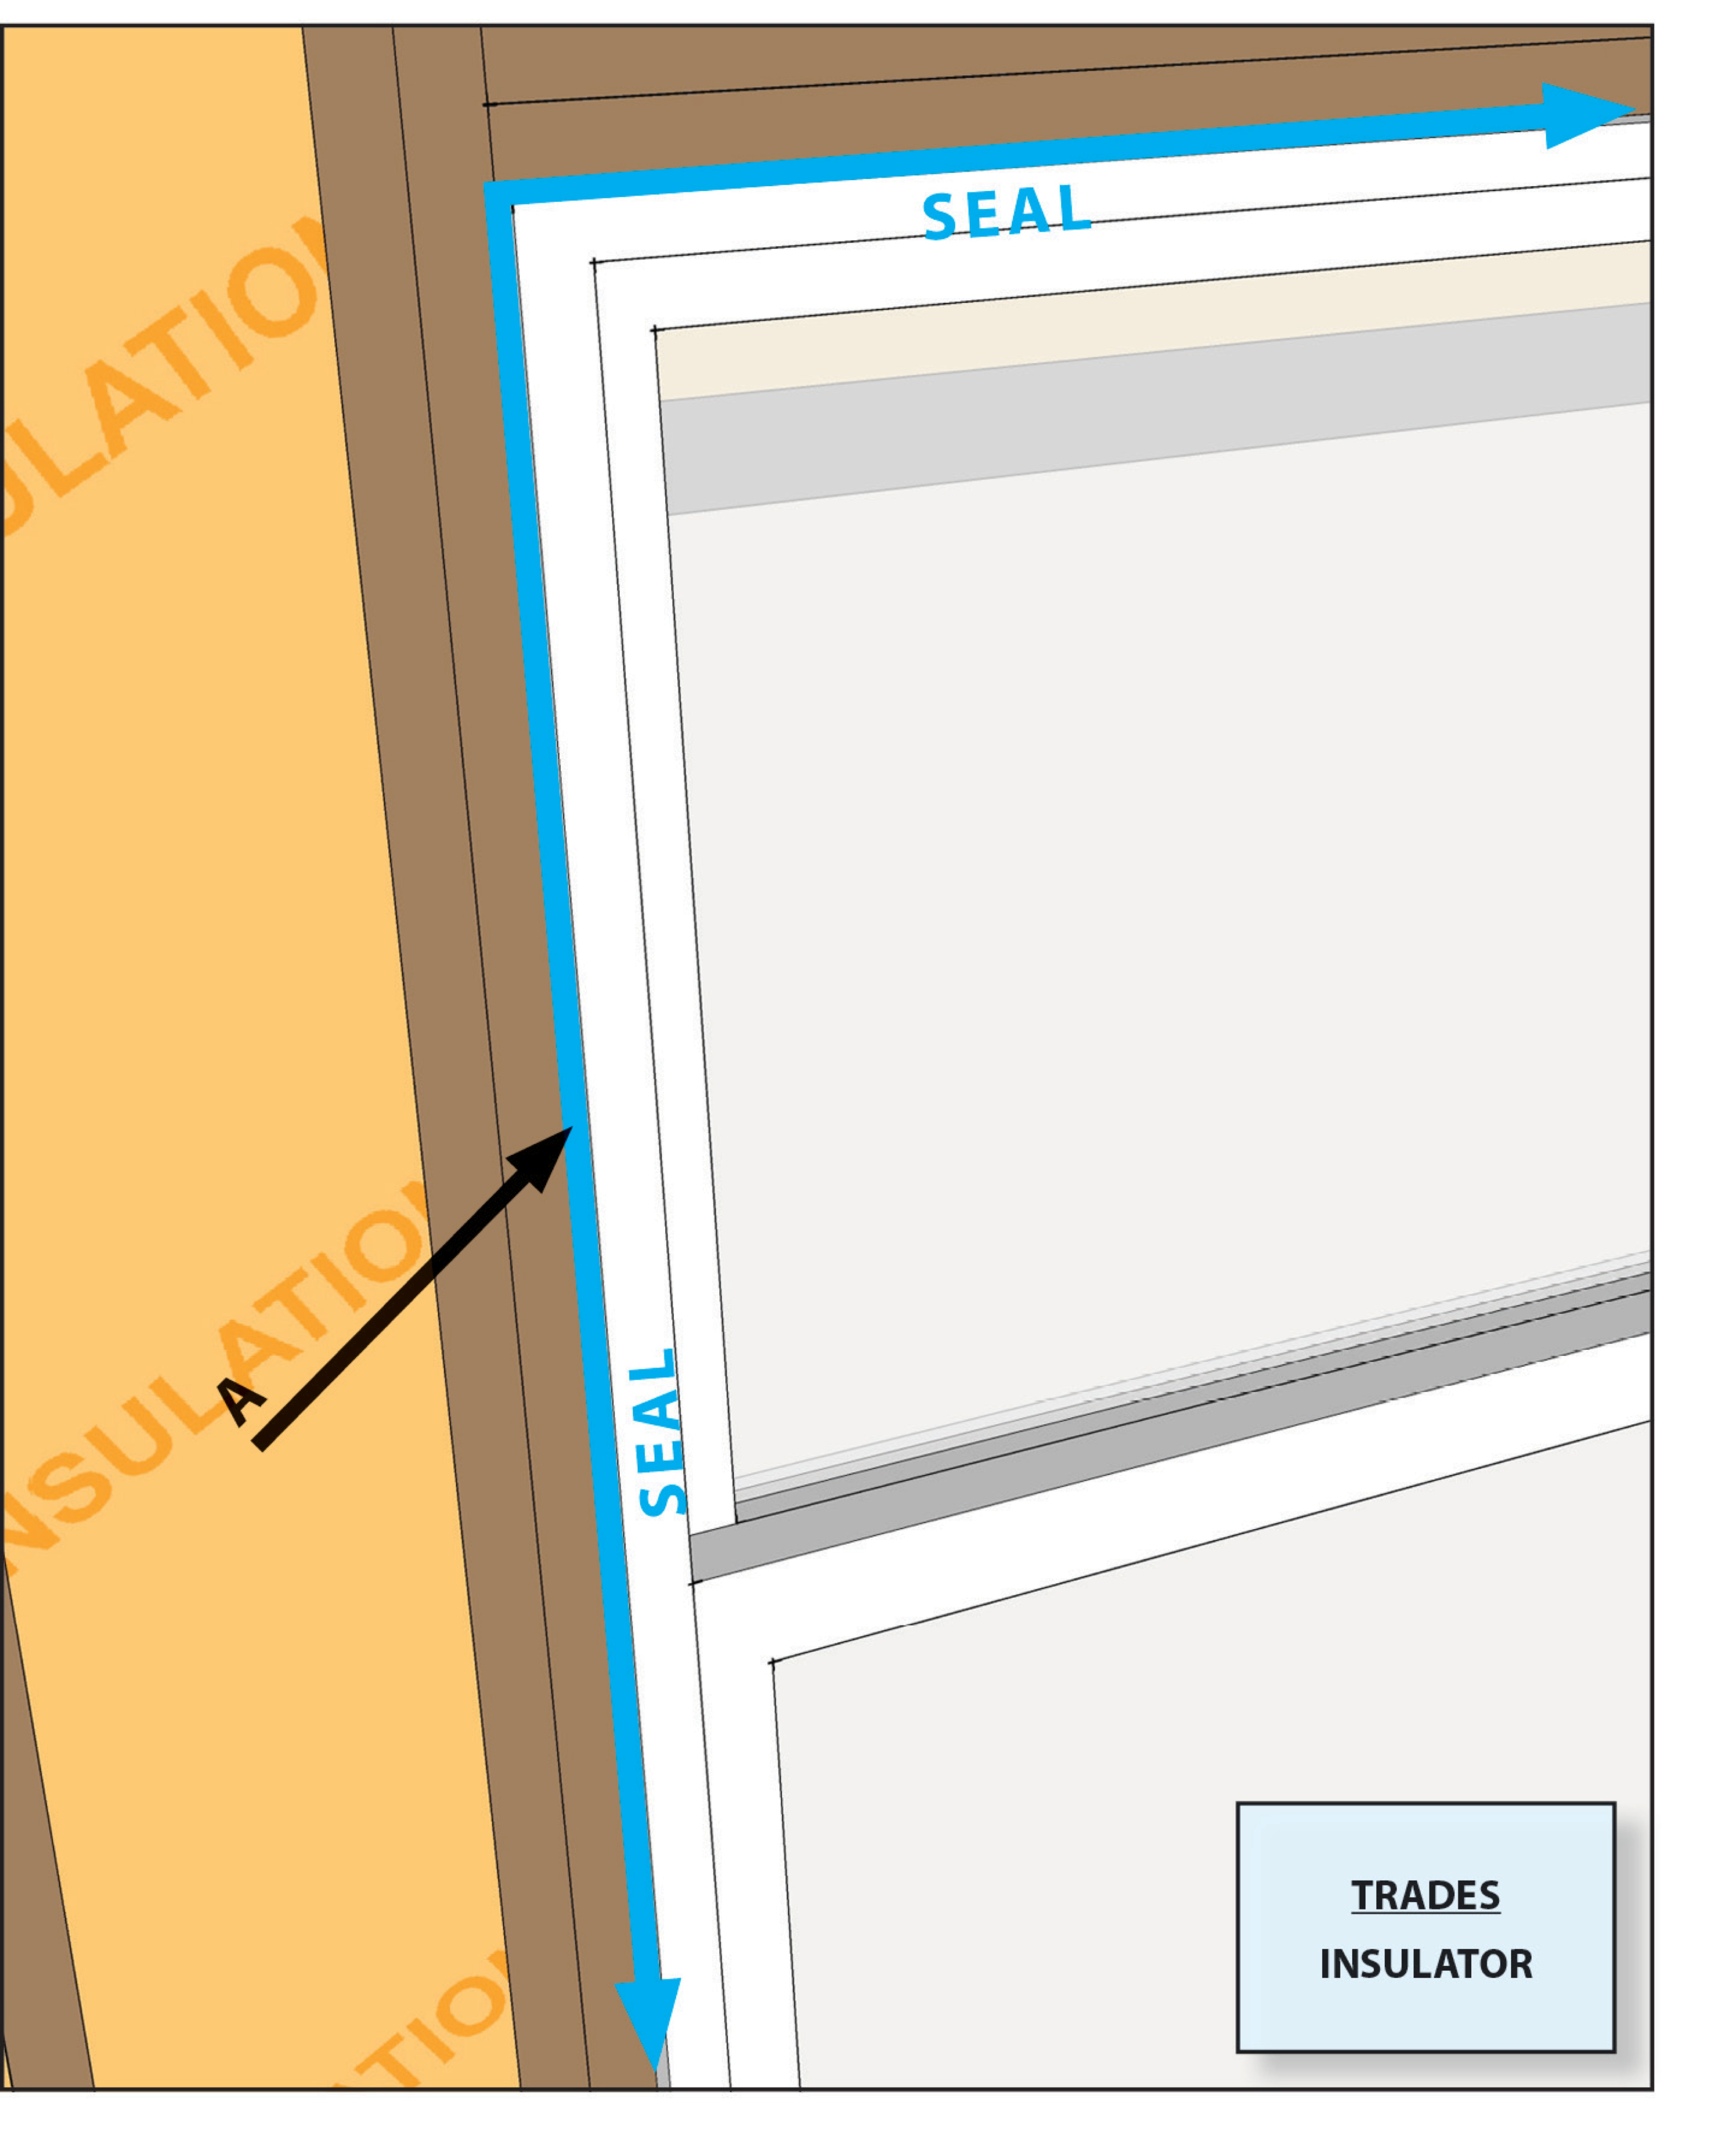
Exterior doorways are essentially large holes in the exterior shell of the home connecting the indoors to the outdoors or to other unconditioned spaces like garages, attics, and porches. Doors adjacent to unconditioned spaces should be treated the same way as exterior doors and are required to meet the same code requirements as exterior doors. With proper installation and air sealing, exterior doors do not have to represent a significant source of air leakage and heat loss. Exterior doors are usually sold as a kit with the frame attached. Insulated foam-core, metal or fiberglass ENERGY STAR doors are available and should be selected if possible. When the exterior door is installed in a new house, the rough opening (the space left for the door) is typically 1.5 to 2 inches larger than the door frame to give the installer room to install, plumb, and square the door. Once the door is set in place, some installers will stuff batt insulation into any gaps remaining in the rough opening around the frame. This fiber insulation may provide some insulation value but will not stop airflow. The rough opening should be filled with non-expanding foam or backer rod (a rod-shaped closed-cell foam product) and caulk. On the exterior, the door should be flashed with a fluid-applied or self-adhesive waterproof flashing that is properly integrated with the wall drainage plane and vapor barrier materials before siding is installed. Weatherstripping should be installed on the inside perimeter of the door frame around the top and sides of the door, and a tight-fitting door sweep should be installed along the bottom of the door.
Air and water leaks around doors during high wind events can contribute to building failures; see the Climate tab for more information.
Air-sealing could be done by the framer, the insulation contractor, or the contractor who installs the door. This task should be included in the contract for the appropriate trade depending on the workflow at the specific job site.
In multifamily structures, each dwelling unit , stairwell, and elevator block (including vestibules) should be considered thermally isolated from the units and common areas around it so that these spaces do not communicate with each other in terms of air flow and heat transfer. their own air space Therefore, each entry door into a dwelling unit should be air- sealed as if it were an exterior door, whether it opens to a conditioned corridor, a breezeway, or directly to the outside. Ensure that each space is air-sealed from adjacent spaces, especially that each dwelling unit is air-sealed from adjacent units and common spaces like corridors. For more on air-sealing of individual dwelling units in multifamily construction, see the Solution Center guide Air Sealing and Compartmentalization in Multifamily Buildings.
How to Air-Seal Exterior Doors
- Select doors that are self-closing and fire-rated; consider ENERGY STAR-labeled metal- or fiberglass-clad insulated foam core doors (Figure 1). See the Solution Center guide Exterior Doors Are Insulated, Impact Rated, and Fire Rated for more information.
Source
Report identifying the steps to take, with the help of a qualified home performance contractor, to seal unwanted air leaks while ensuring healthy levels of ventilation and avoiding sources of indoor air pollution.
- Install the door per the manufacturer’s instructions.
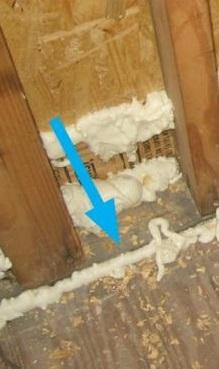
- Fill the rough opening around the door with non-expanding foam or press backer rod into the wider gaps and seal the seams with caulk (Figure 2).

Source
Report identifying the steps to take, with the help of a qualified home performance contractor, to seal unwanted air leaks while ensuring healthy levels of ventilation and avoiding sources of indoor air pollution.
- Flash the door frame with adhesive waterproof flashing that is properly integrated with the wall sheathing and house wrap.
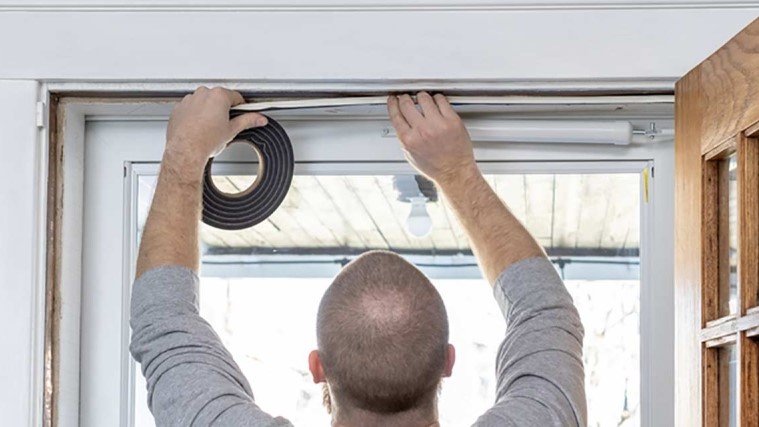
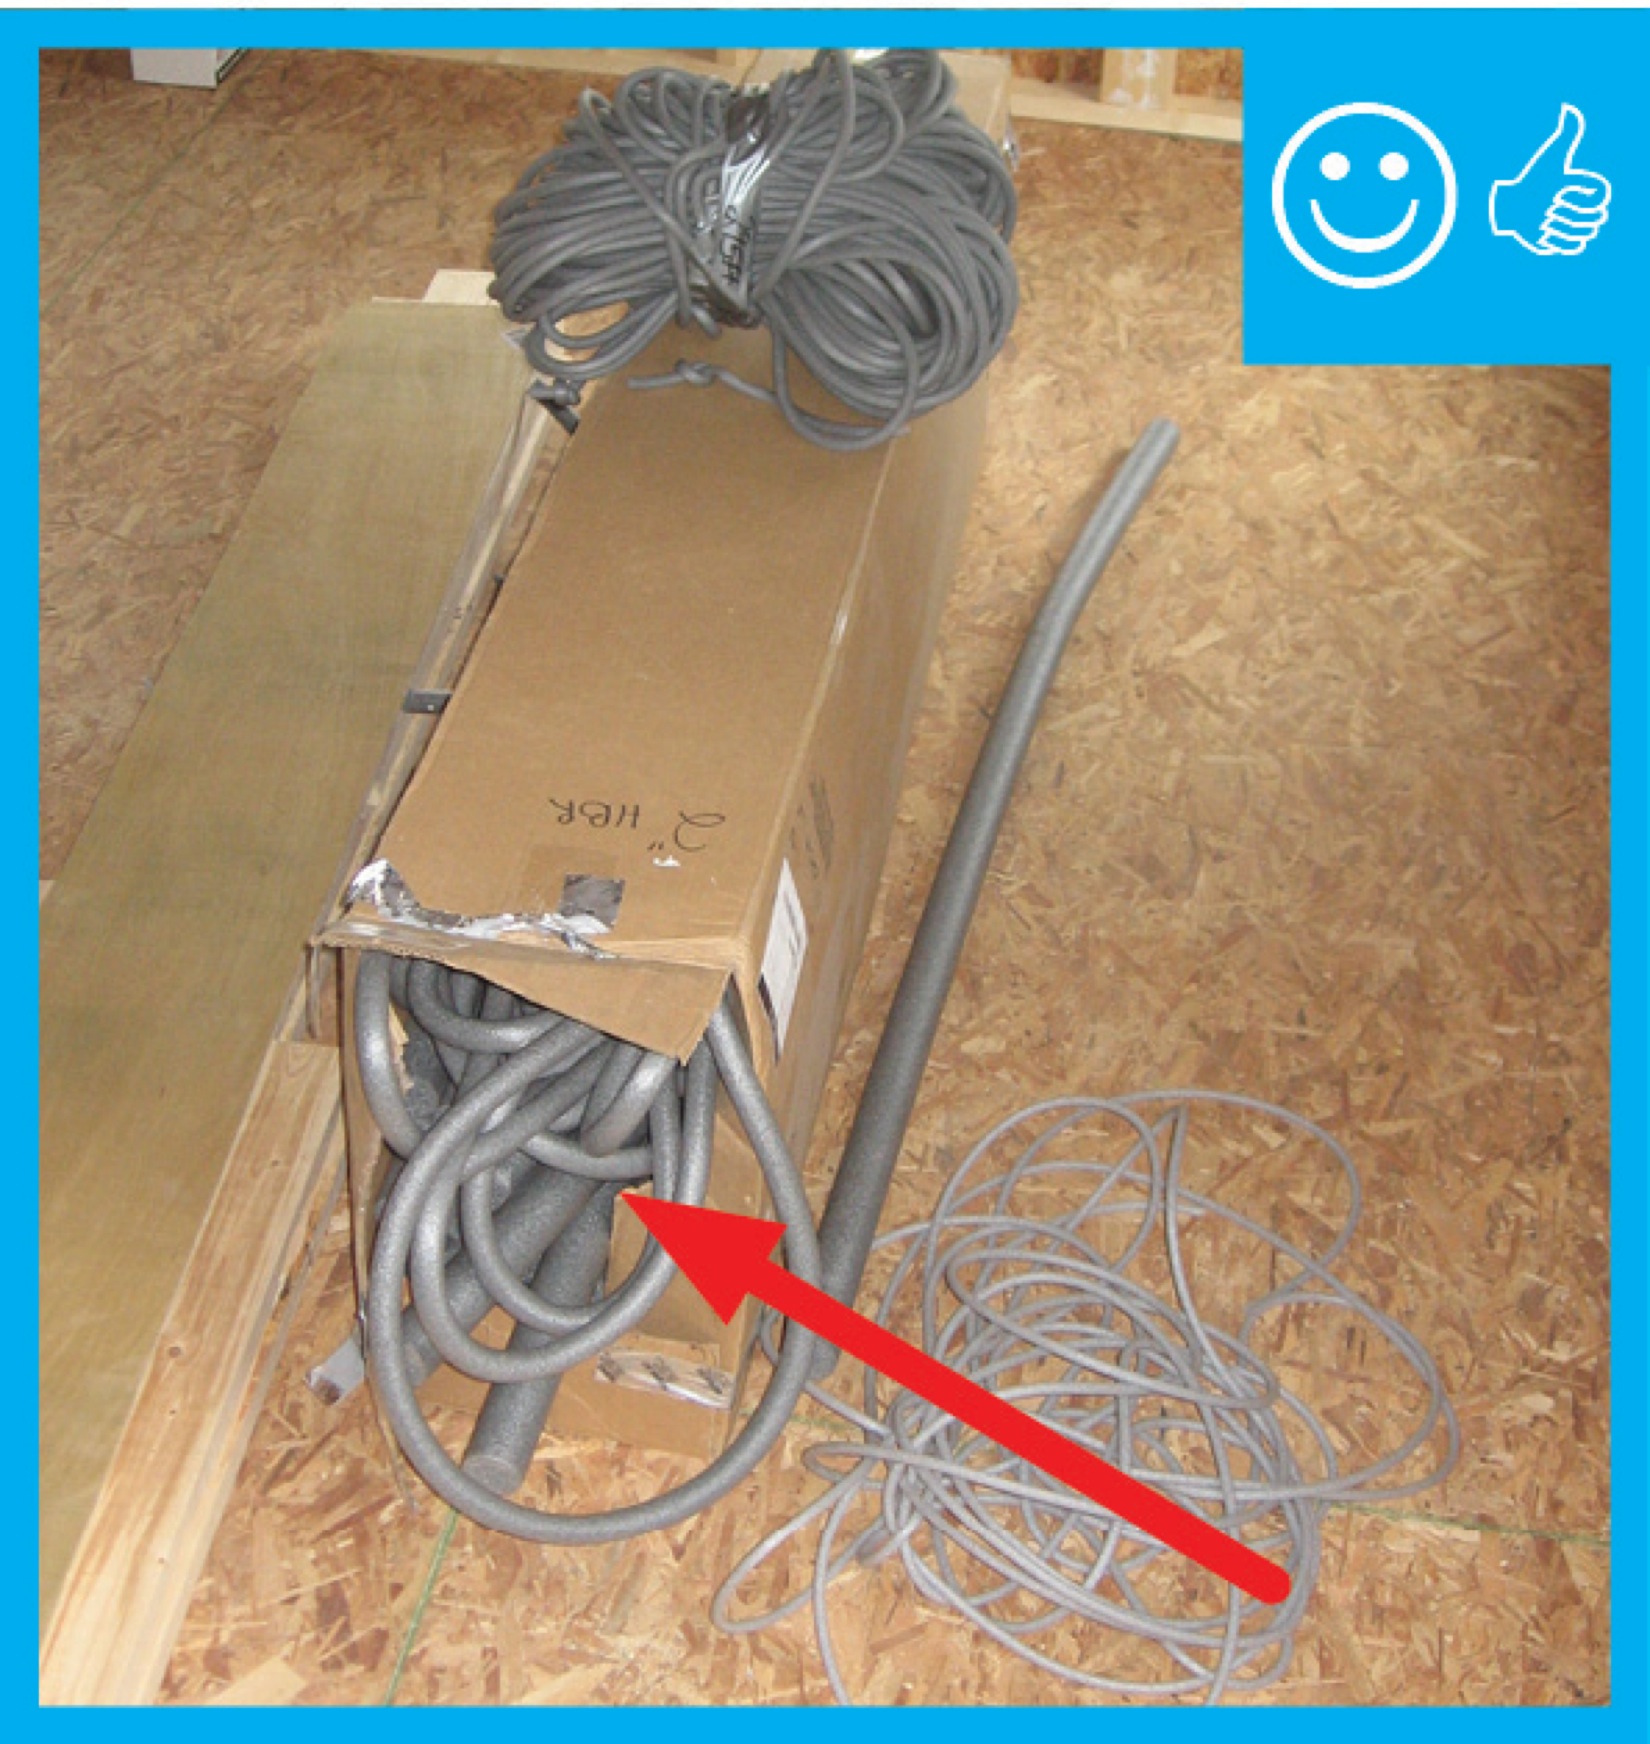
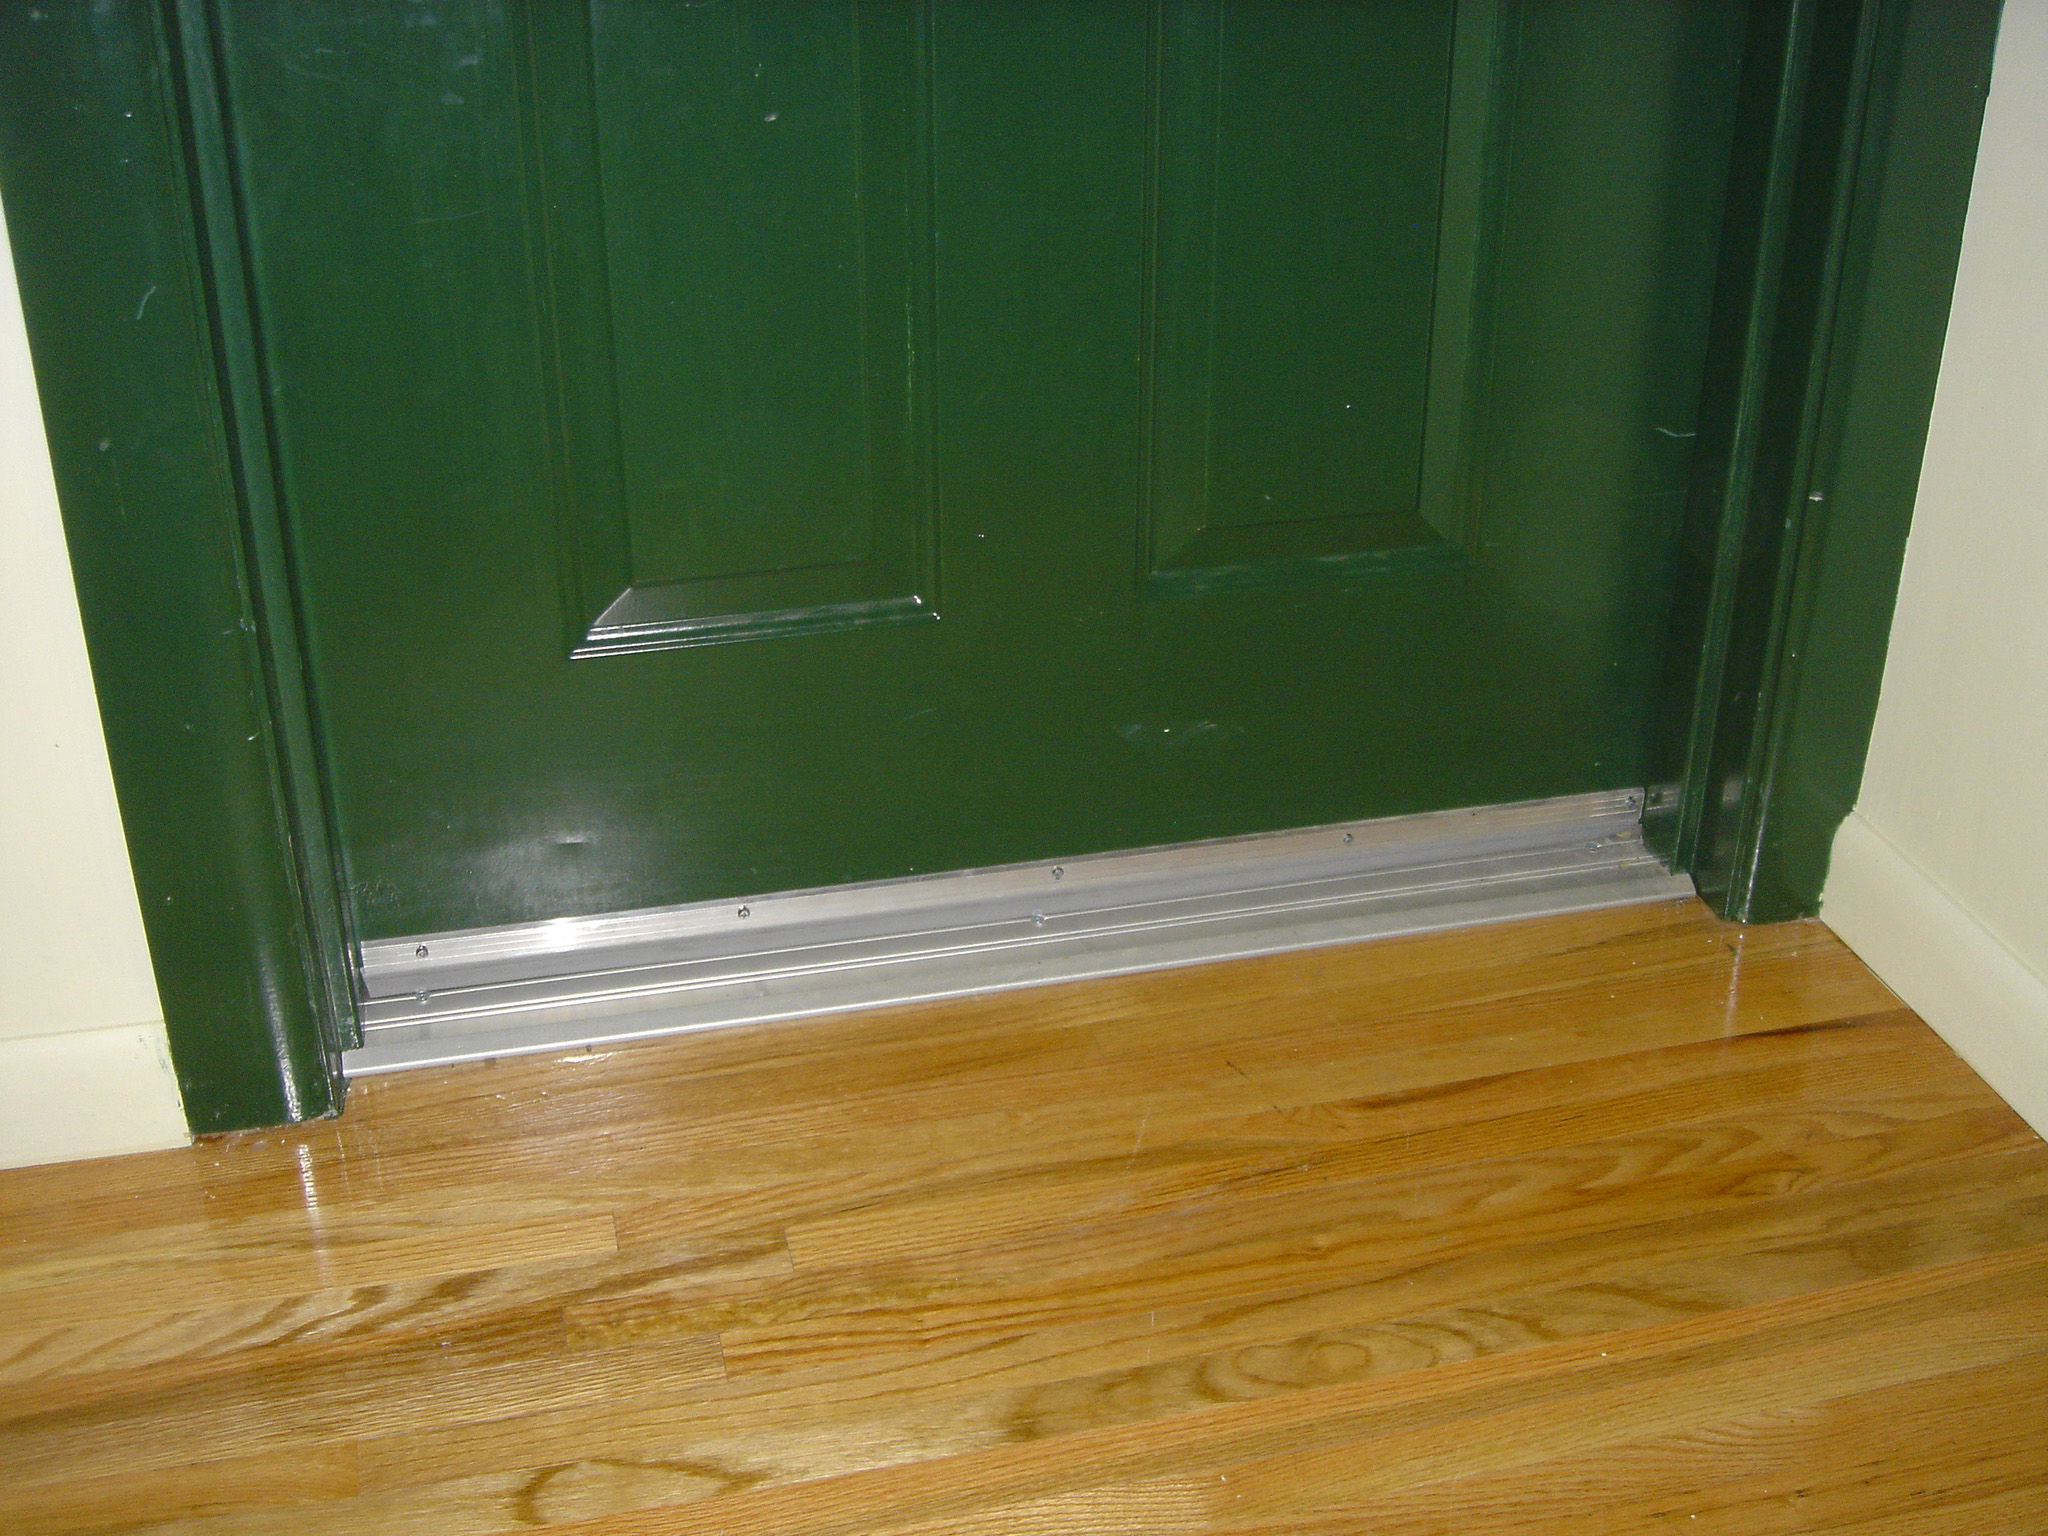
- Install appropriate weatherstripping to the door frame and threshold (Figure 3). See Table 1 for types. To determine how much weatherstripping you will need, add the perimeters of all the doors to receive weatherstripping, then add 5% to 10% to accommodate any waste. Weatherstripping should be applied to clean, dry surfaces in temperatures above 20°F (-7° C). Make sure the weatherstripping meets tightly at the corners. Use a thickness that causes the weatherstripping to press tightly between the door and the door jamb when the door closes, without making it difficult to shut.
Source
Article describing tips for effectively installing weatherstripping on windows and doors.
| Weatherstripping | Best Uses | Cost | Advantages | Disadvantages |
|---|---|---|---|---|
Tension seal: Self-stick plastic (vinyl) folded along length in a V-shape or a springy bronze strip (also copper, aluminum, and stainless steel) shaped to bridge a gap. The shape of the material creates a seal by pressing against the sides of a crack to block drafts. | Inside the track of a double-hung or sliding window, top and sides of door. | Varies. | Durable, invisible when in place, very effective. Vinyl is fairly easy to install. Look of bronze works well for older homes. | Surfaces must be flat and smooth for vinyl. Can be difficult to install, as corners must be snug. Bronze must be nailed in place (every three inches or so) so as not to bend or wrinkle. Can increase resistance in opening/closing doors or windows. Self-adhesive vinyl available. Some manufacturers include extra strip for door striker plate. |
Felt: Plain or reinforced with a flexible metal strip; sold in rolls. Must be stapled, glued, or tacked into place. Seals best if staples are parallel to length of the strip. | Around a door or window (reinforced felt); fitted into a door jamb so the door presses against it. | Low. | Easy to install, inexpensive. | Low durability; least effective at preventing airflow. Do not use where exposed to moisture or where there is friction or abrasion. All-wool felt is more durable and more expensive. Very visible. |
Reinforced foam: Closed-cell foam attached to wood or metal strips. | Door or window stops; bottom or top of window sash; bottom of door. | Low. | Effective sealer, scored well in wind tests, rigid. | Can be difficult to install; must be sawed, nailed, and painted. Very visible. Manufacturing process produces greenhouse gas emissions. |
Tape: Nonporous, closed-cell foam, open-cell foam, or EDPM (ethylene propylene diene monomer) rubber. | Top and bottom of window sash; door frames; attic hatches and inoperable windows. Good for blocking corners and irregular cracks. | Low.. | Extremely easy to install, works well when compressed, inexpensive. Can be reinforced with staples. | Durability varies with material used, but not especially high for all; use where little wear is expected; visible. |
Rolled or reinforced vinyl: Pliable or rigid strip gasket (attached to wood or metal strips). | Door or window stops; top or bottom of window sash; bottom of a door (rigid strip only). | Low-Mod. | Easy installation, low to moderate cost. Self-adhesive on pliable vinyl may not adhere to metal; some types of rigid strip gaskets provide slot holes to adjust height, increasing durability. Comes in varying colors to help with visibility. | Visible. |
Door sweep: Aluminum or stainless steel with brush of plastic, vinyl, sponge, or felt. | Bottom of interior side of in-swinging door; bottom of exterior side of exterior-swinging door. | Mod- high. | Relatively easy to install; many types are adjustable for uneven threshold. Automatically retracting sweeps also available, which reduce drag on carpet and increase durability. | Visible. Can drag on carpet. Automatic sweeps are more expensive and can require a small pause once door is unlatched before retracting. |
Magnetic: Works similarly to refrigerator gaskets. | Top and sides of doors, double-hung and sliding window channels. | High. | Very effective air sealer. | |
Tubular rubber and vinyl: Vinyl or sponge rubber tubes with a flange along length to staple or tack into place. Door or window presses against them to form a seal. | Around a door. | Mod- high. | Effective air barrier. | Self-stick versions challenging to install. |
Reinforced silicone: Tubular gasket attached to a metal strip that resembles reinforced tubular vinyl. | On a doorjamb or a window stop. | Mod- high. | Seals well. | Installation can be tricky. Hacksaw required to cut metal; butting corners pose a challenge. |
Door shoe: Aluminum face attachment with vinyl C-shaped insert to protect under the door. | To seal space beneath door. | Mod- high. | Sheds rain on the exterior, durable. Can be used with uneven opening. Some door shoes have replaceable vinyl inserts. | Fairly expensive; installation moderately difficult. May require door bottom planing. |
Bulb threshold: Vinyl and aluminum. | Door thresholds. | Mod- high. | Combination threshold and weatherstrip; available in different heights. | Wears from foot traffic; relatively expensive. |
"Frost-brake" threshold: Assembly including an exterior slope, interior lip, and threshold joing, where the joint acts as a thermal break; e.g., metal exterior and wood interior with a vinyl joing. | Door threshold. | Mod- high. | The use of different materials means less cold transfer. Effective. | Moderately difficult to install, involves threshold replacement. |
Fin seal: Pile weatherstrip with plastic Mylar fin centered in pile. | For aluminum sliding windows and sliding glass doors. | Mod- high. | Very durable. | Can be difficult to install. |
Interlocking metal channels: Enables sash to engage one another when closed. | Around door perimeters. | High. | Exceptional weather seal. | Very difficult to install as alignment is critical. To be installed by a professional only. |
Ensuring Success
Visually inspect exterior doors to see that weather stripping has been installed and that doors fit snugly with no air movement around their perimeter or along the trim when the door is closed. Verify that doors open freely with no drag on the threshold. Visually inspect that the rough openings around door frames are air sealed before the drywall or door trim is installed. Check for air movement around the closed door and door trim with a smoke pencil or hand. Leaks will be easier to detect during a blower door test.
Region
Hurricane and High Wind Zones
In high wind- and hurricane-prone areas, here is a summary of steps that can be taken to improve the storm resistance of exterior doors, based on the detailed information provided below and in the cited documents by FEMA and others:
- All exterior doors on homes in hurricane-prone areas should be pressure and impact rated or protected by a system that is pressure and impact rated, according to the Insurance Institute for Business & Home Safety (IBHS 2019). See the Solution Center guide Exterior Doors Are Insulated, Impact Rated, and Fire Rated for more information.
- Doors should have flashing and weatherstripping, be properly air-sealed, and be set in pan flashings designed to resist the entry of wind and wind-driven rain.
- For increased disaster resistance in coastal and high wind areas, install exterior doors to swing outward rather than inward. Weather stripping should be installed on the interior side of the door to minimize decay.
- Consider designing the home’s entry with a vestibule or double-doored entry.
- Install water-resistant flooring at all entryways.
- Doors, door framing, and door hardware should be made of water-resistant, corrosion-resistant materials.
- Exterior doors should meet U-factor requirements for the home's climate zone, as required by local building codes. Please see the Compliance Tab for more information.
- See FEMA P-499 Technical Fact Sheet No. 6.1: Window and Door Installation for best-practice approaches that can be taken to reduce water infiltration. Pan flashing, weather stripping, and threshold seals are discussed. The Solution Center guide Windows and Doors are Fully Flashed and the Tech Note: Window and Door Flashing: Code Requirements and Best Practices by Home Innovation Research Labs provide additional detailed instructions for installing window and door flashing.
In all areas where buildings are constructed, windows and doors tend to be more vulnerable to damage than other portions of a building's envelope. In coastal areas where high winds, windborne debris, and wind-driven rain are common and often intense their vulnerabilities are more pronounced (FEMA P-762 2009). Air leaks around doors can allow wind entry during high-wind events, contributing to internal pressure changes that can contribute to building failures (FEMA P-762 2009). Flashing is required by the 2021 International Residential Code (IRC) Section R703.4 to prevent moisture from entering the wall system.
Water leakage around windows and doors is also quite common but because the effects of water leakage are often subtle, the full effects of water leakage are often not readily apparent. Water-resistant siding materials like vinyl and veneer can hide moisture damage in the sheathing caused by rainwater entry for years. Leakage or water entry due to inadequate or improperly installed flashing, weatherstripping, or weather-resistant barriers can allow water to enter a building’s interior even when the structure of the window or door remains intact. Water intrusion can cause rot and fastener corrosion that can weaken the window or door frame or the wall framing itself. Leakage can also cause damage to interior finishes and facilitate mold growth (FEMA P-762 2009).
Windows and doors can fail if they are not strong enough to resist wind pressures from a high-wind event or if forces exerted on the doors or windows exceed the strength of their anchorage. When strength is inadequate, the window or door’s glazing or frames fail; when anchorage is inadequate, the entire door or window unit can be torn from its mounting. As wind speeds increase due to storm strength in Category 2 or weak Category 3 levels, failures of these elements become more frequent. Wind pressure increases resulting from the failure of windows and doors can significantly increase (in some cases doubling) the wind forces working to blow the roof off or blow out exterior walls.
The FEMA P-762 Local Officials Guide to Coastal Construction provides the following guidance on window and door leakage (excerpted):
Hurricanes and coastal storms can pose significant problems from water-infiltration due to wind-driven rain. Leakage can occur between the door or window and their frames and between the door/window frames and the walls onto which they are mounted. Coastal storms such as tropical storms and hurricanes generate winds that may approach or exceed the wind speeds observed during design wind events. As such, these winds generate high-wind pressures on the outsides of the buildings, exploiting any vulnerability around doors and windows and allowing water to enter buildings.
Further, leakage rates typically increase with greater wind speeds. While the amount of water entry will typically be much less from leakage around windows and doors than the water entry that can result from a breach in the building envelope, actions can and should be taken to help reduce leakage around doors and windows. These actions are often above code or best-practices approaches.
Code Requirements for Window and Door Leakage
The IRC and the International Building Code (IBC) both specify that windows, sliding doors, and exterior doors meet testing requirements specified in AAMA/ WDMA/CSA 101/I.S.2/A440 and/or ASTM E330.
Reducing Window and Door Leakage
FEMA P-499 Technical Fact Sheet No. 6.1: Window and Door Installation, provides some best-practice approaches that can be taken to reduce water infiltration. Pan flashing (i.e., flashing under windowsills), weatherstripping, and threshold seals are discussed. Other actions can be taken to reduce the potential for water entry. These include:
- Vestibules. Designing a vestibule, or double-doored entry, to protect a door entry is one method of managing water infiltration problems. Through this approach, both the inner and outer doors can be equipped with weatherstripping, and the vestibule itself can be designed to tolerate water. For example, water-resistant finishes (e.g., concrete or tile) can be specified, and the floor can be equipped with a drain. As a result, a secondary layer of protection is provided for the primary entrance (via the vestibule and vestibule door).
- Door swing. Out-swinging doors offer an advantage compared to in-swinging door assemblies. With out-swinging door assemblies, the weatherstripping is located on the interior side of the door, where it is less susceptible to degradation than the exposed weatherstripping on in-swinging door assemblies. Also, some interlocking weatherstripping products are available for out-swinging door assemblies that provide better performance than those used on in-swinging door assemblies.
- Finish selection. One design approach to deal with leakage is to avoid running carpet (or other finishes that can be damaged by water) entirely to the edge of walls that contain a large amount of glazing. Instead, a strip of water-resistant material (such as tile) could be specified along the wall so if light to moderate leakage occurs, the potential for damage to interior finishes and contents is greatly reduced.
Code Requirements for Strength and Anchorage
The IRC and the IBC both specify that windows, sliding doors, and exterior doors meet testing requirements for strength and anchorage to resist wind pressures
Pests
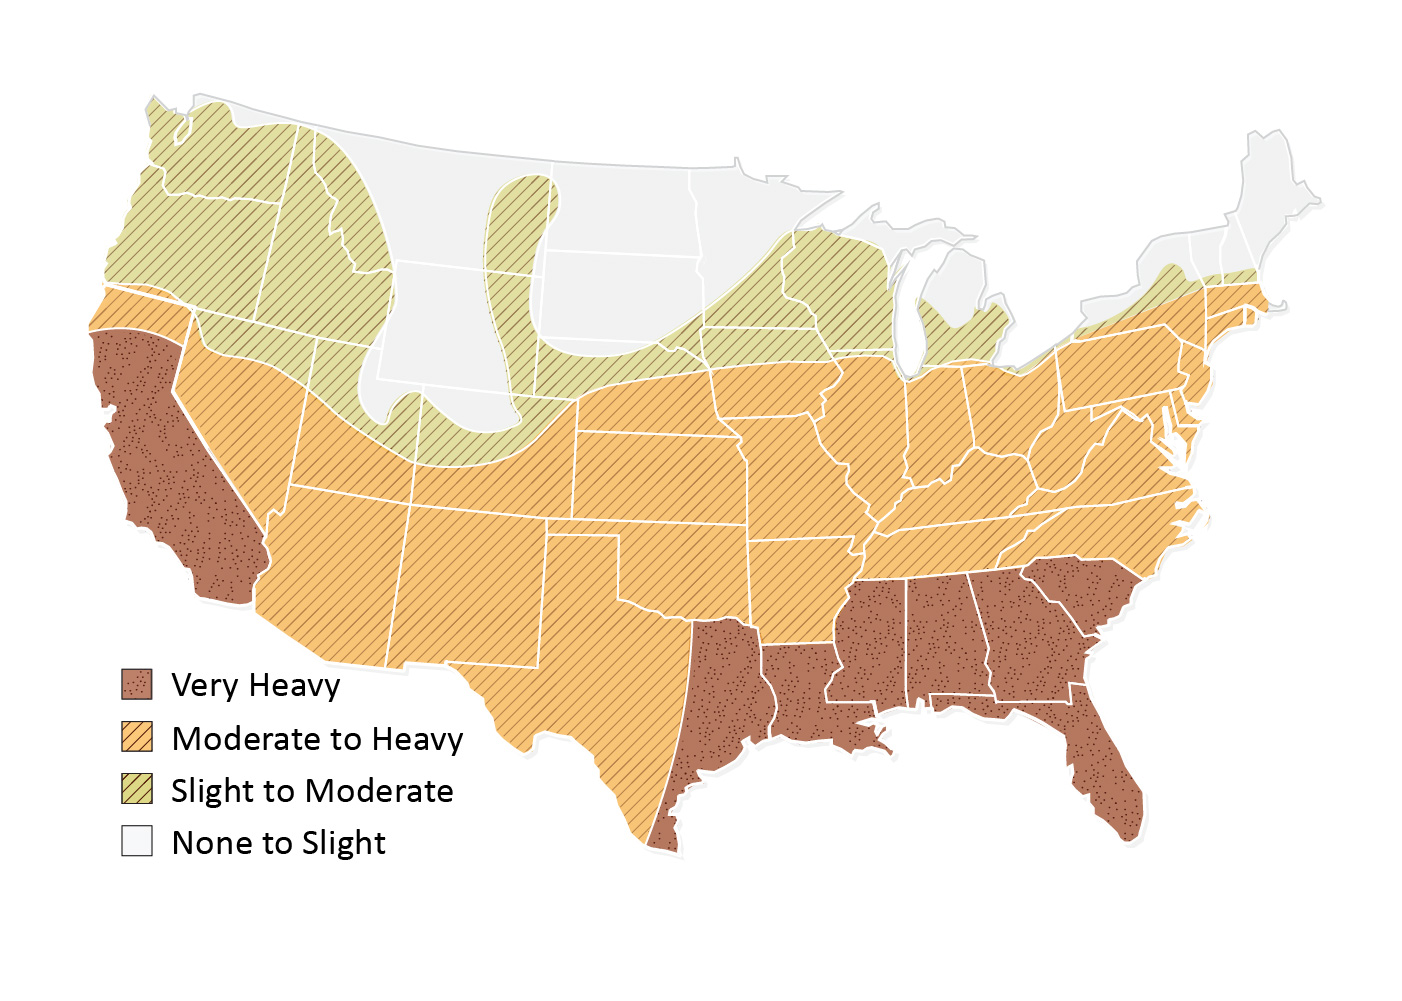
In areas where severe termite or insect infestation problems exist (see Figure 1, a termite infestation map), wood frames, shims, and bucks should either be pressure-treated or should be constructed with wood that is naturally insect- and rot-resistant. Since some pressure treatment increases the moisture content of framing, the use of material that is kiln dried after treatment is duggested to control shrinkage. Metal doors are recommended. PVC trim should be used (FEMA P-762 2009).
Source
- Use solid-core doors where possible. Solid-core doors are more durable and do not have hidden recessed areas or cavities that could harbor pests.
- In areas of high rodent pressure, install metal doors or fit external doors with 26-gauge sheet metal kick plates 12 inches tall and mounted no more than 1/4 inch from the bottom of the door.
- Ensure that doors fit tightly with less than ¼ inch between the bottom of the door and the threshold. Use tight-fitting door sweeps if gaps are larger than 1/4 inch.
- Install a door sweep – automatic door sweeps or bristle sweeps are preferable to rubber or plastic sweeps. Install door sweeps that touch the ground and go the entire length of the bottom of the door. If properly installed, the sweep will brush the ground, but not hold the door open (a fire hazard). In areas prone to rodent infestation, do not use vinyl sweeps.
- Equip exterior doors with self-closing devices.
- Install screen doors with a heavy kick plate and durable frames to prevent warping and ensure a good seal from the outdoors.
- Use weatherstripping on all exterior doors.
- Install screens and weatherstripping on all operable exterior windows.
- Install head flashing, side flashing, and sill pan flashing around all windows and doors.
- Avoid planting shrubs or installing trellises near doorways.
Training
Right and Wrong Images
Source
Guide describing details that serve as a visual reference for each of the line items in the Thermal Enclosure System Rater Checklist.
Source
Guide describing details that serve as a visual reference for each of the line items in the Thermal Enclosure System Rater Checklist.
Source
Guide describing tools for island and hurricane-prone communities on redevelopment and rehabilitation of homes to prepare for future natural disasters.

Source
Guide describing details that serve as a visual reference for each of the line items in the Thermal Enclosure System Rater Checklist.
Source
Guide describing details that serve as a visual reference for each of the line items in the Thermal Enclosure System Rater Checklist.

Source
Guide describing details that serve as a visual reference for each of the line items in the Thermal Enclosure System Rater Checklist.

Source
Source
Document describing the air leakage provisions of Appendix RA of the 2015 IECC (prepared for the State of Georgia to assist with compliance with their 2019 Energy Code).
Source
Guide describing details that serve as a visual reference for each of the line items in the Thermal Enclosure System Rater Checklist.
Source
Source
Source
Source
Website providing the technical specifications and related documents for home builders, subcontractors, architects, and other housing professionals interested in certifying a home to the EPA's Indoor airPLUS program requirements.

Source
Article describing an overview of weatherstripping requirements.
Videos


Compliance
Retrofit
SCOPE
In existing homes, air-seal doors adjacent to unconditioned space (e.g., vented attics, garages, unconditioned basements, cellars, vented crawlspaces, outdoors) to minimize air leakage.
- Install a continuous gasket, such as weatherstripping, around the interior perimeter of the door frame.
- Install a tight-fitting door sweep along the bottom of the door.
- Inspect for and repair any water damage or dry rot. If the existing door has a hollow core, consider replacing the door with an automatic closing door that is metal or fiberglass with an insulated foam core and has an ENERGY STAR rating. Exterior door replacements must meet the code requirements under alterations for an exterior door replacement (see the Compliance tab for more information).
- Remove interior trim around the door, insulate and air-seal the rough opening, then replace and caulk around trim.
- If the remodeling scope includes removing exterior trim around the door, flash around the exterior of the door frame with adhesive or liquid-applied waterproof flashing that is integrated with house wrap before replacing trim.
- For more information on conditions that may be encountered when working with doors adjacent to unconditioned spaces in existing homes, see the Pre-Retrofit Assessment of Walls, Windows, and Doors. Also see the U.S. Department of Energy’s Standard Work Specifications (SWS) guidance on air-sealing doors to keep out moisture, air, and pests. The SWS also describes practices to complete home upgrades safely without injury or hazardous exposure in the section on Global Worker Safety.
DESCRIPTION
How to Air-Seal Doors Adjacent to Unconditioned Spaces in Existing Homes
- Inspect all the doors in the house that are adjacent to unconditioned spaces (e.g., outside, garage, cellar, crawl space, vented attic, etc.) for gaps between the door and the framing, for air leakage around the framing, and for signs of water damage or dry rot.
- Repair any water damage or dry rot to door, framing, or wall materials.
- Carefully remove the door trim, using a crow bar or nail remover to loosen and pull finishing nails around the trim.
- Remove interior trim around the door, inspect the rough opening around the door; if it lacks air-sealing and insulation or if it is only insulated with air-permeable batt insulation, remove the insulation and air-seal the rough opening with foam-backer rod, non-expanding spray foam, or caulk; then re-install and caulk around trim.
- If the remodeling scope includes removing exterior trim around the door, inspect for and repair any water damage or dry rot; then flash around the exterior of the door frame with adhesive or liquid-applied waterproof flashing that is integrated with house wrap; then replace and caulk around trim.
- Install appropriate weatherstripping to the door frame. See the table in the Description tab for types.
COMPLIANCE
See Compliance tab.
More Info
Case Studies
References and Resources
*For non-dated media, such as websites, the date listed is the date accessed.
Contributors to this Guide
The following authors and organizations contributed to the content in this Guide.
Sales
Tight Air Sealed Home = Comprehensive Draft Protection
Technical Description
Poorly air-sealed homes are less comfortable and cost more to maintain because they provide a pathway for drafts, cold spots, moisture, and insects into the home. Comprehensive draft protection includes a continuous air barrier around the whole house along with caulking and sealing in all holes and cracks. This includes around wiring, plumbing, ducts, and flues; where wall framing meets flooring; around windows; where drywall meets top plates and sill plates; where rim joists meet foundation walls and subfloors; etc. Spray foam insulation can be used at rim joists, floors above unconditioned space, and in attics to insulate and air seal at the same time.
Questions? Comments? Contact our webmaster.