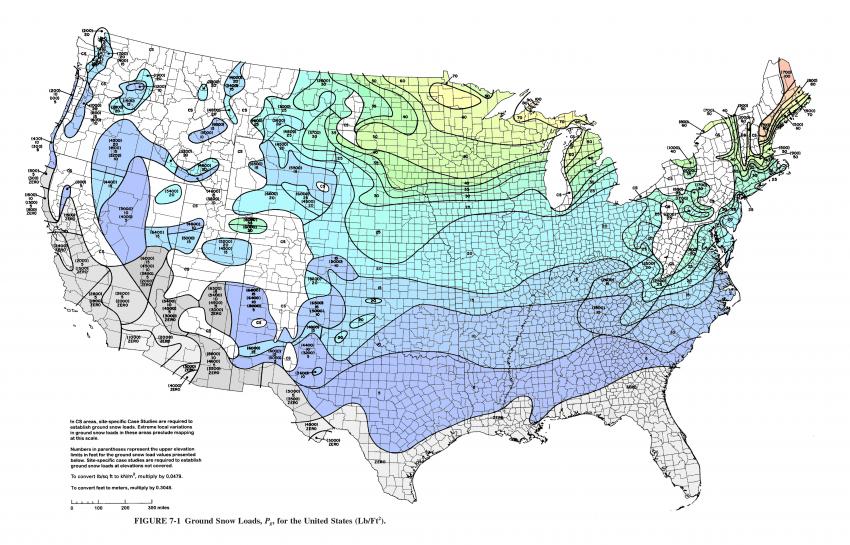
In cold climate zones where heavy snow fall is expected (Figure 1), it is important to design attic and roof assemblies to minimize the likelihood of ice dam formation. An ice dam is an accumulation of ice that forms at the eave of a roof and prevents melted snow from draining off the roof. Some snow melt may overflow the dam and create icicles (Figure 2). These icicles are often a sign that more liquid water is building up behind the dam where it can be drawn up beneath the shingles by capillary action and cause roof leaks. If enough water and ice accumulates on the roof, it could overwhelm the roof structure and cause a roof collapse (University of Minnesota 2019).
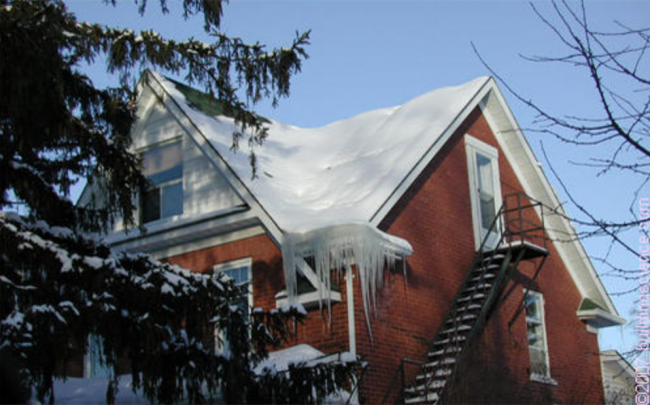
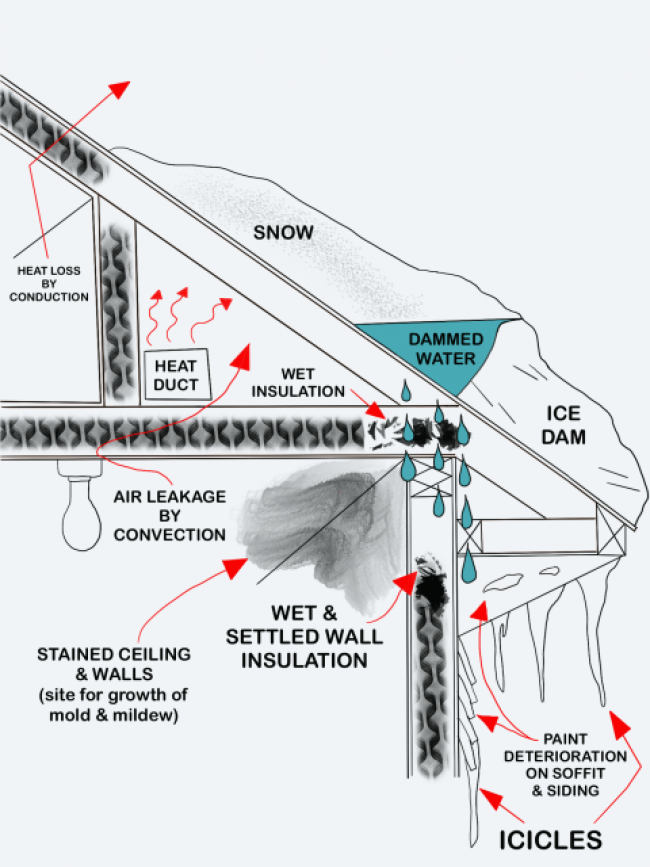
Ice dam formation requires three things to occur: snow on the roof; a poorly air sealed and/or poorly insulated attic; and freezing temperatures (UMass Amherst - Department of Environmental Conservation 2019). Ice dams can form with as little as 2 inches of snow accumulation on a roof. When heated air from the house escapes into the attic, it can warm the underside of the roof deck, melting the snow on the roof above. This snowmelt water runs down the roof until it reaches the cold eaves where it refreezes as shown in Figure 3 (UMass Amherst - Department of Environmental Conservation 2019). As this melting and freezing action continues, the ice ridge grows larger, forming a dam that blocks the flow of water behind it so that a puddle of liquid water forms on the roof above the eave.
The three best ways builders can combat ice dam formation are to
- Fully air seal the ceiling plane.
- Thoroughly insulate the attic.
- Ventilate the roof.
The most important step is to seal all of the air leaks from the conditioned space into the attic space to keep warm air from entering the attic in the first place (Lstiburek 2018). Common sources of air leakage into the attic include gaps around electrical wiring, light fixtures especially recessed can lights, plumbing stacks, furnace flues and chimneys, attic hatches and stairs, dropped ceilings, open soffits, exhaust fan housings, top plates, ceiling drywall seams, and attic kneewalls (Lstiburek 2014). Figure 4 shows examples of air sealing of several potential air leakage spots on the ceiling including around exhaust ducts, wiring holes, top plates, and drywall seams. Many of these air sealing measures are described in the Building America Solution Center guides listed at the end of this guide.

Adequate attic insulation also needs to be installed to prevent heat from transferring to the roof decking. This insulation can be installed on the ceiling lid in a vented attic, or on top of the roof deck (using layers of rigid foam), or on the underside of the roof deck of an unvented attic (using closed-cell spray foam). The air barrier under the insulation has to be continuous. In a vented attic, the air barrier is usually the ceiling drywall, with every penetration air sealed. In an unvented attic with rigid foam above the roof decking, the air barrier can be the roof decking with taped seams or a full self-adhered membrane or a fluid-applied air barrier product. In high snow-load zones (> 60 lbs/ft2) the most successful approach to addressing ice dams with unvented compact roof assemblies is to construct a vented “over-roof” over the unvented “under-roof” (Lstiburek 2020). In Climates Zones 6 or higher, a vented attic also needs at least a Class II vapor retarder (kraft-faced fiberglass batts, “smart" membrane vapor barrier, or vapor barrier paint) between the air barrier (the ceiling drywall) and the insulation (Lstiburek 2020). Raised-heel energy trusses can allow the full depth of insulation over the top plates to keep the roof deck area above the eaves cooler.
It’s critical to vent the roof assembly in cold climates, under the roof deck with a vented attic or over the roof deck with an unvented attic, to keep the roof cool to minimize the snow melt that leads to ice dam formation, as shown in Figure 5 (FEMA 2014). Baffles and insulation dams should be installed to keep insulation out of the soffit vents and to direct cooling air flow from the soffit vents up along the underside of the roof deck to the ridge vents (Figure 6). An air gap of at least 2 inches should be provided between the top of the insulation and the underside of the roof deck (Lstiburek 2018).


See the following guides for instructions on specific areas to air seal to prevent the leakage of heated air from the home through the ceiling and into the attic.
- Air Seal Top Plates or Blocking Missing at Top of Walls Adjoining Unconditioned Spaces
- Air Sealing Attached Garage
- Air Sealing Attic Access Panels/Doors/Stairs
- Air Sealing Bathroom and Kitchen Exhaust Fans
- Air Sealing Drywall to Top Plate
- Air Sealing Duct and Flue Shafts
- Air Sealing Electrical Wiring
- Air Sealing Light Tubes
- Air Sealing Recessed Light Fixtures Below Unconditioned Space
- Air Sealing Whole-House Fans
- Attic Eave Minimum Insulation
- Attic Knee Walls
- Batt Insulation for Existing Vented Attics
- Blown Insulation for Existing Vented Attic
- Ceilings
- Condensation Control in Attics and Roofs in Cold Weather
- Dropped Ceiling/Soffit Below Unconditioned Attic
- Indoor Sprinklers for Fire Protection
- Insulating and Air Sealing Existing Non-ICAT Recessed Lights
- Insulation Below Attic Platforms
- Roof/Attic to Exterior Wall Air Control Upgrade
- Skylight Shaft Walls
- Spray Foam Insulation Applied to Existing Attic Floor
- Unvented Attic Insulation
- Vented vs Unvented Attic
- Walls Adjoining Porch Roof
- Wind Washing
These Building America Solution Center guides provide more information on attic ventilation:
- Condensation Control in Attics and Roofs in Cold Weather
- Roof Vents
- Attic Eave Minimum Insulation
- Vented vs Unvented Attic
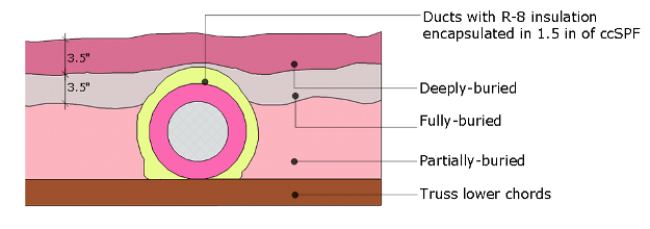
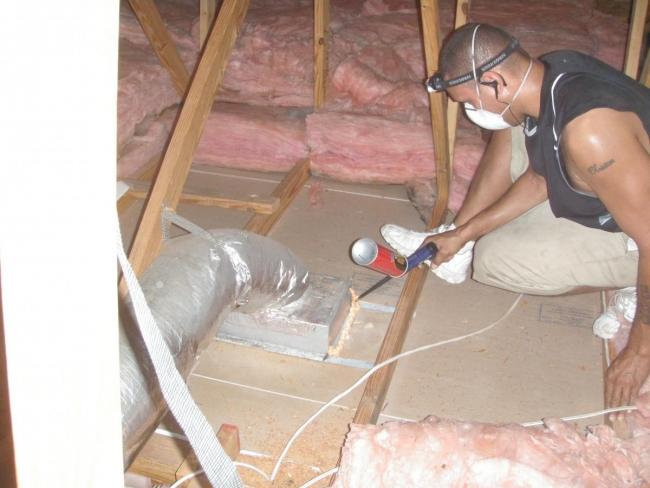
If any ducts are located in a vented attic (not recommended), they can be air sealed and insulated by encapsulating in spray foam and then covering with attic insulation (Figure 7), after first air sealing by spray foaming around all of the duct boot penetrations on the ceiling deck (Figure 8). A better option if HVAC equipment must remain in the attic is to move the air barrier and insulation above the HVAC by locating it at the roof line of the attic as shown in Figure 9 where the roof joists have been netted and filled with blown insulation, then more rigid foam has been installed above the roof deck and a vented over-roof has been installed above that.

The following guides provide information on adding more insulation to an existing attic and on converting a vented attic to an unvented attic by adding insulation above or along the underside of the roof deck.
- Above Deck Rigid Foam Insulation for Existing Roofs
- Unvented Insulated Sloped Roofs
- Water Managed Roof – Re-roofing and Adding Insulation Over a Sloped Roof
- Water Managed Roof – Re-roofing and Adding Insulation over a Flat Roof
- Roof/Attic to Exterior Wall Air Control Upgrade
- Managing Snow Loads on Roofs and Decks
- Below Deck Spray Foam Insulation for Existing Roofs
- Unvented Conditioned Attic with Spray Foam Insulation Below Roof Deck
- Unvented Attic Insulation
- Spray Foam Insulation Applied to Existing Attic Floor
- Batt Insulation for Existing Vented Attics
- Blown Insulation for Existing Vented Attic
As an added layer of protection against roof leaks should ice dams occur, building codes often require that self-adhered membrane be installed on the roof deck along the eaves, as described in the guide "Roof Eaves Sealed with Self-Adhering Membrane in Cold Climates."
More Info
The following authors and organizations contributed to the content in this Guide.
Pacific Northwest National Laboratory