
Insulating and Air Sealing Existing Non-ICAT Recessed Lights

    Scope
    Scope Images
    Image
    Install a sealed enclosure over a non-IC rated recessed light fixture to air seal the can and to prevent insulation from touching the recessed can light
    Scope

    Air seal non-insulation contact (IC) rated recessed can lights by covering the can light with a protective covering to prevent conditioned air from escaping into the attic and to keep insulation from touching the recessed can light . 

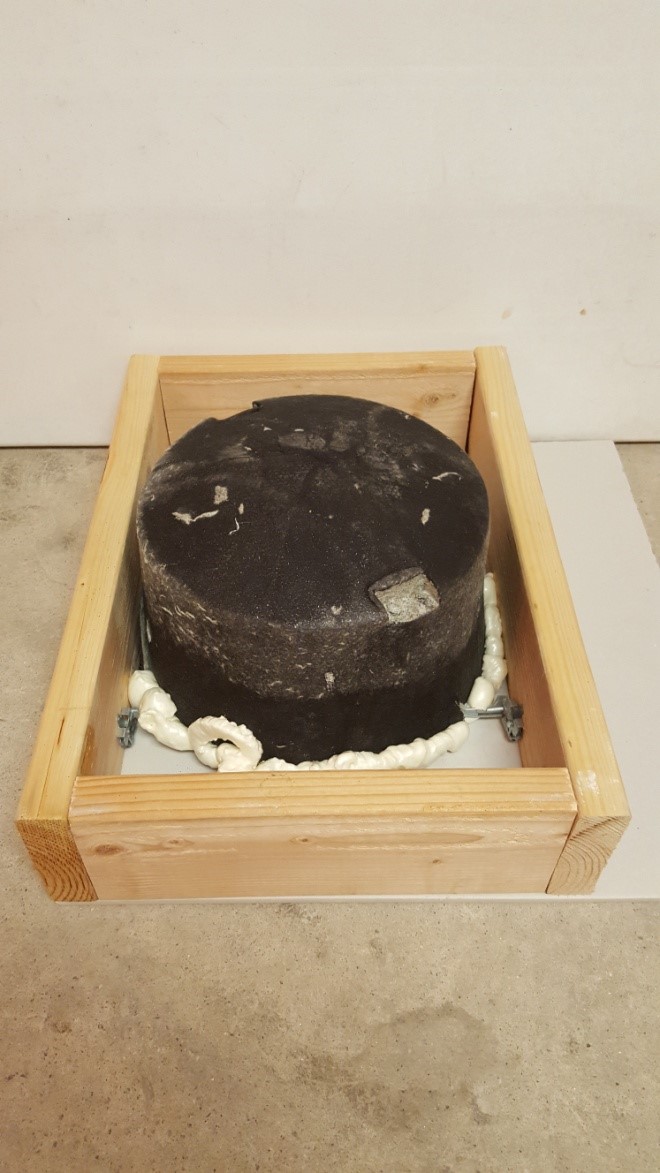
    • Purchase or construct a can light enclosure made from material with a 1-hr fire rating, that has a maximum R-value of ≤ R-0.5 at the top to allow heat to dissipate, that provides a clearance of at least 3 inches on all sides of the fixture, and that extends above the height of the surrounding attic insulation (per the Standard Work Specifications for Home Upgrades).
    • Install the air barrier enclosure over the recessed lighting fixture so that it is centered and sits flush to the top side of the ceiling drywall.
    • Seal around the base of the enclosure with spray foam.

    Or, replace the non-IC rated fixture with an ICAT-rated fixture.

    For more information, see the U.S. Department of Energy’s Standard Work Specifications regarding non-insulation contact (IC) recessed light.

    See the Compliance Tab for related codes and standards, and criteria to meet national programs such as DOE’s Zero Energy Ready Home programENERGY STAR Single-Family New Homes, and Indoor airPLUS.

    Description
    Description

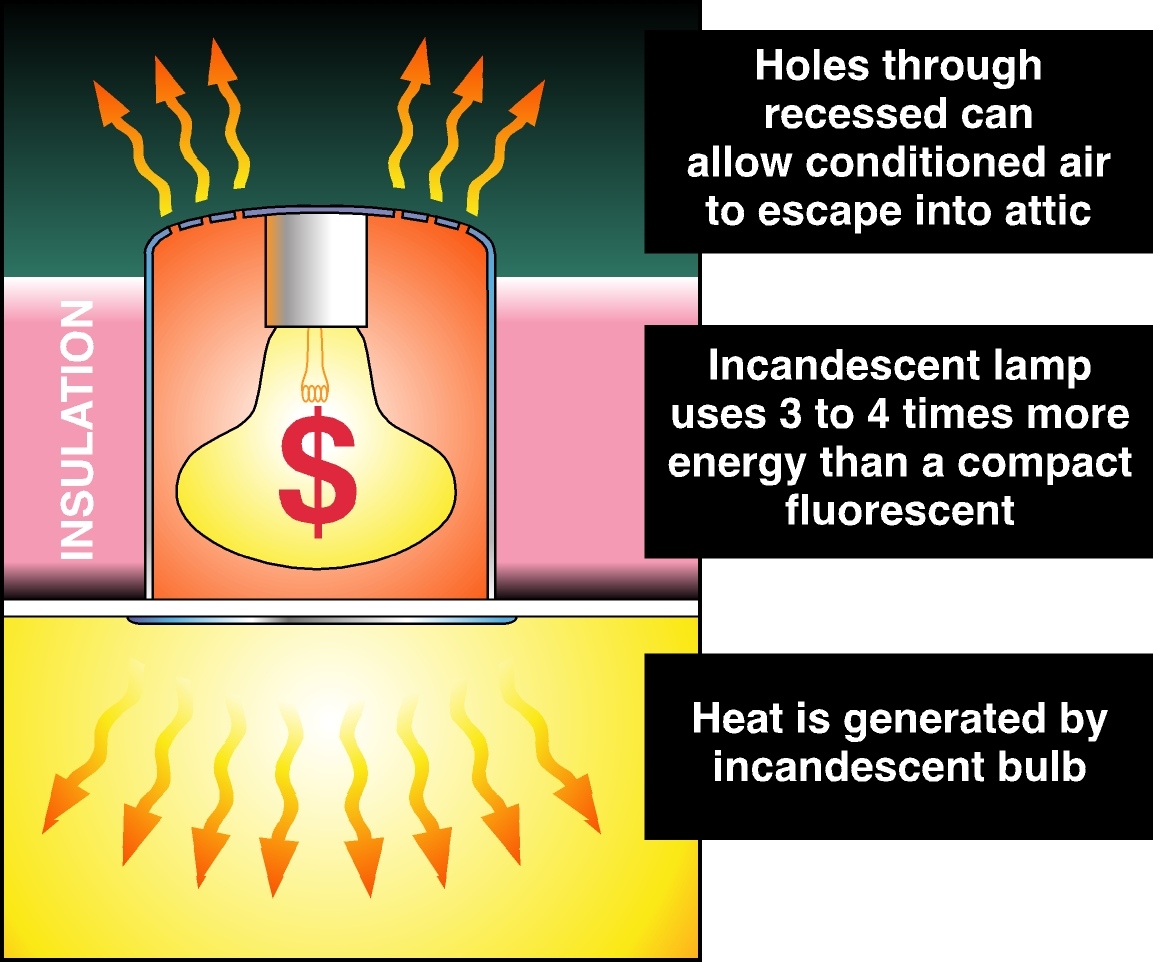
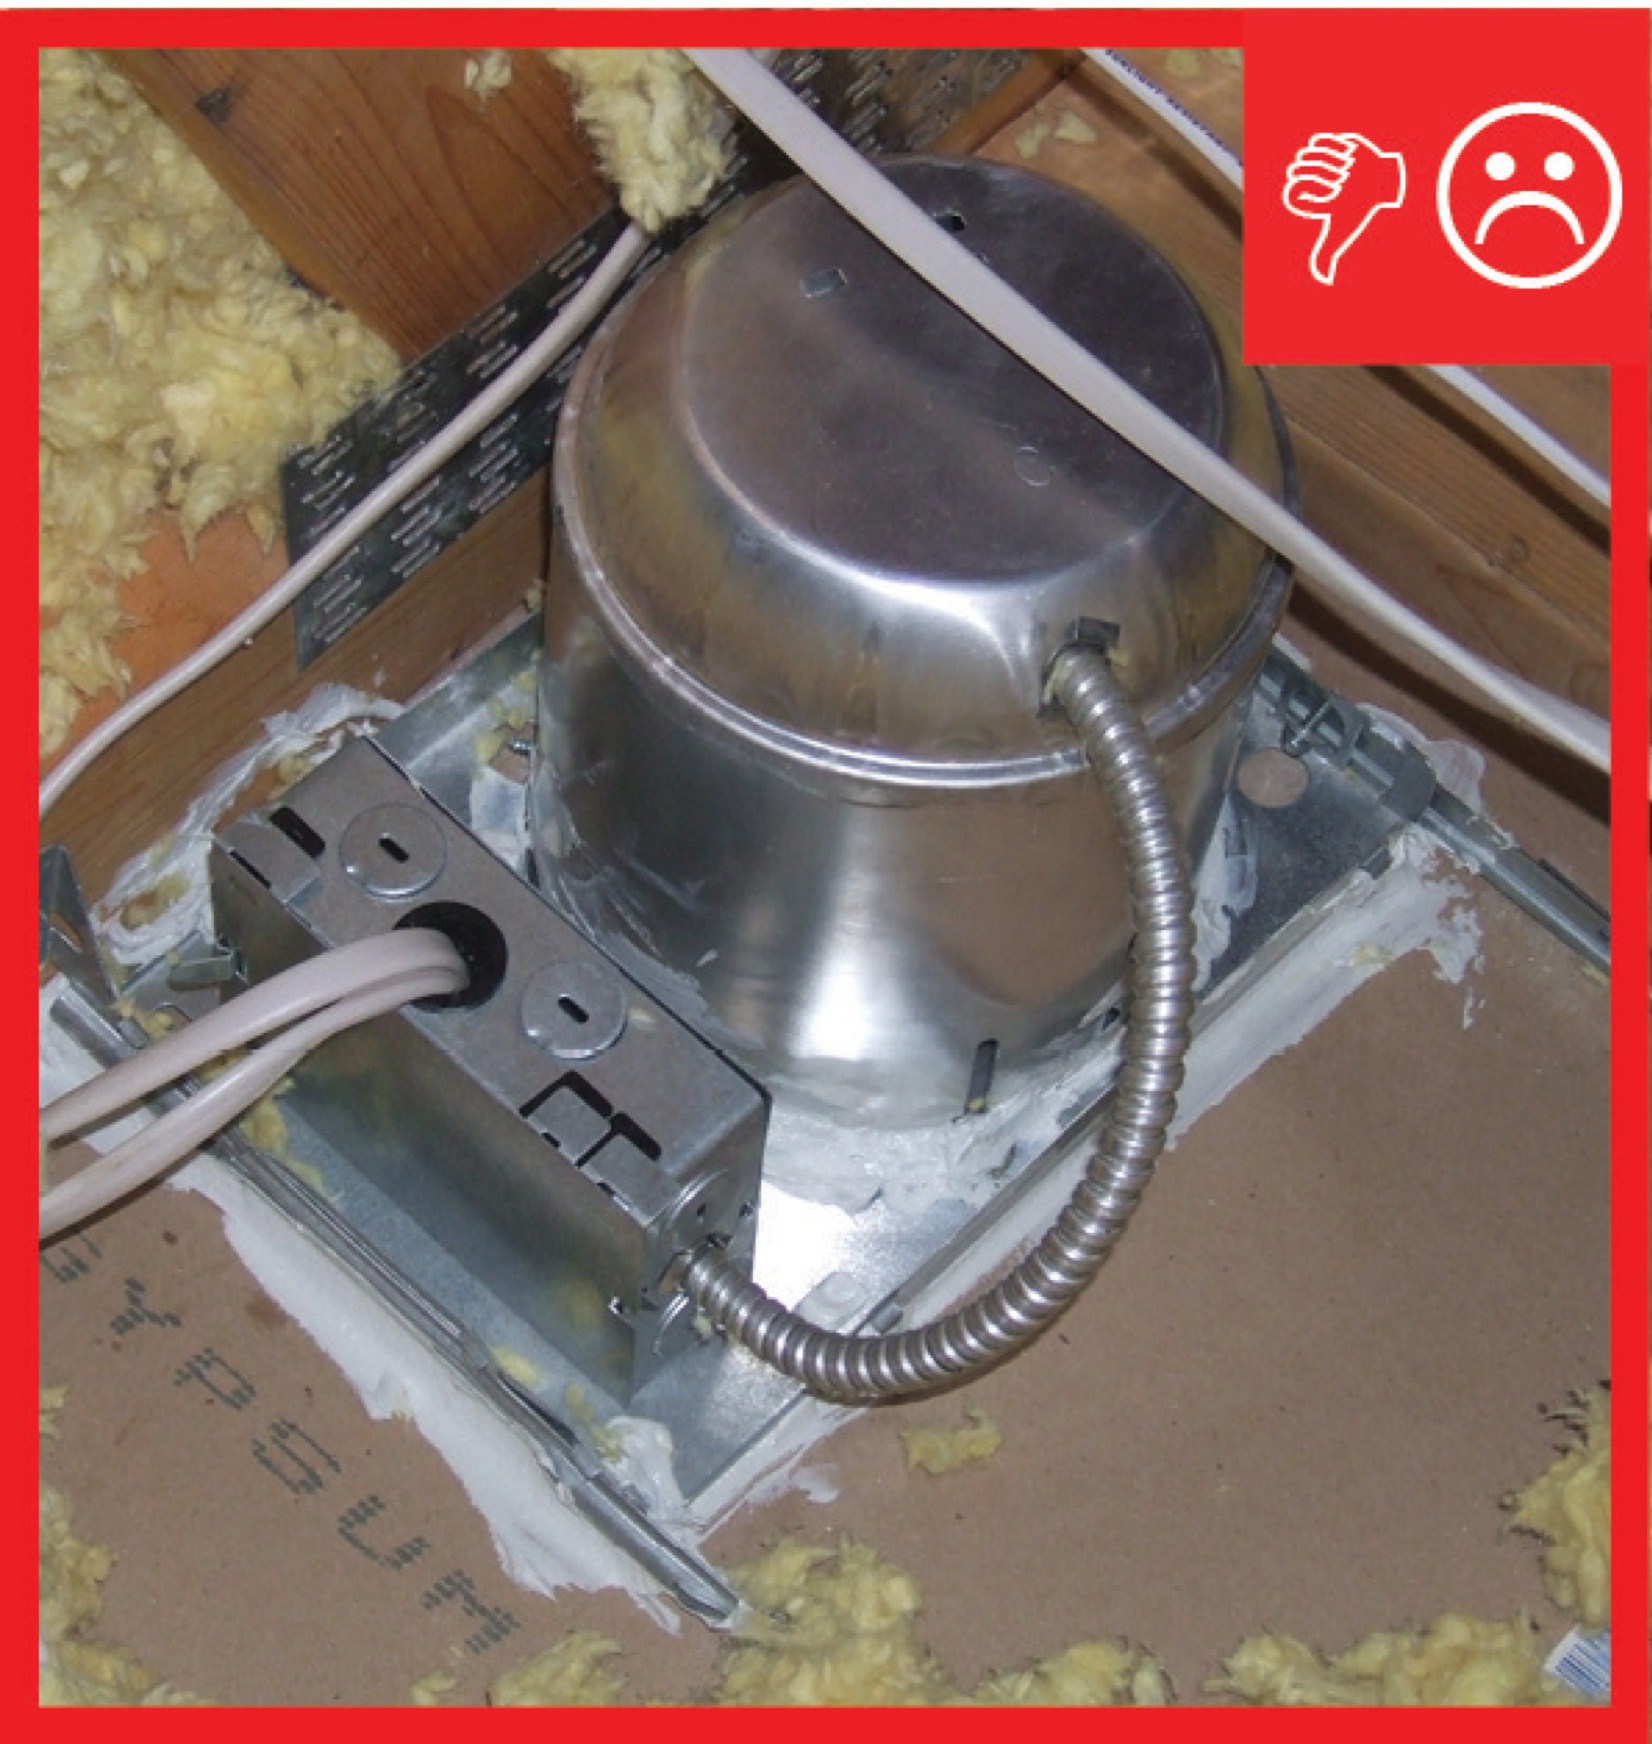
    In existing homes, older recessed can lights are likely not rated for direct contact with insulation. In addition, these fixtures have holes in the top of the light fixture to allow heat to escape (because they were designed for high-heat-output incandescent bulbs). These fixtures are referred to as non-IC (Insulation Contact) or non-ICAT (Insulation Contact and Air Tight) recessed can lights.

    Non-ICAT rated recessed can lights are energy intensive in three ways (see Figure 1). If they are installed in an insulated ceiling, insulation has to be kept at least 3 inches from the fixture all the way around, leaving about 1 square foot of uninsulated ceiling space. (If insulation is in contact with non-ICAT rated lamps, a fire hazard exists.) Second, many homeowners and contractors install incandescent bulbs or R-lamps in the fixtures; these bulbs use four times the electricity of fluorescents and six times the electricity of LEDs, as well as generating heat that adds to air-conditioning loads. Third, if the cans are not airtight, they allow conditioned air to escape from the living area into unconditioned spaces such as the attic. Leaky recessed cans are like a hole in the ceiling, only worse. A non-ICA-rated recessed can light with an incandescent bulb can draw 3 to 5 times more air through holes in the fixture when the light is on versus when it is off due to the stack effect. When the lamp inside the can is turned on, the heat it generates turns the can fixture into a chimney, pulling air from the house up into the attic (McCullough and Gordon 2002). For more on recessed can lights, see the Building America Solution Center guide Air Sealing Recessed Light Fixtures Below Unconditioned Space.

    Non-airtight non-insulation contact rated recessed can light fixtures waste energy and create a potential fire hazard.
    Figure 1. Non-airtight non-insulation contact rated recessed can light fixtures waste energy and create a potential fire hazard. (Source: Steven Winter Associates.)


    To address the issue of air leakage and insulation contact, enclosures can be purchased or constructed to cover existing non-IC rated recessed can lights. The covers are made of fire-rated materials such as 5/8-inch fire-code gypsum wallboard or fsk (foil/scrim kraft) material.  Joints and penetrations are sealed with fire-rated caulk or taped and spackled.

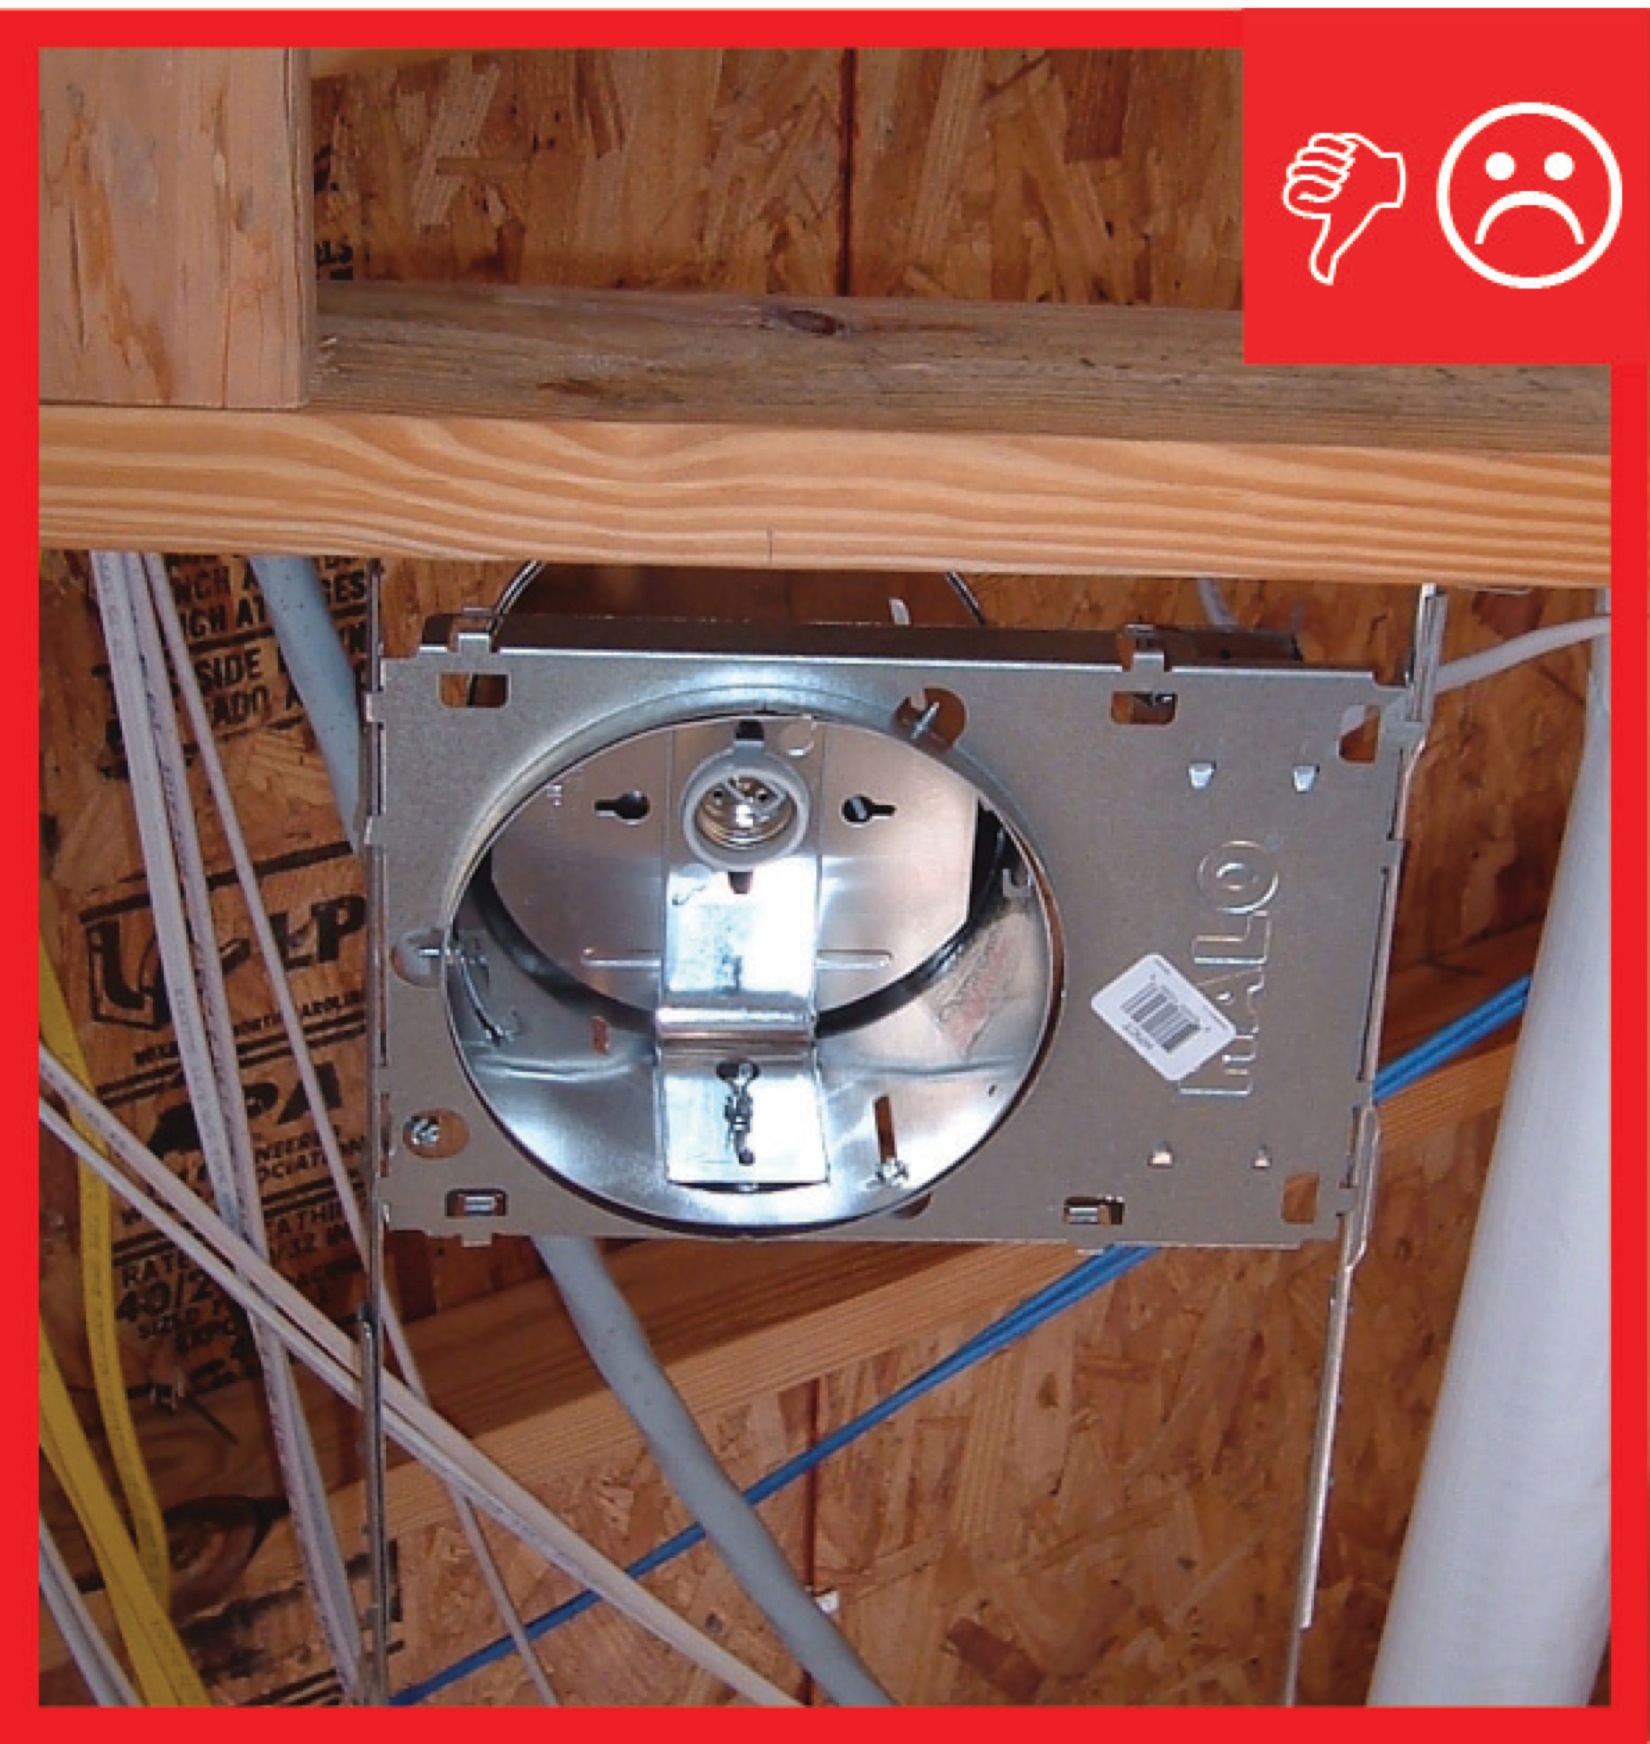
    A better option is to replace the old non-IC fixtures with new ICAT-rated light fixtures. IC-rated fixtures have a thermal safety switch that will shut off the fixture if it overheats and won’t turn it back on until it cools sufficiently. The newer ICAT-rated fixtures are made with fewer holes and equipped with gaskets to eliminate most of the air leakage pathways. Because they are insulation contact-rated, attic insulation can be installed over and around them so there is no slow down in insulation installation. There are also LED based ceiling-mounted light fixtures that look like recessed can lights but are actually mounted to the ceiling surface; i.e., there is no can extending up into the attic.

    If the non-IC recessed can light is to remain and if it currently uses an incandescent bulb, replace the light bulb with a lower heat output bulb, such as a light-emitting diode (LED) or compact fluorescent bulb, prior to installing an air barrier enclosure over the recessed can light. Incandescent or halogen bulbs should not be used with non-IC rated recessed can lights after enclosures are installed because excessive heat build-up can occur, causing a potential fire hazard.

    While enclosure boxes made out of rigid foam insulation have been a common field constructed solution for weatherization contractors and do-it-yourselfers, these enclosures do not have a 1-hour fire-rating. The rigid foam can also provide too much insulation, reducing heat dissipation through conduction. According to a study by the Pennsylvania Housing Research/Resource Center (PHRC), NEC code compliant type NM-B (non-metallic sheathed cable) wiring for a recessed can light remained within the acceptable temperature limit of 194°F when enclosed by an airtight enclosure. However, in older existing homes, there is the potential for the lighting fixture wiring to be NM (without the B suffix), which has a lower temperature limit of 140°F and can deteriorate from exposure to high heat within the airtight enclosure. If a lower heat output bulb is used, this may not be an issue, but it is still not a best practice, as some older fixtures may not have a thermal safety switch integrated into the fixture to prevent overheating.

    Heavily insulated enclosures could be used with recessed can lights that are IC-rated but not AT-rated. Again, low heat output bulbs are required in any of these enclosure approaches.

    How to Air Seal Non-IC Recessed Fixtures

    Because this will require accessing the attic, please first see the guide, Pre-Retrofit Assessment of Attics, Ceilings, and Roofs, for health and safety information related to accessing the attic.

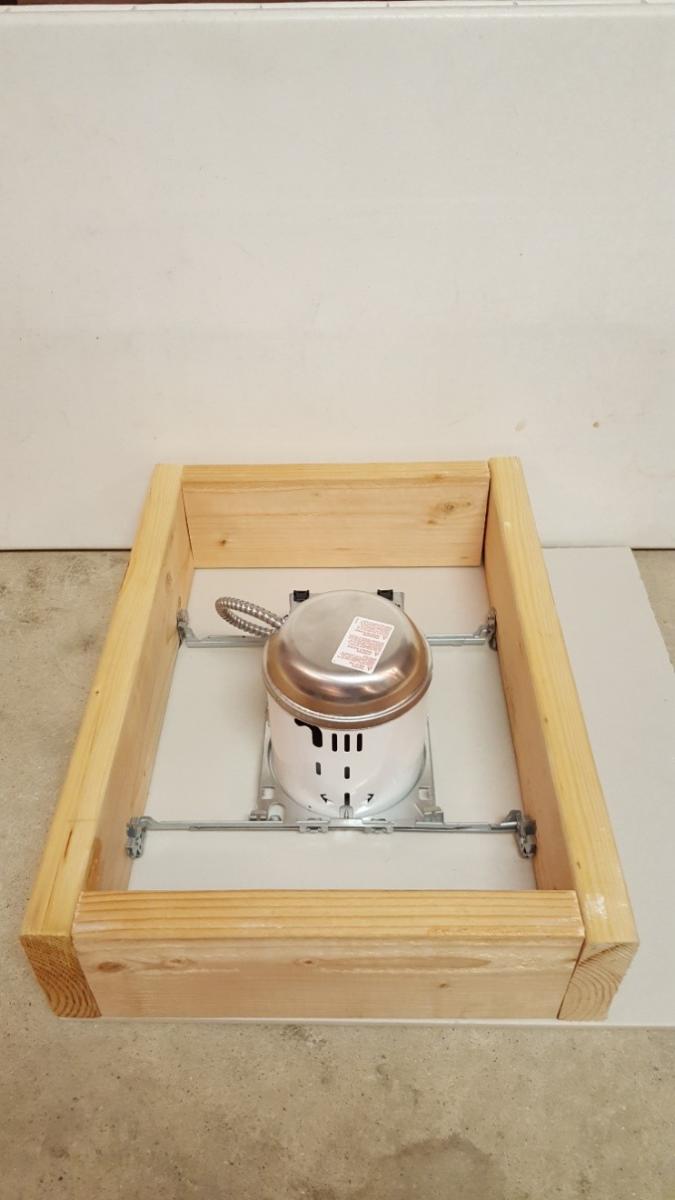
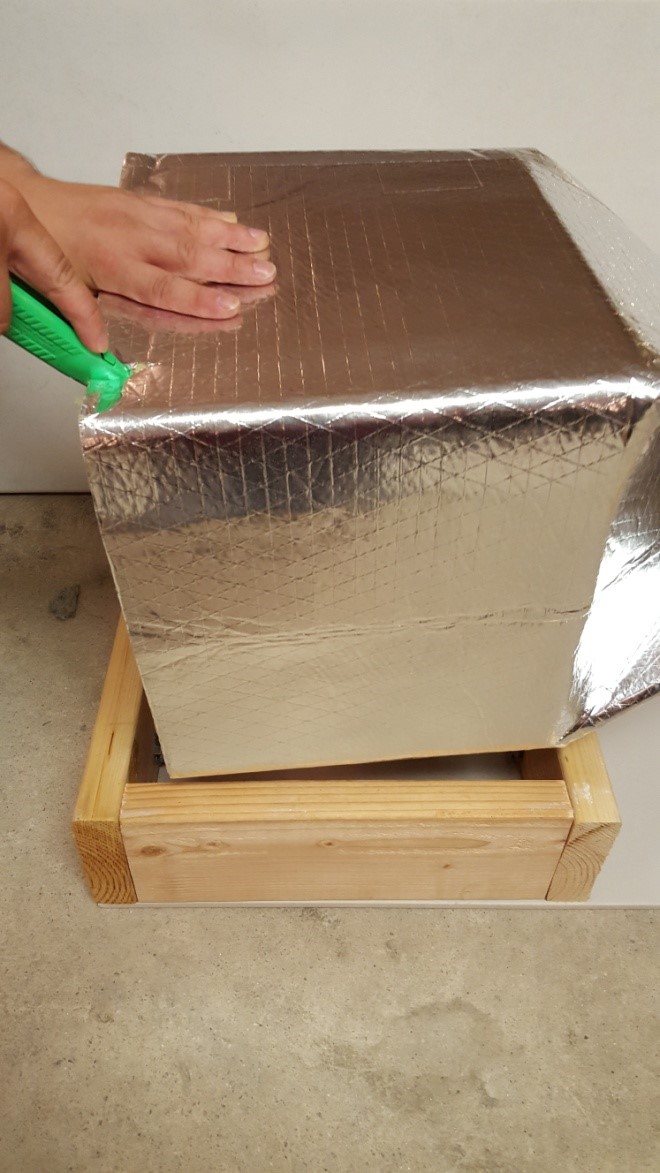
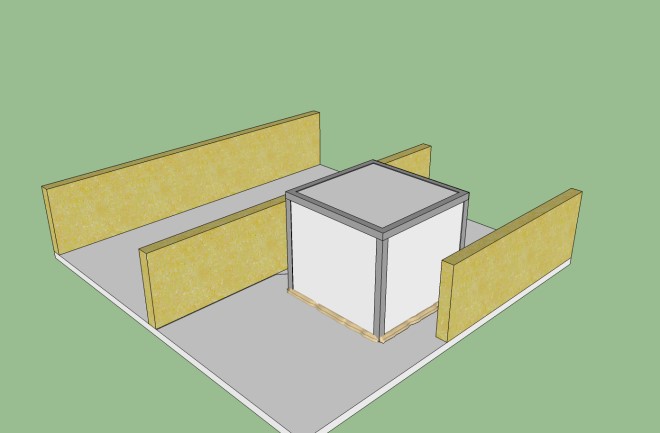
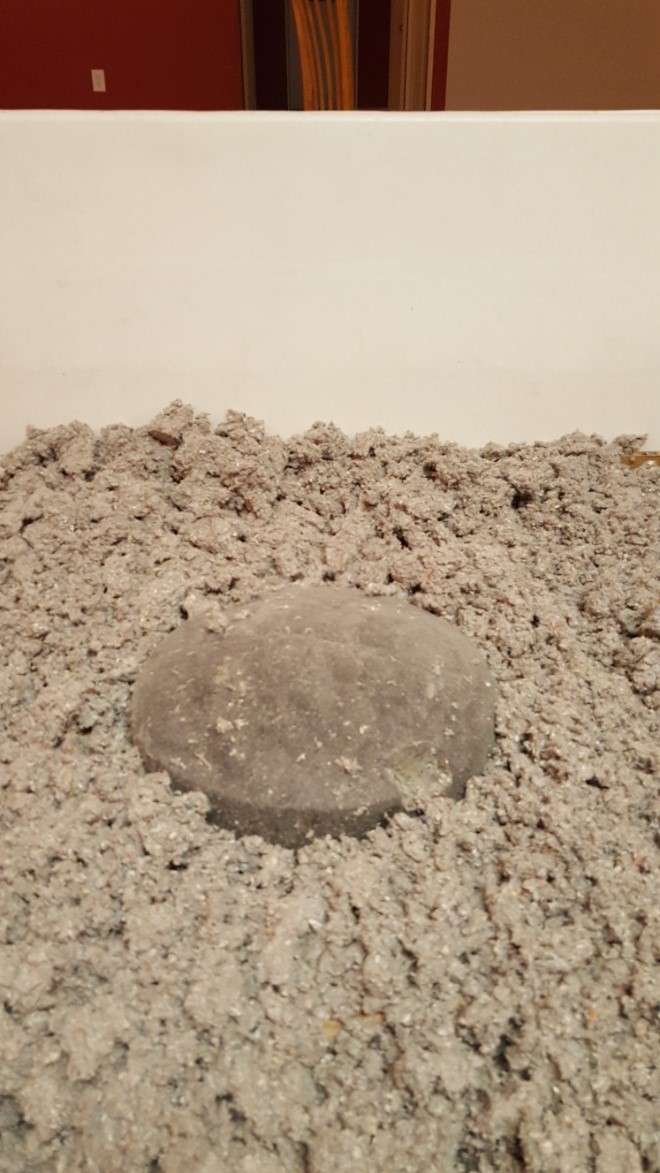
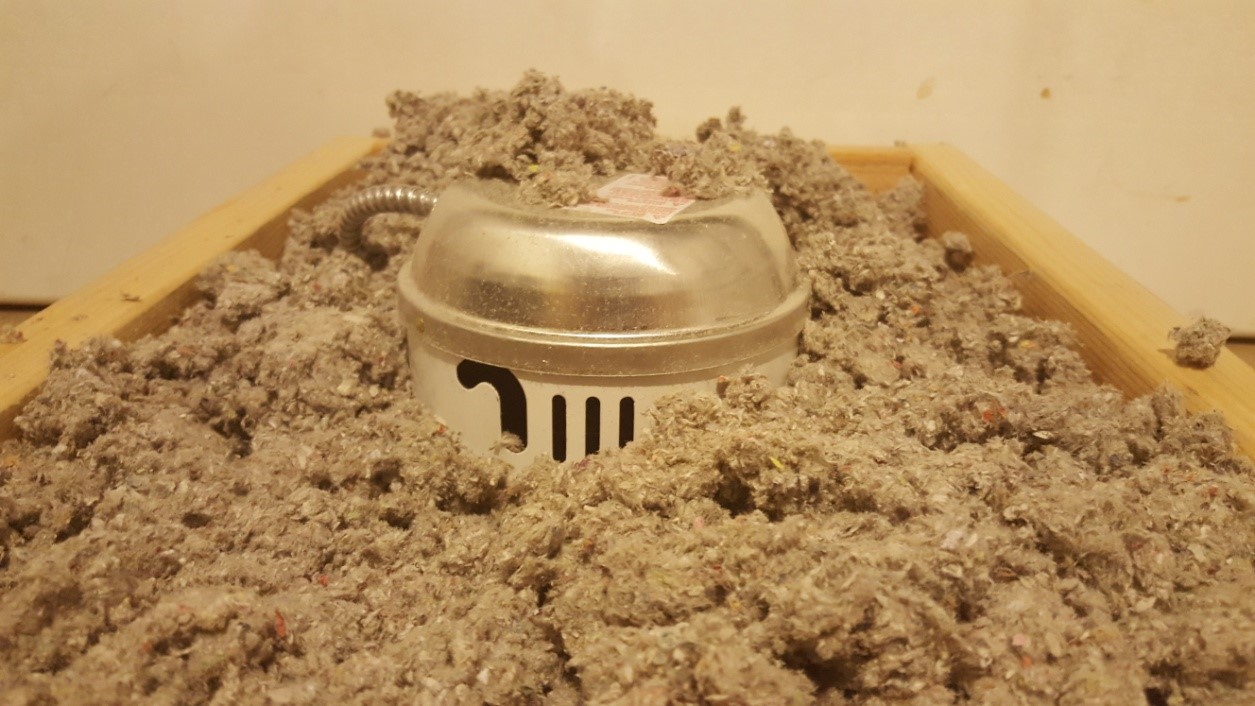
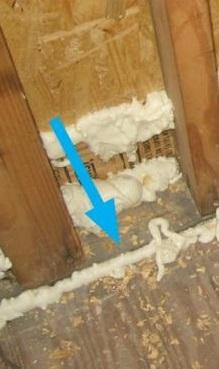
    1. Remove insulation from around the recessed can fixture. See Figures 2 and 3.
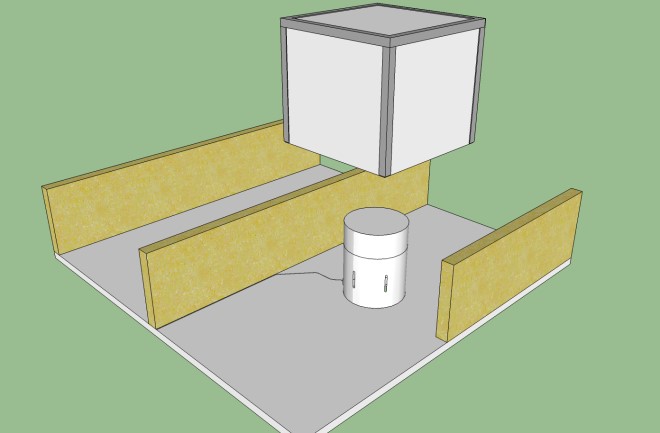
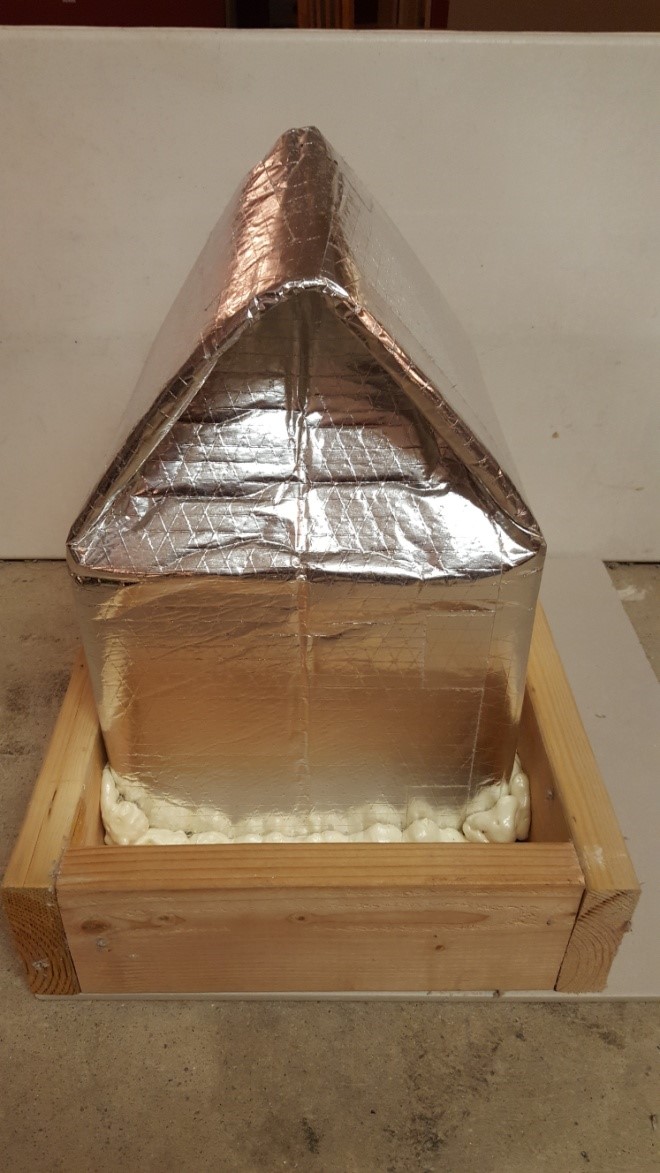
    2. Construct or purchase a fire-rated cover for the fixture that is made of a fire-rated material. See Figure 4.
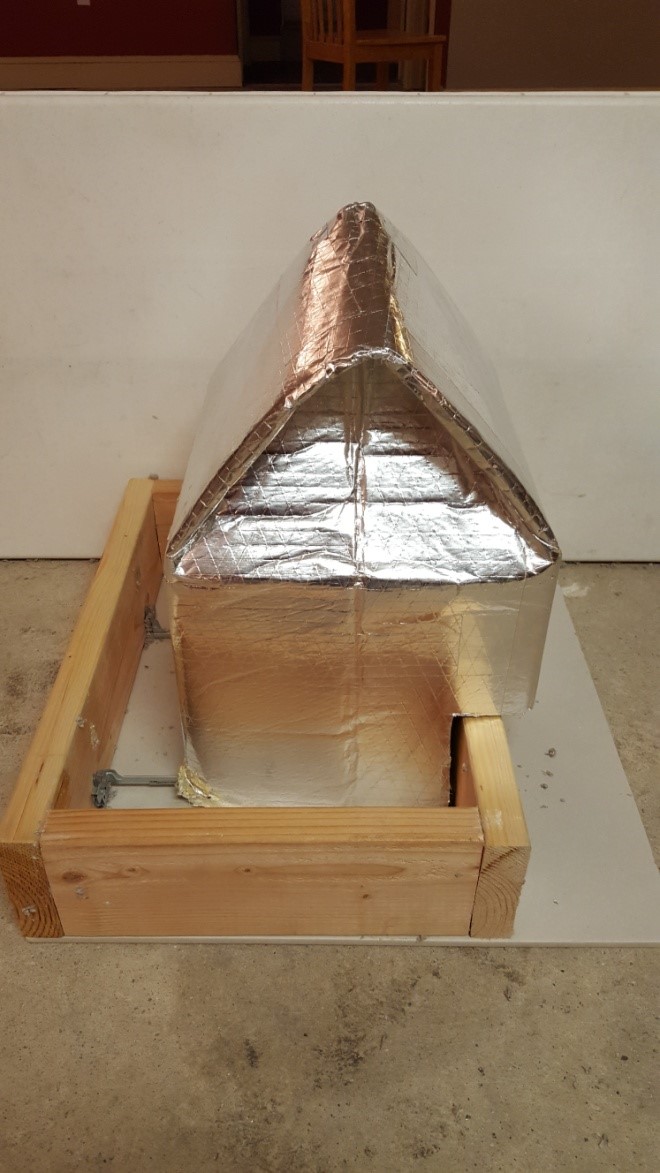
    3. Install the cover by centering it over the fixture with a minimum clearance of 3 inches on all sides of the recessed can light. See Figure 5.
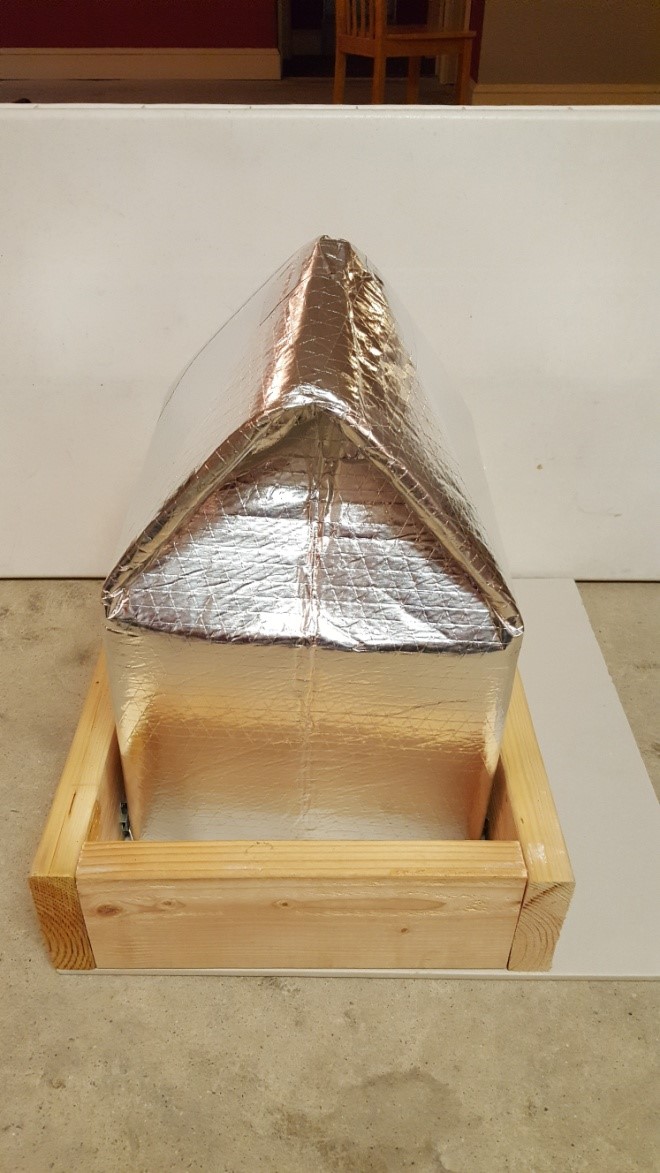
    4. Make slits as required around wiring and hanger brackets to allow the enclosure to sit flush to the gypsum board. See Figure 6.
    5. Cut the cover if necessary to fit around ceiling joist framing. See Figure 7.
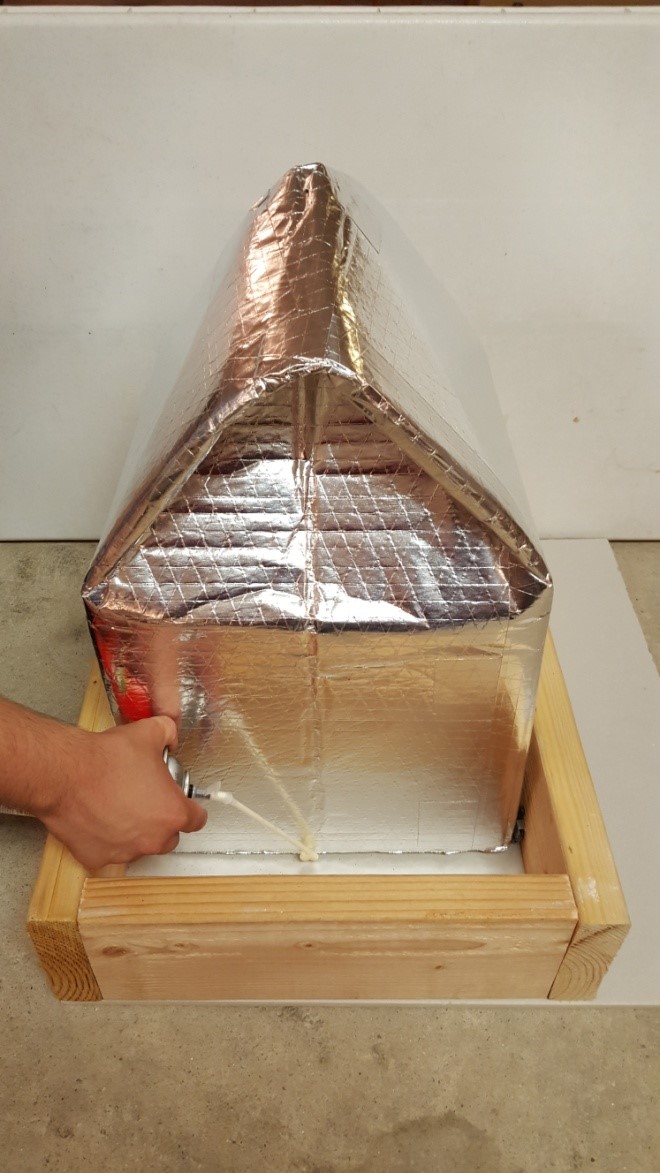
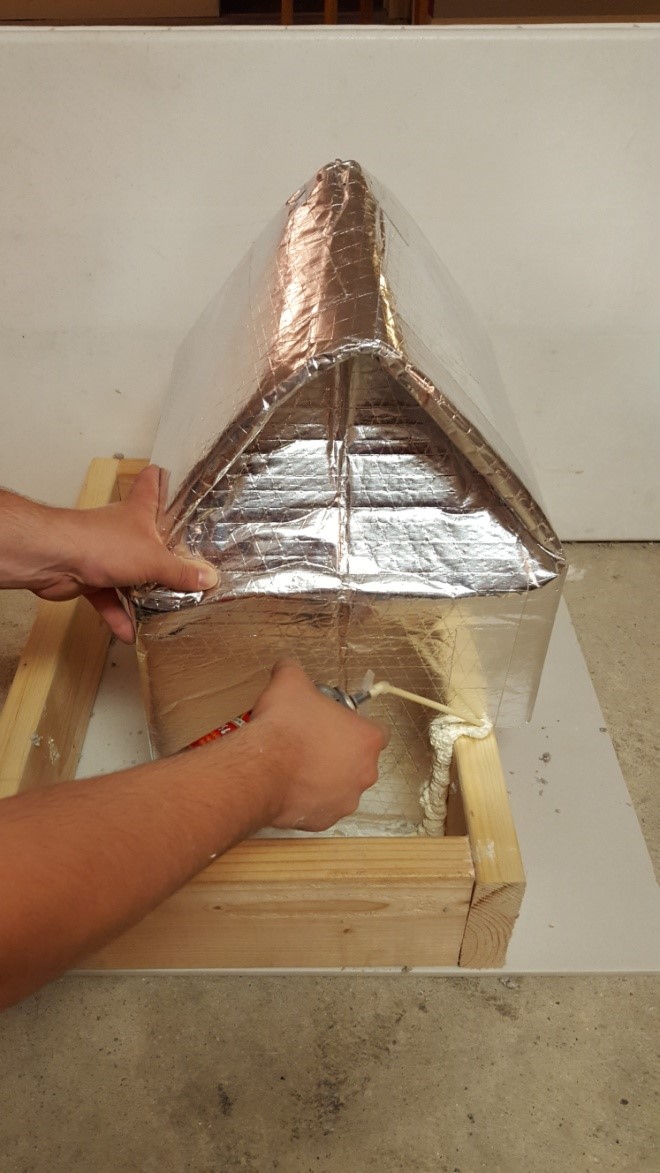
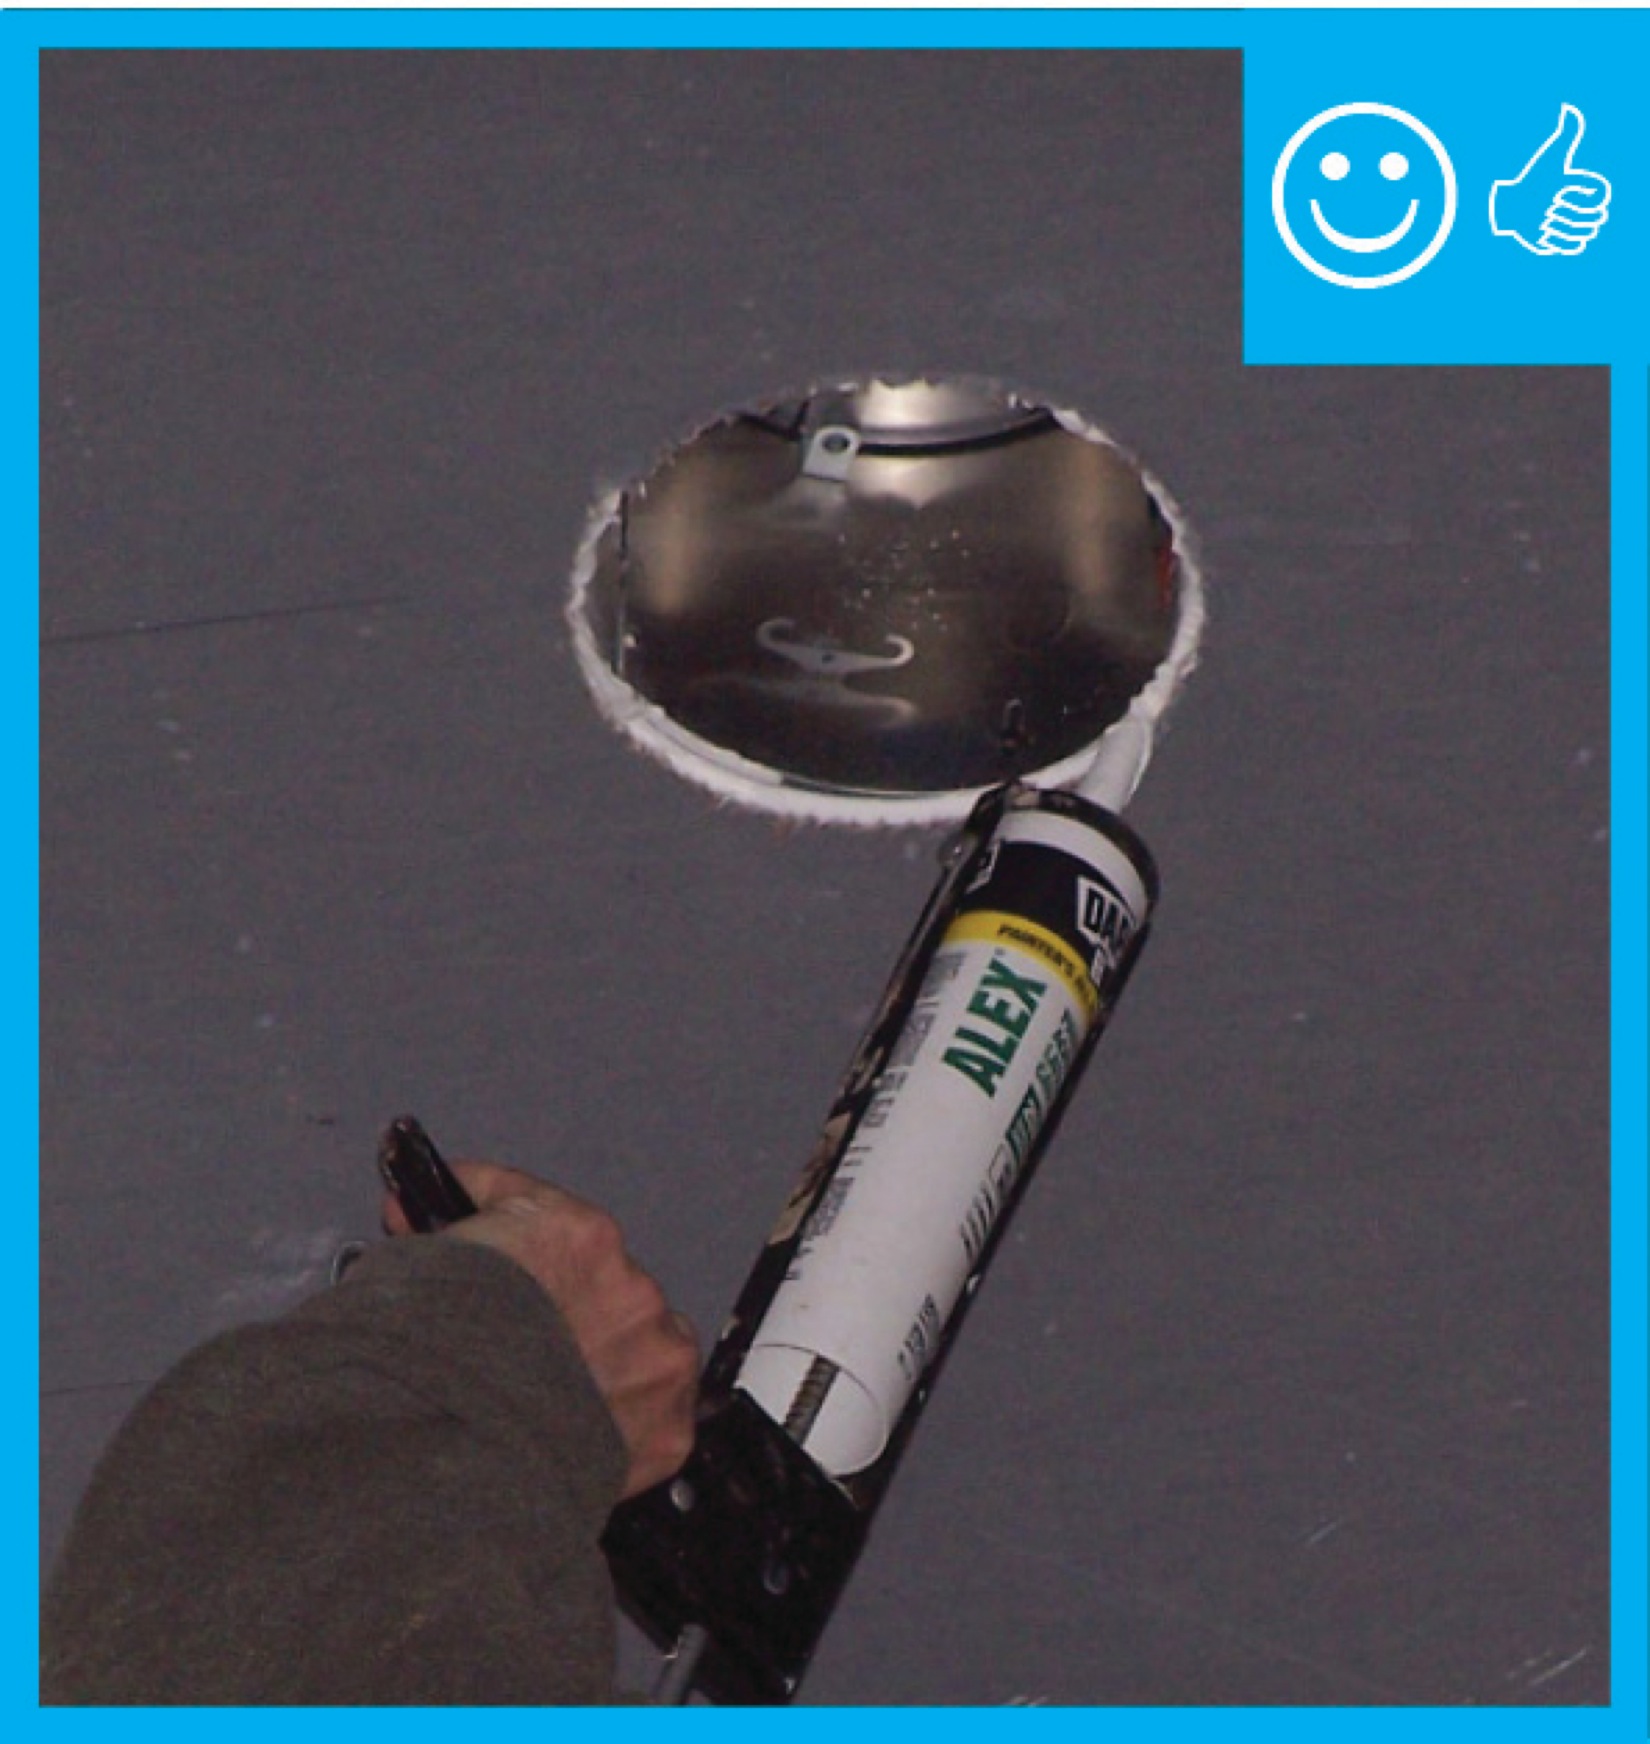
    6. Use expanding spray foam to air seal the enclosure to the gypsum board on all four sides and to any ceiling joists. Also use spray foam to seal any penetrations in the cover. Be extremely careful to not get any spray foam on the can or any surfaces that will be hot. See Figures 8, 9, and 10.
    7. Allow the spray foam to fully cure and ensure that the enclosure is fully air sealed (see Figure 11). One simple way to test this is to turn on the recessed can lights then go into the attic and turn off the attic lights. Light will be visible through any cracks where the enclosure isn’t completely sealed to the drywall.
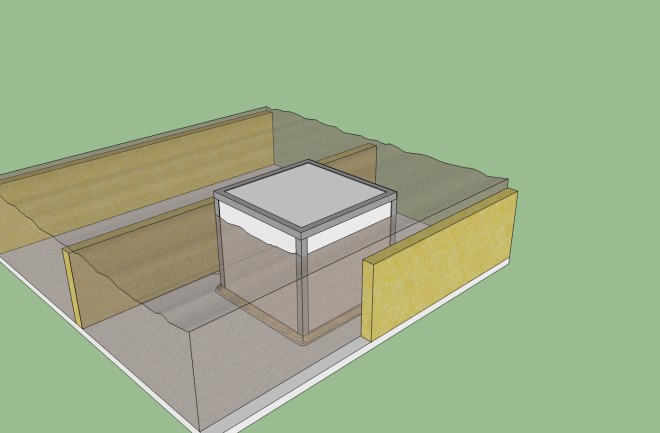
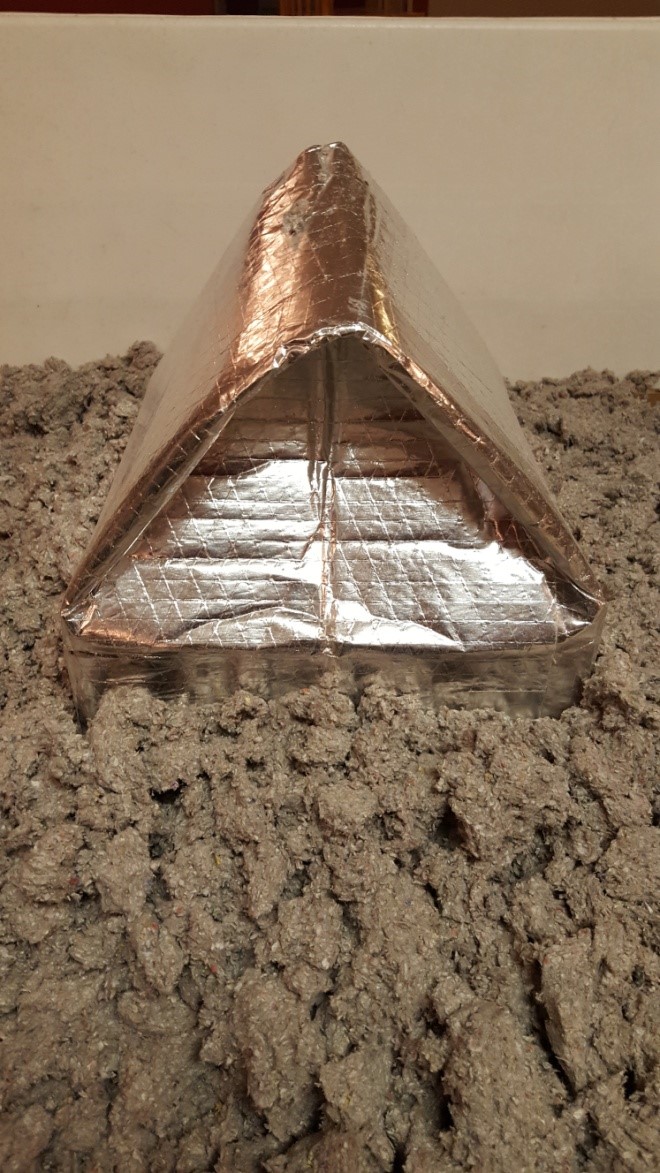
    8. Insulate attic to desired R-value, but ensure that top of the enclosure remains exposed above the attic insulation. See Figures 12 and 13.
    9. Do not air seal a non-IC rated recessed can light from inside (the living space side of the fixture).  The holes will allow for natural convection to dissipate heat away from the lighting fixture.
    Remove insulation around the non-IC rated recessed light fixture before installing a cover.
    Figure 2. Remove insulation around the non-IC rated recessed light fixture before installing a cover. (Source: Steven Winter Associates.)


    Make sure all insulation is held back from any contact with a non-IC rated recessed light fixture.
    Figure 3. Make sure all insulation is held back from any contact with a non-IC rated recessed light fixture. (Source: Steven Winter Associates.)


    Build or select an enclosure that will maintain a minimum of 3 inches clearance on all sides of the light fixture.
    Figure 4. Build or select an enclosure that will maintain a minimum of 3 inches clearance on all sides of the light fixture. (Source: Steven Winter Associates.)


    Center the enclosure to maintain a minimum of 3 inches clearance on all sides of the of the non-IC rated recessed light fixture.
    Figure 5. Center the enclosure to maintain a minimum of 3 inches clearance on all sides of the of the non-IC rated recessed light fixture. (Source: Steven Winter Associates.)


    Make slits in the recessed can enclosure for wiring and hanger brackets to allow the enclosure to sit flush to the gypsum board.
    Figure 6. Make slits in the recessed can enclosure for wiring and hanger brackets to allow the enclosure to sit flush to the gypsum board. (Source: Steven Winter Associates.)


    If the light fixture is off center, cut the enclosure as needed to fit around ceiling joists.
    Figure 7. If the light fixture is off center, cut the enclosure as needed to fit around ceiling joists. (Source: Steven Winter Associates.)


    Use canned expanding spray foam to air seal the recessed can light enclosure to the gypsum board on all four sides and to seal any penetrations.
    Figure 8. Use canned expanding spray foam to air seal the recessed can light enclosure to the gypsum board on all four sides and to seal any penetrations. (Source: Steven Winter Associates.)


    Use canned expanding spray foam to air seal the recessed can light enclosure to the ceiling joists.
    Figure 9. Use canned expanding spray foam to air seal the recessed can light enclosure to the ceiling joists. (Source: Steven Winter Associates.)


    Use expanding spray foam to air seal the recessed can light enclosure to the gypsum board.
    Figure 10. Use expanding spray foam to air seal the recessed can light enclosure to the gypsum board. (Source: Steven Winter Associates.)


    Allow the spray foam to fully cure around the recessed can light cover and ensure that the enclosure is fully air sealed.
    Figure 11. Allow the spray foam to fully cure around the recessed can light cover and ensure that the enclosure is fully air sealed. (Source: Steven Winter Associates.)


    Insulate attic to the desired R-value, but ensure that top of enclosure over the recessed can light remains exposed above the attic insulation.
    Figure 12. Insulate attic to the desired R-value, but ensure that top of enclosure over the recessed can light remains exposed above the attic insulation. (Source: Steven Winter Associates.)


    Attic insulation can come in contact with the recessed can light enclosure but should not cover the top of it.
    Figure 13. Attic insulation can come in contact with the recessed can light enclosure but should not cover the top of it. (Source: Steven Winter Associates.)


    Success
    Ensuring Success

    Best Solution: Replace non-IC rated recessed can lights with ICAT-rated recessed can lights or even better, ceiling-mounted light fixtures. Use low-heat-output bulbs such as LEDs.

    Correct enclosure height: First determine the amount of attic insulation desired. Once the R-value, insulation material, and equivalent depth to achieve the desired R-value are known, then purchase or build an enclosure that will extend above the attic insulation height.

    Double and Triple Check that

    • No insulation is in contact with the non-IC rated recessed can light.
    • No foam or other sealant is in direct contact with the non-IC rated recessed can light.
    • No high-heat-output bulbs, such as incandescent bulbs, are installed in the fixture.
    Climate
    Climate

    Colder climates will increase the potential for heat loss and air leakage, and the impacts of that heat loss, if the recessed lights are not properly air sealed.  Heat loss into the attic can warm the underside of the roof deck which can contribute to snow melt and ice dam formation. Significant air leakage from the house into the attic increases the potential for condensation and frost formation in the attic, if warmer vapor-laden conditioned air is allowed to escape into a wintertime attic with cold surfaces.

    Training
    Right and Wrong Images
    Image
    Right – The insulating enclosure over this non-IC rated recessed light fixture is centered and air sealed
    Right – The insulating enclosure over this non-IC rated recessed light fixture is centered and air sealed
    Image
    Right – The top of the enclosure over this recessed can light remains clear of attic insulation
    Right – The top of the enclosure over this recessed can light remains clear of attic insulation
    Image
    Right – Recessed can light penetration sealed with caulk to drywall
    Right – Recessed can light penetration sealed with caulk to drywall
    Image
    Wrong – Insulation is in direct contact with this non-insulation contact (IC)-rated recessed light fixture
    Wrong – Insulation is in direct contact with this non-insulation contact (IC)-rated recessed light fixture
    Image
    Wrong – Non ICAT recessed light installed
    Wrong – Non ICAT recessed light installed
    Image
    Wrong – Non ICAT recessed light installed
    Wrong – Non ICAT recessed light installed
    Image
    Right – Airtight boxes are installed for LED can lights.
    Right – Airtight boxes are installed for LED can lights.
    Image
    Wrong - IR image shows a lack of air sealing and insulation around a ceiling light fixture.
    Wrong - IR image shows a lack of air sealing and insulation around a ceiling light fixture.
    Videos
    Compliance

    Compliance

    The Compliance tab contains both program and code information. Code language is excerpted and summarized below. For exact code language, refer to the applicable code, which may require purchase from the publisher. While we continually update our database, links may have changed since posting. Please contact our webmaster if you find broken links.


    ENERGY STAR Single-Family New Homes, Version 3/3.1 (Rev. 11)

    National Rater Field Checklist

    Thermal Enclosure System.
    4. Air Sealing (Unless otherwise noted below, “sealed” indicates the use of caulk, foam, or equivalent material). 
    4.2 Recessed lighting fixtures adjacent to unconditioned space ICAT labeled and gasketed. Also, if in insulated ceiling without attic above, exterior surface of fixture insulated to ≥ R-10 in CZ 4-8.

    Please see the ENERGY STAR Single-Family New Homes Implementation Timeline for the program version and revision currently applicable in your state.


    DOE Zero Energy Ready Home (Revision 07)

    Exhibit 1 Mandatory Requirements.
    Exhibit 1, Item 1) Certified under the ENERGY STAR Qualified Homes Program or the ENERGY STAR Multifamily New Construction Program.


    2009 International Energy Conservation Code (IECC)

    Section 402.4.5 Recessed lighting. Recessed lights in the building thermal envelope are 1) type IC rated and ASTM E283 labeled and 2) sealed with a gasket or caulk between the housing and the interior wall or ceiling covering.

    2012, 20152018, and 2021 IECC

    Table R402.4.1.1 Air Barrier and Insulation Installation, Recessed lighting: Recessed light fixtures installed in the building thermal envelope are airtight, IC rated, and sealed to the finished surface with gasket or caulk. “Air tight” is defined as not more than 2.0 cfm when tested in accordance with ASTM E 283 at a 75 Pascal pressure differential.

    Retrofit:  2009, 2012, 2015, 2018,  and 2021 IECC

    Section R101.4.3 (in 2009 and 2012). Additions, alterations, renovations, or repairs shall conform to the provisions of this code, without requiring the unaltered portions of the existing building to comply with this code. (See code for additional requirements and exceptions.)

    Chapter 5 (in 2015, 2018, 2021). The provisions of this chapter shall control the alteration, repair, addition, and change of occupancy of existing buildings and structures.


    2009 International Residential Code (IRC)

    Section N1102.4.5 Recessed lighting. Recessed lights in the building thermal envelope are 1) type IC rated and ASTM E283 labeled and 2) sealed with a gasket or caulk between the housing and the interior wall or ceiling covering.

    E4004.8. A recessed luminaire that is not identified for contact with insulation shall have all recessed parts spaces at least 1/2 inch from combustible materials. The support and trim parts can be in contact with combustible materials. A recessed luminaire that is ICAT rated can be in contact with combustible materials.

    E4004.9. Thermal insulation shall not be installed above a recessed luminaire or within 3 inches of the recessed luminaires enclosure, wiring, ballast, etc., unless the luminaire is ICAT rated.

    2012, 20152018, and 2021 IRC

    Table N1102.4.1.1 Air Barrier and Insulation Installation, Recessed lighting: Recessed light fixtures installed in the building thermal envelope are airtight, IC rated, and sealed to the finished surface with gasket or caulk. “Air tight” is defined as not more than 2.0 cfm when tested in accordance with ASTM E 283 at a 75 Pascal pressure differential.

    E4004.8. A recessed luminaire that is not identified for contact with insulation shall have all recessed parts spaces at least 1/2 inch from combustible materials. The support and trim parts can be in contact with combustible materials. A recessed luminaire that is ICAT rated can be in contact with combustible materials.

    E4004.9. Thermal insulation shall not be installed above a recessed luminaire or within 3 inches of the recessed luminaires enclosure, wiring, ballast, etc., unless the luminaire is ICAT rated.

    Retrofit:  2009, 2012, 2015, 2018,  and 2021 IRC

    Section R102.7.1 Additions, alterations, or repairs. Additions, alterations, renovations, or repairs shall conform to the provisions of this code, without requiring the unaltered portions of the existing building to comply with the requirements of this code, unless otherwise stated. (See code for additional requirements and exceptions.)

    Appendix J regulates the repair, renovation, alteration, and reconstruction of existing buildings and is intended to encourage their continued safe use.

    More

    More Info.

    Access to some references may require purchase from the publisher. While we continually update our database, links may have changed since posting. Please contact our webmaster if you find broken links.

    References and Resources*
    Author(s)
    NREL
    Organization(s)
    NREL
    Description
    The Standard Work Specifications (SWS) are a tool for industry guidance to ensure effective, durable, and safe work is performed during home upgrades.
    Author(s)
    McCullough,
    Gordon
    Organization(s)
    Pacific Northwest National Laboratory
    Publication Date
    Description
    Report discussing the potential energy savings of new high-efficiency downlights, and the results of product testing to date.
    Author(s)
    Pacific Northwest National Laboratory
    Organization(s)
    PNNL
    Publication Date
    Description
    Report providing information about techniques and approaches to improve the efficiency of recessed lighting.
    Author(s)
    Van der Meer
    Organization(s)
    Pennsylvania Housing Research/Resource Center
    Publication Date
    Description
    Recessed lighting is here to stay. If installed incorrectly they may contribute to air leakage and compromise building integrity.
    *For non-dated media, such as websites, the date listed is the date accessed.
    Contributors to this Guide

    The following authors and organizations contributed to the content in this Guide.

    Sales
    Building Science Measures
    Building Science-to-Sales Translator

    Tight Air Sealed Home = Comprehensive Draft Protection

    Image(s)
    Technical Description

    Poorly air-sealed homes are less comfortable and cost more to maintain because they provide a pathway for drafts, cold spots, moisture, and insects into the home. Comprehensive draft protection includes a continuous air barrier around the whole house along with caulking and sealing in all holes and cracks. This includes around wiring, plumbing, ducts, and flues; where wall framing meets flooring; around windows; where drywall meets top plates and sill plates; where rim joists meet foundation walls and subfloors; etc. Spray foam insulation can be used at rim joists, floors above unconditioned space, and in attics to insulate and air seal at the same time.

    Comprehensive Draft Protection
    Sales Message

    Comprehensive draft protection minimizes air flow that can undermine a complete high-performance insulation system. What this means for you is less wasted energy along with enhanced comfort, health, quiet, and durability. Wouldn’t you agree it would be a shame to only get a partial return on your investment in advanced insulation?

    Last Updated

    Mobile Field Kit

    The Building America Field Kit allows you to save items to your profile for review or use on-site.

    Sign Up  or  Log In

    Did you find this information helpful?

    If you have questions and/or would like a reply to this feedback, please include your e-mail address in the message.
    This question is for testing whether or not you are a human visitor and to prevent automated spam submissions.