

Scope
Air-seal around kitchen and bathroom exhaust fans to keep conditioned air from leaking into unconditioned space.
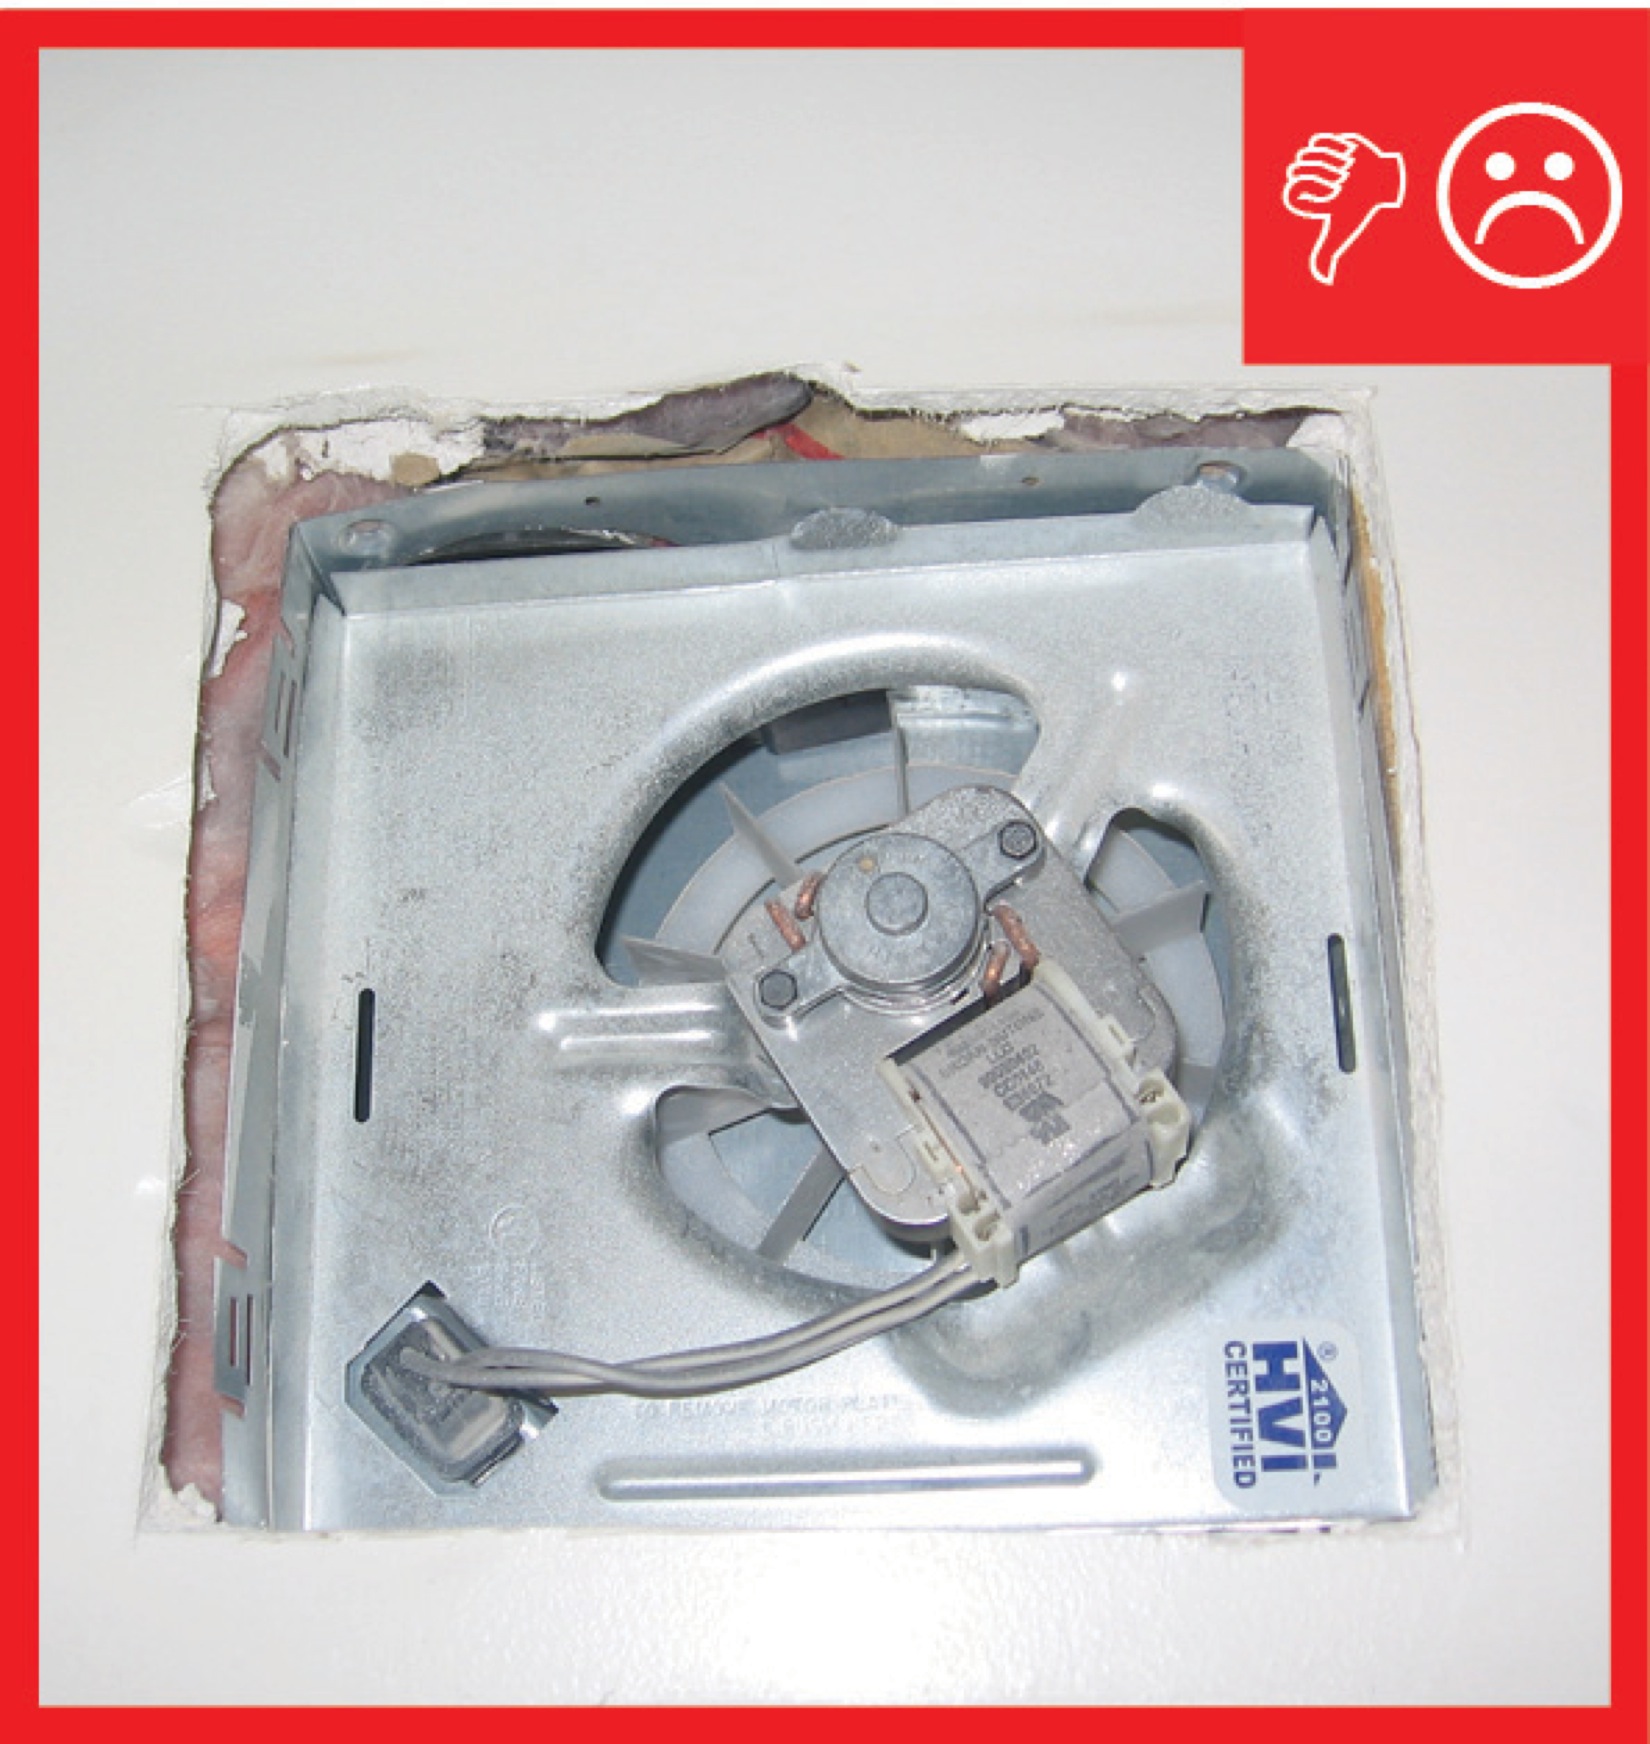
- Using a saw, cleanly cut all a hole in the ceiling drywall no more than 1 inch larger in diameter than the fan box.
- Seal holes in the fan housing with caulk, sealing putty, or metal tape.
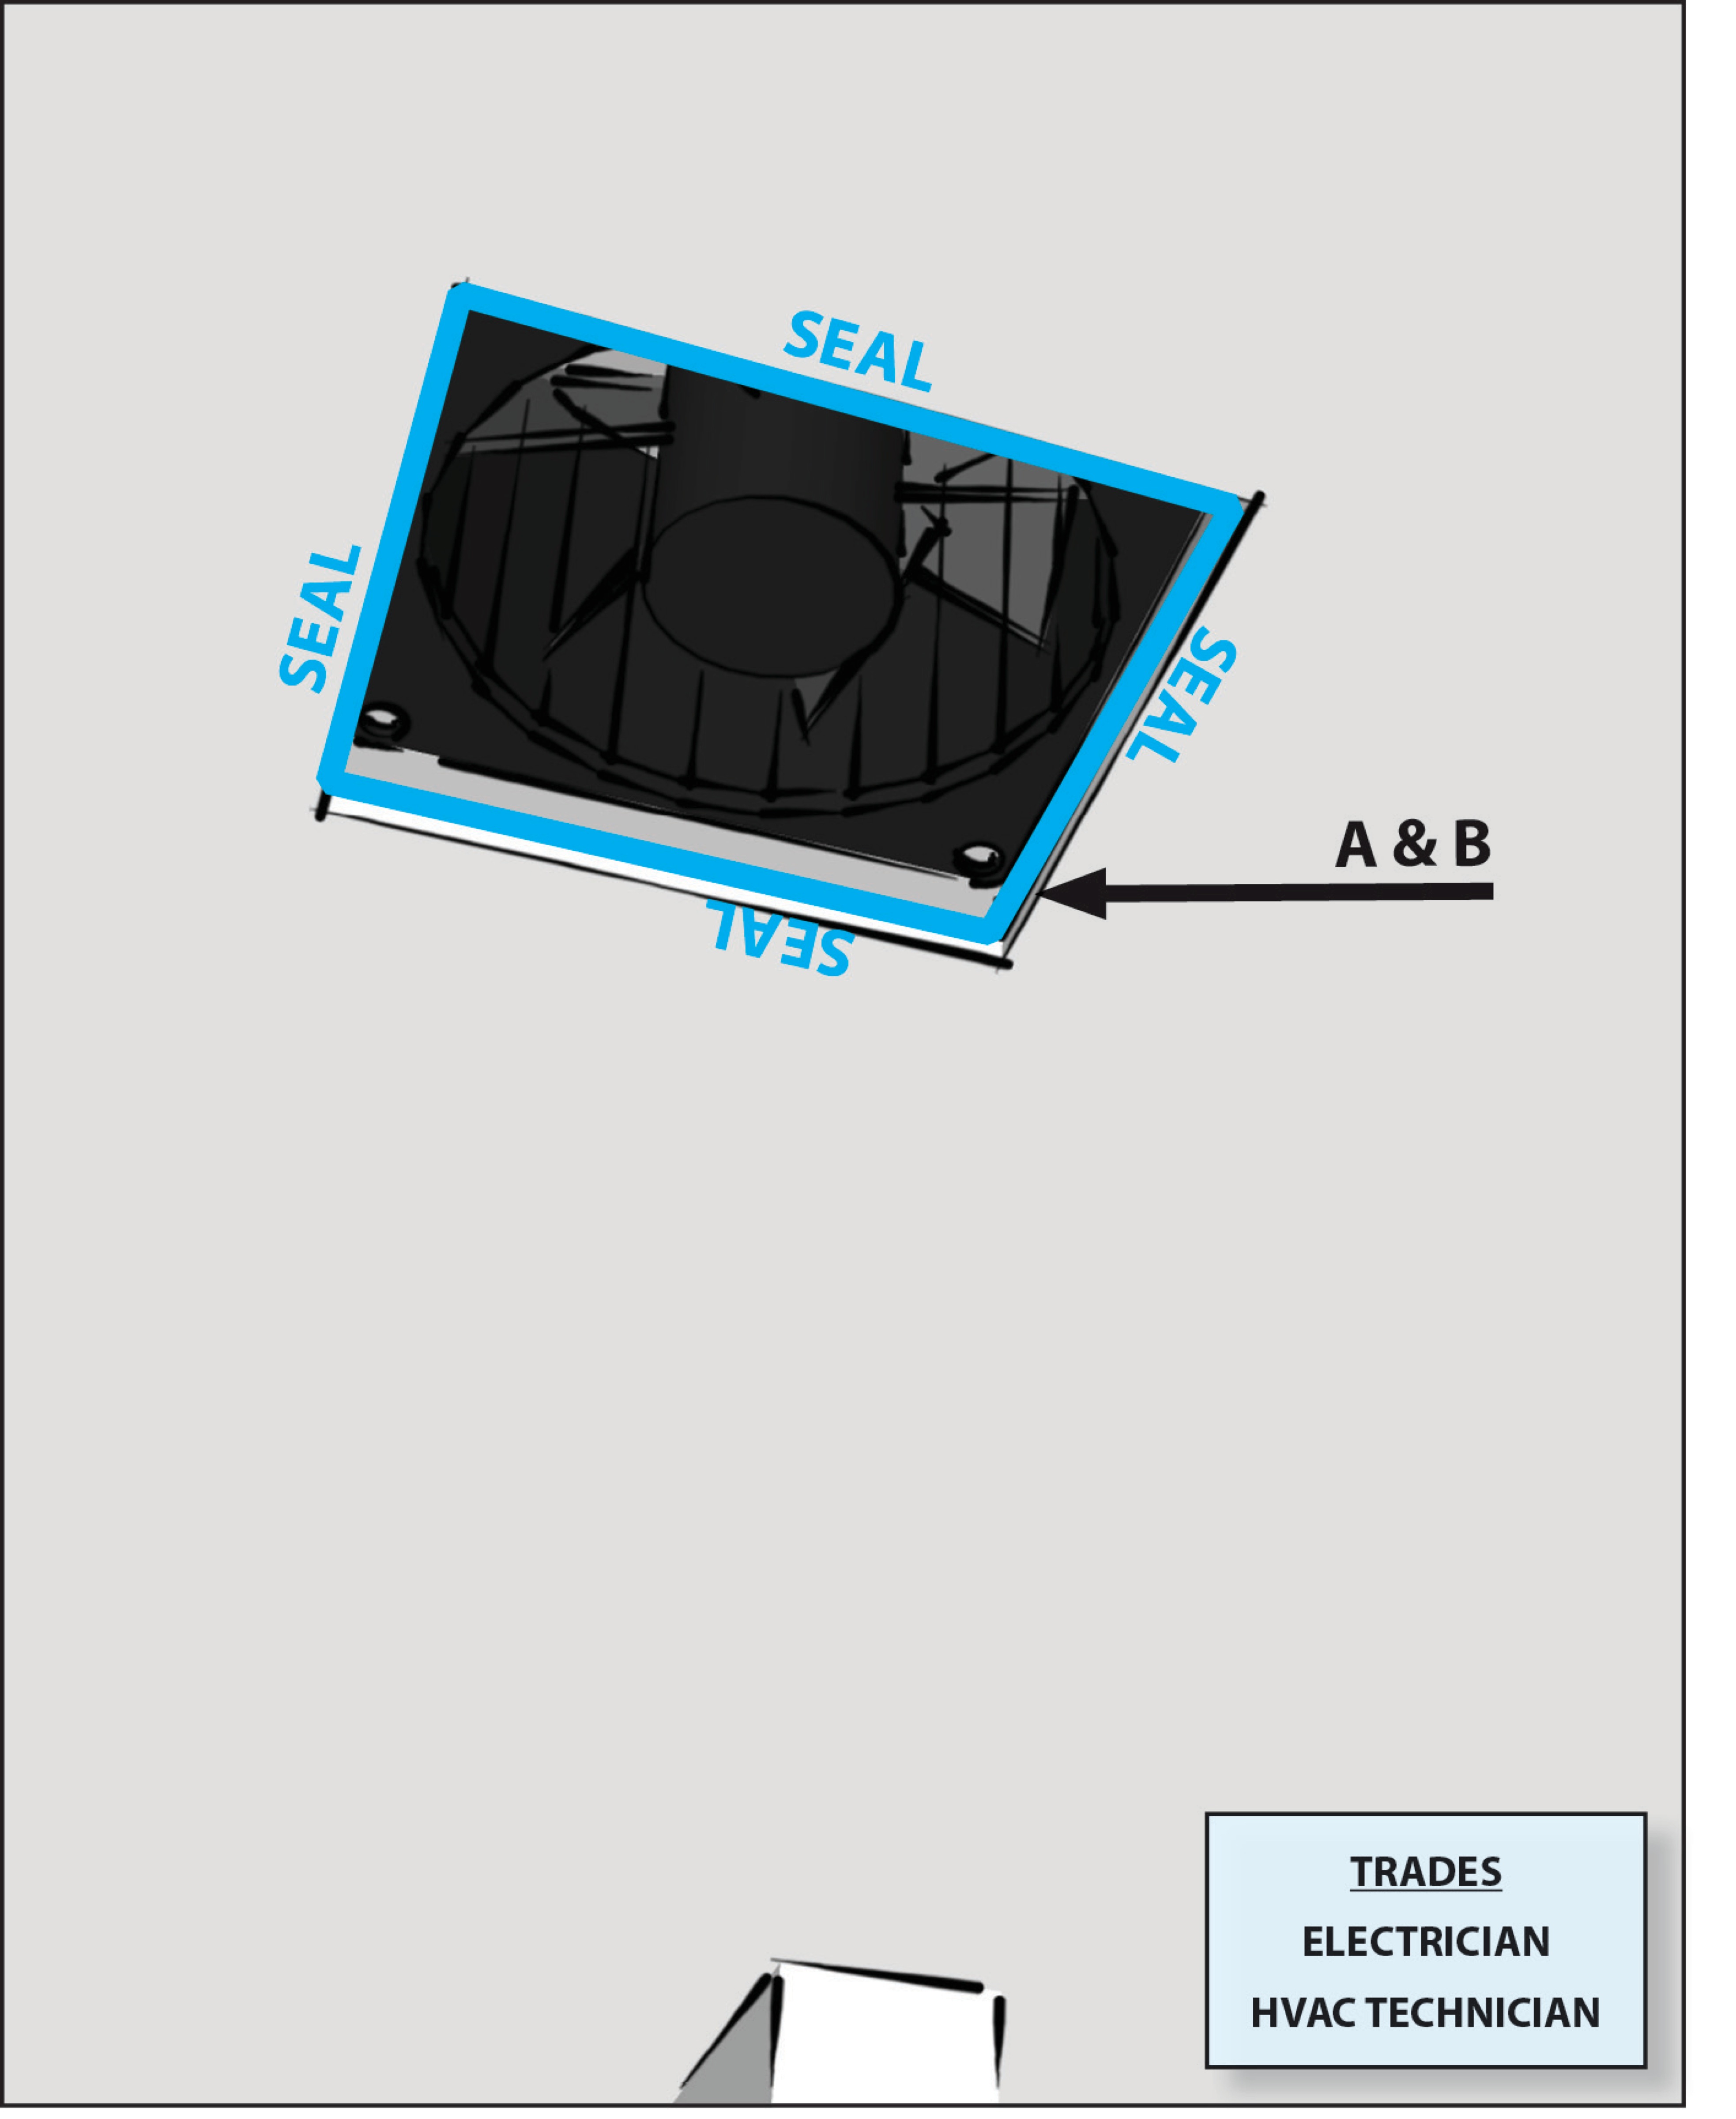
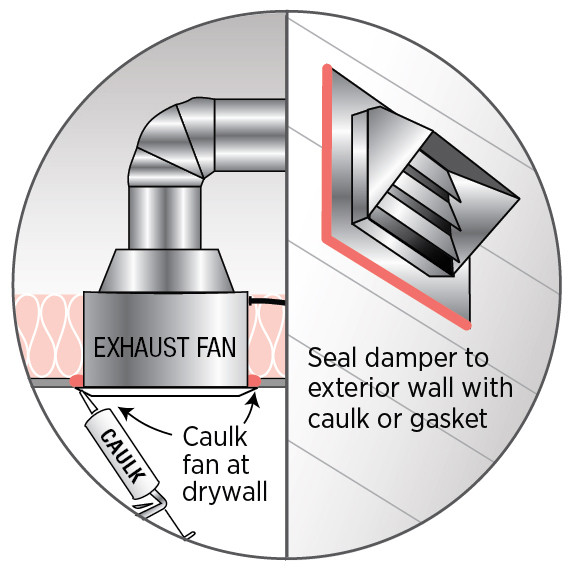
- Install the fan then seal around the fan with caulk or canned spray foam.
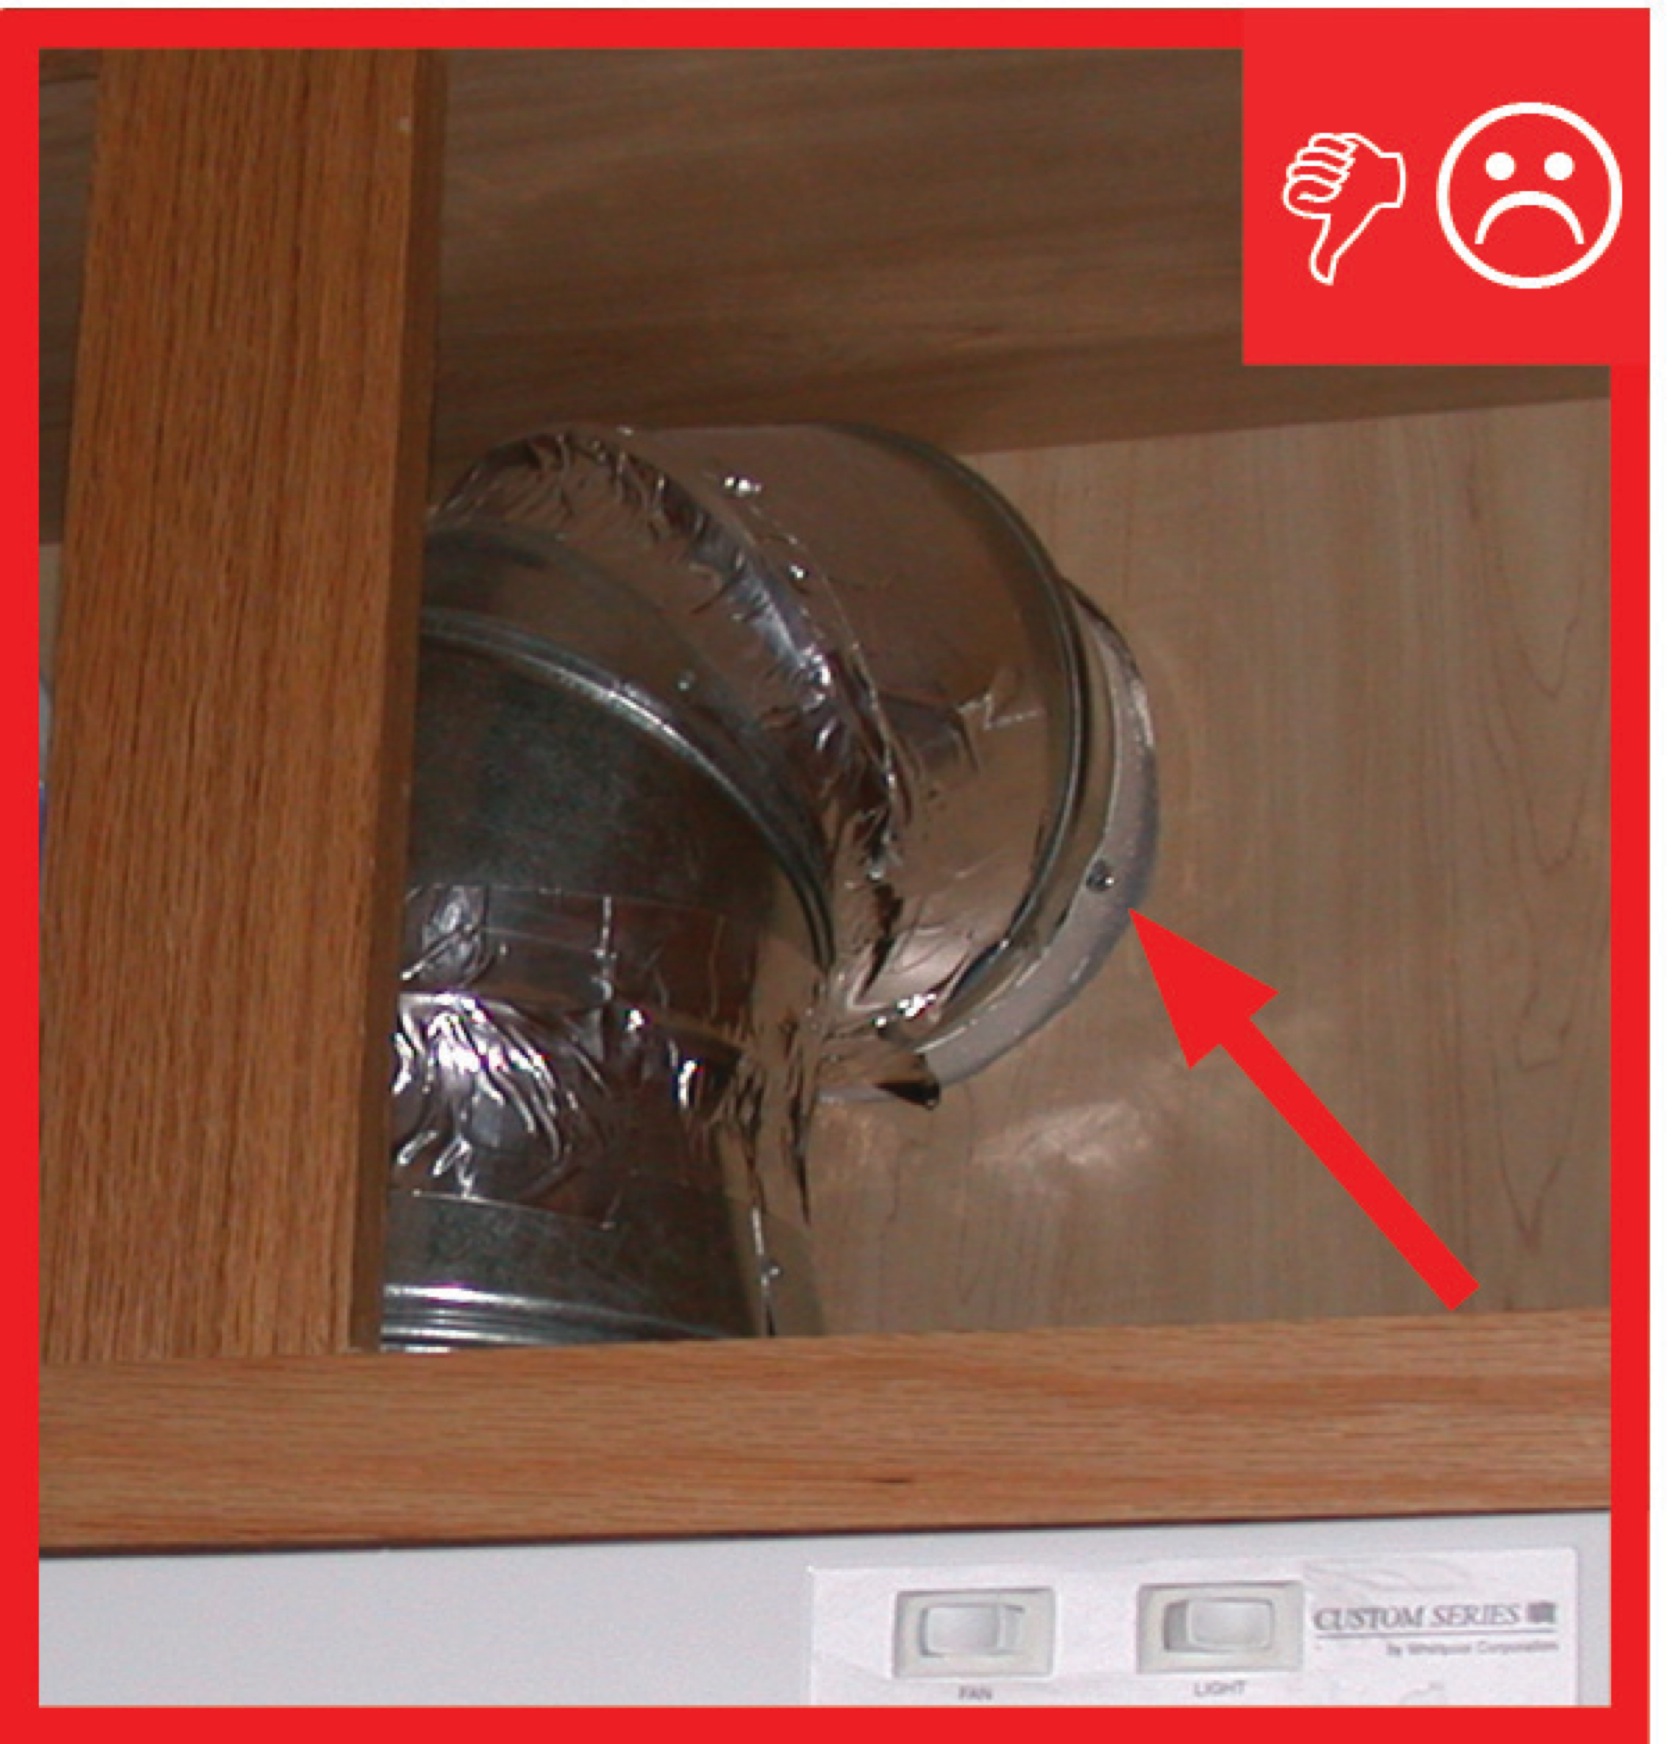
- Seal the exhaust duct to the fan box with approved metal tape or mastic.
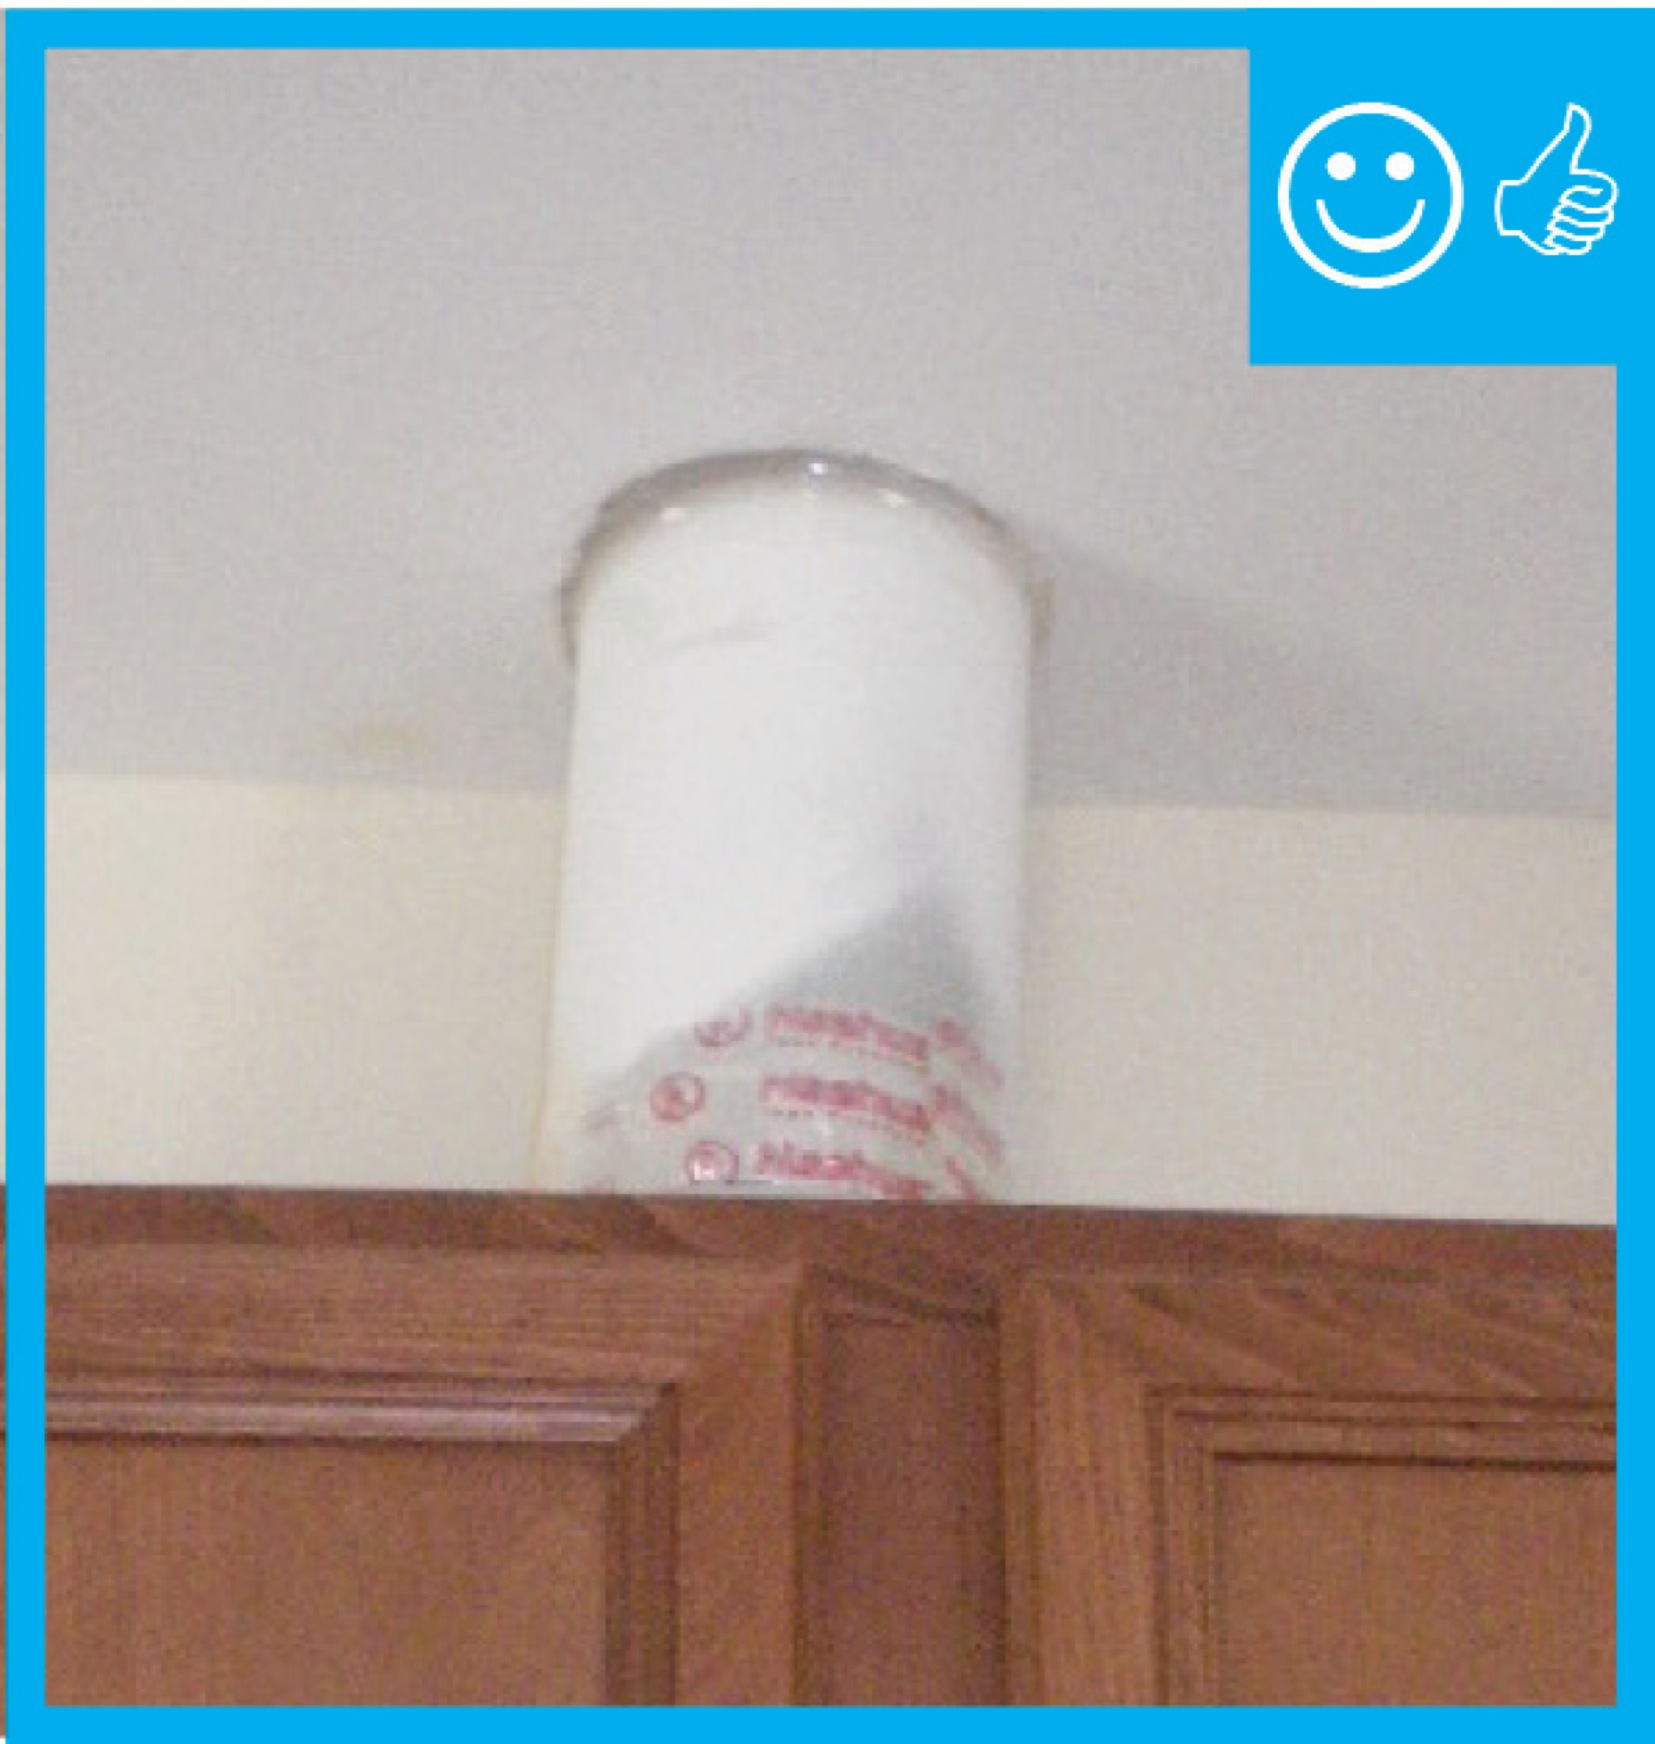
- Seal around the exterior fan duct vent with caulk or a pre-made exterior wall gasket.
- If duct vents through the roof, install flashing around the vent that is properly integrated with roof paper and roofing material.
- Do not vent exhaust fans into the attic.
See the Compliance Tab for links to related codes and standards and voluntary federal energy-efficiency program requirements.
Description
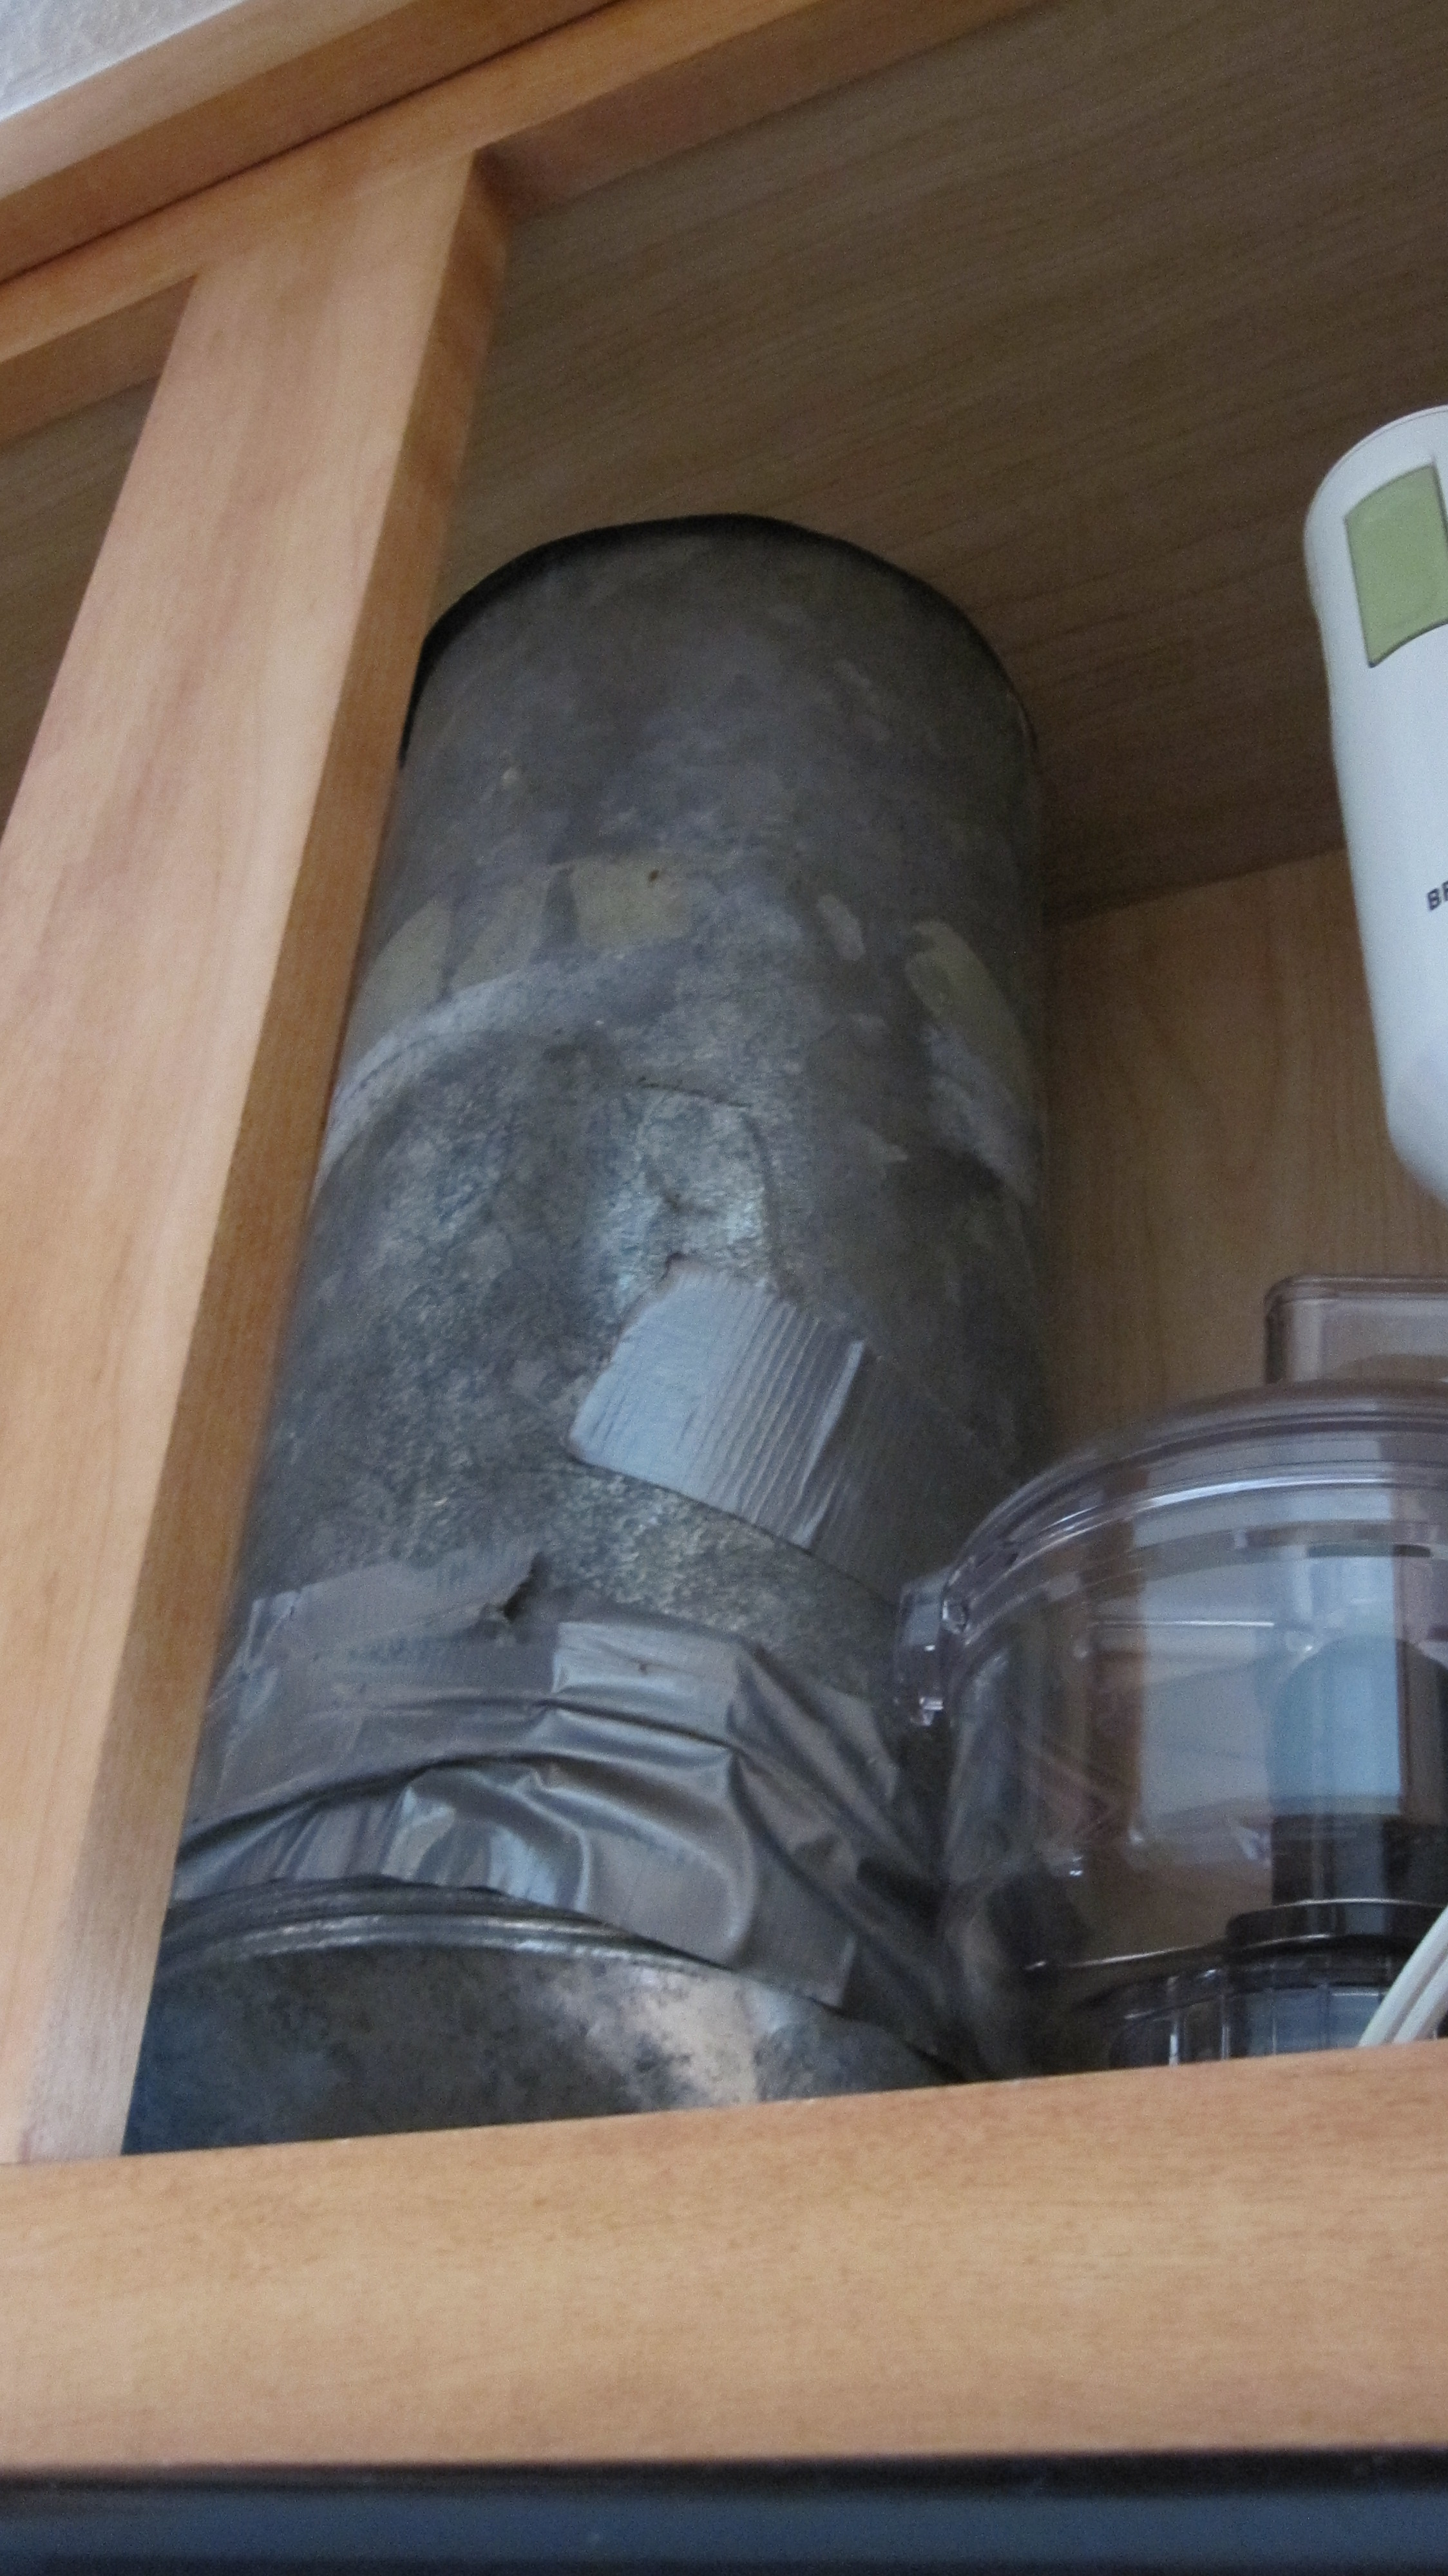
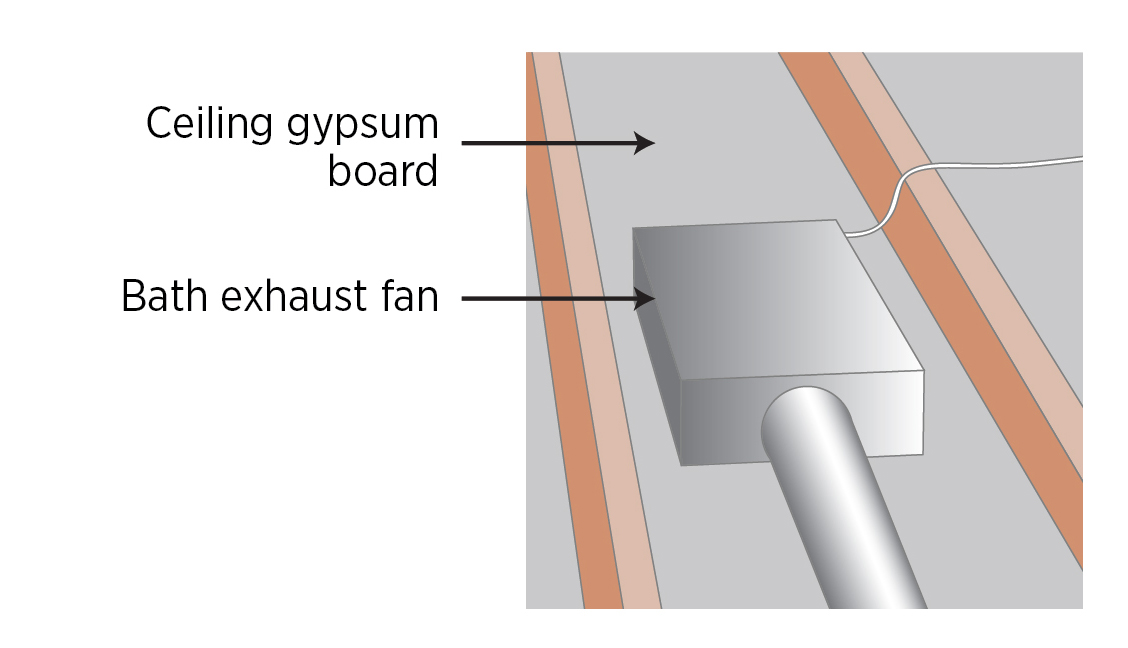
Exhaust fans are typically installed in bathroom ceilings and in kitchen range hoods, or sometimes kitchen ceilings or walls, to provide spot ventilation. Generous holes are often cut in the ceiling drywall for installation of bath exhaust fans and kitchen exhaust fan ducts, leaving gaps where the fan box or duct is installed. While these gaps may be covered by decorative trim in the case of the exhaust fan box or be hidden in cabinets in the case of range hood exhaust fan ducts, those coverings will not stop air leaks. When the drywall is not sealed to the edges of the exhaust fan box or ducting, a considerable amount of conditioned air can leak through these gaps and into unconditioned attic space. The boxes themselves can also be leaky. Pressure and temperature differences between conditioned and unconditioned spaces encourage this air flow. These air leaks represent energy losses; they could also potentially allow warm, moisture-laden air into unconditioned attics where it can condense on cold surfaces, creating moisture problems. Air barriers need to be continuous to be effective; this means sealing all penetrations in exterior walls, ceilings, and floors adjoining unconditioned spaces.
Be sure to schedule sealing around exhaust fans and ducts after fans and drywall have been installed. Responsibility for sealing air leaks around exhaust fans and ducts should be included in the contract for the appropriate trade, depending on the workflow at a specific job site.
Source
How to Air Seal Holes around the Kitchen Exhaust Duct
- Cut openings for the duct that are no bigger than needed to fit the exhaust duct through the ceiling or top of the kitchen cabinet. Make clean, even cuts.
- After the exhaust duct is installed, air seal with caulk between the duct and drywall from the room side. If gaps are larger than a ¼ inch, use canned spray foam that is carefully applied. Do not use pieces of fibrous insulation; this insulation does not air seal. If gaps are larger than one inch, they can be sealed from the attic side with air-blocking material such as rigid foam that is cut to fit and sealed in place with caulk or spray foam.
- Use caulk or pre-made exterior wall gaskets to air seal the exterior fan duct vent to the exterior wall. Ensure that exterior gaskets are properly integrated with the housewrap.
How to Air Seal the Bathroom Fan Housing
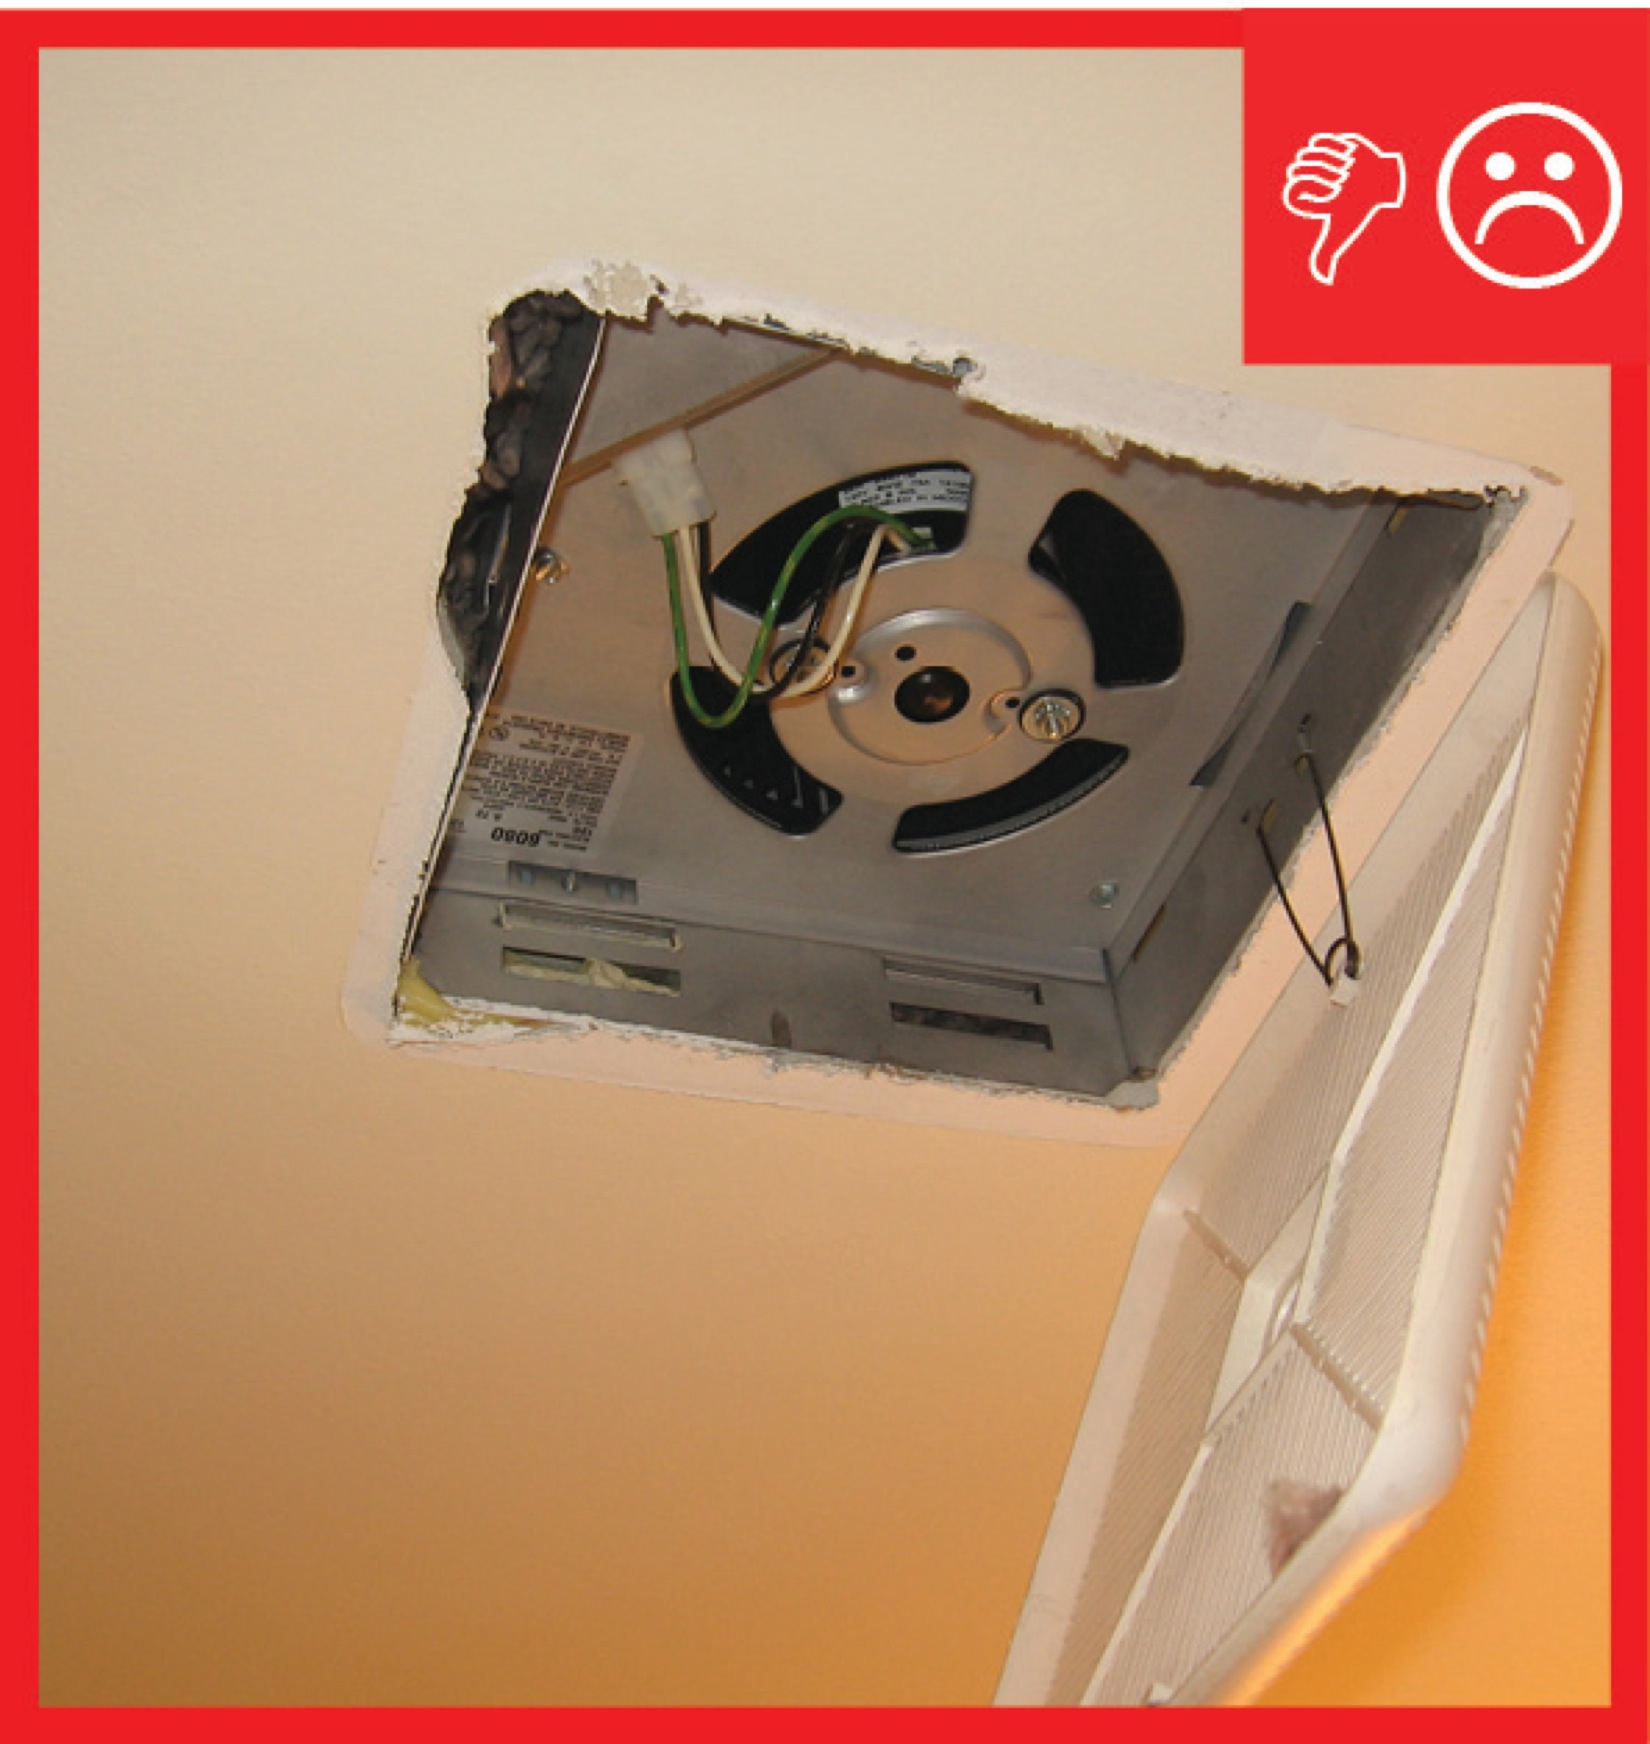
- Cut openings in the ceiling that are no bigger than needed to fit the fan box. Make clean, even cuts in the drywall.
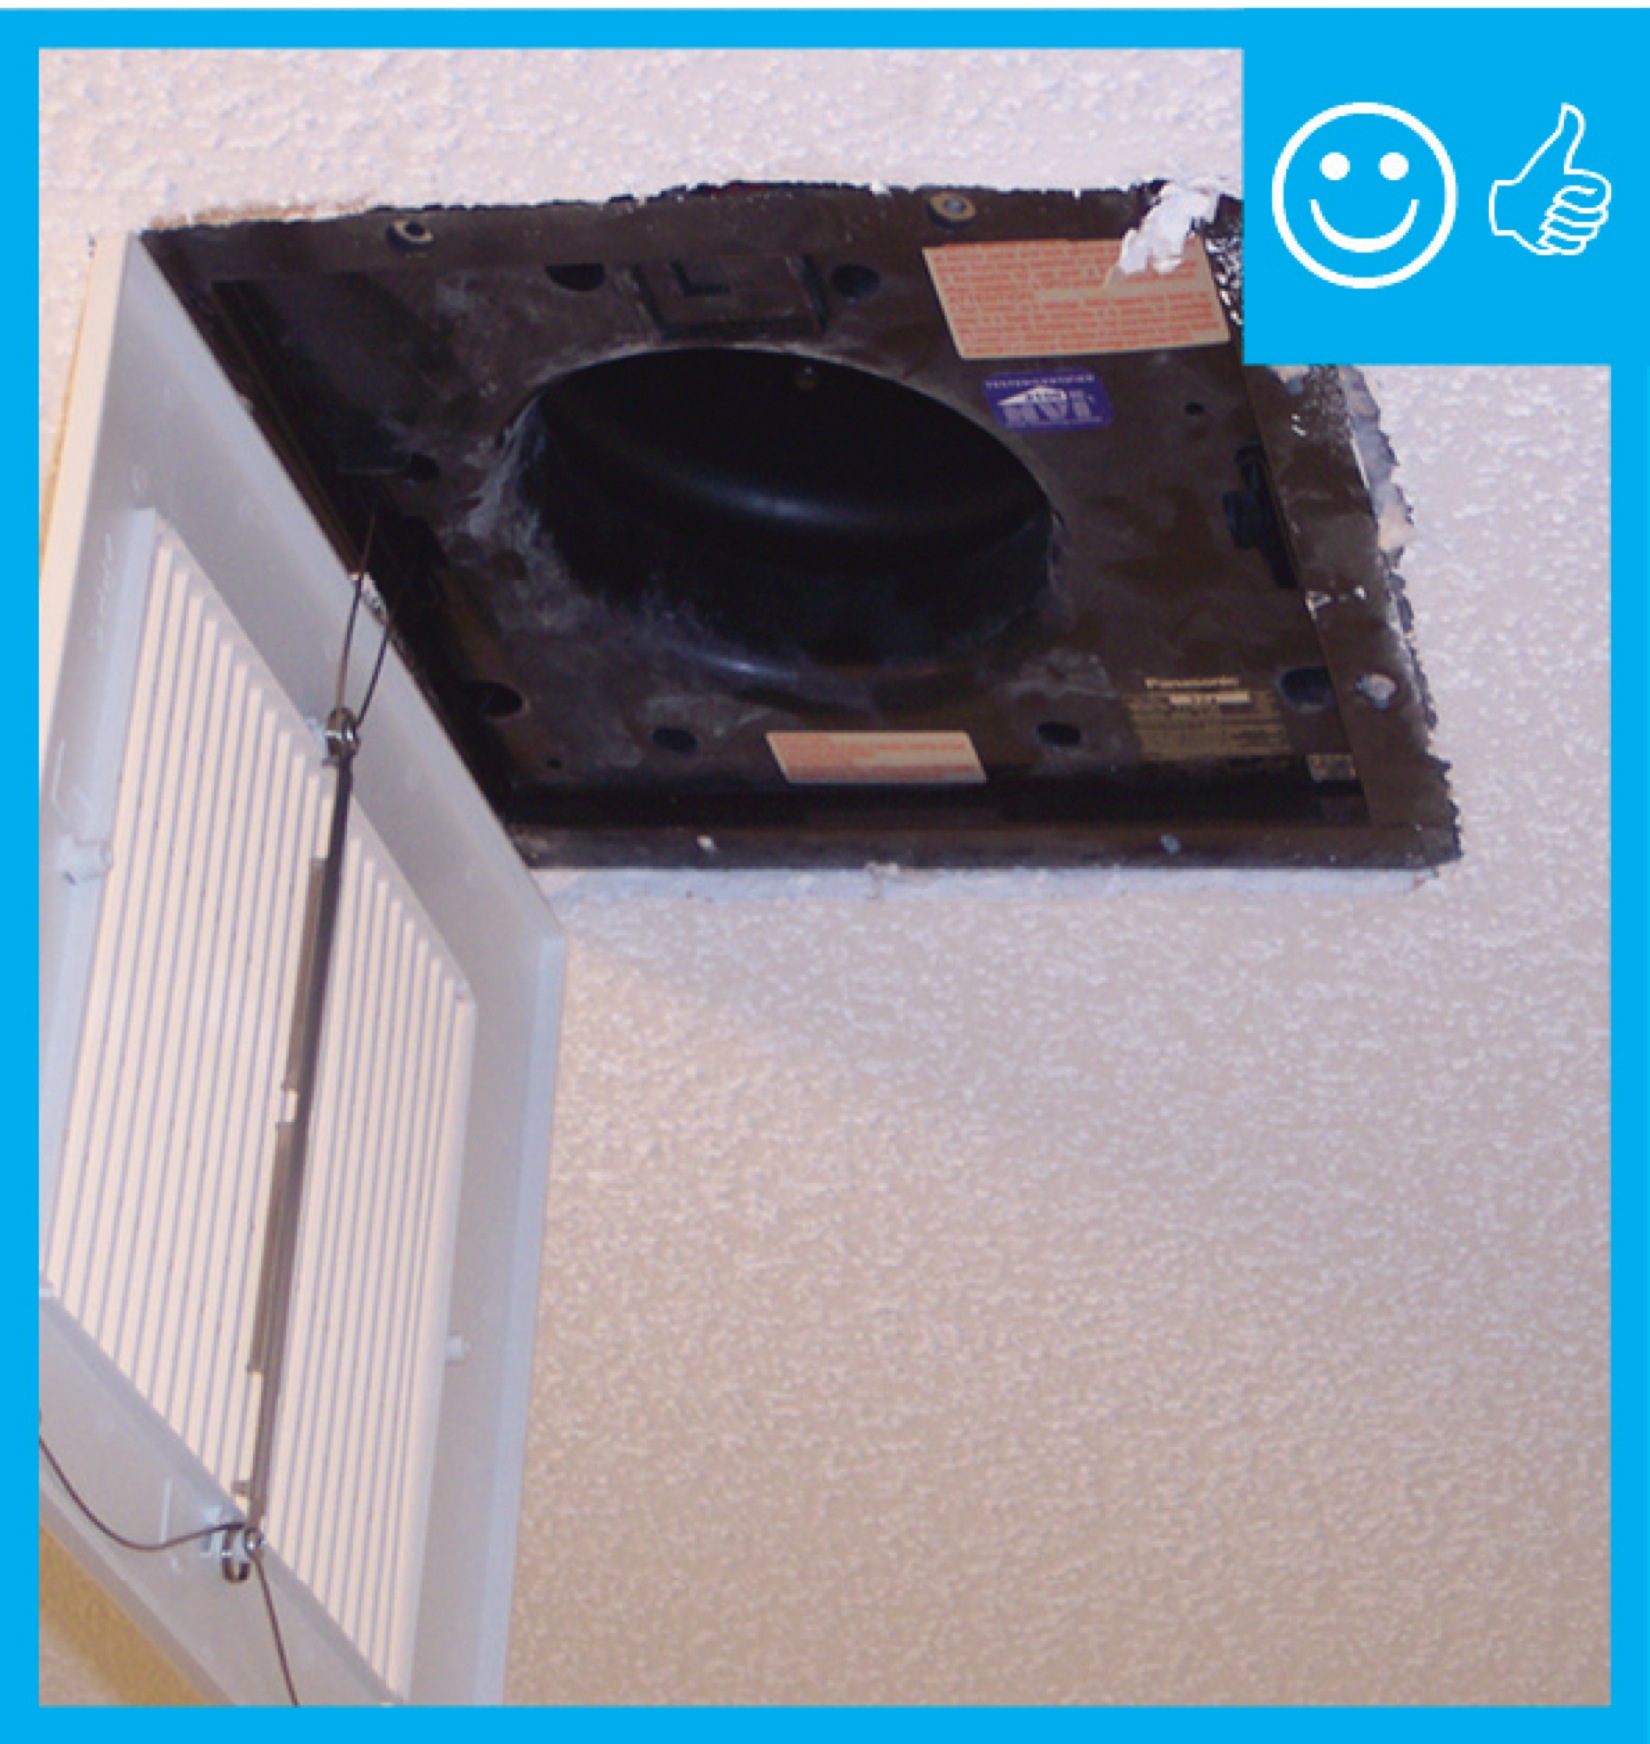
- After the fan is installed, air seal with caulk between the fan housing and drywall from the room side before installing trim.
- If gaps are larger than a ¼ inch, use canned spray foam carefully applied so that trim will fit over it.
- If gaps are larger than a half inch, they can be sealed from the attic side with air blocking material such as rigid foam that is cut to fit and sealed in place with caulk or spray foam. Do not use pieces of fibrous insulation; this does not air seal.
- Seal holes in the fan housing with caulk or metal tape.
- Use caulk or premade exterior wall gaskets to air seal the exterior fan duct vent to the exterior wall. Ensure that exterior gaskets are properly integrated with housewrap.
How to Create an Insulation Shield for the Exhaust Fan
The bathroom exhaust fan box may have air leaks and holes in the casing. You may want to cover the fan to stop air leaks and to allow you to install insulation over it.
- Create a 5-sided box from a solid air barrier material such as rigid foam, gypsum board, or plywood. Tape the seams of the box with housewrap tape (not duct tape) or seal with mastic. Cut an access in the box for the exhaust duct.
- Seal the box to the ceiling gypsum board and seal around the exhaust duct with caulk or canned spray foam.
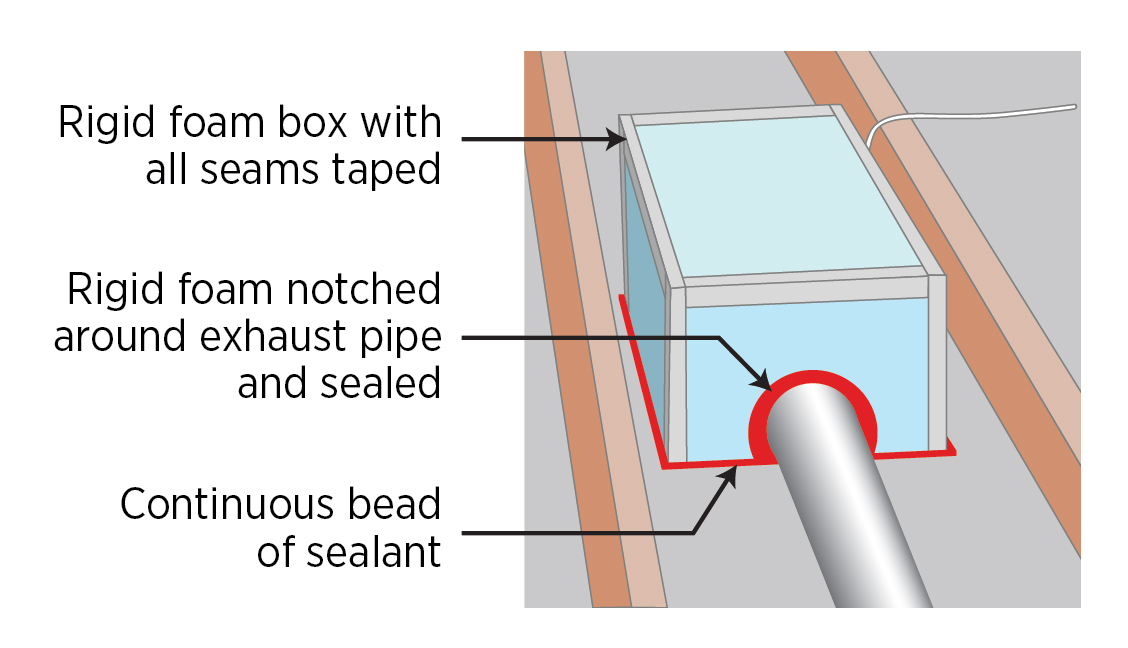
Figure 4. Bath exhaust fan with rigid foam box (Source: Courtesy of PNNL). Cover the box with attic insulation.

Figure 5. Fully insulated bath exhaust fan (Source: Courtesy of PNNL).
Ensuring Success
Holes cut in the ceiling or wall for bathroom exhaust fan boxes and kitchen exhaust fan ducts should be visually checked to ensure that the opening around the fan box or exhaust duct is sealed with caulk or canned spray foam. An experienced technician can also check for air leaks with a smoke pencil or by feeling with the back of the hand. Air barrier effectiveness is measured at the whole-house level. Blower door testing, which is conducted as part of the whole-house energy performance test, may help indicate whether holes for exhaust fans in exterior walls or ceilings have been successfully sealed.
Region
No climate specific information applies.
Training
Right and Wrong Images
Source
Guide describing details that serve as a visual reference for each of the line items in the Thermal Enclosure System Rater Checklist.
Source
Guide describing details that serve as a visual reference for each of the line items in the Thermal Enclosure System Rater Checklist.
Source
Guide describing details that serve as a visual reference for each of the line items in the Thermal Enclosure System Rater Checklist.

Source
Guide describing details that serve as a visual reference for each of the line items in the Thermal Enclosure System Rater Checklist.
Source
Guide describing details that serve as a visual reference for each of the line items in the Thermal Enclosure System Rater Checklist.
Source
Guide describing details that serve as a visual reference for each of the line items in the Thermal Enclosure System Rater Checklist.
Videos

Compliance
Retrofit
SCOPE
In existing homes, air seal and insulate around new or existing bathroom and kitchen exhaust fans to minimize air leakage to and from unconditioned attics.
- Remove insulation around the exhaust fan on the attic side.
- Inspect the attic floor around the fan box for air leaks. Inspect for air or water leakage around vent duct openings in the roof or exterior walls.
- Repair or replace any damaged materials.
- Fabricate and install an insulation shield as described in the Description Tab and air seal and/or insulate as needed.
- See the Scope and Description tab for additional instructions.
For more information on conditions that may be encountered when working in existing attics, see the Pre-Retrofit Assessment of Attics, Ceilings, and Roofs. Also see the U.S. Department of Energy’s Standard Work Specifications (SWS) guidance on air sealing ceiling penetrations.
DESCRIPTION
- Remove any existing insulation from around the exhaust fan on the attic side.
- Inspect the attic floor around the fan box for air and water leaks. Inspect for air or water leakage around vent duct openings in the roof or exterior walls.
- Repair or replace any damaged materials.
- Fabricate and install an insulation shield as described in the Description Tab and air seal and/or insulate as needed.
- See the Scope and Description tab for additional instructions.
COMPLIANCE
Alterations
2009 IECC and 2009 IRC, 2012 IECC and 2012 IRC
2012 IECC, Section R101.4.3 / 2012 IRC N1101.3 and 2009 IECC 101.4.3 / 2009 IRC N1101.4.3 Alterations – General. Alterations to an existing building or portion of a building should comply with the provisions of the code as they relate to new construction without requiring unaltered portion(s) of the existing building to comply with this code.
2015 IECC and 2015 IRC, 2018 IECC and 2018 IRC
2015 IECC/2015 IRC, Section R501.1.1/N1107.1.1 Existing Buildings – General. Alterations to an existing building or portion of a building should comply with Sections R502/N1108, R503/N1109, or R504/N1110. Unaltered portions of the existing building are not required to comply.
R503.1/N1109.1 Alterations. General. Alterations to any building or structure should comply with the requirements of the code for new construction. Alterations should not negatively impact conformance of a building or structure to the provisions of this code; that is, code conformance should be the same as existed for the building or structure prior to the alteration. Alterations should not create an unsafe or hazardous condition or overload existing building systems. Alterations should be such that the altered building or structure uses no more energy than the existing building or structure prior to the alteration.
See Compliance tab.
More Info
References and Resources
*For non-dated media, such as websites, the date listed is the date accessed.
Contributors to this Guide
The following authors and organizations contributed to the content in this Guide.
Pacific Northwest National Laboratory
Building Science Corporation, lead for the Building Science Consortium (BSC), a DOE Building America Research Team
Sales
High-Efficiency Fans = High-Efficiency Fans
Technical Description
High-efficiency exhaust fans and ceiling fans are more energy efficient and quieter than standard fans.
Questions? Comments? Contact our webmaster.