

Scope
When constructing homes, take steps to minimize food, water, harborage, and entry for pests.
- Seal all penetrations in the foundation wall and at joints between the foundation and exterior above-grade walls.
- Seal all cracks around plumbing and wiring penetrations and cover with metal flashing.
- In moderate to heavy termite areas, take additional precautions including using solid concrete or filled concrete block at the top of foundation walls, reinforcing concrete slabs and walls to minimize cracking, and using treated wood or metal sill plates.
- Minimize standing water and damp wood around the foundation by removing all woody debris around structure after construction, avoiding plants within 2 feet of home, directing irrigation away from home, using gutters, and employing other water management practices as described in the Building America Solution Center guides linked to the ENERGY STAR Water Management and EPA Indoor airPLUS checklists.
- Employ durable mesh and screening at all vents, use bug screens on all openable windows, install flashing around doors and windows, use weather stripping and tight fitting metal and/or rubber door sweeps to reduce pest access at these common entry points.
See the Compliance Tab for links to related codes and standards and voluntary federal energy-efficiency program requirements.
Description
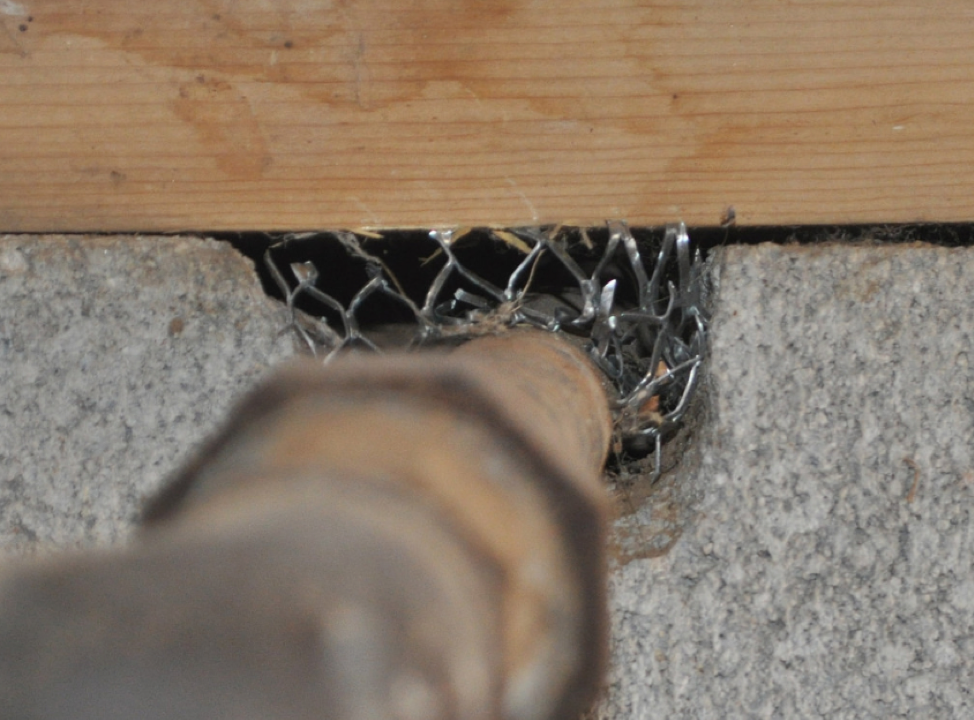
Insects, rodents, and other pests are more than just a nuisance; they can carry diseases, aggravate allergies, and spread germs, and they can cause considerable damage to structures and property if their activities go undetected for any length of time (Figure 1). Making a house resistant to the entry of pests minimizes both the damage they can cause and the exposure of occupants to pest-related allergens, diseases, and asthma triggers. While the use of chemicals and poisons are common conventional methods for preventing or treating pest infestations, relying solely on their use increases ongoing maintenance activities and costs for the homeowner and some of these products can contribute to health and safety concerns of their own. Fortunately, there are many steps builders can take during home construction that can reduce the opportunities for pest intrusion and damage, and minimize the need for pesticides.

All animals, whether vertebrate or invertebrate, require food, water, and shelter. If they are able to gain access to those essentials in, under, or around the house, they may take up residence and become pests. Builders can take an integrated pest management approach incorporating multiple pest resistance measures, sometimes in conjunction with pesticides, to eliminate or minimize access and make the home a more inhospitable place for pests.
Pests need a surprisingly small amount of space to enter a structure. Mice can get through openings as small as ¼ inch. Rats can get through openings as small as ½ inch. See Table 1 which lists the opening spaces required for entry by various pests. The Retrofit tab has an extensive discussion of materials that can be used to bar entry to a variety of pests.
The steps that builders take to air seal the building envelope will also help to keep out insects and rodents. Several of these steps are described in Solution Center guides linked to the ENERGY STAR Rater Field Checklist. The steps that builders take to manage water and moisture will also make a home less inviting to pests. For example, damp wood is especially appealing to termites and carpenter ants, and standing water is an attractant for all manner of pests. The Building America Solution Center has several guides to help builders construct homes that can effectively manage moisture in the home and drain water from the home and the site. These guides are listed under the ENERGY STAR Water Management System Builder Checklist and the EPA Indoor airPLUS Moisture Control checklist.
There are many actions builders can take to specifically minimize pest entry throughout the home. The following lists are drawn from several sources, including Pest Prevention by Design: Authoritative Guidelines for Designing Pests Out of Structures, written by Chris Geiger and Caroline Cox and published by the City of San Francisco Department of the Environment and the International Code Council with input from a technical advisory committee of staff from university extension programs, governments, pest control companies, builders, contractors, architects, engineers, inspectors, and consultants. Another good resource is Best Practices for Nuisance Wildlife Control: A Training Manual by the U.S. Department of Agriculture Cooperate Extension Service. Some of these measures are further described in Solution Center guides linked to the actions below.
| Common Name | Scientific name | Maximum opening size/mesh size | Reference |
|---|---|---|---|
| Insects/Arthropods | |||
| Biting midges | Ceratopogonidae | 0.605 mm ~30 mesh | AFPMB, 2009 |
| Cheese skipper | Piophila casei | 0.595 mm ~32 mesh | Ebeling, 1975* |
| Cockroaches | Blatella germanica | 1.66 mm ~12 mesh | Koehler, 1994** |
| Cotton aphid | Aphis gossypii | 0.341 mm ~50 mesh | Bethke & Paine, 1991* |
| Fruit flies | Drosophilida spp. | 2.12 mm ~10 mesh | NPS, 2006 |
| Honeybees | Apis spp. | 3.00 mm ~7 mesh | NPS, 2006 |
| House flies | Musca domestica | 2.03 mm ~10 mesh | Block, 1946 |
| Mosquito | Aedes egyptii | 1.03 mm ~18 mesh | Wesley & Morrill, 1956; Block, 1946 |
| Mosquito | Anopheles quadrimaculatus, Culex quinquefasciatus | 1.38 mm ~14 mesh | Block, 1946 |
| Redlegged ham beetle | Necrobia rufipes | 0.595 mm ~32 mesh | Ebeling, 1975* |
| Sand flies | Phlebotominae spp. (Psychodidae) | 0.605 mm ~30 mesh | AFPMB, 2009 |
| Termites (Eastern subterranean) | Reticulitermes flavipes | 0.610 mm ~30 mesh | Tucker, 2008* |
| Termites (Formosan) | Coptotermes formosanus | 0.660 mm ~28 mesh | Grace et al, 1996* |
| Thrips | Frankiniella occidentalis | 0.192 mm ~80 mesh | Bethke & Paine, 1991* |
| Yellowjackets | Vespidae spp. | 3.00 mm ~7 mesh | NPS, 2006 |
| Scorpions | Scorpionida spp. | 1.6 mm | Timm & Marsh, 1997 |
| Birds | |||
| Pigeons | Columba livia | 50.8 mm (2 in) | Timm & Marsh, 1997 |
| Sparrows, Starlings | Passer spp., Sturnus vulgaris | 19.1 mm (0.75 in) | Timm & Marsh, 1997 |
| Mammals | |||
| Bats | Chiroptera spp | 6 mm/0.25 in | Greenhall & Frantz, 1994 |
| Mice | Mus musculus | 6 mm/0.25 in | Greenhall & Frantz, 1994 |
| Rats | Rattus norvegicus, R. rattus | 9.5mm/3/8 in gaps under doors; 18 gauge 13 mm/0.5 in mesh | Corrigan, 1997 |
*Studies marked with an asterisk identified nominal gap sizes; these were matched with the closest Tyler mesh size. All other studies referred specifically to minimum mesh sizes; these were matched with approximate gaps sizes. Mesh opening sizes are nominal, i.e., not diagonal. **Study pertained to preferred harborage for nymphs, not minimum opening for access, which is likely smaller. | |||
Reduce Pest Entry Outside
Roof
- Design roofs with few gables, dormers, and roof-wall junctures. Simple roof geometries are easier to flash and less likely to provide hiding or nesting spots for squirrels, racoons, and rodents.
- Install metal drip edge to discourage insects or rodents from getting into the roofing at the eaves or rakes.
- Install leaf guards over gutters to keep nesting materials out of gutters.
- Fit curved roof tiles along the eaves with commercially available metal bird stops (see Figure 2) or fill openings with concrete to exclude birds, bats, rodents, and flying insects.
- Install metal step flashing at all roof-wall junctures and in roof valleys to encourage vegetative debris to be washed off rather than collecting where it can create nesting spots. Metal flashing installed over peel-and-stick membranes also protects roofing materials from rotting and creating weak spots where animals can dig through and enter the attic.
- Install ¼-inch metal screening in all roof vents to keep out rodents.
- Install pest-resistant vents (see Figure 3 and more information on Retrofit tab.)
- Secure soffit vents from dislodging due to high winds or animal activity by using sturdy metal vent covers that are mechanically fastened to framing or blocking every 12 inches. If vent openings are larger than ¼ inch, back them with ¼-inch hardware cloth.
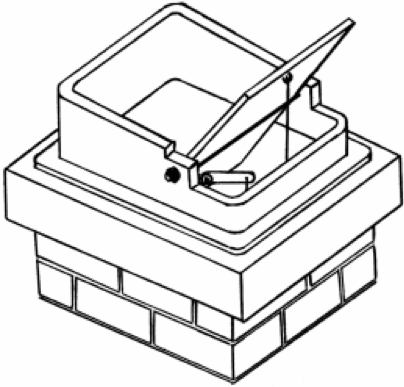
- Install chimney covers to keep out birds, animals, snow, and rain, and to prevent burning embers from escaping (see Figure 4 and more information on Retrofit tab).
Exterior Walls
- Use pest-resistant wall materials.
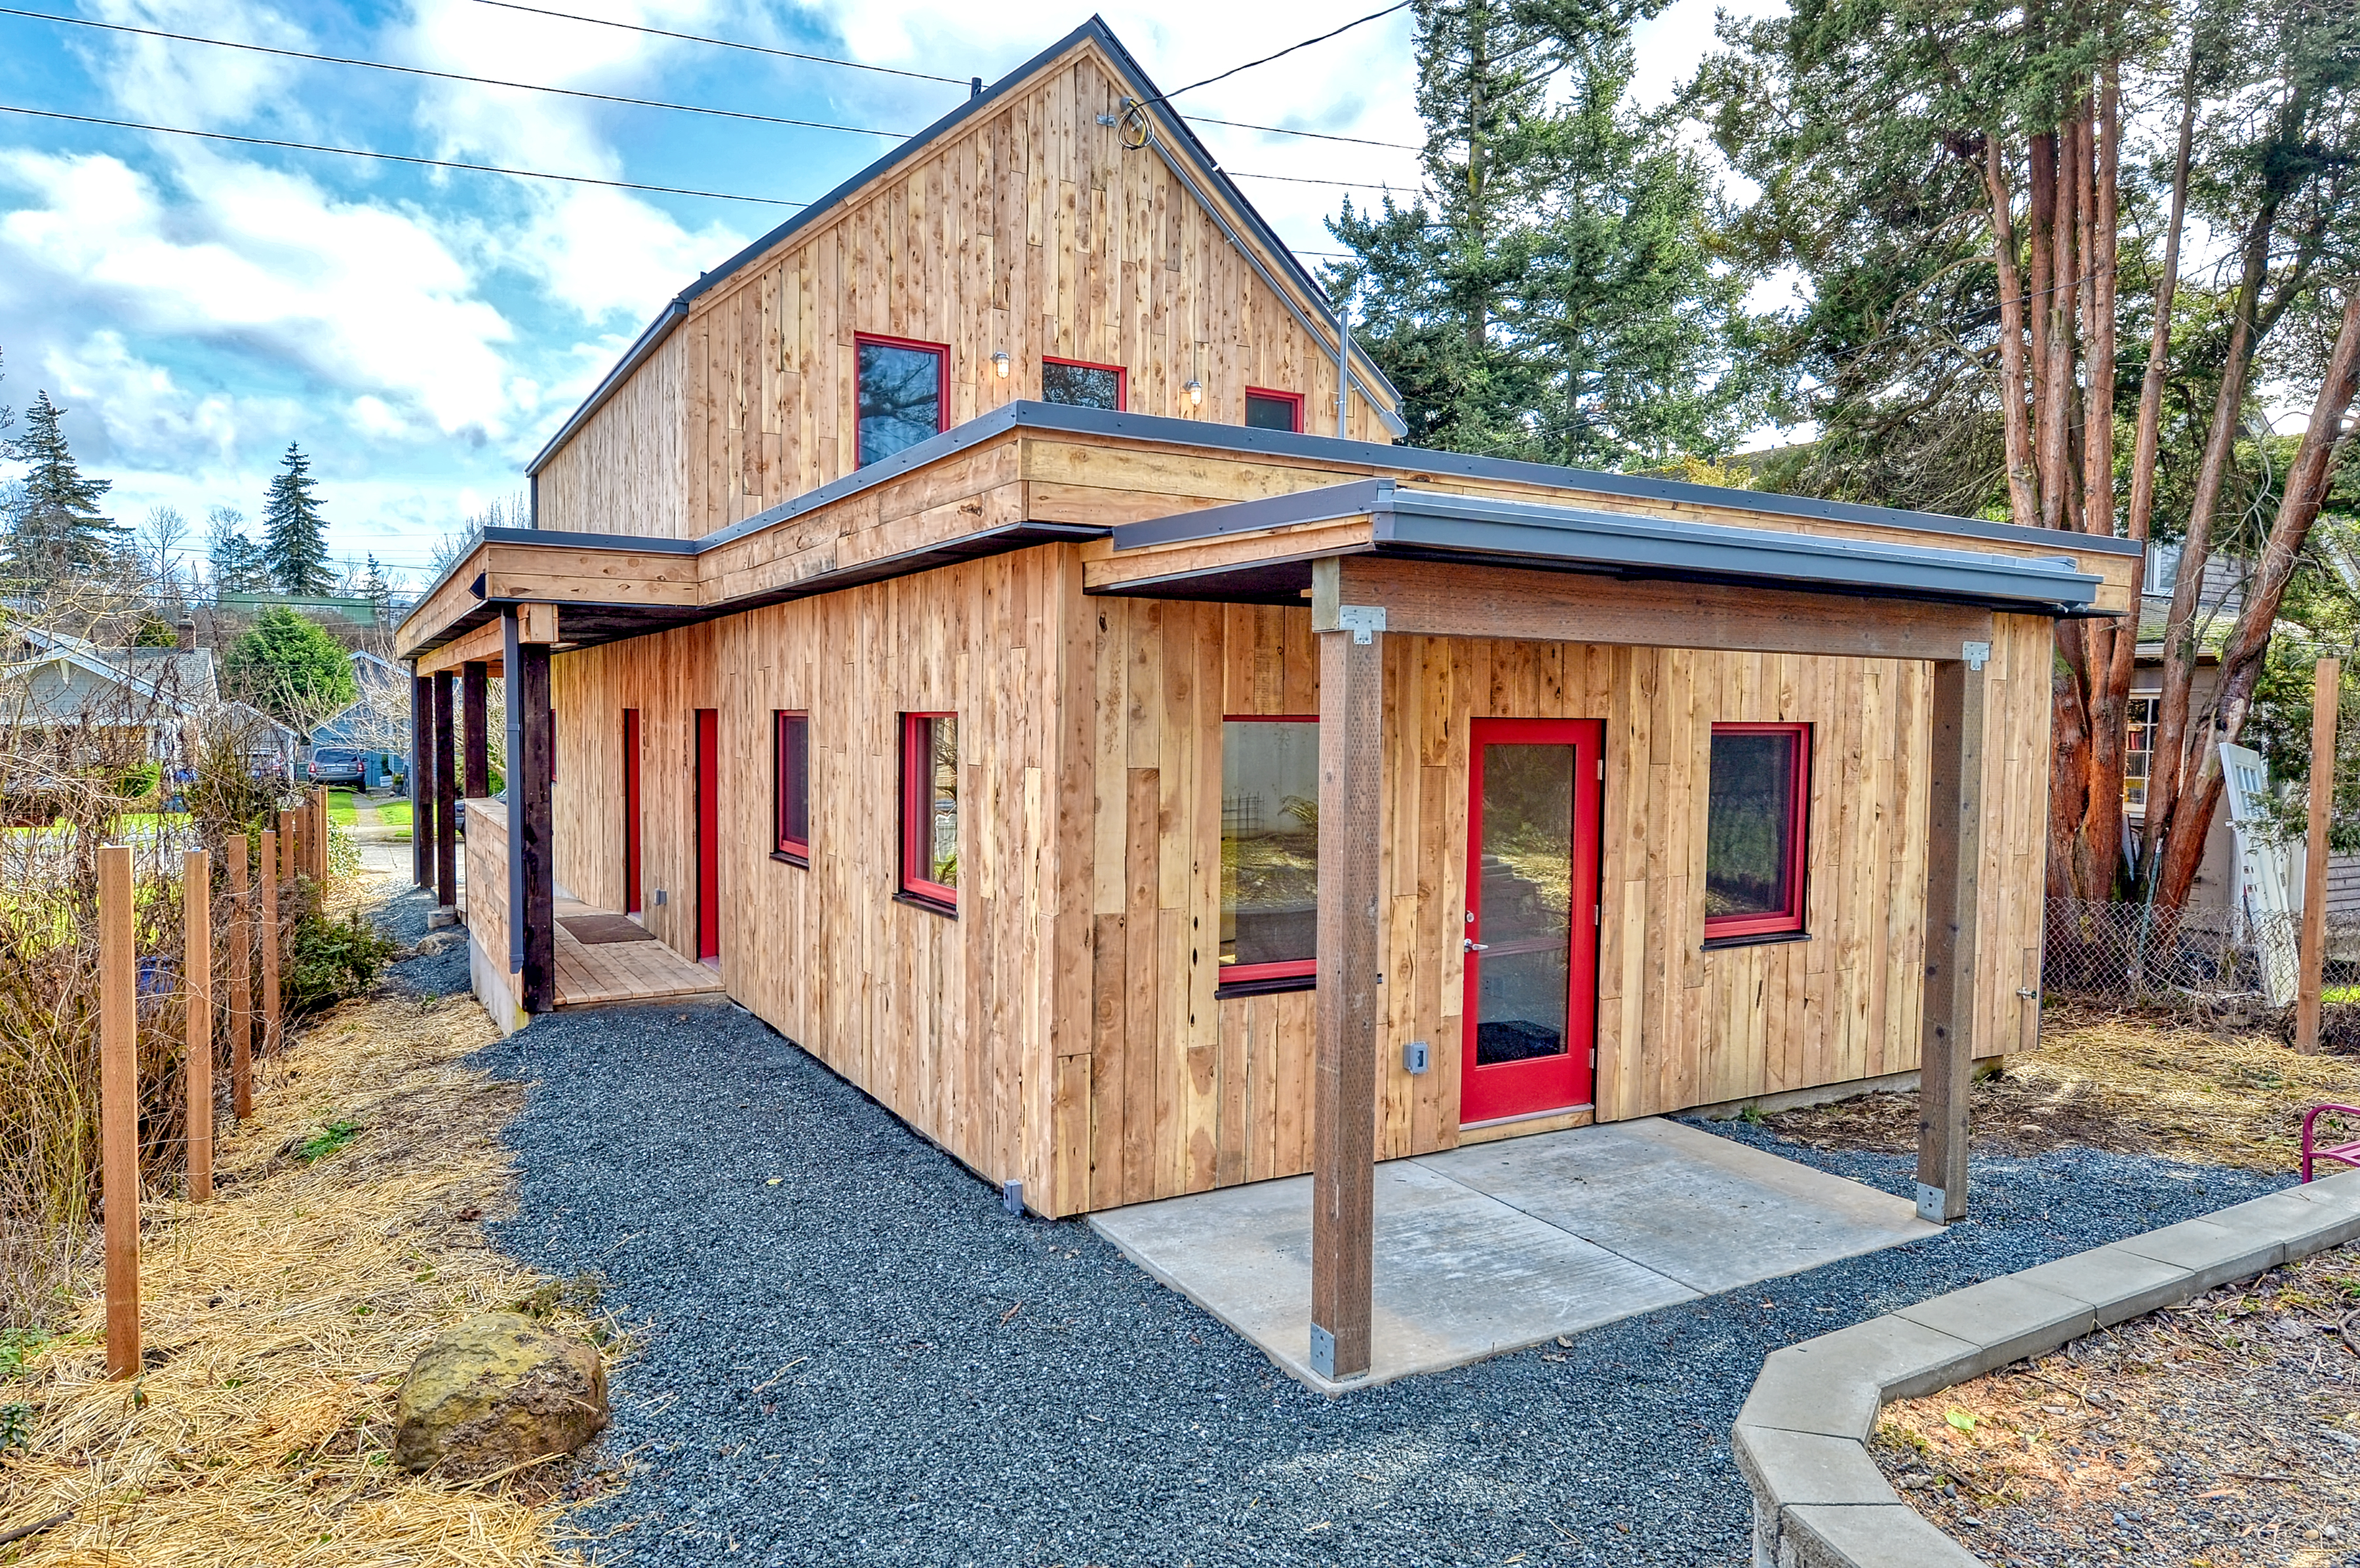
- Use termite-resistant siding materials including brick, concrete, stone, fiber cement, aluminum, steel, rigid plastics, and the heartwood of naturally pest-resistant woods such as western red cedar, redwood, incense cedar, Port Orford cedar, black locust, northern white cedar, and Alaska cedar. In areas of high termite hazard, use borate-treated framing and avoid synthetic stucco which can hide termite activity, or detail and install the stucco carefully following manufacturers instructions to avoid future cracking, and install weep screed flashing at the bottom of stucco walls.
- Use rodent-resistant above-grade wall and foundation materials like concrete, cement, metal, brick, fiber cement, stone, and plaster (see Table 2). See a more extensive discussion of rodent- and pest-resistant materials on the Retrofit tab.
- Use borate-treated insulation or naturally termite-resistant insulation such as mineral wool.
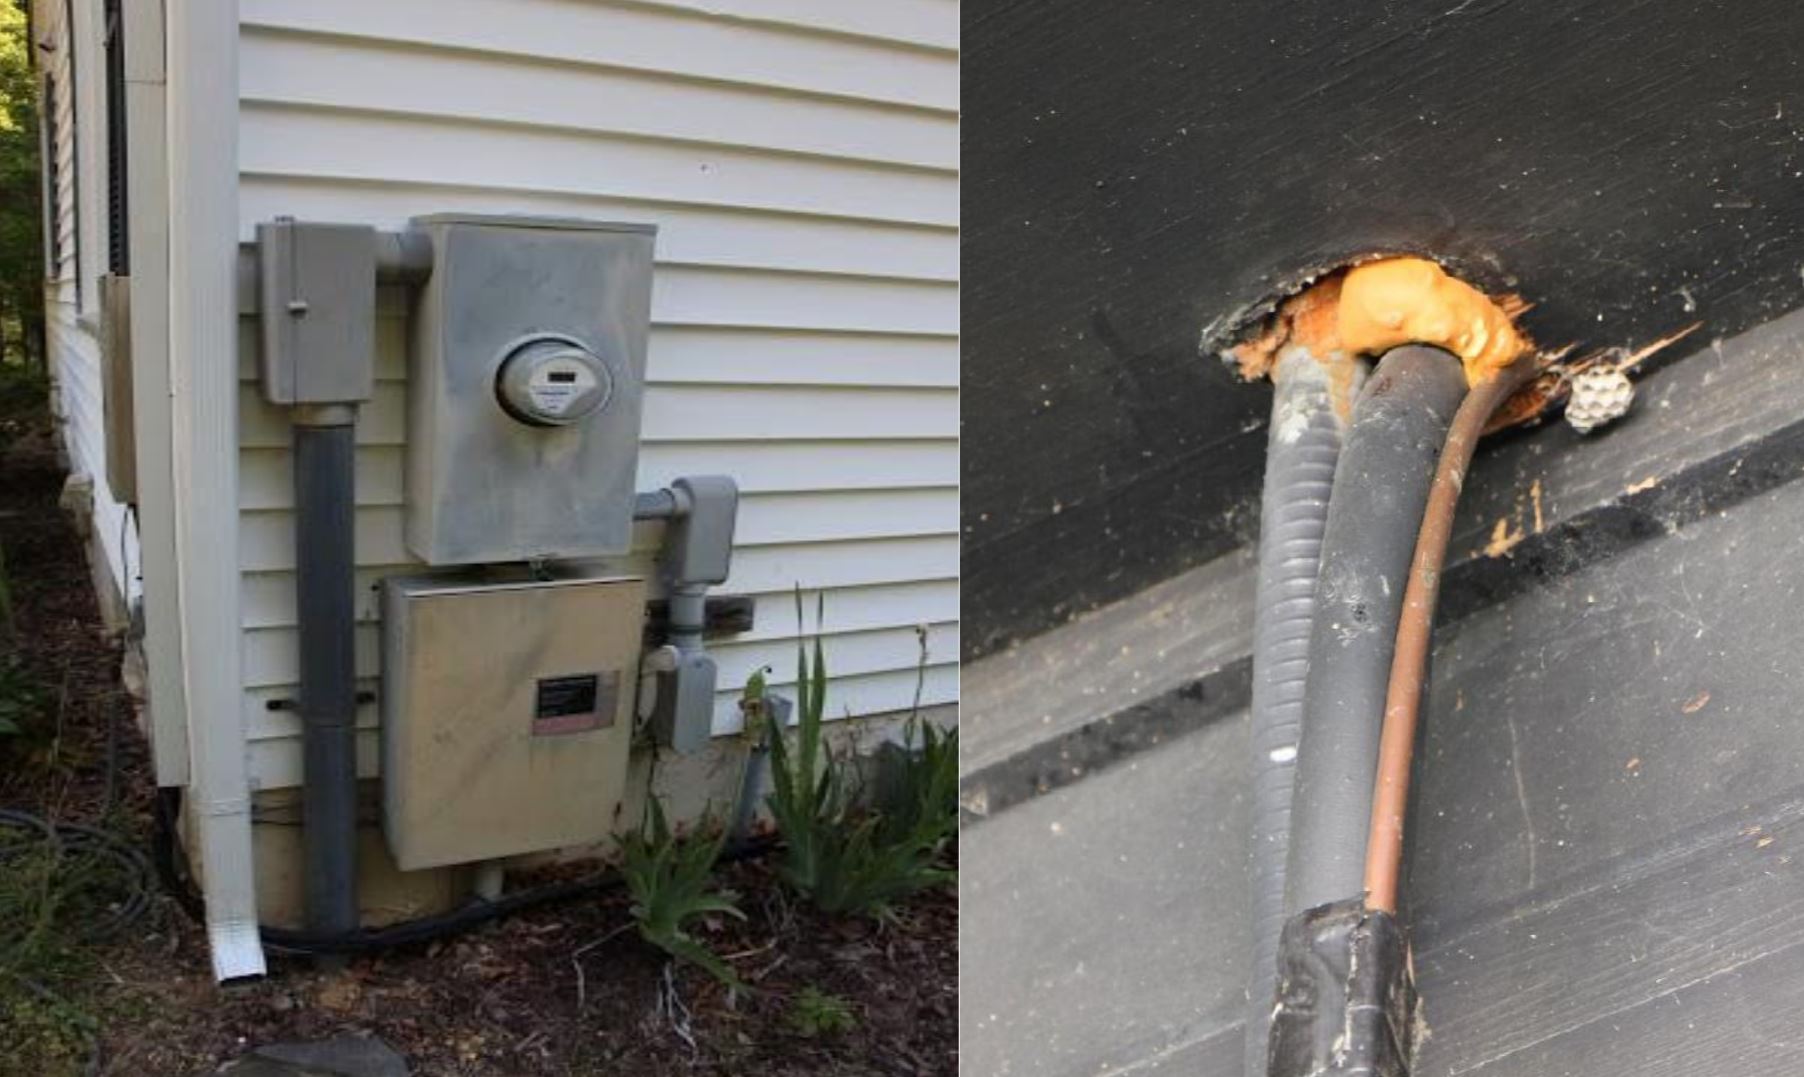
- Install pre-made gaskets, escutcheons, or flashing around penetrations through exterior walls, including plumbing, vents, light fixtures, wiring, etc.
- Caulk or seal wherever siding meets trim and around windows and doors. Use high-quality, exterior-grade caulks and sealants that meet ASTM standard C-920. Caulk should be compatible with both siding materials and trim materials.
- Use back flashing at siding butt joints.
- Cap concrete masonry unit walls by filling the top row of blocks with cement to eliminate rodent access.
- Provide at least 6 inches of clearance between siding and soil; 8 to 12 inches is preferable.
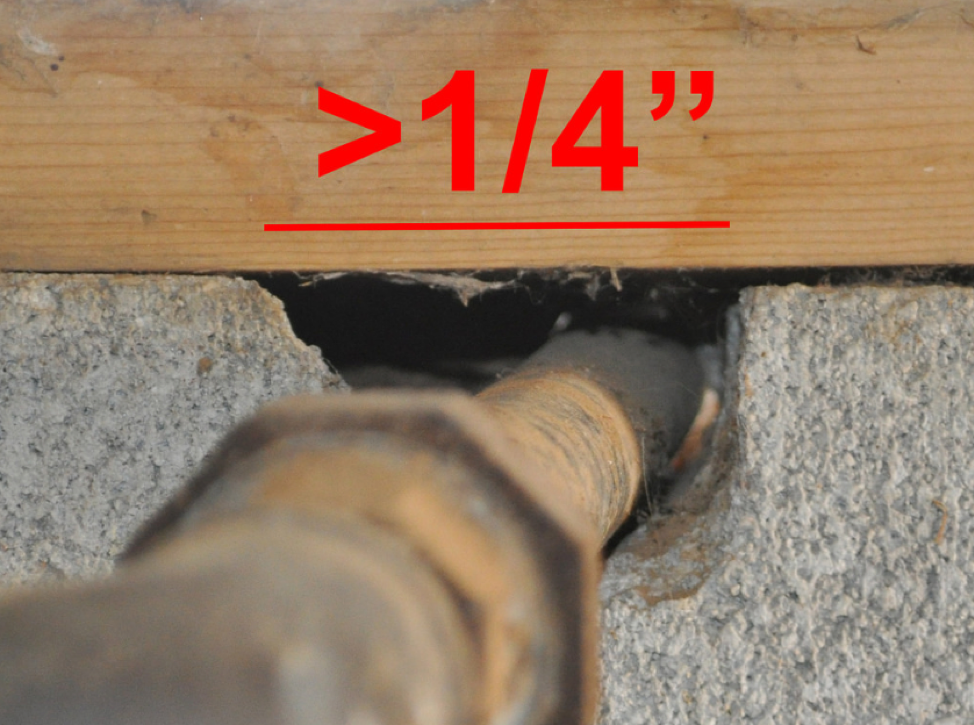
- Seal all holes or joints in exterior or other cavity walls that are larger than ¼-inch diameter to prevent access by mice. Where larger holes or joints are necessary, they should be screened with ¼-inch mesh or otherwise shielded from pest intrusion.
- Seal smaller holes to eliminate access from smaller pests. Use caulk (non-elastomeric, does not return to original shape when stretched or compressed) for openings of ¼-inch diameter or less. Use an elastomeric sealant to close larger openings. Use a liquid sealer to close pores and hairline cracks.
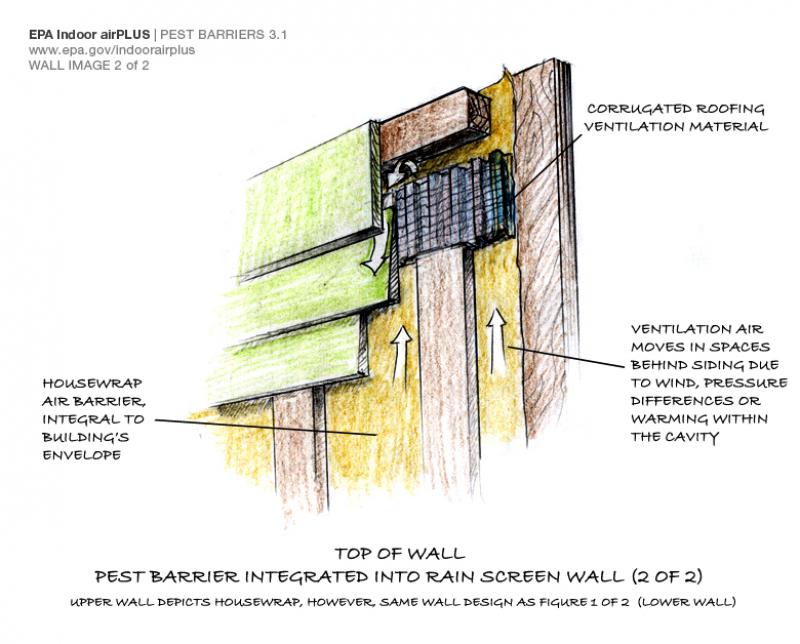
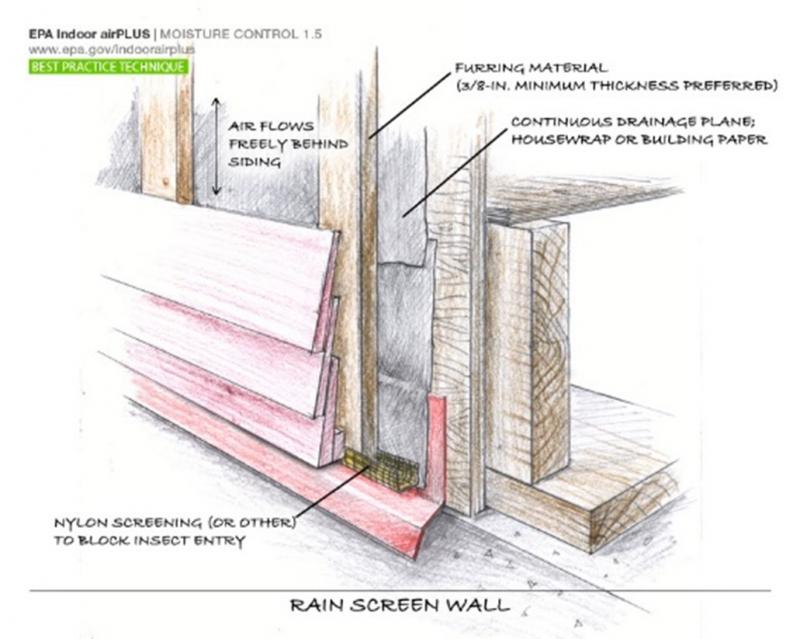
- Install screening over furring at the bottom and tops of ventilation gaps behind cladding on exterior walls to keep out insects (and burning embers in wildfire areas. See Figures 5 and 6).
Material | Uses | Thickness |
Concrete | Slabs, curtain walls, foundation walls, ground cover barriers | ≥ 2 inches (5.1 cm) if reinforced, or 3.75 inches (9.5 cm) if not reinforced |
Brick | Curtain walls, facades to ground-level | 3.75 inches (9.5 cm) thick with joints filled with mortar |
Galvanized sheet metal | Wall or pipe barriers | 24 gauge or heavier |
Kick plates or door edging | 22-gauge or heavier | |
Perforated or expanded sheet metal grills | 14-gauge | |
Hardware cloth | Wire mesh to exclude rats | if woven, 19-gauge, 1/2 x 1/2-inch (1.3x1.3-cm) mesh |
Mesh to exclude mice | 24-gauge, 1/4x1/4-inch (0.6x0.6-cm) | |
Aluminum | Frames and flashing | 22-gauge |
Kick plates and guards. | 18-gauge |
Exterior Doors and Windows
- Use metal or solid-core doors where possible. Solid-core doors are more durable than hollow-core wood doors and do not have hidden recessed areas or cavities that could harbor pests.
- In areas of high rodent pressure, fit external doors with 26-gauge sheet metal kick plates 12 inches tall and mounted no more than 1/4 inch from the bottom of the door.
- Ensure that doors fit tightly with less than ¼ inch between the bottom of the door and the threshold. Use tight-fitting door sweeps if gaps are larger than 1/4 inch. Install a door sweep; automatic door sweeps or bristle sweeps are preferrable to rubber or plastic sweeps. If rodent pressure is high, protect rubber and plastic sweeps with metal kick plates installed on the outside of the door.
- Equip exterior doors with self-closing devices.
- Install screen doors with durable frames to prevent warping and ensure a good seal from the outdoors.
- Use weather-stripping on all exterior doors.
- Install screens on all openable exterior windows.
- Weatherstrip all operable windows.
- Install head flashing, side flashing, and sill pan flashing around all windows and doors.
Exterior Attached Structures
- For decks and fences, use termite-resistant fence and post materials, including naturally pest-resistant wood species, concrete, or steel. Consider non-wood fencing for the 6 feet closest to the house for both pest and fire safety.
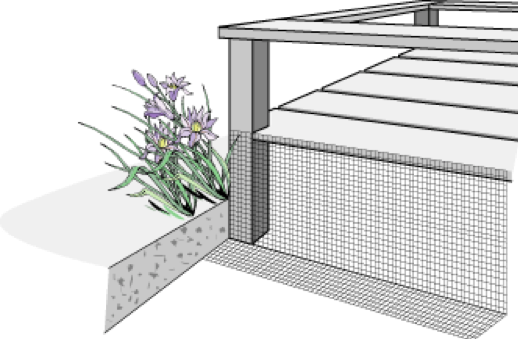
- Install screening around decks from deck surface to ground to discourage animals from taking up residence and to keep out debris that would provide cover for animals. (See Figure 7.)
- Ensure wood steps rest on a concrete base at least 6 inches above grade to minimize access by wood-destroying pests, particularly in areas with high termite pressure.
- In areas of high-rodent infestation, prevent rodents from traveling up downspouts and pipes by installing rodent-inhibiting cones or discs (typically metal) around the pipe that are attached to the pipe or to the wall at least 2 feet up from the ground. Cones should be 12 inches in diameter and 12 inches long. Discs should be 18 inches in diameter (See Figure 8).
- Prevent mice and Norway rats from climbing on exterior vertical pipes by applying a 12-inch band of glossy paint around the pipe.
- Use flap valves, screens, or bulb-shaped metal screen leaf guards in the bottom end of downspouts to prevent entry by rodents. Flap valves are preferred as screens require regular cleaning to avoid clogging the downspouts.
- Allow inspection for termites by providing at least 6 inches clearance between the side of the house and accessory wooden structures like decks, fences, patios, and planters. If this clearance is not possible, construct accessory structures so that they are easily removable to allow inspection for termites.
- Install exterior lighting with motion detectors or timers to reduce the amount of time the lights are on to minimize attraction for insects.
- Provide garages and/or sheds for outdoor storage to minimize the likelihood of clutter along exterior walls.
- Provide concrete pad or gravel space for garbage cans so they are not in the garage or touching the house.

Landscaping
- Do not plant trees or shrubs near the home's walls. Maintain at least 6 feet of clearance between exterior walls and tree limbs or branches that might provide pest access for rodents, racoons, and possums (10 feet or more if tree squirrels are a problem).
- Provide 2 feet or more of distance between shrubs and from shrubs to buildings to minimize hiding places for rodents.
- Avoid planting anything within 18 inches of the home.
- Do not over-irrigate and do not let irrigation spray the house. For irrigation near the foundation, consider drip irrigation, rather than surface sprinklers.
- Do not install trellises against house walls.
- Use plants that shed a minimum of seeds and fruits near the house since the seeds and fruit may attract and support insects, rodents, and undesired birds.
- Avoid planting Algerian or English ivy, star jasmine, and honeysuckle on fences or buildings, as they provide shelter and food for rats.
- Where Argentine ants are common, avoid bamboo, cherry laurel, fig, pine, and roses near buildings. These plants often have abundant scale and aphid populations, and excreta from these insects provides food for ant colonies.
- Never let wood chips pile up against wood siding.
- To discourage termites, ants, and spiders, use crushed stone or pea gravel instead of wood chips and mulch around the home’s foundation.
- To discourage burrowing rodents, install a foundation border of stone 1-inch (2.5 cm) diameter or larger, laid in a band at least 2 feet (60 cm) wide and 1/2 foot (15 cm) deep. Or install concrete pavers or pour a concrete skirt around the building. (See the guide Pest-Resistant Ground Cover at Foundation Perimeter.)
Minimize Moisture
For comprehensive lists of Solution Center guides on making homes more moisture resistant, see the ENERGY STAR Water Management System Builder Requirements checklist and the EPA Indoor airPLUS Moisture Control checklist.
- Slope patio slabs, walks, and driveways away from building.
- Tamp backfill to prevent settling and slope the final grade away from the foundation at a rate of 1/2 inch per foot over a minimum distance of 10 ft.
- Install vapor barrier under slabs and install capillary break under sill plates.
- Ensure siding is at least 6 inches above finished ground level or more.
- Use gutters with downspouts on all buildings with eaves of less than 6 inches of horizontal projection pipe except for gable ends and roofs above other roofs. Downspouts and gutters should discharge at least 5 feet away from the structure if terminating above grade or to a drywell at least 10 feet away from the structure below grade. Or, instead of gutters, install a grade-level drainage bed of rock with buried drain pipe to carry the water to a drywell or to daylight at least 10 feet from the foundation. To avoid splash-back damage to the siding, the first course of siding should be 16 inches above grade, or 8 inches above grade if the dripline is at least 16 inches horizontally from the foundation wall, or the wall is covered with cladding material that can tolerate regular wetting and install a well-sealed, continuous drainage plane that extends at least 16 in. above the final grade (e.g., brick veneer or stone cladding over a self-adhering moisture control membrane and air gap.
Keep Wood Debris away from the House
- Remove wood and cellulose debris around the structure after construction.
- Don’t bury wood scraps, form boards, vegetation, stumps, large dead roots, cardboard, or trash within fifty feet of the building.
- Install fill material around structures that is clean and free of vegetation and cellulose material.
- When constructing with concrete masonry units, remove any plant debris or paper in block cells before use.
- After all foundation work is completed, remove all loose wood and wood debris from the crawl space and around the perimeter of the building.
- Consider installing a 2-foot perimeter of crushed rock, pea gravel, concrete, or concrete pavers around the home instead of wood mulch or vegetation, as described in the guide “Pest-Resistant Ground Cover at Foundation Perimeter.”
- Advise the homeowner to keep plants, trees, wood mulch, and wood piles away from the house. These actions taken to create defensible space around a home to reduce wildfire risk will also minimize pest risk.
Discourage Roosting and Nesting Birds and Rodents
- Screen in openings in buildings, exposed rafters in porch roofs, and other likely perches in semi-enclosed areas with rust-proof, ¾-inch wire or plastic mesh to exclude birds, or ½-inch metal mesh to also exclude rodents.
- Choose or design items with smooth surfaces and sloped not flat horizontal tops when purchasing or designing exterior attachments like light fixtures, moldings, awnings, fence posts, pergolas, signs, fire sprinkler pipes, and column capitals so that they do not provide opportunities for bird perching, roosting, or nesting, especially near building entrances.
- Slope window ledges and projections at 45 degrees to minimize bird perching and roosting.
- Install bird stop in the open ends of rounded roof tiles.
- Install leaf guards on gutters to minimize collection of leaves, branches and other nesting materials.
- Install bird spikes, "porcupine wire," netting, or similar devices to discourage birds from nesting on light fixtures or use bird exclusion devices, including wires, springs, nets, and electrical strips, to prevent birds from reaching light fixtures and other perching spots. (Note these devices are not foolproof and do require maintenance.)
- Do not attach bird houses, bird feeders, or bird baths to the home, balconies, decks, or attached patios as they can attract rodents and nuisance insects, in addition to birds.
Inside the Home
Living Space
- Caulk moldings, joints, and trim around the room perimeter (floor, doors, cabinets, and windows) with silicone sealant to eliminate hiding spots for bed bugs.
- Use nailed flat baseboard rather than glued cove base. The adhesives may be food for cockroaches, and the gap behind the cove provides potential harborage for a variety of pests, including bed bugs.
- Avoid gaps between drywall panels and subfloor. Caulk the subfloor-to-drywall joint. Caulk the sill plate-to-slab floor joint.
- Ensure concrete floors are smooth and sealed to prevent dirt accumulation in crevices; provide a non-slip surface.
- Design the HVAC system to enable the use of high-MERV air filters.
- Install a central vacuum system that takes pollens, dust mites, etc. out of the home.
- Install dehumidifiers if needed based on local climate to help home maintain an indoor relative humidity below 60% to minimize the growth of dust mites, which need 70% or higher humidity to multiply. Insulate basement floor slabs and/or do not install carpets on cold basement floors as cold slabs increase relative humidities at adjacent surfaces and cold carpets are an ideal breeding ground for dust mites.
- Install easy-care hard-surface or vinyl flooring in entry ways, mudrooms, at garage and outdoor entries, and in kitchens, bathrooms, and laundry rooms to facilitate clean up of tracked-in water and dirt.
- Provide space for or install shoe cubbies near the entry closest to the garage to encourage shoe removal when entering the home. Over 60% of house dust is tracked in on dirty shoes.
- Provide closets, cabinets, and storage space to help homeowners minimize clutter.
Bathrooms
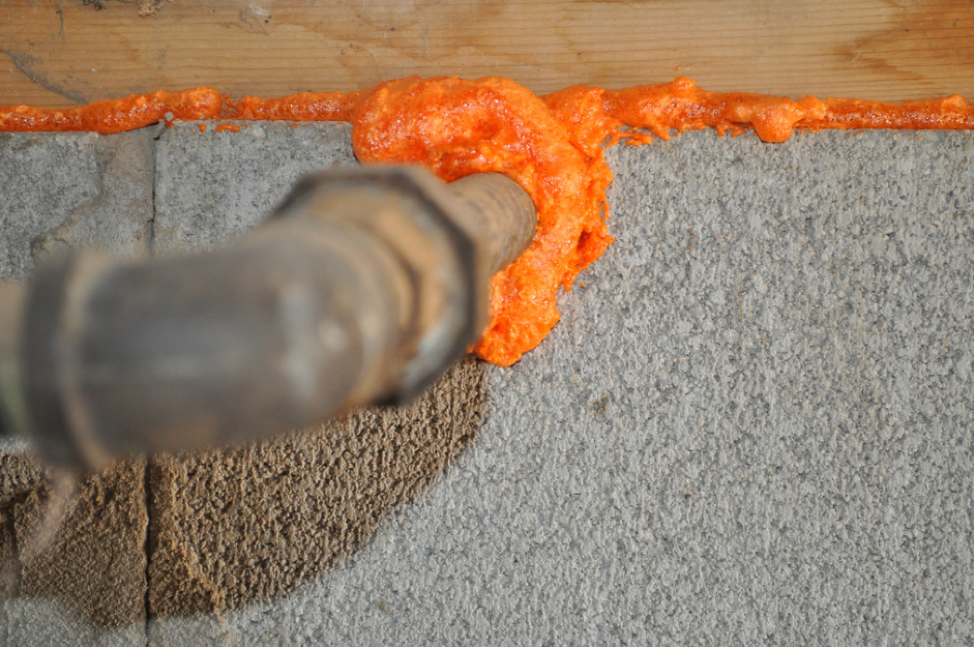
- Seal any penetrations through walls, floors, cabinets, and ceilings for wiring, pipes, flues, ducts, etc., with polyurethane foam, silicone sealant, or other flexible sealant. Larger gaps may require the addition of copper or stainless steel wool to the foam to inhibit rodents.
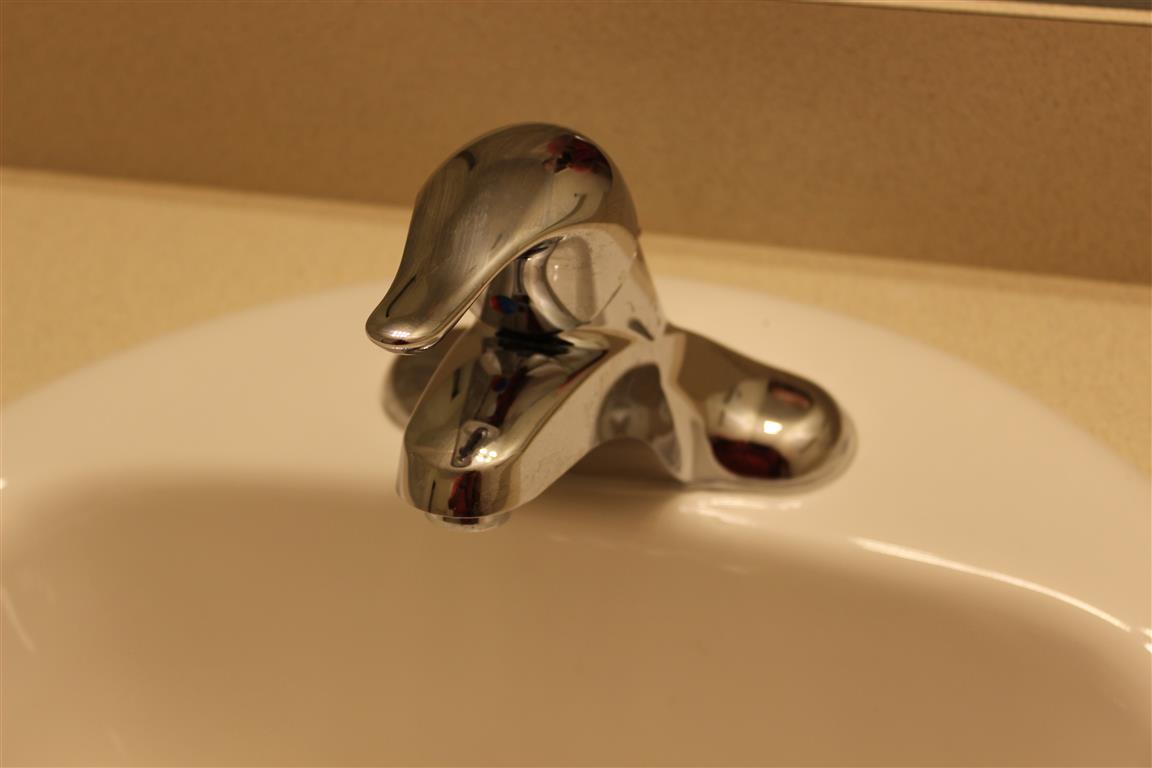
- Install metal escutcheon plates on plumbing pipes.
- Install one-piece countertops if possible, that is, with an attached backsplash. If this is not feasible, use an elastomeric sealant to seal where countertops and backsplashes meet and where they meet walls.
- Use one-piece tub or shower enclosures where possible to minimize potential infiltration of moisture.
- Slope horizontal surfaces of soap holders, shampoo cubbies, and shower seats so water drains into the shower or tub.
- Use insulated toilet tanks to minimize toilet sweating.
- Ensure horizontal exhaust fan ducts are sloped so that condensation water doesn't accumulate in the ducts.
- Install bathroom fans with a humidistat and timer and/or with a low speed for continuous operation, to more effectively remove moisture.
- Avoid installing carpet in areas prone to moisture: bathrooms, laundry rooms, kitchens, entryways and on cold basement floors.
Kitchens
- Avoid joints that are difficult to clean between sinks and countertops. Install undermount or integral sinks if possible.
- Install one-piece countertops with attached backsplash or use an elastomeric sealant to seal along the edges of countertops and backsplashes where they meet walls.
- Ensure all holes and penetrations on walls are sealed using sheet metal or by stuffing holes with copper or stainless steel mesh then covering with patching plaster before cabinetry and appliances are installed. (See the Retrofit tab for more on barrier materials.)
- Caulk cabinet-to-wall and cabinet-to-floor seams.
- Specify cabinets with flat rather than raised panel doors and enamel, gloss paint, or other smooth finishes for easier cleaning.
HVAC
- Use escutcheons, cement mortar, or copper mesh or hardware cloth embedded in patching plaster to seal any openings around utility penetrations.
- Where rodent pressure is not high, or with gaps less than ¼ inch, use silicone sealant to seal around utility penetrations to deter insect movement.
Foundations
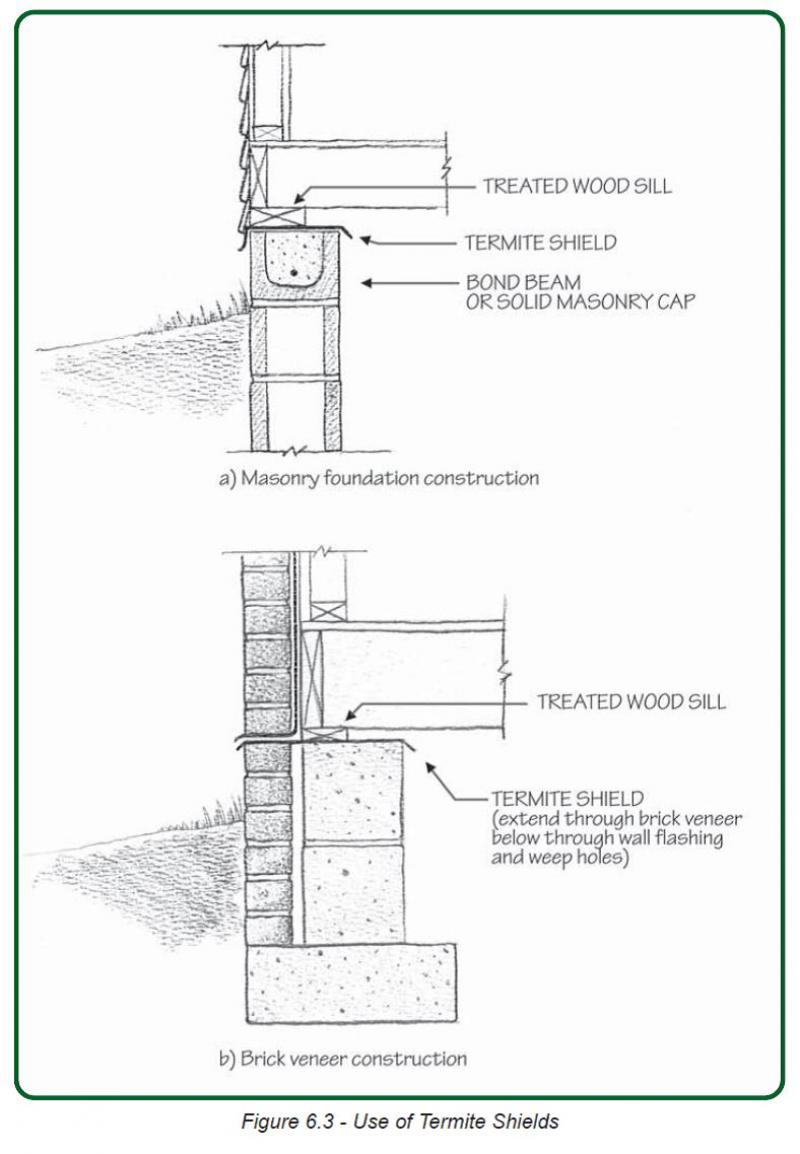
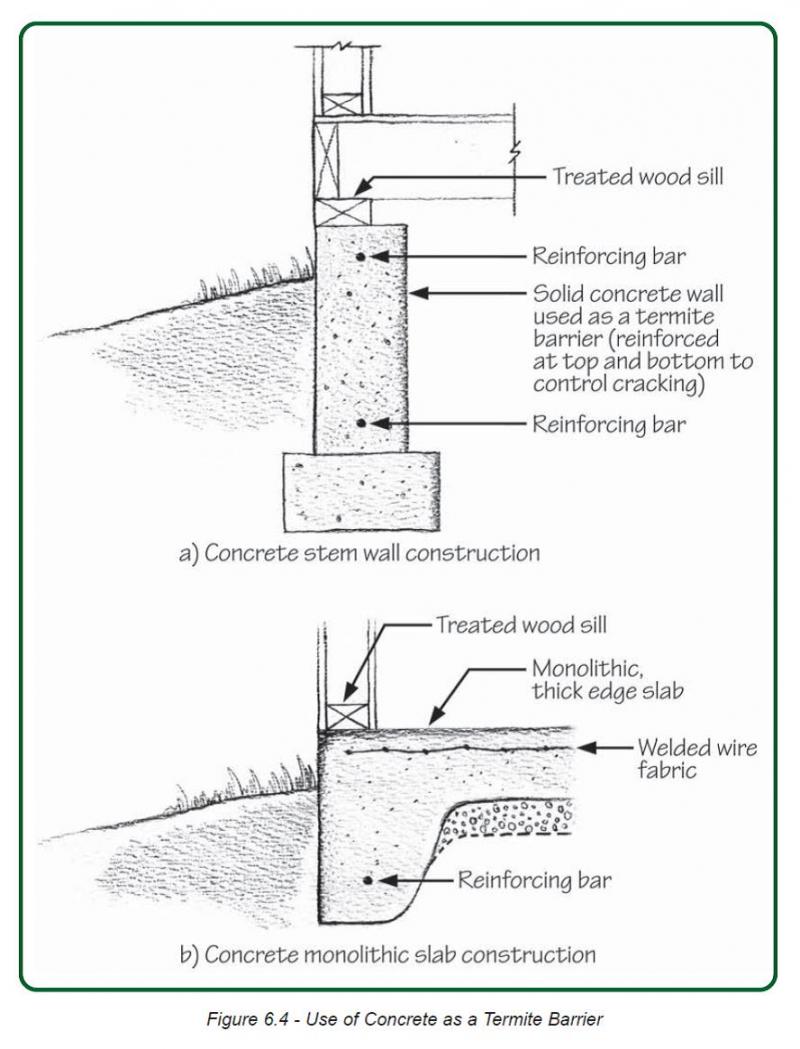
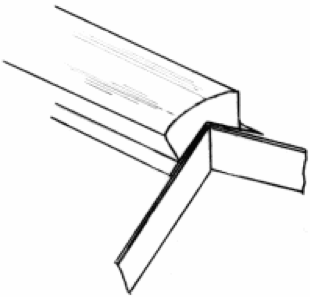
- Install termite shields at the tops of foundation stem walls under the sill plate. (Figure 9).
- Reduce termite entry through slab foundations by minimizing the use of expansion joints and installing metal mesh or sand barriers at any necessary joints.
- Mechanically compact concrete to remove voids.
- Use reinforced concrete (Figure 10) and cure concrete slowly (> 7 days) or as recommended to minimize cracks and shrinkage.
- If using masonry block for stem walls fill the holes in the top course of concrete block to deter termites and other pests (Figure 9).
- Install metal mesh, sand, or basalt barriers around slabs.
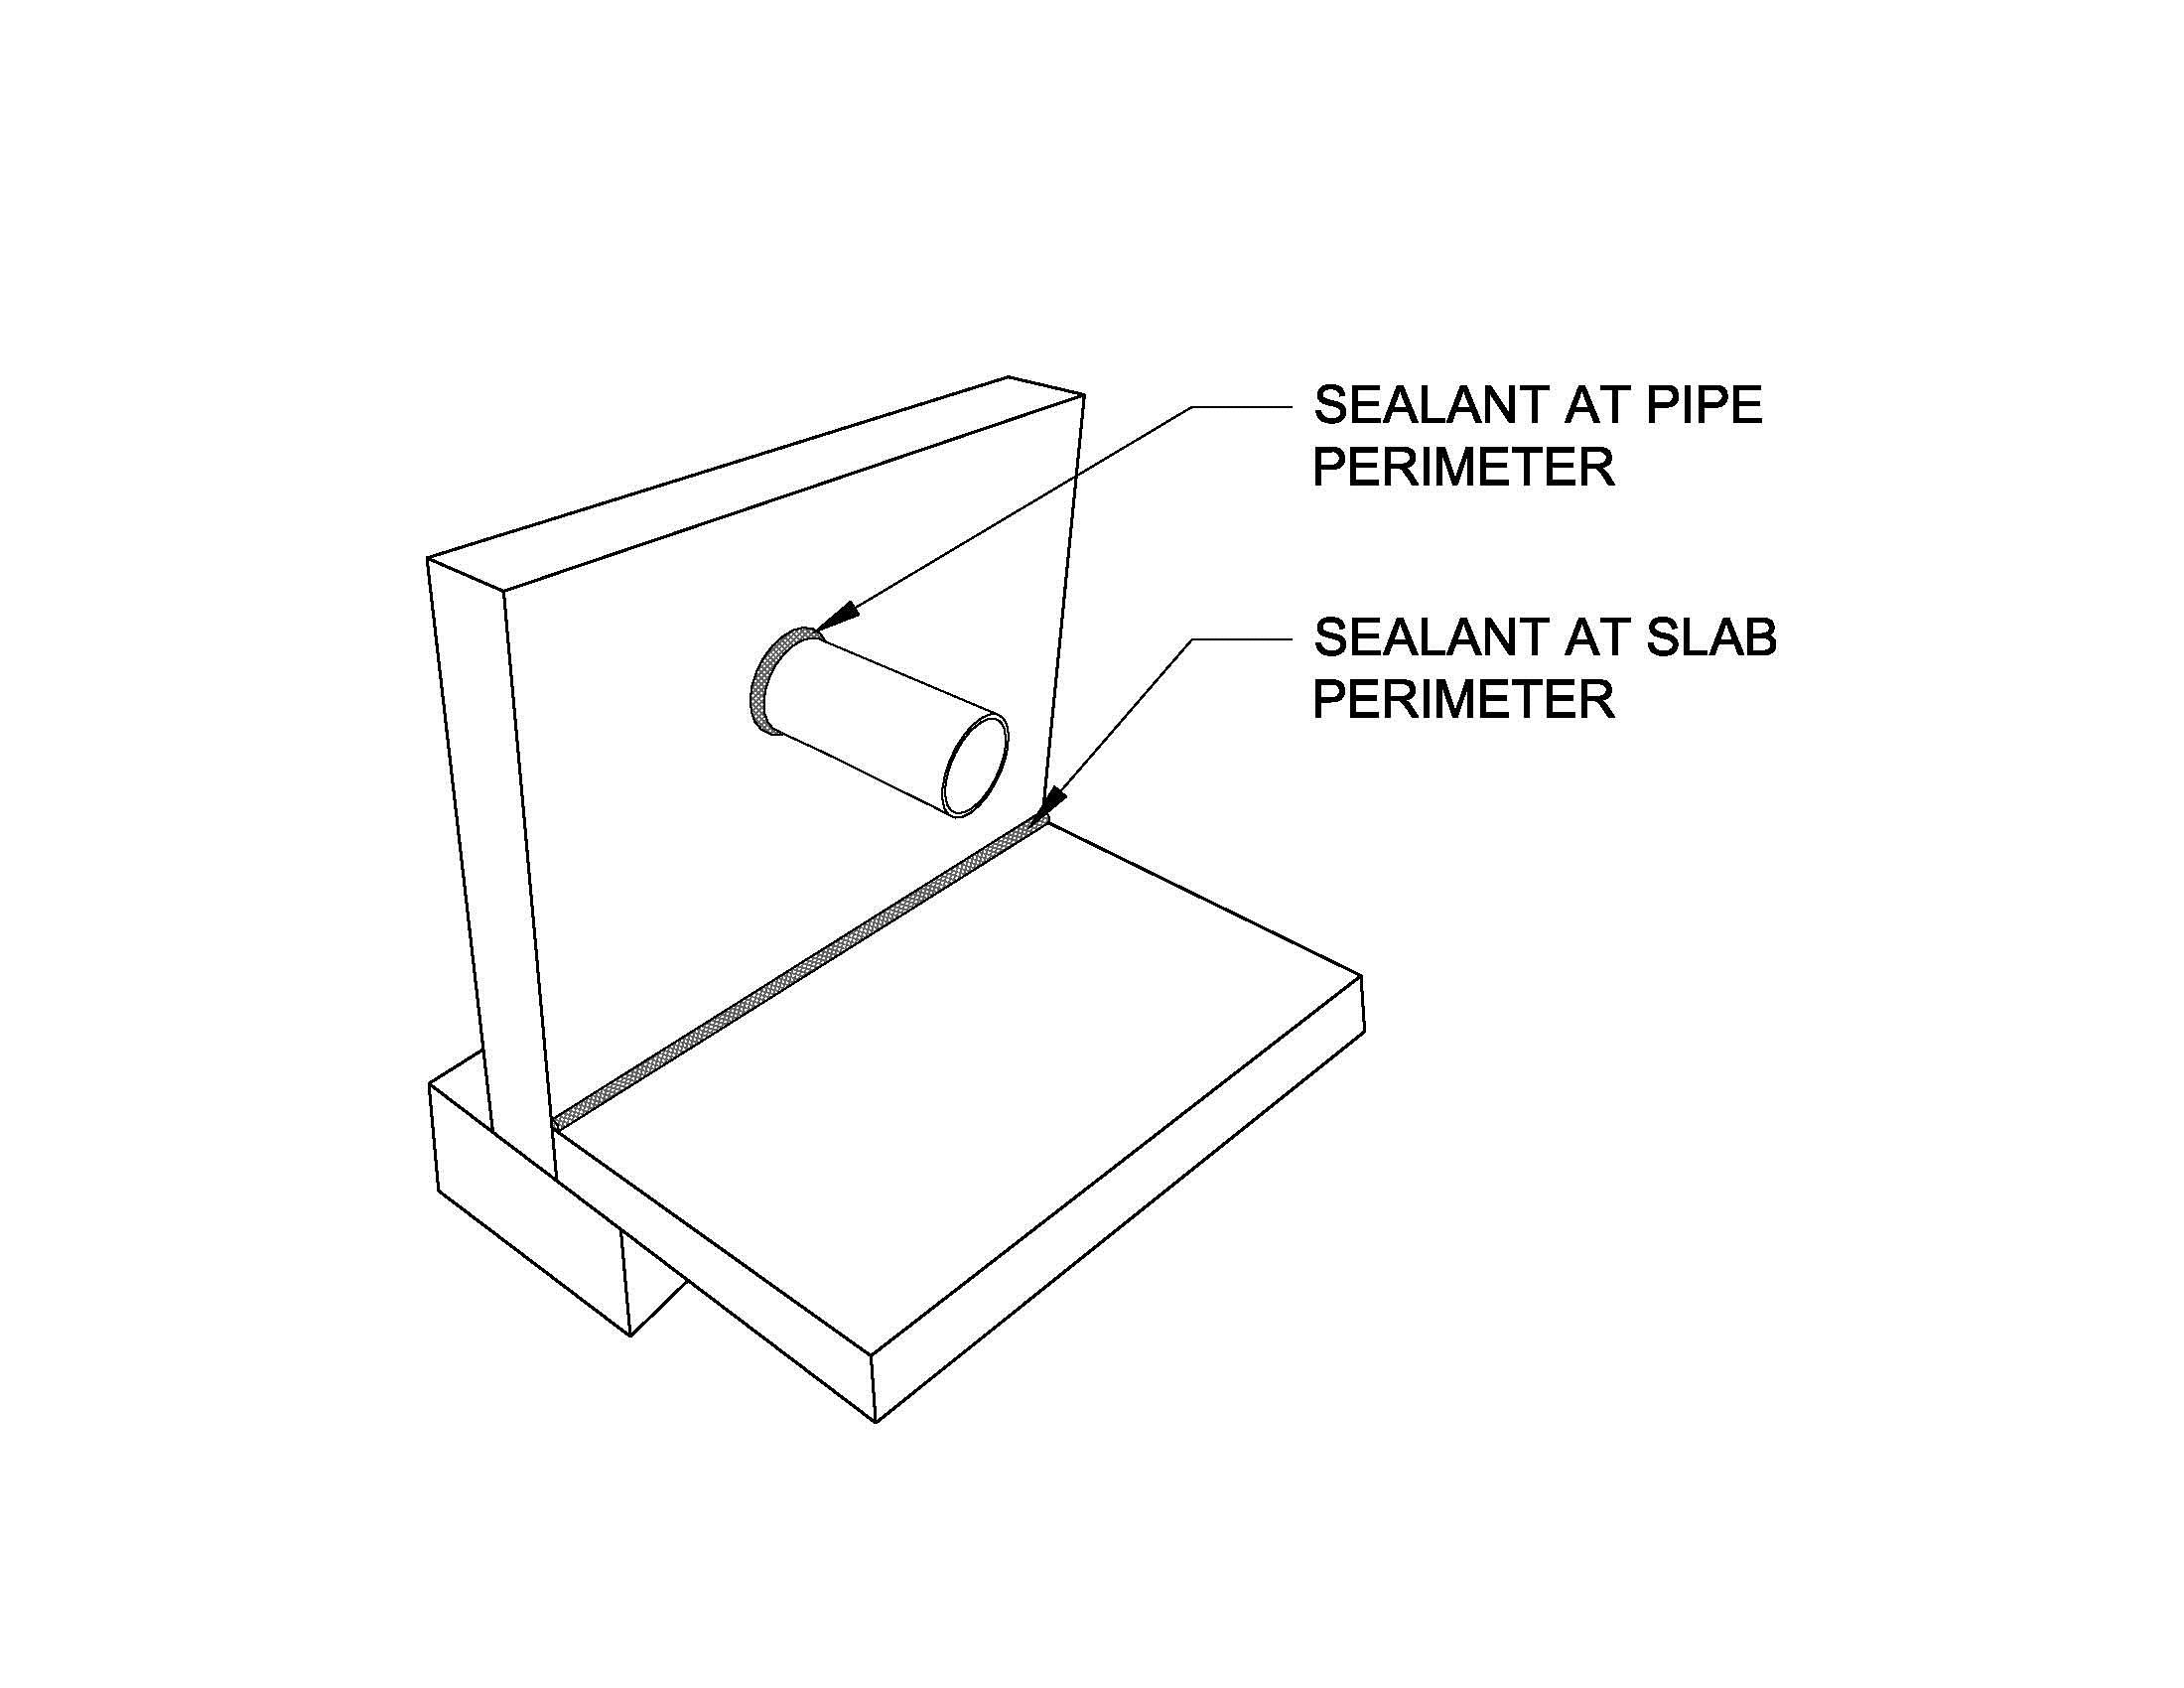
- Use epoxy, metal mesh, or sand barriers around service penetrations through concrete (Geiger and Cox 2012).
- See the guide Termite-Resistant Foundations for much more detail on make foundations resistant to termites. To discourage rodent burrowing, install a 2 -foot-wide border of gravel, 1-inch stone, concrete pavers, or poured concrete around the perimeter of the building.
- If burrowing rats are a known hazard, install "curtain walls" around a crawlspace foundation. Construct curtain walls of 29-gauge corrugated iron, concrete, or bricks that extend down from the exterior of the wall 2 feet (0.6 m) below the surface and out 8 to 12 inches.
Advice for Homeowners
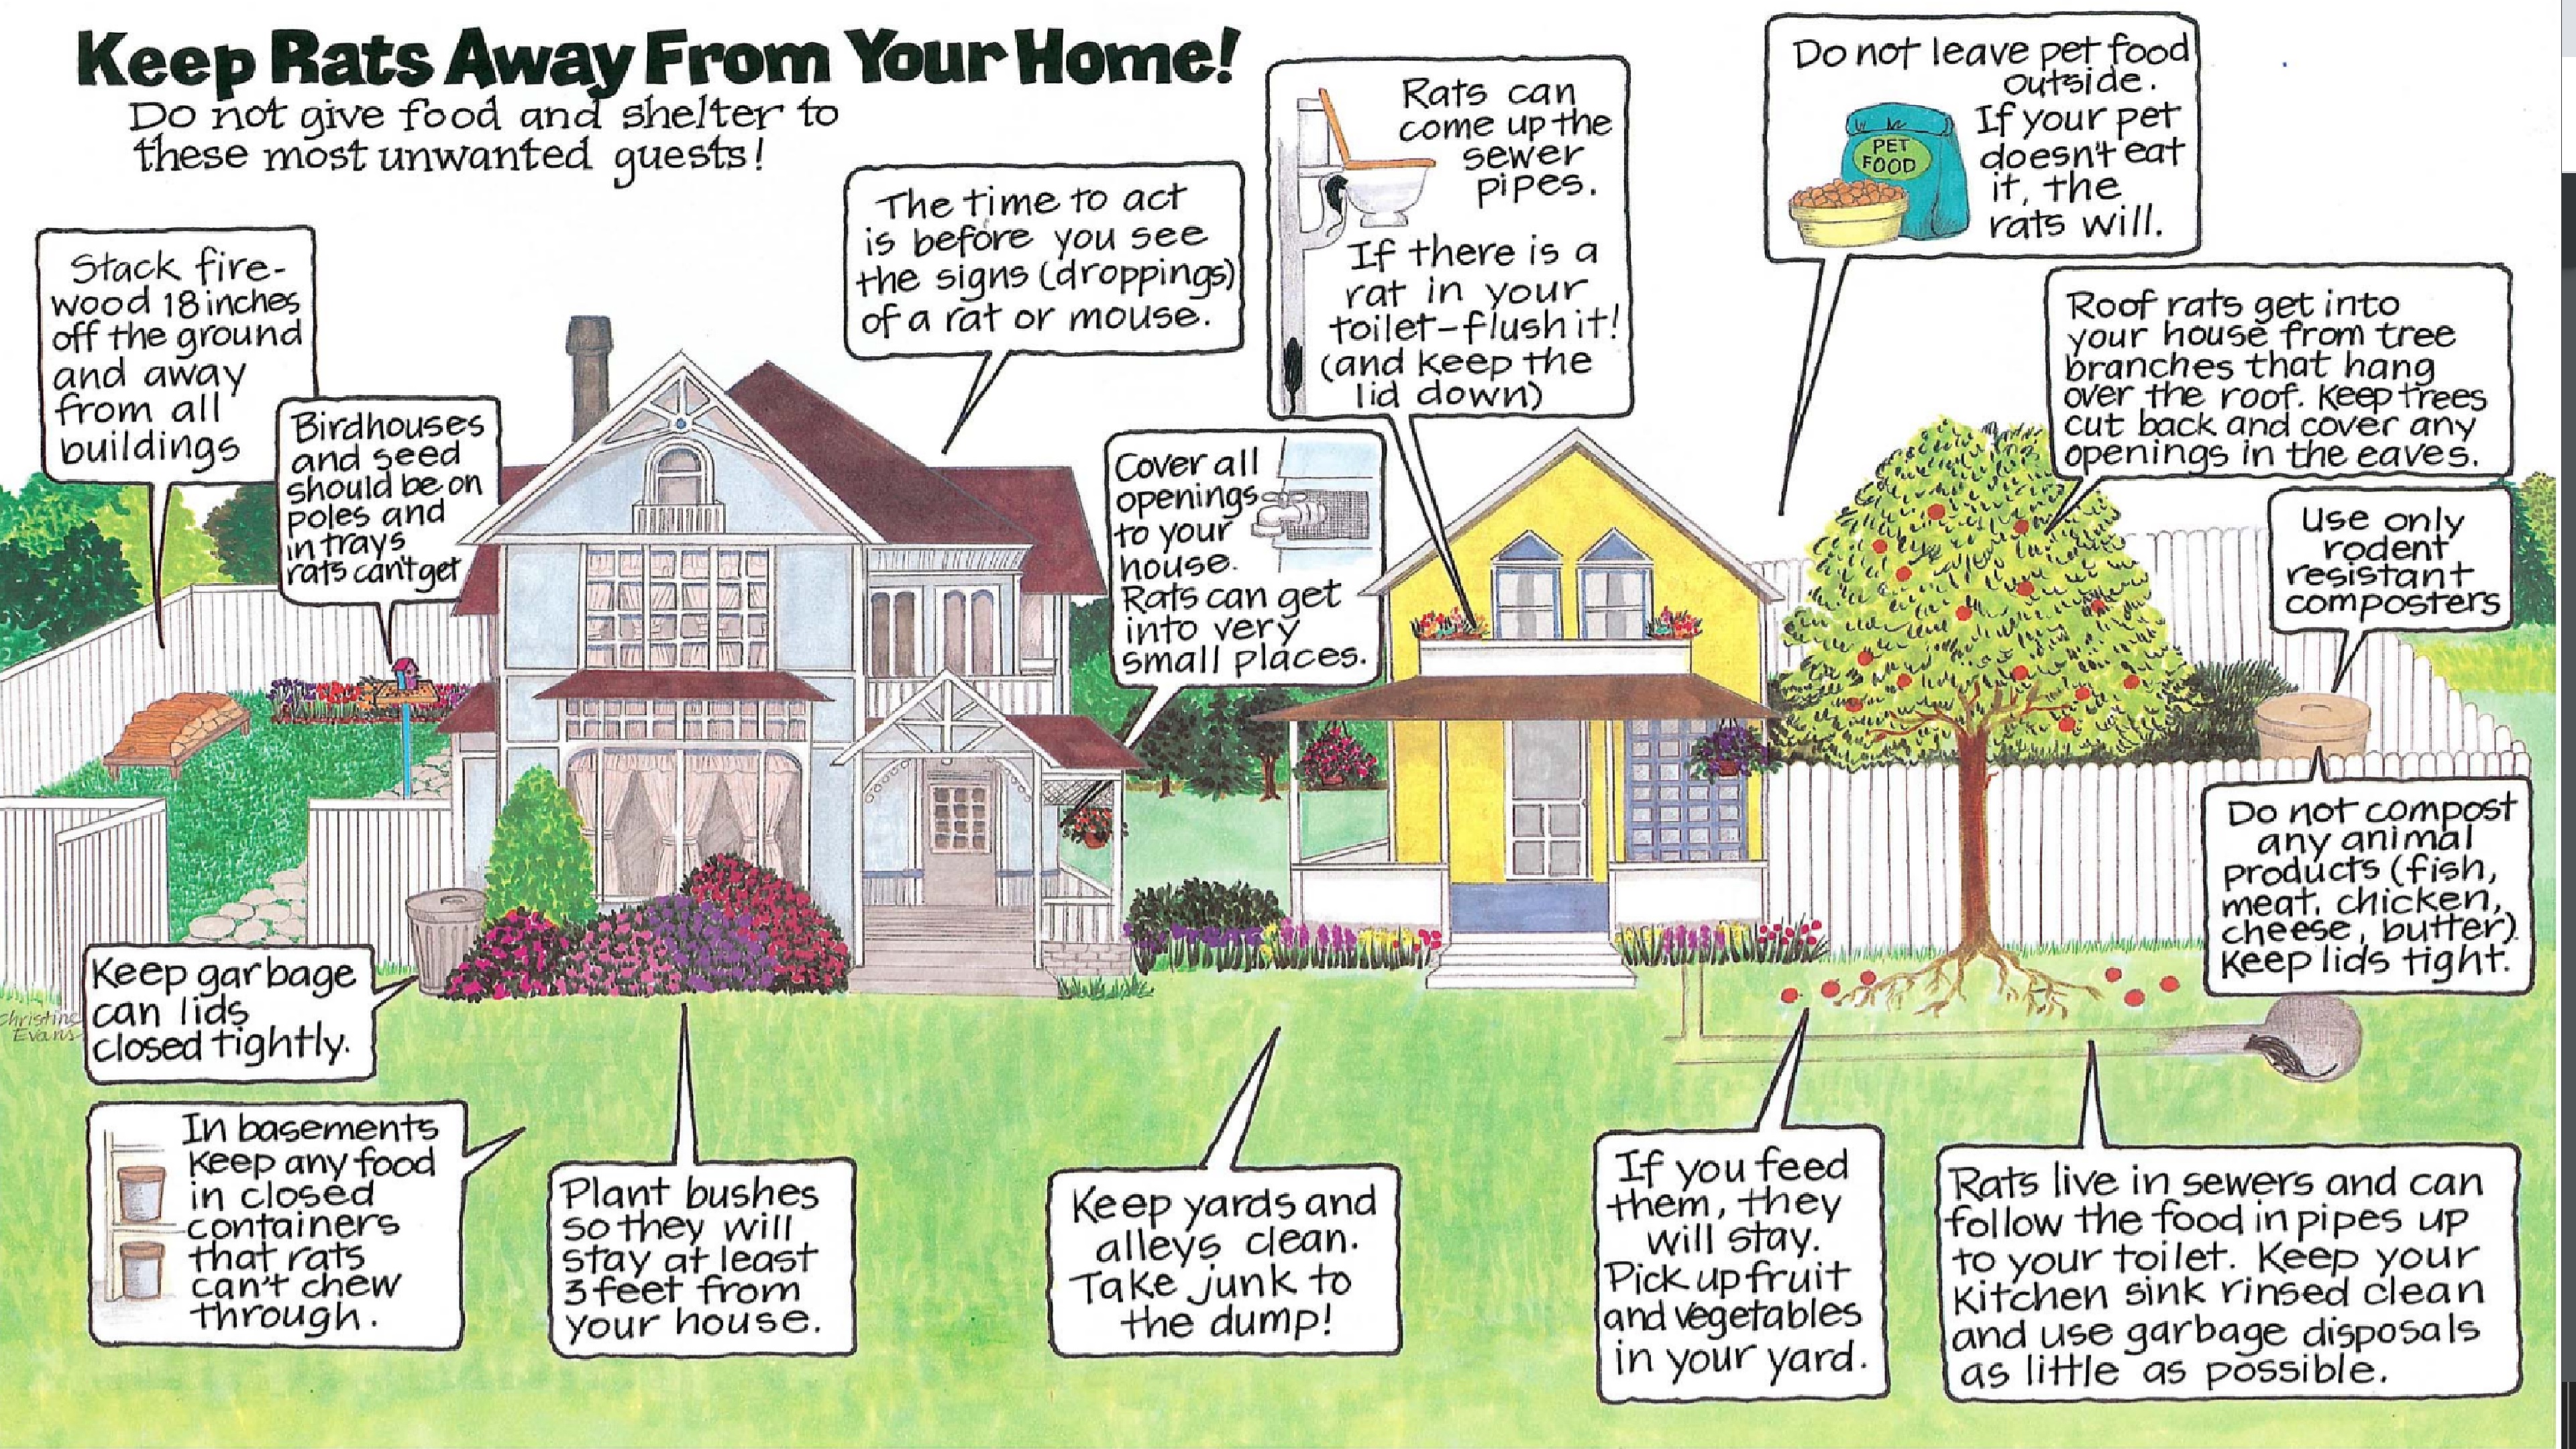
Ongoing maintenance and mindfulness can keep pests at bay over the long term. Provide recommendations like the following list. There are also many sources for homeowner guidance on line from cities, counties, and extension services. See for example the poster in Figure 11 for rodent-proofing homes and yards from King County, Washington.
- Advise homeowners to keep indoor humidity between 35% and 60%. In humid climates, use dehumidifiers in basements and during humid seasons of the year. Don’t use humidifiers.
- Periodically wash bedding in hot water (greater than 130°F) to kill dust mites and wash away allergens.
- Keep kitchen waste in covered containers. Don’t leave food out. Clean dishes. Don’t pour grease down drains.
- Control dust. Dust contains asthma triggers and other hazardous materials. Over two-thirds of dust in homes originates outdoors and is tracked in on feet. Remove shoes and provide a place for shoes at the door. Provide a welcome mat and keep the welcome mat clean. Vacuum surfaces regularly. Vacuums with high-efficiency filtration are recommended. Make the home easy to clean by removing clutter.
- Don’t use moth balls, which release chemicals that are unhealthy.
- If pesticides are necessary, employ professionals who specialize in integrated pest management.
Ensuring Success
Clean areas to air seal prior to caulking to ensure a good seal. Inspect for air leakage afterwards, visually or with a blower door.
To ensure worker health, ventilation may be needed during the application of sealants and pest treatments.
Follow code requirements regarding the installation of foam insulation around foundations in termite-prone areas.
Region
Rodents, birds, various insects, and other pests are present throughout the United States.
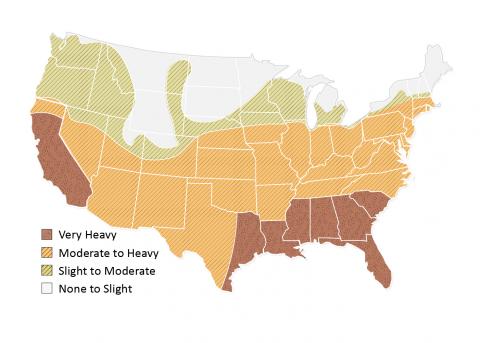
The Termite Infestation Probability Map shown below (from the IRC Figure R301.2(7)) shows the likelihood of termite infestation across the United States. Consult your local code for termite requirements in your location (see Compliance tab).
Training
Right and Wrong Images

Source
Source
Source
Source
Source
Source
Manual describing methods for rodent-proofing buildings.
Source
Source
Compliance
Retrofit
SCOPE
Inspect the perimeter of the existing home.
- Note that tree branches, gutters, anything leaning against the house, and all gaps, cracks, cavities, or open chases with access to the outside may give pests access to the house.
- Remove all materials touching the house, including tree branches and bushes.
- Note that damp wood encourages entry by insects and pests. Untreated wood should not touch the ground. To prevent water from pooling around the house ensure proper drainage, by sloping the grade away from the house 0.5 inch per foot for 10 feet on all the sides. See the guide Final Grade Slopes Away from Foundations for more information on water management.
Inspect the house foundations, including the inside of the crawlspace.
- See the Pre-Retrofit Assessment of Crawlspaces and Basements for guidance on avoiding moisture issues and for more information on pests.
Seal all holes, gaps, and cracks.
- See the Description tab for information on sealing foundations and slabs.
- Cover all stationary sealed holes, cracks, and gaps with escutcheon plates, wood, or metal coverings. Cover the cracks and holes on both the interior and exterior surfaces. Or stuff the holes with wire mesh and cover that with a hardening compound on both the interior and exterior surfaces.
- Install rodent-resistant door sweeps in rodent-prone areas.
- Do not use blown-foam sealant in areas exposed to the sun or in areas where it alone is expected to block rodent or insect entry or movement.
- Cover all openings with animal- and weather-resistant screens, one-way doors, self-closing louvers, or other coverings. Search the Building America Solution Center for more information on specific features such as chimneys, passive ventilation openings, open access under decks, porches, and cantilevers, and open access to crawlspaces.
See the U.S. Department of Energy’s Standard Work Specifications for more on preventing pest entry and infestation.
DESCRIPTION
Sealing Cracks, Gaps, and Holes
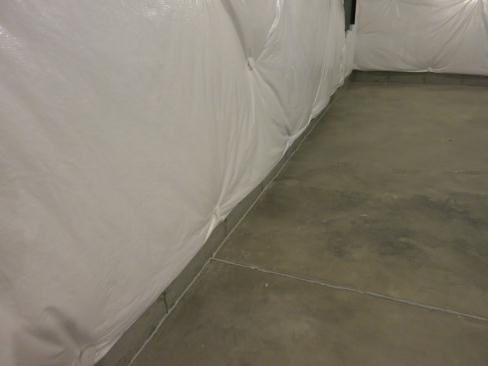
Ensure that no untreated wood is in contact with both the ground and concrete foundations or any other part of the house. Cover exposed earth in crawlspaces and basements with a vapor retarder made of 6-mil polyethylene sheeting. All joints of the vapor retarder shall overlap by 6 inches and be sealed or taped. The edges of the vapor retarder shall extend at least 6 inches up the stem wall and shall be attached and sealed to the stem wall. See the guide Capillary Break at Crawlspace Floors – Polyethylene Lapped up Walls and Piers or Secured in the Ground for more information.
Seal all holes, gaps, and cracks. Common points of rodent and insect entry include under poorly sealed doors and where pipes and wires go through walls. For utility penetrations, small gaps can be filled with foam, spackle, or caulking. Larger gaps will need reinforcement. Cover the hole with wood or a metal plate (escutcheon plates around pipes) or stuff the hole with wire mesh and cover that with a hardening compound. Cover the cracks and holes on both the interior and exterior surfaces of the building enclosure. Remove baseboards and seal the junction between the wall and the floor to stop insects from migrating from room to room, to help block entry from the outside under exterior walls, and to help improve energy efficiency. In multi-level structures, the junction between the walls and the ceiling should also be sealed. Use gaskets and caulk to seal light switch boxes, outlet boxes, and other cracks and penetrations.
Whatever materials are used to seal out rodents, make sure the final patch is smooth. An uneven surface will trigger a rodent to gnaw. Rodents use their whiskers to feel gaps where their bodies might fit. From there they gnaw and dig to make the gap big enough. If a rat or mouse’s skull can fit through a hole or gap, the rest of the body can squeeze through. A 1/4-inch hole is all that is needed for young mice and young rats can squeeze through a ½-inch hole.
Where rodent infestations have occurred or are likely, check the sweep on exterior house and garage doors. To see if the sweep is providing full coverage, stand inside the home or garage while it is daylight outside. Close the blinds or drapes and turn off the interior lights then see if any light shines through gaps at the bottom or lower corners of the door. If there are gaps under the door, install a new rodent-proof door sweep. Do not install a vinyl sweep as rodents can chew through vinyl. Instead, install a rodent-proof metal and rubber door sweep that touches the ground and goes the entire length of the bottom of the door. The sweep should extend completely to the corners. If properly installed, the sweep will brush the ground, but not hold the door open (a fire hazard). Some brands of door sweeps for rodent-prone areas include a stainless-steel strip attached to a thick bristled brush. You can also install a rubber seal along the bottom of the garage door to increase durability and discourage gnawing.
Cellulose Insulation with Boric Acid
Blown-in cellulose insulation is available that is treated with boric acid which acts as both a fire retarder and an insecticide [Integrated Pest Management Toolkit for Building Owners, Managers, and Staff]. Treated cellulose can be used to insulate several components of existing homes, including exterior walls, vented attics, overhangs, and floors over garages.
Covering Holes and Other Access Points
All holes, gaps, and cracks should be filled with durable, chew-resistant materials. All permanent openings like windows, vents, flues, etc., should be covered with grates or screens that are fastened in place and made of durable materials.
Materials
Galvanized sheet metal is durable and, when attached with screws, resistant to removal by raccoons and other animals. But it can be hard to bend and fit around corners.
Galvanized hardware cloth (or "metal mesh") is easier to shape than sheet metal and is reasonably durable. Hardware cloth is generally available in quarter-inch and half-inch mesh sizes. Half-inch hardware cloth is stronger but less flexible than quarter-inch. To keep smaller animals, such as bats or mice, out of an area, use quarter-inch hardware cloth. Hardware cloth is often used to create fences.
Stainless steel or vinyl-coated hardware cloth is stronger than galvanized and will never rust. The disadvantages of stainless steel are that it's much more expensive and harder to cut and shape.
Vinyl-coated, welded wire mesh is even stronger than hardware cloth. It lasts longer and will never rust (one manufacturer guarantees its product for seven years when used in the ocean), but it is more expensive than hardware cloth. Welded wire mesh is sold in rolls and is available in different heights, gauges, and mesh sizes. Some nuisance wildlife control operators prefer to use welded wire mesh to create rat walls and for any other installation that is meant to last a long time. The recommended size for larger animals is 1×1-inch mesh, while ½×½-inch mesh is suitable for most smaller animals.
Aluminum flashing is flexible and relatively easy to shape around corners. It is best for bird and bat exclusion because raccoons and rodents can usually chew or claw through it. Other exclusion materials include caulk, sealant (for movable joints), copper mesh (this resembles steel wool but doesn't rust), and expanding foam insulation. These materials are great for sealing cracks and other small openings.
Windows
To minimize the entry of flying insects, install screens on all operable windows and passive ventilation openings and install filters on all HVAC air intake ports. A bonus of installing screens and filters is that these materials may also block the entry of embers originating from fires.
Vent Covers
Animals frequently enter buildings through vents. Replace damaged and vulnerable vents with sturdier, more animal-proof designs. Some vents can be modified with homemade screens. For example, you could attach quarter-inch hardware cloth to screen a kitchen hood vent or protect an attic fan. Just be careful that you don't reduce the amount of ventilation too much when you're modifying a vent, especially with dryer vents. This could increase the risk of fire. Check the requirements for each piece of equipment before you modify the vent.
Pop-up roof vents should be made of either metal or heavy-duty plastic. The best models are totally enclosed to prevent birds and rodents from nesting inside them. (See Figure 1.) There are also commercial stainless steel box screens that can be installed over existing vents.
Ridgeline vents are roof vents that extend along the entire ridgeline of the roof. (See Figure 2.) The screening over the vent openings should be durably fastened to the vent structure. The vents come with end caps that frequently work loose allowing small animals, such as sparrows, mice, and bats, to easily get inside attics. Replace the caps and secure to prevent entry into these vents.
A wide range of animals, from sparrows to raccoons, can find their way into a building through the ventilation openings located in the soffits under the eaves. Securely attach metal louvered grates over these soffit vent openings to prevent entry. (See Figure 3.)

Plastic gable louvers on the sides of buildings should be replaced with metal gable louvers. The gaps between individual louver slats should be narrow enough so birds can't nest in them. Screen the back (inside part) of the vent to keep bats and insects out of the attic.
Clothes dryer vents are another popular route to the indoors used by small animals. Be careful when screening these vents because lint buildup can damage the dryer and cause fires. Clean the screen frequently or choose a vent design that prevents lint build-up while still excluding animals. See the guide Proper Clothes Dryer Venting for more information.
Crawlspace vents are often missing or pushed aside to route clothes dryer vents or other wiring through the these holes in the foundation wall. Inspect all crawlspace vents, including those located under decks, and ensure that all are covered with ¼-inch metal screens that are fastened in place with permanent fasteners.
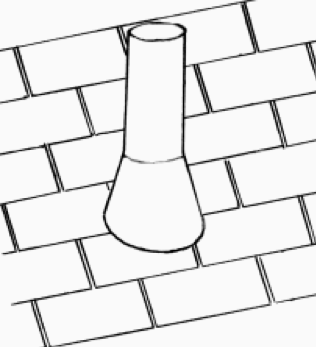
Sewer vent pipes can be covered with commercial shields to prevent rodents and birds from entering the building by slipping through gaps next to the pipes. (See Figure 4.)
Chimneys are attractive to raccoons, squirrels, bats, birds, and other animals that like to makes dens or nests in tree cavities. To keep animals out of a chimney, you should install a chimney cover. Find a model that meets fire codes. Most chimney covers are made of stainless steel or galvanized steel, but there are also copper and aluminum models. Some work both as a cover and a damper.
If your chimney has one flue and the flue is lined with a tile flue liner, look for a cover design that attaches to a single tile flue liner. These models generally bolt to the outside of the tile liner or have legs that slip inside the flue. Covers that slip inside the tile liner keep out squirrels and birds but raccoons can usually remove this kind of cover. If raccoons are a problem, choose a chimney cover that bolts to the sides of the flue. Choose models with the smallest openings allowed by fire codes to exclude bats.
Other chimney covers attach to, or around, the top of the chimney. These covers are very helpful if there are several flues in each chimney or if there are no tile liners extending through the top of the chimney.
There are commercial covers designed to fit metal chimneys. With care, you should be able to enclose the metal chimney cover with half-inch hardware cloth. Several chimney cover manufacturers are able to custom fit covers for unusual chimneys (for a price, of course). Call the manufacturer to find out which chimney measurements are needed.
Open Areas Under Decks, Porches, and Cantilevers, or Large Open Access to Crawlspaces
The fence design shown in Figure 7 is sometimes called a rat wall. It is often attached to a foundation, deck, or porch, or installed as a free-standing barrier around a garden area. Rat walls are effective against a variety of animals including skunks, woodchucks, raccoons, squirrels, and rats. Match the size of the mesh to the size of the animal you're trying to exclude.
The top of the fence is attached to a structure. The bottom is buried 6 to12 inches deep and includes a bottom edge or “shelf” that juts out about 6 to 12 inches to help stop animals from digging under the fence.
If there is evidence of animal activity prior to installation of the wall, one-way doors can be installed in the rat walls to allow the animals a pathway out. First, attach the rat wall. Leave one or two locations open and install one-way doors there. Make sure the animal can't dislodge or dig underneath the one-way doors. When there's been no sign of animal activity for several days, remove the one-way doors and complete the enclosure.
COMPLIANCE
See Compliance tab.
More Info
References and Resources
*For non-dated media, such as websites, the date listed is the date accessed.
Contributors to this Guide
The following authors and organizations contributed to the content in this Guide.
Building Science Corporation, lead for the Building Science Consortium (BSC), a DOE Building America Research Team
Sales
Pest Resistant Home

Technical Description
Insects, rodents, and other pests are more than just a nuisance; they can carry diseases, aggravate allergies, and spread germs. These pests can cause considerable property and structural damage if their activities go undetected for any length of time. There are several steps that builders can take to reduce opportunities for pest intrusion and damage. Wet wood attracts carpenter ants and is easier for animals to gnaw through so it is important to construct the home so that it stays dry or dries out quickly if some components do get wet. In areas with a high likelihood of termite infestation, building codes restrict where and how rigid foam can be installed along the interior and exterior of basement and foundation walls. Although termites don’t eat the foam, they tunnel through it; therefore, its presence can hide their activities from building inspectors. Many of the same activities that builders take to air seal a home, like caulking seams and sealing around pipes and wiring , will also keep out insects. Vent openings and ventilation gaps at the tops and bottoms of walls should be covered with wire mesh.
Questions? Comments? Contact our webmaster.