
Roof Valleys and Penetrations Sealed

    Scope
    Scope Images
    Image
    Install self-sealing bituminous membrane or equivalent at all valleys and roof deck penetrations
    Scope

    Scope

    Install a self-sealing membrane in roof valleys and around penetrations to minimize the possibility of roof leaks. 

    • Choose a self-sealing membrane such as a bituminous peel-and-stick material or equivalent at all valleys and roof deck penetrations.
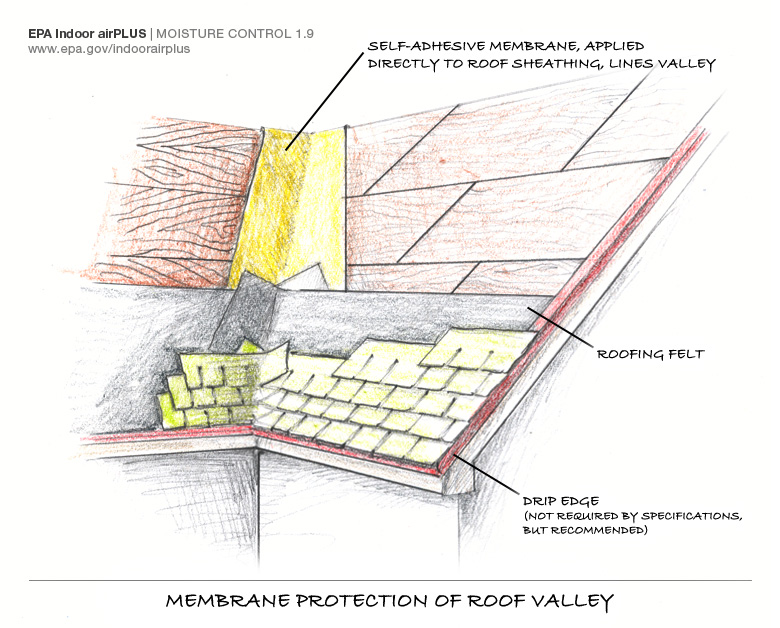
    • In valleys, install this layer directly on the roof sheathing surface beneath the roofing felt.
    • Around penetrations such as pipes or vents, install one piece to surround the pipe from the down-slope side of the pipe, then install the upslope piece to overlap the upper edge of the down-slope side. Integrate with the roofing underlayment.
    • Building code requirements for roof valley flashing vary by roofing material type.

    See the Compliance Tab for related codes and standards, requirements and criteria to meet national programs such as DOE’s Zero Energy Ready Home programENERGY STAR Single-Family New Homes, and Indoor airPLUS.


    Description
    Description

    The roof is the house's primary defense against water intrusion from rain, snow, and ice. This "lid" of the home must be structurally sound and must be designed and constructed to shed water effectively and consistently through all seasons, extreme weather events, and atmospheric conditions. Water that leaks into the house through the roof can quickly damage insulation, create conditions for mold growth and pest invasion, and even set into motion structural rot. Over time even the smallest leak in a roof can result in a significant amount of water damage, and not just in the attic. Once inside the home, water can travel laterally as well as vertically along framing members to cause damage to ceilings, walls, floors, and even basements.

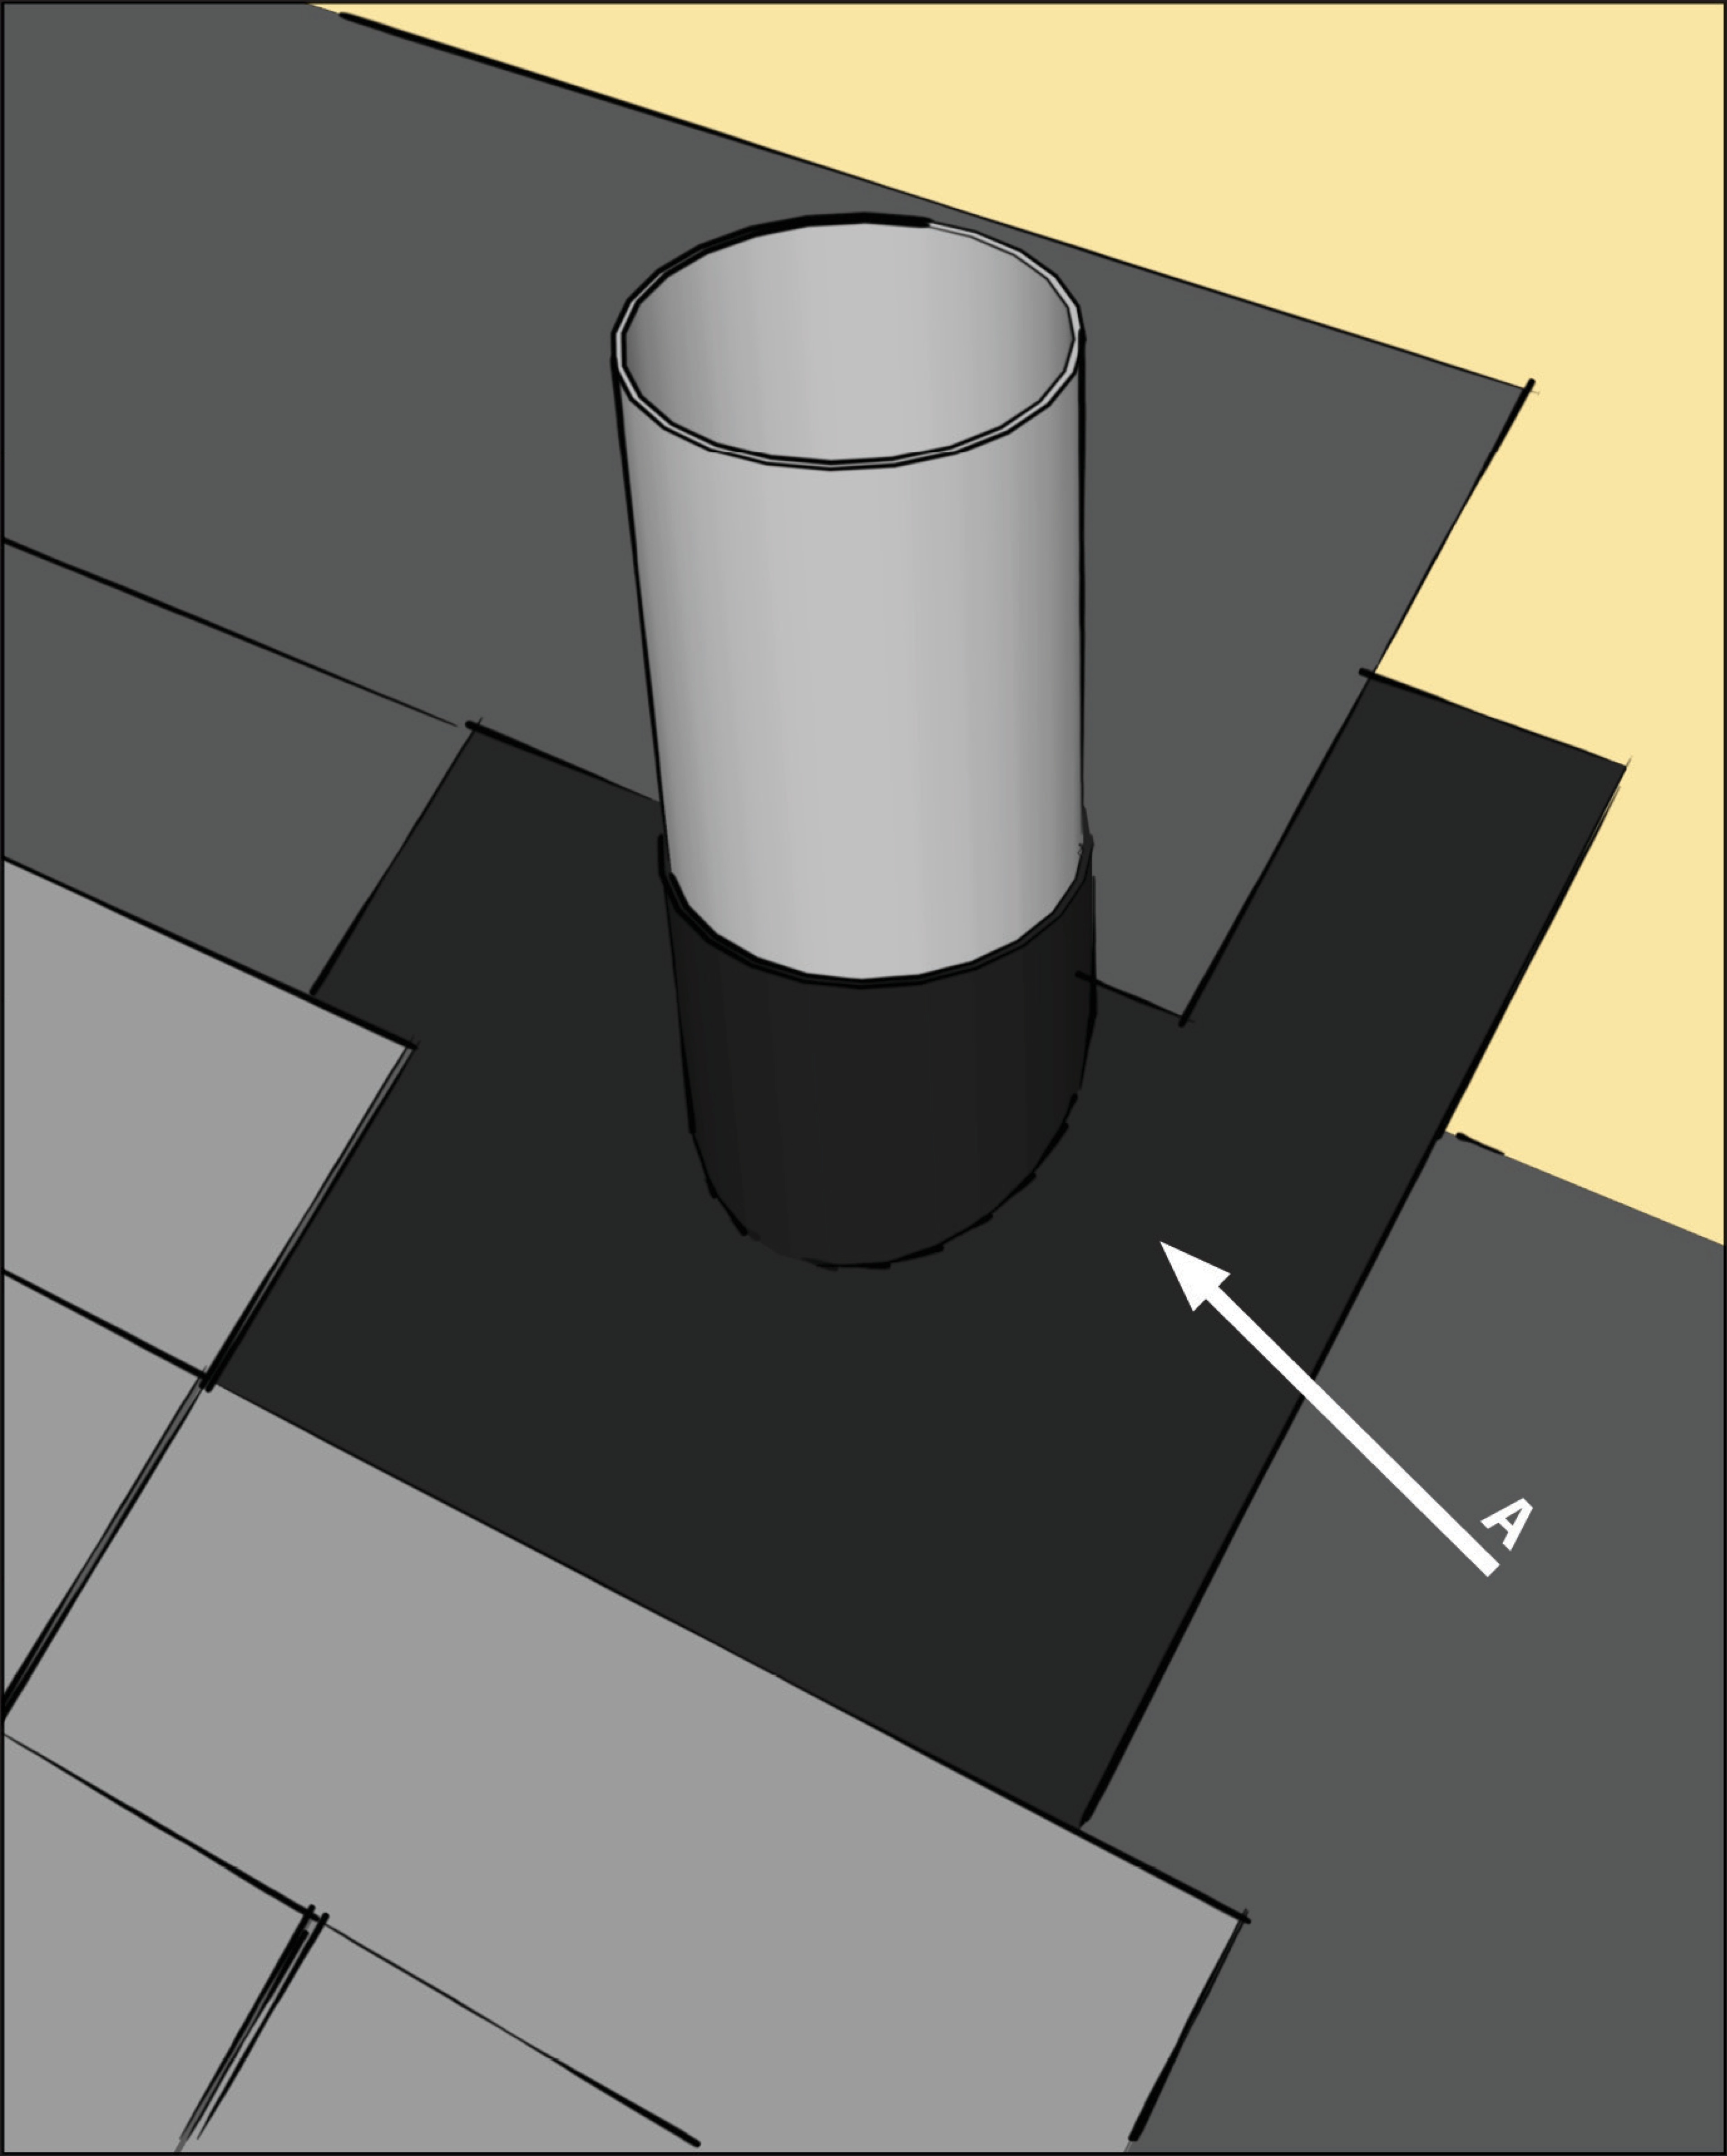
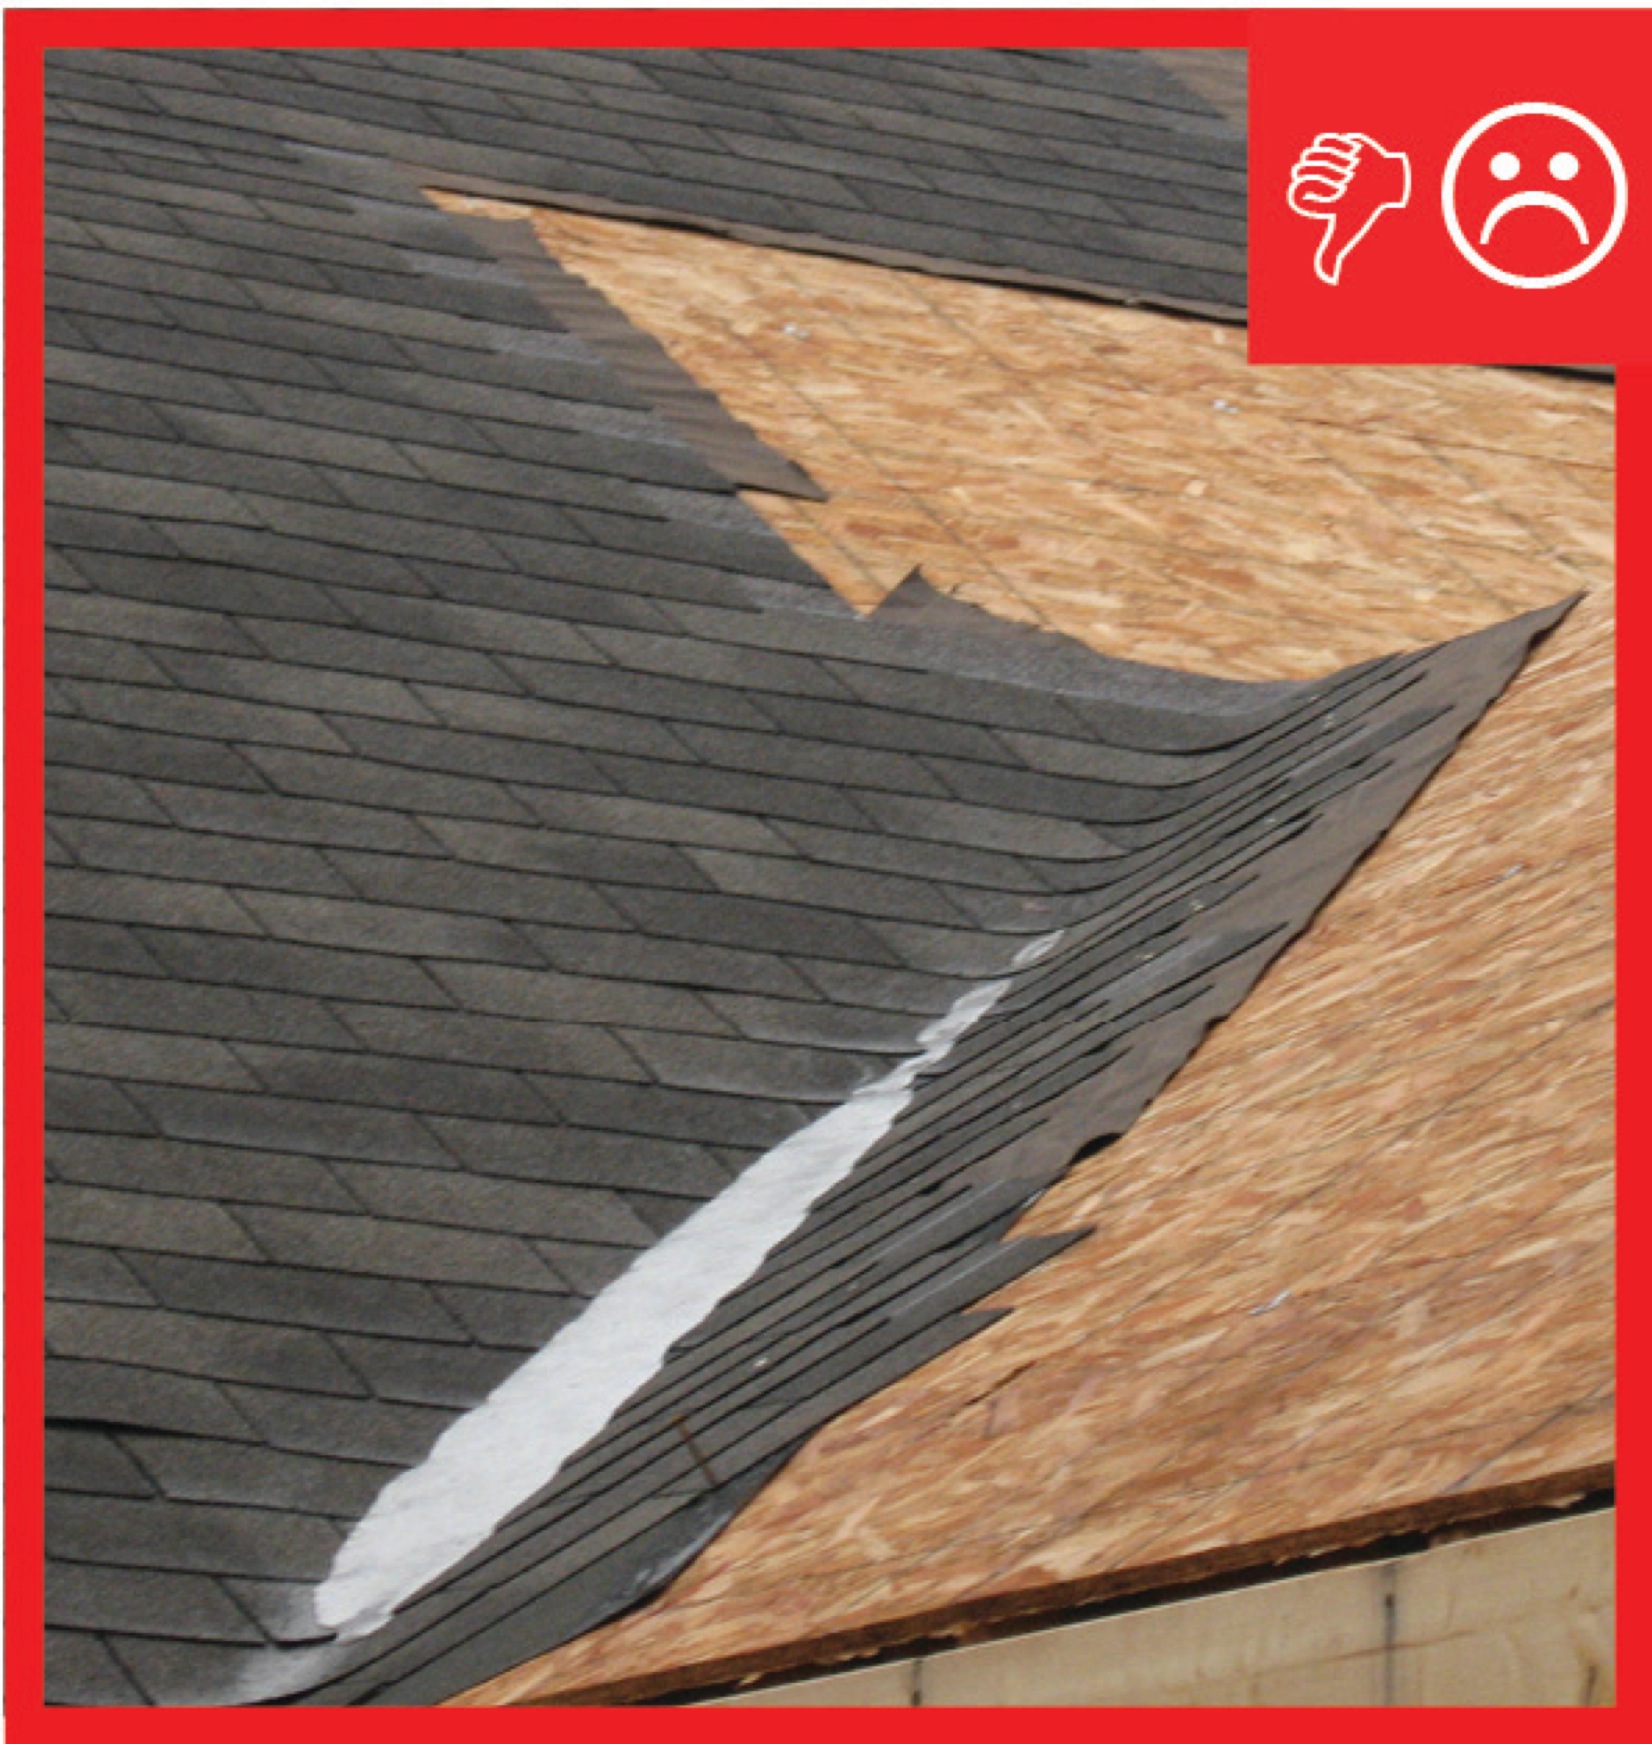
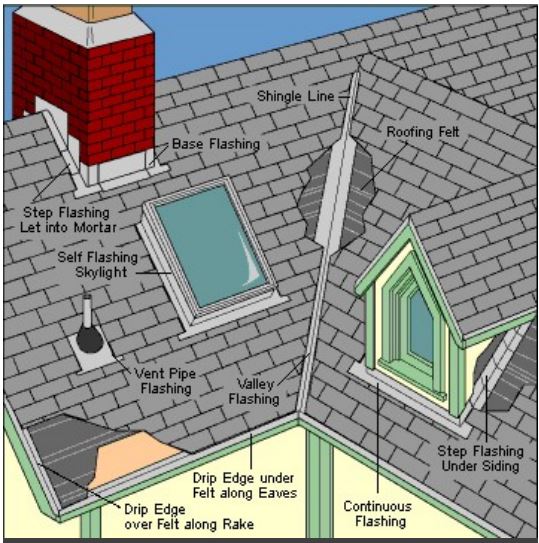
    Valleys and penetrations through the roof decking are among the most vulnerable areas for water intrusion. Valleys should be carefully sealed along the entire length. To help prevent water entry at these vulnerable points, install a self-sealing bituminous membrane or the equivalent along all valleys and properly integrate this membrane into the adjoining roofing materials. The self-sealing membrane should also be installed, along with flashing, around all penetrations through the roof, including direct penetrations like plumbing stack vents and structural penetrations like dormer windows and chimneys. Sheathing seams should be sealed with compatible tape.

    Most roofing membranes are made of a heavy, flexible bituminous material that has been impregnated with a petroleum-based solution like tar which makes the material waterproof. Most membrane products come with a "peel and stick" adhesive backing. When properly installed, these products provide long-lasting protection from water intrusion. Note: The U.S. Environmental Protection Agency (EPA) uses the phrase "or equivalent" to indicate that a variety of products can be used. Regardless of the product's composition, it must be water impermeable and must durably adhere to the roof deck. Please check with the manufacturer's material classifications and installation instructions to ensure the material you choose will adequately protect the roof from water intrusion (EPA 2011).

    Building codes generally do not require a sealed roof deck for new homes or roof replacements, but a sealed roof deck is beneficial in any area and is particularly recommended in hurricane-prone or high-snow-load regions. Sealed roof deck valleys and sealed penetrations are components of a sealed roof deck.

    Note: The U.S. Environmental Protection Agency (EPA) uses the phrase "or equivalent" to indicate that a variety of products can be used. Regardless of the product's composition, it must be water impermeable and must durably adhere to the roof deck. Please check with the manufacturer's material classifications and installation instructions to ensure the material you choose will adequately protect the roof from water intrusion.

    Peel and stick membrane applied to roof valley.
    Figure 1. Peel and stick membrane applied to roof valley. These workers are properly installing a self-sealing bituminous membrane to a valley on the roof deck. Note the material is centered along the valley to ensure maximum protection. (Source: EPA Indoor airPLUS, 2020.)


    How to Install Self-Sealing Bituminous Membranes along Valleys of Roof Decks

    1. Clean the roof deck sheathing along the valley to ensure it is free of loose nails, wires, and debris. Although the membrane is made from a relatively strong material, it can be torn or punctured. Make sure the area is dry and free of oil and dust to ensure the membrane will adhere properly.
    2. Measure the length of the valley to be covered.
    3. Cut the self-sealing bituminous membrane to length. For extremely long valleys, cut the material into shorter, more manageable lengths.
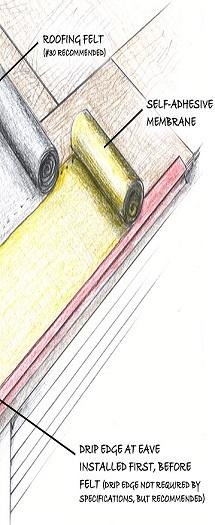
    4. Install metal drip if required or desired for wildfire and hurricane resistance. Install self-adhering bituminous membrane along the roof eave as required by code or desired to reduce the risk of water damage from ice dams.
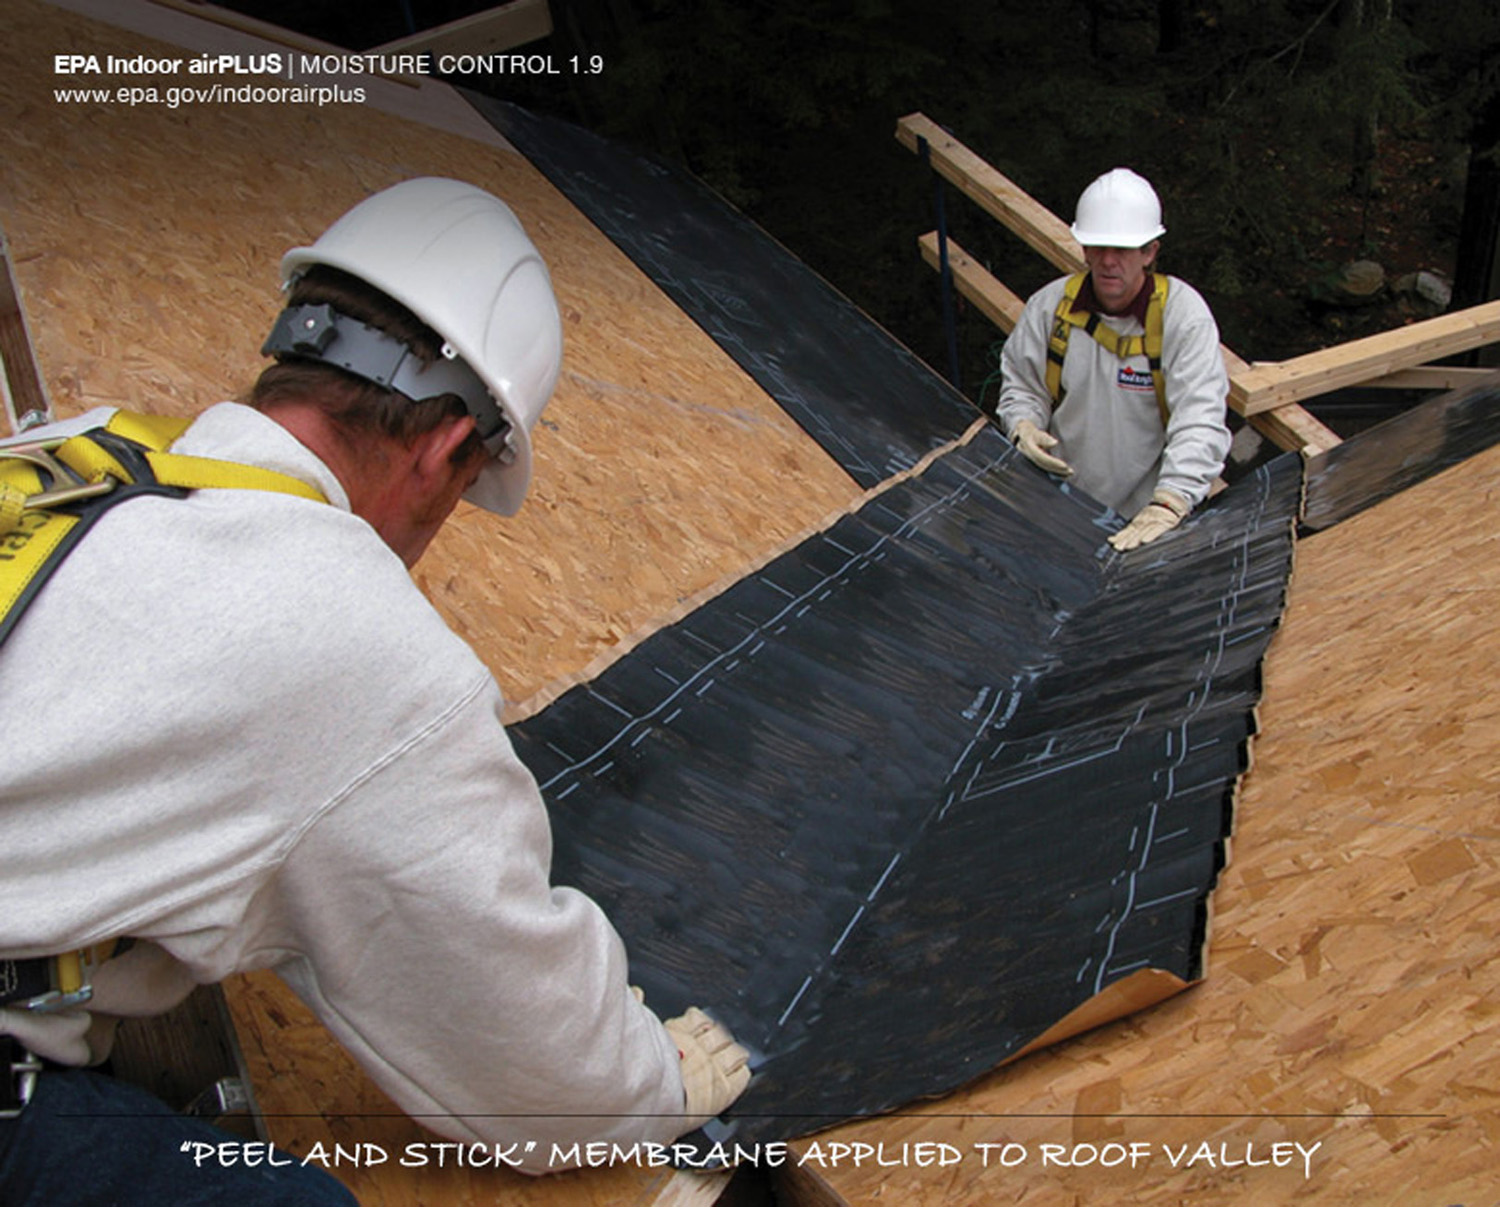
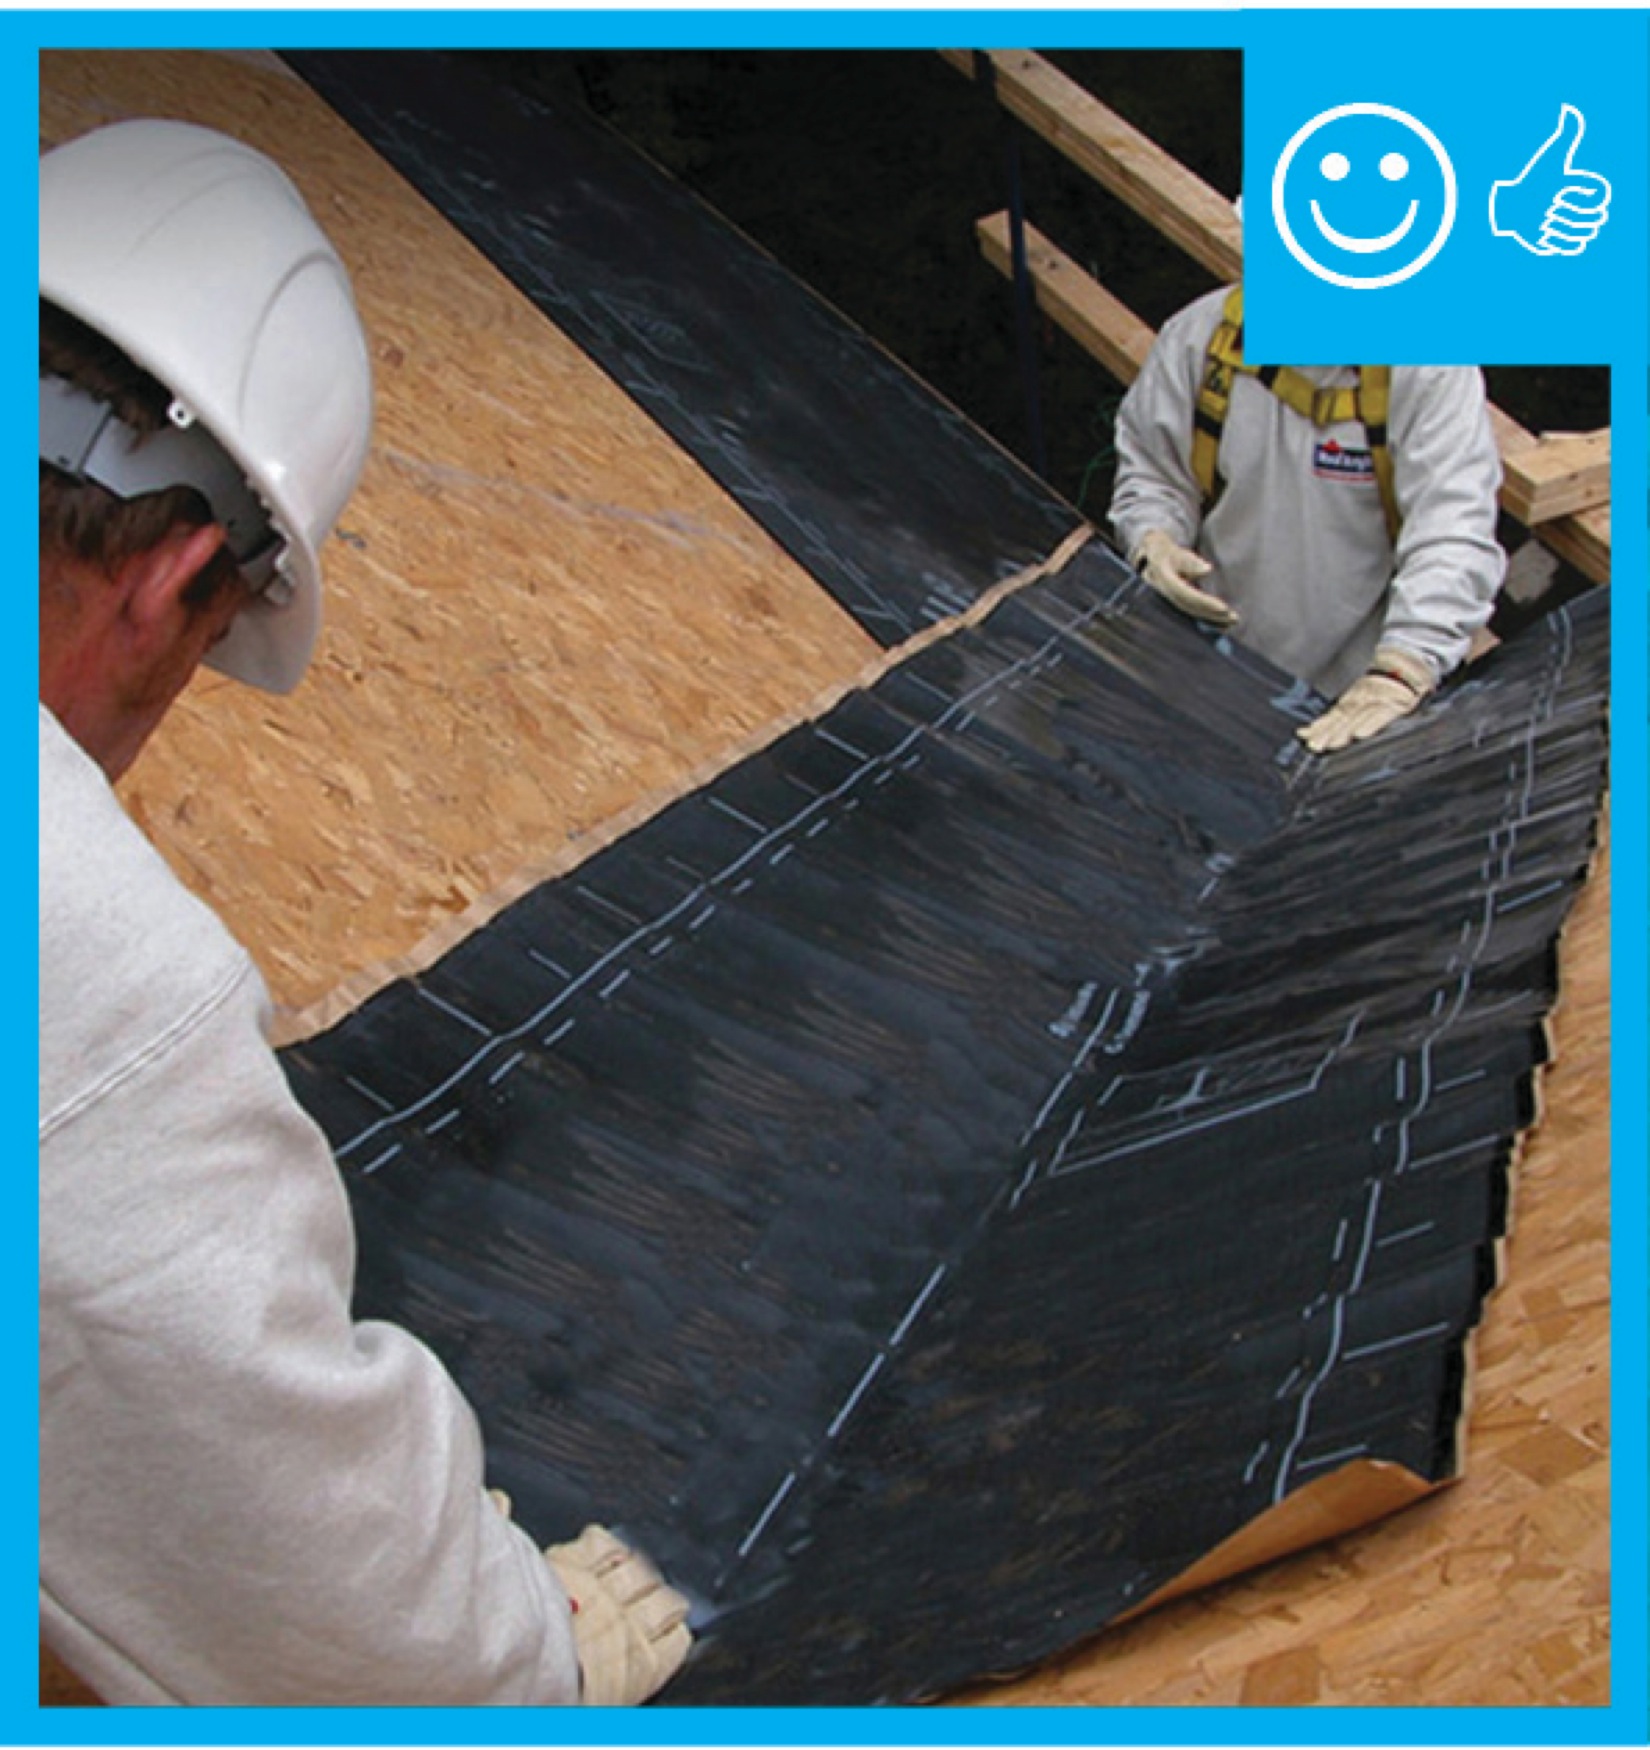
    5. Install the membrane directly on the roof sheathing material (typically OSB). Apply from the lowest point to the highest, overlapping membrane sections by 6 inches in a shingle fashion to allow water to flow unobstructed down the length of the valley. The membrane must be straight and centered with the valley line.
    6. Installation note: Some peel-and-stick membrane products come with a lengthwise split along the protective backing that can give you a guideline for centering the product while you peel and install it along first one side of the valley and then the other.
    7. Make sure the membrane lays flat with no gaps, creases, or folds. Secure the material in place with a heavy roller.
    8. Install the membrane and continue with the installation of the roof cladding. (See Figure 2. Fasteners should not be located within 6 inches of the valley center.)
    9. If installing shingle roof cladding, metal valleys are recommended over woven or abutted shingle cladding in valleys.


    Roof valley membrane protection.
    Figure 2. Use bituminous seal-sealing membrane to seal roof valleys. The self-adhesive membrane is installed directly on the plywood roof deck beneath the underlayment (roofing felt) and shingles. (Source: EPA Indoor airPLUS, 2020.)


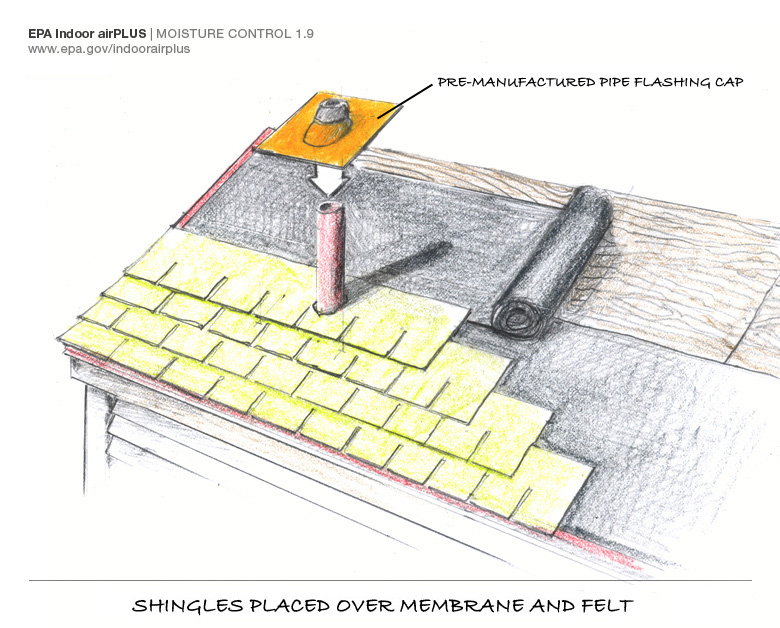
    How to Install Self-Sealing Bituminous Membranes Around Direct Penetrations in the Roof

    1. Clean the roofing area after the pipe or vent has been installed through the roofing deck. Make sure the roof deck around the penetration is free of loose nails, wires, debris, dust, oil, or water.  
    2. Starting at the eave side of the roof below the penetration, install the underlayment (roofing felt) up to the penetration.
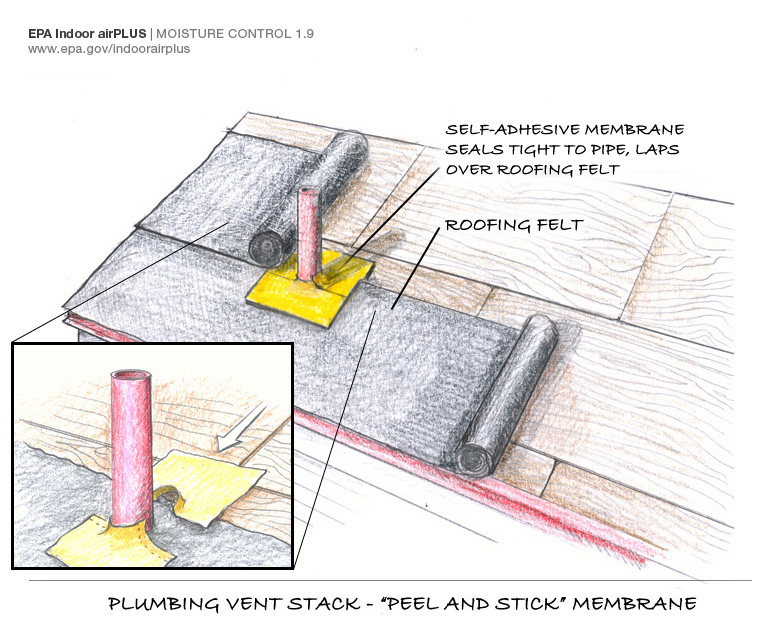
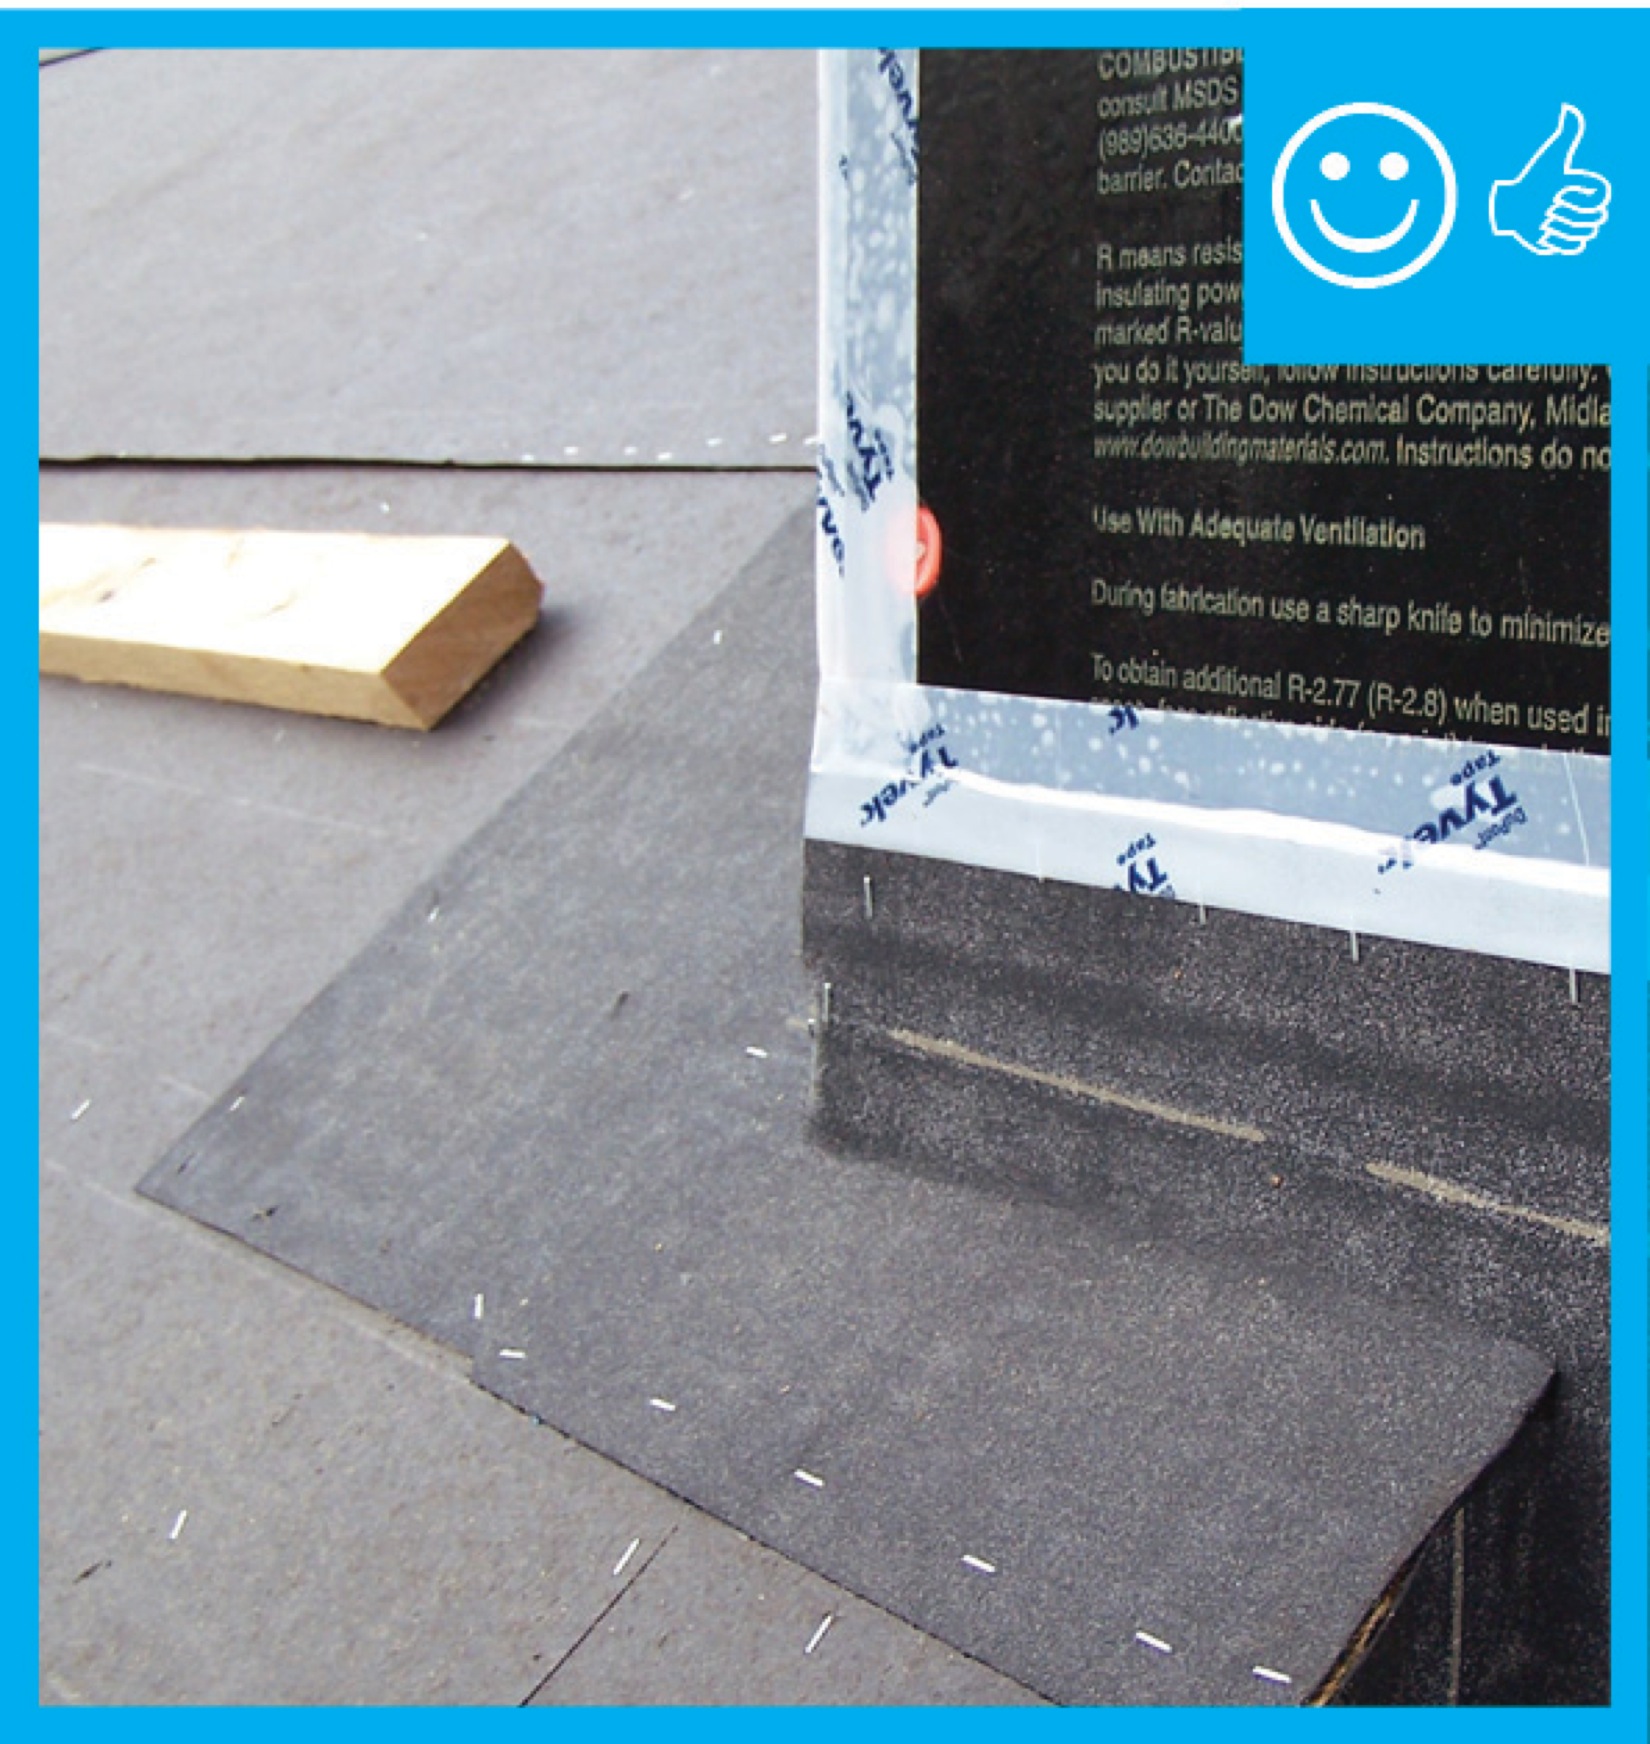
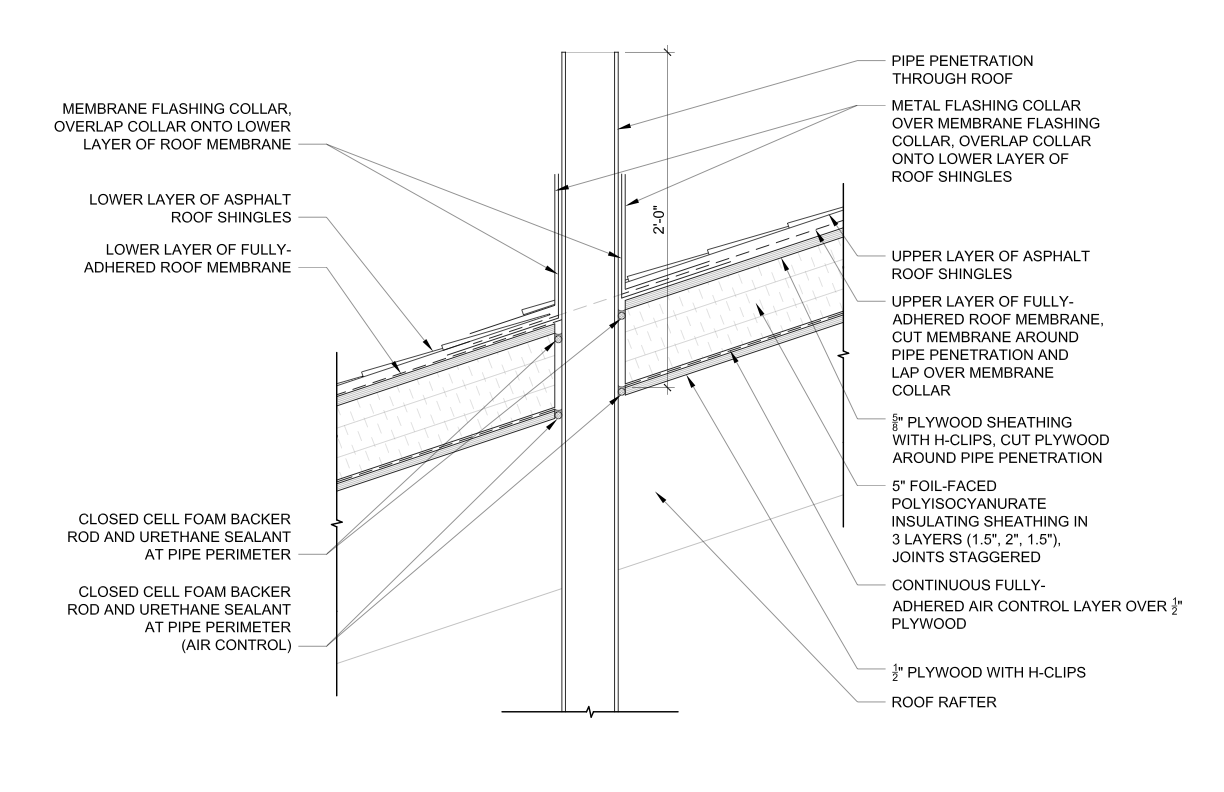
    3. Measure the area to be covered and cut a piece of membrane to fit around the lower half of the penetration, allowing for at least 6 inches of membrane on each side and below the penetration. See Figure 3.
    4. Install the self-adhesive membrane so that it seals tight around the pipe and laps over the roofing felt, as shown in Figure 3. Use a heavy hand roller to secure it in place. Some manufacturers require that a primer be applied before the membrane is installed, particularly during cold weather or damp conditions.
    5. Measure and cut a piece of membrane to fit around the upper side of the pipe. A flexible-type membrane-like flashing tape is ideal for flashing around pipes. Install so that it seals tightly around the pipe and the edges overlap the top edge of the first piece of membrane, as shown in Figure 3.  
    6. Continue installing underlayment above the penetration to overlap this membrane.
    7. Install shingles or roofing material up to the penetration.
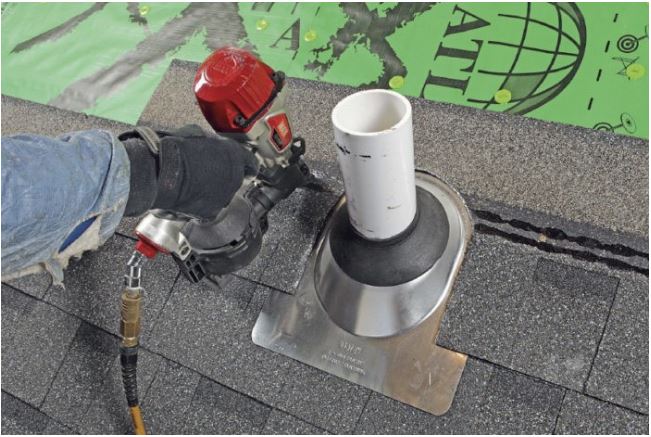
    8. Install a pre-manufactured pipe flashing over the pipe and shingles, as shown in Figure 4 and Figure 5.
    9. Continue installing shingles above the pipe to cover the top edge of the flashing. 
    10.  
    Sealing direct roof penetrations - first steps.
    Figure 3. Seal around piping and other roof penetrations with self-sealing bituminous membrane that is layered shingle-fashion with the roof underlayment. (Source: EPA Indoor airPLUS, 2020.)


    Sealing direct roof penetrations—final steps.
    Figure 4. Install a pre-manufactured pipe flashing cap around the pipe and integrate installation so that the upper edge of the flashing is covered by rows of asphalt shingles above the piping. (Source: EPA Indoor airPLUS, 2020.)


    Integrate pre-formed vent pipe flashing, shingle-fashion, with roofing underlayment and shingles.
    Figure 5. Integrate pre-formed vent pipe flashing, shingle-fashion, with roofing underlayment and shingles. (Source: Home Innovation Research Labs, 2020.)


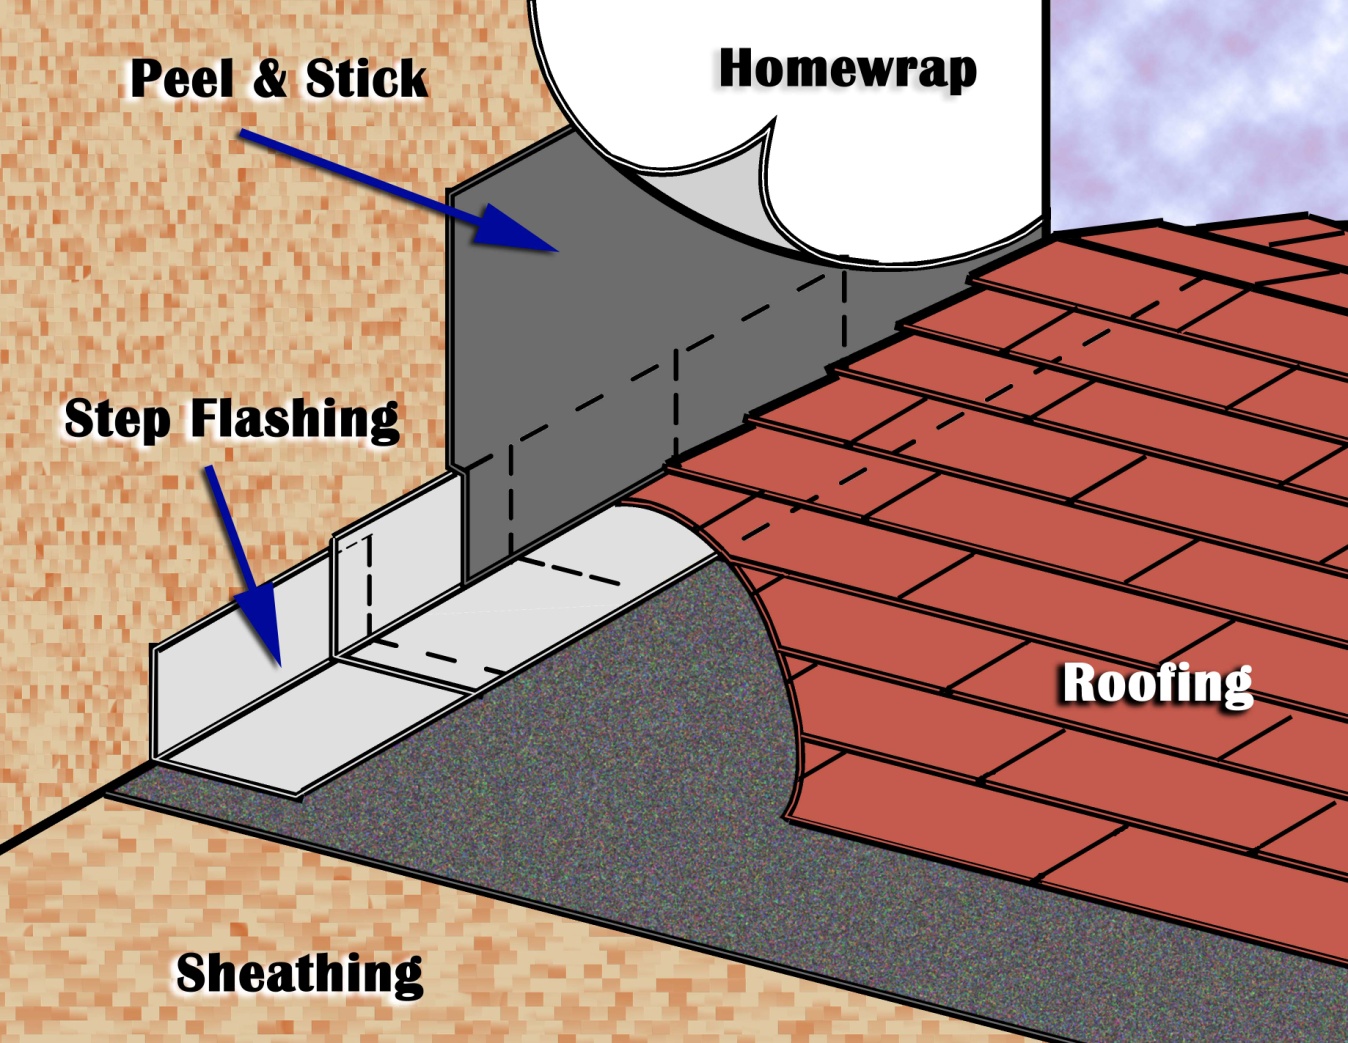
    How to Seal Around Structural Penetrations and Roof-Wall Junctures

    1. Clean the roofing area after the dormer or other structure has been installed through the roofing deck. Make sure the roof deck around the structure is free of loose nails, wires, debris, dust, oil, or water.
    2. Install underlayment to lap up the vertical wall at least 8 inches and secure it in place. Alternatively, install the underlayment to the vertical wall and install a self-adhesive membrane over the underlayment and up the wall at least 8 inches.
    3. Install the step flashing and kick-out flashing and secure them in place. 
    4. Apply self-adhesive membrane material directly over the vertical rise of the step flashing and up the side of the penetration.
    5. Install the WRB material over the peel and stick, securing it in place and attaching it to the membrane with tape.
    6. Continue installing the roofing material.
    7. Alternately, the self-adhering membrane can be installed prior to the step flashing as described in the guide Step and Kick-Out Flashing at Roof-Wall Intersections. Apply to the roof deck and lap up the side wall, install metal step flashing, cover the top of metal flashing with self-adhesive tape flashing, and install house wrap and siding over tape flashing.
    Sealing structural penetrations at roof wall intersections.
    Figure 6. Protect roof-wall intersections, as required for structural roof penetrations such as dormers or a framed chimney, with step flashing and self-adhesive bituminous membrane.


    Success
    Ensuring Success

    To ensure that the roof valleys and penetrations are well sealed, the area must be cleaned prior to the installation of the self-adhesive bituminous membrane. Only a complete seal will help keep water from finding its way through the valley and entering the house. Also, once applied, the membrane must be rolled flat so that no folds or creases are present.

    Climate
    Climate

    Hurricane-Prone Regions

    Roofing and wall cladding are more likely to be damaged or lost in hurricane-prone regions and other high-wind areas, leaving flashing and underlayment exposed and more susceptible to wind and water intrusion. Proper installation of flashing and sealing products is even more important in these areas to protect against storm damage. 

    The IRC does not have additional requirements for roof-wall flashing in hurricane-prone regions or other high-wind areas. Some local jurisdictions may have additional requirements or require specific product approval. Building codes establish minimum requirements, but products must also be installed in accordance with the manufacturer’s instructions. This is important because codes typically do not provide all the detailed information for a durable installation. Assessments by FEMA after hurricanes commonly find that water intrusion and structural building failures are due to improper installation of building components. So, even where the IRC does not require additional measures, proper installation is more critical in hurricane-prone regions.   

    The Insurance Institute for Business and Home Safety® (IBHS) offers guidance, best practices, and voluntary construction standards and programs for building in disaster-prone areas, including hurricanes and other high-wind zones. The IBHS FORTIFIED Roof program includes options for sealed roof decks. IBHS also provides specific guidance for flashing, including roof valley flashing.

    Sealing the roof deck at valleys and penetrations and proper sealing of the roof deck using self-adhesive membrane and underlayment can significantly prevent water infiltration through the roofs during hurricanes when the primary roofing is damaged. See the Hurricane Technical Summary for New Construction by the IBHS Fortified Home program for all of the methods that can be adopted for sealing roof decks.

    High Snow Load Regions

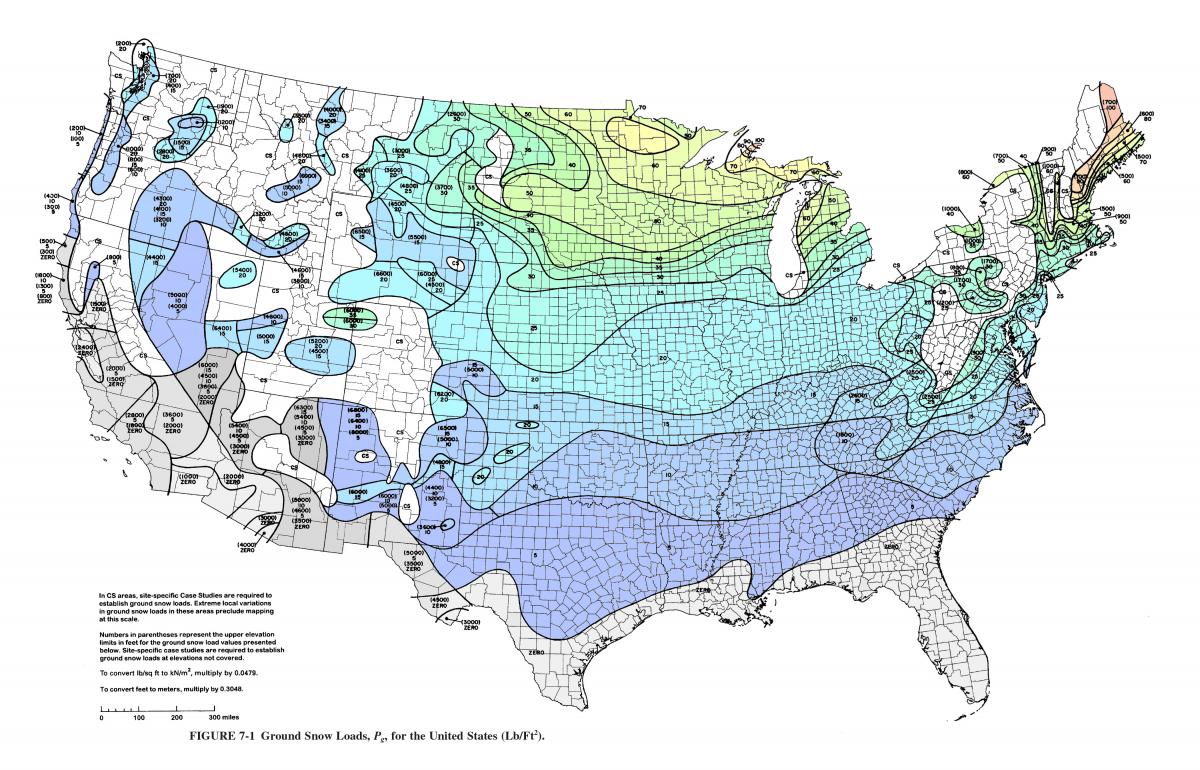
    In areas with deep or sustained snow cover (Figure 1), extra protection of roof valleys, as shown in this guide, is recommended. Because roof valleys are difficult to ventilate, they are more prone to heat accumulation and, therefore, snow melt, which can contribute to ice dam formation and subsequent water leakage.

    Design Snow Loads Map for the United States, adapted from ASCE 7-10, Figure 7-1
    Figure 1. Design Snow Loads Map for the United States, adapted from ASCE 7-10, Figure 7-1 (Source: Medeek Design 2015).


    Training
    Right and Wrong Images
    Image
    Wrong – There is not a self-sealing bituminous membrane installed at the valley of the roof
    Wrong – There is not a self-sealing bituminous membrane installed at the valley of the roof
    Image
    Right – There is a self-sealing bituminous membrane installed at the valley of the roof prior to the roof felt
    Right – There is a self-sealing bituminous membrane installed at the valley of the roof prior to the roof felt
    Image
    Right – There is a properly installed and layered self-sealing bituminous membrane at the roof penetration
    Right – There is a properly installed and layered self-sealing bituminous membrane at the roof penetration
    Image
    Right – All penetrations through the roof decking are sealed with paint-on flashing.
    Right – All penetrations through the roof decking are sealed with paint-on flashing.
    Image
    Right – Flashing is installed around chimney, skylight, vents, dormers, in valleys and at eaves
    Right – Flashing is installed around chimney, skylight, vents, dormers, in valleys and at eaves
    Image
    Right – Integrate pipe flashing with roof shingles
    Right – Integrate pipe flashing with roof shingles
    Image
    Roof valley membrane protection
    Roof valley membrane protection
    Image
    Peel and Stick Membrane Applied to Roof Valley
    Peel and Stick Membrane Applied to Roof Valley
    Image
    Install self-sealing bituminous membrane or equivalent at all valleys and roof deck penetrations
    Install self-sealing bituminous membrane or equivalent at all valleys and roof deck penetrations
    Image
    Right – A protective membrane has been installed in the valleys and at the eaves of this roof before installing underlayment.
    Right – A protective membrane has been installed in the valleys and at the eaves of this roof before installing underlayment.
    Image
    Right – All penetrations through the roof decking are sealed with paint-on flashing.
    Right – All penetrations through the roof decking are sealed with paint-on flashing.
    Image
    Right – A protective membrane has been installed in the valleys and at the eaves of this roof before installing underlayment.
    Right – A protective membrane has been installed in the valleys and at the eaves of this roof before installing underlayment.
    Videos
    Publication Date
    Author(s)
    Weather Proofing America
    Organization(s)
    Weather Proofing America
    Description
    Video explaining how to correctly install wall-to-roof flashing and kick-out flashing to protect walls from rain water damage.
    CAD
    CAD Files
    CAD image for roof pipe penetration water and air sealing details
    CAD image for roof pipe penetration water and air sealing details
    Download: DWG PDF
    Compliance

    Compliance

    The Compliance tab contains both program and code information. Code language is excerpted and summarized below. For exact code language, refer to the applicable code, which may require purchase from the publisher. While we continually update our database, links may have changed since posting. Please contact our webmaster if you find broken links.


    ENERGY STAR Single-Family New Homes, Version 3/3.1 (Rev. 11)

    National Water Management System Builder Requirements

    3. Water-Managed Roof Assembly.

    3.3 Self-adhering polymer-modified bituminous membrane at all valleys & roof deck penetrations.4, 16

    Footnote 4) Not required in Dry (B) climates as shown in 2009 IECC Figure 301.1 and Table 301.1.

    Footnote 16) As an alternative, any applicable option in 2009 IRC Section R905.2.8.2 is permitted to be used to meet Item 3.3, and any option in 2009 IRC Section R905.2.7.1 is permitted to be used to meet Item 3.4. EPA recommends but does not require, that products meet ASTM D1970. In addition, any option in 2009 IRC Section R905.13 is permitted to be used to meet either Item 3.3 or 3.4.

    Please see the ENERGY STAR Single-Family New Homes Implementation Timeline for the program version and revision currently applicable in your state.


    DOE Zero Energy Ready Home (Revision 07)

    Exhibit 1 Mandatory Requirements.

    Exhibit 1, Item 1) Certified under the ENERGY STAR Qualified Homes Program or the ENERGY STAR Multifamily New Construction Program.


    2009201220152018, and 2021 International Residential Code (IRC)

    Section R905.3.8 Flashing. Flashing and counterflashing are to be provided at the juncture of vertical roof surfaces per the manufacturer’s instructions. If metal, it cannot be less than 0.019 inches (No. 26 galvanized sheet gage) corrosion-resistant metal. Valley flashing must extend at least 11 inches from the centerline each way and have a splash diverter rib not less than 1 inch high at the flow line formed as part of the flashing. Sections of flashing must have an end flap of at least 4 inches. For 3/12 roofs and greater, valley flashing must have a 3-ft wide underlayment of one layer of Type I underlayment running the full length of the valley, in addition to any other required underlayment. Metal valley flashing underlayment must be solid-cemented to the roofing underlayment for slopes less than 7/12 or be a self-adhering polymer-modified bitumen sheet in areas where the average daily temperature in January is 25°F.

    Section R905.2.8.2 Valleys – For asphalt roofs, open valleys (valley lining exposed) should be lined with a strip of corrosion-resistant metal (listed in Table R905.2.8.2) that is at least 24 inches wide or two layers of mineral–surfaced roll roofing with the bottom layer strip at least 18 inches wide and the top layer at least 36 inches wide. For closed valleys (where the valley is covered with shingles), the valley should be lined as described for open valleys or with one ply of smooth roll roofing at least 36 inches wide or with self-adhering polymer modified bitumen complying with ASTM D1970. Requirements vary for other roofing types. See Section R905.4.6 for metal roof valley flashing requirements, Section R 905.6.6 for slate roof valley flashing, Section R 905.7.6 for a wood shingle roof valley flashing, and Section R 905.8.8 for wood shake roof valley flashing.

    Section R905.1.2 (Section R905.2.7.1 in 2012 and 2009) specifies ice barrier requirements for geographic areas where there has been a history of ice dams. Requirements apply to asphalt shingle roofs, metal roof shingles, mineral-surfaced roll roofing, slate and slate-type shingles, wood shingles, and wood shakes. An exception is included for detached accessory structures not containing a conditioned floor area.

    Section R905.7.1.1 (Section R905.8.1.1 in 2009) states that in areas where the average daily temperature in January is 25°F (-4°C) or less, solid sheathing is required on that portion of the roof requiring the application of an ice barrier.

    Section R908.3 (Section R907.3 in 2009) states that roof replacement shall include the removal of existing layers of roof coverings down to the roof deck except where the existing roof assembly includes an ice barrier membrane, in which case the existing ice barrier membrane shall be permitted to remain in place and covered with an additional layer of ice barrier membrane.

    Retrofit: 2009201220152018, and 2021 IRC

    Section R102.7.1 Additions, alterations, or repairs. Additions, alterations, renovations, or repairs shall conform to the provisions of this code without requiring the unaltered portions of the existing building to comply with the requirements of this code unless otherwise stated. (See code for additional requirements and exceptions.)

    Appendix J regulates the repair, renovation, alteration, and reconstruction of existing buildings and is intended to encourage their continued safe use.

    More

    More Info.

    Access to some references may require purchase from the publisher. While we continually update our database, links may have changed since posting. Please contact our webmaster if you find broken links.

    References and Resources*
    Author(s)
    U.S. Environmental Protection Agency
    Organization(s)
    EPA
    Publication Date
    Description
    Guide describing details that serve as a visual reference for each of the line items in the Water Management System Builder Checklist.
    Author(s)
    U.S. Environmental Protection Agency
    Organization(s)
    EPA
    Publication Date
    Description
    Website providing the technical specifications and related documents for home builders, subcontractors, architects, and other housing professionals interested in certifying a home to the EPA's Indoor airPLUS program requirements.
    Author(s)
    Home Innovation Research Labs
    Organization(s)
    Home Innovation Research Labs
    Publication Date
    Description
    Fact sheet describing flashing of roof penetrations to make a home more resistant to high winds, hurricanes, and rainwater intrusion.
    Author(s)
    Environmental Protection Agency
    Organization(s)
    EPA
    Publication Date
    Description
    Indoor airPLUS is a voluntary partnership and labeling program that helps new home builders improve the quality of indoor air by requiring construction practices and product specifications that minimize exposure to airborne pollutants and contaminants.
    Author(s)
    Insurance Institute for Business & Home Safety
    Organization(s)
    IBHS Fortified Home
    Publication Date
    Description
    Website providing resources for roofers to construct high-wind, hurricane, and hail-resistant roofs from IBHS Fortified program.
    Author(s)
    Insurance Institute for Business & Home Safety
    Organization(s)
    IBHS
    Publication Date
    Description
    Report summarizing the requirements for strenghtening and protecting the roof, openings in the house, and creating a continuous load path to strengthen walls and foundation per the IBHS Fortified Homes Hurricane Standard for Existing Homes.
    Author(s)
    Insurance Institute for Business & Home Safety
    Organization(s)
    IBHS
    Publication Date
    Description
    Report summarizing the requirements for strenghtening and protecting the roof, openings in the house, and creating a continuous load path to strengthen walls and foundation per the IBHS Fortified Homes Hurricane Standard for New Homes.
    *For non-dated media, such as websites, the date listed is the date accessed.
    Contributors to this Guide

    The following authors and organizations contributed to the content in this Guide.

    Sales
    Building Science Measures
    Building Science-to-Sales Translator

    Heavy Membrane Valley/Eave = Roof Water Barrier

    Image(s)
    Technical Description

    Valleys and penetrations through the roof decking are some of the areas of the roof most vulnerable to leaks. A peel-and-stick bituminous membrane is installed for protection at these critical locations, including all roof valleys, roof-to-wall transitions, and roof edges to minimize ice dam damage in cold climates. Metal or plastic flashing is usually installed along with the membrane at wall intersections. Flashing is also installed around chimneys, vent stacks, and any other roof penetrations. Some builders install peel-and-stick membrane or a paint-on damp-proofing over the whole roof.

    Roof Water Barrier
    Sales Message

    Roof water barriers help drain water away below the roofing. What this means to you is peace-of-mind knowing your home has a comprehensive set of measures that minimize the risk of water damage in your home. Wouldn’t you agree every home should have full water protection?

    Last Updated

    Mobile Field Kit

    The Building America Field Kit allows you to save items to your profile for review or use on-site.

    Sign Up  or  Log In

    Did you find this information helpful?

    If you have questions and/or would like a reply to this feedback, please include your e-mail address in the message.
    This question is for testing whether or not you are a human visitor and to prevent automated spam submissions.