

Scope
Install drain tile (perforated plastic drainage pipe) along the exterior (or interior) of the footings of basement and crawlspace walls to provide drainage around the foundations.
- Install drain pipe to sit outside of, not on top of, the footings and below the bottom of the concrete slab or crawlspace floor.
- Lay the pipe with enough slope to drain to a non-perforated pipe that carries the collected water to daylight, to a drywell, to a storm sewer if approved by the local municipality, or to a sump pump that will transport it to daylight, a storm sewer, or a drywell.
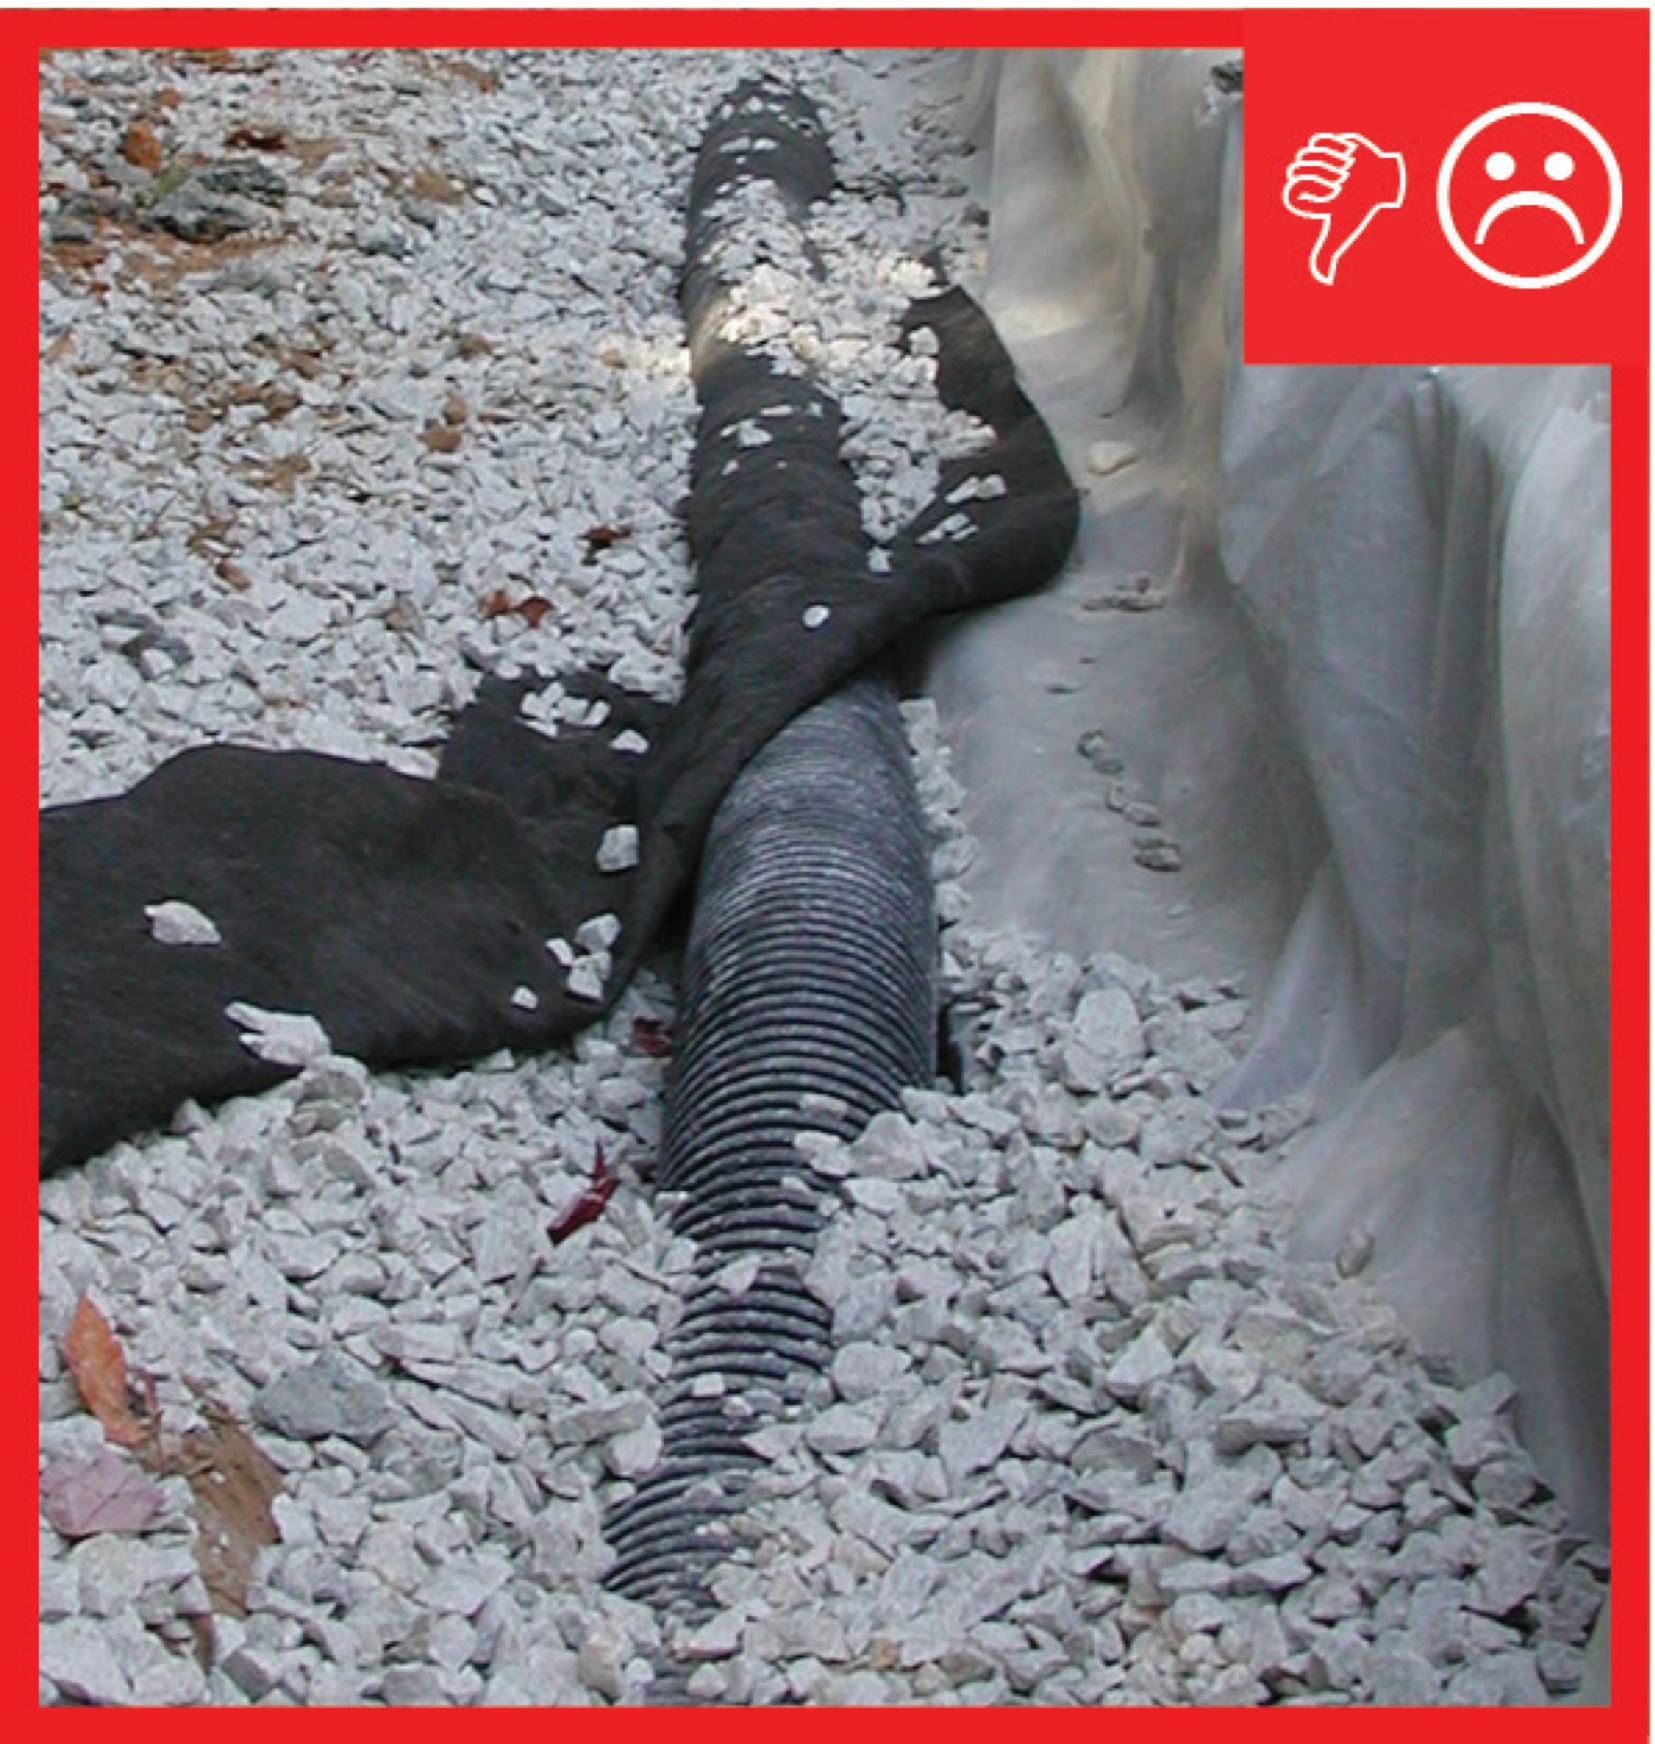
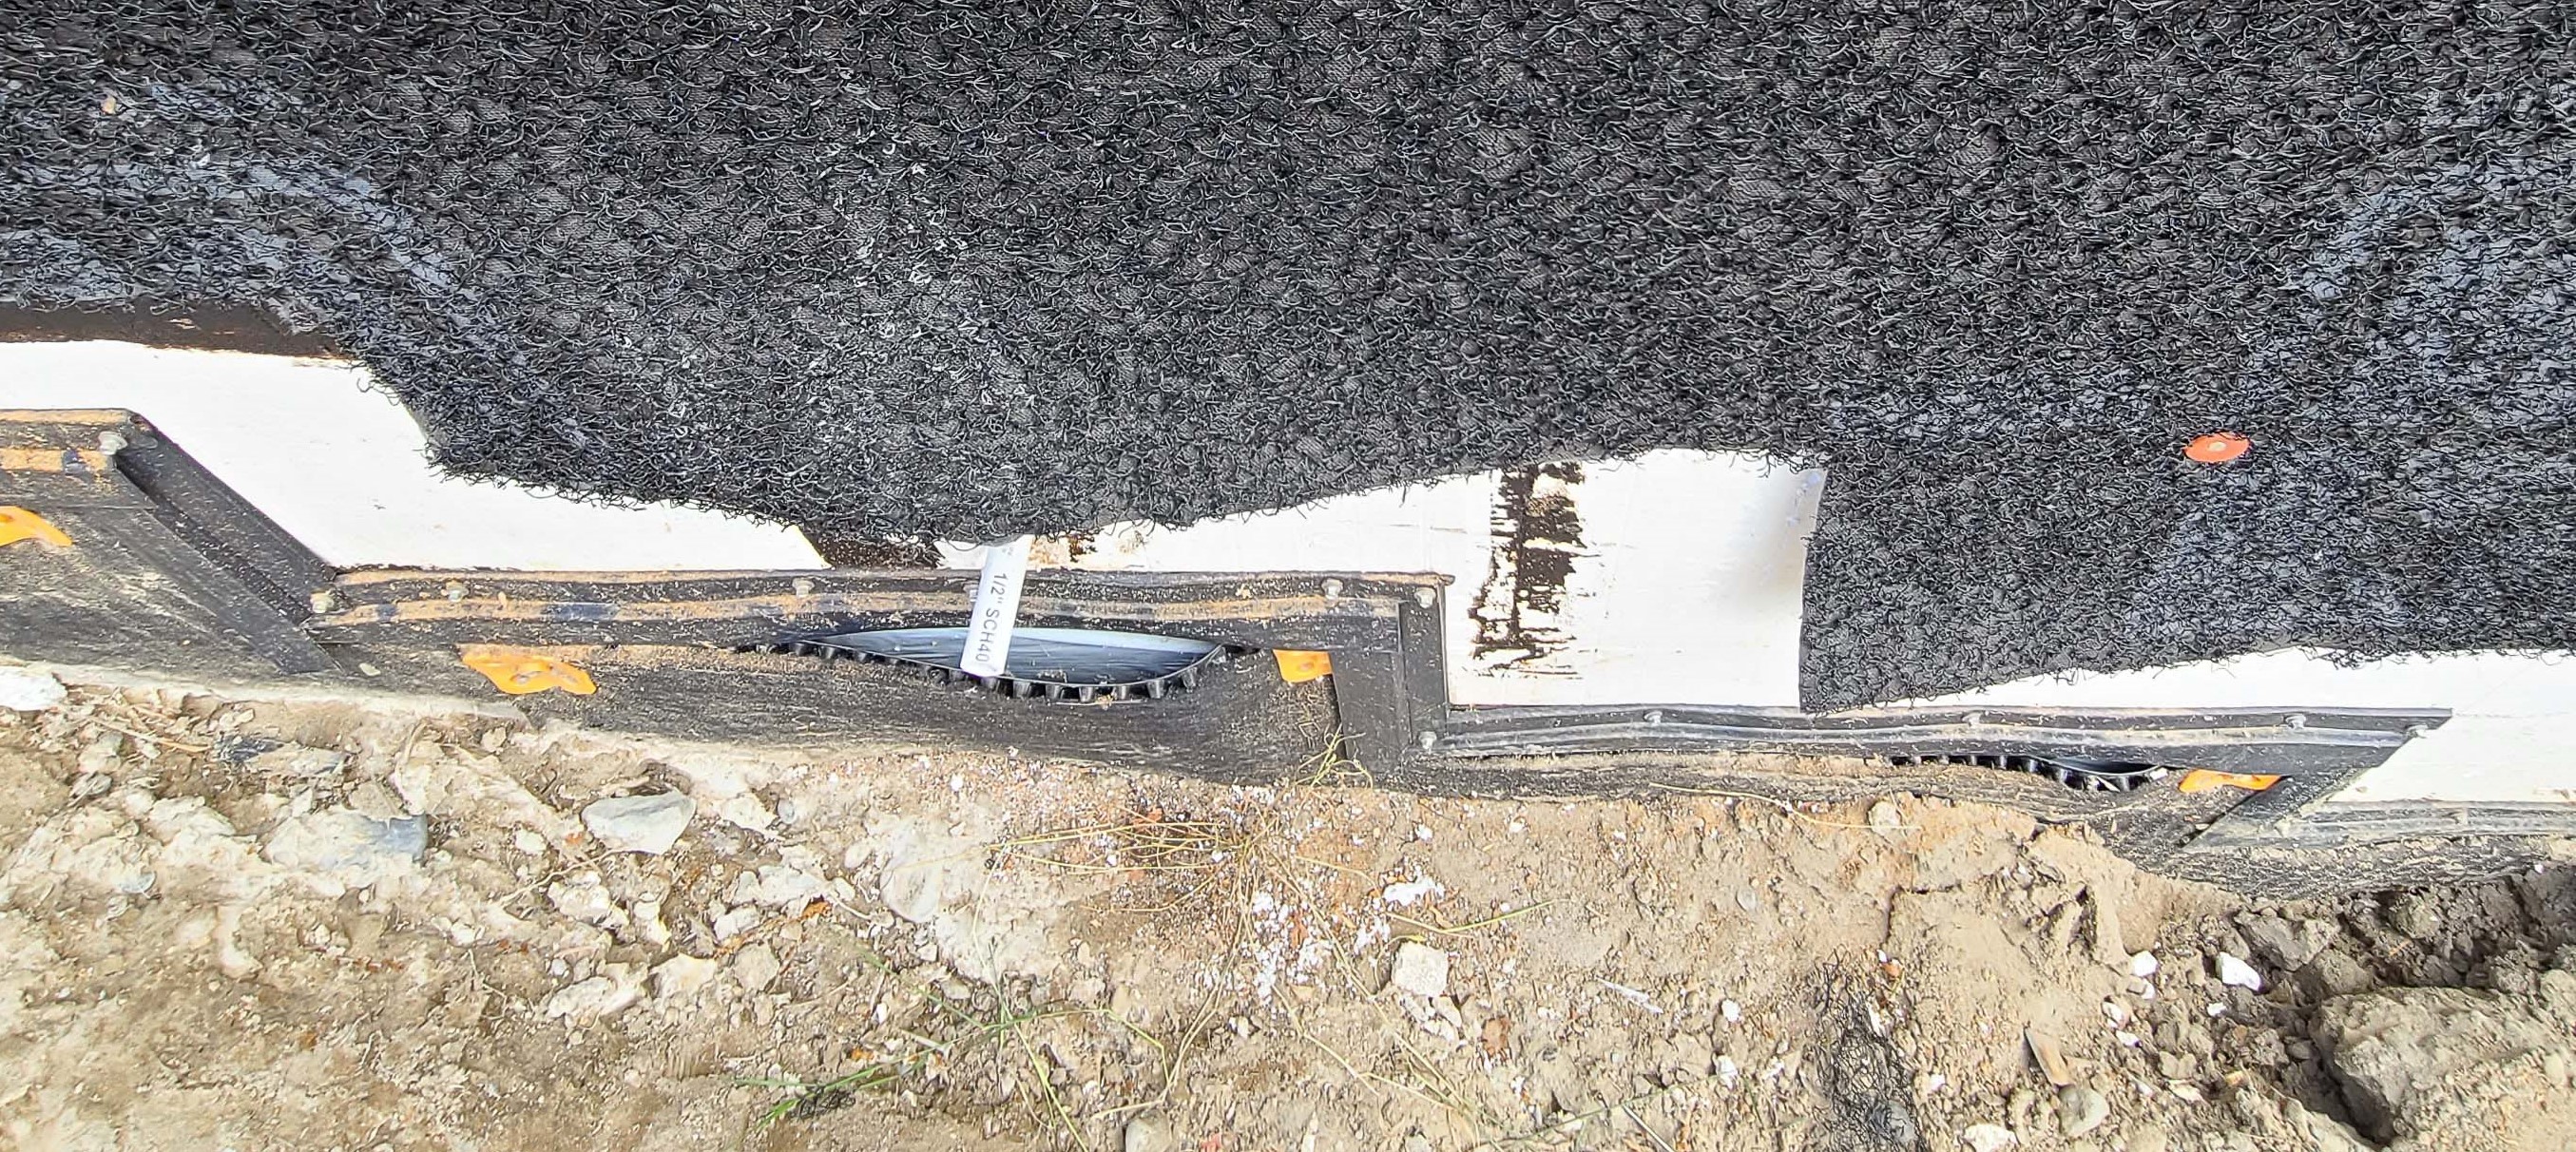
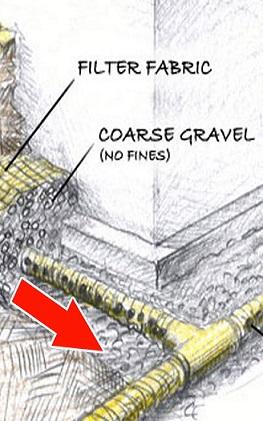
- Lay the drain pipe, perforations down, in a gravel trench with at least 6 inches of ½-inch to ¾-inch washed gravel or stone above the pipe and at least 2 inches below (IRC 2009).
- Install landscape fabric under, around, and over the washed gravel (IRC 2009, ENERGY STAR).
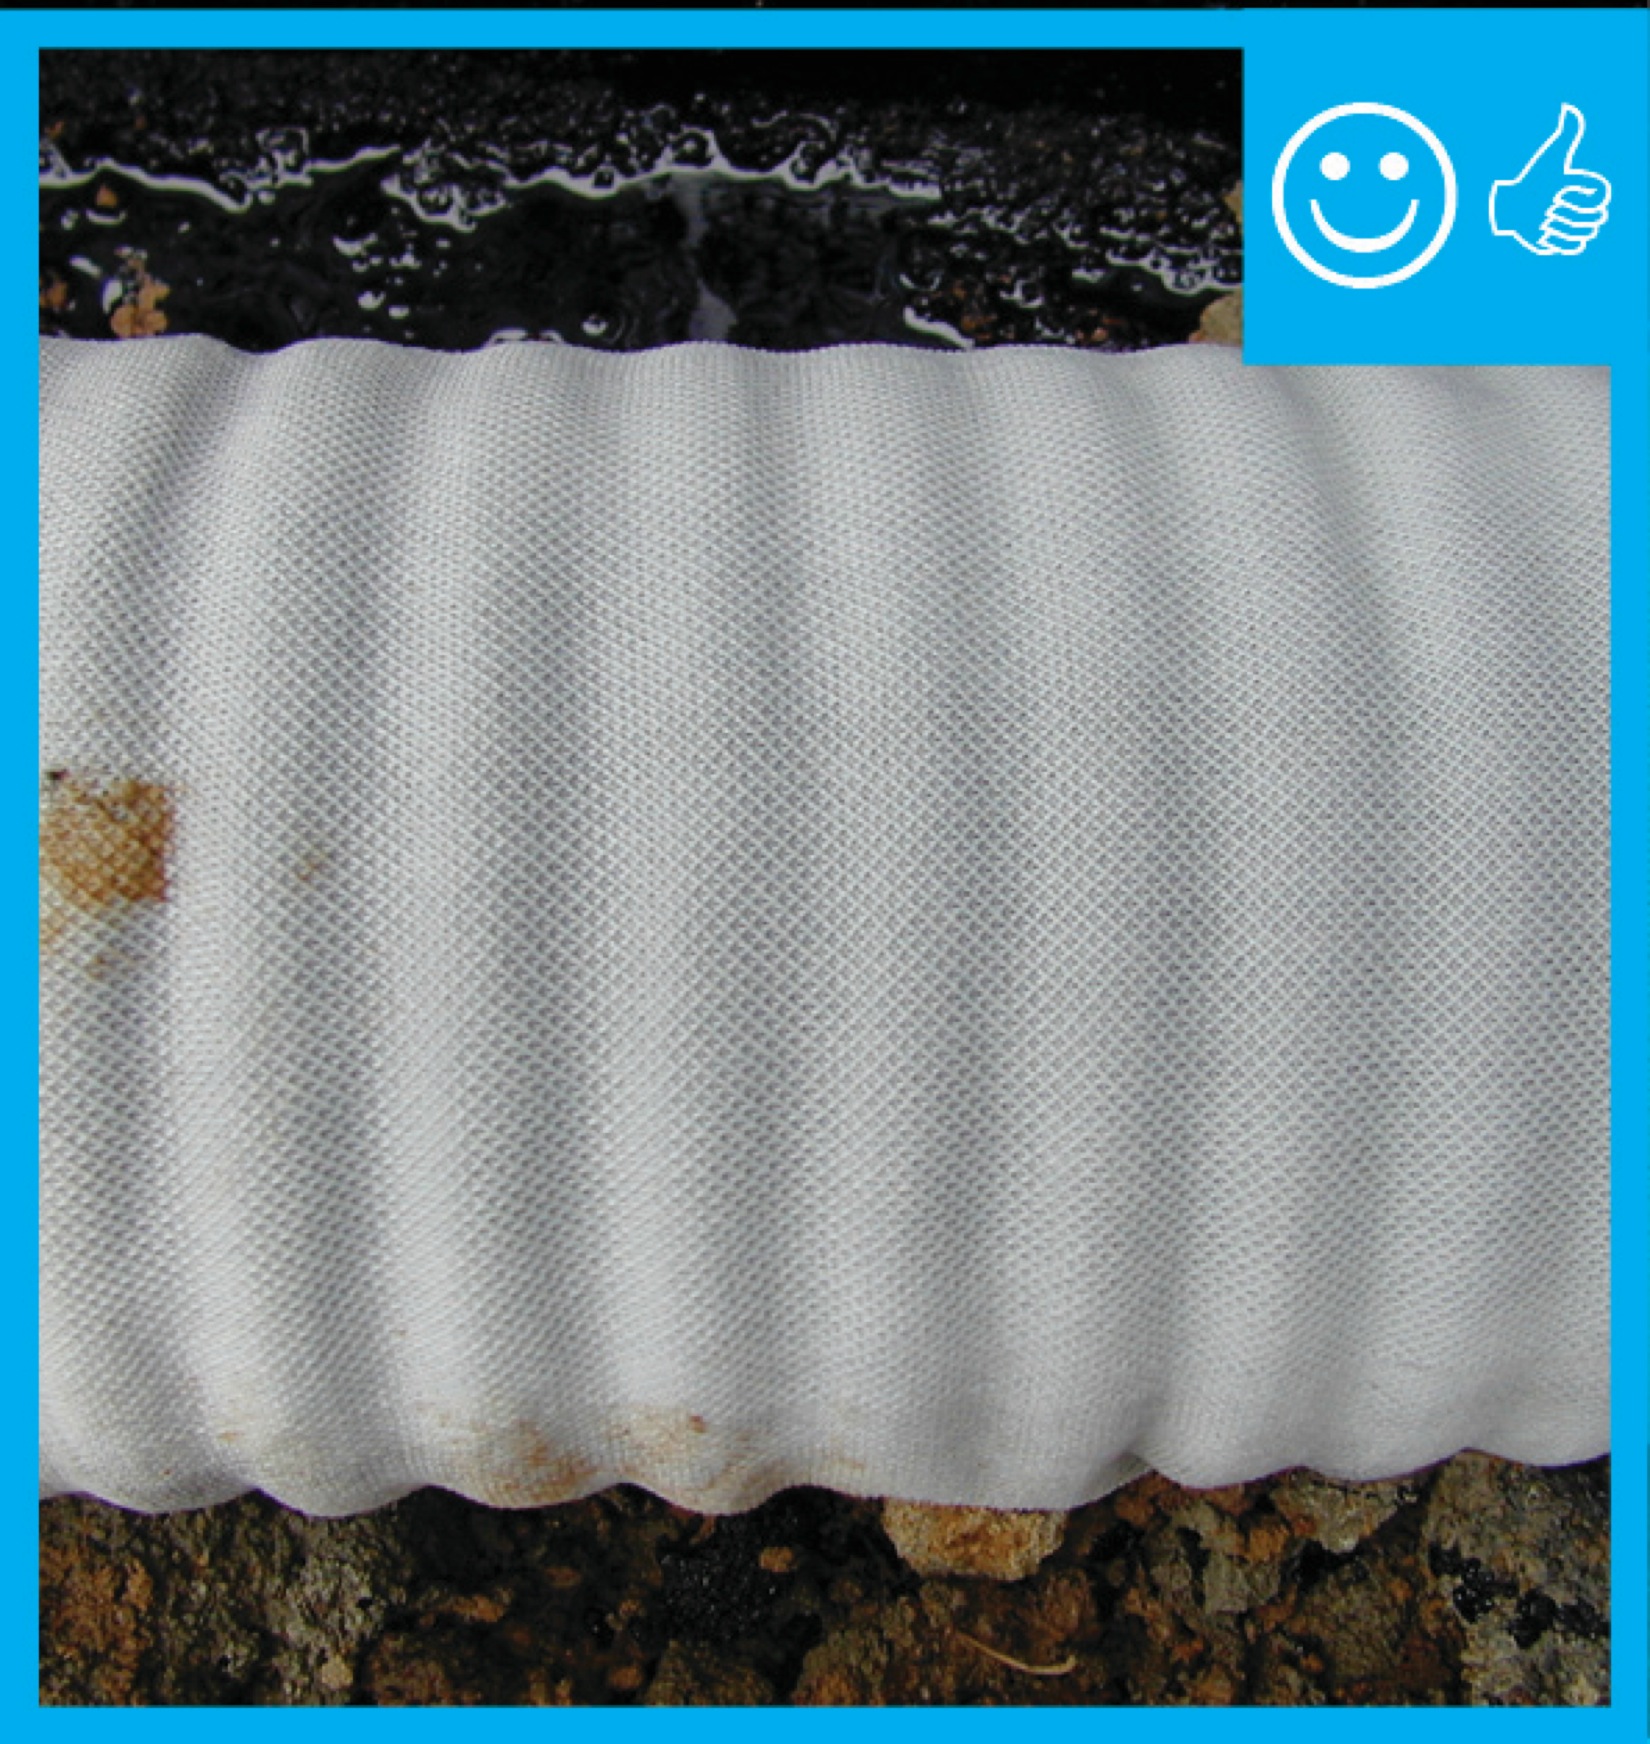
- Alternately, use drain pipe encased in a filter-fabric sock and surround the cloth-covered pipe with gravel. Or, install a code-approved composite foundation drainage system (CFDS) (IRC 2009, ENERGY STAR).
According to the International Residential Code and ENERGY STAR Certified Homes, drain tile is not required when a certified hydrologist, soil scientist, or engineer has determined that a foundation is installed in well-drained ground or sand-gravel mixture soils, as identified in the 2009 IRC, Table R405.1.
See the Compliance Tab for links to related codes and standards and voluntary federal energy-efficiency program requirements.
Description
Water management is an important part of the design and construction of the home. Keeping water from entering the house is critical to ensure the long-term structural integrity of the building as well as to reduce the chances of mold issues and poor indoor air quality. A complete water management strategy will deflect water that comes in contact with the building envelope and divert that water down and away from the house.
A well-sealed foundation or crawlspace will keep water from entering the home, but to finish the task of water management, you must also create a path for water to flow away from the home and be discharged at a safe distance. Allowing water to collect around the foundation will eventually lead to unacceptable levels of soil saturation and ultimately could overcome any water sealing practices used to protect the foundation.
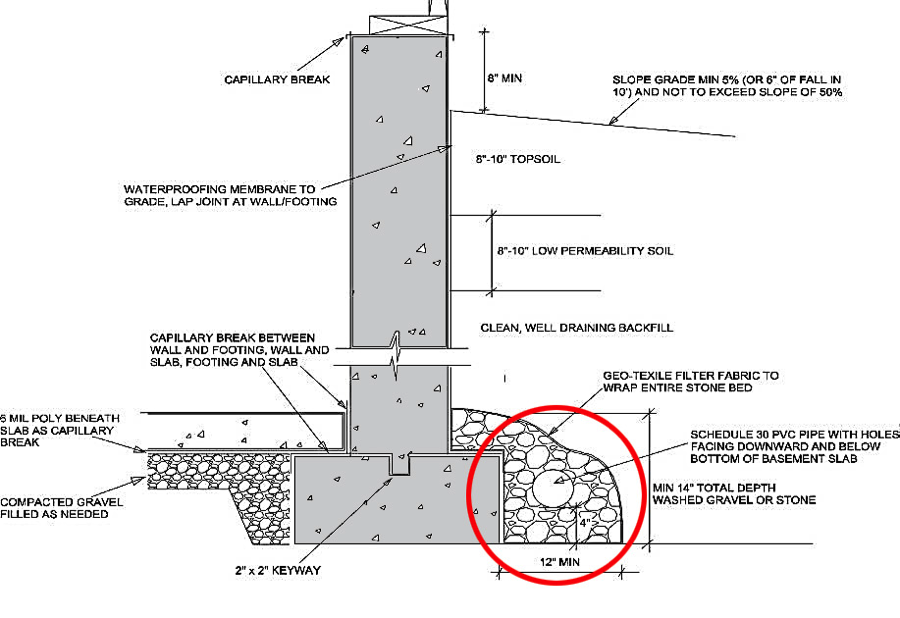
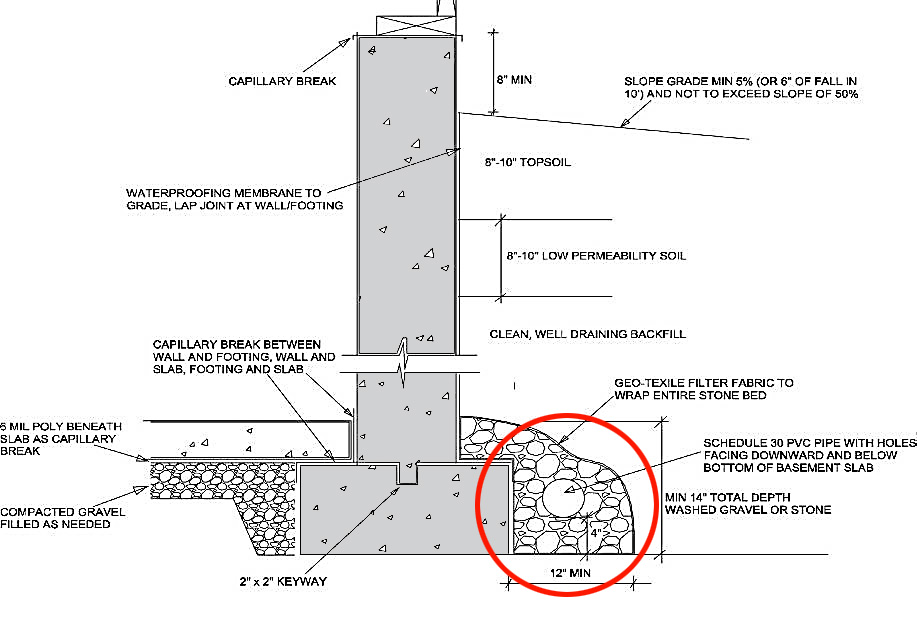
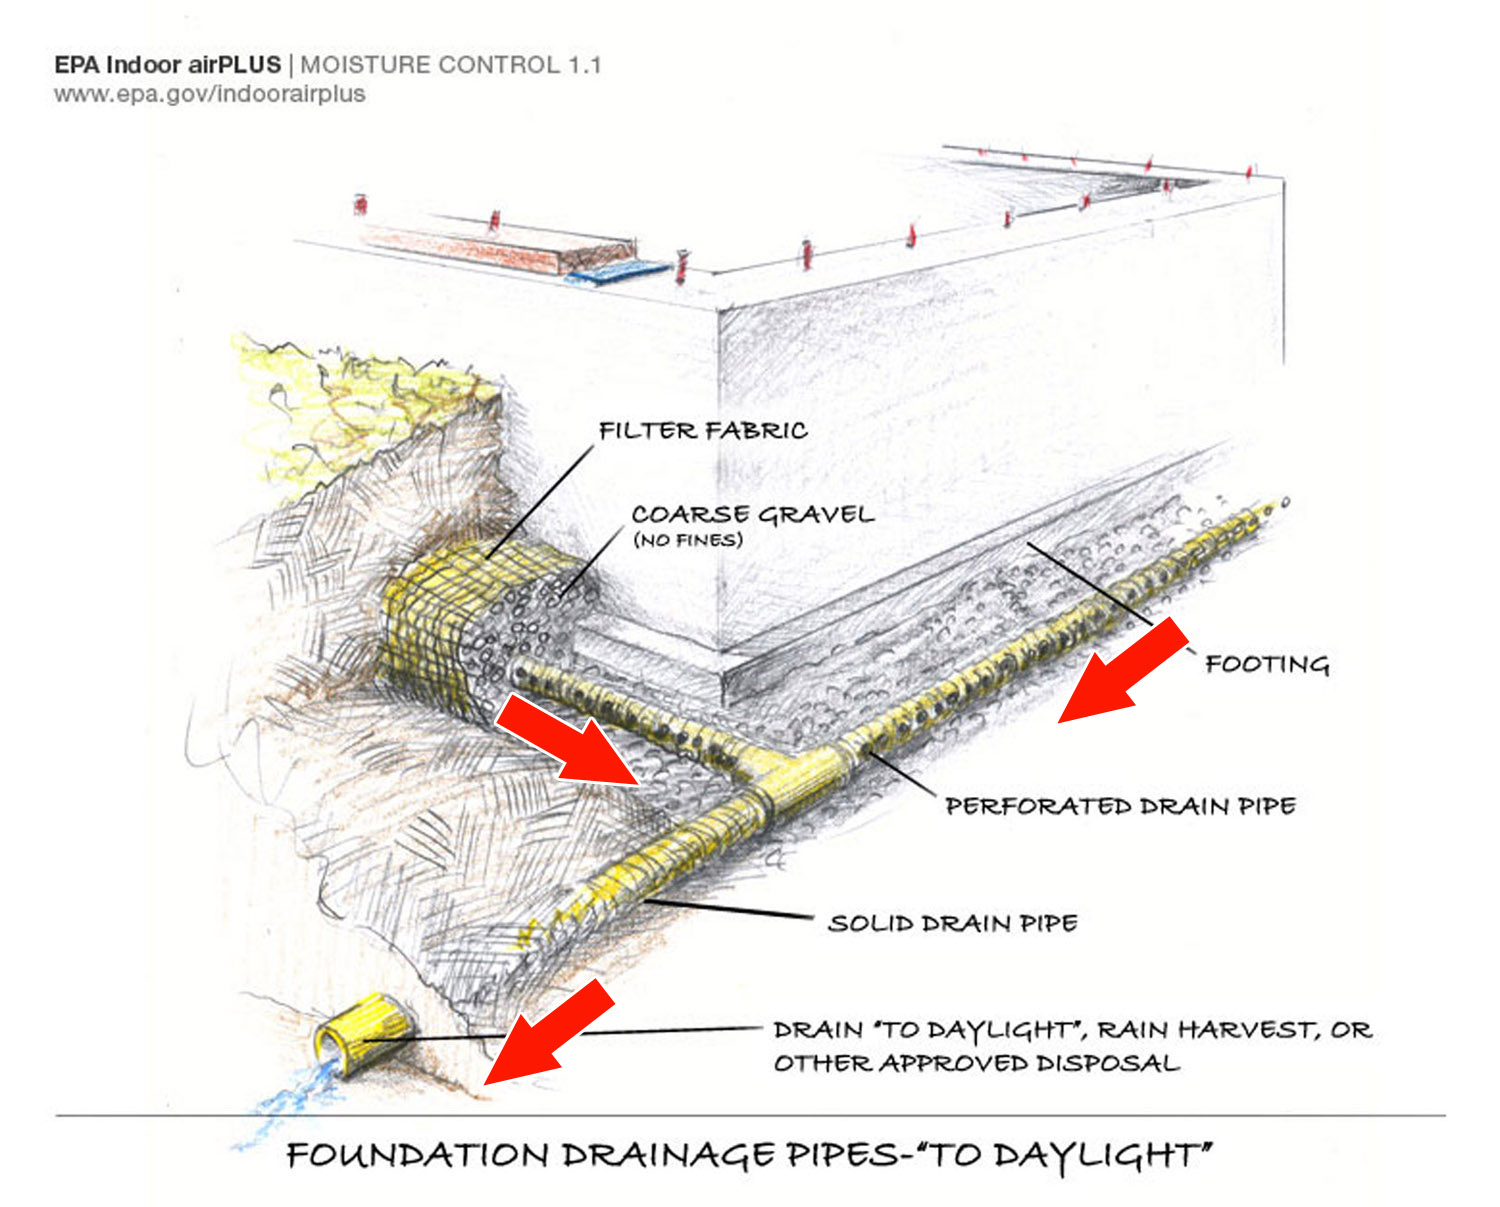
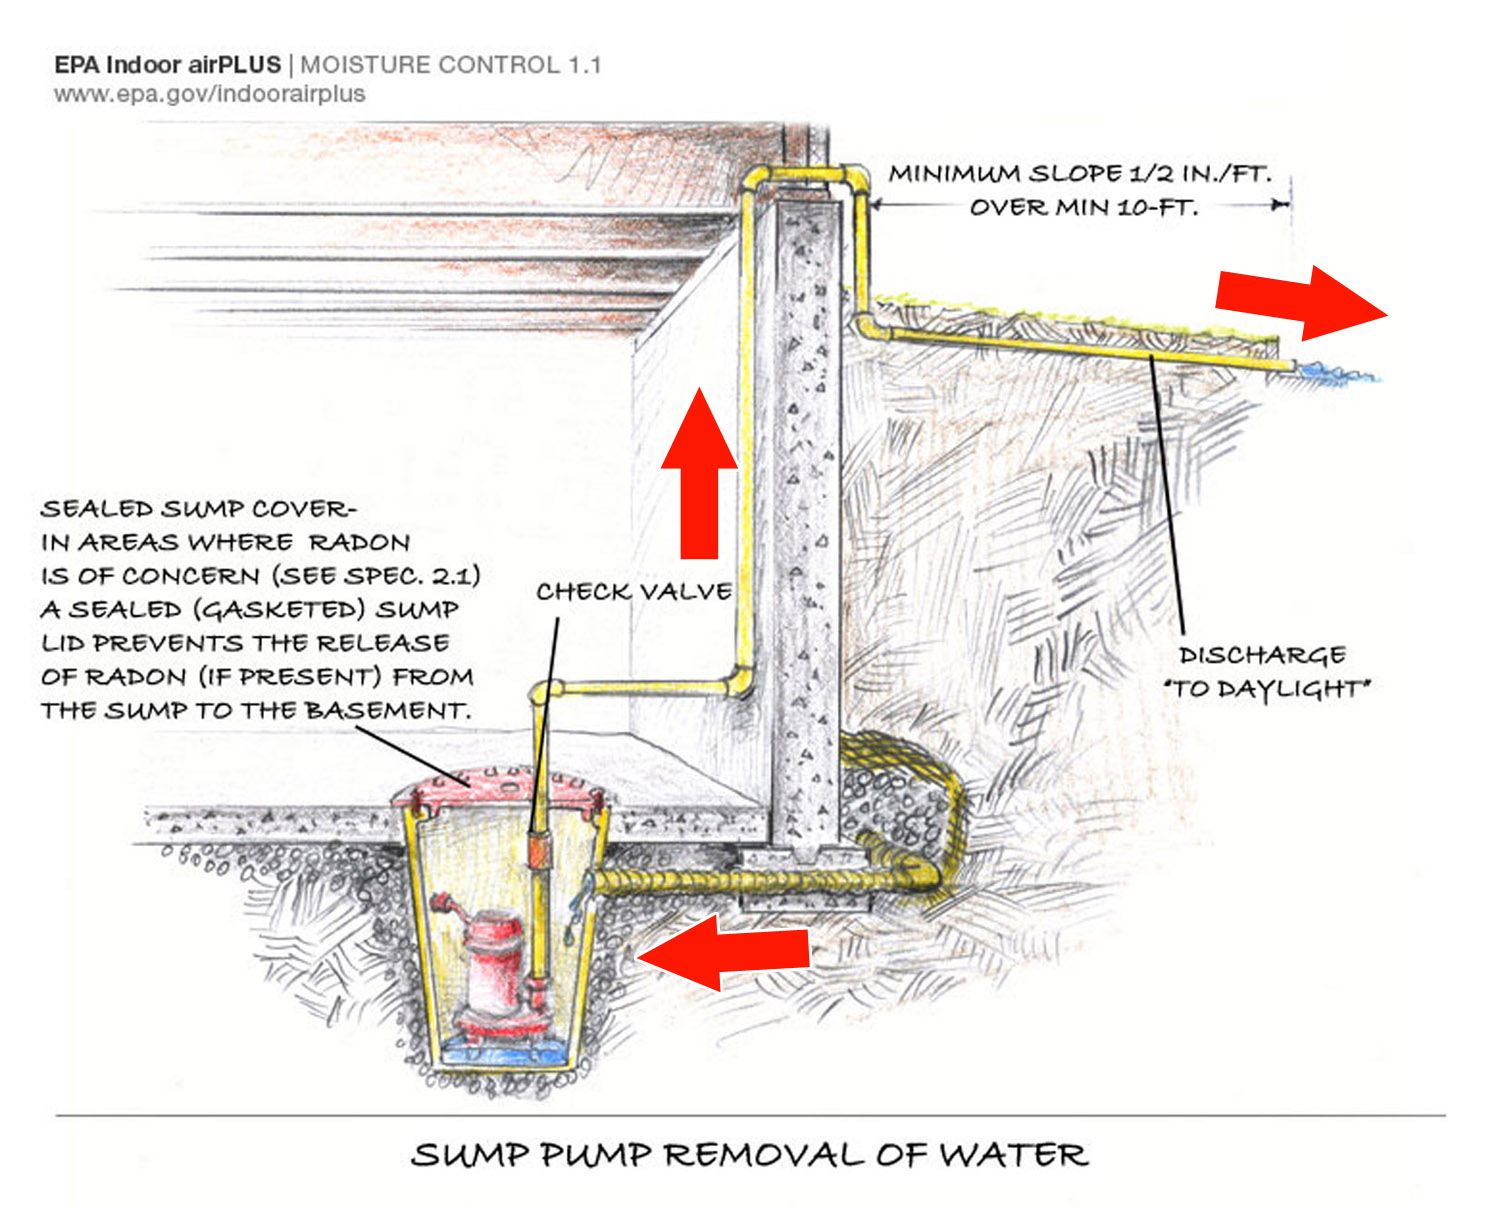
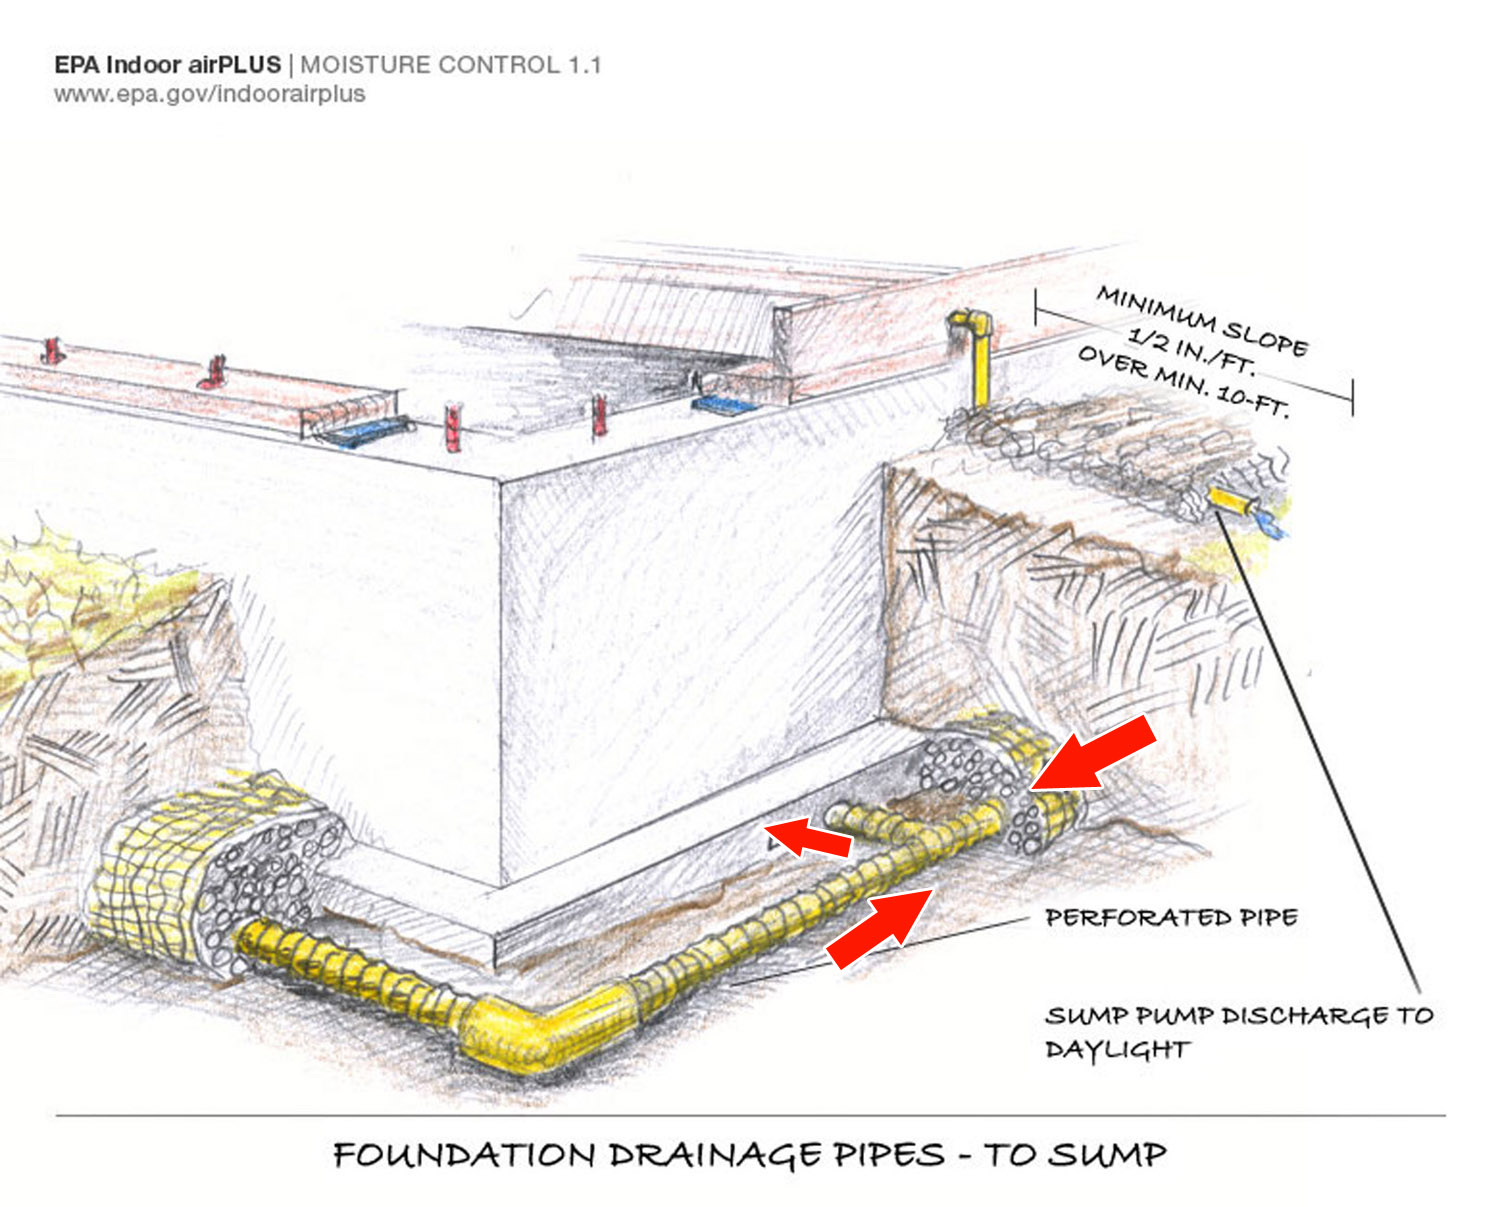
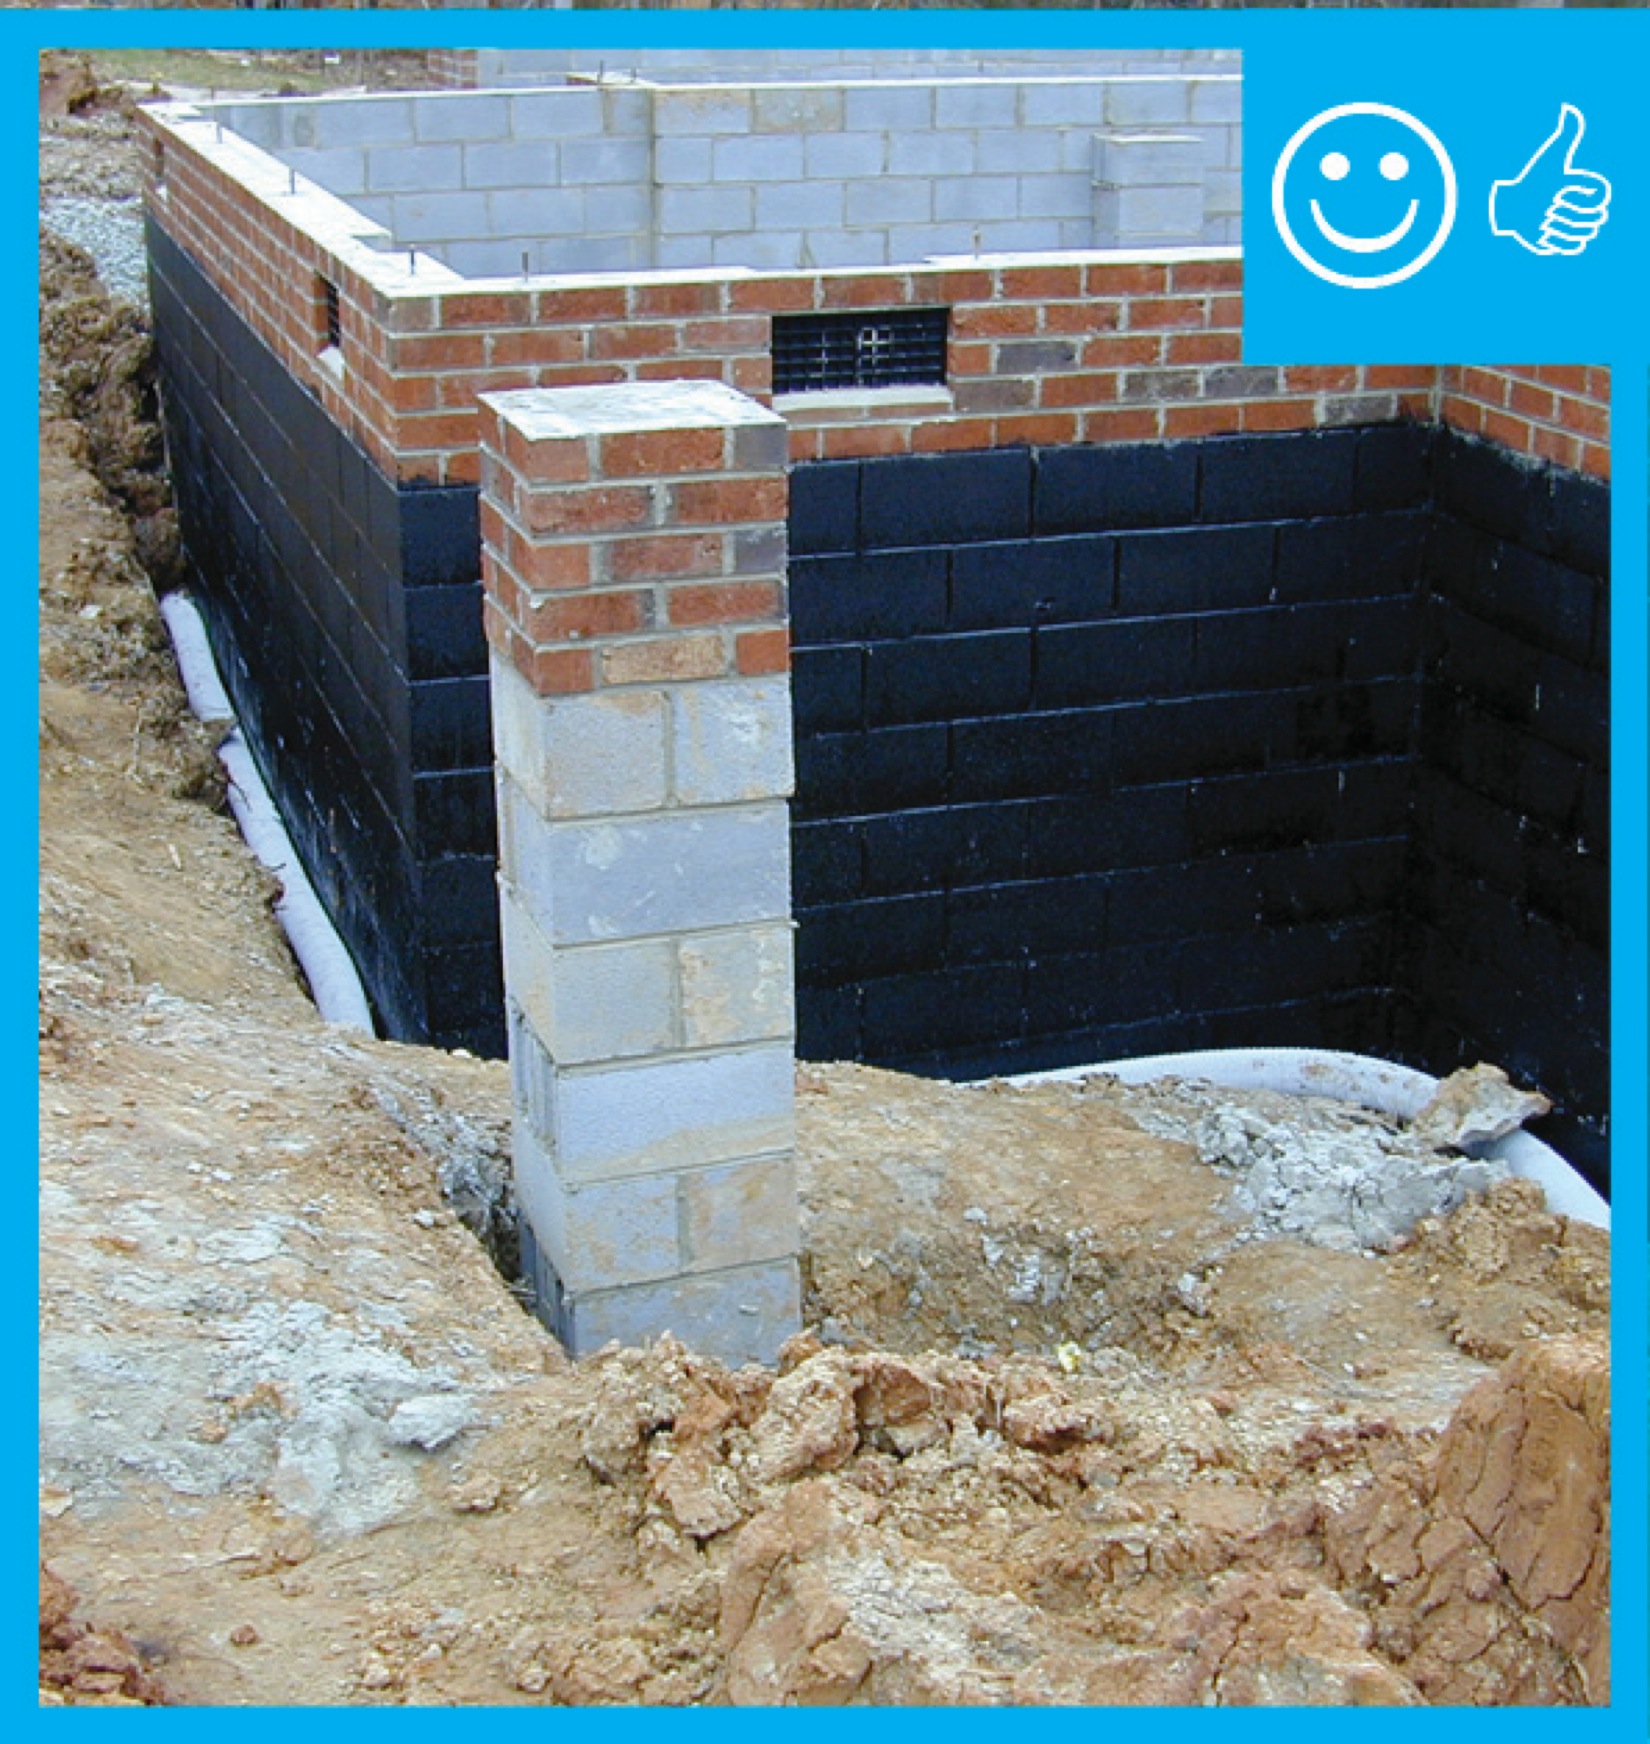
To carry water away from the foundation, a footing drain system should be installed consisting of a perforated drain pipe (also called drain tile) that is located underground on the exterior side of the footings at a depth below the level of the basement slab or crawlspace floor. The perforations allow any surface or ground water that reaches the footing to flow into the drain tile and be carried away rather than pooling along the foundation wall. To keep the pipe from getting clogged with silt, the pipe is wrapped with filter fabric (Figure 1) then laid in a bed of washed stone that is also wrapped in filter fabric, also called geo-textile or landscape fabric (Figure 2). The pipe surrounds the full perimeter of the house and is laid so that it is slightly sloped, allowing water entering anywhere along the perimeter to drain to a single collection point. That collection point connects to an unperforated pipe that discharges the drain pipe to an above-grade location at least 10 feet away from the foundation or to a suitable alternative such as to a drywell or storm sewer. Or, the drain pipe can discharge into a sump pump located in the floor of the crawlspace or basement. The sump pump will then discharge the water either to daylight or to a suitable alternative such as to a drywell or storm sewer. See Patio Slabs, Porch Slabs, Walks, and Driveways for more information about discharging water away from the foundation.
A properly installed and functioning footing drain system will keep water moving away from the foundation to help maintain a dry basement or crawlspace. Poor installation of the pipe system often prevents it from accomplishing this important drainage function.

How to Install Drain Tile that Discharges to Daylight
- Dig a trench large enough to accommodate the filter fabric, drainage tile, and gravel. The trench should allow 6 inches of space around the pipe, which means it will usually have to be at least 16 inches deep and 16 inches wide to fit a standard 4-inch pipe with protective cover. Because the drain tile will be installed at a height that is lower than the bottom of the concrete slab or crawlspace floor, the trench must be at least 10 inches deeper than the top of the footing or slab.
- Slope or level the trench so that when the drainage tile is installed, water will readily flow to the lowest point (i.e., the discharge pipe).
- Lay the filter fabric on the bottom of the trench. When complete, the entire drainage tile and gravel bed will be surrounded by filter fabric, so leave ample surplus to ensure there is enough fabric to cover the wrap around over the top of the drain pipe and the 6 inches of rock poured over it.
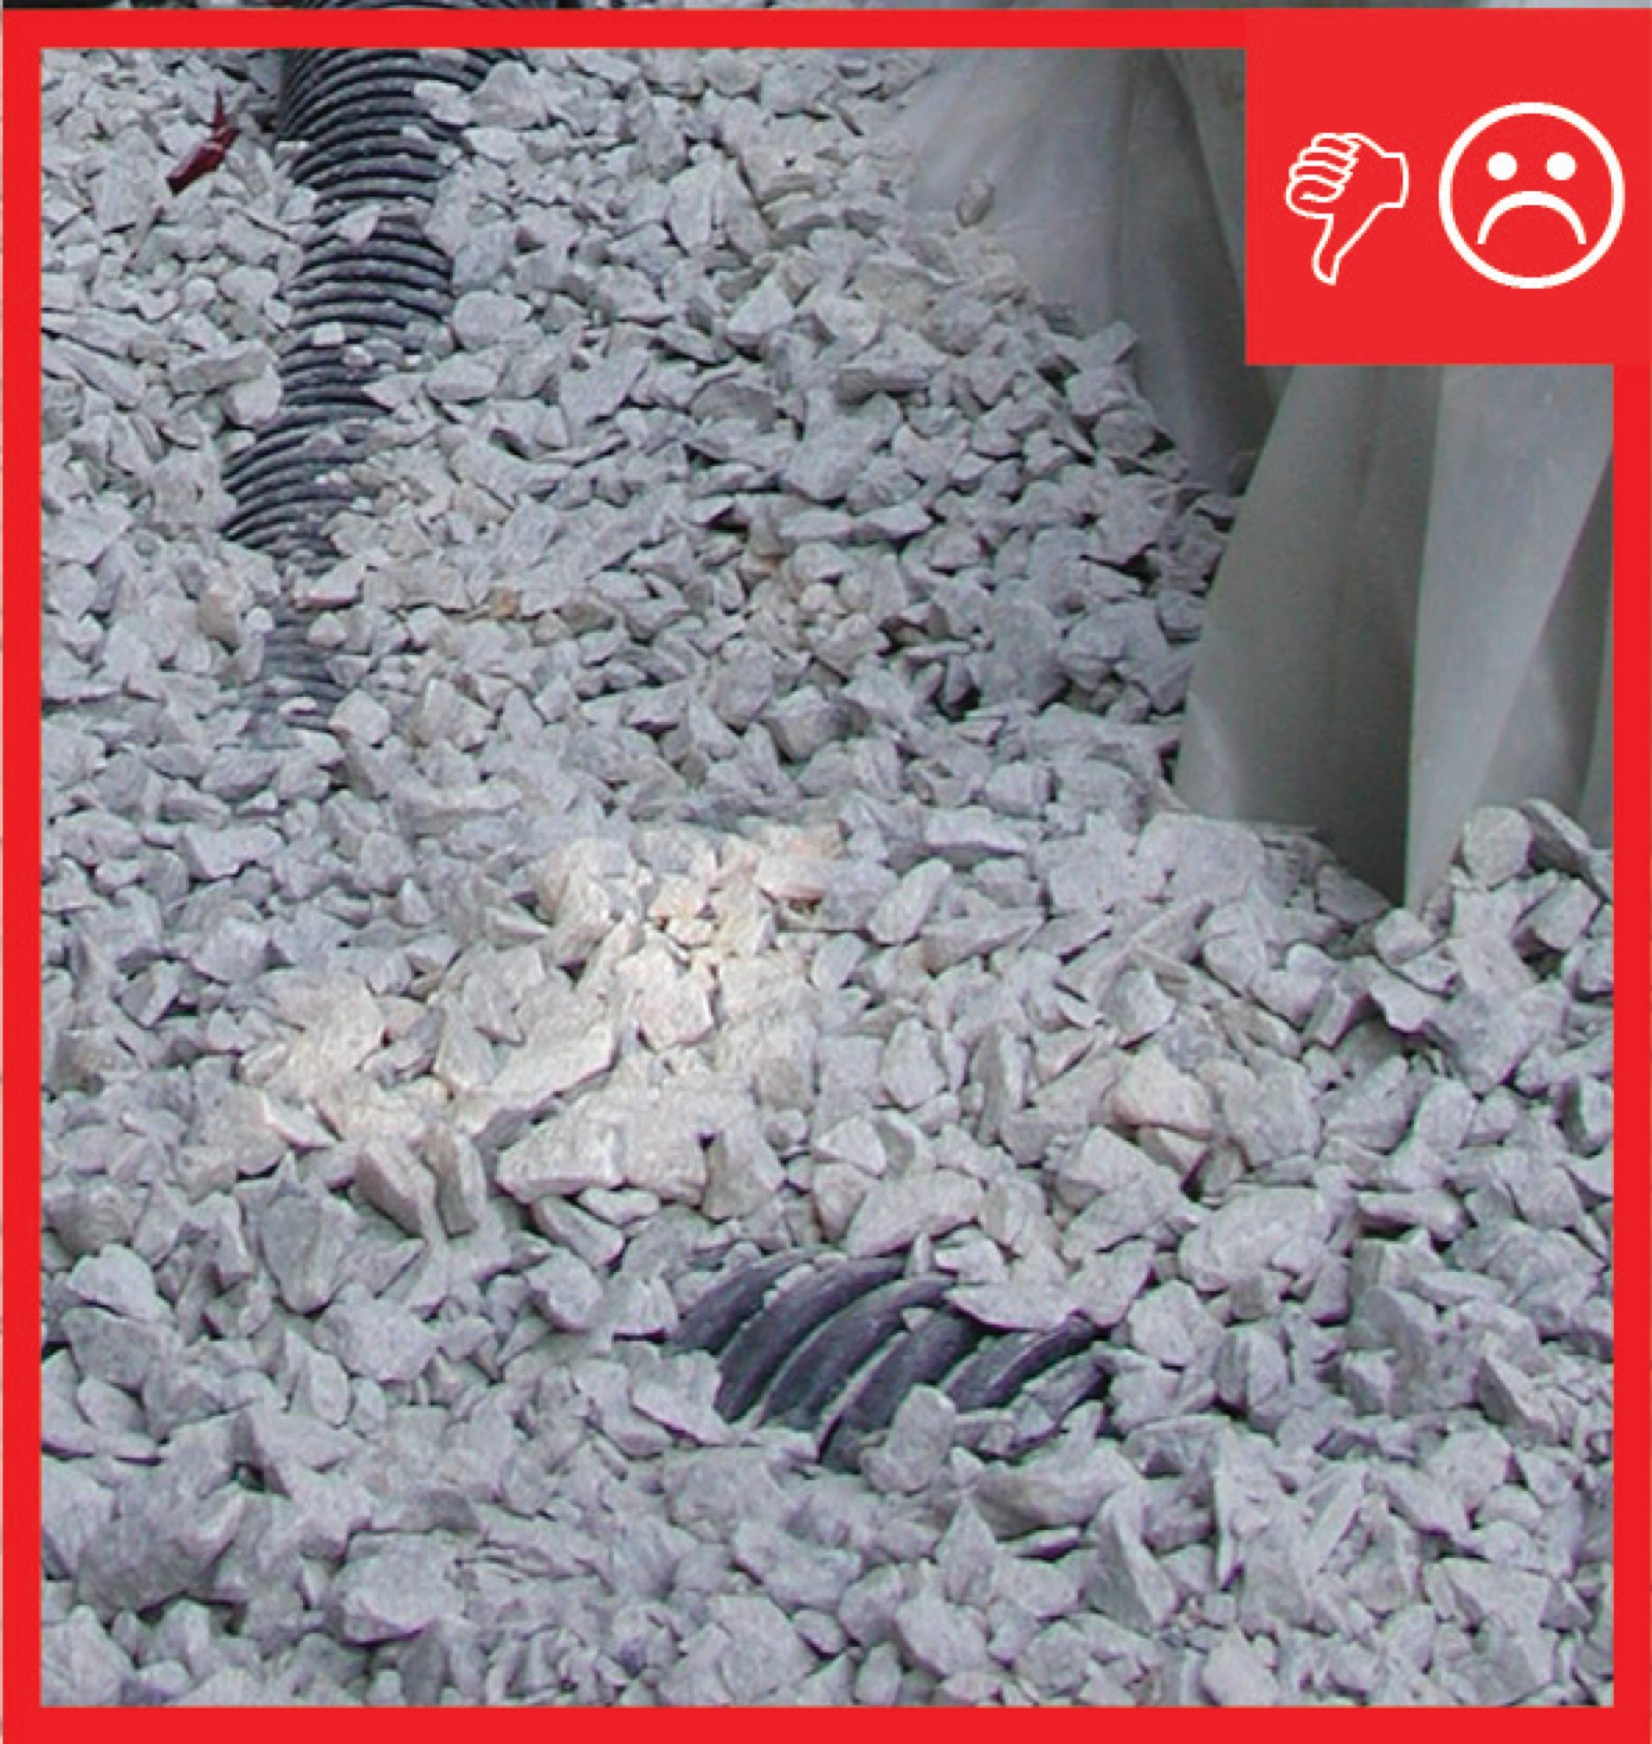
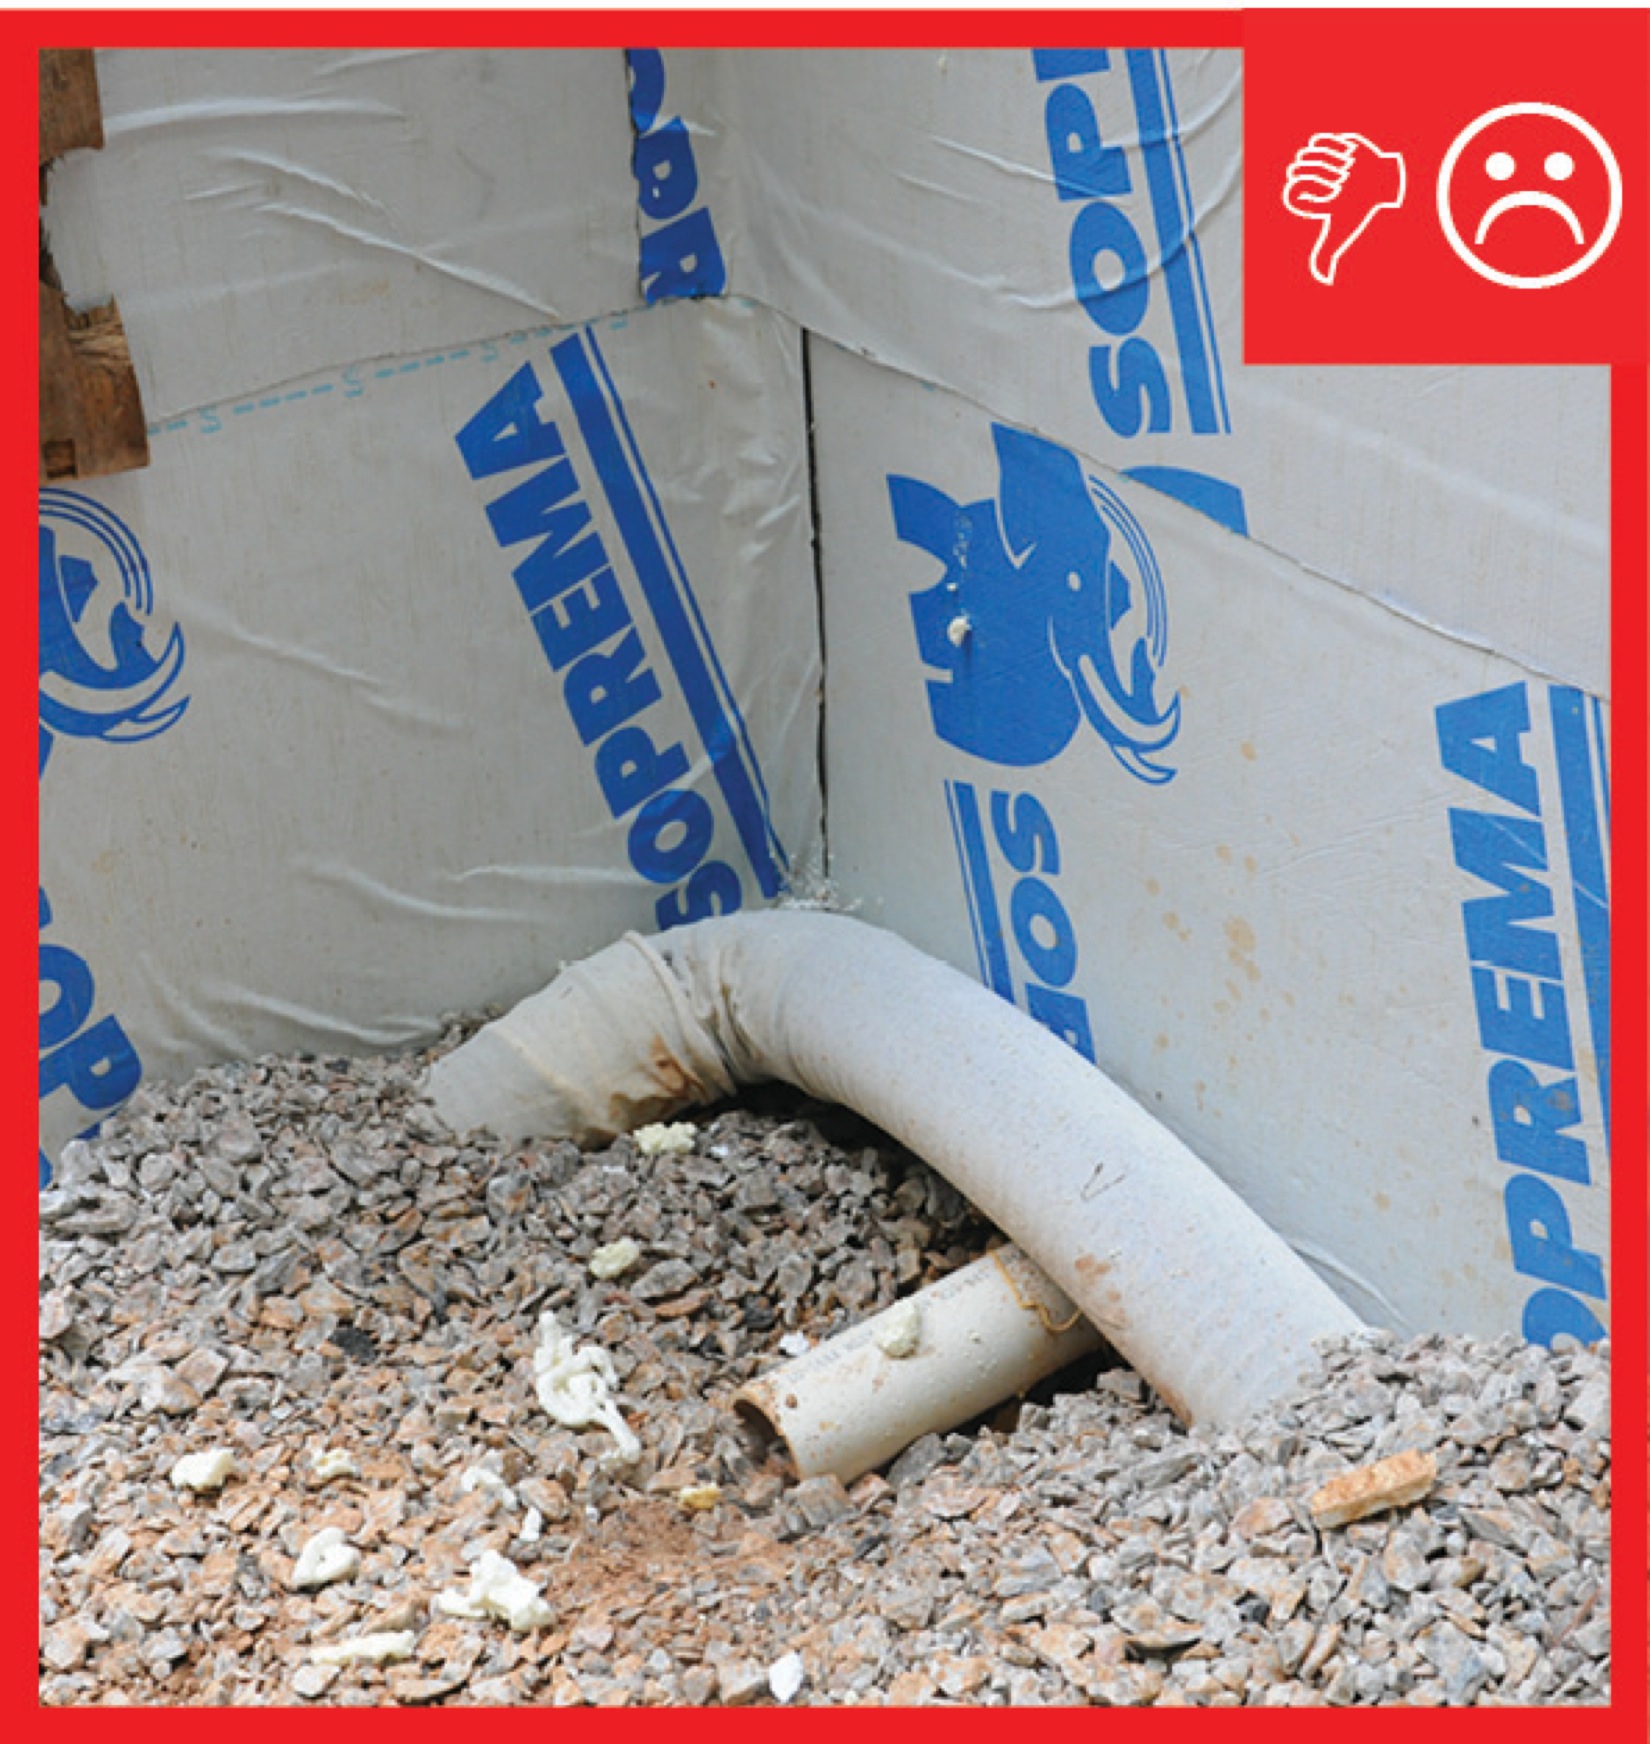
- Lay a 6-inch layer of ½- to ¾-inch washed or clean gravel in the trench. It is important that the gravel be free of fines (i.e., clean) because silt and sand in the gravel will eventually clog the drain tile perforations or build up in the bottom of the pipe and reduce the effectiveness of the drainage system.
- Install the drainage tile. Secure all the connections to make a complete drainage system around the entire foundation. Connect the perforated pipe to a non-perforated pipe that leads to the discharge location. (See Patio Slabs, Porch Slabs, Walks, and Driveways for more information about discharging water away from the foundation.) The discharge pipe must lay at a downward slope and discharge to daylight at least 10 feet from the foundation (Figure 3), or to a suitable alternative such as to a drywell or storm sewer.
- Once the drainage tile is connected, cover the system with a 6-inch layer of ½- to ¾-inch washed or clean gravel.
- Wrap the drainage tile and gravel in the filter fabric to further protect the system from silt and sand.
How to Install Drain Tile that Discharges to a Sump Pit
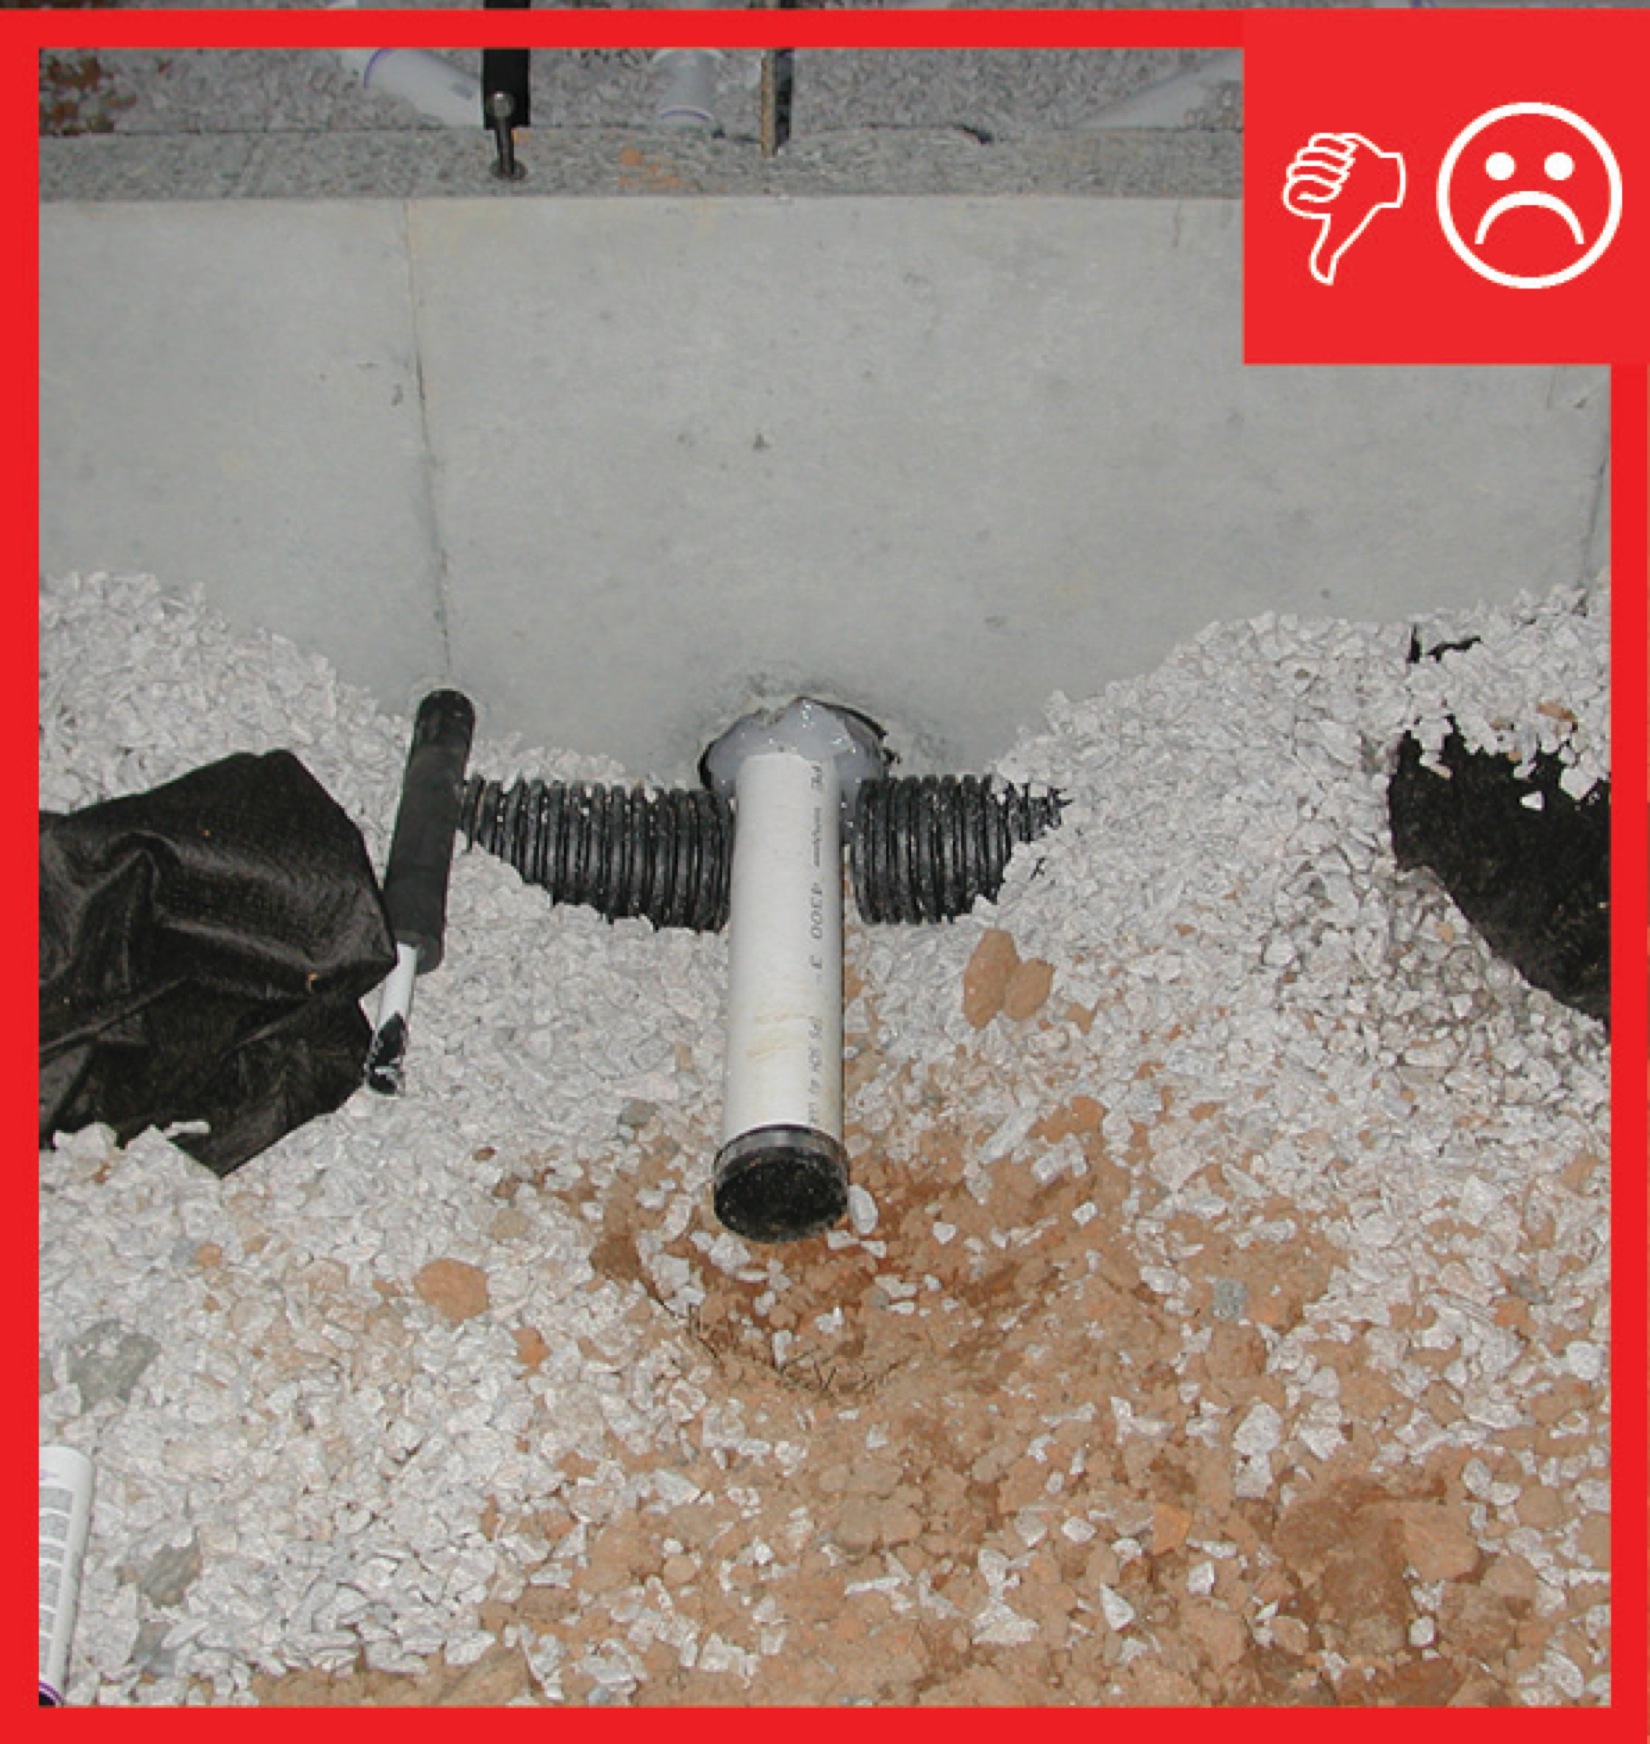
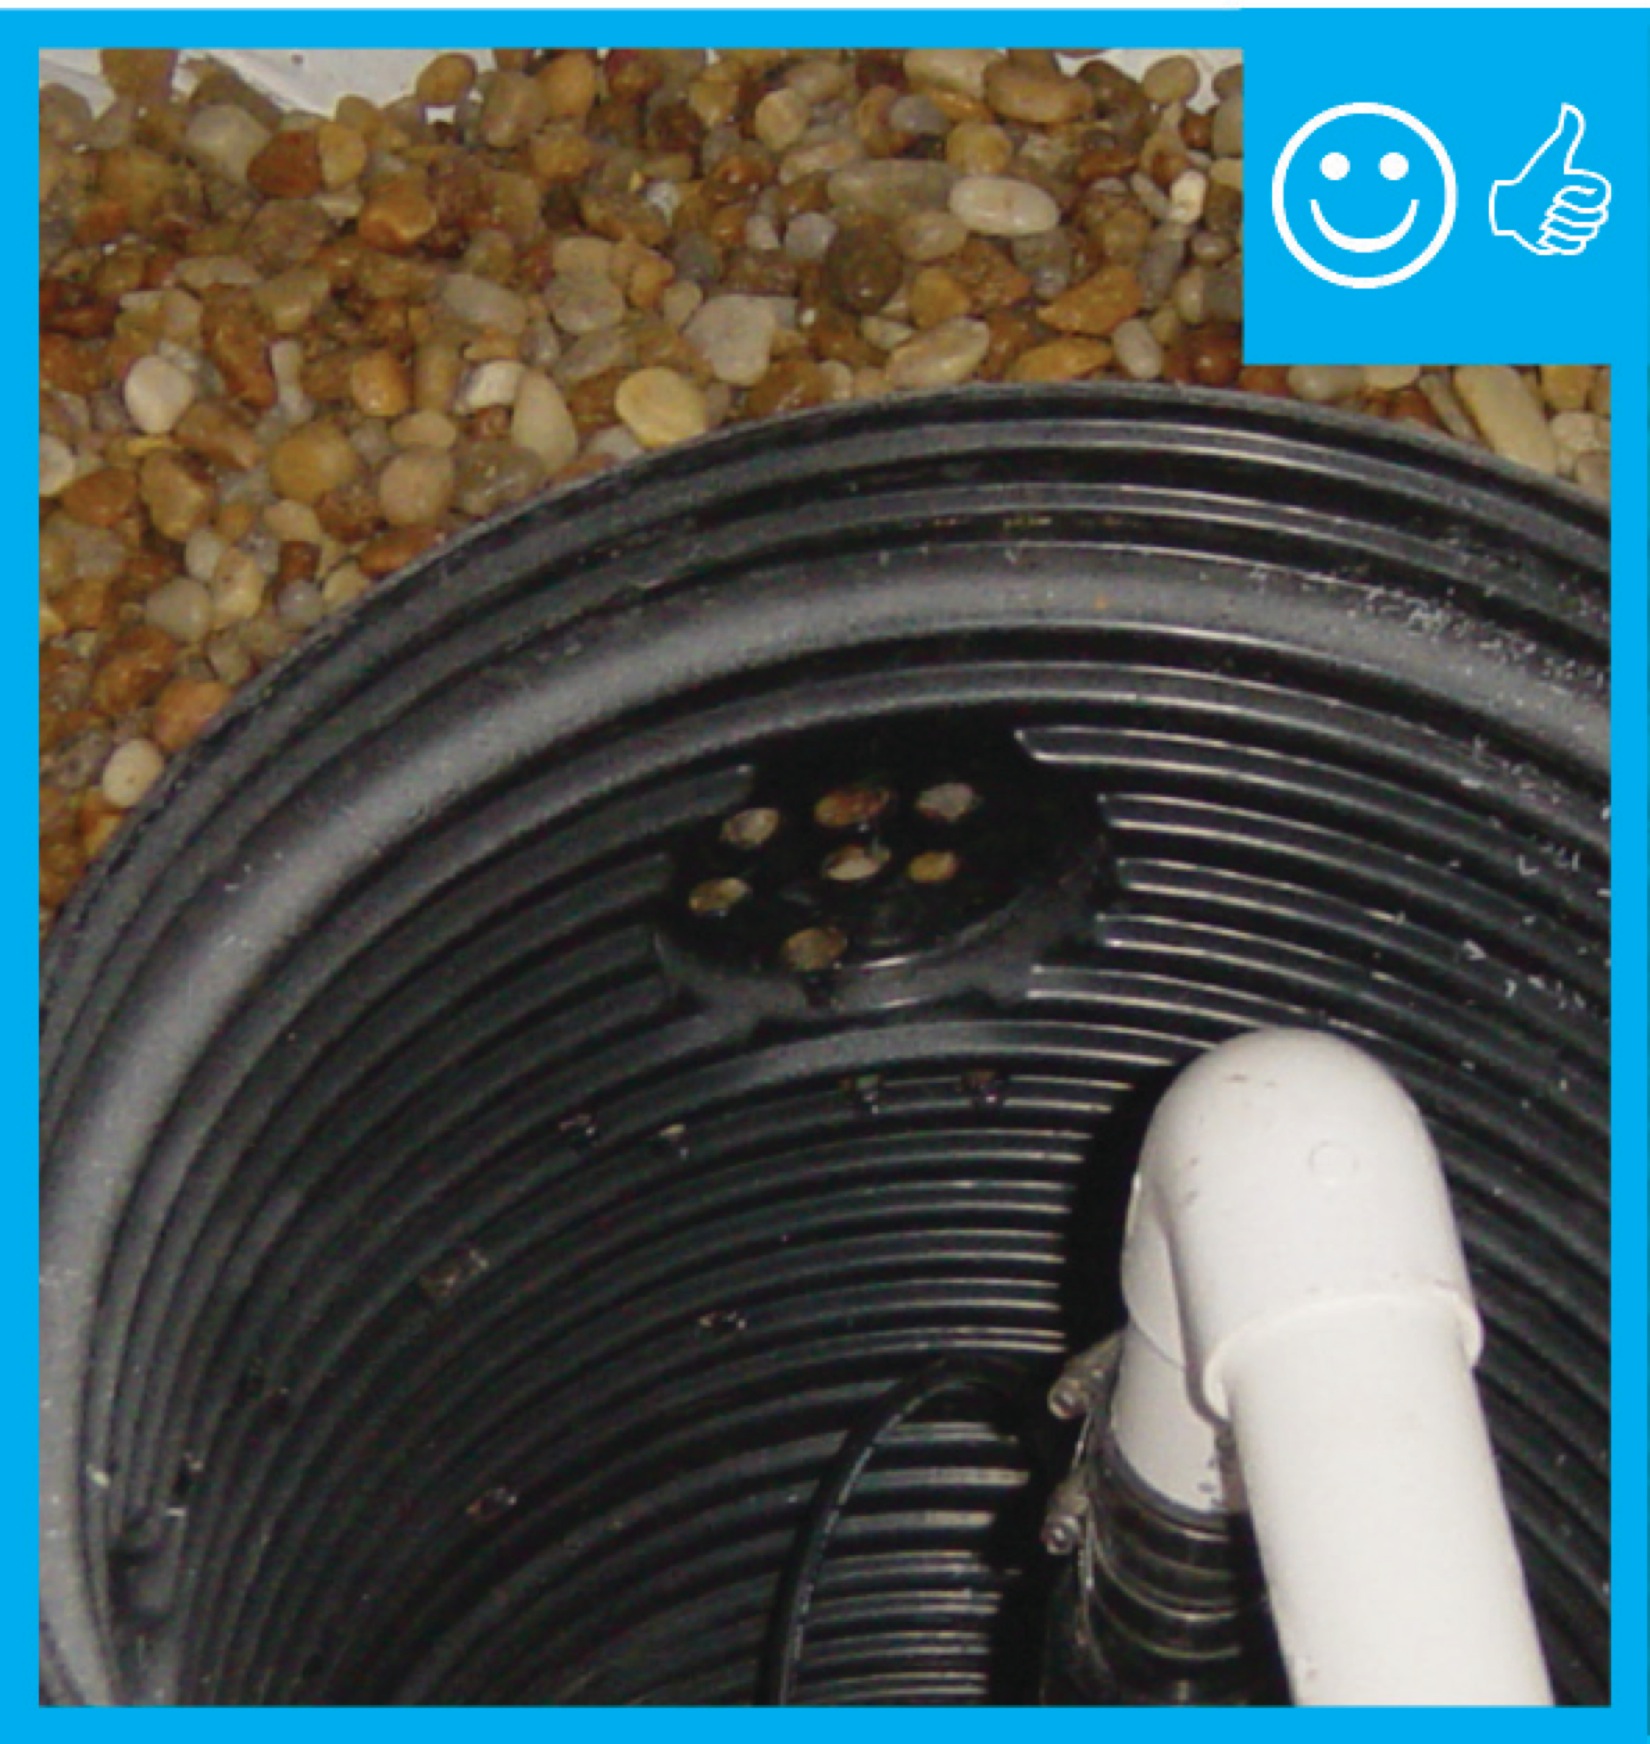
- Prior to pouring the concrete slab or foundation, establish where the sump pit will be located and extend a piece of 4-inch non-perforated pipe from the pit to the exterior of the house, leaving at least 12 inches of pipe to extend beyond the footing. The pipe should be imbedded in the gravel capillary break below the foundation or slab.
- Pour the foundation, taking care to not damage the drainage pipe.
- After the concrete has set, follow the instructions listed above for installing the drain tile, with one exception: In step 5 above, install the non-perforated pipe to lead to the sump pit, as shown in the Figure 4. The sump pump should send the water to a discharge pipe that slopes downward at least 1/2-inch per foot for 10 feet (Figure 5) before discharging the water to daylight or to a suitable alternative such as a drywell or storm sewer. (See Patio Slabs, Porch Slabs, Walks, and Driveways for more information about discharging water away from the foundation).
Ensuring Success
In order to ensure the drainage system is installed properly, it is important that only clean gravel, free of fines, be used in the trench around the drain tile. Gravel that has sand or silt will foul the perforations in the drain tile and eventually diminish the system’s ability to divert water away from the foundation.
Also, a properly installed drain tile works in combination with the discharge of the water away from the foundation. Therefore, see Patio Slabs, Porch Slabs, Walks, and Driveways for additional guidance in discharging water away from the foundation.
Region
No climate-specific information applies.
Training
Right and Wrong Images
Source
Guide describing details that serve as a visual reference for each of the line items in the Water Management System Builder Checklist.
Source
Guide describing details that serve as a visual reference for each of the line items in the Water Management System Builder Checklist.
Source
Guide describing details that serve as a visual reference for each of the line items in the Water Management System Builder Checklist.
Source
Guide describing details that serve as a visual reference for each of the line items in the Water Management System Builder Checklist.
Source
Guide describing details that serve as a visual reference for each of the line items in the Water Management System Builder Checklist.
Source
Guide describing details that serve as a visual reference for each of the line items in the Water Management System Builder Checklist.
Source
Guide describing details that serve as a visual reference for each of the line items in the Water Management System Builder Checklist.
Source
Videos

Compliance
Retrofit
Water management is an important part of the design, construction, and ongoing maintenance of a home. A complete water management strategy will deflect water that comes in contact with the building envelope and also divert the water down and away from the house where it can harmlessly flow away. Keeping water from entering the house is critical to ensure the long-term structural integrity of the building as well as to reduce the chances of mold issues and poor indoor air quality.
In an existing home, it is possible that no footing drain pipe was installed around the foundation of the home, or that if one was installed it has since gotten clogged by dirt or roots or broken by landscaping or other excavation activities. Indicators of a missing, clogged, or broken drain pipe include water collecting in the basement or crawlspace. However, water in the basement or crawlspace could also be due to other factors. While cleaning out, installing, or replacing blocked footing drain pipe around the foundation may solve the problem, it is a labor-intensive fix that involves excavating around the home’s perimeter, ideally to the footing. Before undertaking the expense of drain pipe replacement, confirm that:
- gutters and downspouts are installed and operating correctly
- there are no plumbing leaks in the basement or crawlspace
- there are no gaps or cracks in the basement or crawlspace wall that are providing a pathway for water
- the final grade slopes away from foundation
- patios, sidewalks, and driveways slope away from the house or drains are installed to collect and carry water away from the house.
After checking and correcting anything needed on this list, if there is still elevated foundation moisture present, excavate and install drain tile (perforated plastic drainage pipe) as low as possible along the exterior (or interior) of the basement or crawlspace walls to provide drainage around the foundations. See the scope and description tab of this guide to learn more about why, where, and how this pipe can be installed. Also see the guides on foundation wall drainage systems and exterior insulation for existing foundation walls; if the foundation walls will be excavated, waterproofing, insulation, and drainage plane material could be added at that time for relatively low additional cost.
For more information on factors to consider when working in and around the basement or crawlspace, see the Pre-Retrofit Assessment of Crawlspaces and Basements.
For additional information, see the U.S. Department of Energy’s Standard Work Specifications regarding drain pipes.
See Compliance Tab.
More Info
References and Resources
Multi-Year Advanced Residential Building Systems Research - Revisions to Quality Management Products
*For non-dated media, such as websites, the date listed is the date accessed.
Contributors to this Guide
The following authors and organizations contributed to the content in this Guide.
Sales
Drainage Tile Wrapped in Fabric Filter = Anti-Clog Foundation Drain
Technical Description
A well-sealed foundation will help keep water from entering the home, but a footing drain tile helps complete the protection by carrying water away from the home to be safely discharged. The footing drain tile is made up of a perforated drain pipe wrapped in landscape fabric to stop the pipe from clogging with loose sediment. Drainage pipes may be purchased with pre-installed filters, or landscape fabric can be used to create a filter on site. Laying the drain pipe on a gravel bed and backfilling with gravel will help encourage good drainage.
Questions? Comments? Contact our webmaster.