

Scope
Construct an unvented crawlspace and insulate the interior walls with rigid foam insulation; this can provide an insulated, air-sealed environment for ducts and HVAC equipment, protect floor joists from condensation from humid air in humid climates, and protect floors and pipes from cold temperatures in cold climates.
- Install insulation to levels that meet or exceed code or energy-efficiency program requirements.
- Check with local authorities prior to installation of the insulation to ensure that the rigid foam meets all code requirements.
- Cover the walls and floor of the crawlspace with a polyethylene vapor retarder prior to installing the rigid foam.
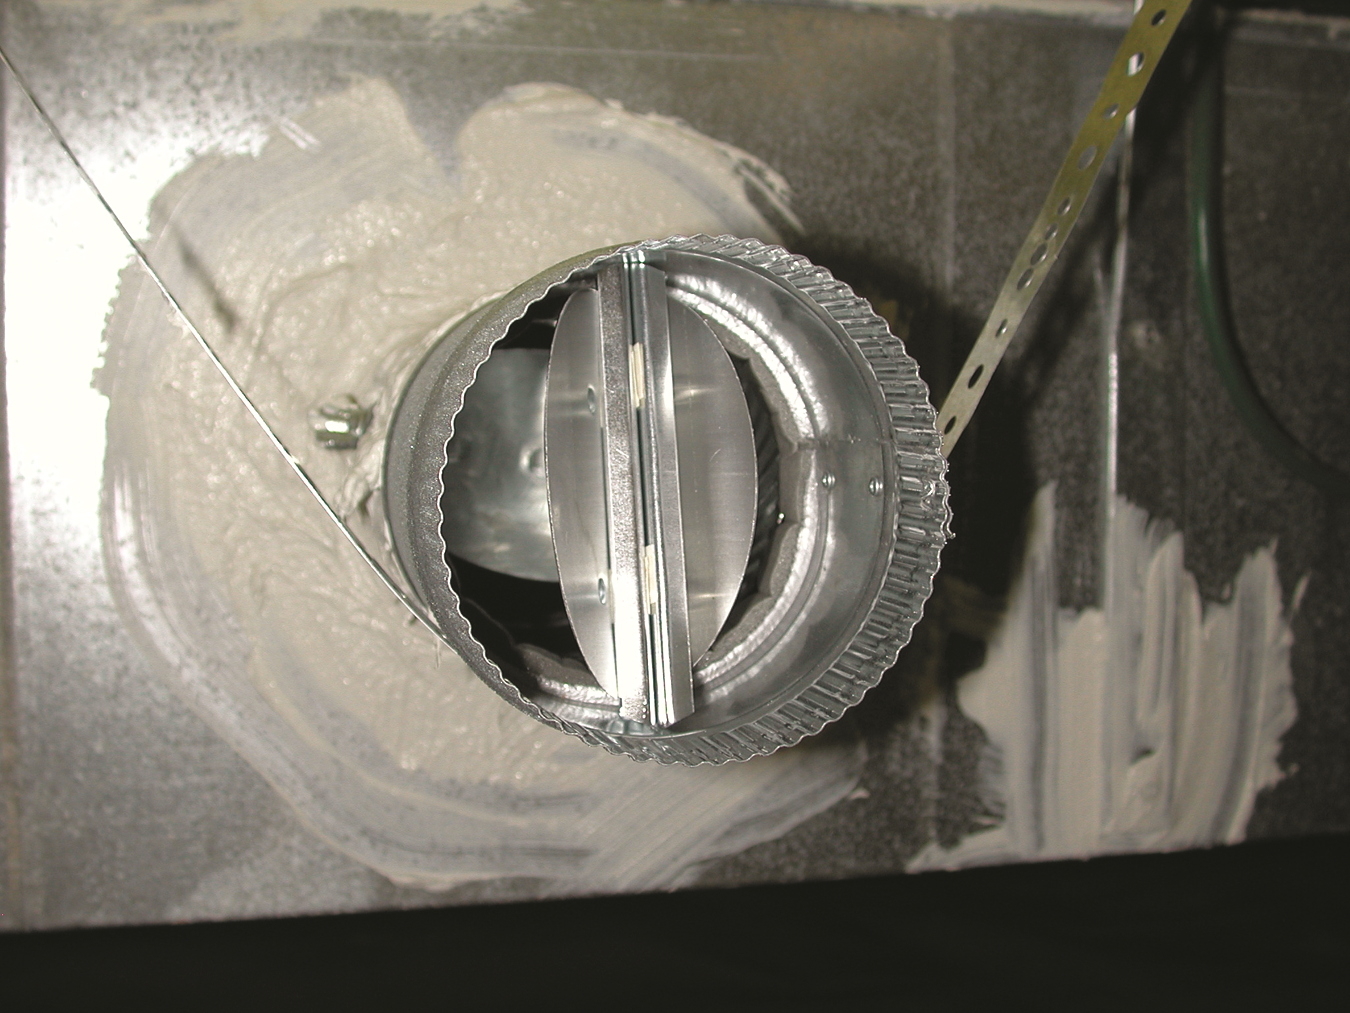
- If the crawlspace has vents, install pieces of rigid foam cut to fit in the vent openings and seal in place with spray foam or caulk.
- Fasten the sheets of rigid foam to the crawlspace walls using masonry fasteners with large, button cap washers.
- Leave a pest control inspection strip where needed to comply with local codes.
- Insulate access doors and provide air sealing with gaskets or weather stripping.
- If the band joist area is suitable for insulating, it can be insulated with rigid foam cut to fit in each joist bay and sealed in place with spray foam or caulk.
This guide applies to crawlspaces and basements with walls constructed of solid concrete, or concrete masonry units (CMU) with a continuous brick cap or bond beam.
See the Compliance Tab for links to related codes and standards and voluntary federal energy-efficiency program requirements.
Description
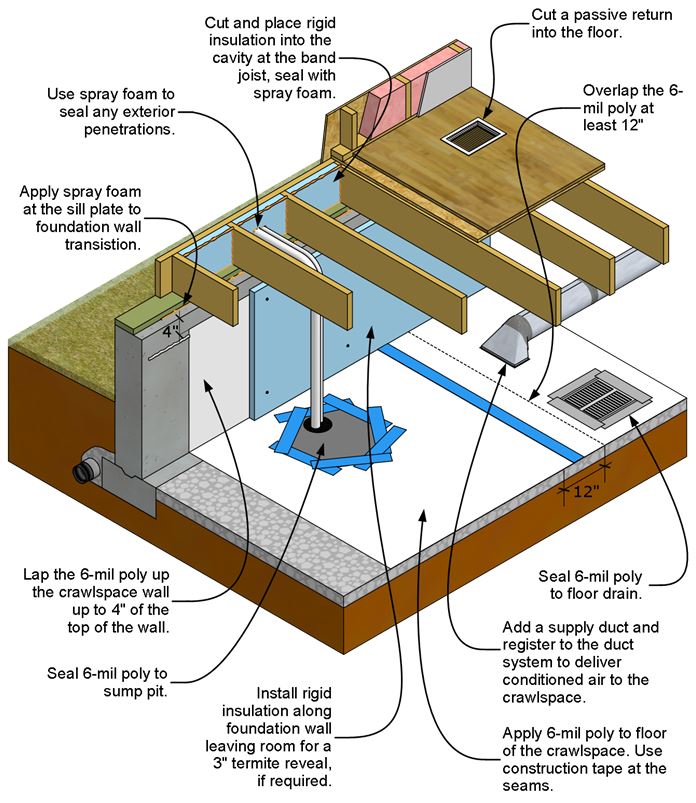
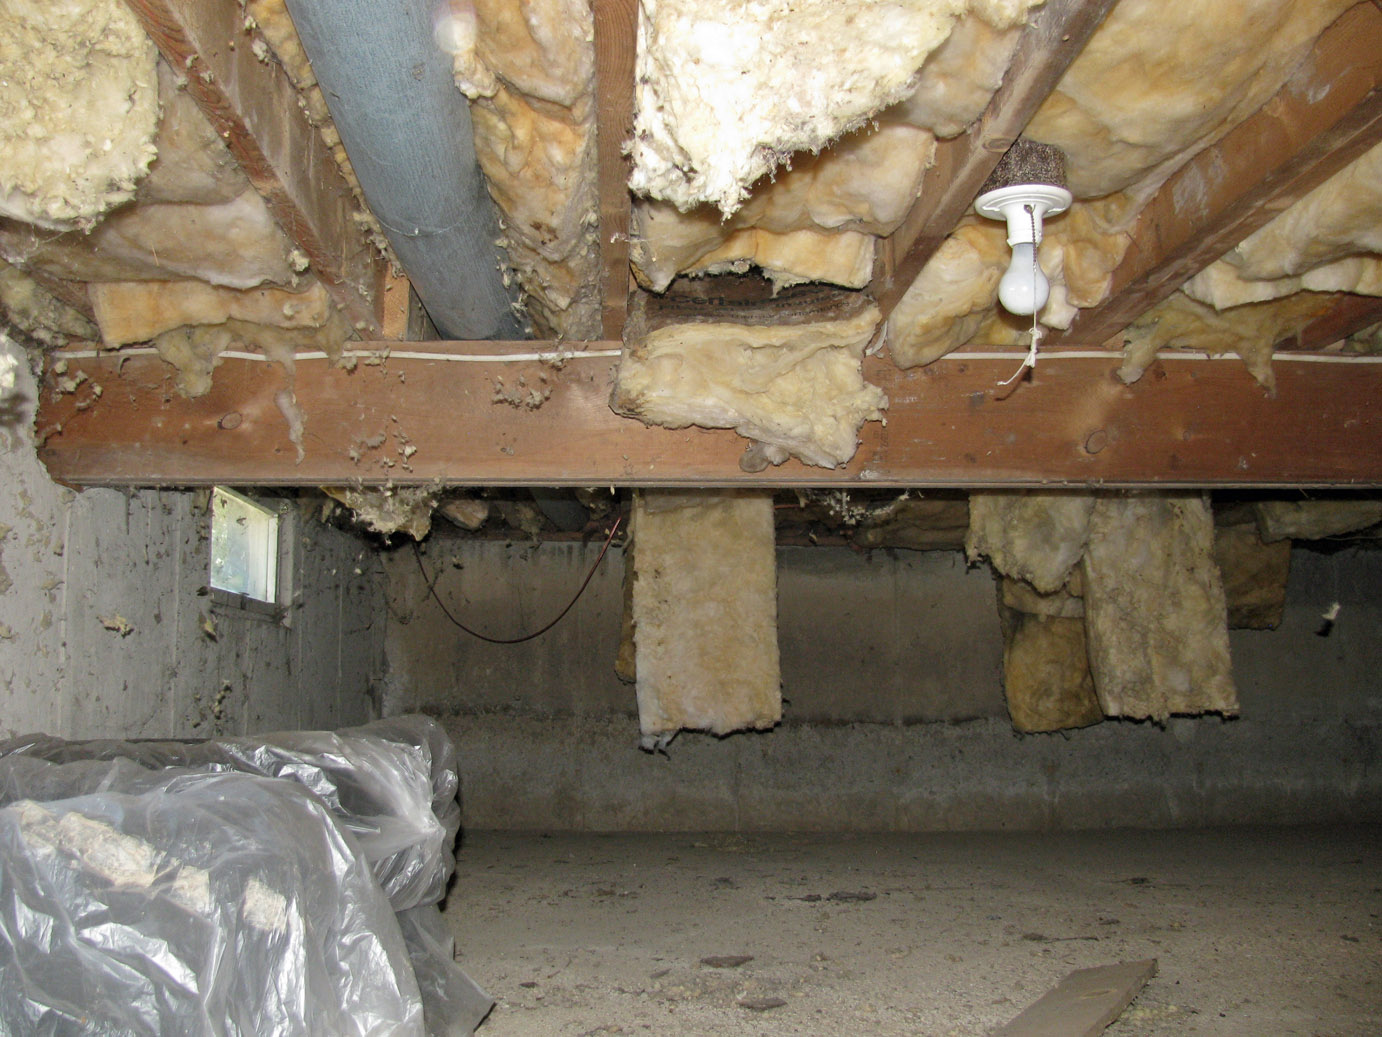
Crawlspaces that are constructed to be unvented, air-sealed, insulated, and conditioned can have several advantages over vented crawlspaces (see Figure 1). They reduce the opportunity for condensation to form on cold floor or rim joists from humid air entering through the vents. Insulated crawlspaces can keep floors warmer and help protect HVAC equipment and plumbing pipes from freezing temperatures in cold climates (BSC 2009). They are less likely to harbor pests.
Although there are different strategies to insulate closed crawlspaces, this guide is intended to provide a cost-effective method for installing rigid foam insulation on the interior perimeter walls and the band joist area in closed (also called sealed or unvented) crawlspace foundations.
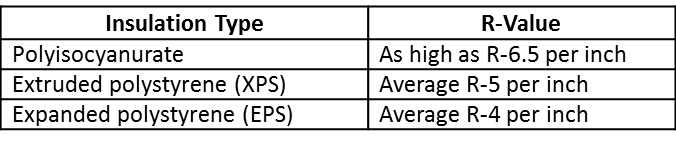
Polyisocyanurate or extruded polystyrene (XPS) rigid foam board is recommended as insulation because of its low permeance to water and high insulation value per inch. The thickness of the foam sheeting may depend on the climate zone in which it is installed, as well as the desired levels of performance.
Table 1 shows the three main types of rigid foam board insulation available in the market today. The R-values vary, depending on the manufacturer, but polyisocyanurate offers the highest R-value.
Many rigid foam board manufacturers apply a thin polyethylene film to both sides of the panels to strengthen them and to make them impermeable to vapor. Use unfaced sheets, or remove the film from the rigid foam board prior to installation, particularly to allow some breathability at the band joist area.
Foam plastic insulation receives special scrutiny in residential building codes because some foam insulations have the potential to release toxic or flammable gases when heated, or they can accelerate the spread of fire if they ignite. To reduce these risks, most codes require a thermal barrier (typically ½-in. gypsum board or equivalent) or an ignition barrier (typically ⅜-in. gypsum board or equivalent) over foam insulation. However, several foam insulation products have been designed and tested to reduce or eliminate those risks. Check with local authorities to ensure that the rigid foam selected meets all code requirements.
Figure 2 below shows examples of typical foundation wall types to which this guide applies. These examples are constructed of solid concrete or concrete masonry units (CMU) with a continuous brick cap or bond beam.

How to Insulate the Closed Crawlspace Walls with Rigid Foam Board
- Check with local code officials to ensure all materials and work will comply with local code requirements, such as the R-value of the insulation, fire and combustion safety requirements, radon mitigation requirements, pest (insect) control, and flood prevention requirements. Refer to the Compliance tab of this guide for additional information about potential code requirements.
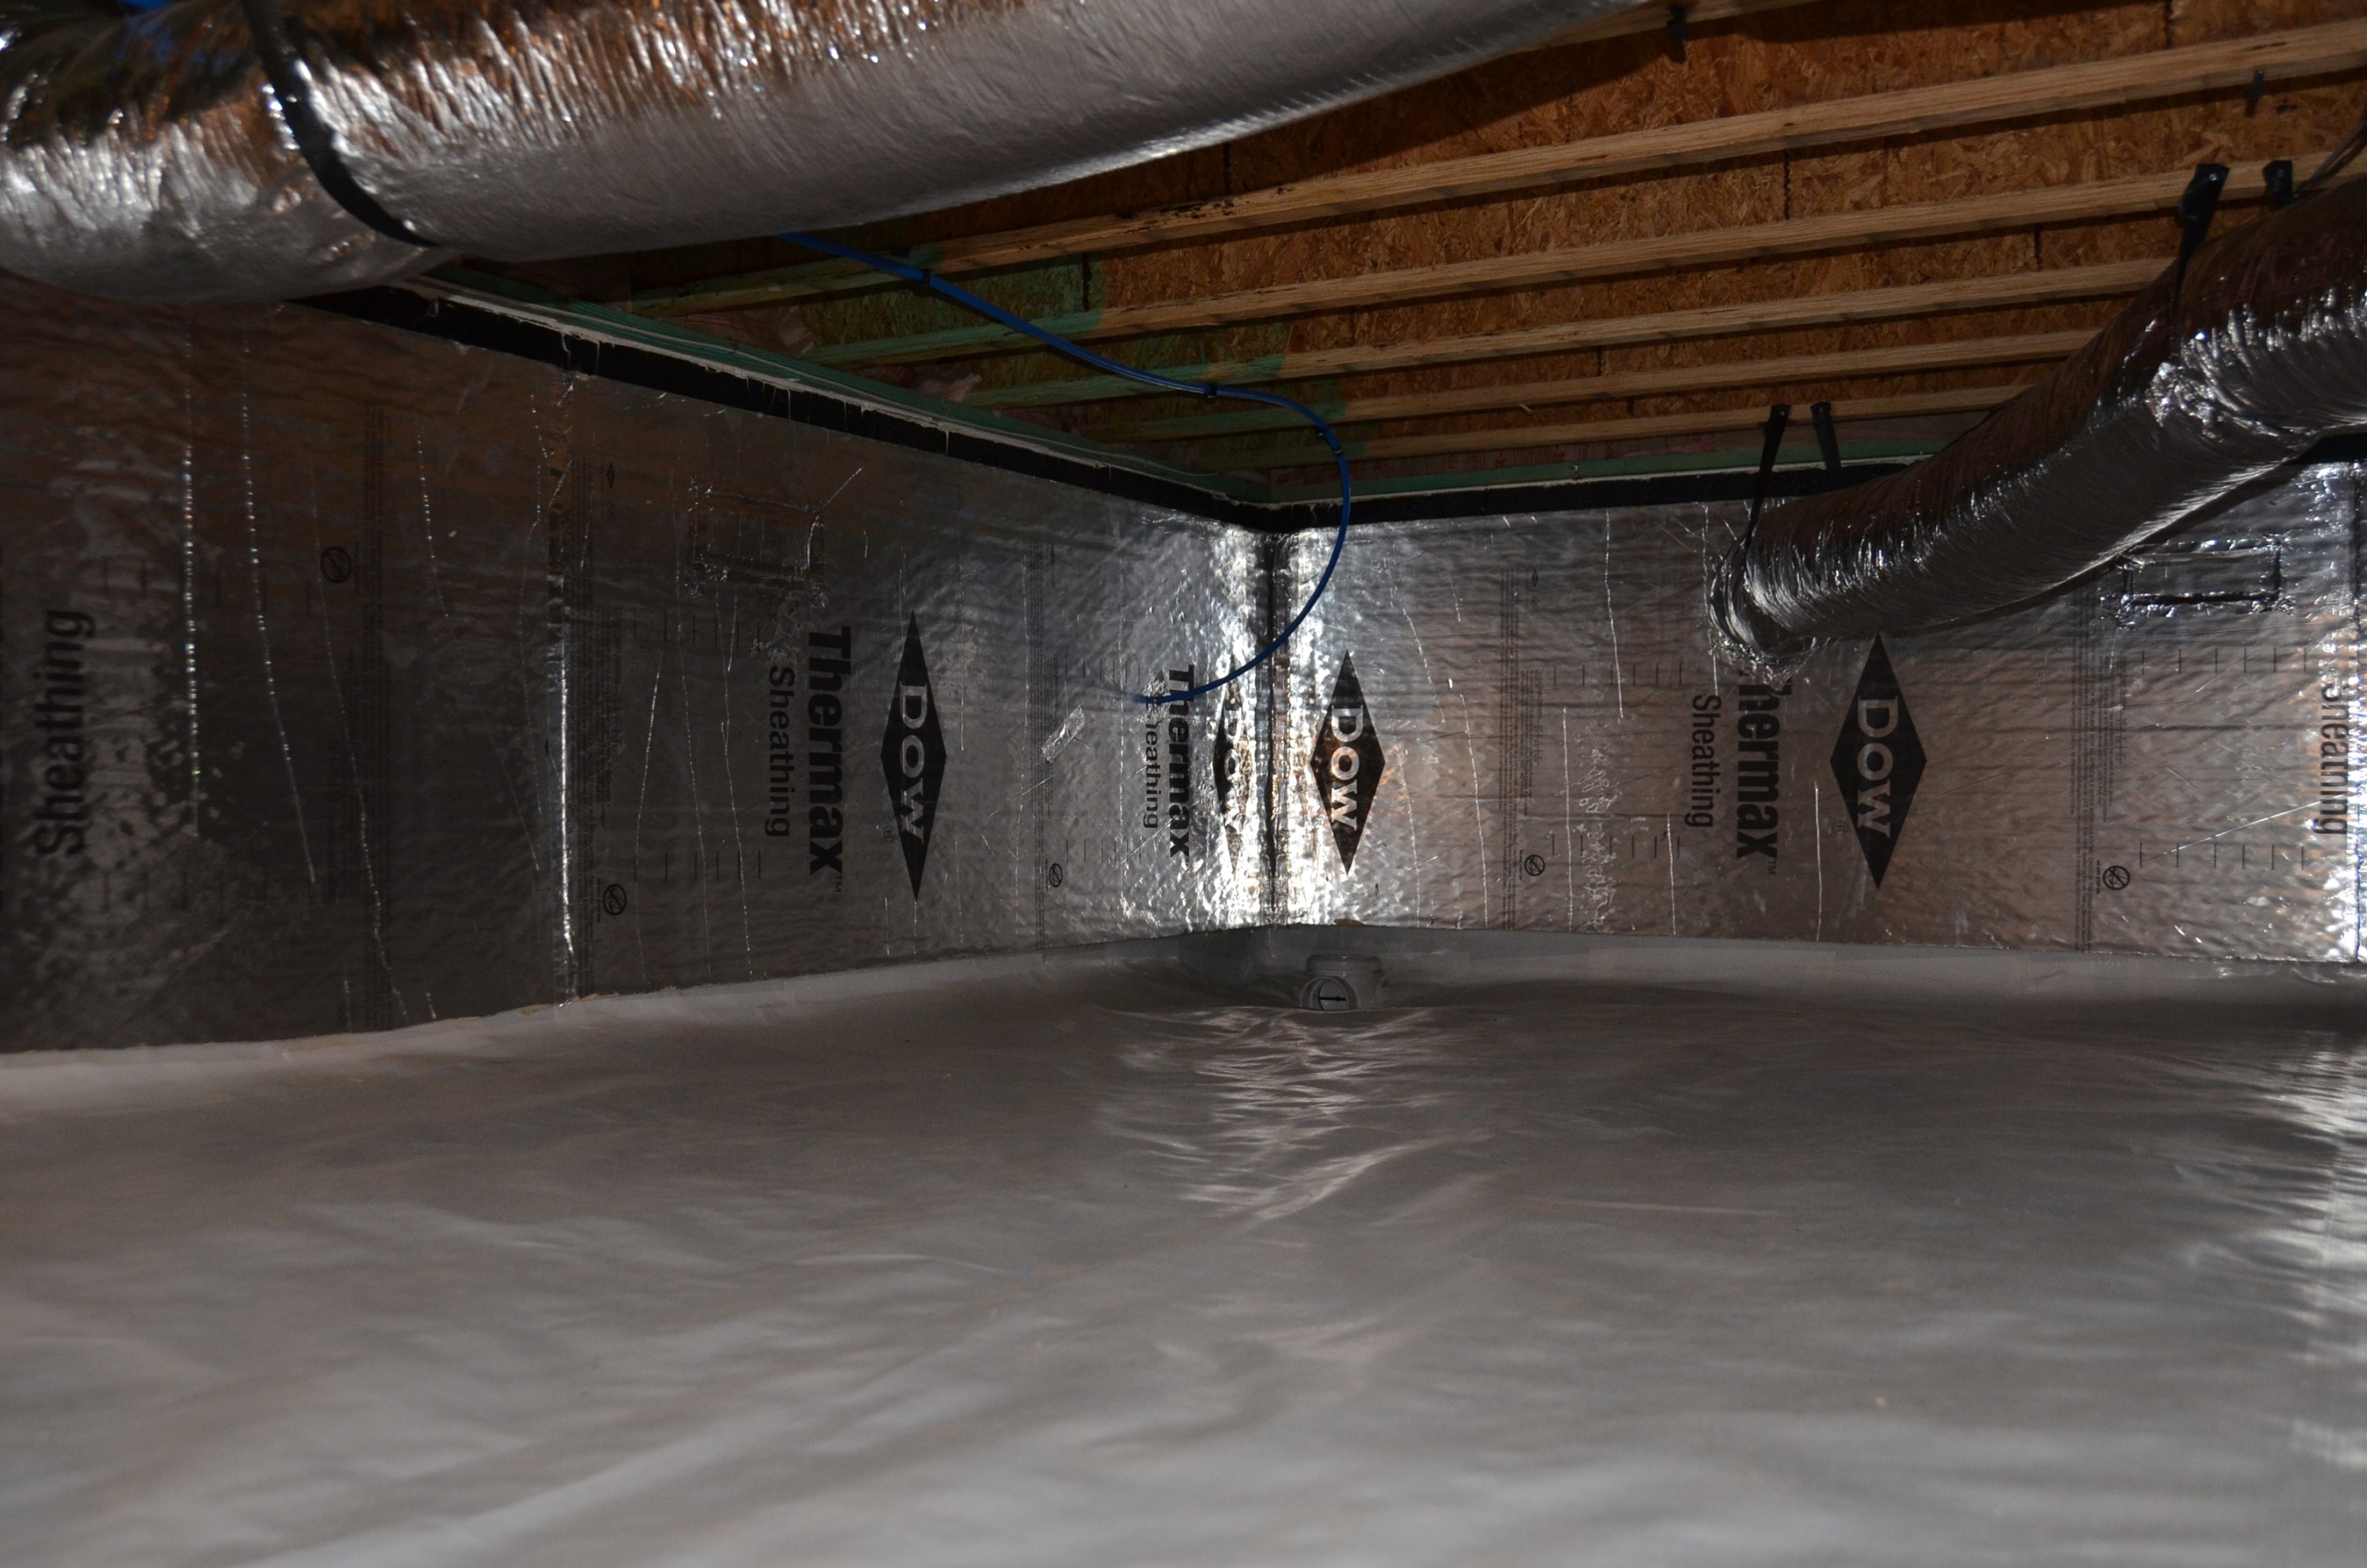
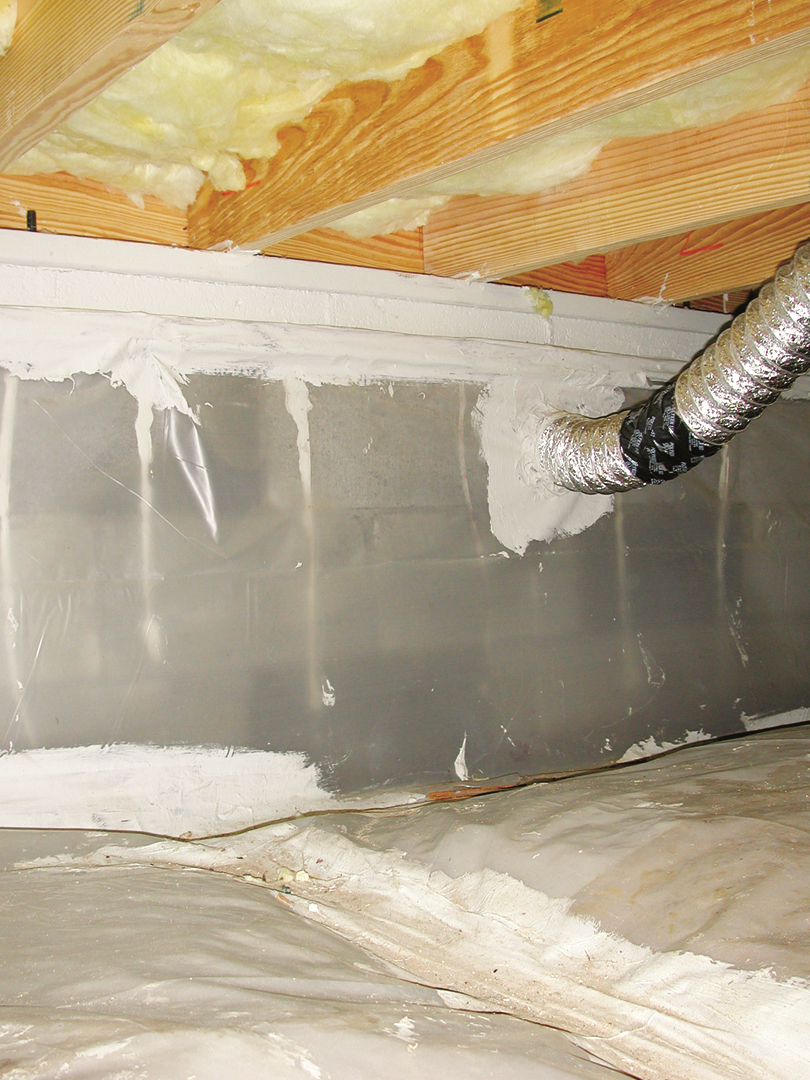
Prior to insulating the crawlspace walls, install a 6-mil polyethylene sheeting vapor retarder on the walls and floor of the crawlspace (see Figure 3). The vapor retarder should completely cover the floor and lap up the walls to within 4 in. of the top of the foundation walls. The vapor retarder should be secured to the foundation walls with strapping attached to the walls using nails, pins, or masonry screws. This wall and floor vapor retarder provides a continuous liner to retard moisture and soil gases from seeping through the ground and the crawlspace walls. The sheeting should be overlapped 12 in. at seams and sealed with adhesive and tape. The IRC requires a 6-inch overlap but 12 inches is recommended. For information on how to install a polyethylene vapor retarder in a crawlspace, see the guide Polyethylene Lapped Up Walls/Piers and Secured in the Ground. A radon venting system should be installed under the vapor barrier. See the guides Vertical Radon Ventilation Pipe and Radon Fan for more information. Optional: a thin concrete slab can be poured over the vapor retarder to increase durability (BSC 2009).
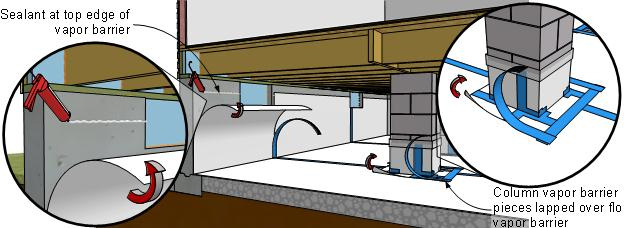
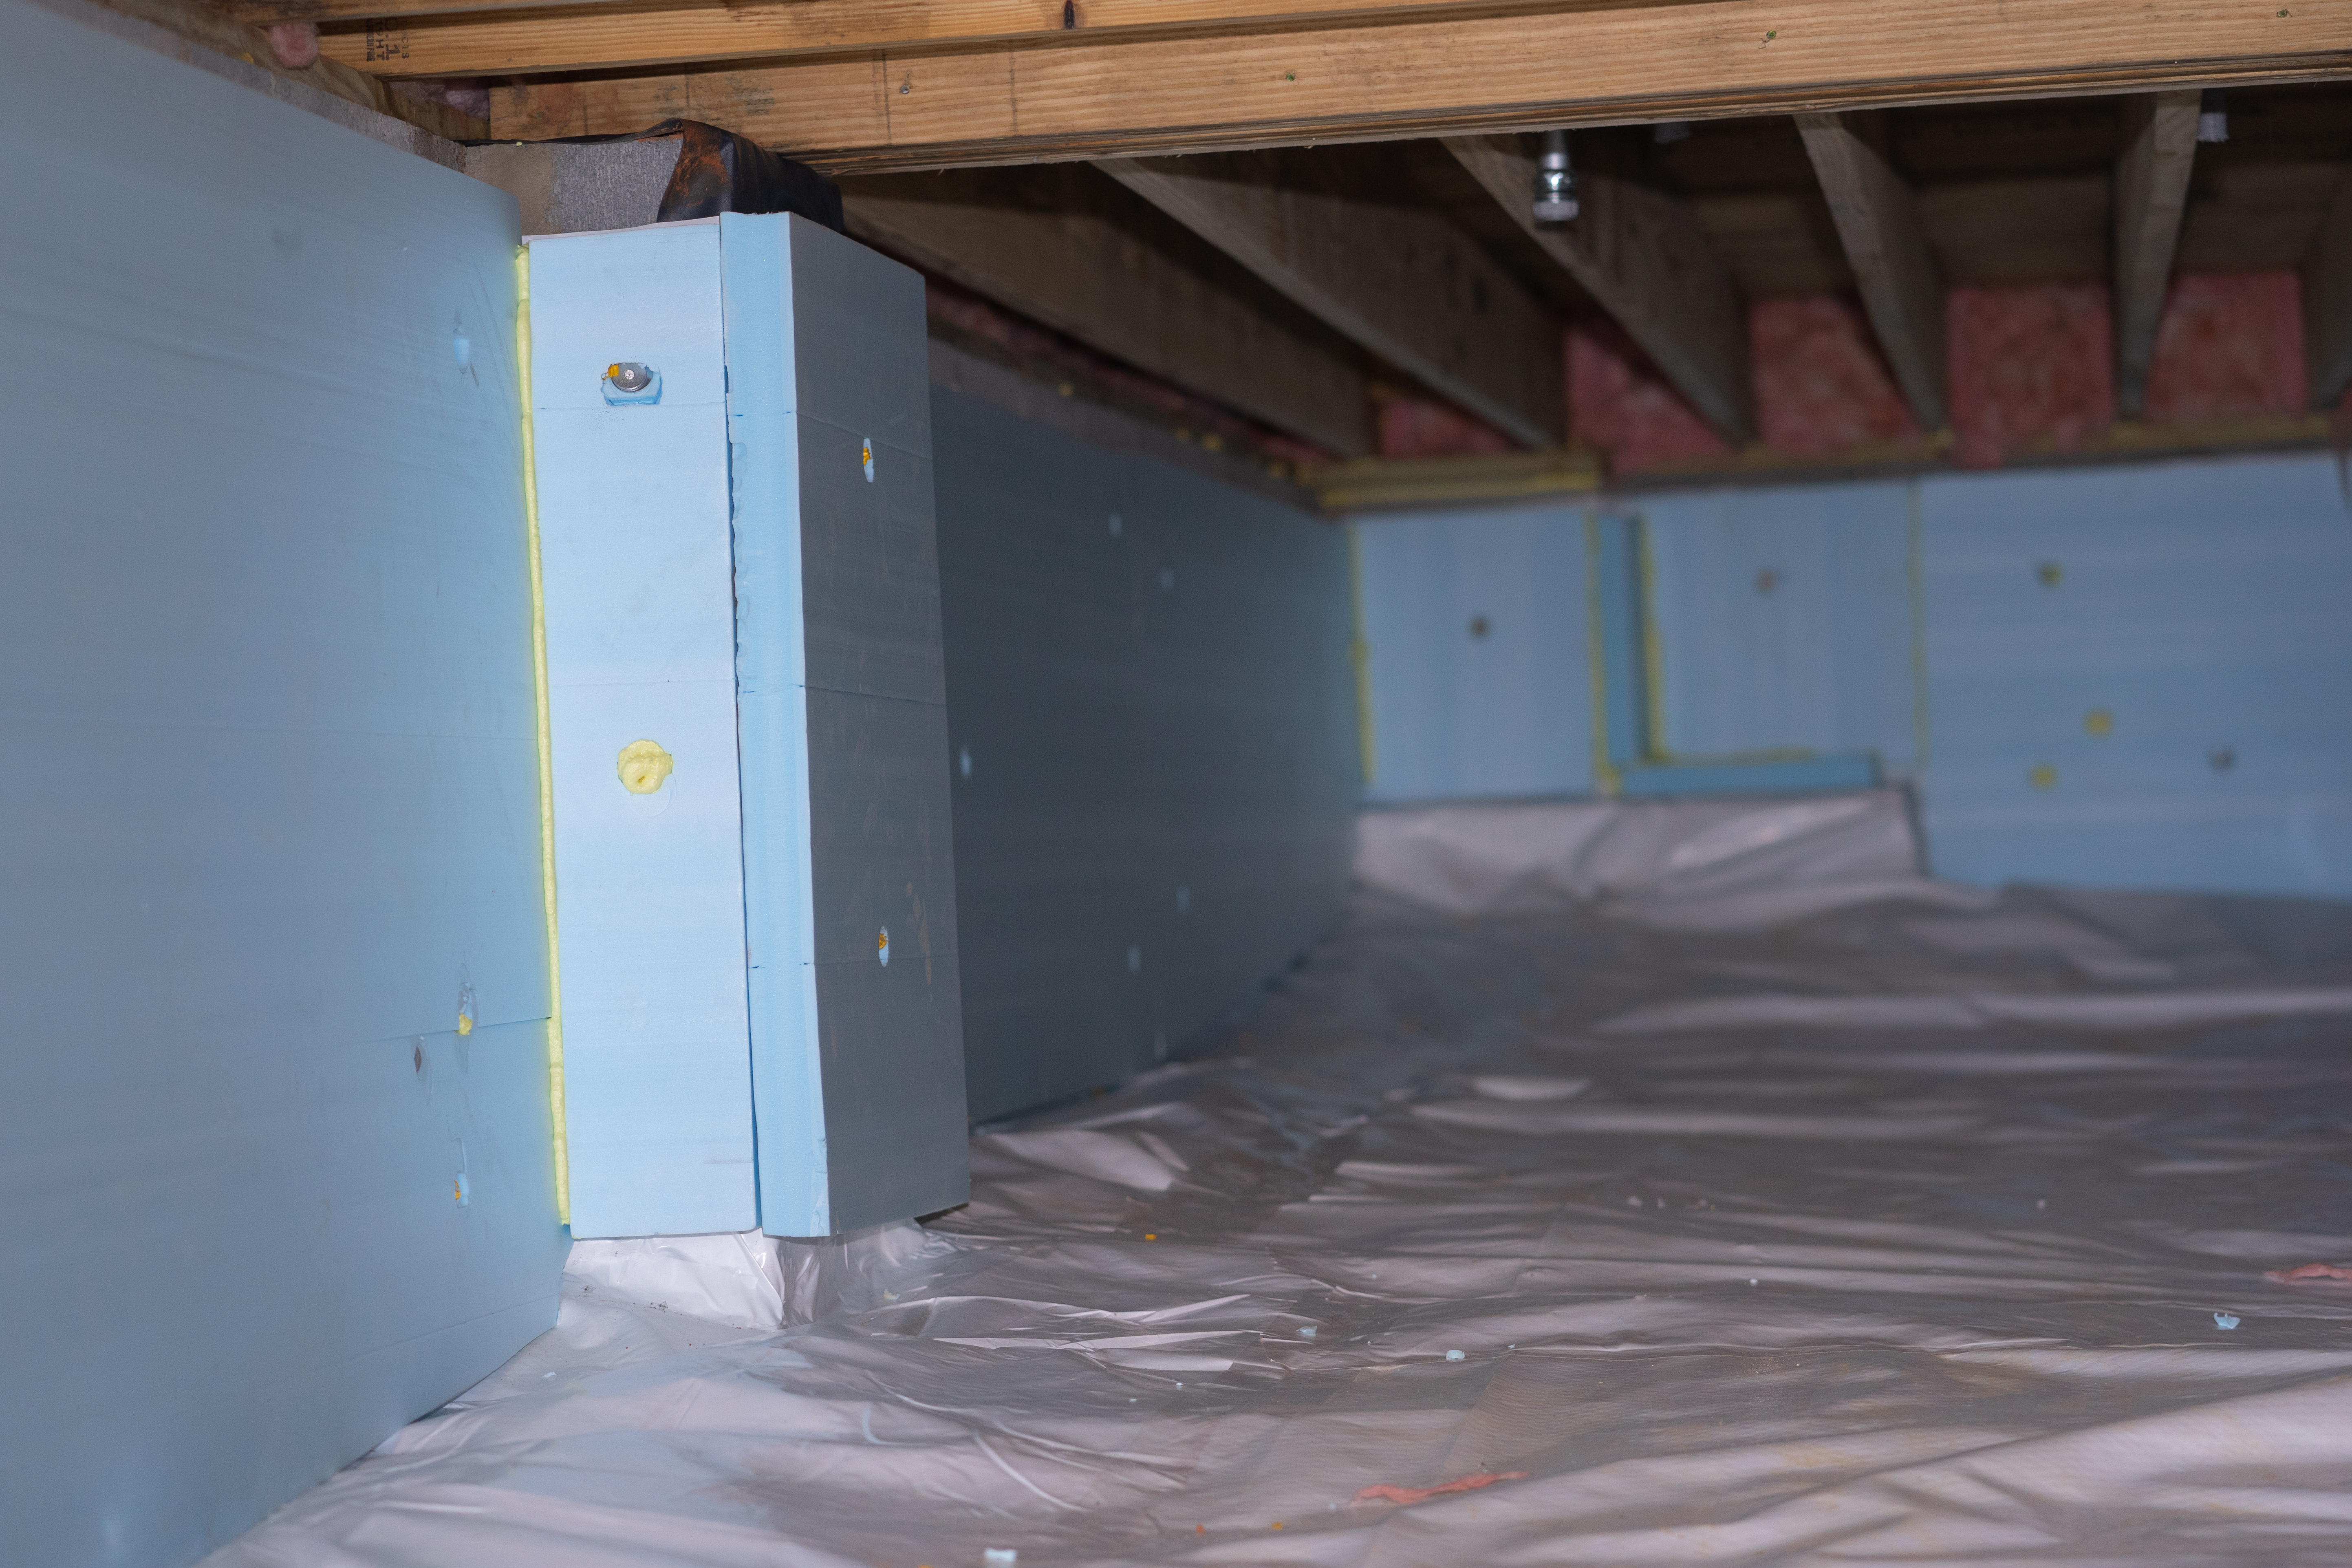
Figure 3. Install vapor retarder over the dirt floor of the crawlspace and extend it up the interior supports and interior perimeter walls. Overlap and seal seams with caulk and tape. (Source: IBACOS.) - Place sheets of unfaced rigid foam board against the interior perimeter of the crawlspace walls. No insulation is needed in the crawlspace ceiling.
Allow space for a pest control inspection strip above the foam sheets and below the rim joist, if required by local jurisdictions. In areas of the United States prone to insect infestation (e.g., termites or carpenter ants), 3 in. of bare wall is required (see Figure 4). The polyethylene vapor retarder behind the foam board stops at 4 in. from the top of the foundation wall. This strip of bare wall can be painted white to facilitate pest inspections. Consult with the local building inspector or a pest control professional for local requirements regarding a pest control inspection strip at the top or bottom of the foundation wall.
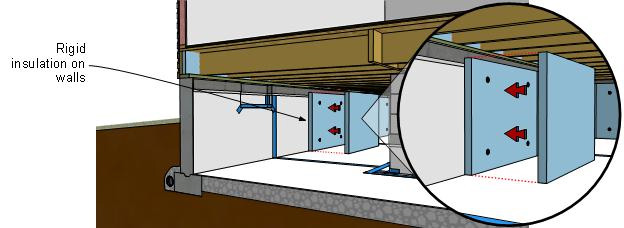
Figure 4. Install rigid foam insulation along perimeter walls of the crawlspace, allowing a 3-in. pest control inspection strip at the top where required by code. (Source: IBACOS.) - Use masonry fasteners with large, button cap washers (intended for use with foam) to mechanically fasten the rigid foam board to the crawlspace walls. If no pest inspection strip is required, the insulation is installed to the top of the foundation wall. The insulation should extend down to grade and then continue down or horizontally as required by code. The fasteners should be spaced an equal distance apart to ensure effective contact with the foundation wall. The 2009 IRC (Section N1102.2.9, p. 470) states:
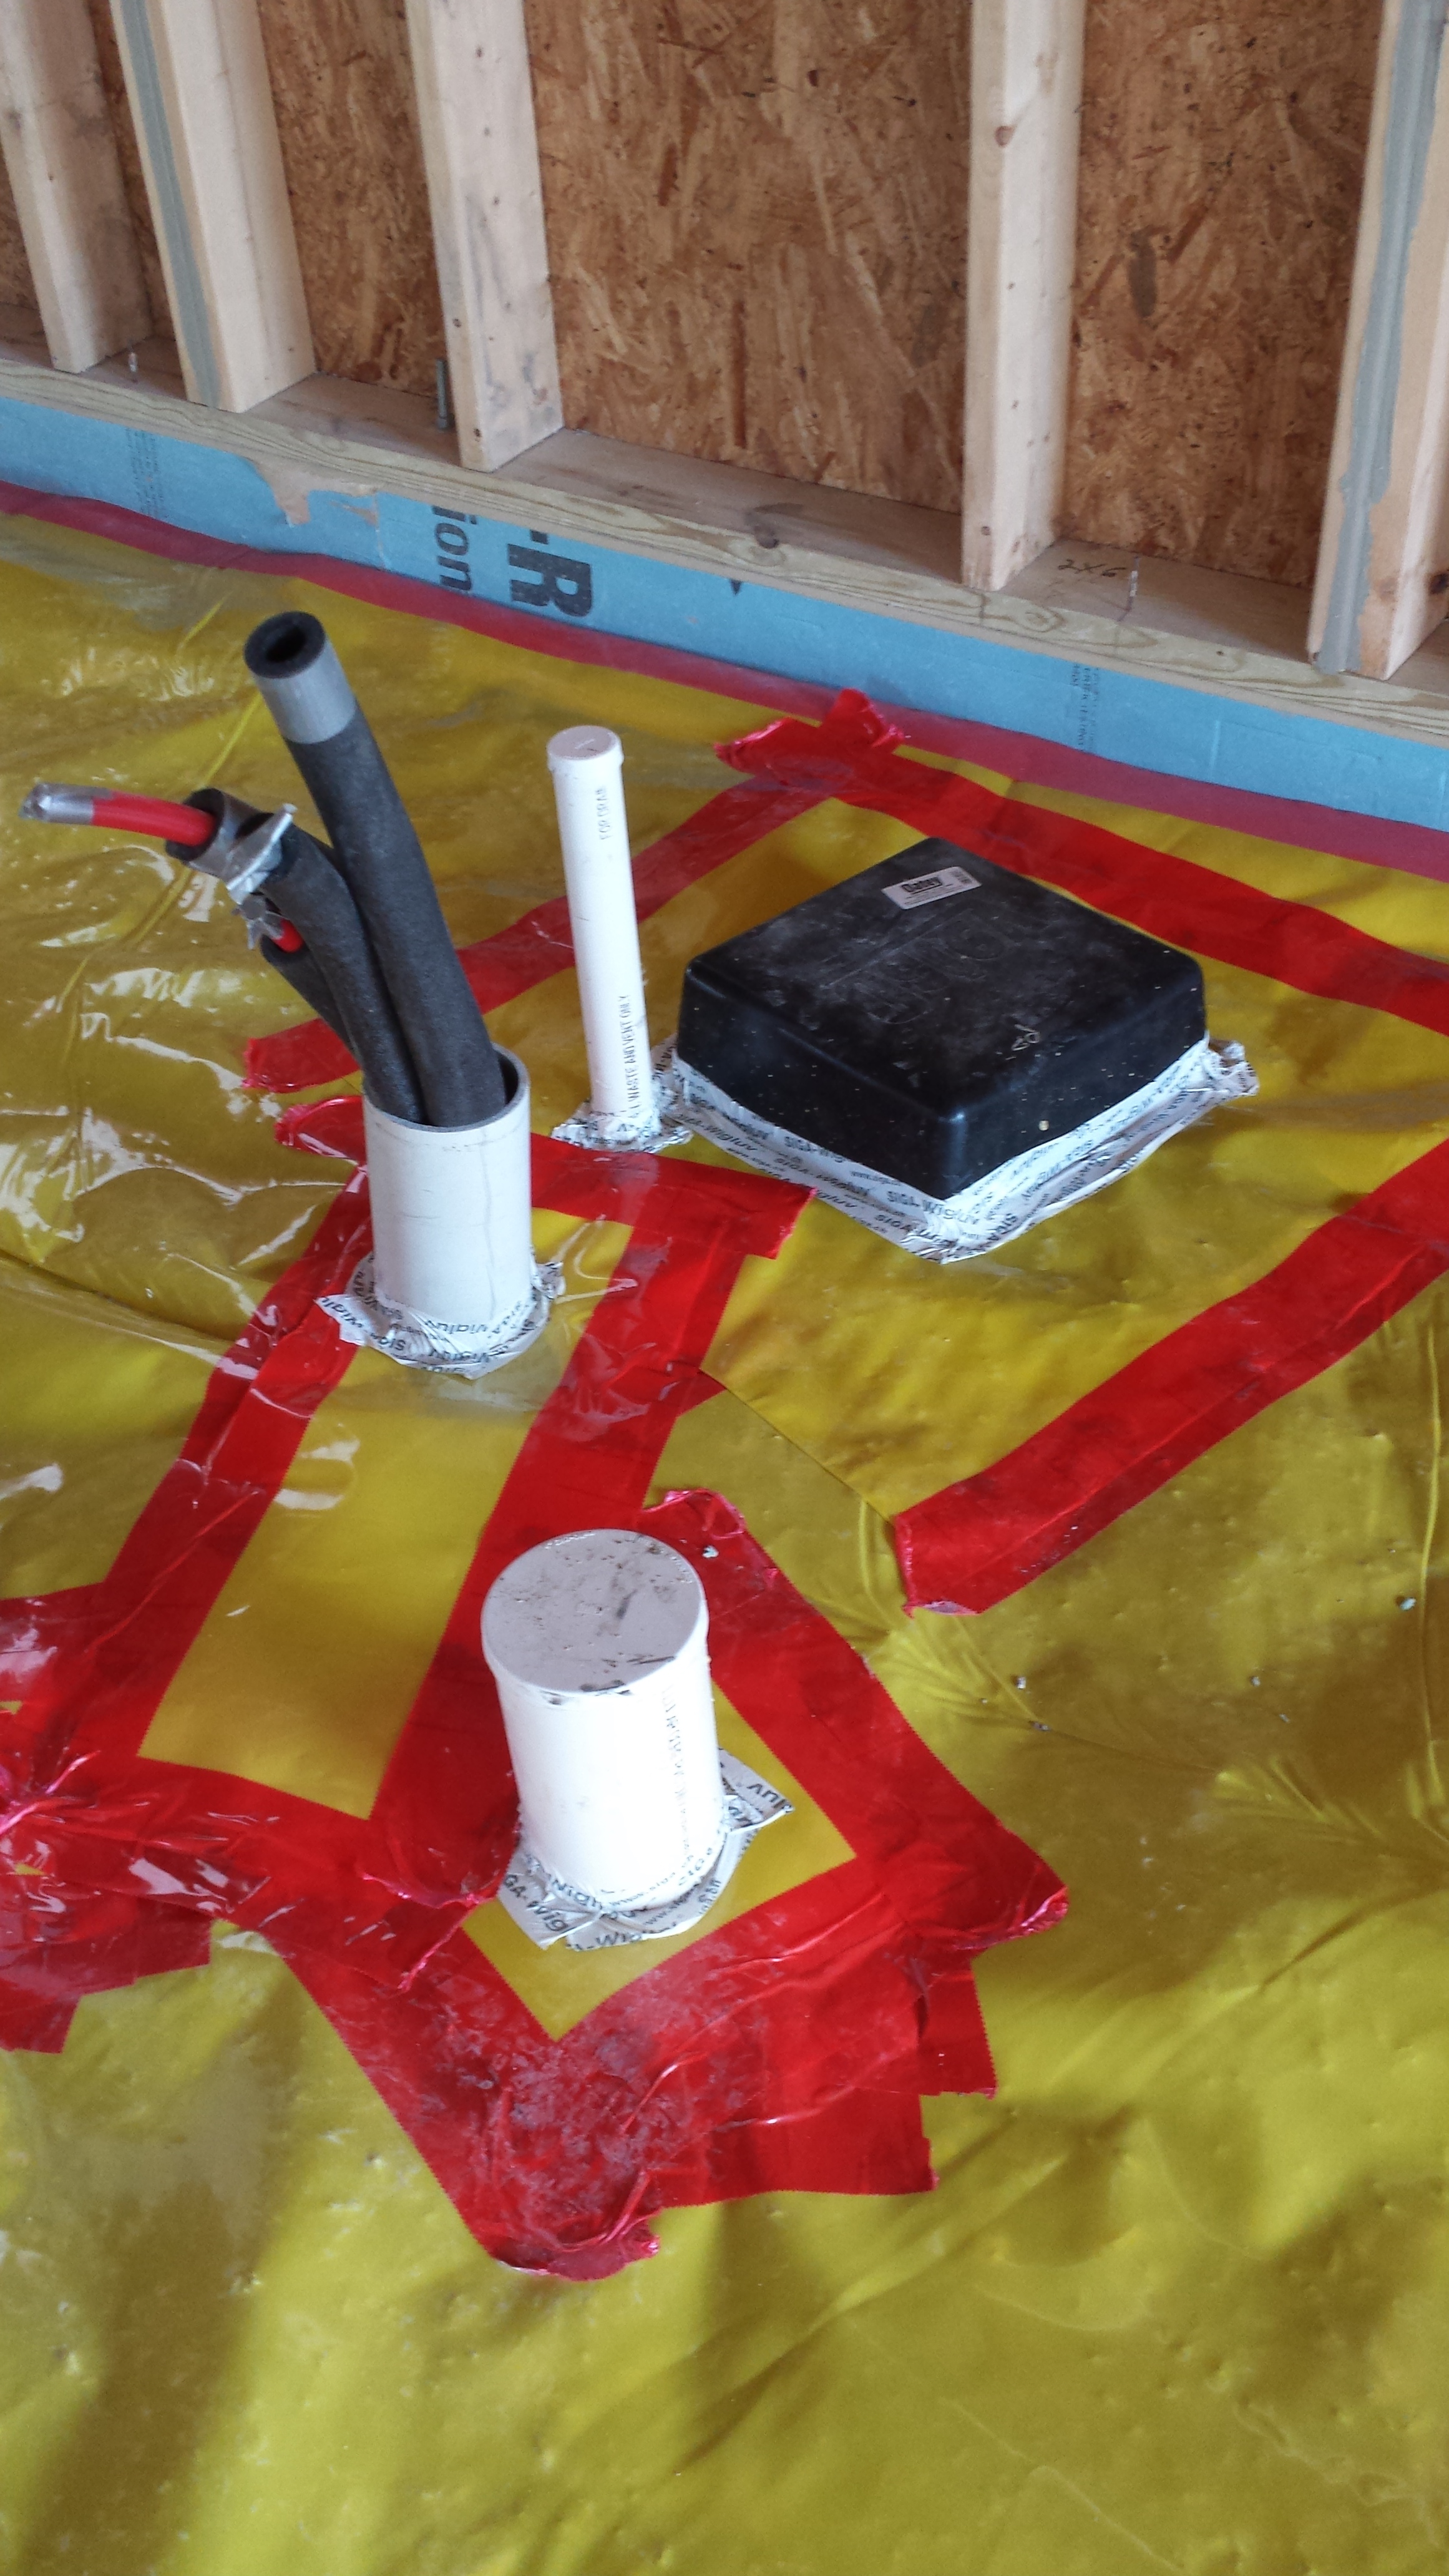
“As an alternative to insulating floors over crawlspaces, insulation of crawlspace walls shall be permitted when the crawlspace is not vented to the outside. Crawlspace wall insulation shall be permanently fastened to the wall and extend downward from the floor to the finished grade level and then vertically and/or horizontally for at least an additional 24 inches (610 mm).” Fill in any wall vents with additional pieces of rigid foam. Cut the pieces to fit into the openings to create a snug fit. If a vent is recessed, it may require doubling the thickness of the foam to be level with the wall surface, as shown in Figure 5. For more information on how to close vented crawlspaces, see “Guide to Closing and Conditioning Ventilated Crawlspaces." The method is primarily for existing construction, but the principles apply to new construction as well.
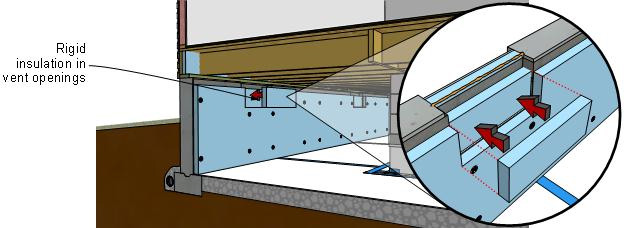
Figure 5. When insulating a crawlspace wall, fill in any existing wall vents with rigid foam insulation. (Source: IBACOS.) Apply expansion foam sealer or caulking to seal the additional foam blocks in place (see Figure 6).
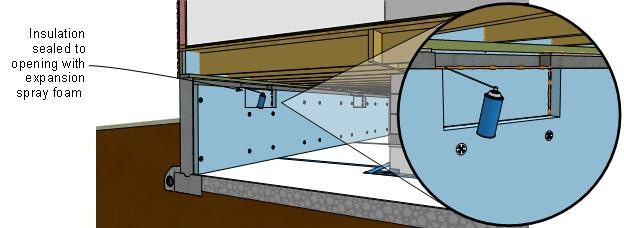
Figure 6. When insulating a crawlspace wall, seal the foam blocking covering the crawlspace vents with canned spray foam. (Source: IBACOS.) Insulate the crawlspace access door by gluing rigid foam to the inside of the panel. Caulk around the outside of the framing and install weather stripping around the inside of the frame. Provide a latch that pulls the door or hatch lid securely against the frame to provide a firm seal. See Figures 7, 8, and 9.
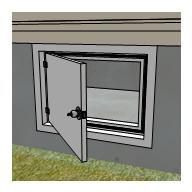
Figure 7. Insulate the crawlspace access door and air seal the opening with weather stripping. (Source: IBACOS.) 
Figure 8. Use weather stripping to air seal the crawlspace access hatch. (Source: IBACOS.) 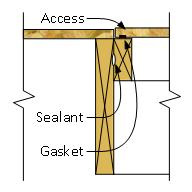
Figure 9. Caulk air seals the framing and weather stripping serves as a gasket on this crawlspace access hatch. (Source: IBACOS.) - Code (2009 IRC R 408.3) requires that crawlspaces have a drying mechanism such as a continuously operating exhaust fan or conditioned air supply. If the HVAC equipment is not located in the crawlspace, a small amount of conditioned air can be brought in to semi-condition the crawlspace by cutting a passive return into the floor. At minimum, air should be delivered at a rate equal to 1 cfm (0.47 L/s) for each 50 ft2 (4.7 m2) of under-floor area or 50 cfm total, whichever is greater. This strategy meets the requirements of the 2009 International Residential Code (IRC 2009, Section R408.3, p. 108); however, local codes might have different requirements.
- In flood-prone areas of the United States, local codes may require the installation of flood vents that allow water to pass freely into and out of a foundation to equalize pressure on the foundation walls. Choose flood vents that are designed to reduce standby air leakage. Install the rigid foam panels around all flood vents and seal the perimeter of the vents with expansion foam sealer or caulking to prevent air leakage. Be careful that the installed foam does not inhibit operation of the vent.
- When the installation of insulation on the crawlspace walls and band joist is complete, inspect the vapor retarder on the floor of the crawlspace. If any tears or rips in the vapor retarder occurred during the work, repair and seal the tears.
- If the bottom of the crawlspace is below grade, it will be necessary to damp-proof or waterproof the exterior surface of the foundation walls. For information on how to accomplish this water management strategy, see “Damp-Proof Exterior Surface of Below-Grade Walls."
How to Insulate the Band Joist Area with Rigid Foam Board
CAUTION: Before insulating the band joist area, assess the moisture potential of both the interior and exterior conditions where the sill plate (also known as the mud sill), band joist, and floor system all meet the top of the crawlspace walls (see Dickson 2013). If installation of insulation in the band joist area will not cause high moisture content and likely damage to the wood, then insulate this area. If there is any doubt about the drying potential at the band joist area, the safest practice would be not to insulate that area and to allow free drying of the wood materials. Refer to "Guide to Closing and Conditioning Ventilated Crawlspaces" for guidance on how to assess moisture conditions in the crawlspace and band joist area. Other options for insulating the rim joist are with spray foam or with rigid foam sheathing installed on the exterior of the home (see "Critical Seal Spray Foam at Rim Joist").
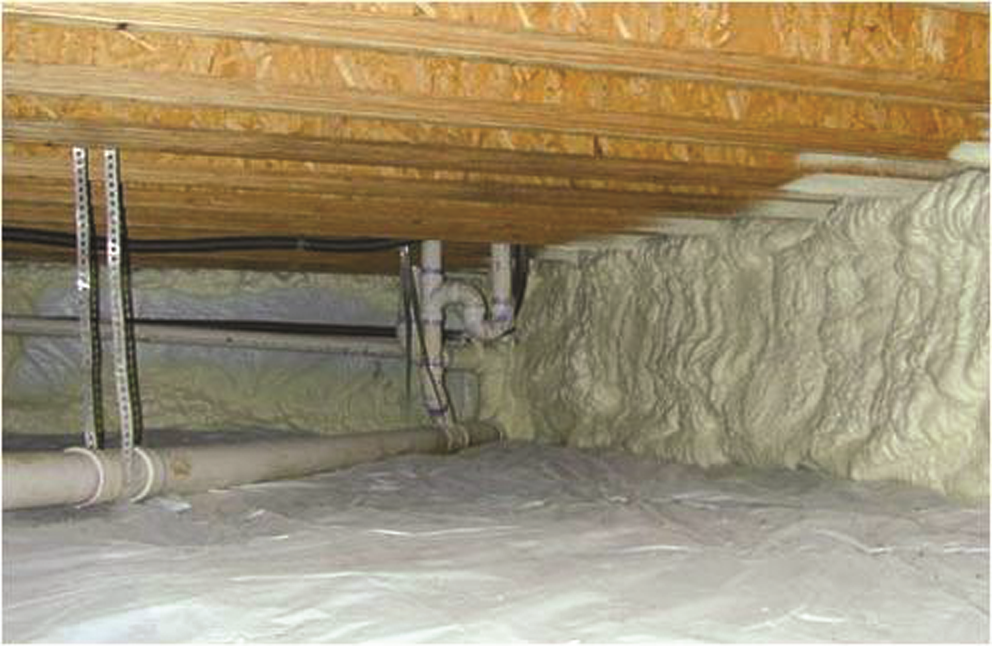
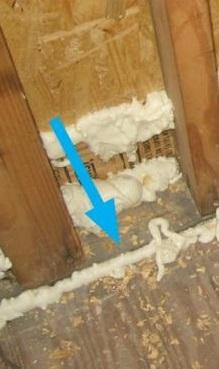
Cut pieces of unfaced rigid foam sheathing to fit along the band joist in each floor joist cavity. See Figure 10.
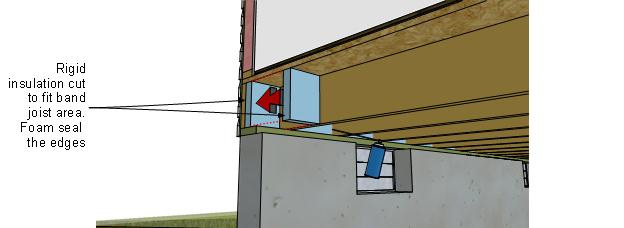
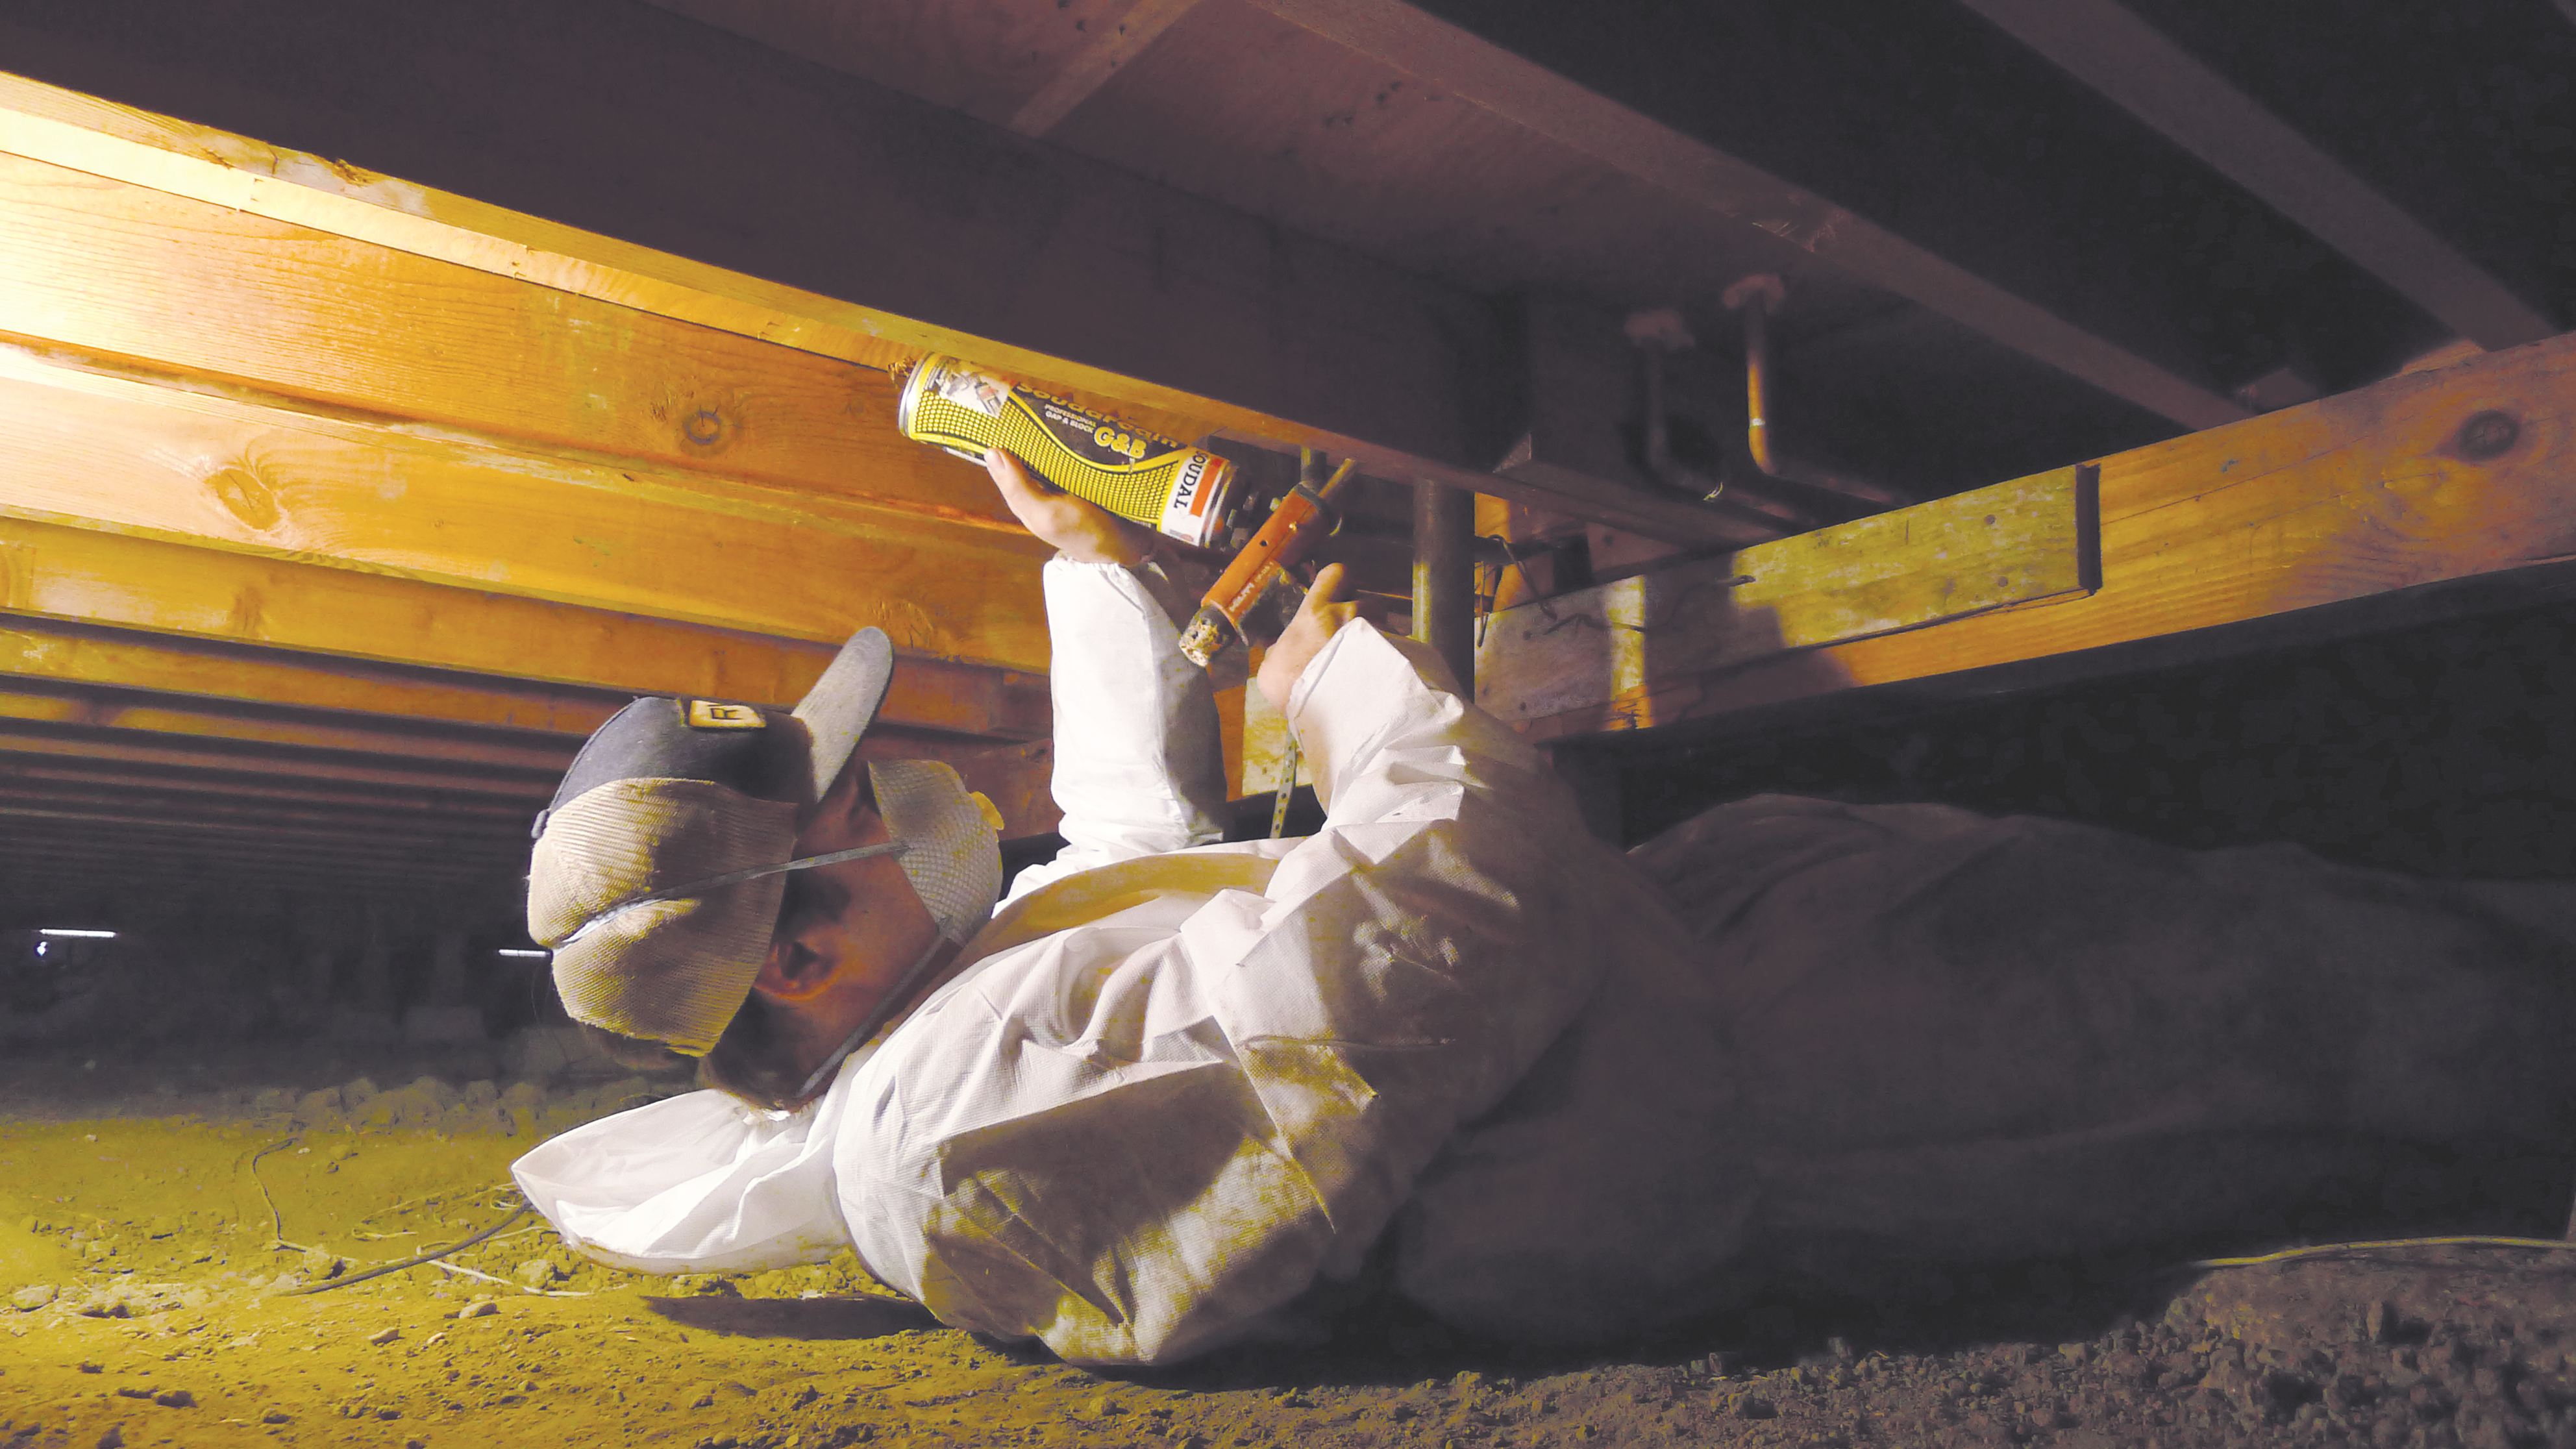
Figure 10. Use pieces of rigid foam that are cut to fit and sealed in place with canned spray foam to insulate the band joist above a crawlspace. (Source: IBACOS.) Use expanding spray foam or caulk to air seal all of the perimeters of the rigid foam insulation pieces and to seal around any penetrations through the insulation.

Figure 11. An unvented, air-sealed crawlspace is kept warm and dry with a continuous layer of 6-mil vapor retarder covering the floor and the walls, which are then insulated with rigid foam. (Source: IBACOS.)
How to Install Ducts in a Sealed, Insulated Crawlspace
When installing HVAC equipment in an insulated crawlspace, good HVAC design principles still apply:
- Design a compact duct layout with short, straight ducts runs.
- Seal and test ductwork for air leakage.
- Install a balanced ventilation system such as a heat recovery ventilator or central fan-integrated ventilation with a fresh air intake and timered exhaust. (For more information, see Whole-Building Delivered Ventilation.)
- Do not install low-efficiency heating systems that draw their combustion air from the crawlspace or basement. Instead install direct-vent sealed-combustion furnaces or heat pumps. (For more information, see Combustion Furnaces, Traditional Split Heat Pumps.)
Ensuring Success
- Check with local authorities prior to the installation of any insulation in closed crawlspaces and band joist areas. This is imperative to to ensure that all local code requirements are met, such as the R-value of insulation, fire and combustion safety requirements, pest inspection requirements, and radon mitigation requirements. Also, local codes in flood-prone areas of the United States may require the installation of flood vents that allow water to pass freely into and out of a foundation to equalize pressure on the foundation walls. Flood vents should be designed to reduce standby air leakage.
- If the bottom of the crawlspace is below grade, it will be necessary to damp-proof or waterproof the exterior wall surface of the crawlspace. For information on how to accomplish this water management strategy, see “Exterior Surface of Below-Grade Walls."
- During any air sealing process, follow safe work practices to minimize any effects from sealants or adhesive fumes on workers’ health. Temporary ventilation could be necessary during the installations.
- Apply a coat of light-colored paint over the 3-in. pest control inspection gap at the top of the foundation walls to facilitate pest inspections.
- Never store flammable materials (e.g., gasoline or solvents) in any crawlspace.
- Cover the floor of the crawlspace and the crawlspace perimeter walls with 6-mil polyethylene vapor retarder.
- Assess the moisture potential in the band joist area, and if appropriate, insulate and air seal the band joist as an integral part of the work.
Typical R-values for common insulation materials are summarized in this table, which also identifies the vapor retarder classification for each insulation.
Region
During warm seasons in humid climates, the outside air can contain more water vapor than the air within the crawlspace. In humid climates, rather than helping to dry out a crawlspace, the vents can actually encourage condensation in the crawlspace by allowing warm, humid air to enter and condense on the floor joists, which are likely to be cooler, especially if the rooms above are air conditioned. In warm humid climates, a closed crawlspace reduces the potential for moisture problems (e.g., condensation, mold growth, wood rot) within the crawlspace.
Local building codes can have specific requirements for types of insulation and requirements for the 3-in. pest control inspection strip at the top of the foundation wall. See the Compliance tab for prescriptive requirements for insulation levels in the International Energy Conservation Code and International Residential Code.
Climate zones 1 and 2 do not require the use of insulation. However, crawlspaces in those regions are usually constructed above grade. Thus, reasonable energy savings can occur if an insulation strategy is implemented. Consider insulation levels similar to those in climate zone 3.
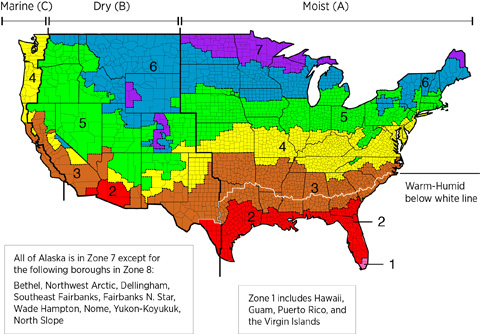
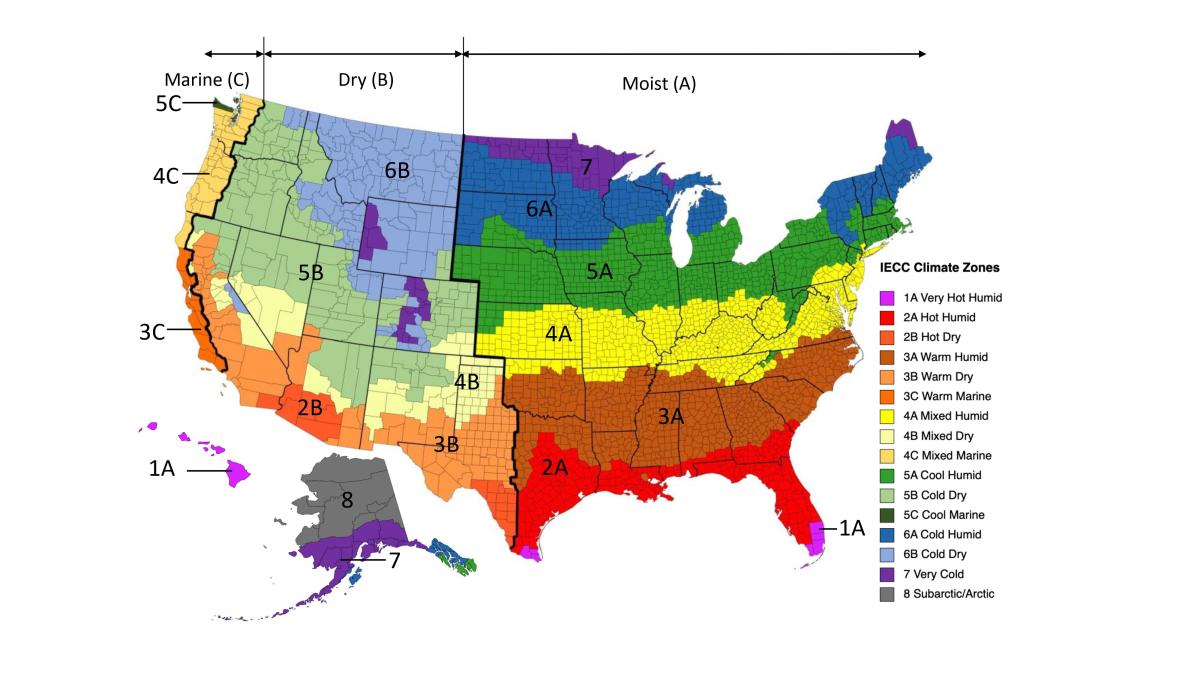
The map in Figure 1 shows the climate zones for states that have adopted energy codes equivalent to the International Energy Conservation Code (IECC) 2009, 12, 15, and 18. The map in Figure 2 shows the climate zones for states that have adopted energy codes equivalent to the IECC 2021. Climate zone-specific requirements specified in the IECC are shown in the Compliance Tab of this guide.
Pests
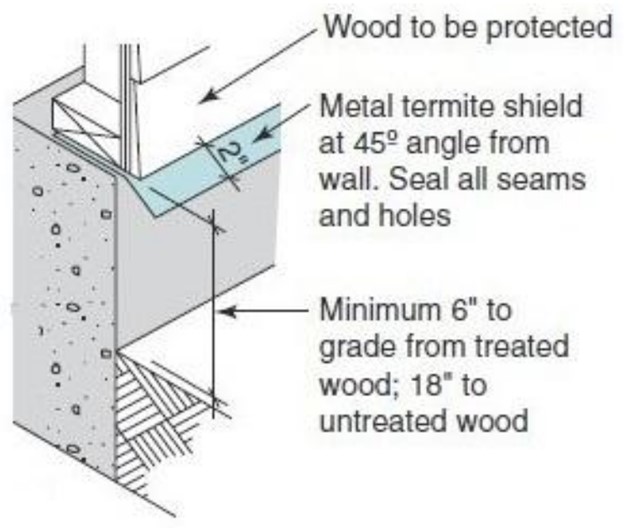
Where termite infestation is heavy (see map), install termite shields at the top of the foundation wall beneath the sill plate that extend out of the wall at least 3/4 inch on either side of the sill plate. If rigid foam is installed on the interior of the crawlspace wall, leave a termite inspection strip or gap in the insulation to allow inspection of the wall for the presence of termite tunnels, as detailed in the Description tab.
Where burrowing rats are likely, construct foundation walls to extend 36 inches below grade or install a curtain wall of concrete or metal in front of the crawlspace stem wall that extends down 2 feet and out 8 to 12 inches to discourage burrowing rodents.
Training
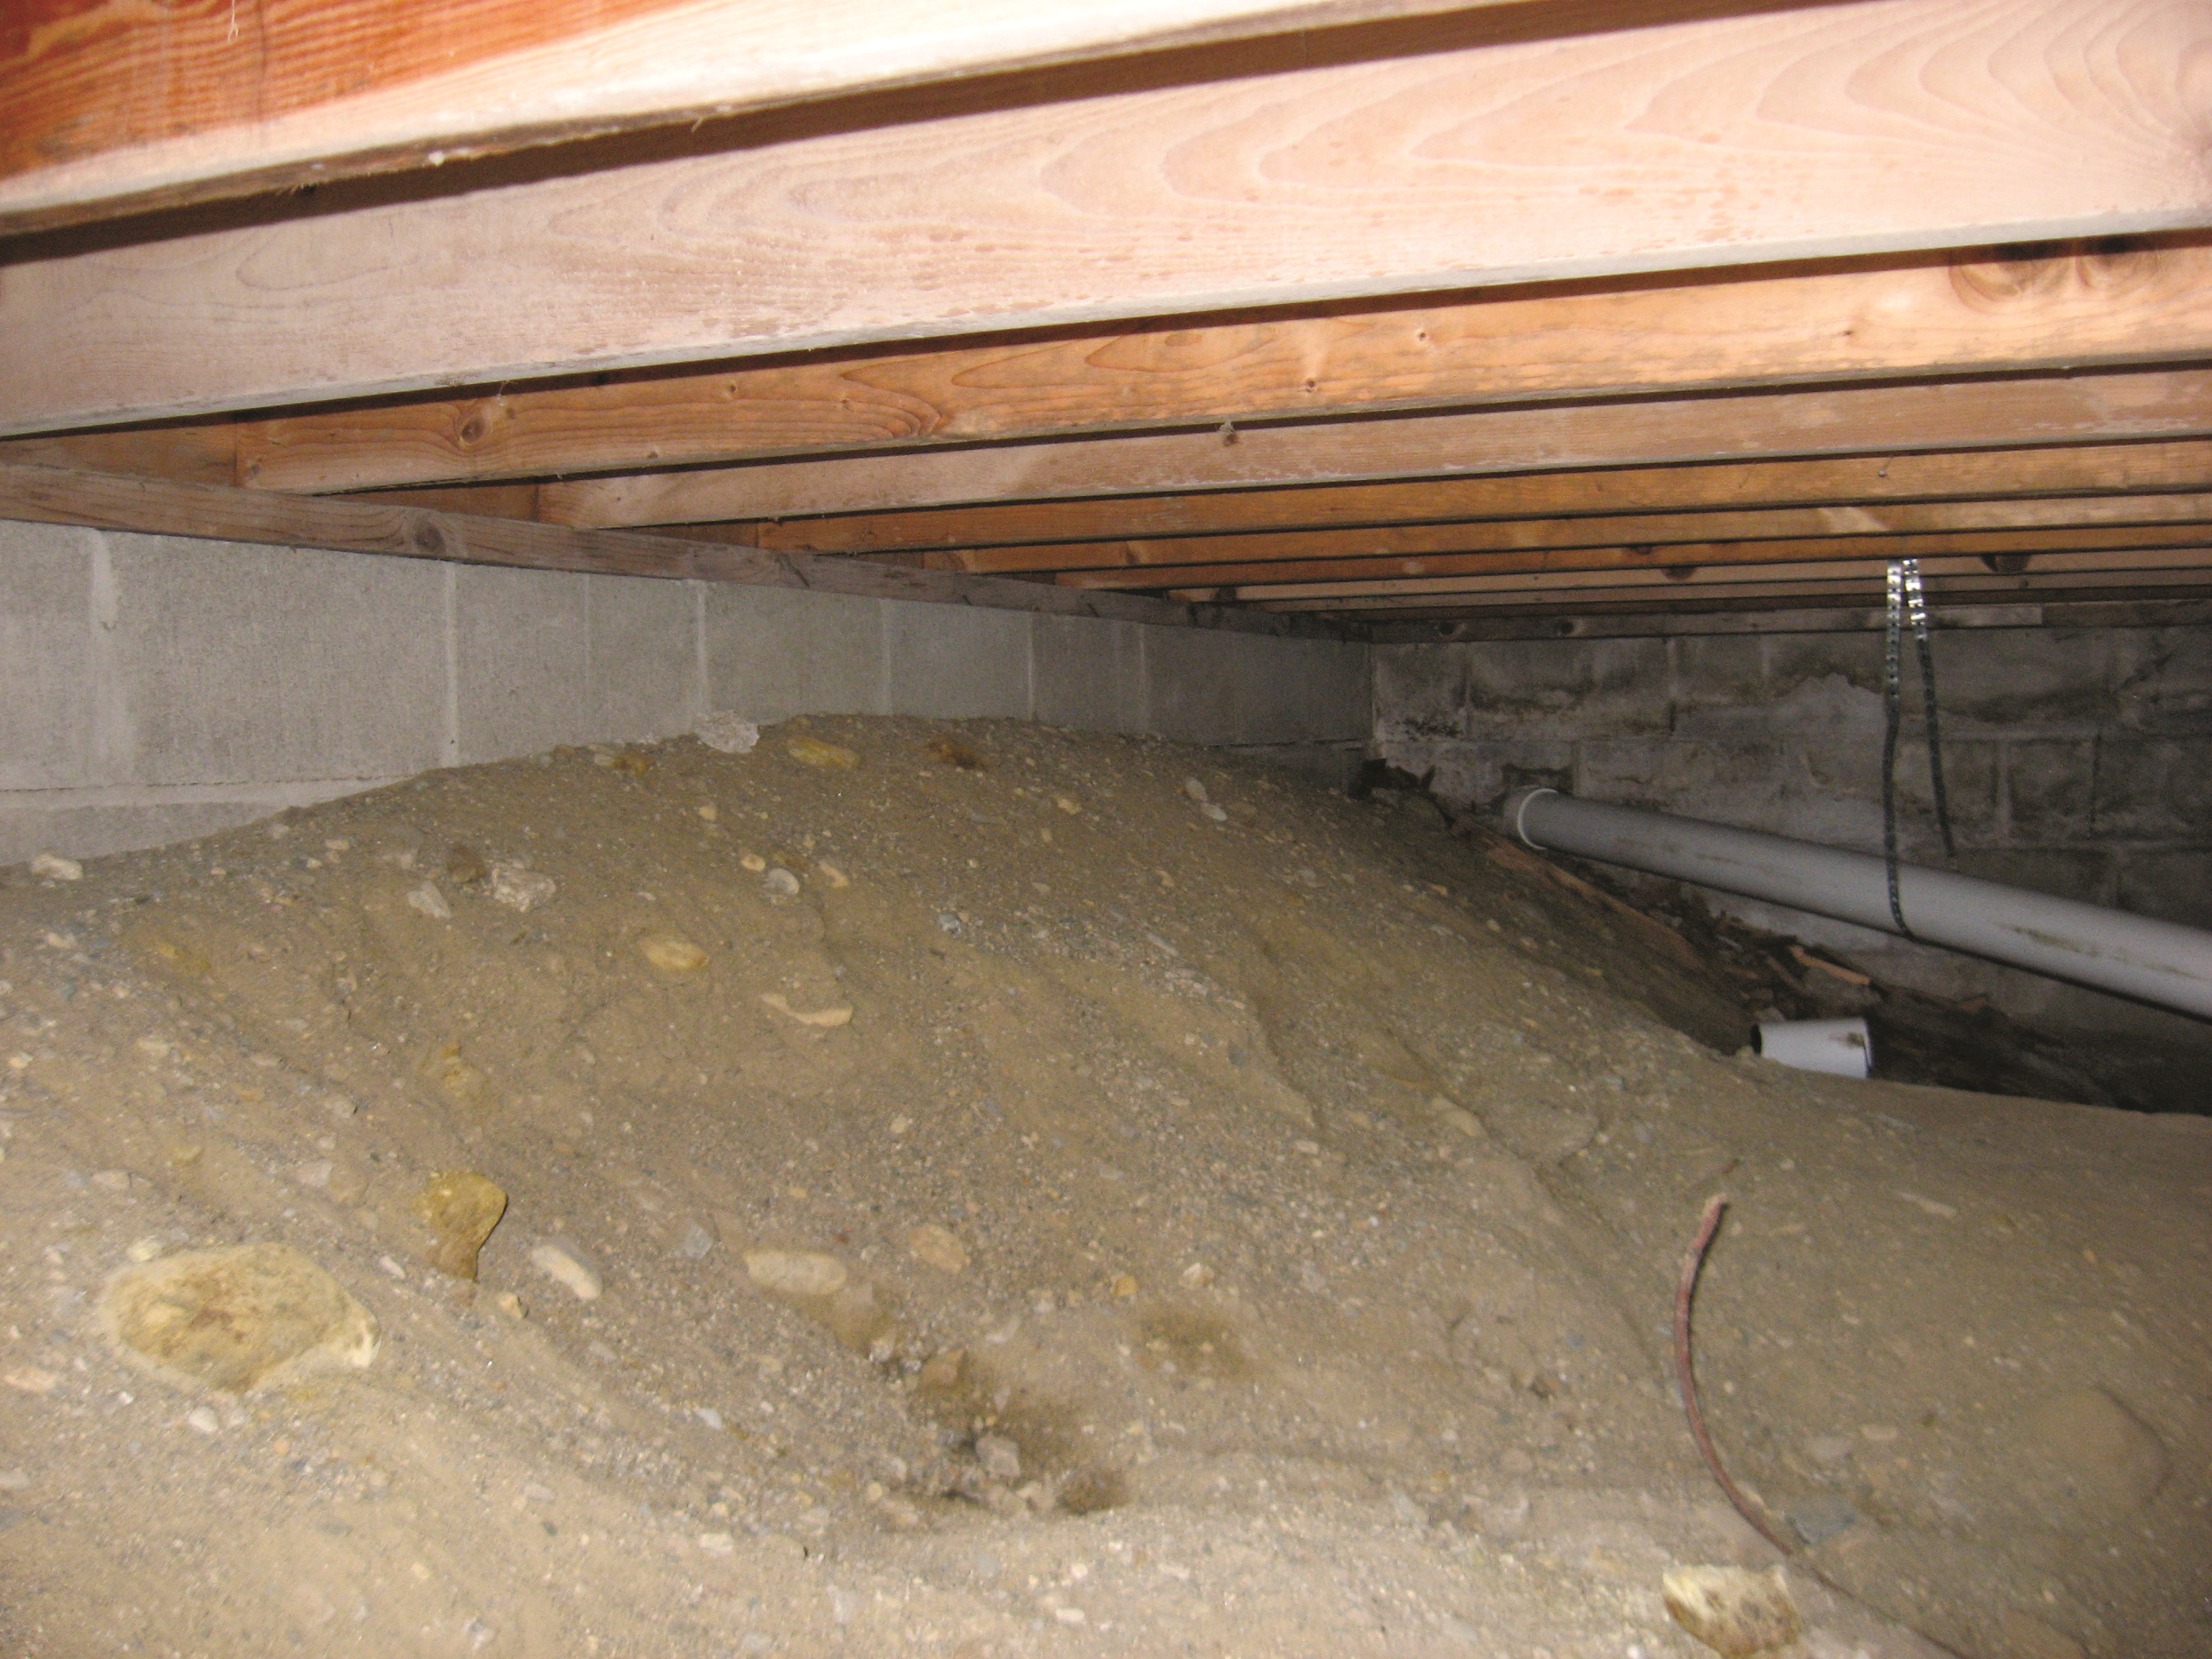
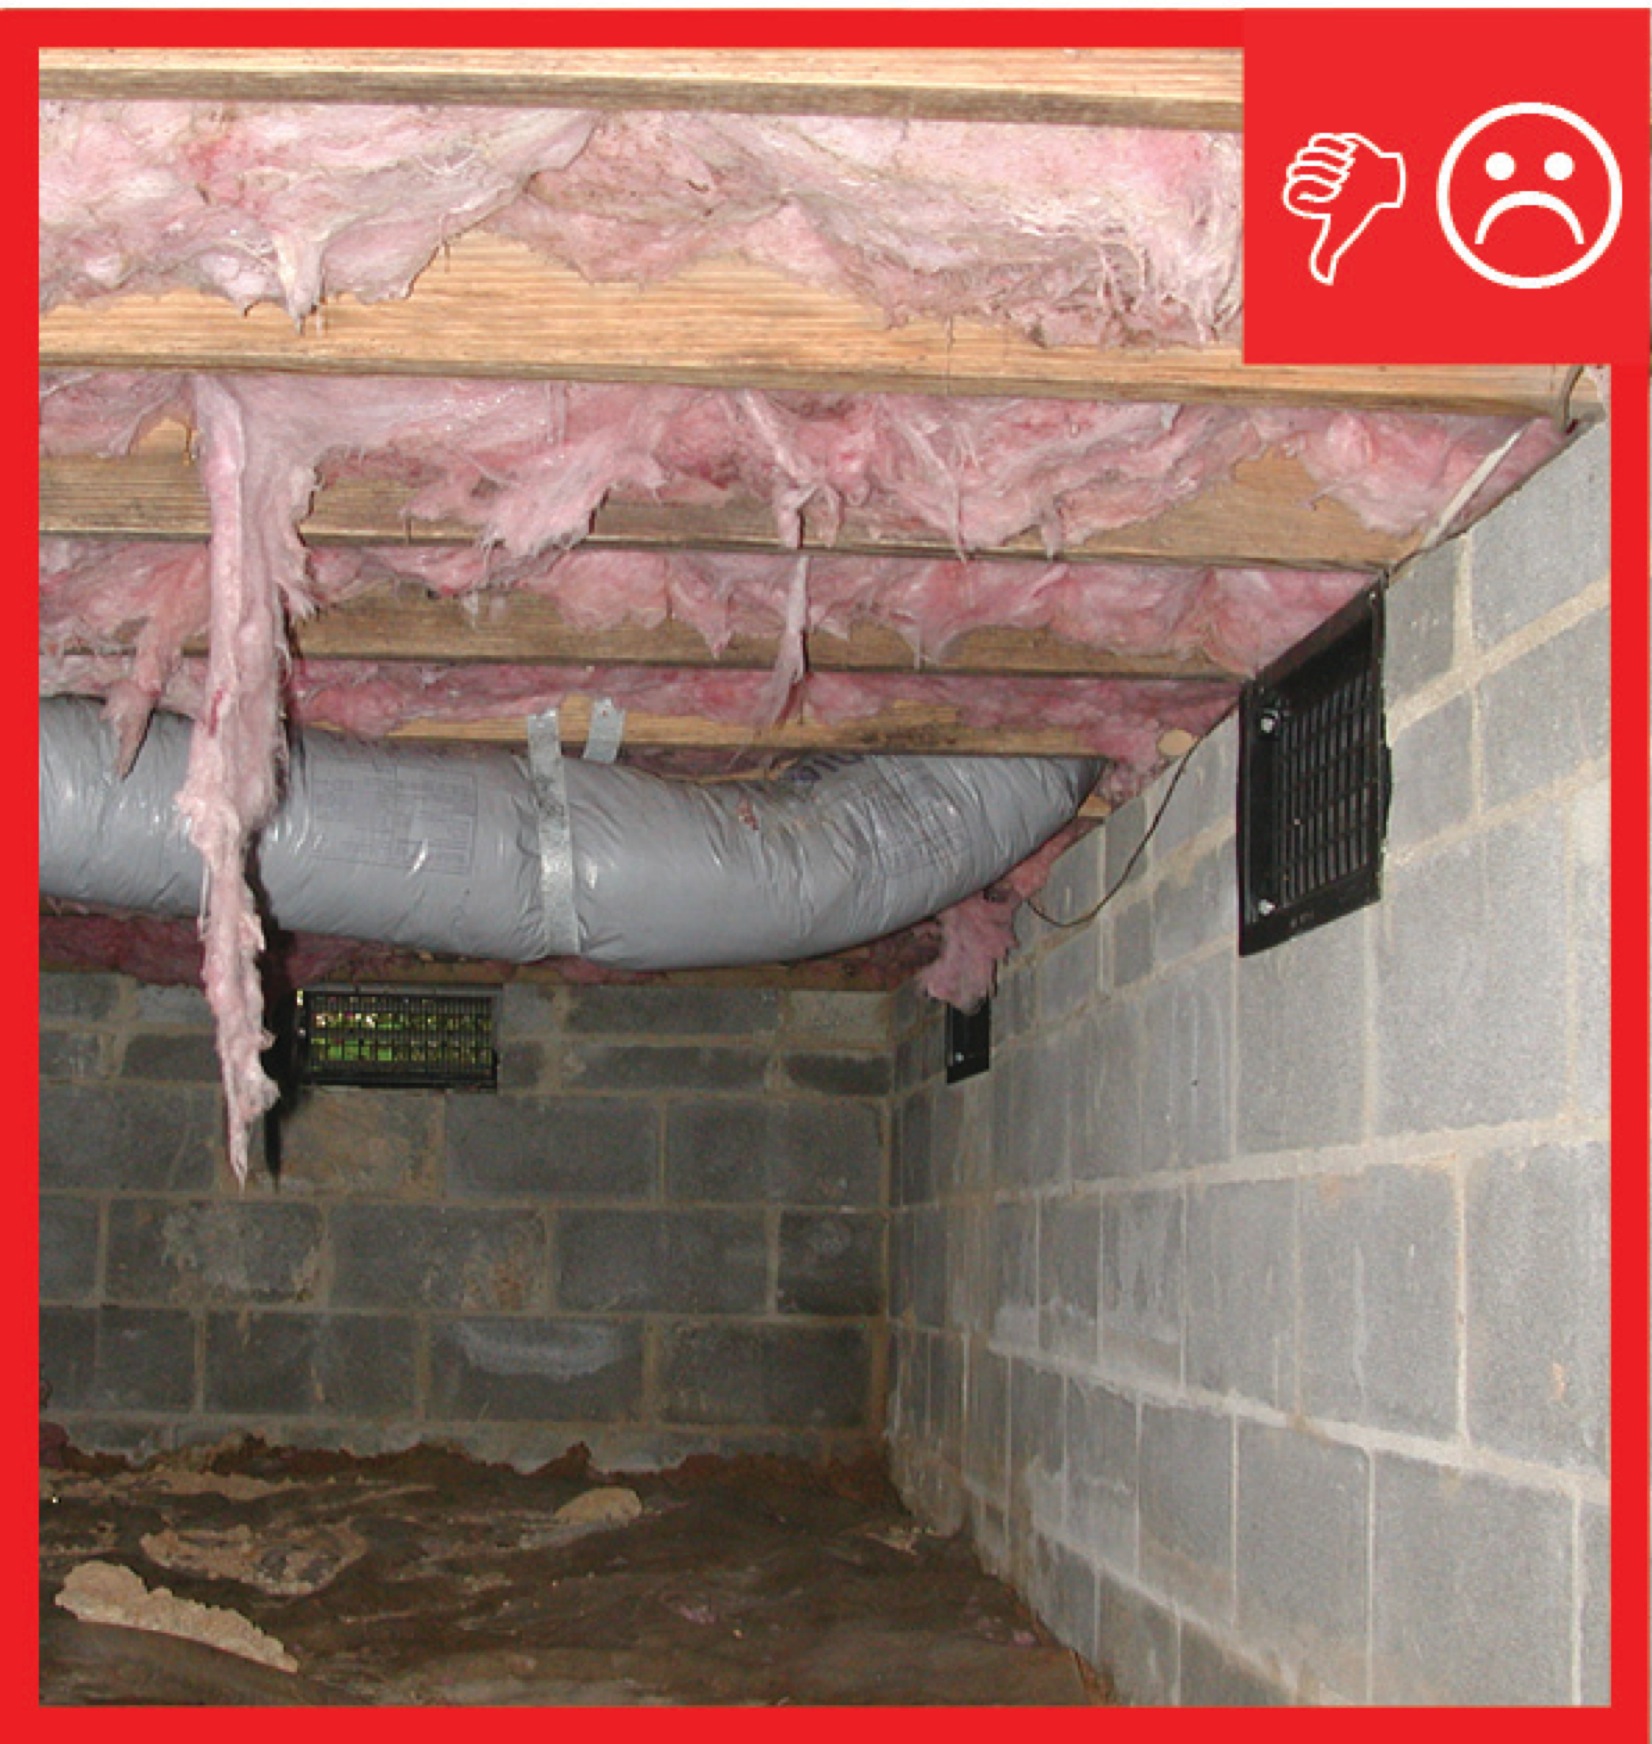
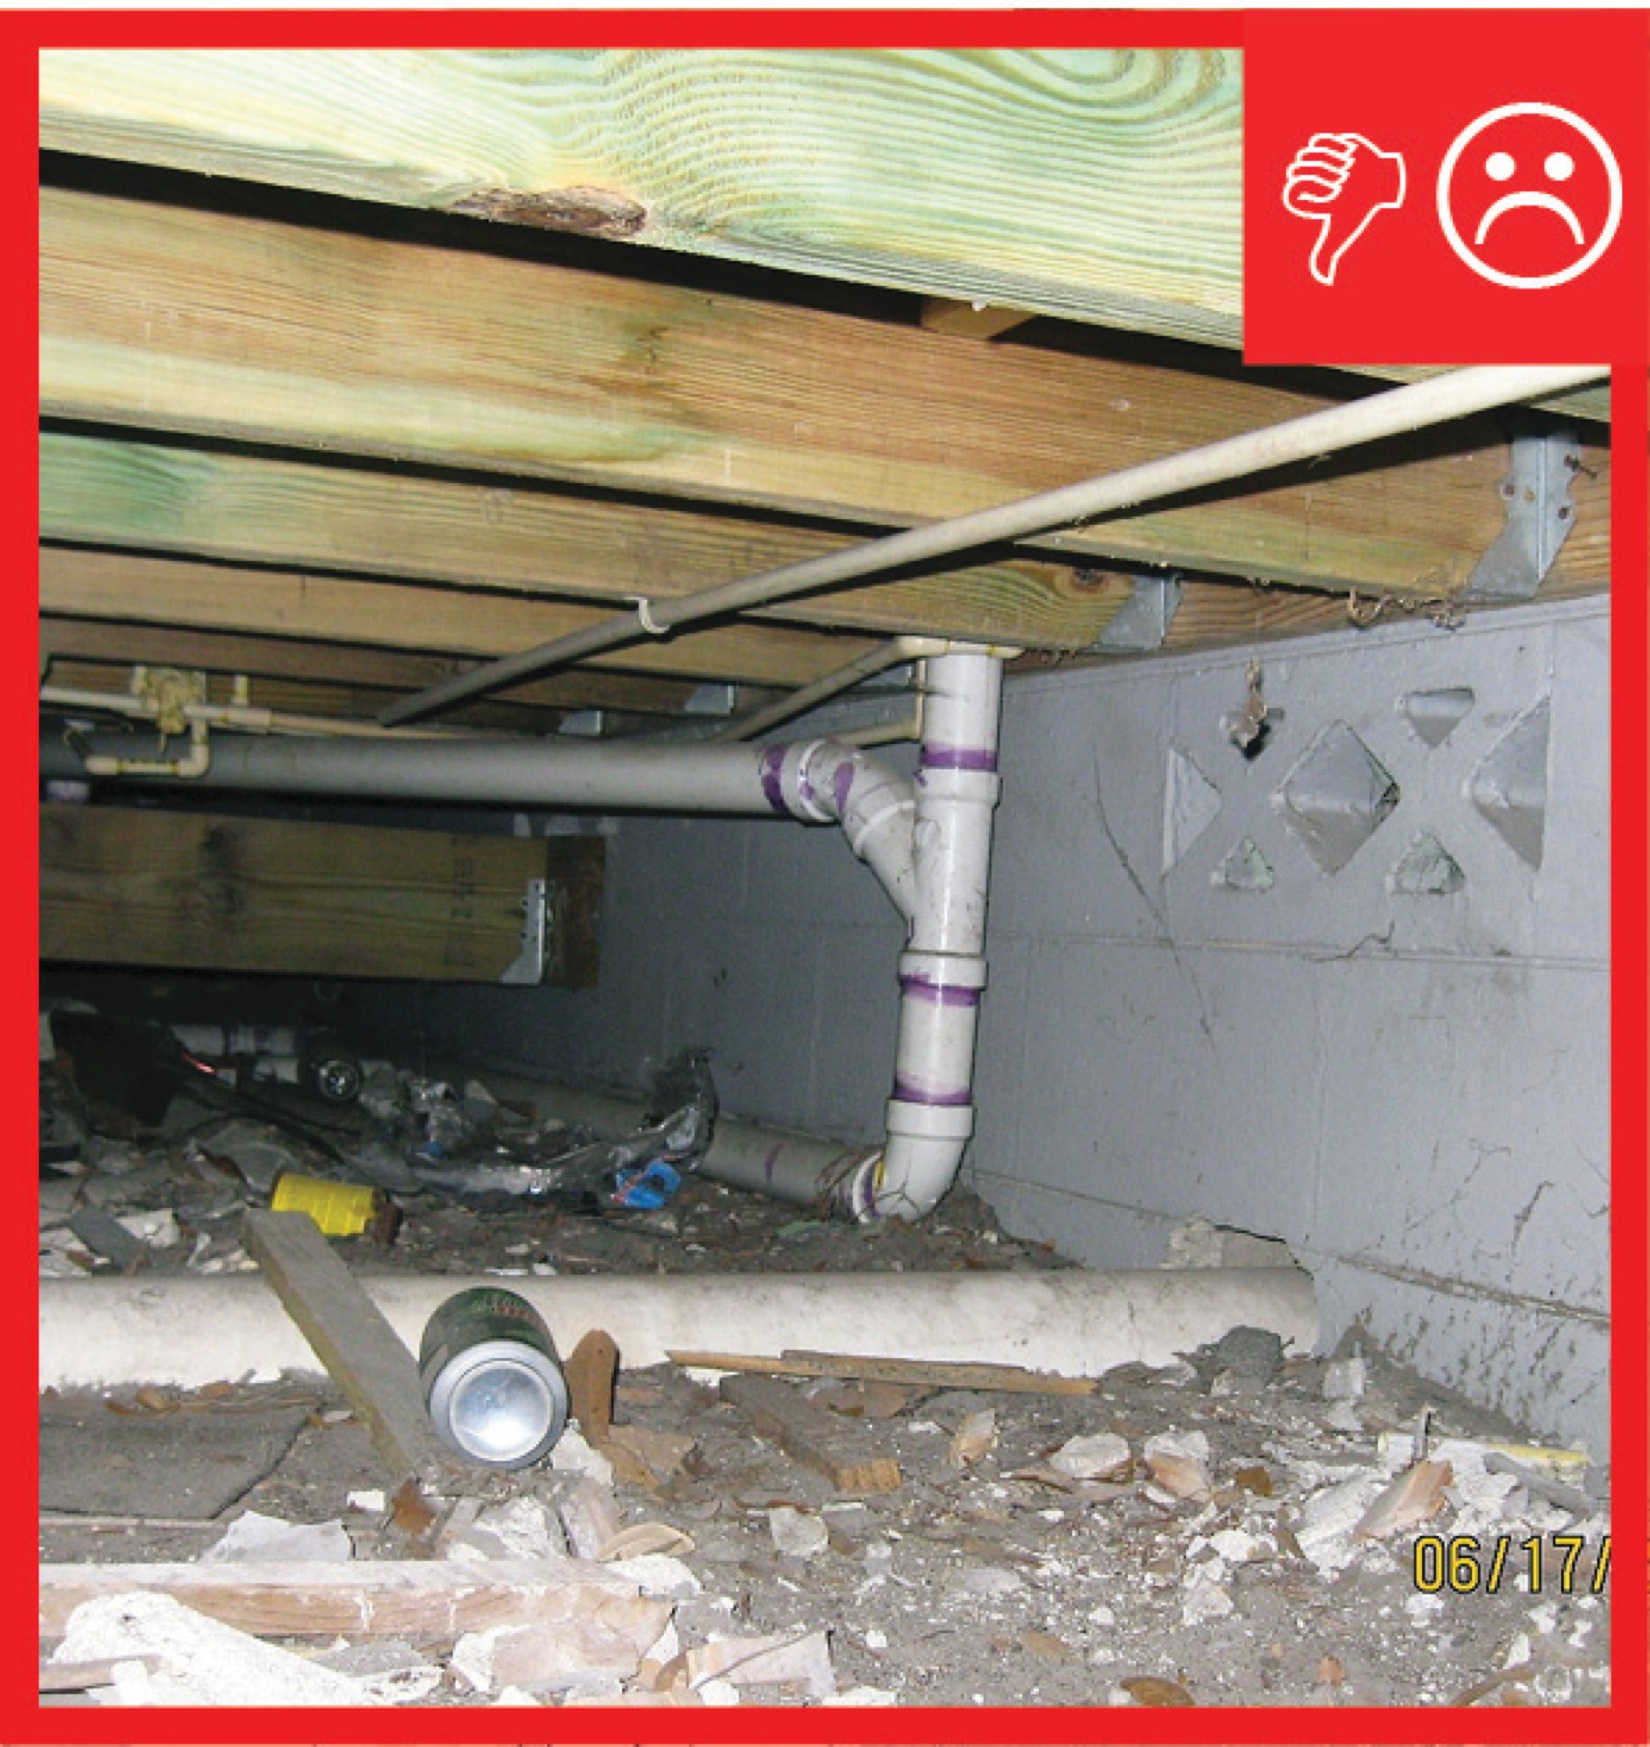
Right and Wrong Images
Source
Source

Source
Article describing how closed crawlspaces can do "double duty" by controlling moisture and providing energy savings.
Source
Article describing how closed crawlspaces can do "double duty" by controlling moisture and providing energy savings.
Source
Article describing how closed crawlspaces can do "double duty" by controlling moisture and providing energy savings.

Source
Article describing the risks associated with vented and unvented crawlspaces in different climate zones.
Source
Article describing methods to manage moisture, rainwater, and vapor in basements and crawlspaces.
Source
Article describing methods to manage moisture, rainwater, and vapor in basements and crawlspaces.
Source
Article describing methods to manage moisture, rainwater, and vapor in basements and crawlspaces.
Source
Guide describing details that serve as a visual reference for each of the line items in the Water Management System Builder Checklist.
Source
Guide describing details that serve as a visual reference for each of the line items in the Water Management System Builder Checklist.
Source
Report providing detailed steps for builders, architects, and property managers to take for integrated pest management for control of a variety of pests including insects, rodents, and birds.

Source
A factsheet providing information on how to prevent pests from entering the home by sealing cracks and openings.
Source

Source

Source
Source
Videos

Compliance
Retrofit
The information provided in this guide for new homes also applies to crawlspaces in existing homes. Additional foundation wall insulation options are described in the guide Air Sealed, Insulated Basements.
If any standing water, mold, rotten wood, or hazardous materials are present in the crawlspace, these conditions should be addressed before air sealing and insulating the crawlspace. See the following Building America Solution Center guides for more information:
The U.S. Department of Energy’s Standard Work Specifications has additional information on crawlspaces and worker safety in crawl spaces.
More Info
References and Resources
*For non-dated media, such as websites, the date listed is the date accessed.
Contributors to this Guide
The following authors and organizations contributed to the content in this Guide.
IBACOS, lead for IBACOS, a DOE Building America Research Team
Sales
Tight Air Sealed Home = Comprehensive Draft Protection
Technical Description
Poorly air-sealed homes are less comfortable and cost more to maintain because they provide a pathway for drafts, cold spots, moisture, and insects into the home. Comprehensive draft protection includes a continuous air barrier around the whole house along with caulking and sealing in all holes and cracks. This includes around wiring, plumbing, ducts, and flues; where wall framing meets flooring; around windows; where drywall meets top plates and sill plates; where rim joists meet foundation walls and subfloors; etc. Spray foam insulation can be used at rim joists, floors above unconditioned space, and in attics to insulate and air seal at the same time.
Questions? Comments? Contact our webmaster.