
Scope
Install a radon fan or a passive radon vent system to prevent the accumulation of radon and soil gases in the home.
Install an active radon vent system with fan if
- the home is built in EPA Radon Zone 1
- or, the home is tested for radon after construction and shows an indoor radon concentration level of ≥ 4 picocuries/liter, regardless of what radon zone the home is located in (EPA Indoor airPLUS).
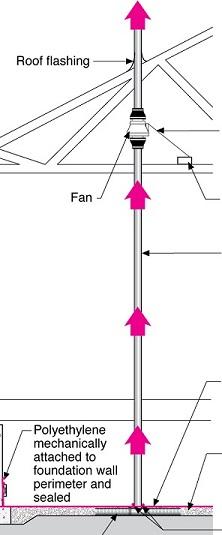
Install an active radon vent system consisting of an in-line fan installed in a vertical vent pipe extending up from a sub-slab collection pipe or mat through the conditioned space of the home and through the roof that uses the fan to pull soil gases up and out of the house. See the guide Radon Fan.
- Determine vent pipe size and location.
- Lay a perforated pipe or a collection mat around the interior of the foundation perimeter and insert a vertical “T” pipe connector to the pipe or mat.
- Install the concrete slab or polyethylene vapor barrier or both over the ground. Ensure that the slab and/or vapor barrier do not cover the vertical opening of the T connector but are sealed around it.
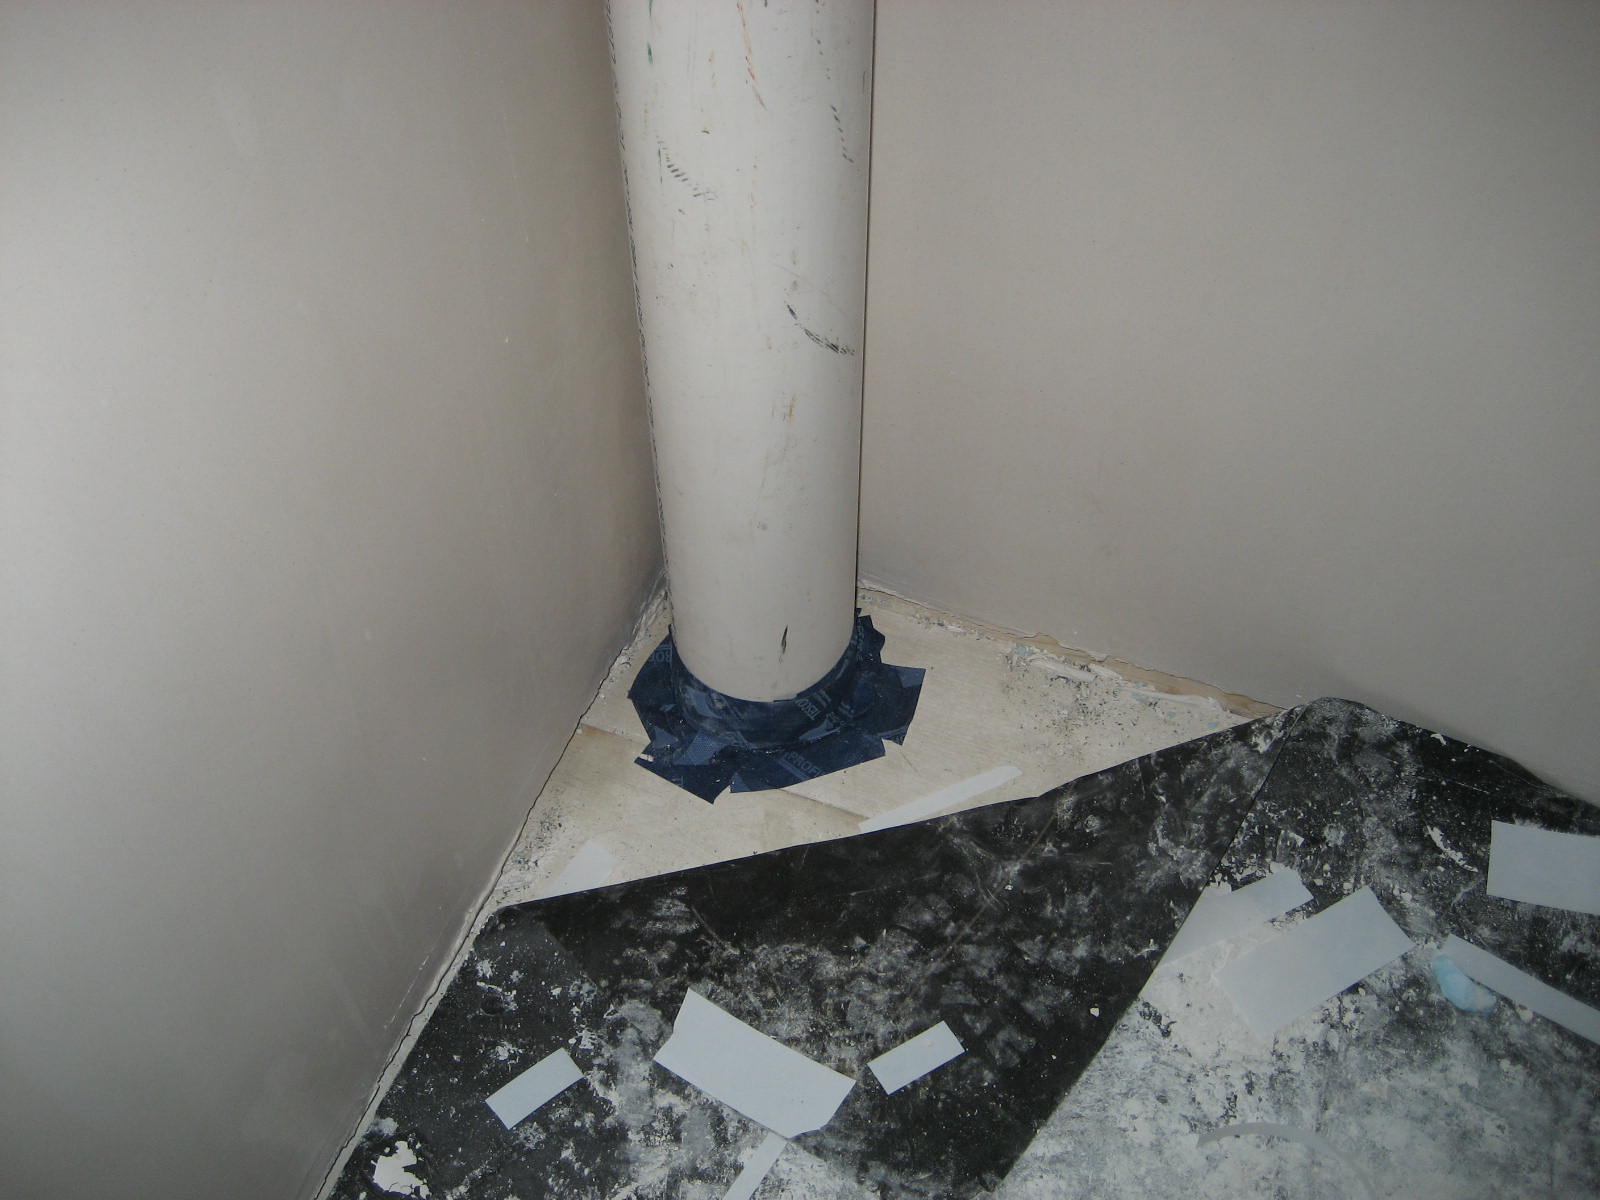
- Install the vertical pipe.
- Run the pipe up through the interior of the house and through the roof.
- Install an in-line fan.
Install a passive radon venting system if the home is located in Radon Zone 2 or 3.
- Install a passive radon ventilation system consisting of a vertical vent pipe extending up from a sub-slab collection pipe or mat through the conditioned space of the home and through the roof that uses the natural stack effect to pull soil gases up and out of the house.
- Install an electrical outlet in the attic near the vent stack in case a fan needs to be added later.
- Test the home after construction is completed and add an in-line fan if the indoor radon concentration is ≥ 4 picocuries/liter.
See the Compliance Tab for links to related codes and standards and voluntary federal energy-efficiency program requirements.
Description
Radon is a naturally occurring radioactive gas that is estimated to cause approximately 21,000 lung cancer deaths per year in the United States. The amount of radon in air is measured in “picocuries per liter of air,” or “pCi/L.” The average outdoor radon level is 0.4 pCi/L. The average indoor radon level is estimated at 1.3 pCi/L. Roughly 1 out of 15 homes in the United States have elevated radon levels (4pCi/L or greater).
Radon and other soil gases can create an unhealthy indoor environment if they accumulate inside the home. Radon can enter the home through cracks in concrete floors and foundation walls, joints between two or more construction materials, gaps in the materials comprising suspended floors, gaps around foundation penetrations, and cavities inside foundation walls.
The U.S. Environmental Protection Agency publishes a map indicating likely radon levels across the United States (see Climate tab) and has established a maximum exposure limit of 4 picocuries per liter of indoor air. Regardless of individual county radon zone designation, high indoor radon levels have been found in every state, and factors impacting radon infiltration can be complex, including interactions between soil composition, weather, home design and construction, and ventilation from the HVAC system.
Because local radon levels may vary from those shown on the county-level EPA radon map, because the amount of radon that will accumulate in a home can’t be determined until the home is built, and because the easiest time to install a radon mitigation system is during initial construction, the best practice recommendation is to install a passive ventilation stack in all new homes, with an electric outlet located in the attic near the vent stack so that it is available to power an in-line fan should post-construction testing dictate that an active radon system is needed to lower radon levels in the home. For more information, see Radon Fan.
The first step in keeping radon and other soil gases out of the home is to install a continuous vapor barrier under the slab or over the crawlspace floor, and to perform thorough air sealing of floors and below-grade walls. See the following guides for more information on air sealing and vapor barriers for basements and crawlspaces.
- Air Sealed, Insulated Basements,
- Unvented, Insulated Crawlspaces,
- Capillary Break Beneath Slab – Polyethylene Sheeting or Rigid Insulation,
- Capillary Break at Crawlspace Floor – Polyethylene Sheeting under Concrete Slab,
- Capillary Break at Crawlspace Floors – Polyethylene Lapped Up Walls and Piers or Secured in the Ground,
- Sump Pump Cover Gasket,
Because no vapor barrier is 100% foolproof, a passive or active radon mitigation system should be installed. The easiest time to install this is when the house is under construction, and the sub-slab gravel pad can be easily accessed to lay down a radon collection mat or pipe along the interior perimeter of the home. When this mat or pipe is attached to a vertical vent pipe which extends out through the roof, a negative pressure is created in the pipe, either actively via an in-line fan or passively due to the stack effect. This negative pressure draws soil gases up and out of the house.
How to Install a Vertical Ventilation Pipe – Slab-on-Grade Construction
- Select the location for the ventilation pipe (min. 3 inches in diameter). It should be installed in a vertical run through a warm part of the house and exhausted through the roof. The pipe discharge should be protected from snow drifts and installed at least 1 foot above the roof (refer to local snow fall data for height of snow drifts against buildings) and 10 feet away from any openings in the building to keep the soil gas from re-entering the building.
- Lay a minimum 3-inch-diameter perforated pipe in a gravel trench or a collection mat on top of the gravel around the foundation perimeter. Install the pipe in a loop to allow for the soil gas to enter the pipe from two sides and connect it to either side of a vertical “T”. Communication to all sub-slab areas is required and multiple connection points or interconnections may be required. See Figure 1.
- Place the polyethylene vapor barrier and concrete slab around the vertical “T”; label and cover the open top of the vertical “T” before placing the concrete. Seal the perimeter of the “T” to the concrete to reduce the soil gas entry.
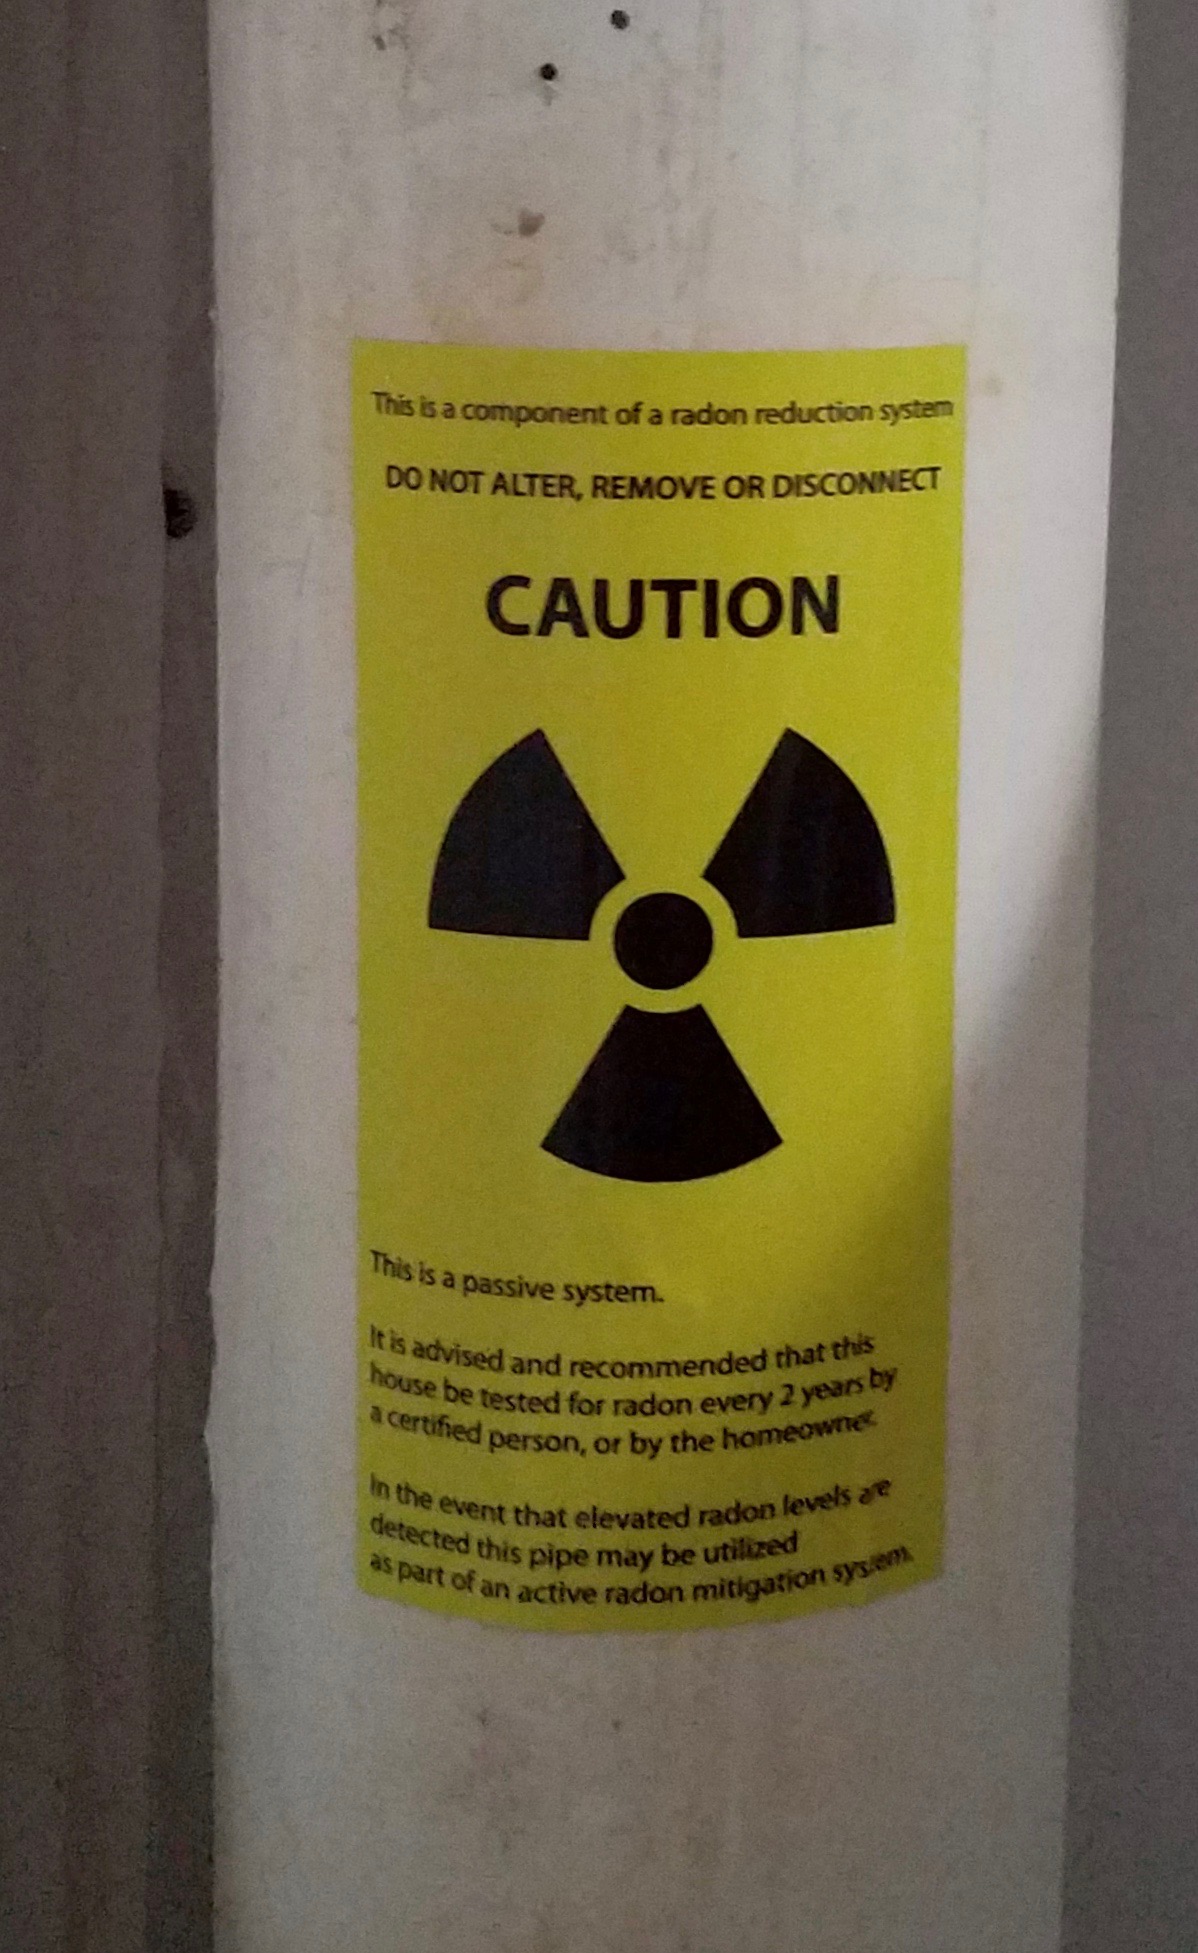
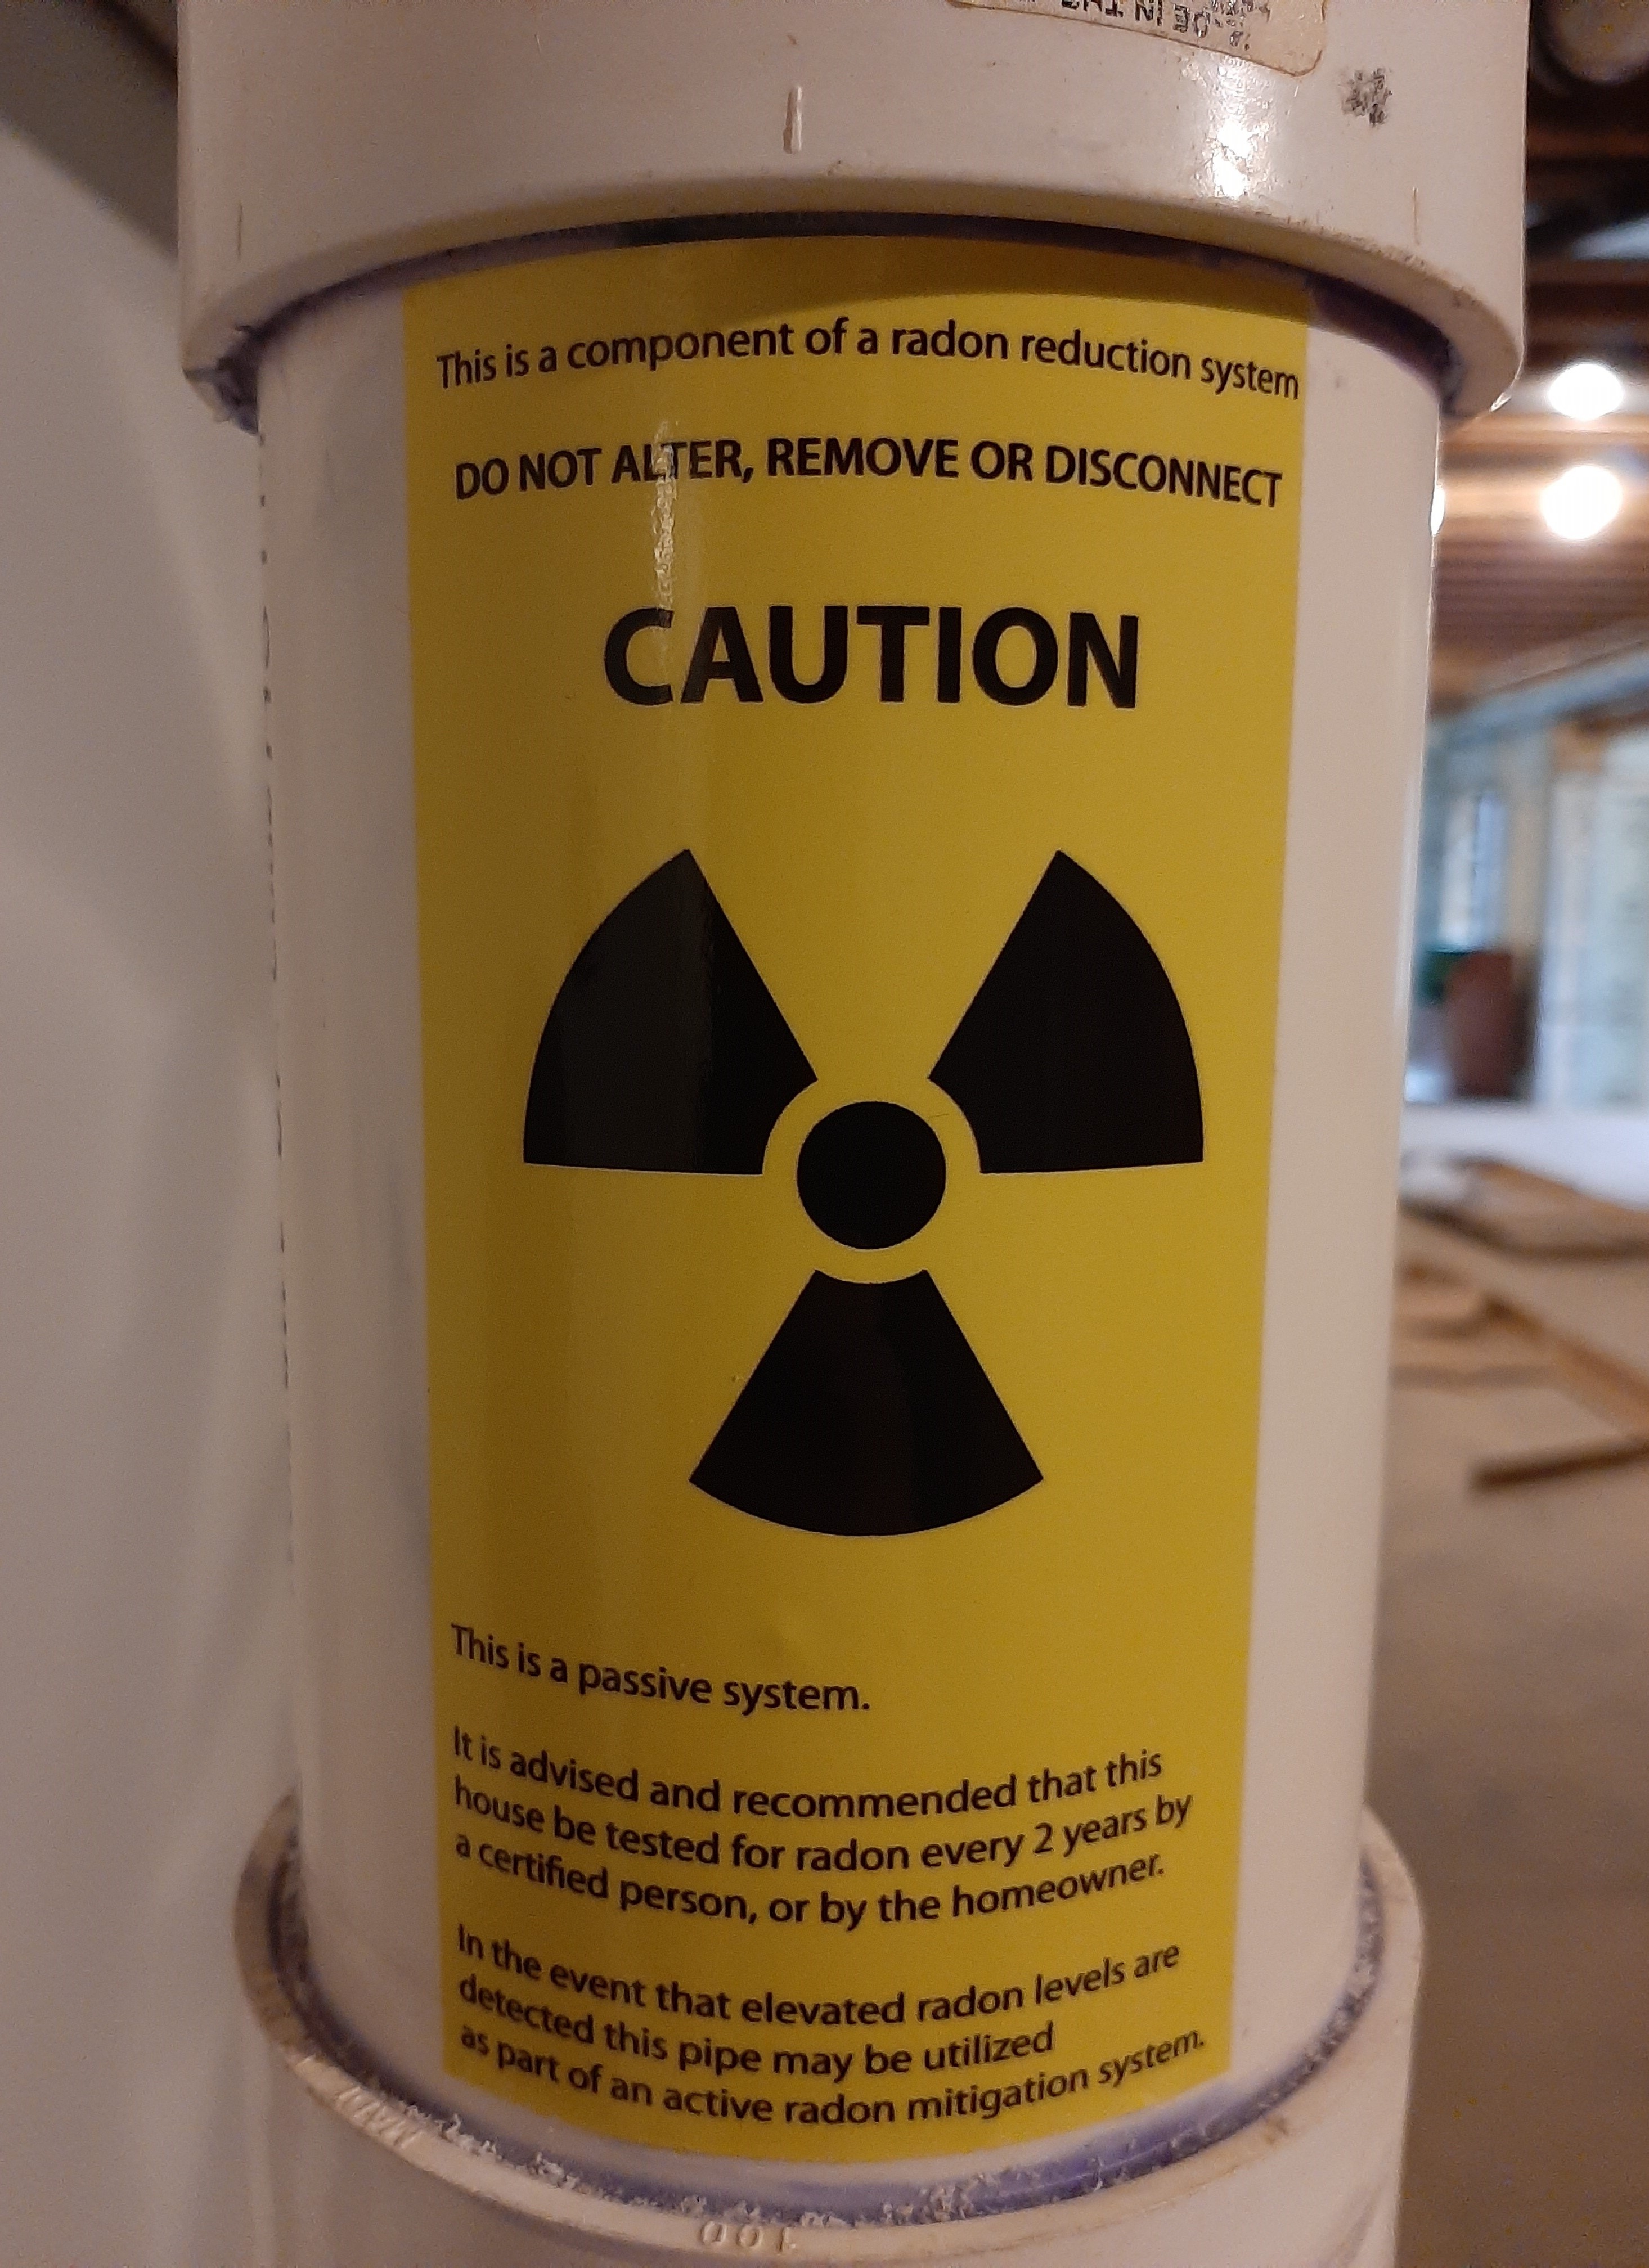
- Install the vertical pipe by connecting it to the vertical “T.” Avoid 90-degree angles in the vertical portion of the pipe; use sweeps if turns are needed. Label the pipe on each floor so it is clear the pipe is not part of the sewer system. If the ventilation pipe extends through an unconditioned attic, insulate the stack to control condensation in the pipe.
- Run the pipe through the roof and flash it properly. Provide a screened rain cap at the termination to prevent rain entry and nesting animals.

How to Install a Vertical Ventilation Pipe – Crawlspace Construction
- Select the location for the ventilation pipe (min. - inch diameter). It should be installed in a vertical run through a warm part of the house and exhausted through the roof. The pipe discharge should be protected from snow drifts and installed at least 1 foot above the roof (refer to local snow fall data for the height of snow drifts against buildings) and 10 feet away from any openings in the building to keep avoid the soil gas from re-entering the building.
- Lay at least 5 feet of min. 3-inch diameter horizontal perforated pipe on the soil at the location where you will run the vertical ventilation pipe and connect it to either side of a vertical “T”. See Figure 2.
- Install a continuous layer of polyethylene vapor barrier with joints taped over the soil. Run the polyethylene sheet up the wall and mechanically attach and seal the edges to the wall. Seal the vertical “T” to the polyethylene to reduce the soil gas entry.
- Install the vertical pipe by connecting it to the vertical “T.” Avoid 90-degree angles in the vertical portion of the pipe; use sweeps if turns are needed. Label the pipe on each floor so it is clear the pipe is not part of the sewer system. If the ventilation pipe extends through an unconditioned attic, insulate the stack to control condensation in the pipe.
- Run the pipe through the roof and flash it properly. Provide a screened rain cap at the termination to prevent rain entry and nesting animals.

How to Install a Vertical Ventilation Pipe – Basement Construction
- Select the location for the ventilation pipe (min. 3-inch diameter). It should be installed in a vertical run through a warm part of the house and exhausted through the roof. The pipe discharge should be protected from snow drifts and installed at least 1 foot above the roof (refer to local snow fall data for the height of snow drifts against buildings) and 10 feet away from any openings in the building to keep the soil gas from re-entering the building.
- Lay a min. 3-inch diameter perforated pipe in a gravel trench or a collection mat on top of the gravel around the foundation perimeter. Install the pipe in a loop to allow for the soil gas to enter the pipe from two sides and connect it to either side of a vertical “T”. Communication to all sub-slab areas is required and multiple connection points or interconnections may be required. See Figure 3.
- Place the polyethylene vapor barrier and concrete slab around the vertical “T”; label and cover the open top of the vertical “T” before placing the concrete. Seal the perimeter of the “T” to the concrete to reduce the soil gas entry.
- Install the vertical pipe by connecting it to the vertical “T.” Avoid 90-degree angles in the vertical portion of the pipe; use sweeps if turns are needed. Label the pipe on each floor so it is clear the pipe is not part of the sewer system. If the ventilation pipe extends through an unconditioned attic, insulate the stack to control condensation in the pipe.
- Run the pipe through the roof and flash it properly. Provide a screened rain cap at the termination to prevent rain entry and nesting animals.

Success
The home can be tested with a short-term or a long-term radon test kit that can be obtained through the mail or at local hardware stores. The short-term tests remain in the home between 2 and 90 days and the long-term tests remain for longer than 90 days. If the radon level is higher than 4 picocuries per liter of air (pCi/L) the radon mitigation fan should be installed and activated. The installation instructions for the radon mitigation system should be followed carefully as improper installation of the system can actually increase radon levels in a home.
Climate
In cold climates, the vertical ventilation pipe should be located inside a heated space. The vertical ventilation pipe should not be placed in an exterior wall as it will reduce the natural thermal stack effect and may prohibit the installation of the fan in the future.
In hot climates, the wind, a hot attic, or heat from the sun could all impact the effectiveness of a passive vent stack.
EPA recommends that the radon mitigation system be installed in high radon potential areas (Zone 1). The list of Zone 1 counties can be found on the EPA website.

Training

Compliance
Retrofit
SCOPE
To mitigate the accumulation of radon and other soil gases in an existing home, install one or more sub-slab depressurization systems.
- Passive sub-slab depressurization systems shall be constructed to passively transport soil gases out of the house. Provisions shall be made (access to an electrical outlet) to allow for the addition of an integrated fan in the ventilation pipe to provide active depressurization, where necessary.
- Basement slabs and slabs on grade should be air-sealed to the extent possible to block radon entry into the building.
- In homes with crawl spaces, the floor above the crawlspace should be air sealed. All retrofit radon reduction systems shall follow ASTM Designation ASTM E2121-21, Standard Practice for Installing Radon Mitigation Systems in Existing Low-Rise Residential Buildings. This standard is available for sale from ASTM.
Radon mitigation systems described in the ASTM standard include the following:
- Crawlspace depressurization (requires the inclusion of a fan)
- Submembrane depressurization (requires the inclusion of a fan)
- Drain tile depressurization (requires the inclusion of a fan)
- Hollow block wall depressurization (requires the inclusion of a fan)
- Sub-slab depressurization (may be passive or include a fan)
- Sump pit depressurization (requires the inclusion of a fan).
Most of these systems will require a vertical ventilation pipe. See the Scope and Description tabs of this guide to learn more about why, where, and how this pipe can be installed.
Because the movement and cutting of existing home components will be involved in the installation of the ventilation pipe, see the Pre-Retrofit Assessment of Hazardous Materials as it relates to asbestos, VOCs, lead, and safe work conditions.
To minimize chances of depressurizing the combustion appliance zone (CAZ) potentially causing combustion exhaust to spill into the CAZ, see the Pre-Retrofit Assessment of Combustion Appliances.
To help maintain a moisture control plan and promote a safe living and work environment during the installation of the ventilation pipe, see the Pre-Retrofit Assessment of Crawlspaces and Basements.
For more information, see the U.S. Department of Energy’s Standard Work Specifications regarding radon.
The only way to know what the radon level is in a specific home is to test. Radon levels may vary tremendously from home to home. Do not count on a neighbor’s results.
The EPA recommends that contractors who test for radon or install radon reduction systems in homes be licensed by the state where the work is being completed or be credentialed through one of two national radon proficiency programs: the National Radon Proficiency Program or the National Radon Safety Board.
Although not required for existing homes, the EPA’s recommendations for new homes provide a useful scale for when to act. The EPA recommends, but does not require, that all homes in EPA Radon Zone 1 should be built with radon-resistant features and should pre-emptively include a radon vent fan. The EPA also recommends, but does not require, that homes built in EPA Radon Zones 2 and 3 include radon-resistant features and a passive radon mitigation system. EPA further recommends that all homes built in EPA Radon Zones 2 and 3 be tested for radon prior to occupancy. A radon vent fan should be installed in the ventilation pipe if testing indicates radon concentrations are greater than the EPA’s action level of four picoCuries per liter (4 pCi/L).
DESCRIPTION
The systems designed to reduce radon levels in existing homes are very similar to the systems used in new homes. There are two key differences. First, whereas sub-slab horizontal pipes are easy to install before a slab is poured, they cannot easily be installed after. Second, a chase for a vertical pipe can easily be designed into a new home, but the vertical pipe may be more conspicuous in an existing home.
Radon mitigation systems should be added to homes where monitoring has shown that the home’s radon levels are ≥ 4 pCi/L. In homes with a basement or slab-on-grade foundation. Active sub-slab depressurization (or suction) is the most common and usually the most reliable radon reduction method (EPA 2016).
Active subslab suction — also called subslab depressurization — is the most common and usually the most reliable radon reduction method. One or more suction pipes are inserted through the floor slab into the crushed rock or soil underneath. They also may be inserted below the concrete slab from outside the home. The number and location of suction pipes that are needed depends on how easily air can move in the crushed rock or soil under the slab and on the strength of the radon source. Often, only a single suction point is needed (EPA 2016).
A contractor usually gets this information from visual inspection, from diagnostic tests or from experience. A radon vent fan connected to the suction pipes draws the radon gas from below the home and releases it into the outdoor air while simultaneously creating a negative pressure or vacuum beneath the slab. Common fan locations include unconditioned home and garage spaces, including attics and the exterior of the home.
Passive subslab suction is the same as active subslab suction except it relies on natural pressure differentials and air currents instead of a fan to draw radon up from below the home. Passive subslab suction is usually associated with radon-resistant features installed in newly constructed homes. Passive subslab suction is generally not as effective in reducing high radon levels as active subslab suction. Some homes have drain tiles or perforated pipe to direct water away from the foundation of the home. Suction on these tiles or pipes is often effective in reducing radon levels. One variation of subslab and drain tile suction is sump-hole suction. Often, when a home with a basement has a sump pump to remove unwanted water, the sump can be capped so that it can continue to drain water and serve as the location for a radon suction pipe. Block-wall suction can be used in basement homes with hollow block foundation walls. This method removes radon and depressurizes the block wall, similar to subslab suction. This method is often used in combination with subslab suction (EPA 2016).
For homes with crawlspaces, an effective method to reduce radon levels involves covering the earth floor with a high-density plastic sheet. A perforated pipe is installed under the sheet and attached to a vertical vent pipe that carries the radon up out through the roof or a side wall to the outdoors.. A fan installed in the vent pipe helps draw out the soil gasses. This form of soil suction is called submembrane suction, and when properly applied is the most effective way to reduce radon levels in crawlspace homes.
Pipes should be installed in a way that minimizes holes being cut through walls, floors, and ceilings. When holes must be cut, they should be air sealed, the integrity of the insulation should be maintained or improved around the penetration, and vibrations in the pipe should be minimized to help maintain the durability of the air sealing and insulation products. Penetrations should be flashed and sealed to avoid leaks and the flashing should be integrated into existing house wrap or weather-resistant barriers. See other guides in the Solution Center for specific guidance on air sealing, insulation, and penetration flashing.
The installation of radon ventilation pipes in existing homes is similar to the installation steps for new homes provided in the Description tab of this guide. In addition to the recommendations on that tab of running the pipe through the warm part of the house, the pipe could also be run through a rim or band joist, then along an exterior wall or through a garage or unconditioned space to the outside.
Radon guidance from EPA, HUD, NIH, OSHA, and FEMA can be found in Homeowner's and Renter's Guide to Reducing Radon After Disasters and Radon: Worker and Employer Guide to Hazards and Recommended Controls.
To integrate this vent pipe with a radon exhaust fan, see the radon fan guide.
COMPLIANCE
This standard describes methods for reducing radon entry into existing attached and detached residential buildings three stories or less in height. This practice is intended to provide radon mitigation contractors with a uniform set of practices. The methods described in this standard apply to currently occupied or formerly occupied residential buildings.
See the Compliance tab.
More
More Info.
Access to some references may require purchase from the publisher. While we continually update our database, links may have changed since posting. Please contact our webmaster if you find broken links.
The following authors and organizations contributed to the content in this Guide.
Building Science Corporation, lead for the Building Science Consortium (BSC), a DOE Building America Research Team
Sales
Radon Resistant Construction =
Radon is an odorless, colorless radioactive gas naturally occurring in the earth that can cause lung cancer in humans. It can enter homes through foundations and basements unless steps are taken to prevent it. Radon-resistant homes help minimize this risk by including a radon barrier with a fully sealed foundation and plastic sheet or layer of rigid-foam insulation rated for soil contact carefully taped at the seams under the slab or lining a crawl space. Below the radon barrier, a perforated pipe is laid in a 4-inch layer of crushed rock to collect radon and soil gasses and passively vent them through a solid vent pipe that goes up through the house (concealed inside a wall) and vents out through the roof. An electric junction box is installed in the attic near the vent pipe to power an inline fan to turn this passive venting system into an active system in case the radon is not being adequately exhausted through the passive exhaust pipe.