

Scope
Air seal and insulate the walls of an existing crawlspace with rigid foam board insulation.
- Allow for a pest control inspection strip if required by local code.
- Install a supply and return connected to the living space of the home to condition the crawlspace to encourage drying.
- Ensure that a 6-mil or thicker vapor barrier completely covers the crawlspace floor and is mechanically fastened to walls and piers 12 to 18 inches up from the crawlspace floor.
- Cover vent openings with rigid foam.
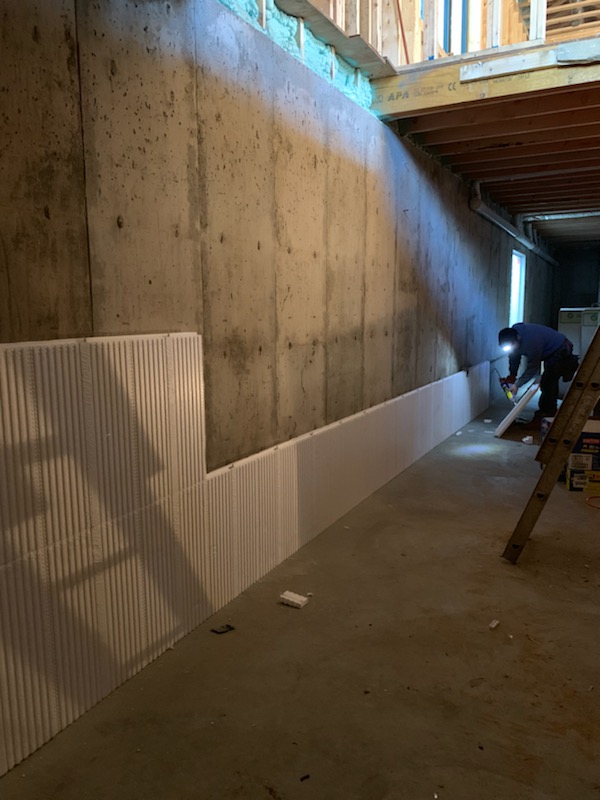
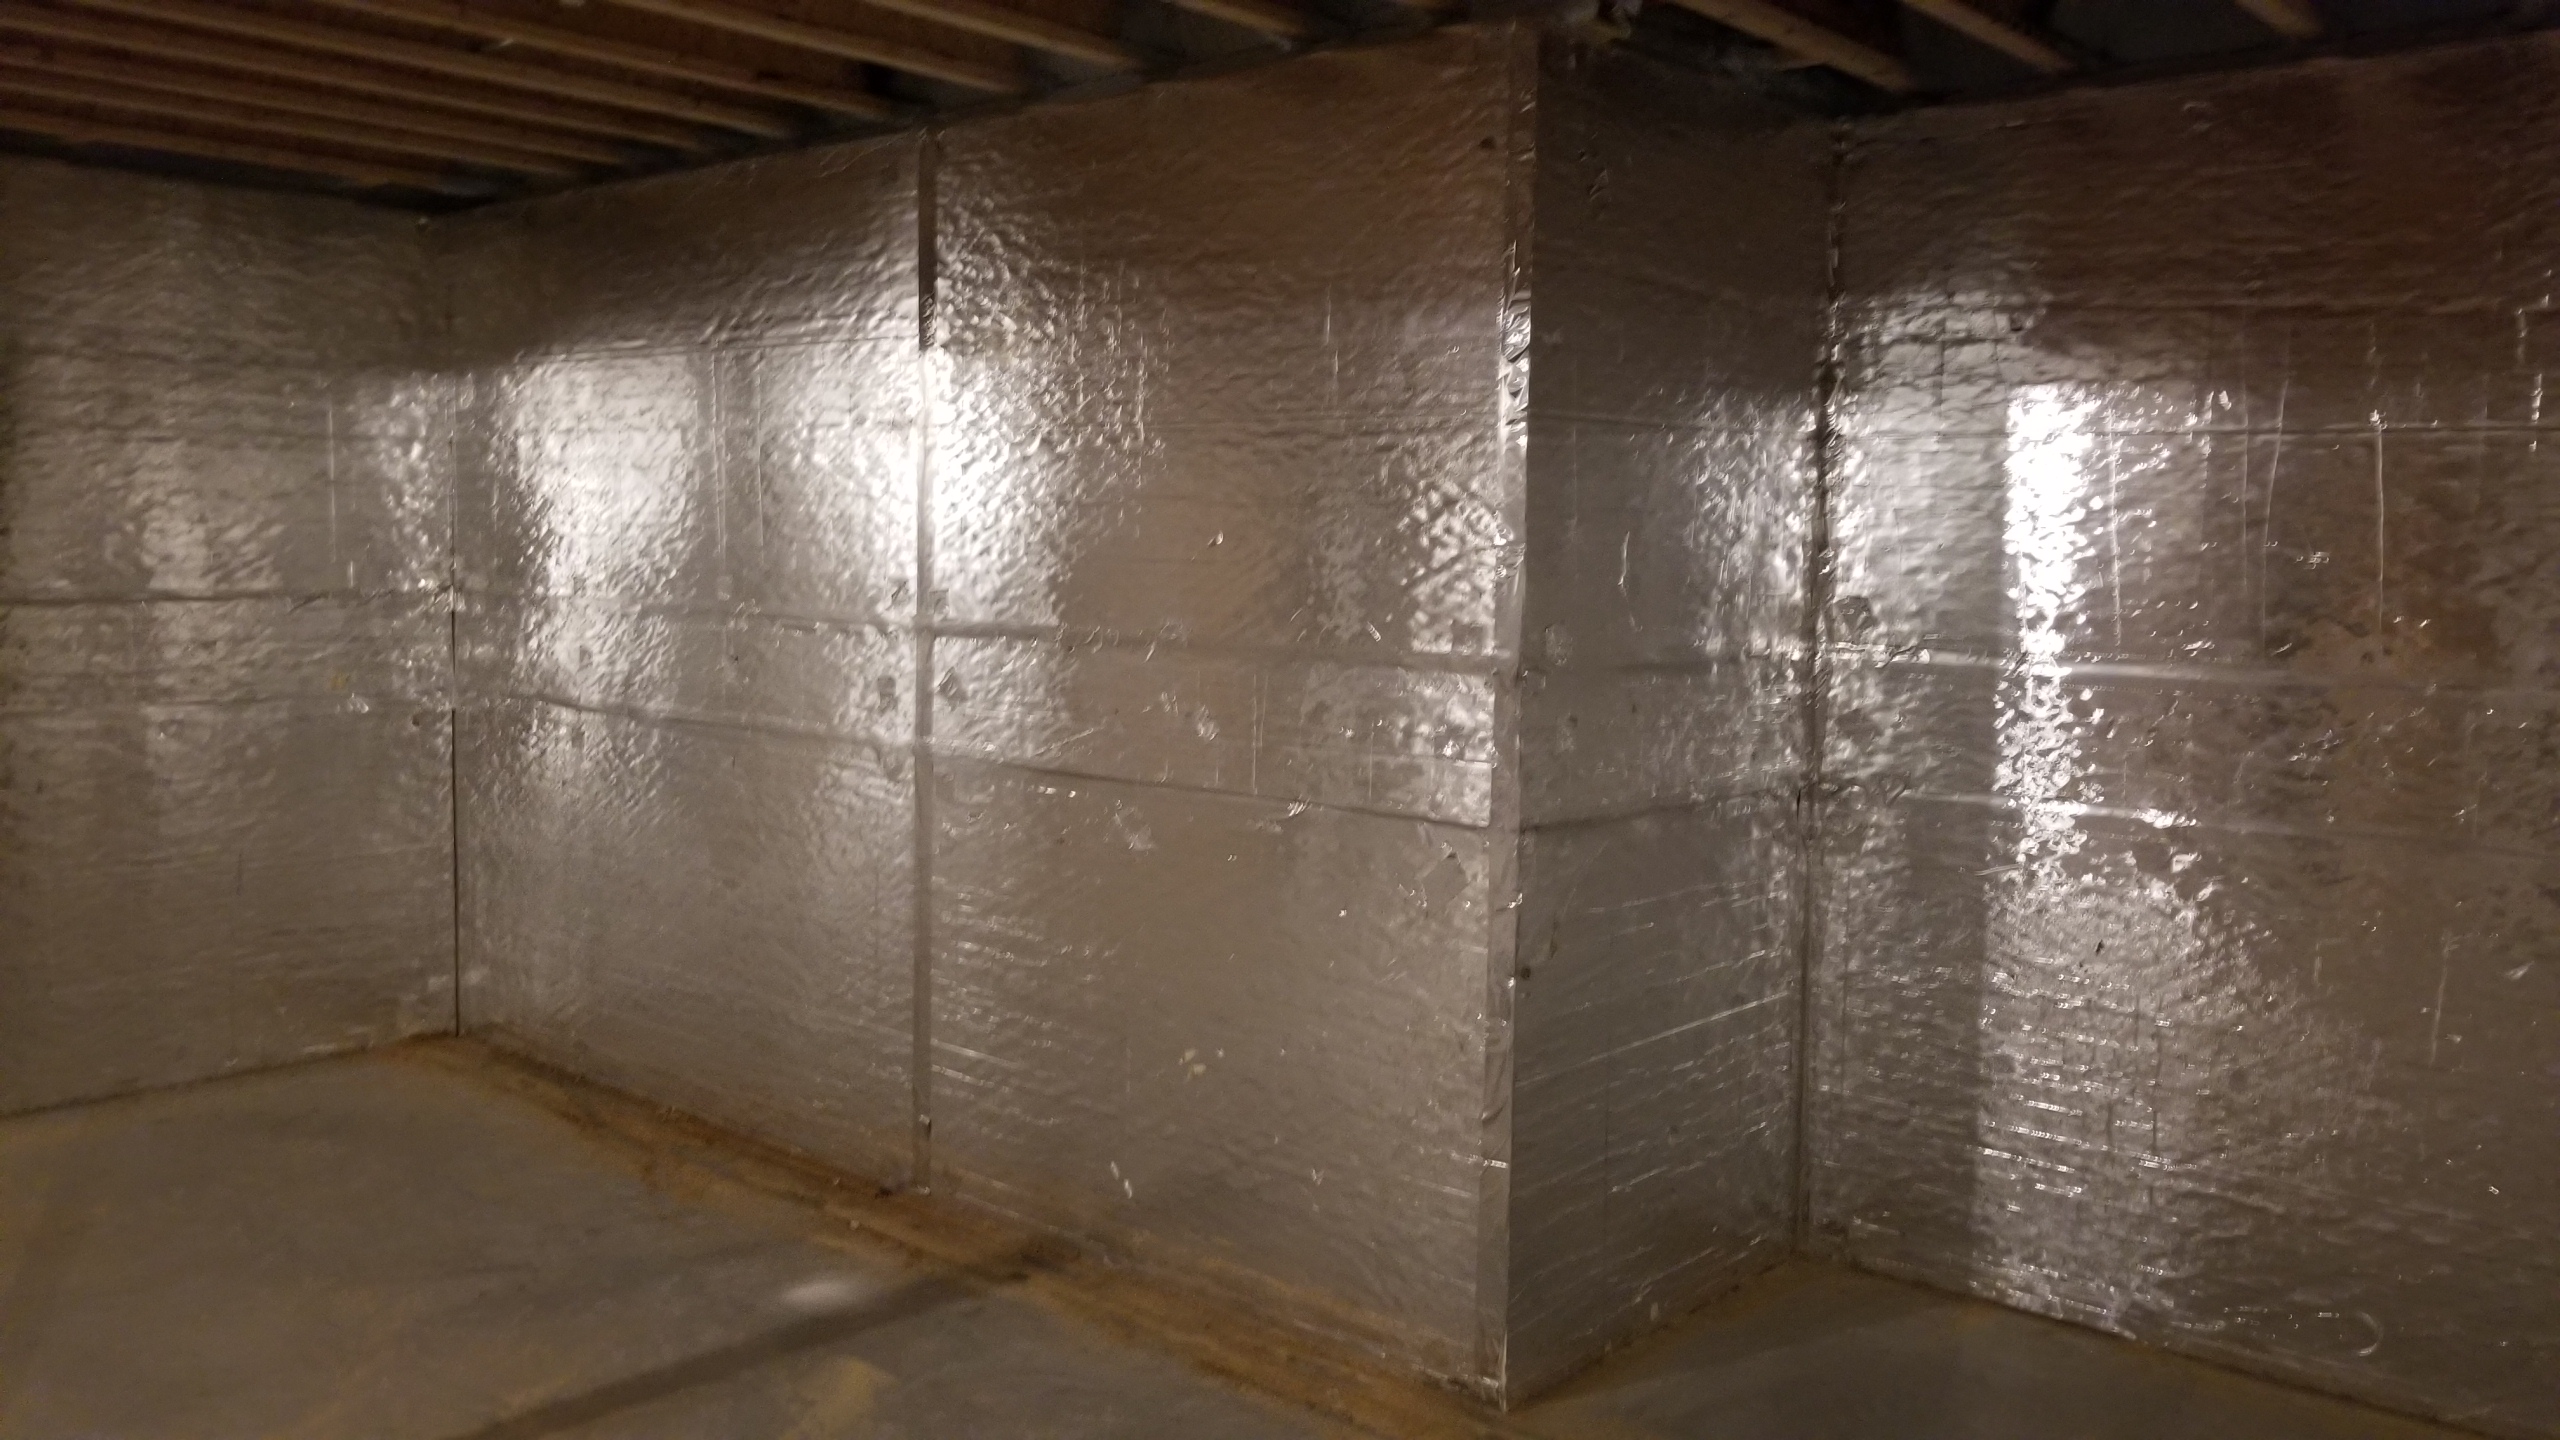
- Install rigid foam insulation to crawlspace walls.
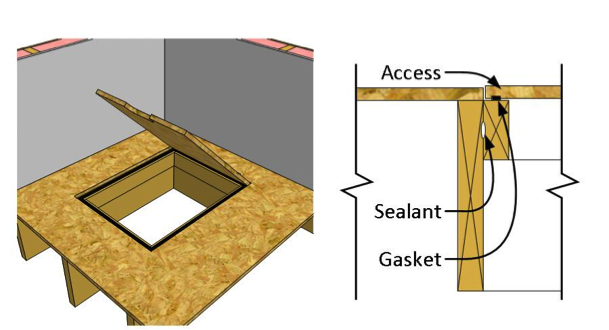
- Insulate access doors and weather strip.
See the Compliance Tab for links to related codes and standards and voluntary federal energy-efficiency program requirements.
Description
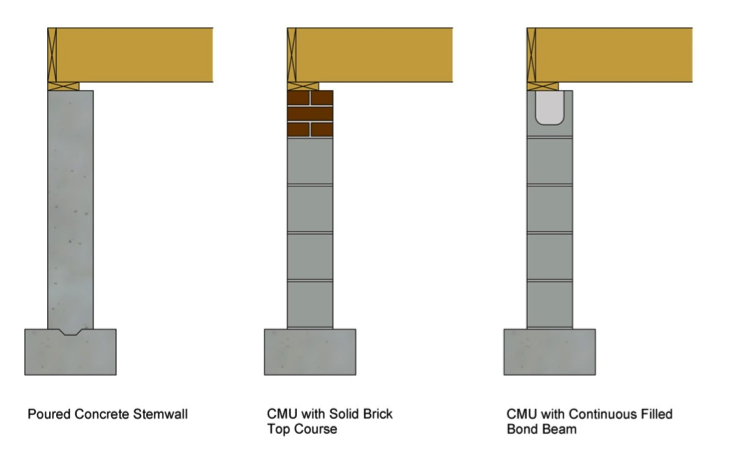
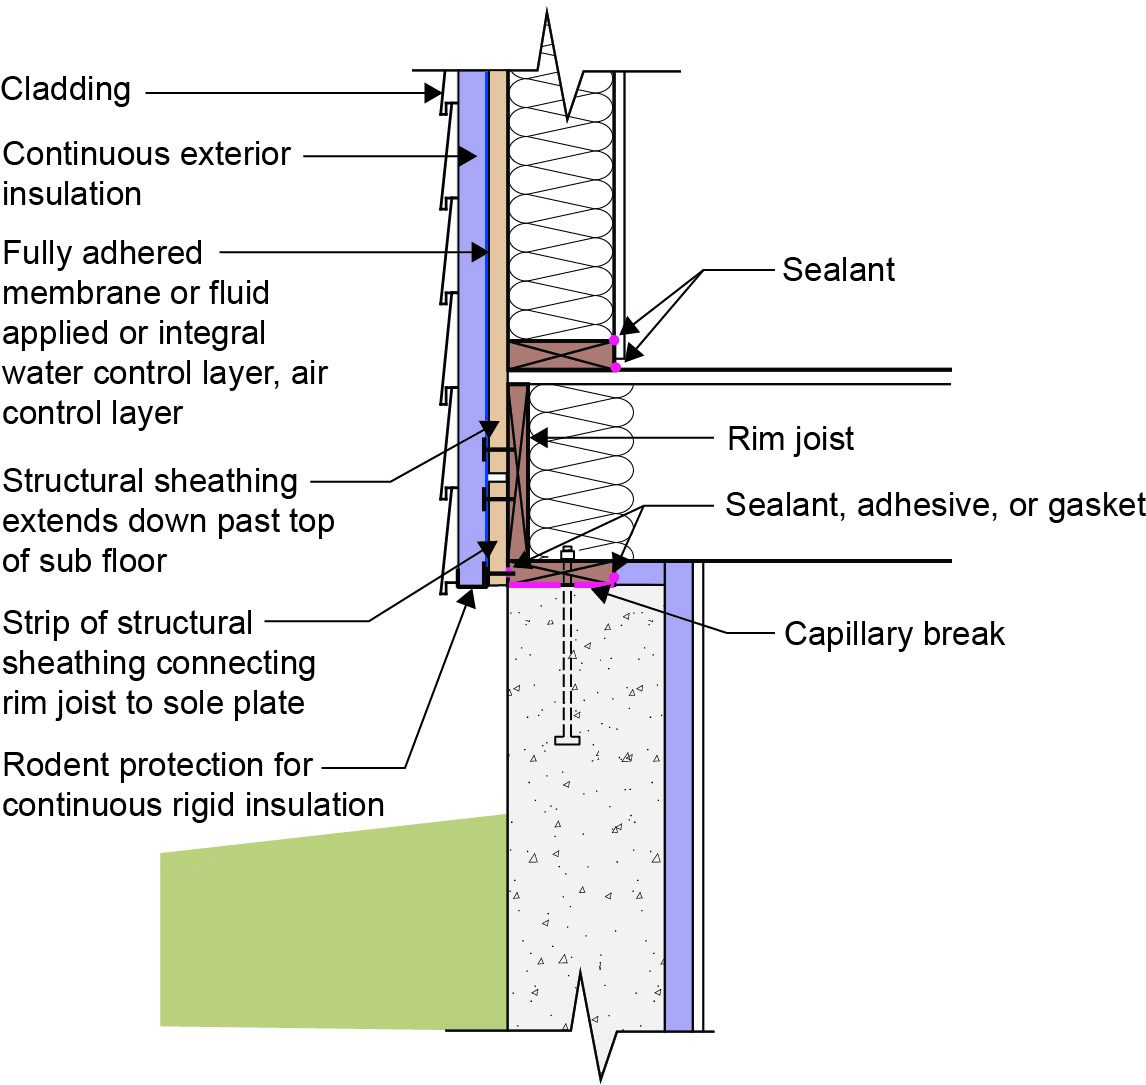
This measure requires the installation of band joist insulation. See the guide Rigid Foam Board Insulation for Existing Band Joists. The method is primarily for existing construction, but the principles apply to new construction as well. Examples of the wall systems that this guide is applicable to are shown in the Scope figure. These examples are constructed of solid concrete or concrete masonry units (CMU) with a continuous brick cap or bond beam.
Prior to insulating the crawlspace walls, a 6-mil polyethylene sheeting vapor retarder, with the sheeting overlapped 12 in. at seams, must be installed on the walls and floor of the crawlspace. For information on how to install a polyethylene vapor retarder in a crawlspace, see “Polyethylene Lapped Up Walls/Piers and Secured in the Ground."
Foam plastic insulation receives special scrutiny in residential building codes because some foam insulations have the potential to release toxic or flammable gases when heated, or they can accelerate the spread of fire if they ignite. To reduce these risks, most codes require a thermal barrier (typically ½-in. gypsum board or equivalent) or an ignition barrier (typically ⅜-in. gypsum board or equivalent) over foam insulation. However, several foam insulation products have been designed and tested to reduce or eliminate those risks. Check with local authorities to ensure that the rigid foam meets all code requirements.
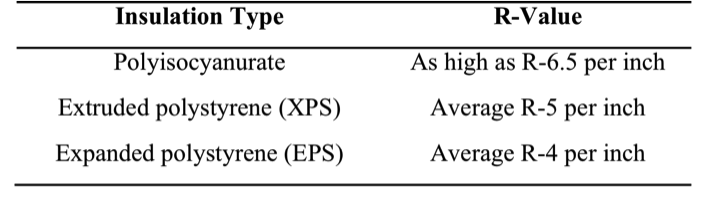
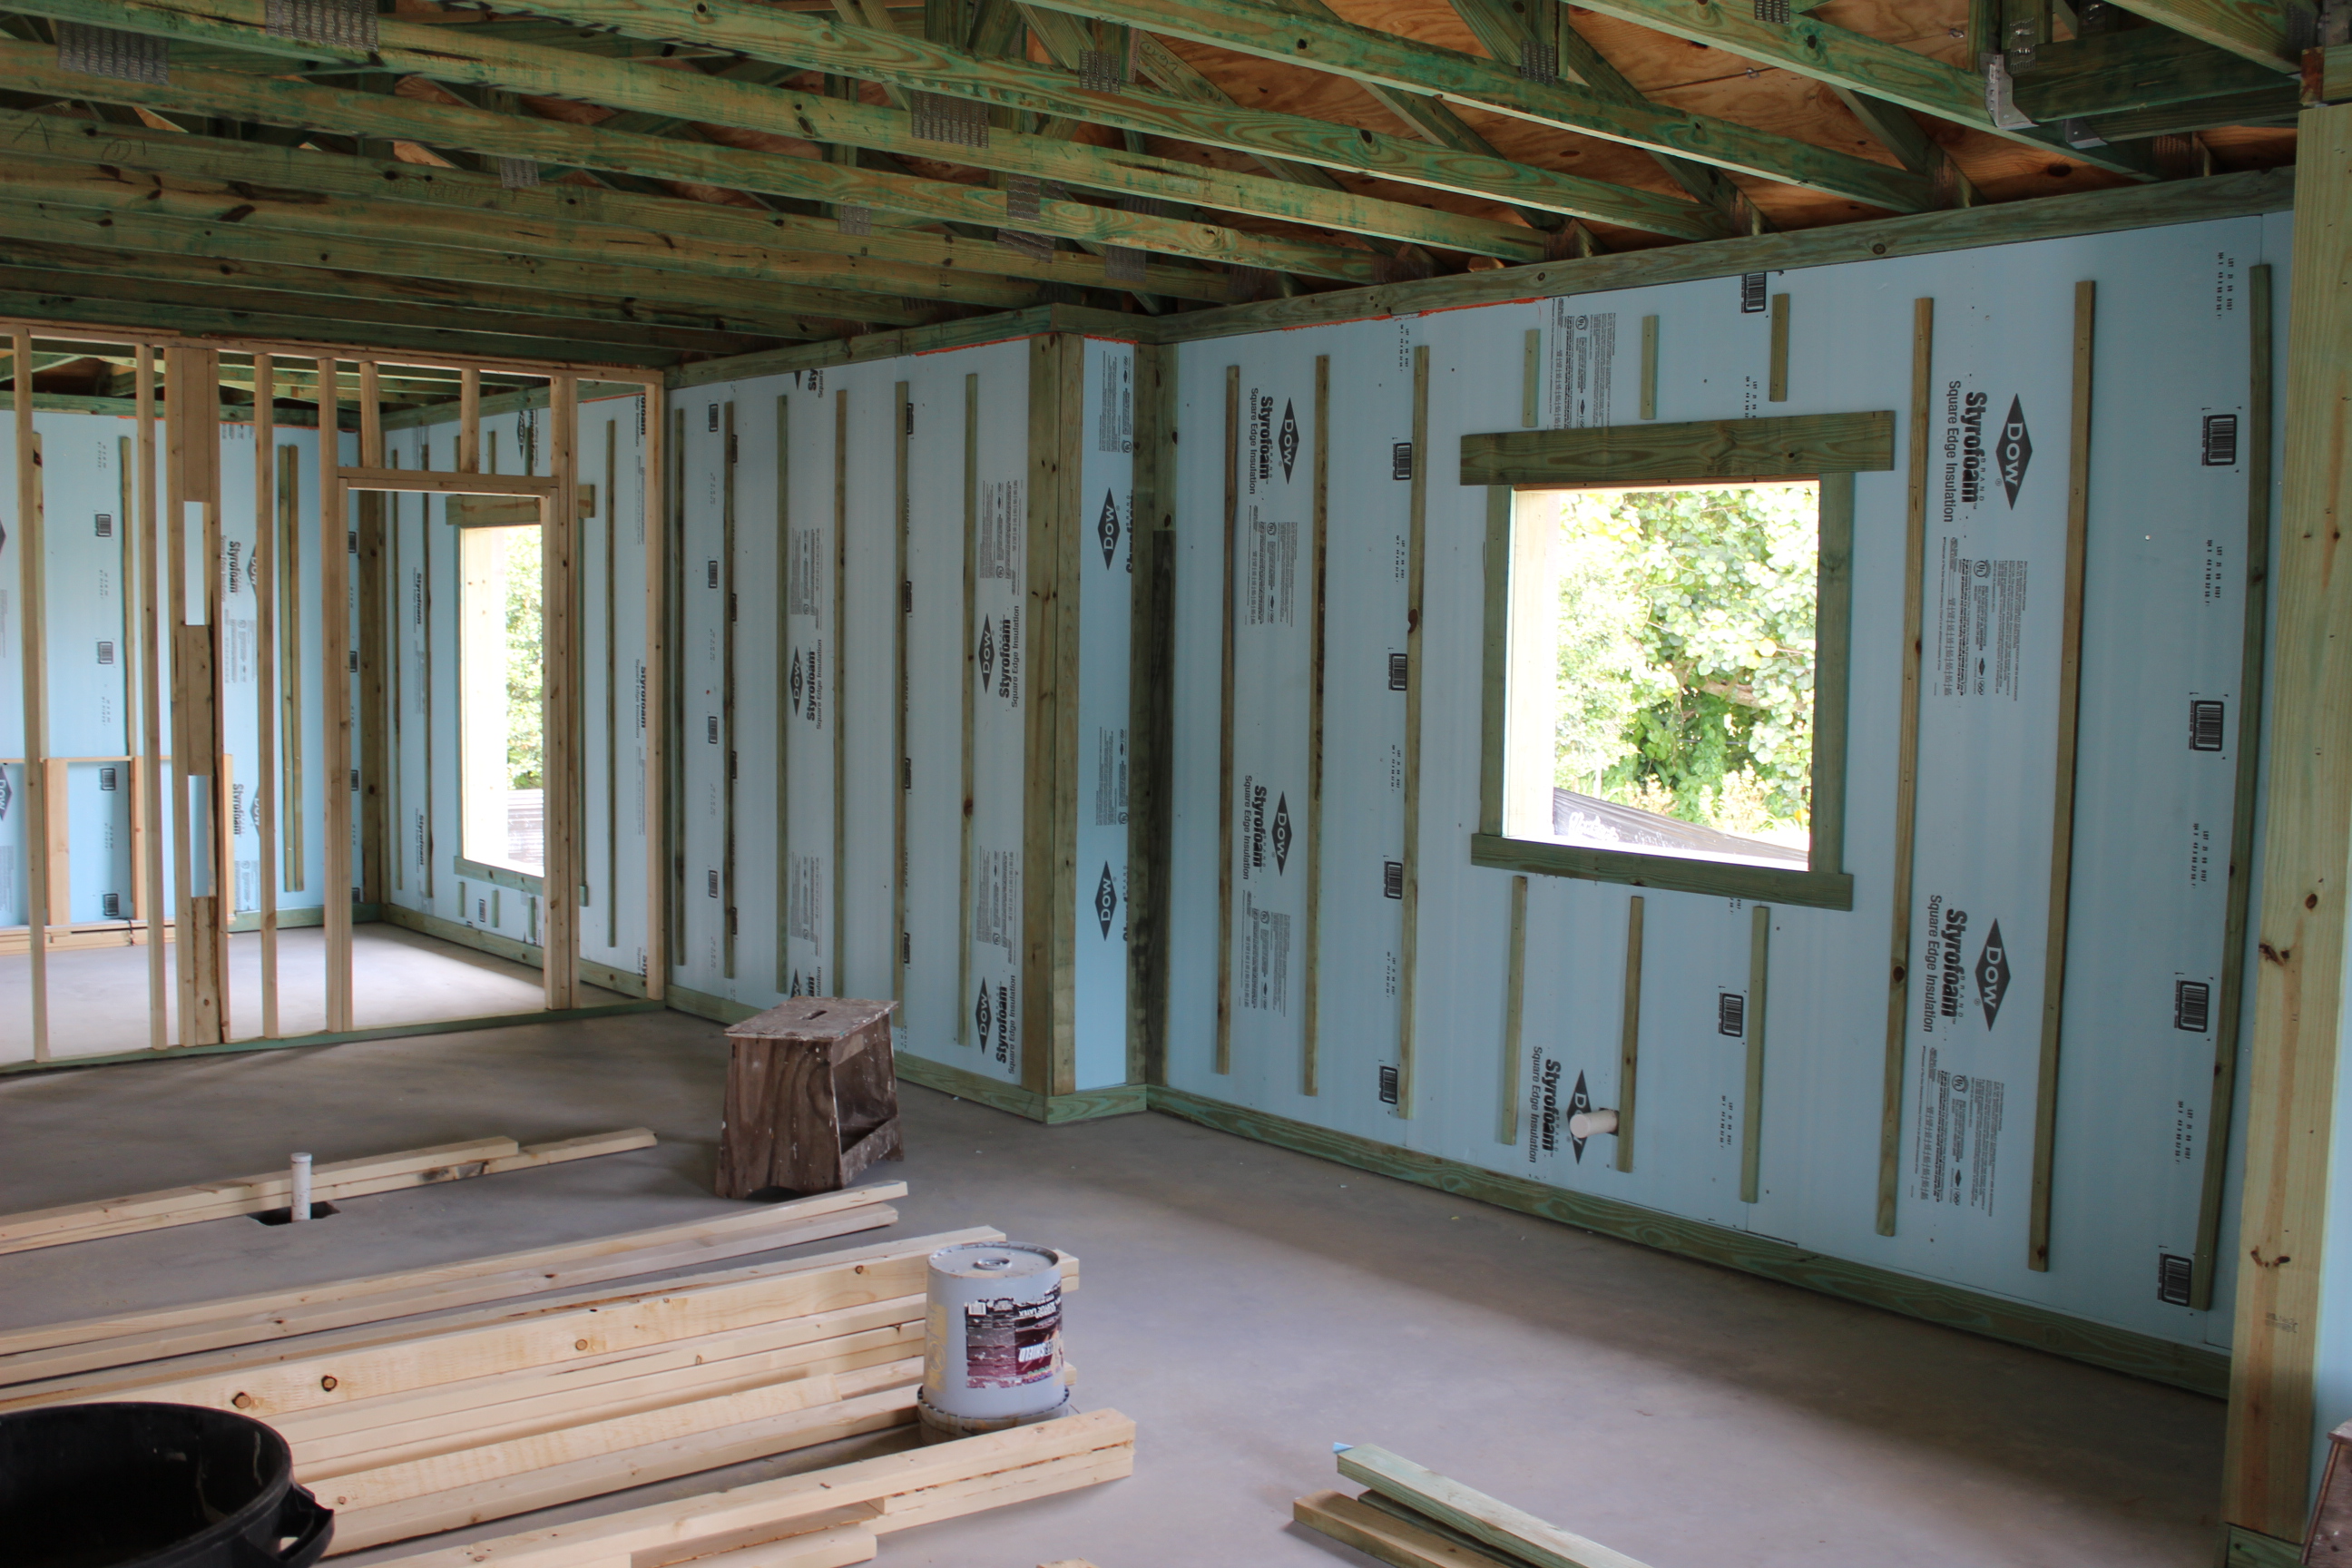
Polyisocyanurate or extruded polystyrene (XPS) rigid foam board is recommended as insulation because of its low permeance to water and high insulation value per inch. The thickness of the foam sheeting may depend on the climate zone in which it is installed, as well as the desired levels of performance.
Table 1 shows the three main types of rigid foam board insulation available in the market today. The R-values vary, depending on the manufacturer, but polyisocyanurate offers the highest R-value.
Many rigid foam board manufacturers apply a thin polyethylene film to both sides of the panels to strengthen them and to make them impermeable to vapor. Use unfaced sheets, or remove the film from the rigid foam board prior to installation, particularly to allow some breathability at the band joist area.
Insulate the Closed Crawlspace Walls with Rigid Foam Board
Check with local authorities to ensure all materials and work will comply with local code requirements, such as the R-value of the insulation, fire and combustion safety requirements, radon mitigation requirements, pest (insect) control, and flood prevention requirements. Refer to the Compliance section of this guide for additional information about potential code requirements.
Ensure that the crawlspace floor and perimeter walls are covered with a 6-mil polyethylene vapor retarder that extends up to 4 in. from the top of the foundation walls. The vapor retarder should be secured to the foundation with strapping attached to the walls using nails, pins, or masonry screws. This vapor retarder is a continuation of the vapor retarder that is installed and secured along the floor of the crawlspace. That is, the wall and floor vapor retarder should be connected and sealed as a liner to prevent moisture and soil gases from seeping through the ground and the crawlspace walls.
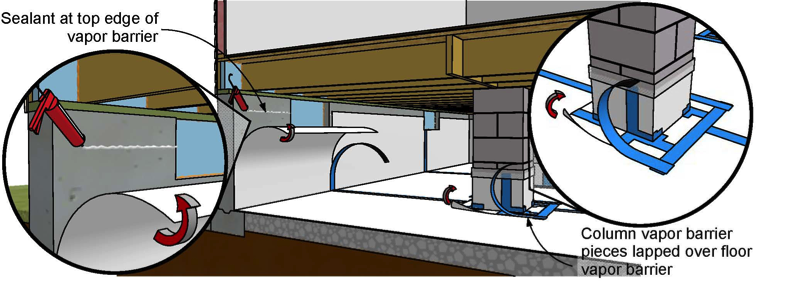
In areas of the United States prone to insect infestation (e.g., termites or carpenter ants), the rigid foam board wall insulation will need to stop 3 in. short of the top of the foundation wall to allow for a 3-in. pest control inspection strip. (The polyethylene vapor retarder behind the foam board stops at 4 in. from the top of the foundation wall.) Consult with the local building inspector and a pest control professional for local requirements regarding a pest control inspection strip at the top or bottom of the foundation wall.
Crawlspaces must always have a drying mechanism. One of the most effective ways is to condition the crawlspace by bringing in a small amount of conditioned air from the mechanical system to temper the space as if it were part of the home. To include a supply and return air strategy to semi-condition the crawlspace, cut a passive return into the floor, and add a small amount of supply air to the space. At minimum, air should be delivered at a rate equal to 1 cfm (0.47 L/s) for each 50 ft2 (4.7 m2) of under-floor area or 50 cfm total, whichever is greater. This strategy meets the requirements of the 2009 International Residential Code (IRC 2009, Section R408.3, p. 108); however, local codes might have different requirements.
Place sheets of unfaced rigid foam board against the interior perimeter of the crawlspace walls, allowing for a 3-in. pest control inspection if required by local jurisdictions.
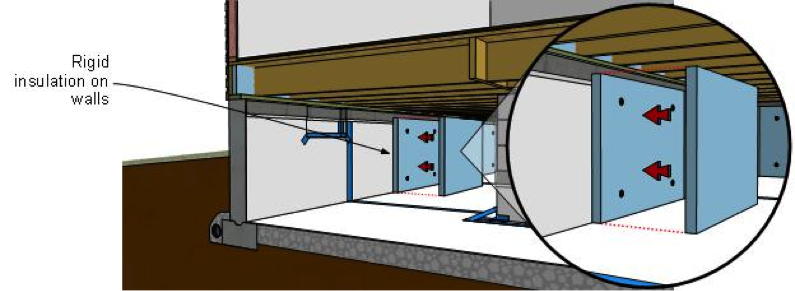
Use masonry fasteners with large, button cap washers (intended for use with foam) to mechanically fasten the rigid foam board to the crawlspace walls from the floor of the crawlspace to the bottom of the floor structure if the termite inspection strip is not needed or, as shown in the figure above, to within 3 in. of the top of the foundation walls, which will allow for the required 3-in. pest inspection strip. The fasteners should be spaced an equal distance apart to ensure effective contact with the foundation wall. The 2009 IRC (Section N1102.2.9, p. 470) states:
“As an alternative to insulating floors over crawl spaces, insulation of crawl space walls shall be permitted when the crawl space is not vented to the outside. Crawl space wall insulation shall be permanently fastened to the wall and extend downward from the floor to the finished grade level and then vertically and/or horizontally for at least an additional 24 inches (610 mm).”
Add pieces of rigid foam in any vent areas. Cut the pieces to fit into the openings to create a snug fit. If a vent is recessed, it may require doubling the thickness of the foam to even the wall surface, as shown in the graphic below.

Apply expansion foam sealer or caulking to seal the additional foam blocks in place.
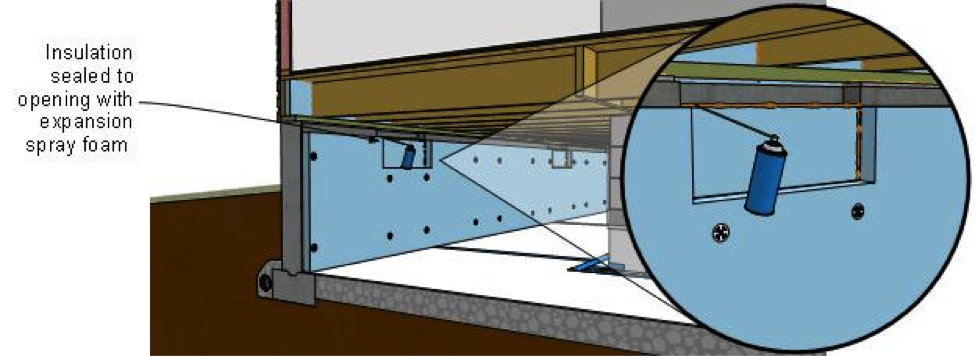
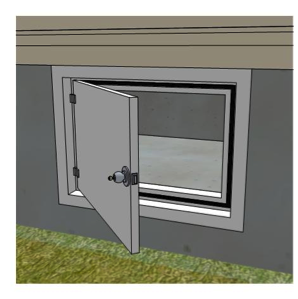
Air seal and insulate the crawlspace access door to prevent outside air from entering the closed crawlspace. The opening of the crawlspace access door also must have weather stripping to prevent air from entering the space.
In flood-prone areas of the United States, local codes may require the installation of flood vents that allow water to pass freely into and out of a foundation to equalize pressure on the foundation walls. Choose flood vents that are designed to reduce standby air leakage. Install the rigid foam panels around all flood vents, and seal the perimeter of the vents with expansion foam sealer or caulking to prevent air leakage. Be careful that the installed foam does not inhibit operation of the vent.
Insulate the Band Joist Area with Rigid Foam Board
See guidance for insulating and air sealing the band joist area in the following guides: Garage Rim/Band Joist Adjoining Conditioned Space and Rigid Foam Board Insulation for Existing Band Joists.
Finish the Work
It is not necessary to apply insulation to the underside of the floor above a closed crawlspace because the rigid foam board insulation applied to the walls provides the necessary thermal protection.
When the installation of insulation on the crawlspace walls and band joist is complete, inspect the vapor retarder on the floor of the crawlspace. If any tears or rips in the vapor retarder occurred during the work, repair and seal the tears.

For more information on how to close vented crawlspaces, see “Guide to Closing and Conditioning Ventilated Crawlspaces”.
Ensuring Success
SITE EVALUATION
The first step in developing a plan for a crawlspace conversion is to perform a thorough evaluation of both the exterior and interior conditions. This inspection must be based on federal, state, and local regulations and carried out by a licensed or certified contractor. The following areas and specific details must be attended to before starting the sealing and insulating of any crawlspace (Dickson 2013, chapter 2).
Immediate Health and Safety Issues
Electrical Inspection
Assessing the current electrical system within the crawlspace is one of the first steps to take. A qualified electrician might need to be consulted if there is exposed or damaged wiring within the crawlspace. If there is a risk of shock or electrocution from faulty wiring, postpone the inspection of the interior systems until any issues have been resolved and the space is safe.
Mechanical Systems/Carbon Monoxide
Establish the type of space conditioning equipment and water heaters. If fuel-fired combustion appliances reside in the crawlspace, it is important to determine their venting and combustion air sources. These life-safety strategies are a critical first step in the overall renovation efforts of the crawlspace. If natural draft-vented appliances that depend on combustion air from the open vents in the foundation are present, equipment upgrades and replacement or alterations to the makeup air methods will be necessary. The best strategy is to replace natural draft-vented appliances with sealed combustion, direct vent furnaces or all-electric heat pumps. The direct vent gas furnaces draw combustion air directly from outside through piping to the unit. All combustion by-products are vented through sealed piping to the outdoors, minimizing the possibility of any carbon monoxide spillage. Verify that a carbon monoxide detector is installed and operational in the crawlspace.
If there are any gas line regulators within the crawlspace, they will need to be moved so they vent to the outdoors.
Mold/Framing
Finding some traces of mold or mildew is common in a poorly detailed and ventilated crawlspace. The floor deck and all framing in the crawlspace are vulnerable to some level of fungal attack if moisture levels within the crawlspace go unchecked. Once high levels of moisture are present, moisture will tend to condense on the cooler surfaces of the wood framing and floor deck. These areas are easy to observe and are an indicator of high moisture content. Any surface mold or fungal growth will require a certified mold remediation expert to conduct an inspection and determine an appropriate remediation protocol to clean all the components before work can proceed. Structural repairs to framing components might be necessary if there is extensive damage or wood rot.
Asbestos
Exposure to asbestos increases a person’s risk of developing lung disease. Old crawlspaces might have asbestos-based insulation wraps on ductwork and plumbing pipes. If discovered, a certified asbestos abatement firm will have to be contracted to inspect and determine the best treatment strategy for the particular situation. General movement and unintentional contact with asbestos-based products can stir the fibers, which then become airborne within the confined space, posing a health risk to workers.
Guidance for mitigating asbestos-related issues from HUD, EPA, NIH, OSHA and FEMA is available in Homeowner's and Renter's Guide to Asbestos Cleanup After Disasters and Asbestos: Worker and Employer Guide to Hazards and Recommended Controls.
Hazardous Materials Storage
Completely remove and properly dispose of all hazardous materials if any hazardous-type material has been stored in the crawlspace (e.g., creosote-treated lumber or pesticides).
Radon
In areas where radon is a risk or where the local residential code requires control of radon or other soil gases, houses with closed crawlspace foundations must be tested and monitored. If necessary, an approved mitigation system must be installed. The U.S. Environmental Protection Agency (EPA) and the Surgeon General recommend testing all homes for radon.
Installing a passive radon mitigation system before undertaking all sealing work could be necessary in radon-prone areas. After the crawlspace is closed and sealed, final testing for radon can take place. Converting the passive system to an active system is easily accomplished if readings exceed the EPA’s acceptable levels.
Exterior Moisture Sources
Roof Drainage Away from the House
Inspect the roof’s bulk water discharge strategy, including all gutters and downspouts, to ensure bulk water runoff is not allowed to collect next to or near the foundation. Downspouts should discharge directly into drains that are directed to a storm sewer system, retention pond, daylighting if the land topography permits, or yard bubblers that are a minimum of 10 ft away from the foundation.
Grading Around the House
Evaluate the grading around the perimeter of the house. Ideally, the ground slopes a minimum of 5% away from the foundation walls for at least the first 10 ft to direct groundwater away from the structure. If proper slope away from the foundation cannot be established because of the home’s elevation and surrounding grade, a surface drainage system (“grade gutter”) should be installed. This system collects water and diverts it away from the foundation.
Before beginning any excavation work, make sure to identify any underground utilities that enter the house, and notify the respective utility companies as required.
Sprinklers
Turn on all sprinklers installed near the foundation to observe their flow pattern. The sprinklers must be positioned so they do not subject the foundation or its immediate vicinity to water.
Foundation Waterproofing and Drainage
Implementing foundation waterproofing and a perimeter drain strategy on the exterior walls will be required on exceptionally problematic sites. Such sites typically have high groundwater or water flow against the foundation that cannot be remediated in any other way.
Foundation Vents
The foundation vents can be another source of bulk water entry. Make sure that they are not too low in relation to the exterior grade. If the vents fall near or below grade, they will need to be filled in with block, brick, or concrete and sealed to prevent water entry.
Access Door
Inspect the general location and overall weather seal of the access door. The access door should be located high enough off of grade to prevent groundwater runoff and snowmelt from entering the crawlspace. If the door is located too low and there is not enough clearance to adjust the entry height, remove the door, seal the opening, and install a new entry at a different location on the exterior that will accommodate the clearance. If no suitable location meets these criteria, cutting an access way through the floor system within the house will be required.
Interior Moisture Sources
Standing Water on the Floor
Any recognizable standing water must be eliminated and the source of the water identified and repaired to prevent a reoccurrence that would raise the moisture levels within the space. Typically, standing water indicates a leaking pipe from above or groundwater entering the space from outside the building or under the floor.
Leaking Drains or Supply Plumbing
Conduct a thorough inspection of all drains and supply plumbing located within the crawlspace to make sure no leaks are adding moisture to the space.
Mechanical System Condensate Drain
Evaluate the entire length of the condensate drain from the air handler to the discharge point. Because of the potentially corrosive discharge from sealed combustion furnaces and air conditioners, condensate drains must be installed as required by local jurisdictions. They must be properly supported and routed directly to a sealed sump crock lid, a floor drain fitting, or a sanitary sewer.
In addition to the primary drain and as a safety precaution if the primary drain fails, an auxiliary drain pan with a separate drain beneath any cooling or evaporator coil is recommended to prevent condensate from flooding the crawlspace. Inspect the current condition of the crawlspace floor because it is a critical factor in directing any surface water toward collector drains and the sump. It also minimizes moisture movement from the soil into the crawlspace environment. Poor sealing practices of the polyethylene vapor barrier allow ground moisture to infiltrate through gaps or open seams in the barrier, increasing the relative humidity of the crawlspace. Grading the base to a minimum 3% slope toward low-spot collector drains that can move water directly to the sump is necessary to eliminate ground moisture from seeping into the space.
Vent Openings
All intentional, operable, or fixed foundation vents will need to be sealed to prevent warm, moisture-laden air from being drawn into the crawlspace. If vents are too low and likely to pose bulk water intrusion into the crawlspace, they will need to be sealed with concrete block, brick, concrete, or glass block windows to prevent water entry.
Sump Pump
Inspect all sump pump crock pits installed in the crawlspace, looking at the detailing of their lids and any drain pipe penetrations. Missing lids and an absence of sealing will allow moisture to enter and increase the relative humidity of the crawlspace. The 2009 IRC states the following in Section R405.2.3, Drainage System (IRC 2009a, p. 107):
In other than Group I soils, a sump shall be provided to drain the porous layer and footings. The sump shall be at least 24 inches (610 mm) in diameter or 20 inches square (0.01129 m2), shall extend at least 24 inches (610 mm) below the bottom of the basement floor and shall be capable of positive gravity or mechanical drainage to remove any accumulated water. The drainage system should discharge into an approved sewer system or to daylight.
In areas with high water tables, installing a battery backup system to the pump is recommended to aid in drainage during power outages.
Drain Pipes
To prevent any water backups through drain pipes, Advanced Energy recommends the following (Advanced Energy 2012, p. 12):
Use a backflow valve in crawlspace drains and a check valve in sump pump out-flow pipes to prevent reverse flow of outside water into the crawlspace and to reduce the chance of vermin entry. Floor drains with p-traps that connect to the whole house plumbing waste drain or to a municipal sewer system may allow entry or sewer gases if (when) the trap dries out and pose a risk of sewage backup.
Other Contaminants
Feces, Carcasses, and Other Animal Waste
Old existing crawlspaces, if left unattended, can contain large amounts of animal droppings or carcasses of animals that have found a way into the crawlspace and died. Be prepared for this possibility, and have the means to conduct a thorough cleanup before proceeding.
Animal Infestation
In some cases, crawlspaces that have been left unattended or neglected can harbor wild animals. Recognizing the exterior details that allow entry and exit and other activity will help prepare the inspector. Depending on the severity, the local animal control agency might need to assist in removing any unwanted animals.
Pest Control
Termites and carpenter ants are known to thrive in dark, damp places that have a readily available food source nearby. Inspecting the foundation walls and framing for signs of these pests is required before moving forward. Any observed signs will then require a more in-depth inspection and treatment by a pest control professional.
Thermal
Insulation Strategy
The current insulation levels, location, and integrity will need to be assessed to determine the appropriate strategy for the climatic region. Existing fiberglass batt insulation in the floor system and draped over the foundation walls should be removed and discarded. A good work plan will include a thorough specification and implementation strategy for thermal insulation.
Space Conditioning
Crawlspaces must always have a drying mechanism. One of the most effective ways is to condition the crawlspace by bringing in a reduced amount of conditioned air from the mechanical system to temper the space as if it were part of the home. A supply and return air strategy must be included to semi-condition the crawlspace.
In some areas of the country that do not have air conditioning or if local requirements will not allow band joist insulation, it might be necessary to install a permanent dehumidification system in the crawlspace to maintain the 30%–50% humidity levels within the space.
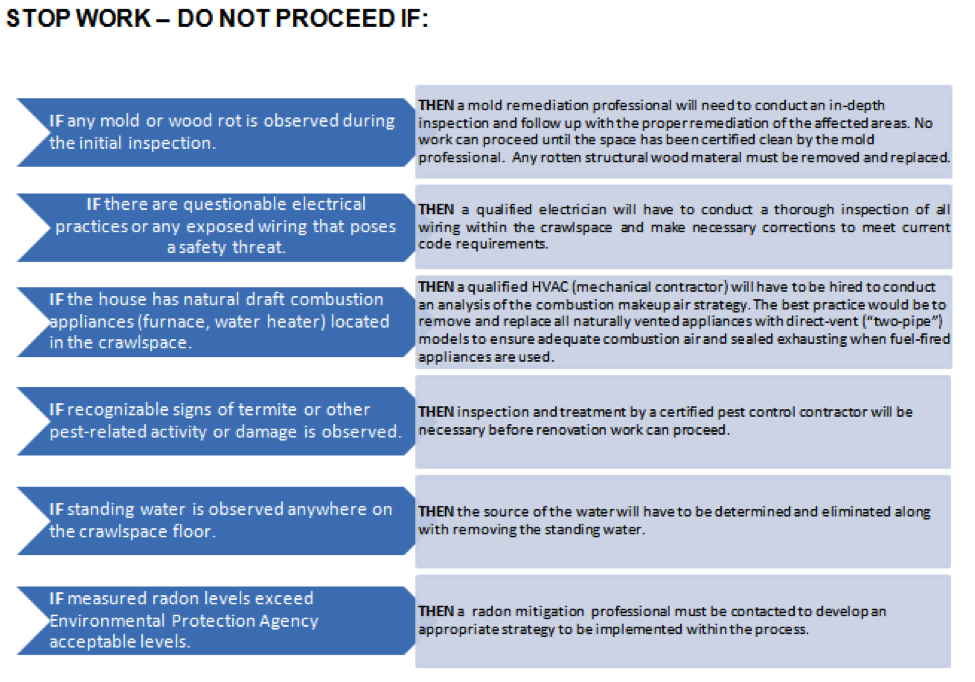
Stop Work Conditions
Figure 8 summarizes the conditions that will necessitate stopping all work on the crawlspace project. Once these problems have been solved, renovation work can continue.
OTHER CONSIDERATIONS
It is imperative to check with local code authorities prior to the installation of any insulation in closed crawlspaces and band joist areas to ensure that all local code requirements are met, such as the R-value of insulation, fire and combustion safety requirements, pest inspection requirements, and radon mitigation requirements.
Also, local codes in flood-prone areas of the United States may require the installation of flood vents that allow water to pass freely into and out of a foundation to equalize pressure on the foundation walls. Flood vents should be designed to reduce standby air leakage.
If the bottom of the crawlspace is below grade, it will be necessary to damp-proof or waterproof the exterior wall surface of the crawlspace. For information on how to accomplish this water management strategy, see “Damp-Proof Exterior Surface of Below-Grade Walls."
During any sealing process, follow safe work practices to minimize any effects from sealants or adhesive fumes on workers’ health. Temporary ventilation could be necessary during the installations.
Applying a coat of light-colored paint over the 3-in. pest control inspection gap at the top of the foundation walls will facilitate pest inspections.
Never store flammable materials (e.g., gasoline, solvents) in any crawlspace.
Check with local authorities, and be sure the rigid foam material meets all safety requirements and fire codes.
Cover the floor of the crawlspace and the crawlspace perimeter walls with 6-mil polyethylene vapor retarder.
Assess the moisture potential in the band joist area, and if appropriate, insulate and seal the band joist as an integral part of the work.
Typical R-values for common insulation materials are summarized in this table, which also identifies the vapor retarder classification for each insulation.
Region
During warm seasons in mixed-humid and humid climates, the outside air can contain more water vapor than the air within the crawlspace. Thus, a closed crawlspace reduces the potential for moisture problems (e.g., condensation, mold growth, wood rot) within the crawlspace. Local building codes can have specific requirements for types of insulation and requirements for the 3-in. pest control inspection strip at the top of the foundation wall.
2009 - 2021 IECC and IRC Minimum Insulation Requirements
Install insulation in amounts that meet or exceed code-required levels for your climate zone. Please see this table for the minimum insulation requirements for ceilings, walls, floors, and foundations in new homes, as listed in the 2009, 2012, 2015, and 2018 IECC and IRC.
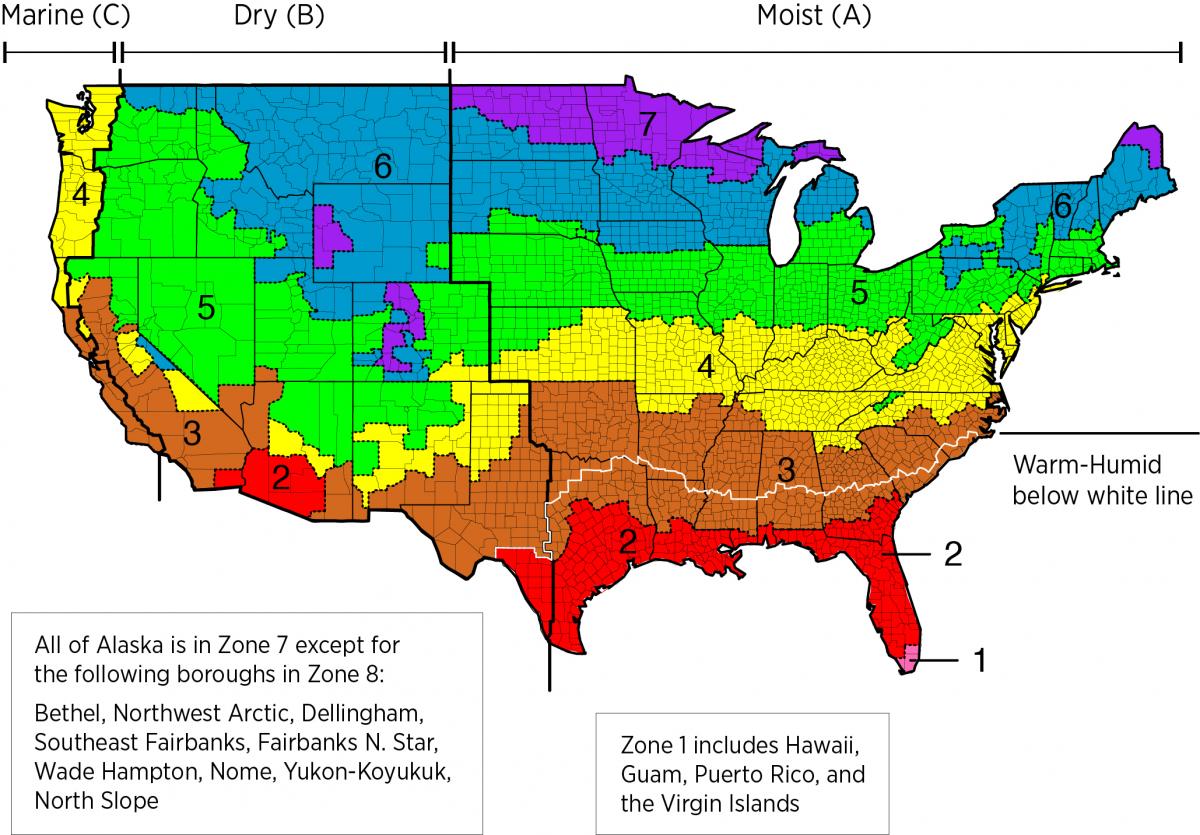
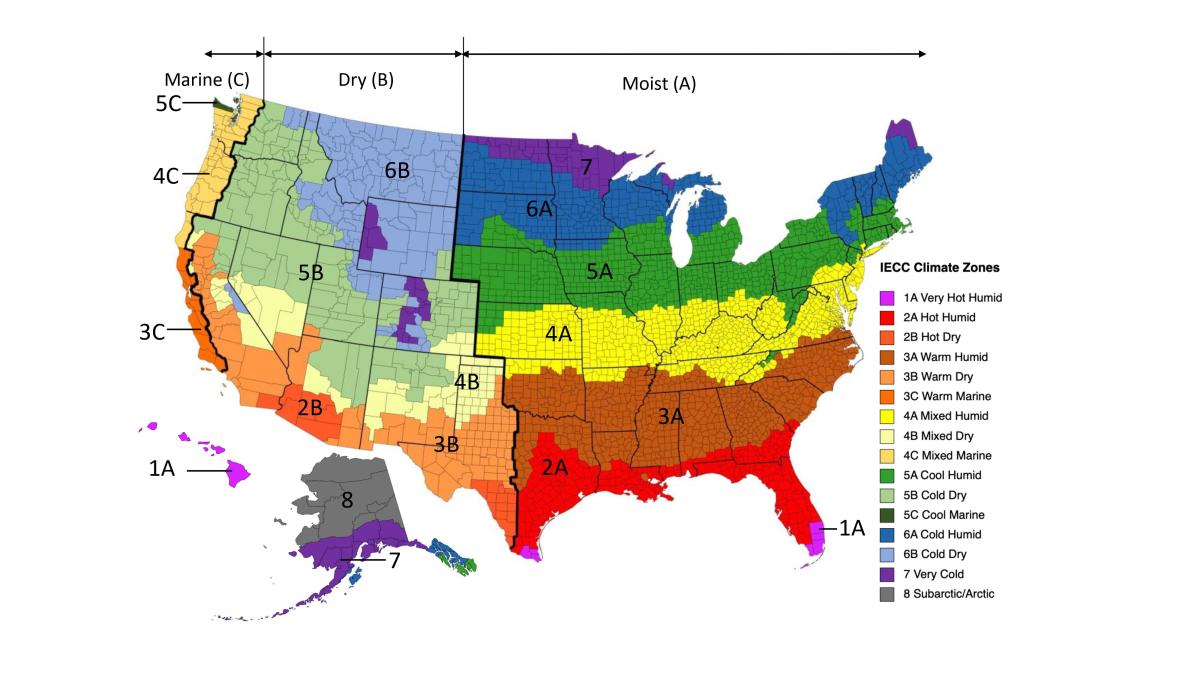
The map in Figure 1 shows the climate zones for states that have adopted energy codes equivalent to the International Energy Conservation Code (IECC) 2009, 12, 15, and 18. The map in Figure 2 shows the climate zones for states that have adopted energy codes equivalent to the IECC 2021. Climate zone-specific requirements specified in the IECC are shown in the Compliance Tab of this guide.
Pests
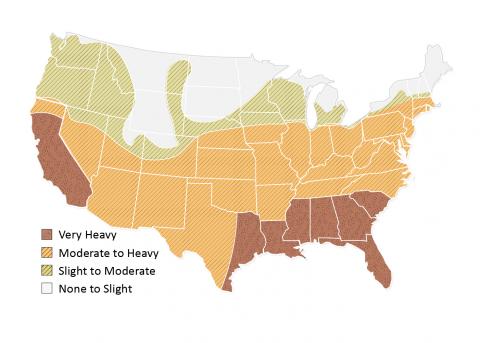
Where termite infestation is heavy (see map), when installing rigid foam on the interior or exterior of the basement or crawlspace walls, leave a termite inspection strip or gap in the insulation to allow inspection of the wall for the presence of termite tunnels.
Training
Right and Wrong Images

Source
Source
Source
Source
Source
Source
Source
Videos

Compliance
More Info
References and Resources
*For non-dated media, such as websites, the date listed is the date accessed.
Contributors to this Guide
The following authors and organizations contributed to the content in this Guide.
Building Science Corporation, lead for the Building Science Consortium (BSC), a DOE Building America Research Team
Sales
High-R Foundation Insulation = High-Efficiency or Ultra-Efficient Foundation Insulation

Technical Description
There are two levels of foundation insulation: high-efficiency insulation, which meets the 2015 International Energy Conservation Code, and ultra-efficient insulation, which is 25% more efficient than this national code. Using high-efficiency and ultra-efficient insulation, along with professional installation (e.g., no gaps, voids, compression, or misalignment with air barriers; complete air barriers; and minimal thermal bridging) creates conditioned spaces that require very little heating and cooling, along with, even comfort and quiet throughout the house.
Questions? Comments? Contact our webmaster.