

Scope

Air-seal above-grade sill plates adjacent to conditioned space to minimize air leakage.
- Air-seal between the sill plate and the sub-floor with caulk, foam, or an equivalent material.
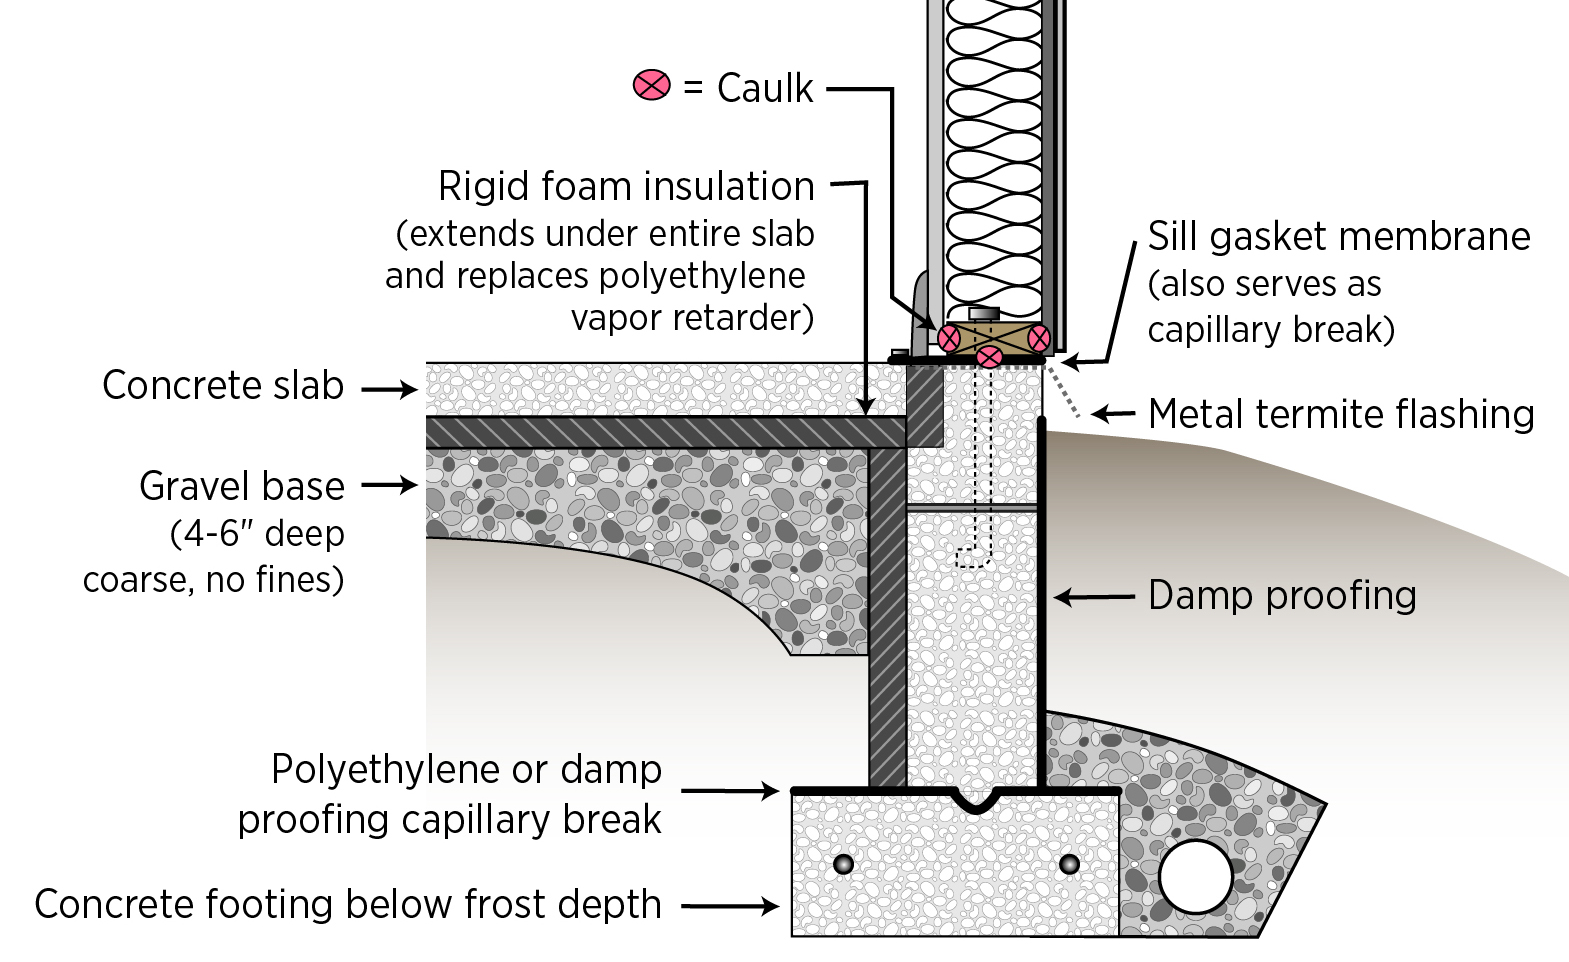
- Install a foam gasket beneath sill plates that are sitting on concrete or masonry and adjacent to conditioned space to both air-seal and serve as a capillary break between the concrete and the sill plate.
See the Compliance Tab for links to related codes and standards and voluntary federal energy-efficiency program requirements.
Description
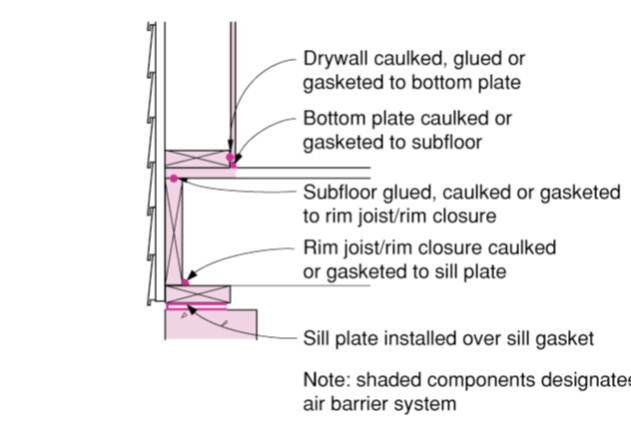
For a home to perform efficiently, the walls, ceiling, and foundation that comprise the building shell must provide a continuous air barrier. Any seams where two different building components come together in the building shell represent a potential source of air leakage that must be air-sealed with an appropriate sealing material. The sill plate where the wall meets the concrete foundation is especially susceptible to air leakage for two reasons. First, because the concrete surface is sometimes rough, a smooth seam between the foundation and the sill plate is difficult to achieve. Additionally, the stack effect naturally pulls air in through the lower part of the building where the sill plate is located.
The sill plate (sometimes called the mud sill) is the board laid directly on top of the foundation wall (Figure 1). It usually consists of one layer of 2x6 or 2x8 pressure-treated lumber. In platform construction, the band joist and floor joists rest on top of the sill plate. They support the subfloor and the base plate (also known as a bottom plate or sole plate), which sits on the subfloor and to which the wall studs are attached. The sill plate is attached to the foundation wall with anchor bolts that are embedded in the concrete of the foundation wall.
Source
Fact sheet describing air-sealing at rim joists.
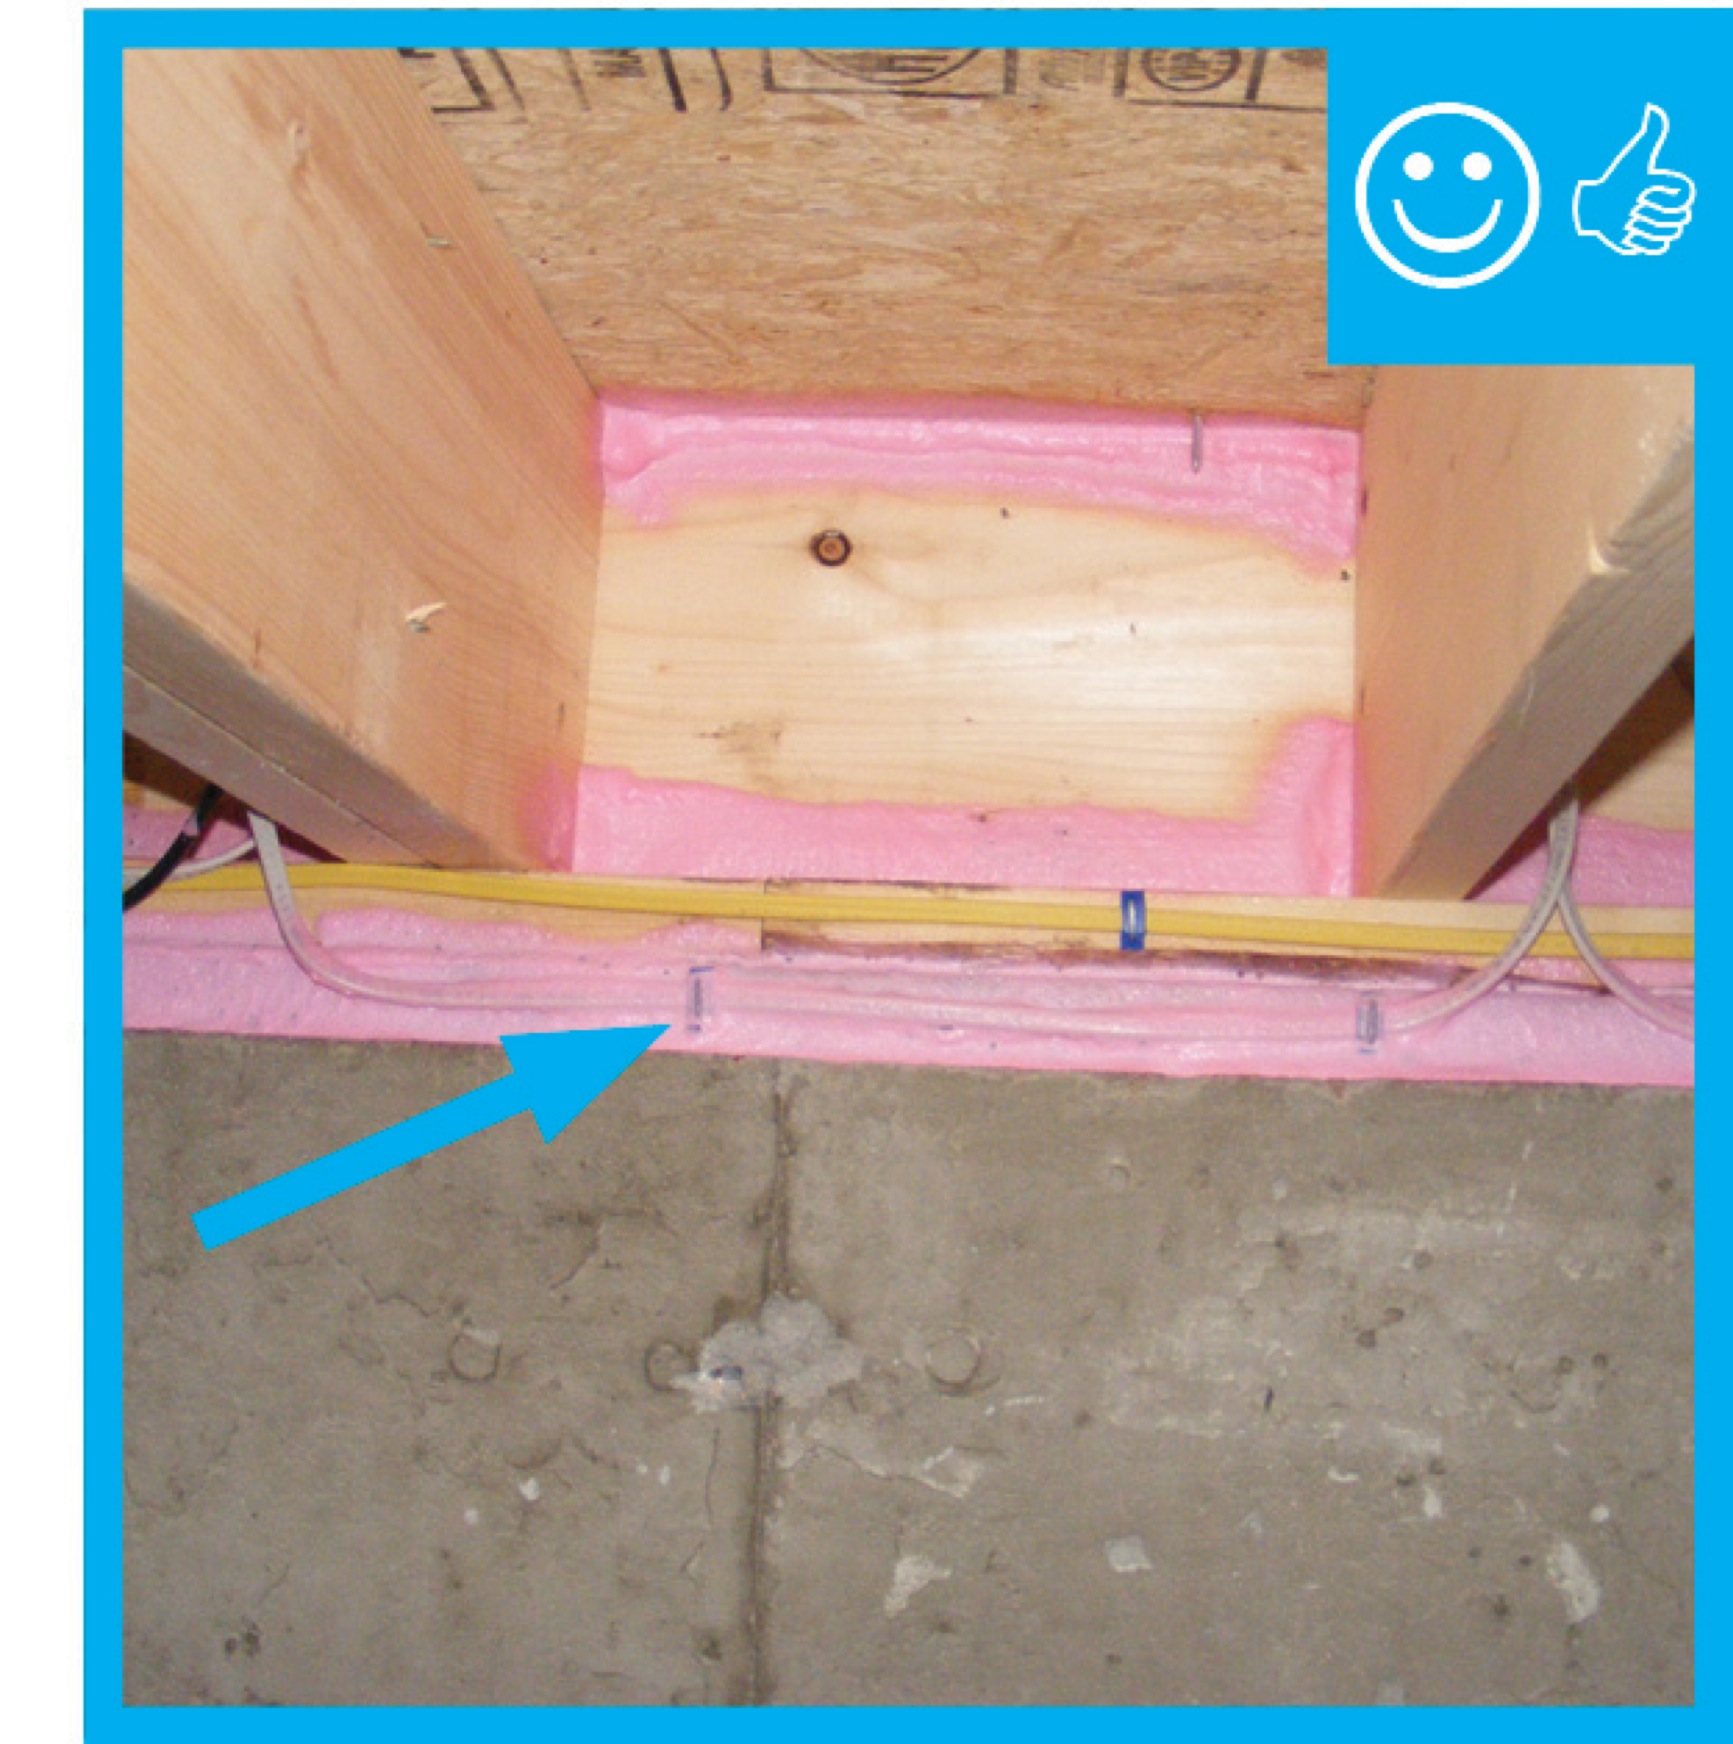
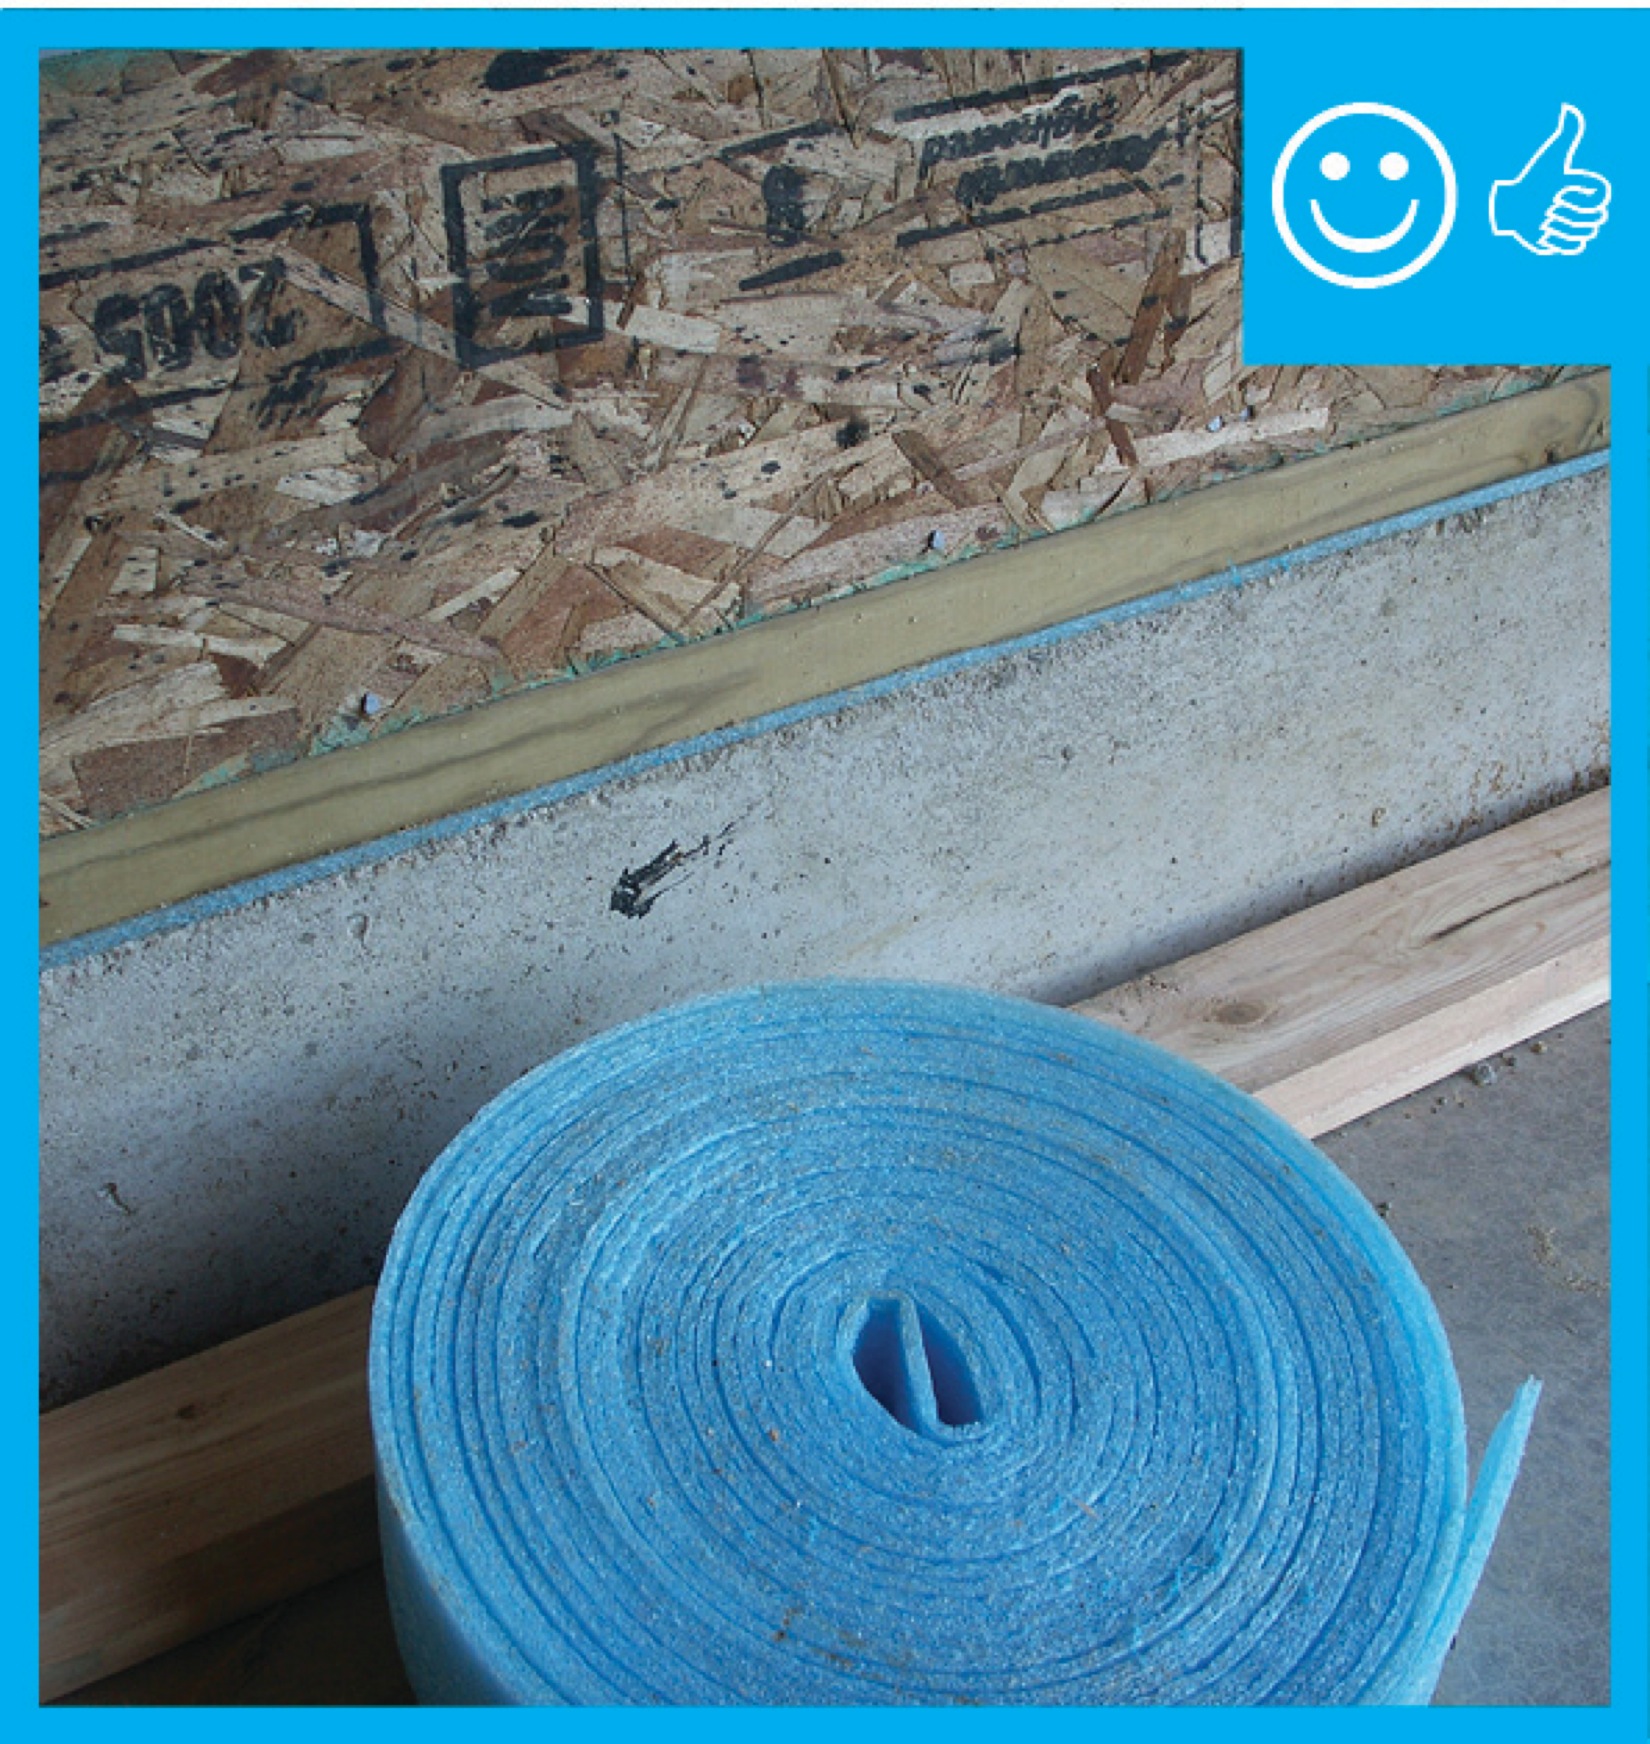
The best way to air-seal the sill plate is to place a sill sealer (also called a sill gasket) on the concrete before laying down the sill plate. Sill sealer is a pliable foam product that is available in varying widths up to 10 inches wide. It comes in rolls and is rolled out over the concrete along the foundation perimeter. The flexible sill sealer product conforms to any irregularities in the surface of the concrete. A waterproof closed-cell foam product should be selected that will both air-seal and provide a capillary break preventing any moisture that migrates up through the concrete from reaching the wood of the sill plate. The rot-resistant product also prevents insect and rodent intrusion. Some builders seal the sill plate to the foundation wall with two large beads of caulk but a sill seal product that covers the whole sill plate area is preferable because of its waterproofing capability and inherent uniformity.
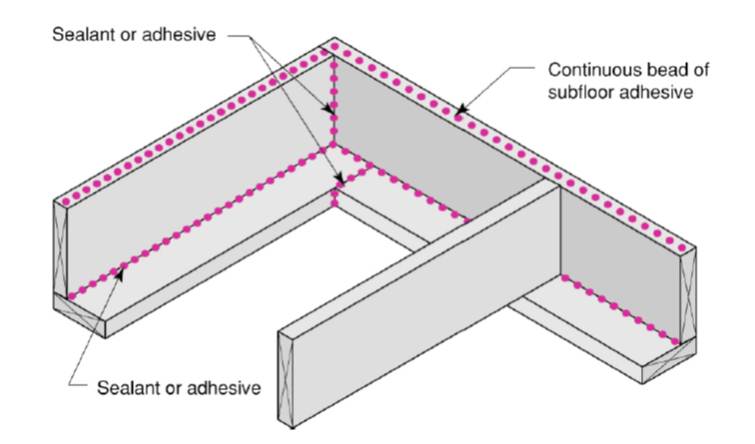
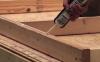
The seam between the sill plate and the rim joist above is sealed with caulk (Figure 2). The entire sill plate-rim joist area can be further air-sealed and insulated with spray foam, but sill plate joints and seams with rim joists should first be caulked. The hole where the anchor bolt protrudes through the sill plate can also be caulked.
Source
Fact sheet describing air-sealing at rim joists.
Sill sealer installation could be done by the framer. This task should be included in the contract for the appropriate trade depending on the workflow at the specific job site.
How to Air-Seal the Sill Plate
- Lay the sill plate boards along the perimeter of the foundation. The edge of the sill plate should be set back from the outside face of the foundation a distance equal to the thickness of the exterior sheathing. Mark the locations of the anchor bolts and drill holes for the bolts. Lay the boards on the sill to ensure they fit then set them aside (Koel 2008).
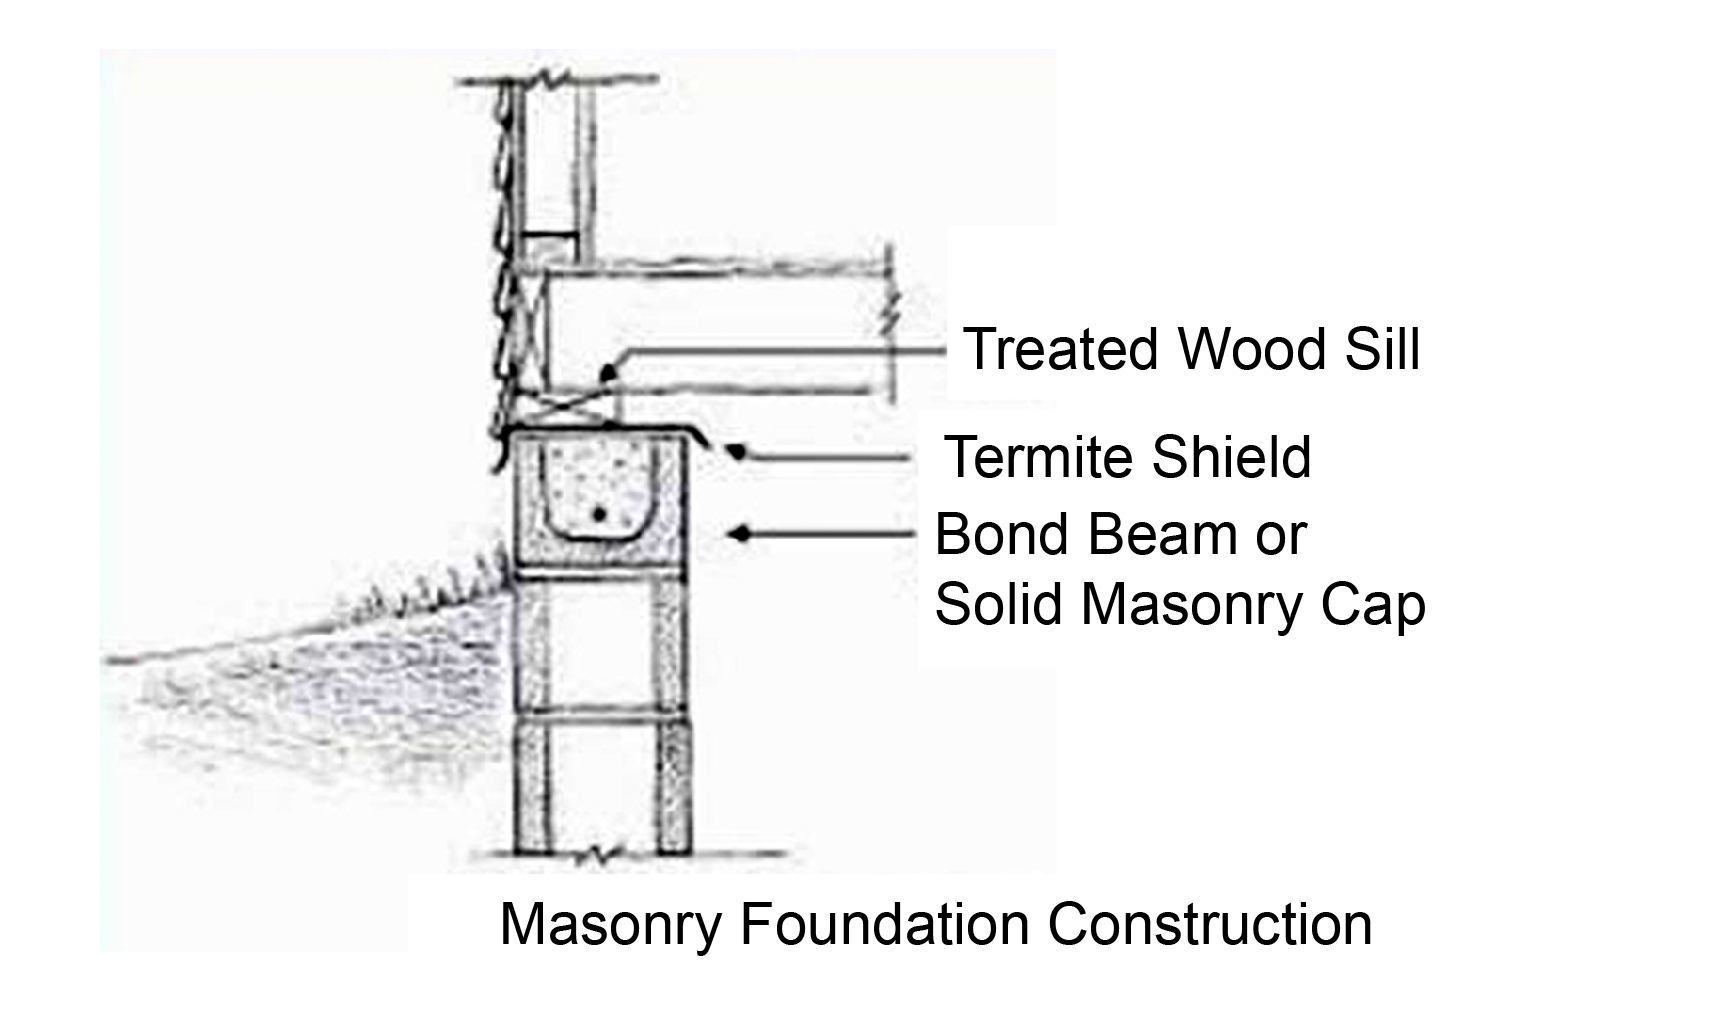
- Install a termite shield if necessary. The termite shield is a strip of 26-gauge aluminum, copper, or galvanized sheet metal laid along the outer edge of the foundation wall. The outer edge extends out from the exterior wall and is bent down at an angle to form a drip edge and a diverter, which makes termite presence more visible (Figure 3). The shield is sealed to the concrete with epoxy and joints in the flashing are glued with epoxy or are soldered (BSC 2009b).
Source
Report describing measures that builders in mixed-humid climates can use to build homes that have whole-house energy savings of 40% over the Building America benchmark with no added overall costs for consumers.
- Roll out sill sealer along the perimeter of the foundation wall. Press down, and cut if needed to allow anchor bolts to come through the sealer. Apply caulk around anchor bolts.
- Lay sill board back in place over termite shield, sill sealer, and anchor bolts. Secure anchor bolts with washers and nuts.
- Install rim joists. Caulk at rim joist-sill plate seams (BSC 2009c).
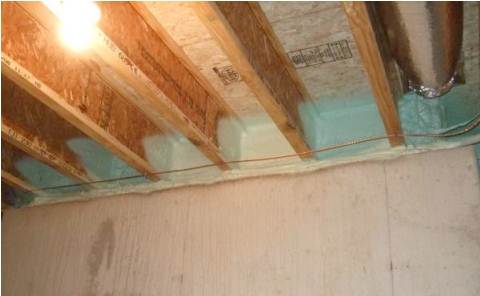
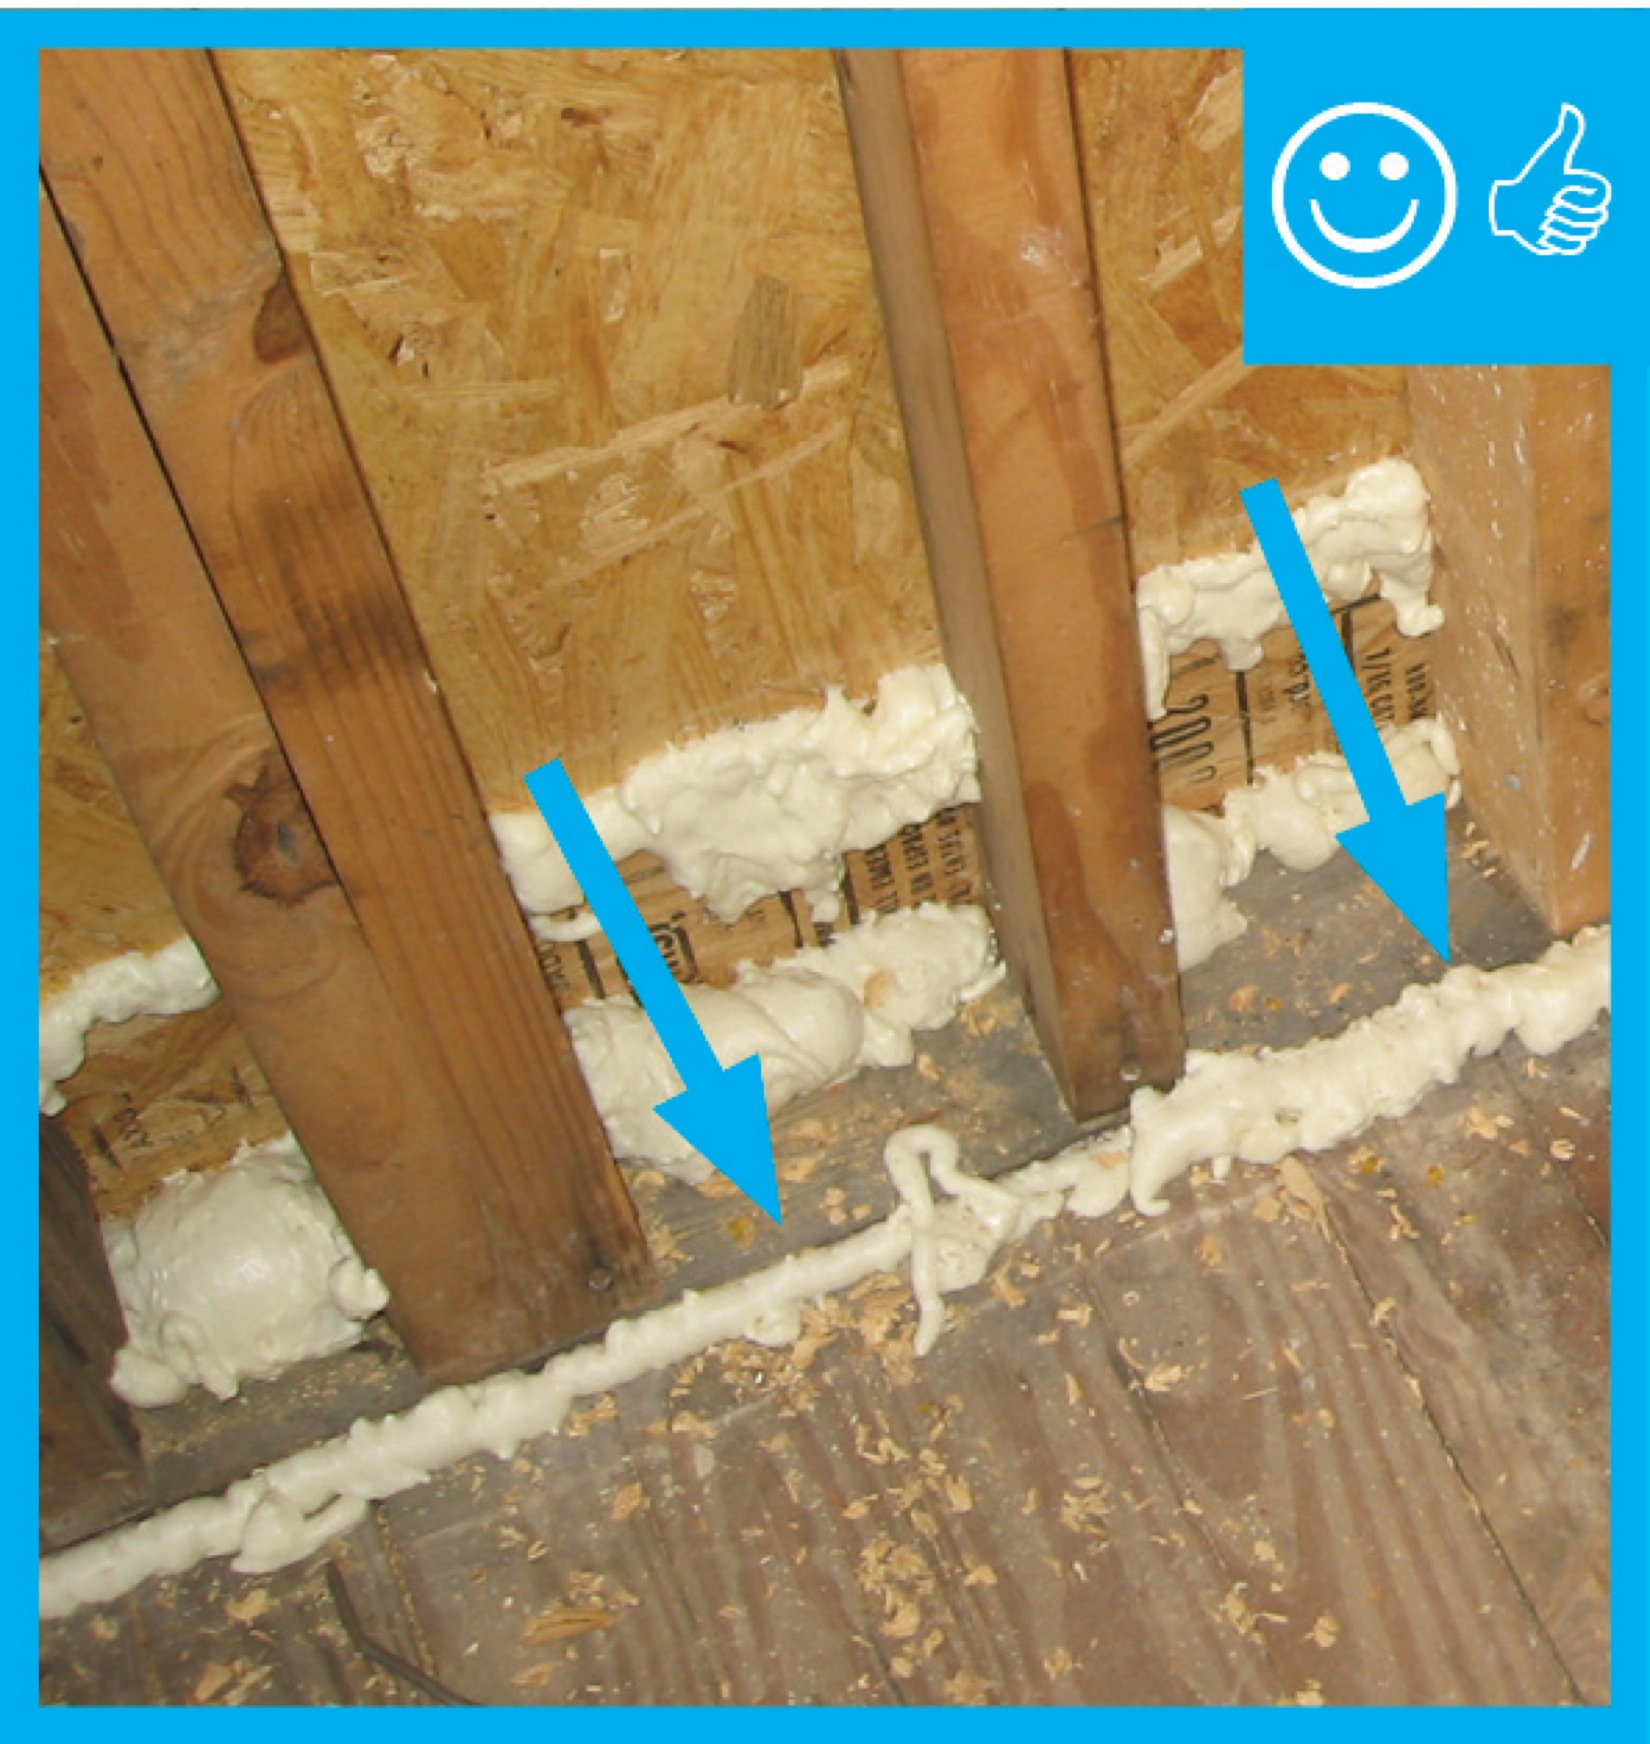
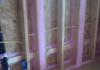
- Optionally, for additional air-sealing and insulation, apply spray foam to the subfloor-rim joist-sill plate juncture (Figure 4).
Source
Report describing measures that builders in mixed-humid climates can use to build homes that have whole-house energy savings of 40% over the Building America benchmark with no added overall costs for consumers.
Ensuring Success
Before drywall is installed, visually inspect that a foam gasket has been installed under the sill plate and that the sill plate is caulked to the rim joist.
Region
Pests
Air-sealing sill plates at exterior walls will minimize the entry of insects and rodents into the home.
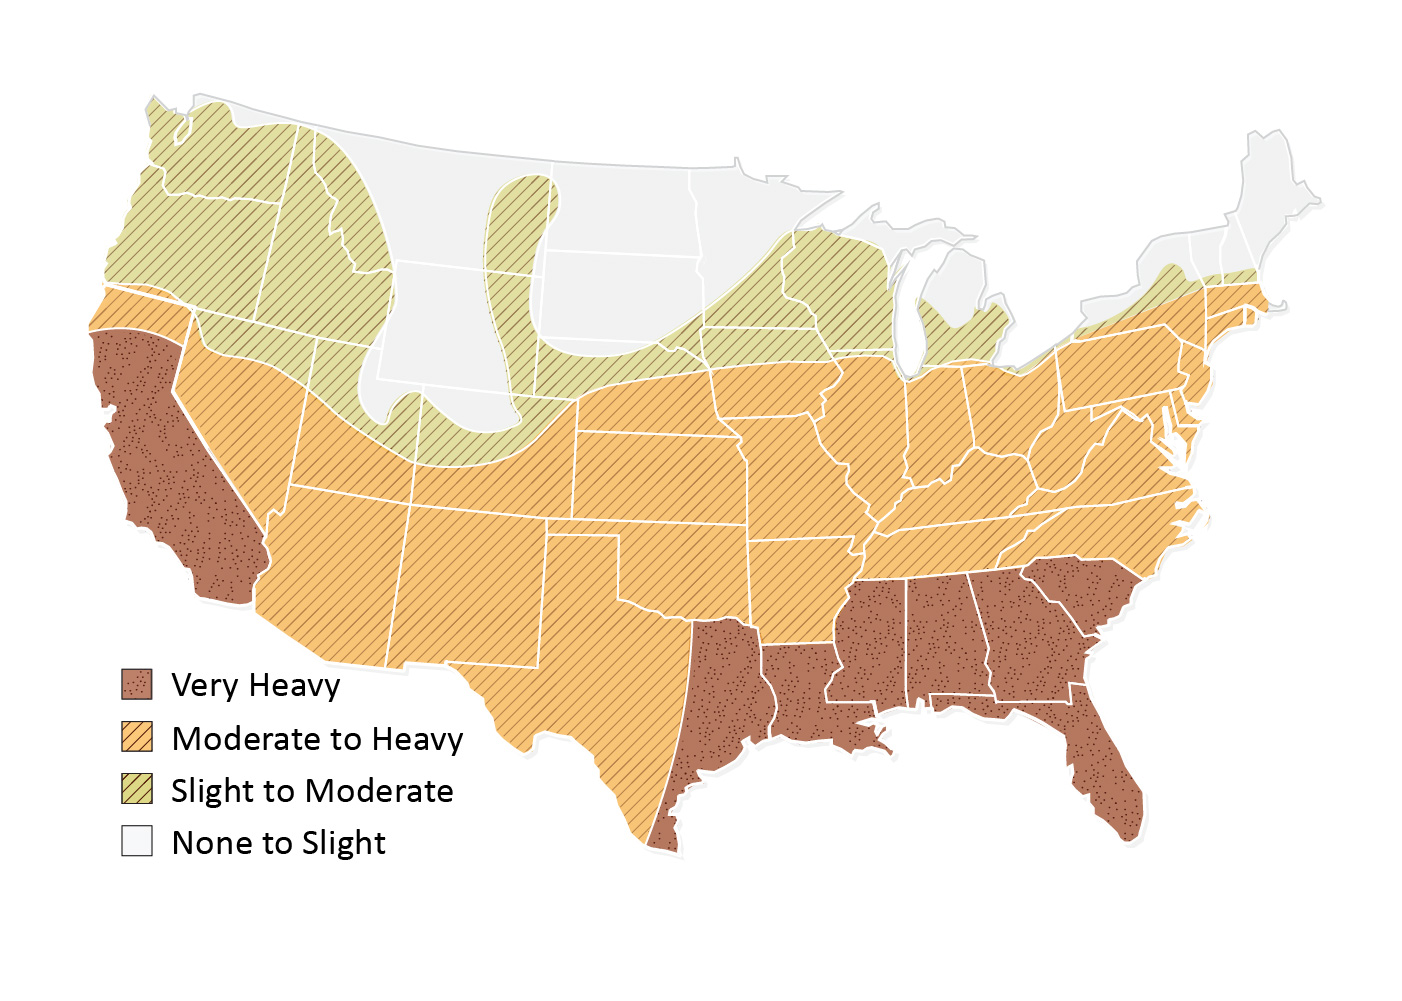
Termites are prevalent in the central and southern United States (see Figure 1, Termite Infestation Map). Corrosion-resistant stainless steel termite shields should be installed at the top of foundation walls beneath the sill plate to discourage termite entry.
Source
Training
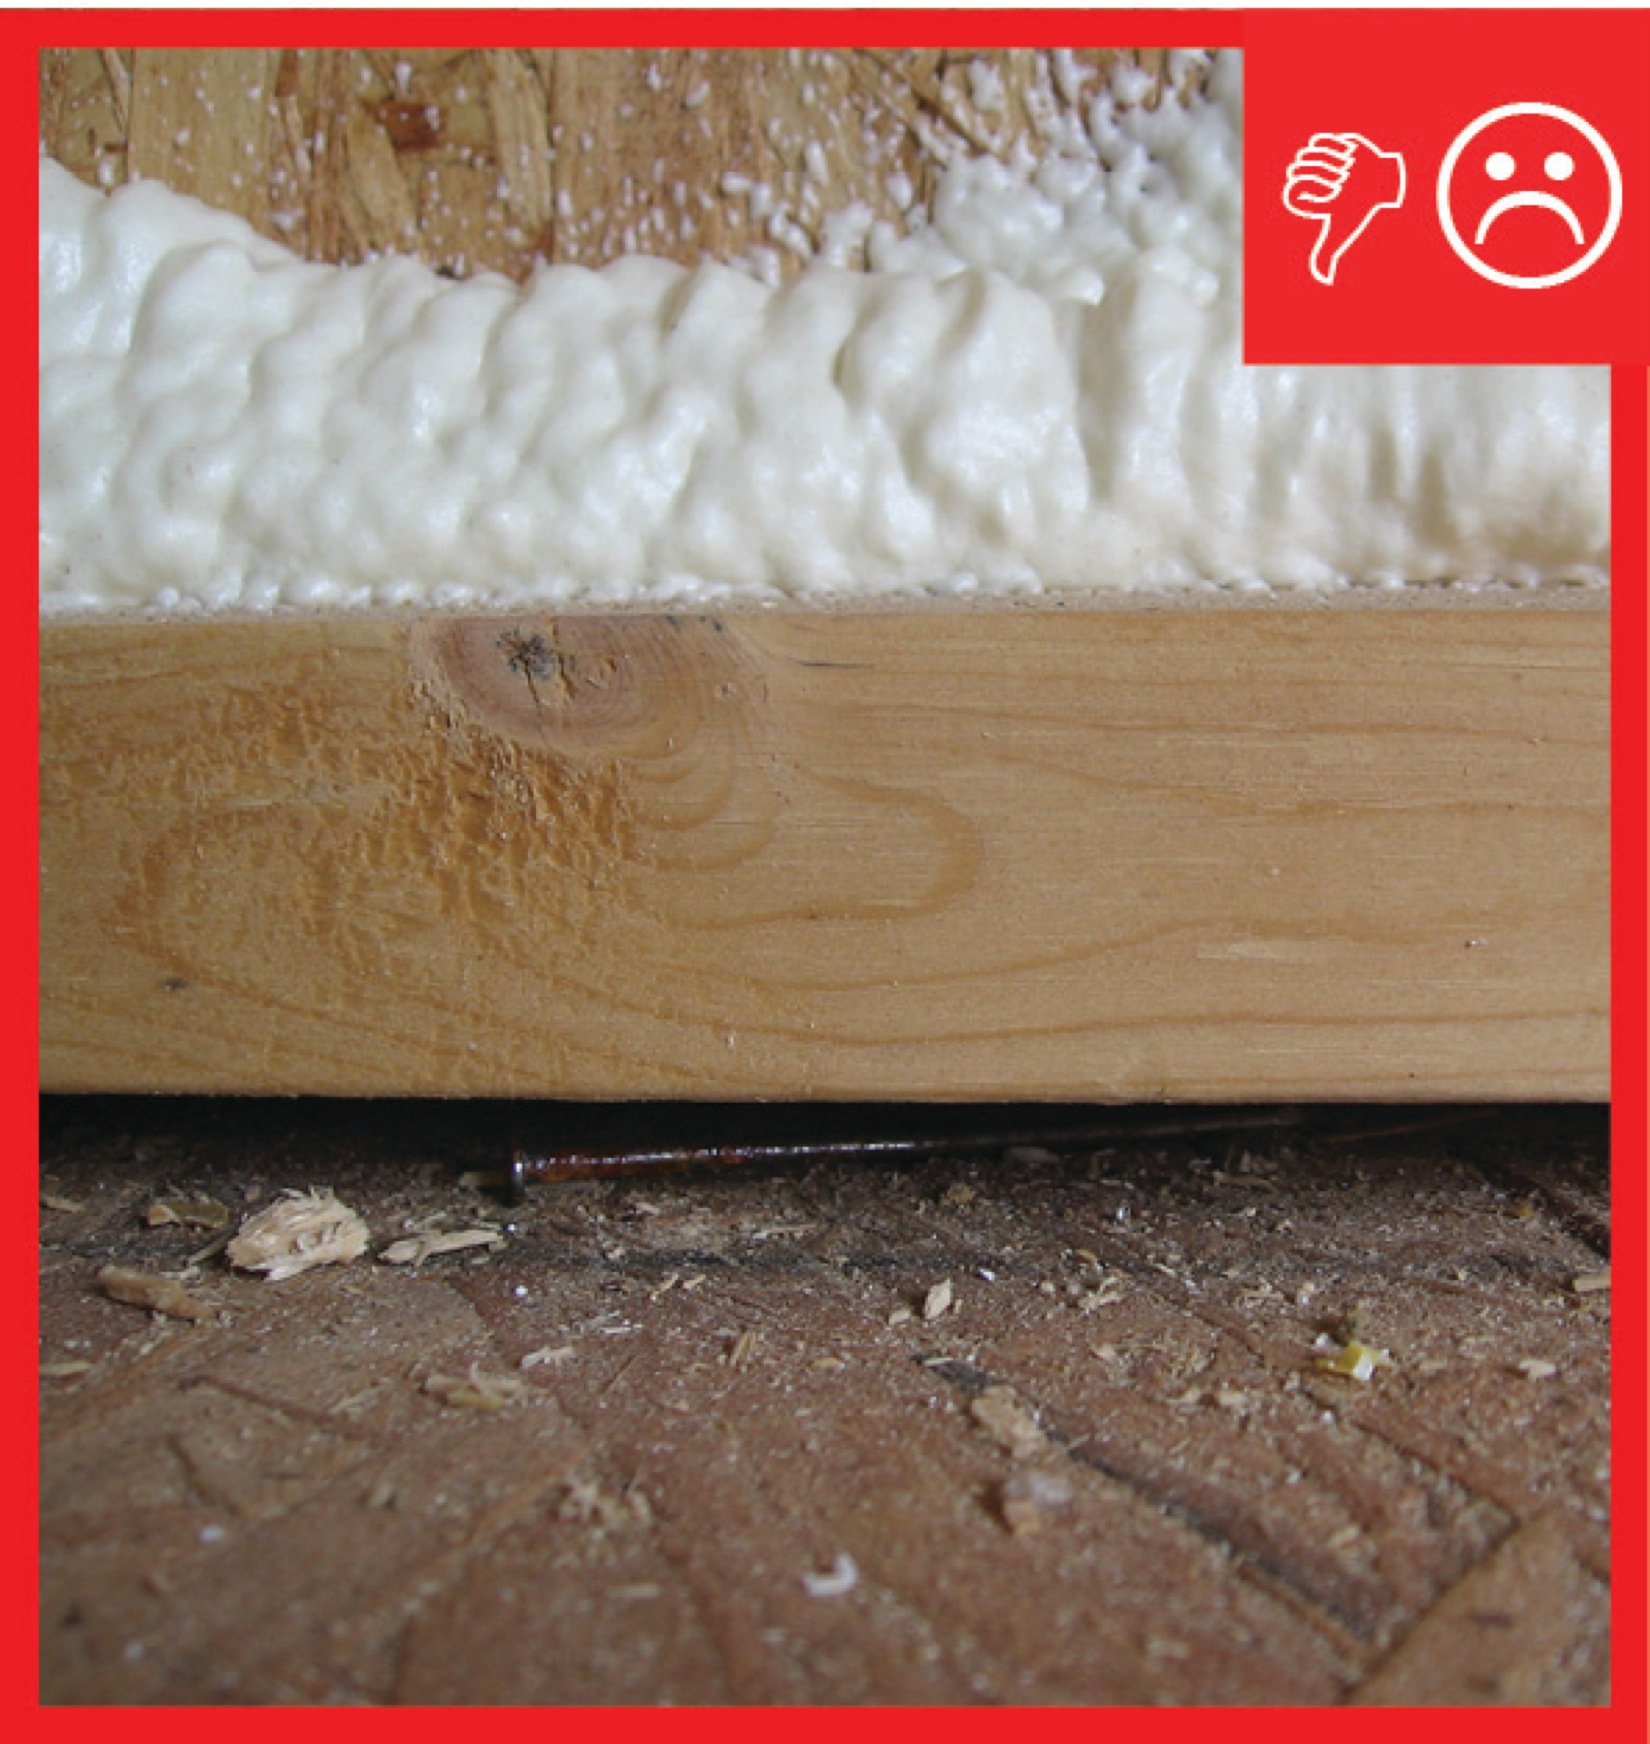
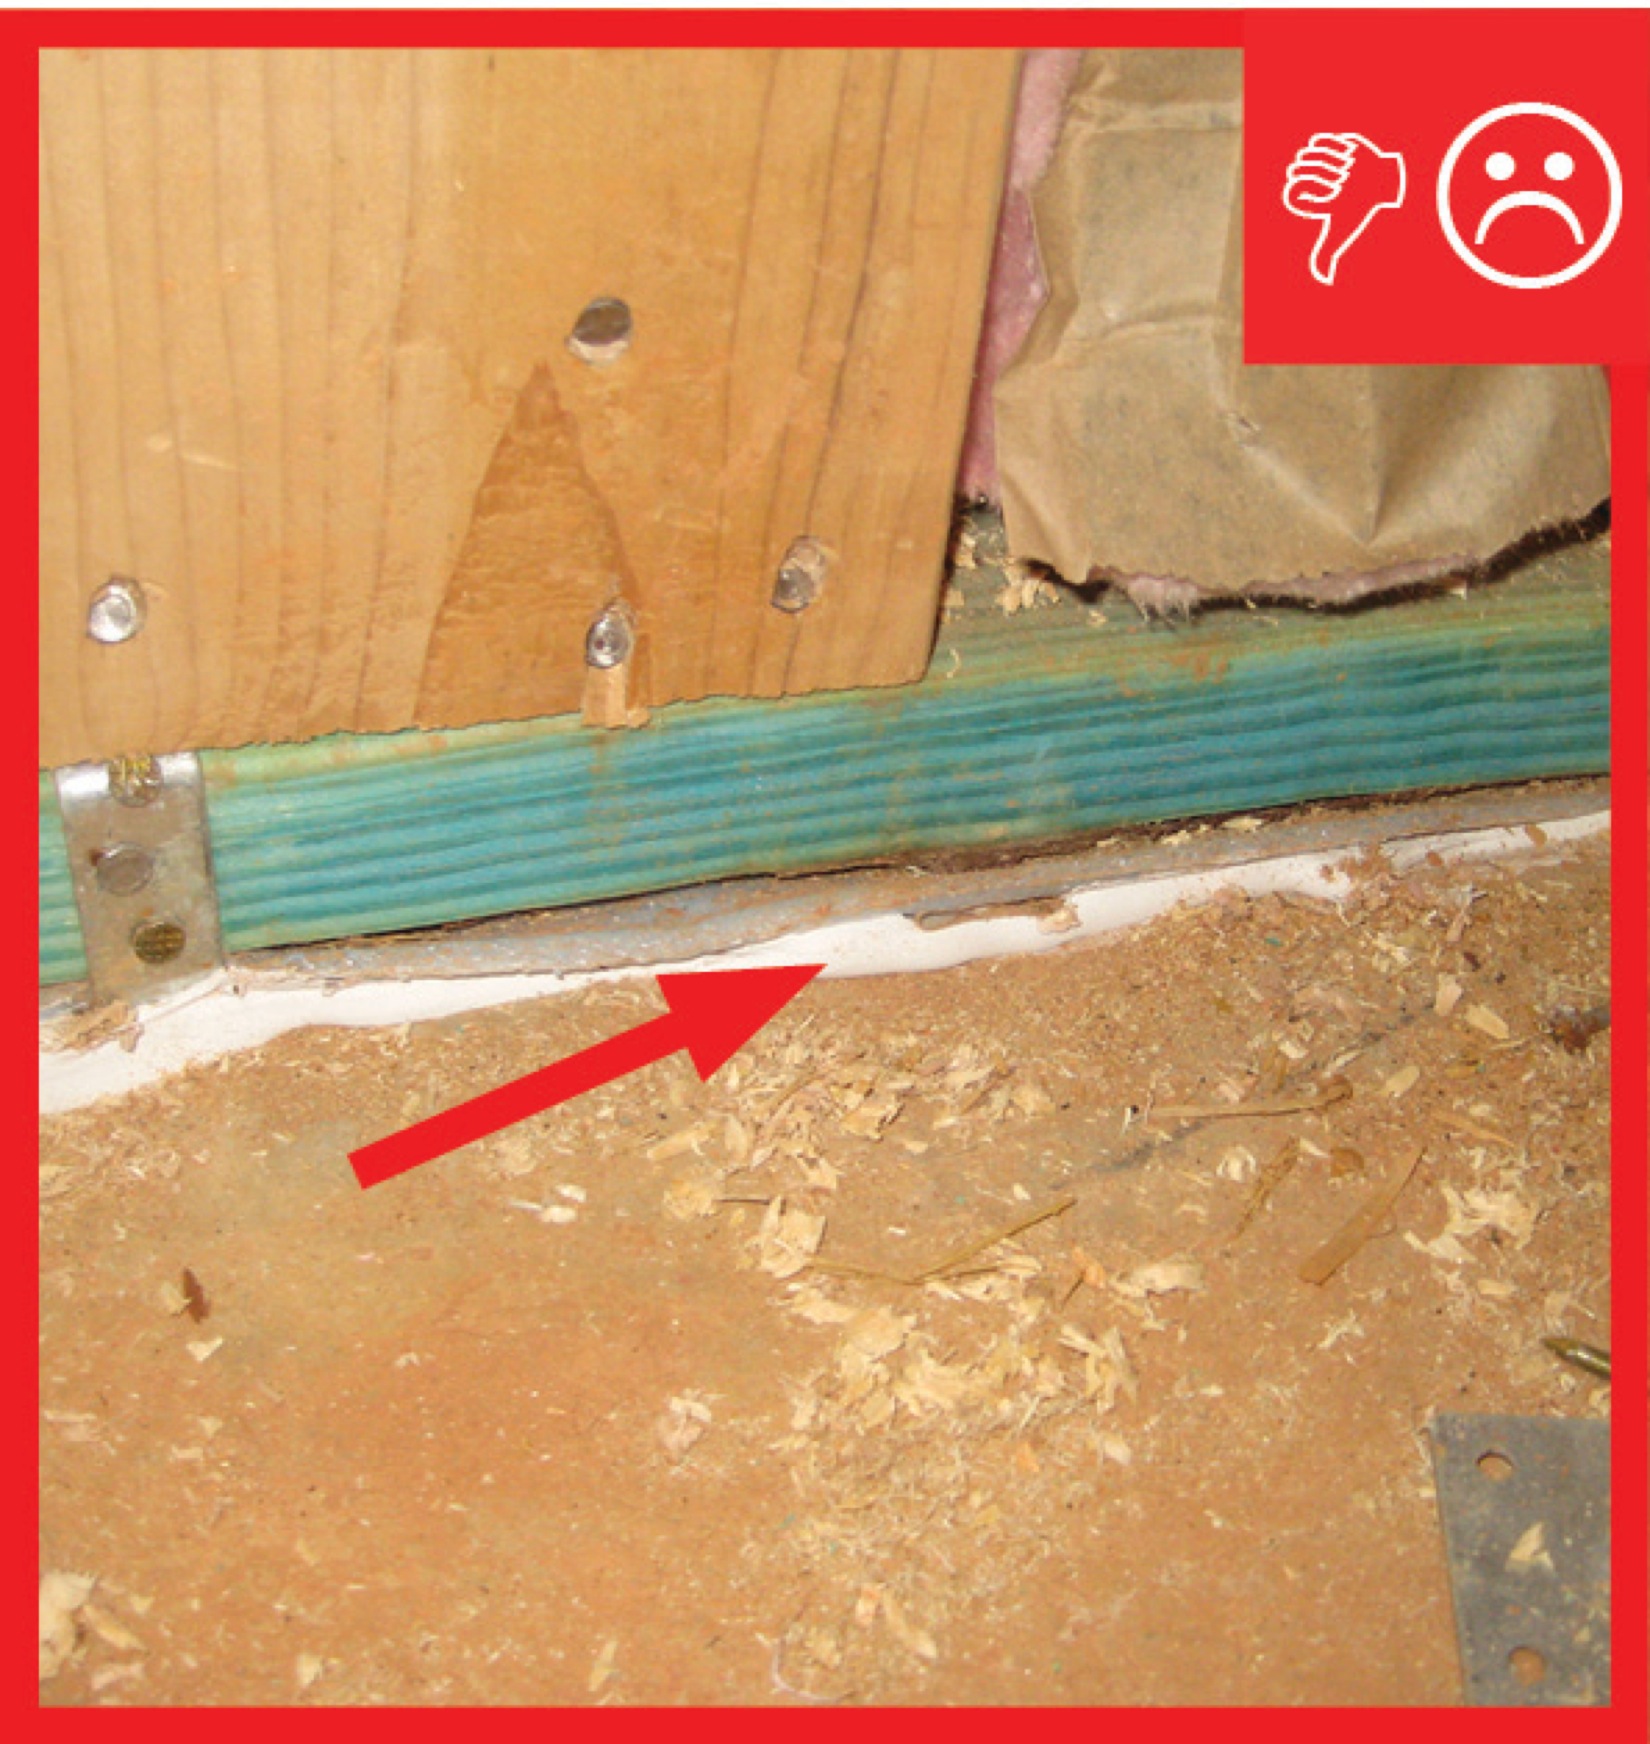
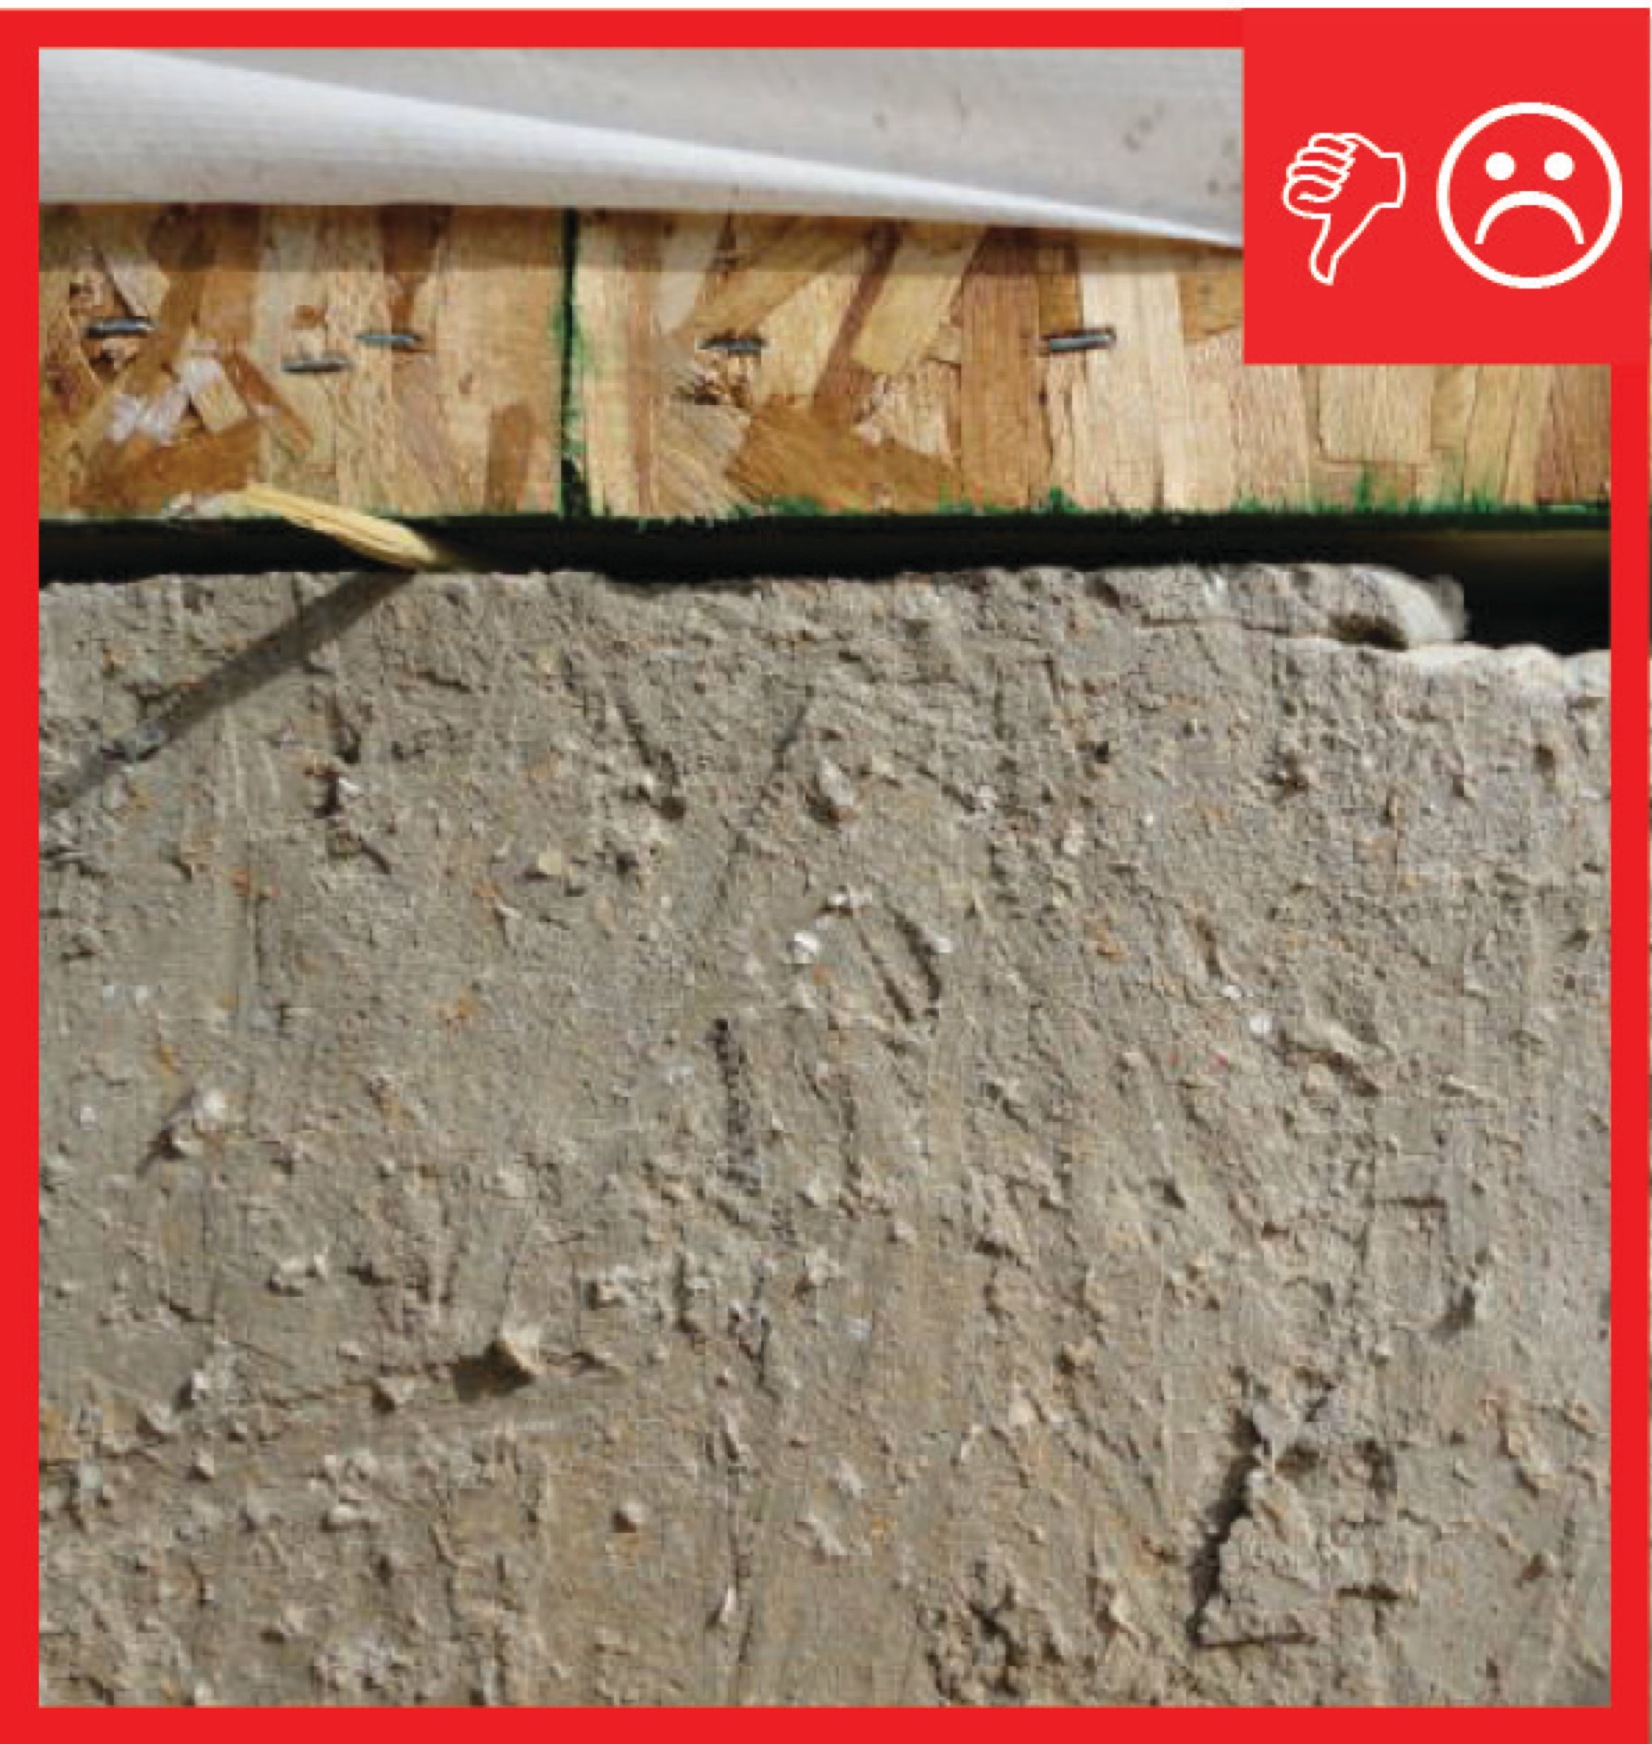
Right and Wrong Images
Source
Report describing measures that builders in mixed-humid climates can use to build homes that have whole-house energy savings of 40% over the Building America benchmark with no added overall costs for consumers.
Source
Source
A factsheet providing information on how to prevent pests from entering the home by sealing cracks and openings.
Source
Fact sheet describing air-sealing at rim joists.
Source
Guide describing details that serve as a visual reference for each of the line items in the Thermal Enclosure System Rater Checklist.
Source
Guide describing details that serve as a visual reference for each of the line items in the Thermal Enclosure System Rater Checklist.
Source
Guide describing details that serve as a visual reference for each of the line items in the Thermal Enclosure System Rater Checklist.
Source
Guide describing details that serve as a visual reference for each of the line items in the Thermal Enclosure System Rater Checklist.
Source
Guide describing details that serve as a visual reference for each of the line items in the Thermal Enclosure System Rater Checklist.
Source
Guide describing details that serve as a visual reference for each of the line items in the Thermal Enclosure System Rater Checklist.
Source
Guide describing details that serve as a visual reference for each of the line items in the Thermal Enclosure System Rater Checklist.
Videos


CAD Files

Compliance
Retrofit
SCOPE
In existing homes assess the foundation systems as described in the guide titled Pre-Retrofit Assessment of Crawlspaces and Basements. Remove objects obscuring access to the seam between the foundation and the sill plate and the space above the sill plate where the rim joist (also called a band joist) is located. Clearing this area may involve rolling back batt insulation that is stuffed into the bays where floor joists sit on the sill or rolling back and securing floor insulation that sits between the floor joists. Carefully clean and seal the seam between the foundation and the sill plate and the space above the sill plate where the rim joist is located. Seal and flash all penetrations through the rim joist or sill plate.
Air-sealing can impact indoor air quality and the air available for combustion appliances to work properly. Before starting the air-sealing, read and conduct the assessments described in the guides Pre-Retrofit Assessment of Combustion Appliances and the Pre-Retrofit Assessment of Hazardous Materials.
All global worker safety and air-sealing health and safety specifications in DOE’s Standard Work Specifications (SWS) should be followed. See the SWS specifications for air-sealing basements and crawl spaces and combustion safety.
DESCRIPTION
The best way to air-seal the sill plate is to place a sill sealer (also called a sill gasket) on the concrete before laying the sill plate over the foundation. A sill seal product that covers the whole sill plate area is preferable because of its waterproofing capability and inherent uniformity. However, this approach only works when there is access to the sill before the sill plate is mounted. For existing homes this approach only works during remodels where the structure is torn down to the foundation, or when room additions include a new foundation.
Although it will not provide waterproofing, sills can still be air-sealed in existing homes with caulk or spray foam if the seam between the foundation and the sill plate is accessible, such as crawlspaces and unfinished basements. Before sealing, thoroughly clean all surfaces to receive sealants or insulation and ensure all dry rot or other damage has been repaired. For more information on air-sealing sill plates in existing buildings, please see the Water Managed Existing Sill Beams and Sill Plates guide. An assessment guide for foundation systems is available in the Pre-Retrofit Assessment of Crawlspaces and Basements assessment guide.
Caulk and/or spray foam can be used to seal (and insulate when spray foam is used) the seam where the sill plate sits on the foundation, as well as the area where the subfloor and rim joist sit on the sill plate.
Any penetrations through exterior walls must be sealed. See the Air Sealing Electrical Wiring and Air Sealing Plumbing and Piping guides for more information.
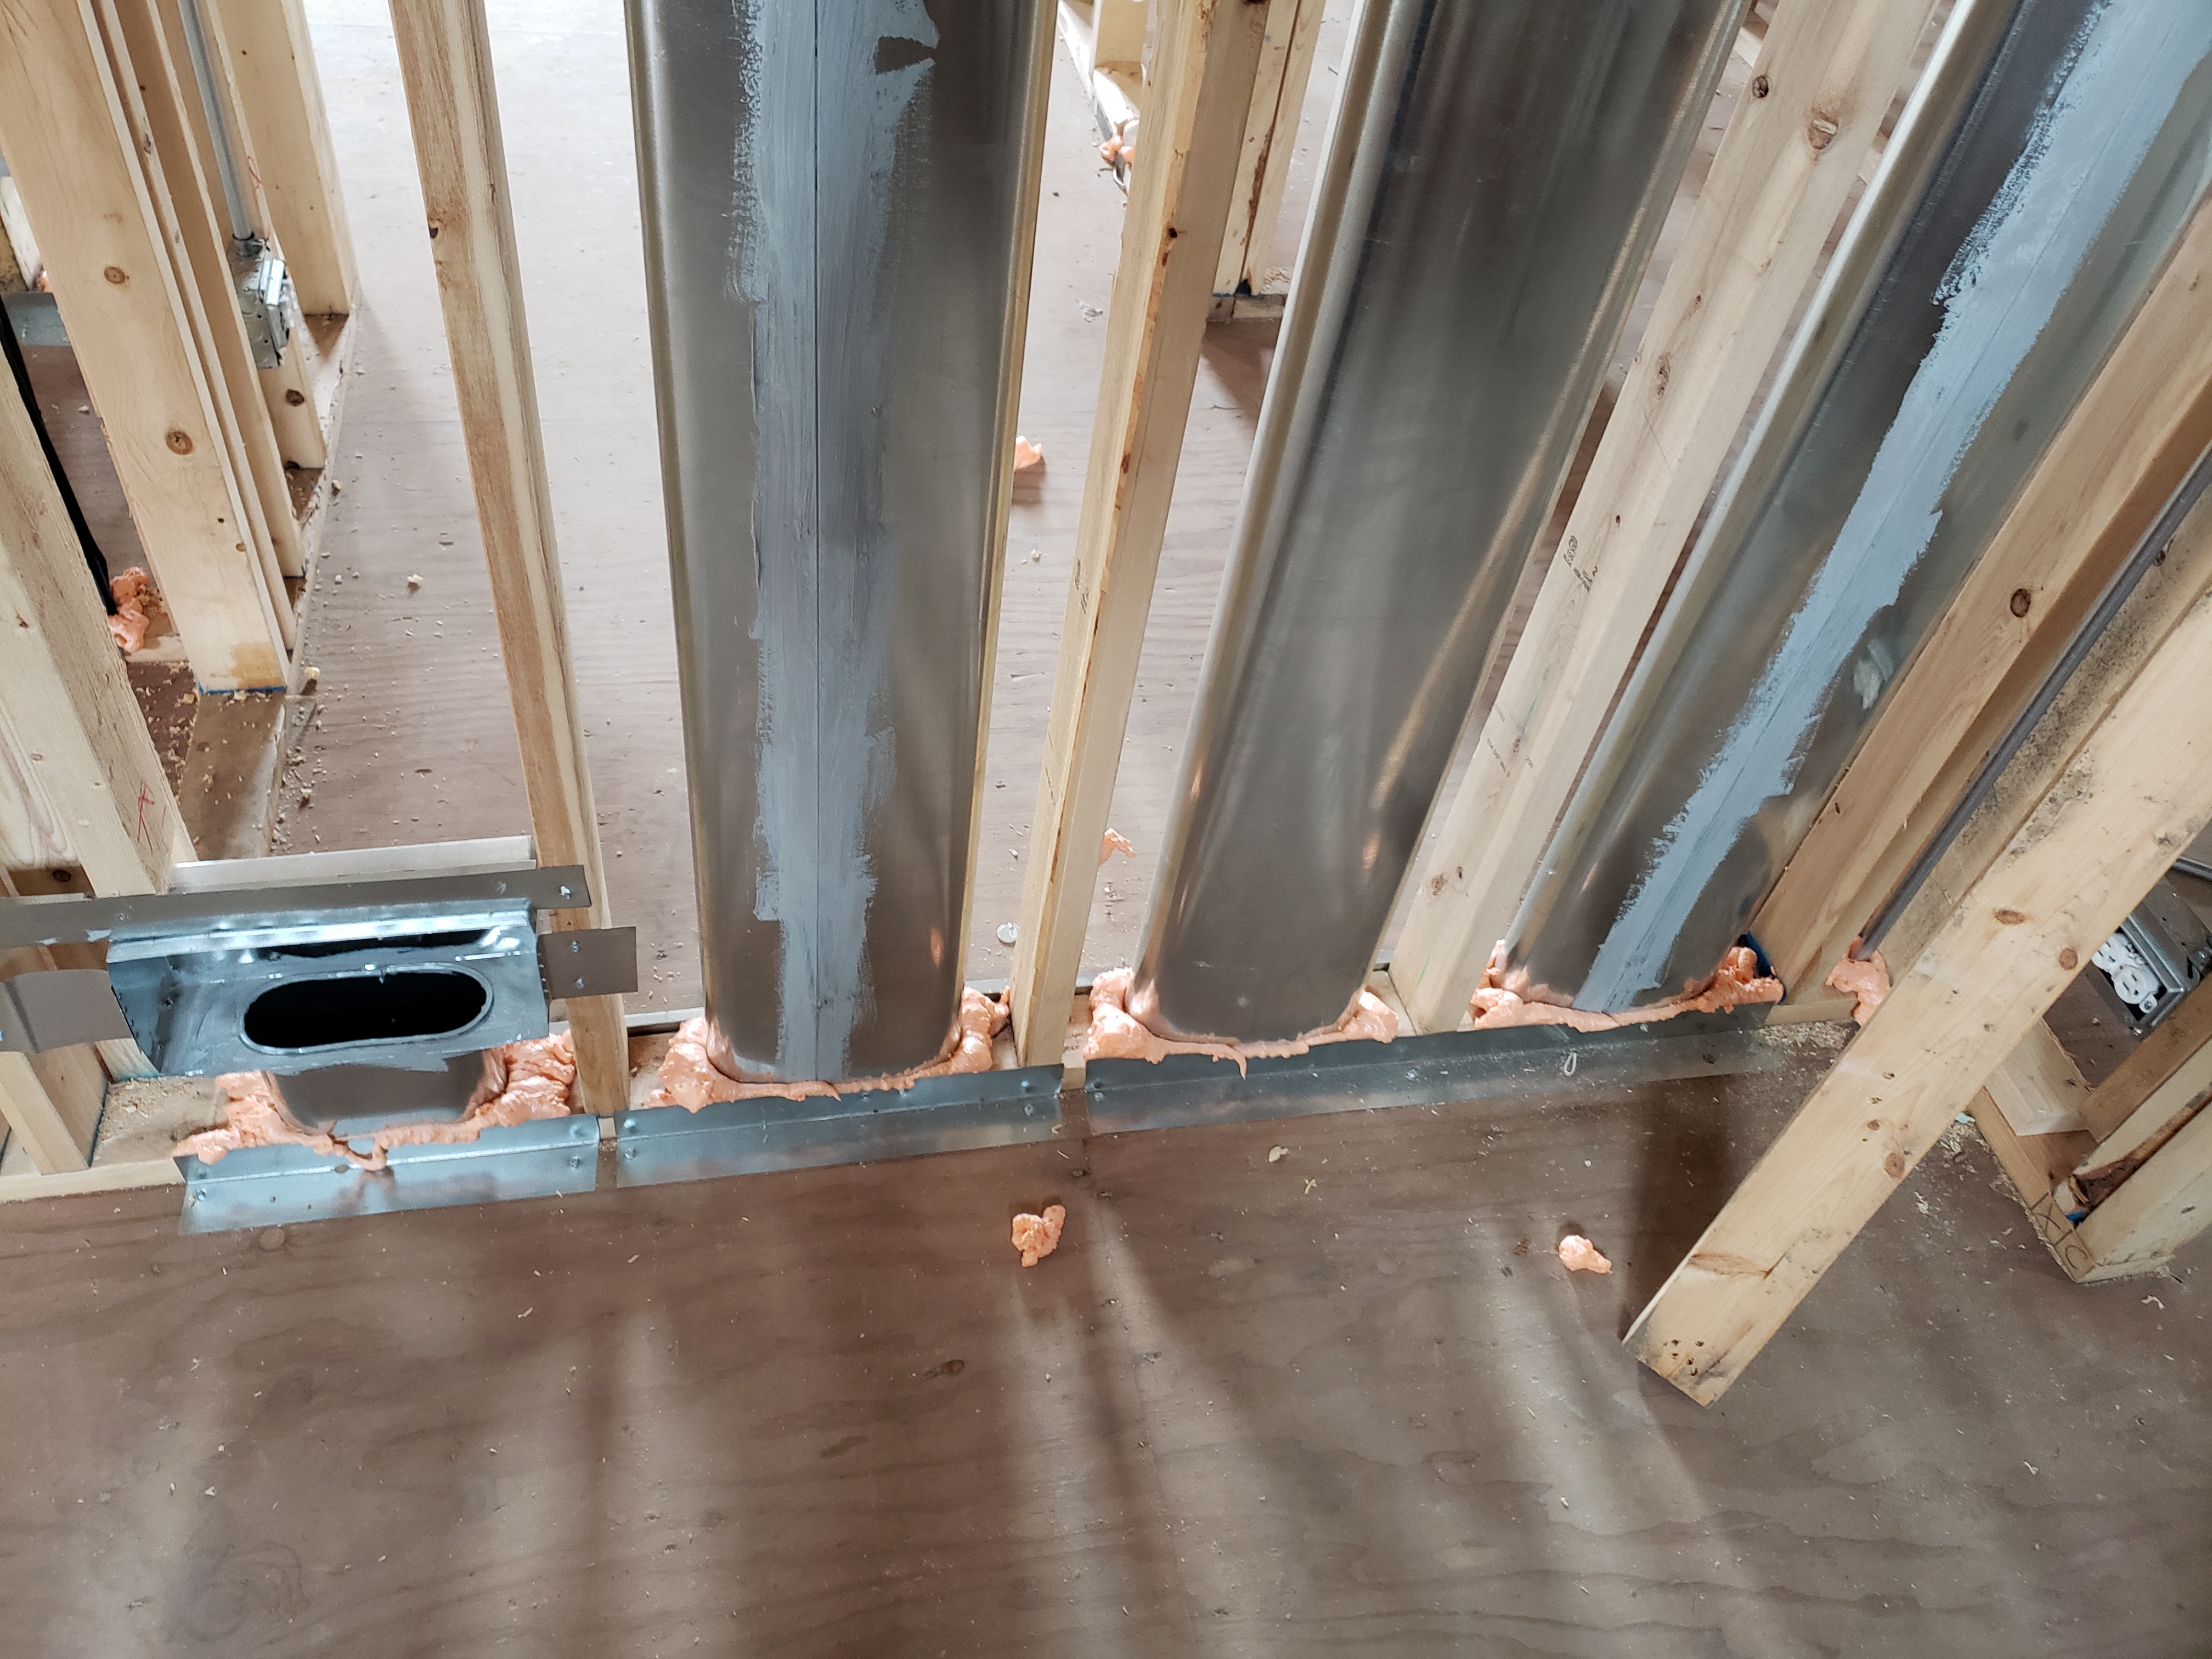
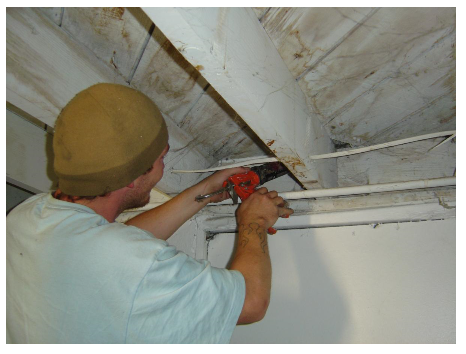
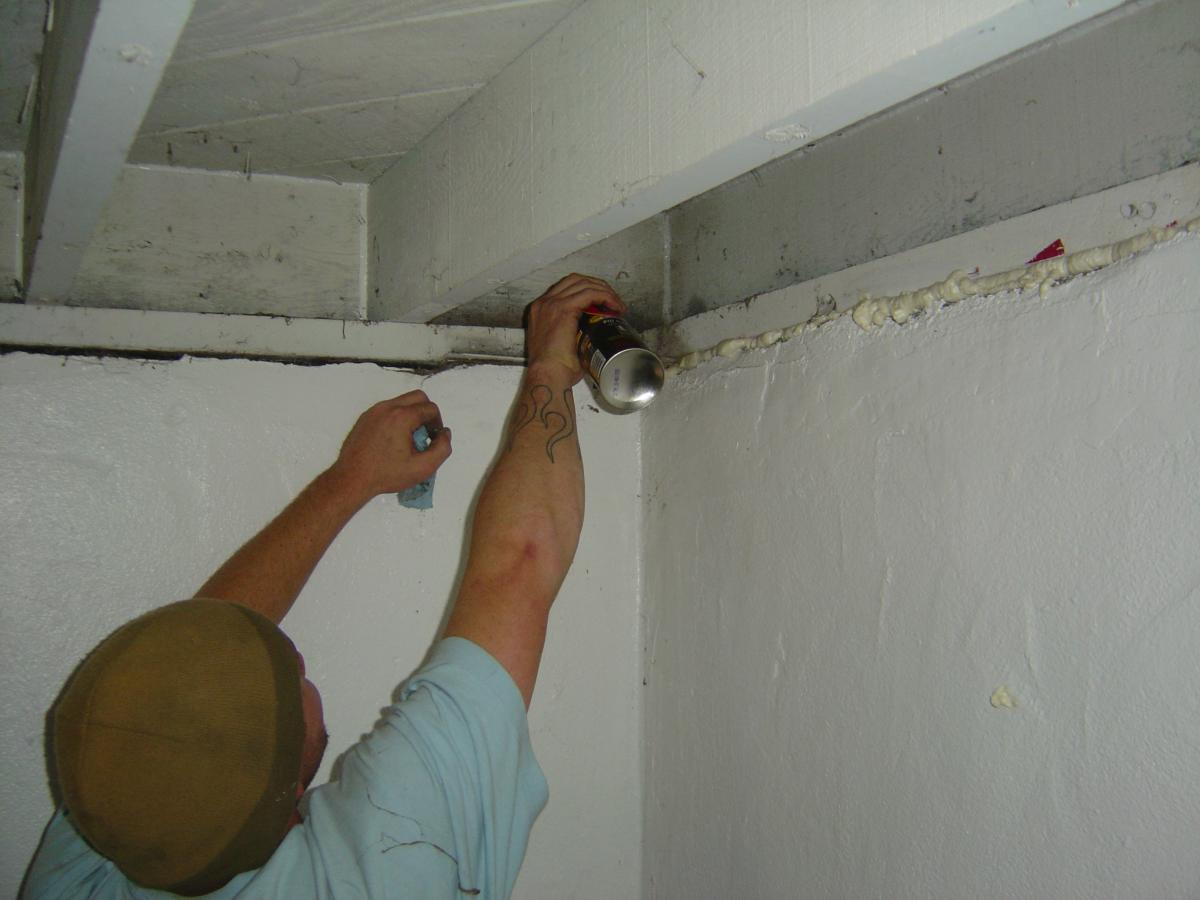
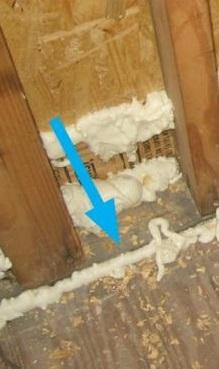
Seal and flash all penetrations through the rim joist or sill plate. All surfaces must be cleaned before applying sealants. The photos in Figures 1 and 2 show how caulk and spray foam are applied. Surfaces must be clean and free of dust, dirt, and grease for the sealants to stick.
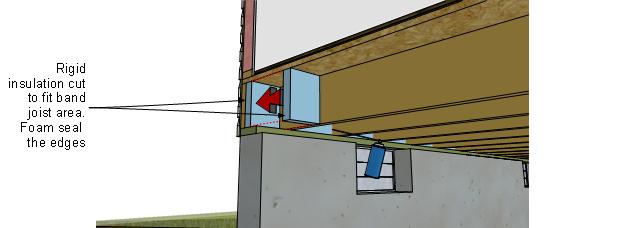
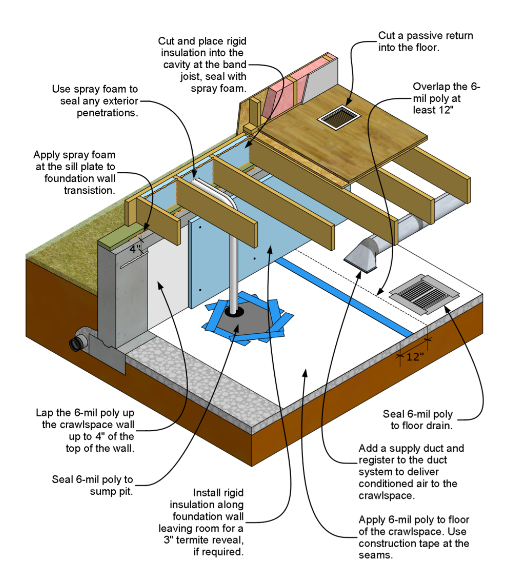
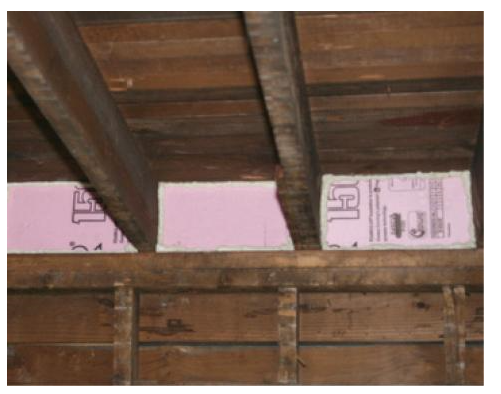
Rigid foam is another option for insulating the juncture of the rim joist and the sill plate as shown in Figures 3 and 4. For more guidance on this approach, see the guide titled Rigid Foam Board Insulation for Existing Band Joists.
Source
Report explaining the issues and concerns with conventional ventilated crawlspaces and to outline prescriptive measures for improvements that will create healthier and more durable spaces.
It may not be possible to apply sealants directly to the seam between the foundation and the sill plate in homes with existing concrete slabs. However, it may be possible to remove the baseboard around the bottom of exterior walls within conditioned spaces and seal the crack between the wall and the floor. This crack may have carpeting and other flooring in it. If it can be done without damaging the visible portion of the carpet, remove carpet fibers from the crack before filling the crack with caulk. Be sure to replace any baseboard removed for the project. Be careful to keep sealants off the floor and wall finishes.
Kitchen and bath cabinets, stairs, and other built-in components may block access. Seal around the cabinets and the joints within the cabinets. Investigate removing the toe kick from cabinets to reach the intersection of the wall and the floor. Kitchen and bath remodels are a perfect time to access this seam. Be sure to replace any toe kicks removed for the project.
Pay attention to cantilevered floor cavities for balconies, bay windows, or other bump outs that extend past the foundation to the exterior. The open bays where the floor joists extend past the foundation must be filled with rigid insulation or another sheet material and insulation. See the Cantilevered Floor guide for more information. The photo in Figure 5 shows how rigid foam insulation held in place with spray foam may be used to seal open bays in cantilevered floors. Once the open bays are sealed the floor joists may be filled with insulation. If it is accessible, seal the floor surface above the cantilevered floor joists. Batt insulation must be installed before exterior sheathing is attached to the bottom of the floor joists. If the cantilevered space is already enclosed, blown in insulation is an option.
Carefully seal walls separating conditioned spaces and garages as exterior walls, caulking all cracks on both sides of the wall, including the seam between the bottom plate of the wall and the foundation or subfloor.
Existing surfaces may be finished with paint containing lead, especially in homes built before 1978. Old plaster may contain asbestos. The Pre-Retrofit Assessment of Hazardous Materials guide contains more information.
COMPLIANCE
See Compliance tab.
More Info
Case Studies
References and Resources
*For non-dated media, such as websites, the date listed is the date accessed.
Contributors to this Guide
The following authors and organizations contributed to the content in this Guide.
Pacific Northwest National Laboratory
Building Science Corporation, lead for the Building Science Consortium (BSC), a DOE Building America Research Team
Sales
Tight Air Sealed Home = Comprehensive Draft Protection
Technical Description
Poorly air-sealed homes are less comfortable and cost more to maintain because they provide a pathway for drafts, cold spots, moisture, and insects into the home. Comprehensive draft protection includes a continuous air barrier around the whole house along with caulking and sealing in all holes and cracks. This includes around wiring, plumbing, ducts, and flues; where wall framing meets flooring; around windows; where drywall meets top plates and sill plates; where rim joists meet foundation walls and subfloors; etc. Spray foam insulation can be used at rim joists, floors above unconditioned space, and in attics to insulate and air seal at the same time.
Questions? Comments? Contact our webmaster.