

Scope

Insulate the sill beam or sill plate on the exterior side in a way that allows drying to the exterior, as part of an exterior wall upgrade, as follows:
- Inspect and assess the home to determine if the building has any urgent problems that must be addressed prior to beginning retrofit work.
- Remove the existing cladding and trim. Prepare the wall sheathing to receive the air and water control membrane.
- Apply continuous beads of sealant at the sill beam or the bottom of the sill plate and foundation wall.
- Install a metal closure/flashing at the bottom of the wall sheathing.
- Install a vapor-permeable air and water-control membrane.
- OR install a strip of permeable house wrap with a vapor impermeable air and water control layer.
- Install insulating sheathing with a 12-inch mineral fiber strip at the bottom of the wall.
- Install insect screen at the bottom of the insulating sheathing.
- Install furring strips over insulating sheathing and attach to the structure through the insulating sheathing. Install furring strips in a vertical orientation only.
- Install a cladding vent at the bottom of wall.
- Install wall cladding and trim. Attach to the furring strips.
See the Compliance Tab for links to related codes and standards and voluntary federal energy-efficiency program requirements.
Description
Improvements to the insulation levels in existing foundations need to be made in such a way that the foundation wall can dry out.
Foundation walls that are made of porous substances like concrete, rock and mortar, or brick can absorb a lot of water. Foundation walls are often in contact with liquid water in the form of ground water, surface water, or incident rainwater. Due to capillary action, this moisture can wick up into the wooden sill beam or sill plate of the wall (unless there is some kind of capillary break between the foundation and the sill beam but there rarely is in older homes).
When the basement or crawlspace walls are uninsulated, this moisture can usually dry to the inside before it causes much damage to the sill plate. If the foundation wall is retrofitted by adding insulation, the insulation - which might include spray foam or rigid foam installed in the rim joist, over the sill beam, and possibly down the inside surface of the foundation wall – can severely limit the ability of the foundation wall to dry to the inside. If moisture is transferred to the framing faster than the framing is able to dry, the moisture will accumulate, leading to decay of the framing.
Capillary moisture can be removed from the wall through evaporation from the exterior surface of the foundation wall if the foundation wall has appreciable exposure above grade (e.g., the height of the exposed exterior portion of the wall is greater than 1 ½ times the thickness of the wall) and if it is not covered by a layer of material that would inhibit drying (e.g., it is not covered with epoxy paint).
Moderate levels of moisture transfer to the framing might be managed by insulating the framing in a way that promotes drying to the exterior. Figures 1 through 2 show ways that an exterior wall can be designed, as part of a siding replacement renovation, to accommodate drying to the outside.
It must be noted that the methods presented below address moderate levels of risk. In situations where the capillary transfer of moisture through the foundation wall to the framing is significant, insertion of a capillary break between the foundation and the framing and/or other measures will be necessary.
These approaches are appropriate for both flat and irregular foundation walls.

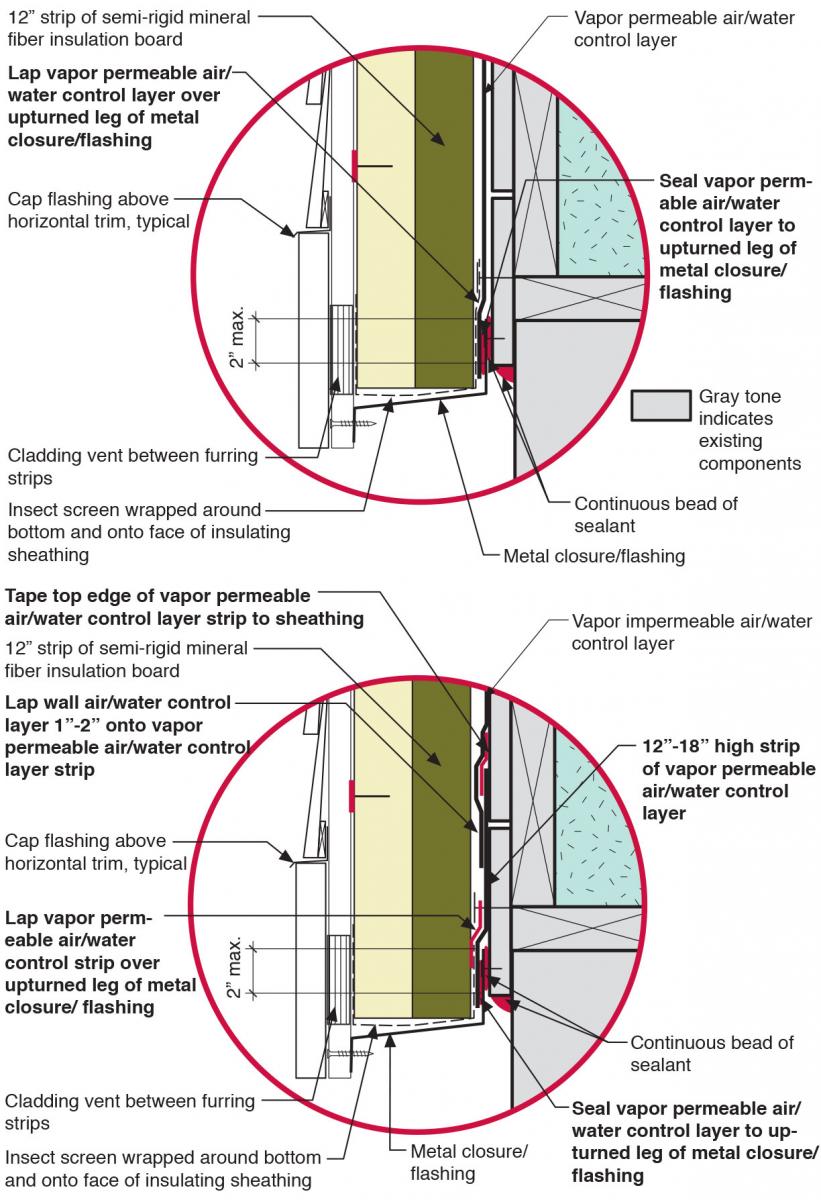
How to Water Manage Existing Sill Beam or Sill Plate with a Vapor Permeable Air Control Layer
- Inspect and assess the home. Identify and address risks to occupants or the building that could be aggravated by the work. Verify safe working conditions. Determine whether the building has more urgent problems that must be addressed. Determine the feasibility of the retrofit solution and of options. See the “Success” tab for more information.
- Remove the existing cladding and trim. Prepare the wall sheathing to receive the air and water control membrane. If using a sheet good as the air and water control layer, such as house wrap, remove all protruding fasteners to avoid punctures or tears in the membrane. Fill in any gaps or voids in the sheathing layer.
- Apply continuous beads of sealant near the top and bottom of the sill beam or at the seam between the sill plate and foundation wall.
- Install a metal closure flashing at the bottom of the wall sheathing and apply a continuous bead of sealant between the closure and the sheathing.
- Install a continuous vapor permeable air/water control membrane. Lap the air/water control membrane over the upturned leg of the metal closure flashing and place a bead of sealant between the two materials.
- Install two layers of insulating sheathing with joints offset horizontally and vertically and the joints of the outermost layer taped. Install a 12-inch strip of semi-rigid mineral fiber insulation board at the bottom of the wall of the inner layer.
- Install an insect screen and wrap it around the bottom of the insulation. Turn it up onto the face of the insulating sheathing.
- Install 1x vertical wood furring strips fastened through the insulating sheathing and to the wall structure with long corrosion-resistant exterior wood screws. Install furring strips in a vertical orientation only. The furring need not be preservative treated for moisture protection. Extend the furring strips down past the insulating sheathing.
- Install a cladding vent between the furring strips at the bottom of the wall.
- Attach siding and trim to the vertical furring strips.
How to Water Manage Existing Sill Beam or Sill Plate with a Vapor Impermeable Air Control Layer
- Inspect and assess the home. Identify and address risks to occupants or the building that could be aggravated by the work. Verify safe working conditions. Determine whether the building has more urgent problems that must be addressed. Determine the feasibility of the retrofit solution and of options. See the “Success” tab for more information.
- Remove the existing cladding and trim. Prepare the wall sheathing to receive the air and water control membrane. If using a sheet good as the air and water control layer, such as house wrap, remove all protruding fasteners to avoid punctures or tears in the membrane. Fill in any gaps or voids in the sheathing layer. Use a primer for self-adhered membranes if recommended by the membrane manufacturer.
- Apply continuous beads of sealant near the top and bottom of the sill beam or to the seam between the sill plate and the foundation wall.
- Install a metal closure/flashing at the bottom of the wall sheathing and apply a continuous bead of sealant between the closure and the sheathing.
- Install a 12-18-inch high strip of vapor permeable house wrap at the bottom of the wall with the top edge taped to the sheathing. Lap it over the metal closure/flashing and seal it between the two materials.
- Install a continuous vapor-impermeable air and water control membrane. Lap the air and water control membrane 1 to 2 inches onto the vapor permeable house wrap strip.
- Install two layers of insulating sheathing with joints offset horizontally and vertically and the joints of the outermost layer taped. Install a 12-inch strip of semi-rigid mineral fiber insulation board at the bottom of the wall of the inner layer.
- Install the insect screen and wrap it around the bottom of the insulation. Turn it up onto the face of insulating sheathing.
- Install 1x vertical wood furring strips fastened through the insulating sheathing and to the wall structure with long corrosion-resistant exterior wood screws. Install furring strips in a vertical orientation only. The furring need not be preservative treated for moisture protection. Extend the furring strips down past the insulating sheathing.
- Install a cladding vent between the furring strips at the bottom of the wall.
- Attach siding and trim to the vertical furring strips.
Ensuring Success
Install the materials that form the water control layer in a shingle fashion so they overlap each other and/or are sealed to allow for the water to drain down and out of the wall.
Verify the permeability of the air and water control layers.
Ensure that wood furring strips do not come in contact with the soil.
Refer to the following inspection checklist to inspect and assess the foundation.
Exterior Moisture Sources
Roof Drainage Away from the House - Inspect the roof’s bulk water discharge strategy, including all gutters and downspouts, to ensure bulk water runoff is not allowed to collect next to or near the foundation. Downspouts should discharge directly into drains that are directed to a storm sewer system, retention pond, daylighting if the land topography permits, or yard bubblers that are a minimum of 10 feet away from the foundation.
Grading Around the House - Evaluate the grading around the perimeter of the house. Ideally, the ground slopes a minimum of 5% away from the foundation walls for at least the first 10 feet to direct groundwater away from the structure. If proper slope away from the foundation cannot be established because of the home’s elevation and surrounding grade, a surface drainage system (“grade gutter”) should be installed. This system collects water and diverts it away from the foundation.
Before beginning any excavation work, make sure to identify any underground utilities that enter the house and notify the respective utility companies as required.
Sprinklers - Turn on all sprinklers installed near the foundation to observe their flow pattern. The sprinklers must be positioned so they do not subject the foundation or its immediate vicinity to water.
Foundation Waterproofing and Drainage - Waterproofing of the exterior walls and installation of a foundation perimeter drain strategy may be required on exceptionally problematic sites. Such sites typically have high groundwater or water flow against the foundation that cannot be remediated in any other way.
Region
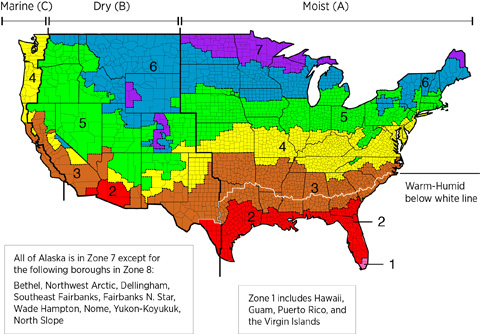
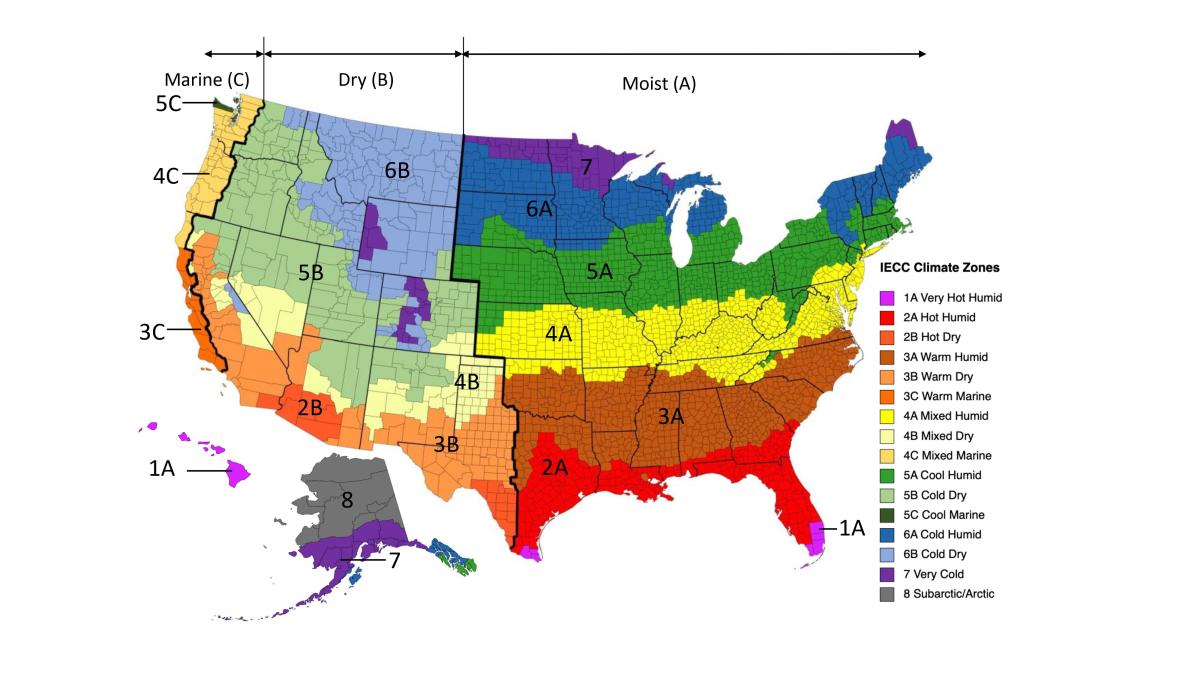
In hot-humid climates, the air and water control membrane between the mineral fiber insulating sheathing and the wall sheathing must be a class II (or lower) vapor retarder.
In other climates, the air and water control membrane should be a class III (or lower) vapor retarder.
The map in Figure 1 shows the climate zones for states that have adopted energy codes equivalent to the International Energy Conservation Code (IECC) 2009, 12, 15, and 18. The map in Figure 2 shows the climate zones for states that have adopted energy codes equivalent to the IECC 2021. Climate zone-specific requirements specified in the IECC are shown in the Compliance Tab of this guide.
Training
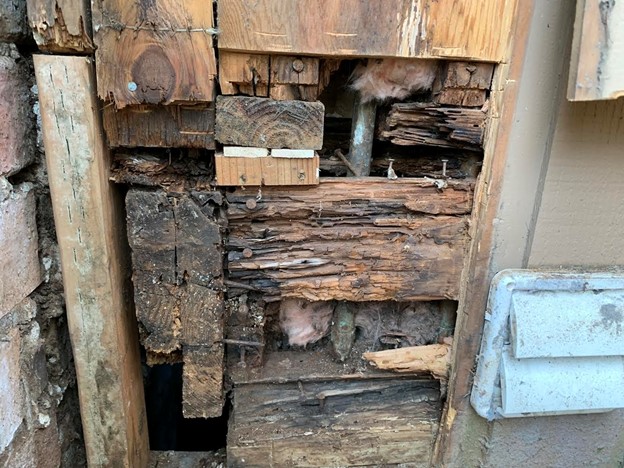
Right and Wrong Images

Source
Source

Source

Source
Source
More Info
Case Studies
References and Resources
*For non-dated media, such as websites, the date listed is the date accessed.
Contributors to this Guide
The following authors and organizations contributed to the content in this Guide.
Building Science Corporation, lead for the Building Science Consortium (BSC), a DOE Building America Research Team
Sales
Water Managed Walls = Wall Moisture Control System

Technical Description
Most exterior wall cladding systems leak. Wind pressure and capillary action can drive rainwater through the many cracks, joints, and small gaps in a building's exterior. With typical residential siding systems, it is nearly impossible to seal all those holes. Even if a builder succeeds in sealing a majority of the holes, using caulk on the exterior of the wall is not a long-term solution; the caulk will need to be reapplied fairly often. A more practical way to protect building exteriors from rainwater relies on a drainage approach. With this approach, any water that leaks through the cladding will run into a water-resistant surface and safely drain down and out of the wall. The water-resistant surface could be house wrap or rigid foam that is securely taped or sealed at all seams. . House wrap should be lapped over any exterior wall flashings installed around window and door openings or where roofs intersect walls. Any holes through the wall, such as for water spigots, exhaust vent outlets, HVAC line sets, or wiring for outdoor light fixtures and receptacles, should be carefully sealed or gasketed.
Questions? Comments? Contact our webmaster.