

Scope
Measure the enclosure air leakage in residential and light commercial buildings of three stories or less following procedures outlined in the RESNET Mortgage Industry National Home Energy Ratings Systems Standards (RESNET Standards) Chapter 8.
- All work must meet applicable codes and regulations for the jurisdiction.
- Follow NREL Assessment Guides to ensure site safety.
- Contractor must be certified as qualified to perform an enclosure leakage test, commonly referred to as a blower door test, according to State or local regulations, or credentialed per Technical Standards for the Building Analyst Professional or RESNET approved “equivalent home performance certification programs.” (See the RESNET Directory for approved raters).
- Perform an enclosure air leakage test and determine air leakage results measured as cubic feet per minute at a 50 Pascals (Pa) pressure difference (CFM50) following RESNET Standards Chapter 8.02. Use the volume of the enclosed space to calculate the Air Changes per Hour at 50 Pa (ACH50).
- For buildings with combustion appliances vented with indoor air, perform a Worst Case Depressurization Test following RESNET Standards Section 807 to determine pressure conditions in the Combustion Appliance Zone (CAZ). (Because some of the procedures outlined in the Description tab involve disassembly of heating and air conditioning equipment, a State or local HVAC license may be needed to carry out all of the tasks involved).
- If CAZ test results indicate potential appliance backdrafting, specific remediation work must be undertaken and the problem resolved prior to testing.
- See the Assessment Guide “Pre-Retrofit Assessment of Combustion Appliances.”
- When air sealing is being performed, CAZ testing should be done at the end of each workday. If test results indicate potential appliance backdrafting, specific remediation work must be undertaken and the problem resolved prior to testing.
- For more information, see the Assessment Guide “Pre-Retrofit Assessment of Combustion Appliances.” Also see the Building America Solution Center guide Combustion Appliance Zone Testing.”
- If CAZ test results indicate potential appliance backdrafting, specific remediation work must be undertaken and the problem resolved prior to testing.
- The contractor will provide client with test results and a remedial work scope that specifically identifies any actions which require prompt attention, affect safety, or require a licensed trade to execute.
- See the U.S. Department of Energy’s Standard Work Specifications for more on safe work practices and combustion appliance zone testing.
See the Compliance Tab for links to related codes and standards and voluntary federal energy-efficiency program requirements.
Description
Enclosure leakage testing is an important building diagnostic and program/code compliance tool. The testing typically results in a building enclosure leakage rate found at a pressure difference of 50 Pascals (Pa) between the enclosed space and the outside. Results are expressed as the amount of air, in cubic feet per minute (CFM), required to change the pressure in the house by 50 Pa (CFM50.) Using the volume of the enclosure, the air changes per hour at 50 Pa (ACH50) pressure difference can be calculated. These measurements and pressure levels are used by most, if not all, domestic energy efficiency programs and many codes. The results can be used to determine the need for air tightening or to show compliance with building codes and energy-efficiency program requirements like ENERGY STAR and DOE’s Zero Energy Ready Home program. For existing homes, see the Retrofit tab.
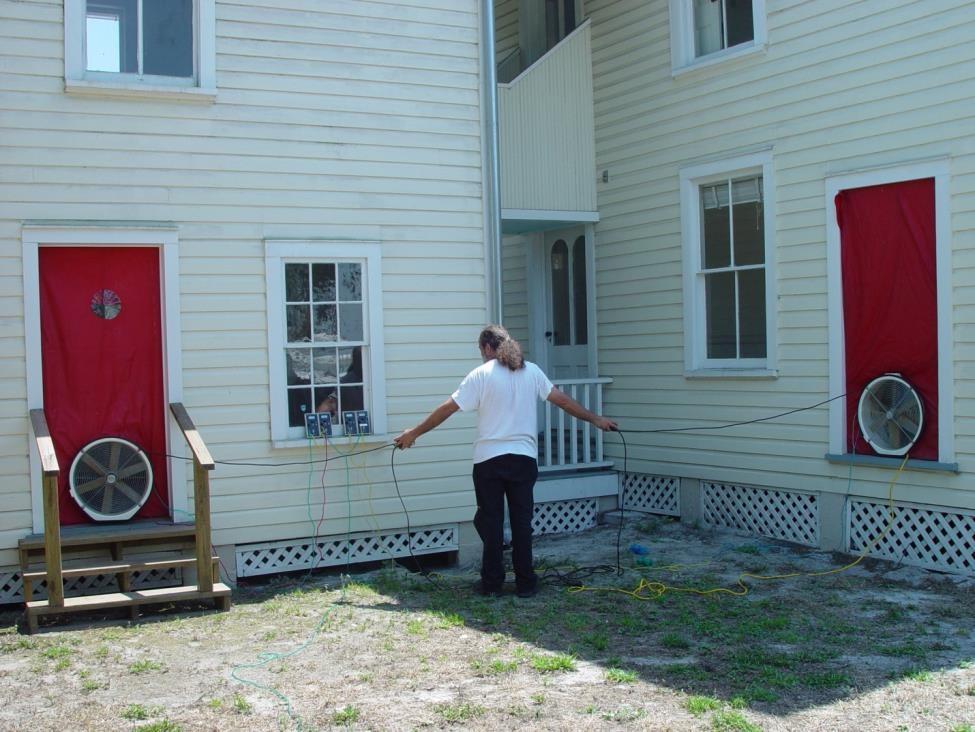
The air leakage test is conducted with a blower door testing kit. While the equipment to perform the test is installed and operating, inspections can reveal the source of excessive leakage. When the house is depressurized, a smoke candle can be used to find leakage at likely sources, such as around doors, windows, baseboards, and electrical outlets. Often leakage can be heard as well as felt with bare skin. If there is a substantial temperature difference between the inside space and the outside air, infrared imaging may be useful in identifying areas of air leakage.
Considerations
The 2012 and 2015 International Energy Conservation Codes (IECC 2012 and IECC 2015) have mandated blower door testing. More and more local jurisdictions are adopting IECC 2012, 2015, or similar language regarding blower door testing to confirm compliance with air sealing requirements.
Even if it weren’t a code or program requirement, there are several benefits to blower door testing. It can provide an unbiased third-party evaluation of air leakage, which is a critical component of building energy efficiency. Blower door testing is also a very useful building diagnostic tool, both for identifying areas of leakage and for verifying correction of air leakage.
The main drawback is that there is a cost associated with it – the fee paid to the home energy rater. In some rural areas, it may be difficult to find local contractors who have the certifications and equipment to perform the testing. Bringing in an out-of-town rater can add to the cost and may delay the construction schedule. The test itself can pull dirt and pollen into the home and has even been known to lift vinyl flooring that is not glued down.
Equipment
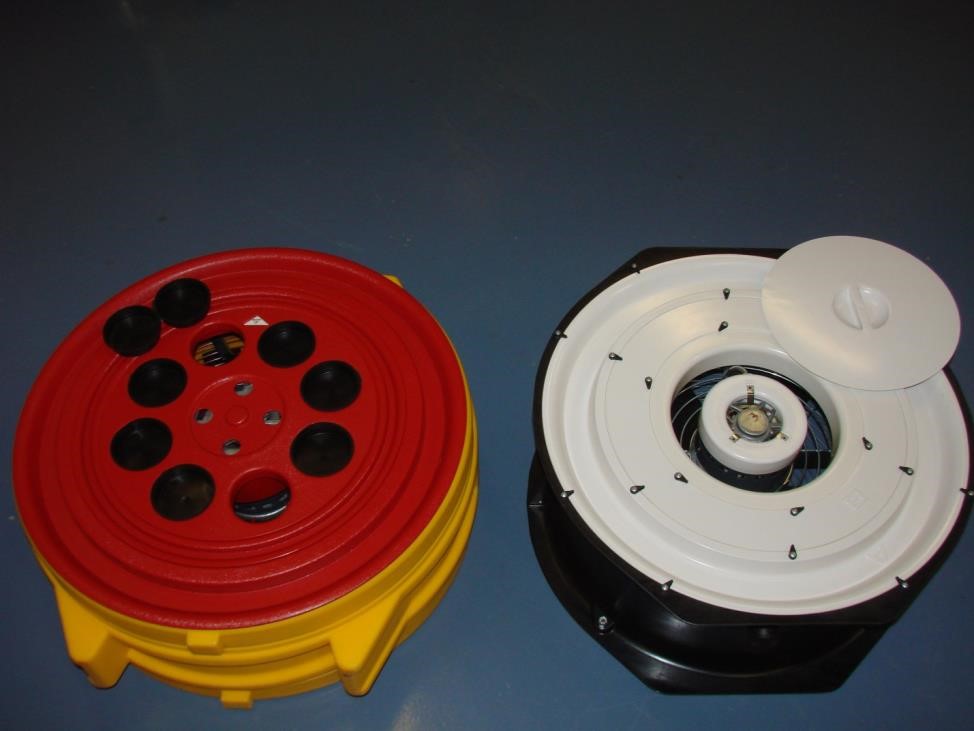
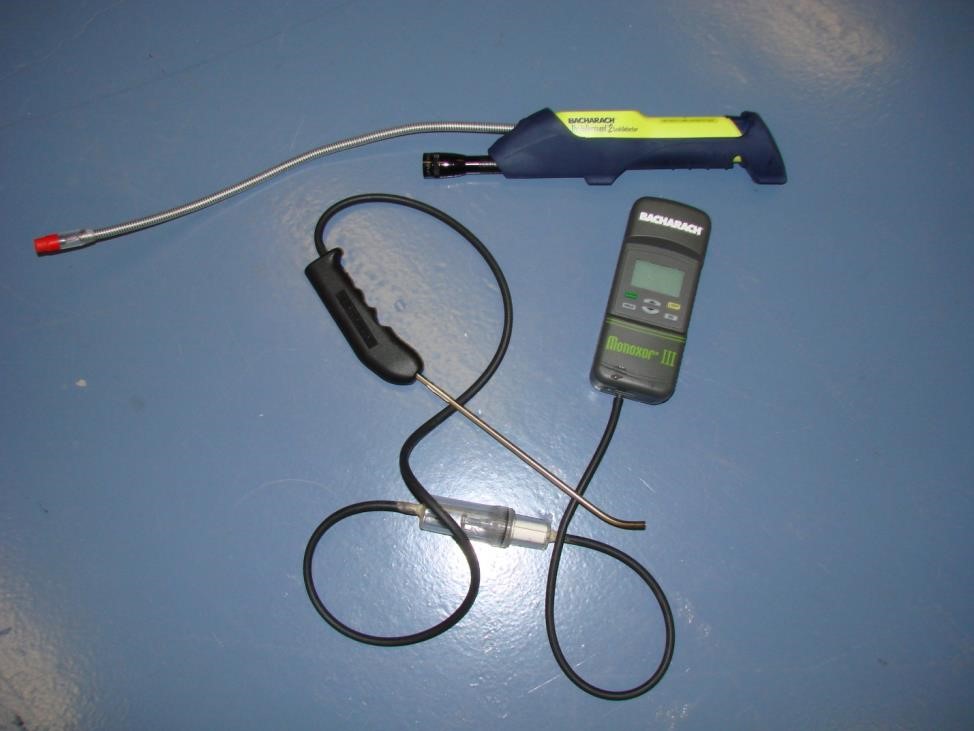
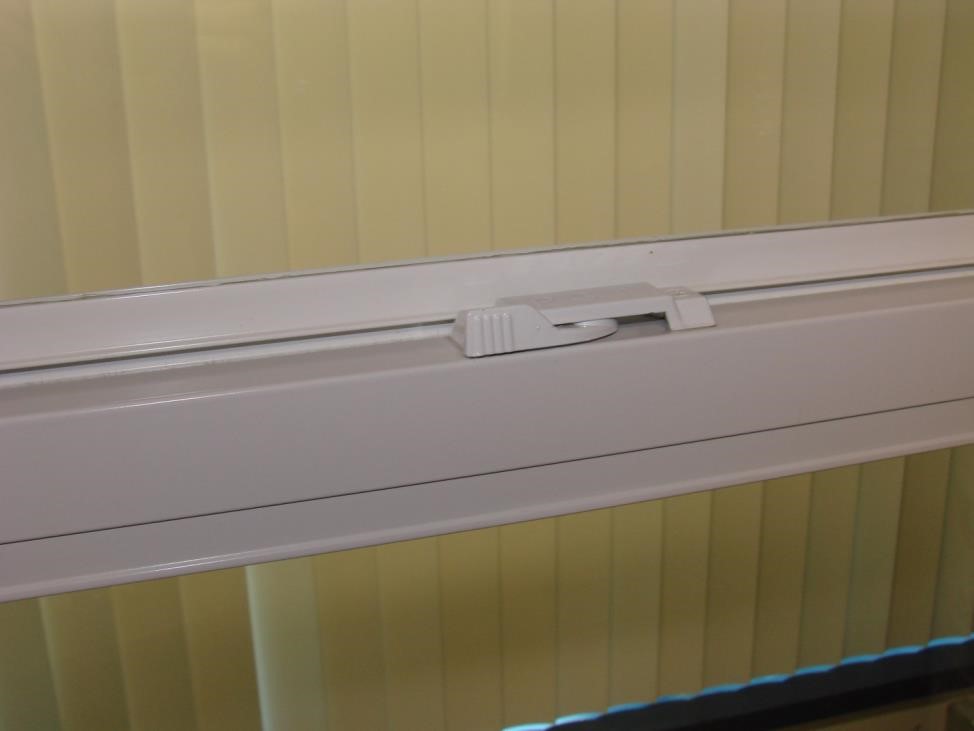
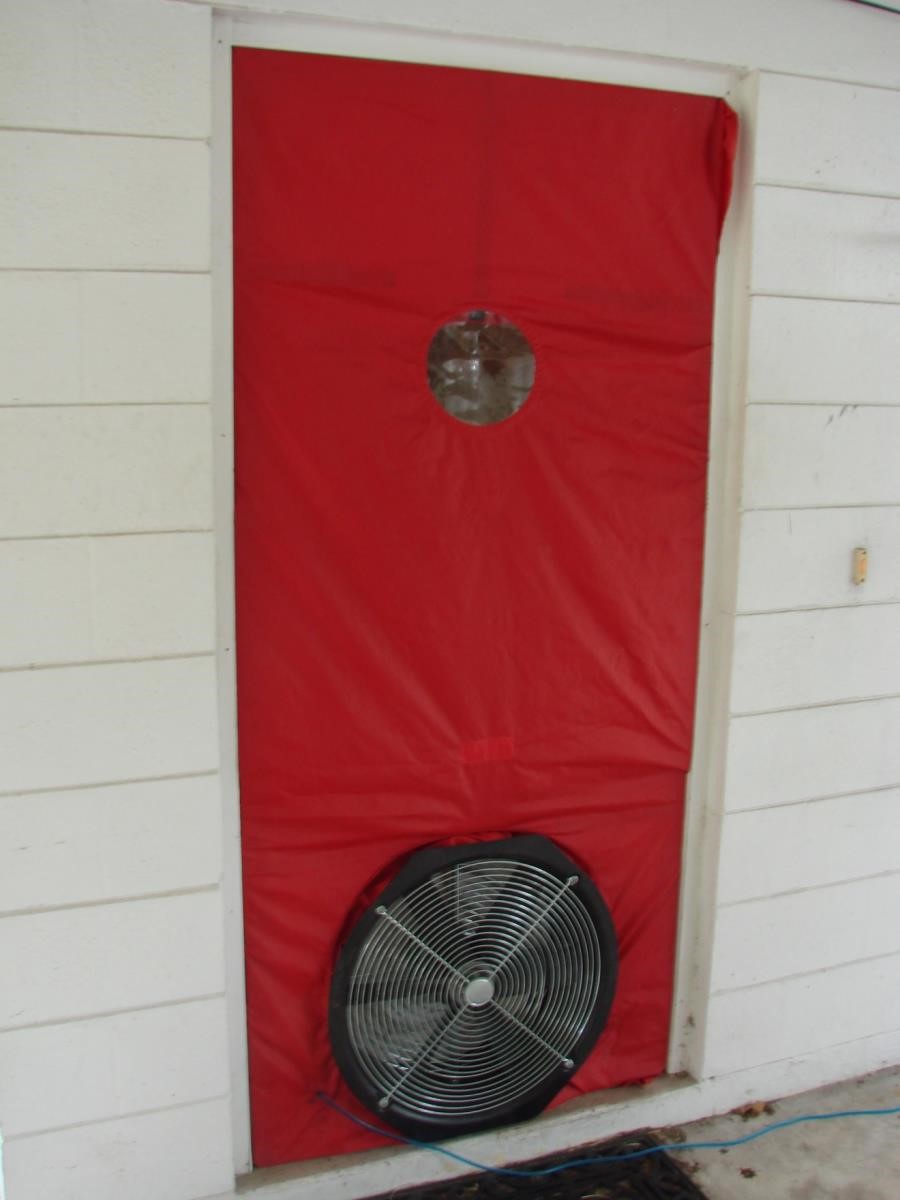
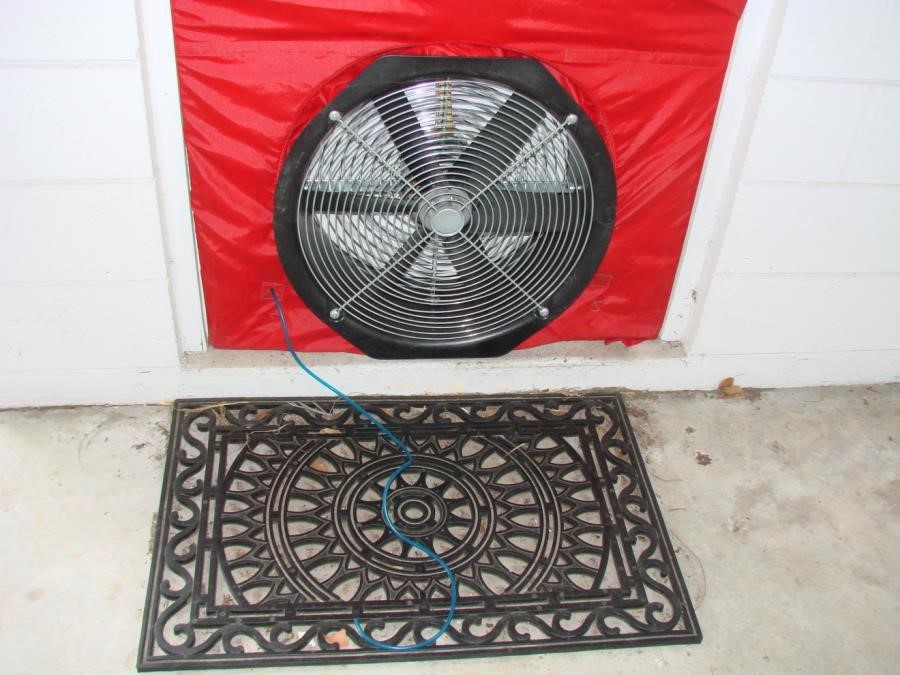
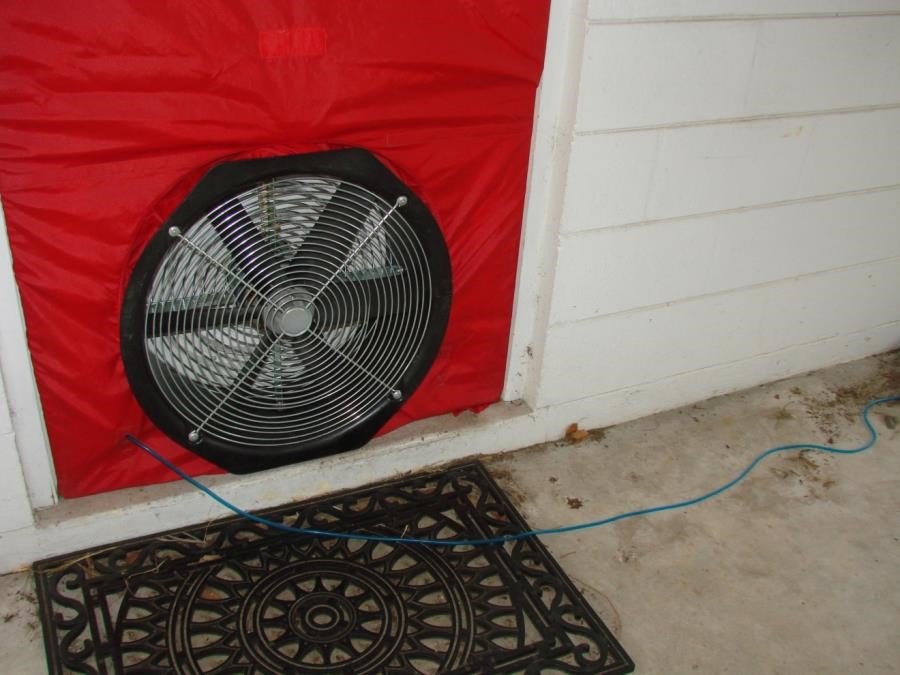
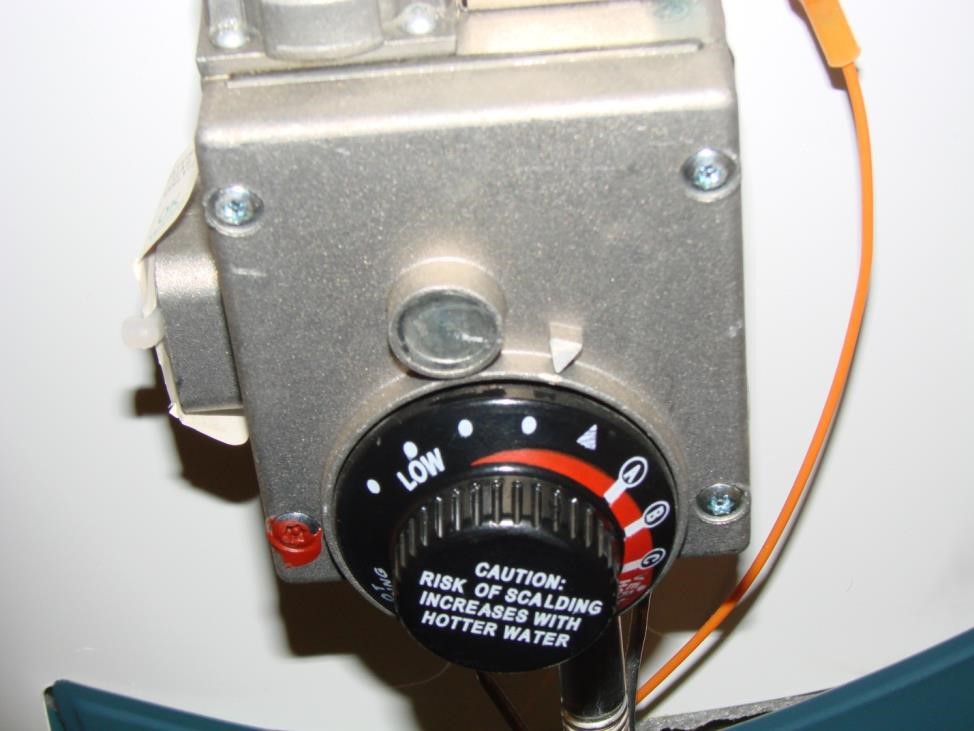
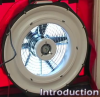
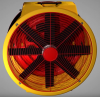
The blower door testing equipment includes a calibrated fan to pressurize or depressurize the house (Figure 1), a manometer to measure these pressures that is accurate to 0.5 Pa and 0.1 Pa resolution (Figure 2), and a covered frame apparatus that is installed in an open exterior doorway or window to hold the calibrated fan during operation. The contractor will also usually have a gas “sniffer” to find gas leaks and a carbon monoxide sensor to detect incomplete combustion in combustion appliances (Figure 3).

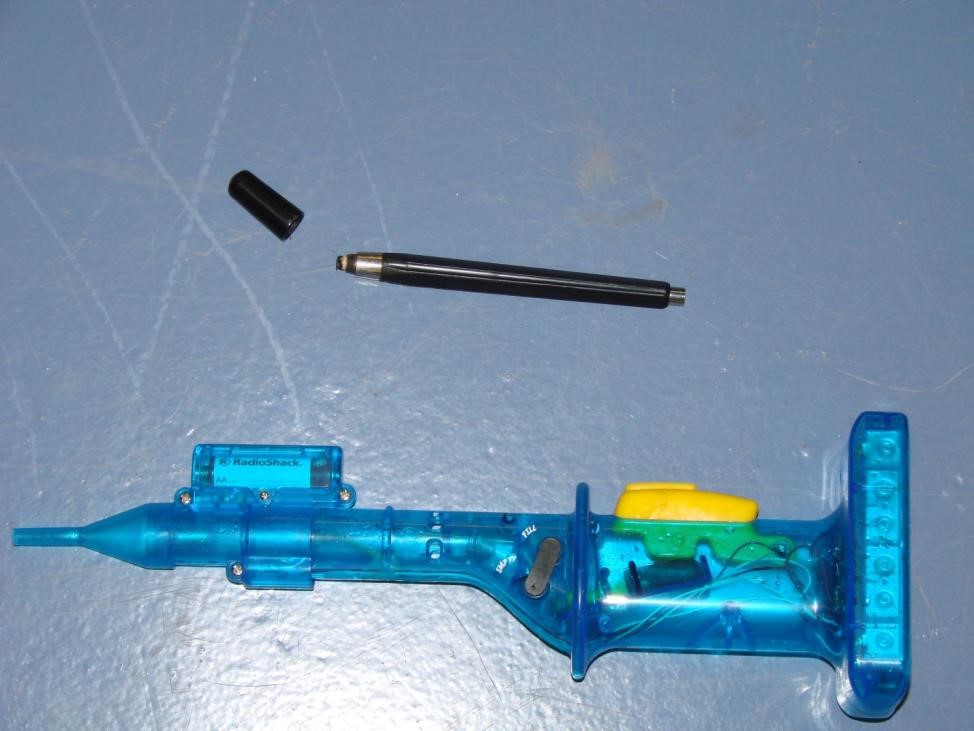
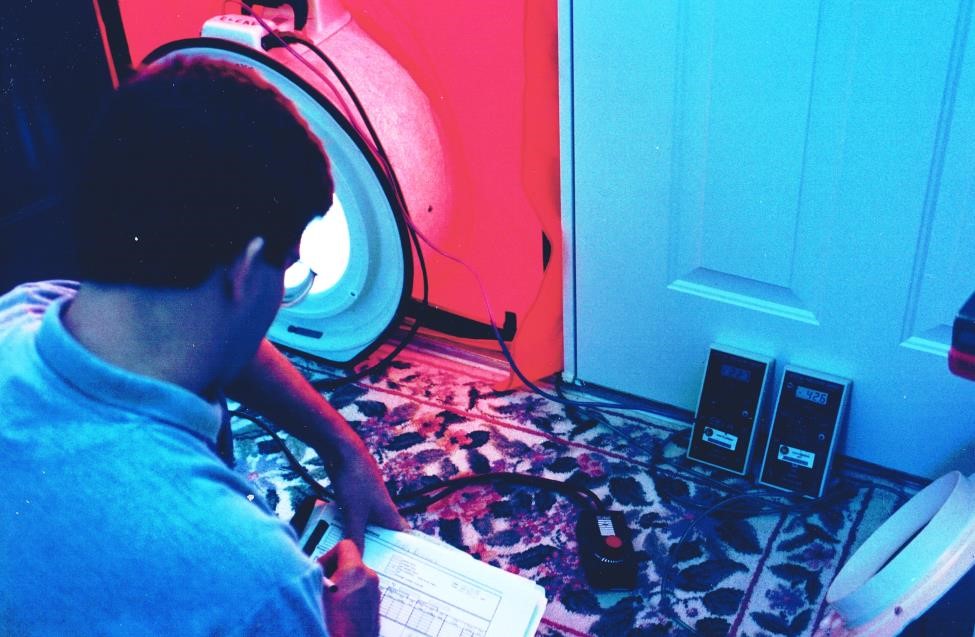
While the fan is operating to depressurize (or pressurize) the building, smoke generators (Figure 4) can be used to help identify leakage sites in the envelope. Often a physical inspection using the back of your hand can find leakage sites. If there is a substantial temperature difference between the inside space and the infiltration air, infrared imaging may also help in identifying leakage areas.
What Contractor Does the Work?
Contractors must be certified as qualified to perform envelope leakage testing according to State or local regulations, or be credentialed per the Building Performance Institute (BPI) Standards or RESNET-approved “equivalent home performance certification programs.” Contractors are typically certified through RESNET (see the RESNET Directory for approved home energy raters) or BPI (see the BPI directory for approved auditors). Some HVAC contractors offer testing as one of their services. Additionally, some utilities offer testing as part of incentive programs.
Test Procedures
Enclosure leakage testing in residential and light commercial buildings of three stories or less follows procedures specified in either the Residential Energy Services Network (RESNET) Mortgage Industry National Home Energy Ratings Systems Standards (RESNET Standards Chapter 8), or one of two specified American Society for Testing and Materials (ASTM) Standards, ASTM E1827 and ASTM E779. All three of these standards provide guidance on how to produce CFM50 and ACH50 test results, the two test results of relevance to codes and certification programs. While the RESNET Standard provides more detailed “how to” guidance, the ASTM Standards provide more mathematical formulas for post-test analysis.
An enclosure air leakage test, commonly referred to as a blower door test, typically generates a measurement of air leakage rate measured as cubic feet per minute at a standard test pressure of 50 Pa pressure difference (CFM50) between the conditioned space and the outside environment. A calibrated fan is used to move air into or out of the building until a standard test pressure is achieved. The volume of air flowing through the calibrated fan is equal to the volume of enclosure air leakage at the standard test pressure. RESNET Standard Section 802.3 describes two levels of accuracy for the testing. RESNET Standard Section 802.4 details the installation of a blower door apparatus.
The RESNET Standard outlines three procedures: single-point (Section 802.5), multi-point (Section 802.6), and repeated single-point (Section 802.7). Section 802.7 also describes various calculations that need to be made to correct the results for ambient pressure, temperature differences, and elevation-induced air density issues.
RESNET Standard Section 802.8 addresses the application of the testing results in terms of accuracy level and other leakage metrics, including equivalent leakage area (ELA), air changes per hour at 50 Pascals (ACH50), specific leakage area (SLA), and normalized leakage area (NLA).
RESNET Standard, Section 802.9 specifies accuracy requirements for blower door fans and pressure gauges. State, local, or program requirements may include the equipment calibration discussed in this section.
In addition to the RESNET Standard, test procedures are outlined in the specified American Society for Testing and Materials (ASTM) Standards, ASTM E1827 and ASTM E779. ASTM Standard E779 describes a single-point and a multi-point test protocol. Standard E1827 is based on Standard E779 and details single-point and two-point leakage testing with a blower door. The ASTM Standards provide less detail than the RESNET Standard on how to conduct the test but they do provide calculations for further analysis. These calculations include:
- corrected test pressures
- air densities and dynamic viscosity
- a power-law equation that correlates pressure difference to air flow via a flow coefficient (C) and a flow exponent (n). These values are automatically calculated by most rating software.
- effective leakage area.
How to Perform an Envelope Leakage Test
The following “How to” instructions are based on the RESNET Standards Chapter 8.
1. Prior to arriving at the test site, determine if power is available. Also determine what stage of construction or renovation the house is in. Generally speaking, enclosure testing is done after finish electrical, mechanical, and plumbing work is completed. Electrical fixtures, switch plates, outlet covers, plumbing fixtures, and HVAC components form part of the enclosure. If any are missing, reschedule testing or develop a plan to provide temporary covers for these leakage sites that would otherwise be covered once the house is completed.
2. At the site, prior to setting up equipment, conduct a walk-through assessment.
- Work with site supervisors to secure loose papers and any potentially hazardous contaminants or debris. For example, if the house has any fireplaces or woodstoves that have been used, remove the ashes or cover them with wet newspaper and temporarily seal the doors.
- Carefully consider whether to pressurize or depressurize the building for leakage testing. Either positive or negative pressures can be used for testing. In positive pressurization, set up the blower door fan such that it pushes air into the building. In depressurization, set up the blower door so the fan pushes air out of the building. Decide which is most appropriate taking into consideration any code and certification program requirements.
- Document as-found conditions, particularly for those items that may be adjusted during the test such as doors and windows (open/closed).
- Record the temperature both inside and outside the building as well as the elevation of the site.
- Calculate the volume of the conditioned space. Record measurements of exterior walls and ceiling heights for future reference.
- If the home is occupied, determine the number and location of occupants. Make sure occupants are aware of testing personnel and the requirement for exterior doors and windows to remain closed when the blower door fan is operating. Determine if there are any pets on the premises and devise a strategy to ensure they stay where the owner wants them (inside or outside) during set up and testing. Opening or closing doors during testing will affect the results.
- Decide which exterior doorway to use, ensuring access to power for the fan. If you have more than one exterior door to choose from, pick one that’s less used.
3. For buildings with operating combustion appliances vented with indoor air drawn from the surrounding space (also known as atmospherically vented combustion appliances), perform a Worst Case Depressurization Test following RESNET Standards Section 807 to determine pressure conditions in the Combustion Appliance Zone (CAZ) before conducting the blower door test. (Because some of the procedures outlined in the RESNET Standard involve disassembly of heating and air conditioning equipment, a State or local HVAC license may be needed to carry out all the tasks involved). Further combustion safety guidance is available in the assessment guide Pre-Retrofit Assessment of Combustion Appliances and the guide Combustion Appliance Zone (CAZ) Testing.
4. Prepare the house for testing.
- Follow the guidance in RESNET Standard, Section 802.2 to prepare each of the following building enclosure elements for the test: garages, crawl spaces, attics, interior doors, chimneys, combustion appliances, fans, motorized and non-motorized dampers, windows and other intentional openings in the building enclosure, un-dampered or fixed damper openings, mechanical ventilation duct work, whole house fans, evaporative coolers, operable window trickle vents, through-wall vents, supply registers and return air grilles, plumbing drains with p-traps, and combustion appliances.

5. Set up the blower door.
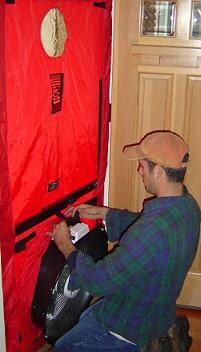
- Install the blower door apparatus and calibrated fan, pressure gauges, and connecting tubes in an exterior doorway with the real door securely propped open. In general, one manometer (or manometer channel) is connected to the calibrated fan while another is connected to an outside pressure reference hose.
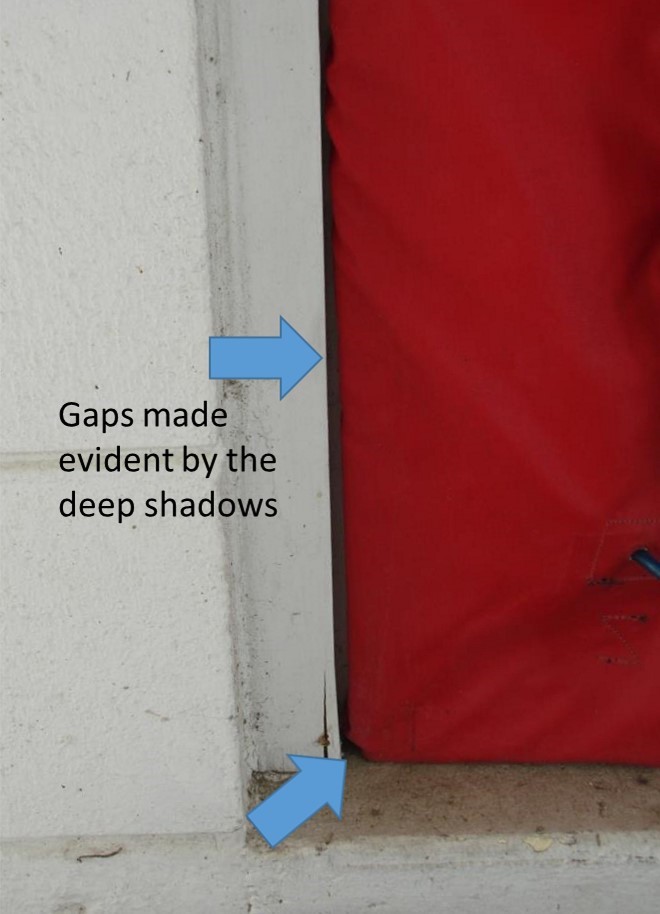
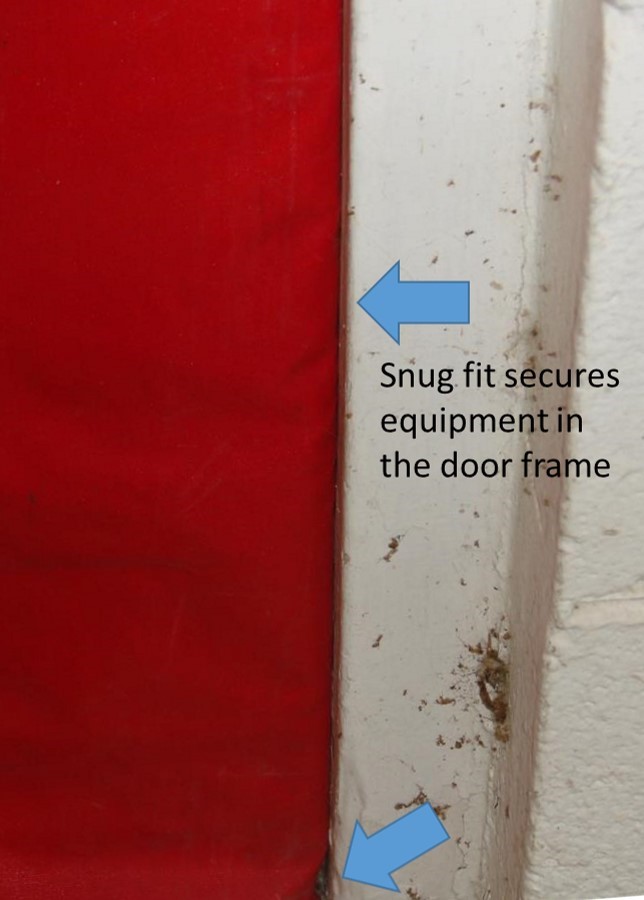
- Refer to the manufacturer’s instructions for setting up and operating the blower door and associated pressure gauges. Check that fan and pressure gauges are operational. Tug on the curtain edges to ensure the frame does not move in the doorway. Make sure the tubes are not compressed.
6. Conduct the following standard test steps.
- Assess baseline air pressure conditions with the blower door apparatus installed but closed and turned off.
- Adjust and turn on the calibrated fan to the lowest speed. Ensure that neither the frame nor the fan are moving around in the doorway.
- Read the pressure difference between the house and the outside environment using the manometer connected to the outside pressure reference hose. Note that even minute hose movements can alter pressure readings. Minor pressure variation from moment to moment is normal. Refer to RESNET Standard Sections 802.5 through 802.7 for guidance on averaging readings.
- Slowly adjust the fan to achieve the desired pressure difference. For a single-point test, the standard pressure difference is 50 Pa.
- Read and record the “fan pressure” measurement from the manometer connected to the calibrated fan’s housing. The fan pressure can be converted to a “fan flow” measurement in cubic feet per minute using the manufacturer’s look-up tables or automatically by the manometer. Refer to manufacturer guidance on manometer set up. This fan flow is called “CFM50.”
- Correct CFM50 readings for altitude and/or high temperature differences per guidance in RESNET Standard.
- For multi-point tests, take additional fan flow measurements at various house pressures, usually in five- to ten-Pascal increments. For example, in addition to 50 Pa, readings could be taken at 25, 30, 40, and 60 Pa. Changes to the blower door set up may be needed. The results can be used to characterize the nature of the leakage area.
- In repeated single-point tests, the process is repeated several times. The results can be used to characterize the precision, uncertainty, and accuracy of the tests.
7. Use the CFM50 test result to calculate the estimated number of air changes per hour at a standard test pressure of 50 Pascals, referred to as “ACH50,” using the following formula:
ACH50 = (CFM50 x 60) / building volume (in cubic feet).
Ensuring Success
- If there is a smell of gas or suspicion of a gas leak at any time before testing begins, alert the household, do not carry out the testing, ventilate the house, identify the leak source, and remediate the gas leak, calling in other parties as appropriate.
- Document all changes to the as-found house conditions. For example, if you adjust the thermostat setting, note the as-found setting.
- Return the building to the as-found condition when testing is complete.
- Make sure combustion appliances are restored to operating condition upon departure unless there is suspicion of a gas leak. Ensure that any combustion appliance pilots that were set to “on” prior to testing remain lit after testing. Consider leaving the keys to your vehicle at the appliances so you don’t forget this important step.
- Calculate ACH50 while on site with testing equipment left in its final configuration. If the measurement is suspicious, for instance a new house with a high ACH50, or an older, obviously leaky house with a low ACH50, check your work. Most often suspicious readings are the fault of a mistake in measurement technique. Check that there are no openings like closet windows or an exterior door or hatch that came open during testing. Check that the fan is set up correctly, including all pressure measurements. It is easy to record an incorrect fan configuration or to set up manometers incorrectly.
- Failing manometer batteries can cause anomalies. Keep replacement batteries with testing equipment.
- Pay careful attention if the test is configured in an unfamiliar protocol; for example if you typically depressurize the house, pay careful attention to what you do when you have to pressurize a house.
- Ensure that blower door fan operation will not affect the manometers or pressure tube inlets by verifying that the manometer taps and pressure tube inlets are out of the fan airstream.
- Use calibrated equipment. See the RESNET Standard Section 802.9.
- Return the house to the as-found conditions recorded prior to the test.
Region
ENERGY STAR Single-Family New Homes, DOE Zero Energy Ready Homes, and the International Energy Conservation Code all specify climate-specific air leakage limits. See the Compliance tab for details.
Training
Right and Wrong Images

Source
Videos


Compliance
Retrofit
SCOPE
Prior to any testing: Carefully inspect the building to determine if depressurizing the building is unsafe due to the presence of hazardous materials or organisms, such as mold, asbestos, or other insulations, that could be drawn into the building by blower door operations.
If testing cannot be performed by depressurization but can be safely carried out by pressurizing the building, proceed with pressurization testing. Otherwise, prepare a work order that clearly identifies remedial actions that must be done before testing can be conducted, including those which require prompt attention, affect safety, or require a licensed trade to execute.
For more on safety and health, see these Building America Solution Center guides:
- Pre-Retrofit Assessment of Combustion Appliances.
- Pre-Retrofit Assessment of Hazardous Materials.
- Home Performance Assessment
For further information, see the Standard Work Specifications on safe work practices and combustion appliance zone testing.
DESCRIPTION
Typical practice when performing blower door testing is to depressurize the building to negative 50 Pa. Depressurizing the building for testing is generally preferred, as most deliberate holes, such as vent fan outlets, are designed to close under suction (depressurization). Duct leakage testing, which also uses the blower door, is easier to perform when depressurizing rather than pressurizing the house. (See the guide Duct Leakage to Outdoors).
However, potentially adverse effects from blower door testing increase with the age of the house. Older houses may have been built with hazardous materials for insulation or pest control. Depressurization of a building will draw air into the building through any cracks or holes in the envelope and could potentially pull contaminants from the walls, attic, crawlspace, and basement into the house. If there is ANY indication of possible contamination from depressurization testing, either remedial work must be carried out prior to testing or a pressurization protocol should be evaluated as a potentially safer alternative.
SUCCESS
Pay careful attention to existing used fireplaces. Fireplace dampers often do not seal well, which can be problematic when depressurizing a house. A small amount of ash can go a long way. Temporarily seal off the fireplace opening with tape and cardboard.
COMPLIANCE
See Compliance tab.
More Info
References and Resources
*For non-dated media, such as websites, the date listed is the date accessed.
Contributors to this Guide
The following authors and organizations contributed to the content in this Guide.
David Beal, Janet McIlvaine, Florida Solar Energy Center
Sales
Blower Door Test
Technical Description
Draft tests are usually performed by a home energy performance professional with a device called a blower door. This test determines how much air is leaking through cracks and holes in the home’s walls, ceilings, and floors. The blower door equipment uses a strong fan to pressurize or depressurize a house and then measure how drafty it is. While the test is being conducted, the analyst can use an infrared camera to look at the walls, ceilings, and floors, to find specific locations where insulation is missing and air is leaking. Nonharmful smoke sticks can also be used to find air leaks.
Questions? Comments? Contact our webmaster.