

A whole-house approach to home improvement can achieve a consumer’s immediate goals - more room, improved style, a more efficient space, or repairing a problem - while also providing an opportunity for increased comfort, improved indoor air quality, and cost-effective energy savings. This whole-house approach is based on an understanding that all systems in a home interact with one another (see Figure 1).
Here are some examples.
- Improvements in air sealing and insulation can reduce heat loss and heat gain and decrease the size and expense of the heating, ventilation, and air conditioning (HVAC) system.
- Upgrades to a home's HVAC equipment can save energy but may also improve the health and safety of the occupants.
- Any project that provides access to usually hidden spaces like attics and wall cavities offers an opportunity for insulation and air sealing, as well as upgrading wiring and plumbing, and perhaps improving ventilation systems.

Start by Getting a Home Energy Assessment
A home energy performance assessment (sometimes called an energy audit) is conducted by a trained contractor who follows recognized guidelines and retrofit procedures, such as the DOE’s Guidelines for Home Energy Professionals. The contractor will test the home’s current performance (Figure 2) and consider the interactions between the home’s systems when helping the homeowners identify and implement safe and effective energy improvements. There are two nationally recognized energy certifications for home performance energy contractors: the Building Performance Institute (BPI) Building Analyst certification and the Residential Energy Services Network (RESNET) Home Energy Rating System (HERS) certification. A Building Analyst or HERS Rater can help prioritize what to do and how different house components can affect one another to help get the most out of the money spent. DOE estimates that homeowners who implement the recommendations from their assessment can reduce energy consumption by 5% to 30%.
Any time a homeowner is seeking ways to save energy and reduce costs is a good time to get an assessment. Assessments are particularly important when
- Adding or replacing HVAC equipment,
- Wanting to improve a home's efficiency by air sealing or adding new insulation, or
- Designing and planning a major repair or remodeling project.
These triggers are important because any home improvement project may offer an opportunity to access parts of a house that are otherwise inaccessible. Energy-efficiency improvements can be included with other remodeling or home-improvement projects to gain more value from design efforts, contracting overheads, and financing costs and to take advantage of having skilled workers on hand. In addition, because all parts of a house make up a system, any home improvement project is likely to impact the overall comfort, safety, durability, and energy efficiency of the project. With a little planning, these impacts can be very beneficial.

Plan Your Projects to Get the Greatest Value at the Least Cost
When considering home improvement projects, or compiling them into a scope of work, prioritize the work and think of the opportunities that each project might provide. Projects that solve defects, such as a leaky roof or a cold shower, should rise to the top of the list. Consider how all the options may provide opportunities to take advantage of system interactions and access. A good guide on planning home improvements and remodels is No Regrets Remodeling: How to Create a Comfortable, Healthy Home that Saves Energy by Home Energy Magazine. Look in the References and Resources section below to find more documents from Building America intended to help contractors who are working with homeowners to select projects that save energy and money.
The Right Steps to Achieving Home Improvements
DOE recommends that homes be upgraded in a way that ensures safety and durability while also conducting work in stages that build on each other and do not get in the way of doing future work. The following steps help to achieve these goals and should be followed to gain the greatest benefit (Figure 3).
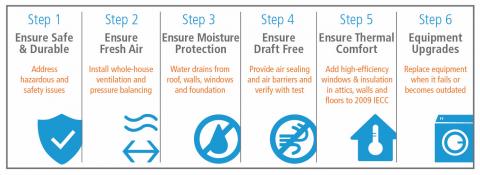
Step 1: Ensure the Home is Safe and Durable: Thoroughly assess the home to ensure that the home’s structure and condition can accommodate any proposed improvements. Conditions to look for include leaks, hazardous materials, and safety issues such as knob-and-tube wiring. The Existing Home Tool includes nine assessment guides for major house assemblies (like attics and foundations) and equipment. Contractors can use these guides to make sure the project scope of work includes any issues that need to be corrected. And homeowners can reference these guides to do their own assessments or to help them communicate with their contractors.
Step 2: Ensure Fresh Air: Upgrade ventilation systems to make sure the home will meet ventilation standards and remove pollutants from the house.
Step 3: Ensure Moisture Protection: Install weather-resistant barriers and properly flash all penetrations to correct and avoid leaks.
Step 4: Ensure Draft Free: Create a continuous air barrier to block air leaks and drafts.
Step 5: Ensure Thermal Comfort: Add insulation to the enclosure, correct deficiencies in windows and doors, and insulate ducts to increase comfort and reduce energy costs. Move ducts into conditioned space for substantial additional savings and more efficient heating and cooling.
Step 6: Upgrade Equipment: Replace and repair equipment at any time. After air sealing and increasing insulation levels, test combustion appliances and repair or replace as needed. Many types of equipment are typically not replaced until they fail. This may result in a limited selection of replacements based on what’s available right away rather than what would bring the homeowner the best value and comfort. Contractors should encourage homeowners to select equipment based on long-term operating costs and goals for comfort and utility rather than what equipment happens to be readily available. Homeowners should decide what types of equipment replacements or additions they are interested in rather than waiting until an emergency forces them to select from what is available.
The six steps apply best to whole-house remodels because the entire house can be accessed at once. However, they also apply well to more-focused remodels and repairs. Over time, more focused projects may provide access to much of the building envelope.
Applying the Right Steps to Focused Home Improvement Projects or Repairs
Examples of more-focused projects include reroofing or remodeling a single room, such as a bathroom or kitchen. The more-focused home improvement often makes hidden areas accessible. Or, they provide an opportunity for home improvement that will benefit from the work. An interior painting project provides an opportunity for air sealing repairs to windows and penetrations. An exterior painting project also provides an opportunity for air sealing and repairs to windows, doors, and cladding. Exterior painting is also a good time to evaluate and potentially upgrade wall insulation before the finish work is complete. The following two examples describe how the right steps apply to two focused home improvement projects. Solution Center guides describe each of the actions in these examples.
New Roof Project Example
When replacing a roof, the roof deck and the attic become highly accessible. Here are how the steps could be applied to a reroofing project.
Step 1: Ensure the Home is Safe and Durable: Find out from a home energy assessment how much insulation is right for the house and what savings could be expected from air sealing the attic and adding insulation, either at the ceiling plane or at the roof deck. Use the Attic Assessment Guide to evaluate durability and hazard issues. Use the combustion appliance guide to gauge how combustion appliances may be impacted by air sealing. Incorporate all upgrades into the scope of work.
Step 2: Ensure Fresh Air: Upgrade the ventilation system to account for the substantial decrease in air leakage that will occur from sealing the attic.
Step 3: Ensure Moisture Protection: the new roof will do much to help with this step. Ensure adequate gutters and downspouts and landscape grading are part of the project. Ensure the attic is properly vented if it is unconditioned, or modify the attic to be a conditioned space and do not use vents.
Step 4: Ensure Draft Free: Air seal the attic or the top of the ceiling before adding any insulation. Proper air sealing of the top plate and various penetrations requires direct access and clean surfaces. Air seal penetrations for chimneys, ducts, exhaust fans, lights, wiring, and plumbing.
Step 5. Ensure Thermal Comfort: Add insulation. Avoid adding it before the tear out to avoid compression. Air seal and insulate any ducts located in the attic. Insulation and air sealing strategies will differ for conditioned (non-vented) versus unconditioned (vented) attics.
Step 6: Upgrade Equipment: Assess and upgrade any equipment located in the attic, including light fixtures that penetrate the ceiling. After air sealing and increasing insulation levels, test combustion appliances and repair or replace as needed.
Bathroom Remodel Example
When remodeling a bathroom, the exterior wall, ceiling, and floor become highly accessible within the space. Here is how the six right steps could be applied to a bathroom remodeling project.
Step 1. Ensure the Home is Safe and Durable: Use a home energy assessment to determine how much insulation is appropriate and what savings could be expected from wall, floor, ceiling, and pipe insulation. Use the Assessment Guides to evaluate durability and hazard issues. Because this upgrade could involve air sealing, use the combustion appliance guide if gas appliances are present to gauge how they may be impacted. Incorporate all corrections into the scope of work.
Step 2. Ensure Fresh Air: Upgrade the house ventilation system to account for the decrease in air leakage that will occur from sealing exposed walls, floors, and ceilings. Replace the bath exhaust. Use low-VOC cabinets that comply with the Indoor airPLUS program.
Step 3. Ensure Moisture Protection: Use water-resistant finish material. Use water-resistant backing behind tile, tubs, and showers and beneath countertops. Ensure the moisture barrier behind exterior wall cladding is intact before adding insulation.
Step 4. Ensure Draft Free: Air seal the wall, floor, and ceiling before adding any insulation. Proper air sealing requires direct access and clean surfaces. Air seal wall, floor, and ceiling penetrations for ducts, exhaust fans, lights, wiring, and plumbing.
Step 5. Ensure Thermal Comfort: After demolition, add insulation to wall, attic, and floor cavities. Ensure insulation is installed in the exterior wall cavities where showers and tubs will be located before tubs and surrounds are installed.
Step 6. Upgrade Equipment: Assess and upgrade any equipment located in the bathroom, including lights and water fixtures. Ensure that water fixtures comply with EPA’s WaterSense criteria. After air sealing and increasing insulation levels, test combustion appliances and repair or replace as needed.
The house-as-a-system approach to upgrades can improve health, safety, comfort, durability, and energy efficiency, as well as the cost effectiveness of the work. Table 1 provides examples of two common home renovation projects and shows some of the possible building interactions related to these projects.
| Heating and Cooling System | Ducts | Insulation & Air Sealing | Walls and Windows | Attic | Foundation | Lighting | Equipment | Ventilation & Indoor Air Quality | |
|---|---|---|---|---|---|---|---|---|---|
| Roofing Replacement | X | X | X | X | X | ||||
| Bath Remodel | X | X | X | X | X | X | X |
Table 1. Examples of Related Projects that Can be Done while Conducting a Roof Replacement or Bathroom Remodel.
More Info
References and Resources*
* For non-dated media, such as websites, the date listed is the date accessed.
Contributors to this Guide
The following authors and organizations contributed to the content in this Guide.
Advanced Energy
Pacific Northwest National Laboratory