

Scope
Install blanket fiberglass insulation in a conditioned, unfinished basement as an alternative to best practice solutions.
- Waterproof exterior of basement walls.
- Ensure a capillary break is installed on top of footer and below basement slab.
- Address any moisture intrusion issues prior to installing insulation.
- Thoroughly air seal and insulate rim joist of the overhead floor system.
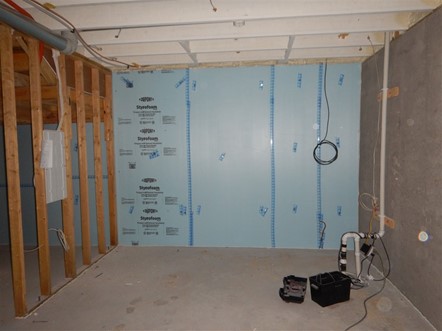
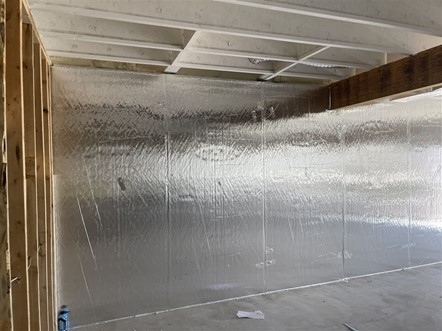
- Install rigid insulation against the interior of the basement walls – seal all joints and seal sheets to the slab and to the top of the foundation wall.
- Install framing “nailers” on basement walls and around all windows/doors to support fully expanded blanket insulation.
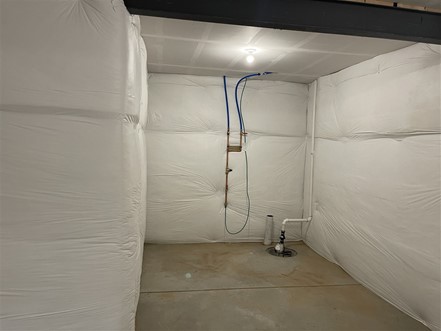
- Install blanket insulation and tape all seams.
- Inspect completed work.
See the Compliance tab for links to related codes and standards and voluntary federal energy-efficiency program requirements.
Description
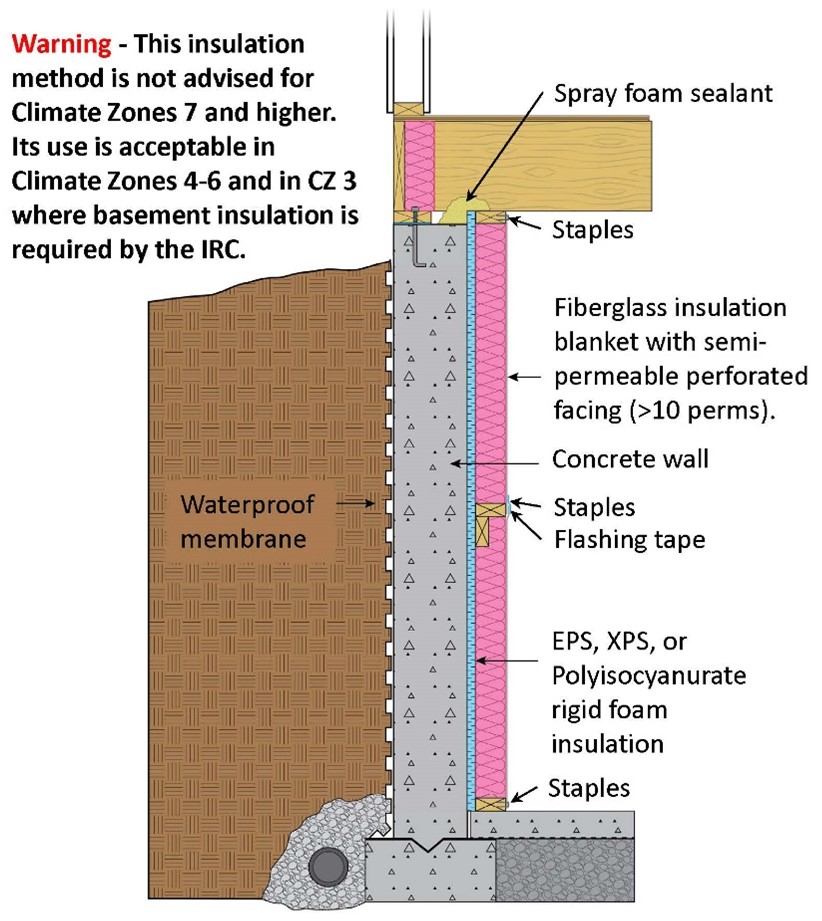
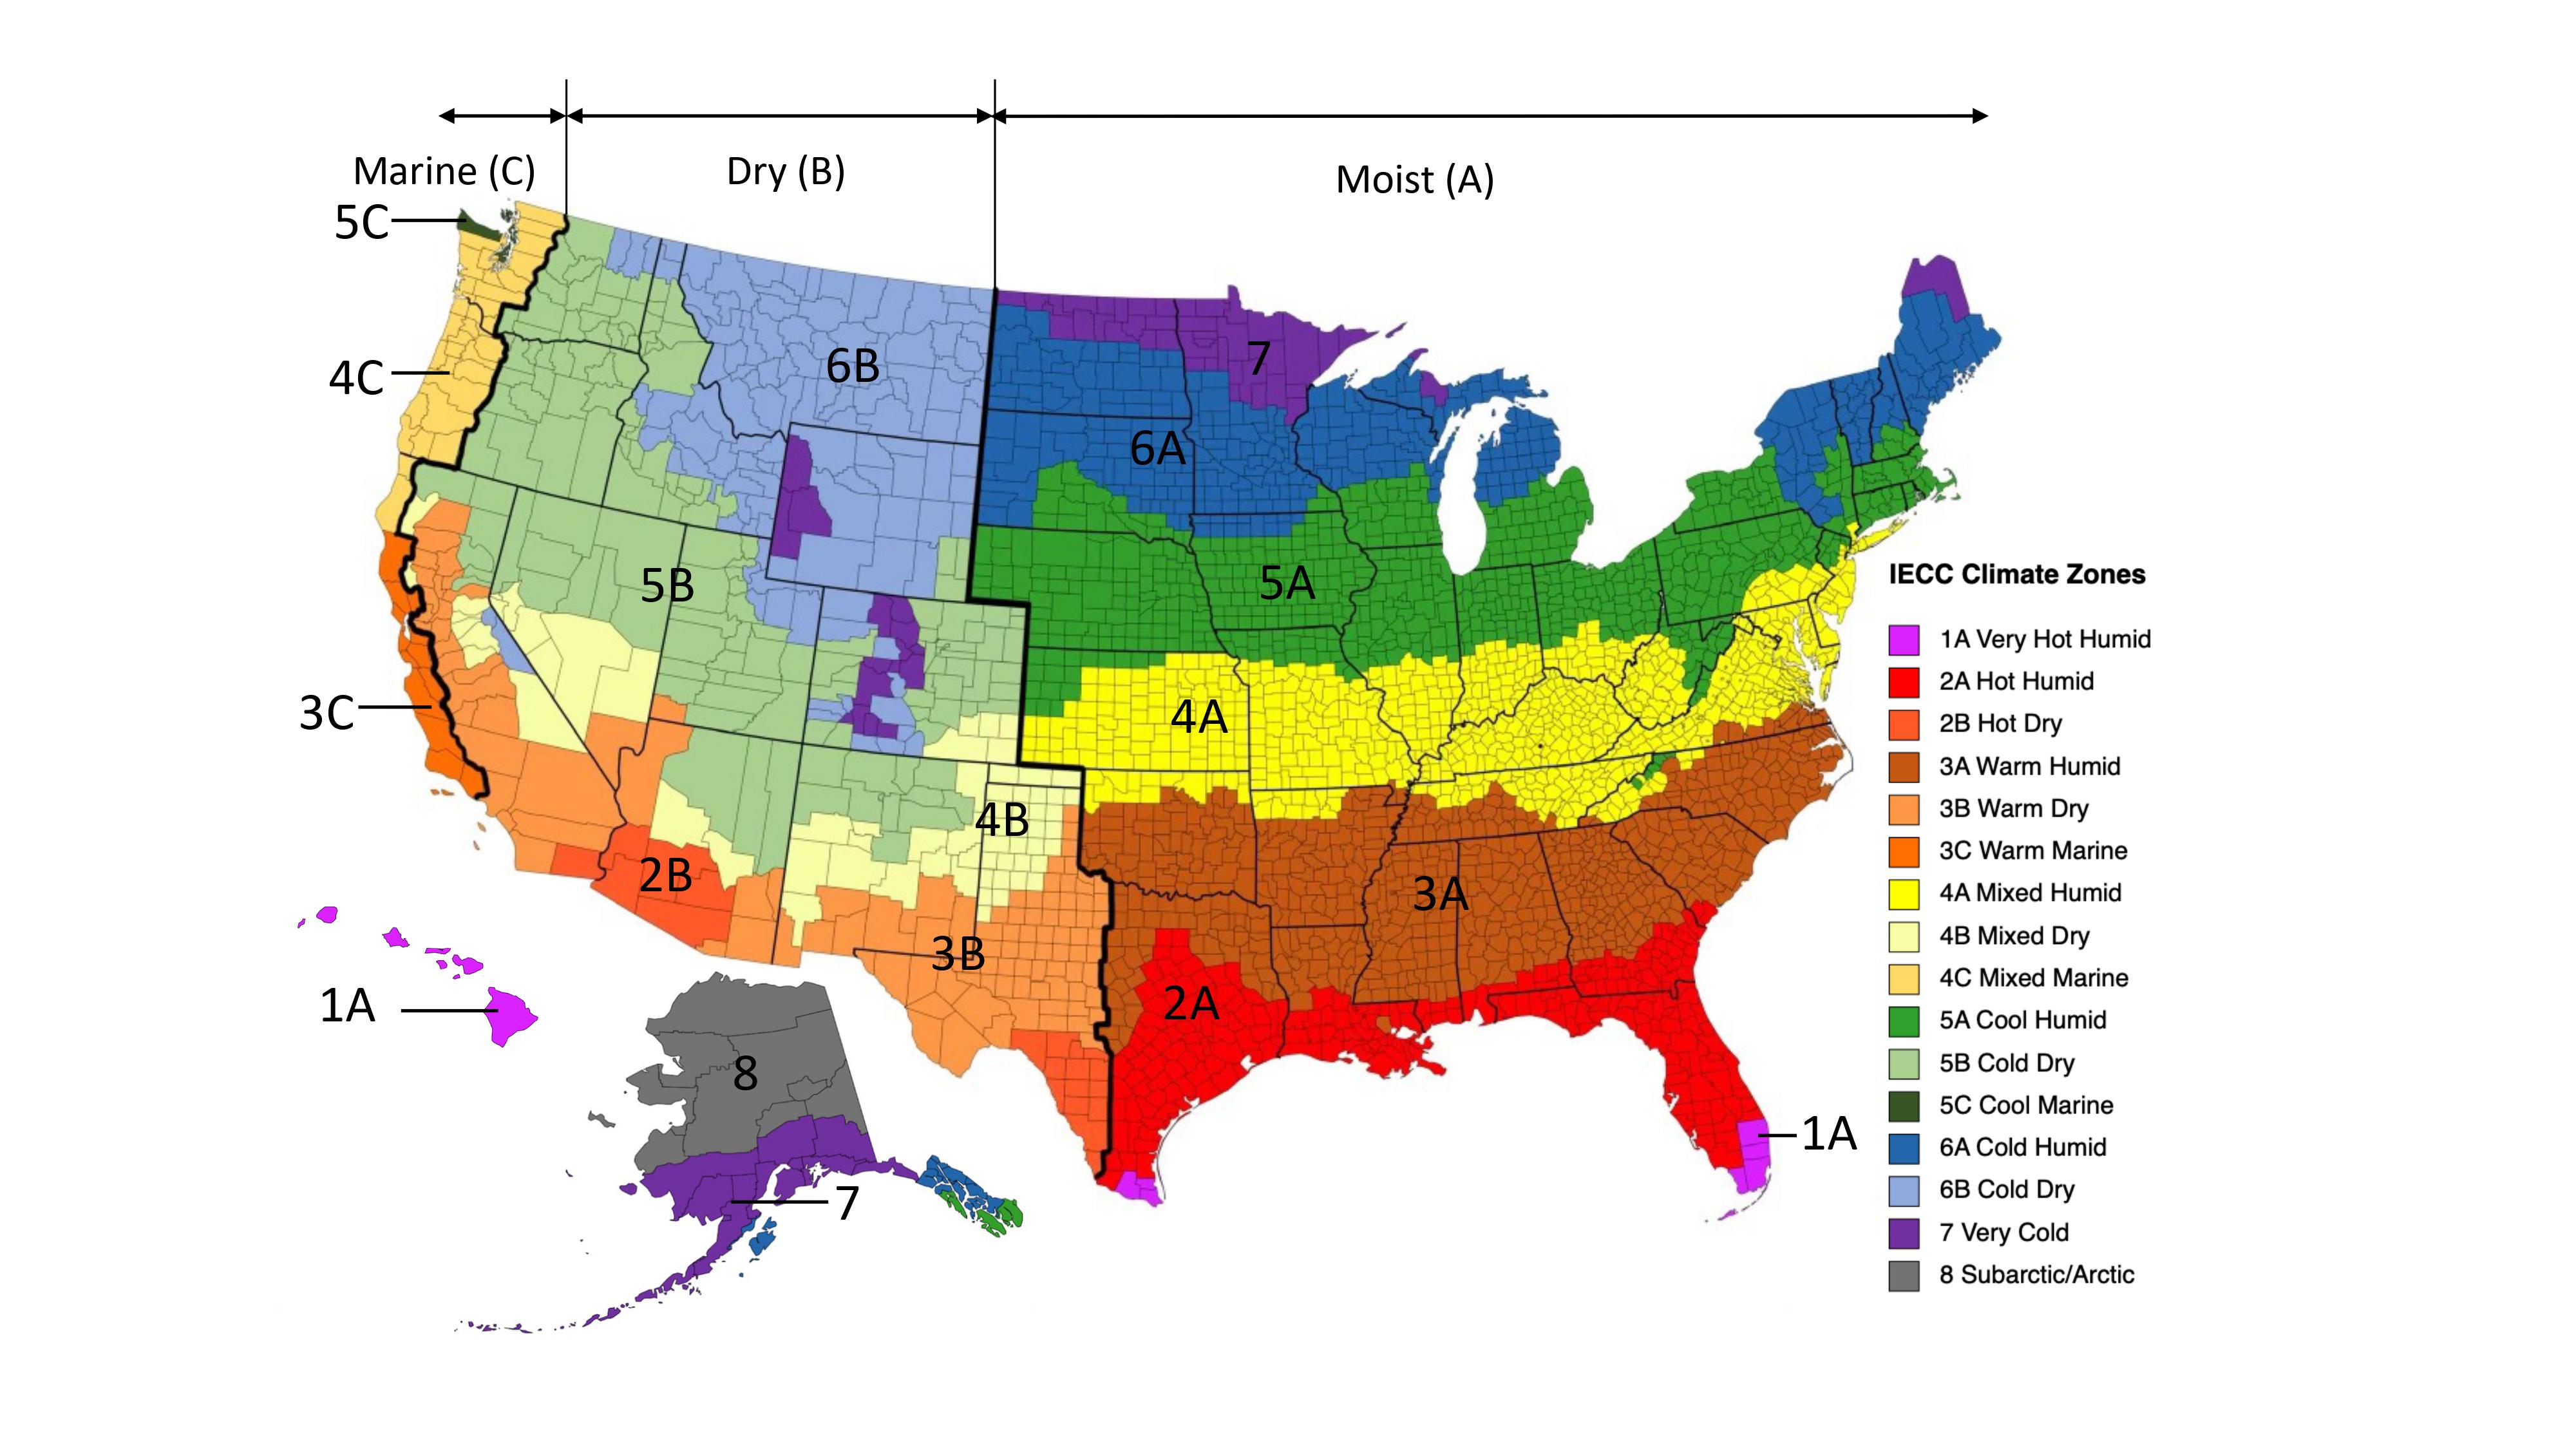
The International Residential Code (IRC) requires basement foundation walls to be insulated in Climate Zones 3 through 8 (see the Climate tab for clarification on Climate Zone 3). This guide is intended to provide an effective strategy to combat thermal- and moisture-related issues in conditioned and semi-conditioned basements that are constructed in International Code Council (ICC) Climate Zones 3, 4, 5, and 6. Basement blanket insulation is not recommended for homes in Climate Zones 7 and 8 where more extreme temperature variations across the wall assembly could lead to condensation issues. (See Compliance tab for insulation requirements.)
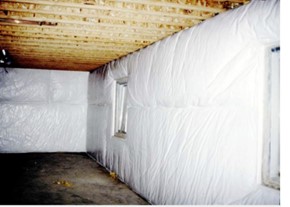
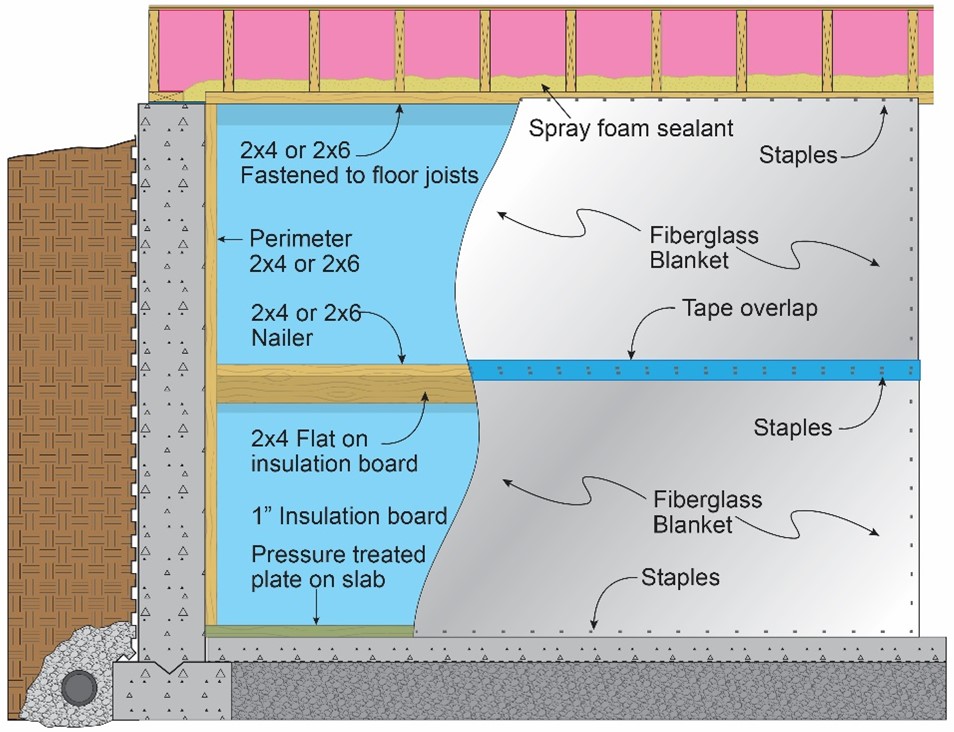
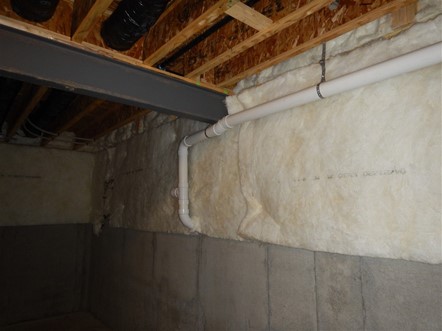
Some builders meet the basement insulation code requirement by using a pre-manufactured insulation “blanket” that is made up of a large fiberglass batt consisting of either a reinforced polypropylene vinyl or foil facer (FSK) laminated to one surface of the insulation to create a vapor retarder or barrier. The facer can be either solid or perforated. These blankets are available in widths of 48 inches and 72 inches and are typically installed in a horizontal fashion directly against the foundation walls with the vapor retarder or barrier facing towards the living space. This simple installation method has led to condensation where the blanket insulation meets the surface of the concrete, resulting in potential durability and indoor air quality problems.
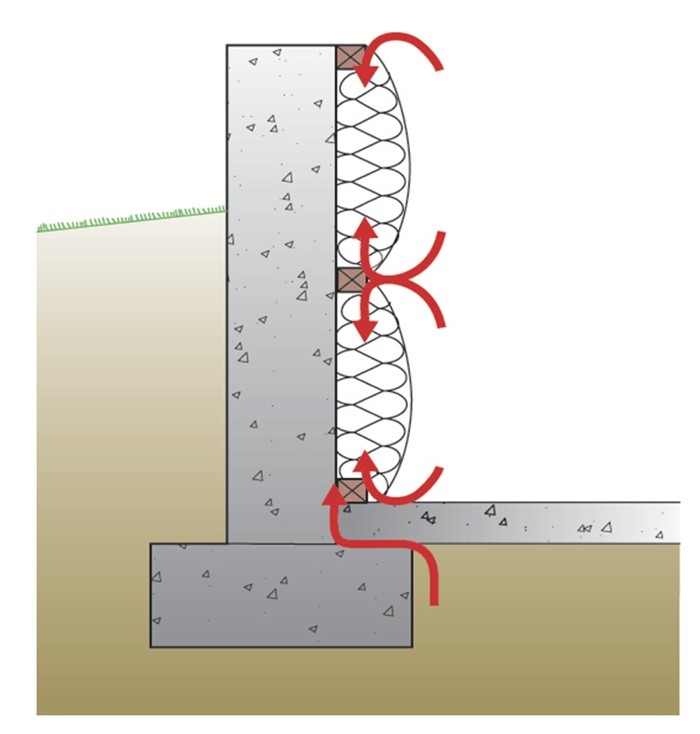
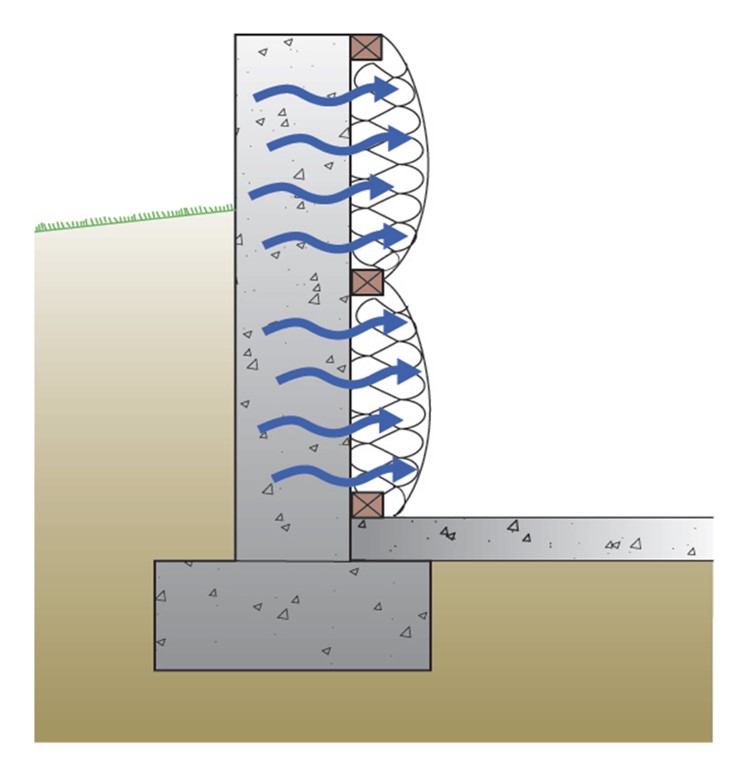
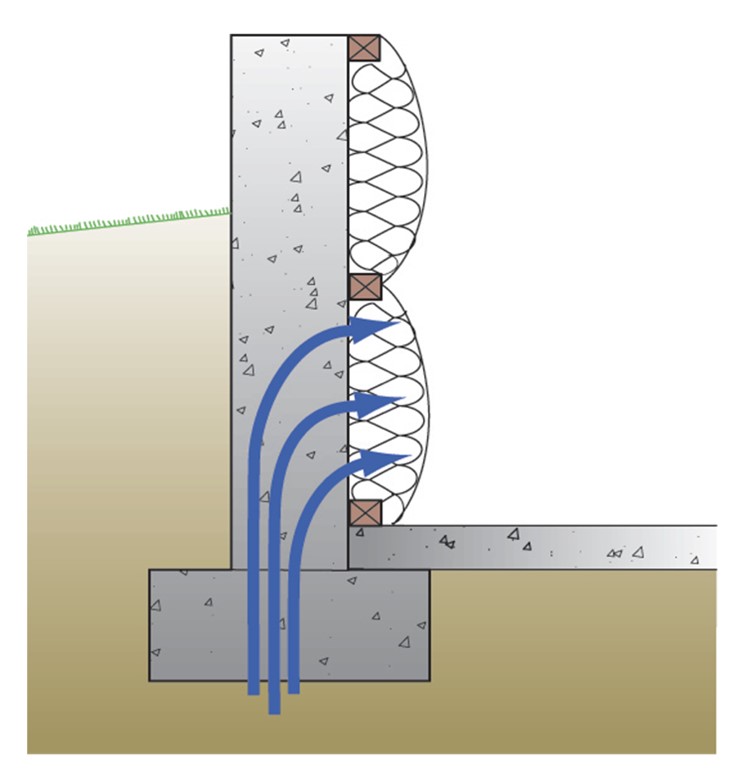
Typically, there are three sources of moisture that can result in condensation issues on basement foundation walls that are constructed of poured concrete or concrete masonry units (i.e., CMU block). The first source is moisture vapor (i.e., humidity) in basement air from human activity or from humidity in the outdoor air that can condense on the cold interior surface of the foundation walls if that surface temperature drops below the interior dew point (Figure 1). The second source is moisture that is within the concrete wall when it was constructed, that can move via diffusion towards the drier air of the basement or outside (Figure 2). The third source is moisture below the foundation, that can move from beneath the footer through the foundation wall via capillary draw and dries to the interior (Figure 3).
Source
Information sheet with methods for constructing or retrofitting basements to reduce moisture issues.
Source
Information sheet with methods for constructing or retrofitting basements to reduce moisture issues.
Source
Information sheet with methods for constructing or retrofitting basements to reduce moisture issues.
The strategy presented is appropriate for new or retrofit construction in conditioned or semi-conditioned, fully or partially below-grade basements where reasonable humidity levels are maintained. This insulation approach will not compensate for poor moisture management. See the Whole-House Dehumidification guide for information on maintaining proper humidity levels. Also see the following guides for information on moisture control and indoor air quality: Water Management of Existing Basement Floor, Whole-House Ventilation Strategies for New Homes, and Whole-House Ventilation Strategies for Existing Homes.
In high-termite-risk areas, a termite inspection strip (a 4-inch horizontal gap of bare wall) may be required at the top of the foundation wall; consult your local code department. (See the guide Termite-Resistant Foundations and Walls for more information.)
While this guide is not intended to represent a “best practice” installation, it does represent an improvement to typical basement blanket insulation installations that will result in improved thermal performance and moisture durability. Refer to the Air Sealed, Insulated Basements guide for best practices.
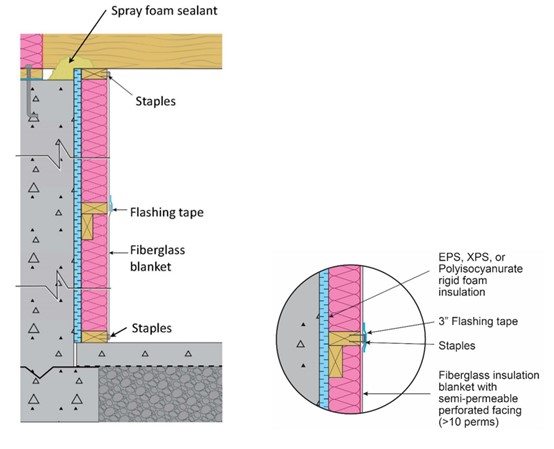
The improved approach to installing blanket insulation is a hybrid insulation solution that includes blanket insulation with a perforated facer installed against a sealed extruded polystyrene (XPS), expanded polystyrene (EPS), or foil-faced polyisocyanurate rigid board insulation that is installed directly against the interior side of the basement walls (Figures 4, 5). This strategy will minimize thermal energy loss and reduce the potential for long-term durability problems due to condensation. The perforated facer on the blanket insulation provides drying capability for any moisture that may accumulate between the fiberglass and rigid foam surface. By following these installation guidelines and ensuring proper sealing of the rigid board insulation, the long-term performance of the insulation will be improved and the risk of moisture condensation on the basement walls will be reduced or eliminated altogether.
Source
Source
How to Insulate a Basement Wall with Blanket Fiberglass Insulation and Rigid Foam Board
Materials Needed:
- Perforated white vinyl or FSK-faced fiberglass or mineral wool blanket insulation in the appropriate R-value per building code and climate zone (Refer to Climate and Compliance tabs) (FSK stands for foil, scrim, kraft, and refers to the flame retardant vapor barrier facing of aluminum foil, fiberglass scrim and kraft paper that covers the blanket.)
- 1-inch-thick rigid foam insulation board (EPS, XPS, Polyisocyanurate)
- 2x4 or 2x6 pressure-treated dimensional lumber for “nailers” in direct contact with the floor slab (8-, 10-, or 12-foot lengths)
- 2x4 or 2x6 dimensional lumber for “nailers” not in contact with floor slab (8-, 10-, or 12-foot lengths)
- Masonry screws and drill bits to fasten “nailers” through the rigid board to the concrete walls. Ensure the fasteners have a minimum 1-inch embedment into the concrete.
- C920 Class 25-rated sealant to seal all perimeter and exposed edges of the rigid board insulation to the concrete walls and floor
- Approved adhesive for applying foam products to concrete
- Button-cap nails or construction staples and applicator
- 3-inch-wide vinyl or foil-faced pressure-sensitive acrylic self-adhesive flashing tape
- Tape measure
- Chalk line
- Adjustable razor knife
- Safety glasses
- NIOSH 95-rated dust mask
- Work gloves.
Before Insulation Work Can Begin:
- The basement walls and footing must be thoroughly waterproofed on the exterior. Damp proofing alone is not sufficient to eliminate the potential of moisture entering and passing through the wall to the interior.
- Inspect the foundation walls and edges of the floor slab for any signs of moisture. If dampness or signs of water intrusion are discovered, then a source for the moisture will have to be determined and remedied before proceeding with the insulation effort.
- Ensure that the overhead floor structure rim–band joist areas are all thoroughly air sealed and insulated.
Installation Steps:
- Begin by thoroughly cleaning the surface of the walls and floor of any loose particles or dust.
- Measure and cut the rigid board insulation to fit from the basement floor slab to the top of the foundation wall. In In high-termite-risk areas, consult local code department to see if a termite inspection strip is required. See Figure 6.
- Follow the adhesive manufacturers’ recommended application methods for gluing the sheets to the walls. (Walls that are not perfectly flat may need intermittently fastened masonry screws and washers to hold the boards in place until the adhesive sets).
- Tape all seams between the boards with a pressure-sensitive acrylic self-adhesive flashing tape.
- Seal all edges of the rigid boards with a C920 Class 25-rated sealant.
- Following all inspections, begin by measuring the height of the walls from the basement floor up to the top of the mudsill plate. This overall height will determine the size of the blankets needed. Blanket insulation can be either 48 inches or 72 inches wide x 50 feet in length. Blankets will be installed horizontally, therefore a seam with a 2x4 or 2x6 nailer will be required at the bottom of the first course.
- Install a 2x4 nailer for R-13 insulation and a 2x6 nailer for R-19 insulation against the underside of the floor joists tightly against the sealed rigid insulation board around the perimeter of the basement ceiling. Blocking may need to be added where the joists run parallel to the rim board.
- Apply spray foam sealant to cover the top of the foundation wall from the rim joist or mud sill to the top nailer (installed underneath the floor joists) to ensure no air from the basement can contact the cold foundation wall. The spray foam should cover all exposed masonry at the top of the foundation wall and seal any gaps along the top of the rigid board where it meets and foundation wall on one side and the top nailer on the other (see Figure 5). This will help reduce the risk of condensation during the cold winter months.
- Based on the width of the insulation, snap chalk lines on the walls at either the 48-inch or 72-inch mark below the bottom of the top nailer and around the perimeter of the basement.
- For the center nailer, fasten a 2x4 or 2x6 to the edge of another 2x4 to create an inverted “L” that can be applied against the rigid foam insulation board on the wall.
- Install the inverted “L” nailer below the chalk line against the rigid foam insulation board. Nailers can be fastened through the insulation board to the concrete walls by drilling and screwing with masonry type screws.
- Install a pressure-treated nailer using construction adhesive and masonry fasteners directly to the floor against the bottom of the rigid insulation on the wall around the perimeter of the basement.
- Apply a generous bead of acoustical sealant along the face of the nailers at the top of the wall before installing the blanket.
- Roll out and drape the first course of blanket insulation down from the top nailers. Firmly place/embed the flange of the blanket into the sealant and fasten with staples or button-capped nails. Ensure the insulation blanket is pulled tightly to make sure insulation is in continuous contact with the rigid foam board.
- Attach the bottom flange of the blanket into the nailers at the mid-point of the walls with the same fasteners. Acoustical sealant is not needed here, as the seams will be taped.
- Install a vertical stud behind any end-cuts in the blanket insulation where one length of blanket ends and another begins, to allow for fastening around the full the perimeter of each blanket.
- Measure the distance between the mid height nailer and the nailer at the floor level. It may be necessary to cut the insulation to fit between the two nailers. When cutting, make sure to add 1½ inches to the overall height and carefully remove the fiberglass from the facer to provide for an overlap flange at the bottom.
- Repeat the same process of sealing and fastening for the bottom course of insulation.
- Seal the mid-height overlap seam with a quality 3-inch-wide vinyl- or foil-faced tape to finish the installation (Figure 5).
- Install nailers around the perimeter of any windows, electrical panel boxes, or any other permanent fixture on the basement walls.
- Install the nailers with the same fasteners that were used previously.
- Carefully cut the vapor barrier at the edge of the box or window and remove approximately 1 ½ inches of the fiberglass or mineral wool material to provide a flange with the vapor barrier.
- Use the same sealer and fasteners to install the blanket around the box or window.
Ensuring Success
Successful implementation of this hybrid strategy depends upon careful attention to the air sealing of the rigid foam board. The entire perimeter of the rigid board, as well as all seams, should be thoroughly sealed to prevent air from getting behind the rigid board and reaching the foundation wall. The perimeter should be sealed to the floor and wall using C920 Class 25-rated sealant, and all seams should be sealed using pressure-sensitive acrylic self-adhesive flashing tape.
Ensuring that the facing on the fiberglass batt is perforated rather than solid will prevent the possibility of moisture becoming trapped within the insulation blanket.
Region
The International Residential Code (IRC), versions 2009-2021, requires basement foundation walls to be insulated in Climate Zones 4 through 8 and in Climate Zone 3 areas that are not designated as warm-humid. (In IECC 2009-2018, basement insulation is required in all of Climate Zone 3B and 3C, and 3A above the warm-humid white line. In IECC 2021, basement insulation is required in 3B and 3C only. It is not required in any part of 3A.)
The requirement for basement insulation dates to the 2009 code cycle and became successively more stringent in the 2012, 2015, 2018, and 2021 code versions. The recommendations in this guide apply only to ICC Climate Zones 4, 5, 6, and 3 where basement insulation is required as noted above. Basements located in Climate Zones 7 and 8 require increased levels of insulation and vapor retarder detailing to manage energy loss and condensation due to the extreme temperature variations between the interior and exterior of the basement and are not within the scope of this guide.

Source
2012 edition of code establishing a baseline for energy efficiency by setting performance standards for the building envelope (defined as the boundary that separates heated/cooled air from unconditioned, outside air), mechanical systems, lighting systems and service water heating systems in homes and commercial businesses.
Source
2021 edition of code establishing a baseline for energy efficiency by setting performance standards for the building envelope (defined as the boundary that separates heated/cooled air from unconditioned, outside air), mechanical systems, lighting systems and service water heating systems in homes and commercial businesses.
Training
Right and Wrong Images

Source

Source
Source
Source
Source
Source
Compliance
Retrofit
Scope
Install blanket fiberglass insulation in an existing conditioned, unfinished basement as an alternative to best practice solutions.
- Assess and address existing conditions for health, safety, or durability issues
- Address any moisture intrusion issues prior to installing insulation
- Thoroughly air seal and insulate rim joist of the overhead floor system
- Install rigid insulation against the interior of the basement walls – seal all joints and seal sheets to the slab and to the top of the foundation wall
- Install framing “nailers” on basement walls and around all windows/doors to support fully expanded blanket insulation
- Install blanket insulation and tape all seams
- Inspect completed work.
Description
Before insulating or re-insulating an existing basement, first consider best practices as described in Air Sealed, Insulated Basements. Utilizing blanket insulation for basement walls is not considered a best practice, but it can be accomplished safely and effectively if the guidance provided on the Description tab of this guide is followed closely.
When considering basement insulation for an existing home, it is critical to examine several health and durability factors, including:
- structural integrity of foundation
- combustion safety
- moisture management
- pests
- radon.
Only when these factors are examined (and any problems are addressed) should basement insulation be implemented.
See the following Building America Solution Center guides for more information:
The U.S. Department of Energy’s Standard Work Specifications has additional information on basements and worker safety in basements.
All the details and steps outlined for new construction in the Description tab of this guide would apply to any retrofit application. However, a more diligent inspection of the “as is” condition of the foundation walls and perimeter of the interior basement slab will be required to ensure any water-related issues don’t exist before proceeding with the insulation retrofit. If there is existing blanket insulation in the basement, remove a portion to inspect for mold and/or condensation. If there is any indication of moisture issues, remove the existing insulation and install new insulation as described here or in the guide Air Sealed, Insulated Basements.
More Info
References and Resources
*For non-dated media, such as websites, the date listed is the date accessed.
Questions? Comments? Contact our webmaster.