

Scope

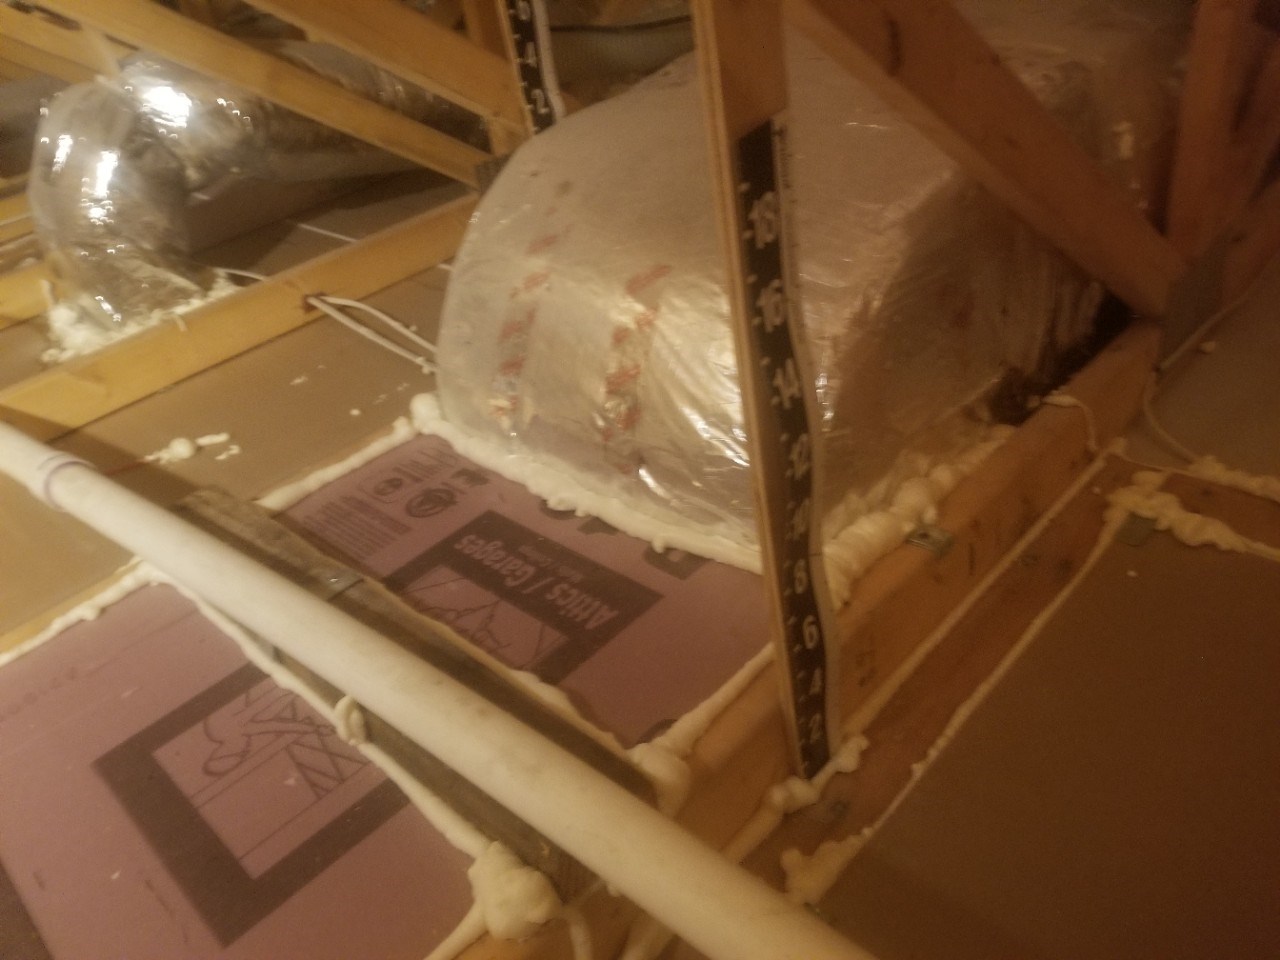
Air-seal around all duct shafts and flues installed through ceilings, walls, and flooring to keep conditioned air from leaking into unconditioned space.
- To air-seal around duct boots, use caulk, canned foam, or rigid air barrier material cut to fit and caulked or foamed in place around the duct shafts.
See the Compliance Tab for links to related codes and standards and voluntary federal energy-efficiency program requirements.
Description
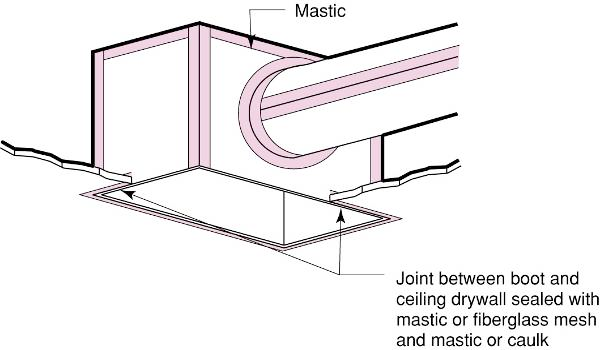
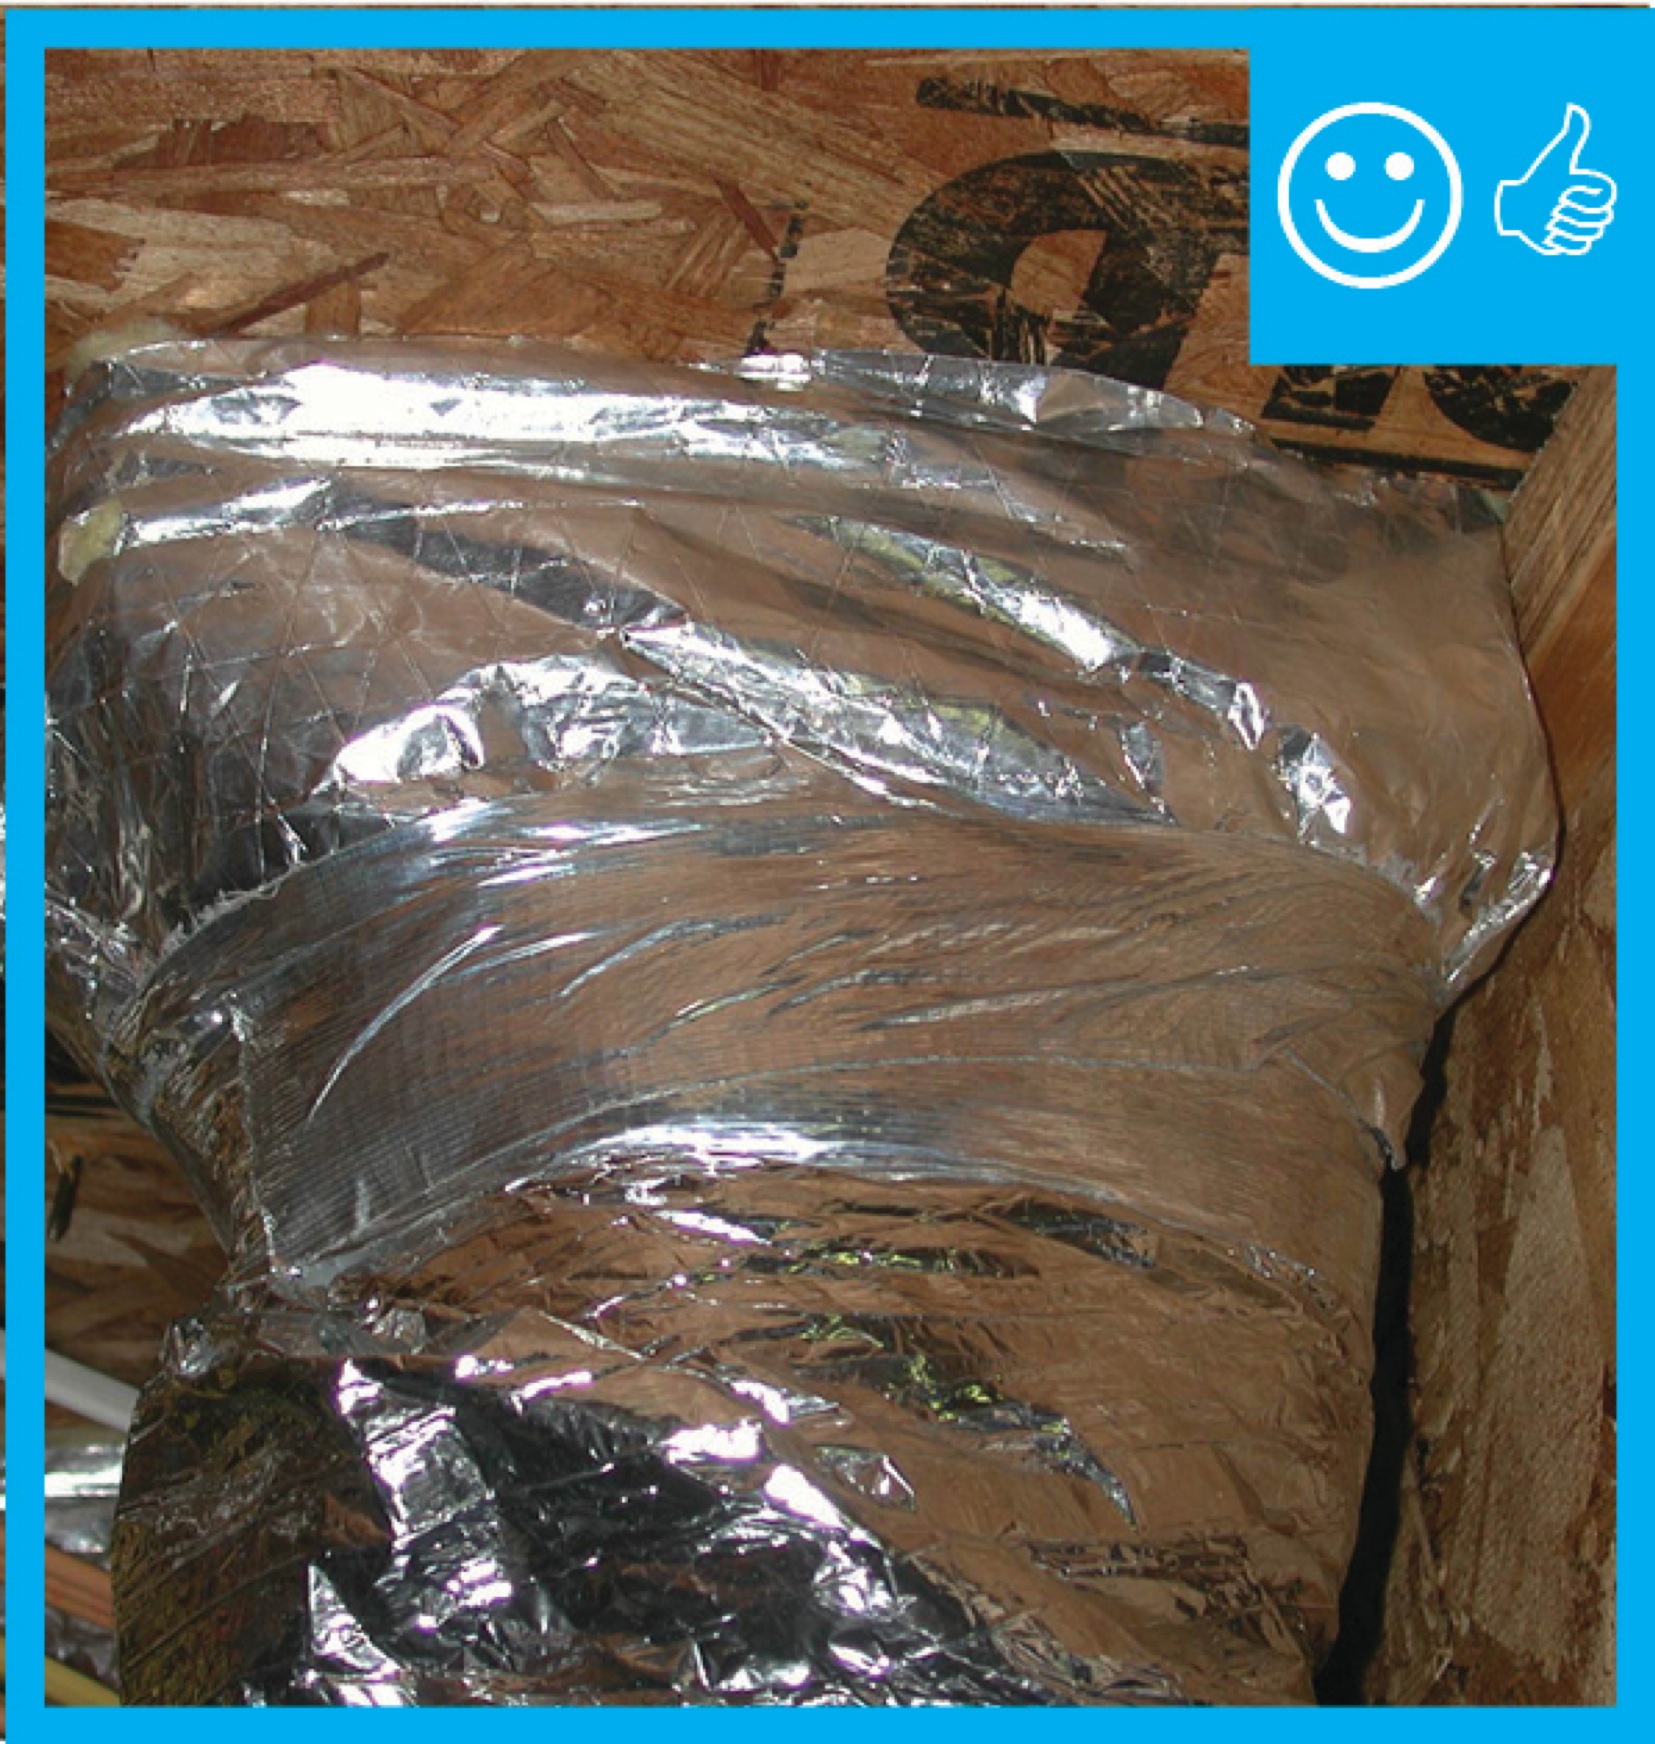
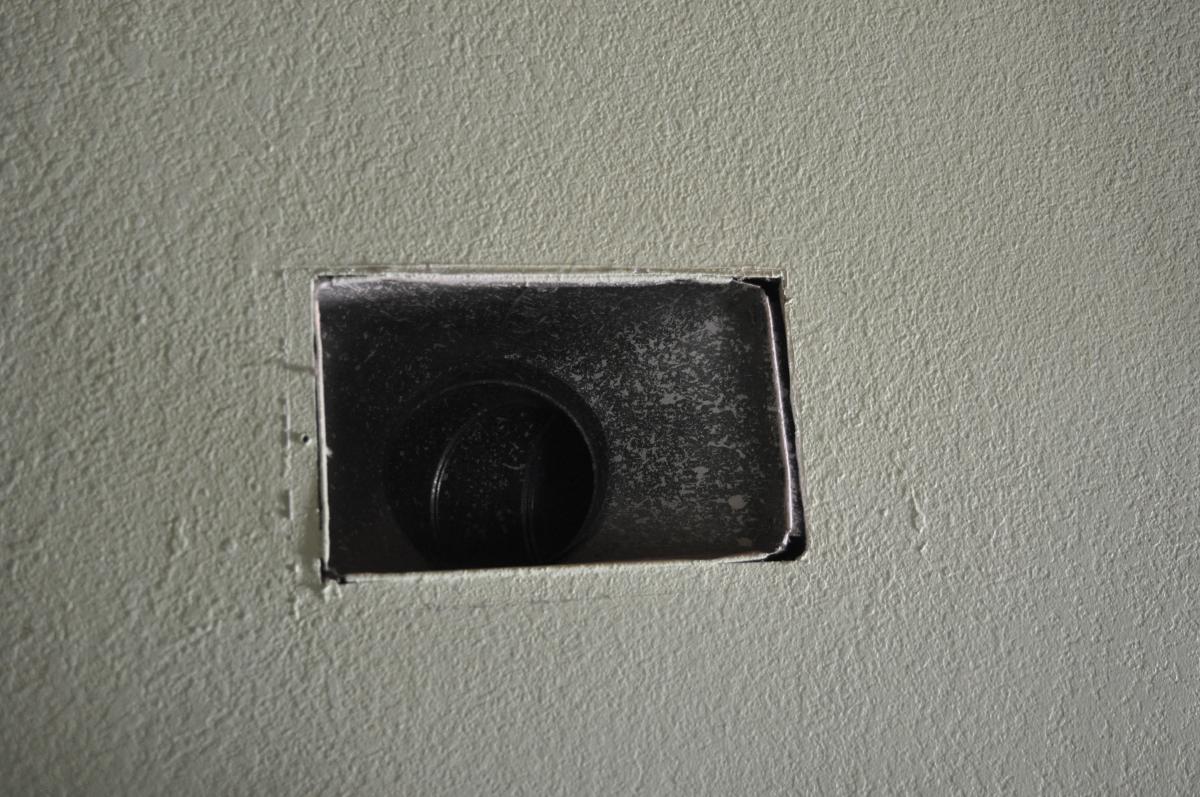
Connections between grilles, registers and ducts at ceilings, floors or knee walls typically leak where the boot does not seal tightly to the grille or gypsum board. Air from the attic, basement, or crawlspace can leak in or out where the ducts connect to the boot.
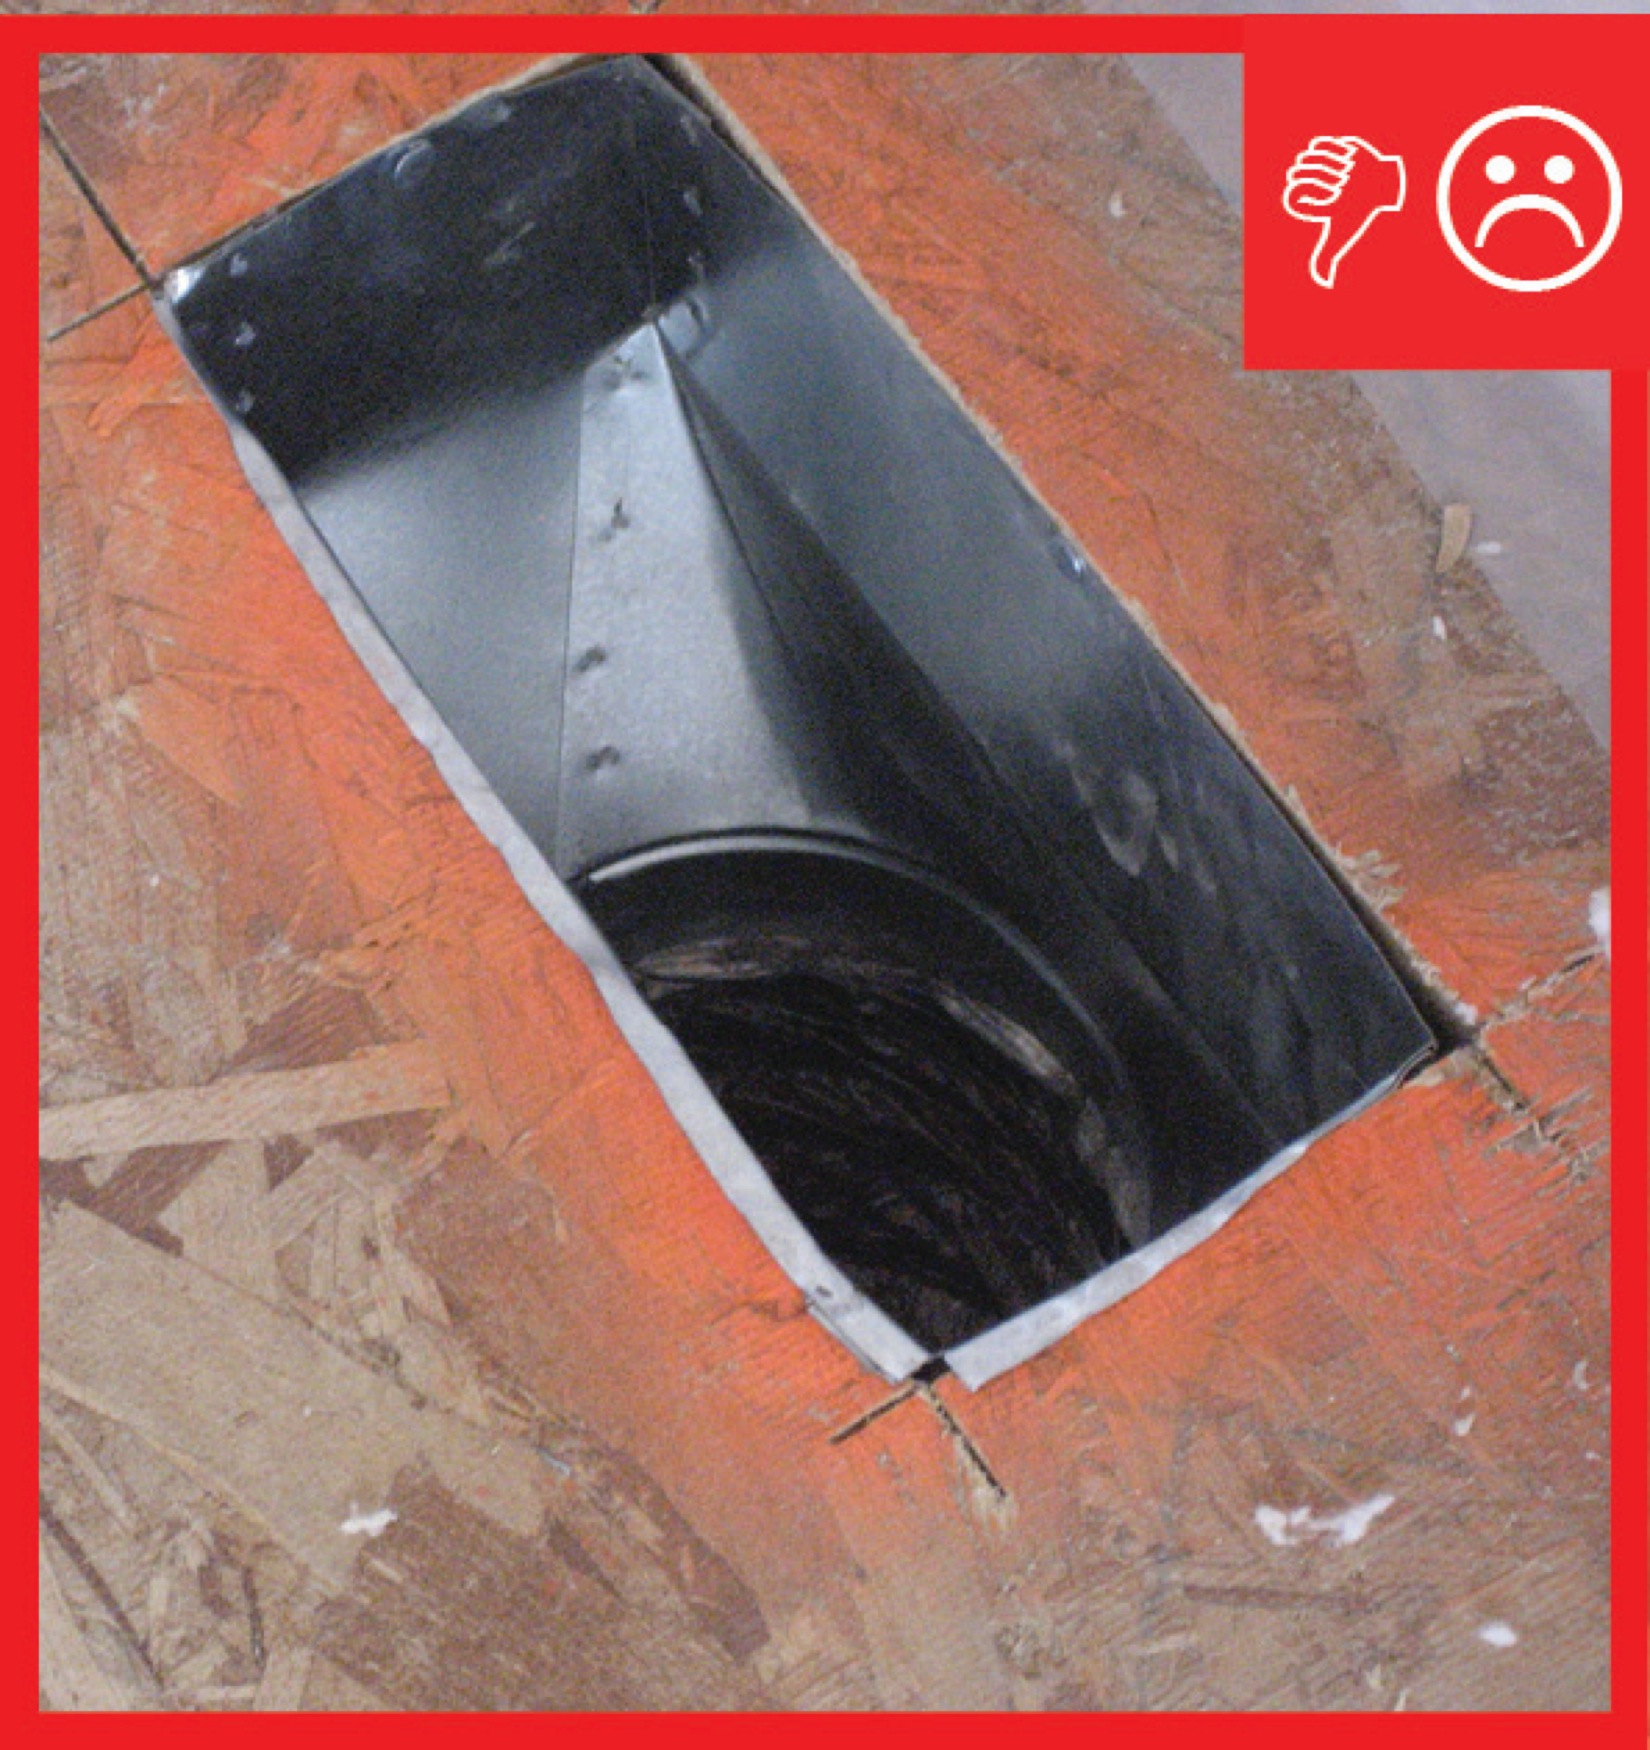
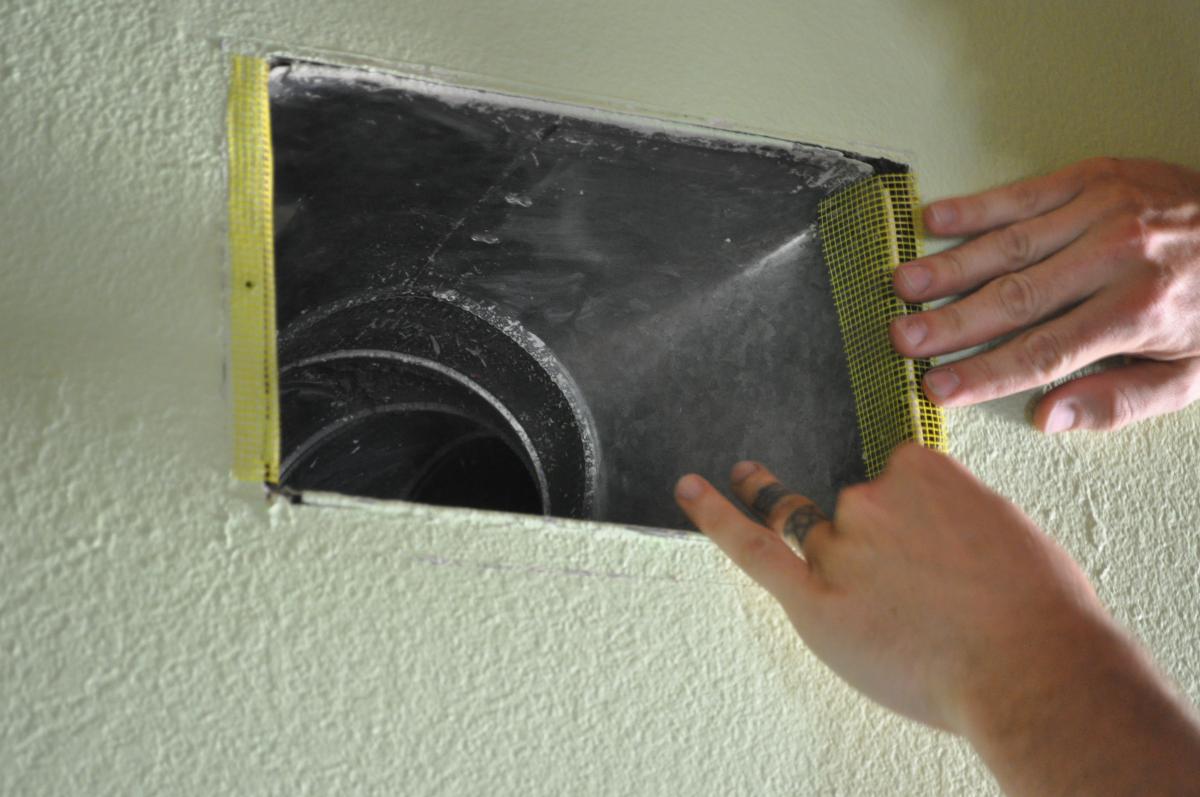
If the gap between boots and gypsum board opening or subfloor openings is kept to less than 3/8-inch, a bead of sealant or mastic may be used to seal the gap. Where gaps are larger than 3/8-inch, fiberglass mesh tape and mastic should both be used. The optimum approach is to keep the gaps to less than 3/8-inch and use a bead of sealant. This requires careful coordination with the drywall contractor to make sure that the rough openings for the boots are cut no more than 3/8-inch bigger than the actual boot size on all sides.
Air barrier effectiveness is measured at the whole-house level. High-performance branding programs and the IECC code require that builders meet specified infiltration rates at the whole-house level. See the Compliance tab for links to these programs.
For more about sealing ducts, see the guides Sealed and Insulated Flex Ducts, Metal Ducts, and Fiberboard Ducts.
How to Seal a Duct Boot to the Ceiling
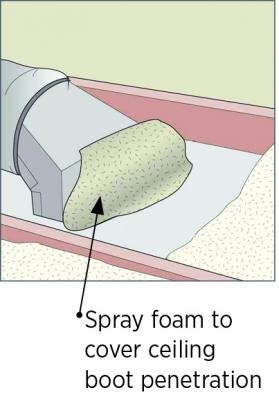
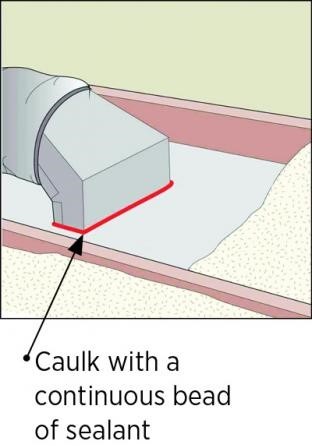
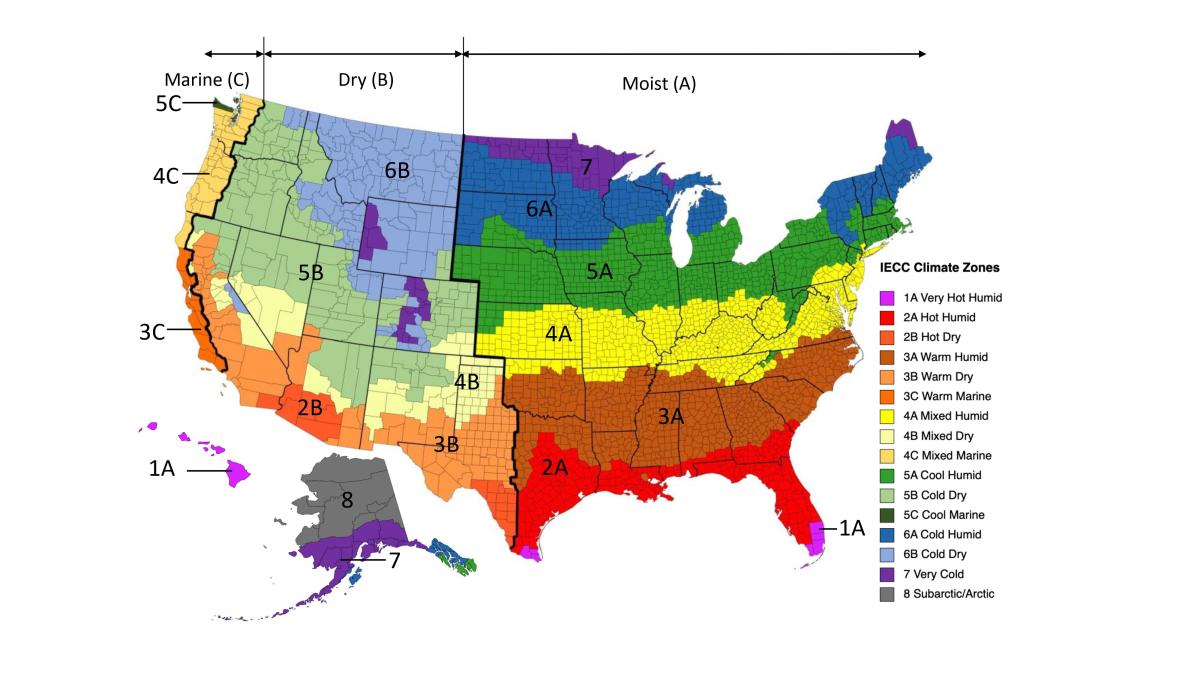
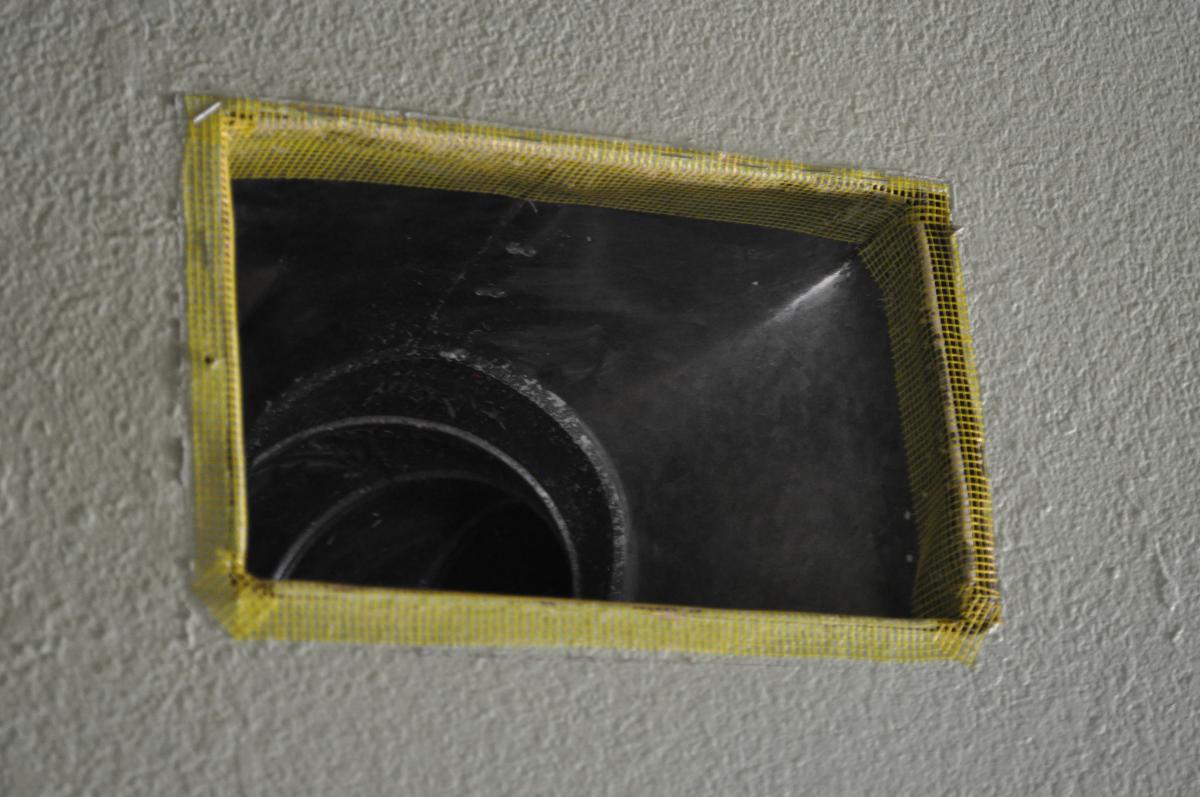
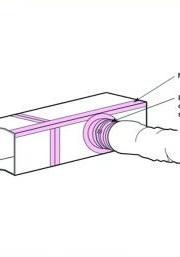
- Seal all sides of the duct boot to the gypsum board with spray foam or caulk (Figures 1, 2, and 3). Apply mastic or metal tape to all duct seams and joints.
- Cover boot with insulation.
- Add insulation to the specified attic insulation depth.
How to Seal the Duct Boot to the Floor
- Mechanically attach the boot to framing around the hole in the flooring. Caulk, spray foam, or mastic seal between floor opening and boot with caulk or fiberglass mesh and mastic.
- Cover boot with insulation.
Ensuring Success
Blower door testing, which is conducted as part of the whole-house energy performance test-out, may help indicate whether duct openings to unconditioned space (such as an attic) have been successfully sealed. Duct blaster testing may also help to indicate leaks. An infrared camera can be used in conjunction with the blower door testing to detect air leakage and heat loss at the duct and flue shaft openings, if a sufficient temperature difference exists between the unconditioned and the conditioned space of the house. An experienced technician can also check for air leaks around registers with a smoke pencil or by feeling with the back of the hand.
Region
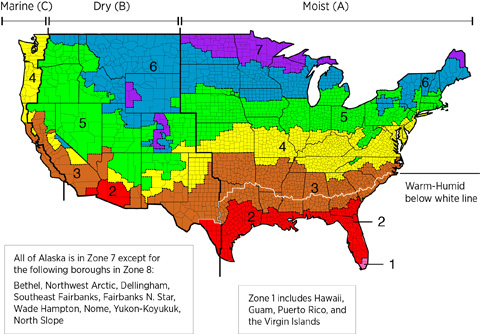
The map in Figure 1 shows the climate zones for states that have adopted energy codes equivalent to the International Energy Conservation Code (IECC) 2009, 12, 15, and 18. The map in Figure 2 shows the climate zones for states that have adopted energy codes equivalent to the IECC 2021. Climate zone-specific requirements specified in the IECC are shown in the Compliance Tab of this guide.
Training
Right and Wrong Images

Source
Compliance
Retrofit
SCOPE
Air seal around duct boots in the ceiling or floor of an existing home, to reduce air leakage to or from the conditioned space and to minimize the entry or unconditioned unfiltered air.
See the U.S. Department of Energy Standard Work Specifications for additional guidance attaching and sealing duct boots.
For guidance on working in attics and crawlspaces, see the Pre-Retrofit Assessment of Attics, Ceilings and Roofs, and Pre-Retrofit Assessment of Basements and Crawlspaces in the Building America Solution Center.
DESCRIPTION
If sealing from the attic or crawlspace side, Remove insulation as needed to access areas to be sealed. Seal with caulk or fiberglass mesh tape and mastic.
If sealing from within the house, remove the register grille. Seal the seam between the duct boot and the flooring or sealing framing and finish material. Use caulk for gaps that are less than 3/8-inch. Use fiberglass mesh tape and mastic where gaps are larger than 3/8-inch.
How to Seal Duct Boot to Ceiling with Fiberglass Mesh Tape and Mastic (for gaps larger than 3/8 inch).
- Remove register grille and wipe seam clean to remove dust and grease from edges of duct boot.
- Apply fiberglass mesh tape over seam between duct boot and ceiling drywall (Figures 1, 2, and 3).
- Cover tape with mastic.
COMPLIANCE
See Compliance tab.
More Info
References and Resources
*For non-dated media, such as websites, the date listed is the date accessed.
Contributors to this Guide
The following authors and organizations contributed to the content in this Guide.
Pacific Northwest National Laboratory
Building Science Corporation
Sales
Tight Duct Sealing
Technical Description
As conditioned air flows from heating and cooling equipment to the spaces where people live, excessive leaks compromise comfort, health, and durability while increasing energy costs. This is because conditioned air escapes ducts supplying heating and cooling, and potentially contaminated air is pulled into the ducts, returning air to the heating and cooling equipment. Professionally sealed comfort delivery systems are significantly air-tight at all seams and connections. Sealing helps conditioned air get where it is needed, at the correct temperature, without pulling in contaminants from crawlspaces and attics.
Questions? Comments? Contact our webmaster.