Scope
In basements or crawlspaces that are insulated along the interior side of the exterior walls with an air-permeable insulation, ENERGY STAR Single-Family New Homes requires that builders do not install a Class 1 vapor retarder on the interior side of the air-permeable insulation. Class I vapor barriers should also not be installed on the interior side of air-permeable insulation in above-grade exterior walls in warm-humid climates (ENERGY STAR).
- Examples of air-permeable insulation include fibrous insulation like fiberglass batt, blown cellulose, or mineral wool.
- The 2009 IRC defines Class I vapor retarders as a material or assembly with a rating of ≤0.1 perm.
- Examples of Class I vapor retarders include rubber membranes, polyethylene sheeting, glass, aluminum foil, sheet metal, foil-faced insulating sheathings, foil-faced non-insulating sheathings, and vinyl wall paper.
- Class I vapor barriers can be used on the interior side of below-grade walls if air-permeable insulation is not present (for example, foil-faced rigid foam board can be installed on the interior of below-grade concrete foundation walls.
- Open-cell and closed-cell spray foams typically have perm ratings above 0.1 so they can be used unless the manufacturer specifies that a product has a perm rating ≤ 0.1 or so long as the spray foam is not sprayed to a depth that makes it ≤ 0.1 perm.
- Exceptions: Impermeable materials such as ceramic tile may be installed over fibrous insulation at shower and tub walls.
- Mirrors may be used if mounted with clips or other spacers that allow air to circulate behind them.
See the Compliance Tab for related codes and standards requirements, and criteria to meet national programs such as DOE’s Zero Energy Ready Home program, ENERGY STAR Single-Family New Homes, and Indoor airPLUS.
Description
Vapor retarders can be an intrinsic and crucial part of the building envelope. In the right location, they can help manage moisture issues to keep the home dry. However, when vapor retarders are installed on the interior side of air-permeable insulation on below-grade walls, condensation issues can ensue.
Many building scientists recommend insulating the basement or crawlspace walls. The 2012 International Residential Code requires basement insulation in Climate Zones 3 and higher. A sealed, insulated basement or crawlspace is a requirement in the U.S. Department of Energy Zero Energy Ready Home program and the U.S. Environmental Protection Agency Indoor airPLUS program. DOE research shows that insulating the basement is cost effective in any home in climate zones 3 through 8. In cities ranging from St. Louis, MO, to Buffalo, NY, insulating to R-10 yielded annual savings of $250 to $400; insulating to R-20 yielded annual savings of $280 to $450 (Southface and ORNL 2002). However, the insulation must be installed in a way that doesn’t trap moisture in the walls.
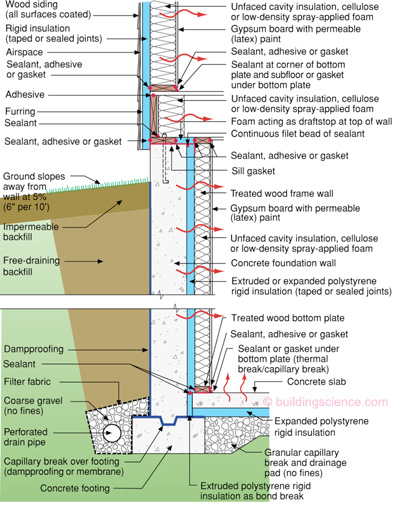
Concrete is porous and allows moisture transfer. If the below-grade portion of a concrete foundation wall is in contact with damp soil, moisture can wick through the concrete via capillary action. Newly poured concrete also has hundreds of gallons of water to release as the concrete cures. When insulating basements to make them into living space or to meet program requirements, it is a common practice (though not recommended by Building America) to install a wood-framed wall against the concrete then to fill the framed wall cavity with fibrous insulation such as mineral wool, fiberglass, or cellulose insulation. Water vapor can pass through this air-permeable insulation. If the insulation is covered with a permeable layer such as gypsum board and latex paint, the water vapor will pass through that layer as well, allowing the concrete wall to dry to the inside of the home.
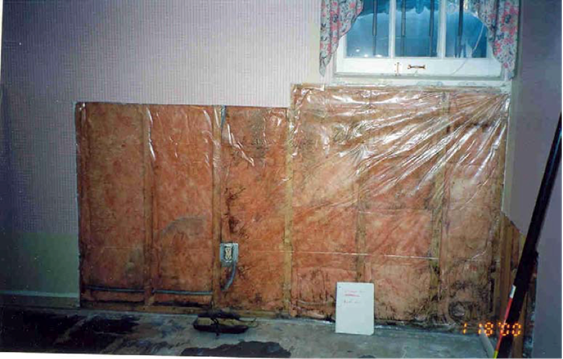
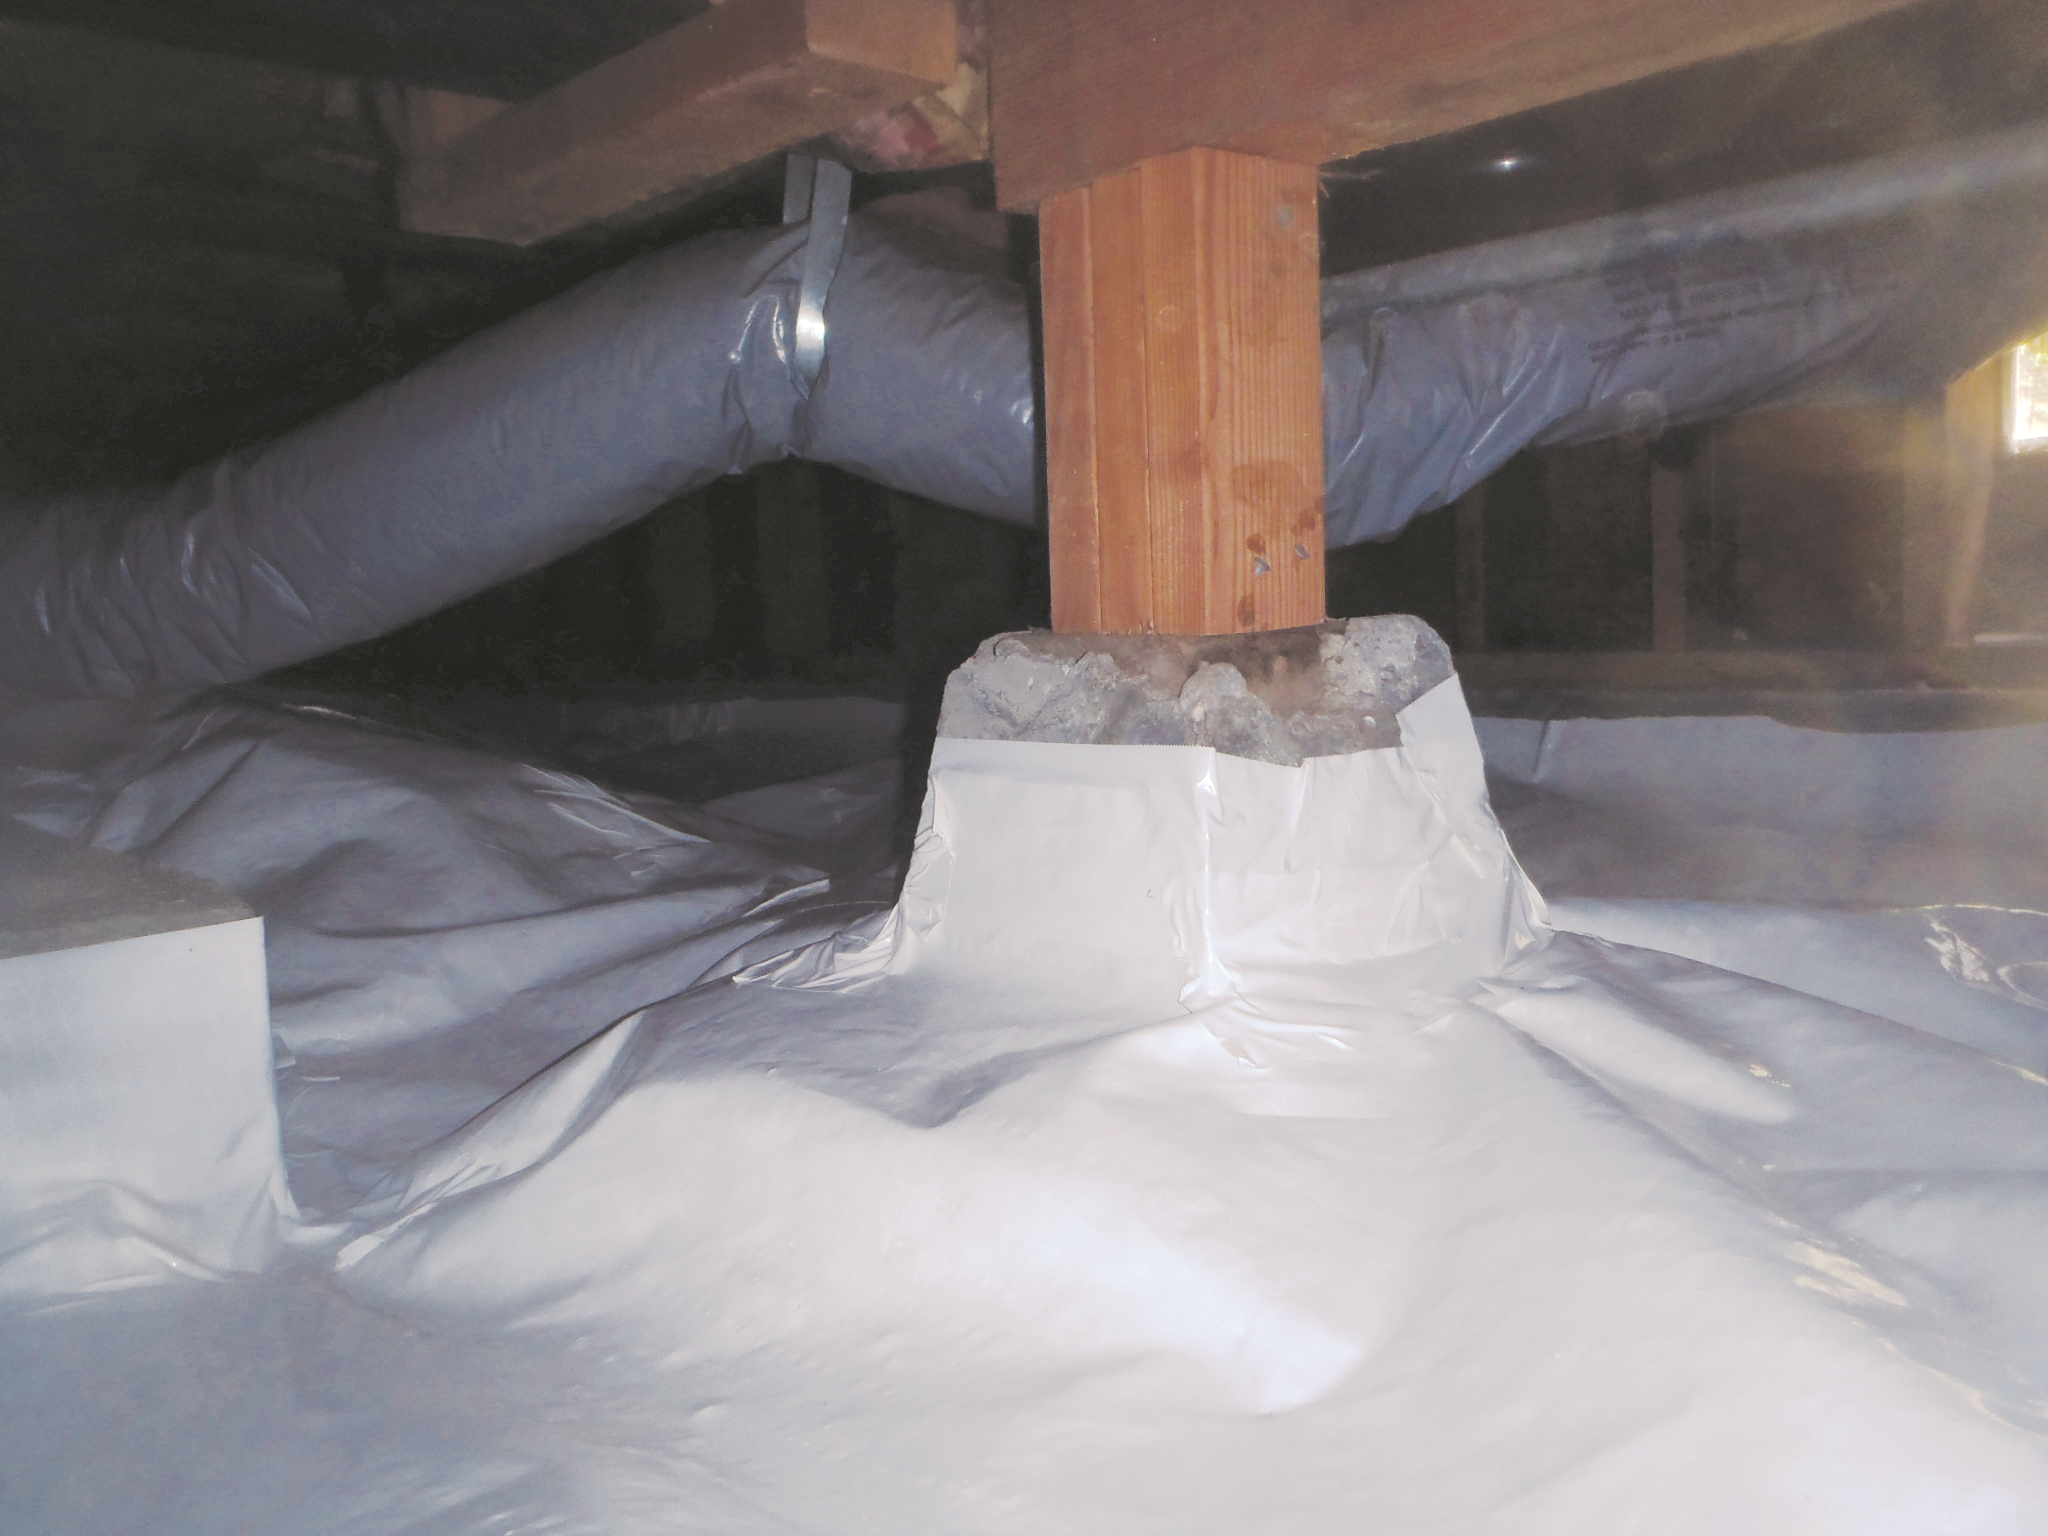
Unfortunately, in many areas of the country, builders install polyethylene sheeting, a Class I vapor retarder, over the insulation before installing the drywall. Water vapor can condense on the sheeting (see Figures 1 and 2). When this condensation occurs, the liquid water has no way to dry to the interior of the home. Instead, it will accumulate in the wall cavity. Over time this dampness can lead to ruined insulation, mold, odors, and structural rotting of framing members.
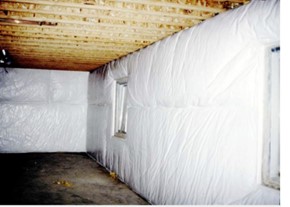
Other Class I vapor barriers, like vinyl wallpaper or the plastic layer installed over blanket insulation in unfinished basements, as shown in Figure 3 (sometimes referred to as diaper insulation) can have the same mold-inducing effect (BSC 2006).


ENERGY STAR also requires that Class I vapor barriers not be installed on the interior side of air-permeable insulation in above-grade exterior walls in hot-humid climates, because warm-moist air entering building cavities through cracks in the exterior wall can condense when it hits the cold back surface of a Class I vapor retarder that is chilled by summertime air conditioning. The condensation can accumulate in the wall cavity creating conditions for mold growth and rot. Examples of Class I vapor retarders that have been incorrectly installed in wall assemblies in hot-humid climates include plastic vapor barrier installed under the drywall or vinyl wallpaper installed over the drywall.
To reduce the risk of condensation, it’s helpful to understand perm ratings so you can select the right wall assembly to reduce condensation risks.
Understanding Vapor Retarders
If water vapor is allowed to pass through the below-grade wall and insulation, it must be allowed to dry to the inside of the home to avoid condensation in the wall cavity. To enable this drying, the wall covering on the interior of the framing must have a relatively high vapor permeability rating.
The vapor permeability (commonly referred to as breathability) is a material’s ability to allow water vapor to pass through it. The moisture vapor transmission rate (MVTR) is the measurement referenced in building codes. The MVTR is measured in a lab using the American Society for Testing and Materials (ASTM) procedure E-96. The test method measures how much moisture vapor is allowed to pass through a material in a 24-hour period (adjusted for vapor pressure across the sample). The resulting number is the moisture vapor permeance (MVP). The unit of measurement for MVP is perms. The higher the perm number, the more moisture vapor the material will allow to pass and the greater its drying potential will be. The water vapor permeability of a material is roughly inversely proportional to its thickness (for example doubling the thickness of spray foam insulation halves the permeability).
Vapor Retarder Code Classifications
The International Residential Code, Section R201, defines vapor retarder classes as follows:
- Class I: 0.1 perm or less
- Class II: 1.0 perm or less and greater than 0.1 perm
- Class III: 10 perm or less and greater than 1.0 perm.
Class I vapor retarders include polyethylene plastic sheeting, rubber membranes, glass, aluminum foil, sheet metal, foil-faced insulating sheathings, and foil-faced non-insulating sheathings. This list is not comprehensive. Any material with a perm rating of 0.1 or less should not be used to the interior of air-permeable insulation on the inside of a below-grade wall. However, if the manufacturer’s specifications for a product indicate a perm rating above 0.1, then the material may be used even if it is on this list.
Examples of Class II vapor retarders include kraft-faced fiberglass batt, low-perm paint, and 1 inch of expanded polystyrene rigid foam.
Examples of Class III vapor retarders include latex paint, plywood, OSB, and drywall.
For open- and closed-cell spray foams, check manufacturer’s specifications. Open-cell spray foam is generally more permeable. Increasing the thickness of any spray foam layer will decrease its permeability.
The main point to remember when using air-permeable insulation in below-grade walls is that moisture must be allowed to dry to the inside of the building. ENERGY STAR Single-Family New Homes prohibits the use of Class I vapor retarders on the interior side of air-permeable insulation in below-grade exterior walls.
ENERGY STAR recommends using a Class II or Class III vapor retarder. Examples include kraft-faced fiberglass batts in the wall cavity or latex paint on the drywall for below-grade walls.
Foam insulation can be used if the manufacturer’s specifications indicate a perm rating greater than 0.1 and if any wall finishes, such as latex paint, are vapor permeable. ENERGY STAR allows some exemptions to the prohibition on Class 1 vapor retarders in below-grade walls. These exemptions include
- Showers and tubs on exterior walls. Class I vapor retarders, such as ceramic tile, may be used at shower and tub walls. The insulation behind the tub or shower should be equivalent to the insulation in the rest of the exterior walls and should be covered with an air barrier of cement backer board, rigid foam insulation, or non-paper-faced drywall that is sealed at the edges and seams to provide a continuous air seal. The recommended backer for exterior walls behind showers and tubs (in both above- and below-grade situations) is cement board. Note that cement board is not waterproof and must be coated with a fluid-applied waterproofing, or a water-resistive barrier must be applied behind it that allows drainage (BSC 2009). The low-perm vapor retarder is allowed due to the high moisture content created by the shower or tub and is used to protect framing and insulation from the excessive moisture.
- Mirrors. Mirrors are a Class I vapor retarder but may be used if they are mounted over the drywall with clips or other spacers that allow air to circulate behind them. The mirror should not be directly fastened to the wall; if so, it will act as a vapor barrier and condensation will form on the foundation side of the mirror.
Alternative Basement Insulation Methods
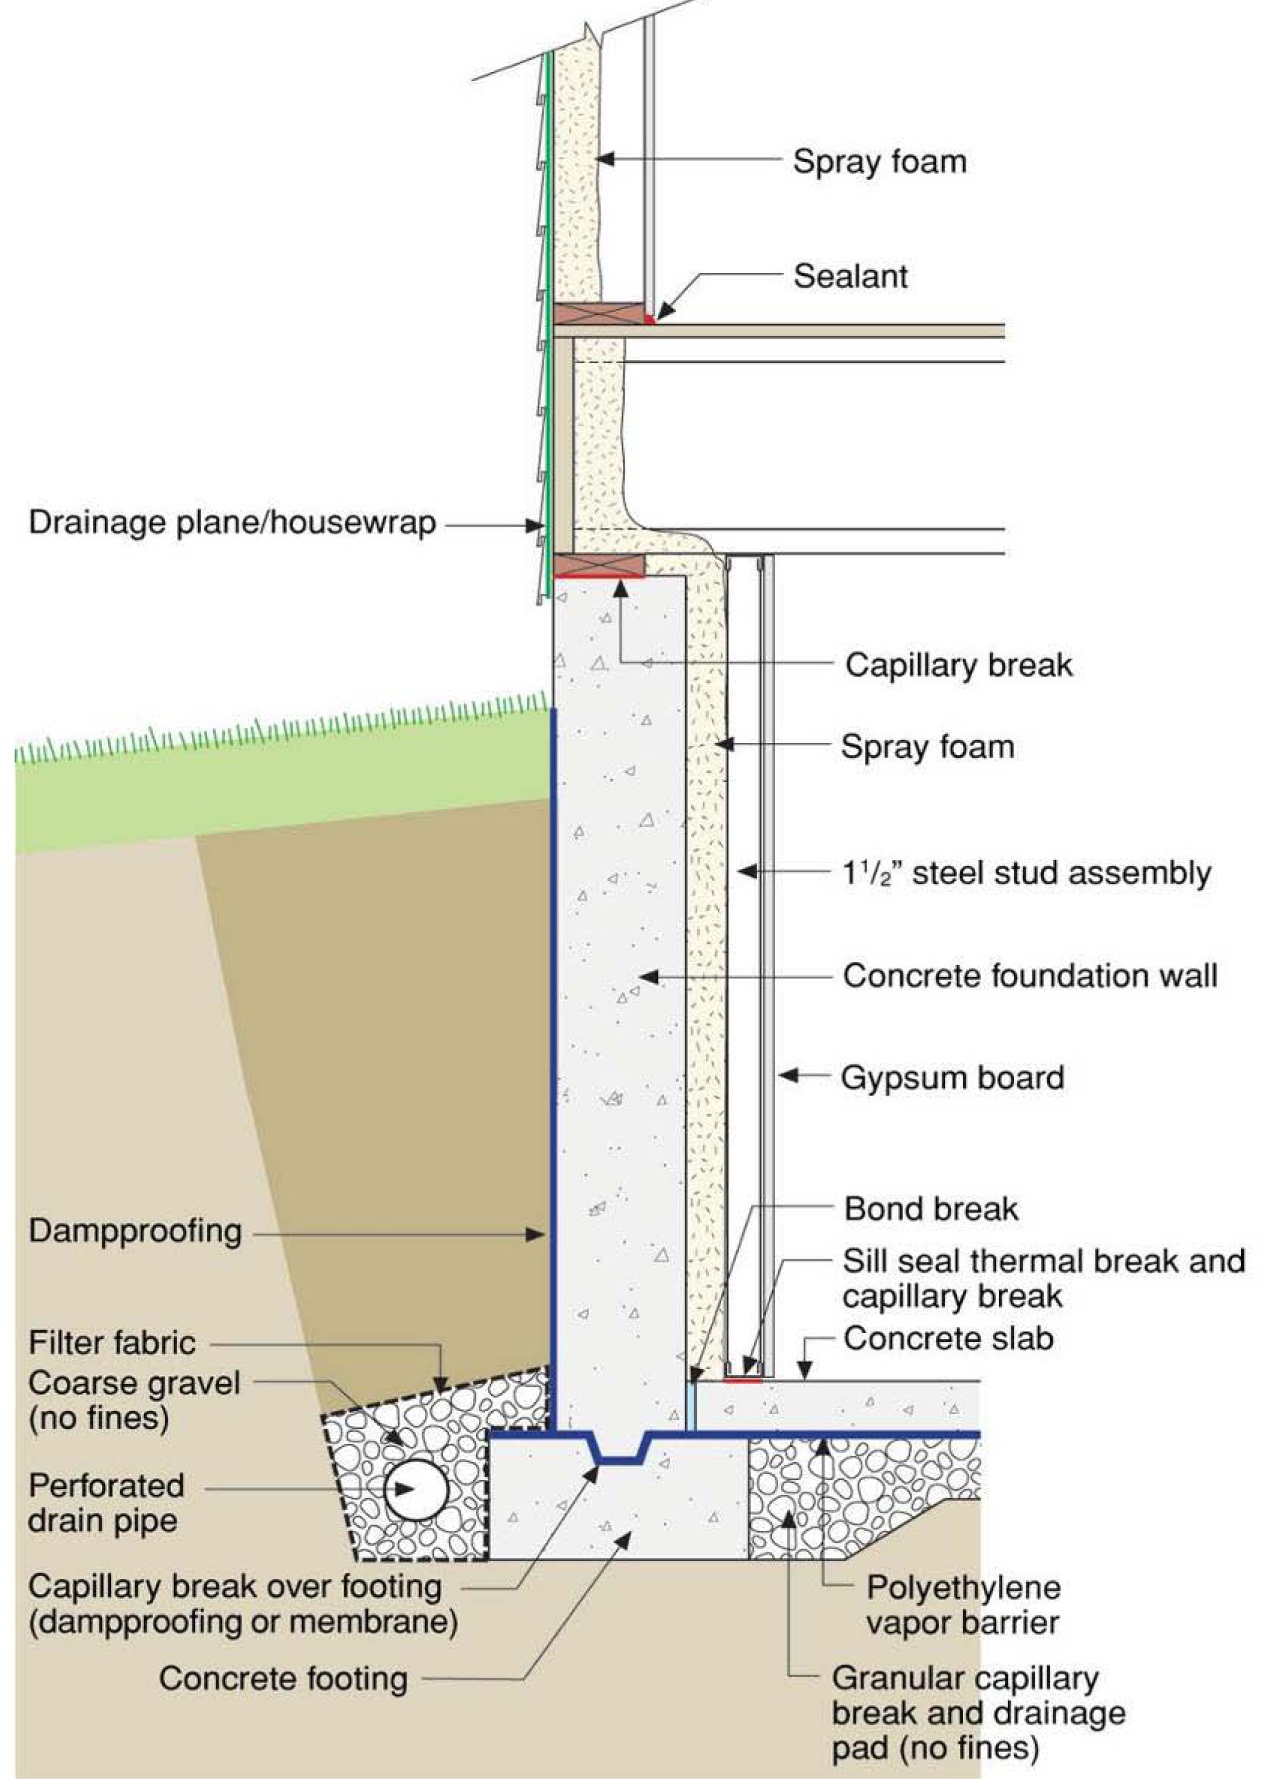
Basement insulation methods have been studied extensively by Building America and there are many alternative methods for insulating basements that avoid the Class 1 vapor retarder issue (Aldrich et al. 2012, BSC 2009, Lstiburek 2006, NorthernSTAR 2012, Southface and ORNL 2002, Ueno and Lstiburek 2012). Here are examples of some of these methods. Note, with all of these methods, closed-cell spray foam can be used to insulate the rim joist:
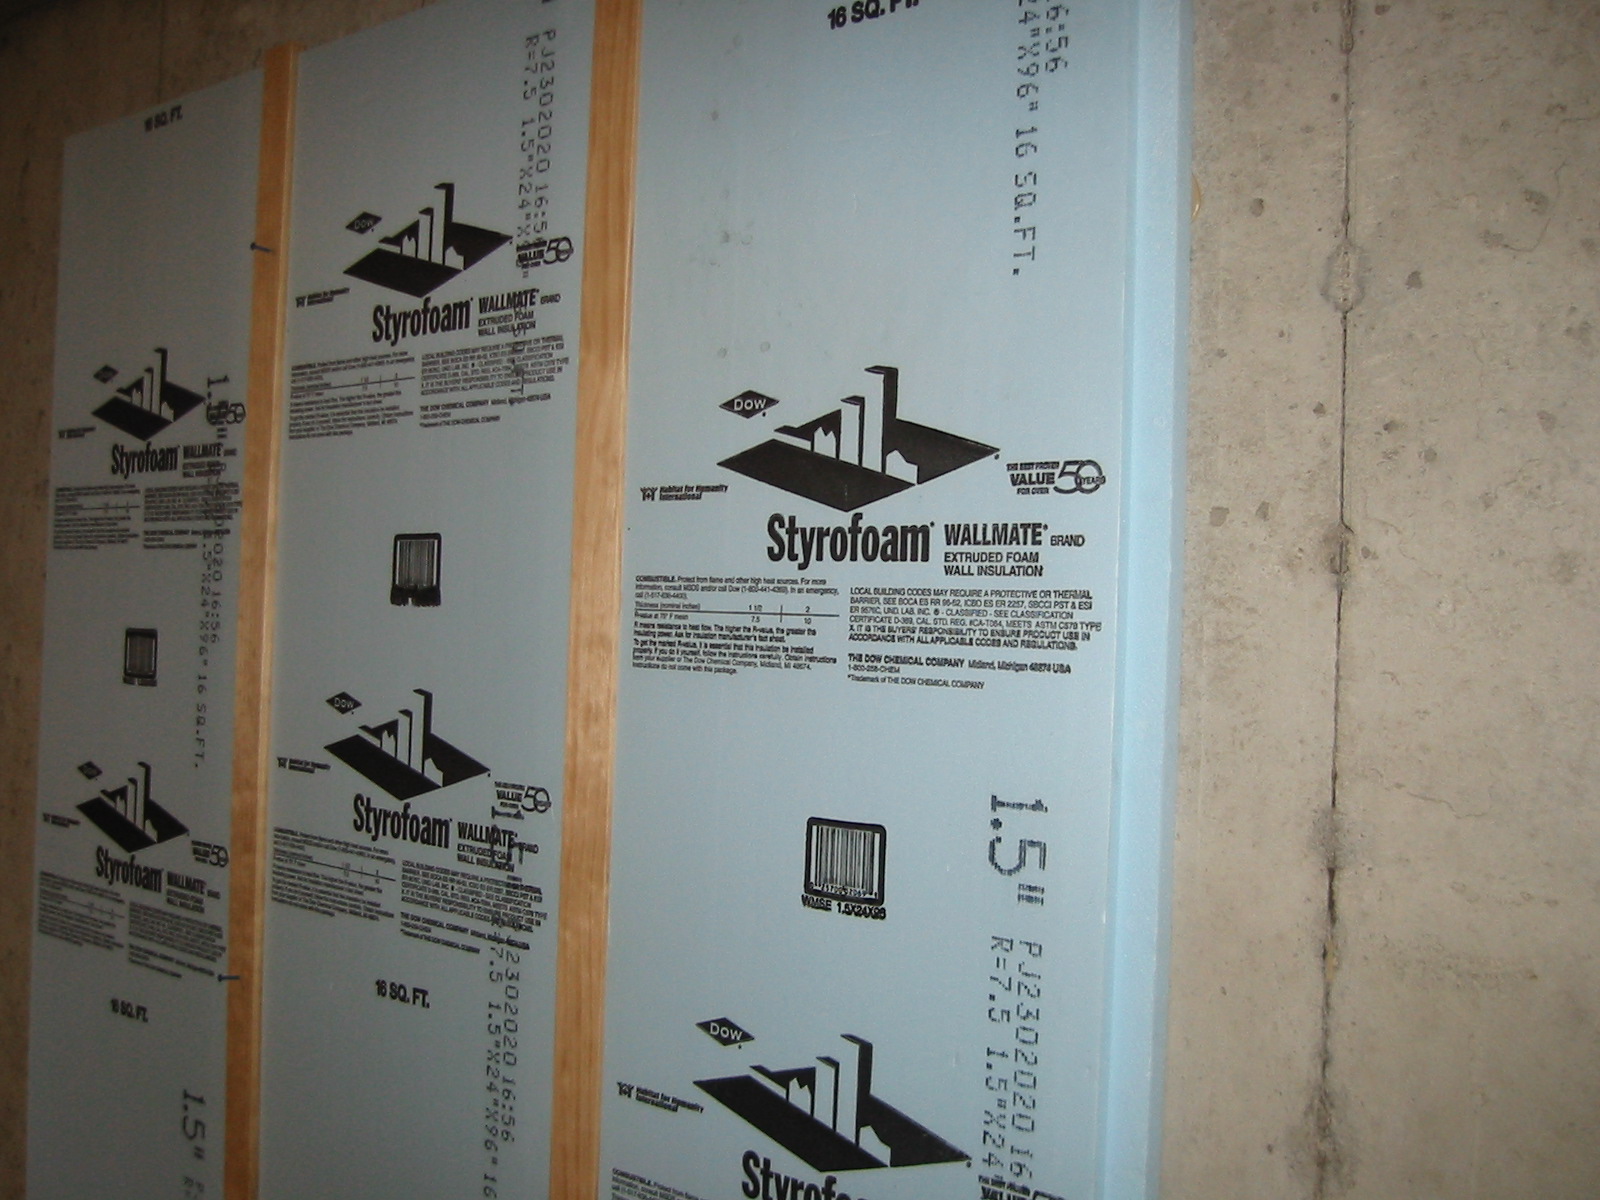
- Attach foil-faced polyisocyanurate to the interior of the concrete wall with mechanical fasteners or construction adhesive, with the bottom 6 inches of wall bare to allow drying or completely seal the polyiso to the full wall with caulk or foam and at seams with foil or polypropylene tape.
- Attach EPS or XPS to the interior of the concrete wall with furring strips. Use the furring strips to attach drywall.
- Attach EPS or XPS to the interior of the concrete wall with construction adhesive. Thoroughly seal the edges and seams of the foam. Install a wood-framed wall interior of the rigid foam. Insulate the cavity with batt or blown fibrous insulation or leave uninsulated. In very cold climates, the cavity insulation R value should not exceed the rigid foam R value.
- Install a 2x4 wood-framed wall set one to two inches in from the foundation wall, then spray closed-cell spray foam directly onto the concrete wall. Finish the interior wall with drywall and latex paint.
- Install rigid foam exterior of the foundation wall.
- Install an ICF foundation wall.
- Install a precast concrete wall system that includes an integrated XPS foam insulation layer sandwiched between two layers of concrete or to the inside of one layer of preformed concrete.
Success
Confirm that no Class I vapor retarder is installed over permeable insulation in below-grade (i.e., basement) walls.
Typical R-values for common insulation materials are summarized in this table, which also identifies the vapor retarder classification for each insulation.
Climate
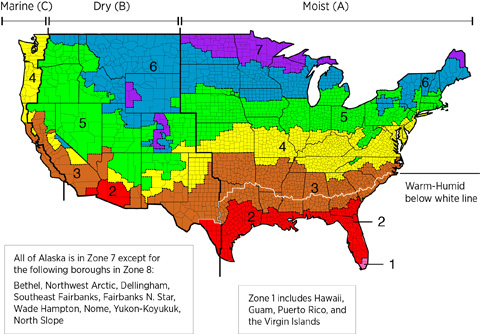
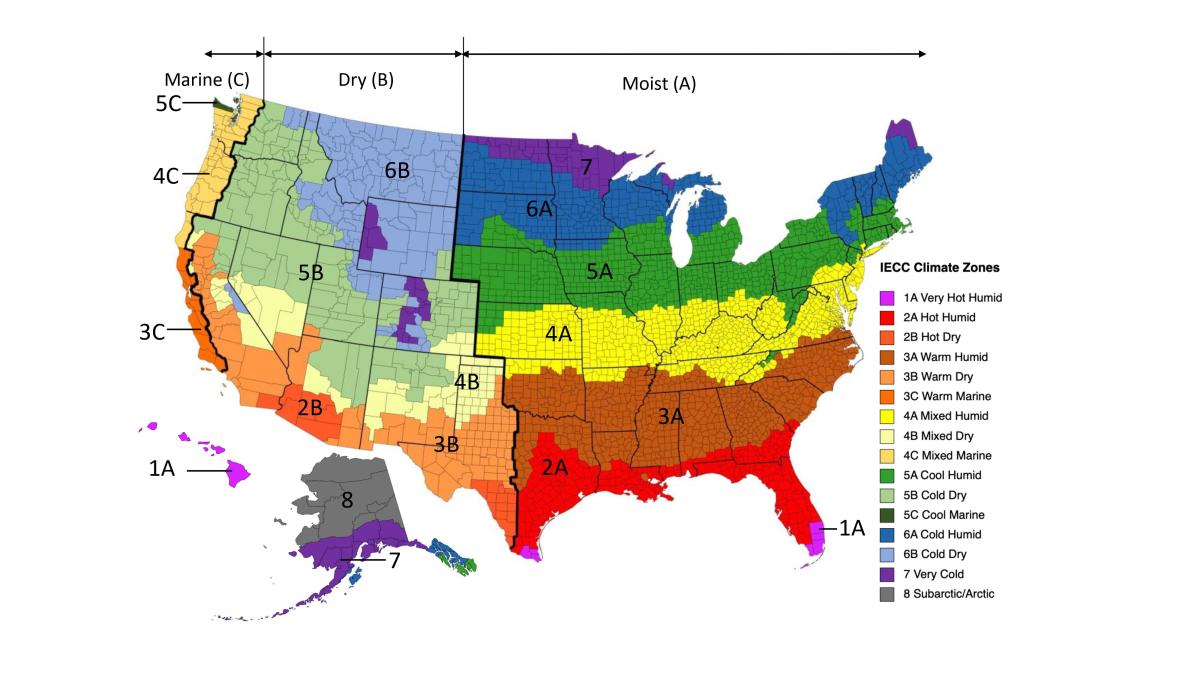
The map in Figure 1 shows the climate zones for states that have adopted energy codes equivalent to the International Energy Conservation Code (IECC) 2009, 12, 15, and 18. The map in Figure 2 shows the climate zones for states that have adopted energy codes equivalent to the IECC 2021. Climate zone-specific requirements specified in the IECC are shown in the Compliance Tab of this guide.
Training


Compliance
Retrofit
DESCRIPTION
In retrofit situations, insulating the exterior of a below-grade wall may be cost prohibitive or impossible. An appropriate insulation assembly can be constructed for the interior side of the basement wall as follows. (See the Description tab for additional information. Also see the U.S. DOE Standard Work Specifications for more on basement and crawlspace wall insulation.)
- Clean the interior of the basement wall and install 1-inch or greater of plastic foam board or closed-cell polyurethane spray foam The foam board serves two purposes: providing a capillary break between the concrete foundation wall and the wood wall framing and keeping warm, humid basement air away from the earth-chilled foundation.
- Install furring strips over the rigid foam for attaching the drywall or construct a 2x4 stud wall that can be filled with insulation. A strip of 1-inch-thick foam board can be installed beneath the sill plate of the stud wall as an added capillary break, especially if rigid foam is not installed under the slab.
- Install fiberglass insulation in the framing cavities, making sure to fill all spaces but being careful not to compress the insulation.
- Cover the wall assembly with moisture- and mold-resistant gypsum board. The gypsum board can be attached so that the bottom edge is a half inch above the concrete floor to provide additional protection from minor flooding (EPA 2012). DO NOT install plastic sheeting under the drywall. DO NOT install vinyl wallpaper over the drywall.
- Paint the gypsum board with two coats of latex paint.
COMPLIANCE
See Compliance tab.
More
More Info.
Access to some references may require purchase from the publisher. While we continually update our database, links may have changed since posting. Please contact our webmaster if you find broken links.
The following authors and organizations contributed to the content in this Guide.
Pacific Northwest National Laboratory
Building Media, Inc., lead for the Building America Retrofit Alliance (BARA), a DOE Building America Research Team
Building Science Corporation, lead for the Building Science Consortium (BSC), a DOE Building America Research Team.