

Scope
For homes with an attached garage, test the air barrier between the house and the garage to verify its integrity. The air barrier between the house and the garage should be tight enough to prevent any garage air from entering the home if and when the home becomes depressurized.
Pressure Mapping Test
- Construct the house with a complete air barrier between the house and garage.
- Test the air barrier between the house and the garage using a blower door kit and two manometers (one smart manometer and one standard two-channel manometer).
- Use the smart manometer to set the blower door to keep the house at 50 Pascals (Pa) pressure difference with reference to outdoors.
- Use the two-channel manometer with a T-fitted hose to simultaneously measure the house with reference to the garage and the garage with reference to outdoors.
- The house pressure with reference to the garage should be greater than 45 Pa.
CFM 50 Test
- As a separate test or as part of a regular blower door test, with only one manometer, record the CFM 50 when the house is at 50 Pa pressure difference with the garage door closed.
- Turn off the blower door. Open the overhead garage door. Turn on the blower door and again get the house to 50 Pa pressure difference from the outside. Then, record the manometer CFM 50 reading again.
- If the difference between the two readings is greater than 6%, the house-to-garage air barrier fails, even if it passed the first test. Inspect and perform additional air sealing then retest.
See the Compliance Tab for links to related codes and standards and voluntary federal energy-efficiency program requirements.
Description
Air from an attached garage can enter the living space of the home if there are leaks in the air barrier between the two spaces and if the home is at a negative pressure with respect to the garage due to natural forces or due to the use of mechanical exhaust ventilation in the living space (Rudd 2014) or other depressurizing appliances like a range hood fan or a clothes dryer.
The surest way to keep garage fumes out of the house is to build a detached garage. Since most houses are designed with attached garages, plan ahead in house design and construction to make sure a continuous air barrier is installed between the house and the garage. Also consider installing supply or balanced ventilation rather than relying on exhaust fans alone for ventilation. DOE-sponsored research has shown that installing supply ventilation (a fresh air intake connected to the central air handler) or balanced ventilation such as an energy recovery ventilator (ERV) or heat recovery ventilator (HRV) can help keep the house pressure balanced or positively pressurized with reference to the garage which also minimizes the likelihood of garage air entry into the house (Rudd 2014).
Thorough air sealing of the house-to-garage air barrier and installation of an exhaust fan in the garage are two measures specified in the U.S. Environmental Protection Agency’s (EPA’s) Indoor AirPlus requirements that can help minimize the entry of garage emissions to the home if the home has exhaust-only ventilation. See the guides Air Sealing Attached Garage, Garage Rim/Band Joist Adjoining Conditioned Space, and Mechanical Ventilation for Attached Garage for more information.
Testing of the level of depressurization of the house with respect to the garage can also help indicate if air is moving from the garage into the home. Testing is required for EPA Indoor AirPlus certification if the home has an attached garage, if a garage fan is not installed, and if the home uses exhaust-only ventilation. This guide provides a simple test method that can be used to help determine whether the garage-to-house barrier is adequately air sealed, based on Building America-supported research and research by others (for example, Rudd 2014, FSEC, and Calcs-Plus).
Using a blower door test kit, plus two manometers, and several hoses with T fittings, while the house is pressurized or depressurized at 50 Pascals (Pa) with respect to the outdoors with all operable garage openings closed, a house-to-garage pressure measurement is taken. Ideally this pressure differential should be between 45 and 50 Pa. The closer the house-to-garage pressure differential is to 50 Pa, the tighter the house-to-garage air barrier is. If this test is being conducted to verify compliance with the EPA Indoor AirPlus requirement, the differential must be greater than 45 Pa.
The instructions below describe the test being conducted with a smart manometer and a two-channel manometer. During the test, the smart manometer is used to hold the house pressure with reference to (WRT) outside at -50 Pa (or +50 Pa if pressurizing the house) while the 2-channel manometer is used to measure the house WRT the garage and the garage WRT outside. The closer the house WRT the garage is to 50 Pa, the better the air barrier is that is separating the house from the garage. A perfectly tight air barrier would yield a reading of 50 Pa for the house WRT the garage and 0 Pa for the garage WRT outdoors. This would mean there would be no pressure difference between the garage and the outdoors; i.e., the garage would be completely connected to the outdoors with no openings or leaks to the house. This test is conducted with all windows and doors in the garage closed.
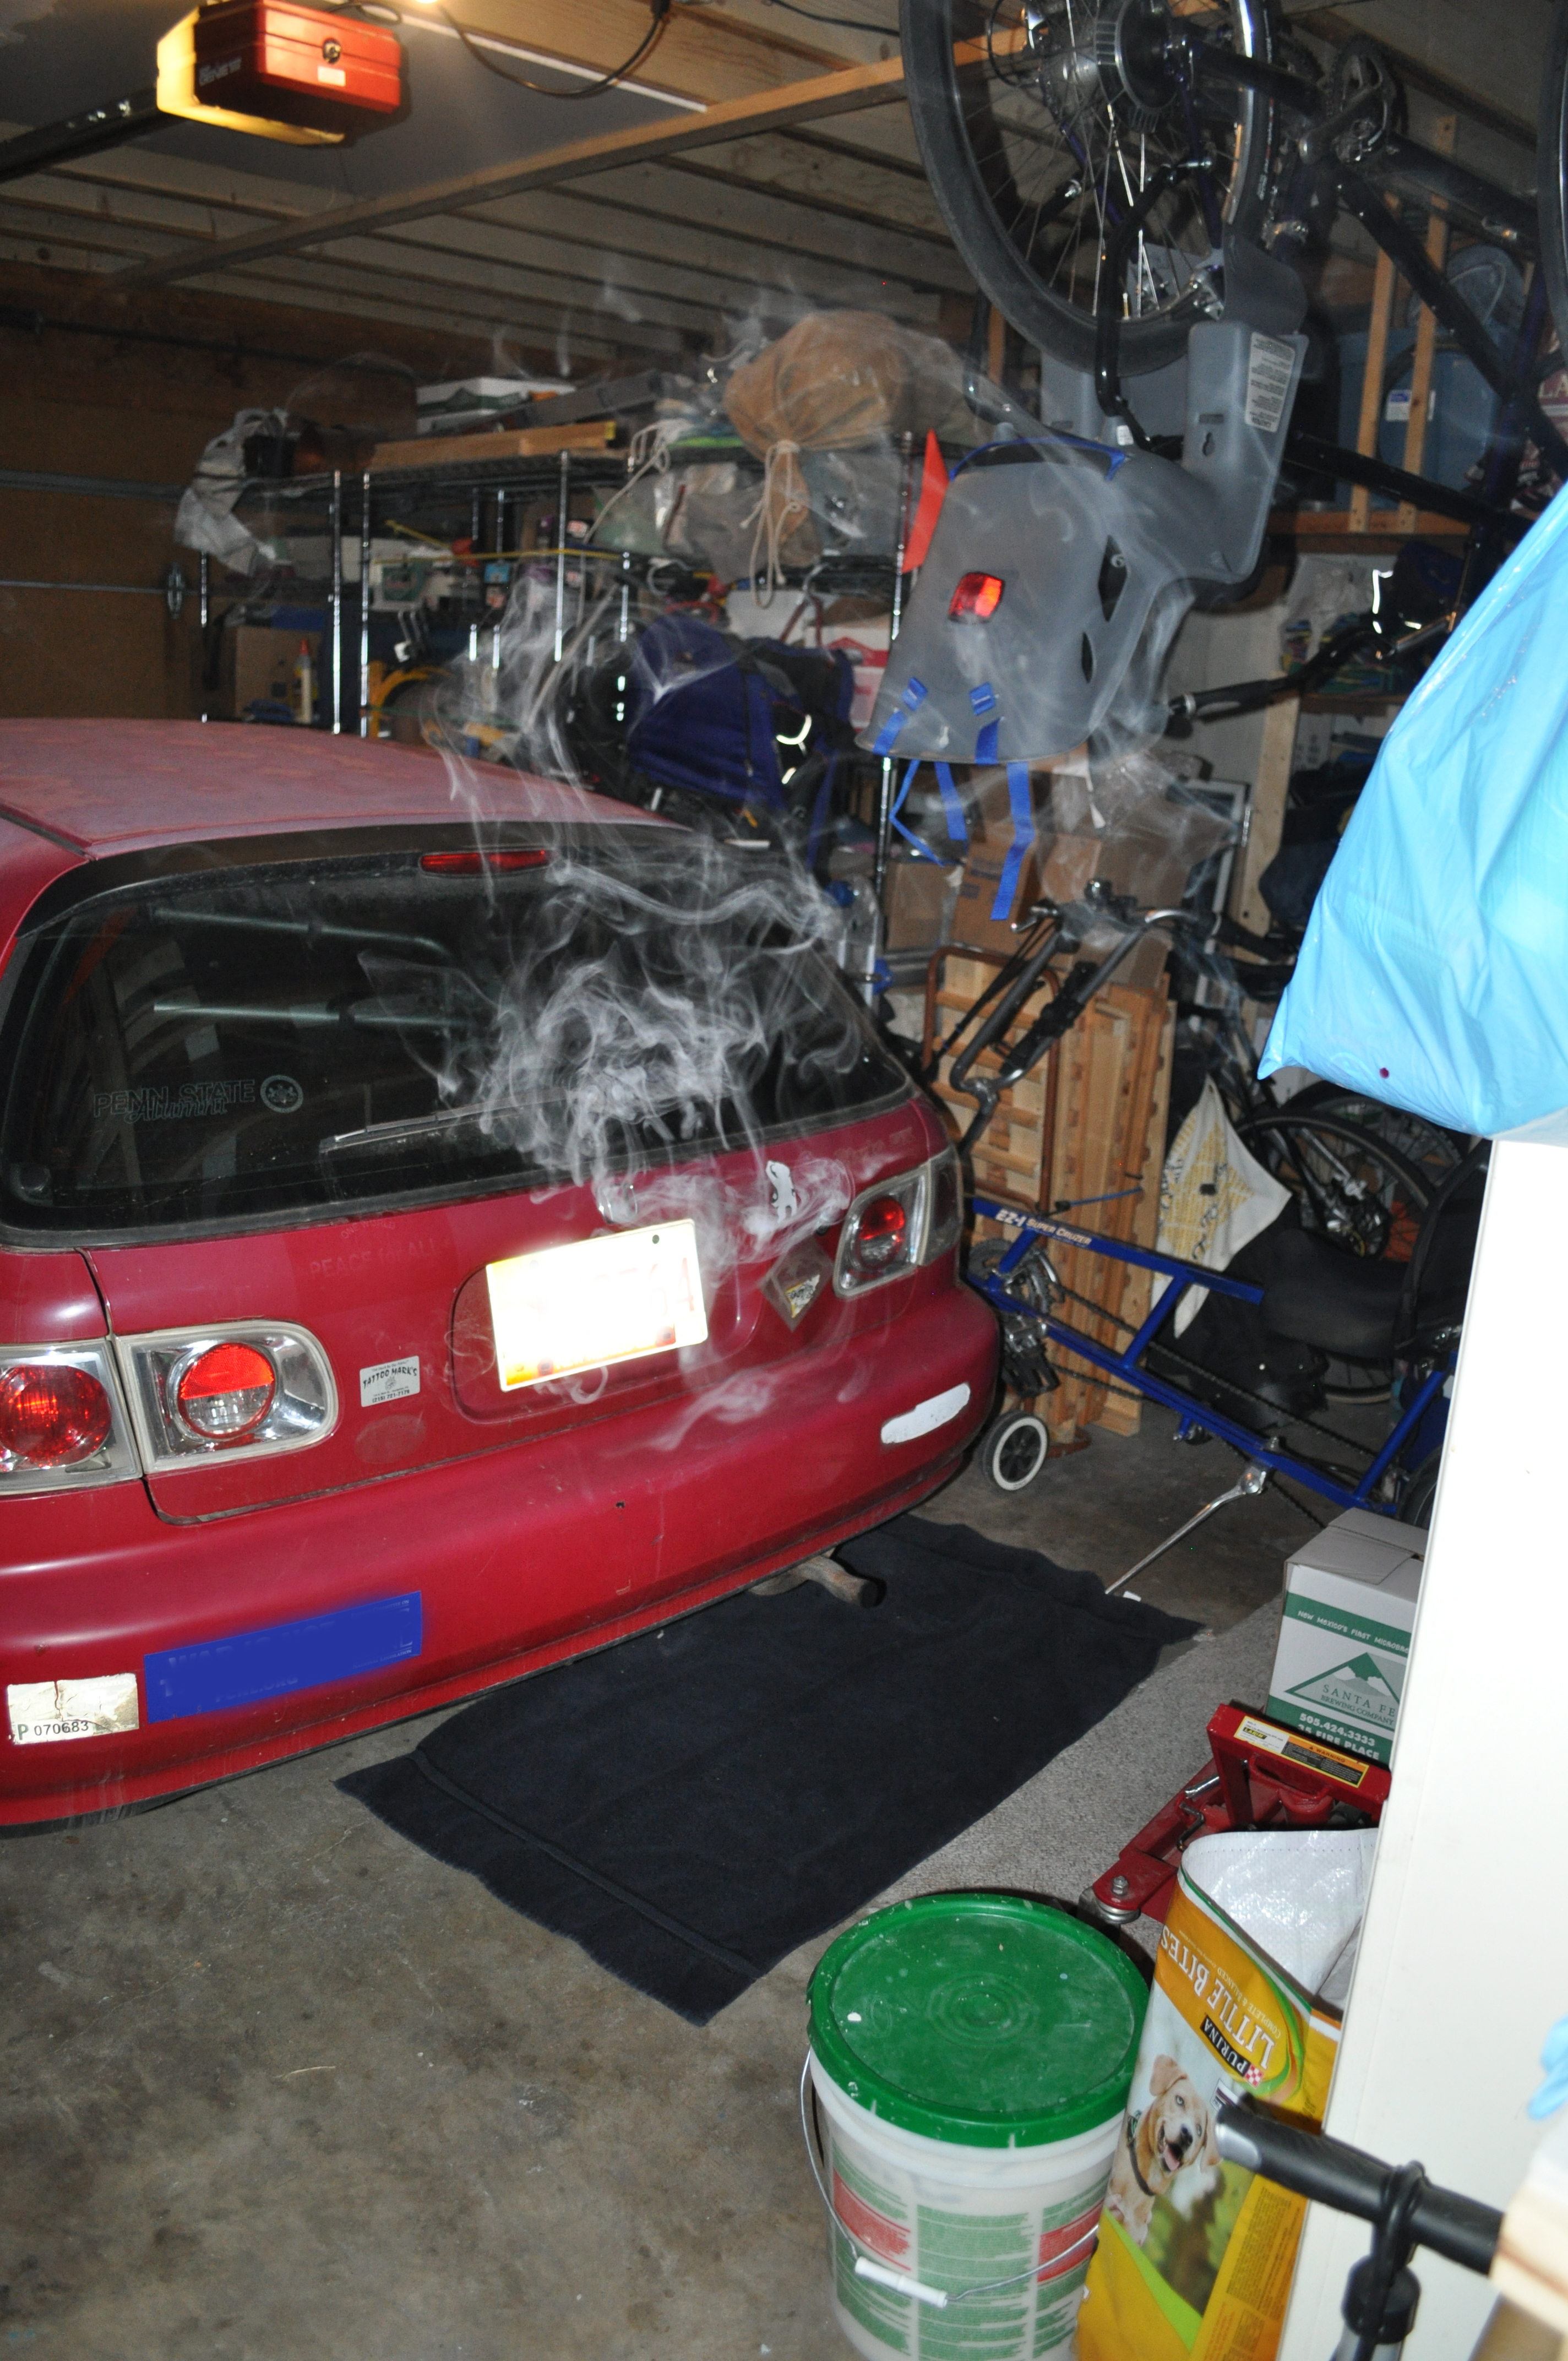
Some conditions, for example, if the house has a leaky house-to-garage interface and a very leaky garage-to-outside interface, can yield a false positive result; i.e., it might look like the house-to-garage air barrier is tight enough when in fact it isn’t. To confirm that the test isn’t yielding a false positive result, a second test is run with the same setup except that this time the overhead garage door is open. The CFM50 with the garage door open is compared to the CFM50 when the garage door was closed. If there is more than a 6% difference in the CFM50 readings, then the house fails and the house-to-garage air barrier should be inspected for air leaks (Rudd 2014). One way to do this is to depressurize the house and run a theatrical smoke machine in the garage. The smoke will be pulled in through any cracks in the wall showing you where the leaks are.
How to Test Pressure Difference between the House and the Garage
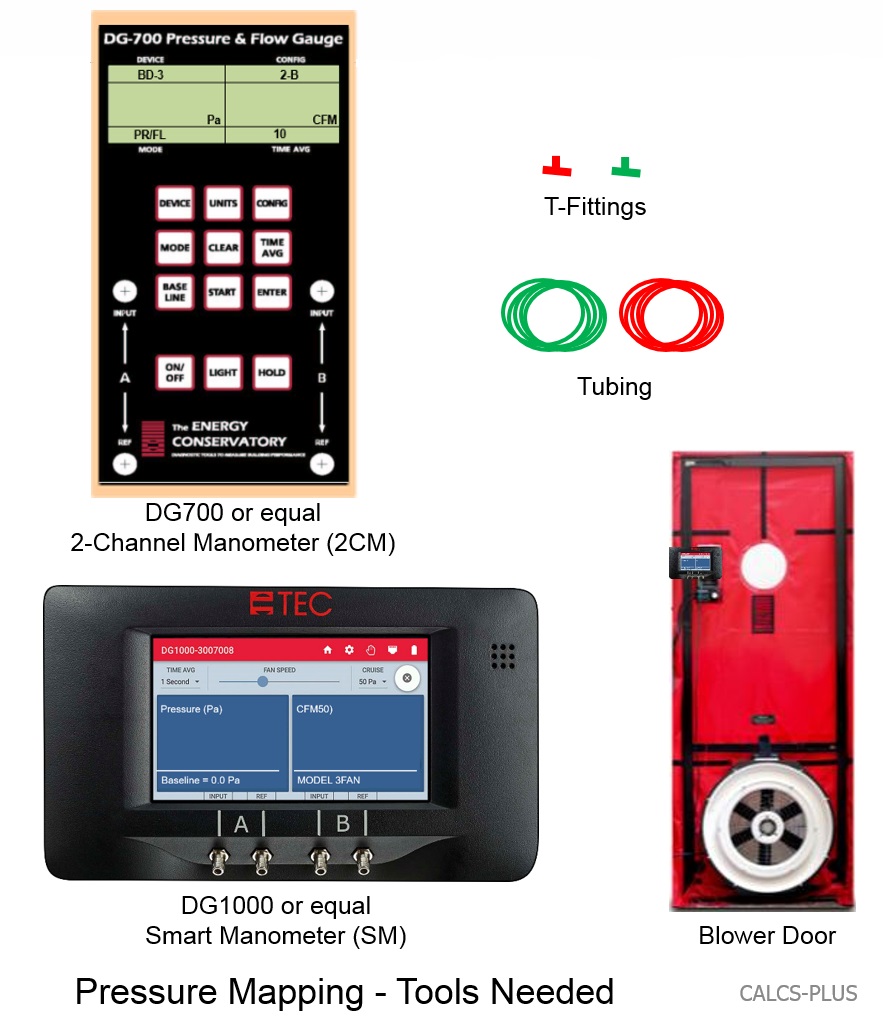
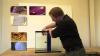
1. Collect the equipment needed to test the pressure difference between the house and the garage while the house is being depressurized to 50 Pascals with reference to outdoors.
The equipment needed includes a blower door test kit, two manometers, and at least six pieces of plastic tubing along with two T-fittings for the tubing. In the drawings below, we are showing three pieces of red tubing and three pieces of green tubing to distinguish them (Figure 1). In this example one of the manometers is a smart manometer (in this case, the DG1000 by The Energy Conservatory (TEC)), which has the ability to “cruise” control the blower door so that it will hold the home at 50 Pascals with reference to the outdoors. If you don’t have a smart manometer (SM), you can use a standard manometer; you’ll need a second person to control that manometer to keep the pressure at 50 Pa WRT outside. The second manometer can be a standard two-channel manometer (2CM) (in this example, the DG700 by TEC, see Figure 2).
Source
Source
2. Set up the house for a building air tightness test per ANSI/RESNET/ICC 380-2016. Set up the home the same way you would when conducting a standard blower door test (all interior doors open, all exterior doors and windows closed, garage door to outside closed, HVAC system and all exhaust fans turned off, fireplace door closed or ashes removed or covered with wet newspaper).
3. Install the blower door in an exterior door of the house.
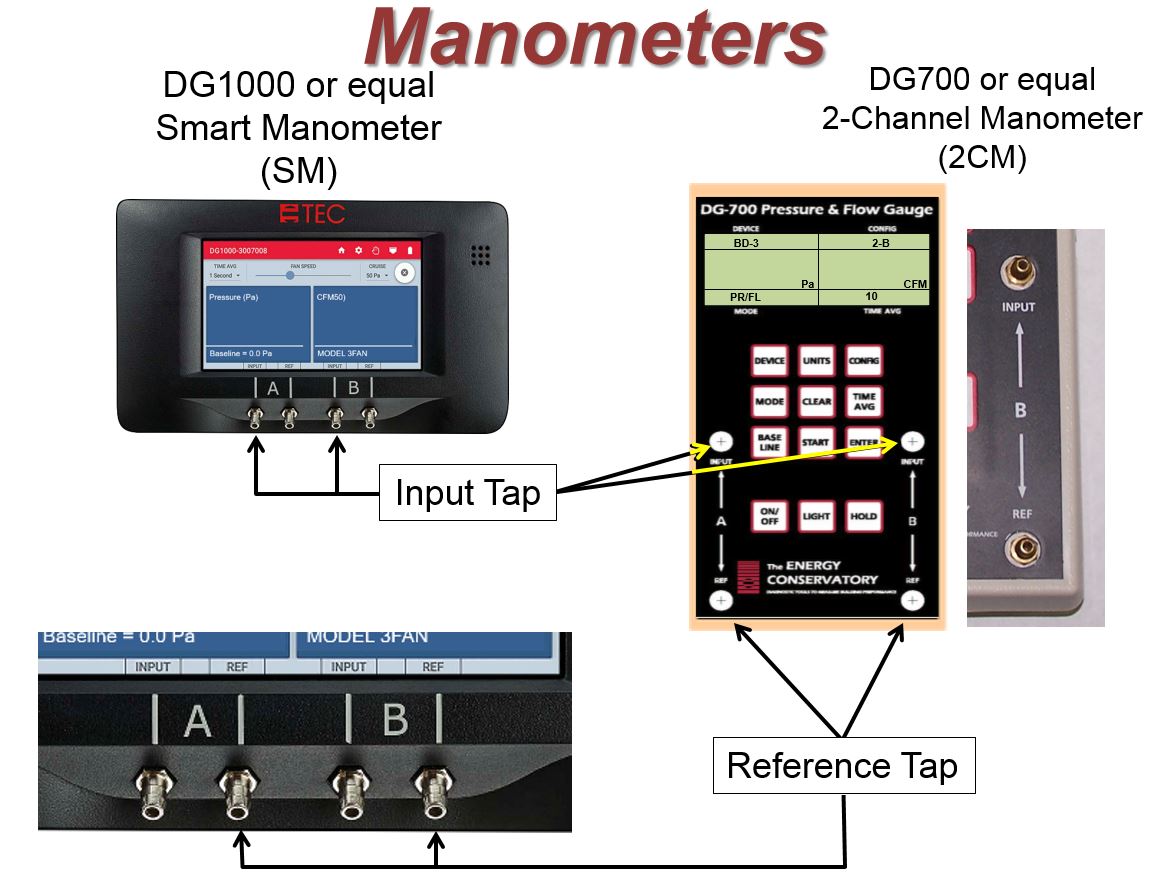
4. Set up the manometers as shown in Figures 3 and 4.
Source

Source
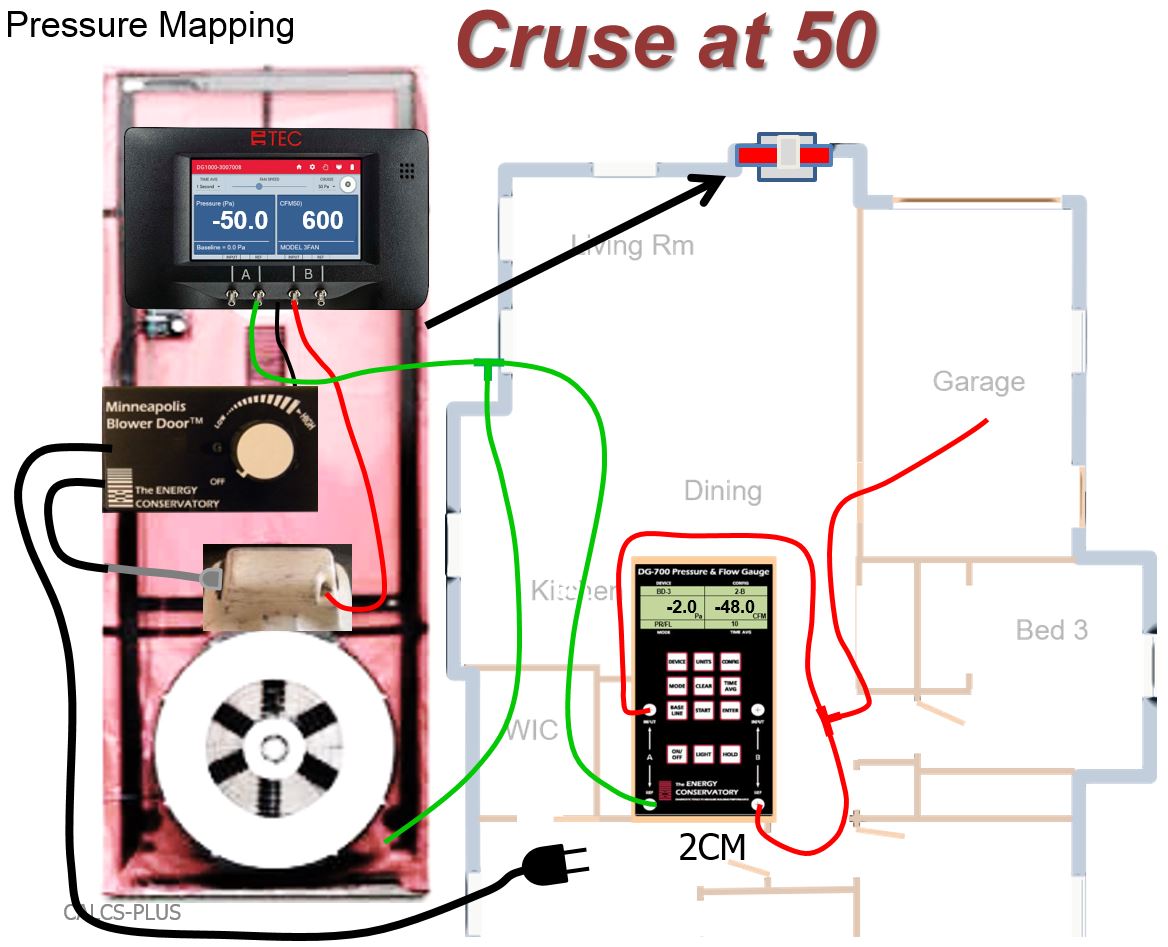
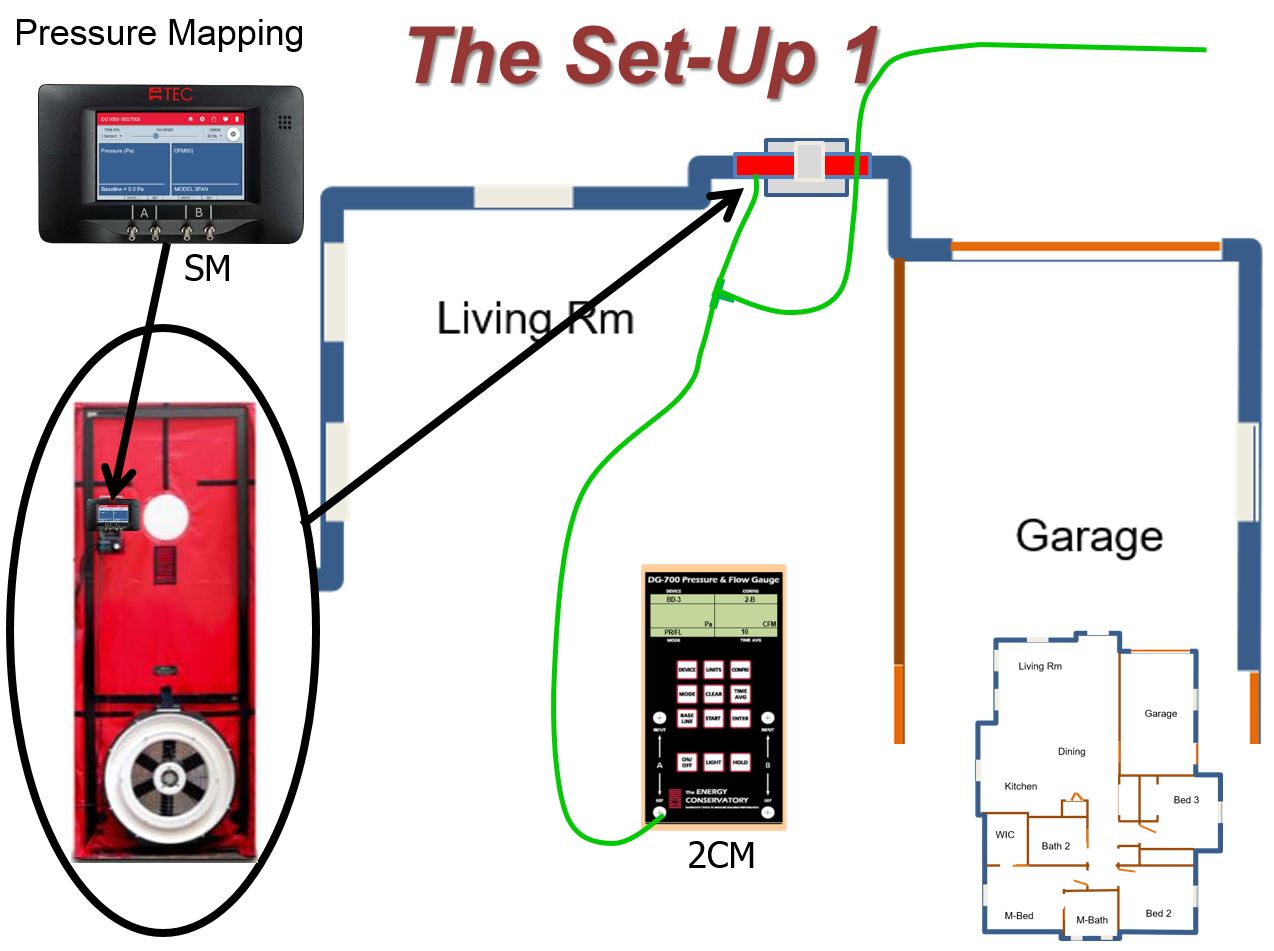
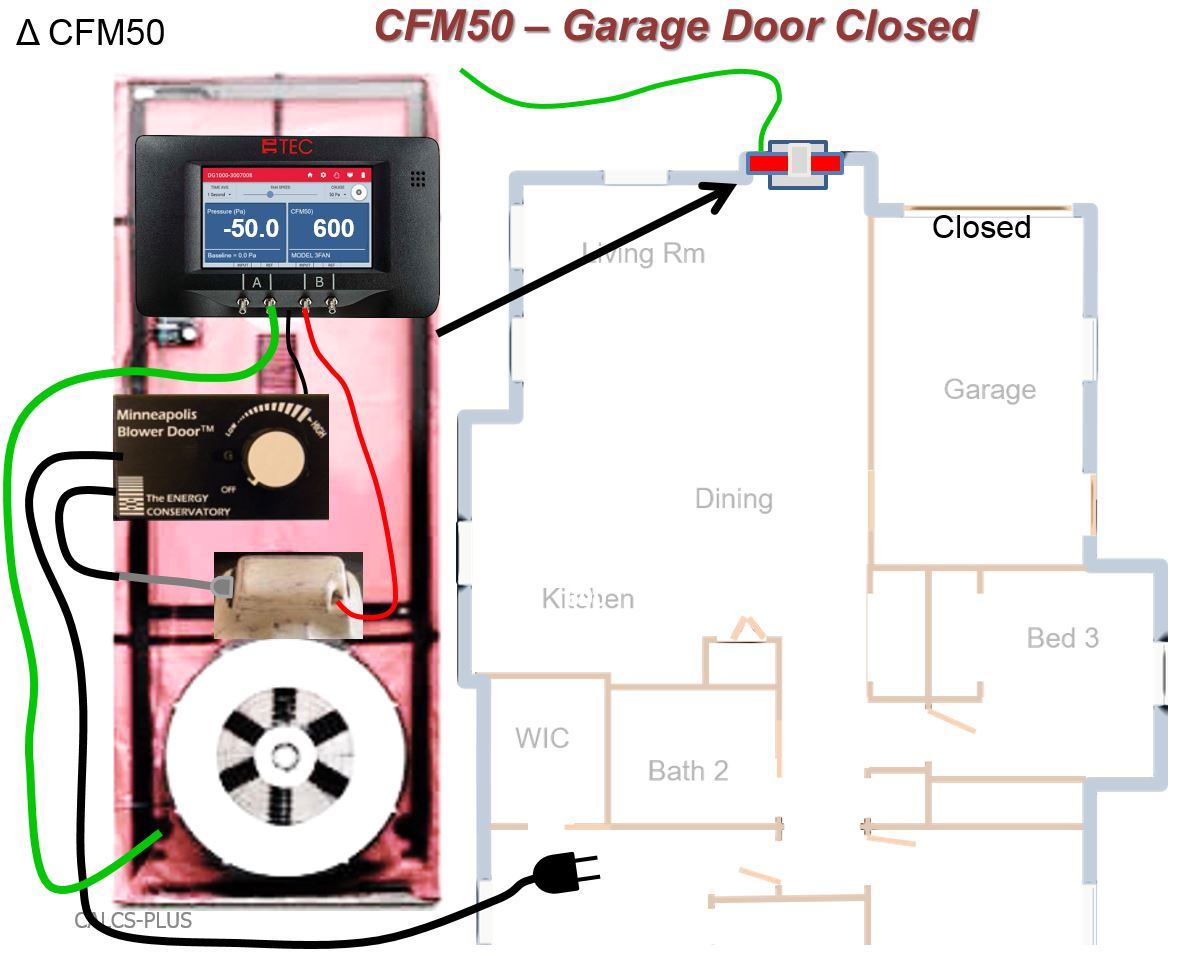
Set up the smart manometer to “cruise” the house at -50 Pa pressure difference with reference to outdoors. If you do not have a smart manometer, you can do this test with two standard 2-channel manometers, with a second technician operating the manometer controlling the blower door to manually keep the house at -50 Pa WRT outside. While the A channel on the smart manometer is connected (via the green T-fitting and tubes) to the outside and to the two-channel manometer, connect the garage (via the red T-fitting and tubes) to the input port of channel A on the two-channel manometer and to the reference port on channel B. So the 2CM A channel is comparing the garage with reference to the outdoors and the 2 CM B channel is comparing the house (the top open port on the B side) with reference to the garage (the red tube).
5. Power on the blower door and set the smart manometer to cruise the home at -50 Pascals with reference to outdoors.
6. Read the results. On the 2-channel monometer, on Channel A read garage pressure with reference to outdoors and on Channel B read house pressure with reference to the garage. Figure 5 shows us sample results for a test. These results show a pressure difference of -48 Pascals for the house with reference to the garage while the pressure difference of the garage with reference to outdoors is -2 Pascals. This shows that the garage is much more connected to the outdoors than to the house. (The closer you are to 0 the more connected you are.) It also tells us that, at -50 Pascals pressure difference, the air barrier between the garage and the house has a 4% leakage rate. So, at normal conditions with the garage doors closed, even if the bath fan were running and depressurizing the house, very little air is likely to come from the garage into the house.

7. Run a second test to eliminate false positives (Rudd 2014).
As shown in the example in Figures 6 and 7, set up the home for a building air tightness test as per ANSI/RESNET/ICC 380-2016. Using one manometer (a DG1000 by TEC is shown in Figures 6 and 7), bring the home to -50 Pa WRT outdoors (see the manometer manufacturer’s instructions). Record the CFM50 showing on channel “B.” In our example, the reading is 600 CFM50.
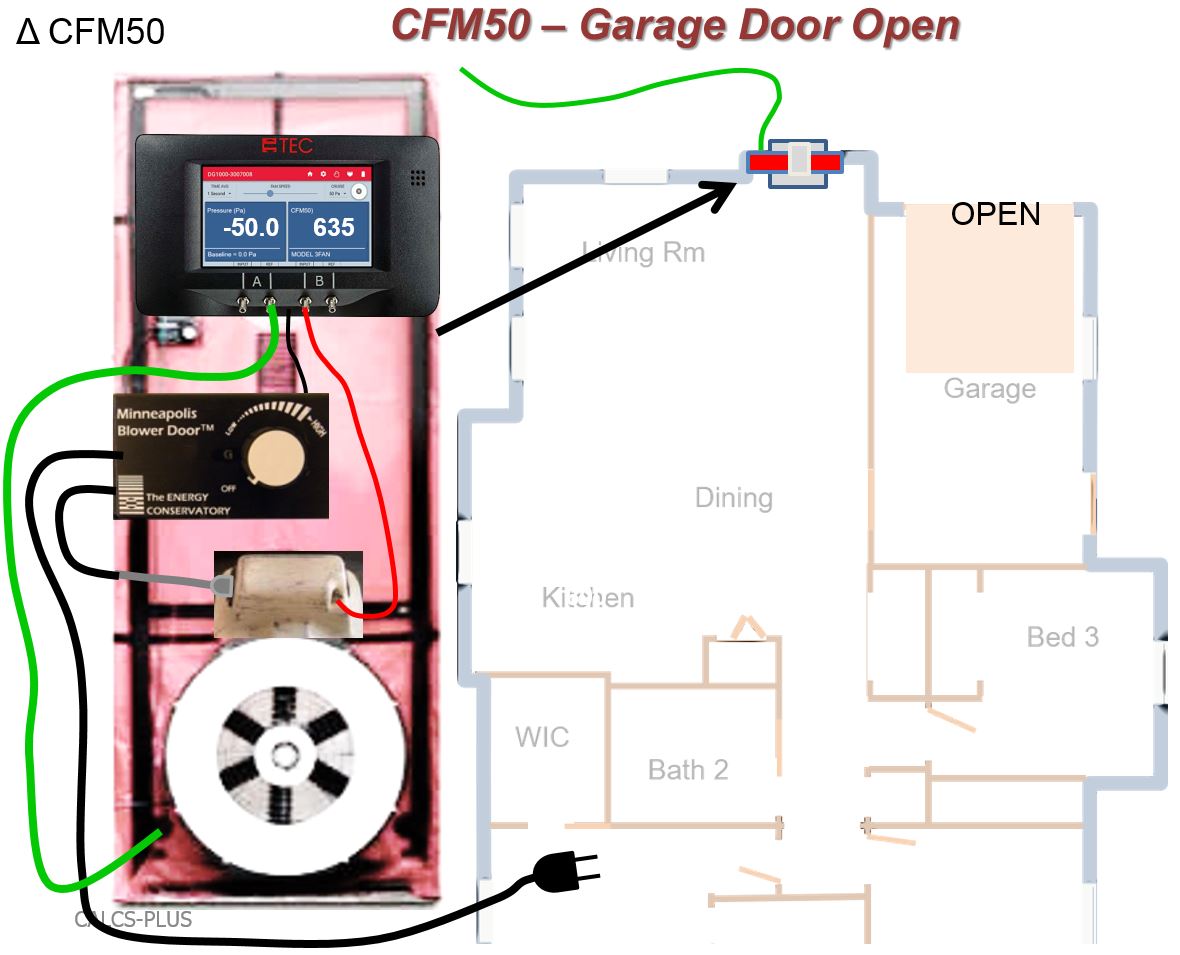
Turn the blower door off, open the largest overhead garage door to the outdoors. Leave the door between the garage and house closed. Bring the house to -50 Pa again. Record the CFM50 on channel “B,” in this case 635 CFM50.
During the first test, with the garage door closed, the amount of fan airflow required to maintain the house at -50 Pascals WRT outdoors was 600 CFM. In the second test, with the garage door open, the airflow required to get the house to -50 Pa was 635 CFM50. The difference between 635 and 600 is 35, which is 5.8% (35/600). This is less than a 6% difference so this house passes the test.
If the second test with the garage door open showed the CFM50 as greater than 6% (in this example, that would be 637 or higher), the house would fail even if it passed the first test. So, for example, if the results for the second test had shown a fan flow of 648 CFM to maintain the 50 PA pressure difference with the garage door open, then the house would have failed because 648 – 600 = 48. And 48/600 = 8%, which is greater than the 6% difference allowed. What could cause a false positive? While in the first test the house appeared to pass because there was a greater than 45-Pa pressure difference between the house and the garage, some of that pressure difference may have been due to the air tightness of the garage itself, not the house-to-garage wall air barrier because when the overhead garage door was opened, the house-garage wall appeared to be leakier.
8. If the house fails either test, inspect the house-to-garage air barrier and perform additional air sealing, then retest. Air leaks can be investigated by depressurizing the house and running a theatrical smoke machine in the garage. Any locations where smoke is entering the home from the garage are areas with leaks.
Source
Source
Ensuring Success
Follow the procedures in the Description tab.
All homes with attached garages should have a hard-wired carbon monoxide (CO) alarm with a battery backup installed in the home. This is an EPA Indoor AirPlus requirement and a common sense precaution. Even homes with balanced ventilation can become depressurized, for example, if a high-powered range hood fan is operating with inadequate make-up air or if the clothes dryer and a few exhaust fans are operating simultaneously. Newer cars with remote keyless starters have been known to accidentally be started while located in a closed garage. Verifying the integrity of the house-to-garage air barrier in all homes is an important safety precaution that can save lives.
Region
No climate-specific information applies.
Training
Right and Wrong Images
Videos

Compliance
Retrofit
The procedure for testing garage to house air leakage is identical for new homes and existing homes. See the Scope and Description tabs.
See the U.S. Department of Energy’s Standard Work Specifications for more on the garage to house air barrier.
More Info
Case Studies
References and Resources
*For non-dated media, such as websites, the date listed is the date accessed.
Contributors to this Guide
The following authors and organizations contributed to the content in this Guide.
Sales
Air Sealed Attached Garage
Technical Description
Air-sealed attached garages help block the leakage of carbon monoxide and other contaminants in the garage from getting into the home. This is achieved by blocking and air sealing floor framing cavities in ceilings above the garage that extend into living spaces; seams along the adjoining living space walls and foundation; and all seams and any holes between the ceiling and any living space above. In addition, any doors between the house and the garage should be self-closing and weather stripped, including a tight-fitting threshold sweep.
Questions? Comments? Contact our webmaster.