

Scope
Rehabilitate an existing wood window to improve air and water control layers:
- Inspect the interior and exterior of the building, including each window, to identify impacts and potential risks with completing the work.
- Diagnose water and air infiltration pathways.
- Choose strategies most appropriate to address each leak.
- Add gaskets and seals at common air infiltration locations to improve the overall air tightness of the window assembly.
Some methods are covered in detail by Davis (2007).
See the Compliance Tab for links to related codes and standards and voluntary federal energy-efficiency program requirements.
Description
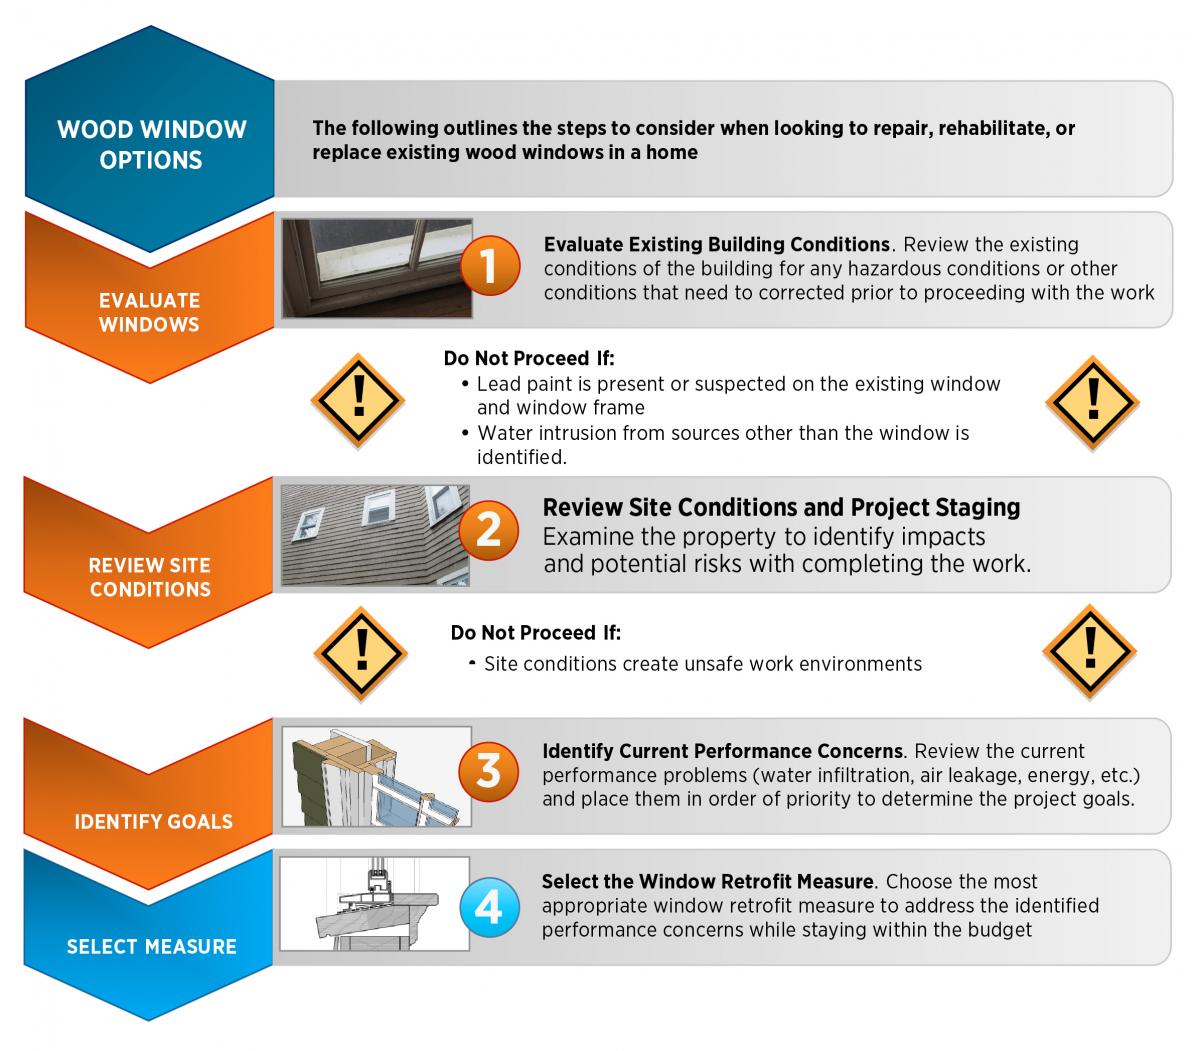
The amount of work required to rehabilitate the windows will depend on the starting condition of the windows. Before beginning this work, the window should be assessed as outlined within the Success tab.
For windows that are generally good condition (square, with sashes that properly fit to the window frame, and no broken or missing glass), the following steps would be recommended (this work is covered in detail by Davis 2007). Windows requiring more extensive rehabilitation such as re-glazing, replacement of rotten wood, or rebuilding of sashes are outside the scope of this guide. Other retrofit measures, including sash retrofit, sash replacement, window insert replacement, or complete window replacement should be considered for severely deteriorated windows.
How to Rehabilitate an Old Window
- Remove the sashes by removing the interior stops and parting bead of the window frame.
- Clean the frames and sashes of any flaking paint or other coatings that may impede the proper installation of gaskets and seals.
- Replace broken glass and repair or replace damaged frames, sills, or sashes (not specifically described in this guide). Other retrofit measures, including sash replacement, window insert replacement, or complete window replacement should be considered for severely deteriorated windows.
- Replace all loose or missing window glazing (not specifically described in this guide).
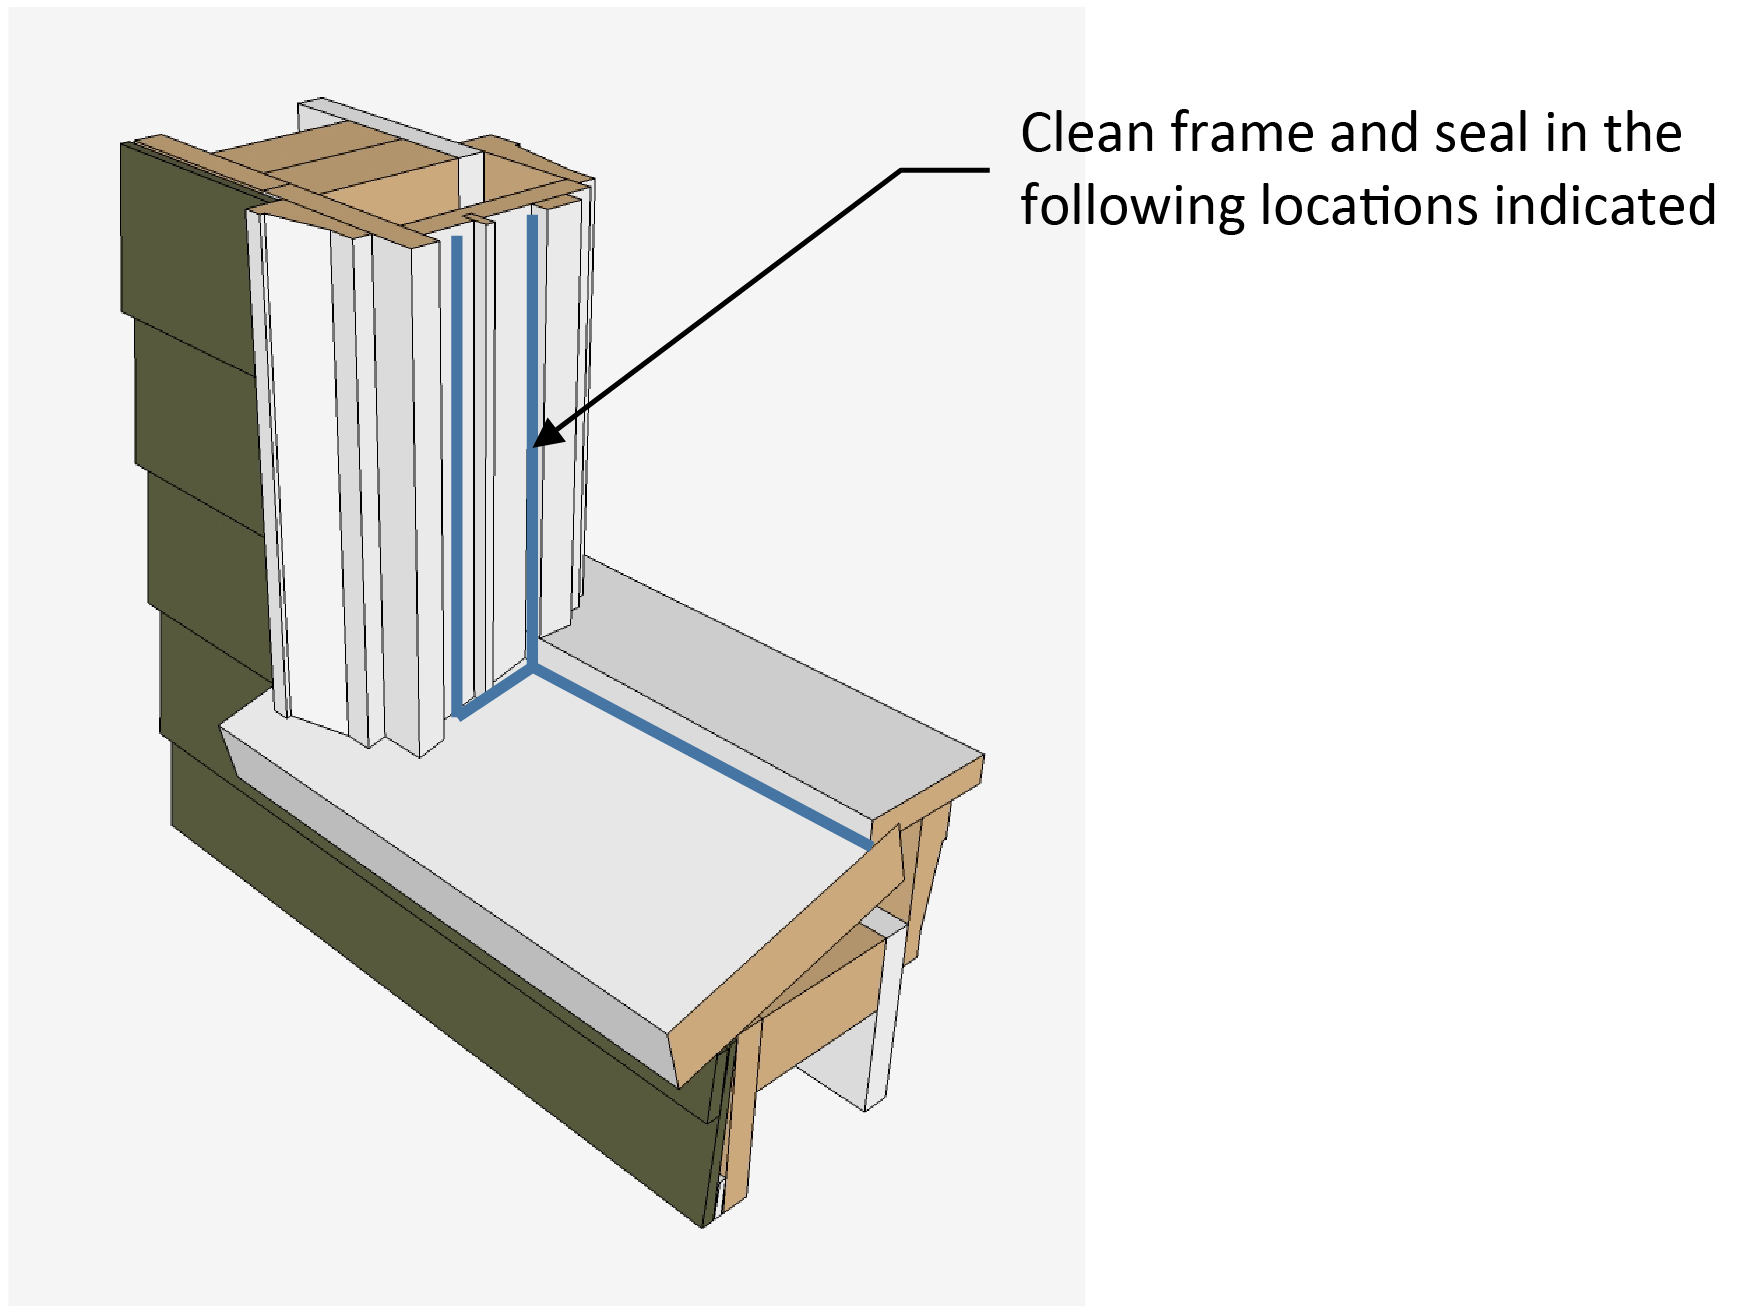
- Caulk and seal the corners and joints in the window frame. This includes all joints between the sill and jambs as well as between the casings and frames.
- Cut grooves into the sashes where new gaskets will be installed.
- If weight pockets are to be retained, clean and lubricate the pulleys, replace the sash cords or chains, and balance the weights.
If the weight and balance system are to be replaced, remove the cords, insulate and air seal the cord openings and install jamb liners and a spring-loaded tape balance. - Prime and paint the window frames and sashes.
- Install new gaskets around the perimeter of the sashes. V-groove type gaskets will likely work the best at the jambs and meeting rails, while bubble gaskets work well at the head and sill interface.
- Reinstall the sashes, meeting rails, and interior stops.

Ensuring Success
Identifying Risks
Prior to any retrofit work being conducted, it is important that the following conditions of the building systems be reviewed:
- Lead and other hazardous materials
- Site conditions and project staging
- Identification of water infiltration concerns
- Identification of deteriorated or damaged materials
- Identification of user comfort concerns
Contractor/Homeowner Safety
US EPA: Lead in Painting, Dust and Soil: Renovation, Repair Painting
OSHA: Fall Protection (if window work is to be done at height, from the exterior)
Lead and Other Hazardous Materials
Old wood windows and trim are a common location of lead paint in homes. Any work being completed on the window systems should follow all appropriate state and federal laws regarding handling of hazardous materials.
Site conditions and Project Staging
The home and site should be reviewed to identify impacts and potential risks with completing the work.
If the work is to be done for the exterior, scaffolding, lifts, ladders, or other means to access work areas may be needed. Work done at height may require fall protection be used. Proximity to adjacent property or vegetation may limit access or create unsafe work areas. Exterior staged work may also damage existing landscaping or vegetation.
If the work is intended to be completed from the interior, consideration should be given to disruption of the occupant and clearances for moving equipment and materials into and out of the space. With any interior work there is always a chance of damage to interior finishes. Appropriate planning and protection is required.
Identification of Water Infiltration Concerns
Windows, above all other enclosure systems, are a common location of water infiltration issues. It is important to understand the various pathways for potential water infiltration, and identify current water leakage problems. While the details presented in this document are all intended to improve the moisture performance of the window assemblies, it is not intended to address all possibilities, and is not a replacement for inspection and evaluation of the performance of an individual window. Existing problems should be identified, and the strategy chosen that will be most appropriate to address the concern. Window systems water leaks can be grouped into four general categories (Figure 1 below):
- Between the window frame and rough opening
- Through the joints in the window frame
- Between the window frame and the operable sashes
- Through the joints between the glass and the sash frames

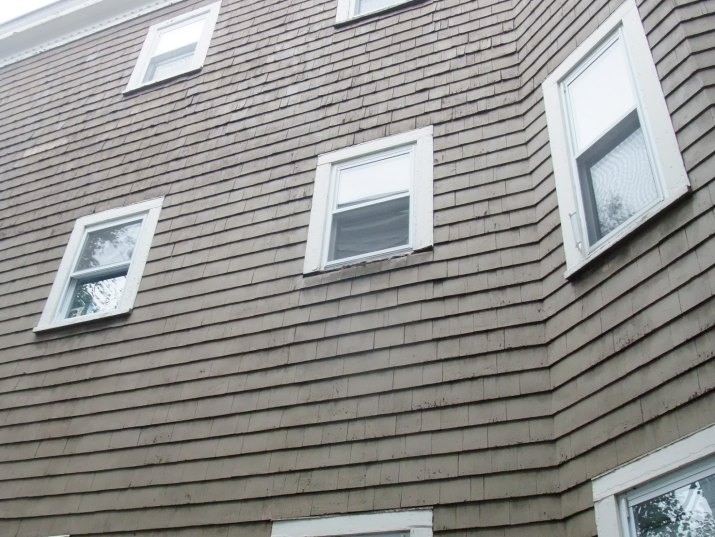
Prior to any work being done, interior and exterior inspection and monitoring of the conditions of the building should be completed. Water staining, peeling paint or wall paper, and staining on trim or floor assemblies below window systems are indications of water infiltration and/or condensation. Leakage between the sashes and the frame and between the glass and the sash is usually marked by water staining on the interior window frame itself. Condensation on the window frames can also lead to staining of the interior finishes. It is important to monitor the questionable area to prevent a false diagnosis of the water management problem being experienced.
Leakage between the window and rough opening or through the joints in the window itself are typically contained within the wall assembly and may go unnoticed, or could manifest as staining and peeling paint below the window or damaged flooring.
Other problems such as water infiltration at the window head may be indications of failed or missing head flashing. However, other problems not associated with the window system may in fact be the cause of the water infiltration. Care must be taken to properly diagnose the infiltration pathway.
If it is a known recurring problem, then the infiltration problem must be addressed prior to or in conjunction with the window retrofit work.
If no obvious signs of water infiltration problems exist and the window elements and connection wall components are in good condition, no additional work may be needed. However, as stated above, water infiltration problems are often concealed within wall cavities with no outward signs. This becomes more of a concern if the window retrofit work is being done in conjunction with the addition of cavity fill insulation. With the addition of insulation to the wall cavities, water infiltration problems that previously may have had sufficient drying ability, may now lead to prolonged moisture accumulation. Prolonged moisture accumulation can lead to material deterioration. If there is suspected leakage, then further investigation, including but not limited to thermal scans, moisture content measurements, and cutting of investigation holes below window assemblies to look for signs of moisture problems would be recommended.
Unless the problem is obvious, it may be prudent to contact someone with experience with diagnosing water infiltration problems prior to proceeding.
Identification of Deteriorated or Damaged Materials
If damage to existing elements is noted, the materials should be removed and replaced as part of the retrofit. Certain elements will be more critical to the proper implementation of the chosen strategy.
The window sill is arguably the most important element of the window assembly, as water will drain downward by gravity either into the wall (e.g., hole through sill) or directly onto the wall (failure of the sill extension). For all proposed measures in this document excluding complete window replacement, the condition of the sill is critical to the performance of the measure. Cracked or rotting sills need to be replaced prior to any work being done.
The window frame including the exterior casings is the next most critical element. If the casing is deteriorating, its replacement may be warranted. This should not be confused with the exterior trim, which is often installed as a decorative element on top of the casing.
Deteriorating trim may not affect the water management performance of the window however; it may be an indication of other problems and generally creates an aesthetic problem.

Depending on the measure being examined, the condition of the window sashes may or may not be a concern to the performance of the measure taken. For window rehabilitation, sash retrofit, or interior storm retrofit, the condition of the sashes is critical to the performance of the window. For exterior storms, the sashes are more protected from the elements, and the condition is less important from a water management perspective, yet still critical from an energy and condensation resistance perspective. For sash replacement, window insert, or full window replacement, the condition of the sash is irrelevant, as they will be removed. For this reason, windows with severely deteriorated sashes may be better candidates for the latter retrofit measures.
Identification of User Comfort Concerns
As part of the initial review, associated comfort concerns relating to the window systems should be evaluated. Window air leakage is a significant source of occupant comfort problems. Unlike other common enclosure leakage pathways, window air leakage is commonly very direct, resulting in distinct drafts.
Radiation effects from cool glass surfaces are another common comfort problem. This is more difficult to identify, as the tendency is to assume that the discomfort felt when near a window is from air leakage or drafts. This results in some misdiagnosis of the dominant function. A general recommendation is to increase the interior surface temperature of the window system to reduce the radiant heat transfer from the occupant to the window. This is commonly done by adding additional panes of glass (or films) to create an insulating air (or other gas) space between the layers.
Window Rehabilitation
This measure improves the existing performance of the window without significant modifications or additions to the window. This measure has practically no impact on the appearance of the window as the modifications are all concealed and minor.
Key points to consider when selecting Window Rehabilitation are as follows:
- Maintains both the interior and exterior appearance of the building. (This is an important strategy where historic preservation is required.)
- This work is best done in conjunction with other measure strategies, including interior and exterior approaches (such as the addition of interior and exterior storms).
- This work will not address any current condensation problems that may be occurring on the window system.
- If sash weights are maintained, other potential energy and durability considerations may not be addressed, such as air leakage and thermal conductance losses at weight pockets.
- Cost can be highly variable depending on the size, complexity, condition, and value of the windows.
Region
No climate specific information applies.
Training
Right and Wrong Images
Source
Presentations
Compliance
More Info
References and Resources
*For non-dated media, such as websites, the date listed is the date accessed.
Contributors to this Guide
The following authors and organizations contributed to the content in this Guide.
Building Science Corporation, lead for the Building Science Consortium (BSC), a DOE Building America Research Team
Sales
High-R Window = High-Efficiency Window

Technical Description
There are two levels of window efficiency relative to standard windows: high-efficiency (e.g., ENERGY STAR Certified windows), which perform at least 15% better than standard windows, and ultra-efficient (e.g., most triple-glazed windows) which perform at least 50% better. These windows use a combination of features to reduce heat loss or gain including two or three glass panes separated by insulating spacers, nontoxic gas (e.g., argon or krypton) in the spaces between the glass panes for better thermal resistance, a nearly invisible low-emissivity coating on the glass that keeps heat in during the winter and out in the summer. They also block damaging ultraviolet sunlight (e.g., fading curtains and furniture), and insulate frames.
Questions? Comments? Contact our webmaster.