Showing results 501 - 688 of 688
Image
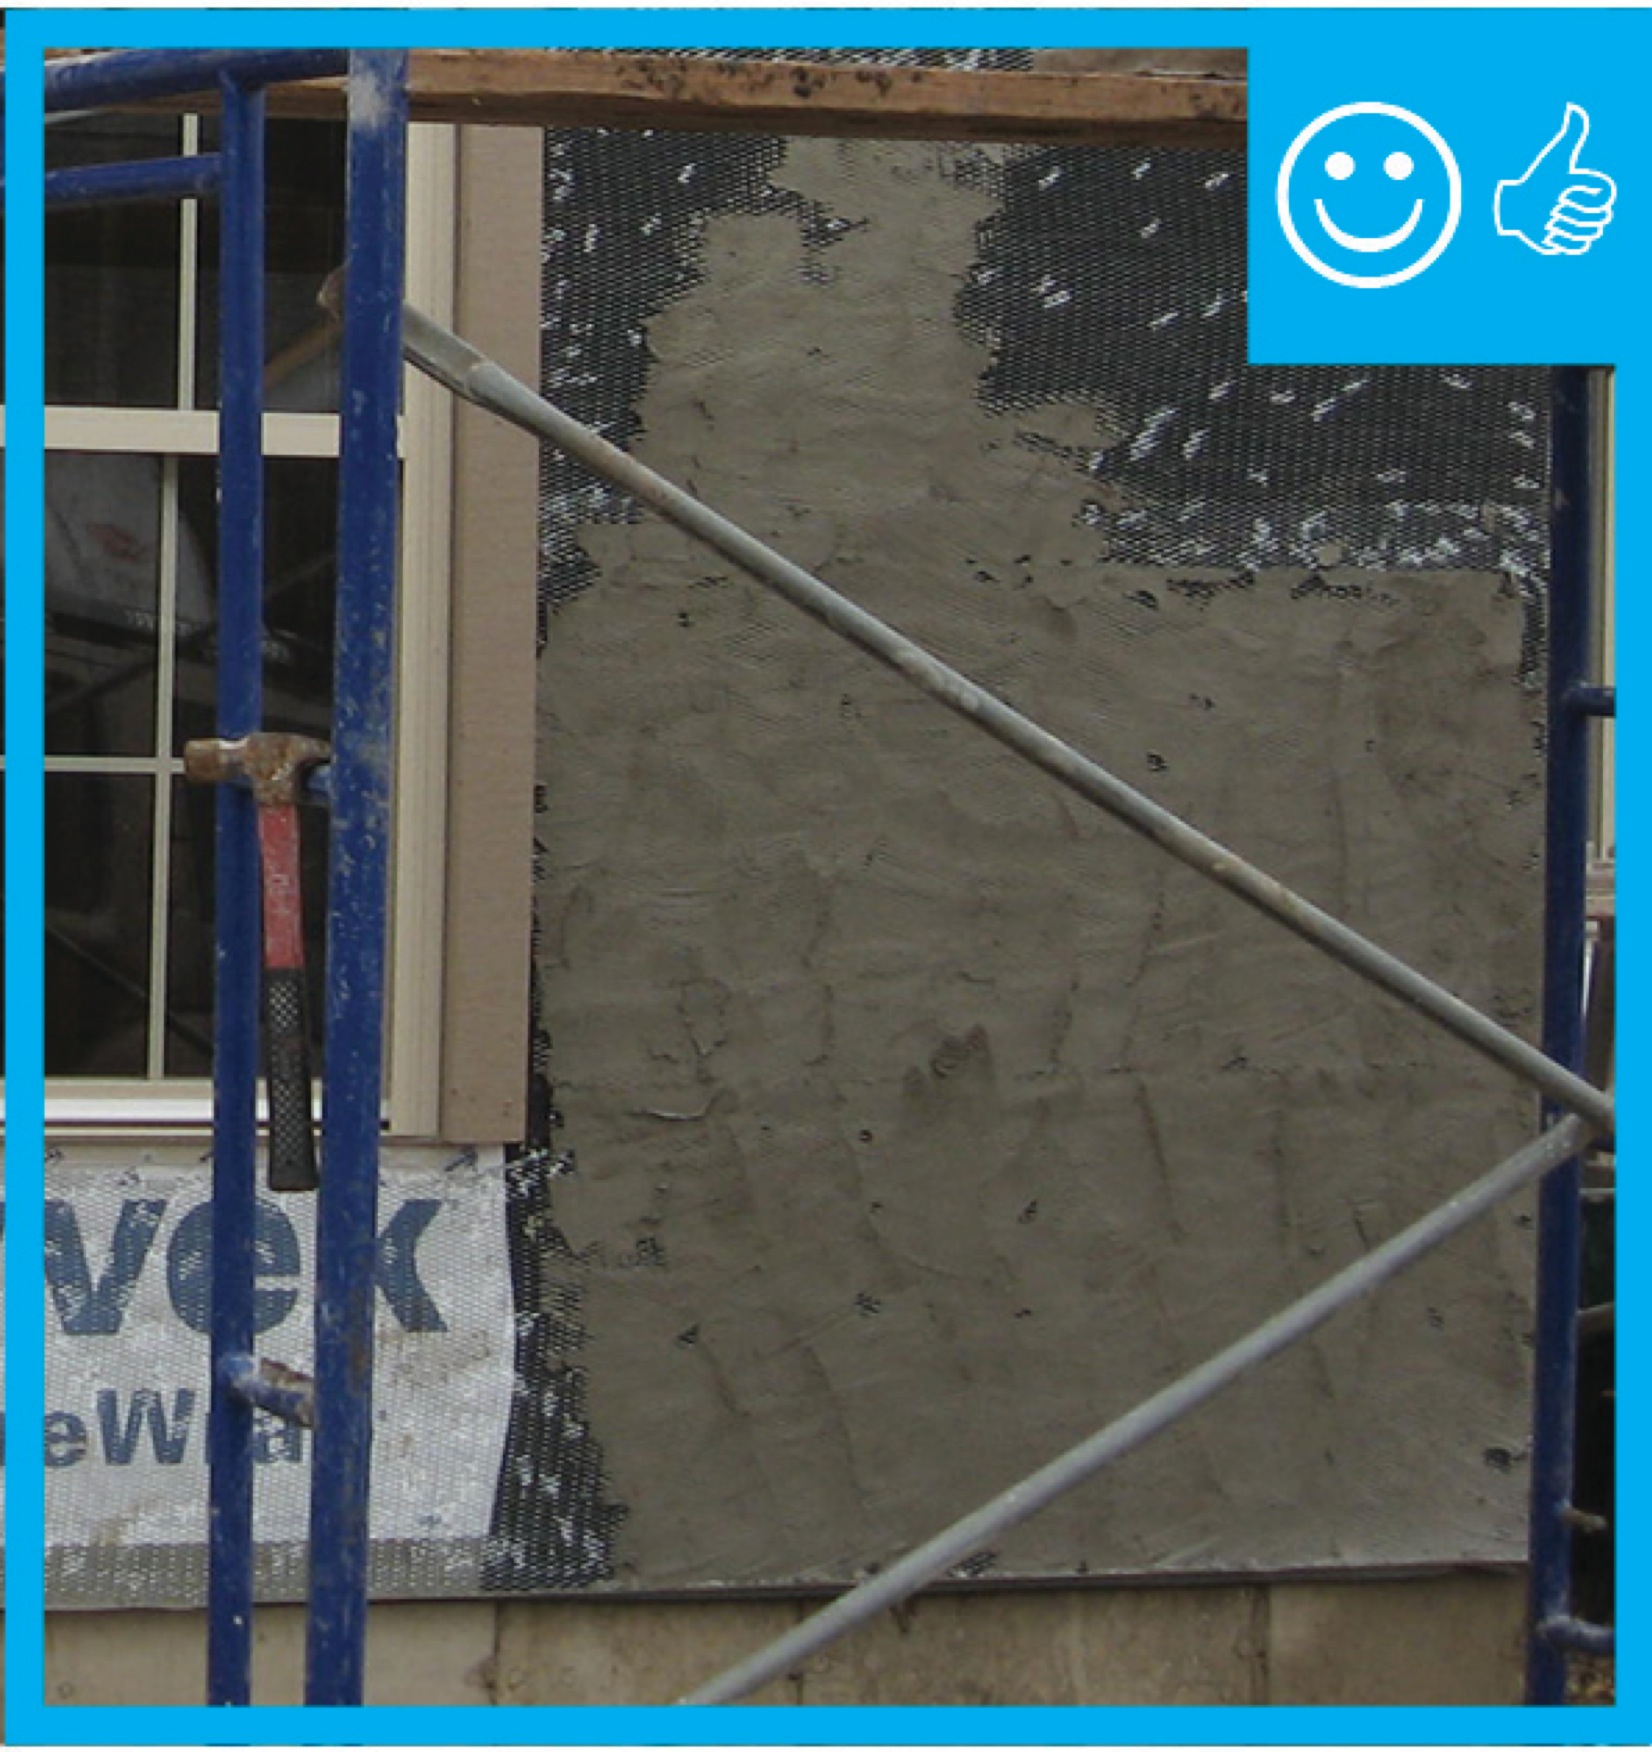
The water-resistant barrier, weep screed, and stucco lathe are properly layered and will create a complete drainage system
Image
Image
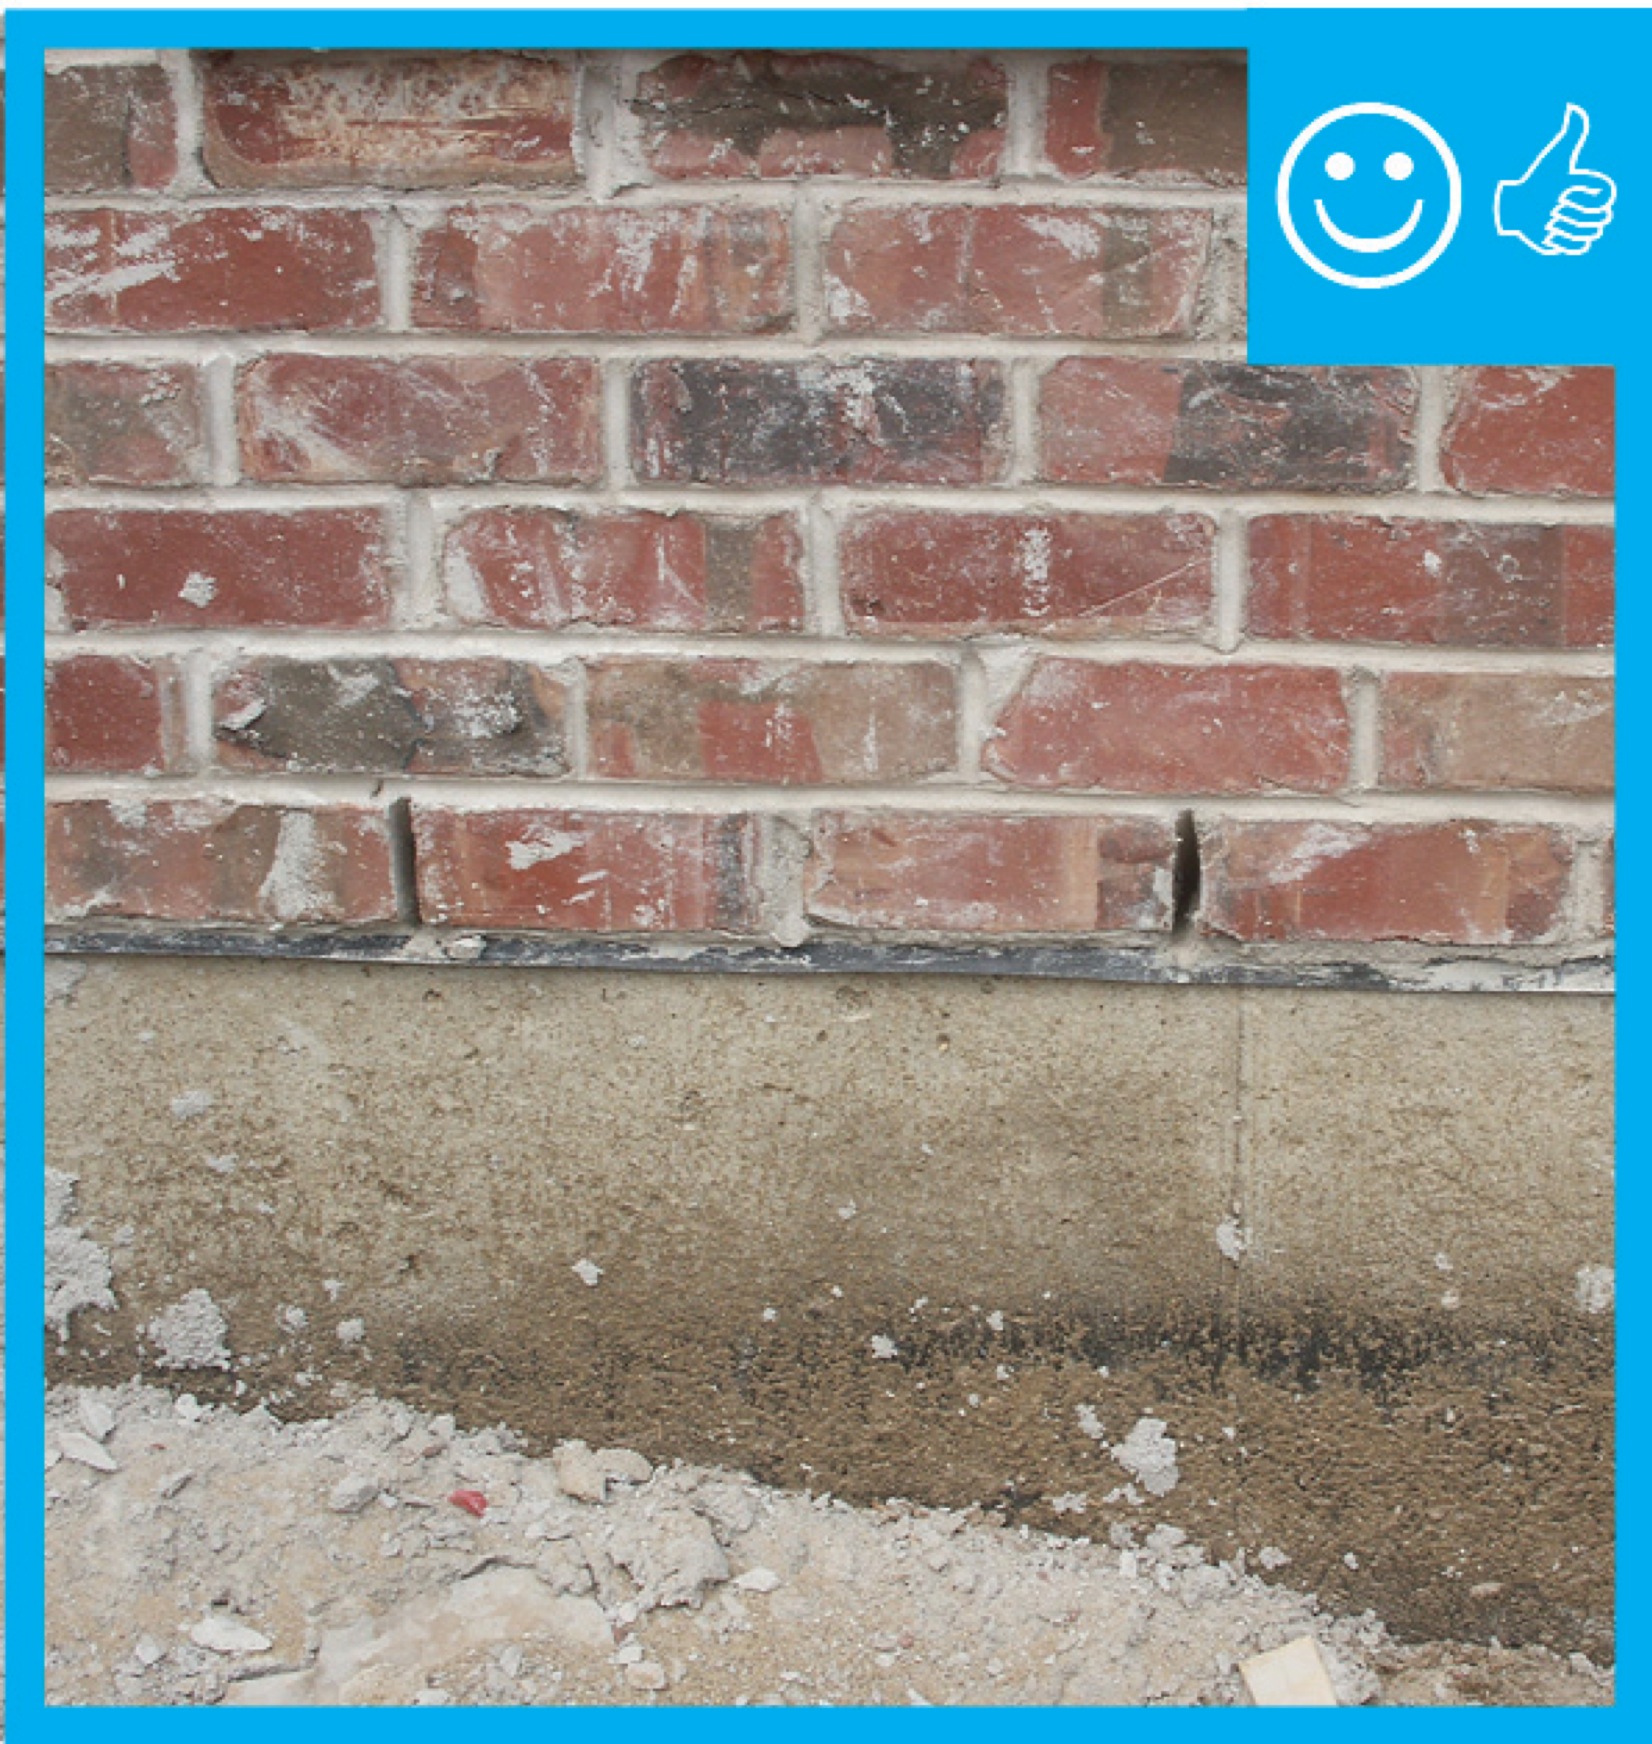
The weep holes are spaced at the correct distance to provide a complete drainage system
Image

Image
Image

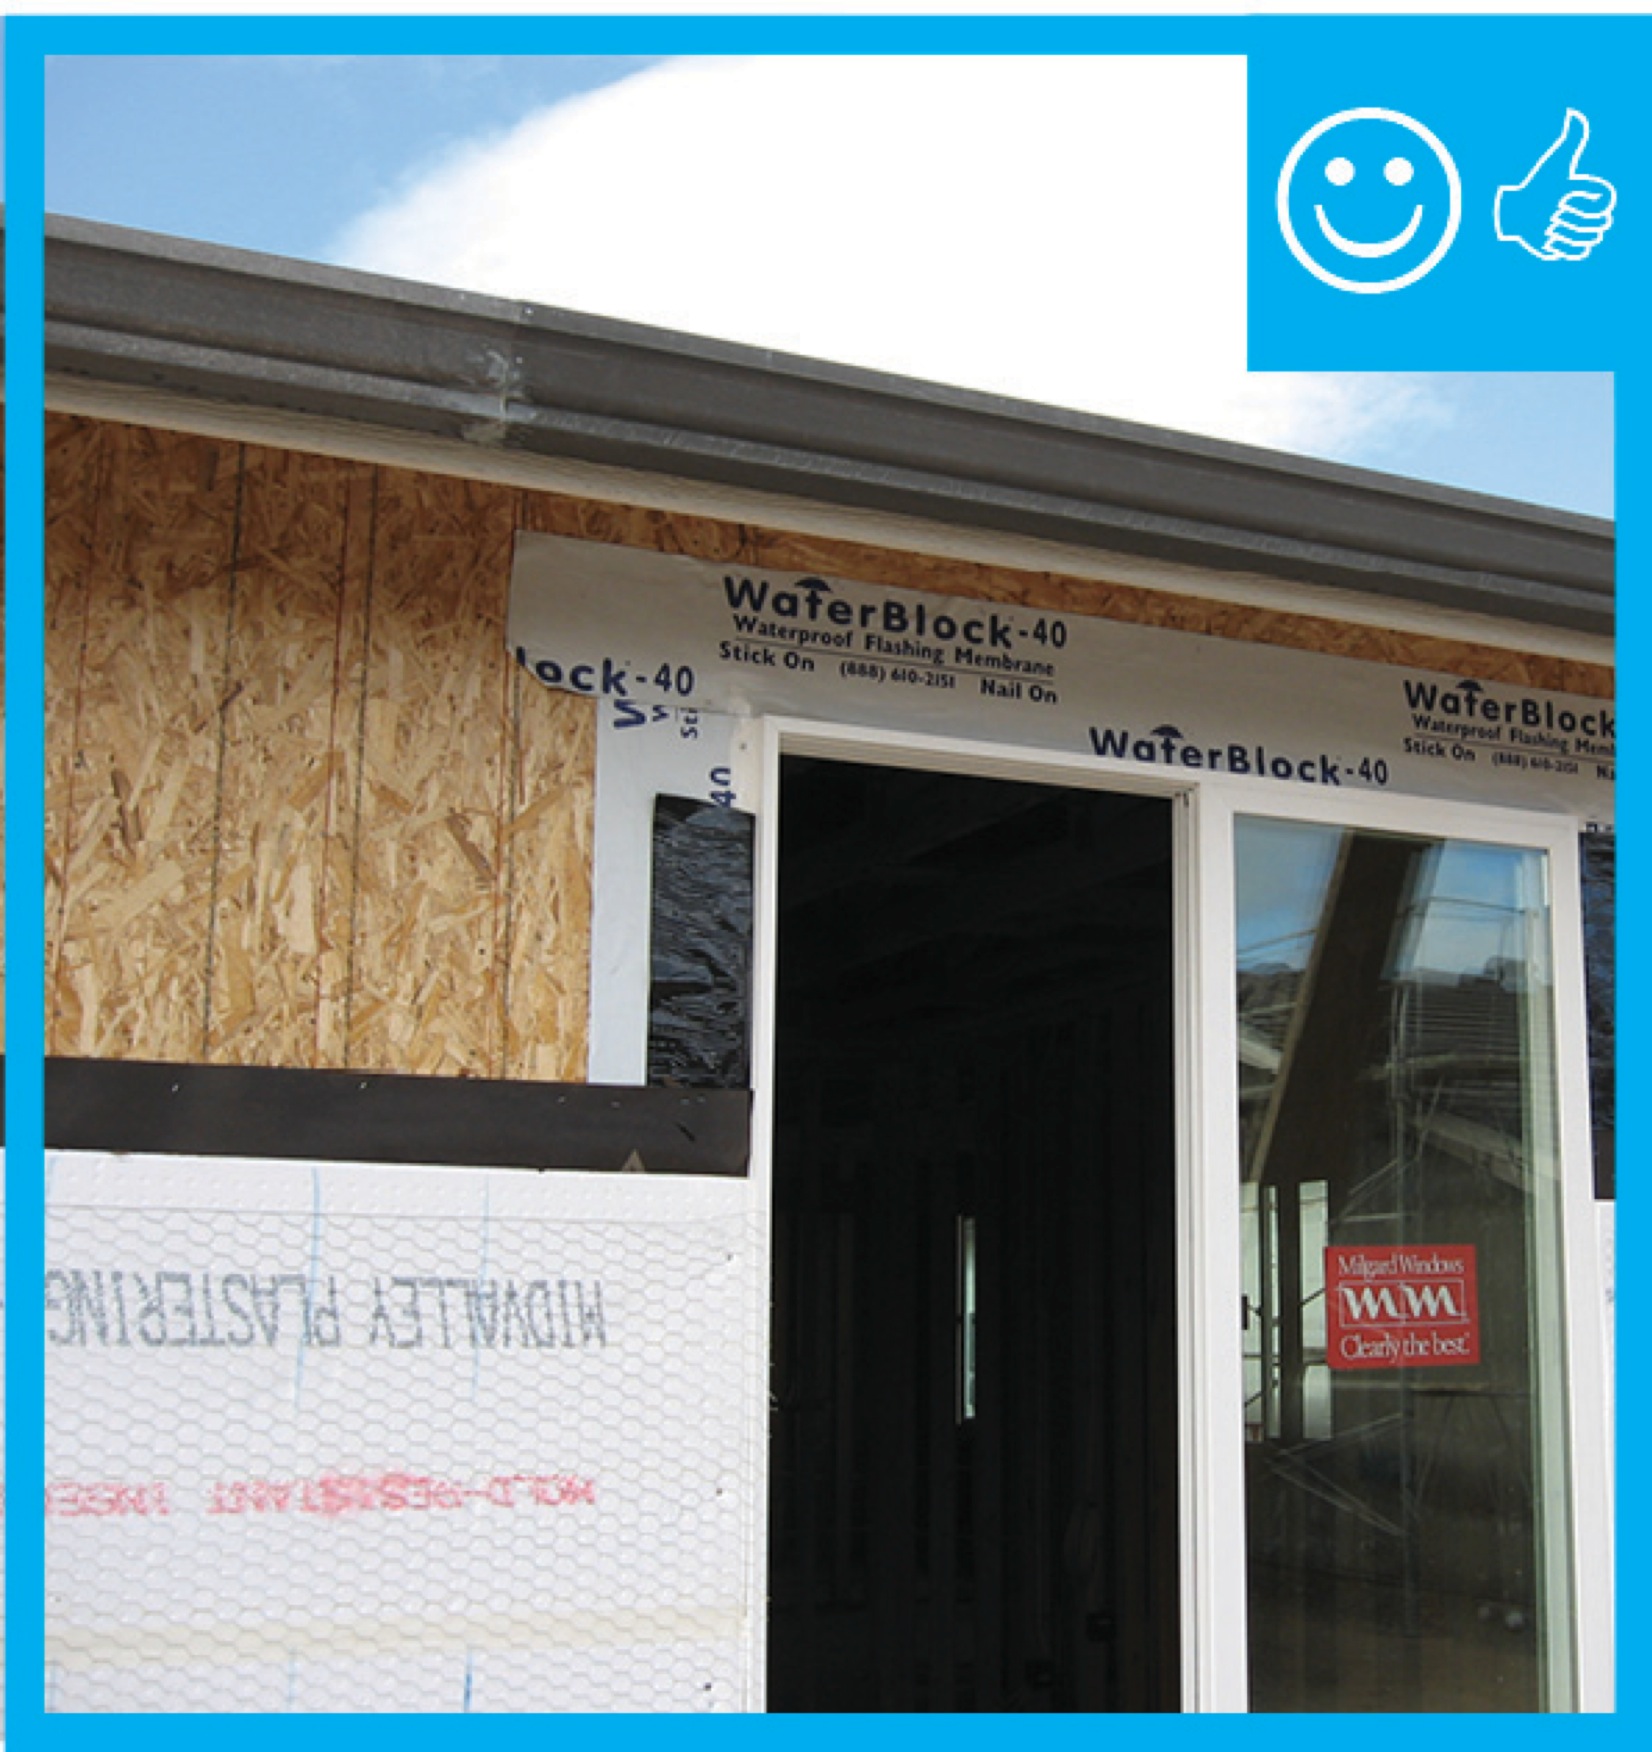
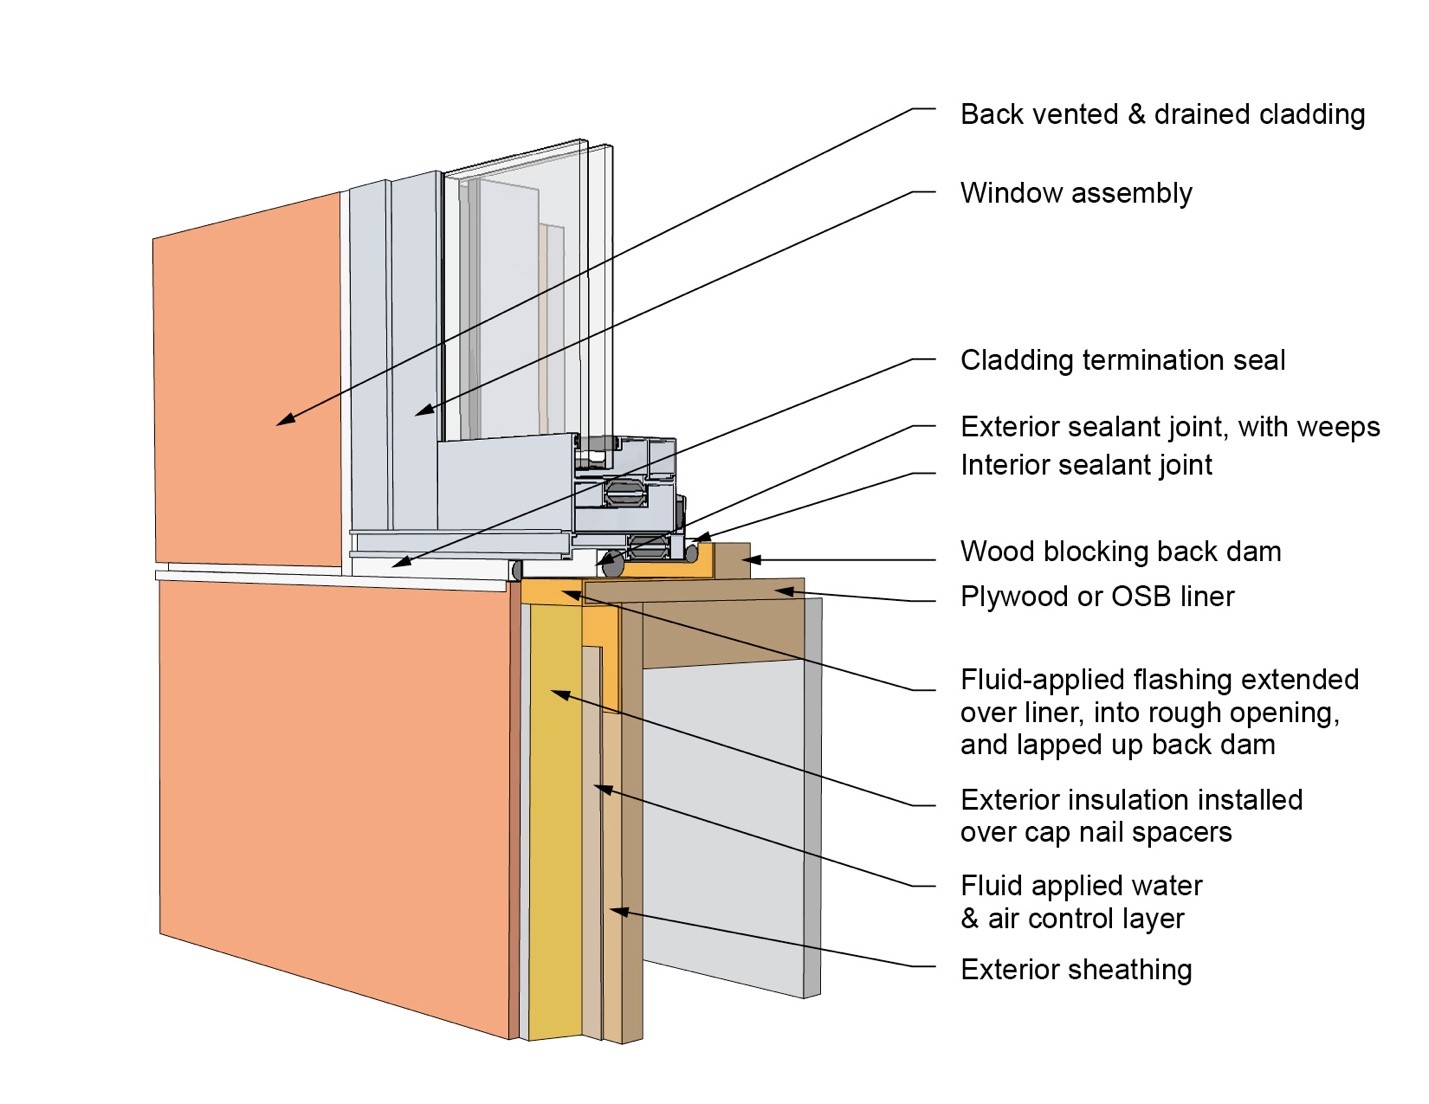
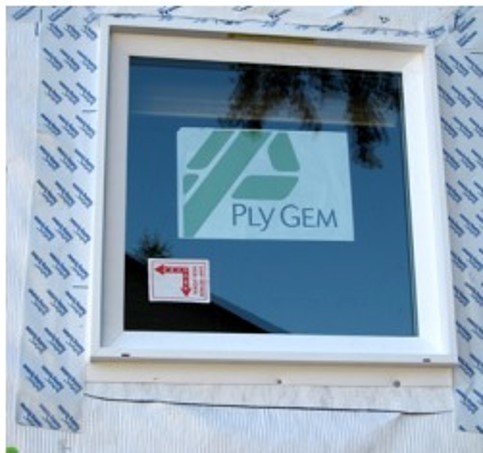
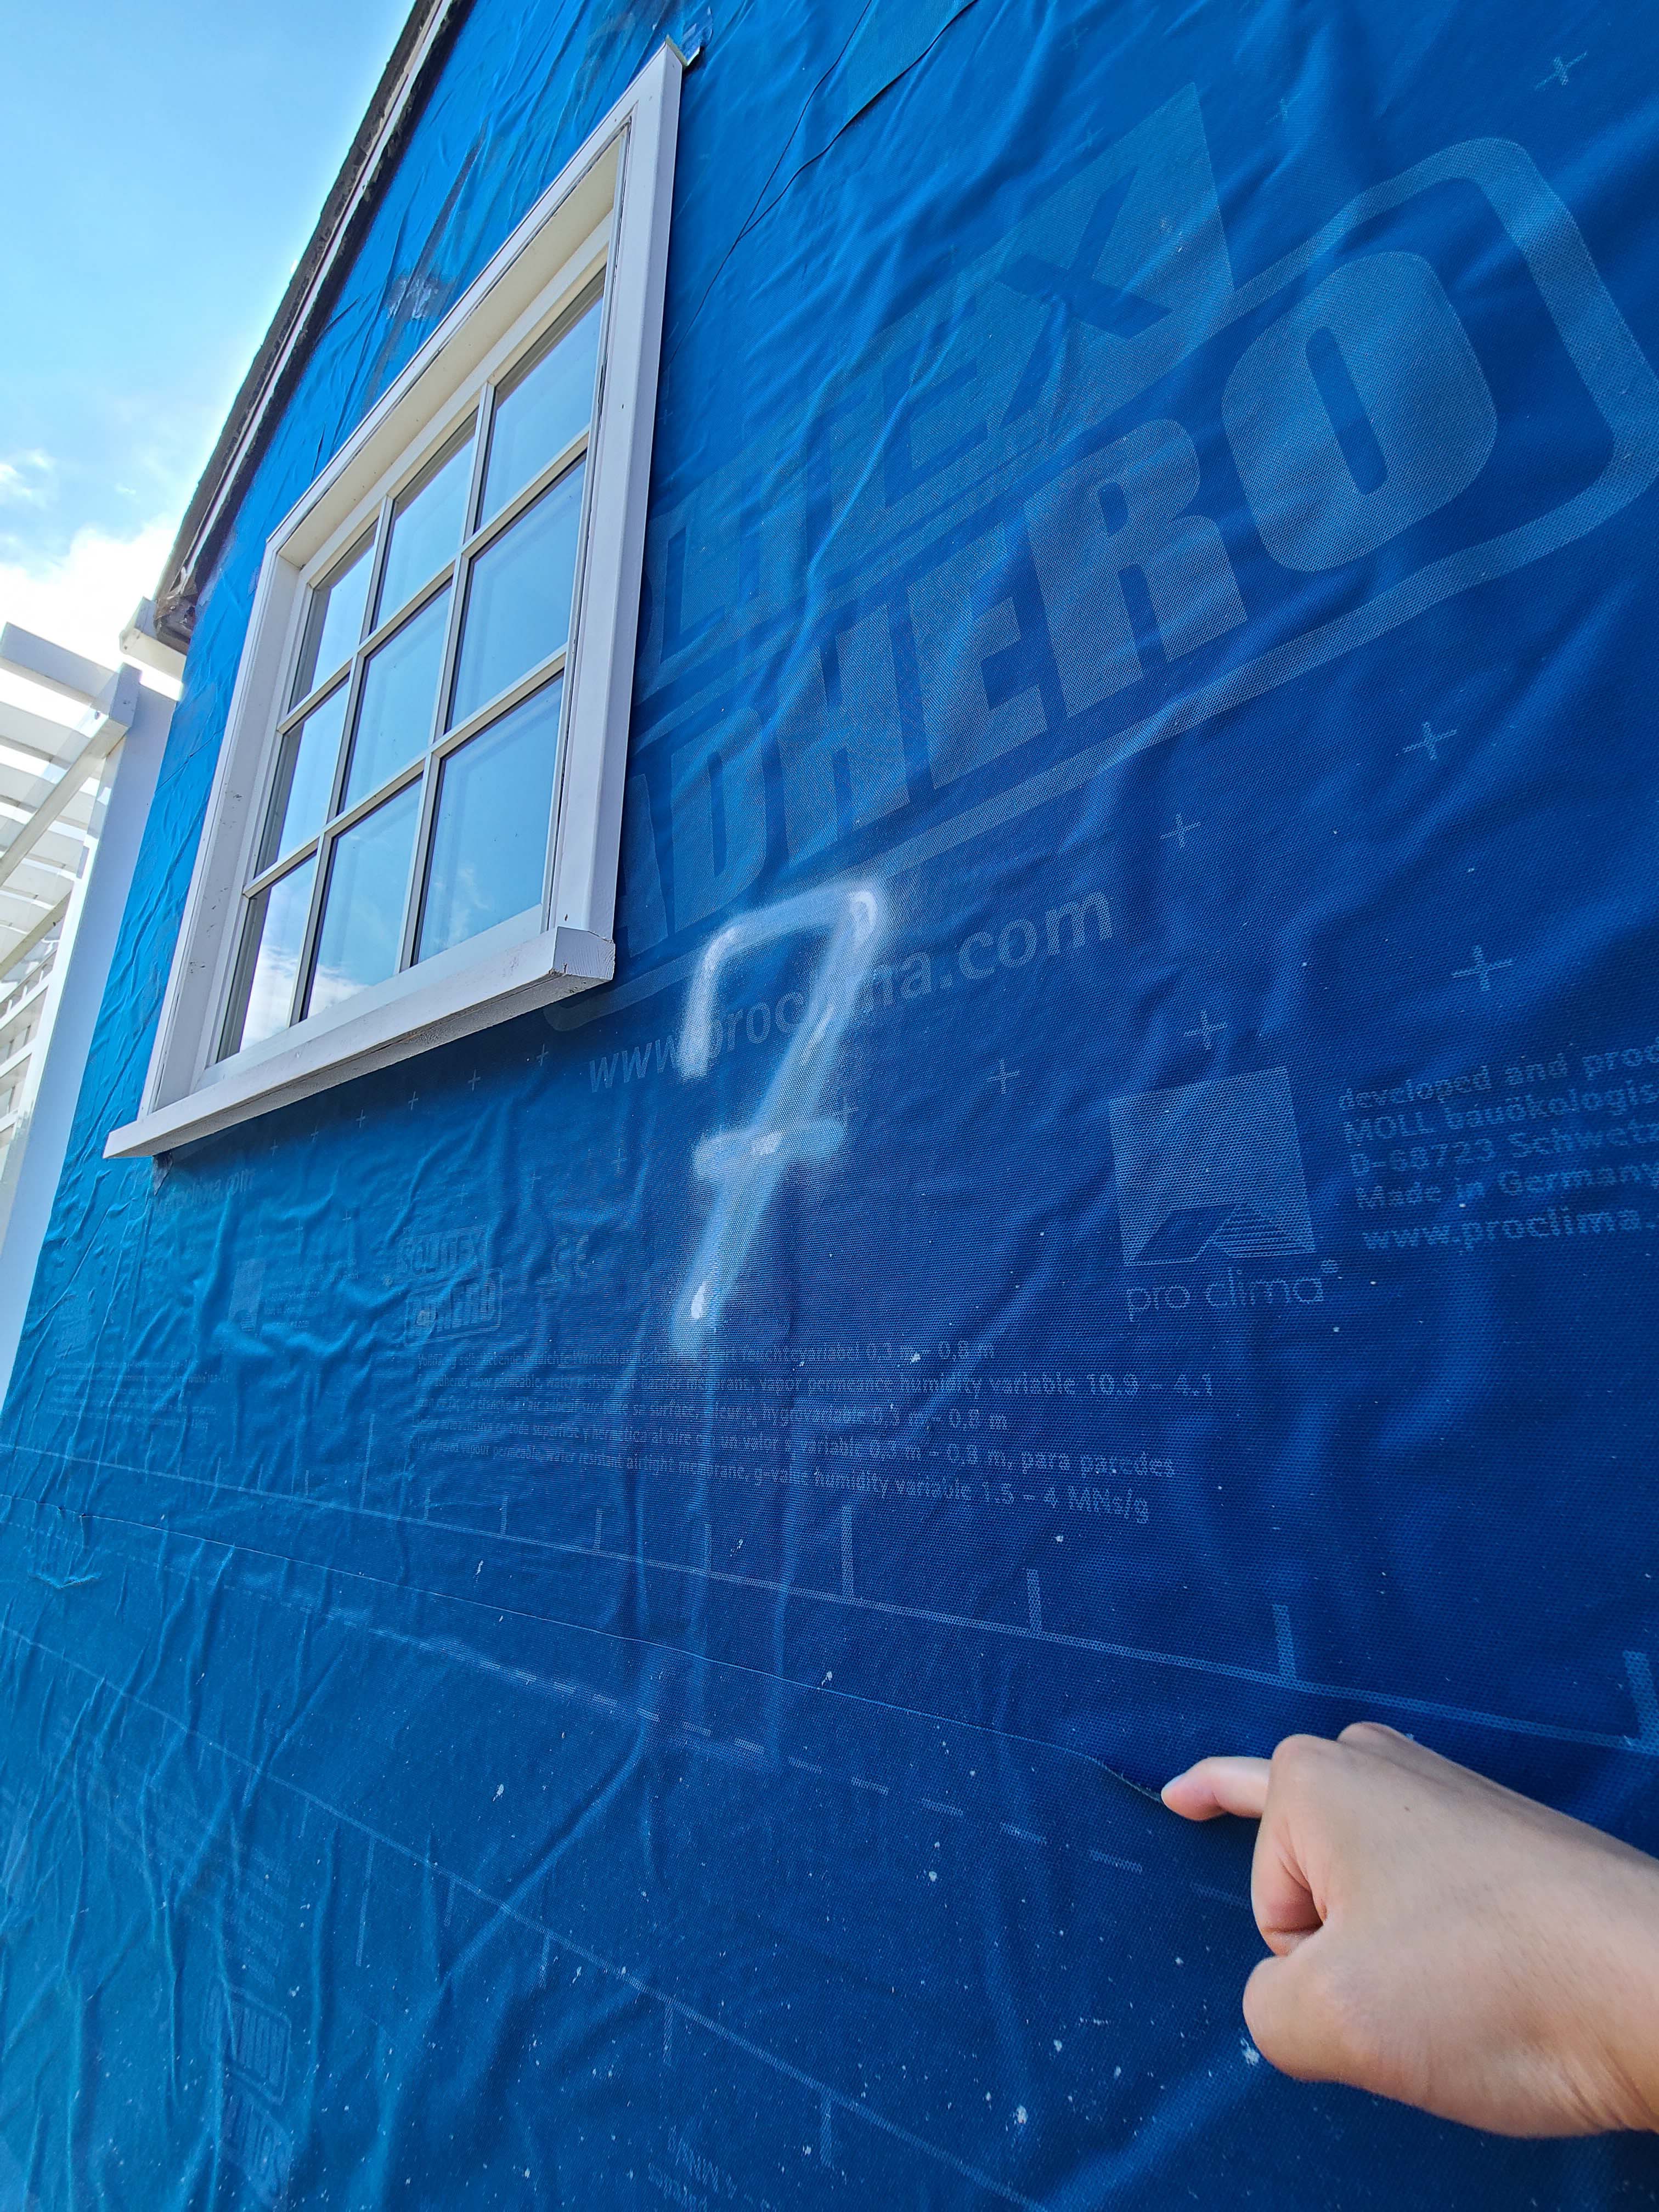
The windows in this building are connected to the fully adhered water and air control layer using fluid-applied flashing
Image
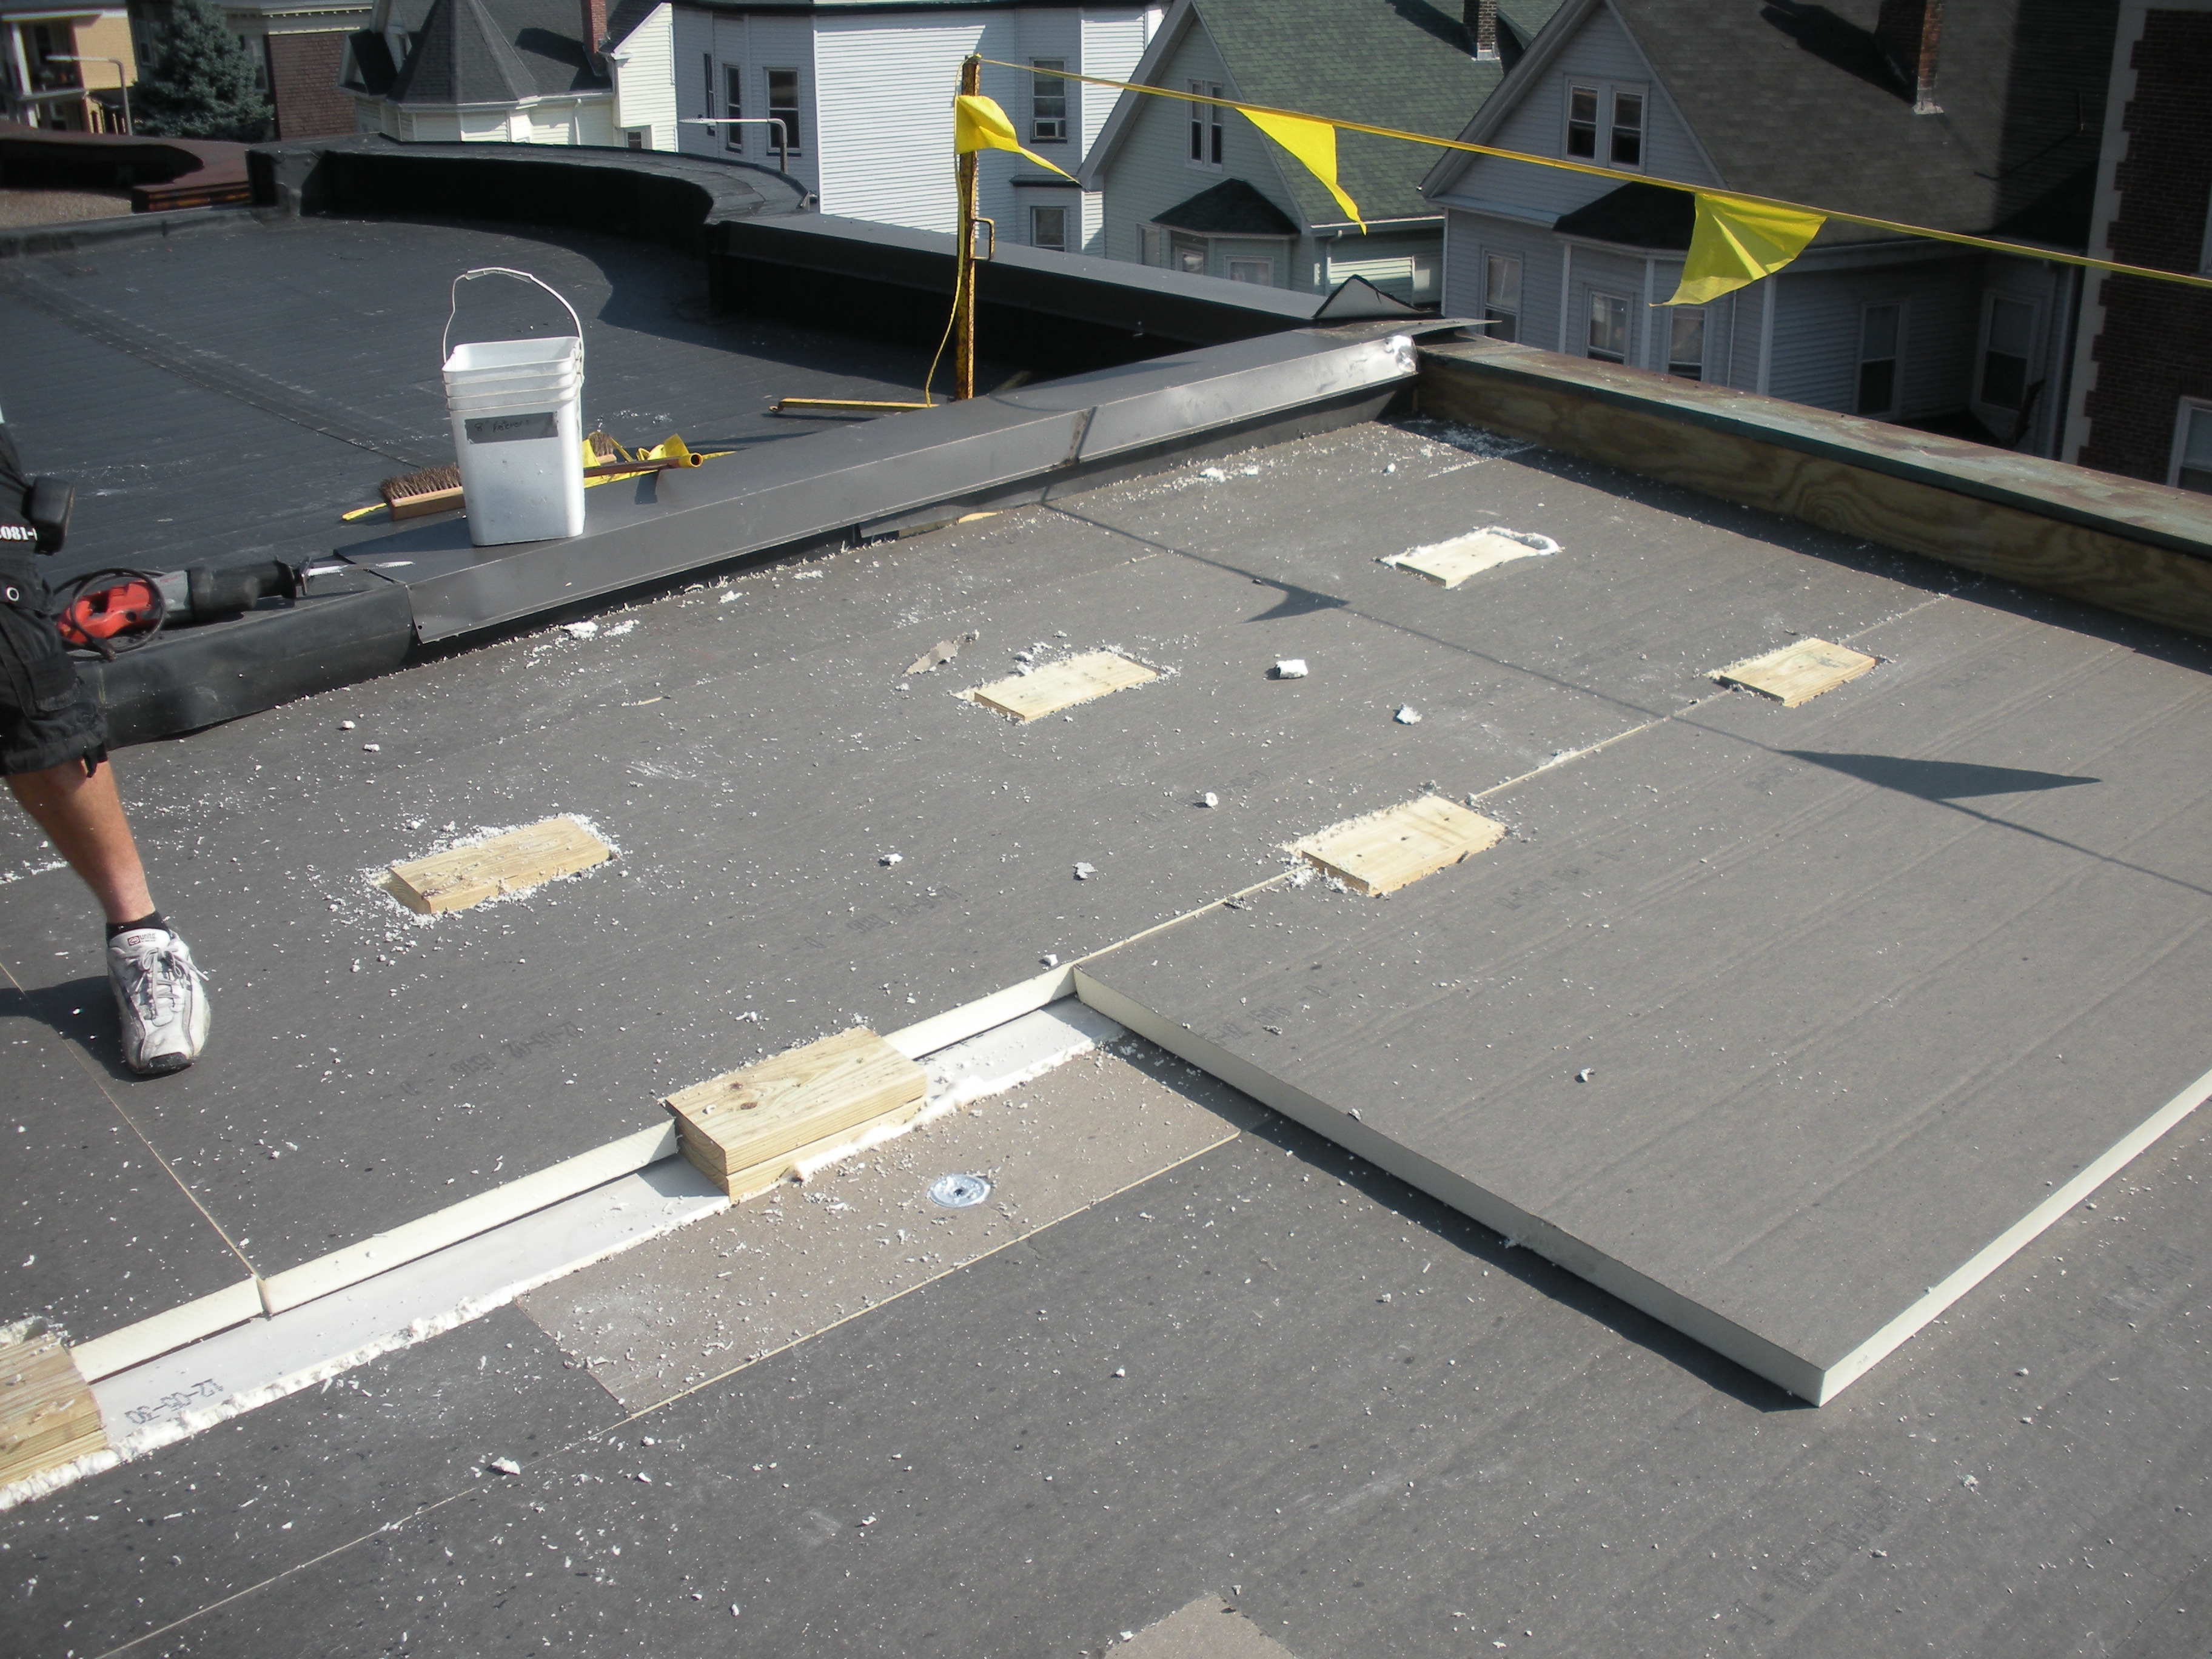
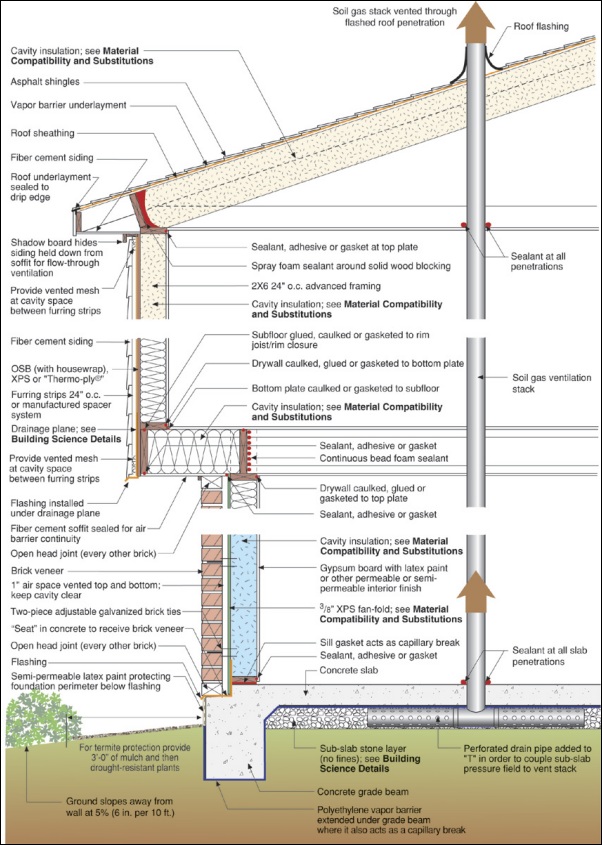
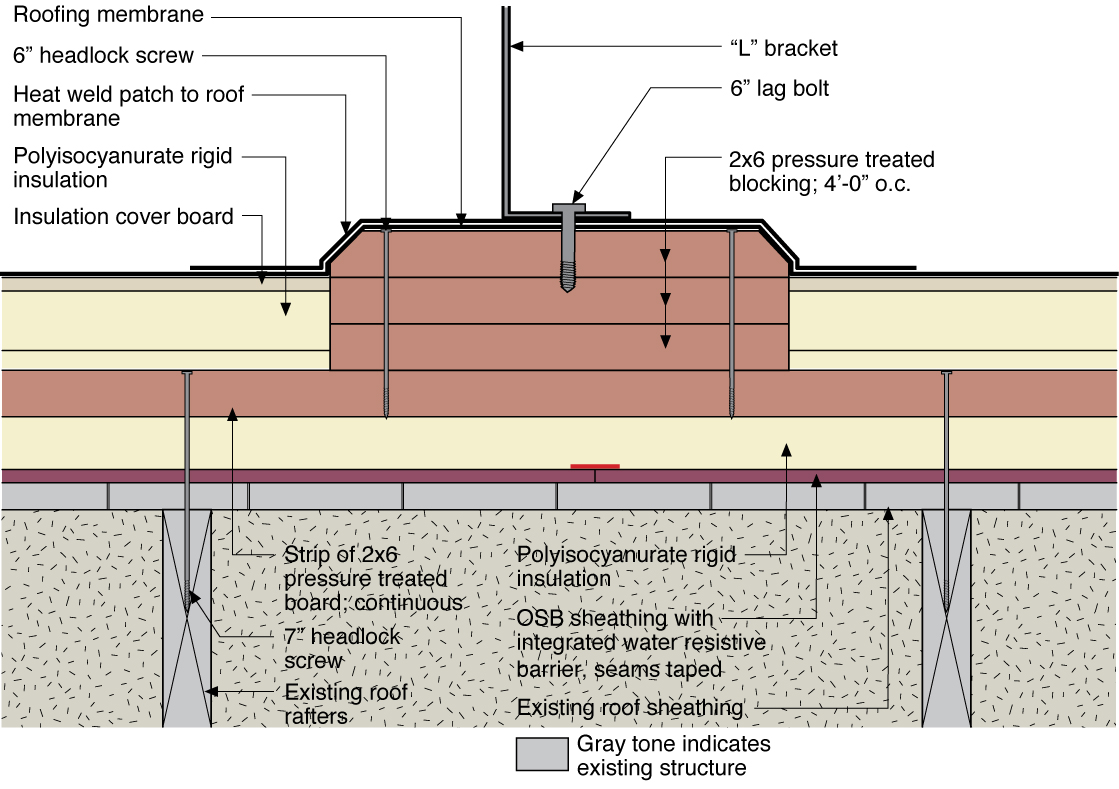
The wood blocking for future PV panel installation extends above the surface of the top layer of polyisocyanurate rigid foam insulation installed as part of a flat roof retrofit
Image

Image
Image
Image
Image
Image
Image

Image
Image
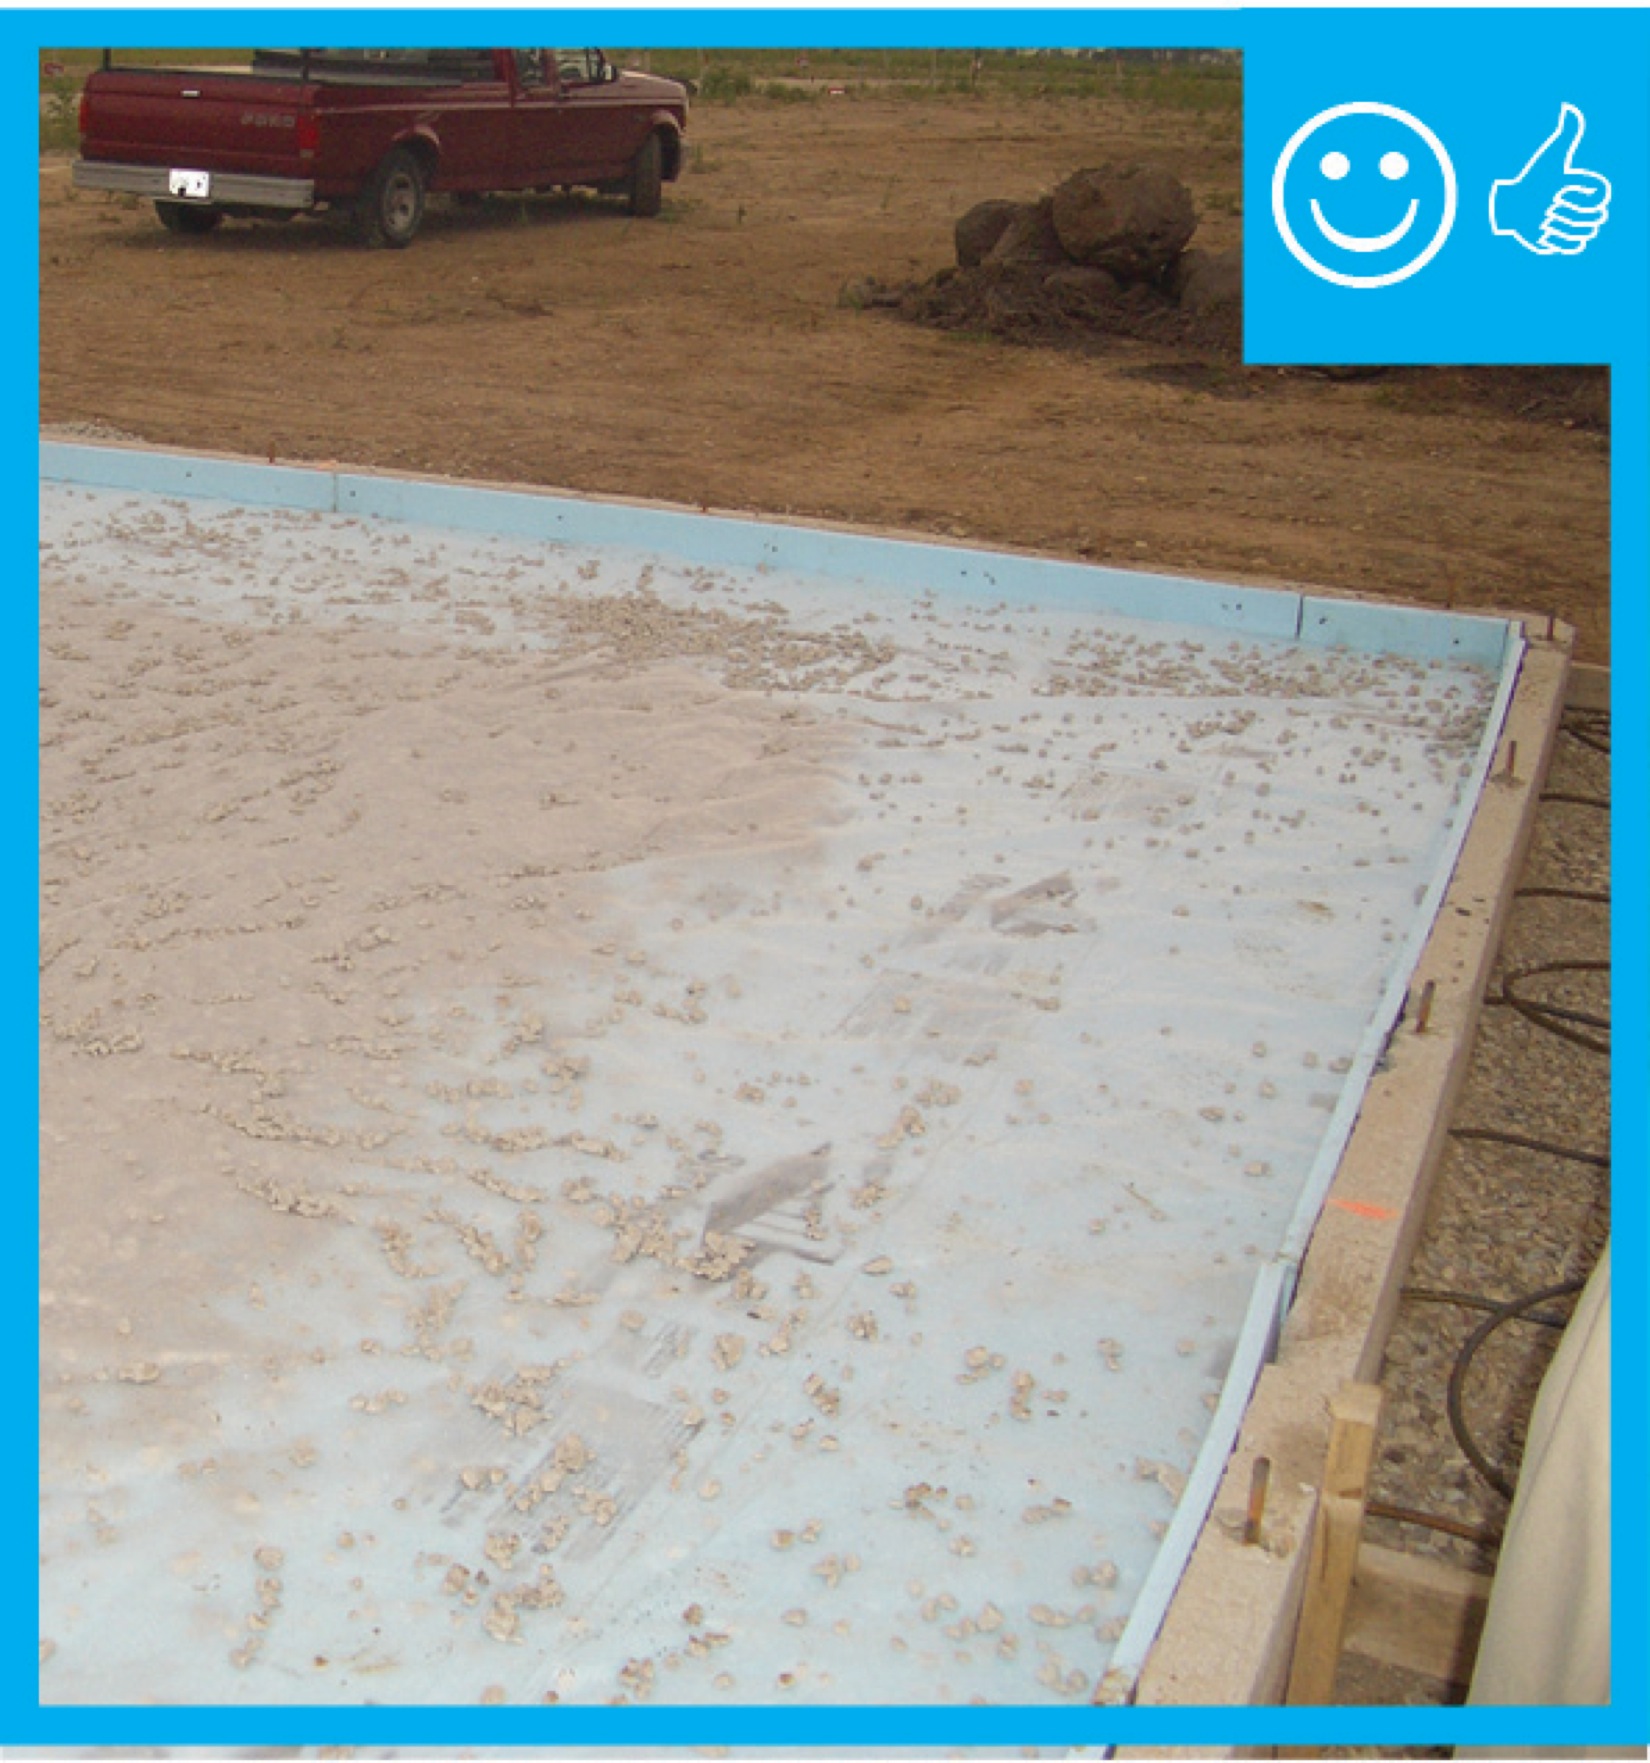
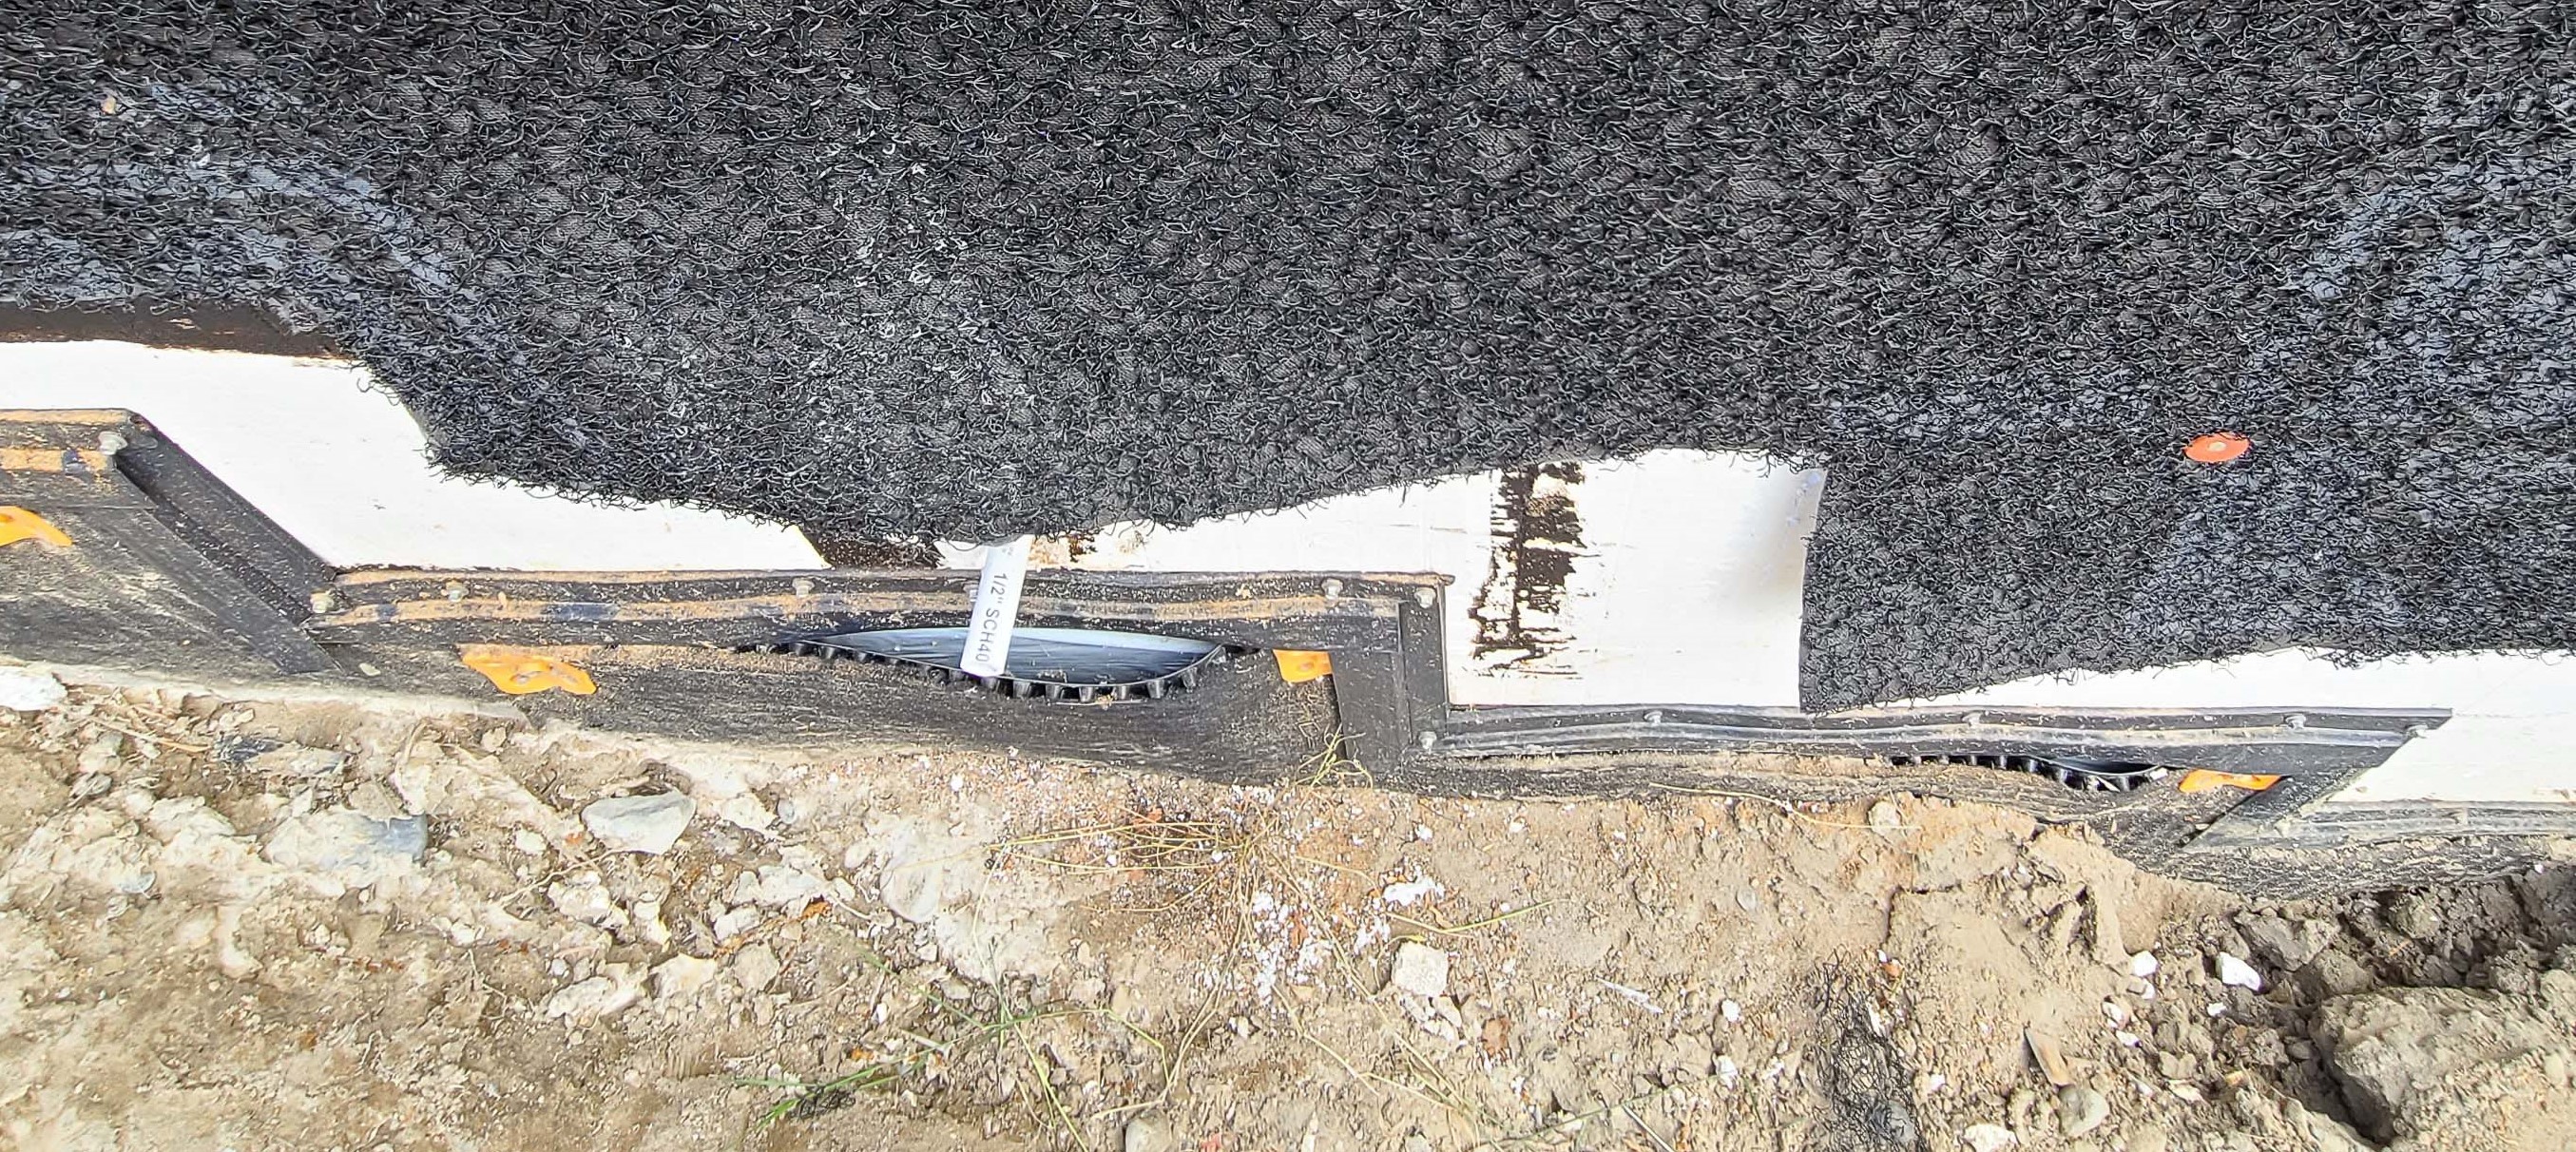
There is polyethylene sheeting installed to provide a capillary break between the ground and slab
Image
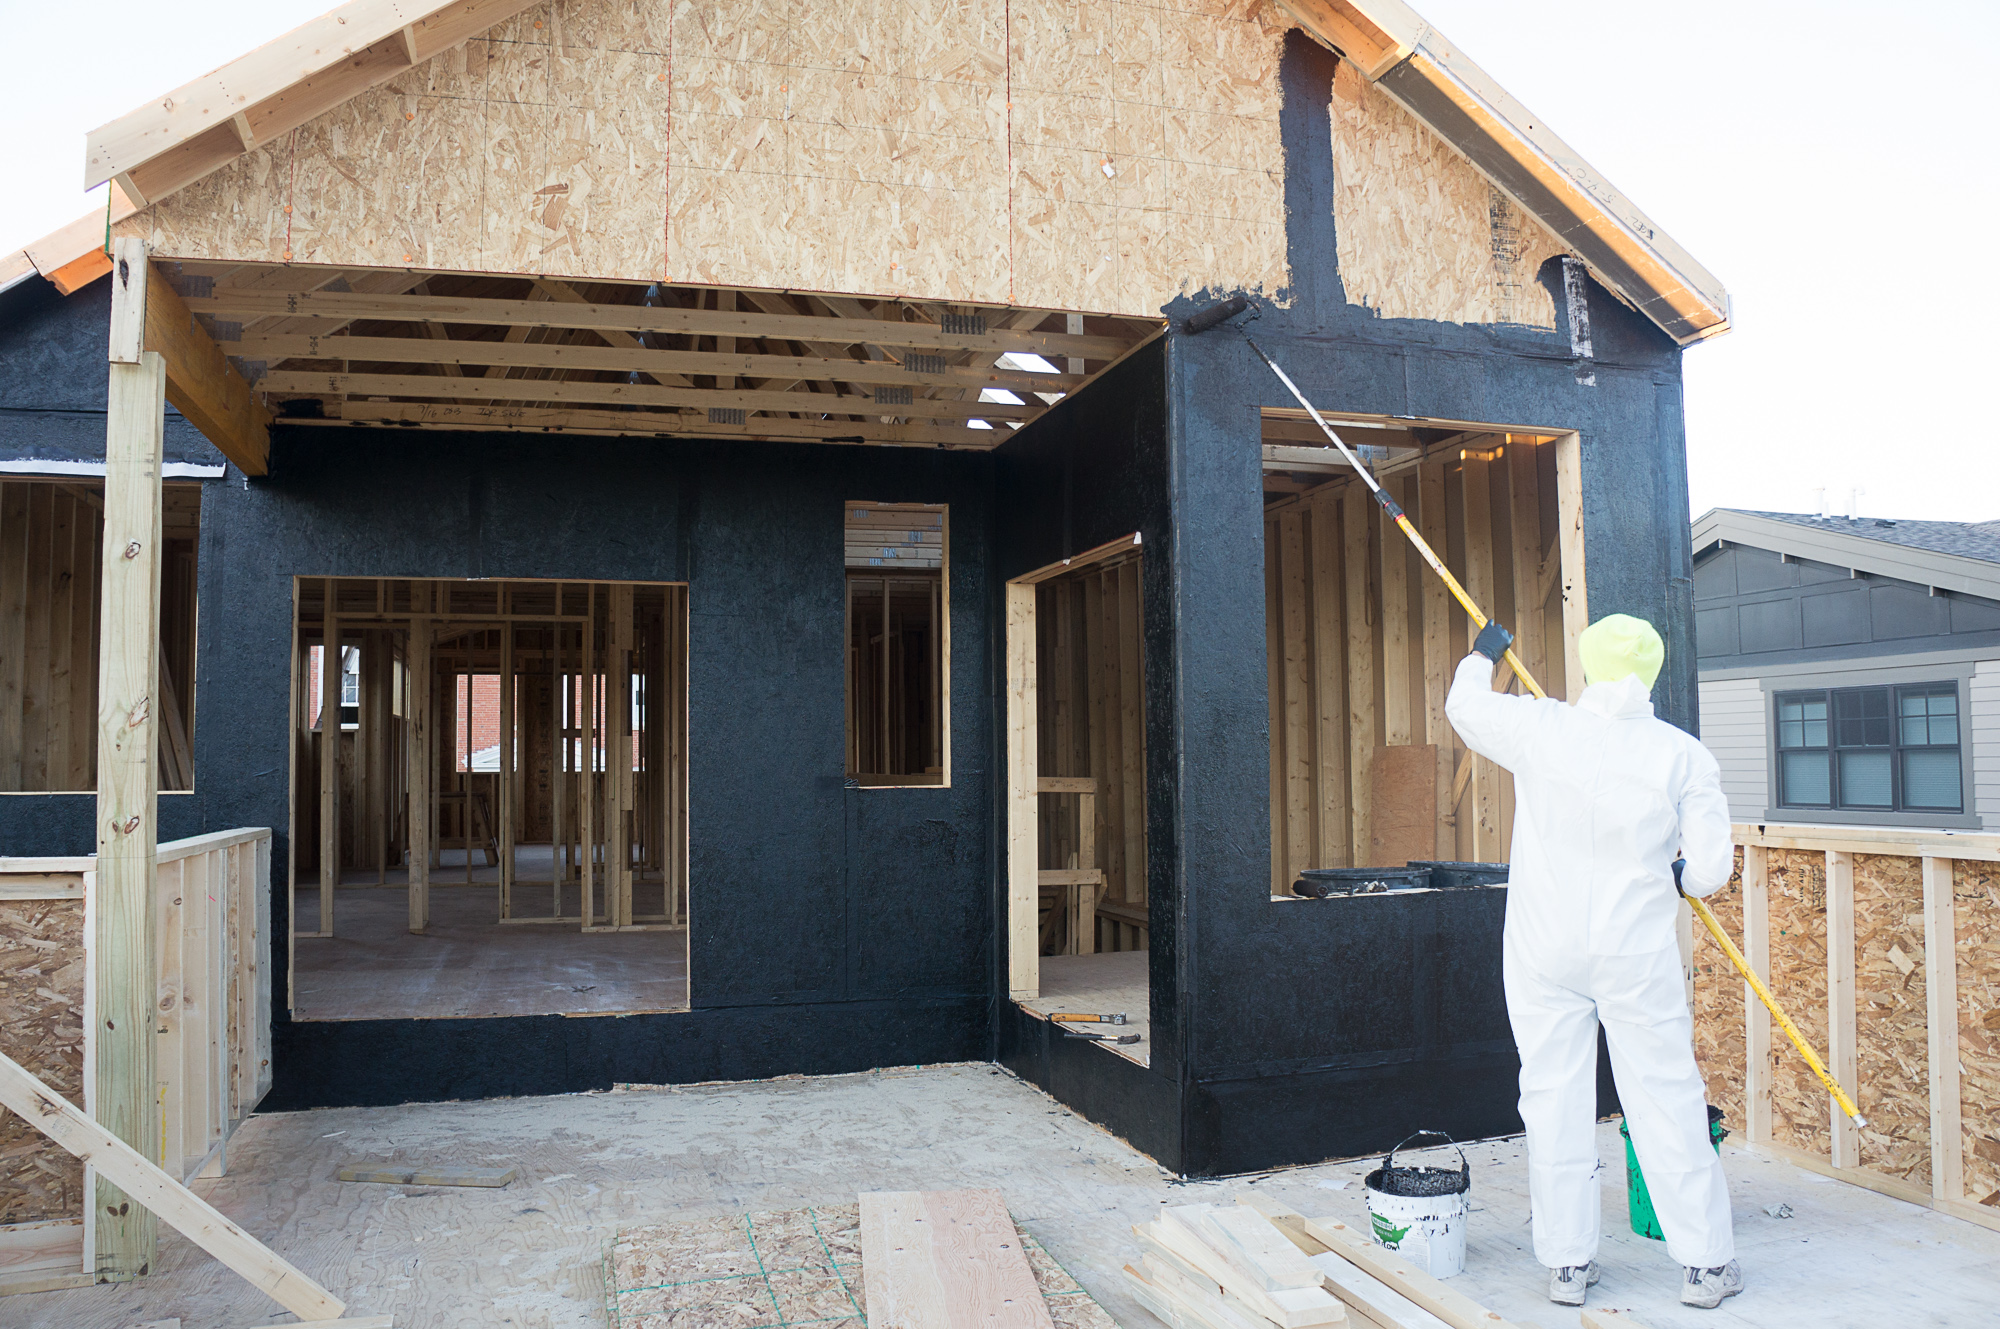
This asphalt-based, vapor-permeable coating is painted directly onto the OSB sheathing to provide a weather-resistant barrier that also reduces air leakage.
Image

This builder employs good water runoff managementpractices to control sediment during construction and to ensure that stormwater drains away from the house after construction.
Image
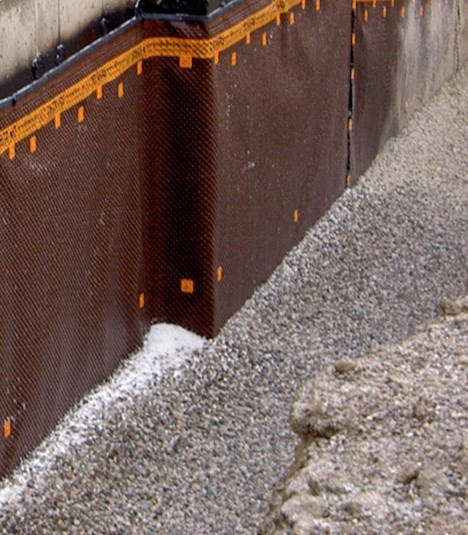
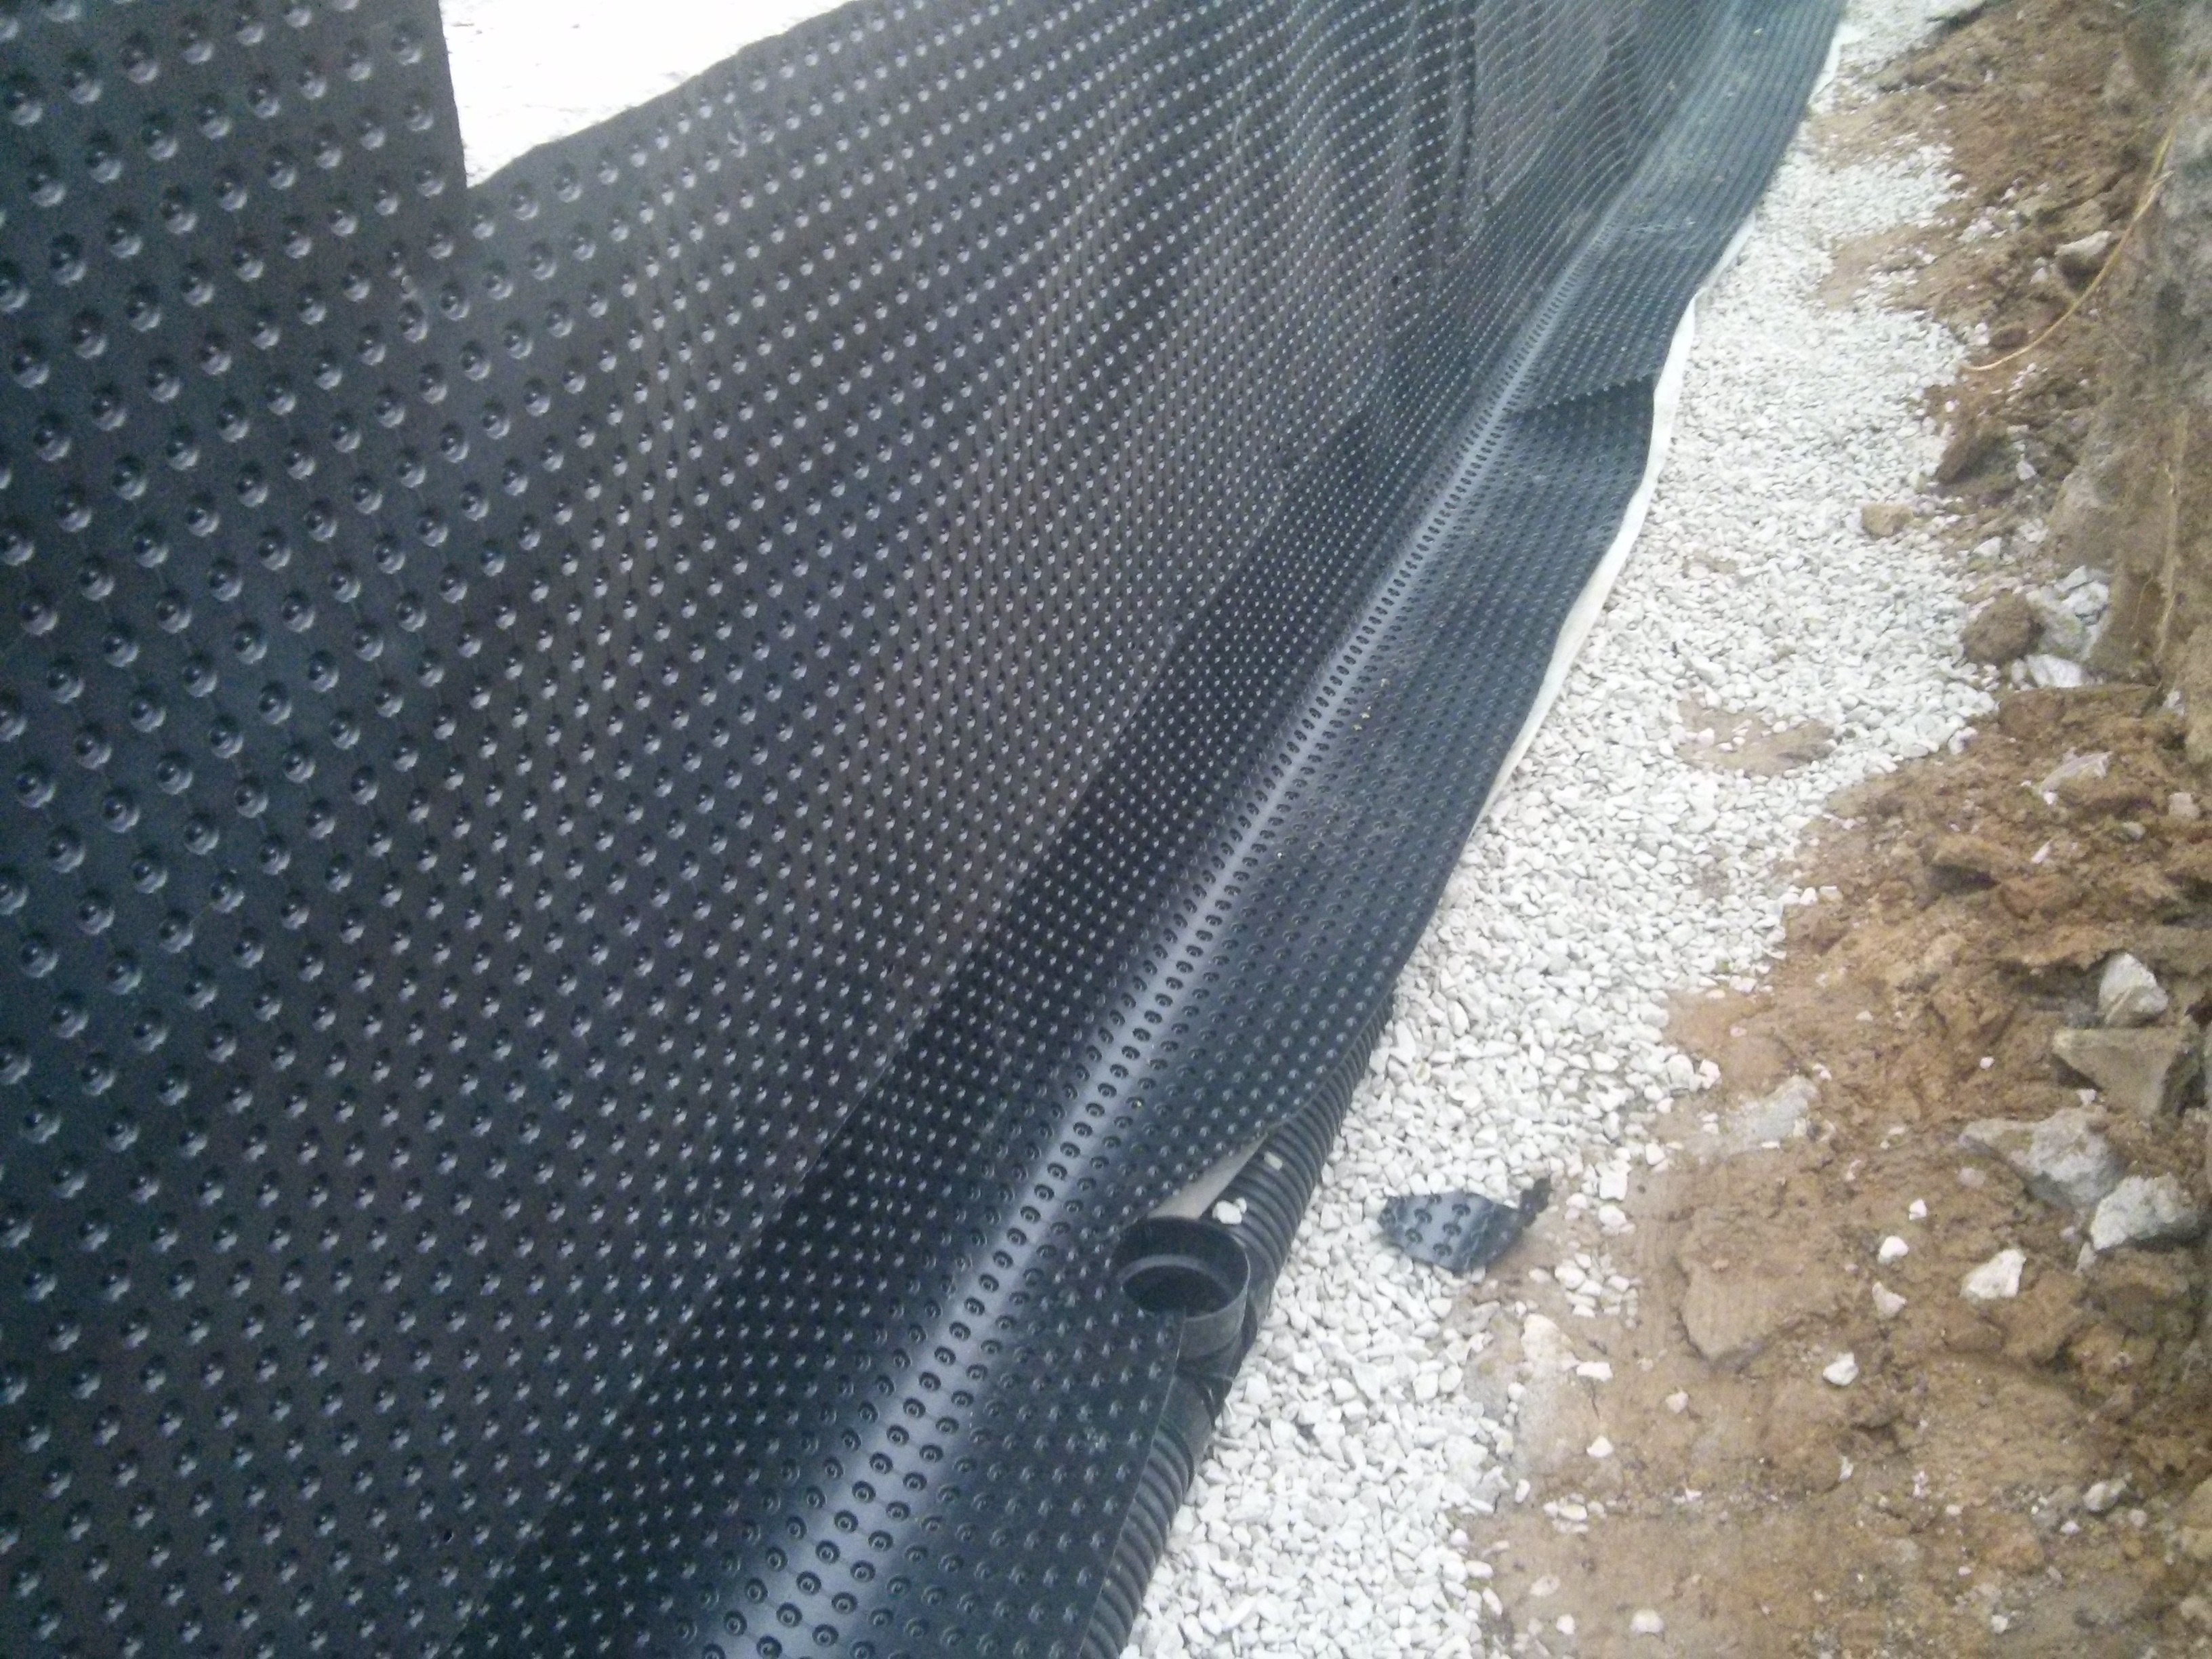
This building foundation has a drainage layer located on the exterior of the waterproofing membrane.
Image
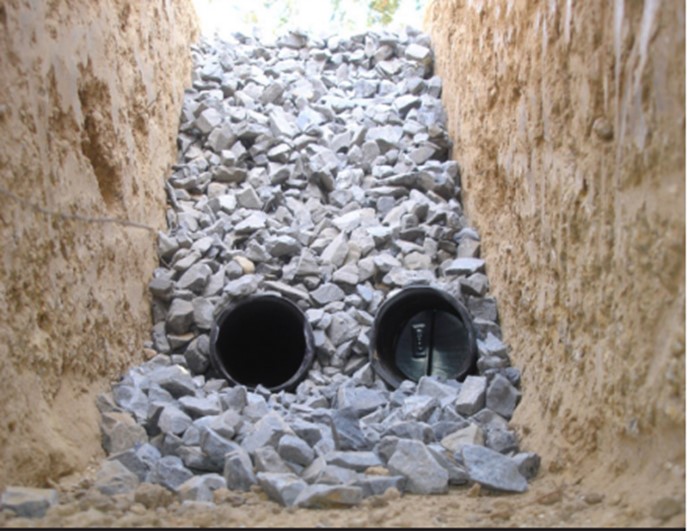
This double French drain provides drainage for a significant volume of storm water.
Image
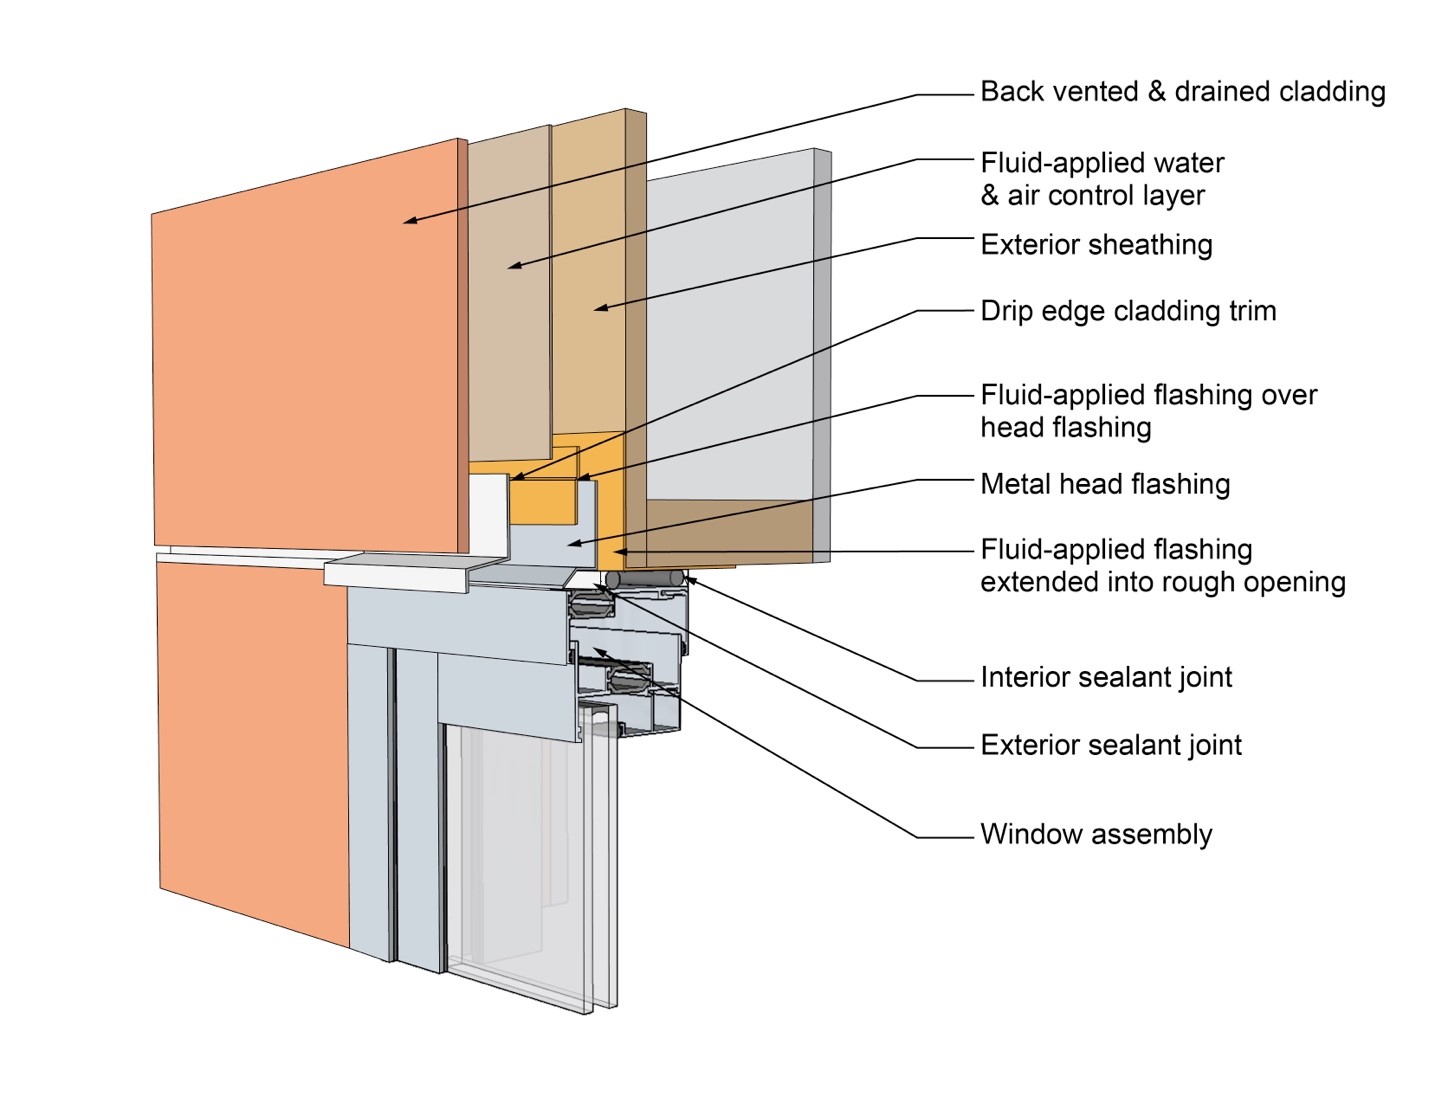
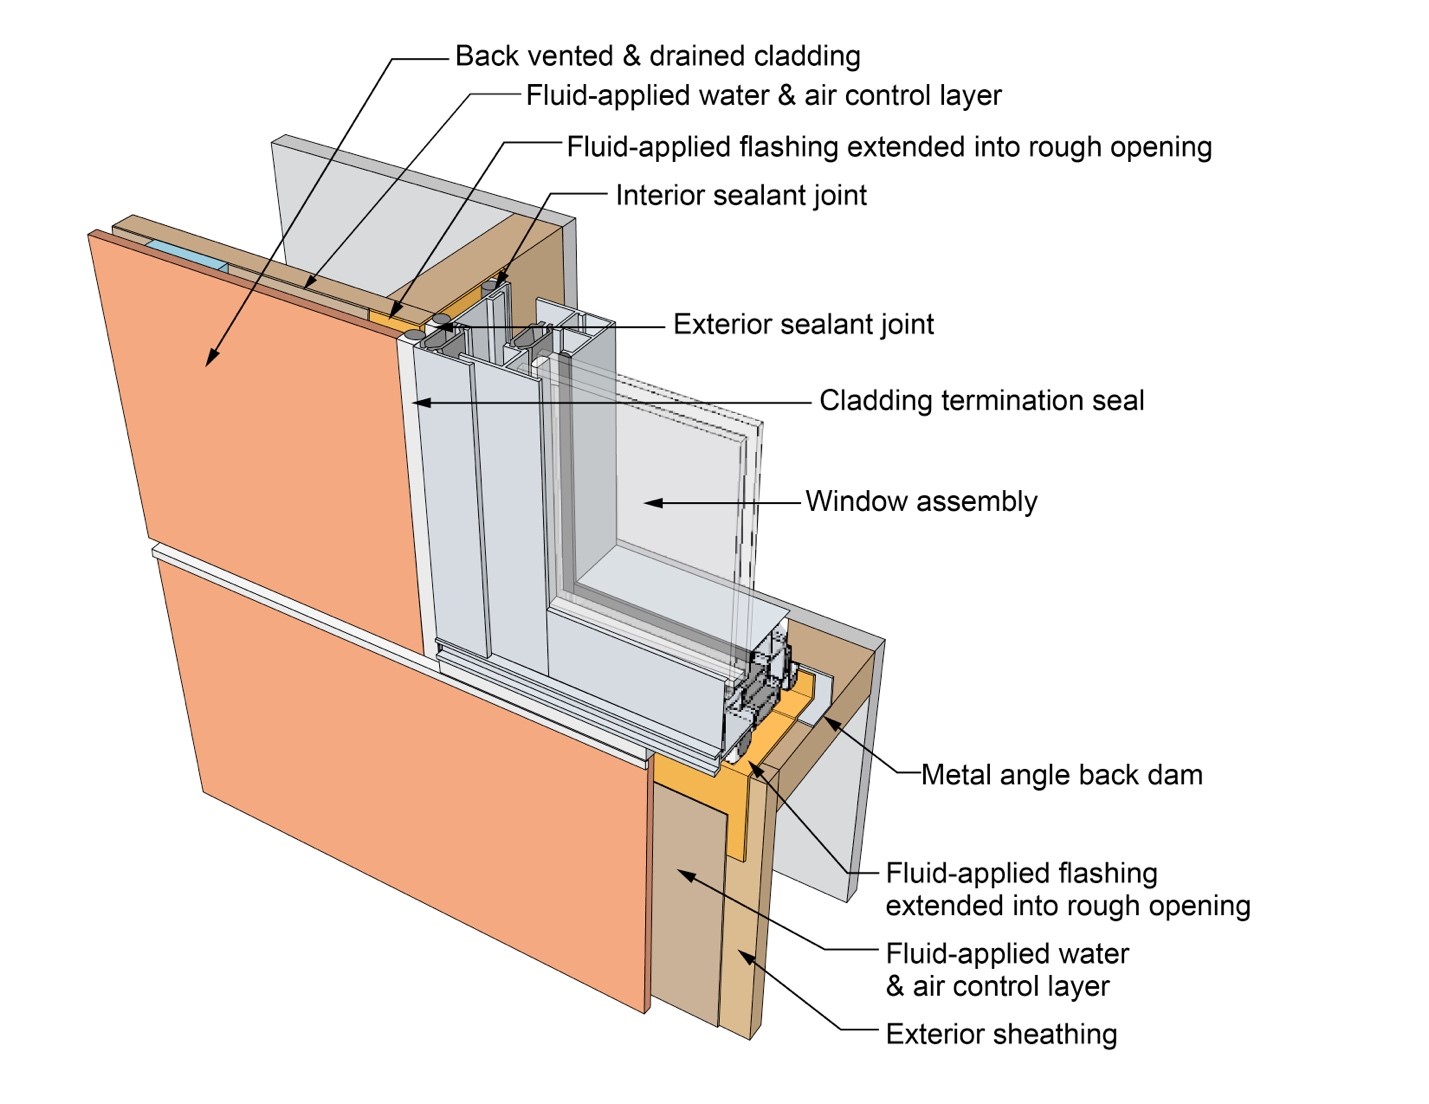
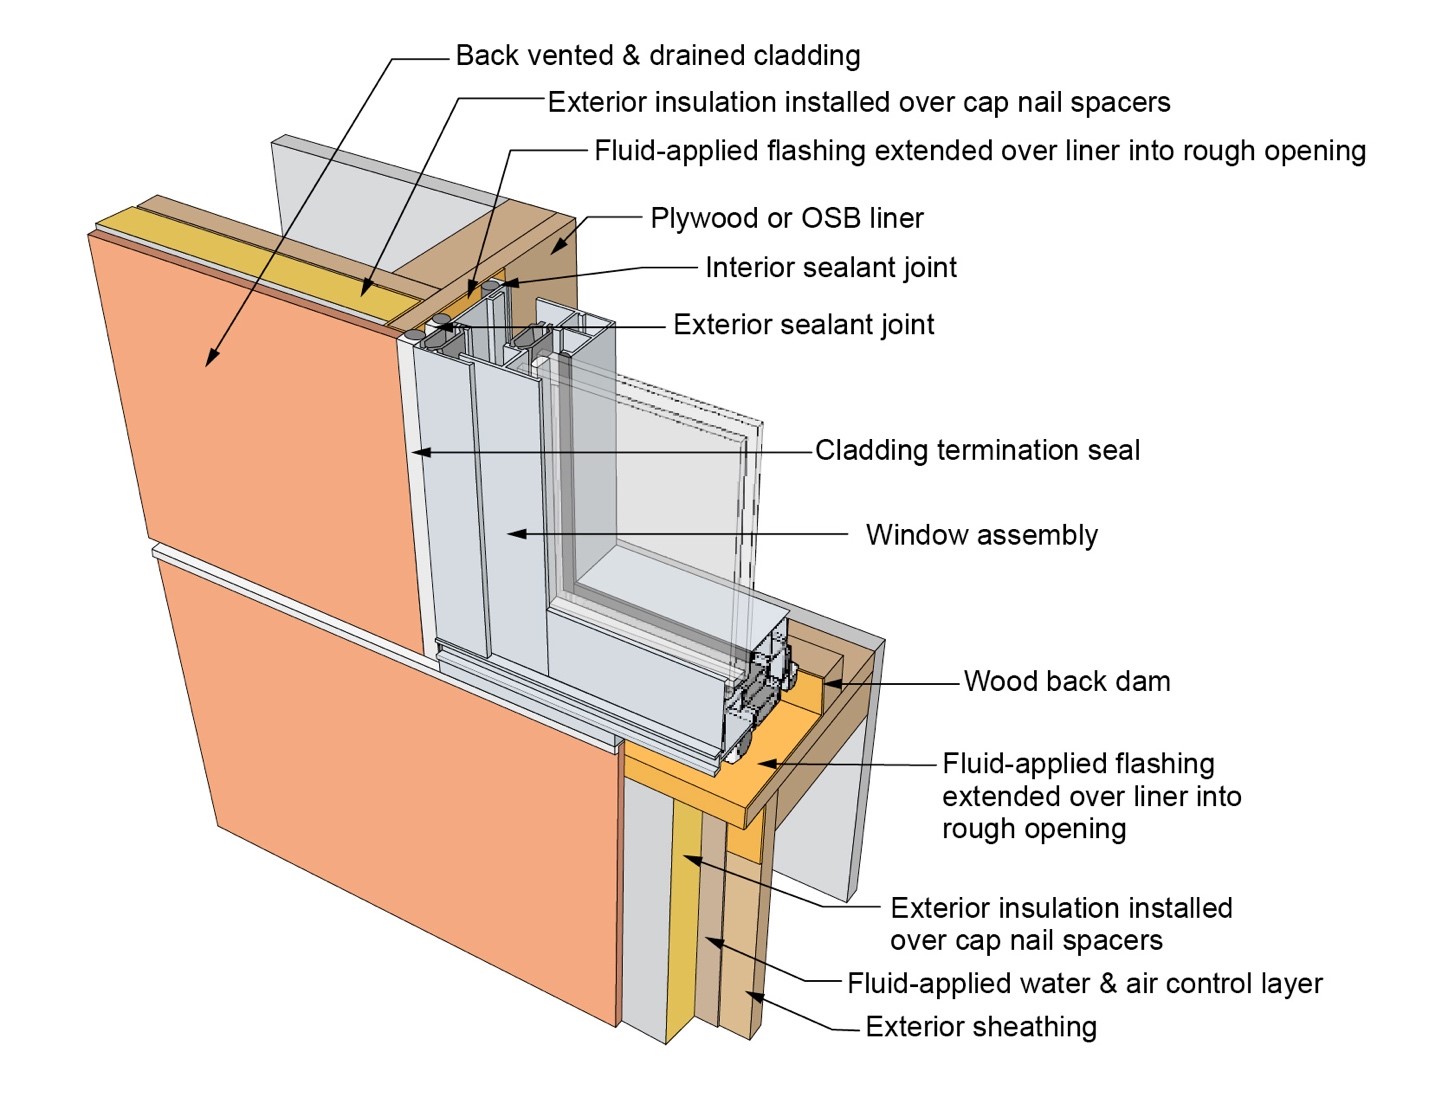
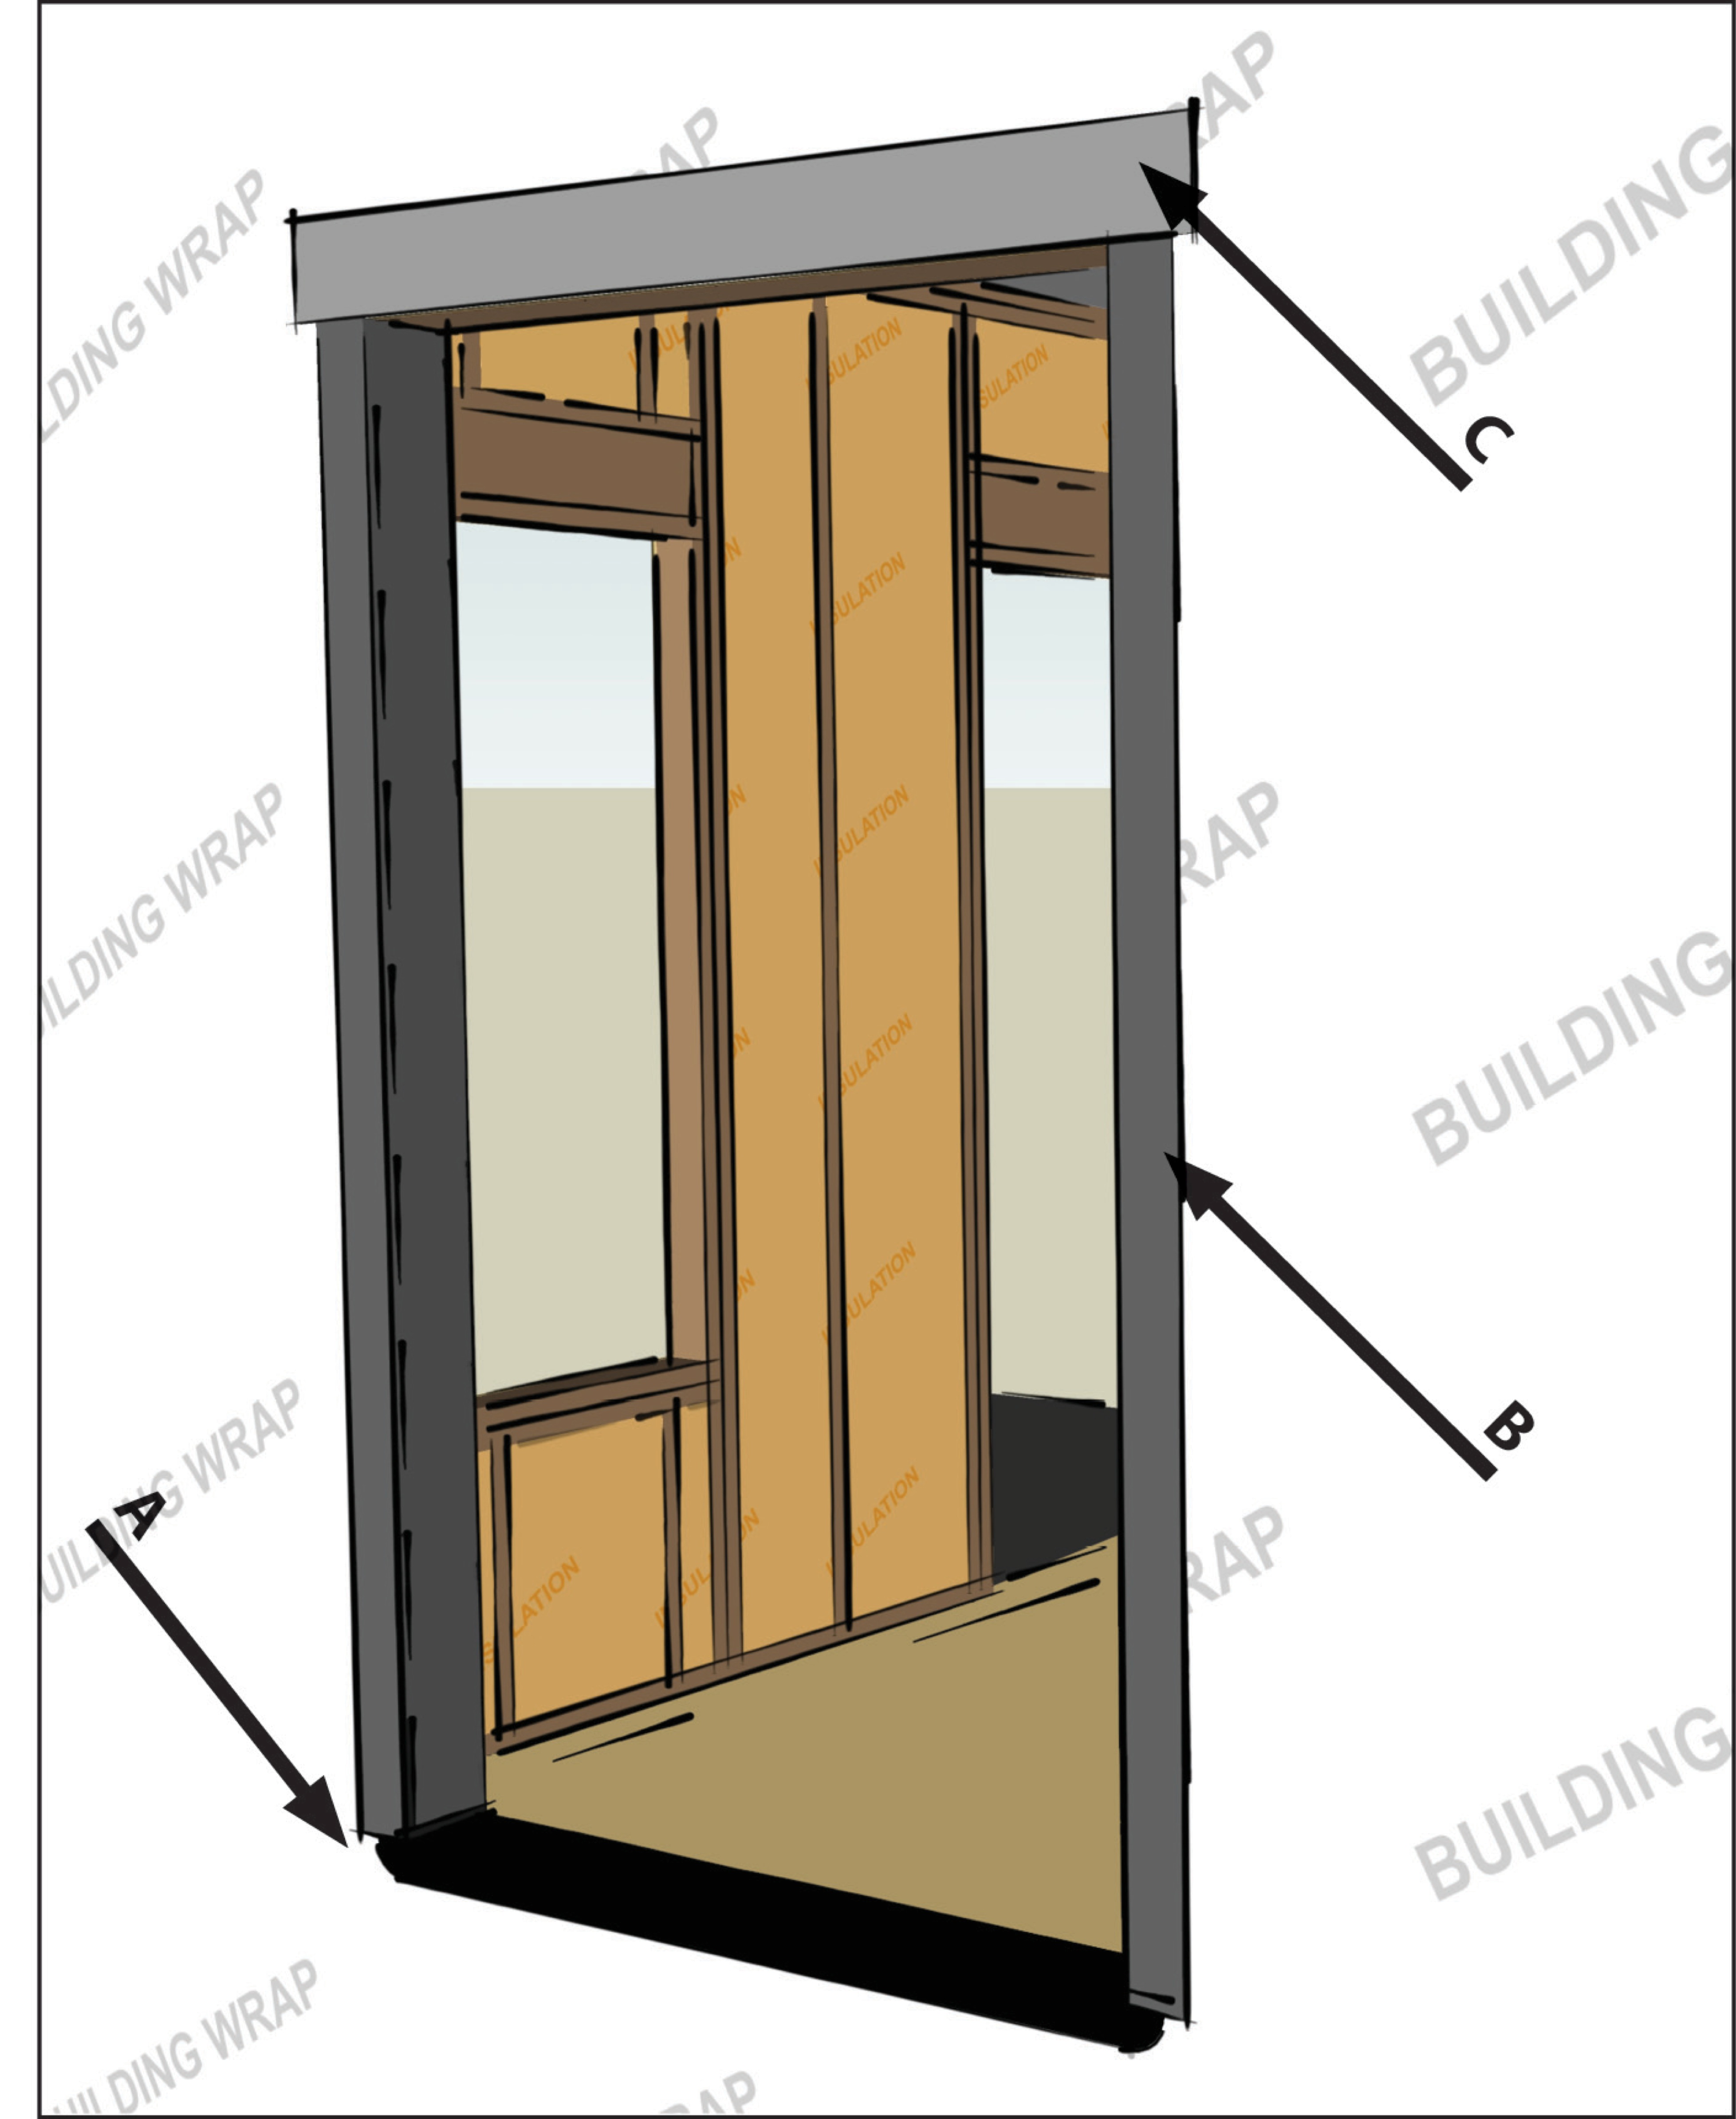
This drawing shows key head details for a window installation using a fluid-applied flashing on a wall with a fluid-applied water and air control layer
Image
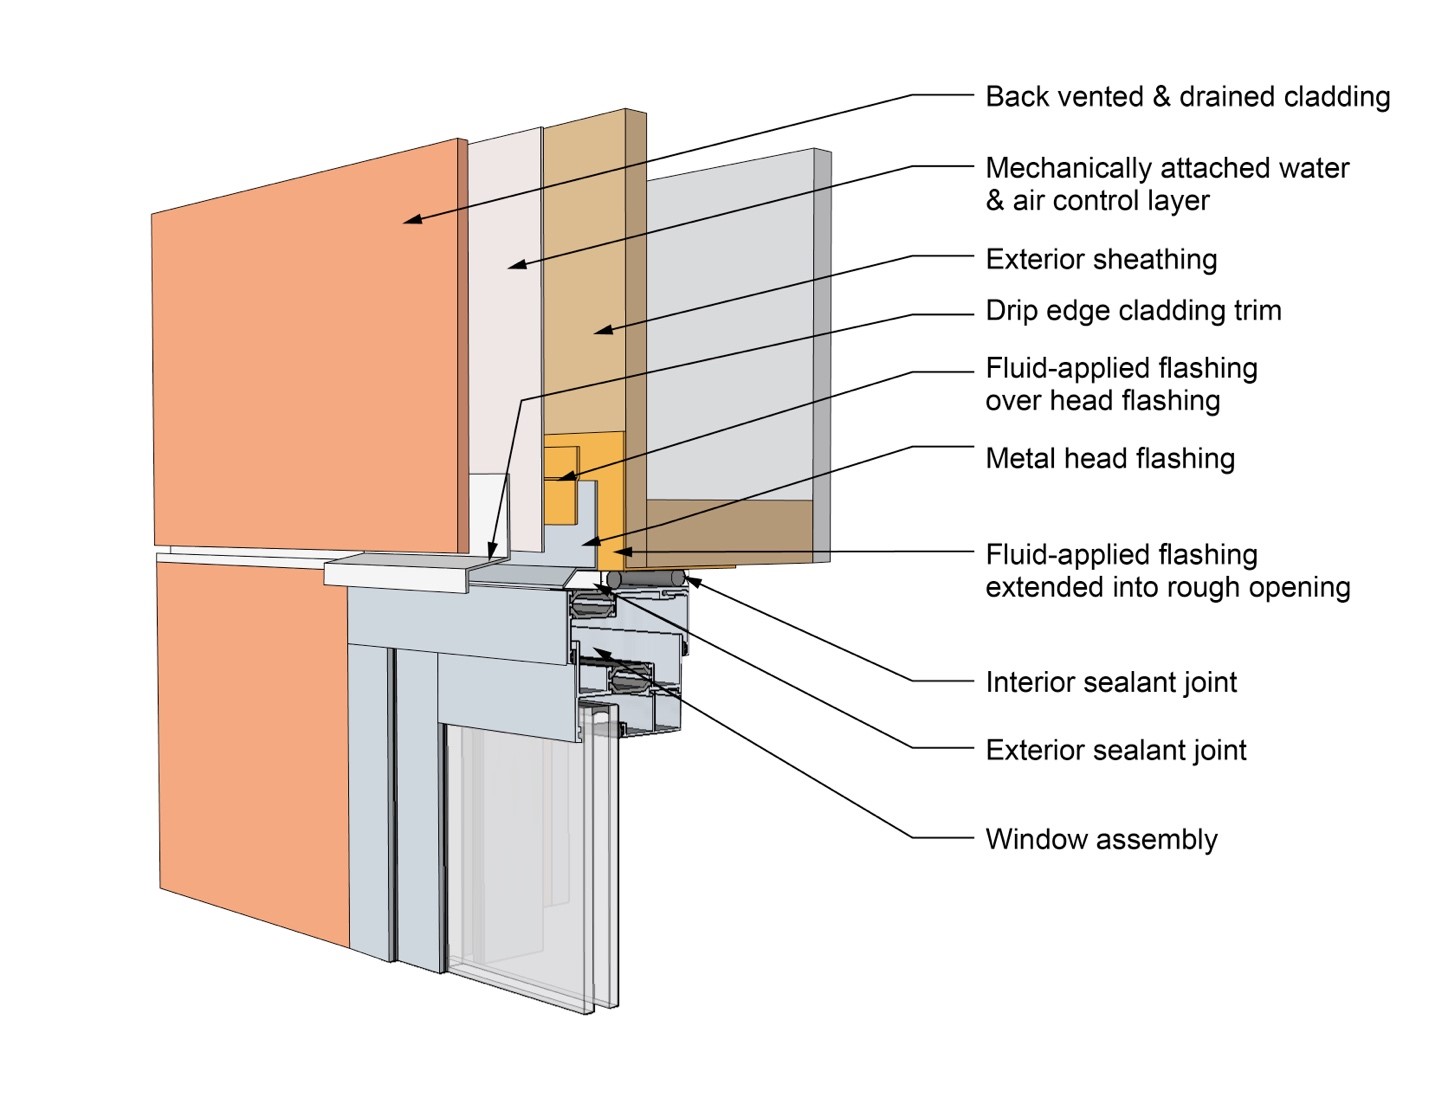
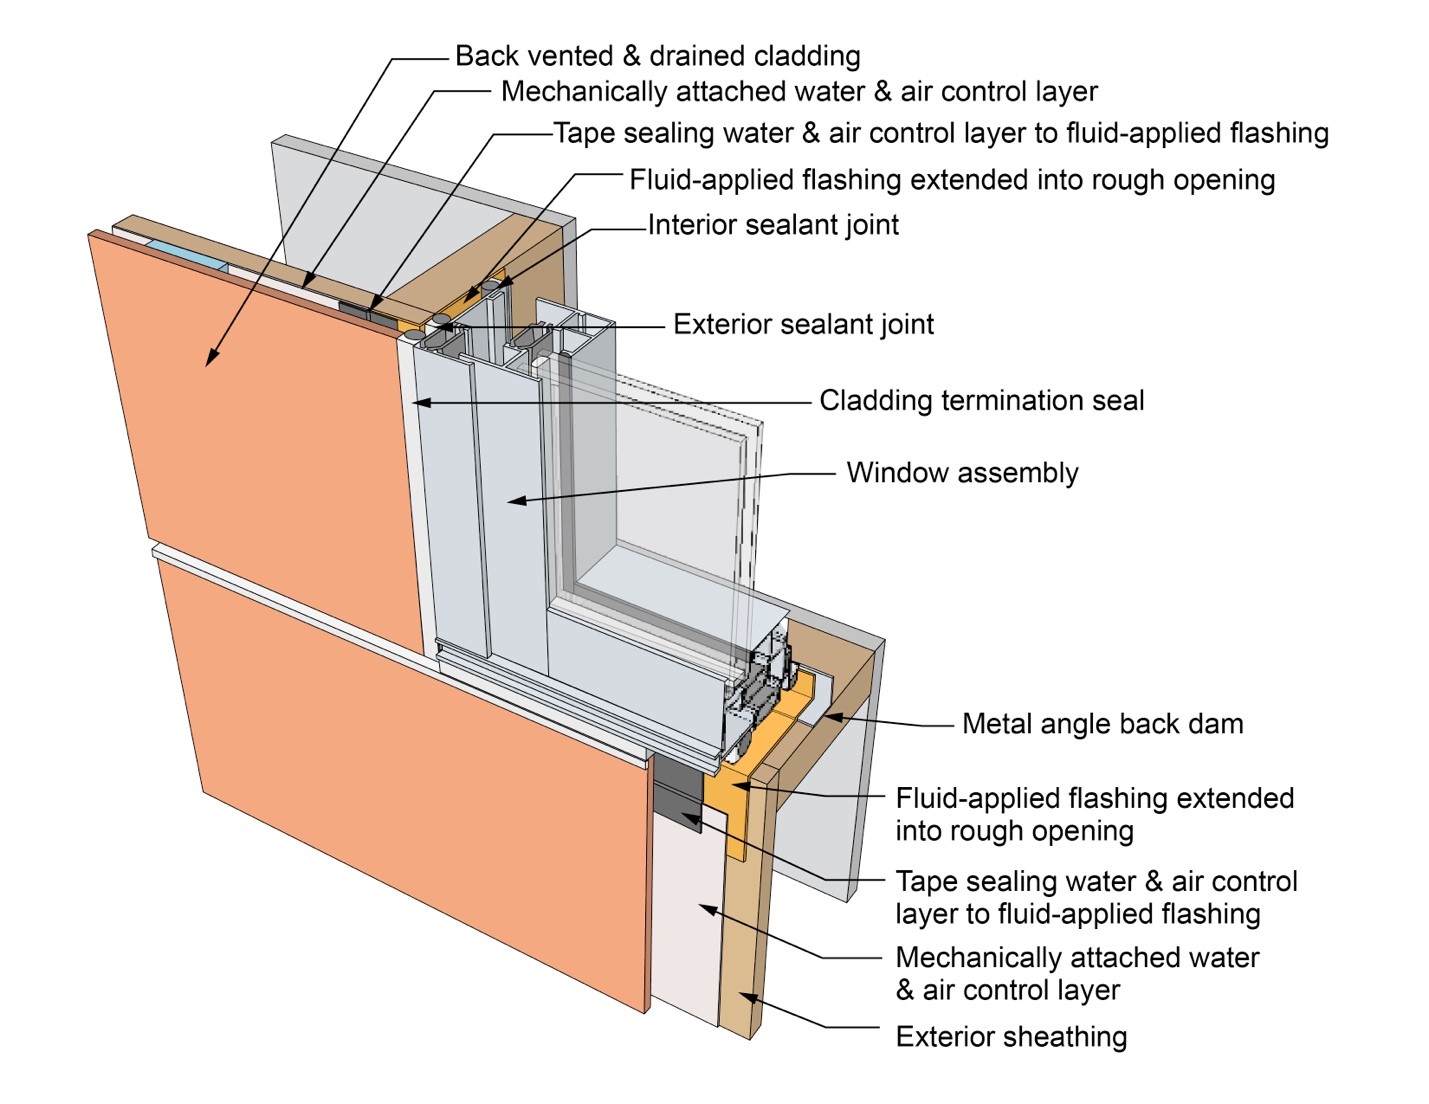
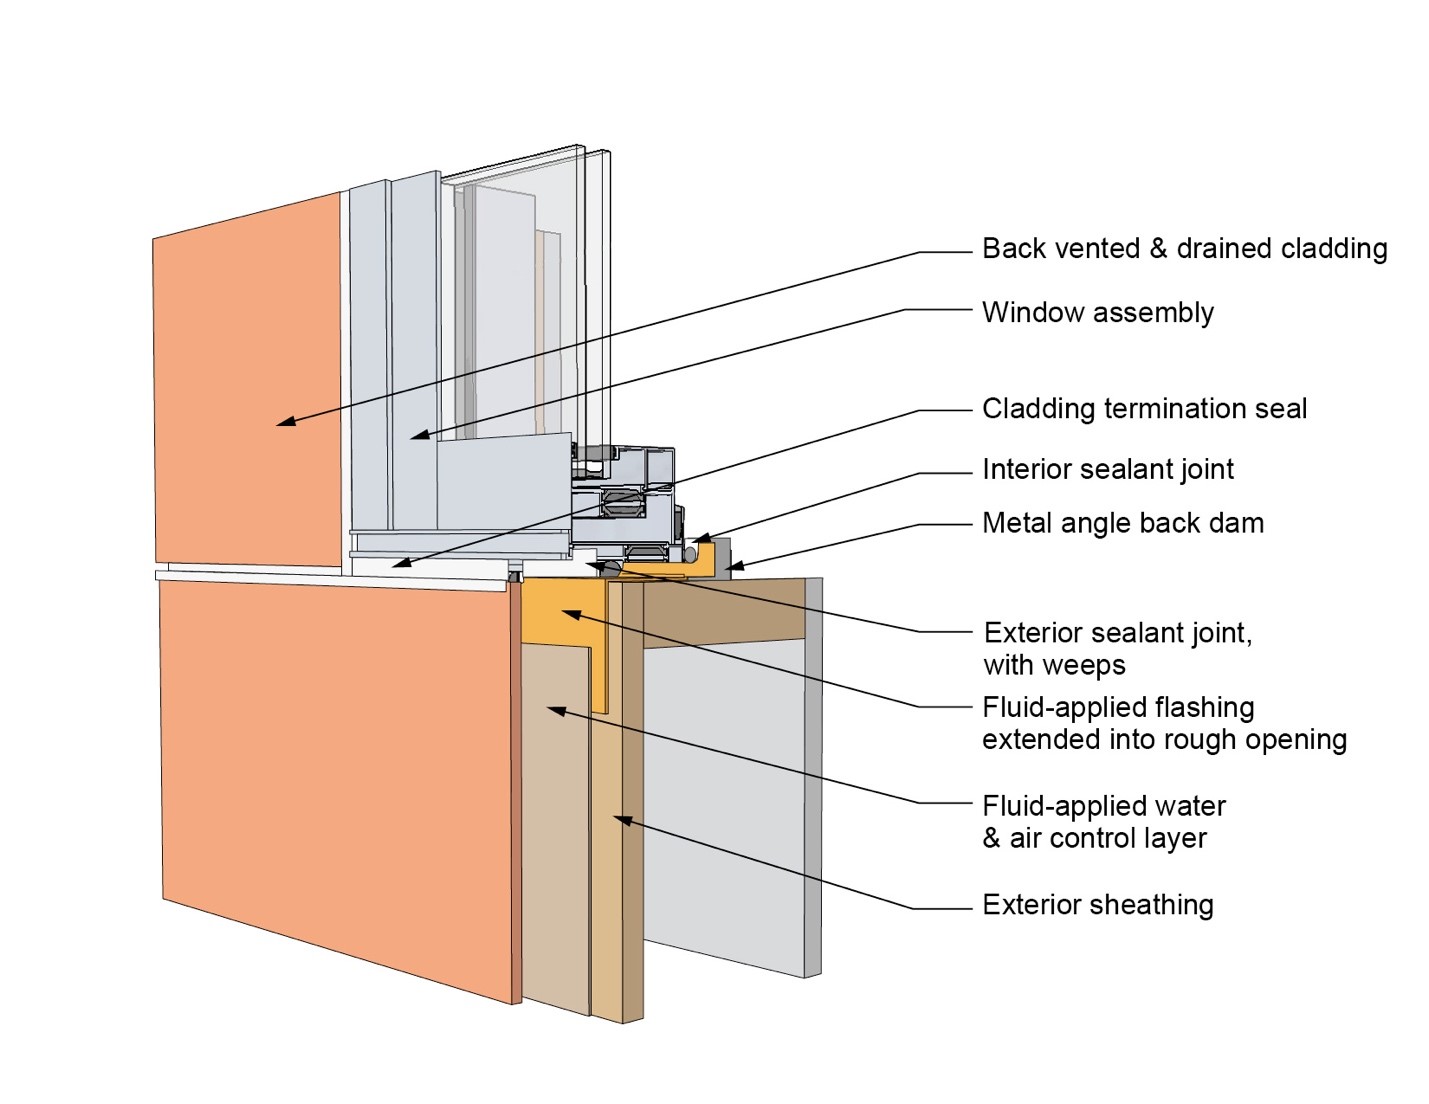
This drawing shows key head details for a window installation using a fluid-applied flashing on a wall with a mechanically attached water and air control layer
Image
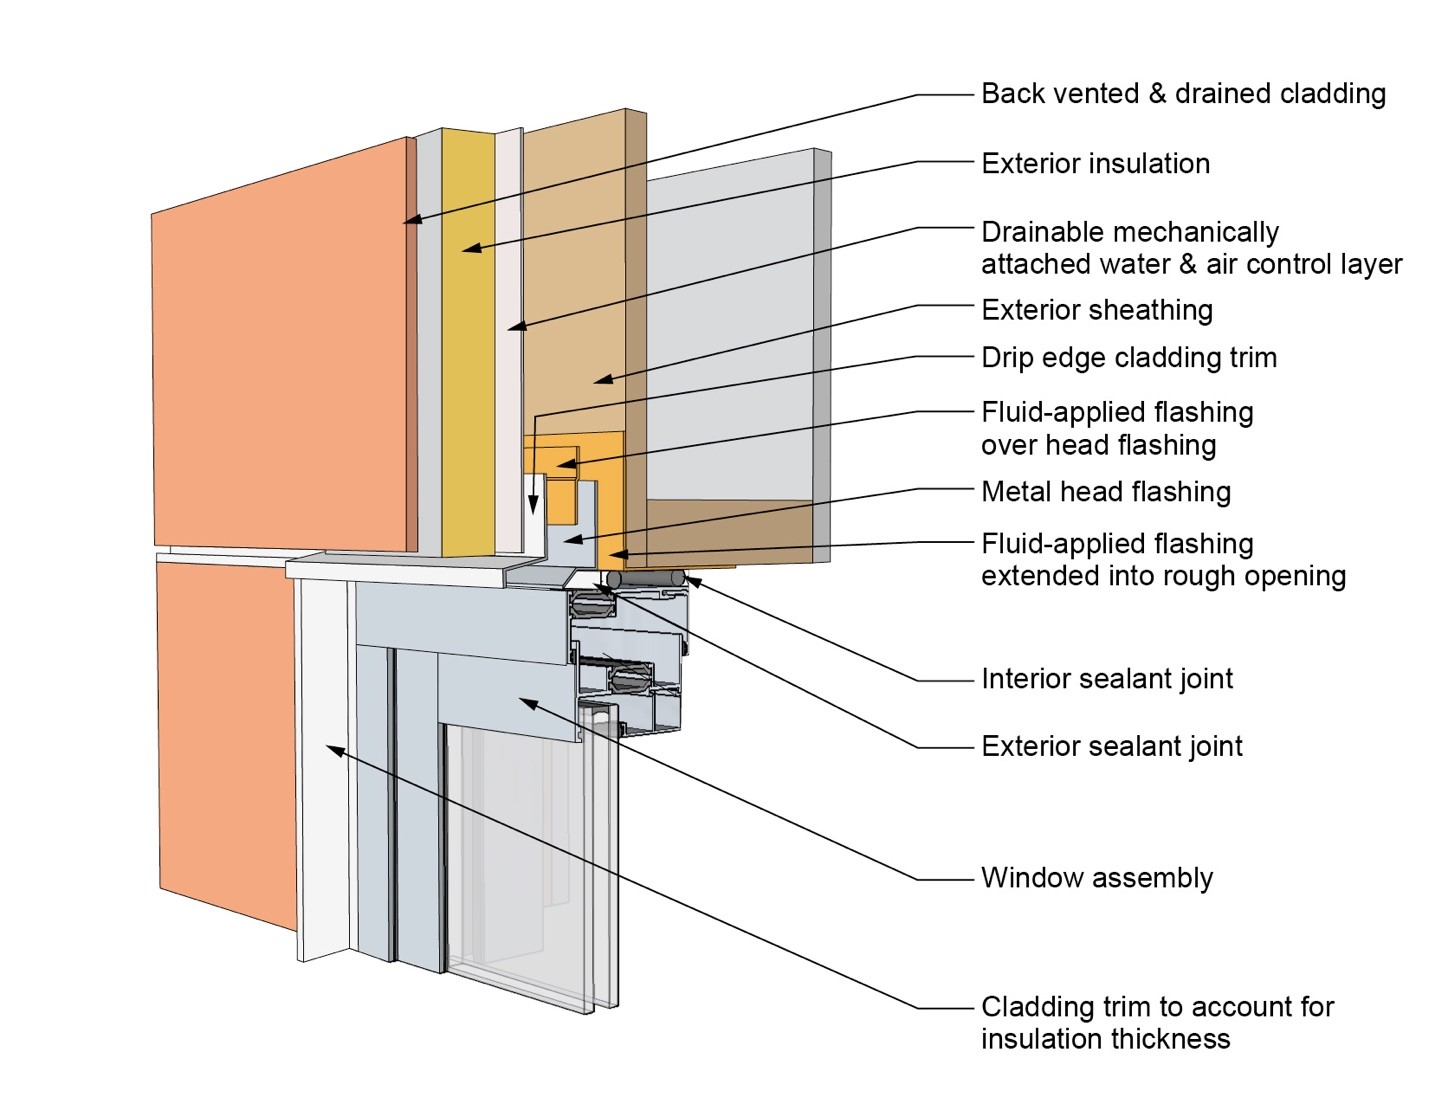
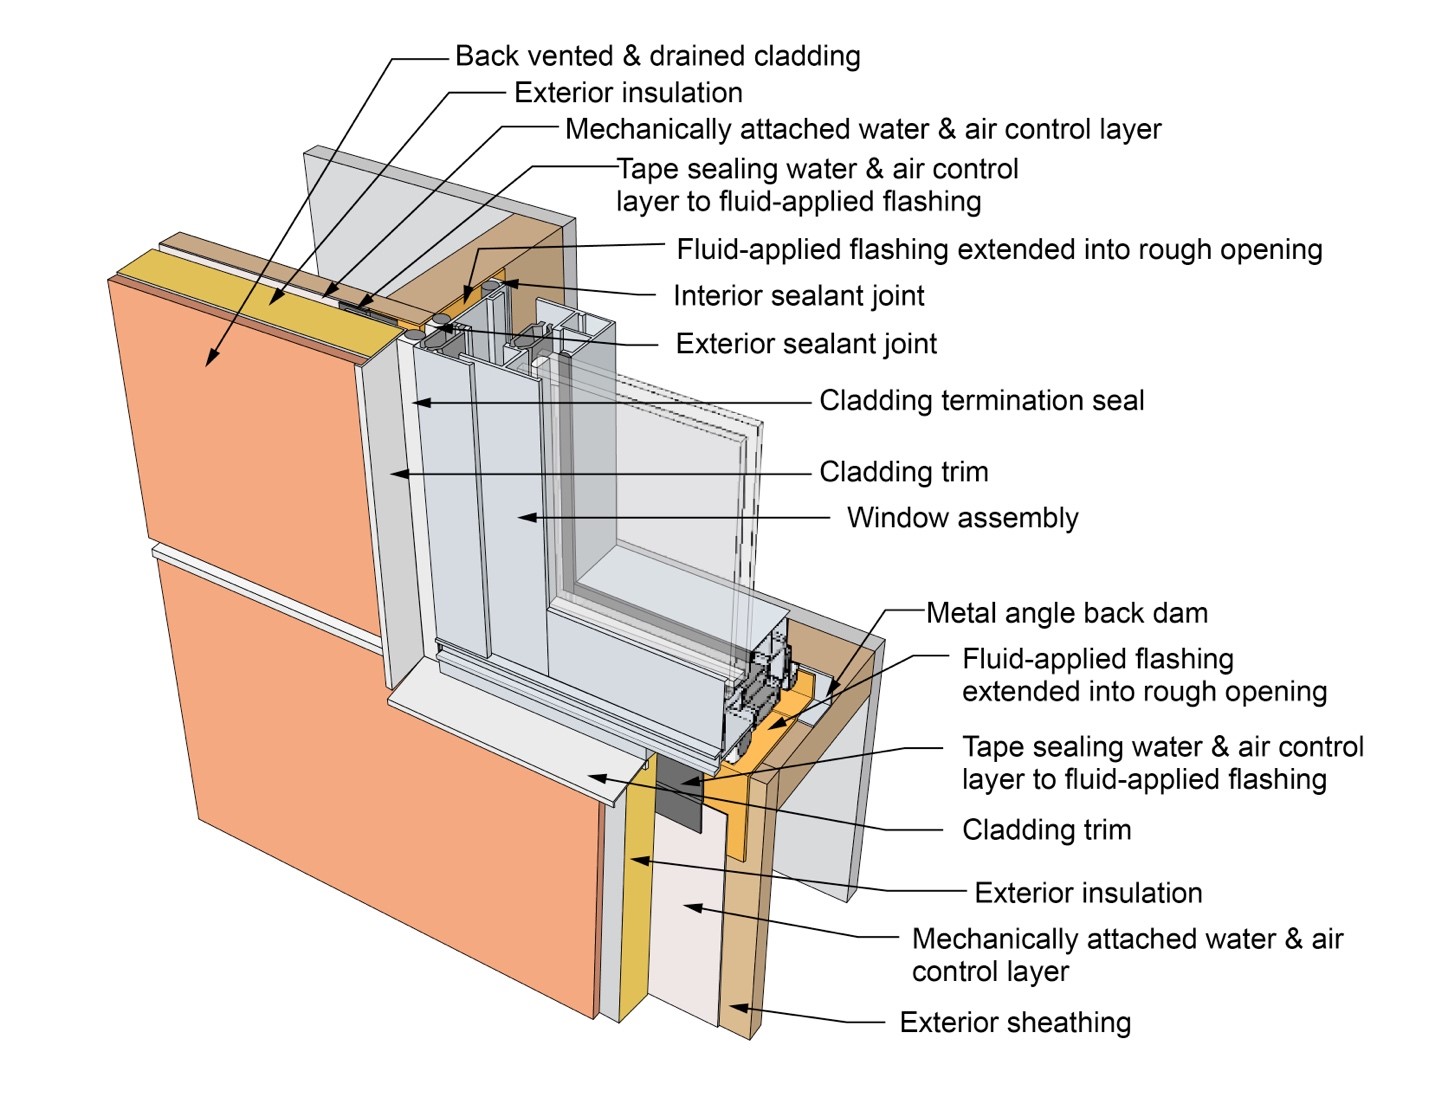
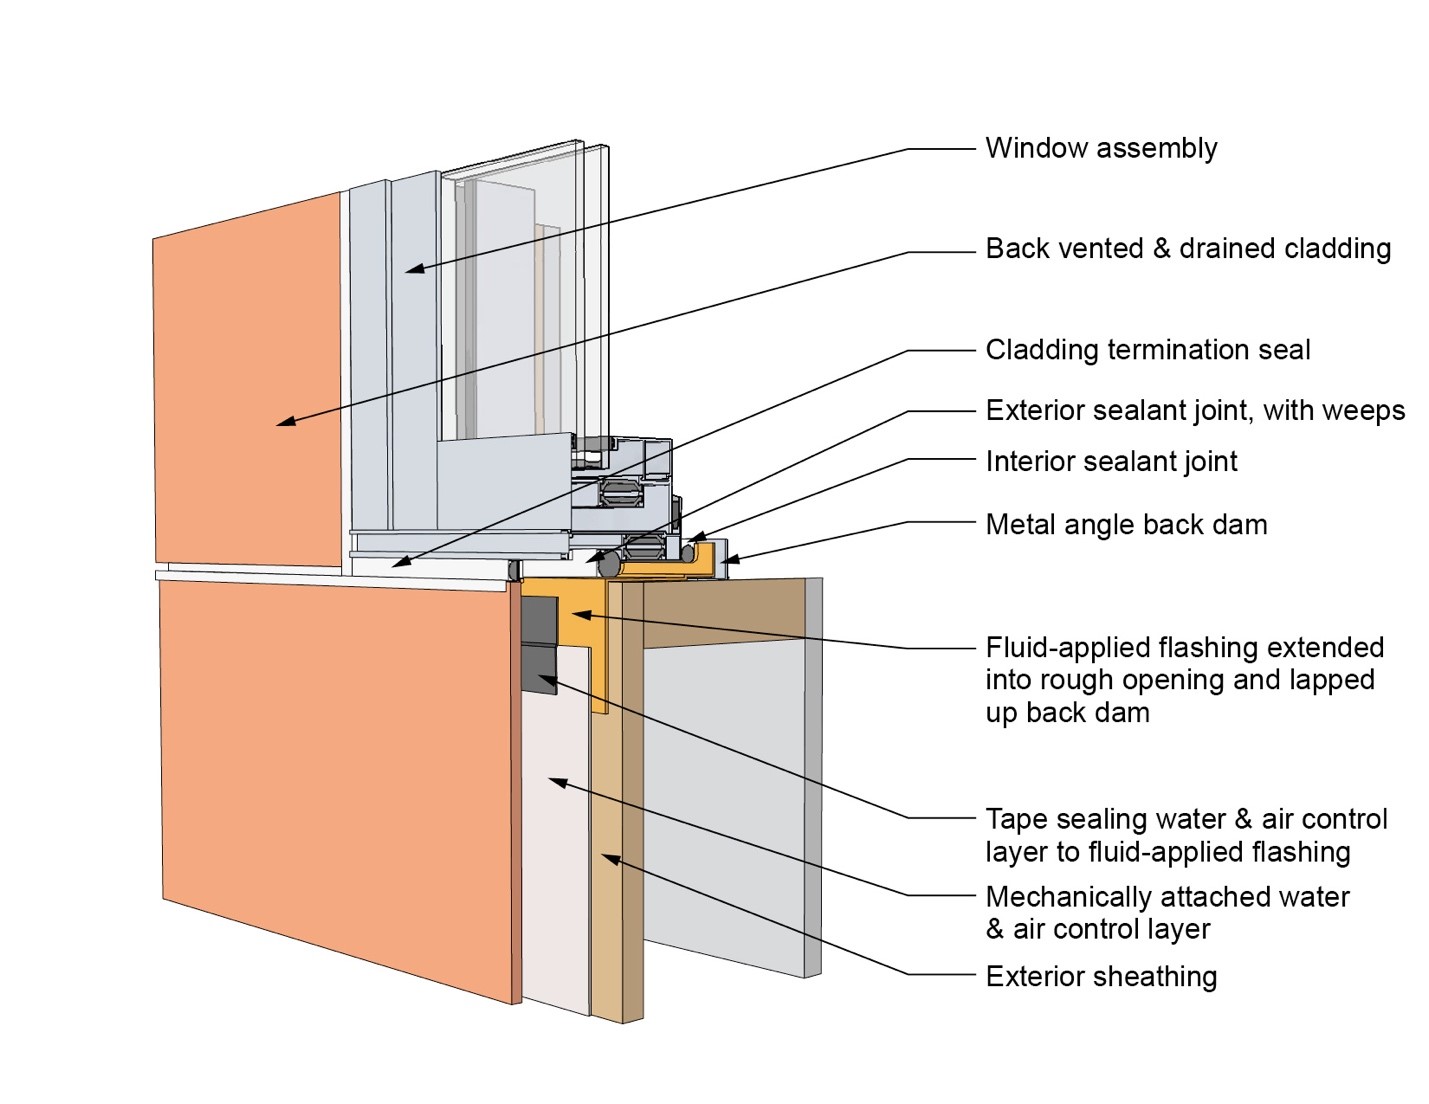
This drawing shows key head details for a window installation using a fluid-applied flashing on a wall with a mechanically attached water and air control layer and continuous insulation
Image
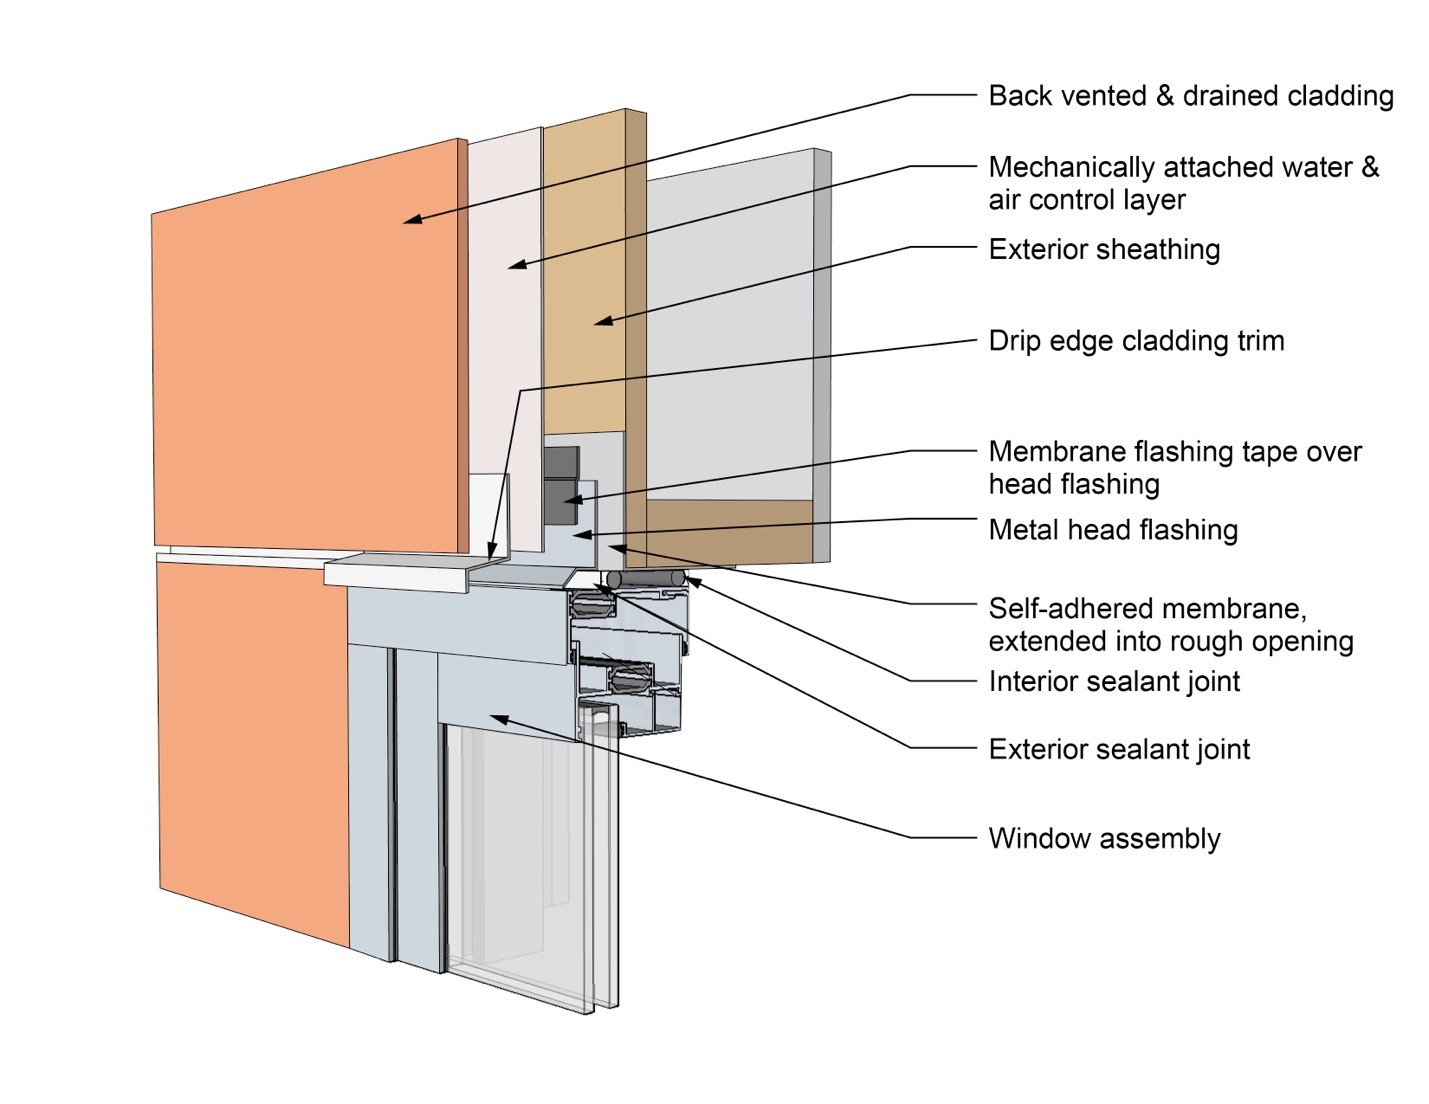
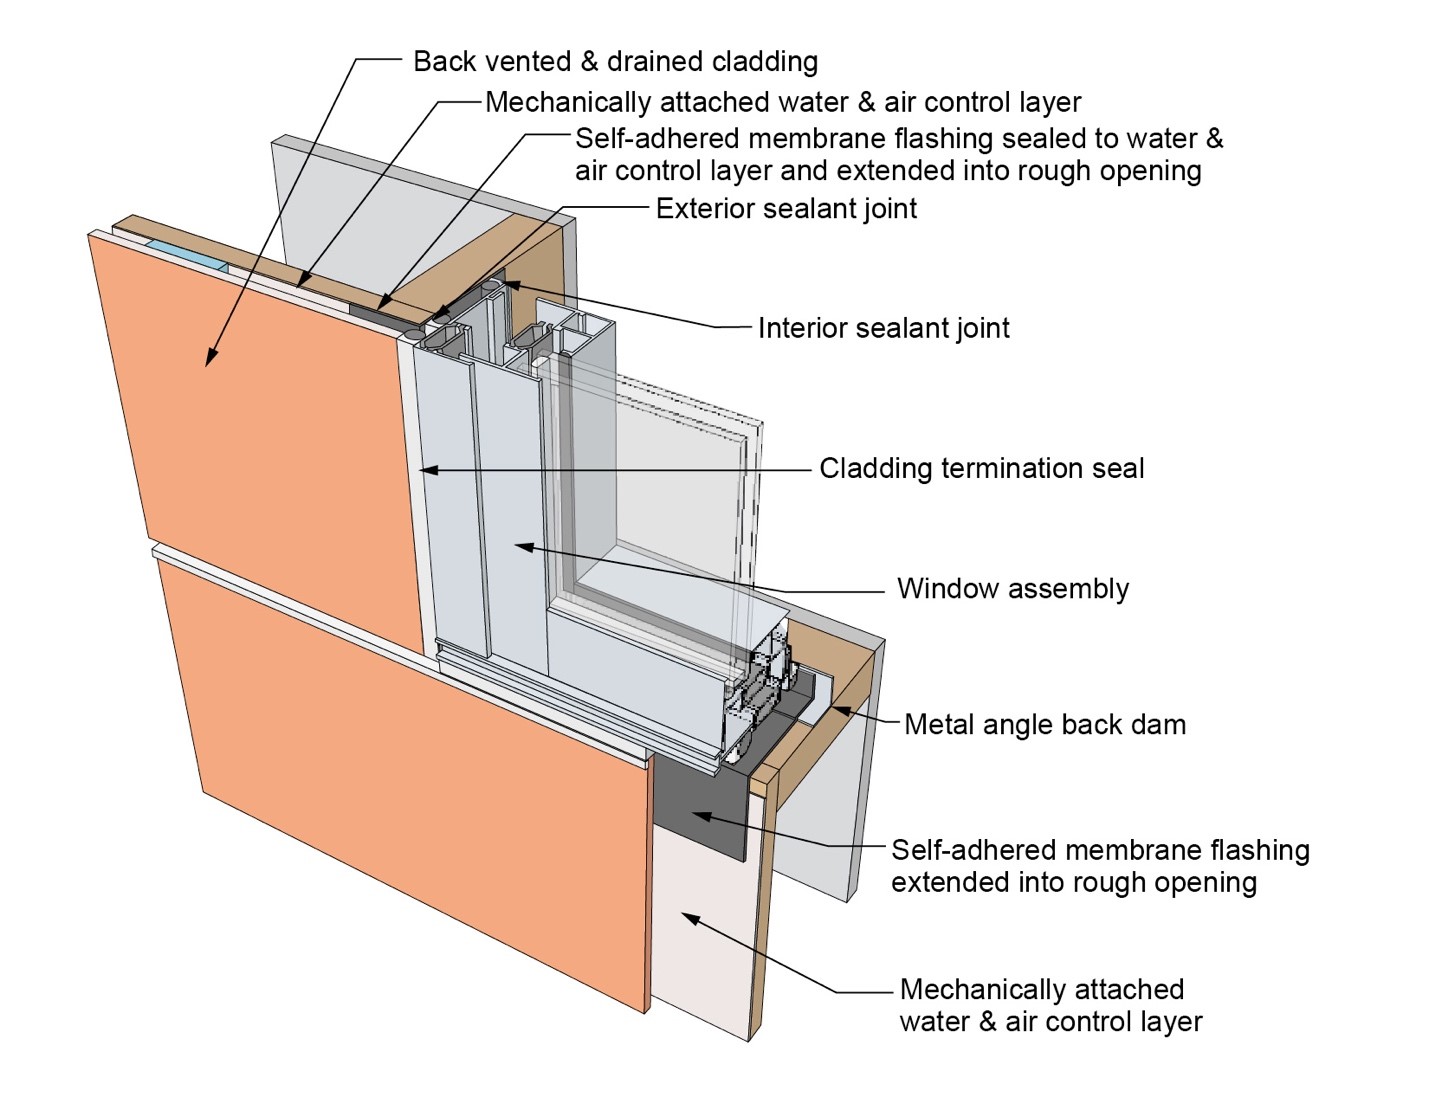
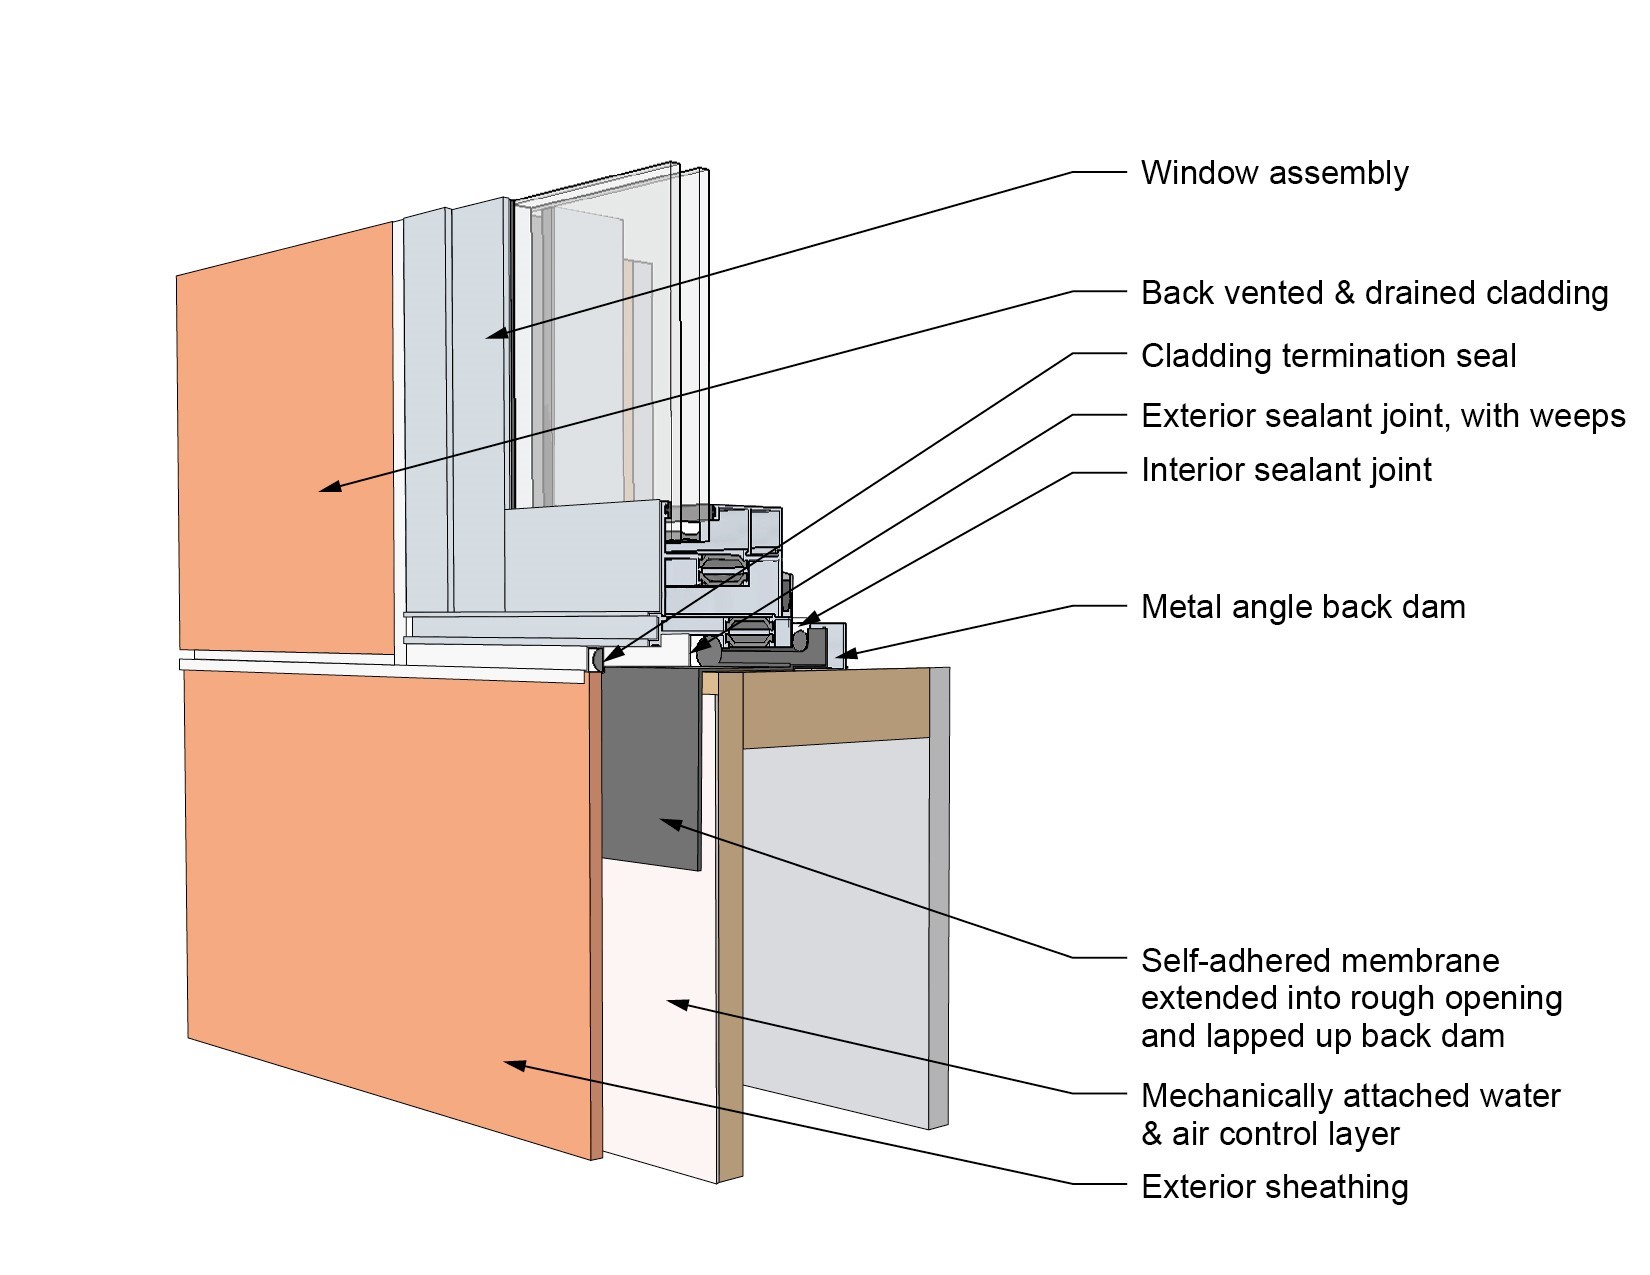
This drawing shows key head details for a window installation using a self-adhered membrane tape flashing on a wall with a mechanically attached water and air control layer
Image
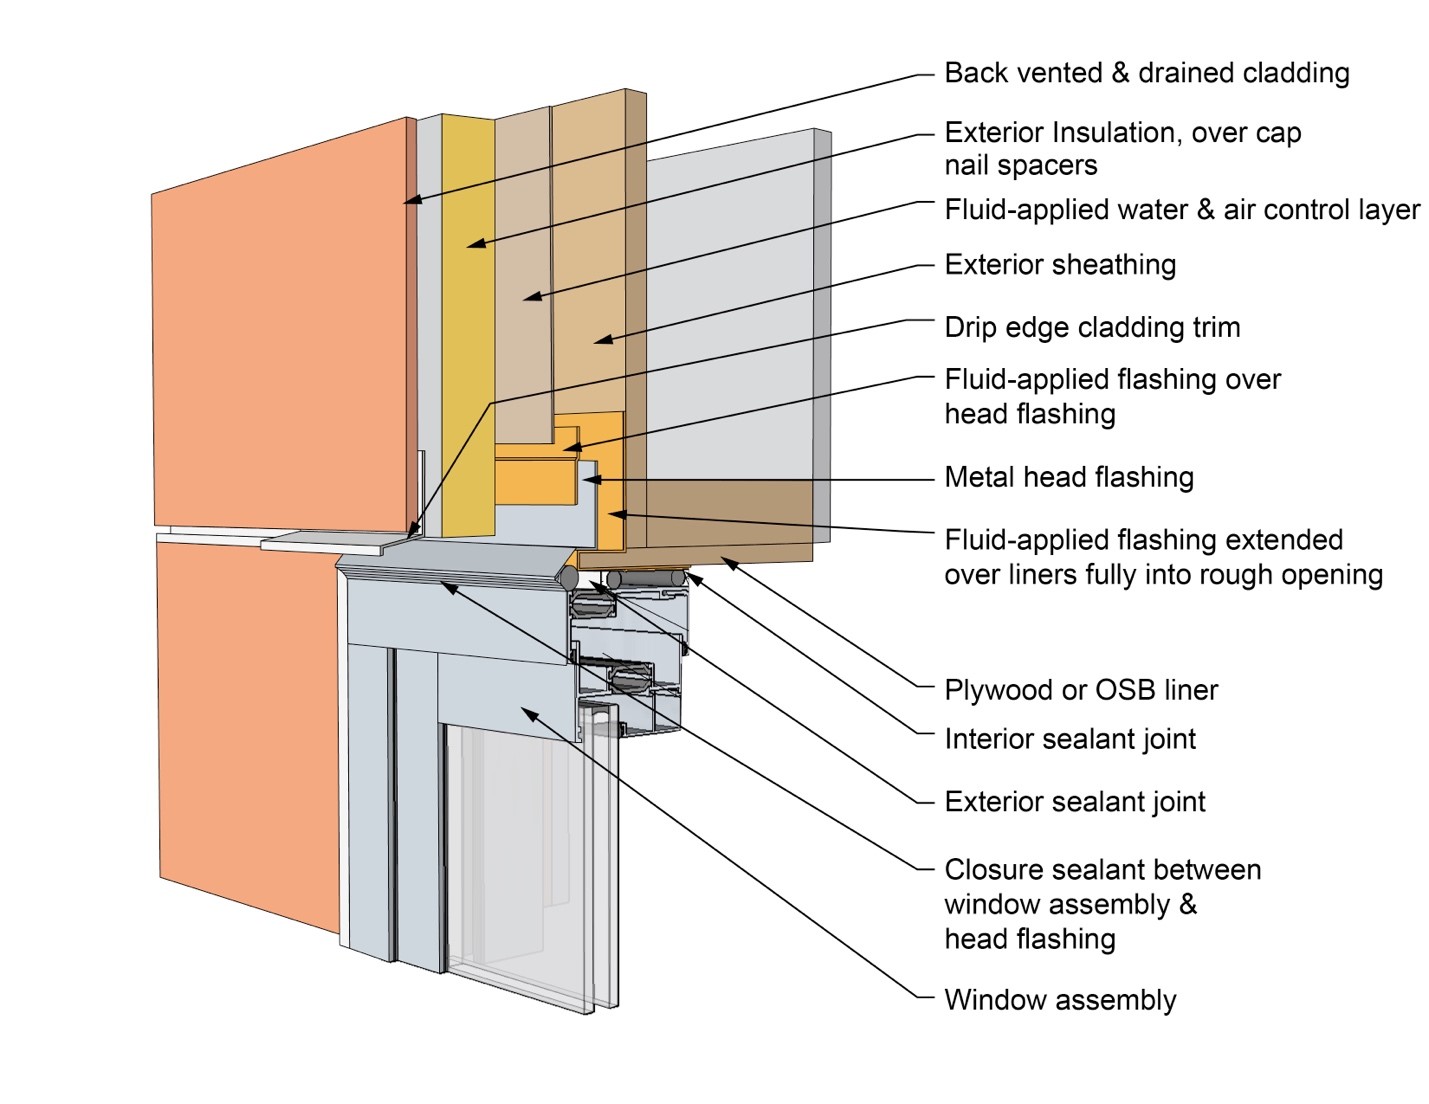
This drawing shows key head details for an “outie” window installation using a fluid-applied flashing on a wall with a fluid-applied water and air control layer and continuous insulation
Image
This drawing shows key jamb details for a window installation using a fluid-applied flashing on a wall with a fluid-applied water and air control layer
Image
This drawing shows key jamb details for a window installation using a fluid-applied flashing on a wall with a mechanically attached water and air control layer
Image
This drawing shows key jamb details for a window installation using a fluid-applied flashing on a wall with a mechanically attached water and air control layer and continuous insulation
Image
This drawing shows key jamb details for a window installation using a self-adhered membrane tape flashing on a wall with a mechanically attached water and air control layer
Image
This drawing shows key jamb details for an “outie” window installation using a fluid-applied flashing on a wall with a fluid-applied water and air control layer and continuous insulation
Image
This drawing shows key sill details for a window installation using a fluid-applied flashing on a wall with a fluid-applied water and air control layer
Image
This drawing shows key sill details for a window installation using a fluid-applied flashing on a wall with a mechanically attached water and air control layer
Image

This drawing shows key sill details for a window installation using a fluid-applied flashing on a wall with a mechanically attached water and air control layer and continuous insulation
Image
This drawing shows key sill details for a window installation using a self-adhered membrane tape flashing on a wall with a mechanically attached water and air control layer
Image
This drawing shows key sill details for an “outie” window installation using a fluid-applied flashing on a wall with a fluid-applied water and air control layer and continuous insulation
Image
This exterior wall retrofit permits drying to the exterior of a sill plate installed on an untreated flat foundation wall
Image
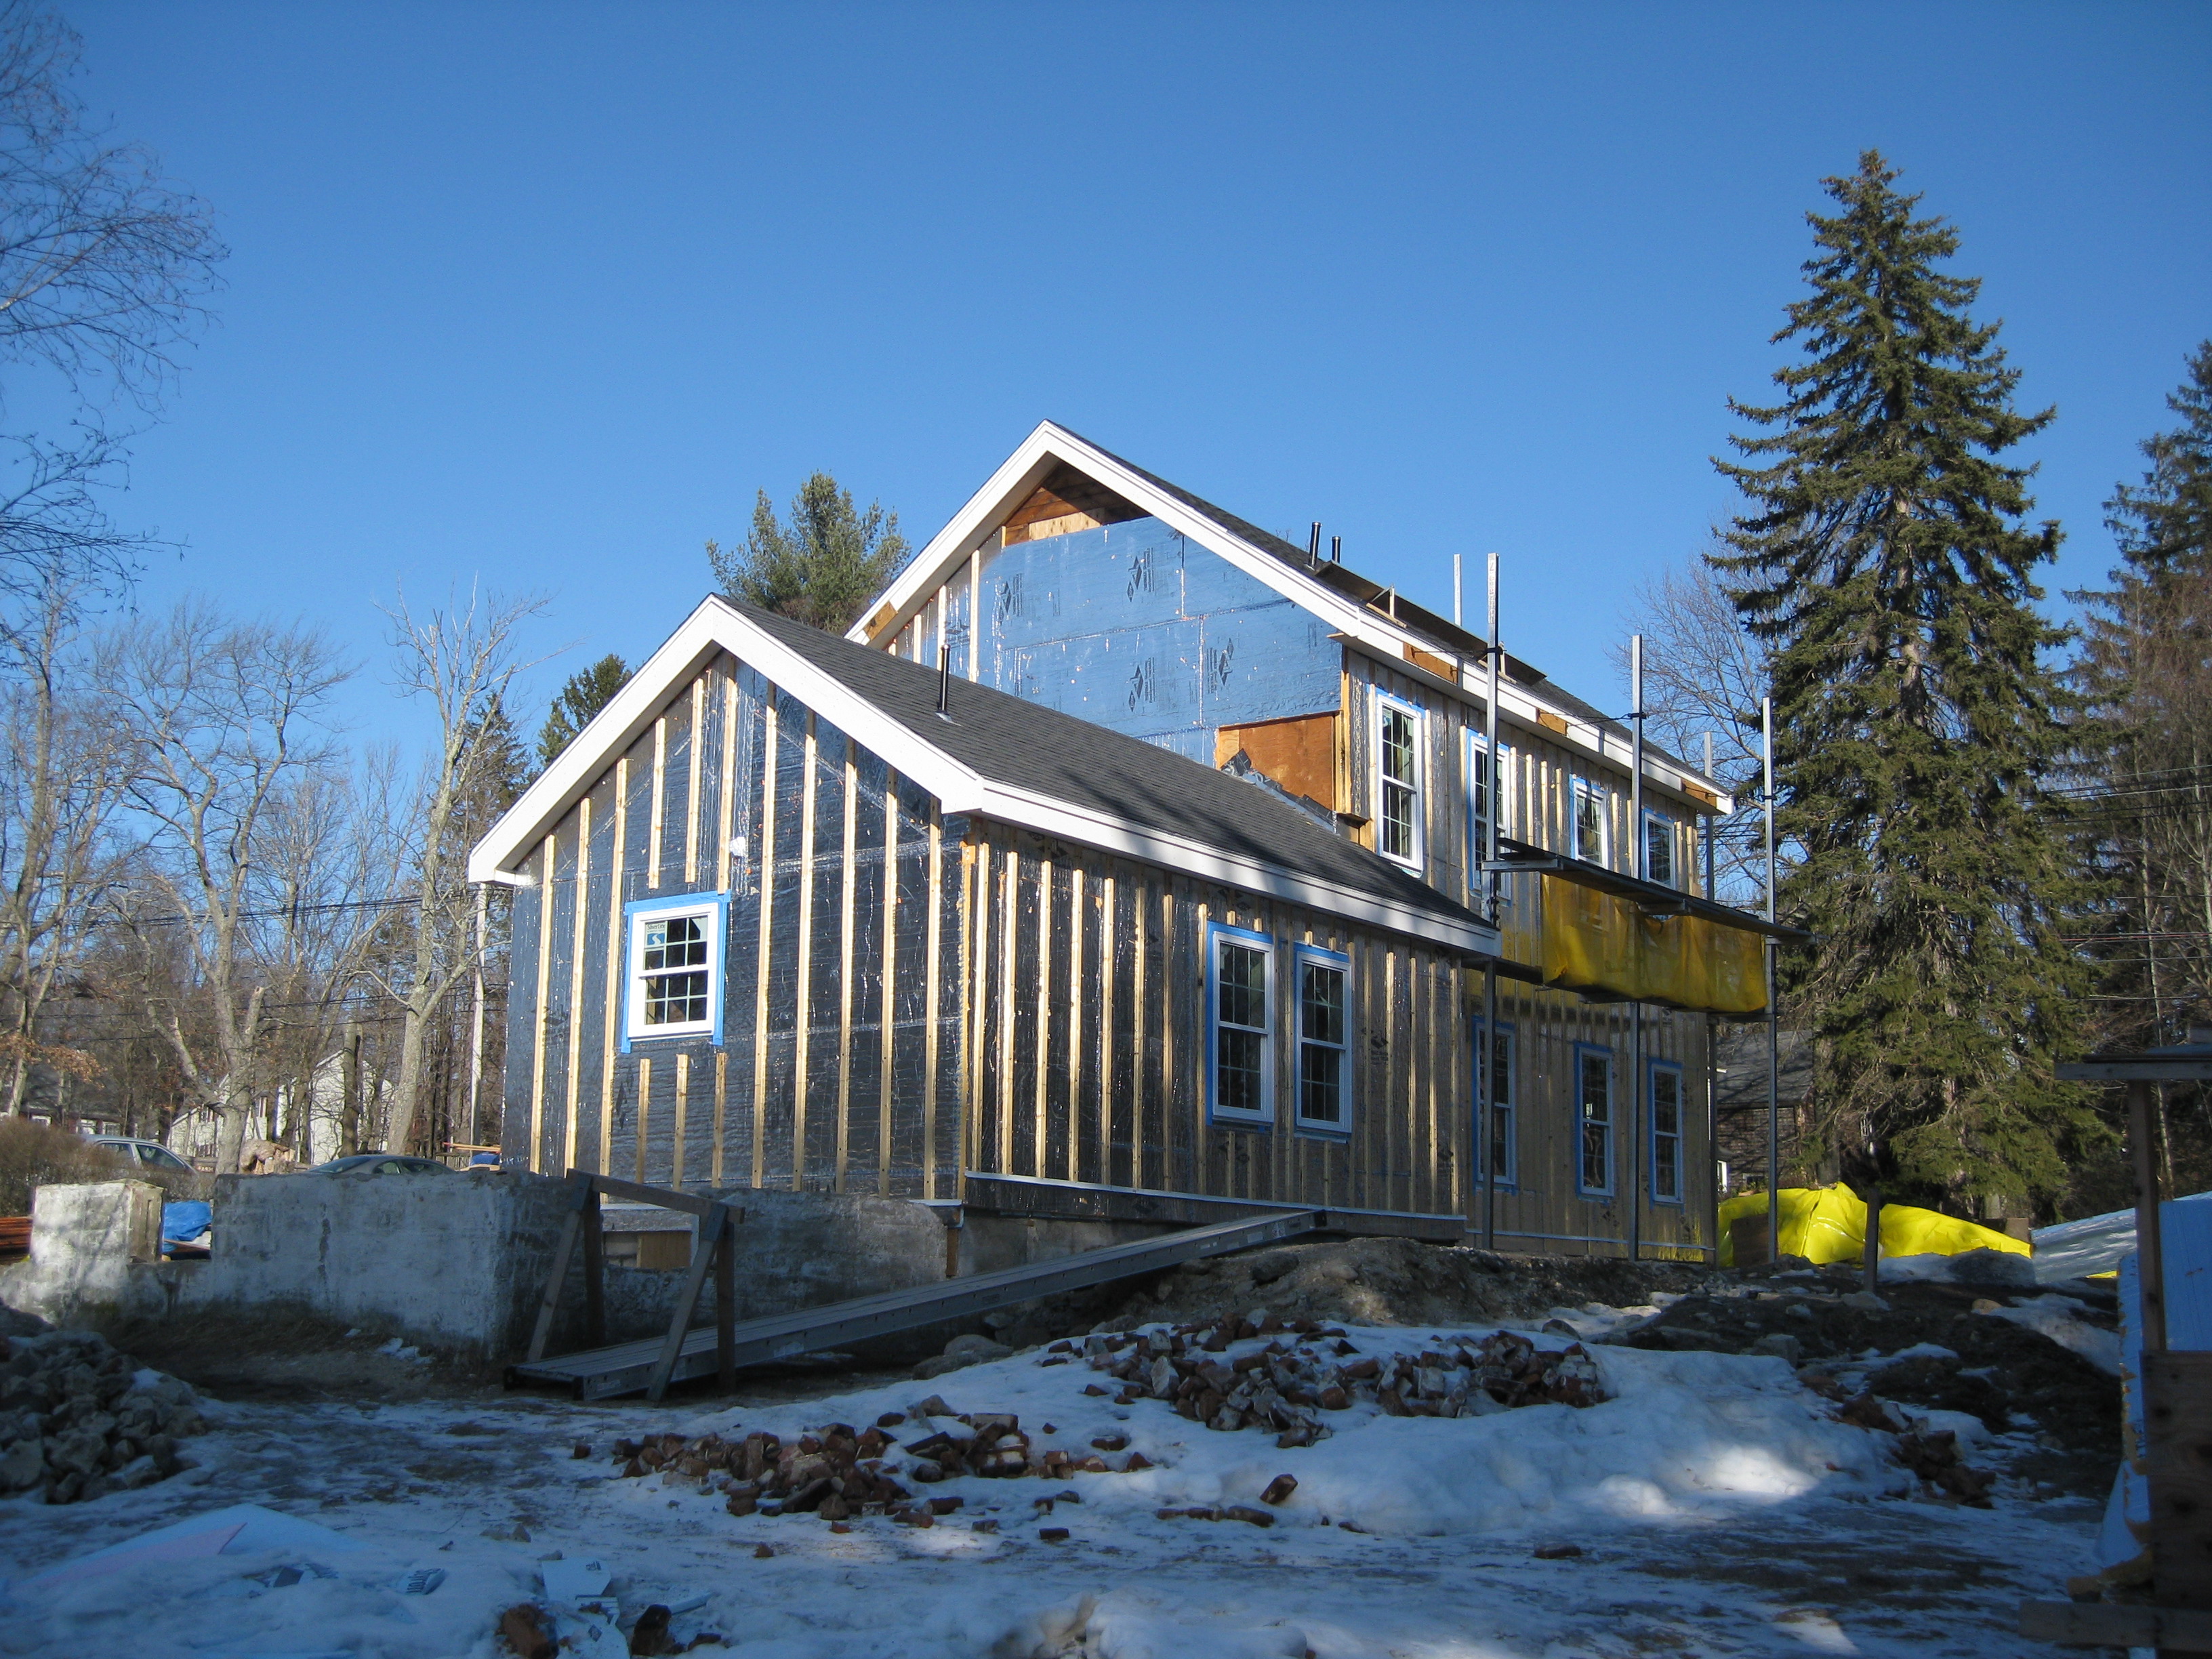
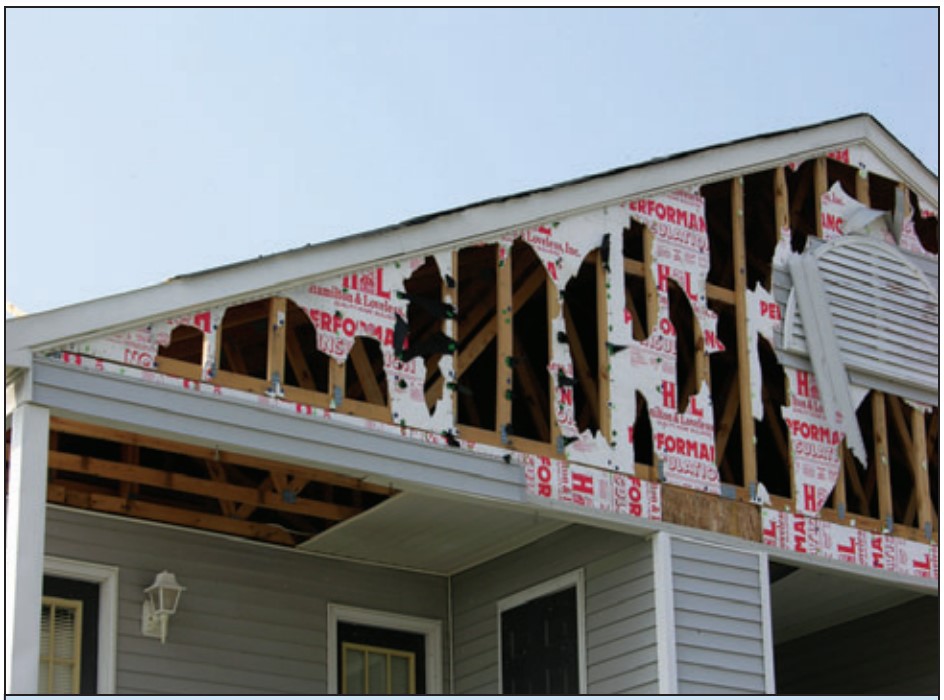
This farmhouse was retrofit by removing the existing siding and adding taped insulated sheathing and battens before installing new siding
Image
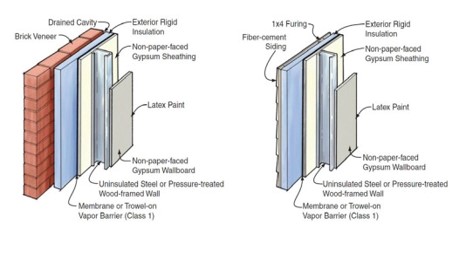
This flood-resistant exterior wall with brick or fiber-cement siding will limit moisture damage in exterior walls.
Image
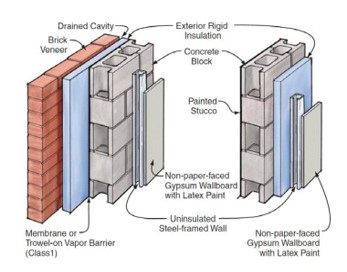
This flood-resistant masonry wall design with metal framing and rigid foam insulation will limit moisture damage in exterior walls.
Image

This home is covered with coated sheathing. Wall portions that will be covered with stone have a dimple plastic moisture barrier and metal lathe that is being covered with plaster.
Image

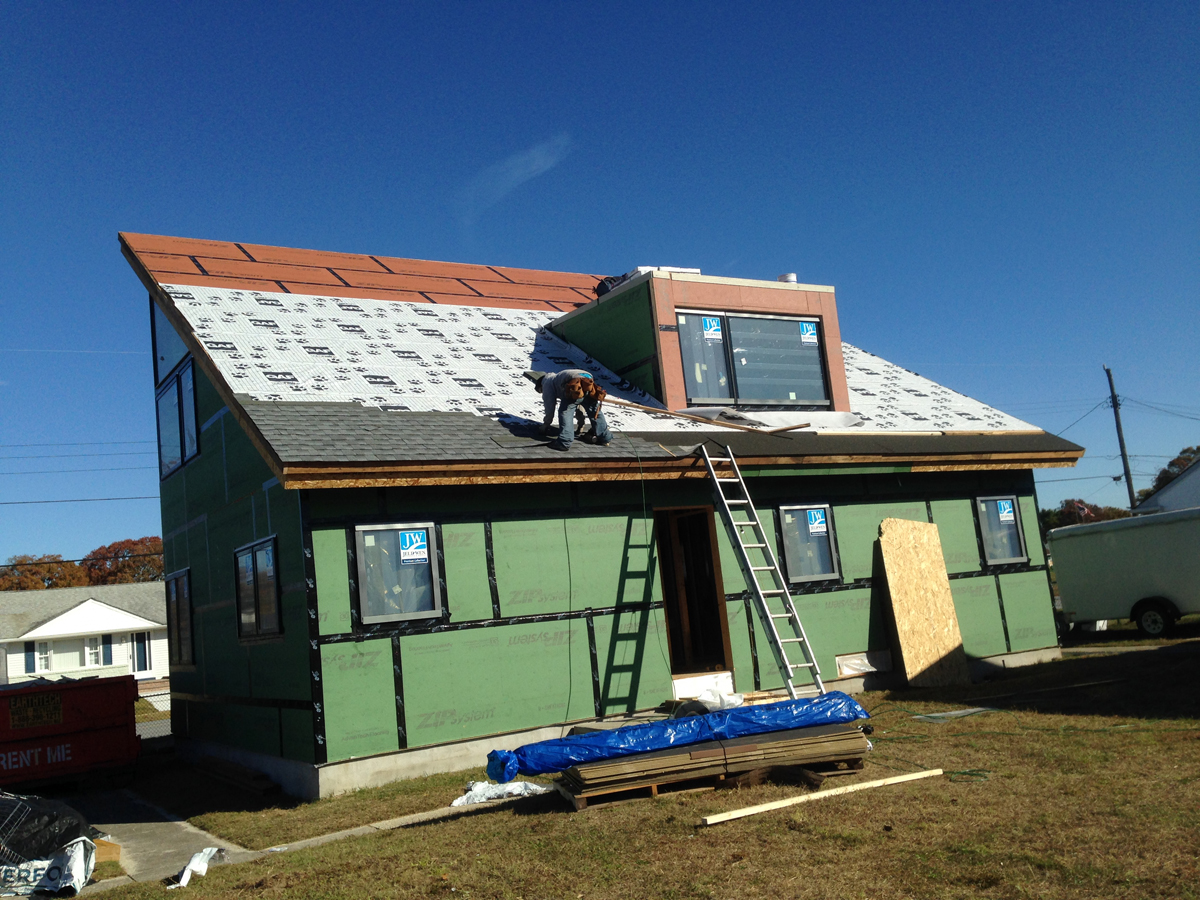
This home was designed with continuous roof vents and few roof penetrations, allowing more room for the solar shingles that integrate with the asphalt shingles installed to meet IBHS Fortified Roof criteria for increased resistance to high winds and rain
Image
This house design in the Hot-Humid climate uses a slab foundation, masonry walls, and an Exterior Insulation Finish System (EIFS) cladding.
Image
Image
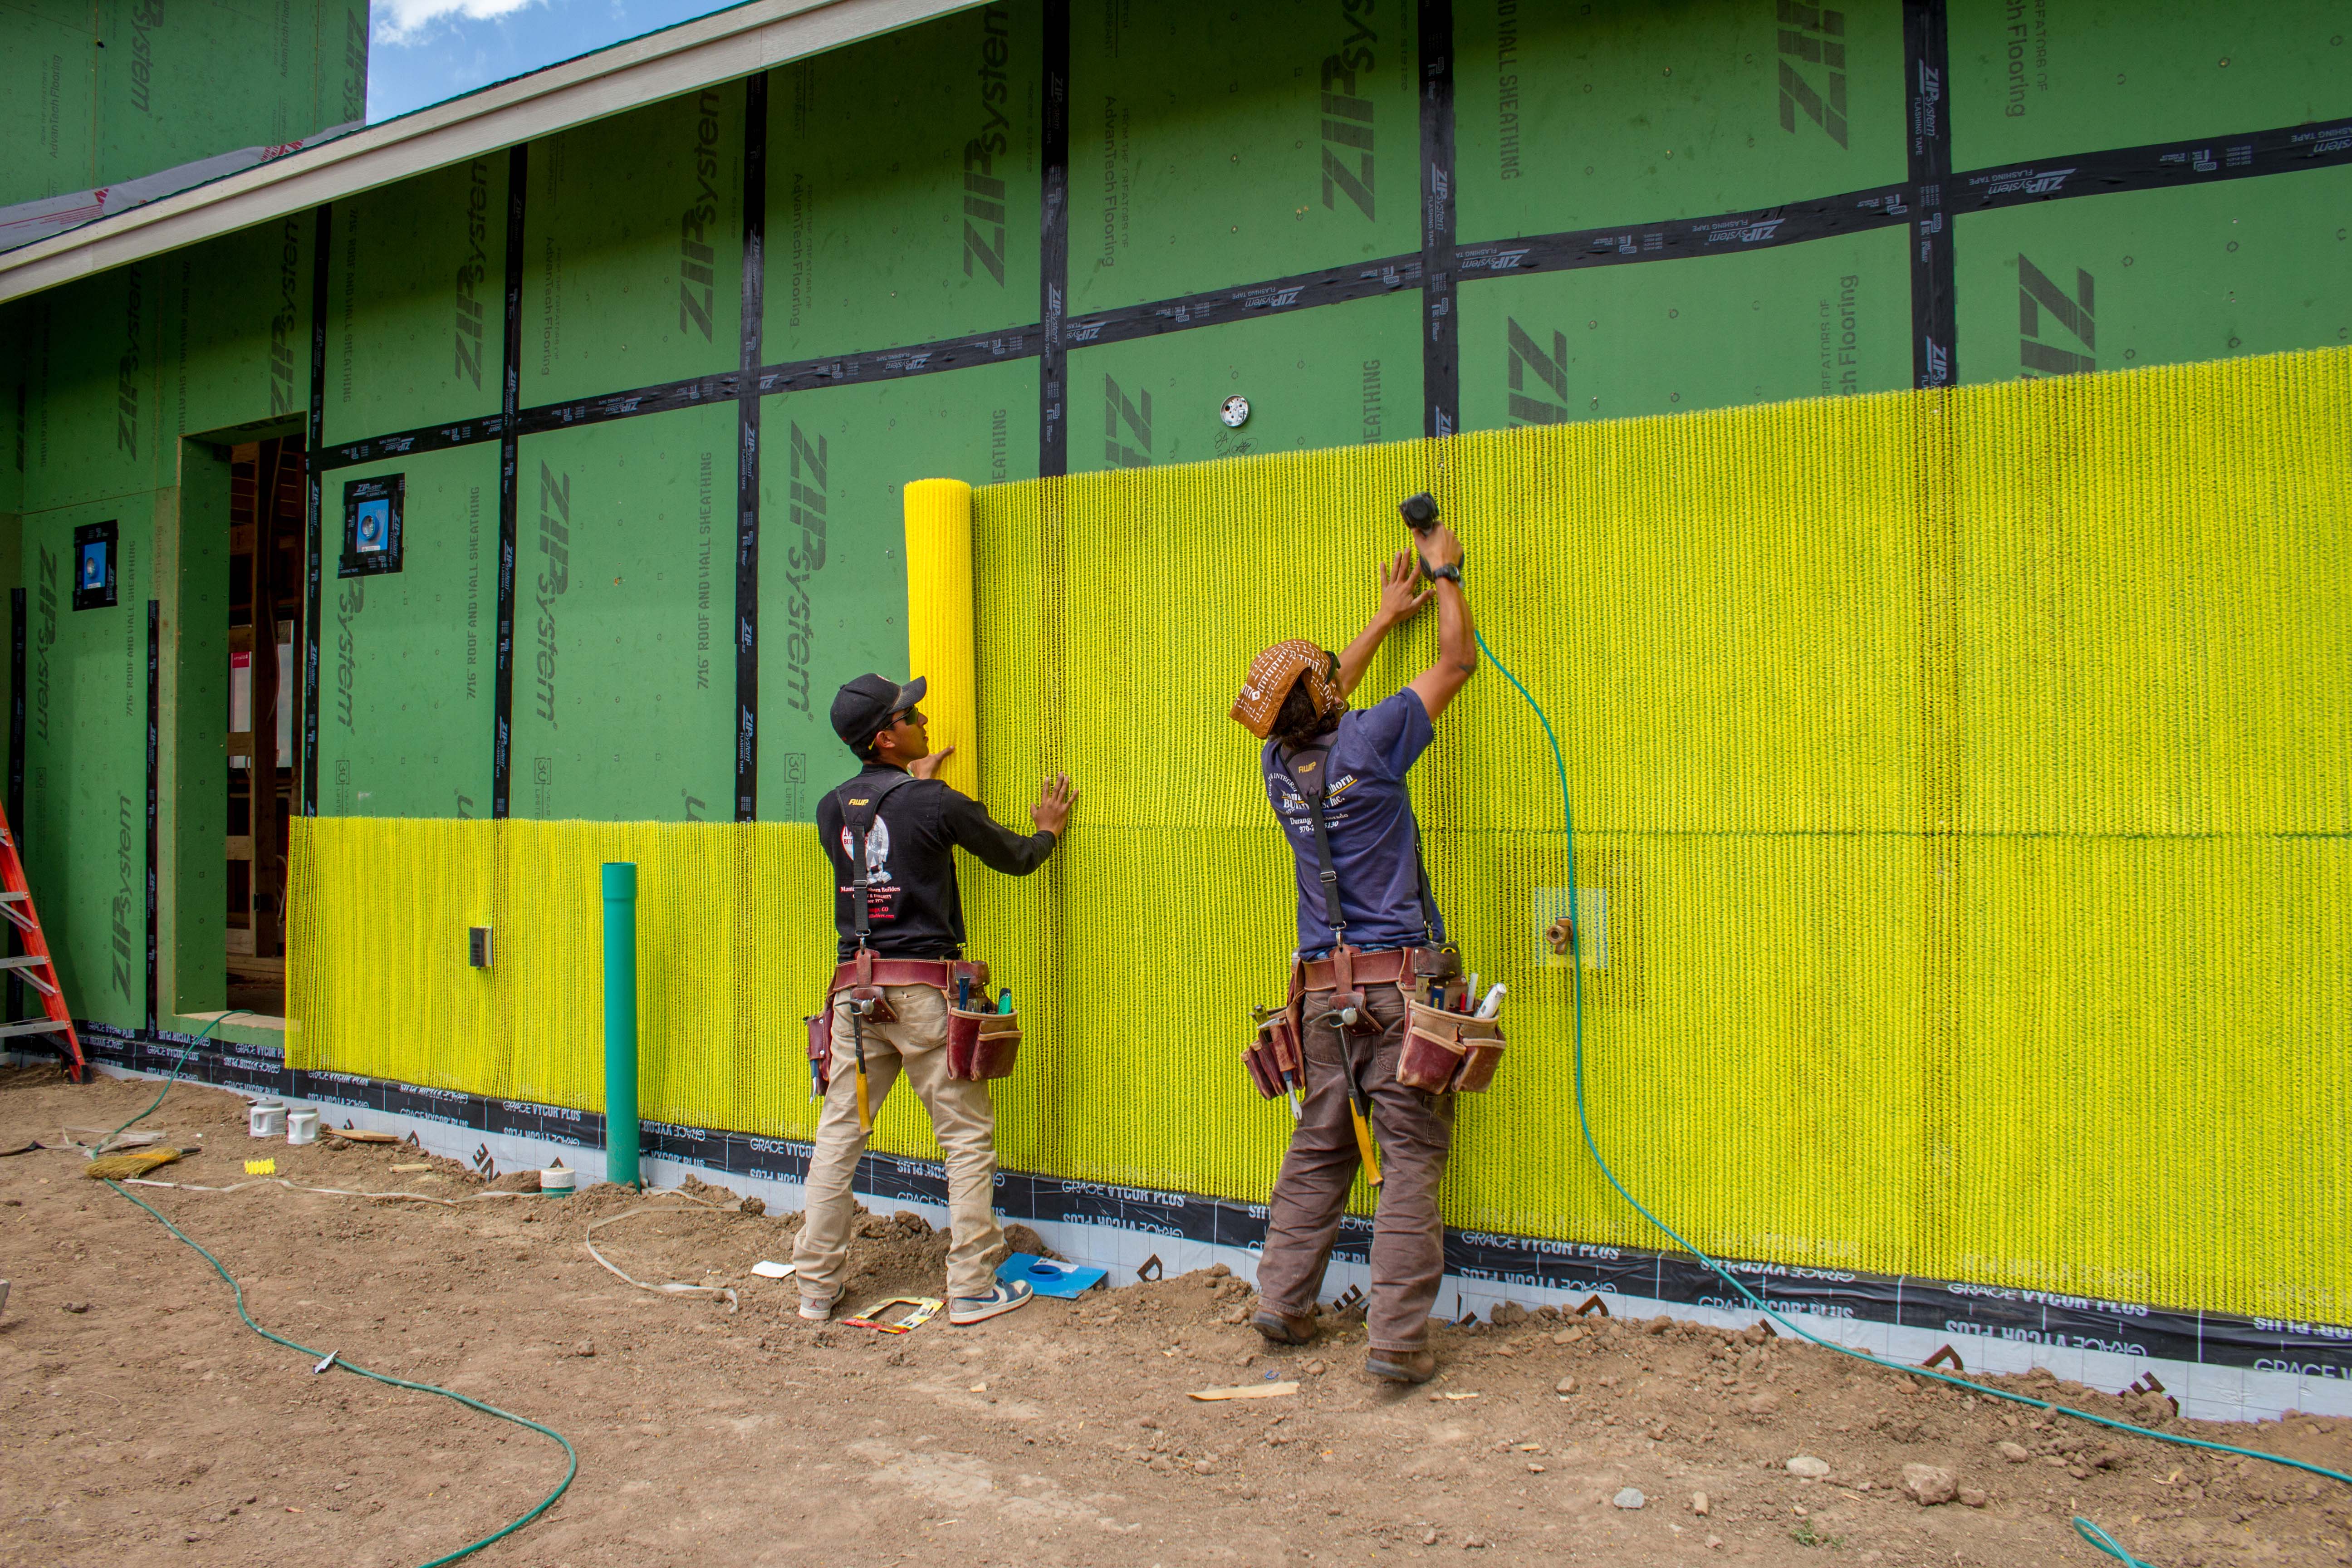
This plastic mesh material creates an air space behind the siding and provides a route for water to run out of the wall in case of leaks.
Image
This roof is hurricane proofed with a coated insulated OSB deck sheathing that is caulked and taped at all seams with a water-resistant tape, then fully covered with a peel-and-stick membrane, and asphalt shingles.
Image
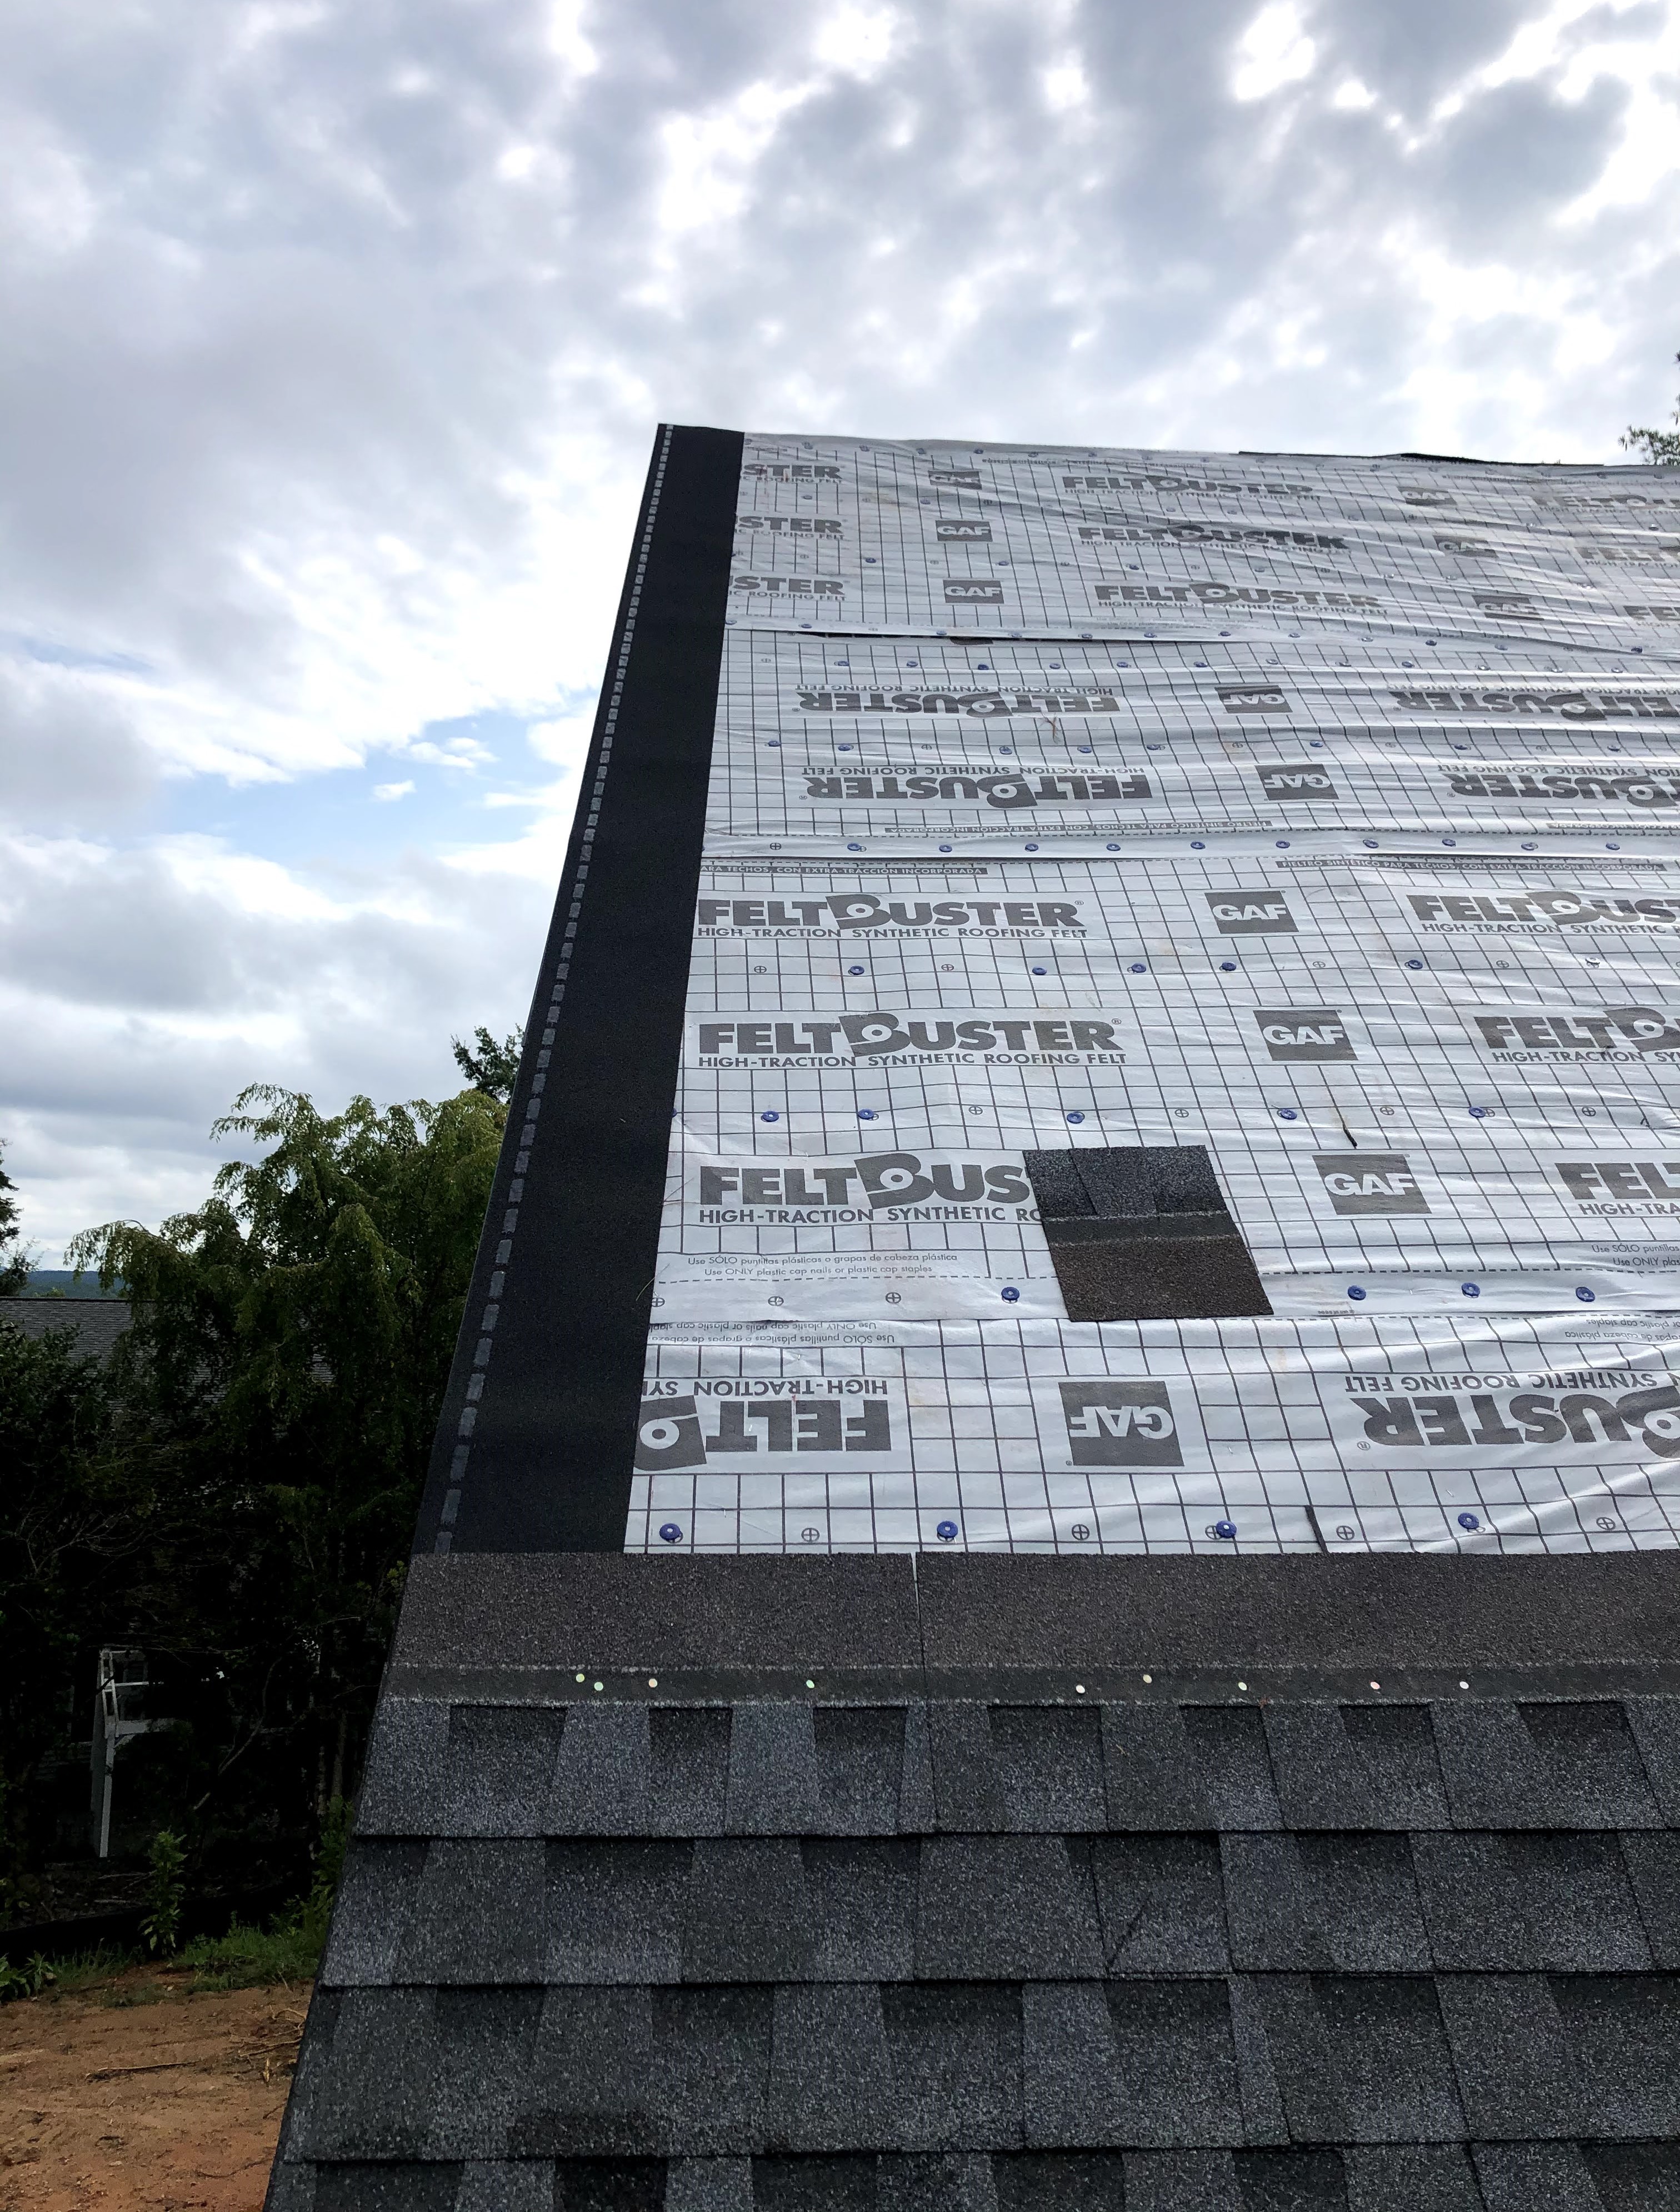
This roof was constructed to meet the IBHS Fortified Roof standard by sealing the decking seams with flashing tape, installing synthetic roof underlayment secured with metal drip edge and nailed every six inches, and using self-adhered starter shingles.
Image
Image
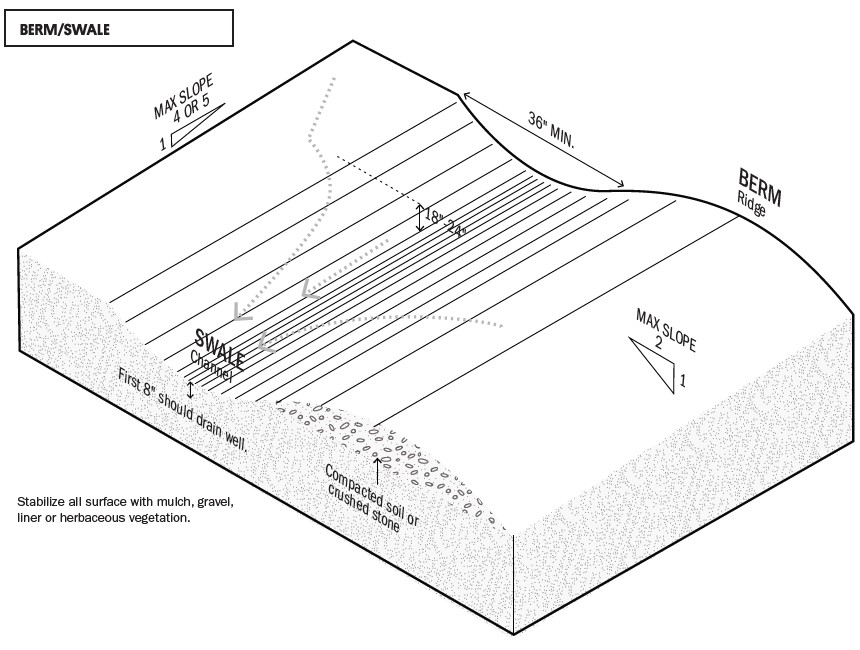
This swale and berm slow the flow of stormwater across a site to minimize erosion.
Image

Image

Threaded connections are one source of leaks in showerheads and showerhead arms.
Image
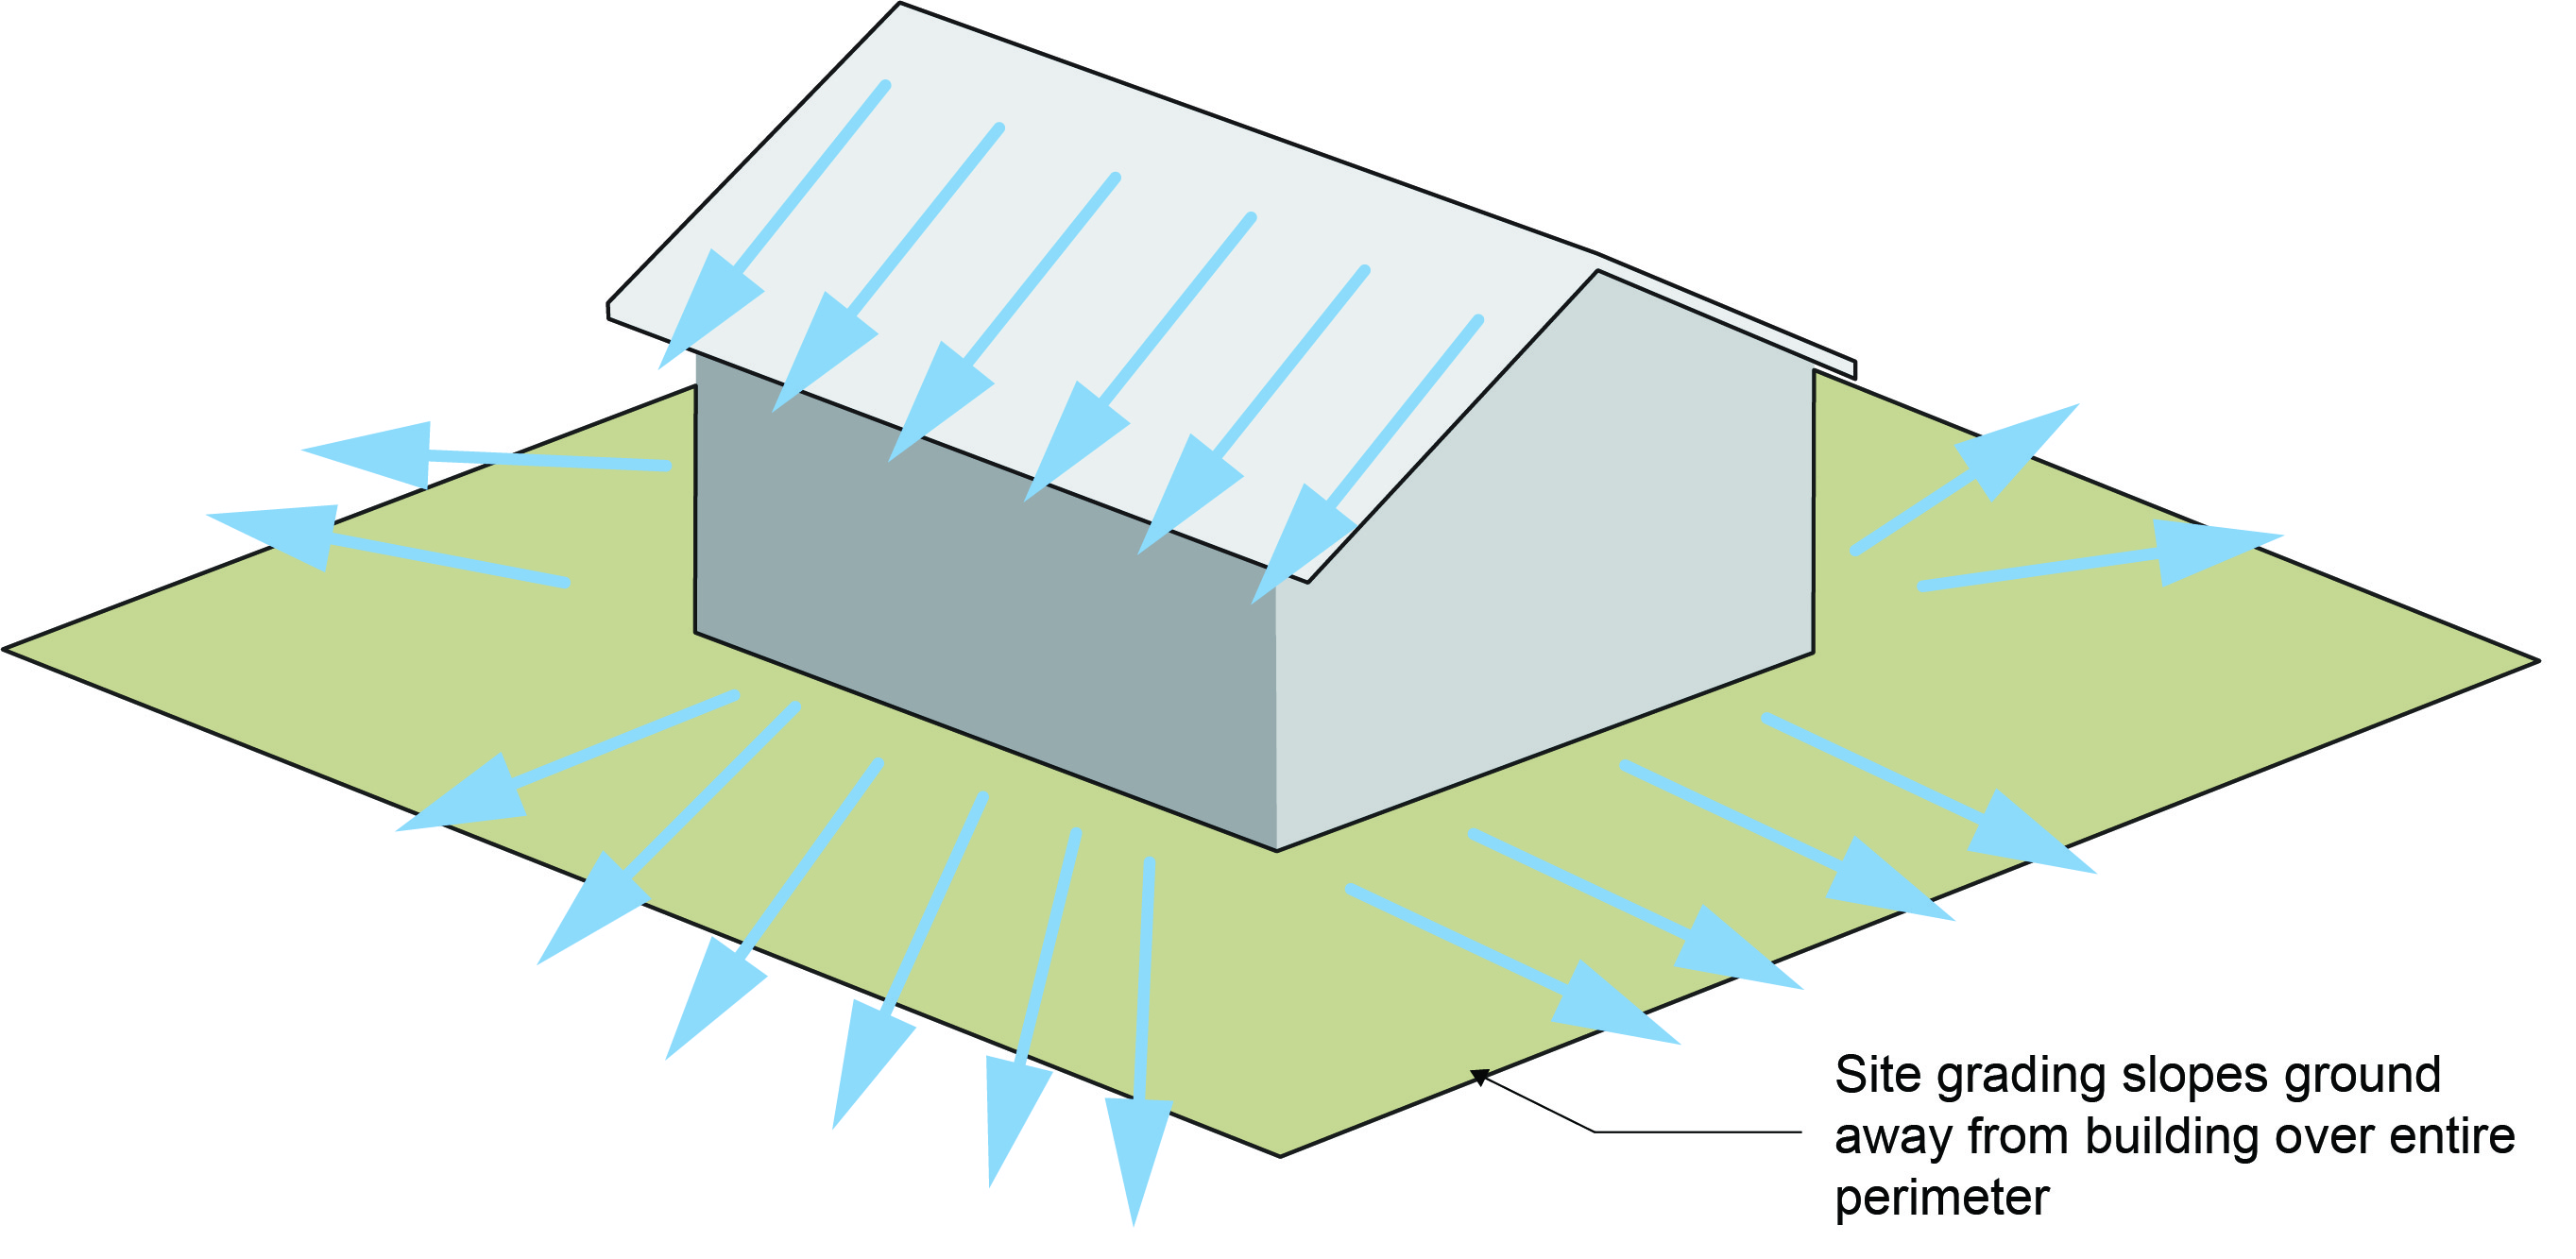
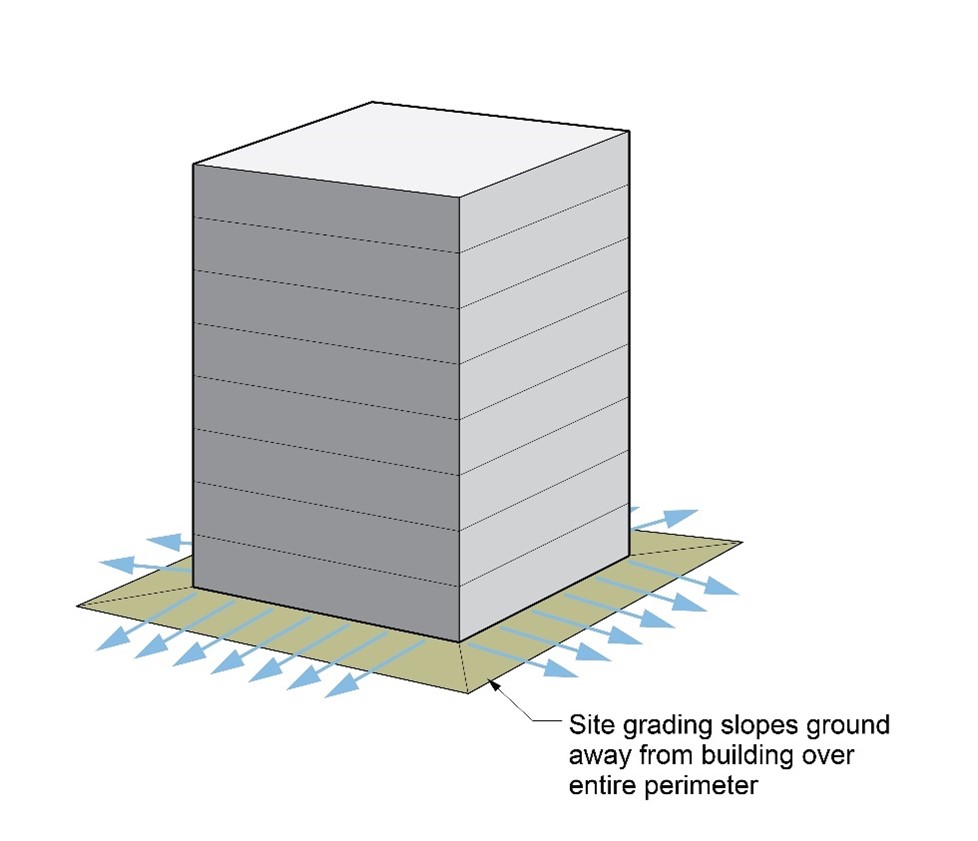
To control surface water, slope the ground away from the building perimeter on all sides.
Image
To handle the high water table on this lot, the builder installed underground drain pipe to french drains for slow dispersal of storm runoff, then set the floor joists on steel framing set 4 ft above grade on 35-foot-deep piers.
Image
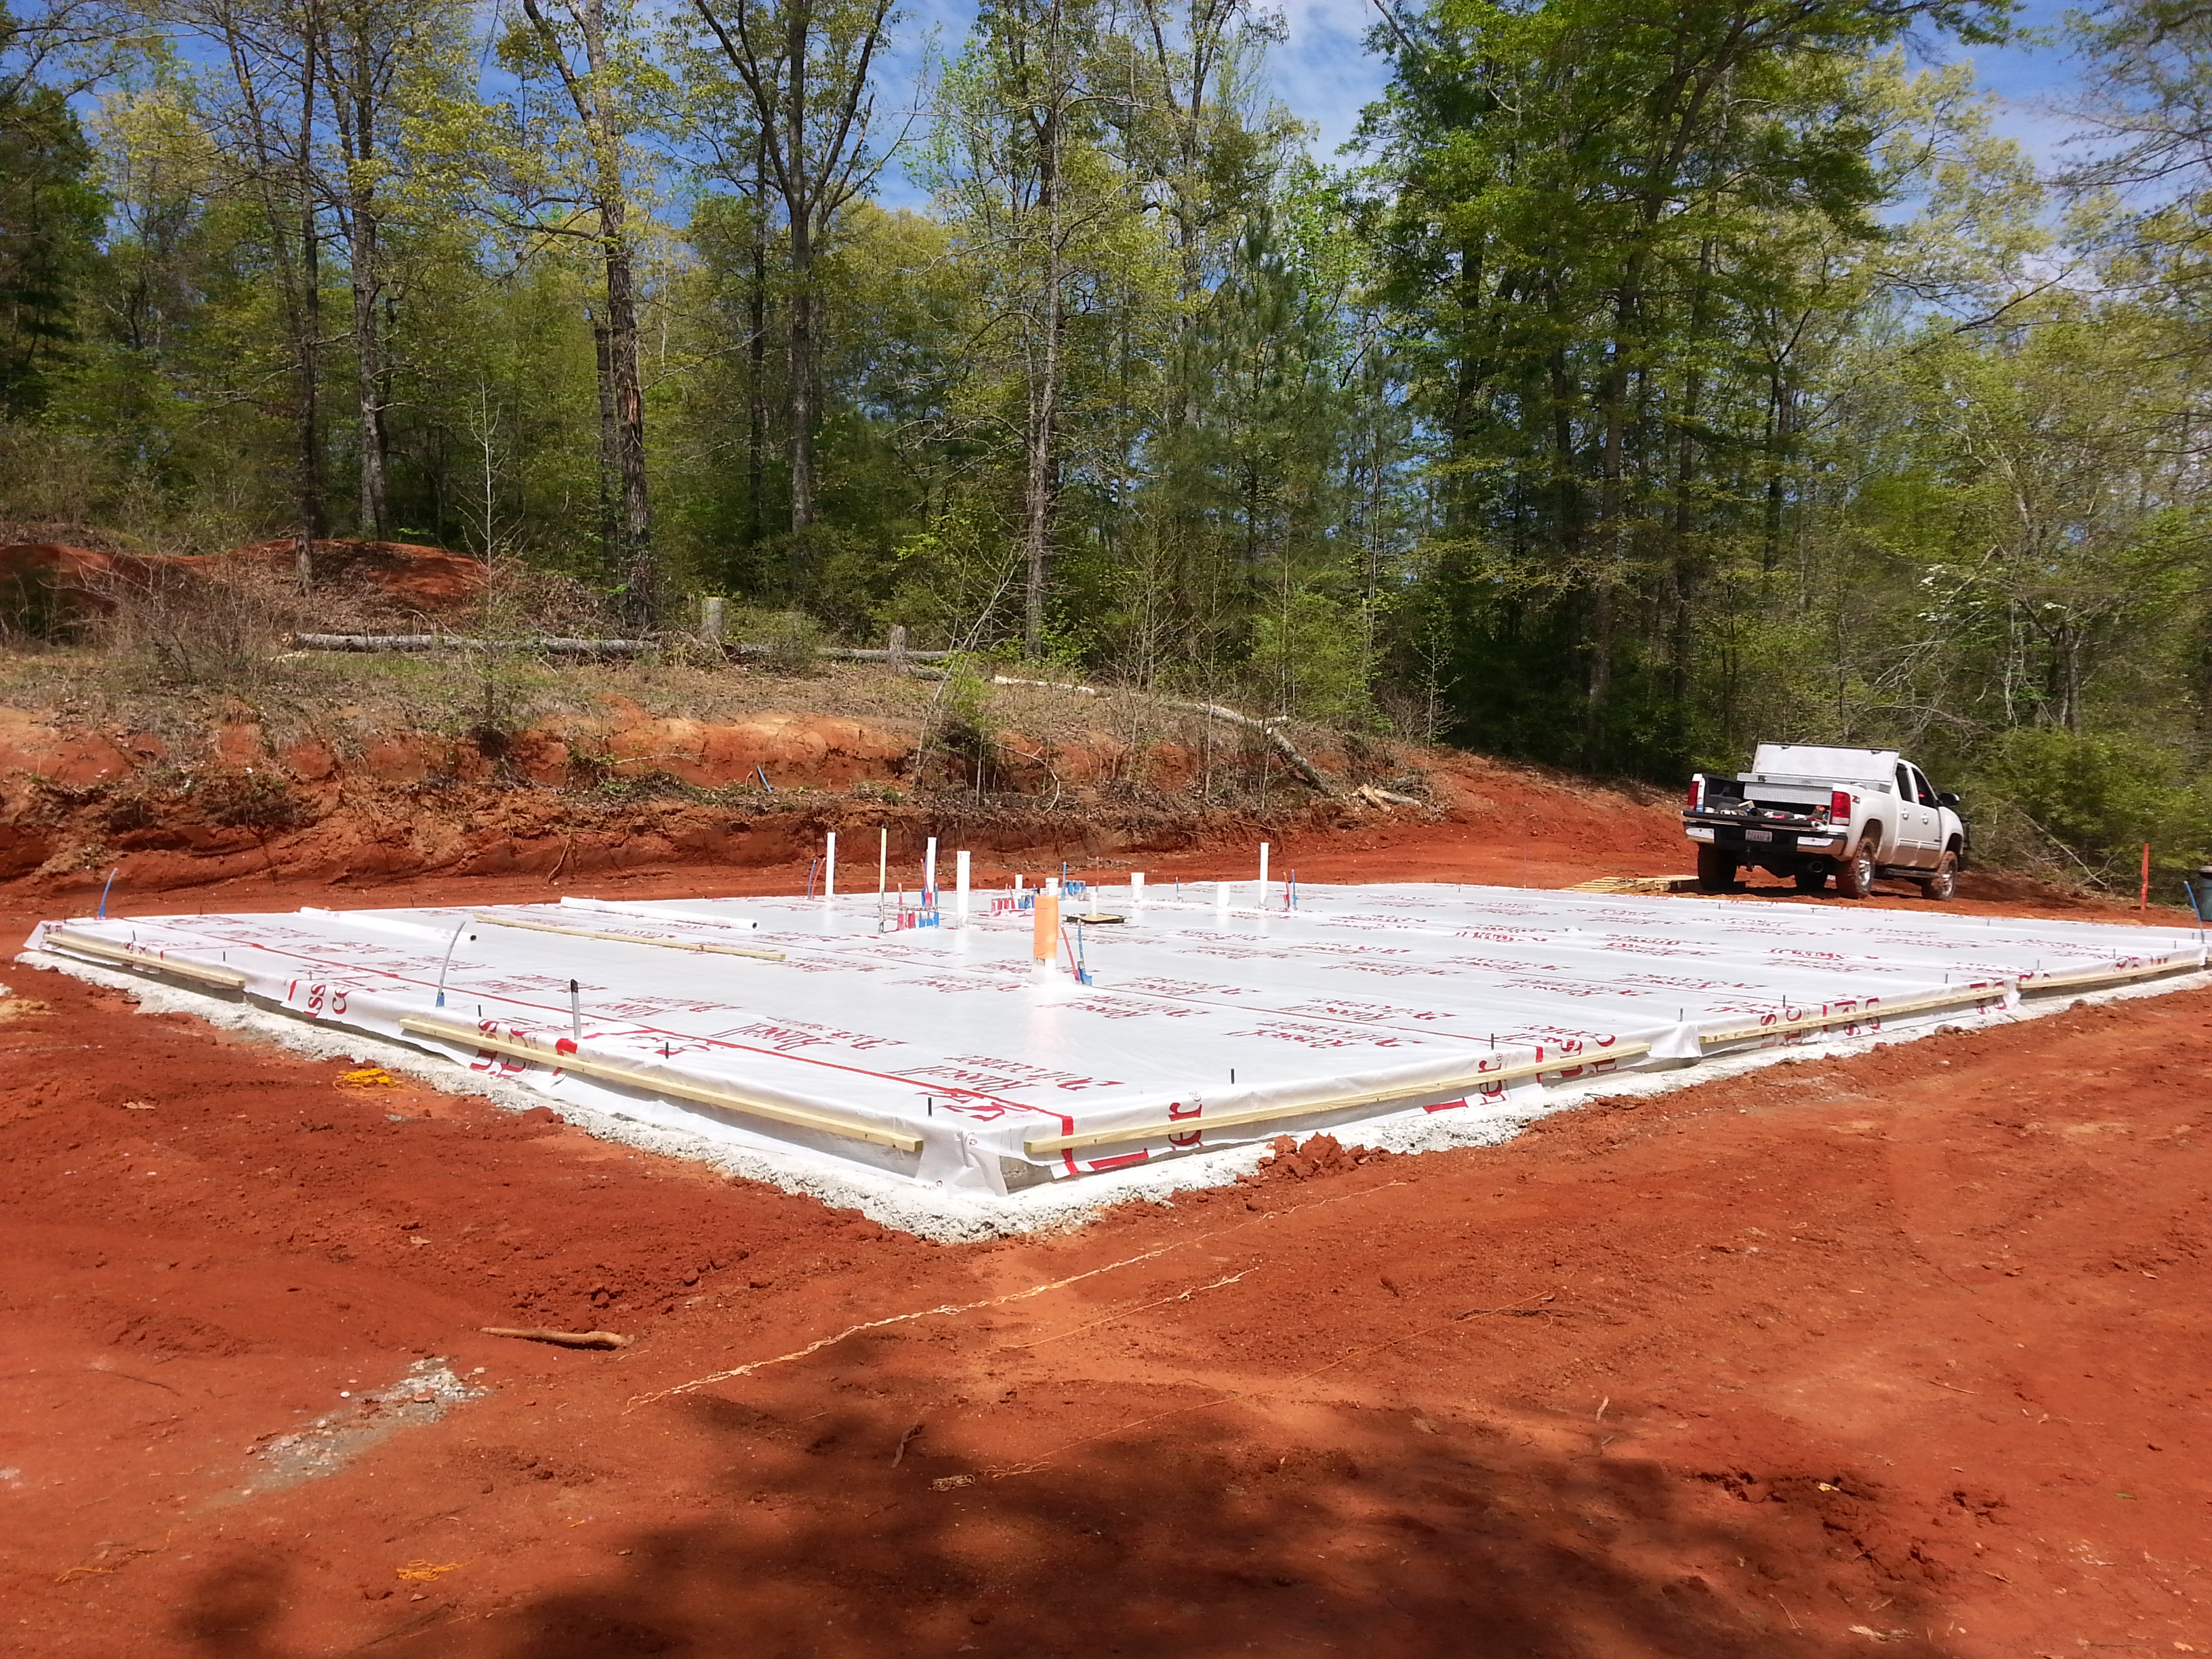
To help keep the monolithic slab-on-grade foundation dry, the site’s surfaces is graded away from the structure, the slab is poured on a bed of gravel, and using a vapor barrier will separate the foundation from the sill plates.
Image

To keep water out, flashing should be integrated with the house wrap, siding, and shingles or roof tiles.
Image
Image
Traditional methods of site drainage, such as site grading, can be difficult to achieve on urban sites.
Image
Image
Image
Image
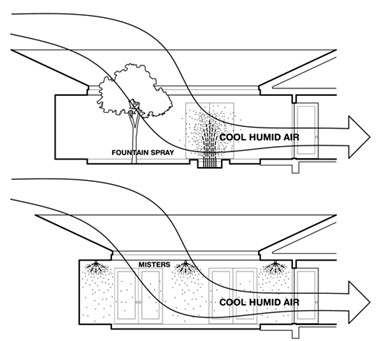
Using outdoor misters or spray fountains can cool the outside air before it enters the house
Image

Vapor-permeable mineral wool insulation is installed on the exterior side of the sill beam during an exterior wall retrofit to allow the sill beam to dry to the outside
Image

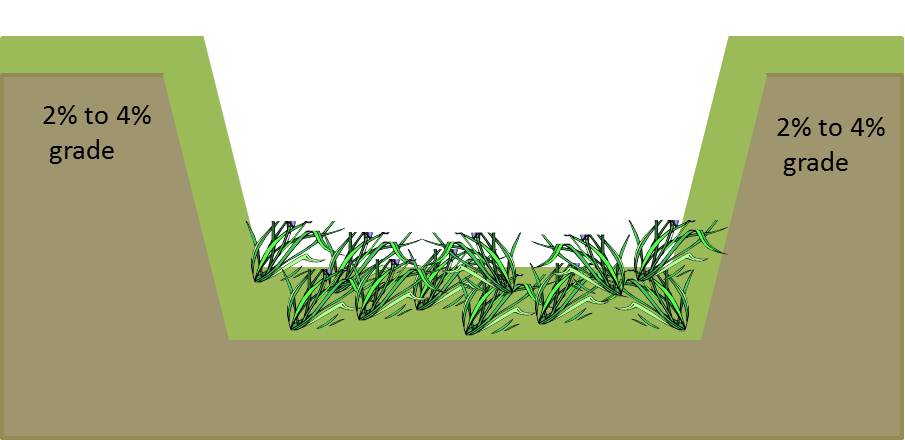
Vegetated swales help to control storm water runoff and can filter out pollutants.
Image

Vegetated swales, pervious pavers, pocket parks, and retention of existing trees all help to minimize runoff and lessen impacts on municipal sewer systems.
Image
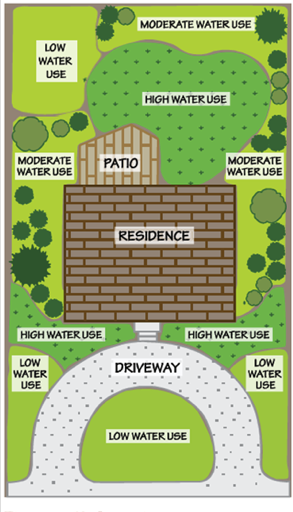
Vegetation types are grouped by water usage in a technique known as hydrozoning to reduce overall water consumption.
Image
Image
Image
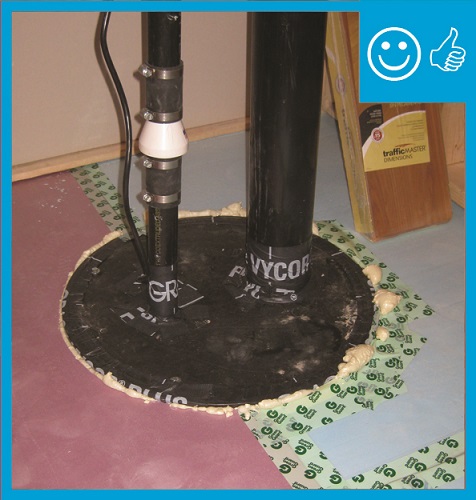
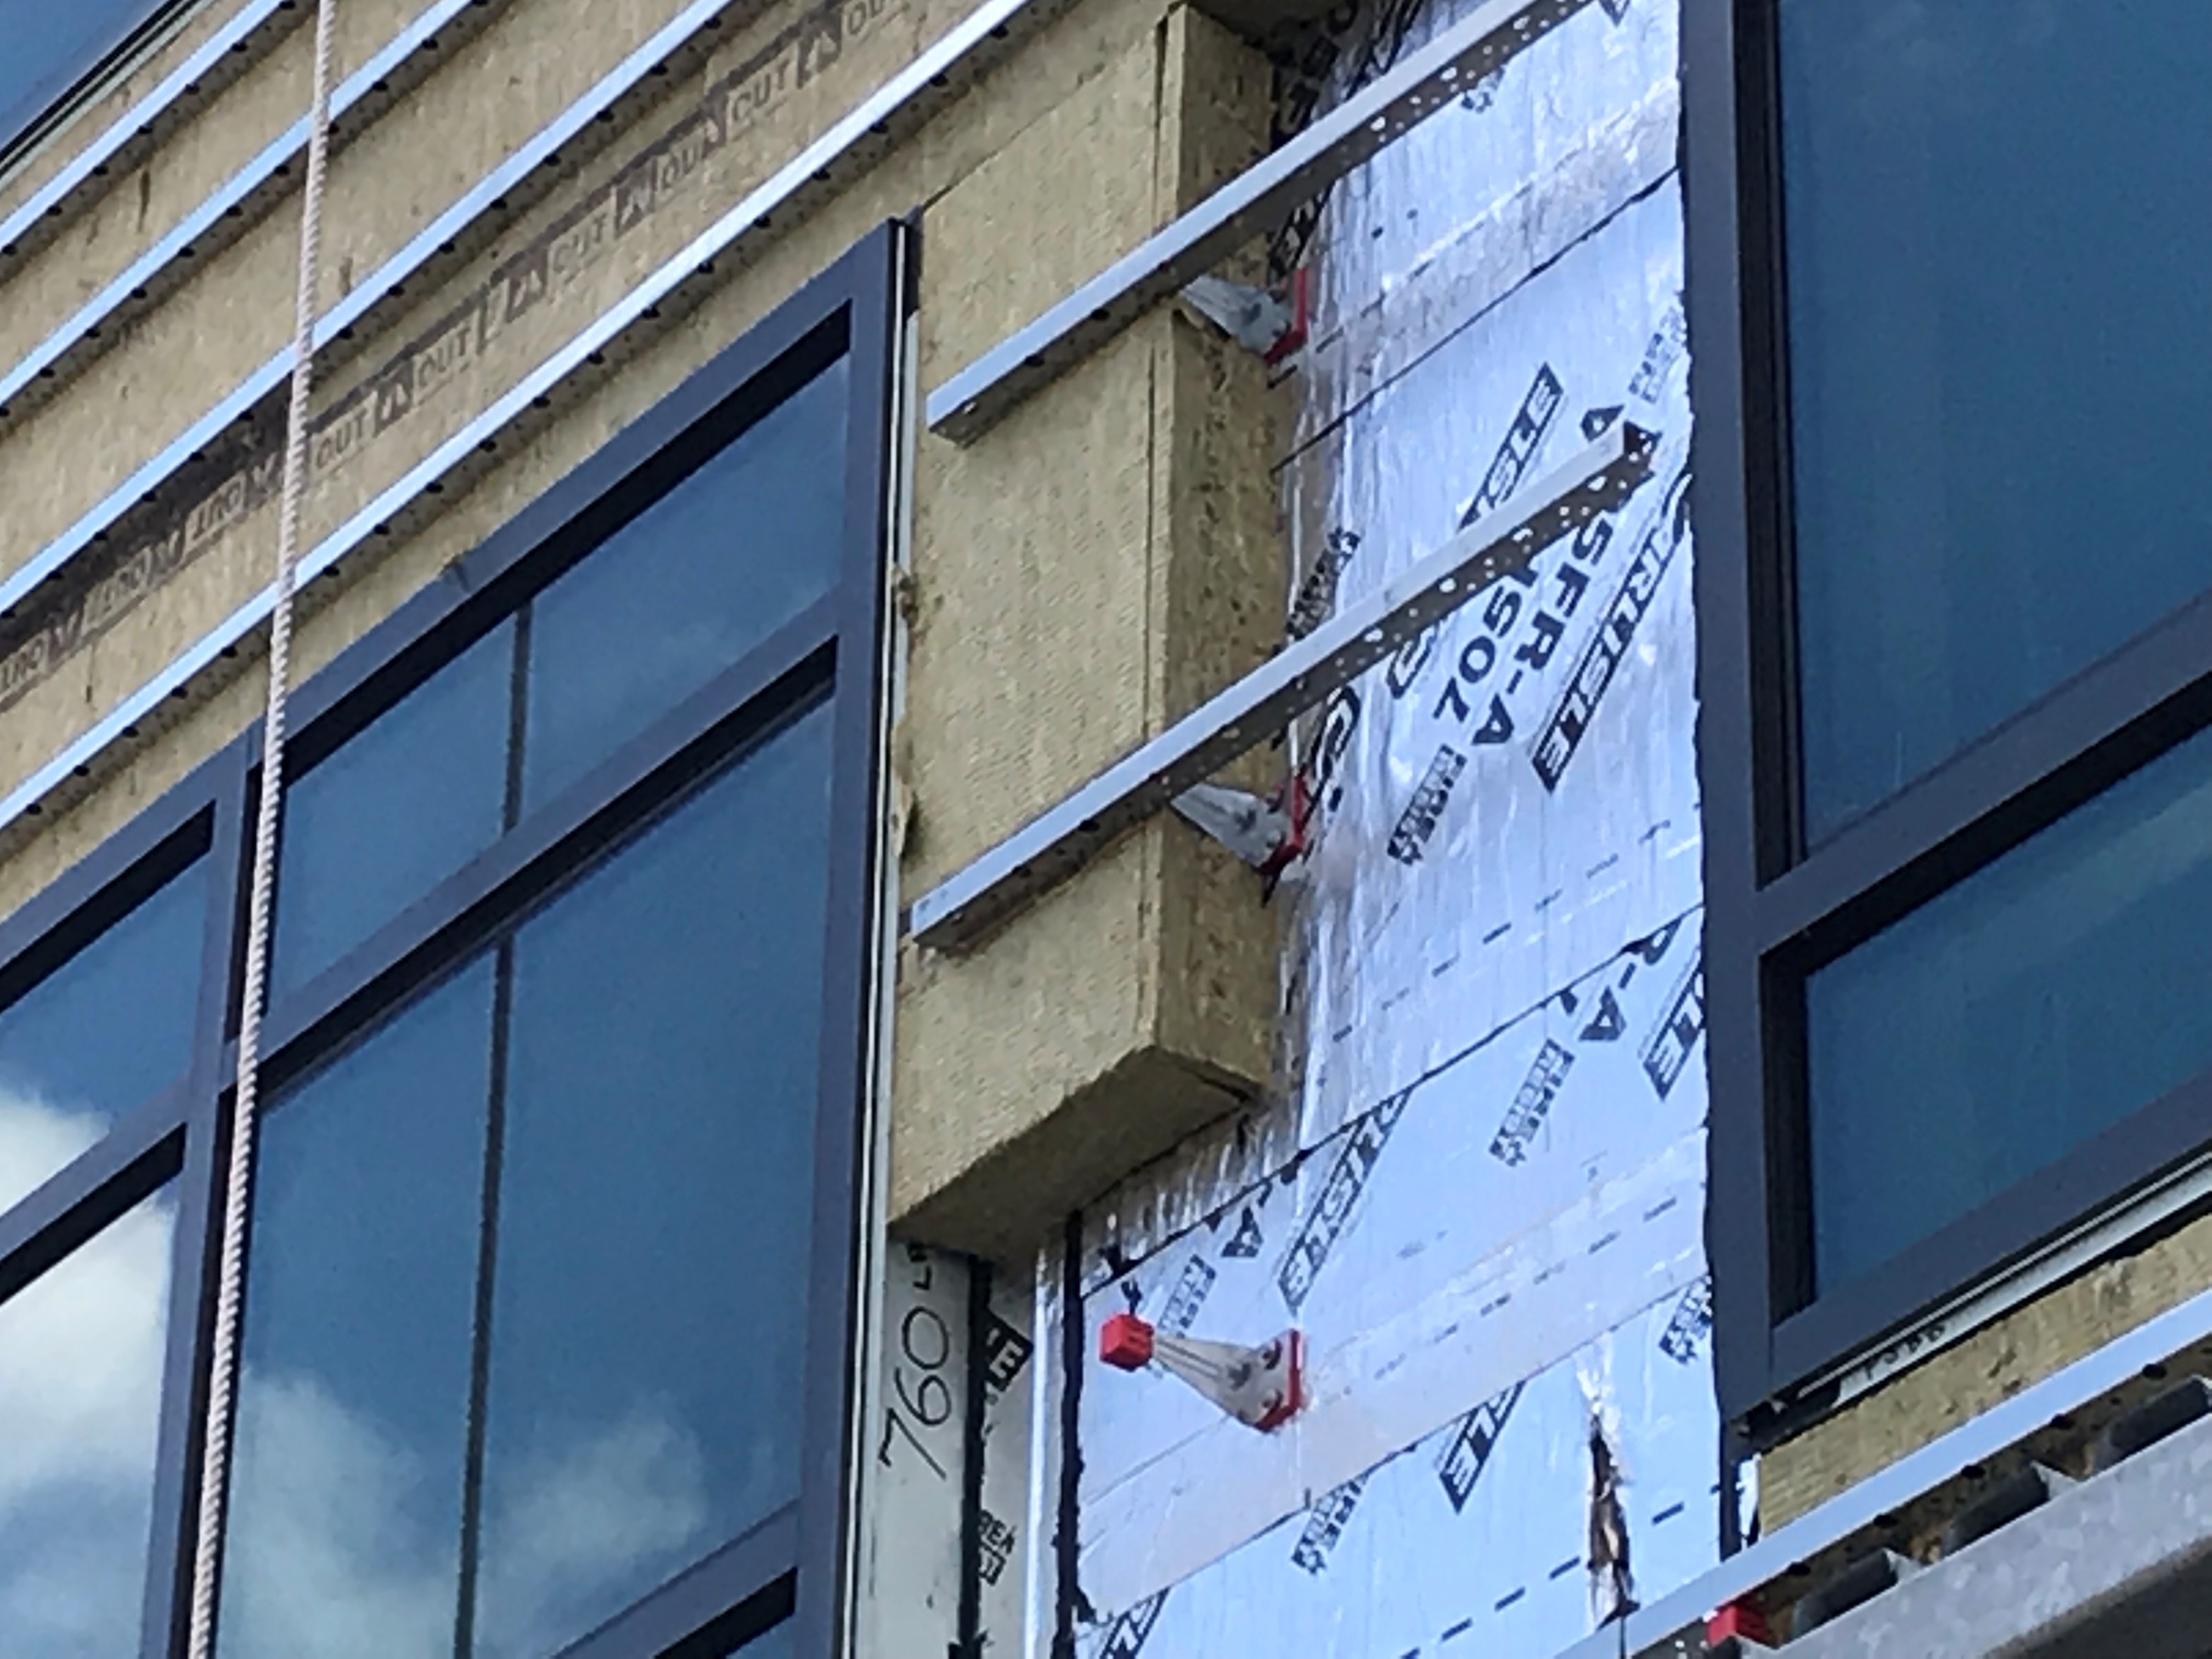
Water management detail for a solar panel rack mounting block installed in rigid foam that was installed over an existing roof
Image
Image
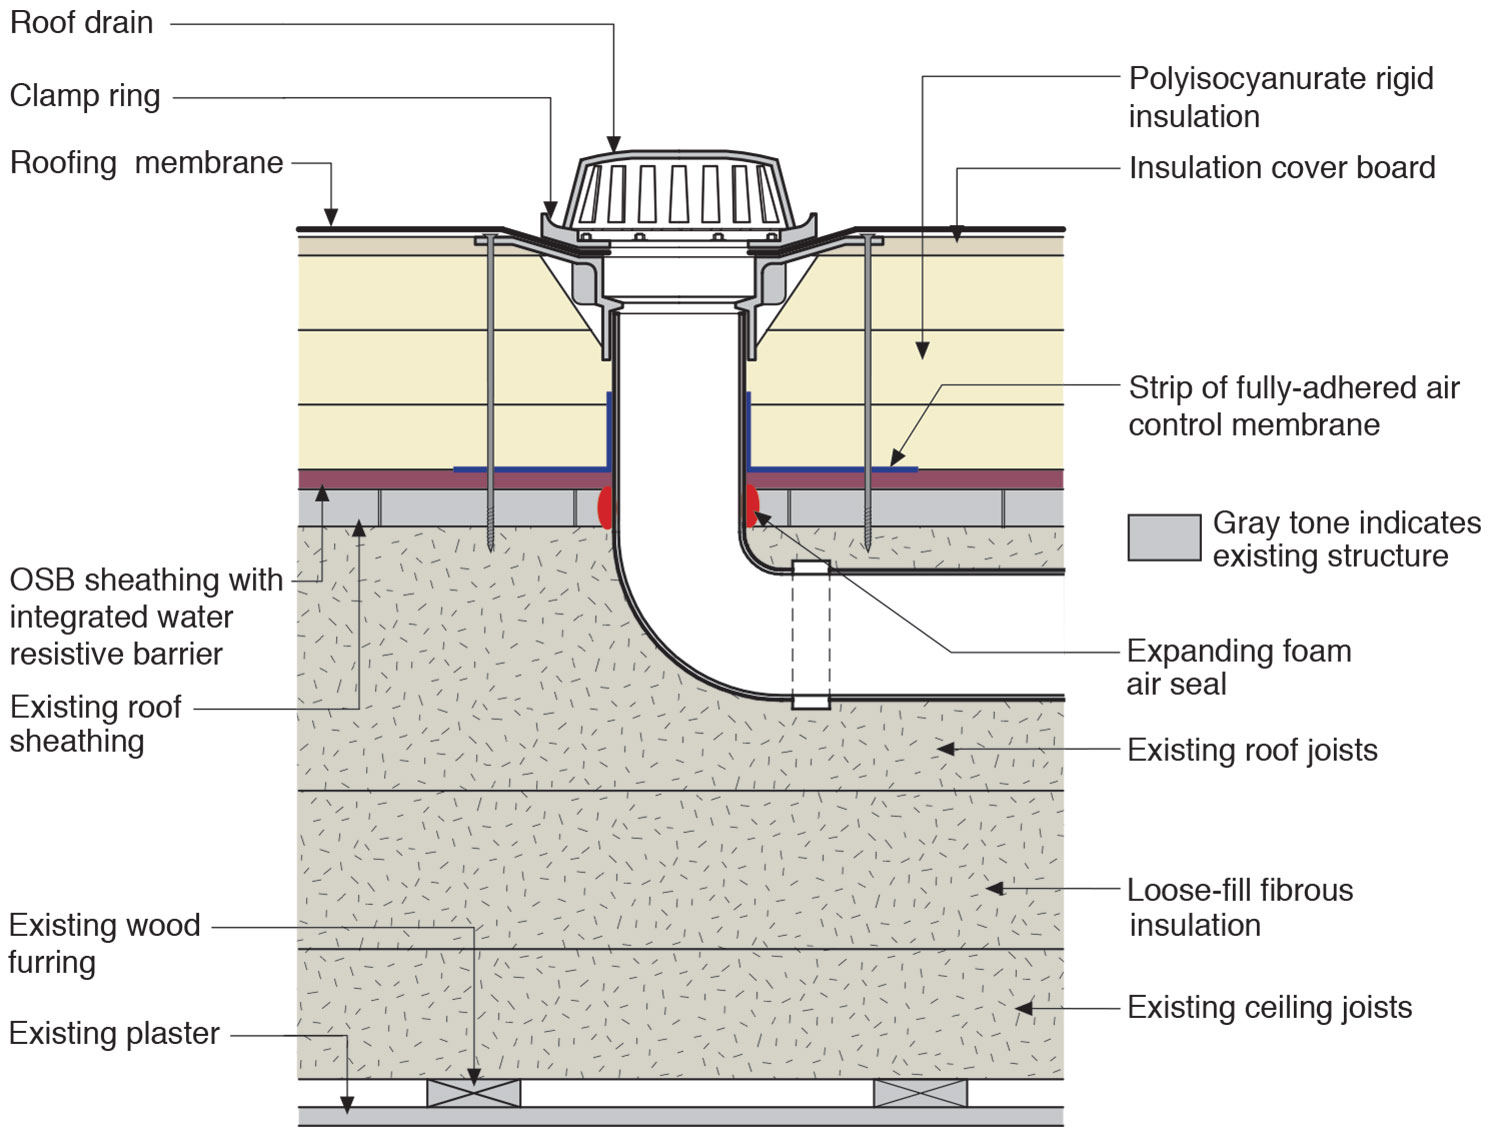
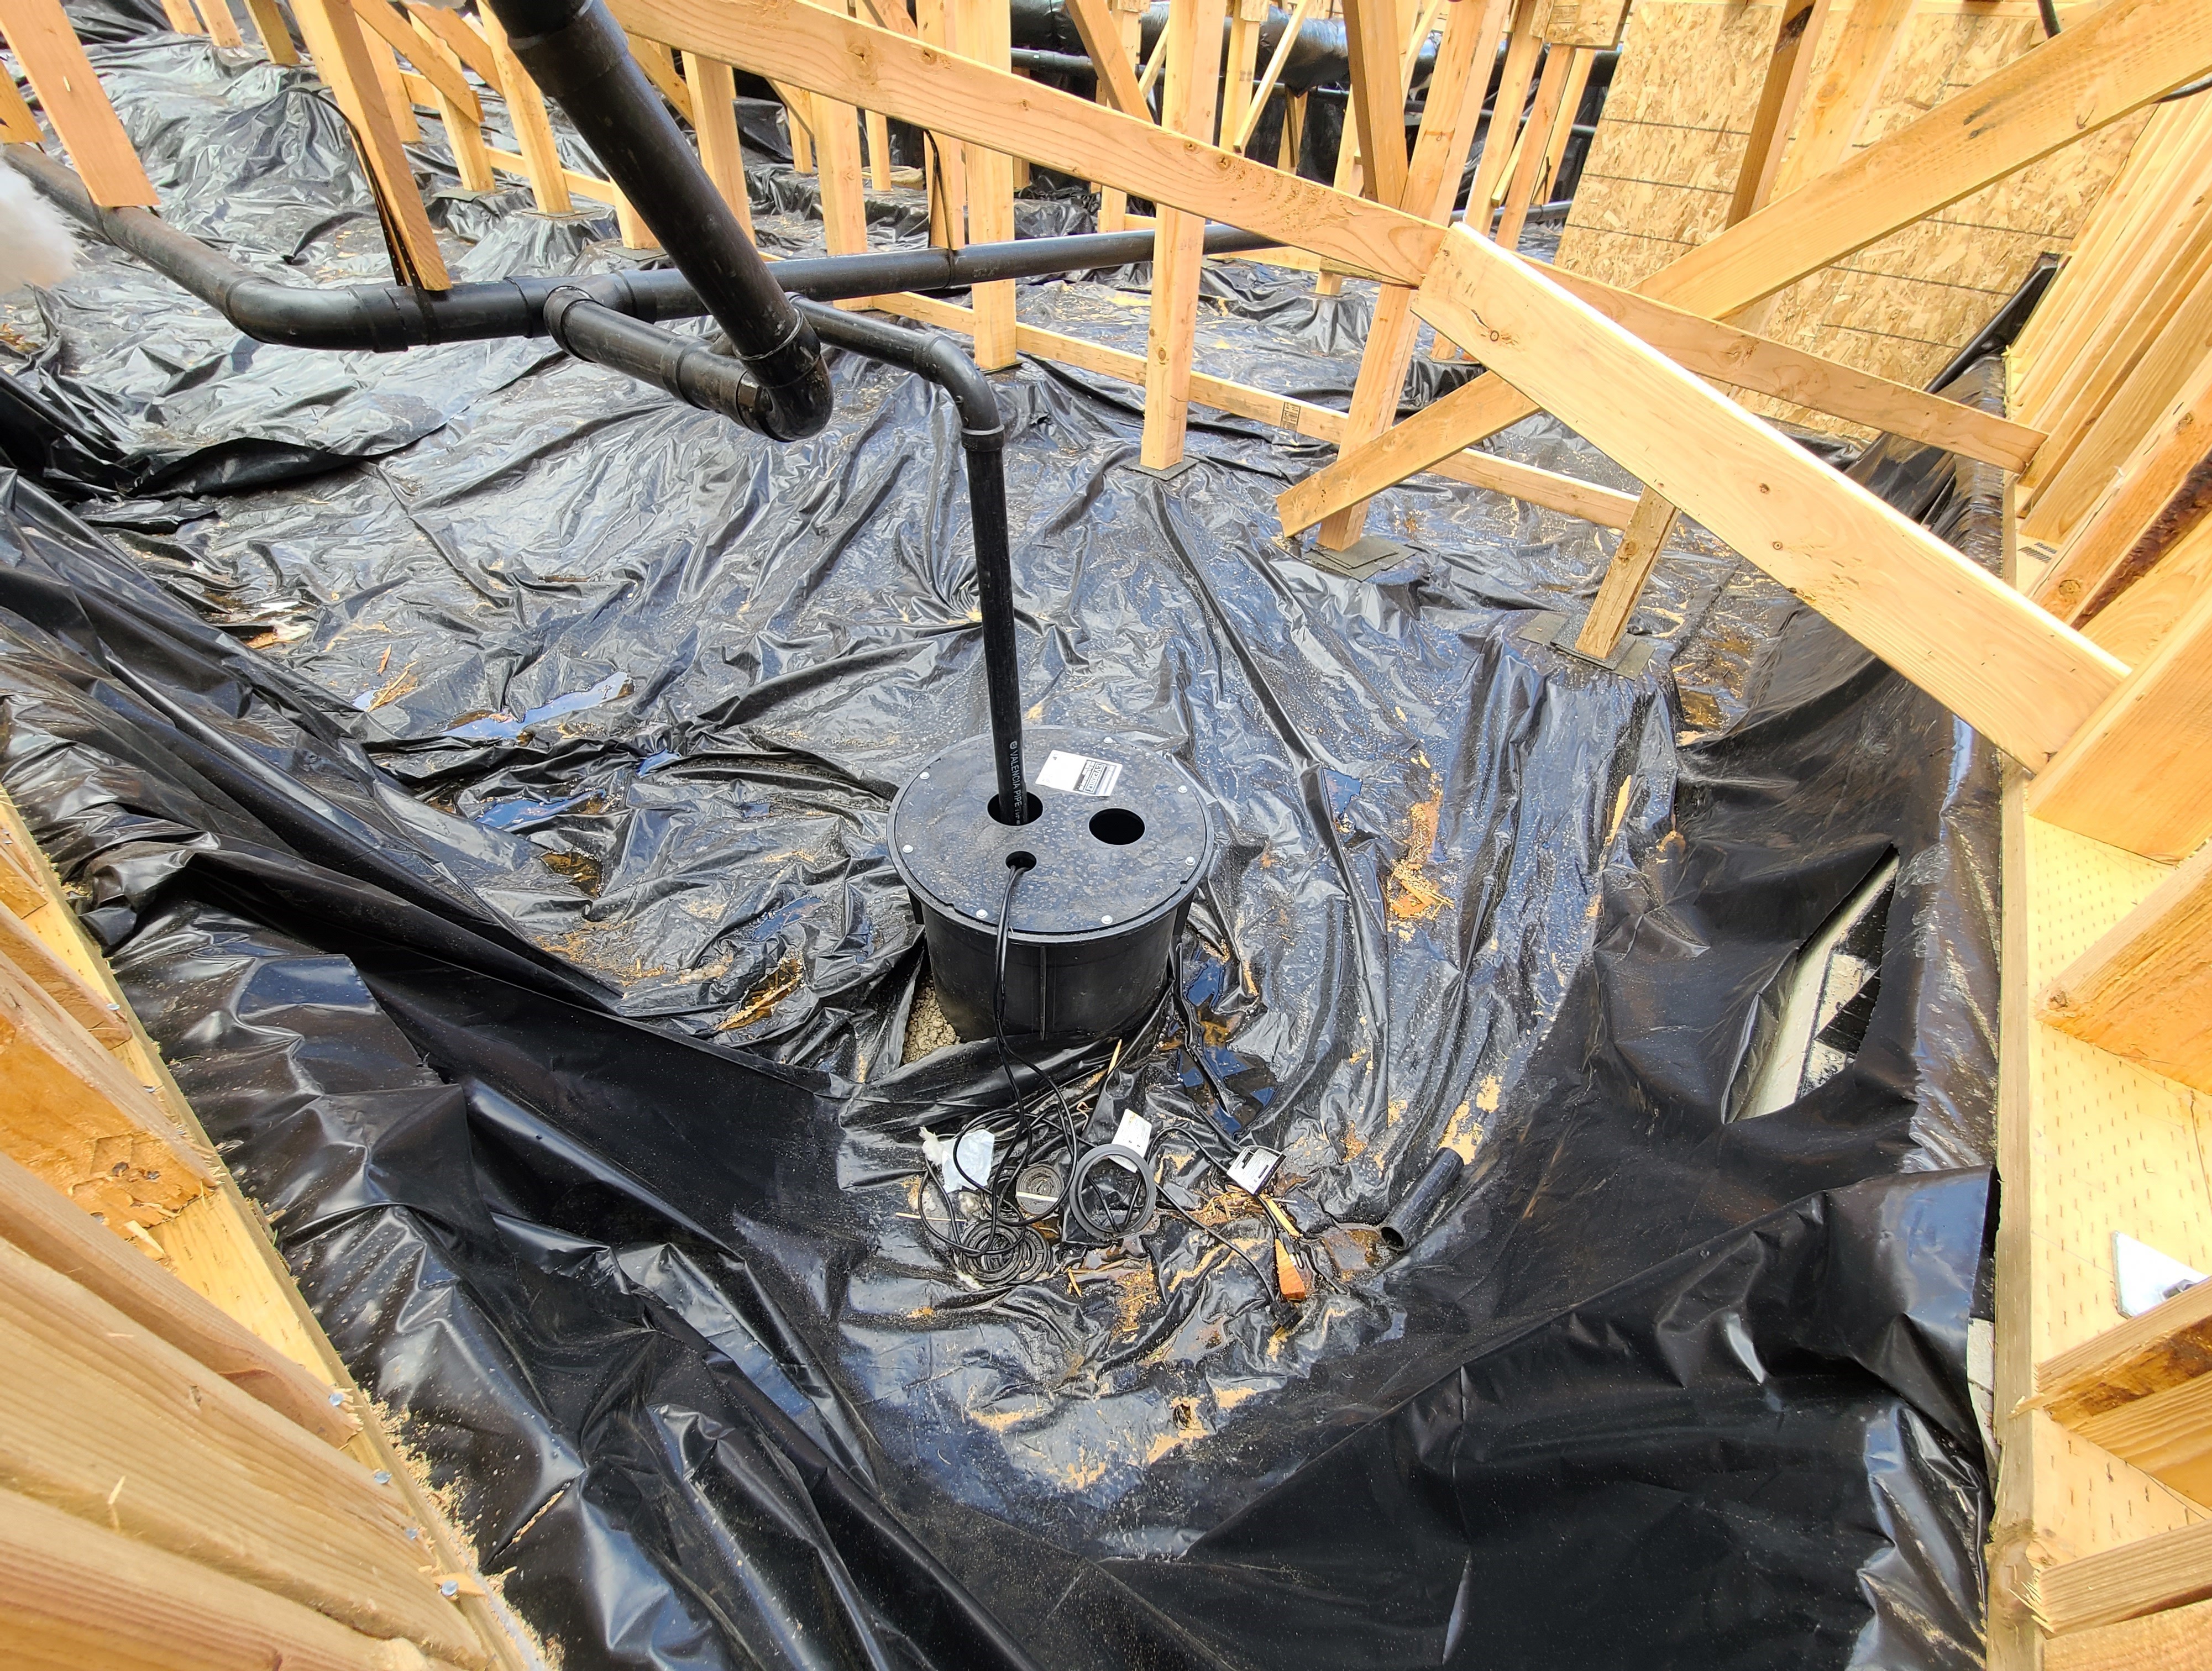
Water management details for a roof drain installed along with rigid foam on a flat roof
Image

Water pressure reducing valves decrease water pressure entering a home to decrease water usage and improve fixture and appliance performance.
Image
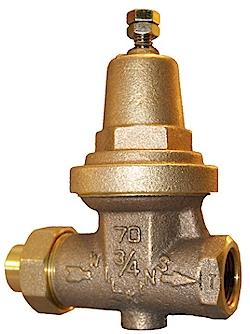
Water pressure reducing valves decrease water pressure entering a home to decrease water usage and improve fixture and appliance performance.
Image
Water should not be directed to flow into the wall. This could soon lead to water intrusion inside the wall.
Image
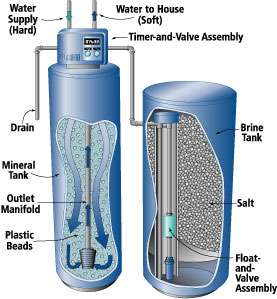
Water softeners reduce minerals in hard water but overly frequent recharging of the mineral tank can waste water.
Image

Image
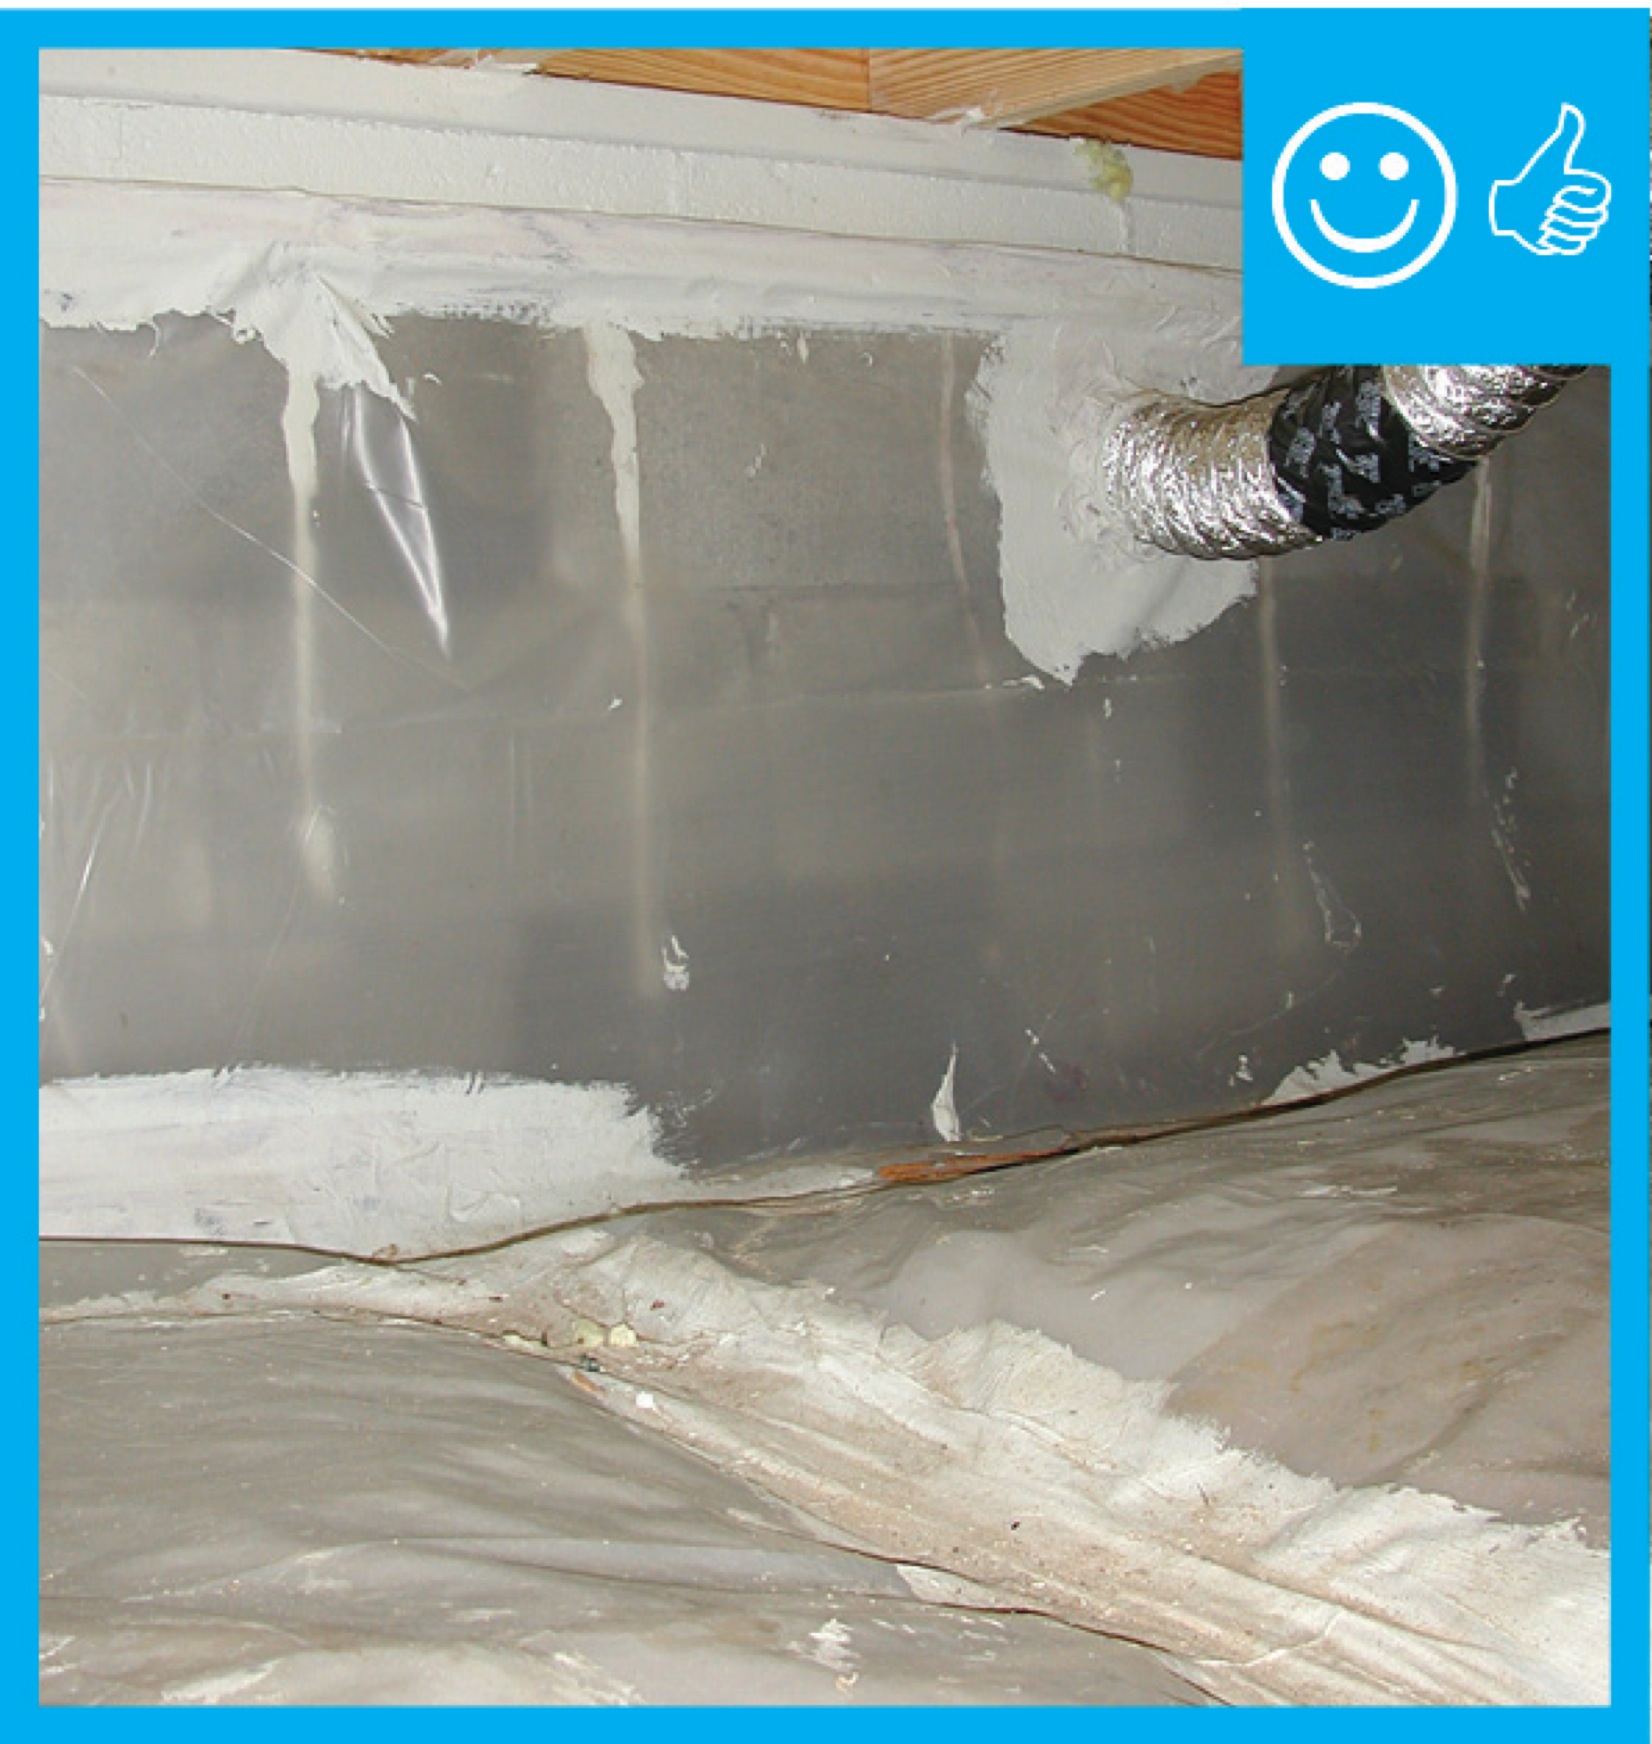
Water-proof materials cover the exterior side of crawlspace windows in a crawlspace retrofit, while foil-faced rigid foams seals and insulates the inside face of the openings
Image

Image
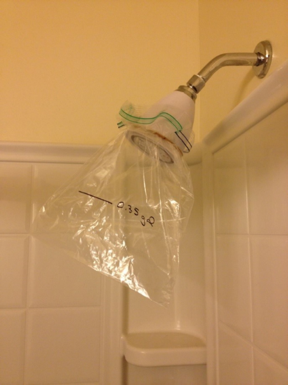
WaterSense-labeled showerheads release ≤ 0.35 gallons of water in a 10-second flow test.
Image

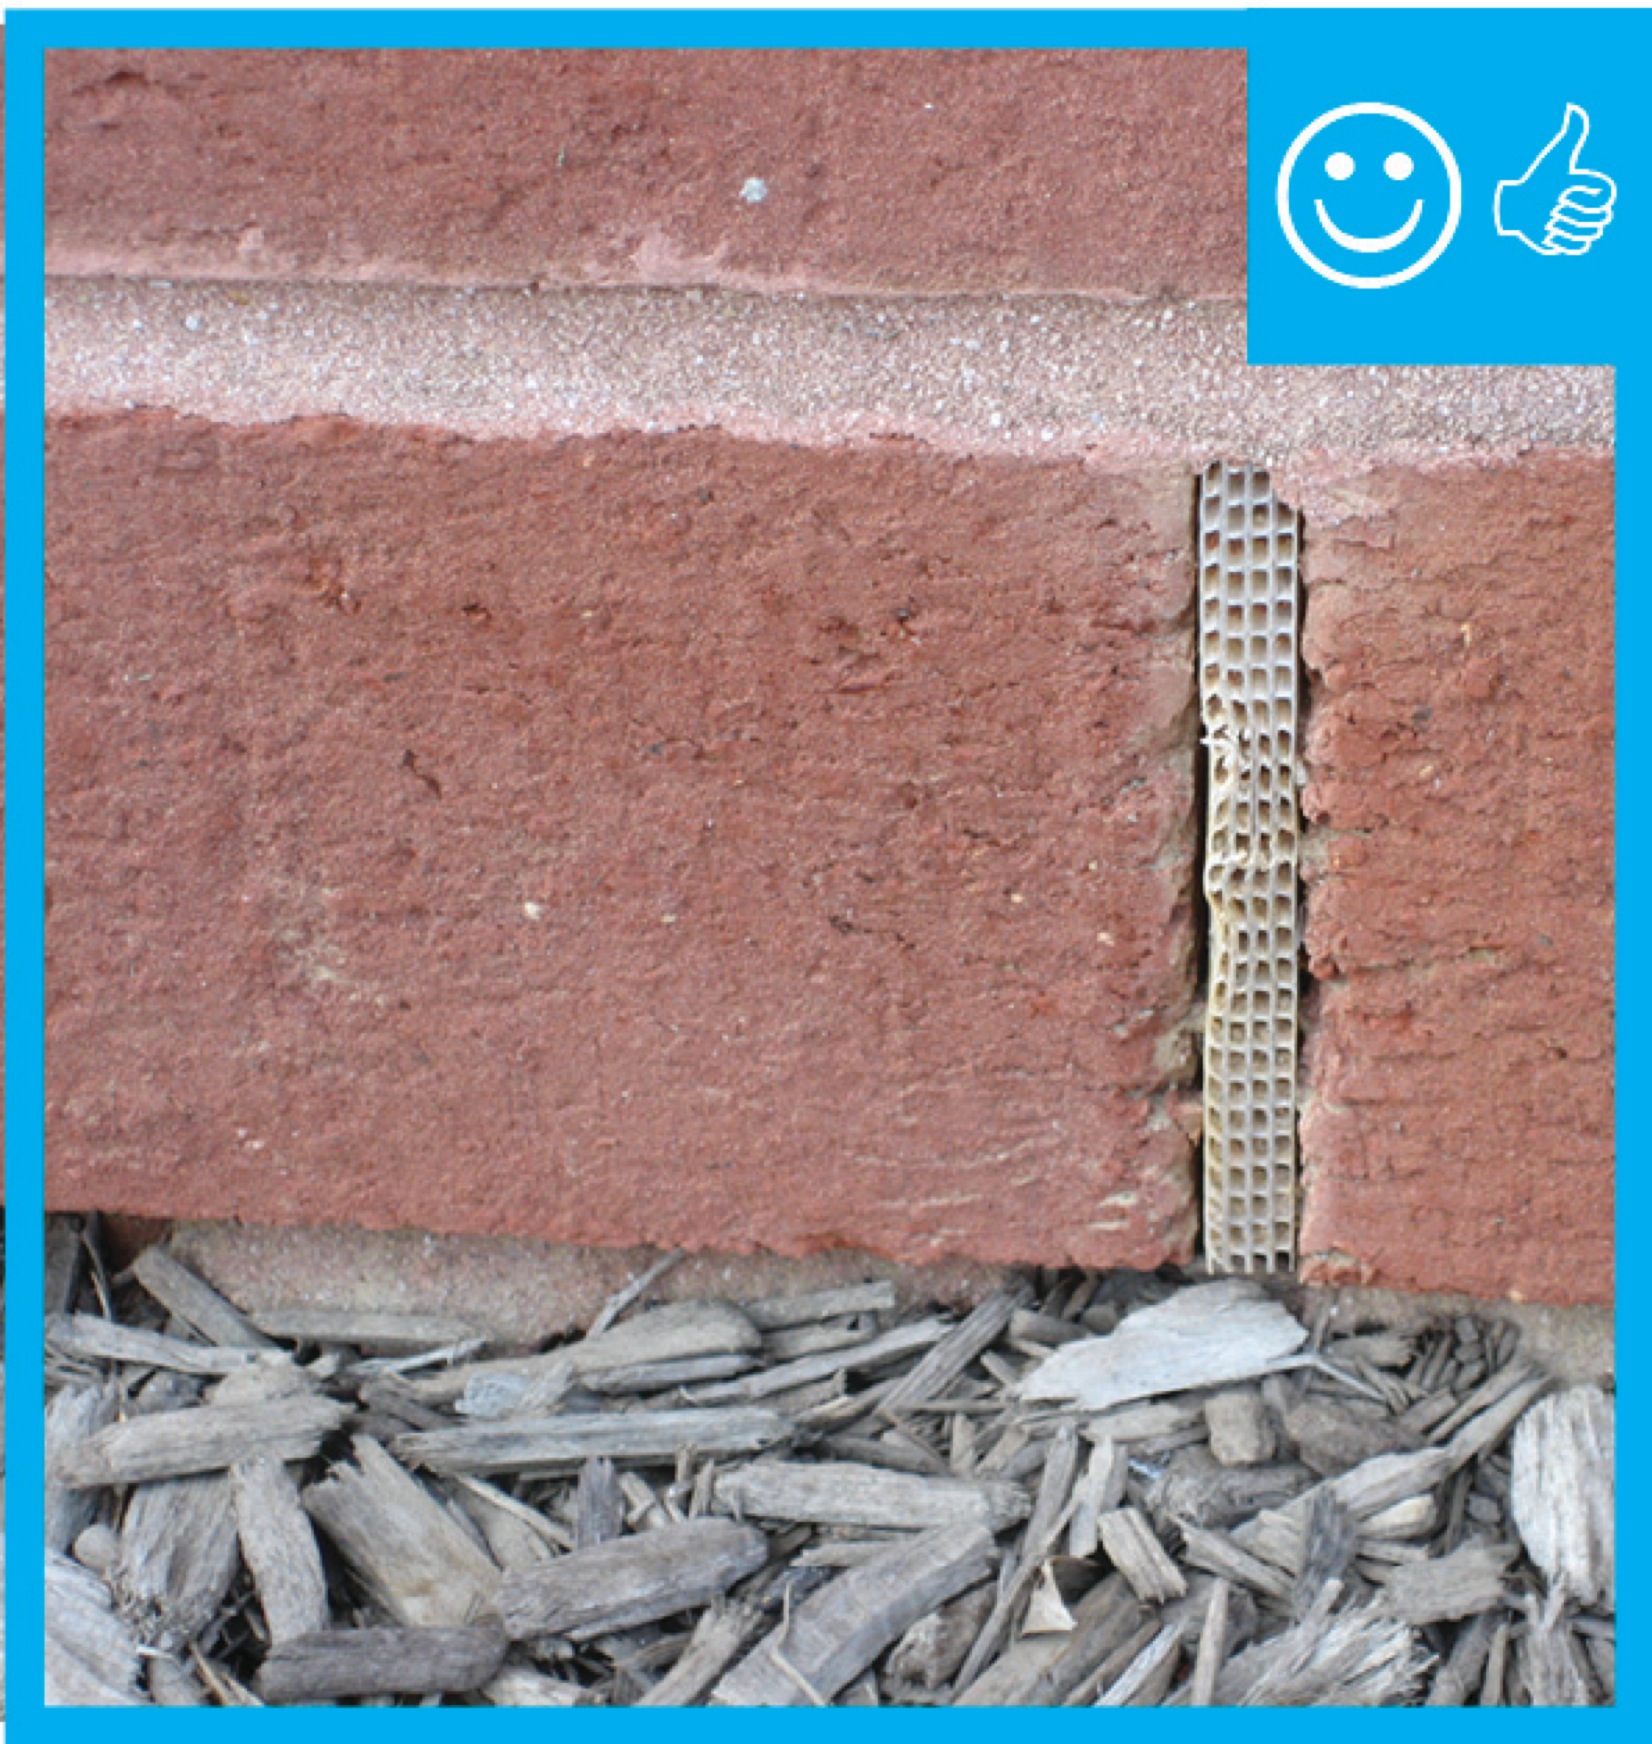
Weep holes: Rope inserted in the head joist between bricks will allow water to weep out of the base of the wall assembly
Image
Image
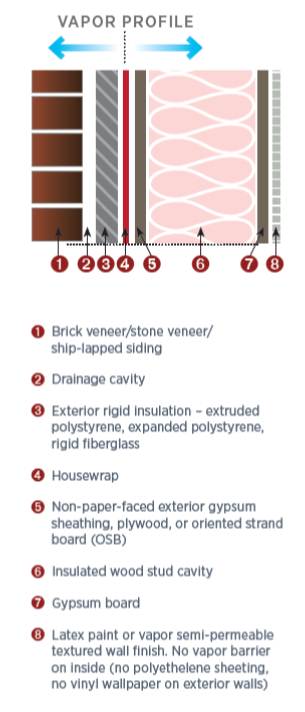
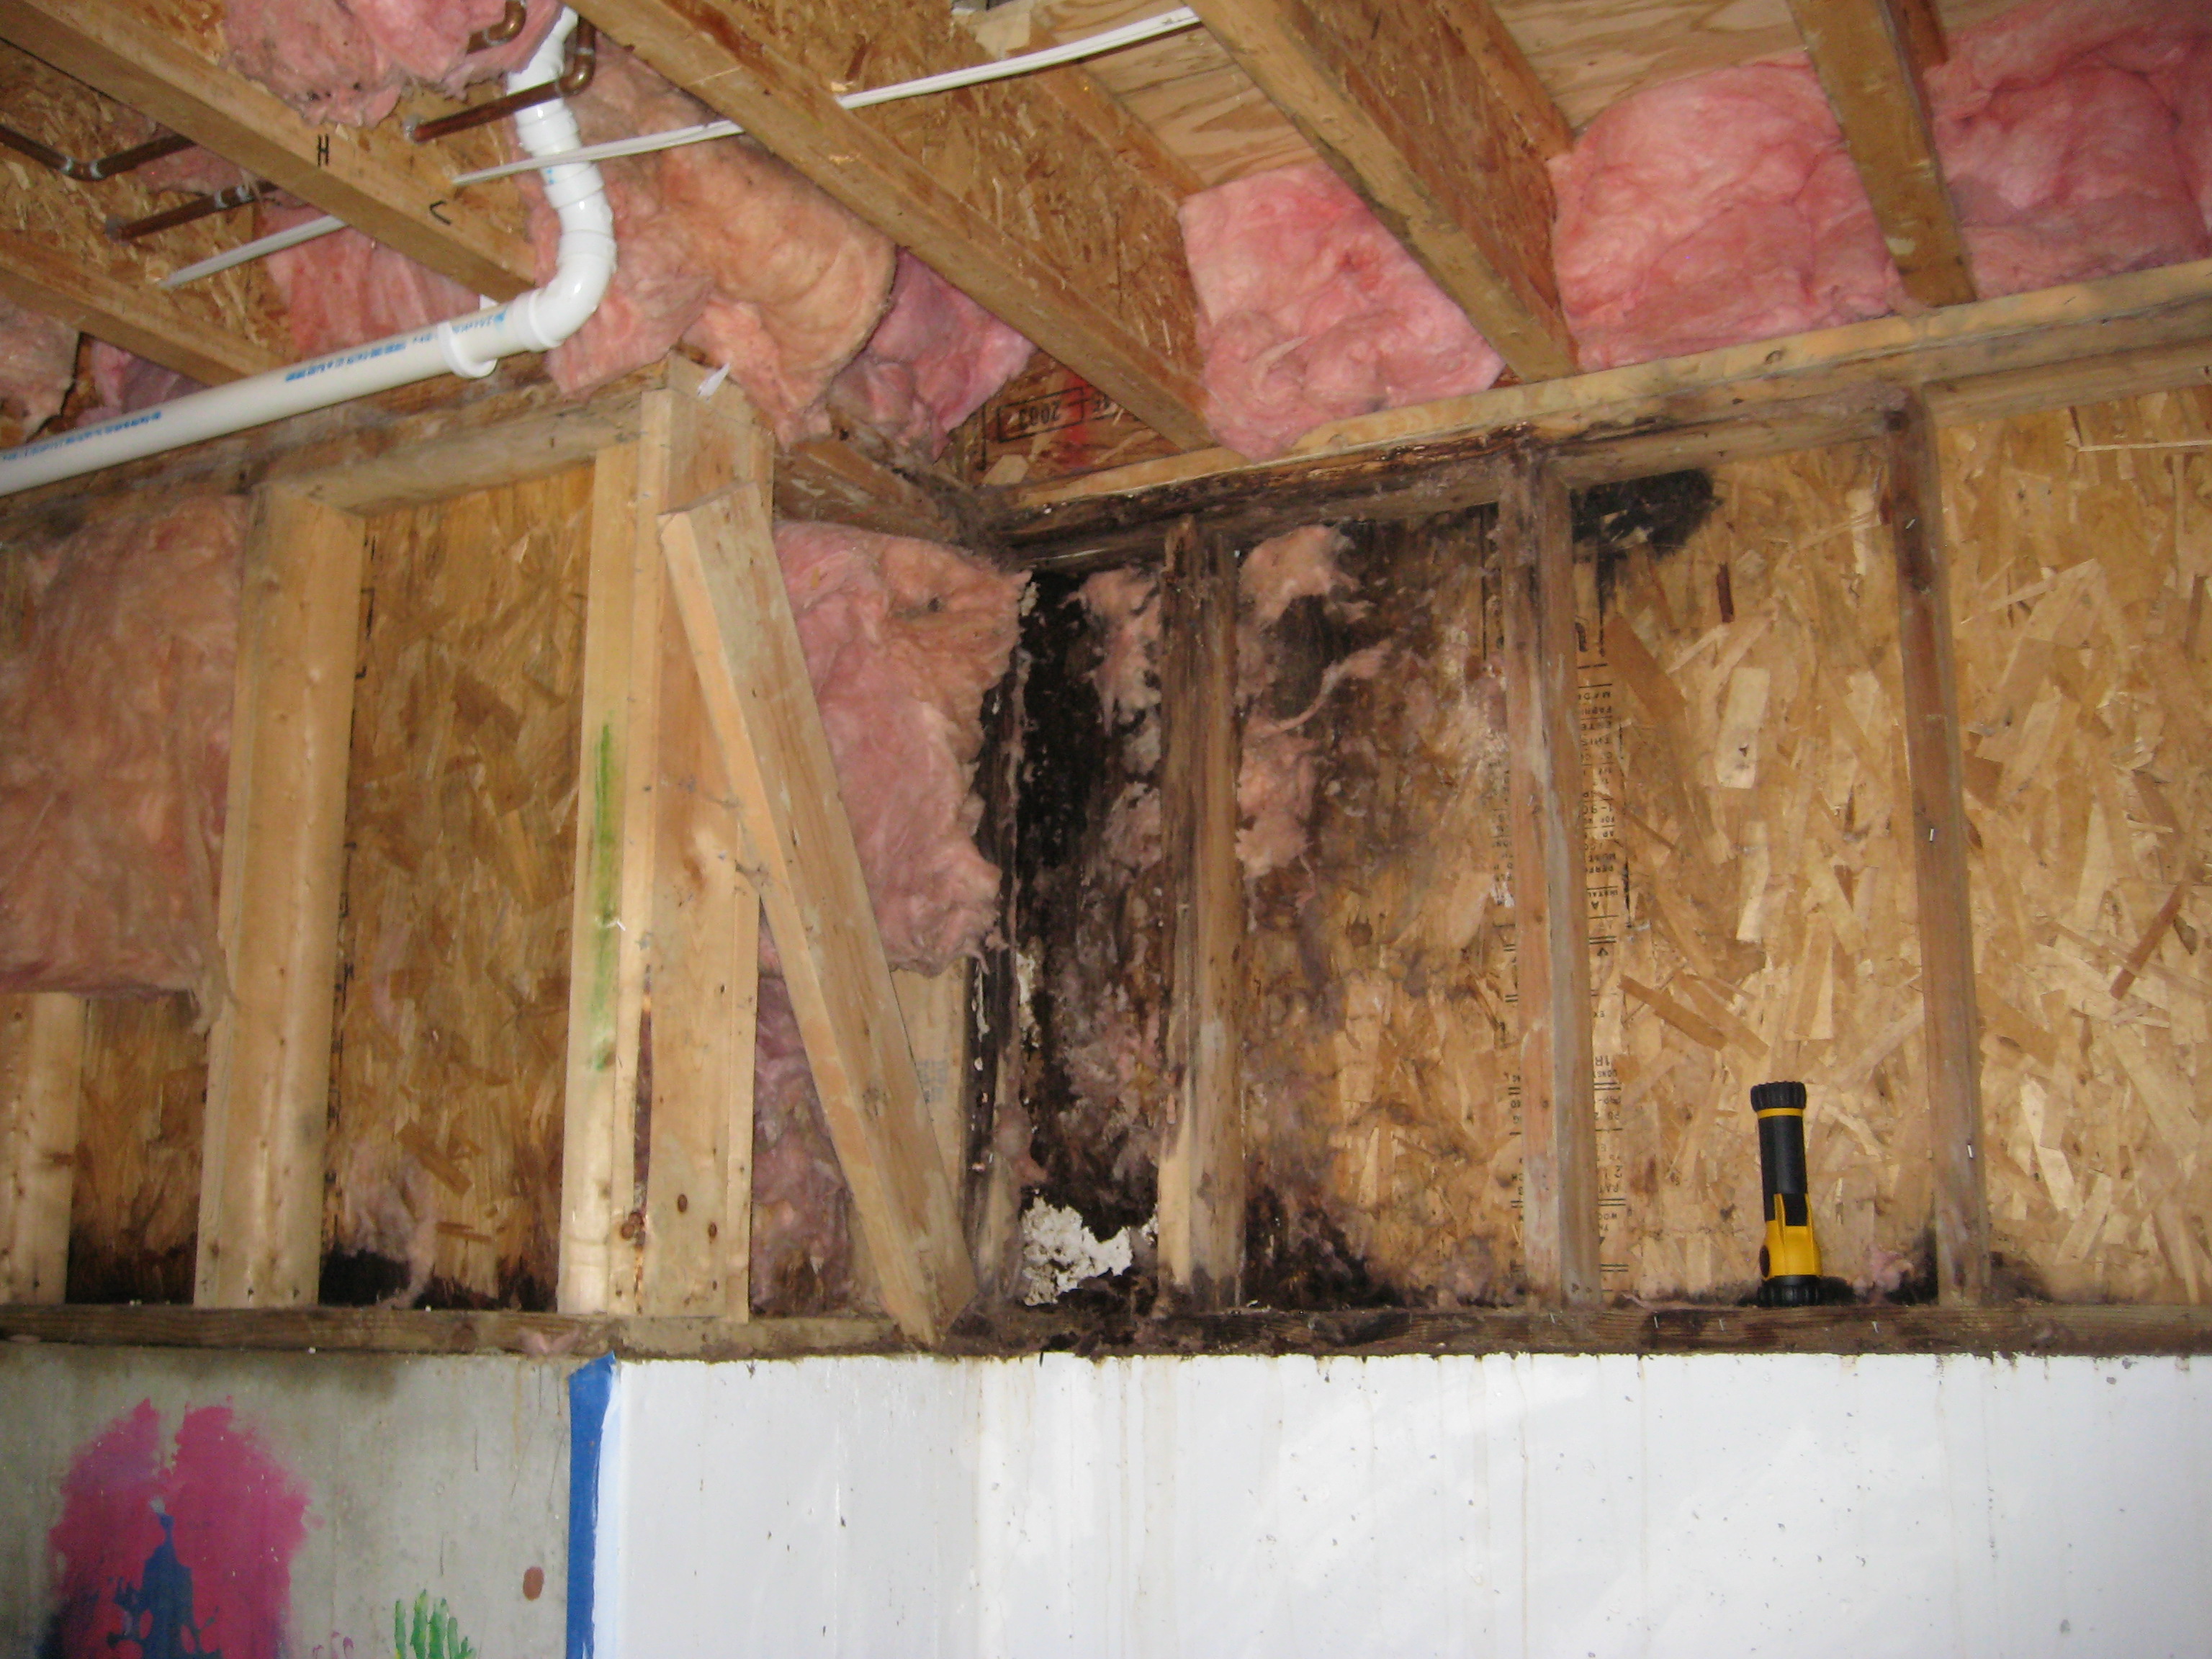
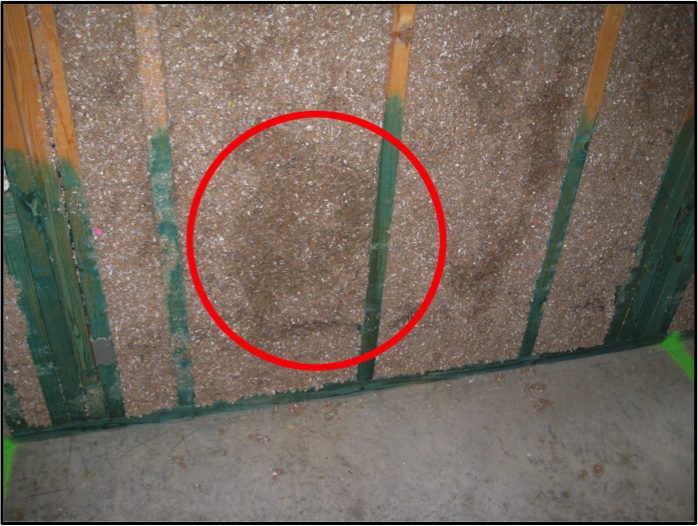
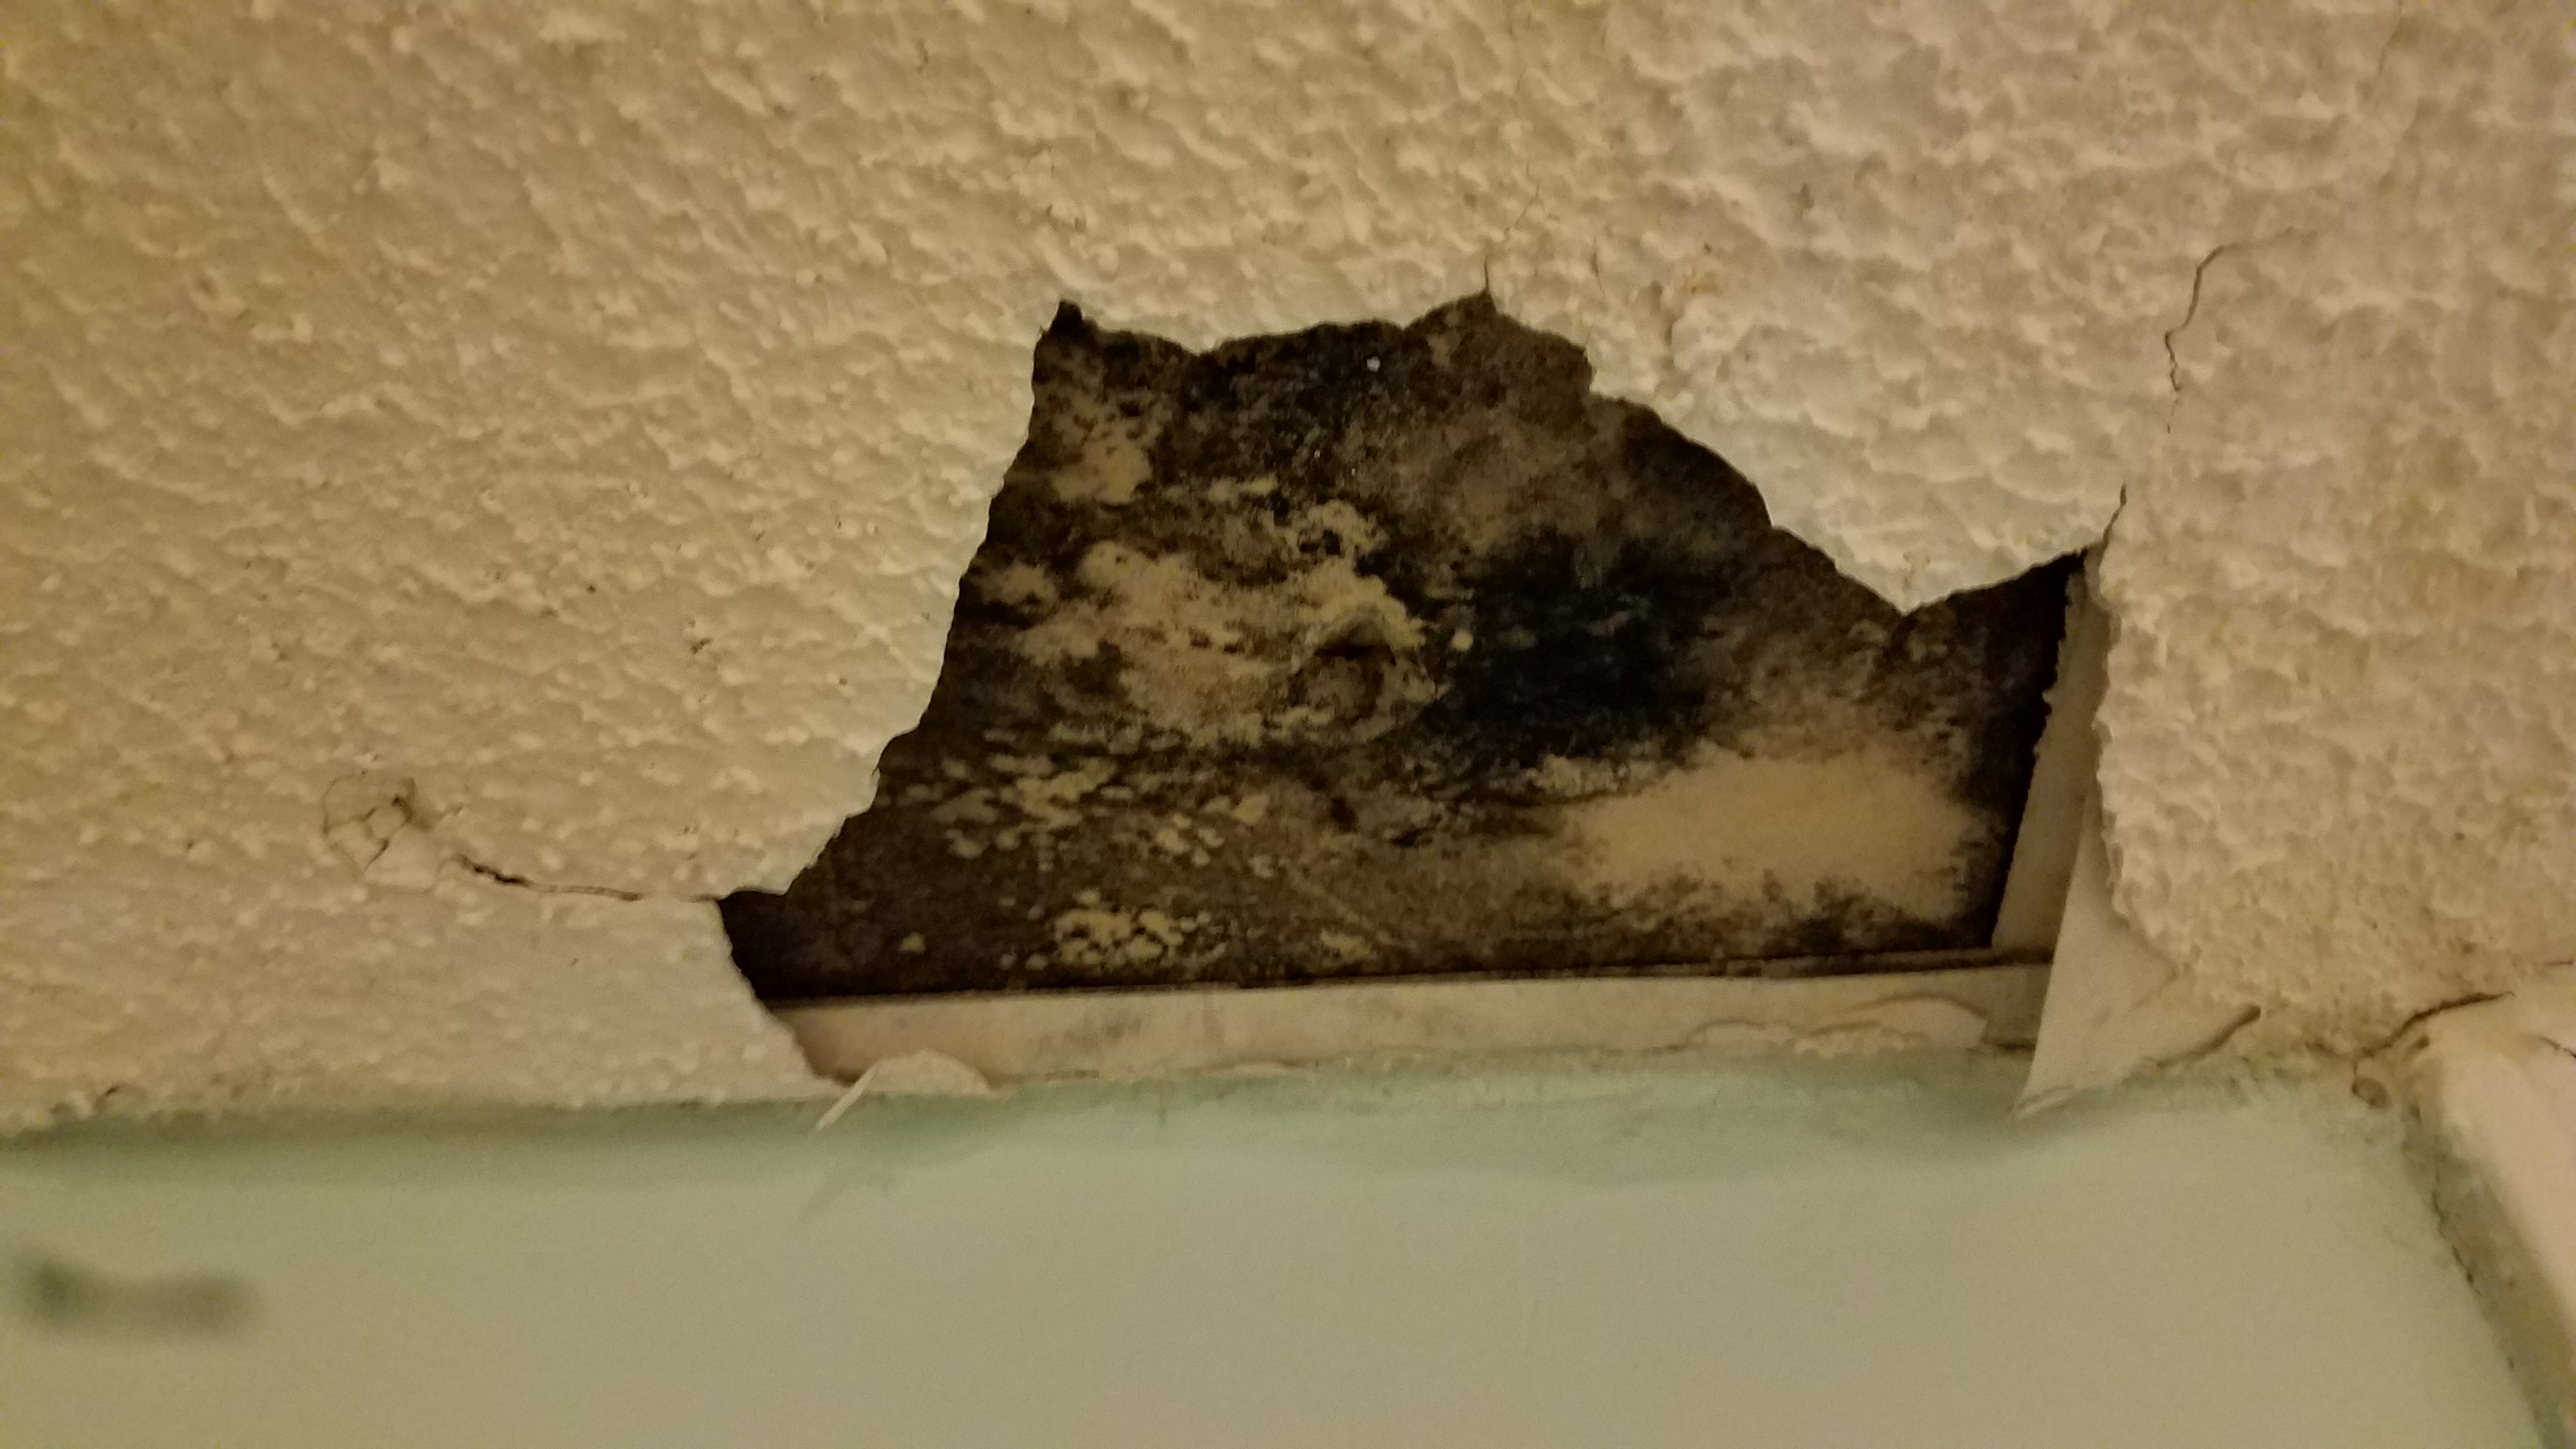
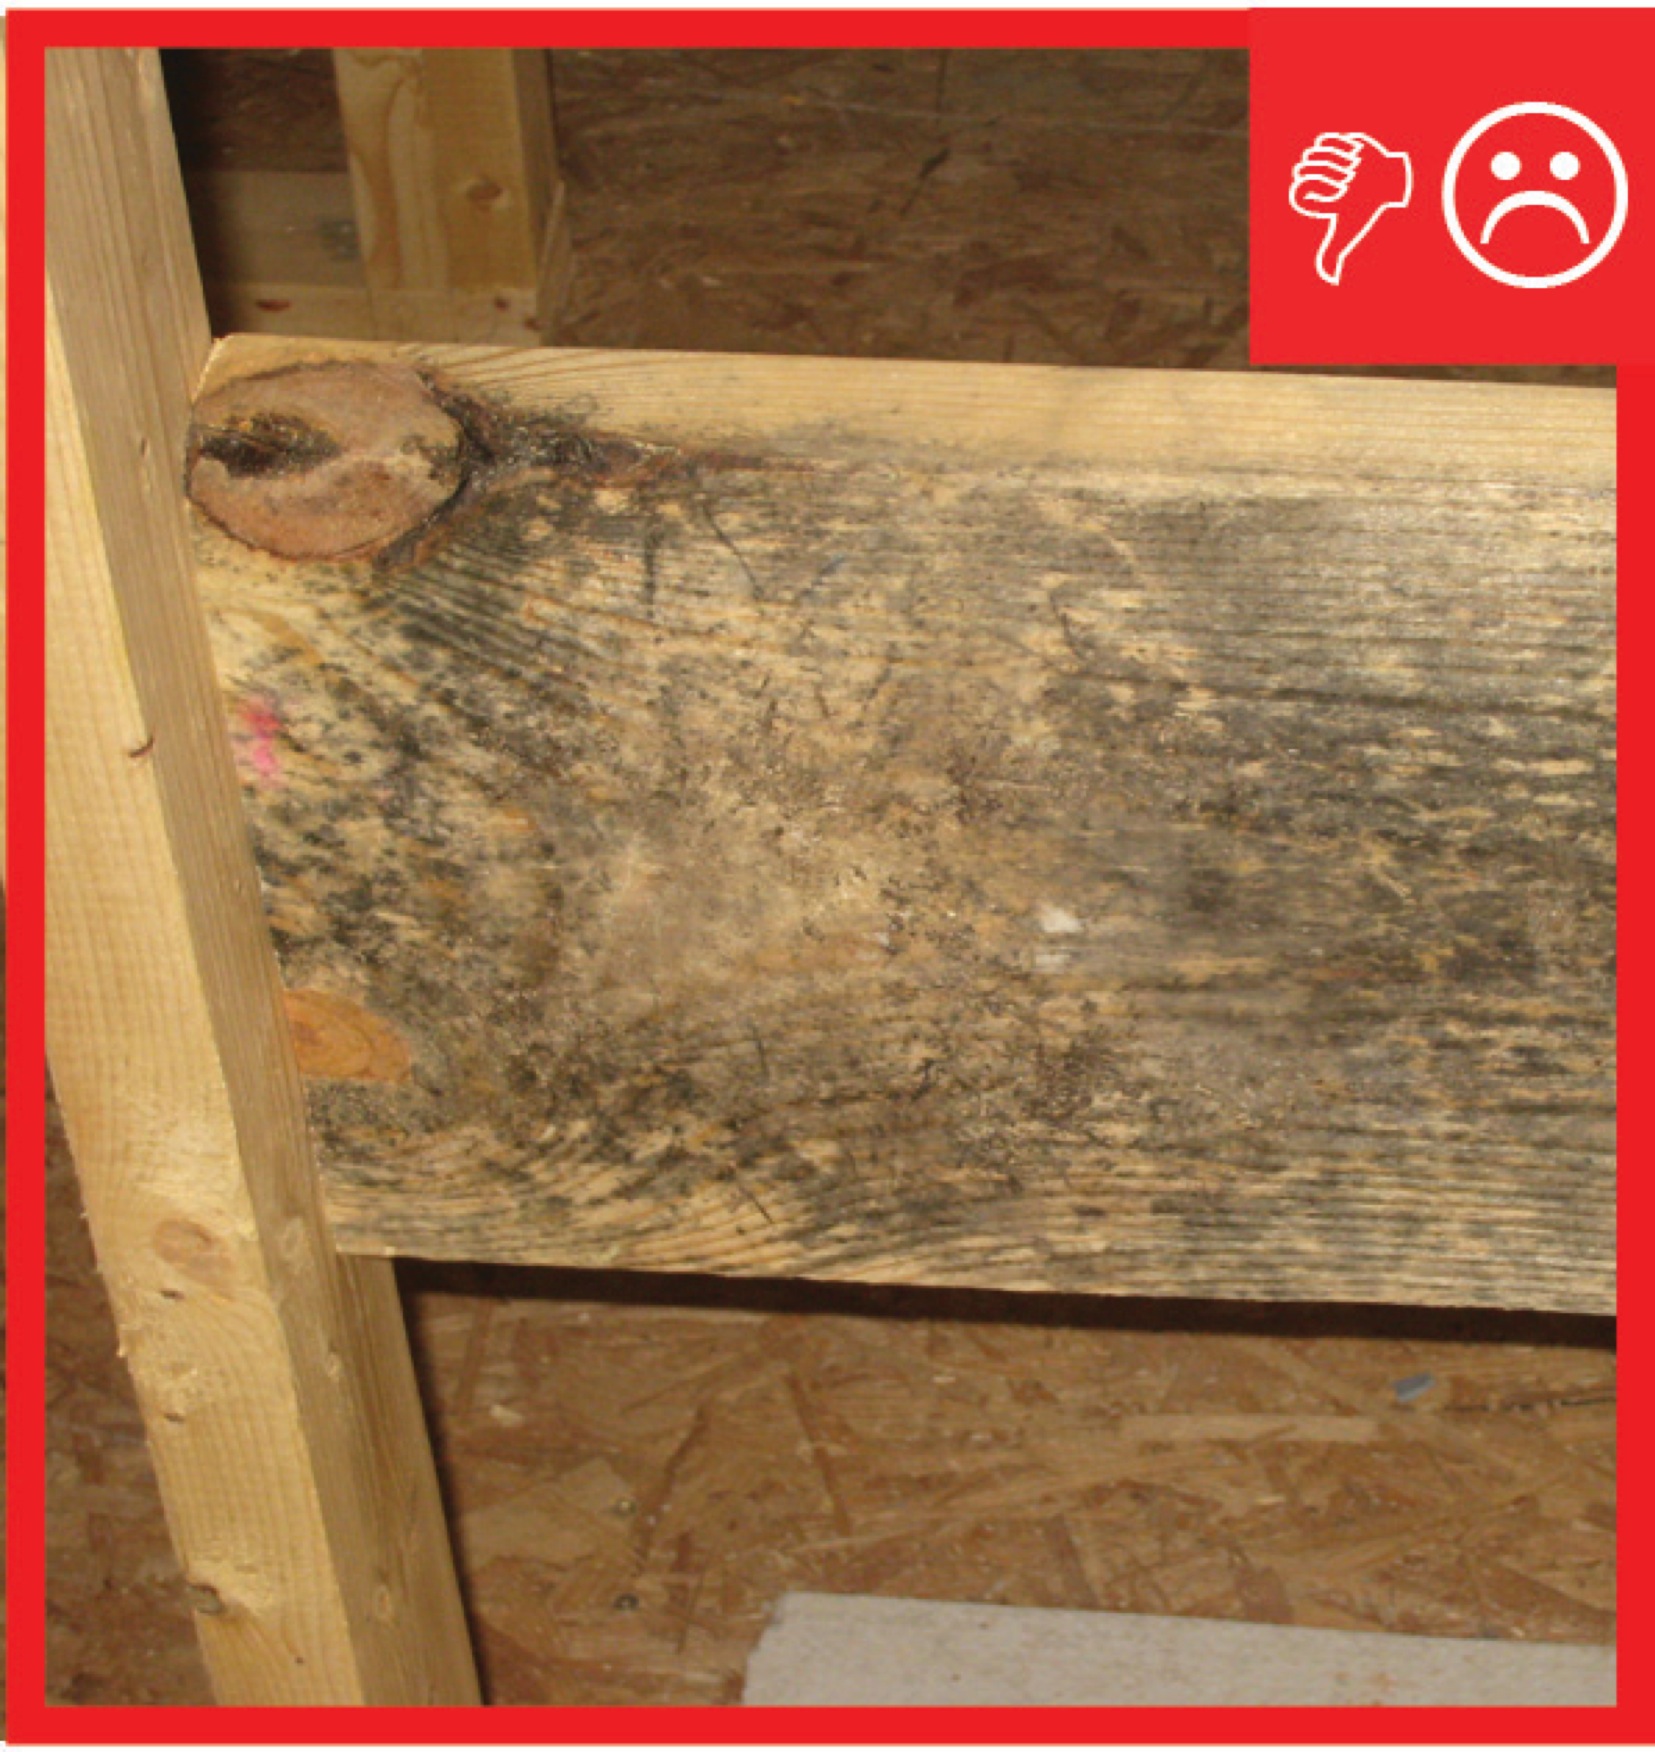
When condensation forms on the interior side of wall sheathing and is not able to dry out, it can lead to mold growth and rotting of wall sheathing and framing
Image
Image
Image
Image
Image
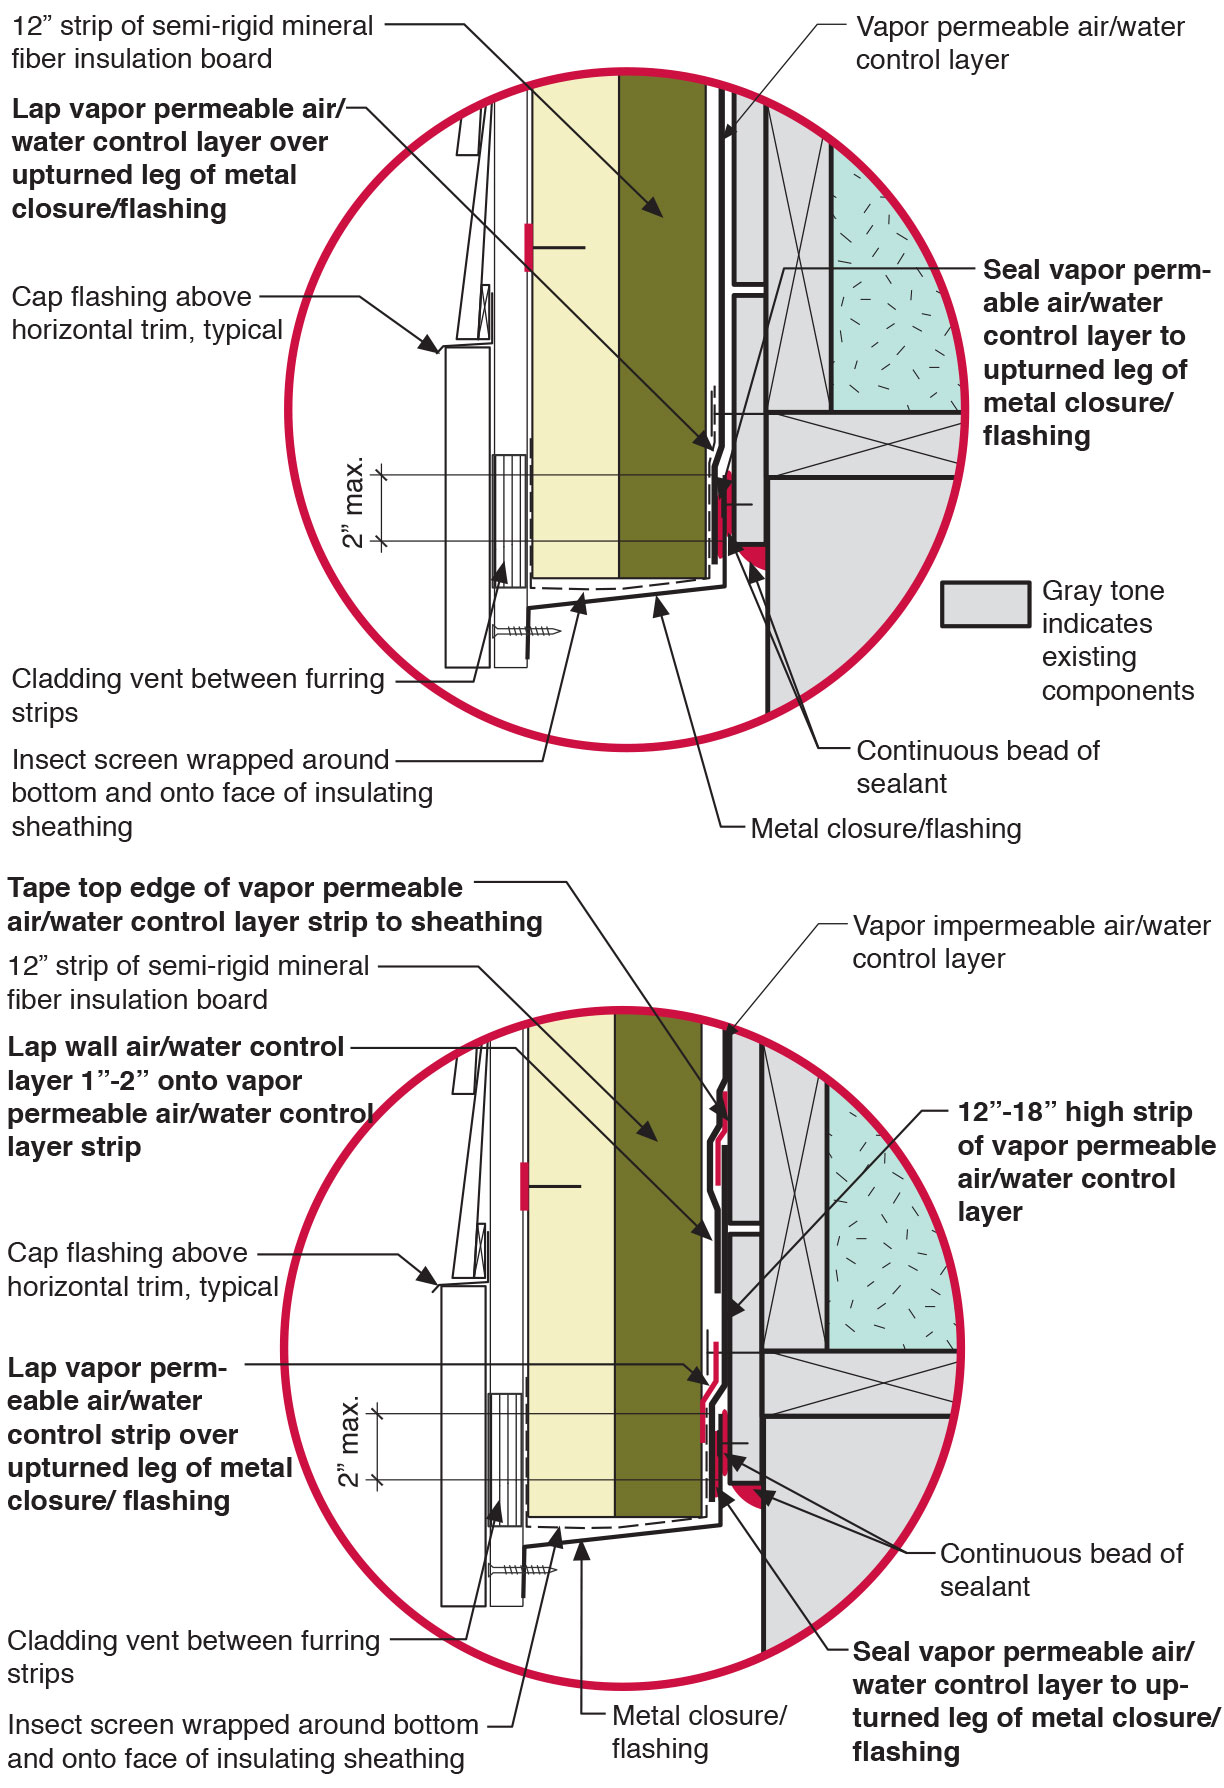
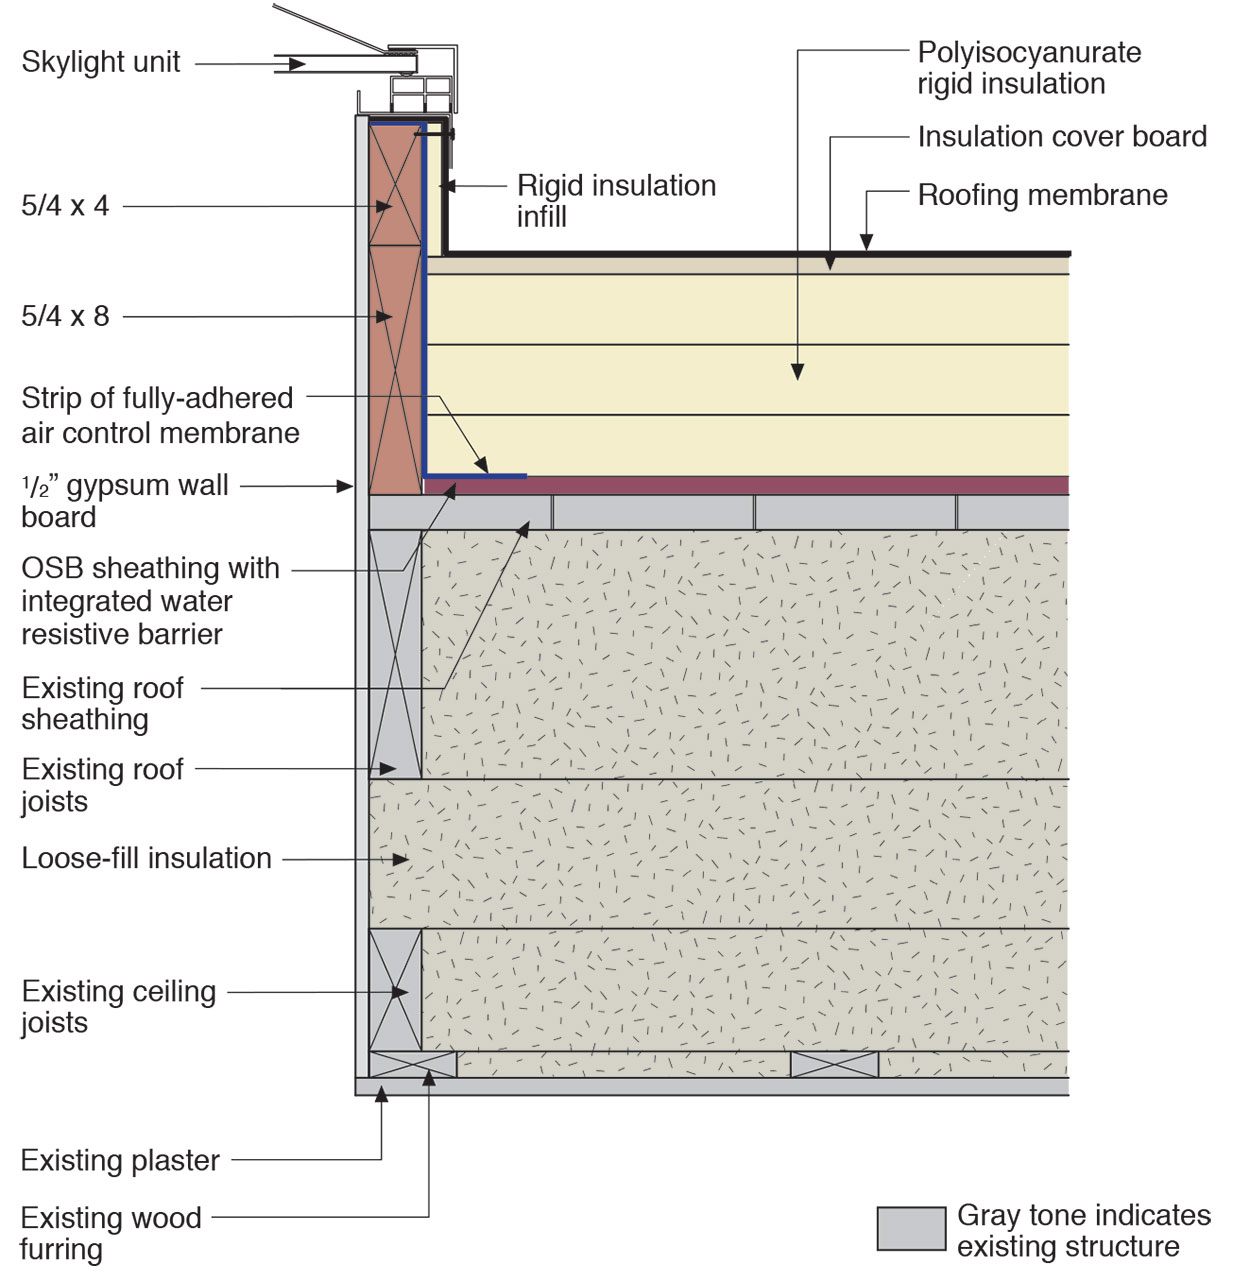
Windows are installed as “outies” in this wall assembly using a self-adhered membrane water and air control layer with continuous exterior insulation
Image
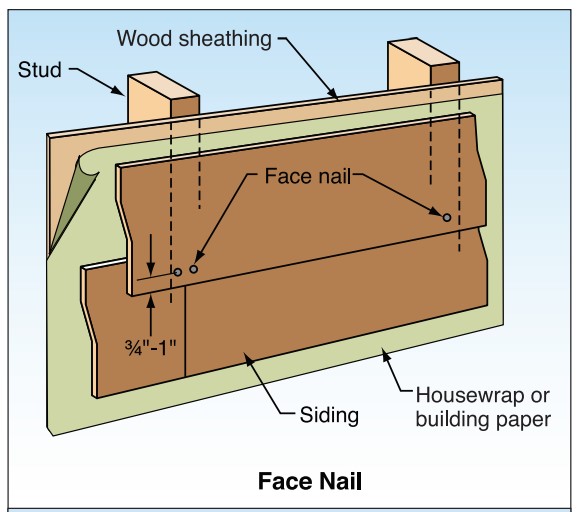
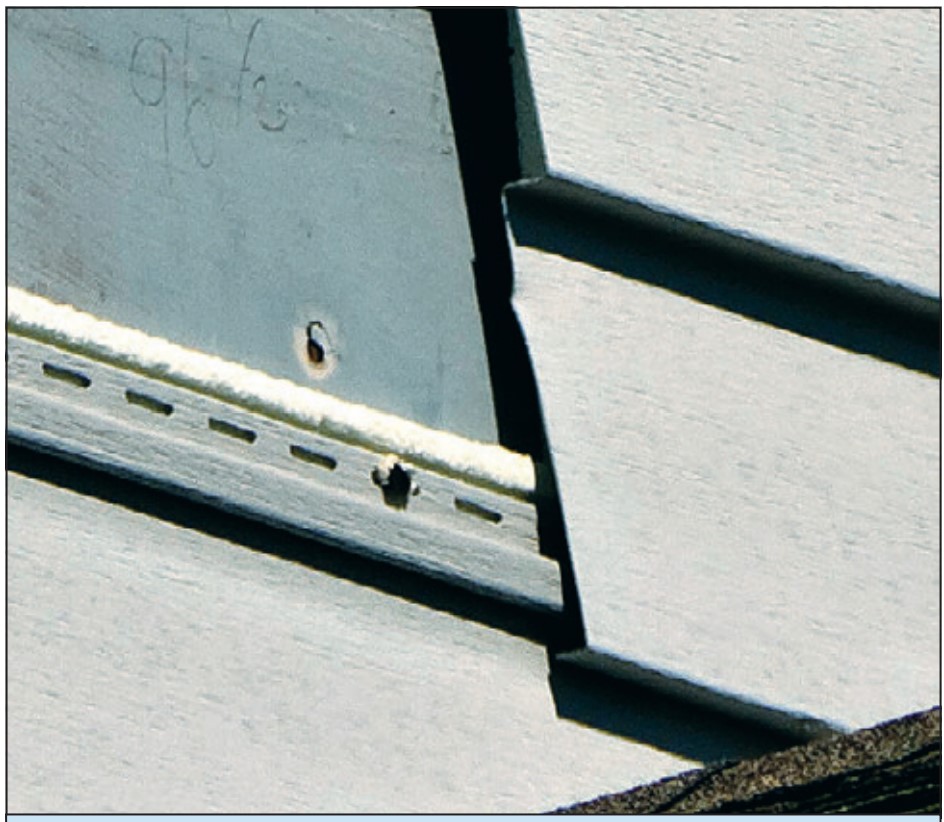
With fiber cement siding, face nail rather than blind nail where the design wind speed is ≥100 mph.
Image
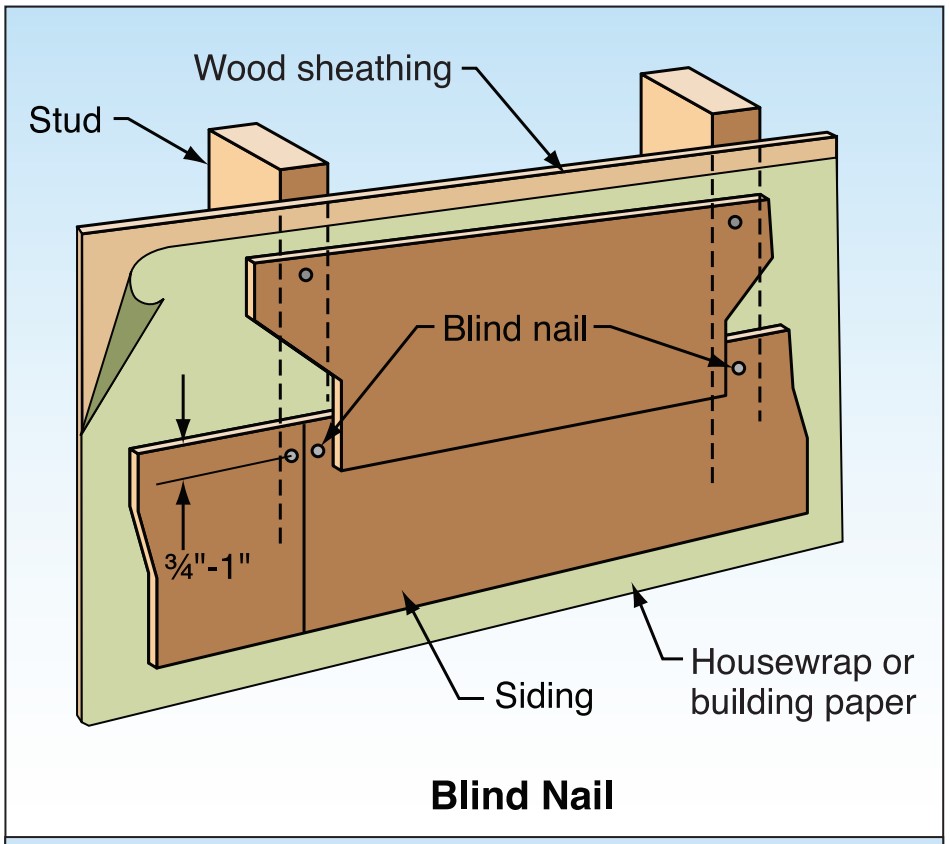
With fiber cement siding, place blind nails 3/4 to 1 inch from top edge and > 3/8 inch in from butt ends.
Image
Wood blocking for future PV panel installation is installed in the layers of polyisocyanurate rigid foam insulation during a flat roof retrofit
Image
Image

Wood siding installation details to improve resistance to wind-driven rain at corners.
Image
Image

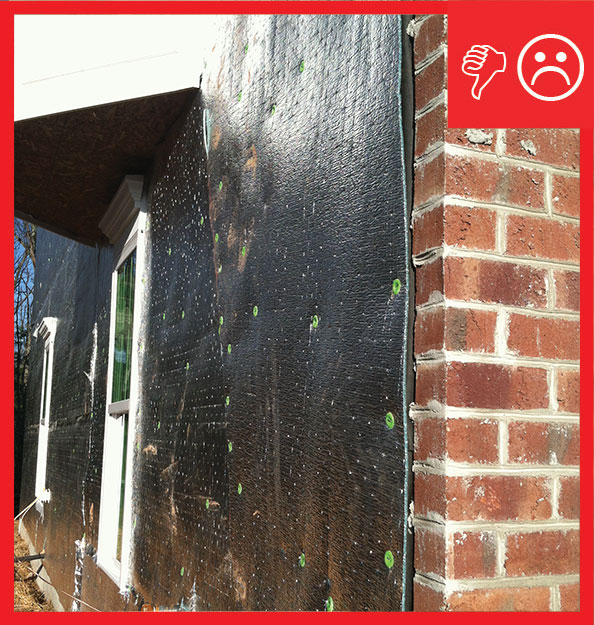
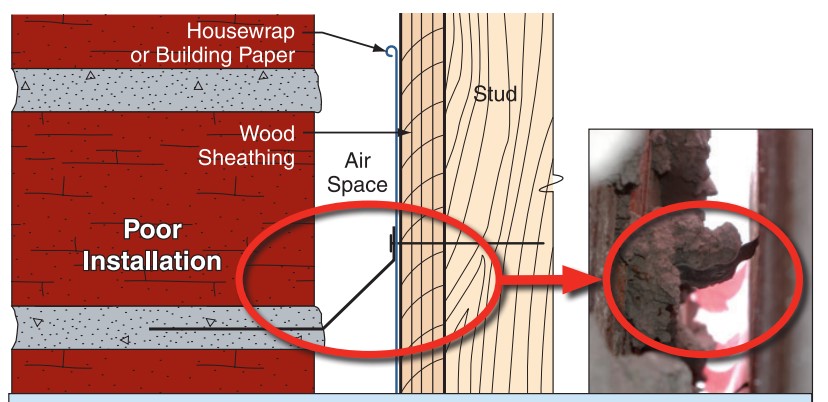
Wrong - House wrap was poorly installed, seams were not taped, and flashing tape was not installed around windows.
Image
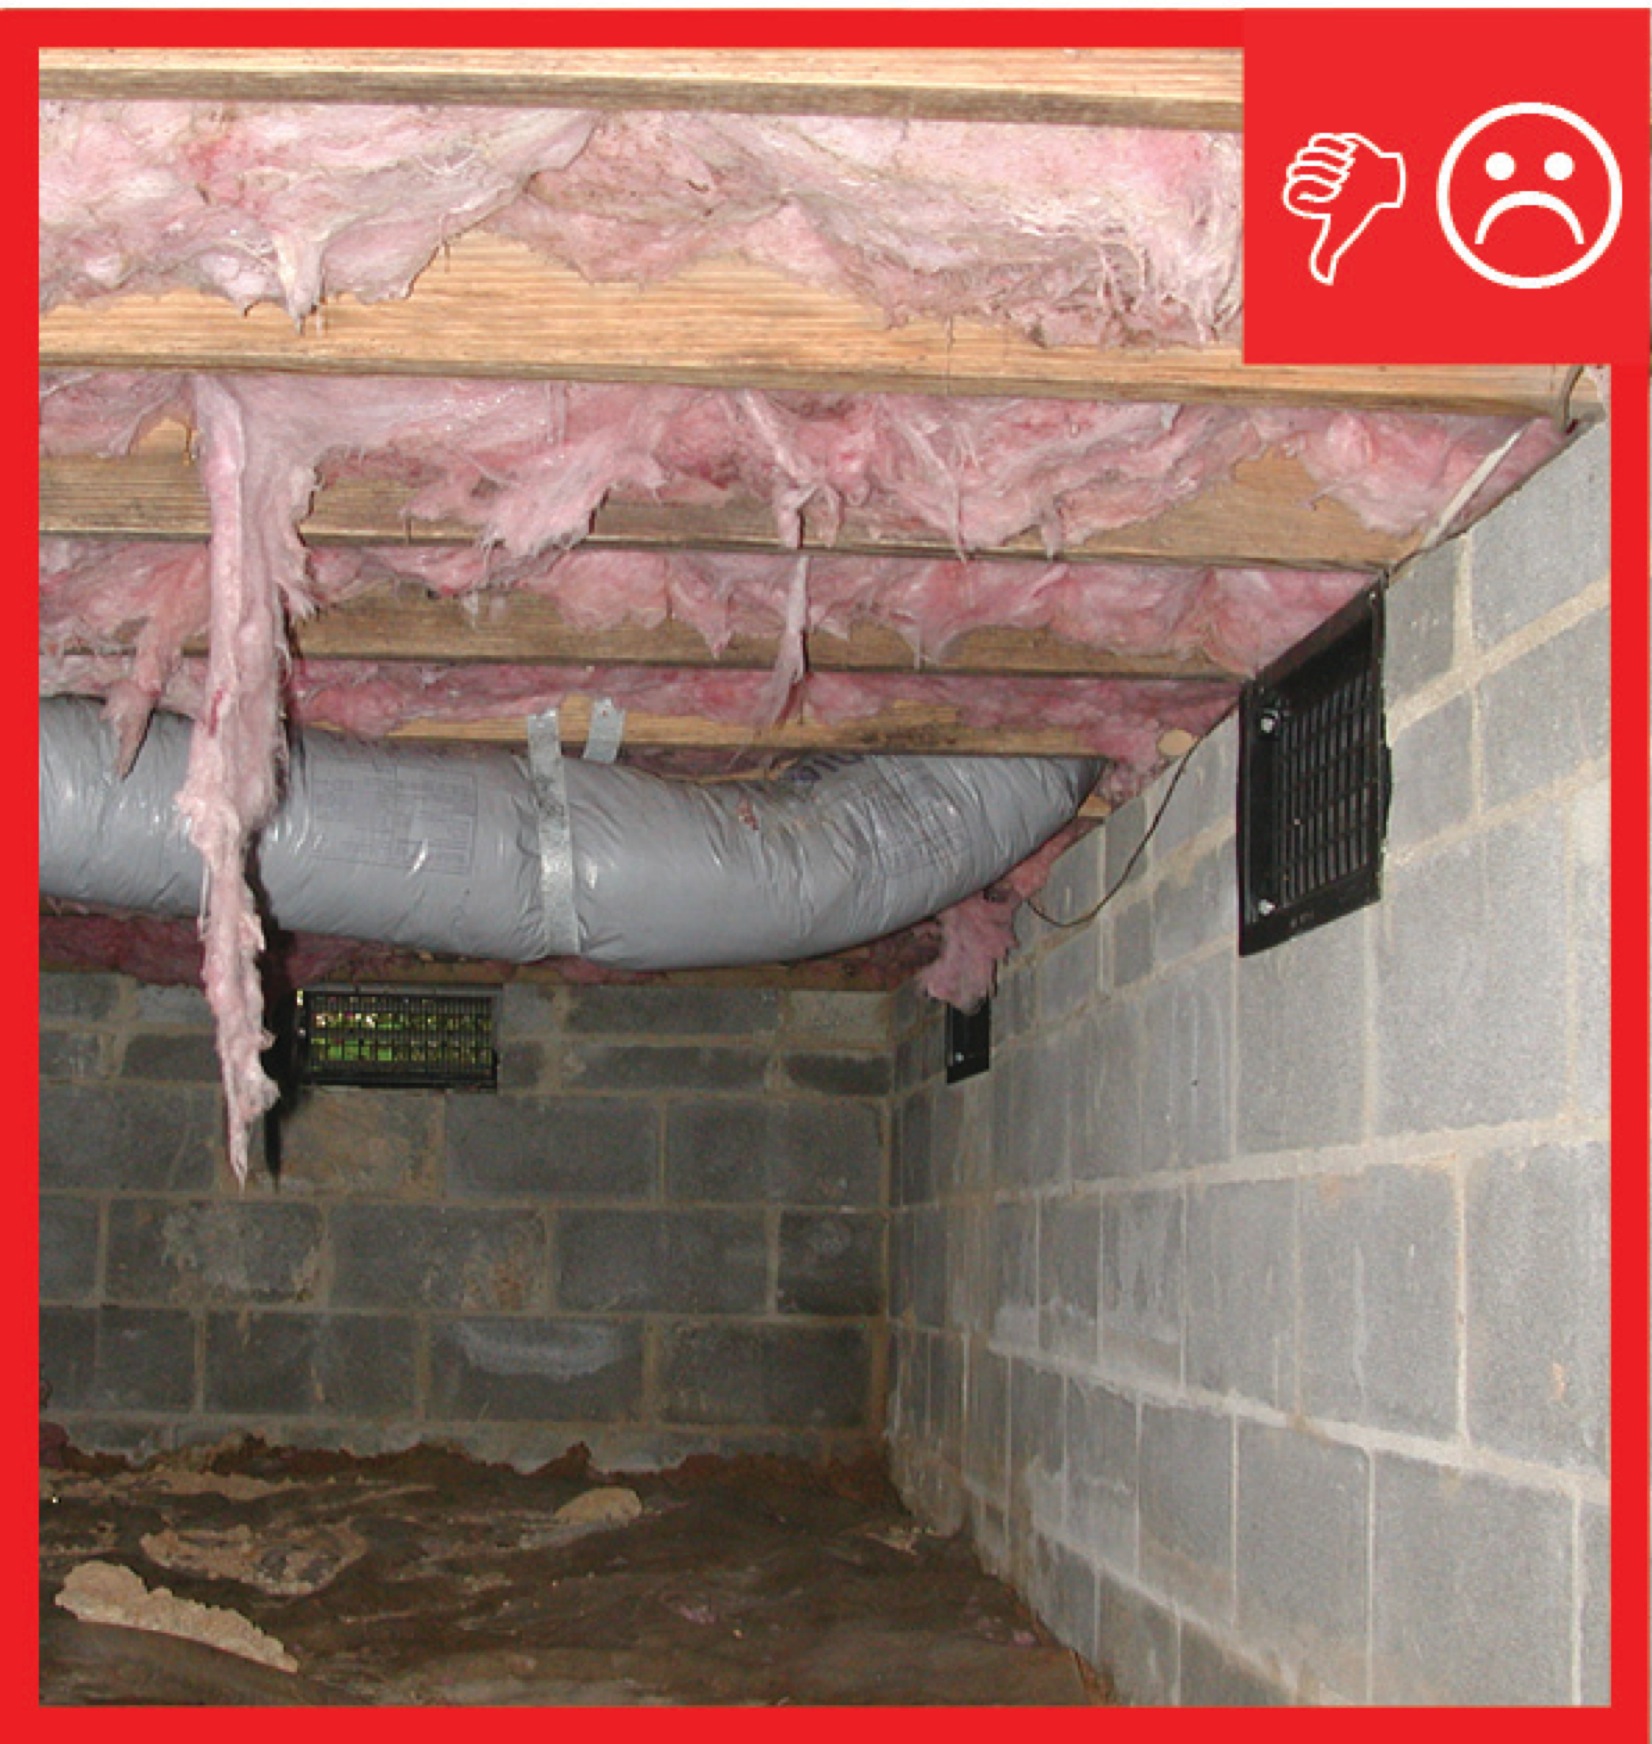
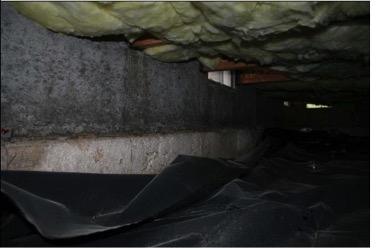
Wrong - A typical vented crawlspace in North Carolina exhibits water leakage, poor drainage, and a low-quality vapor retarder that does not cover all of the ground surface and is not sealed to the walls.
Image

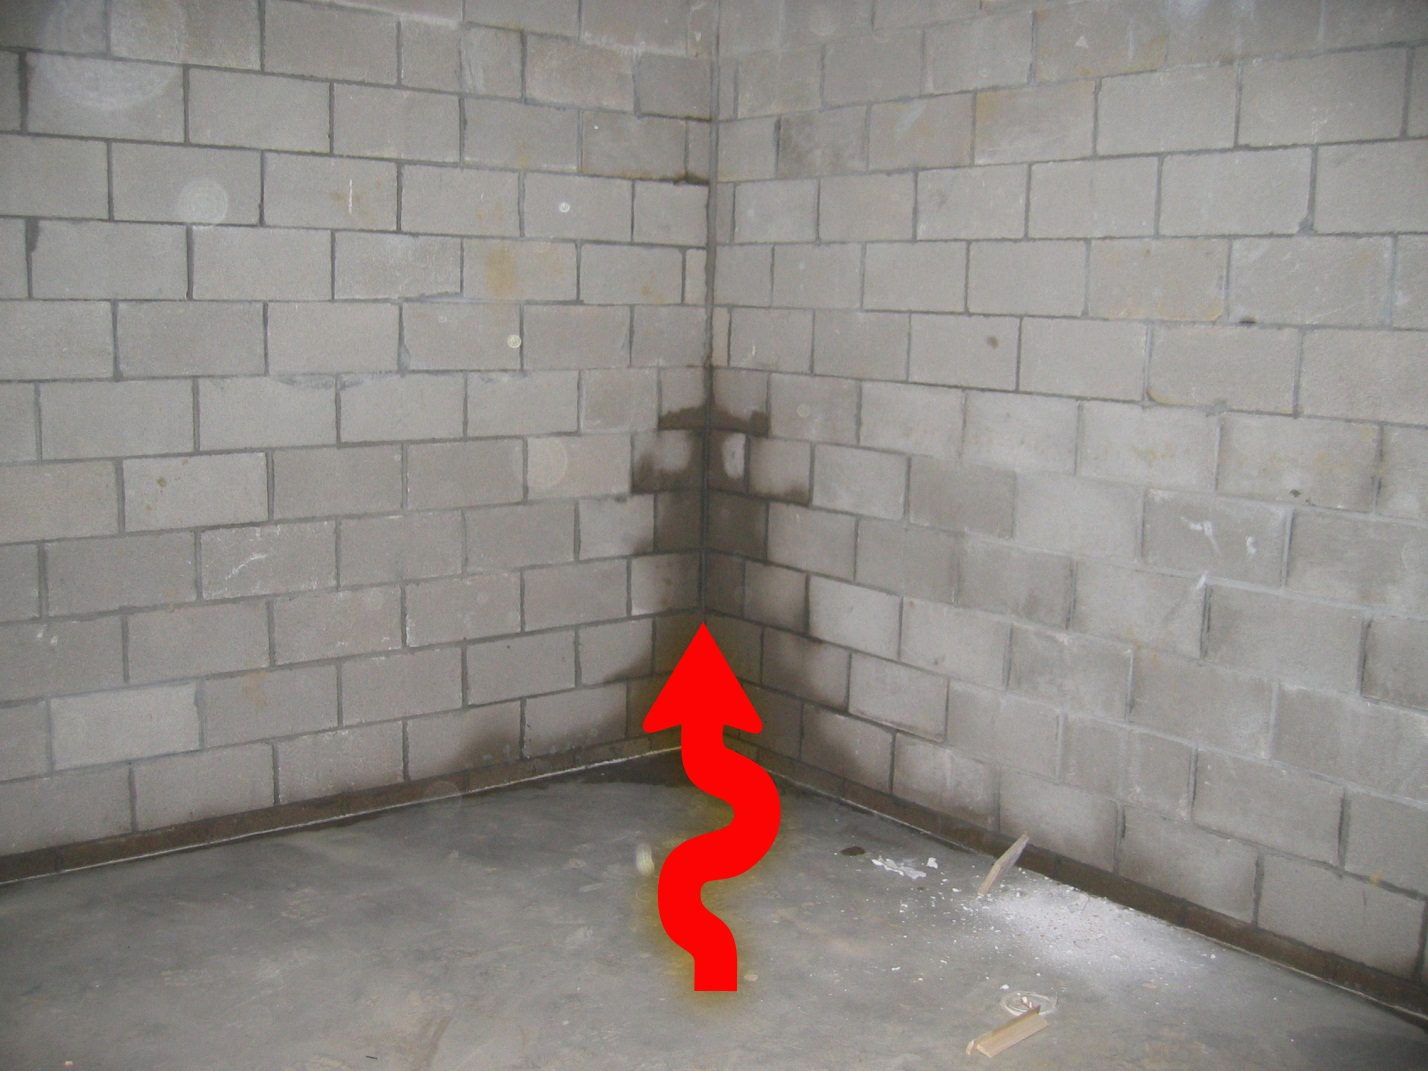
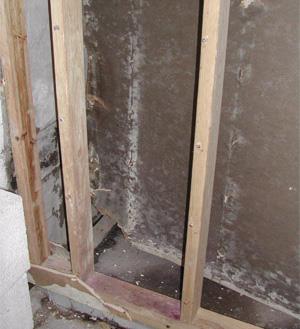
Wrong - Class I vapor retarder over framed basement walls can cause condensation, mold, and rotting because plastic prevents drying to the inside; the outside should have waterproofing and vertical drainage, and the framing should be spaced from the wall.
Image

Wrong - Down spout is detached from gutter and cannot carry bulk water away from building.
Image
Wrong - Exterior drain pipe is exposed and thus subject to being crushed; also it has been allowed to fill with dirt and may be clogged, preventing perimeter drain pipe or downspouts from draining.
Image
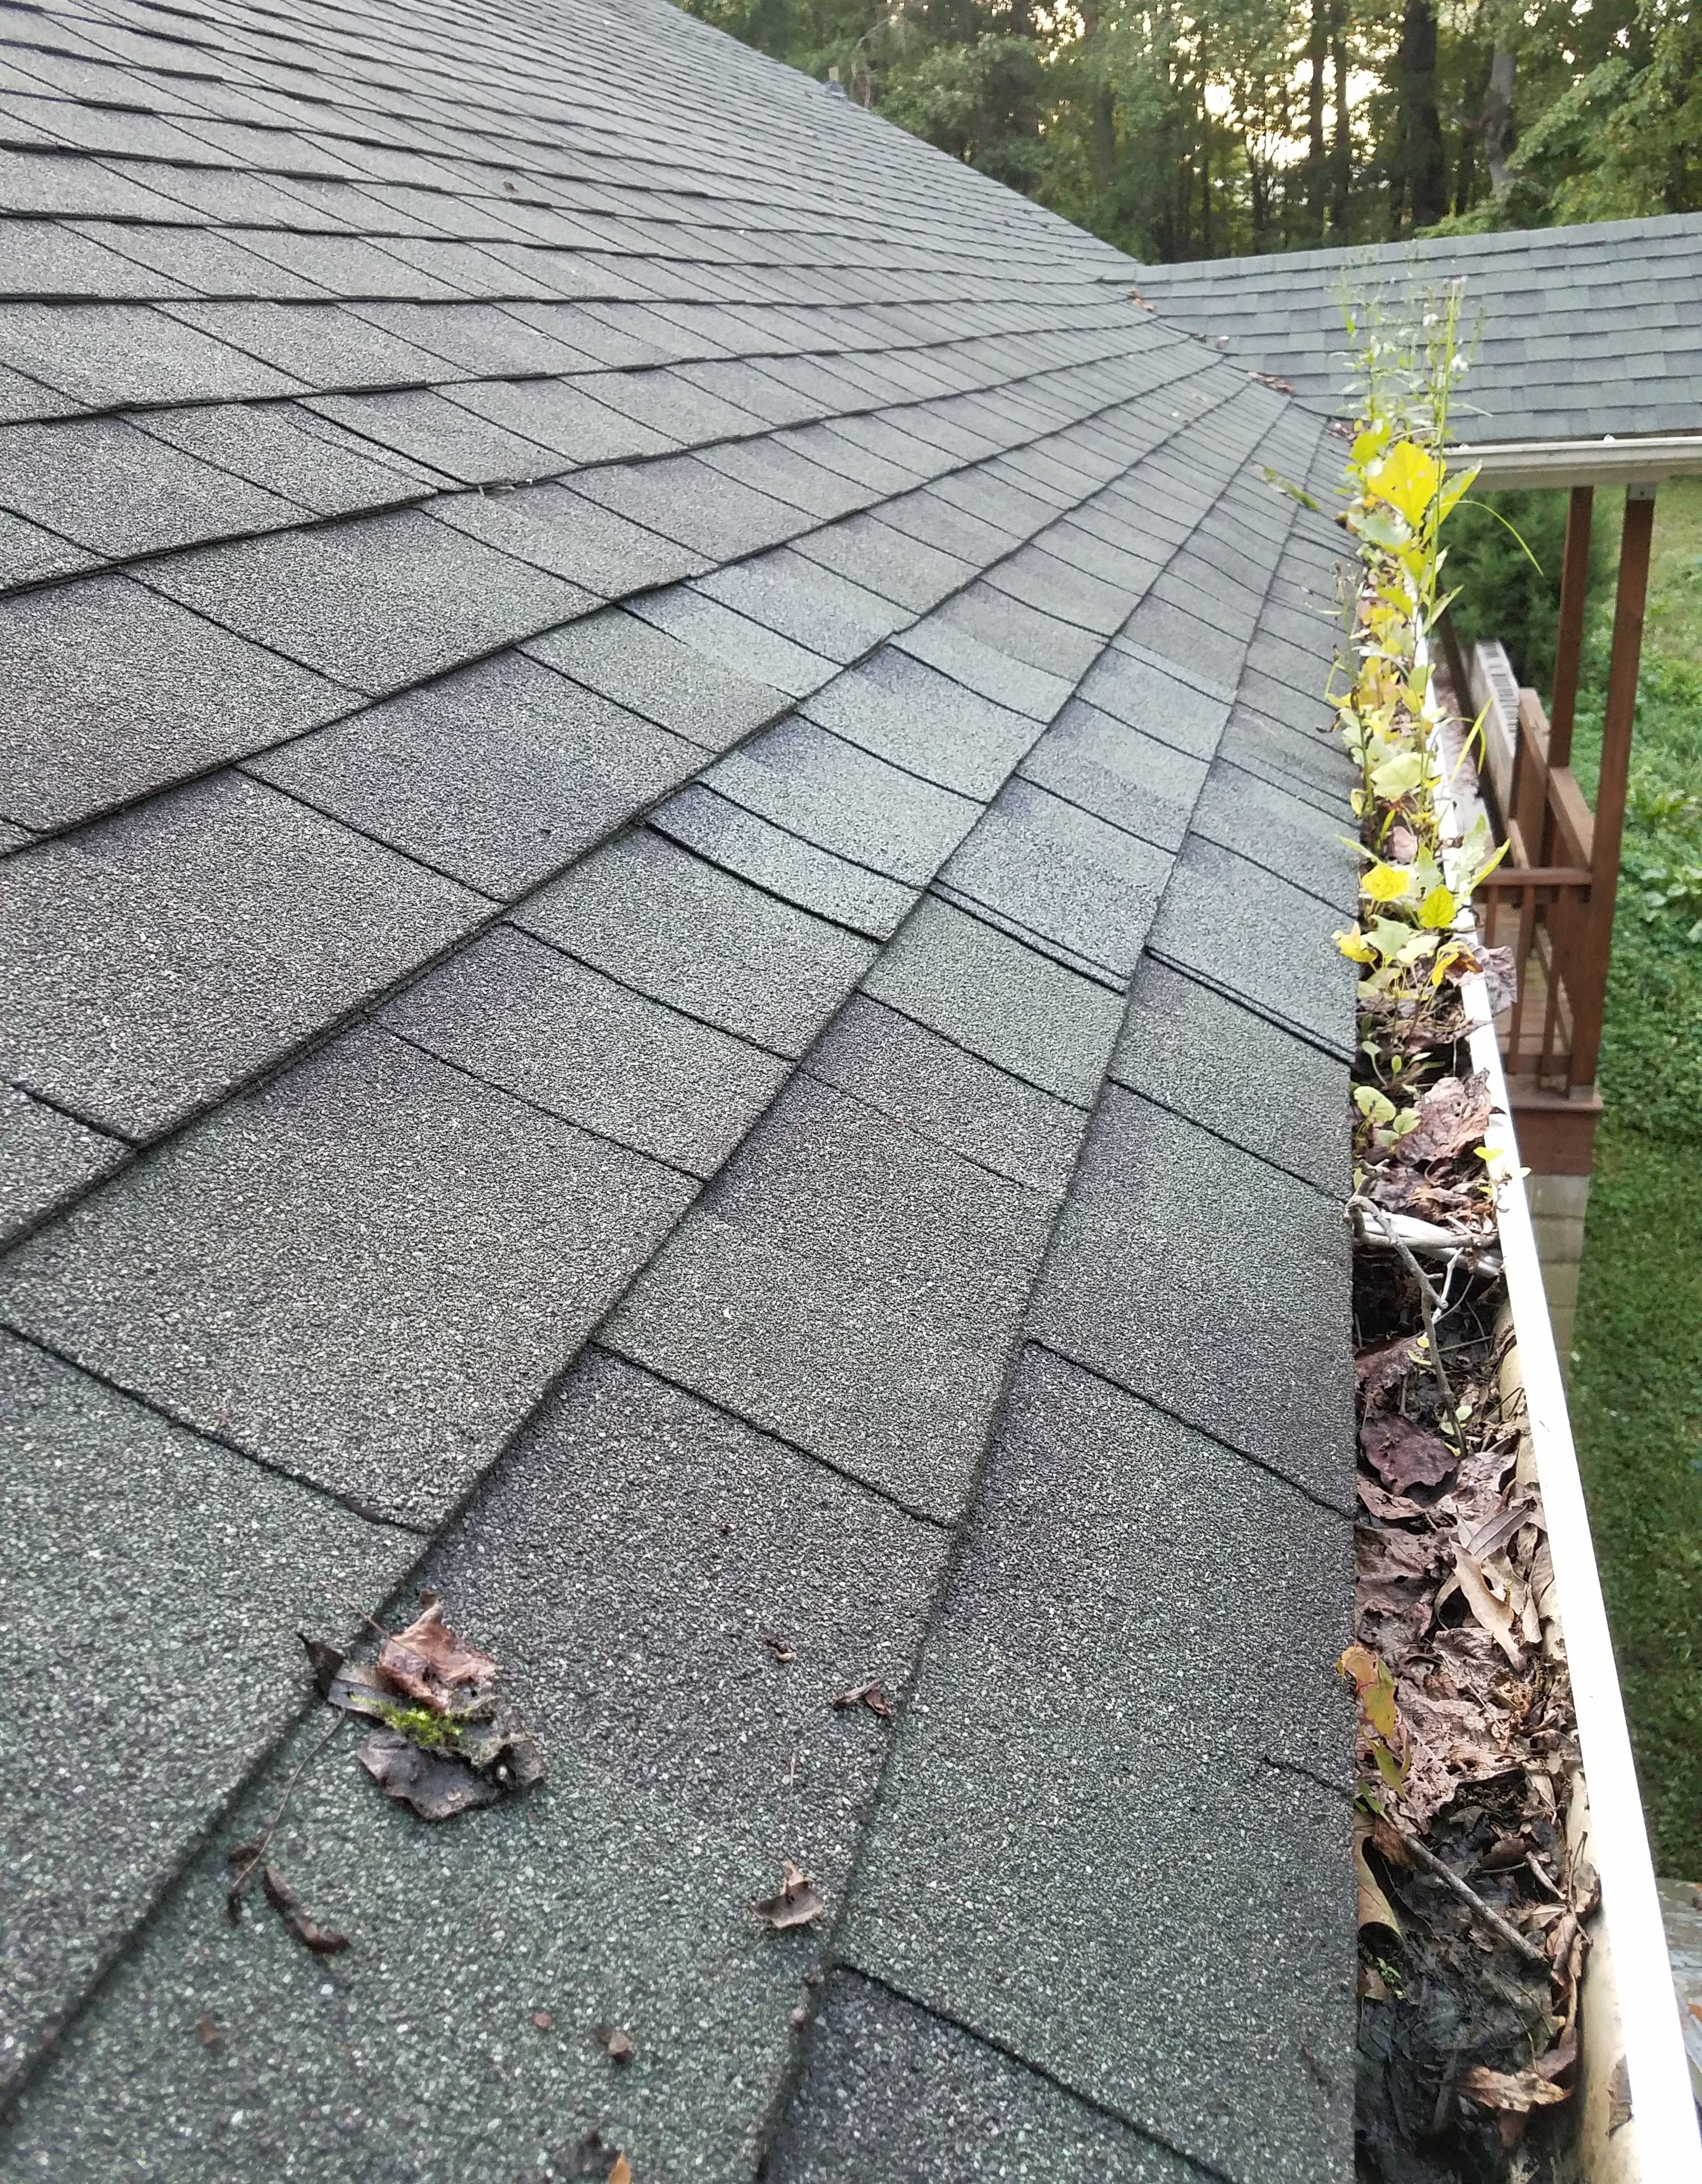
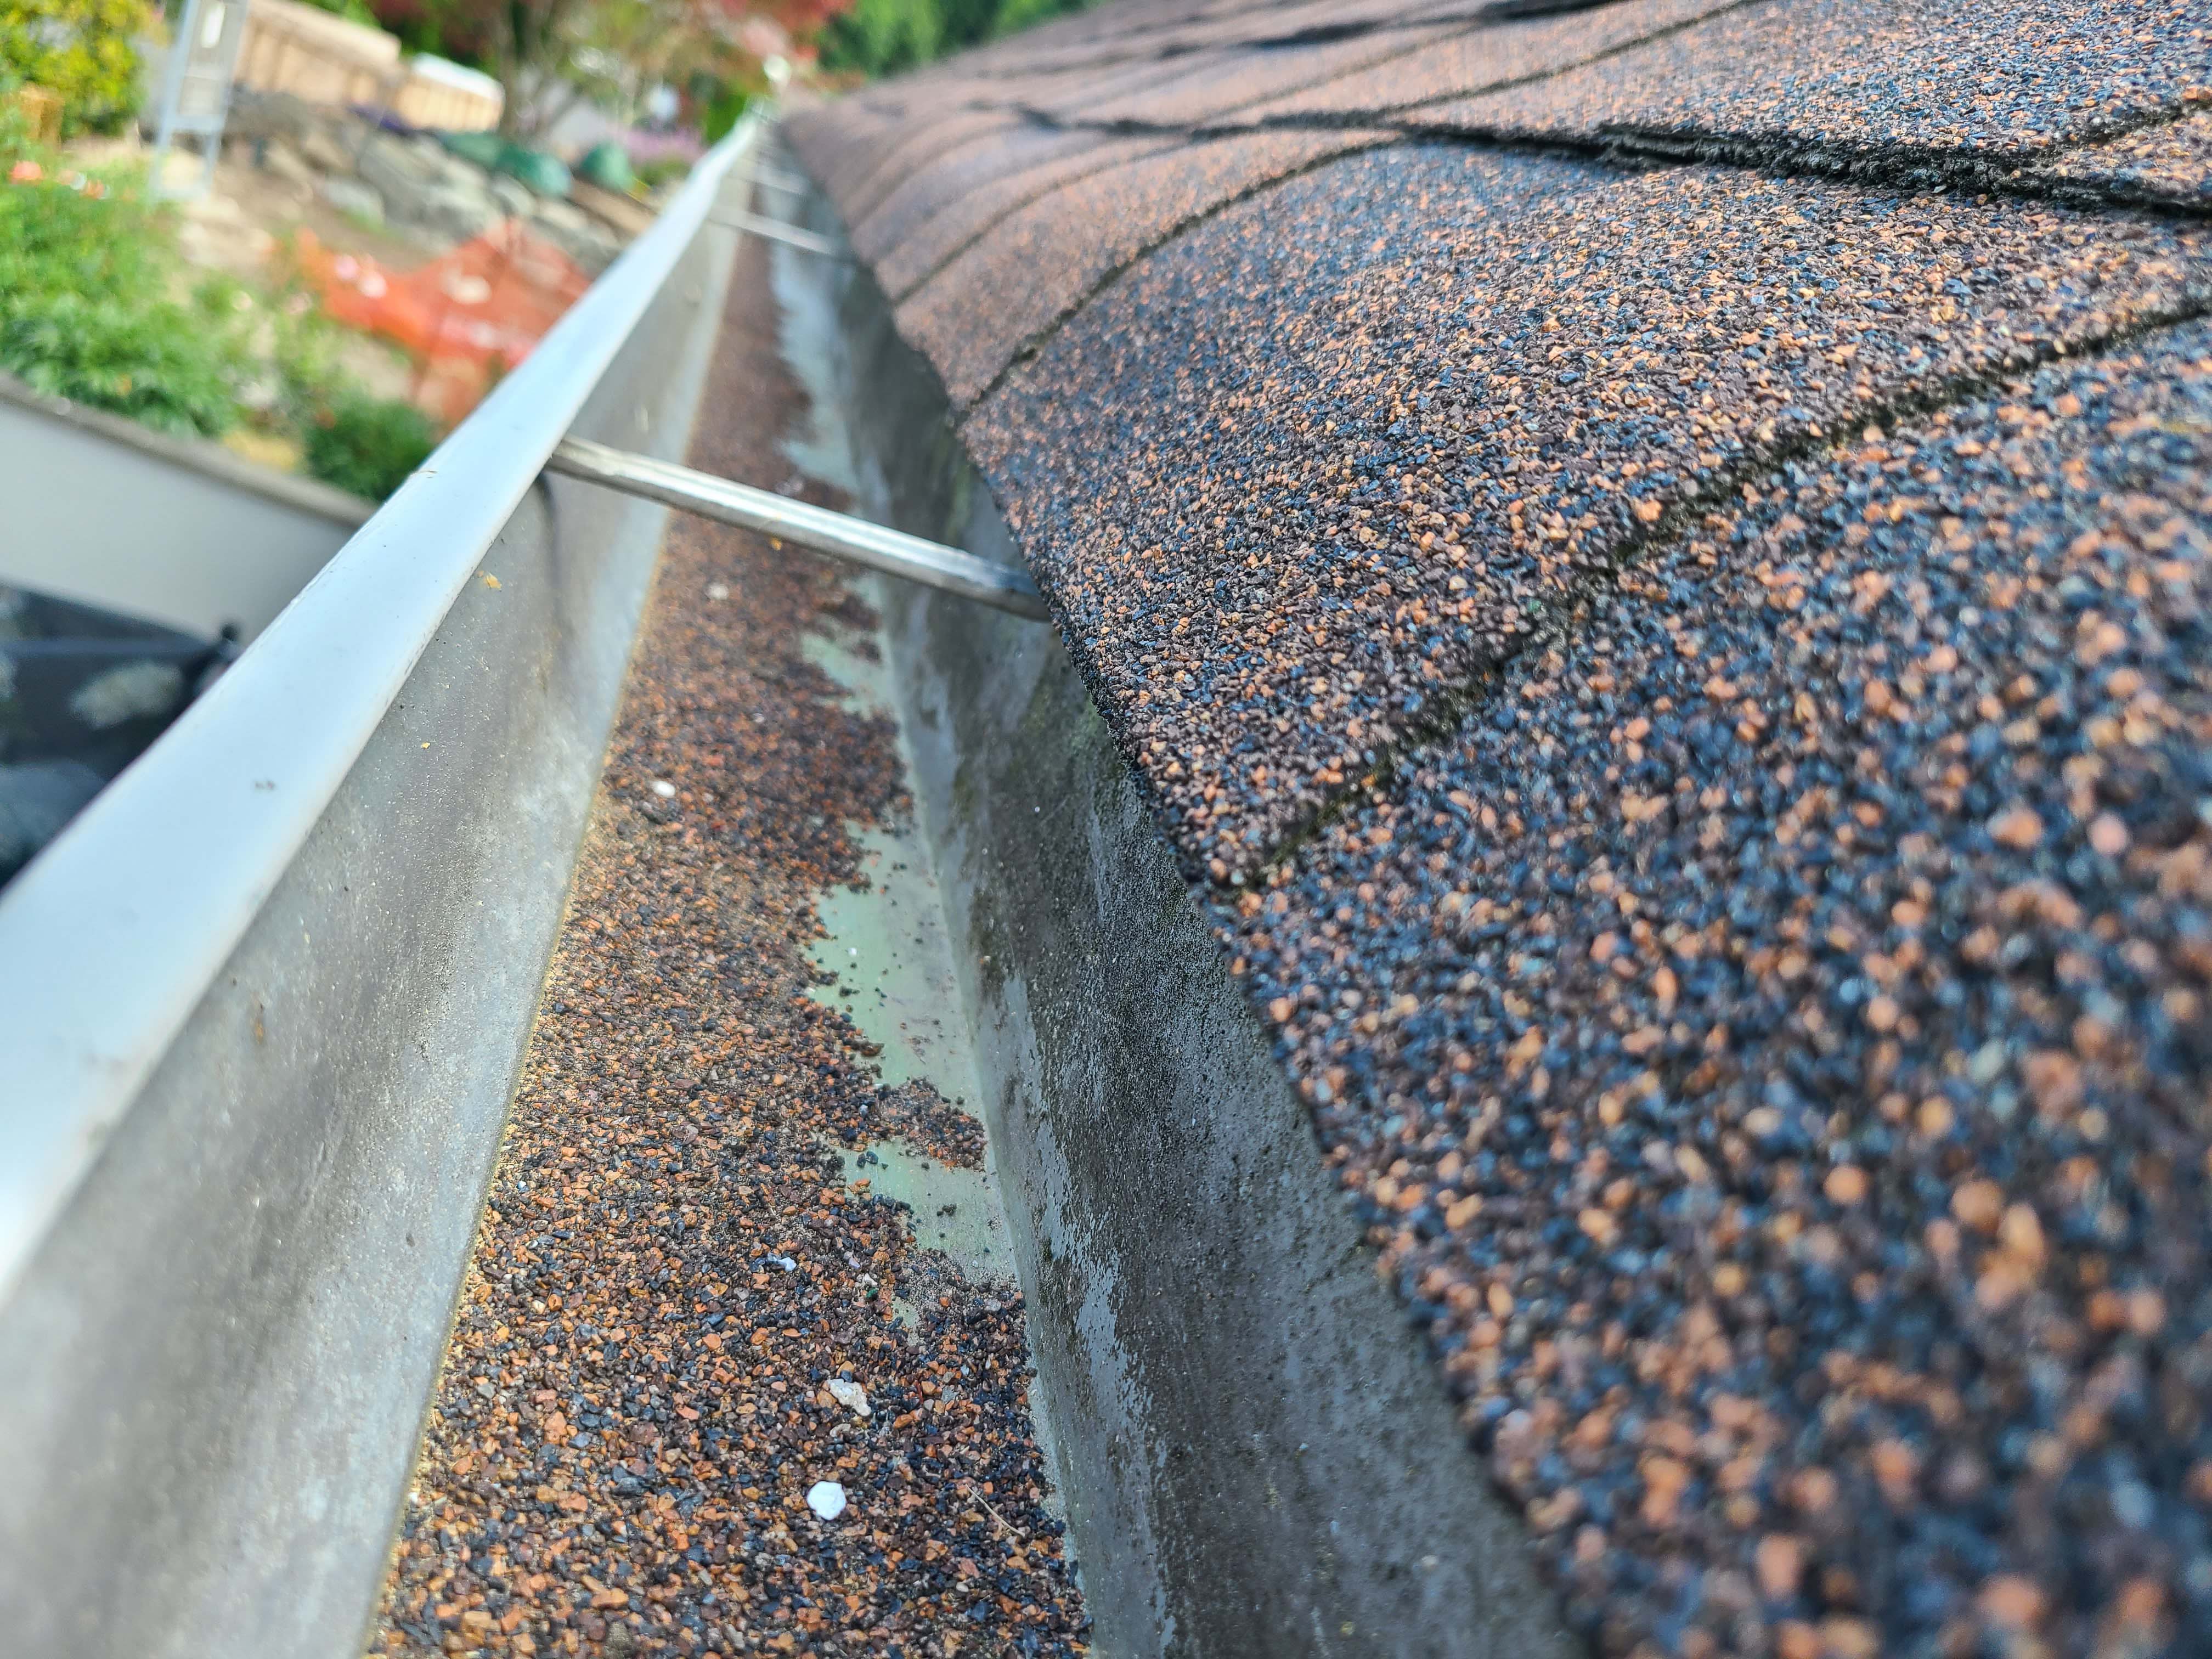
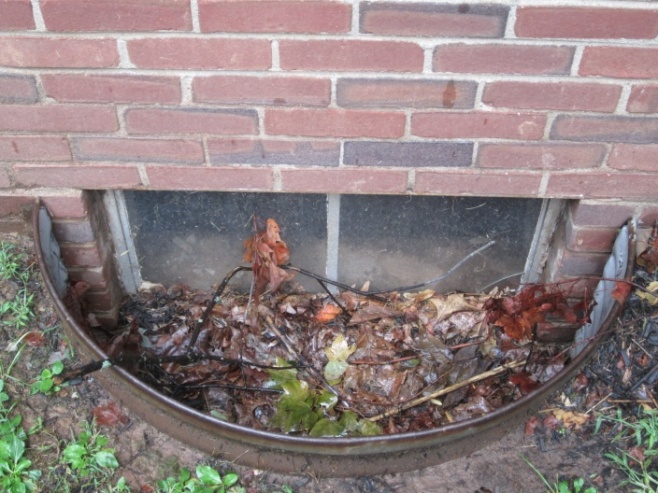
Wrong - Gutters should be regularly cleaned or covered with screening to prevent accumulation of leaves, seeds, and woody debris, which can provide fuel for forest fires or nesting materials for animals.
Image
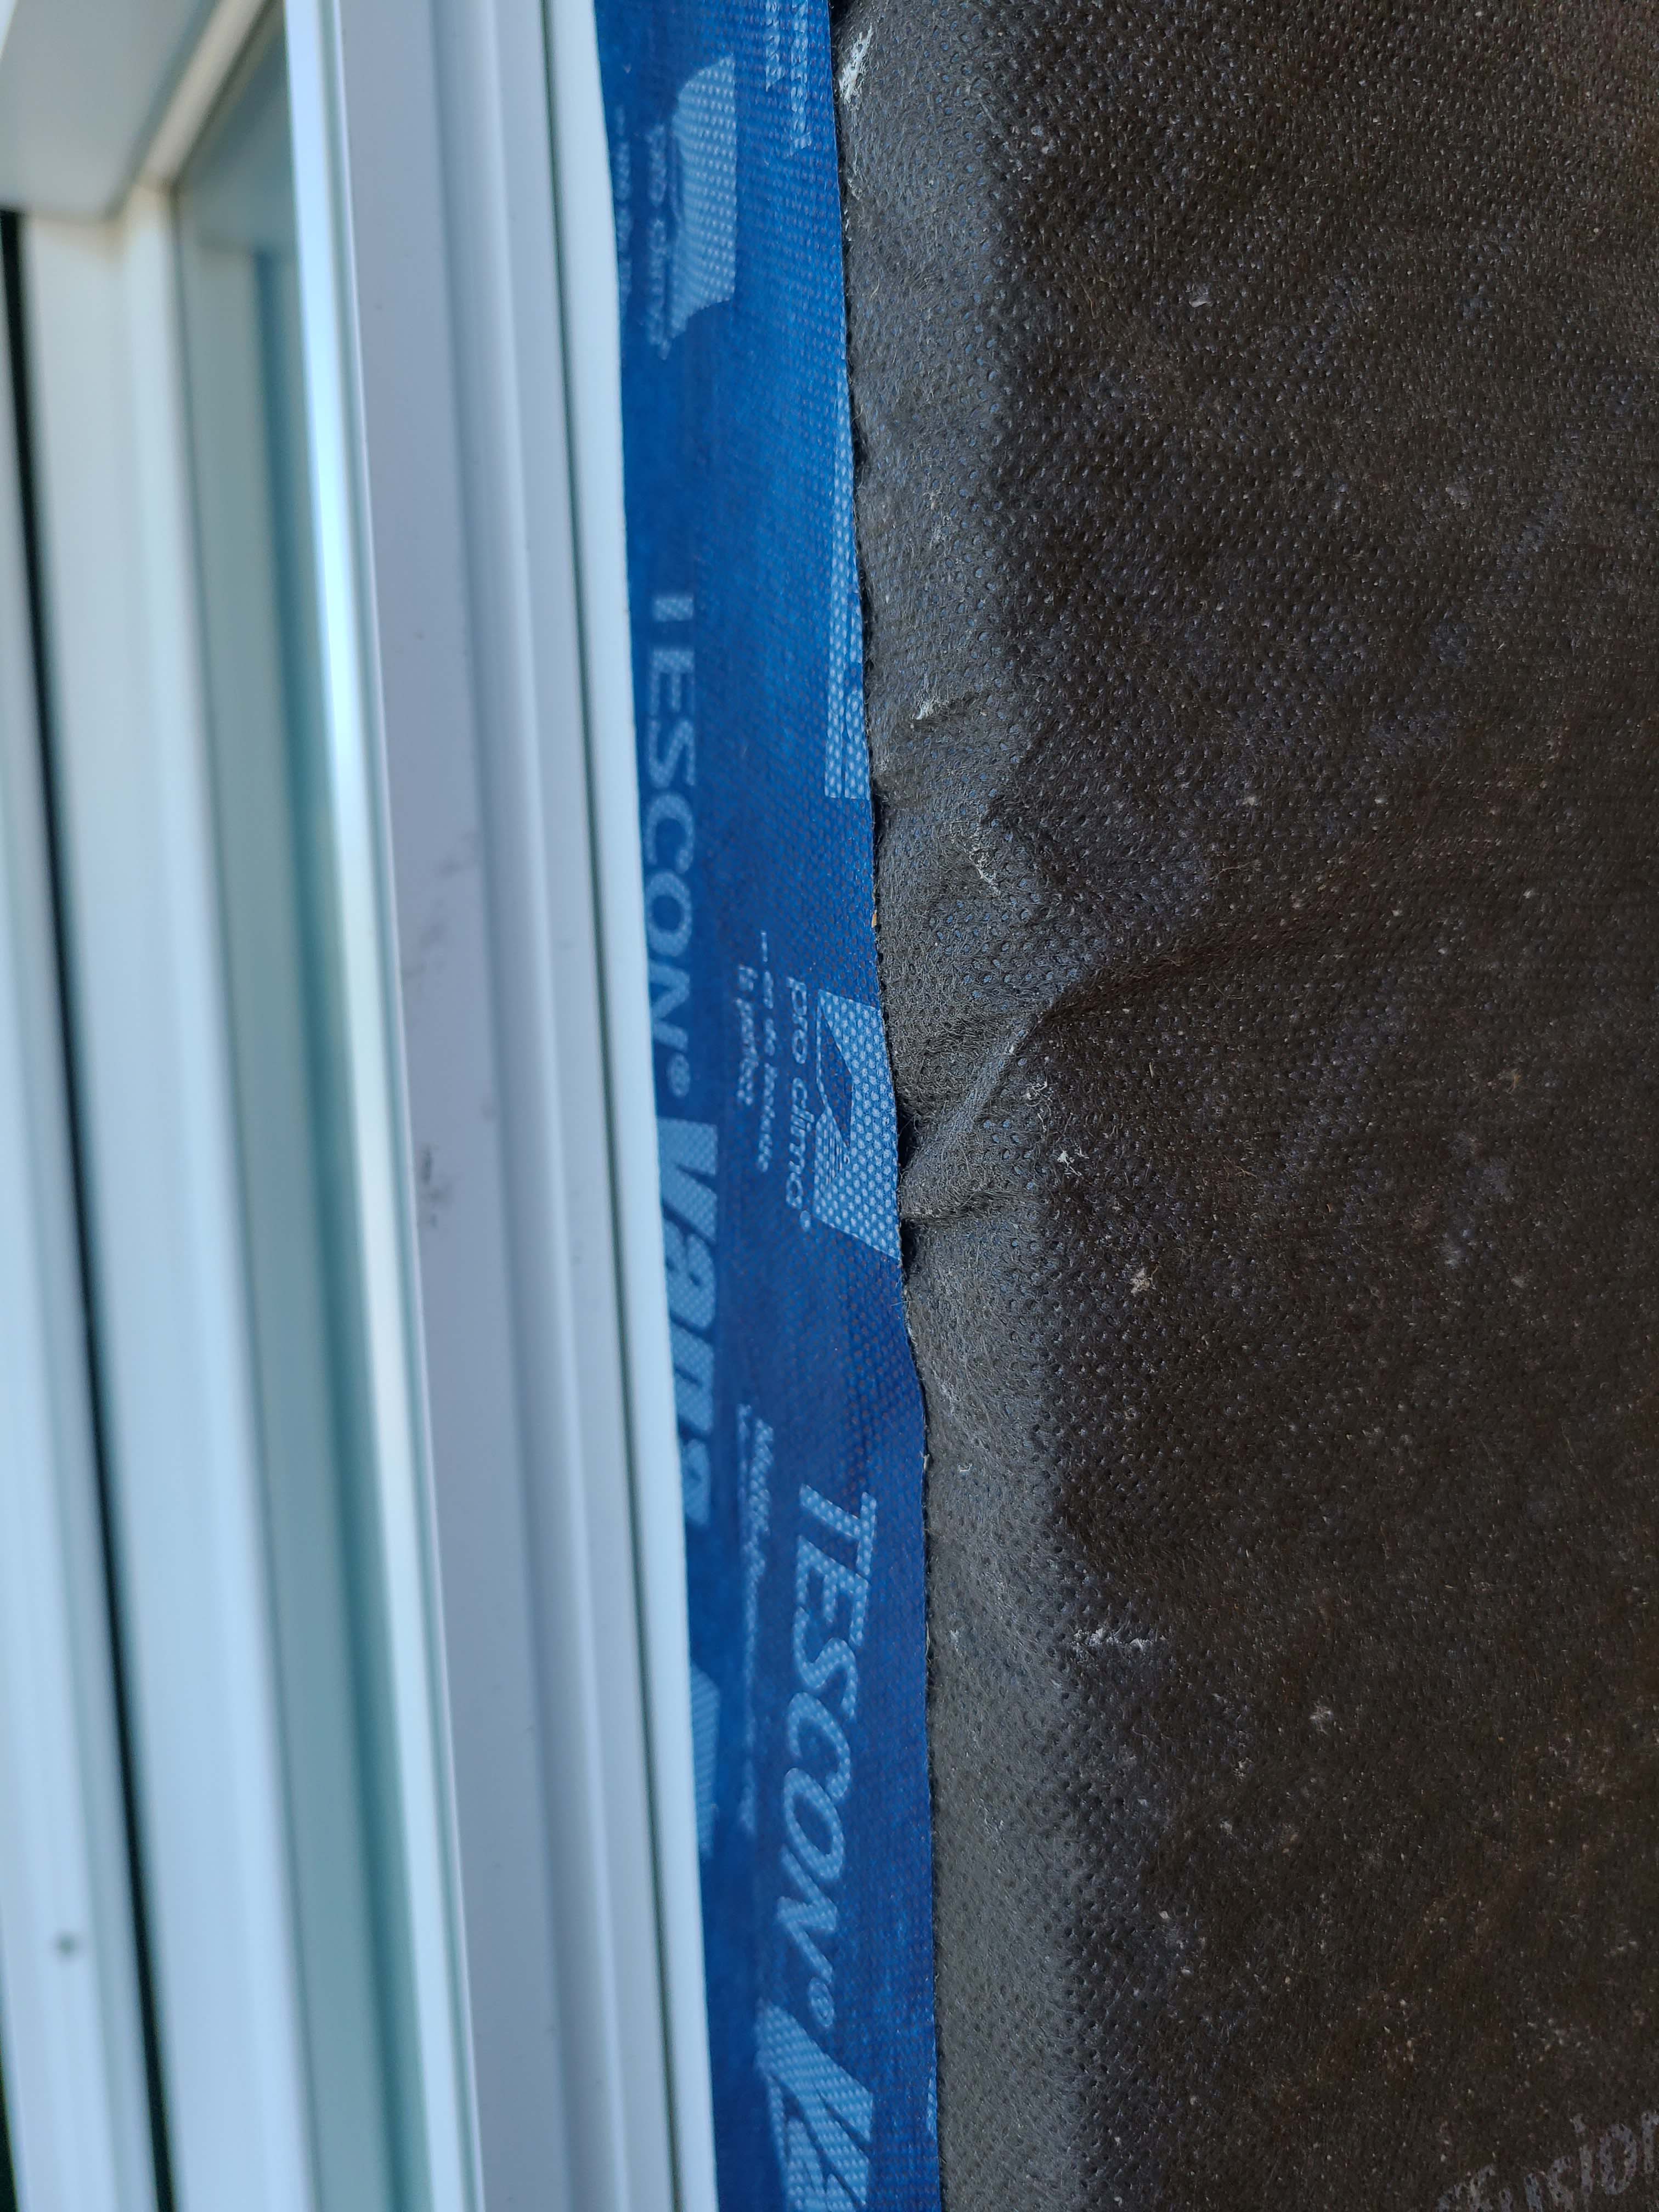
Wrong - House wrap and flashing tape are poorly installed allowing water to get into the gaps behind flashing tape.
Image
Wrong - House wrap should be installed bottom to top, so that upper layers overlap the lower layers encouraging water to shed out instead of behind the house wrap.
Image
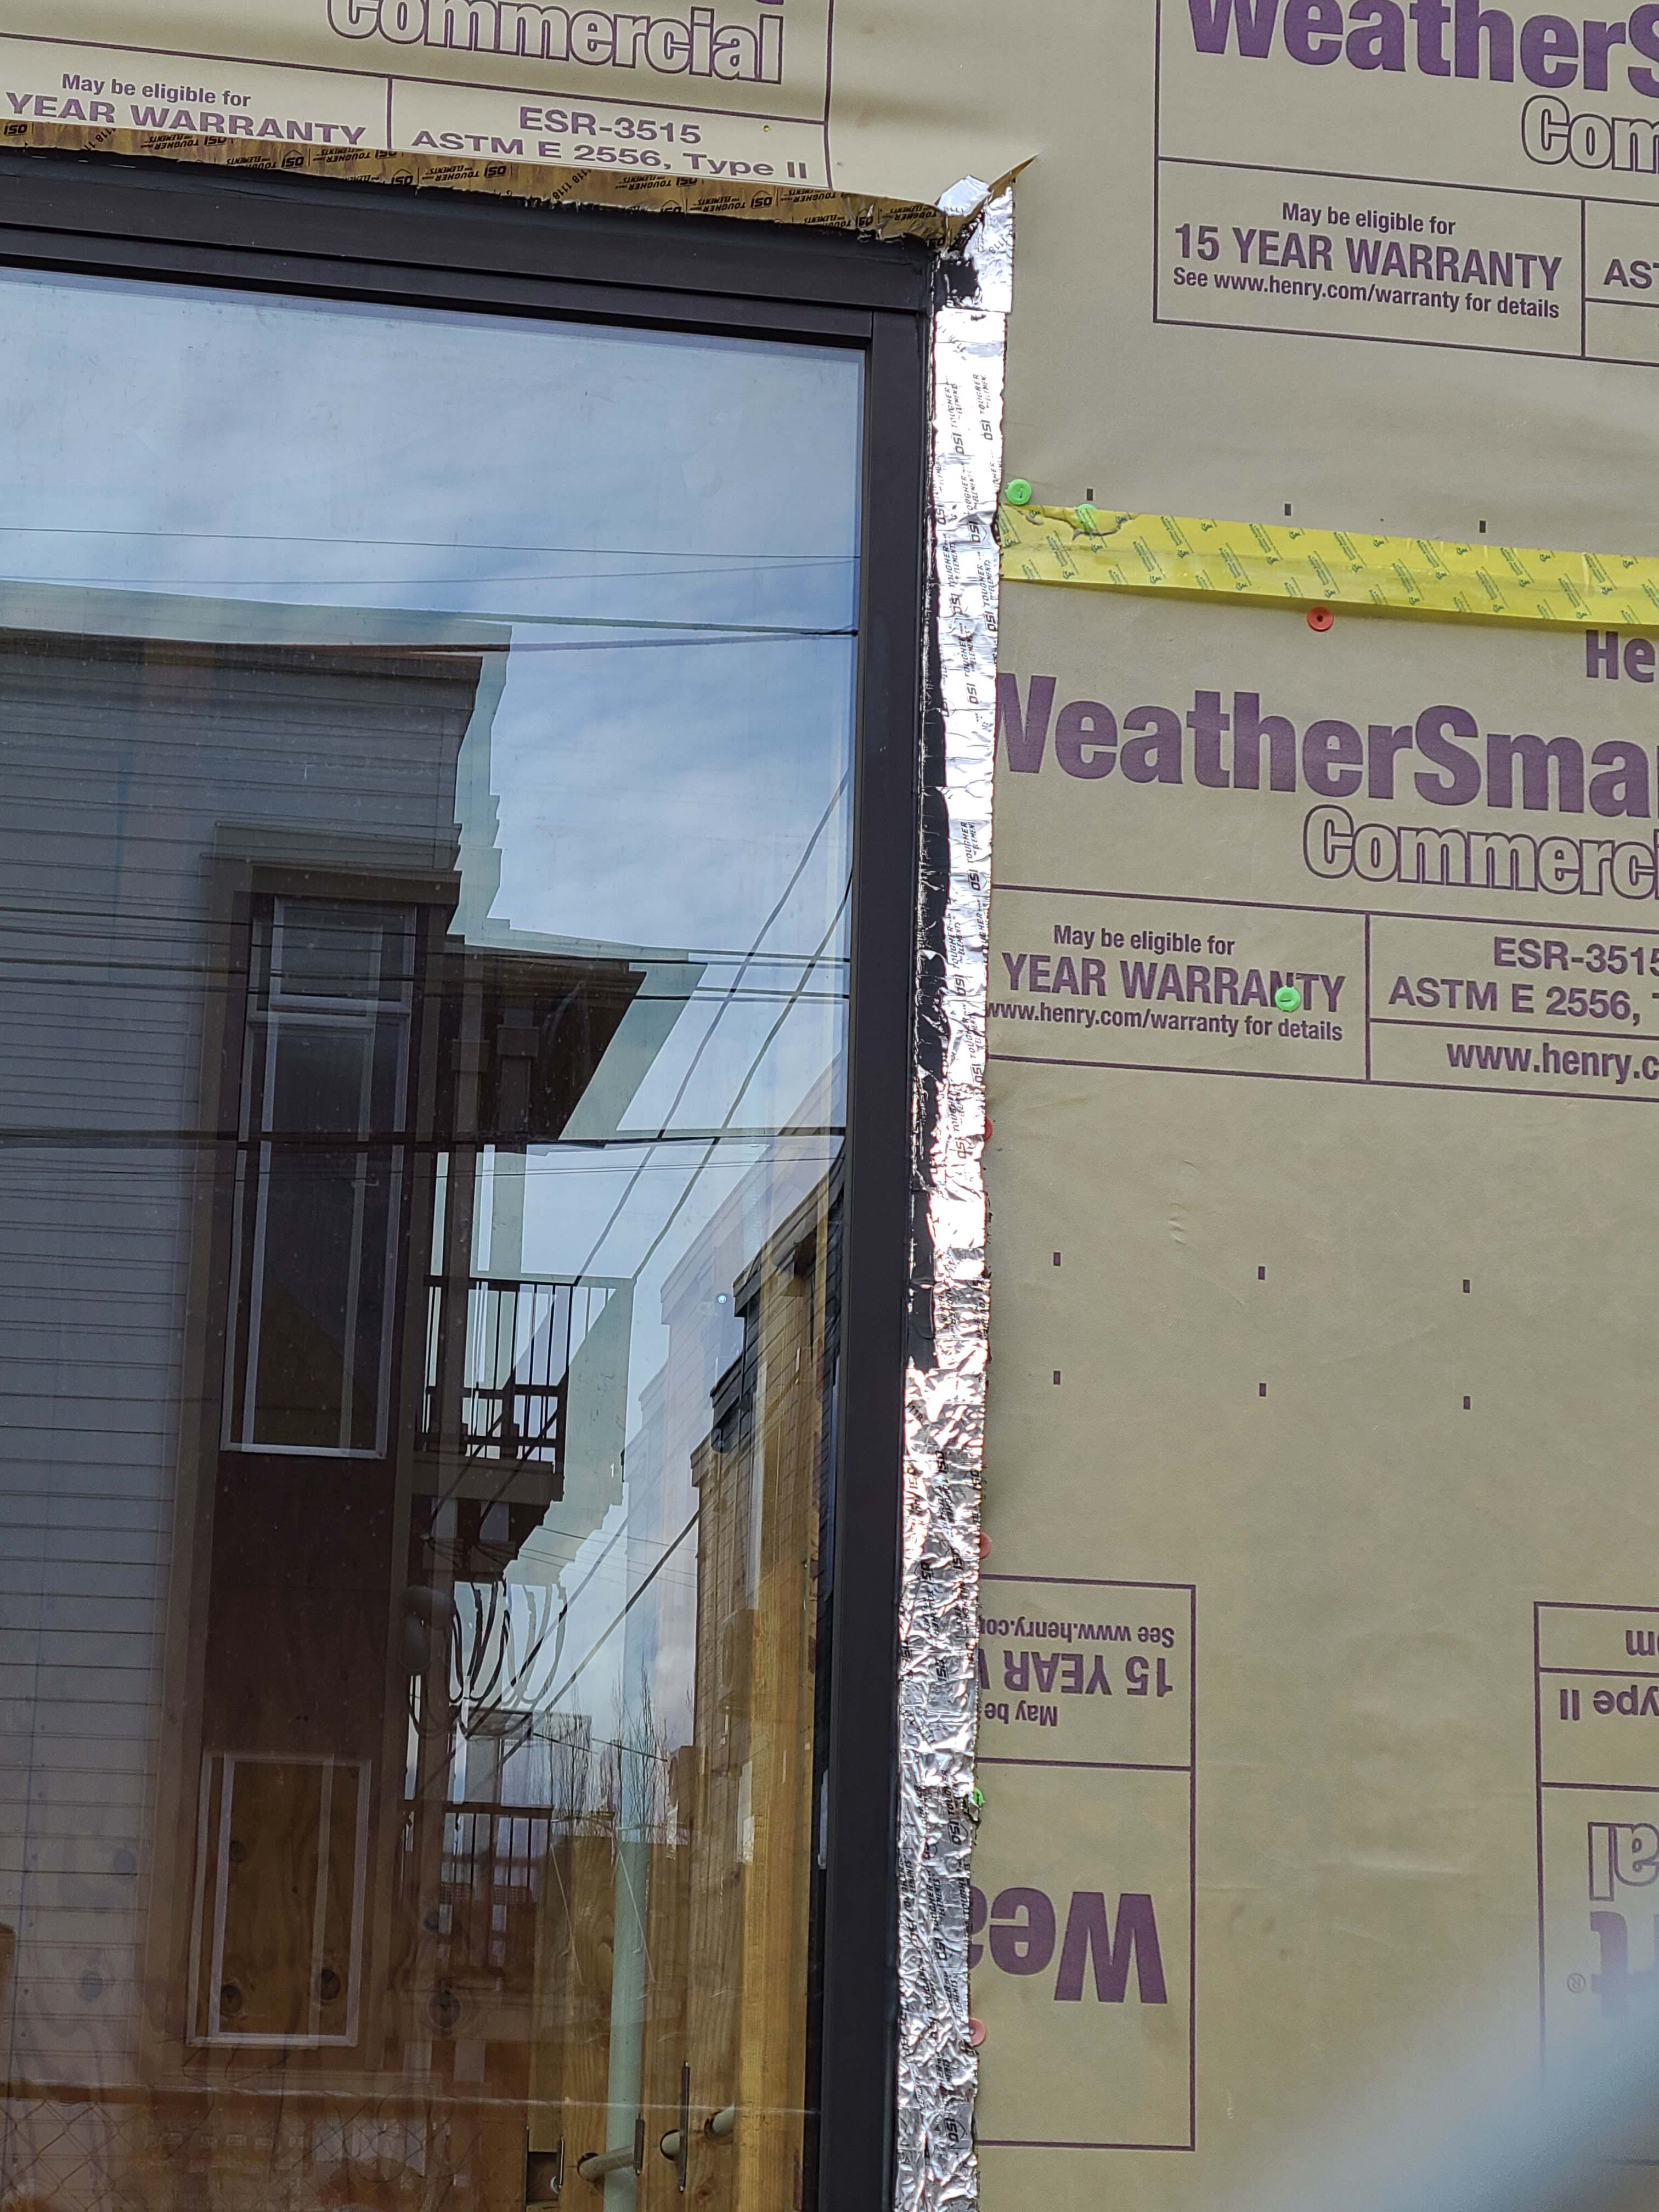
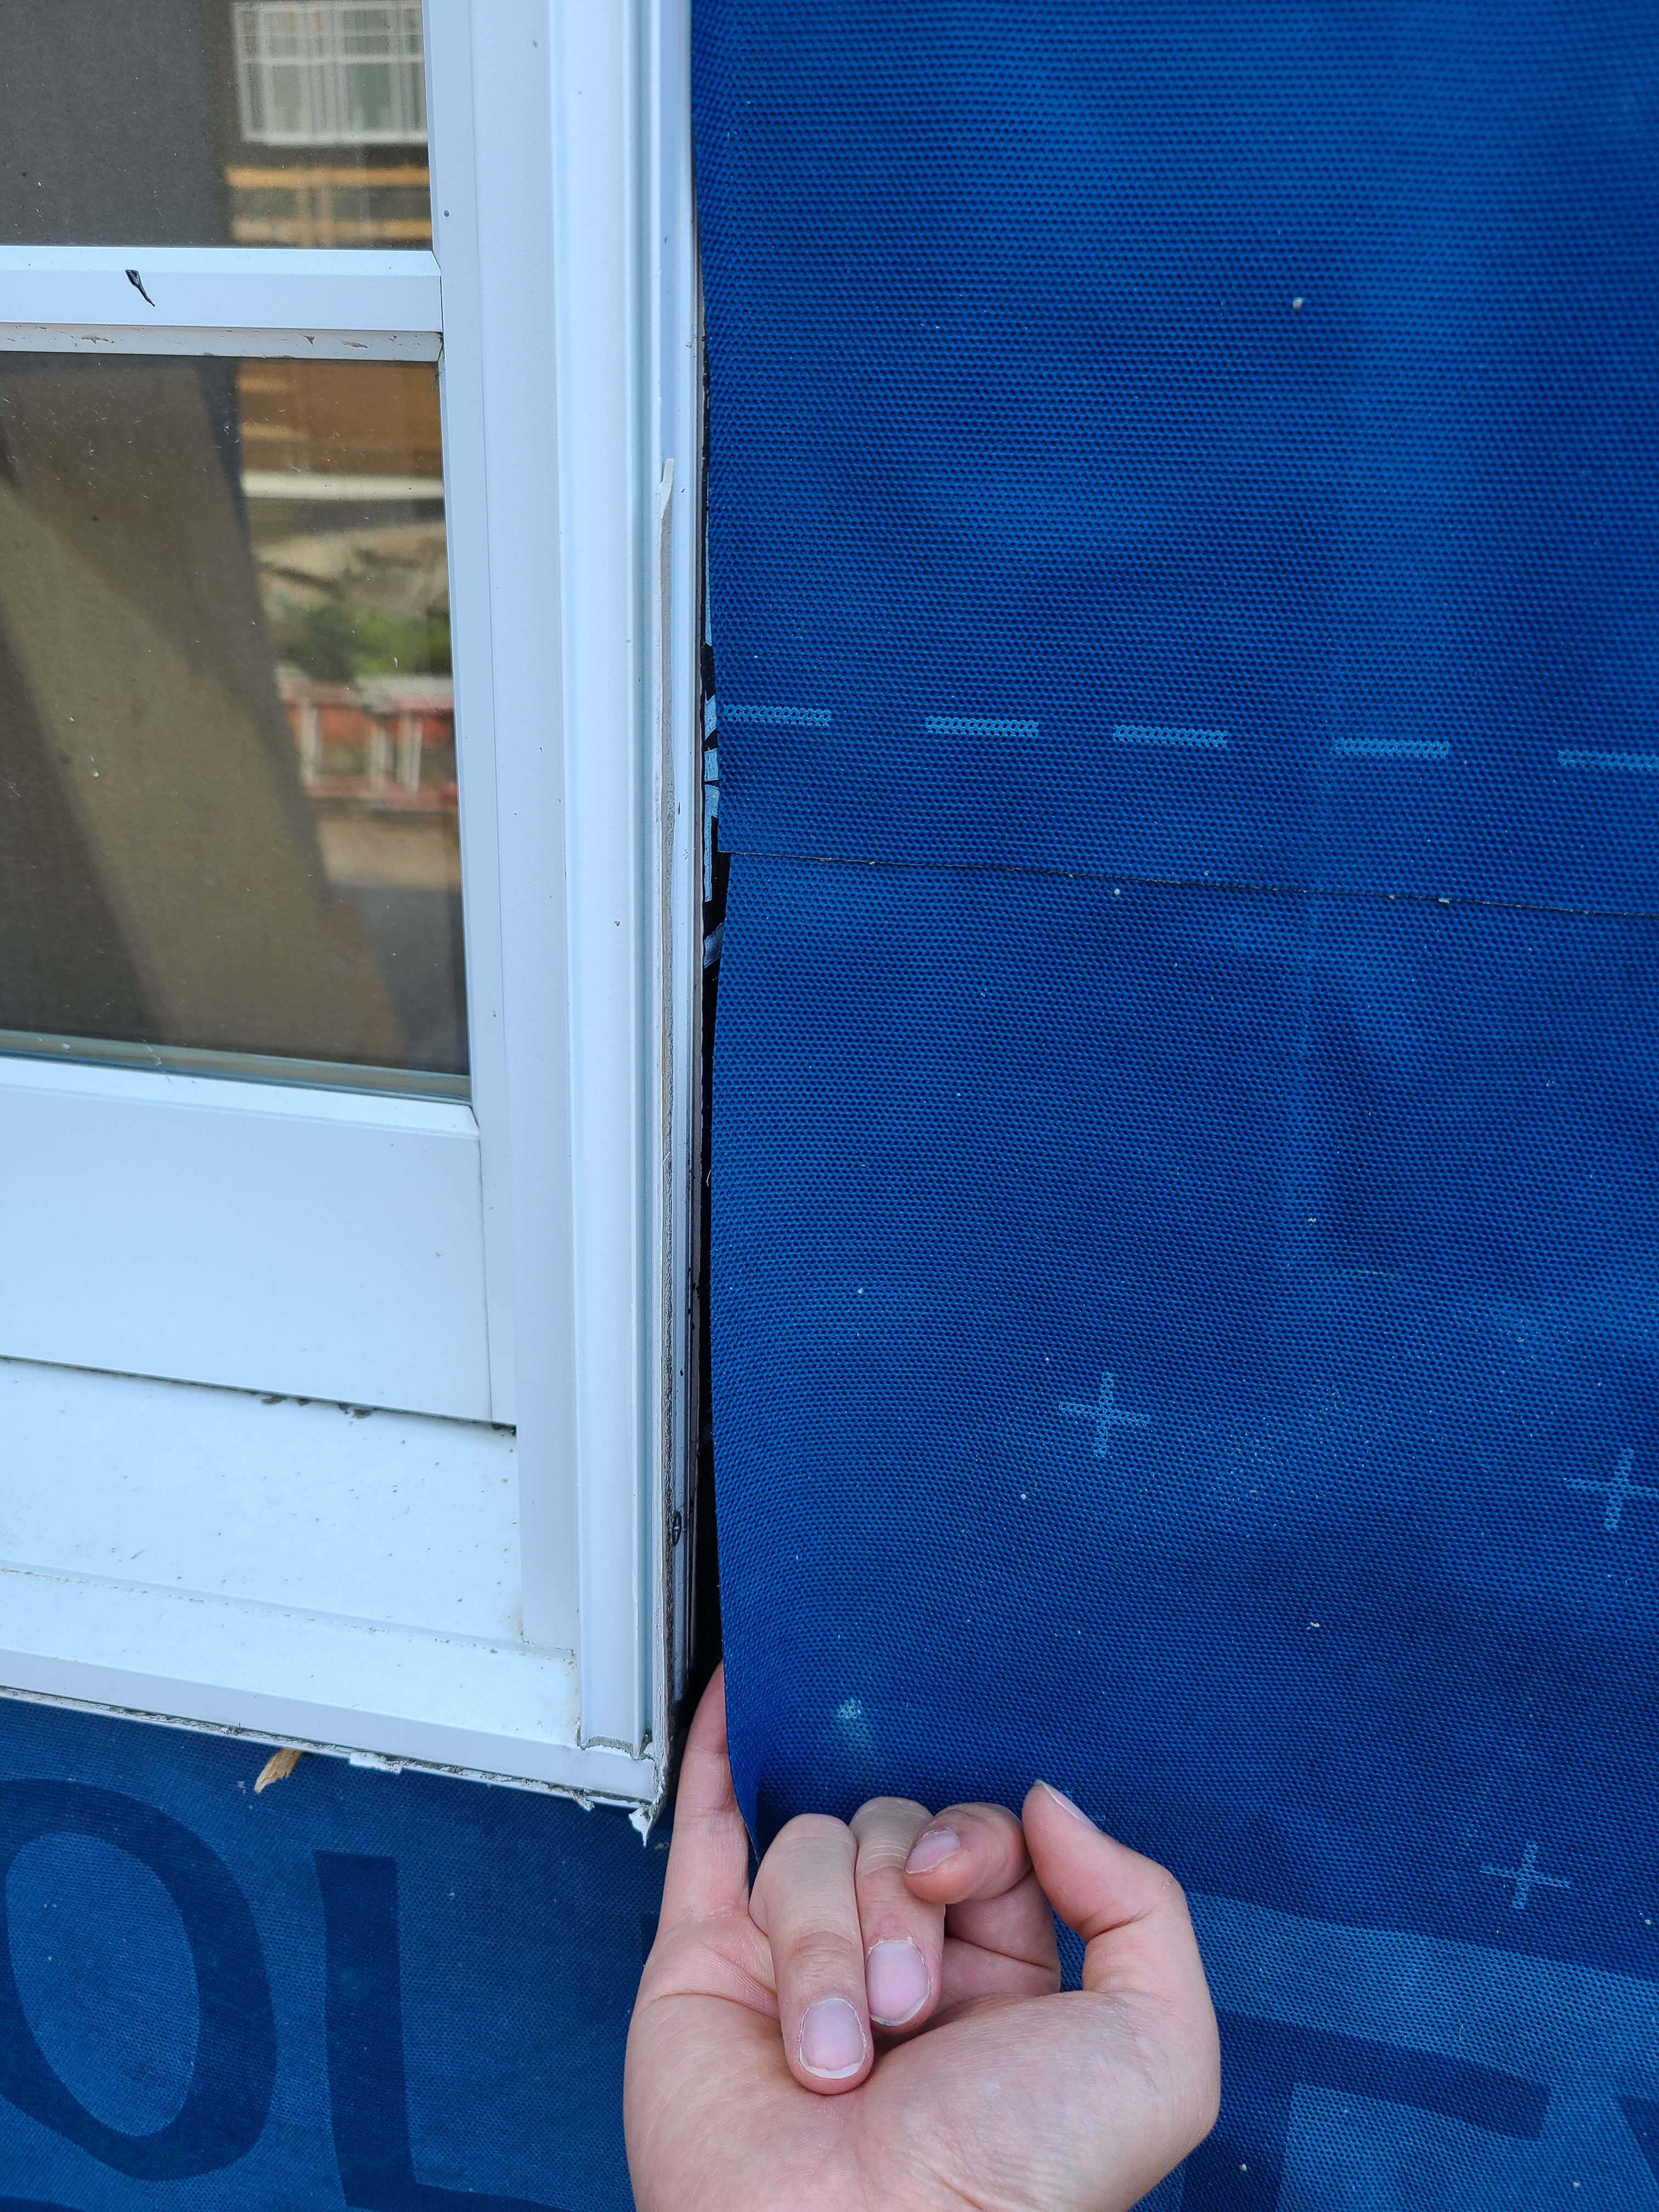
Wrong - House wrap tape is not fully adhered at seam and flashing tape is missing from window head, jamb, and corner above window.
Image
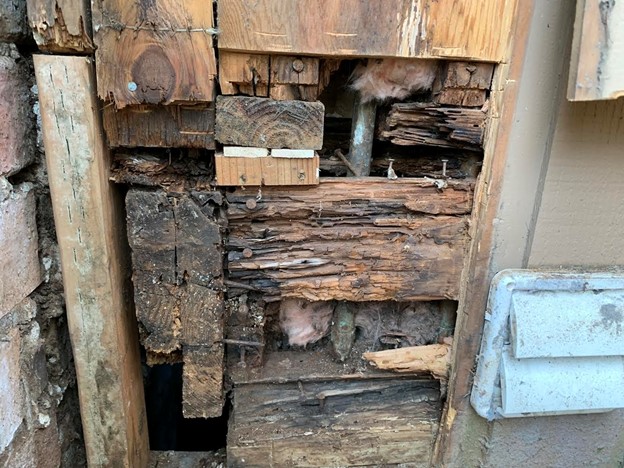
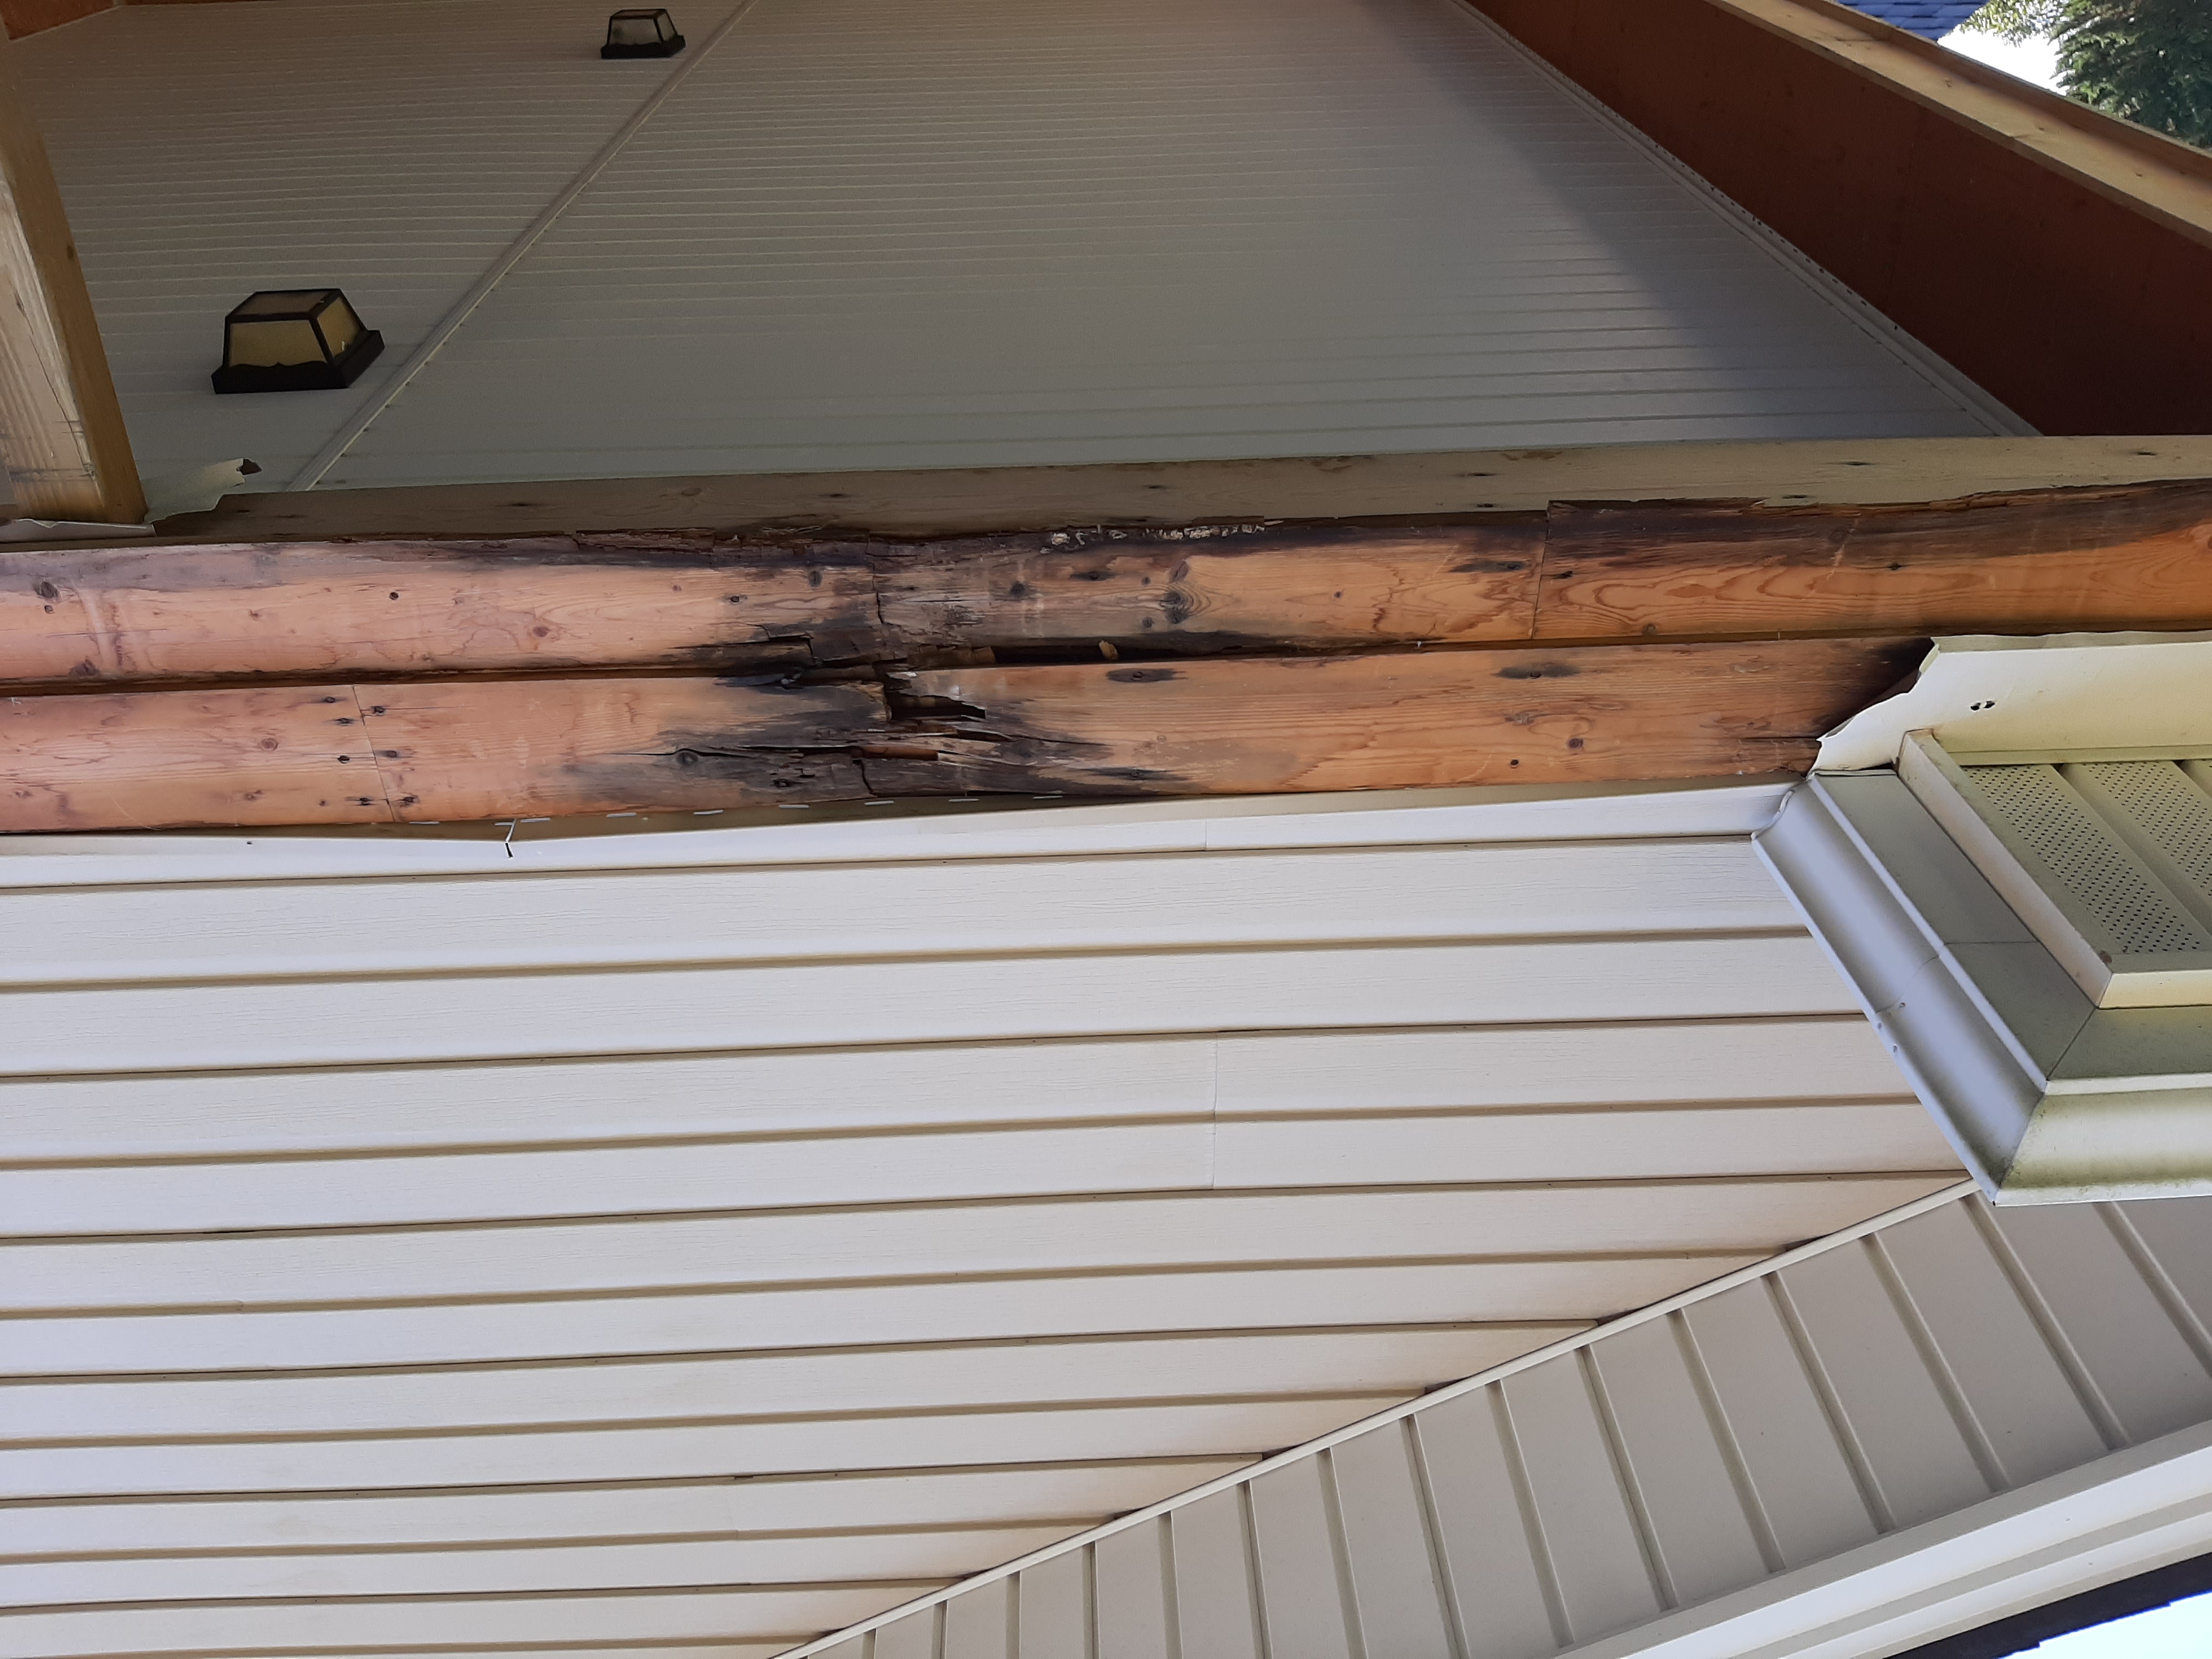
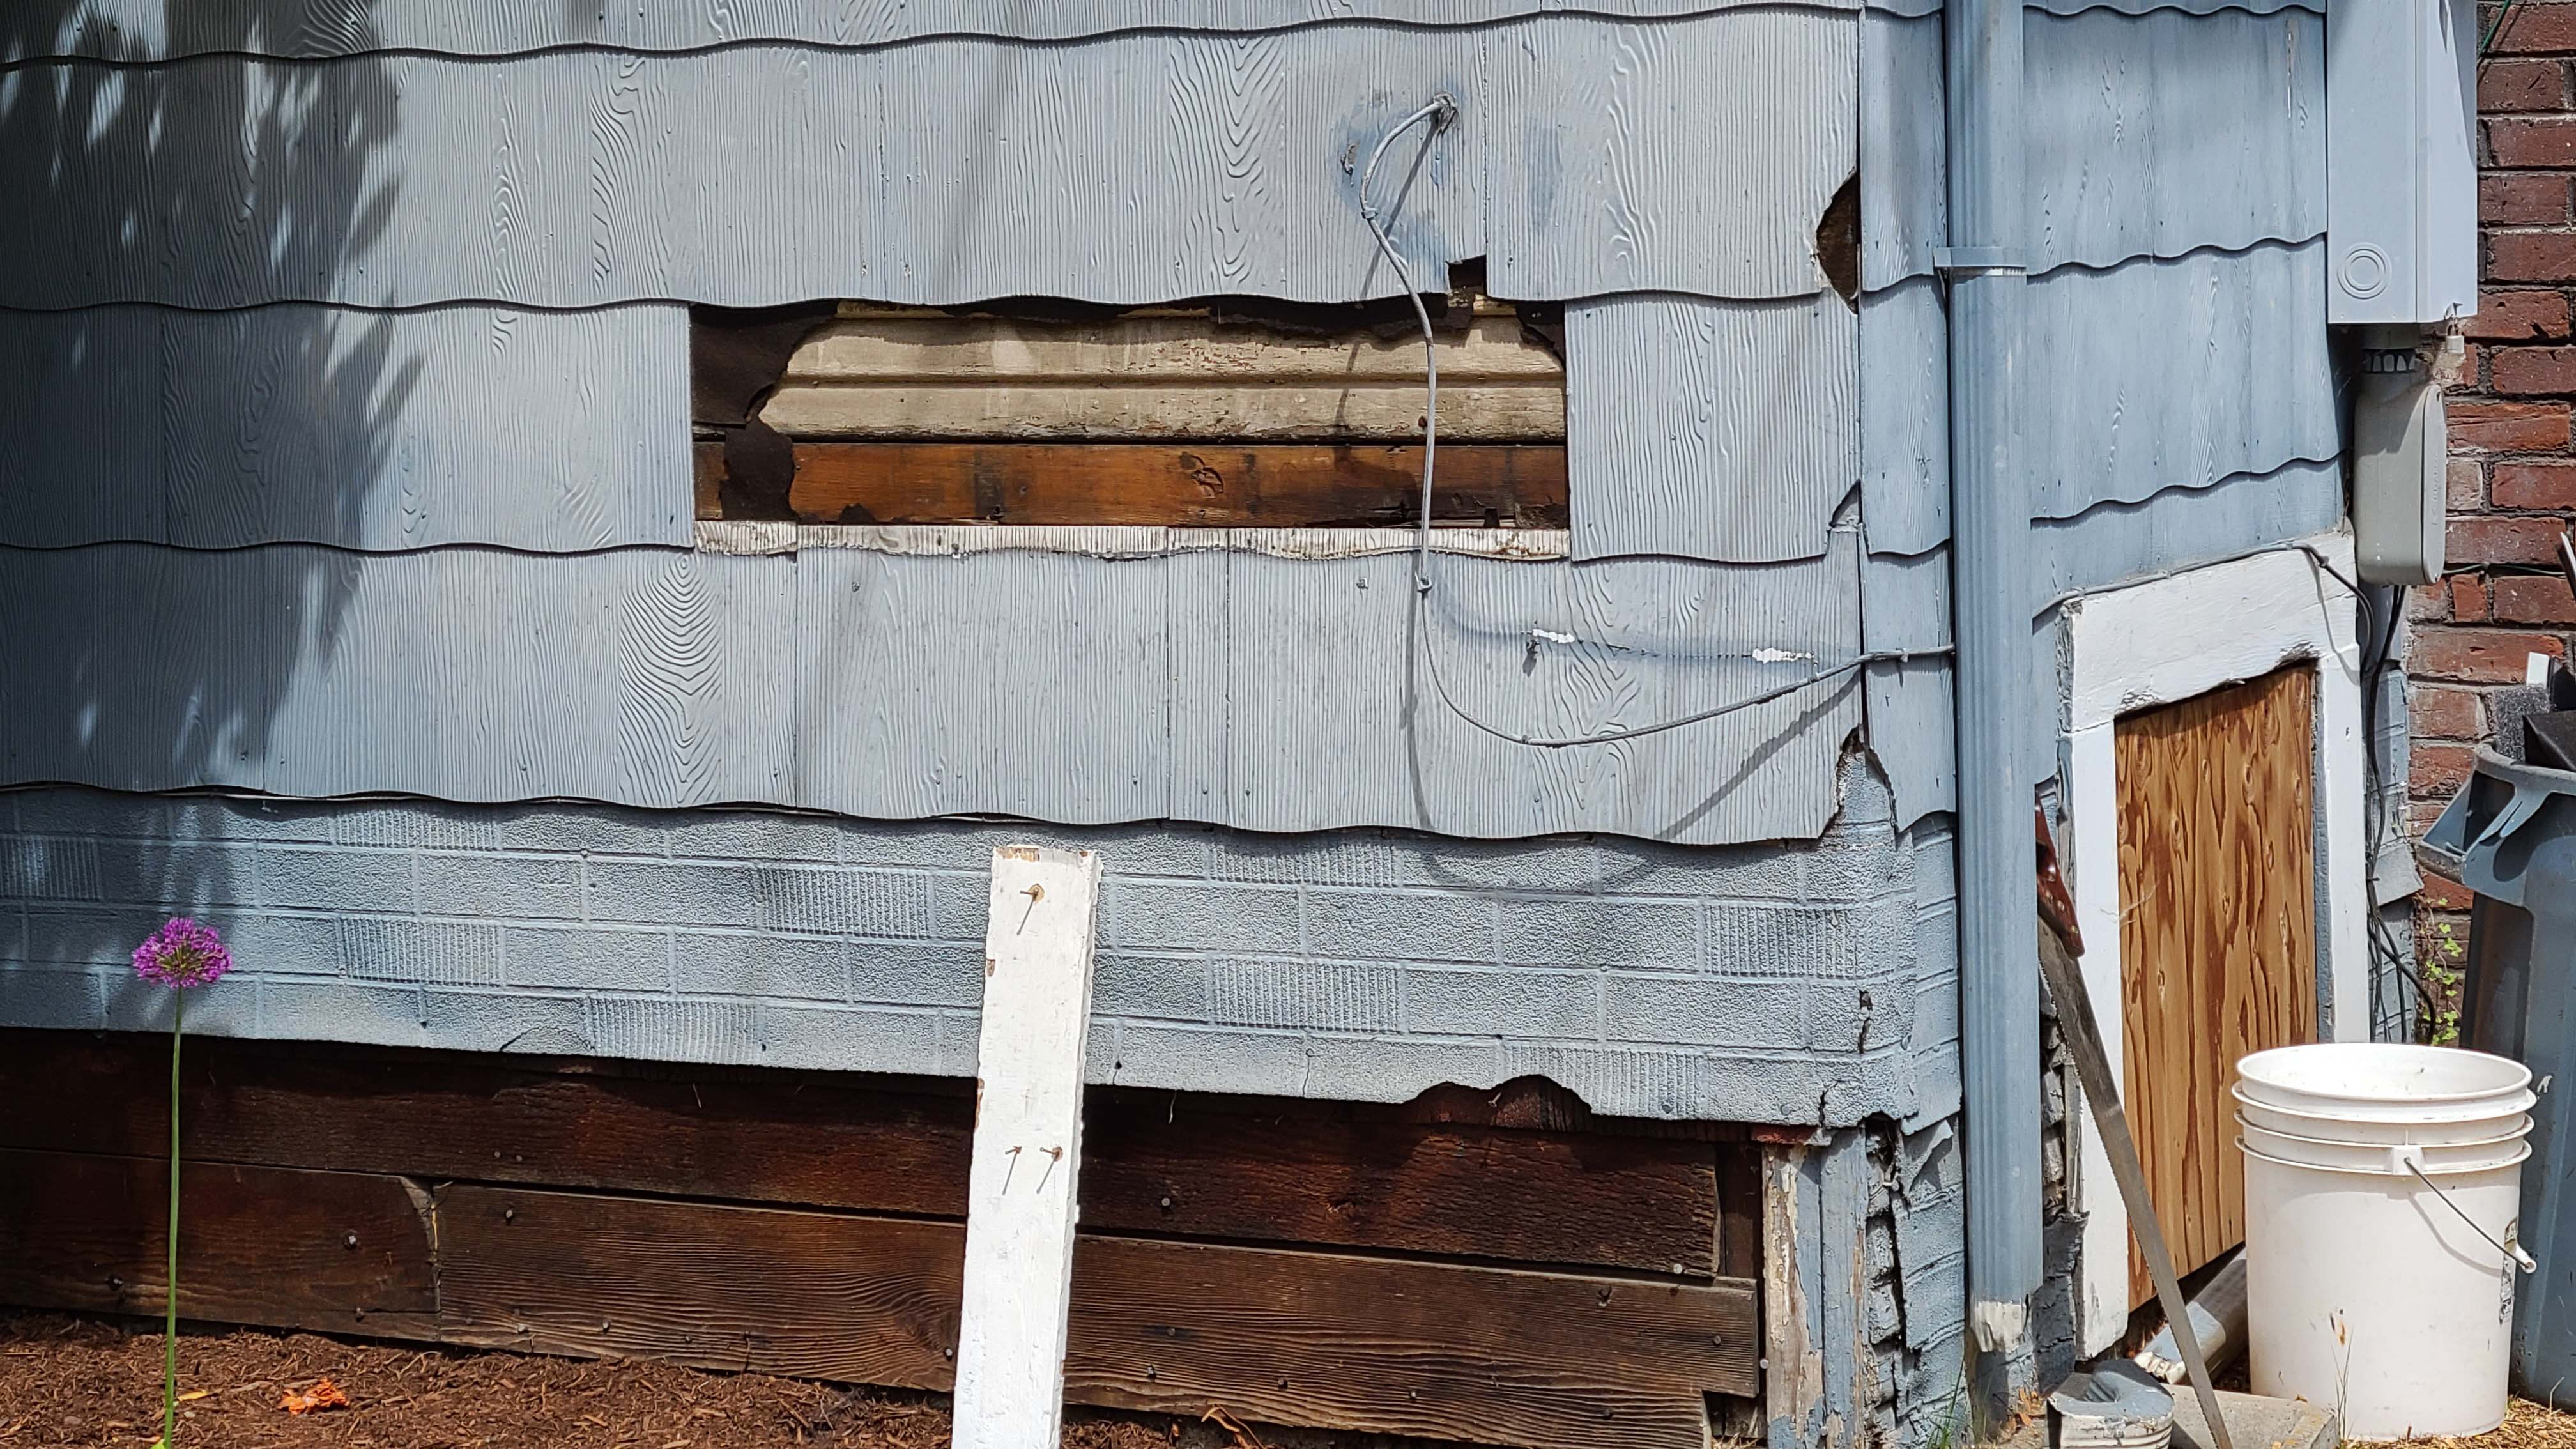
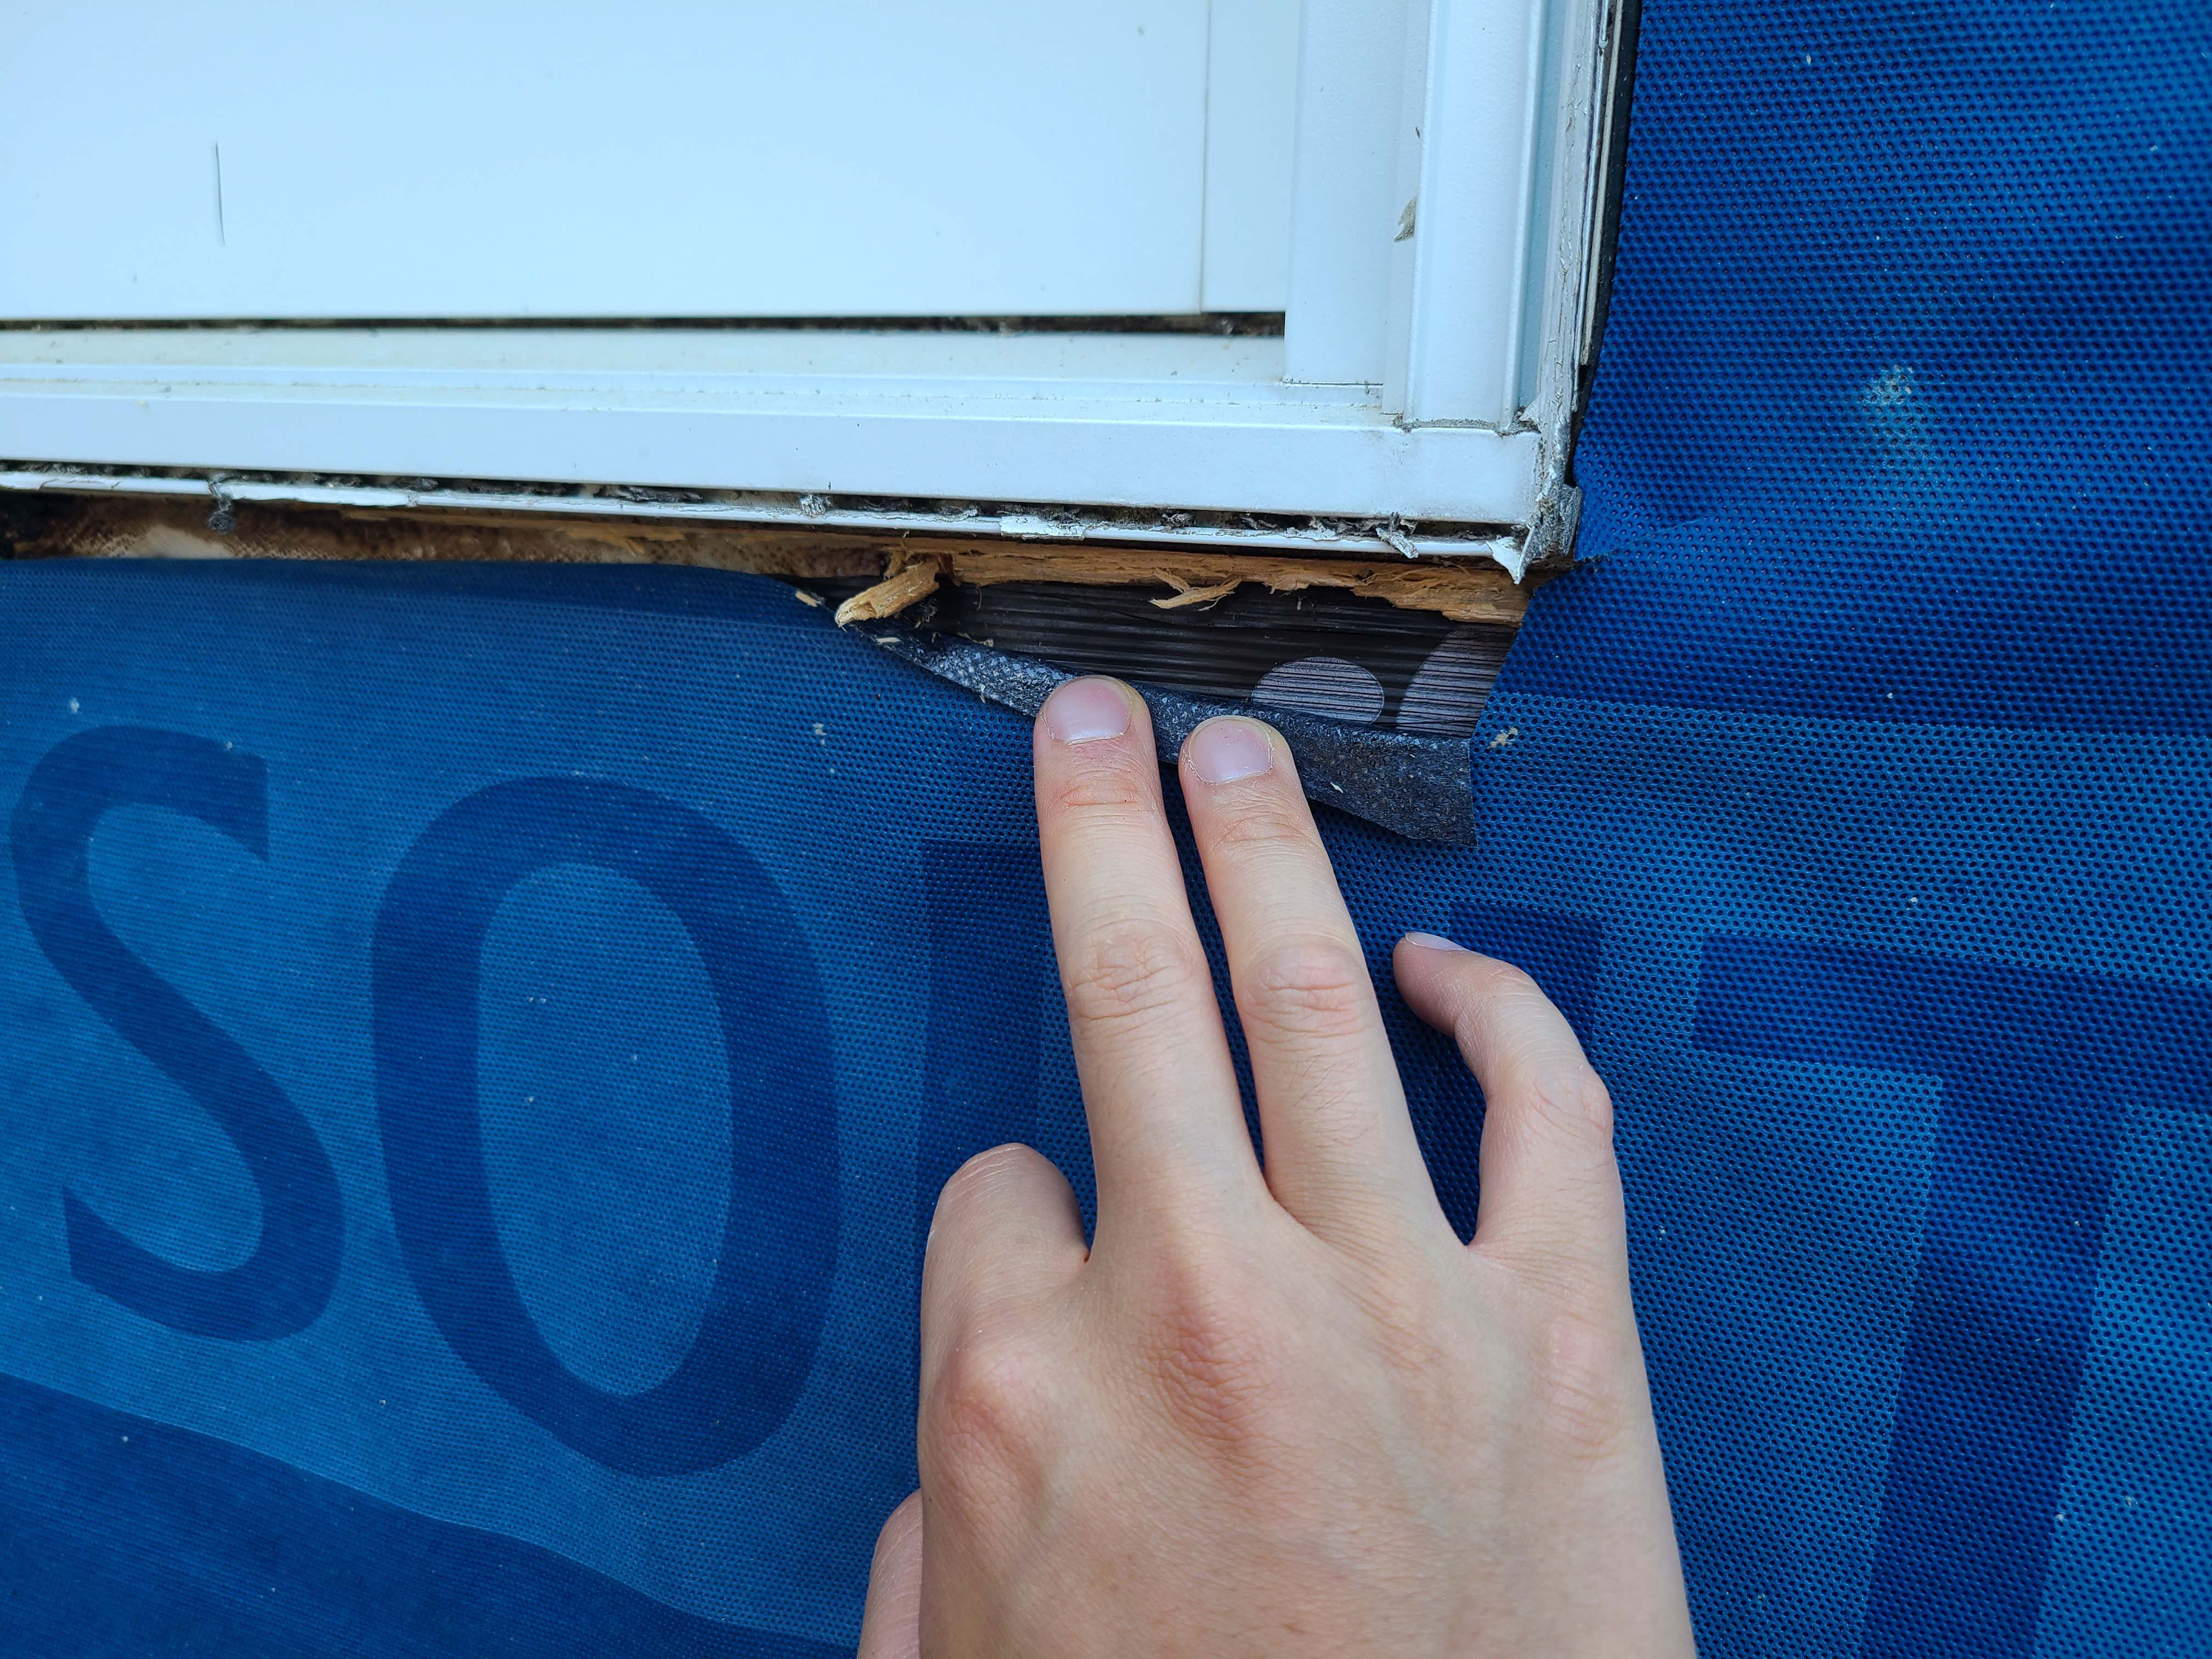
Wrong - Lack of a weather-resistant barrier allowed water to get behind the siding and rot the framing in this corner rim joist area.
Image
Wrong - Lack of house wrap or weather resistant barrier lead to significant water damage behind the brick veneer.
Image
Image
Image

Image
Image
Image
Wrong - Self-adhered house wrap is poorly installed with many bubbles and gaps at seams.
Image

Wrong - Self-adhered house wrap is underlapped instead of overlapped which will allow rain water to get behind house wrap.
Image
Image
Wrong - Step flashing is missing where the gable meets roof and the valley flashing is incorrectly on top of rather than under shingles.
Image
Wrong - Stucco has rotted and cracked above a window because of water damage due to lack of proper flashing and drainage.
Image
Image
Image
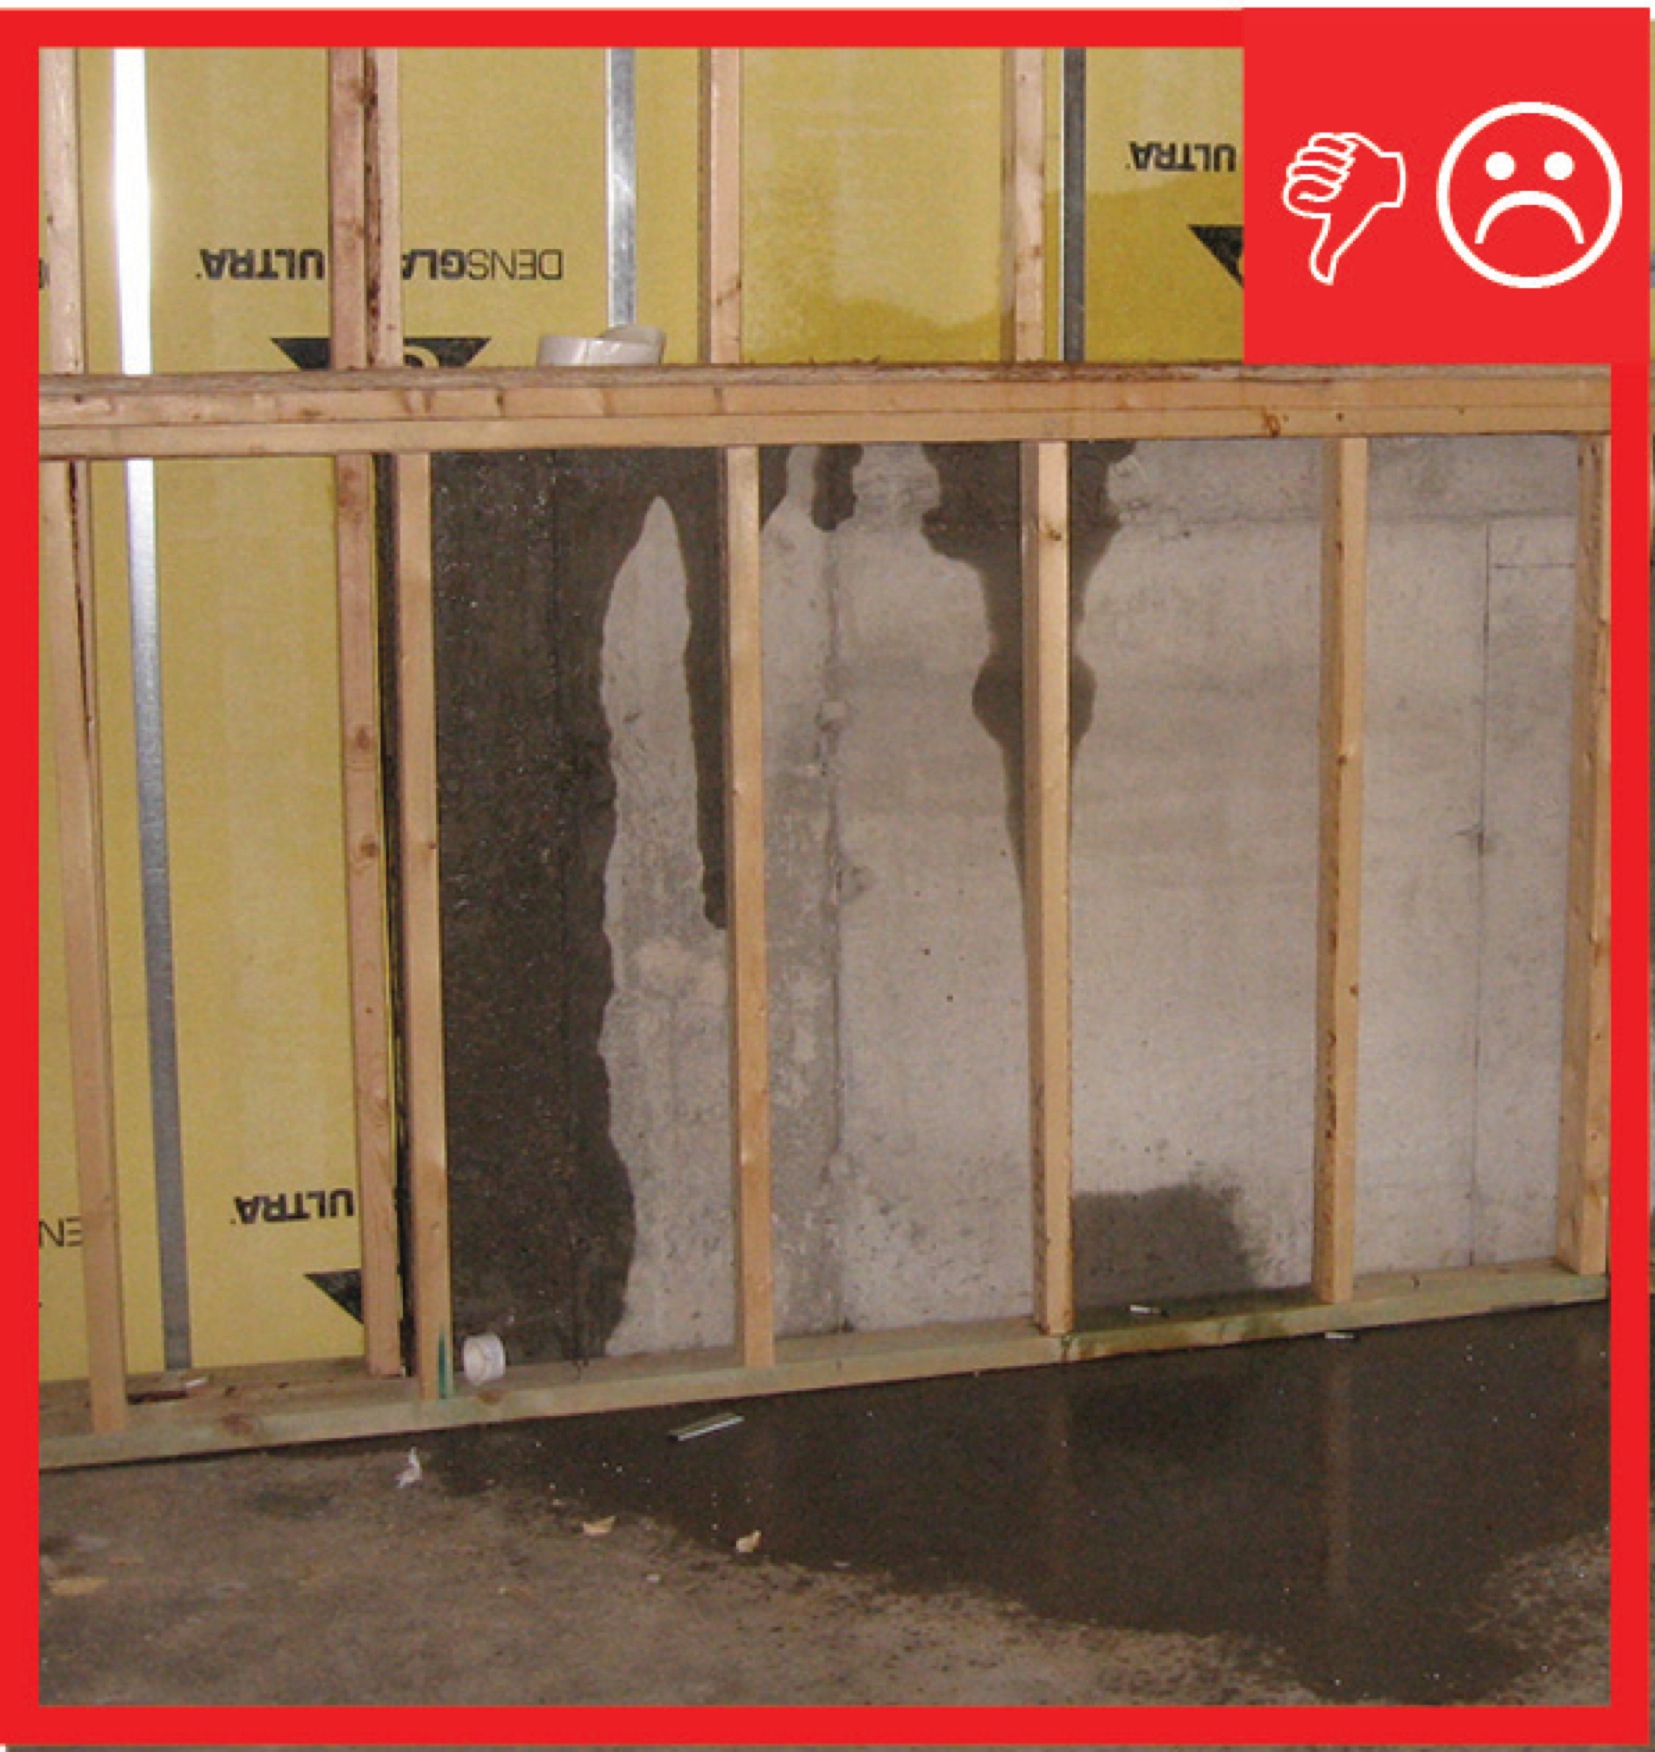
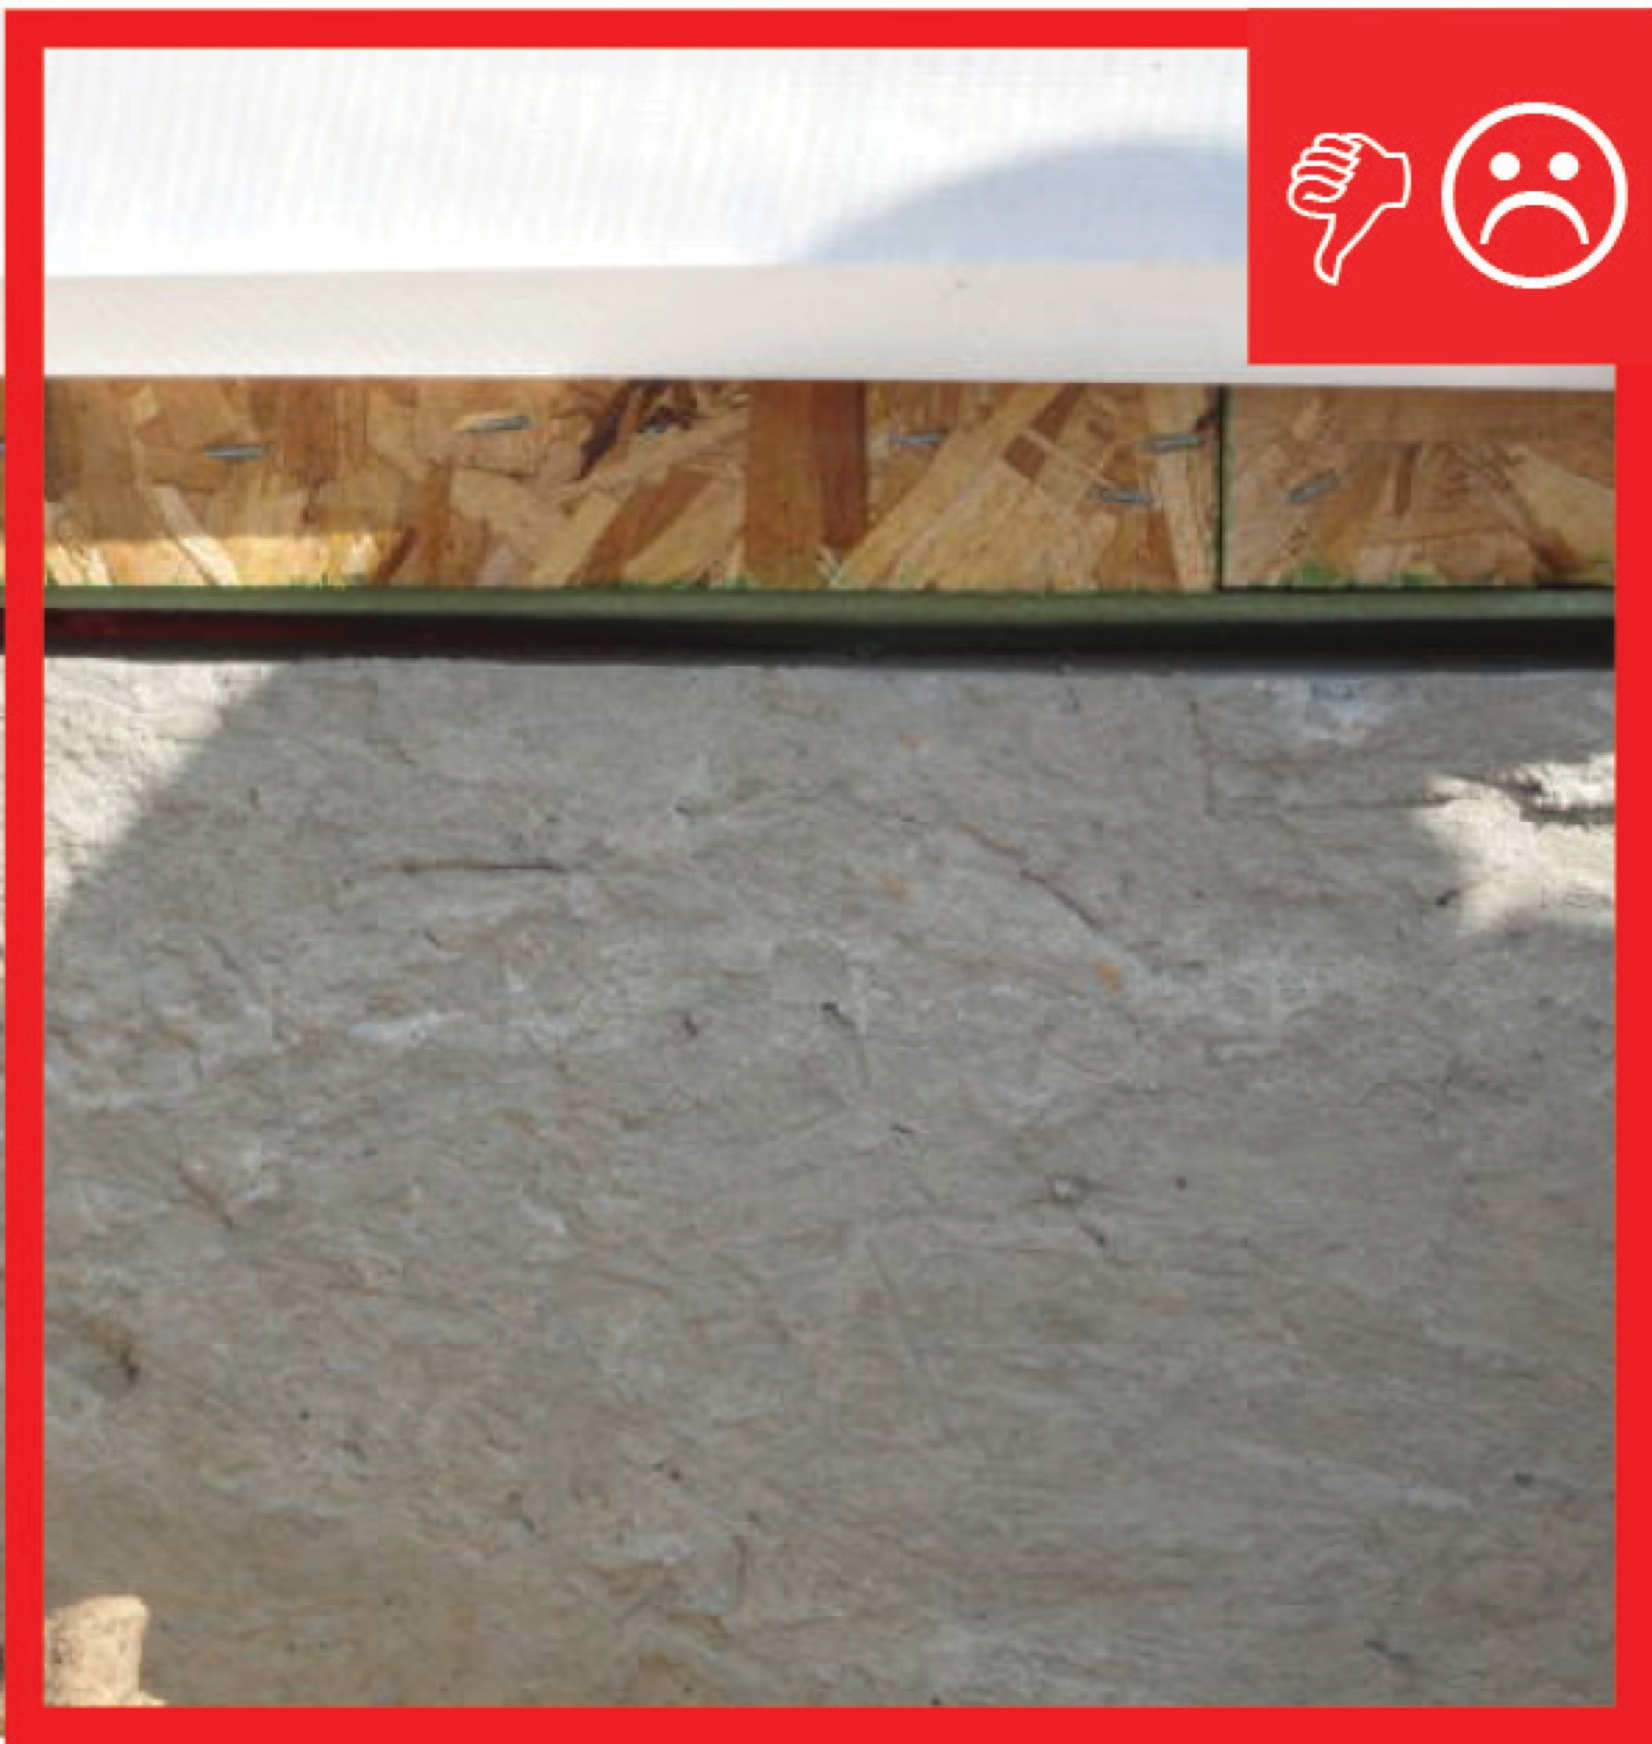
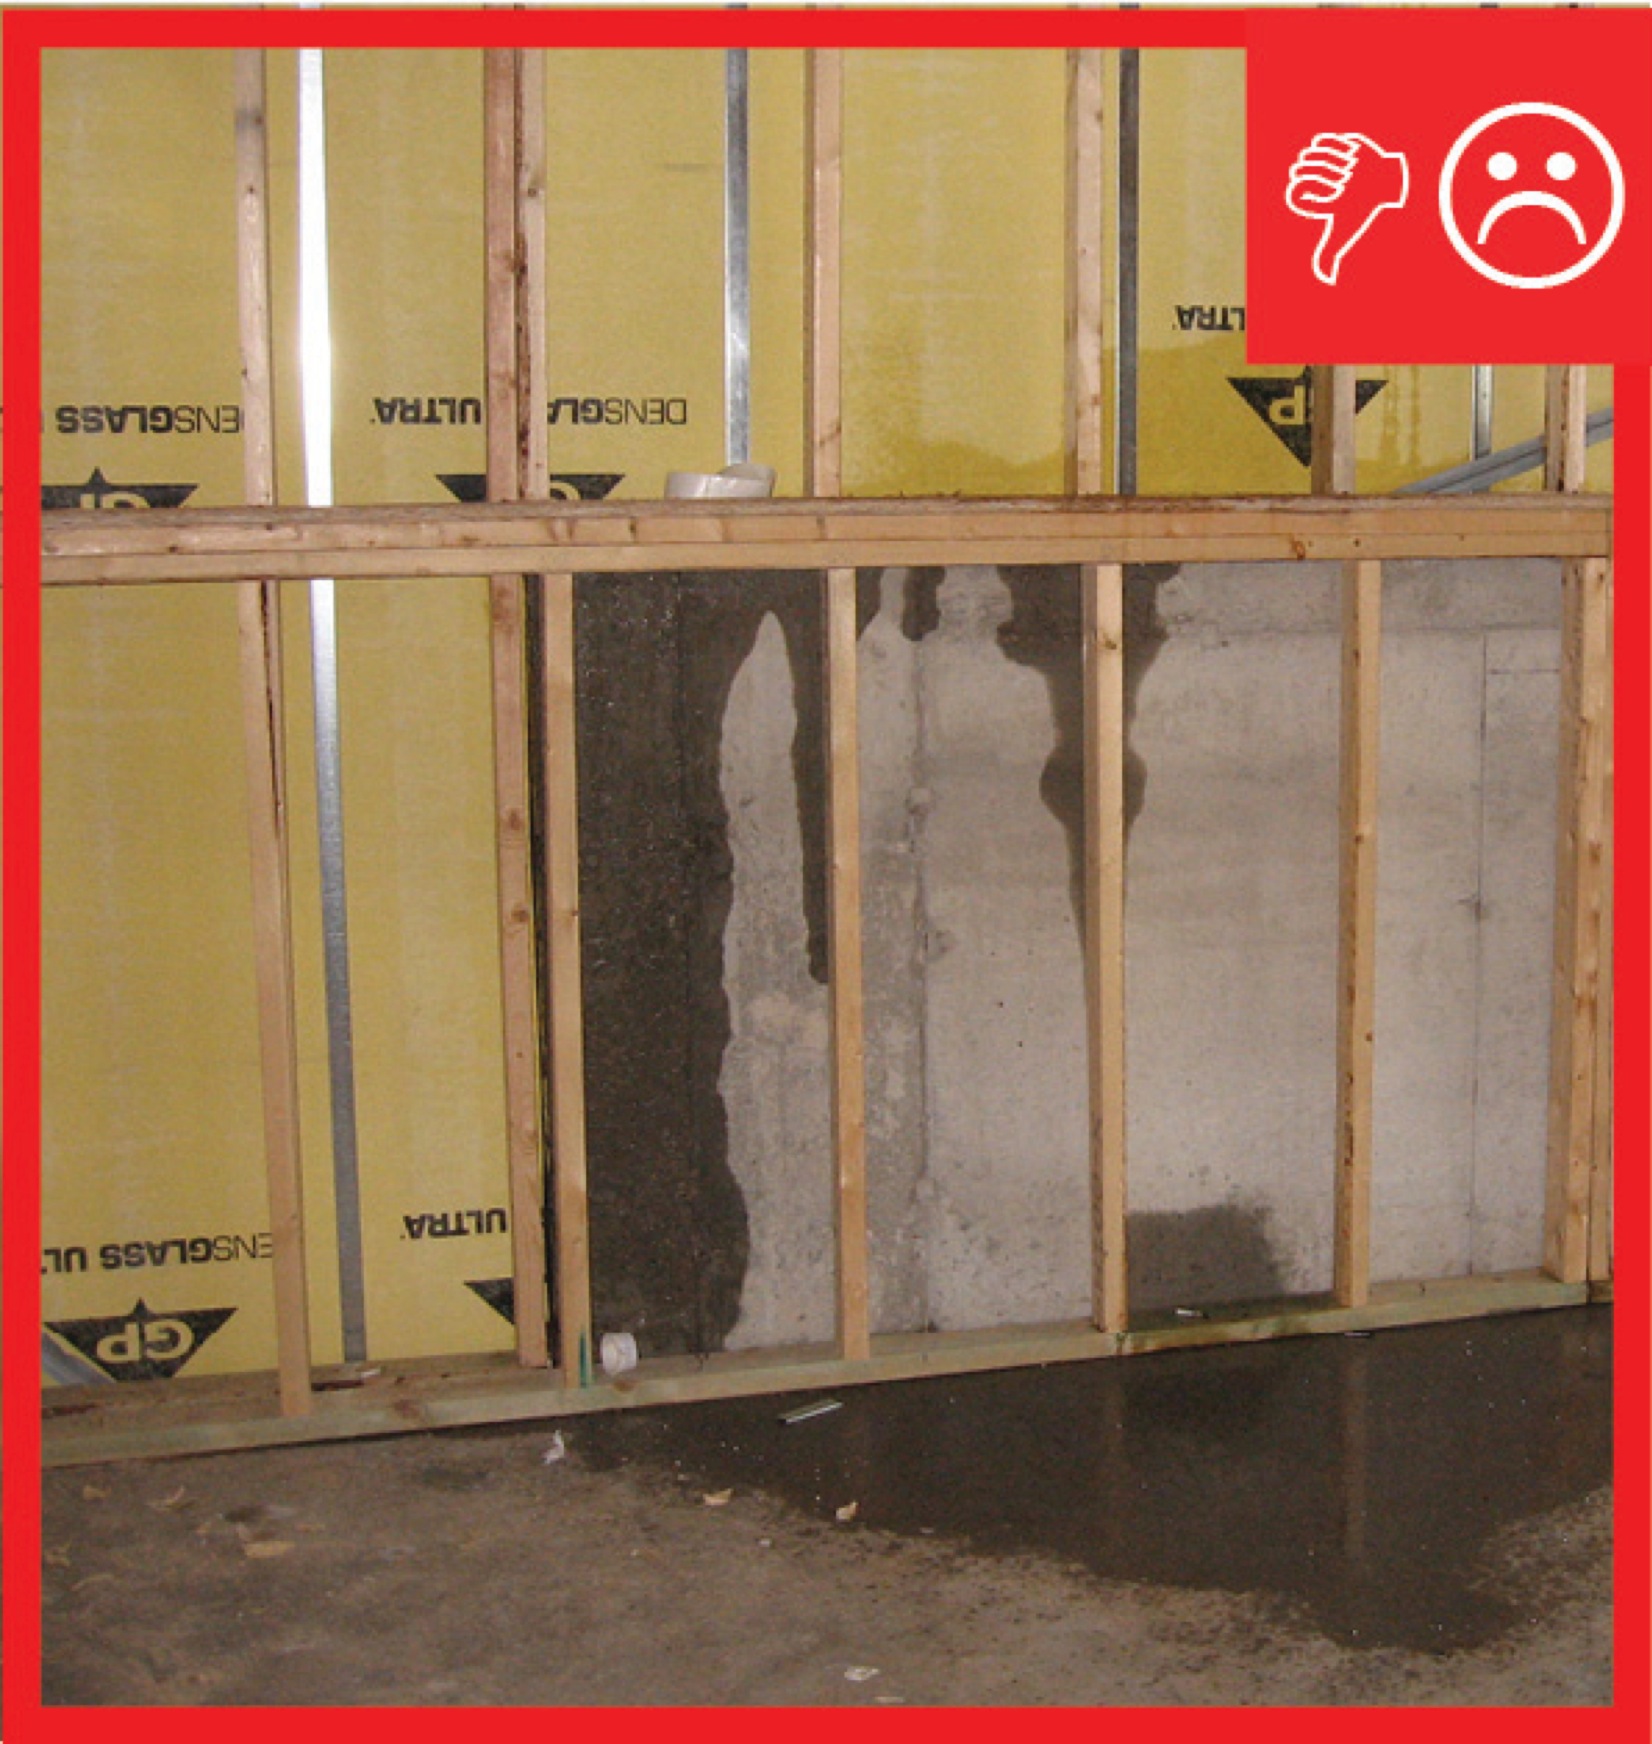
Wrong - The below-grade concrete does not have the correct construction to be impermeable to moisture because the lumber is untreated and against the concrete that lacks waterproofing.
Image

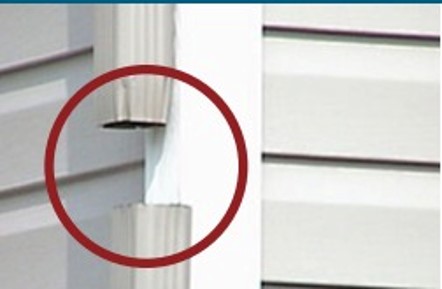
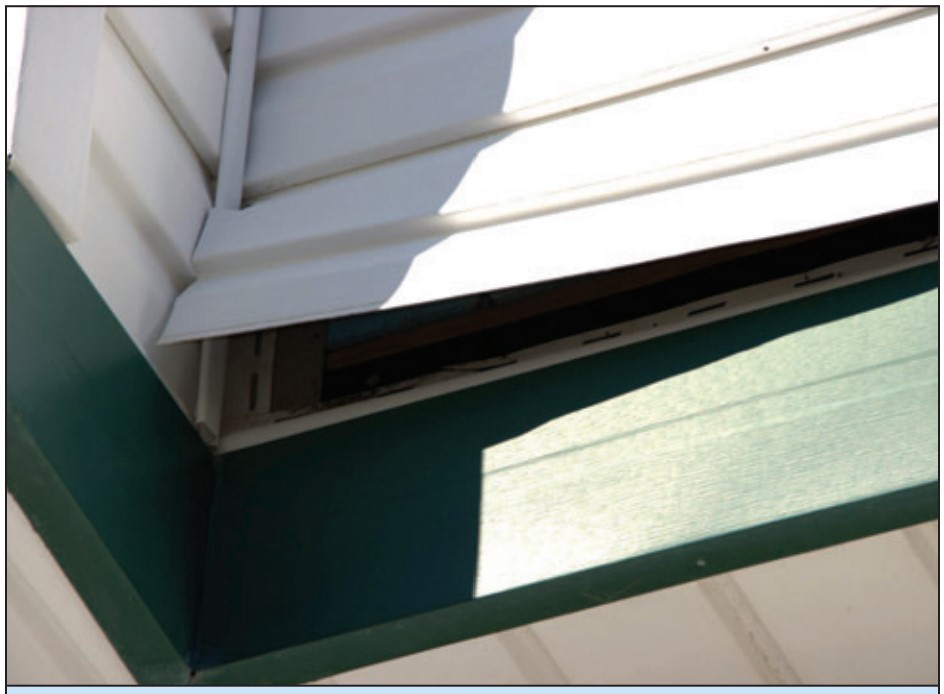
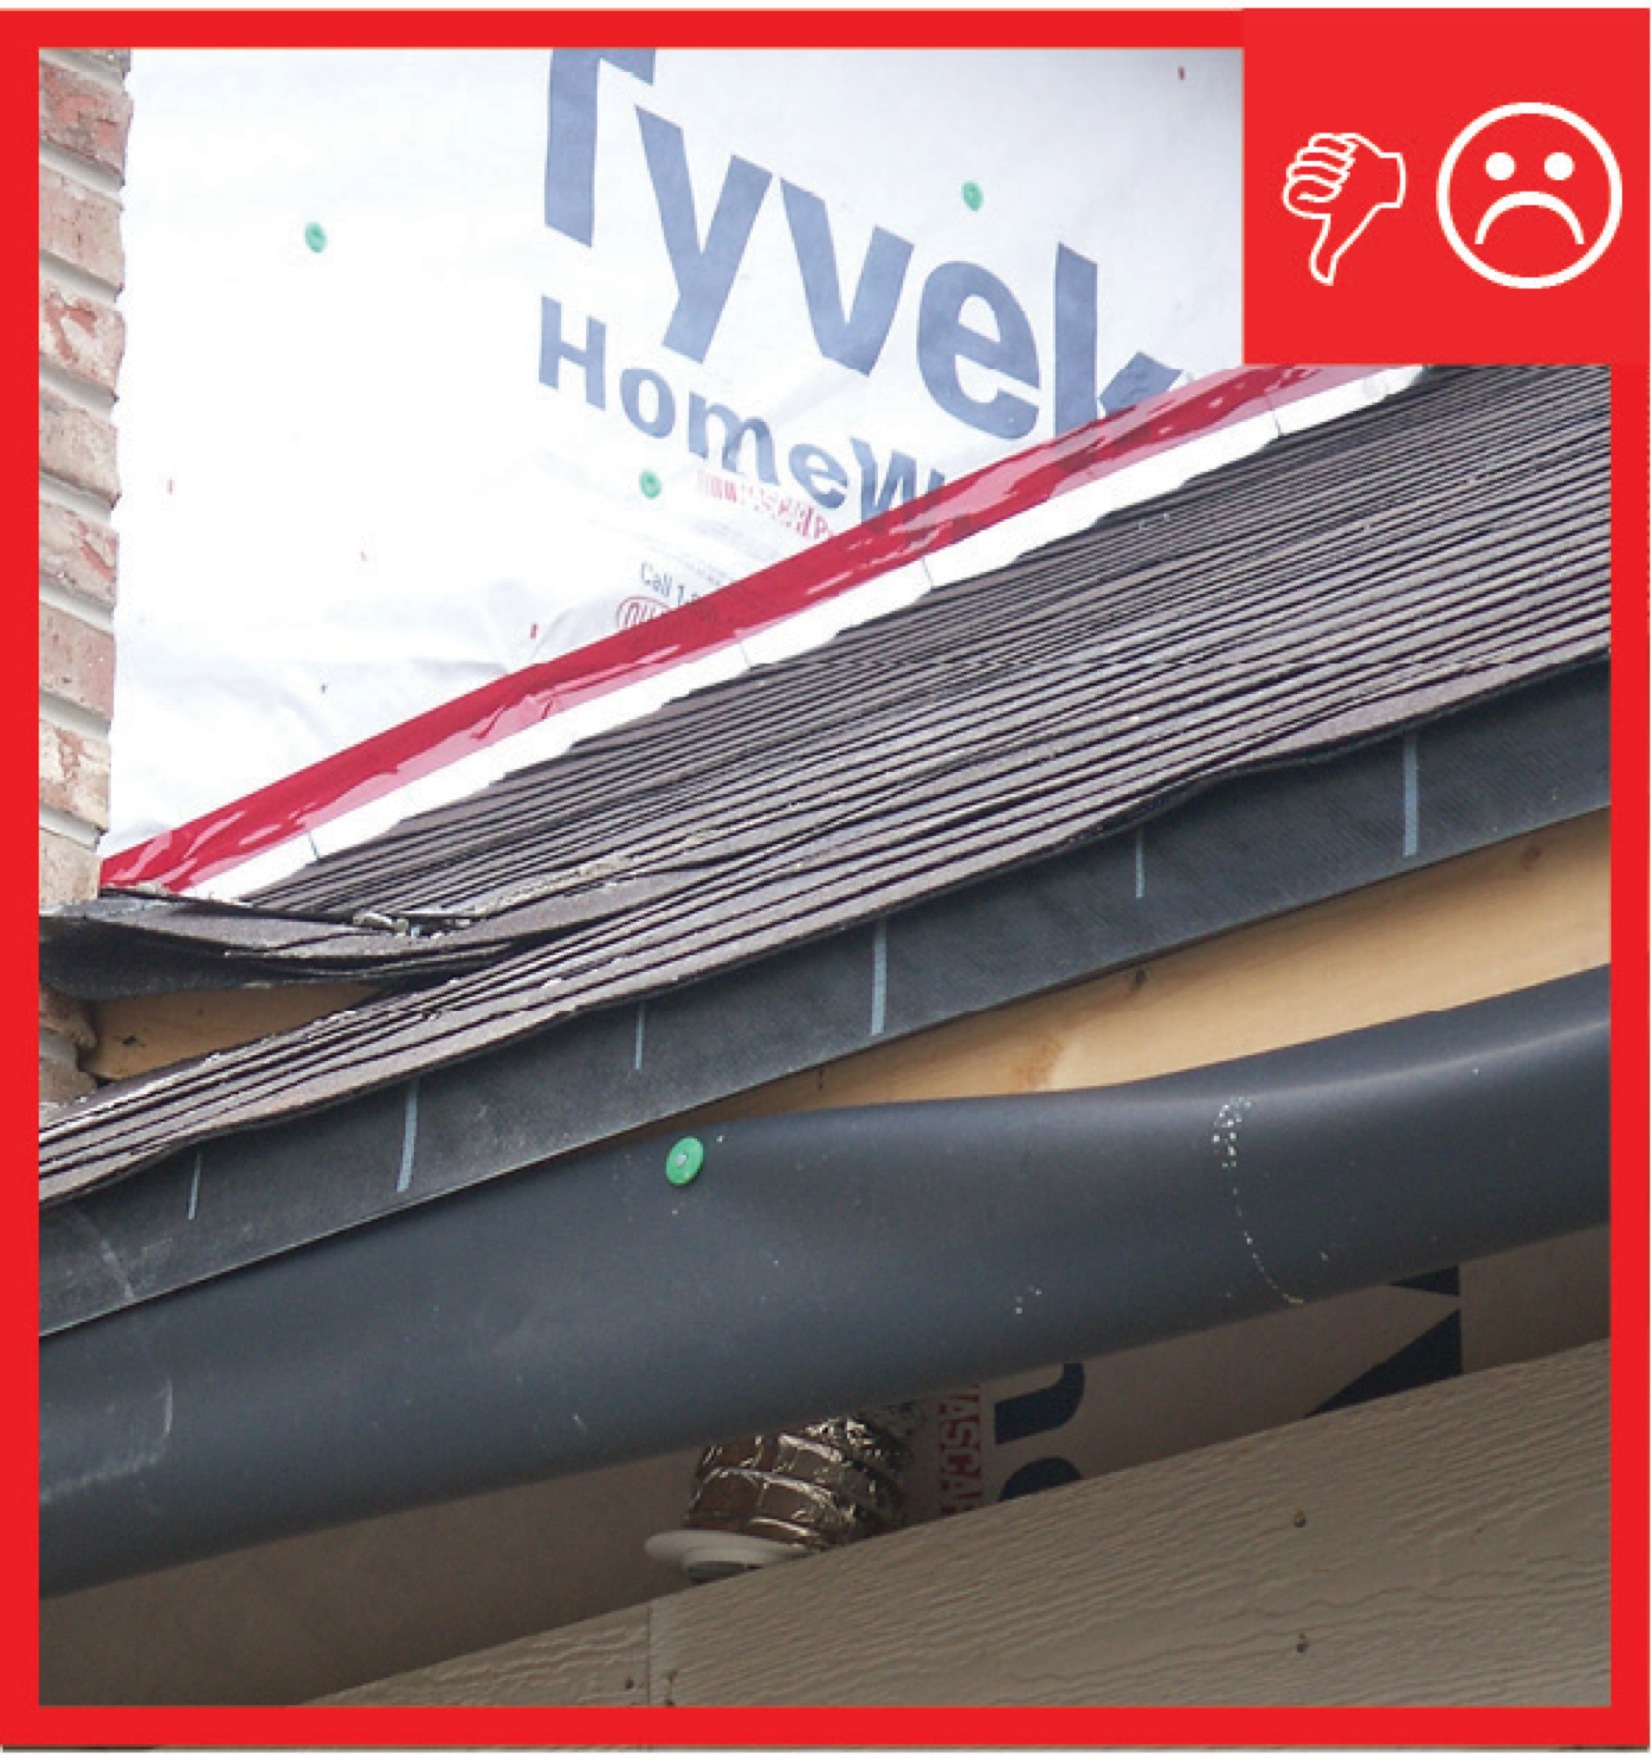
Wrong - The gutter is missing kick-out flashing causing wall and window damage beneath it.
Image
Wrong - The roof insulation panels for this building were not installed in multiple layers with joints offset. The snow melt pattern shows thermal bypasses at the insulation panel joints.
Image

Wrong - The siding on the chimney is rotten because there is no metal step flashing at the base of the chimney.
Image

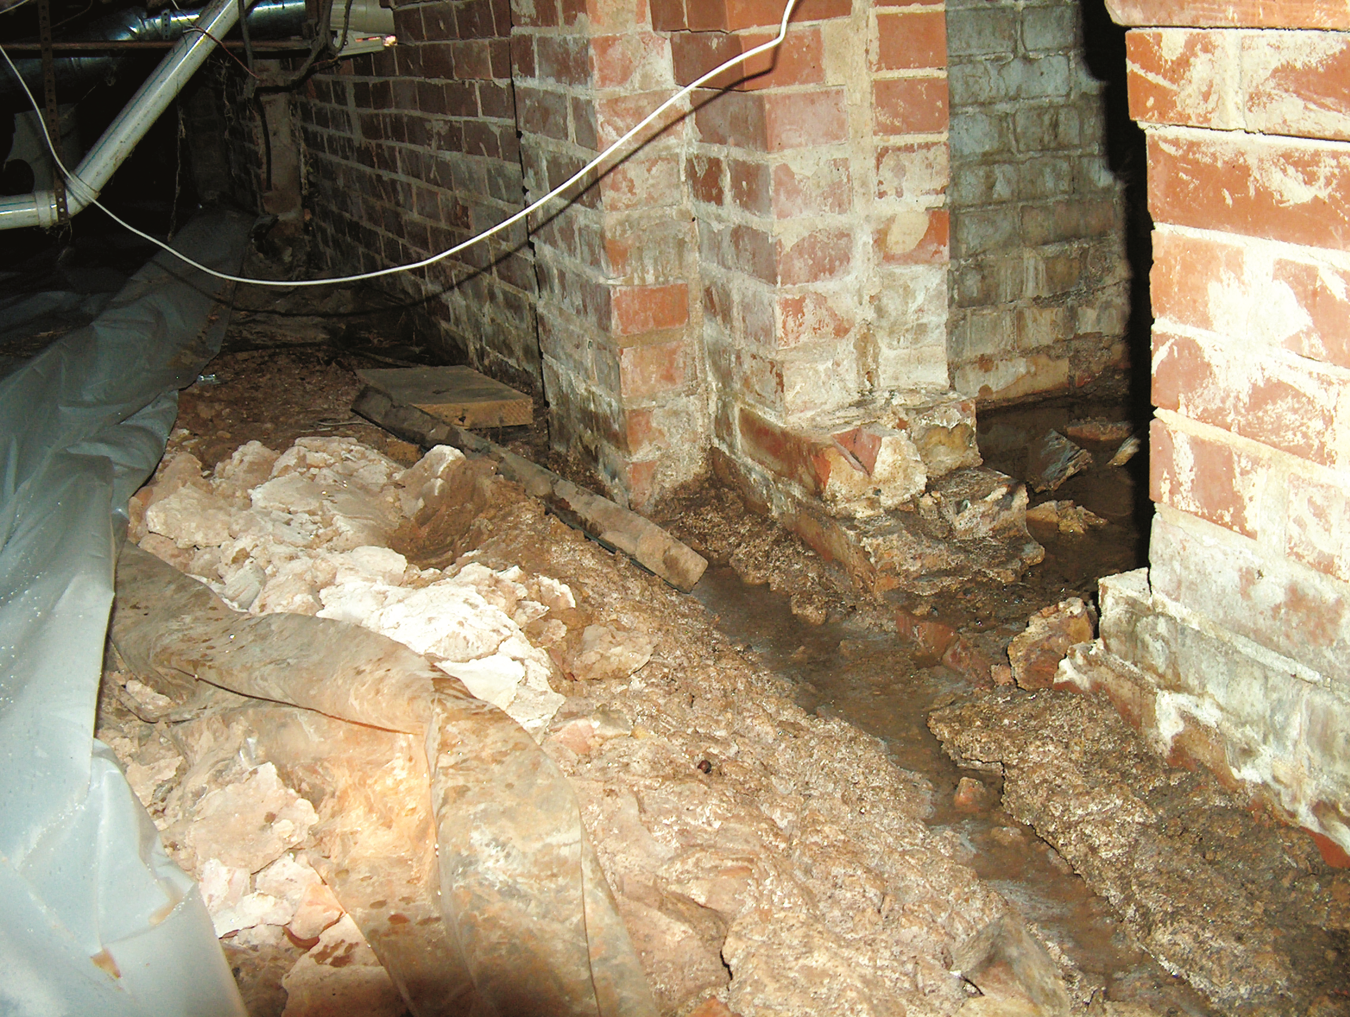
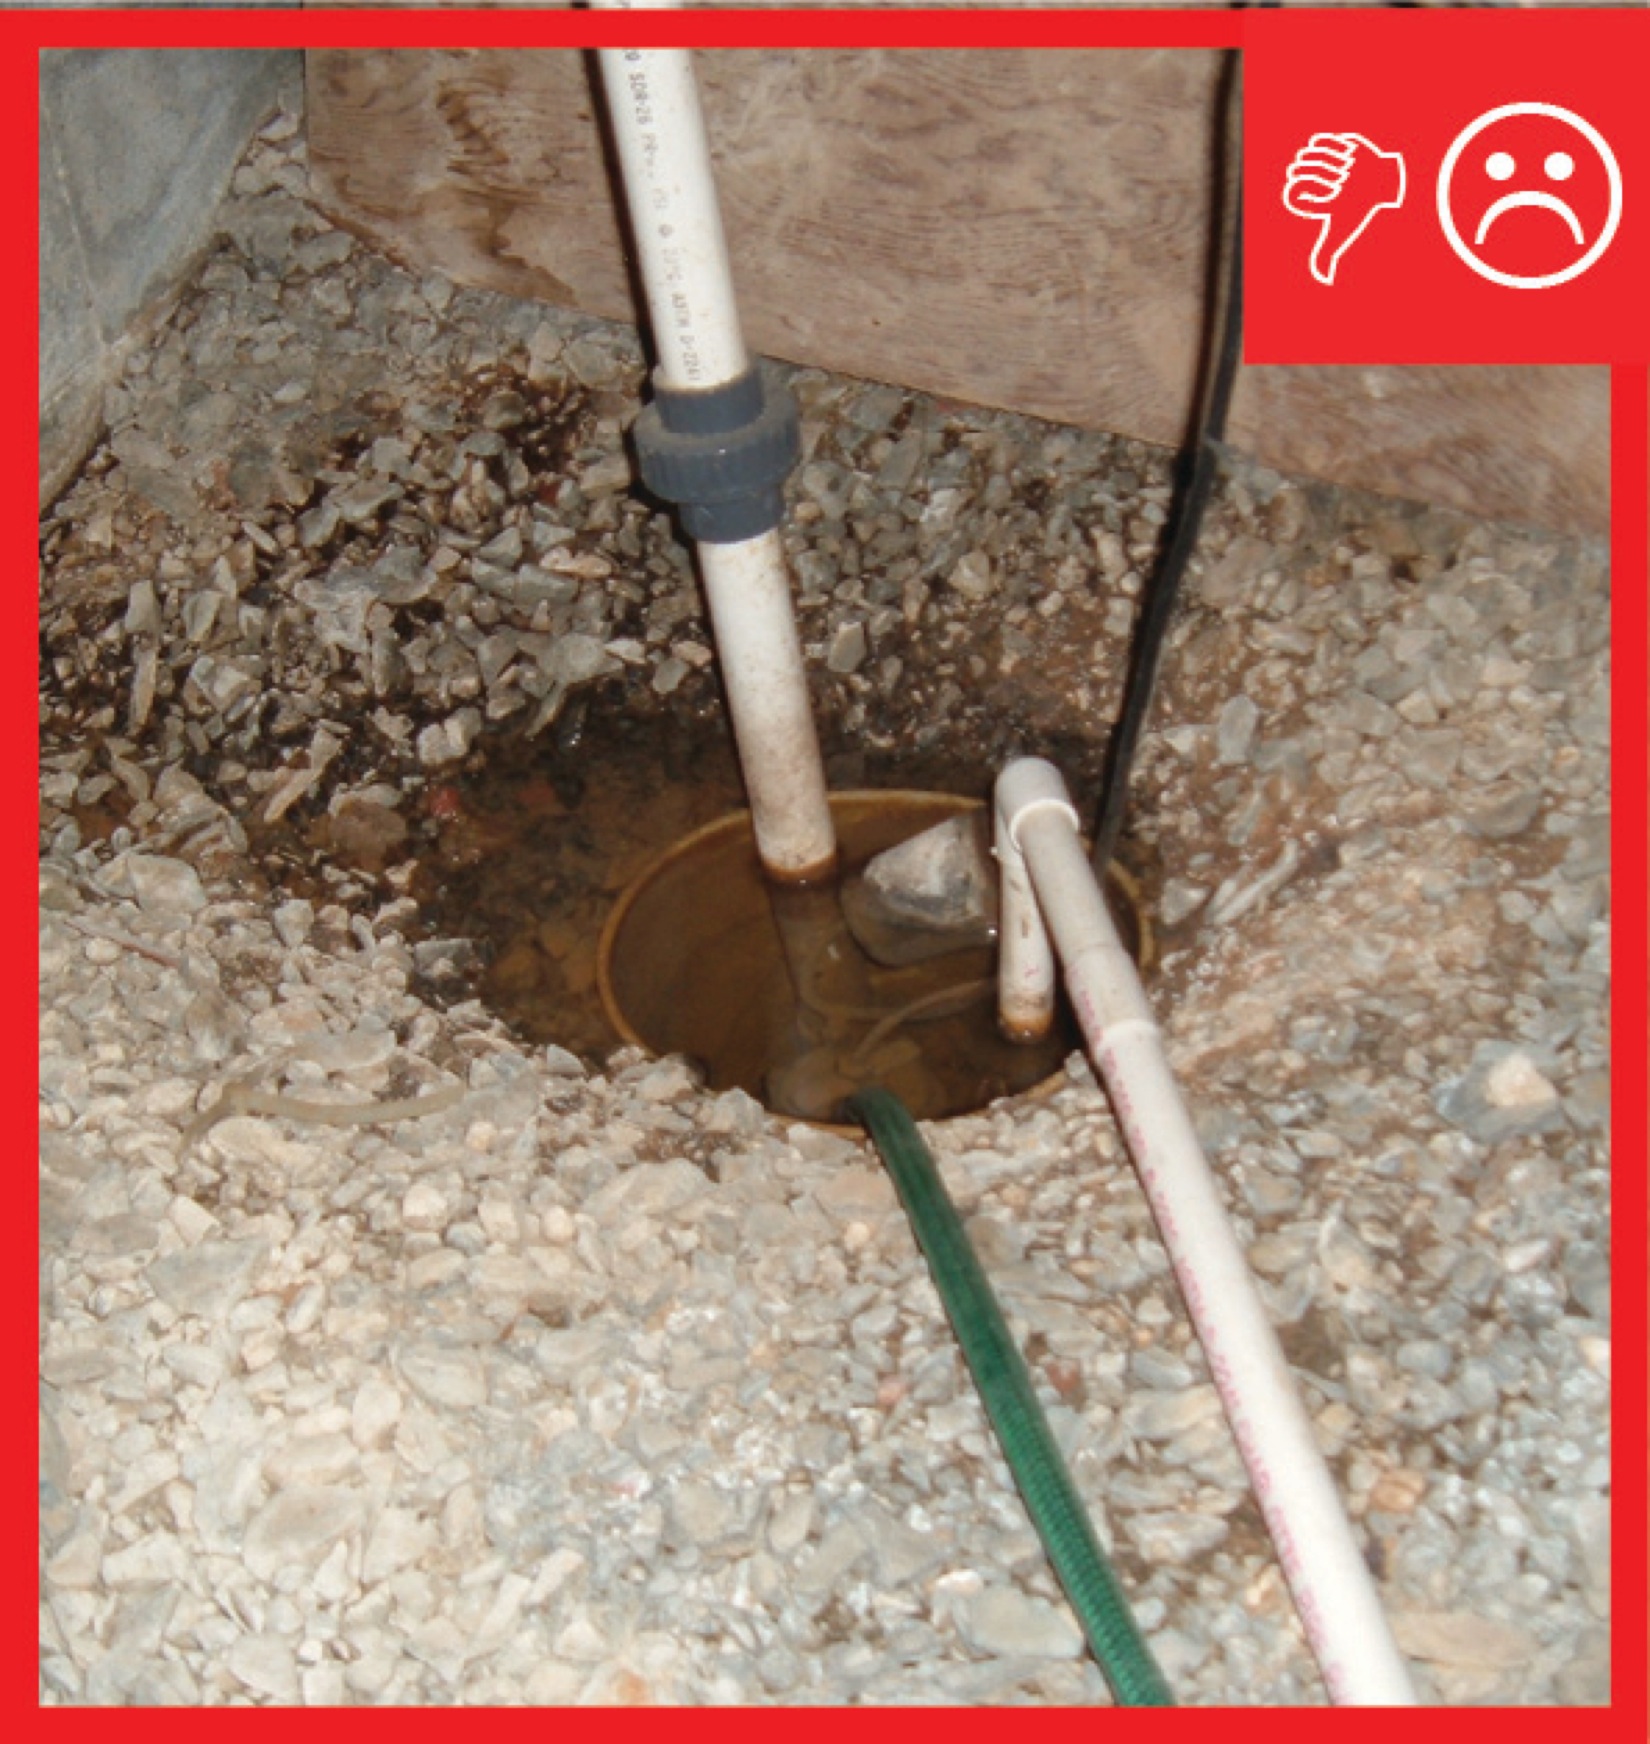
Wrong - The sump pump alone cannot address the water infiltration issues in this crawlspace.
Image
Image
Wrong - The upper edge of the below-grade dimpled plastic rain mat is pulling away from the wall and is no longer tucked under the protective metal flashing so rain water can get behind the plastic mat and wet the foundation wall.
Image
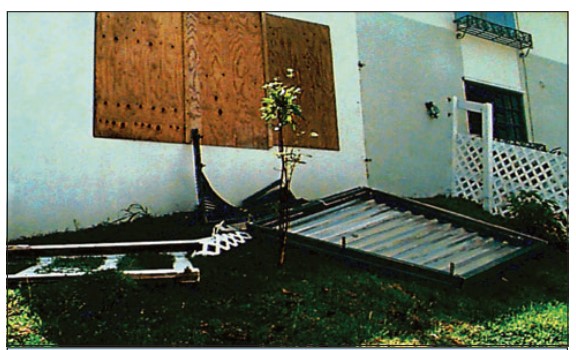
Wrong - The window lying on the ground was protected by a shutter but the shutter was attached to the window frame, rather than directly to the wall framing.
Image
Image

Wrong - There is no step flashing along the base of the gable and the right window is missing sill trim.
Image
Image

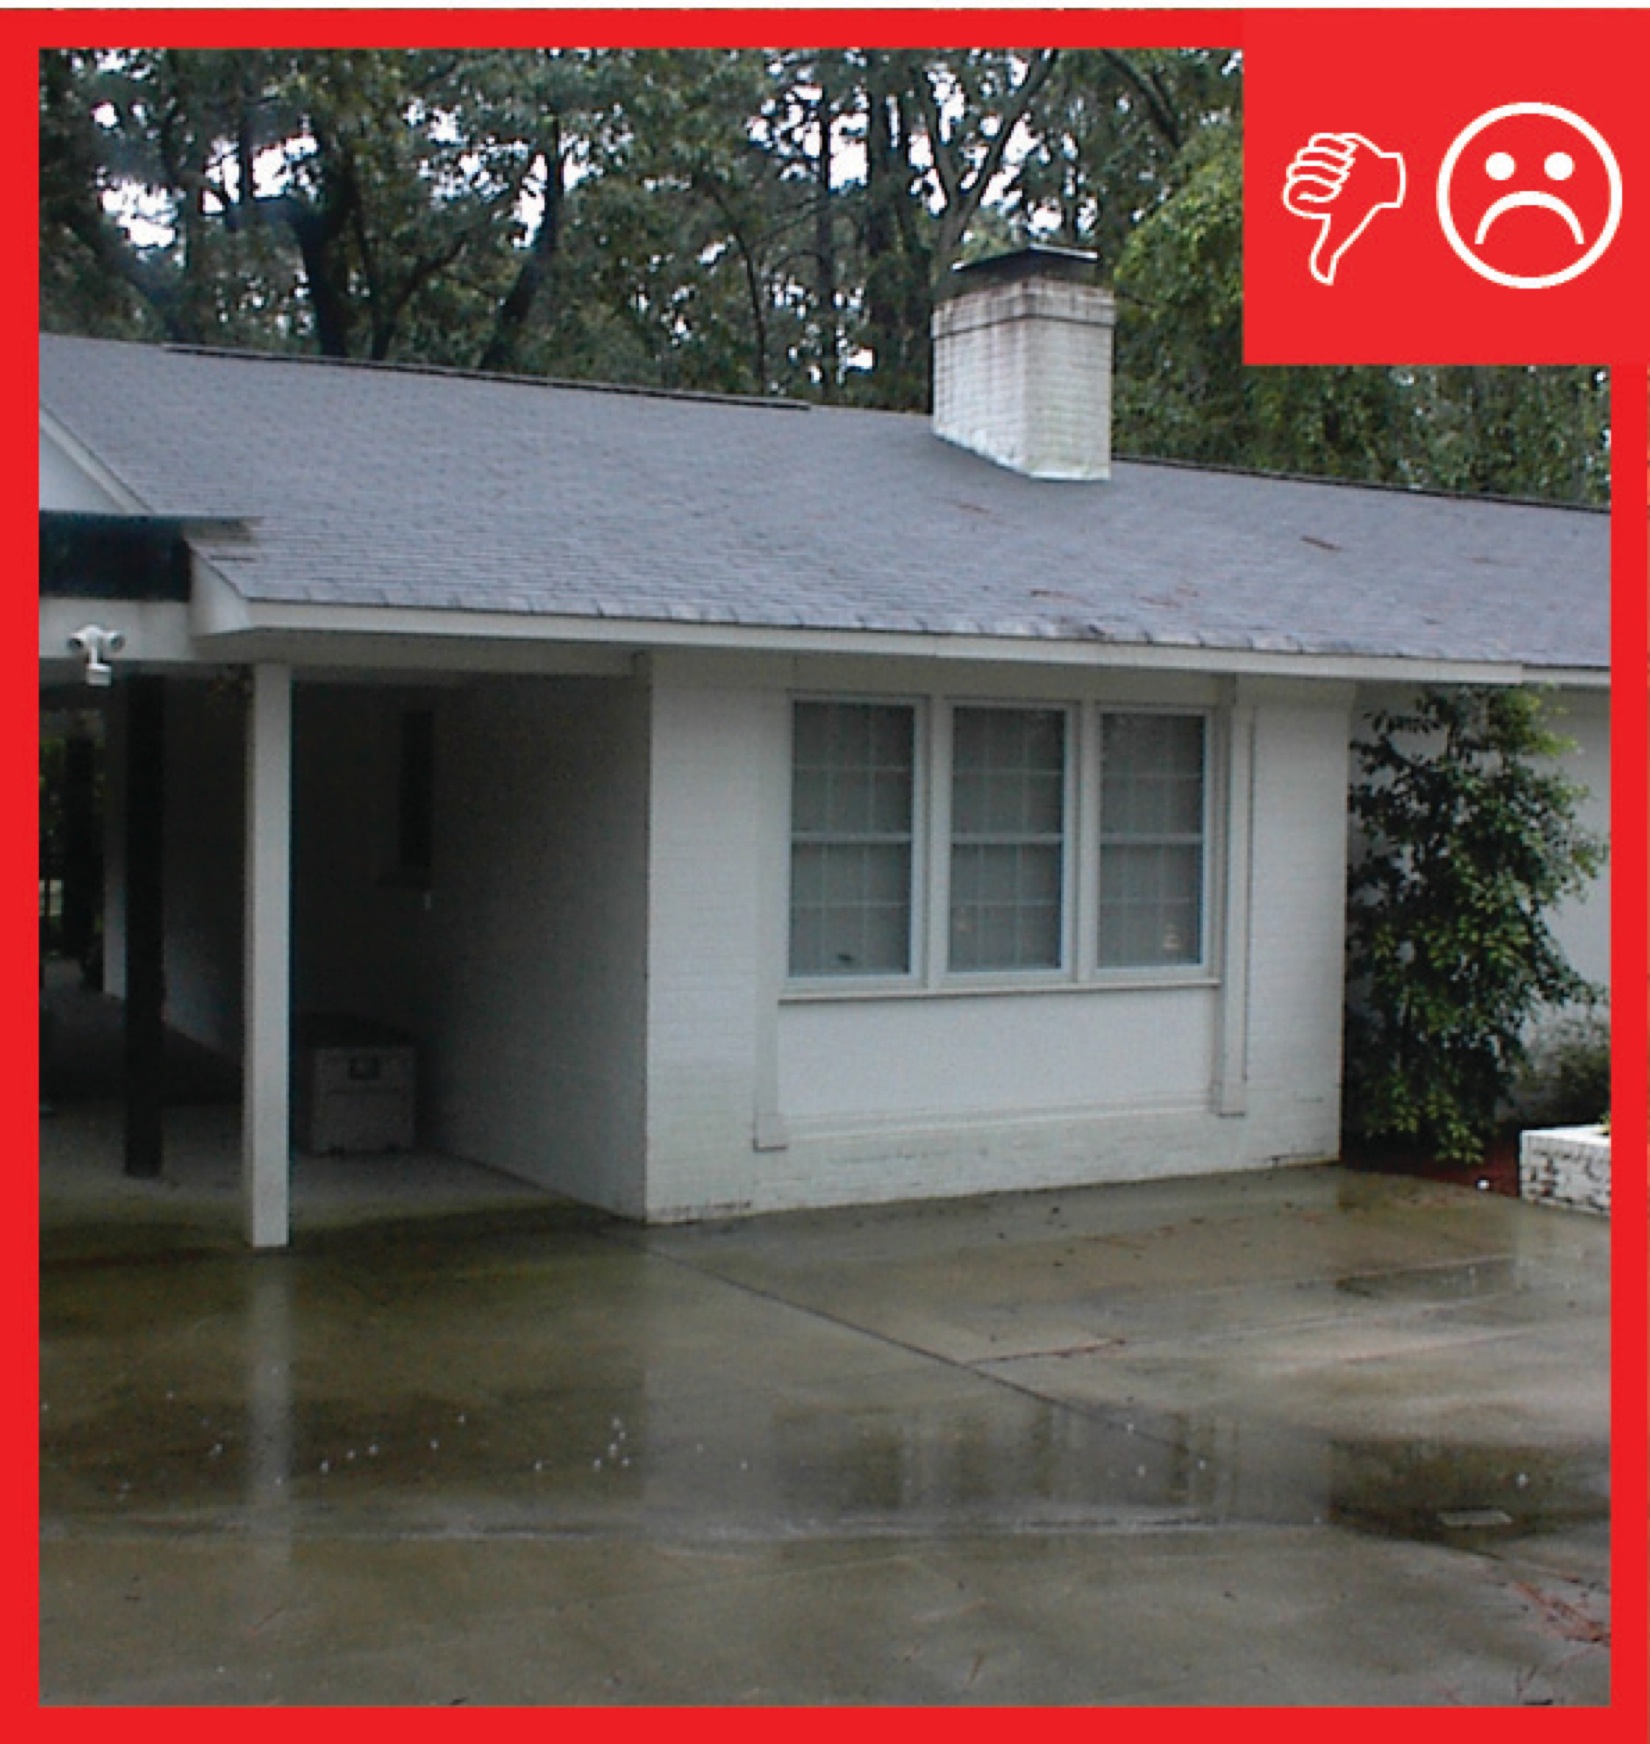
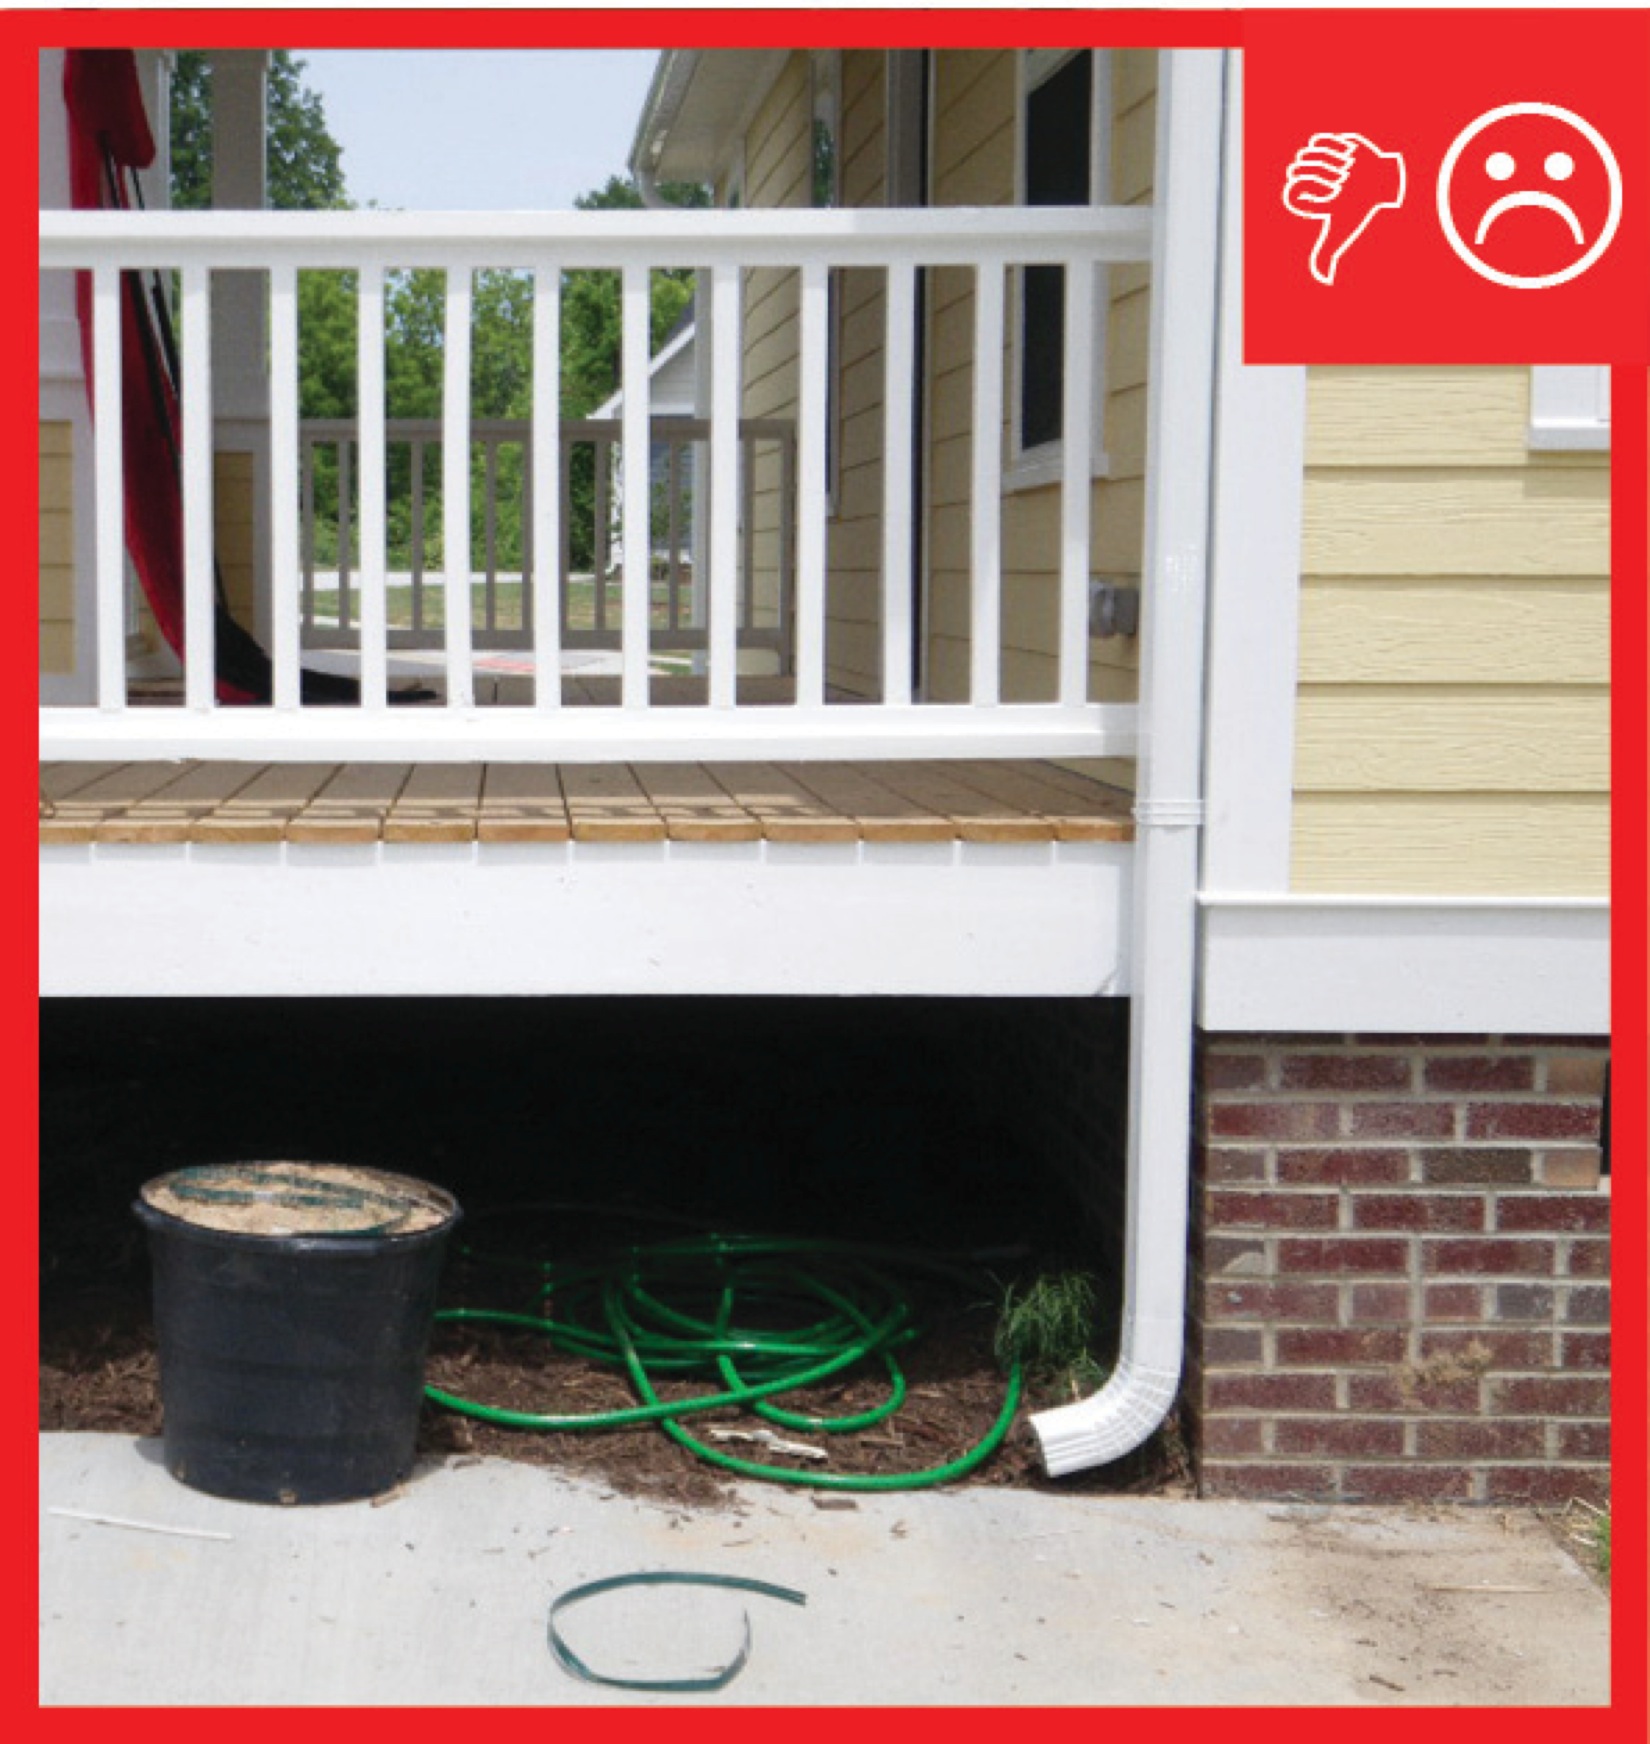
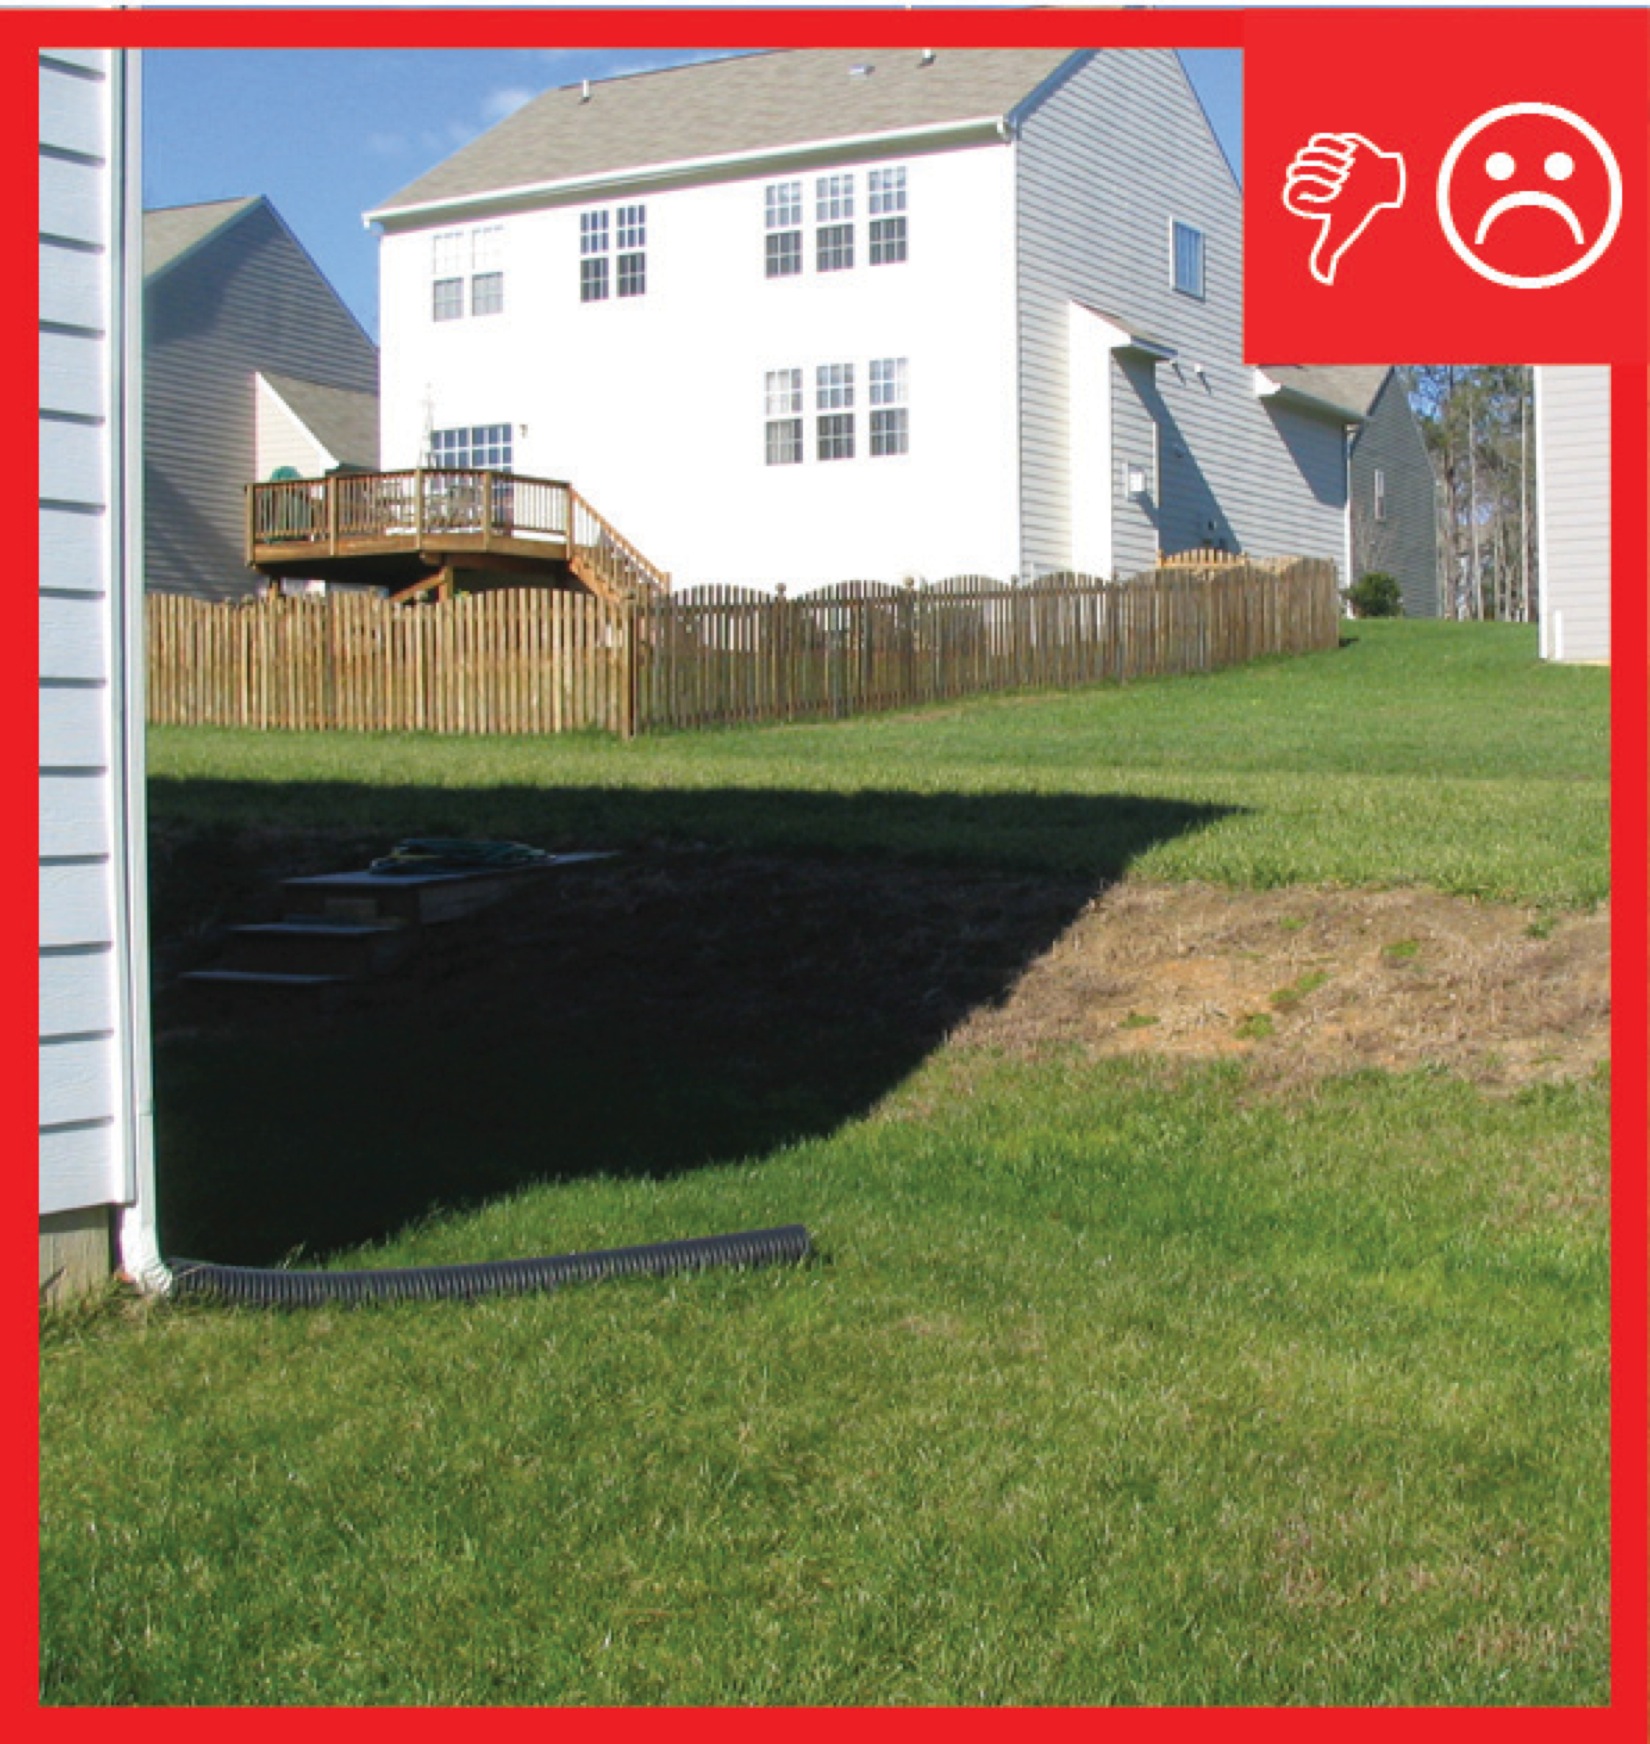
Wrong - This surface downspout run-out is directed toward the foundation instead of away from it.
Image
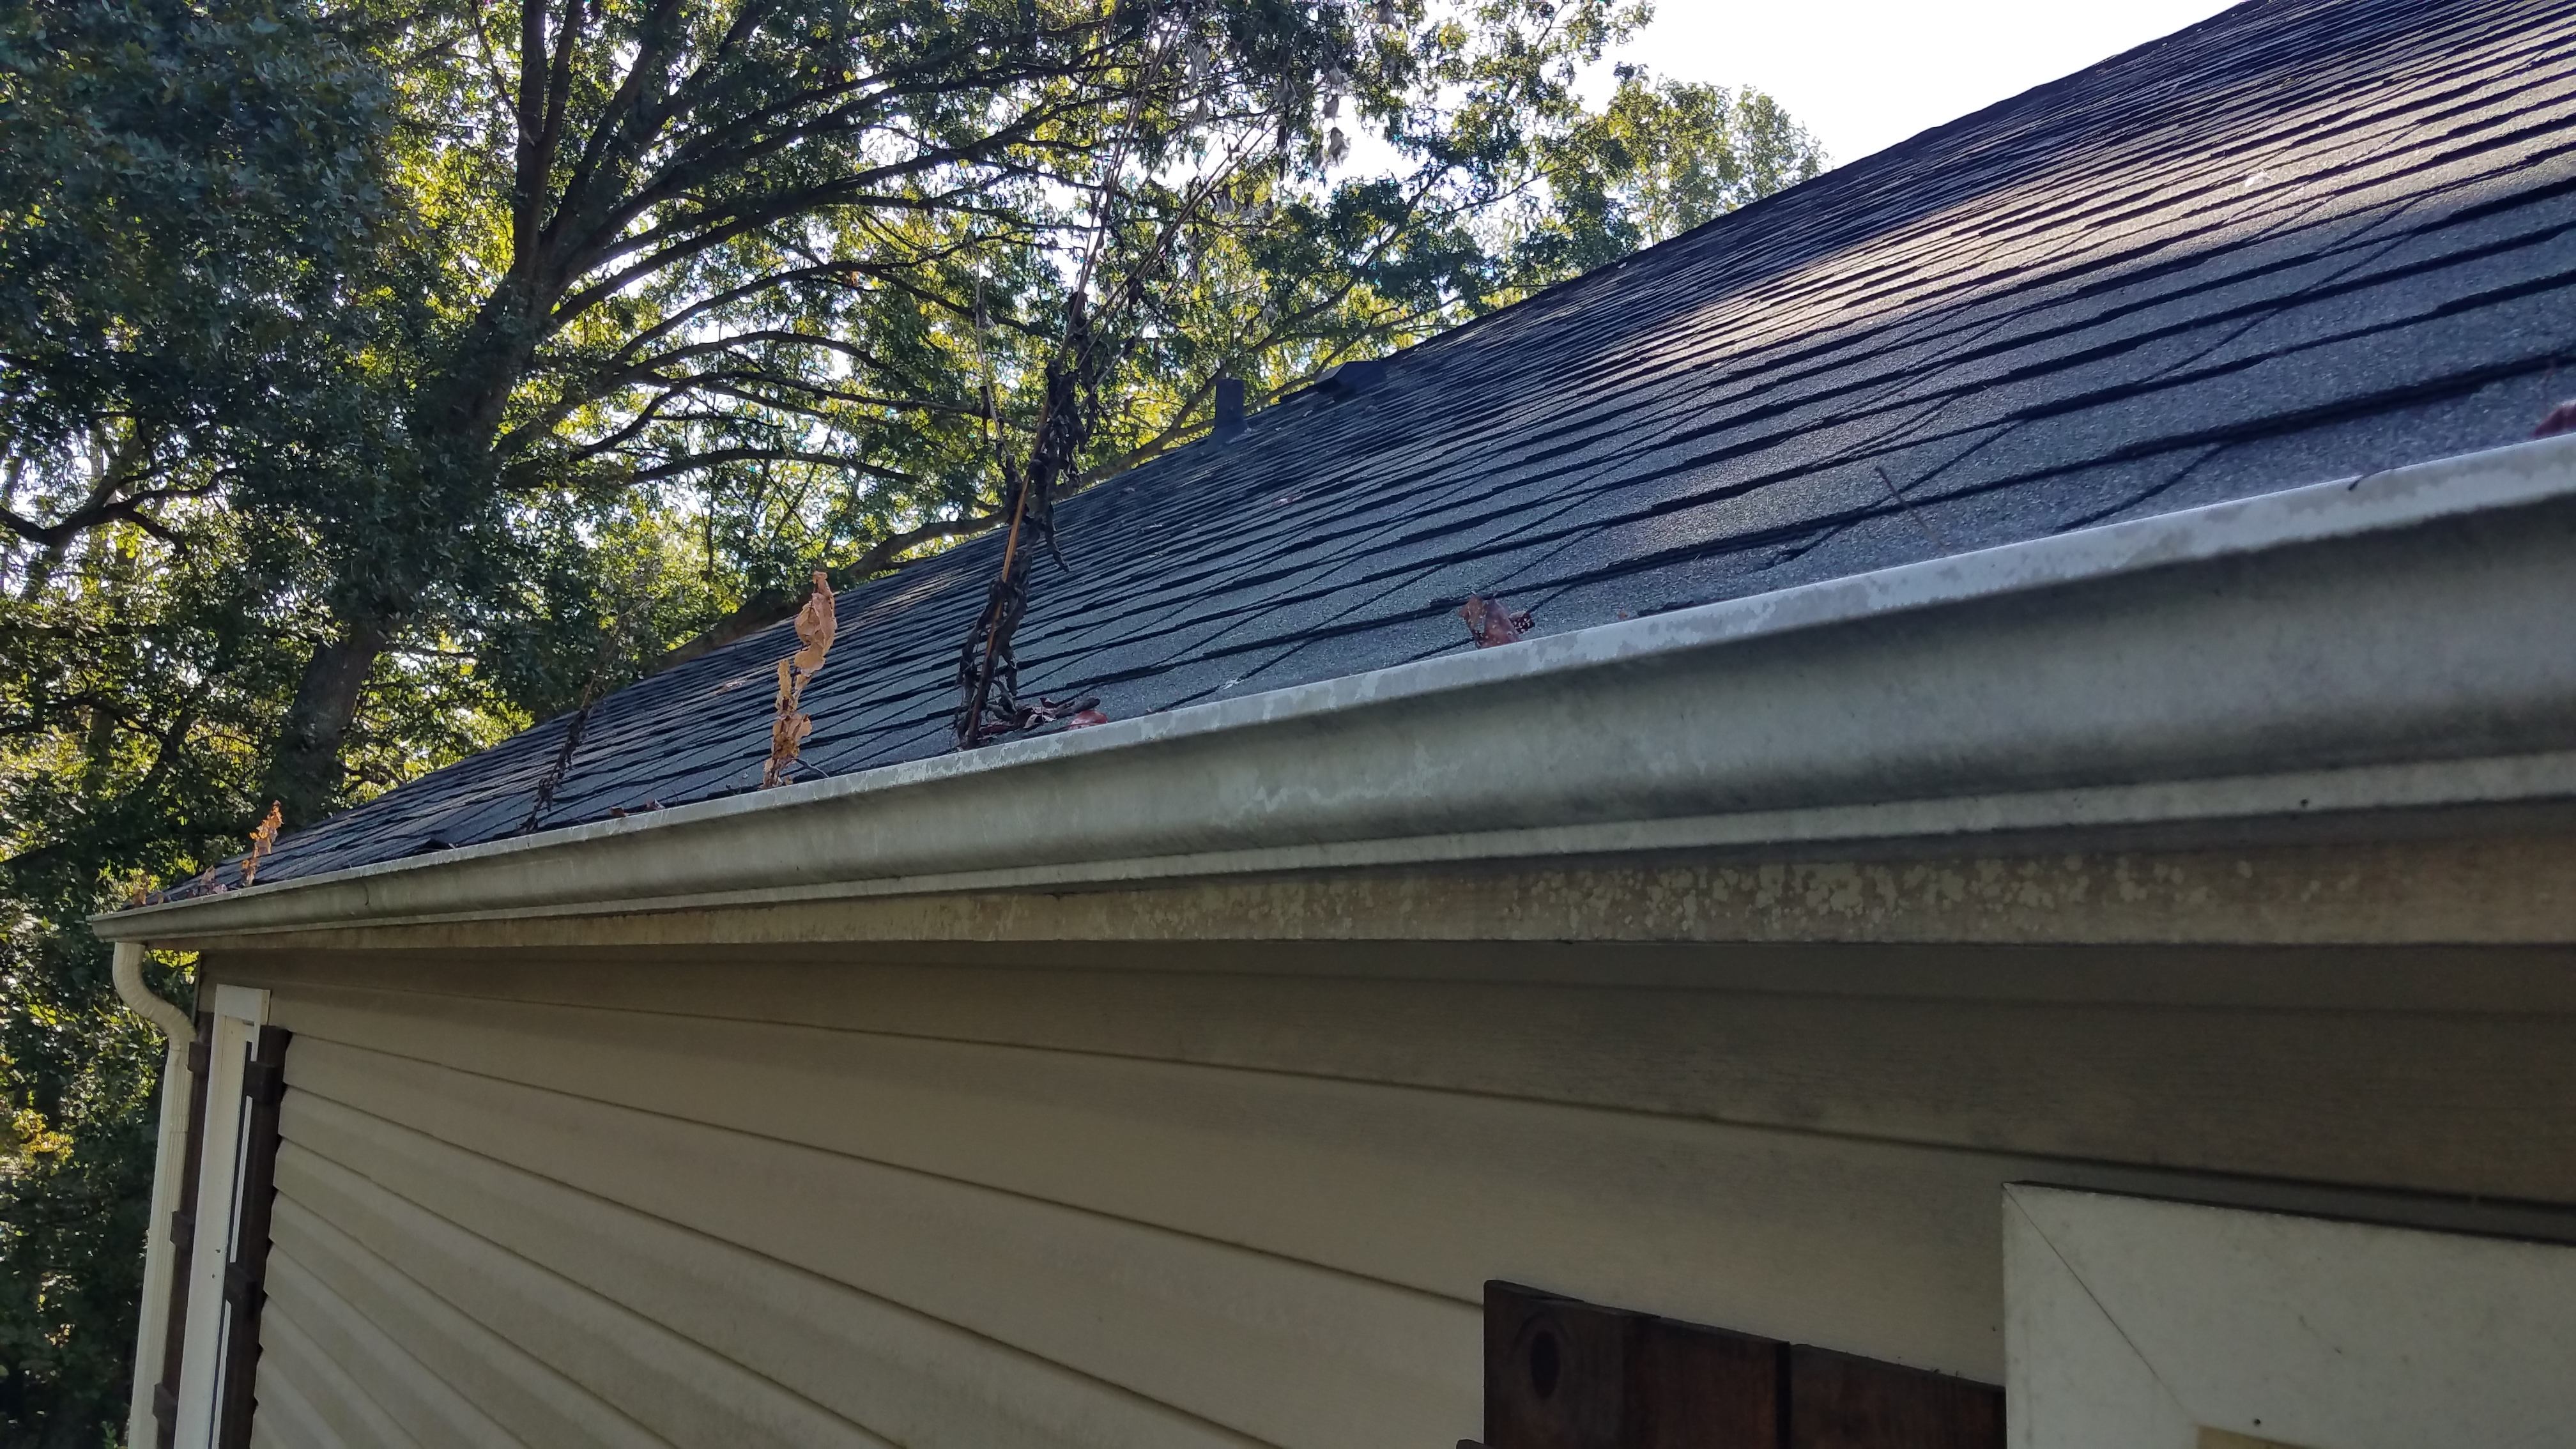
Wrong - Trees are overhanging and touching the roof and debris has collected in the gutters.
Image
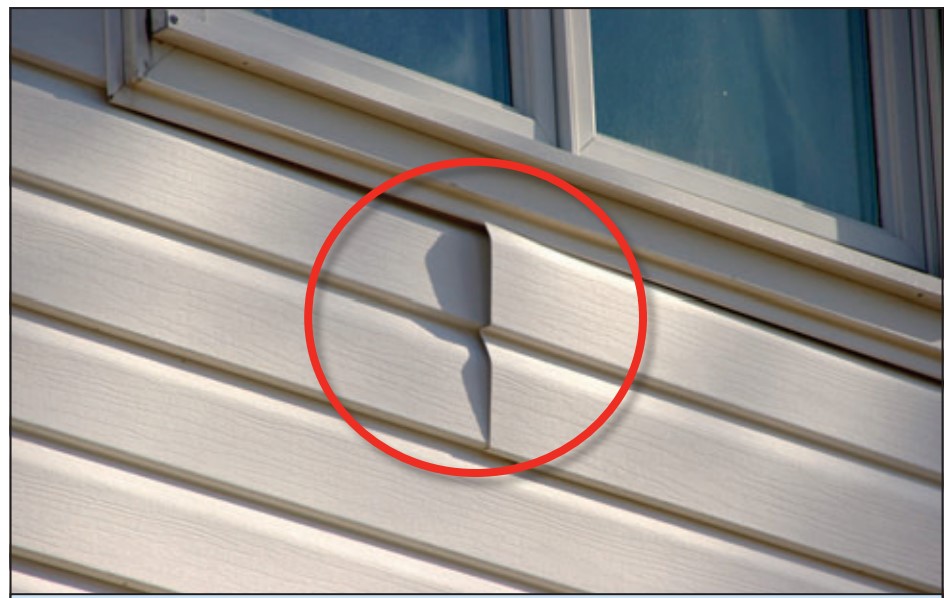
Wrong - Utility trim was substituted for the starter strip and the bottom lock was cut off this vinyl siding so the siding pulled loose under wind pressure.
Image
Wrong - Wall is missing step and kick-out flashing which has allowed water to rot the wood corner trim.
Image
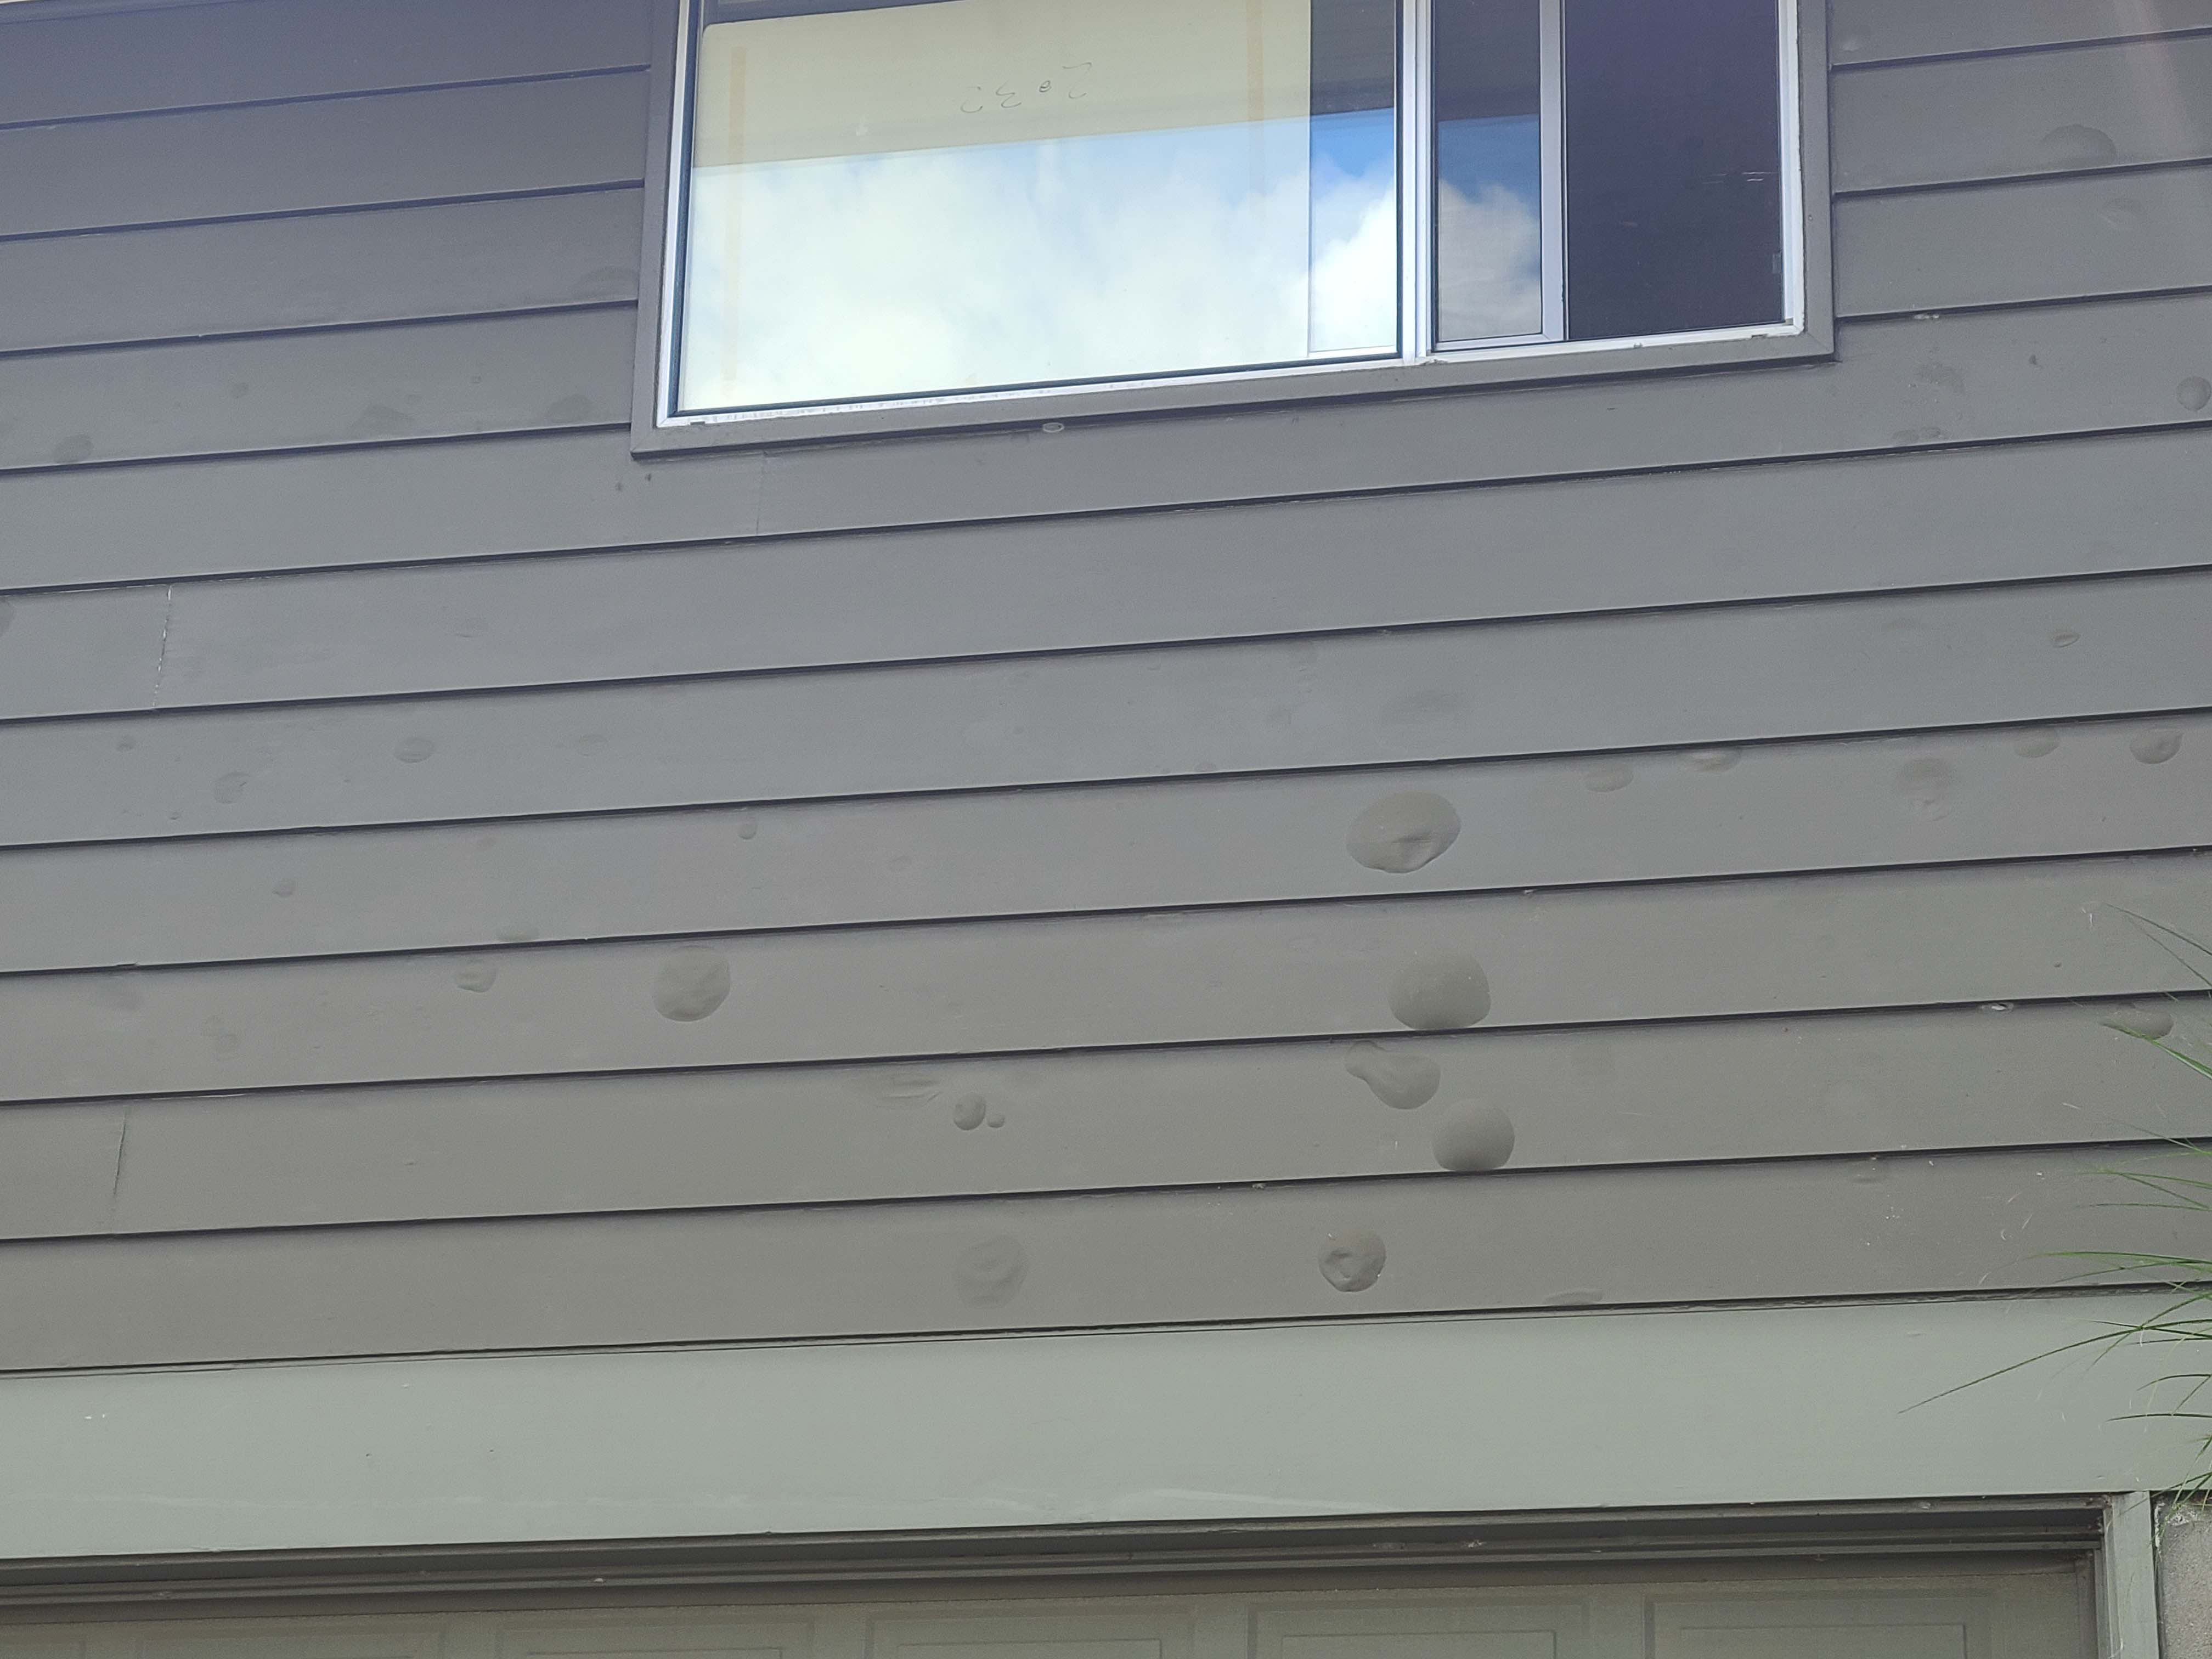
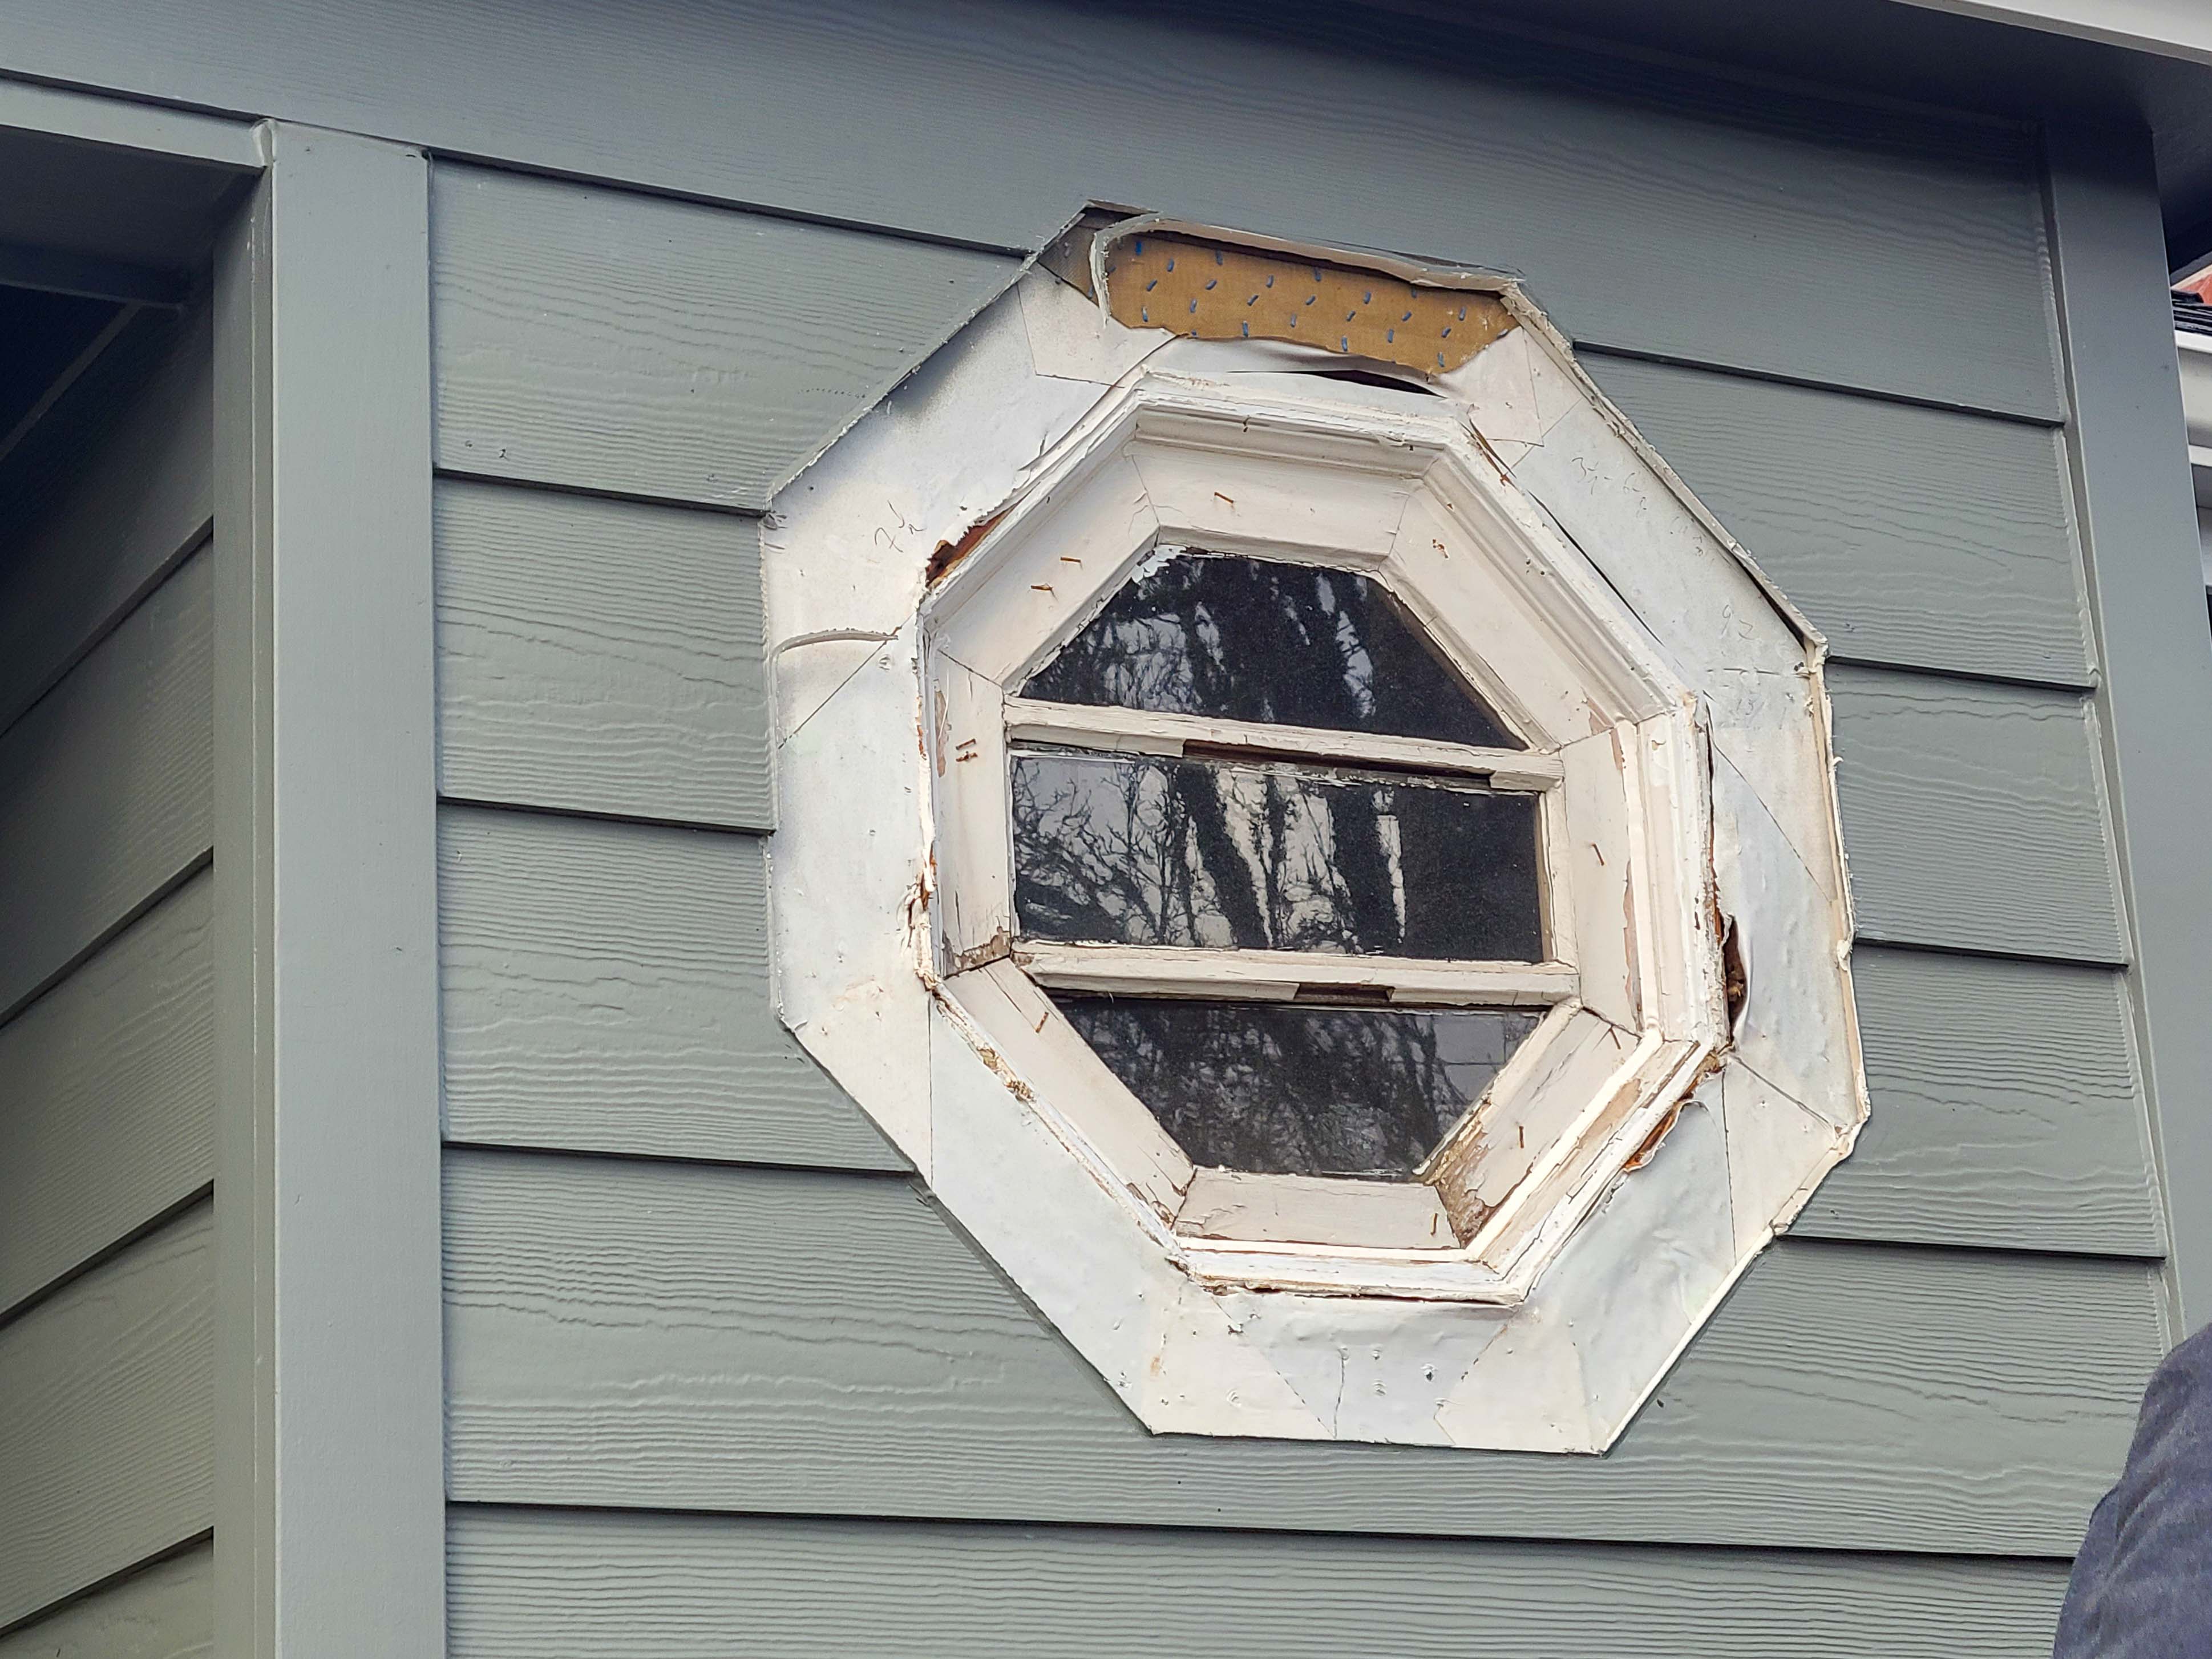
Wrong - Water has gotten behind the paint, possibly due to lack of window flashing, leading to blistering.
Image
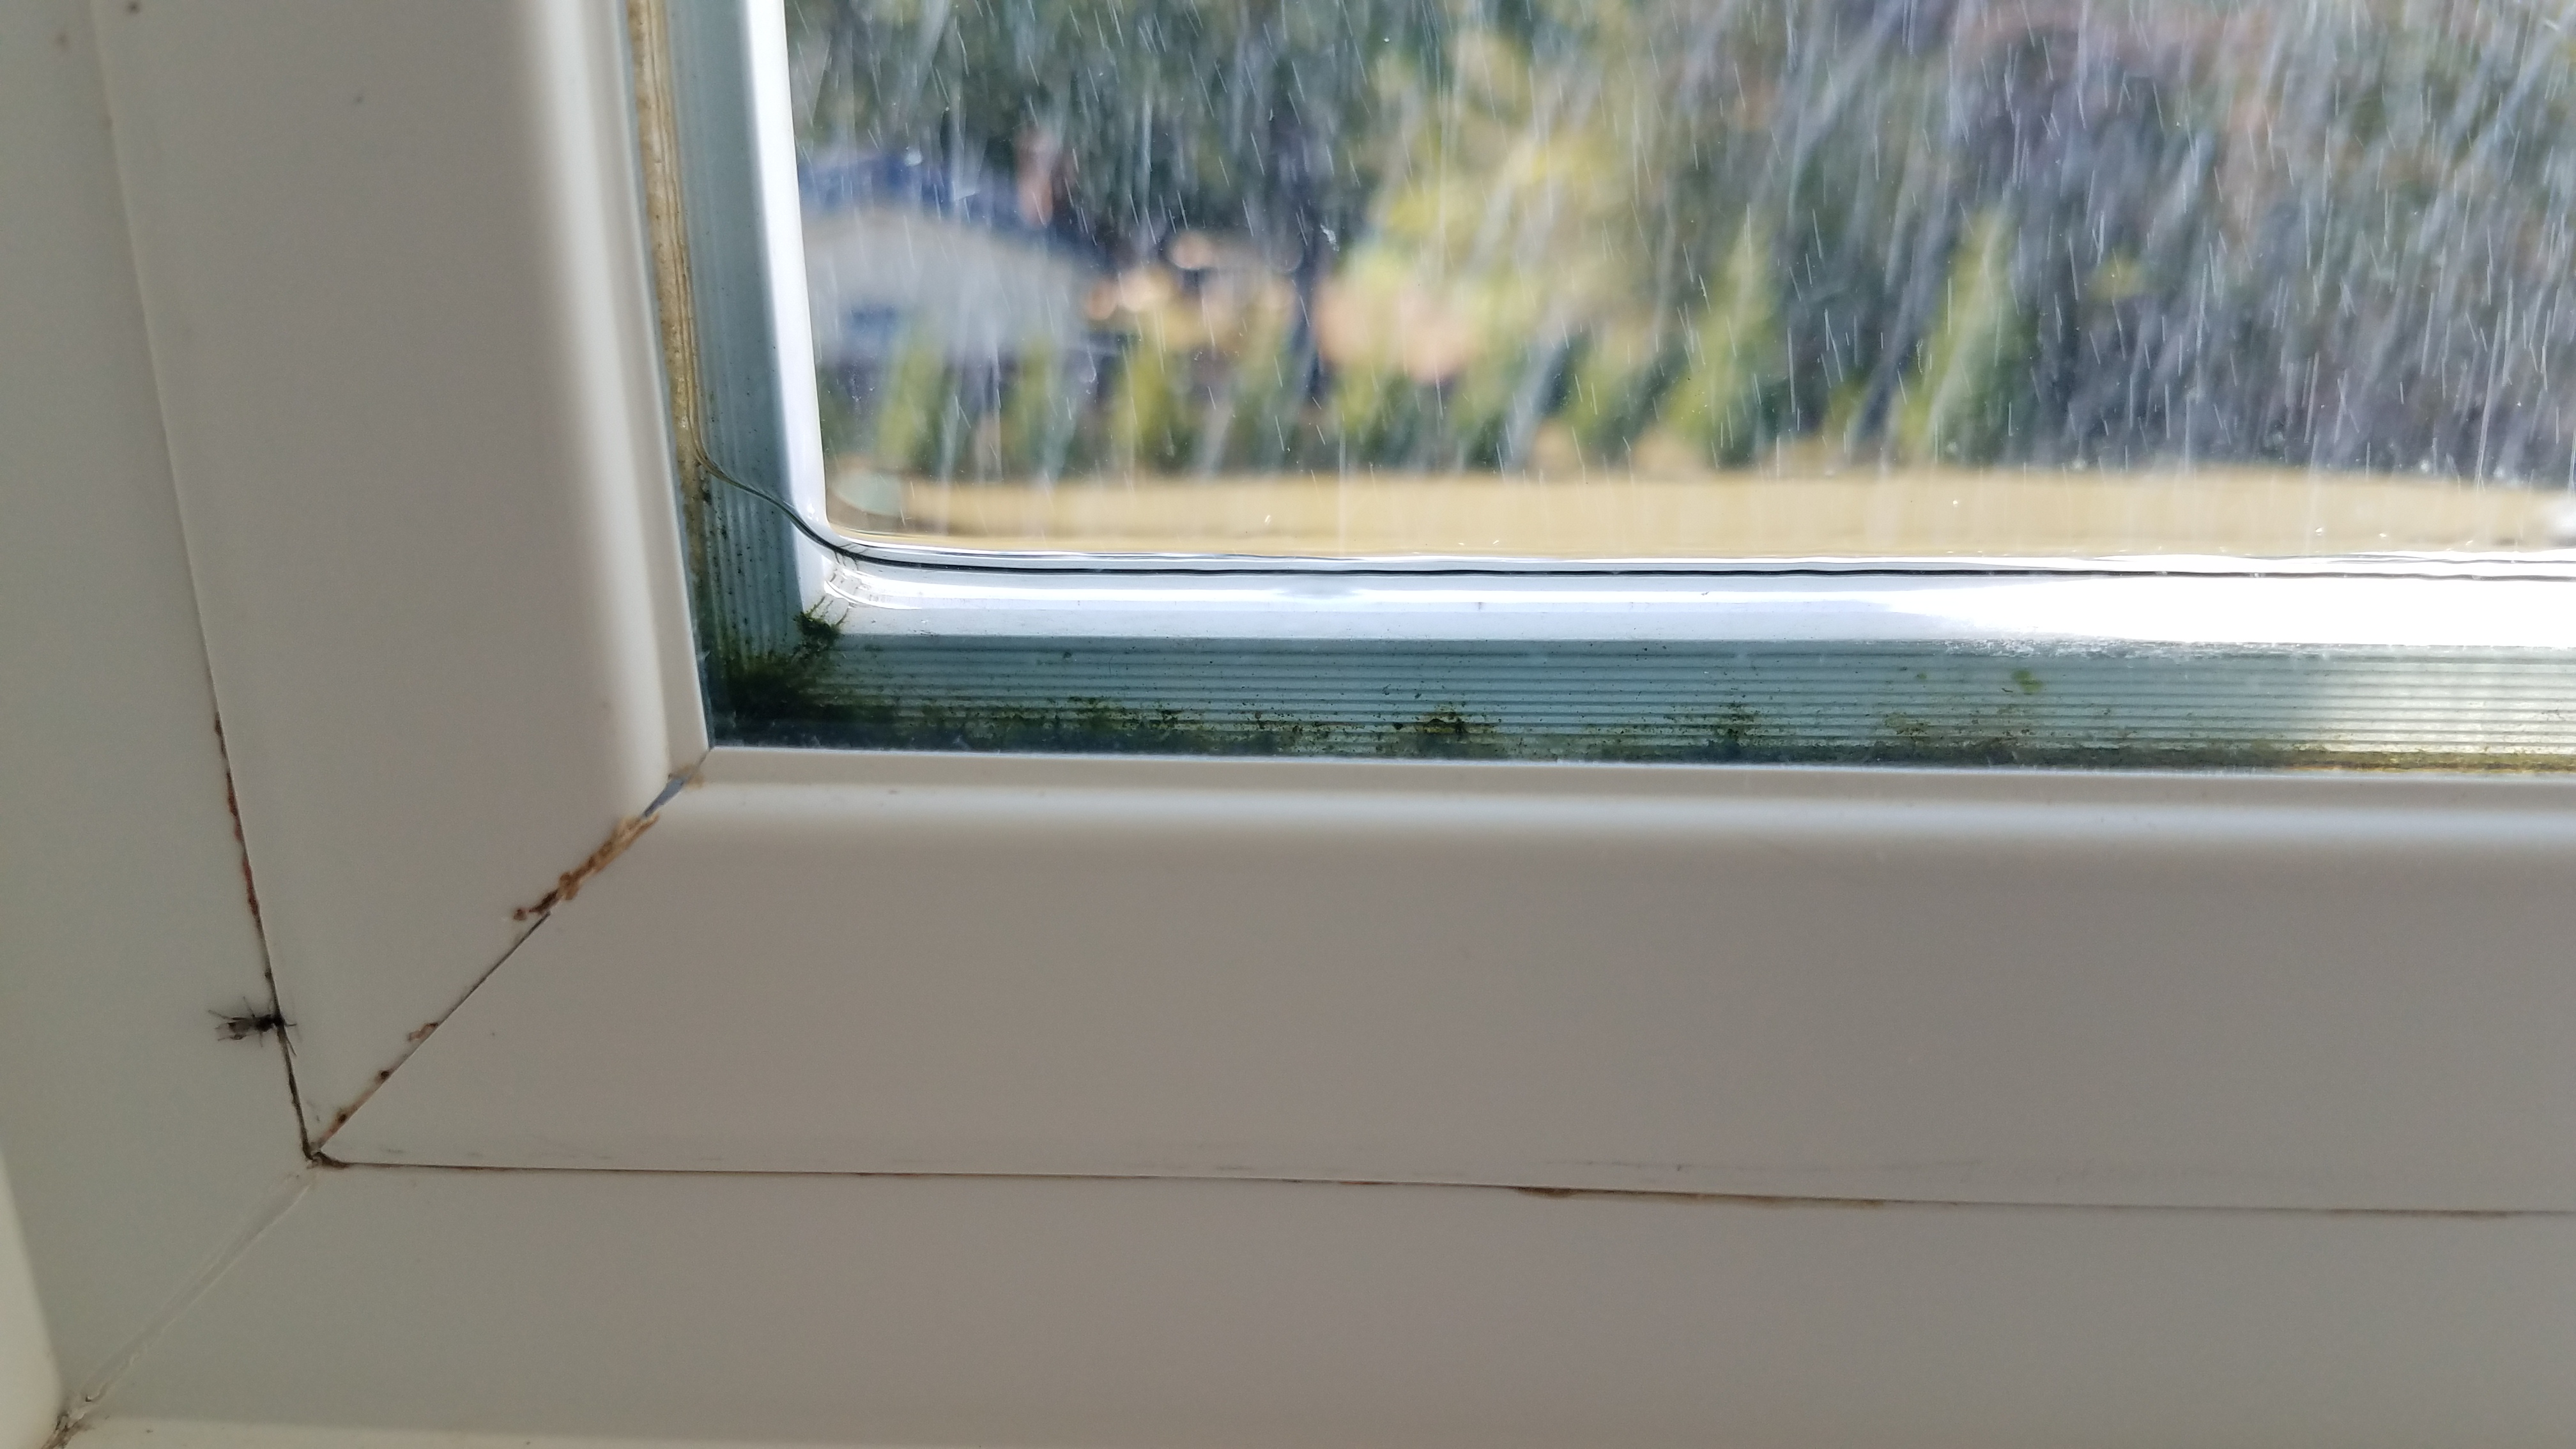
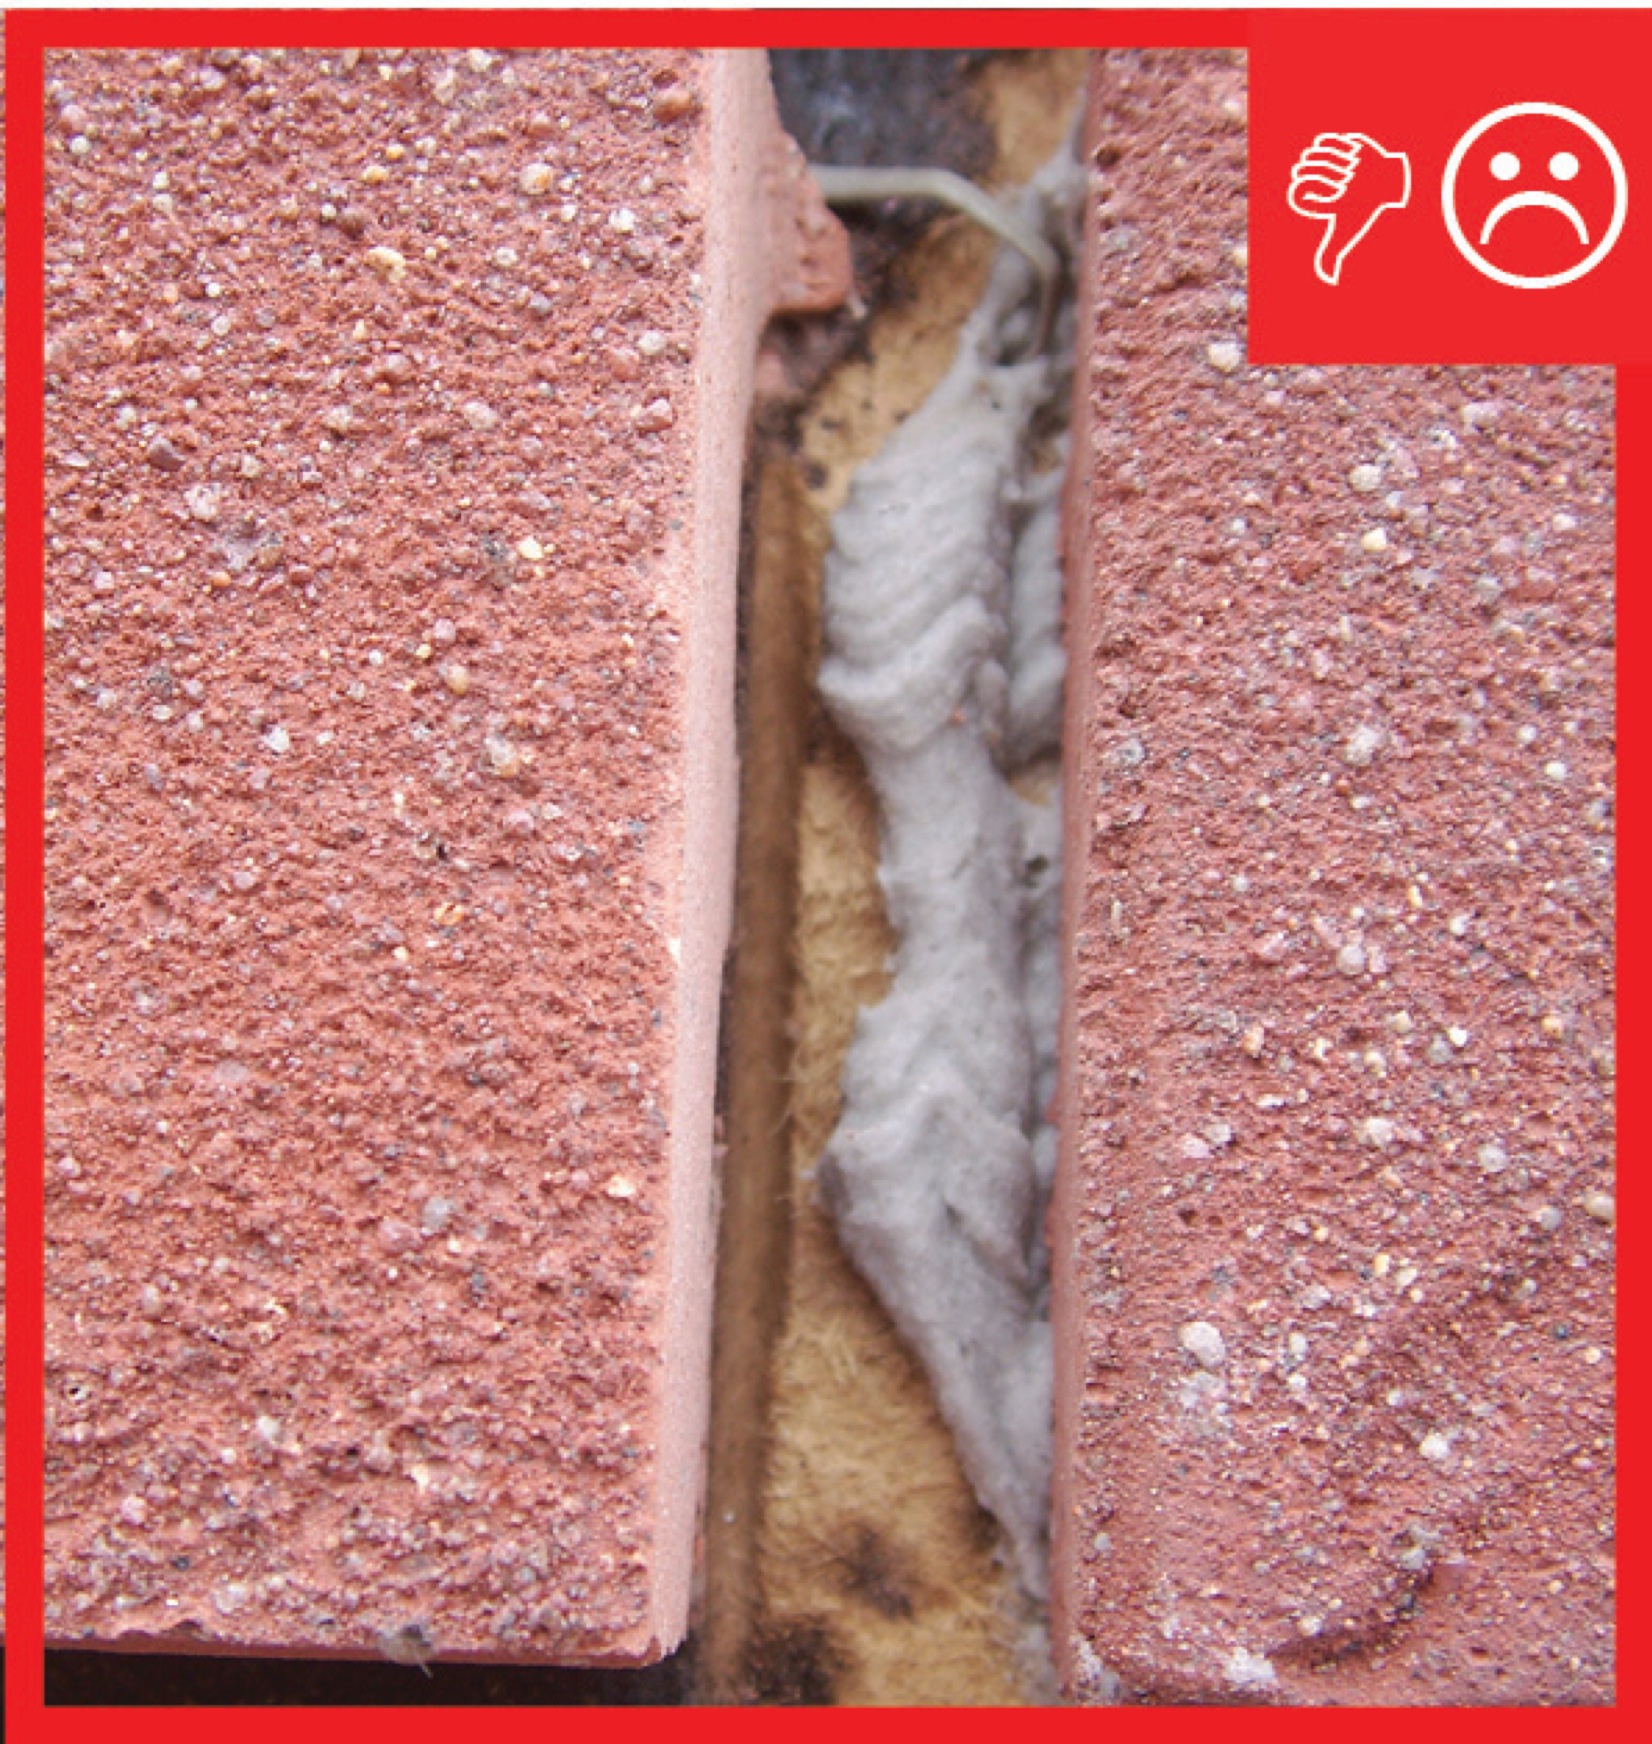
Wrong - Water has leaked into the window assembly and has not been able to drain out, possibly due to blocked weep holes; thus, mold and moss are growing in the window assembly.
Image
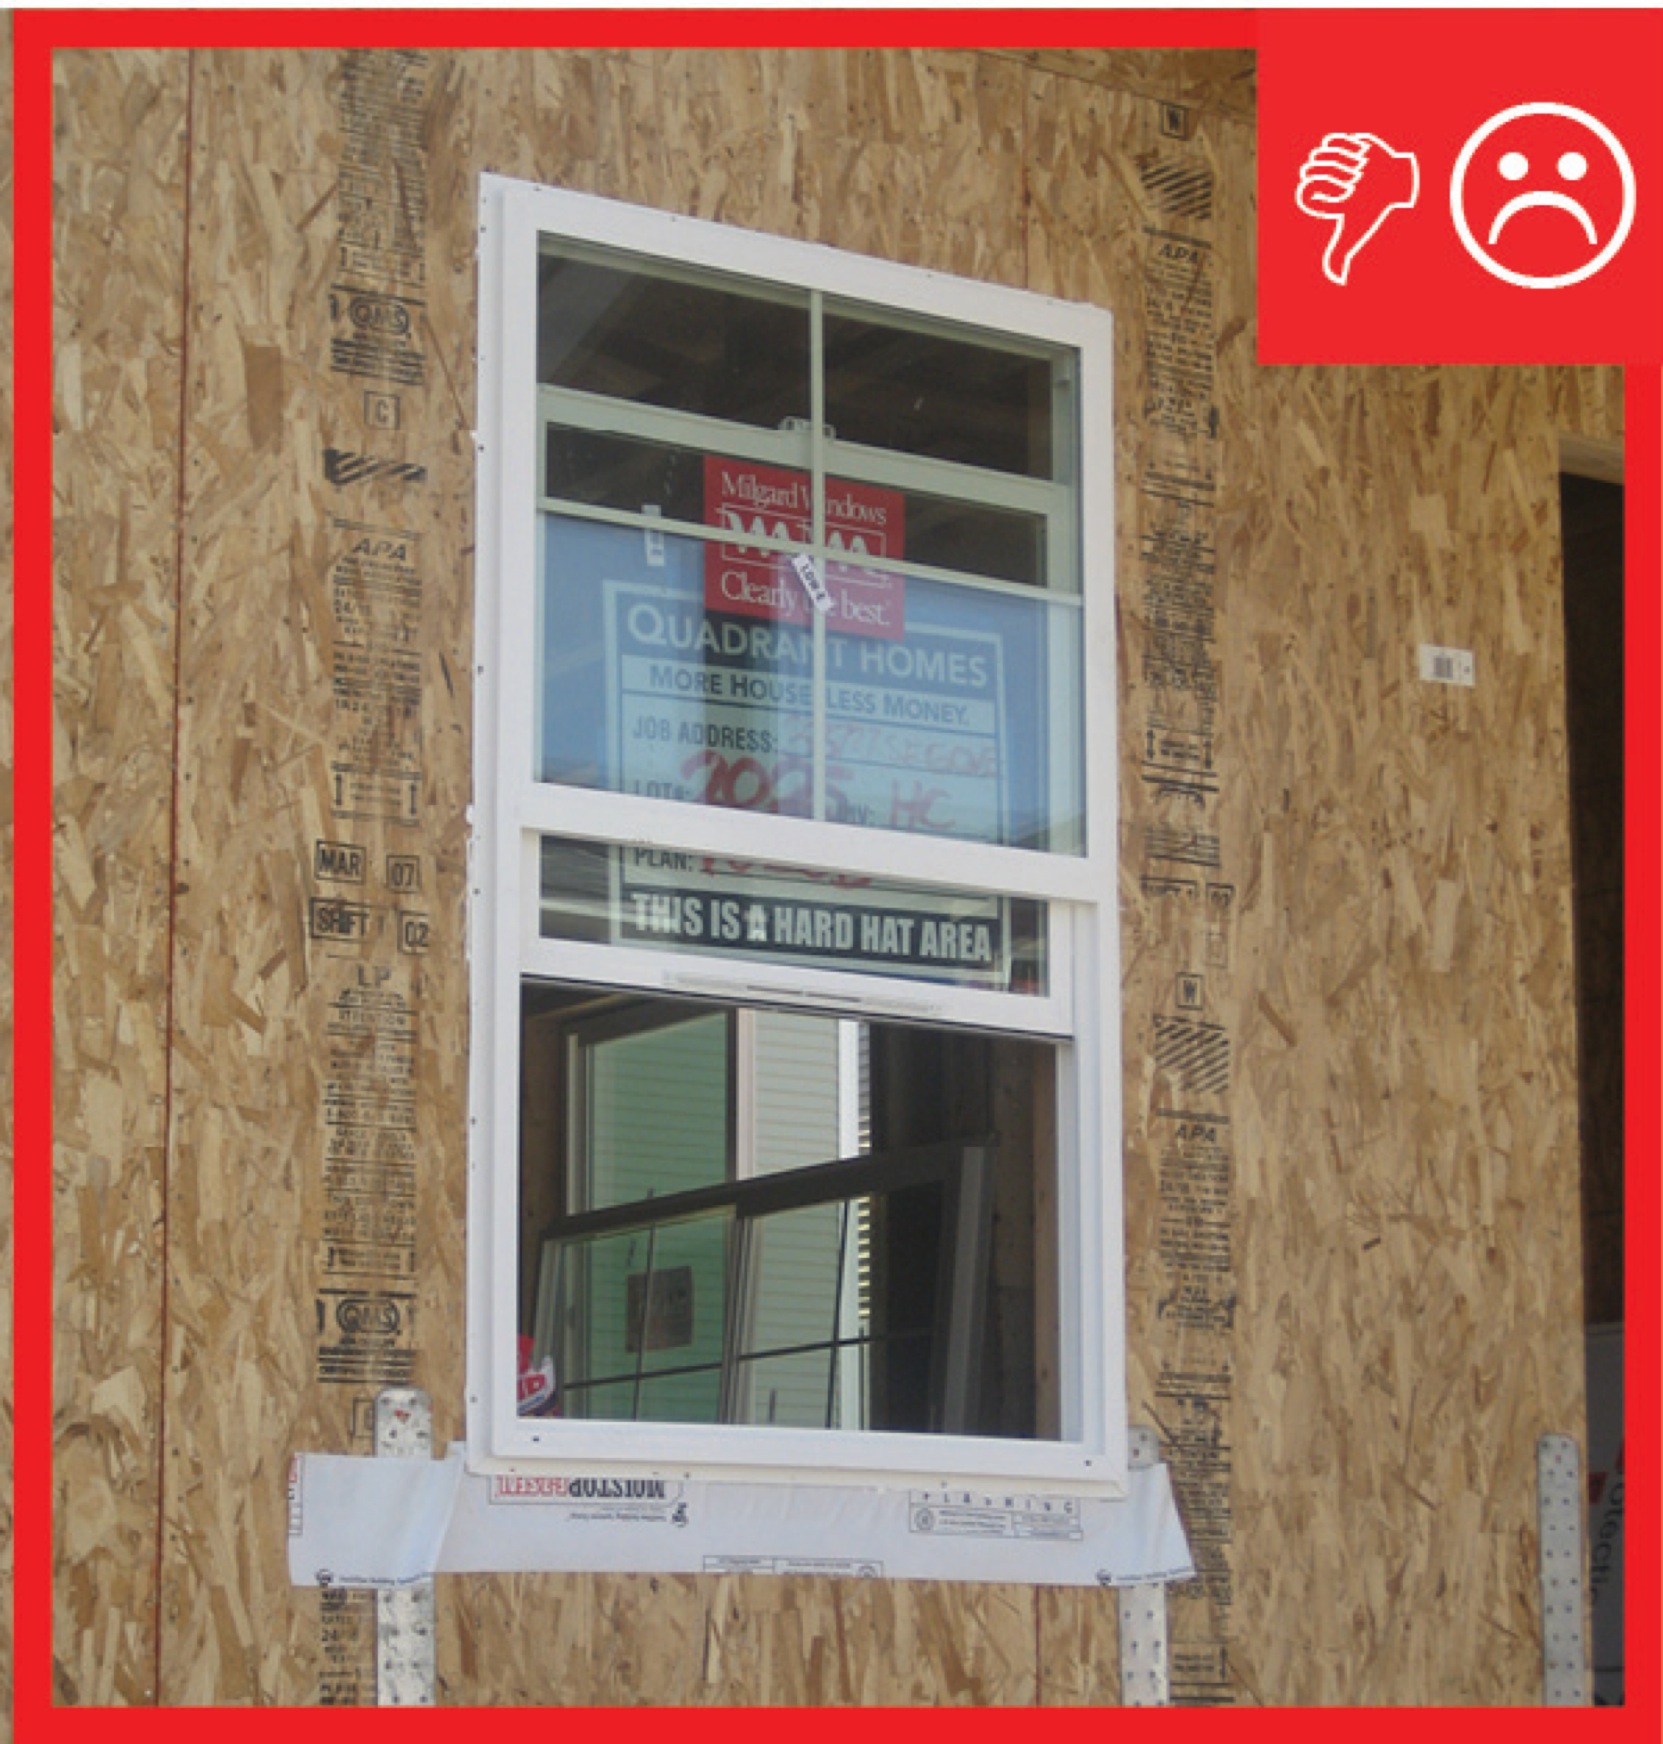
Wrong - Window is missing pan flashing under sill and tape flashing at jamb end sill.
Image
Wrong - Wiring holes are not sealed and possible missing flashing around windows is allowing water into walls and causing paint to peel.
Image
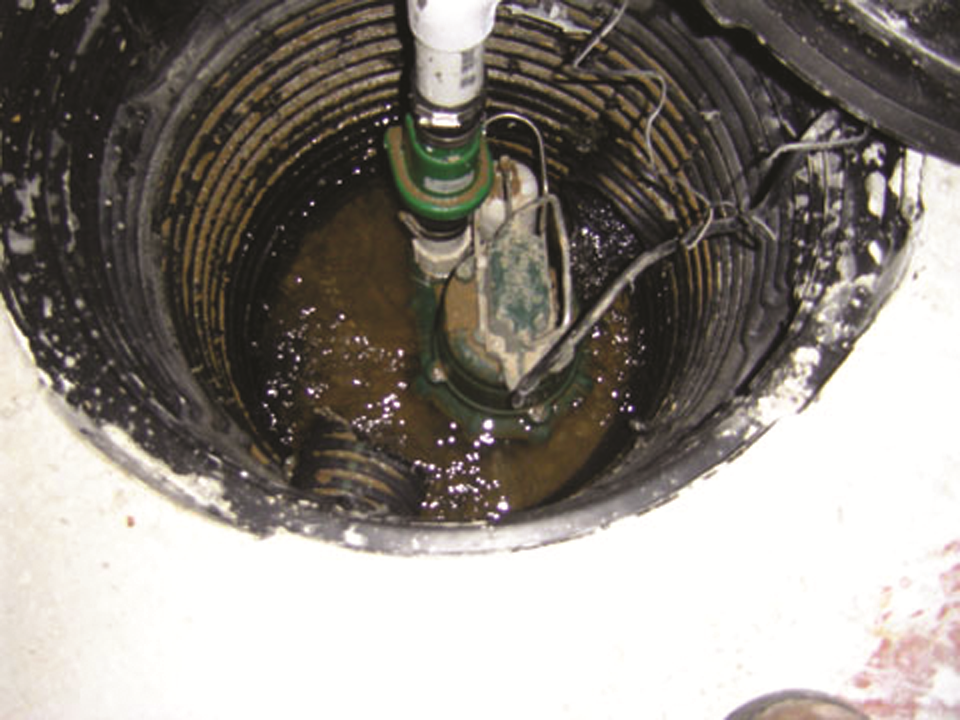
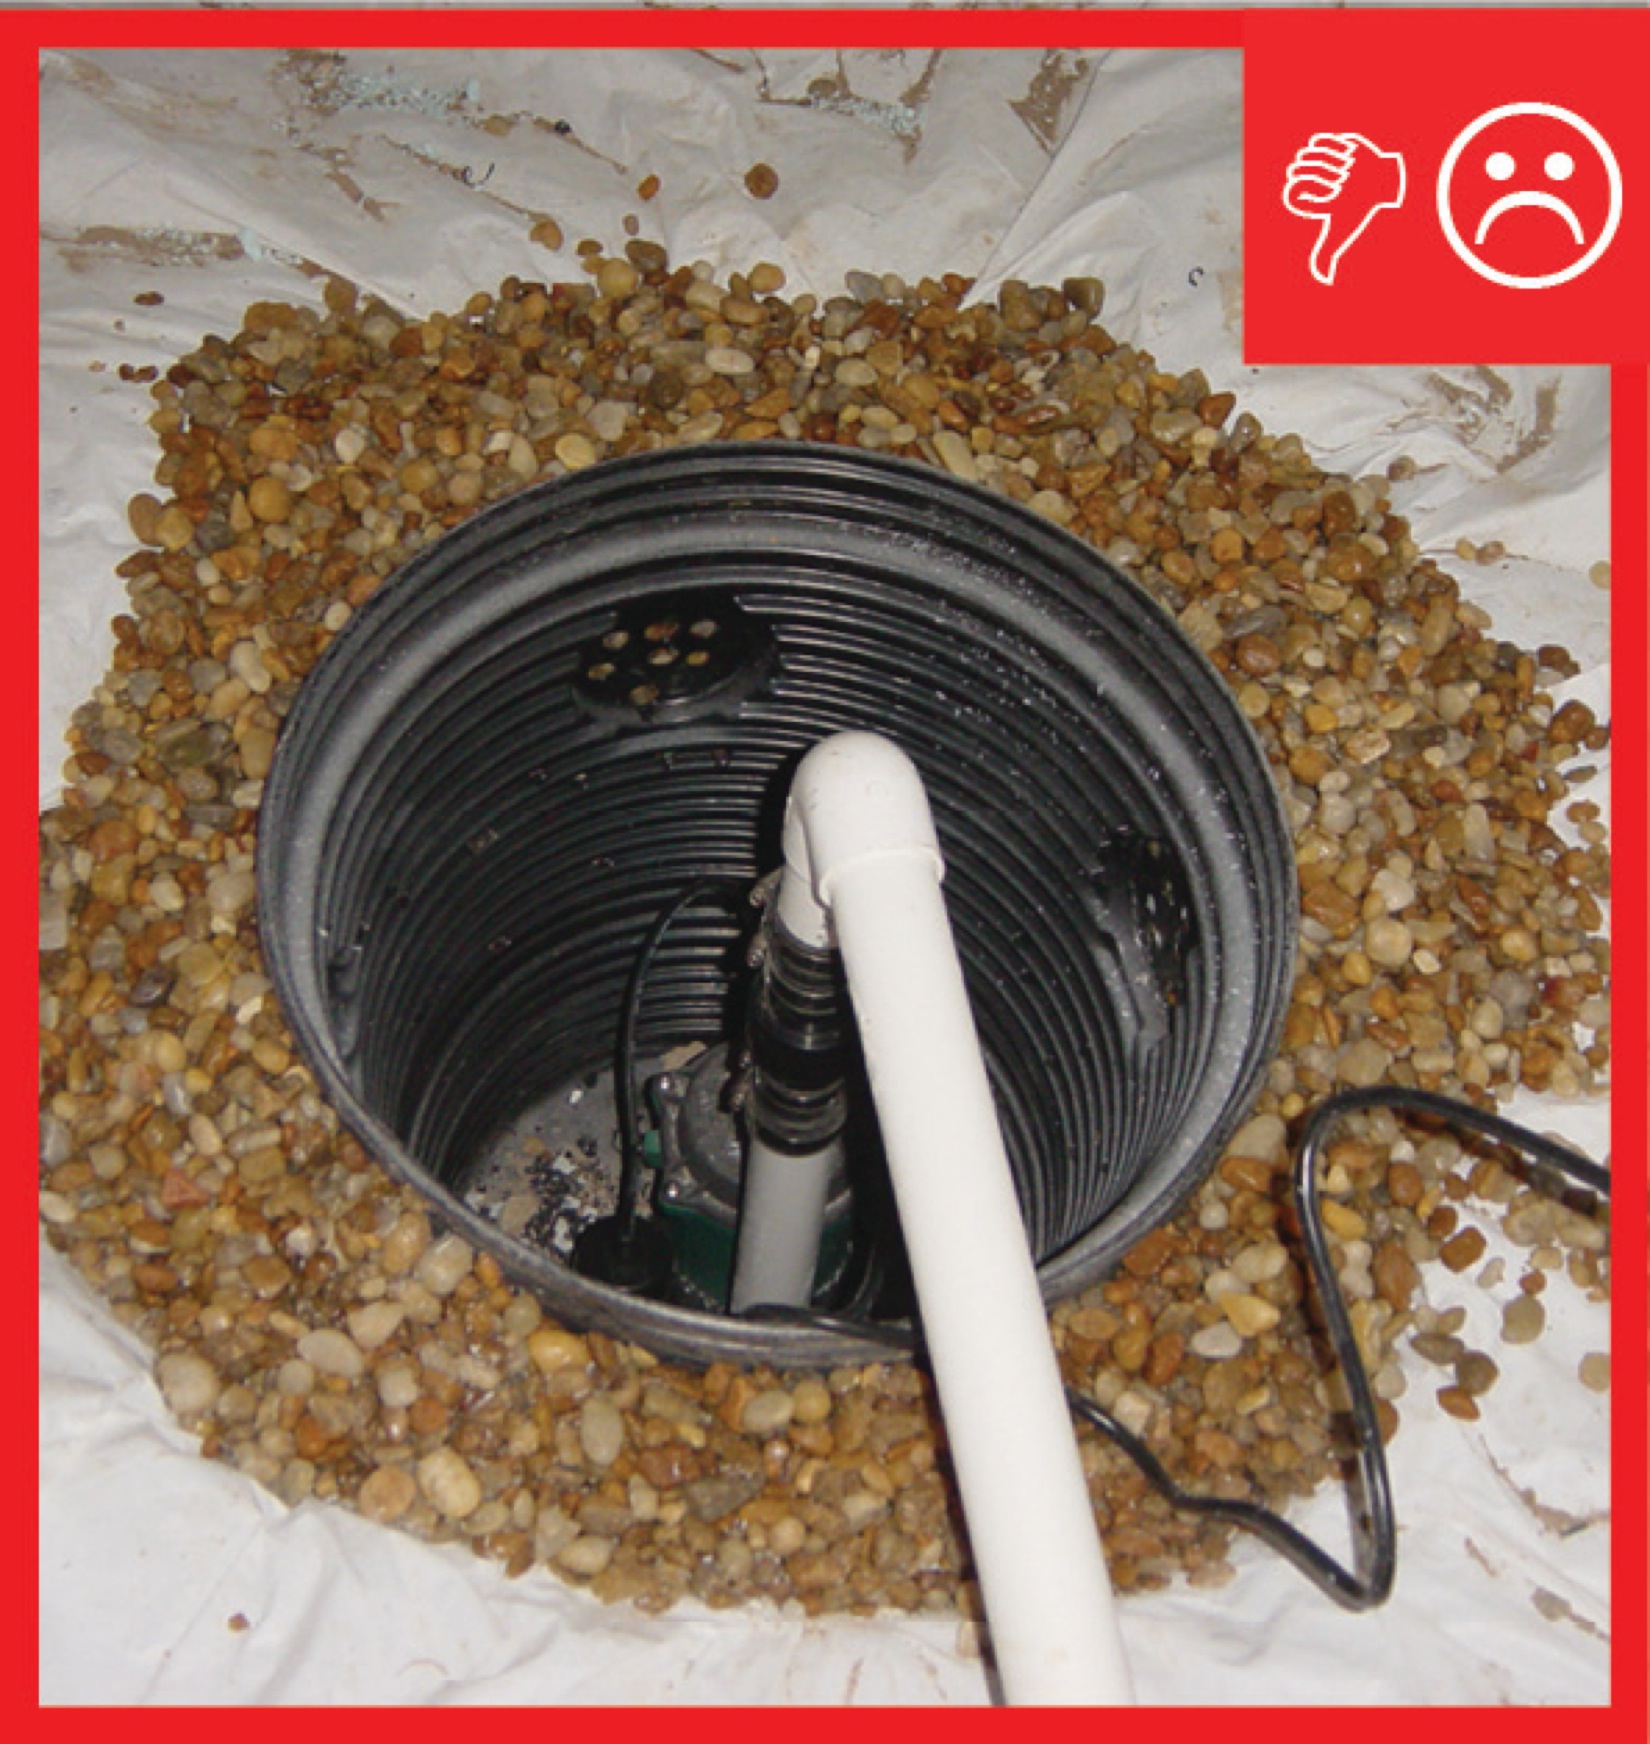
Wrong -The top of the sump pump crock is too high above the crawlspace grade level for any water in the crawl to enter the sump.
Image
Wrong – A poorly sealed window and window well allow bulk water to enter the crawlspace from ground that slopes toward the structure
Image

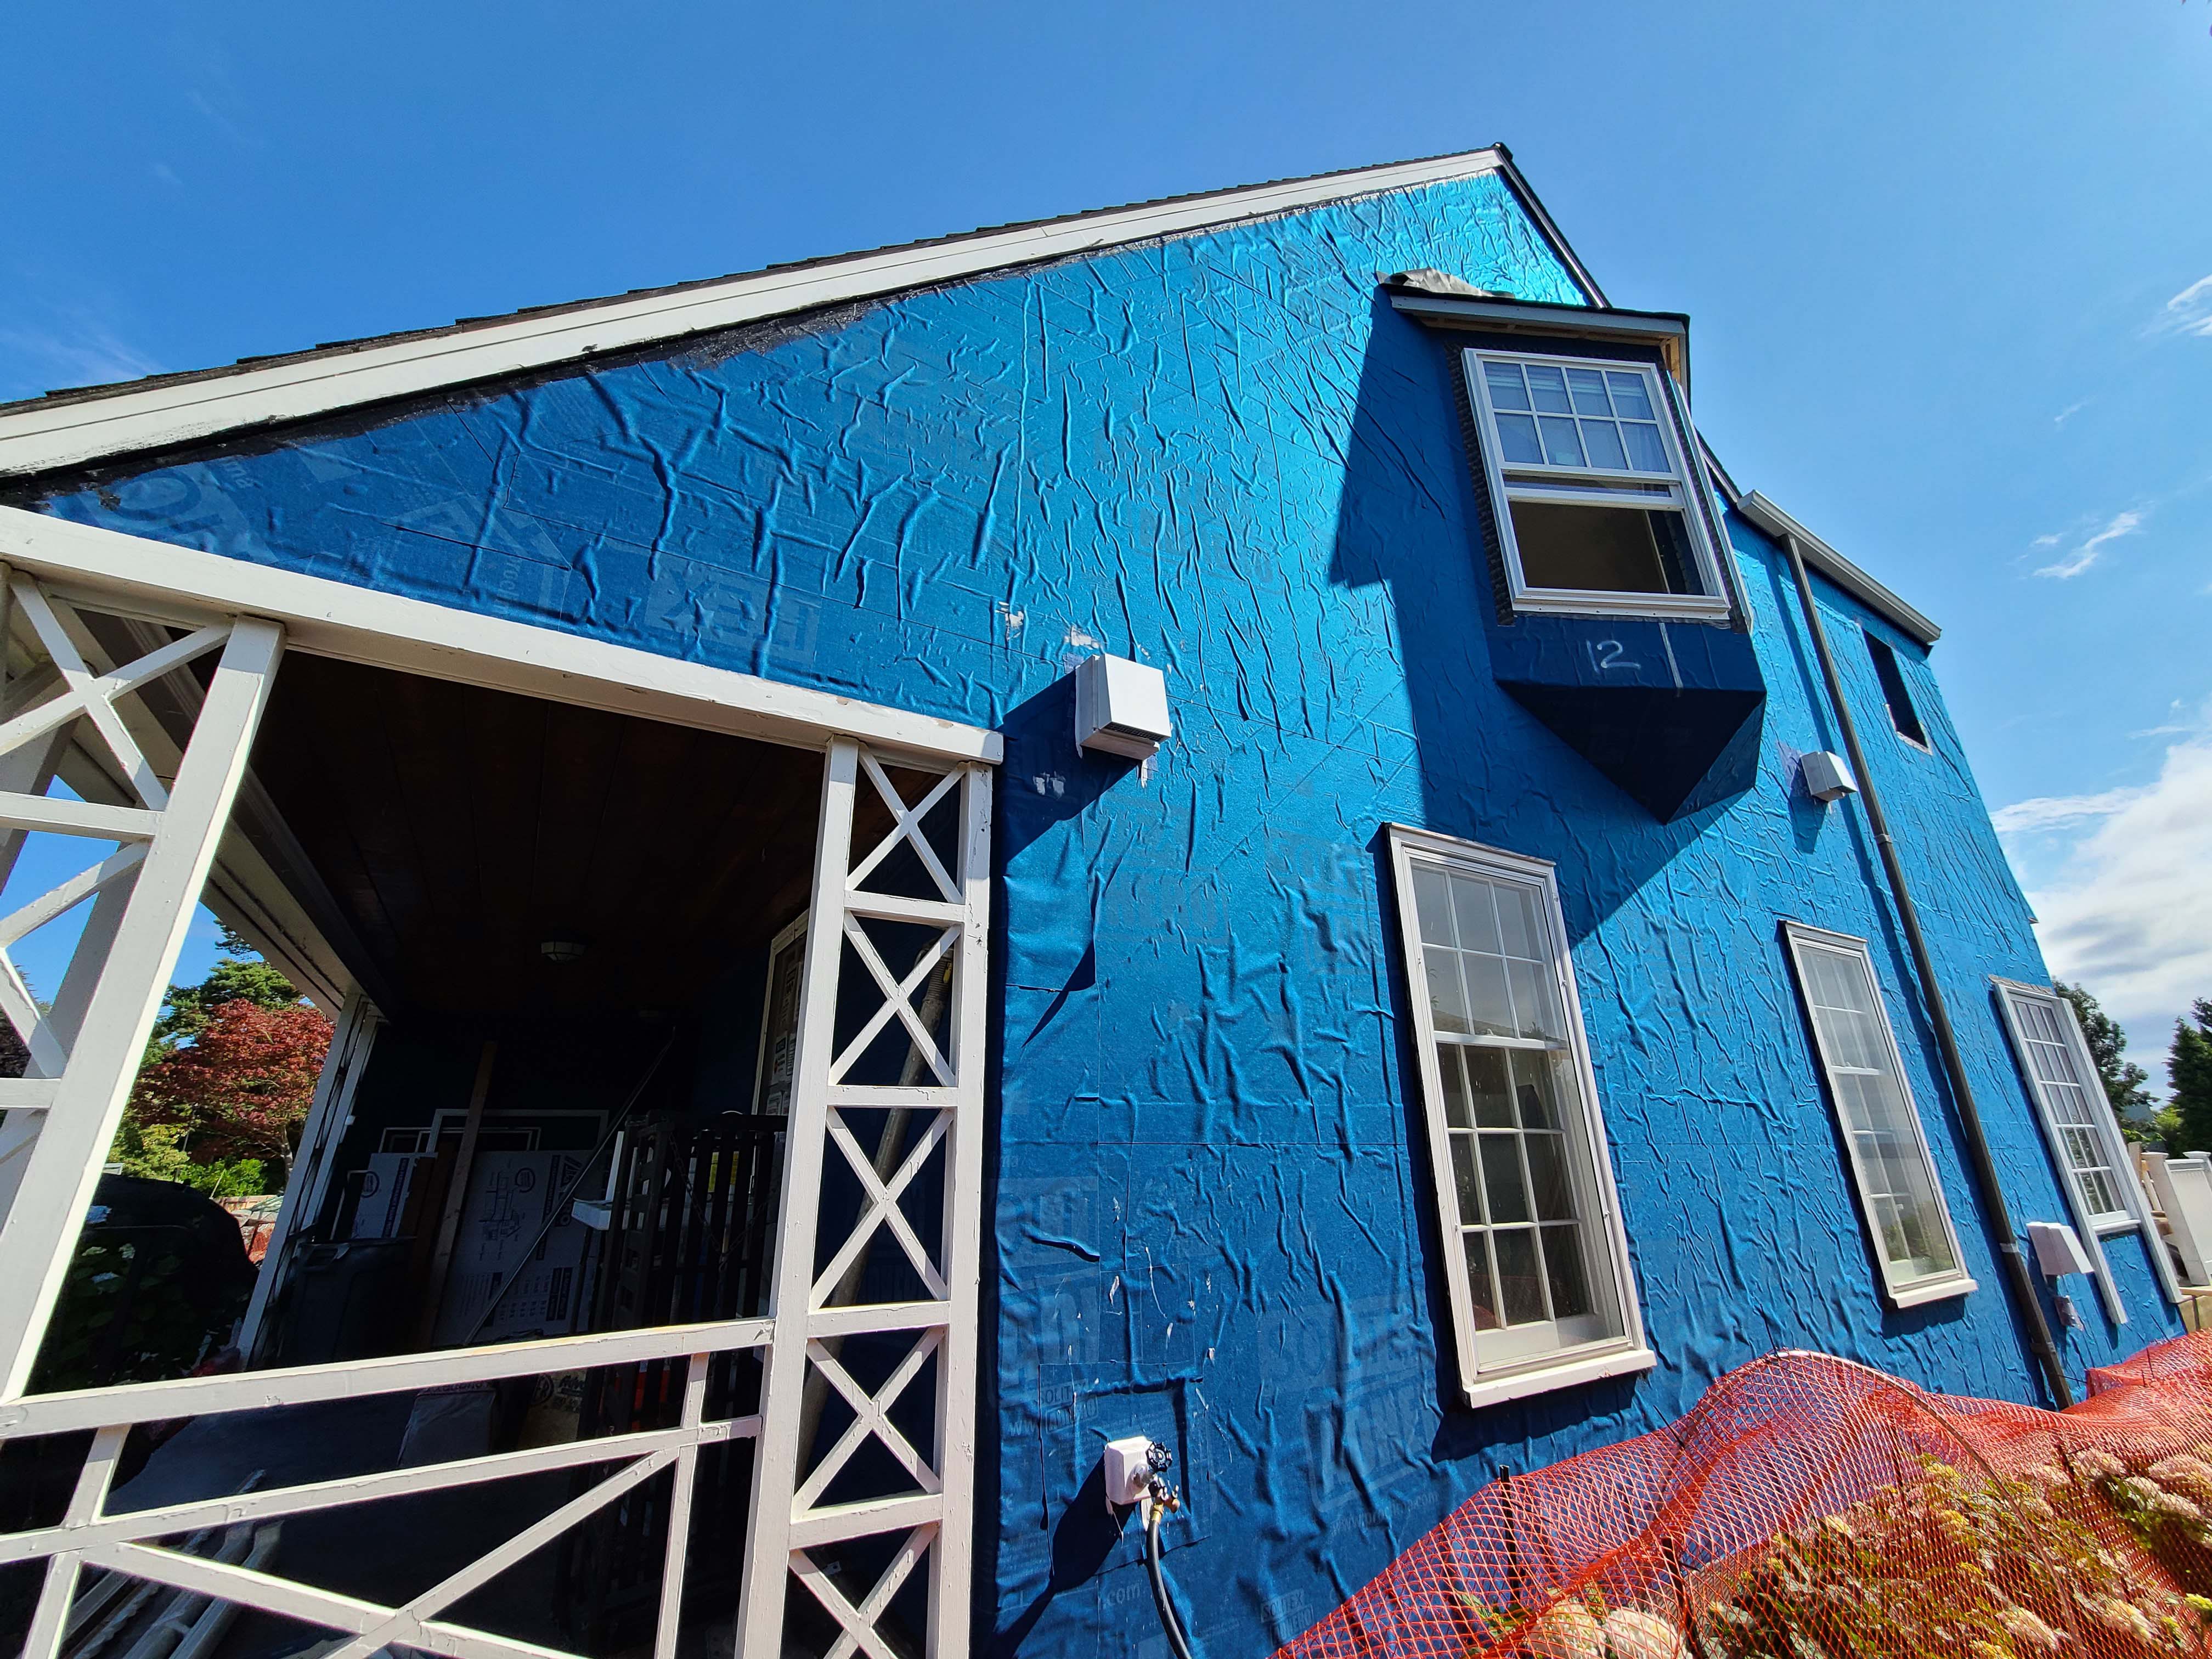
Wrong – Building materials are being stored outdoors with no protection from weather
Image
Image
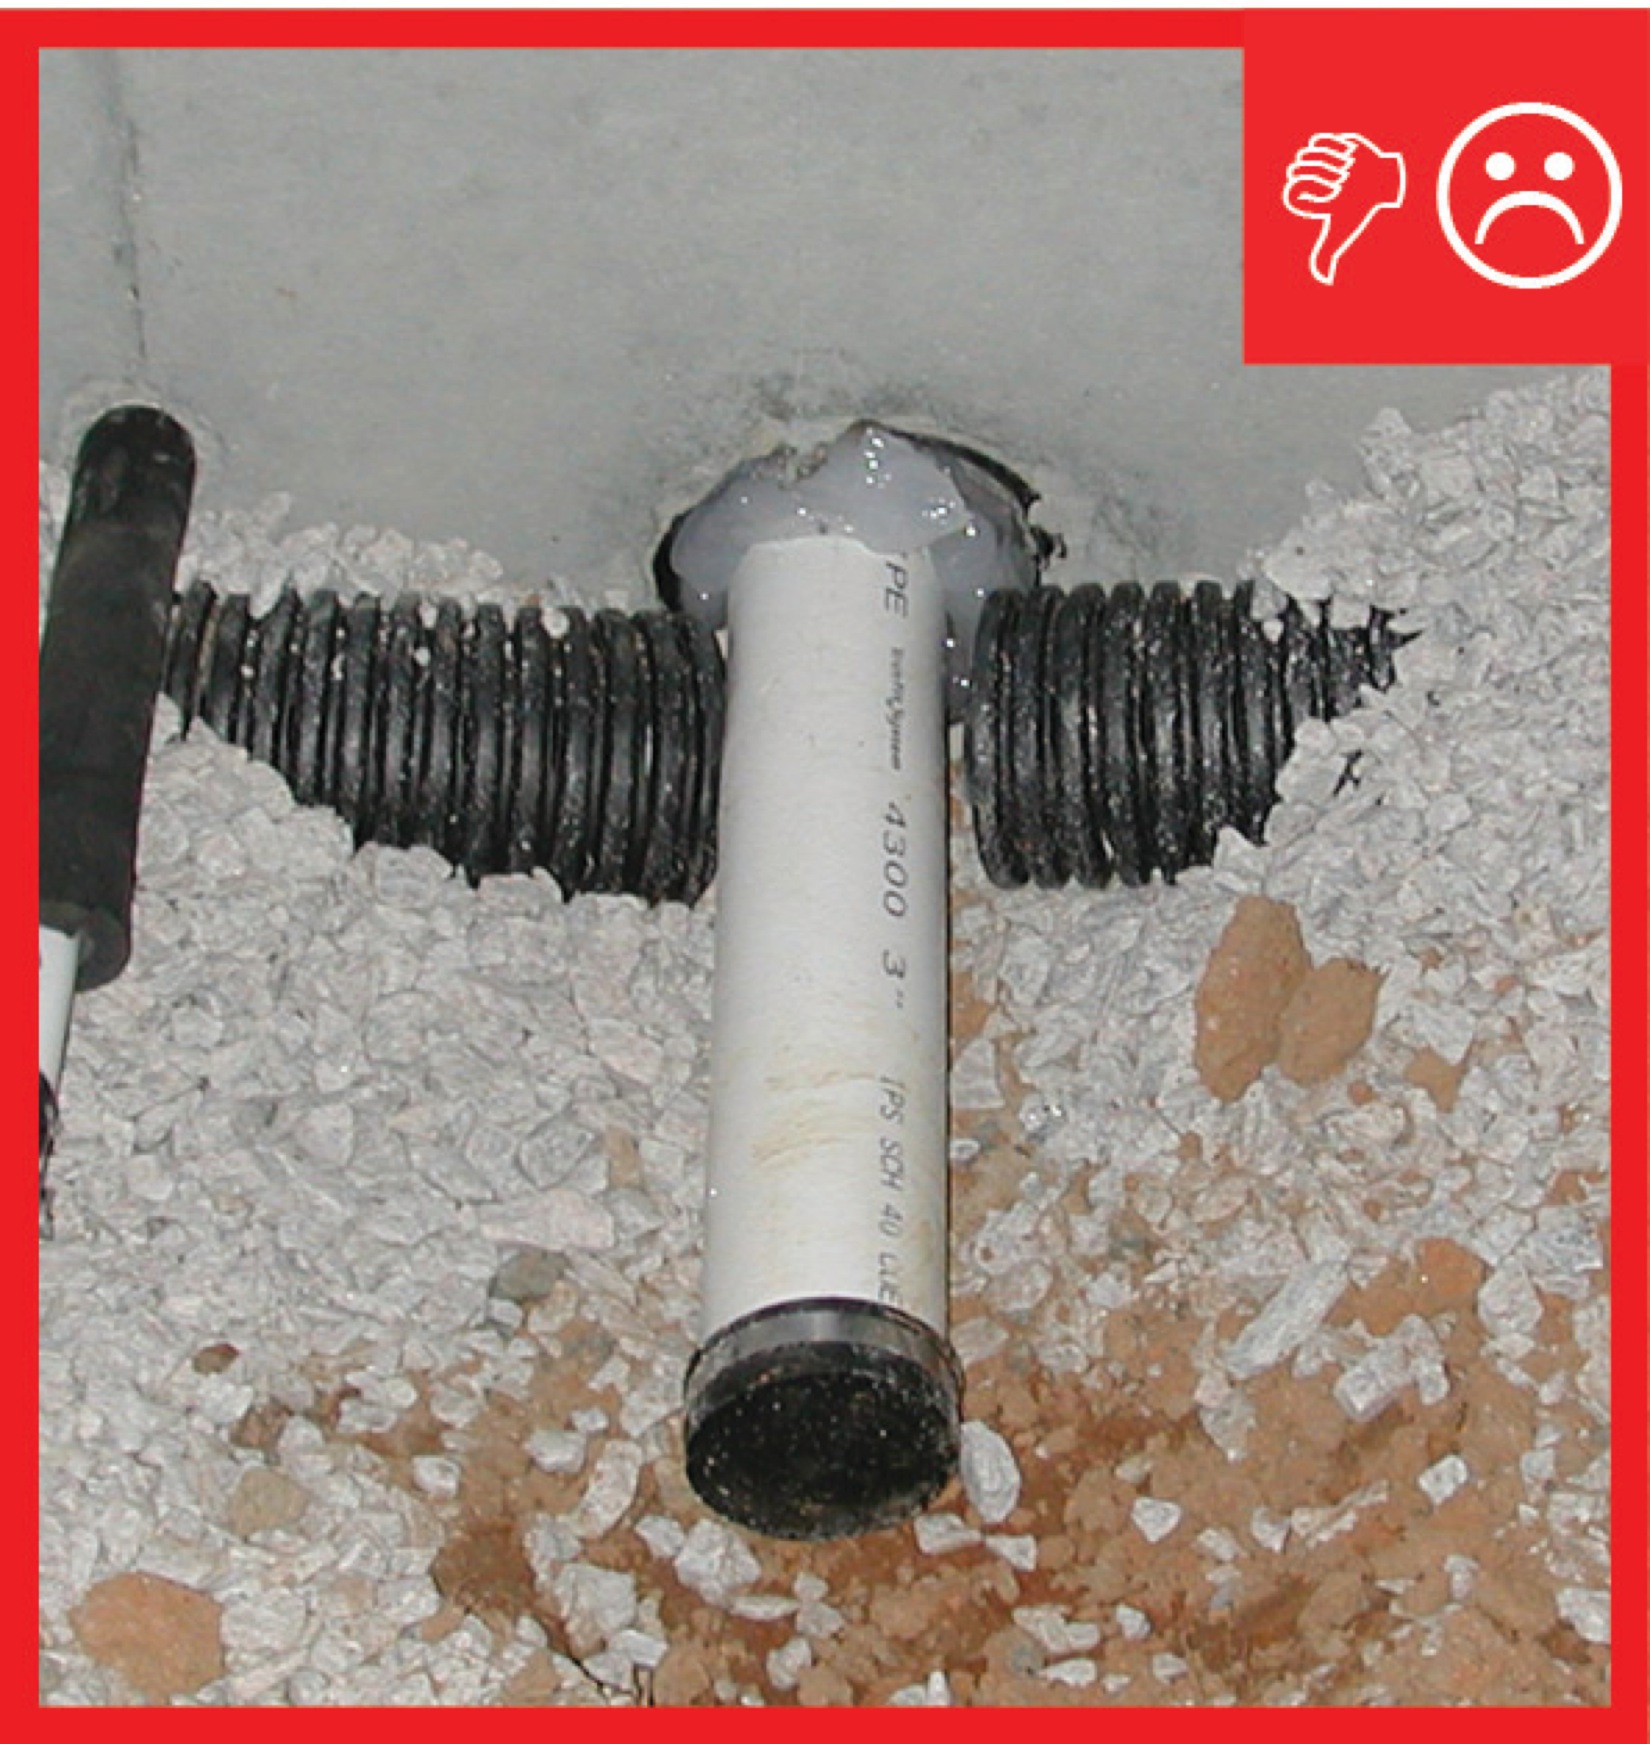
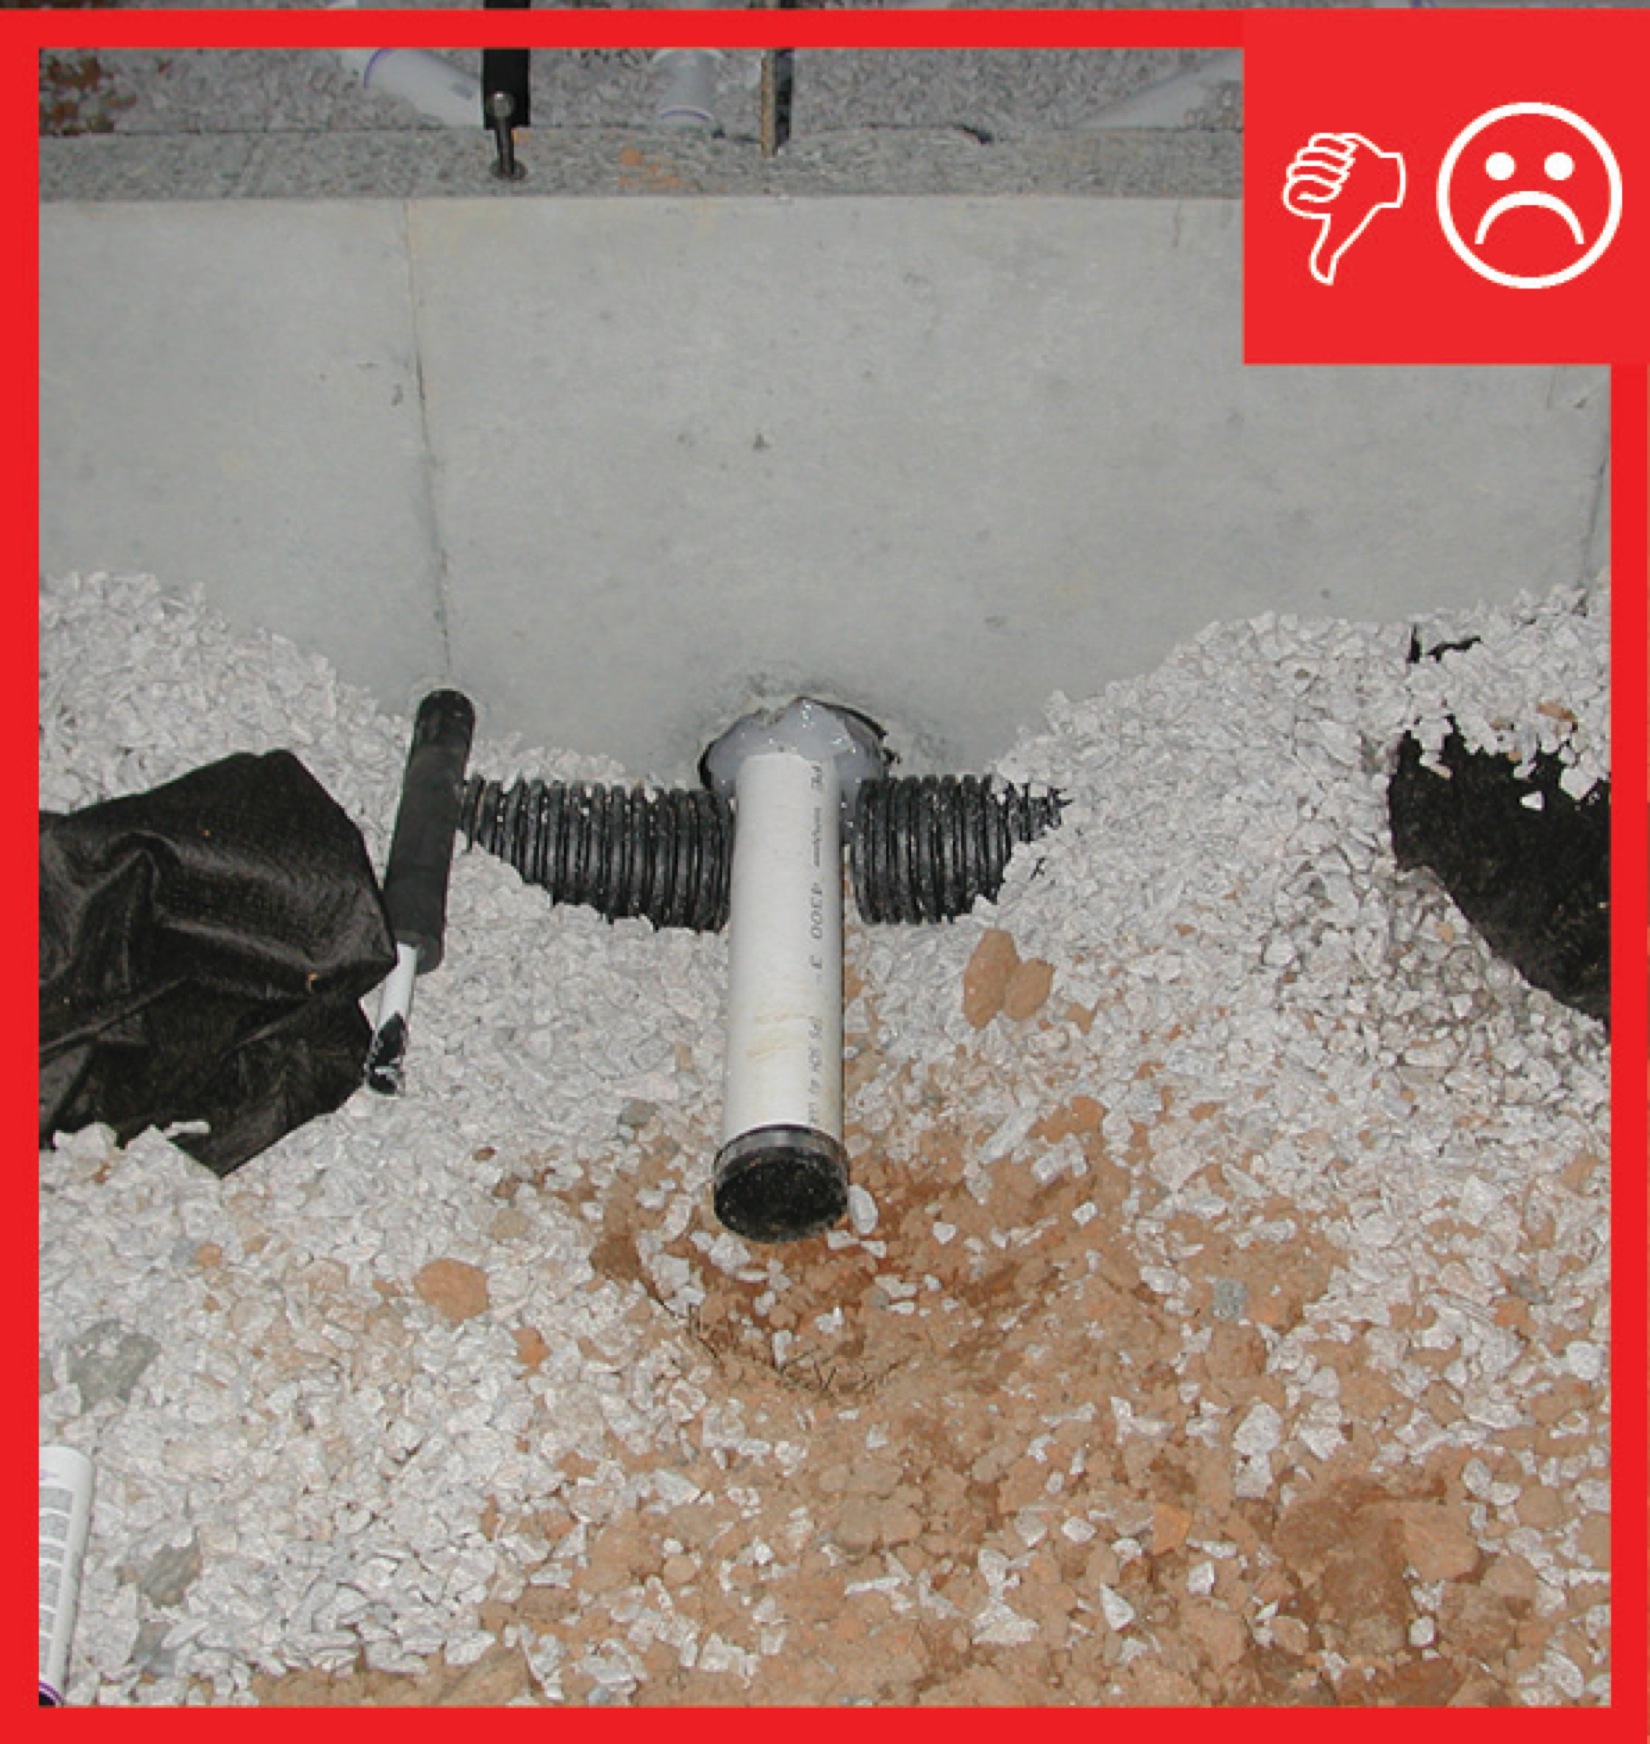
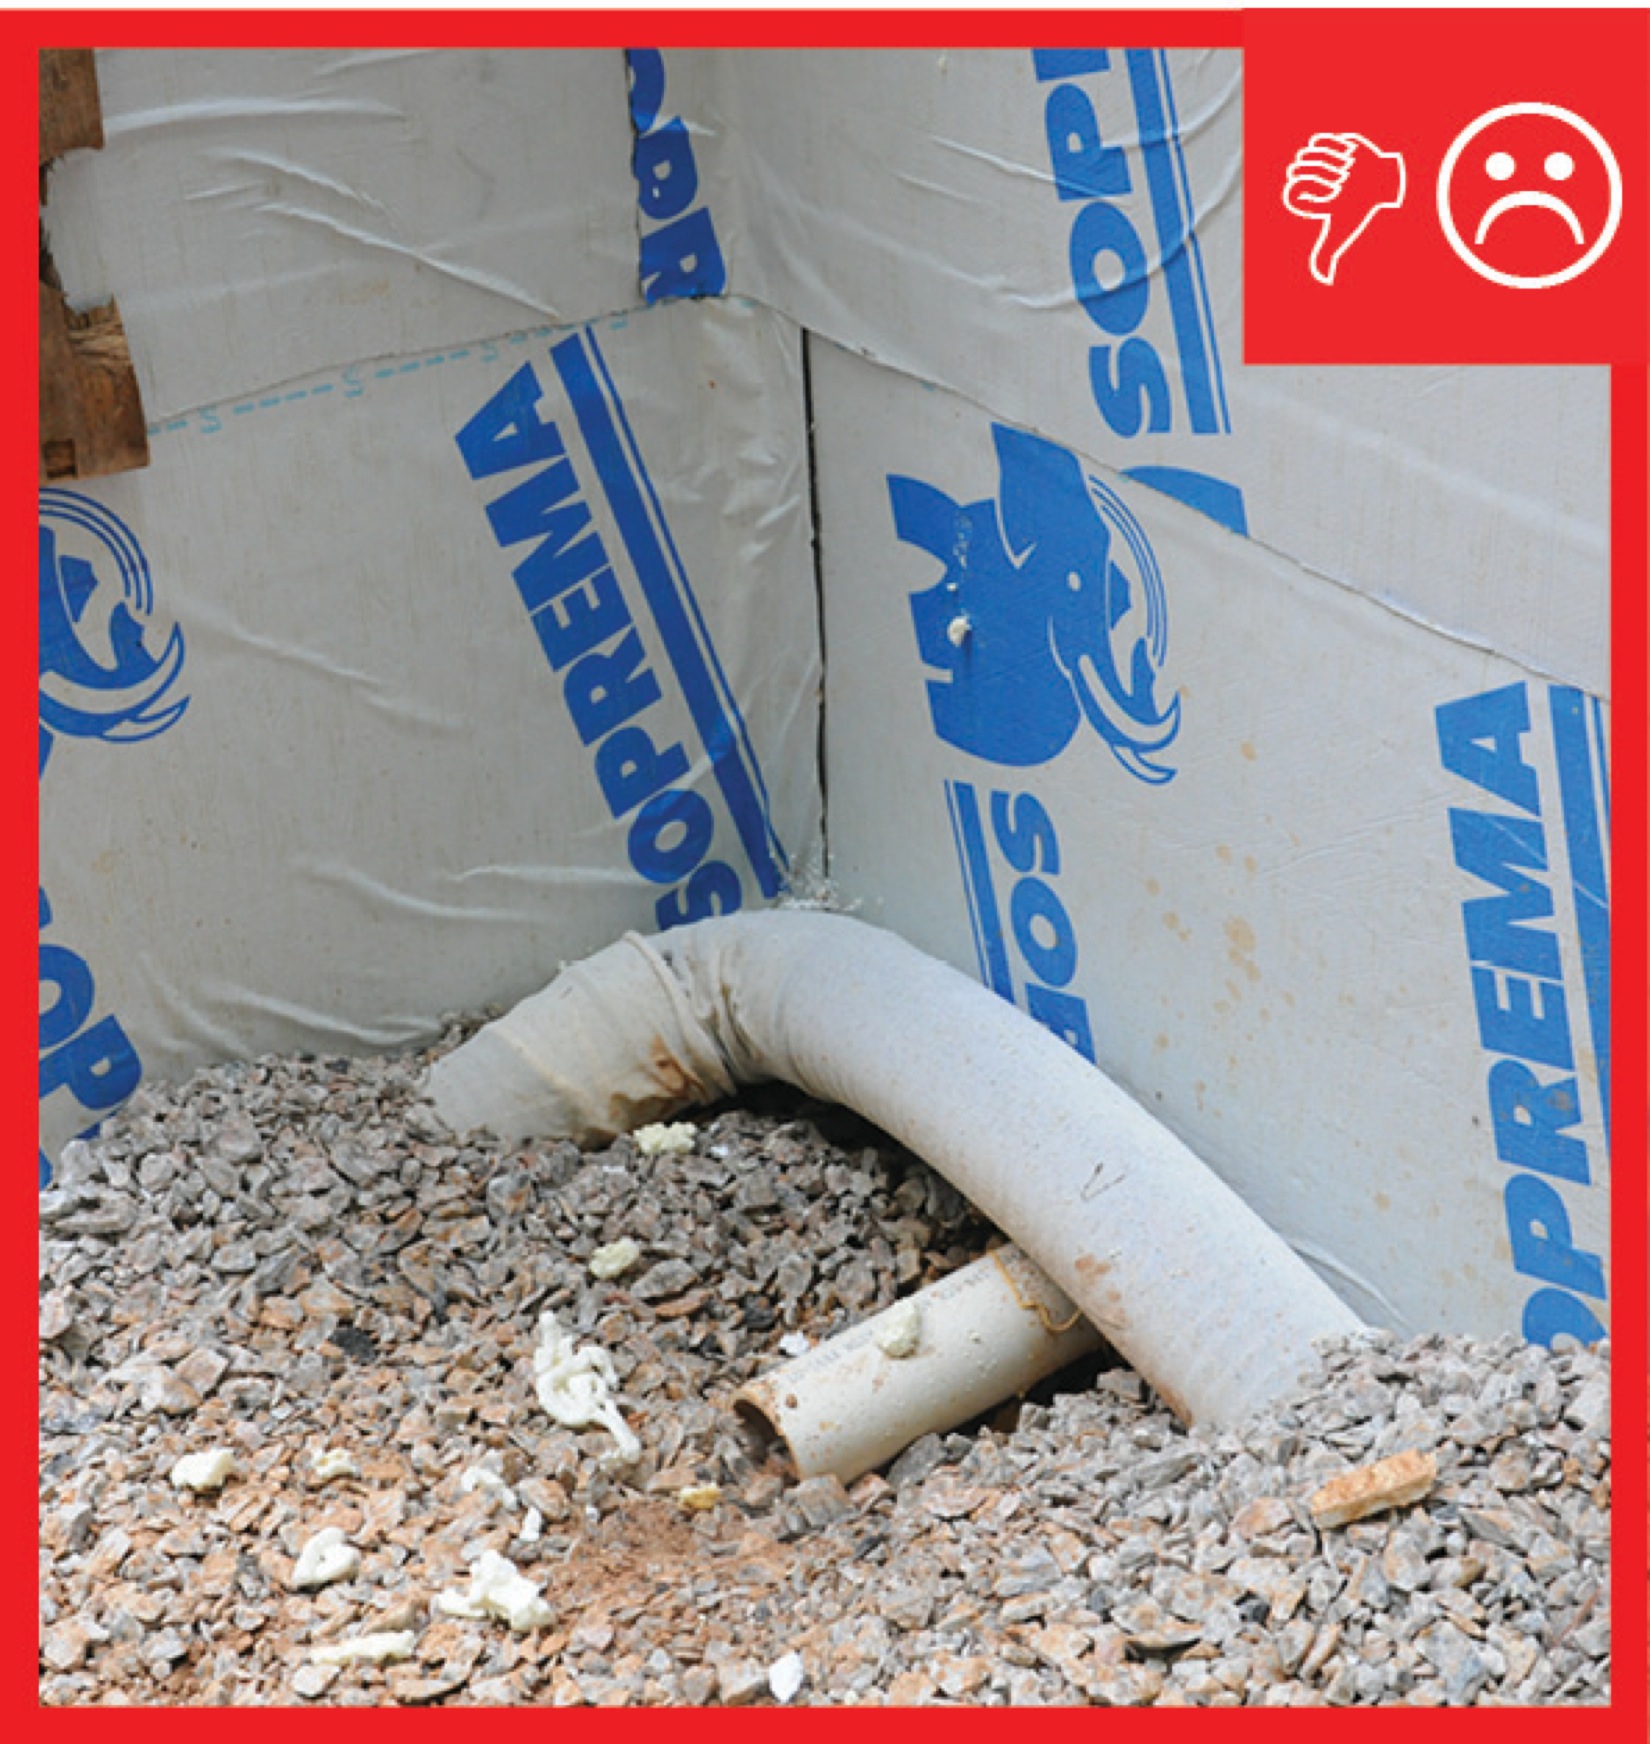
Wrong – Drain pipe has been cut and foundation penetration has not been properly sealed
Image
Image
Wrong – For proper detailing of vinyl around windows and other obstacles, use utility trim, punch snaplocks into siding, and do not overlap directly beneath a window.
Image
Wrong – If dimpled plastic is used it should be trimmed to drain down at the bottom rather than up where water can collect in it.
Image
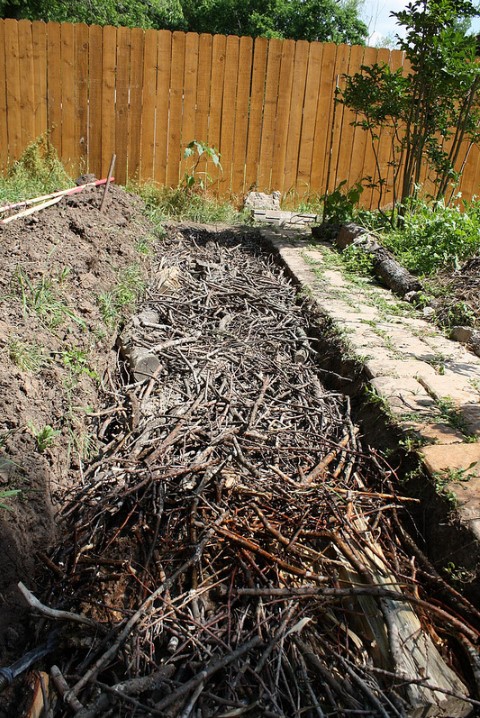
Wrong – Known as a Hugel Swale, organic matter like sticks and leaves break down into compost and fill the swale full. This limits the swale’s ability to filter rainwater.
Image
Wrong – Misalignment of the tie reduces the embedment and enables the brick veneer to be pulled away.
Image
Wrong – No polyethylene sheeting vapor barrier is installed on the crawlspace floor
Image
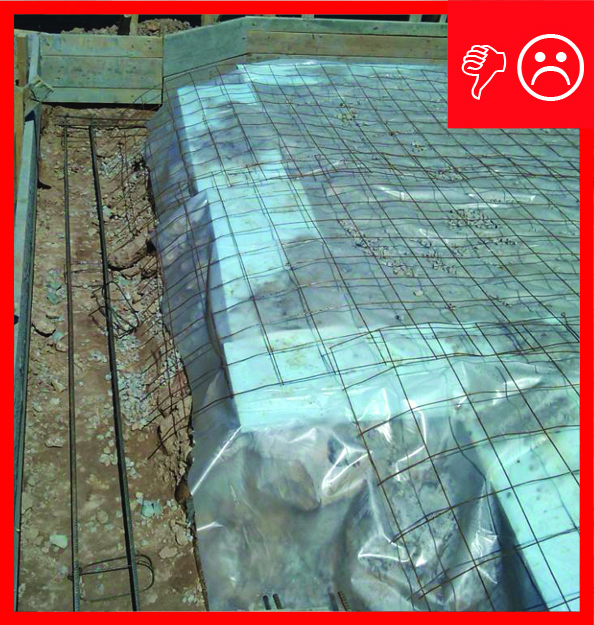
Wrong – Polyethylene sheeting does not completely cover the aggregate and the footing
Image
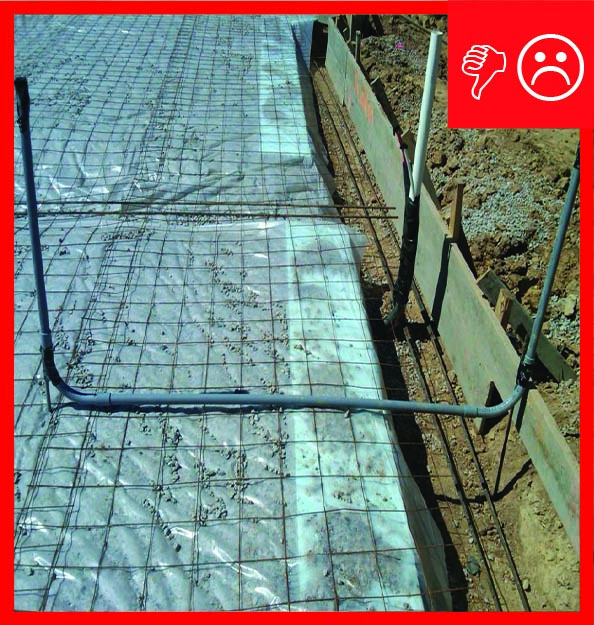
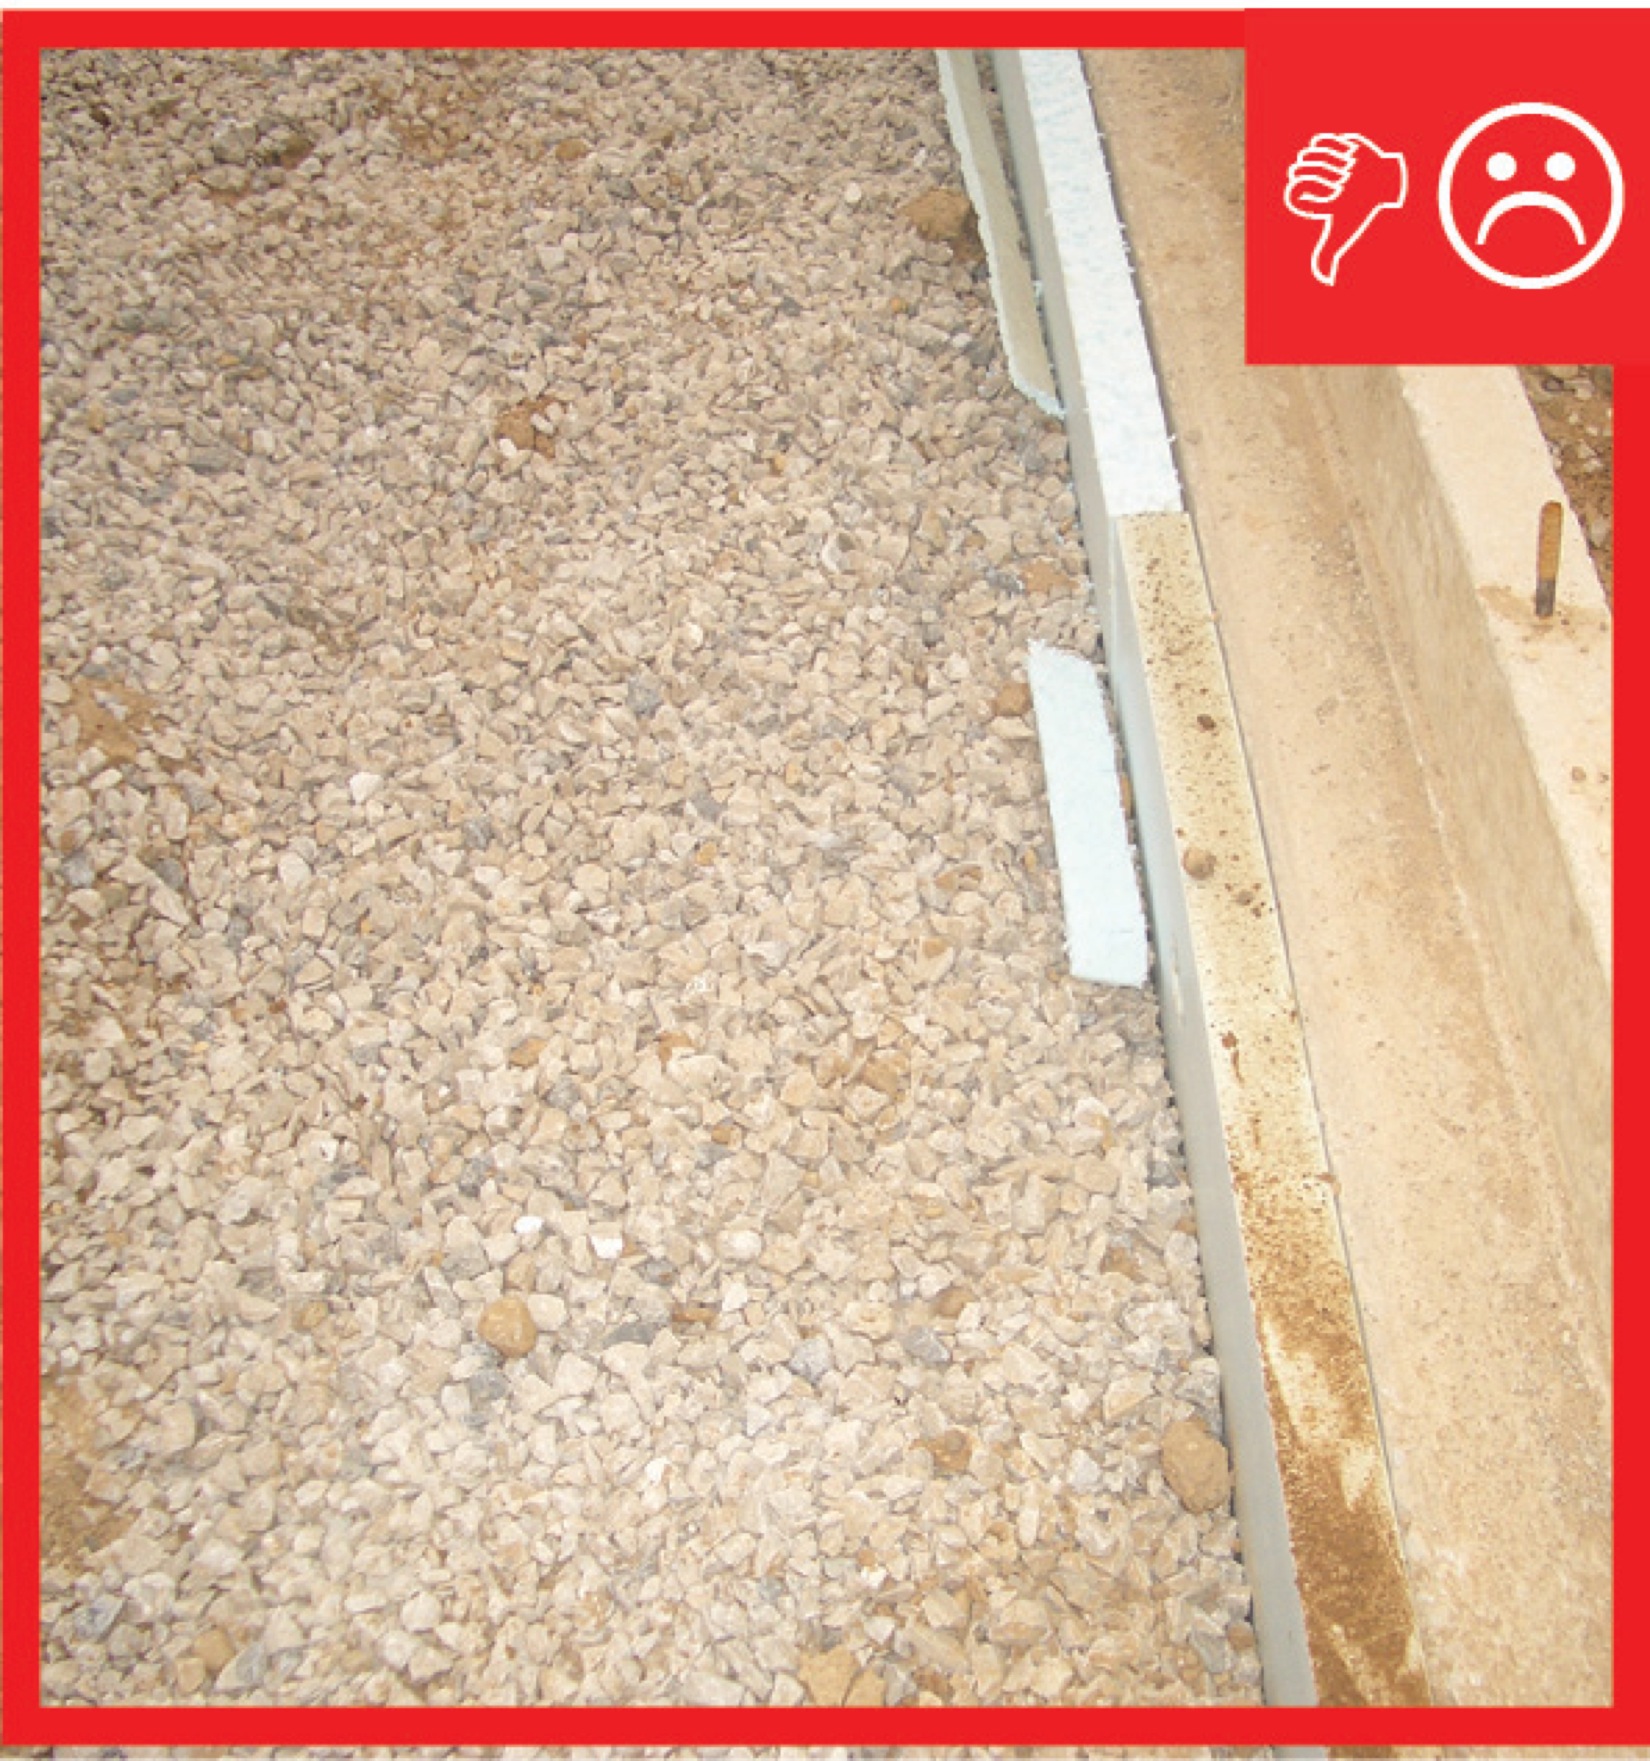
Wrong – Polyethylene sheeting does not extend beyond edge of aggregate to separate the footer from the stem wall which will be poured next
Image
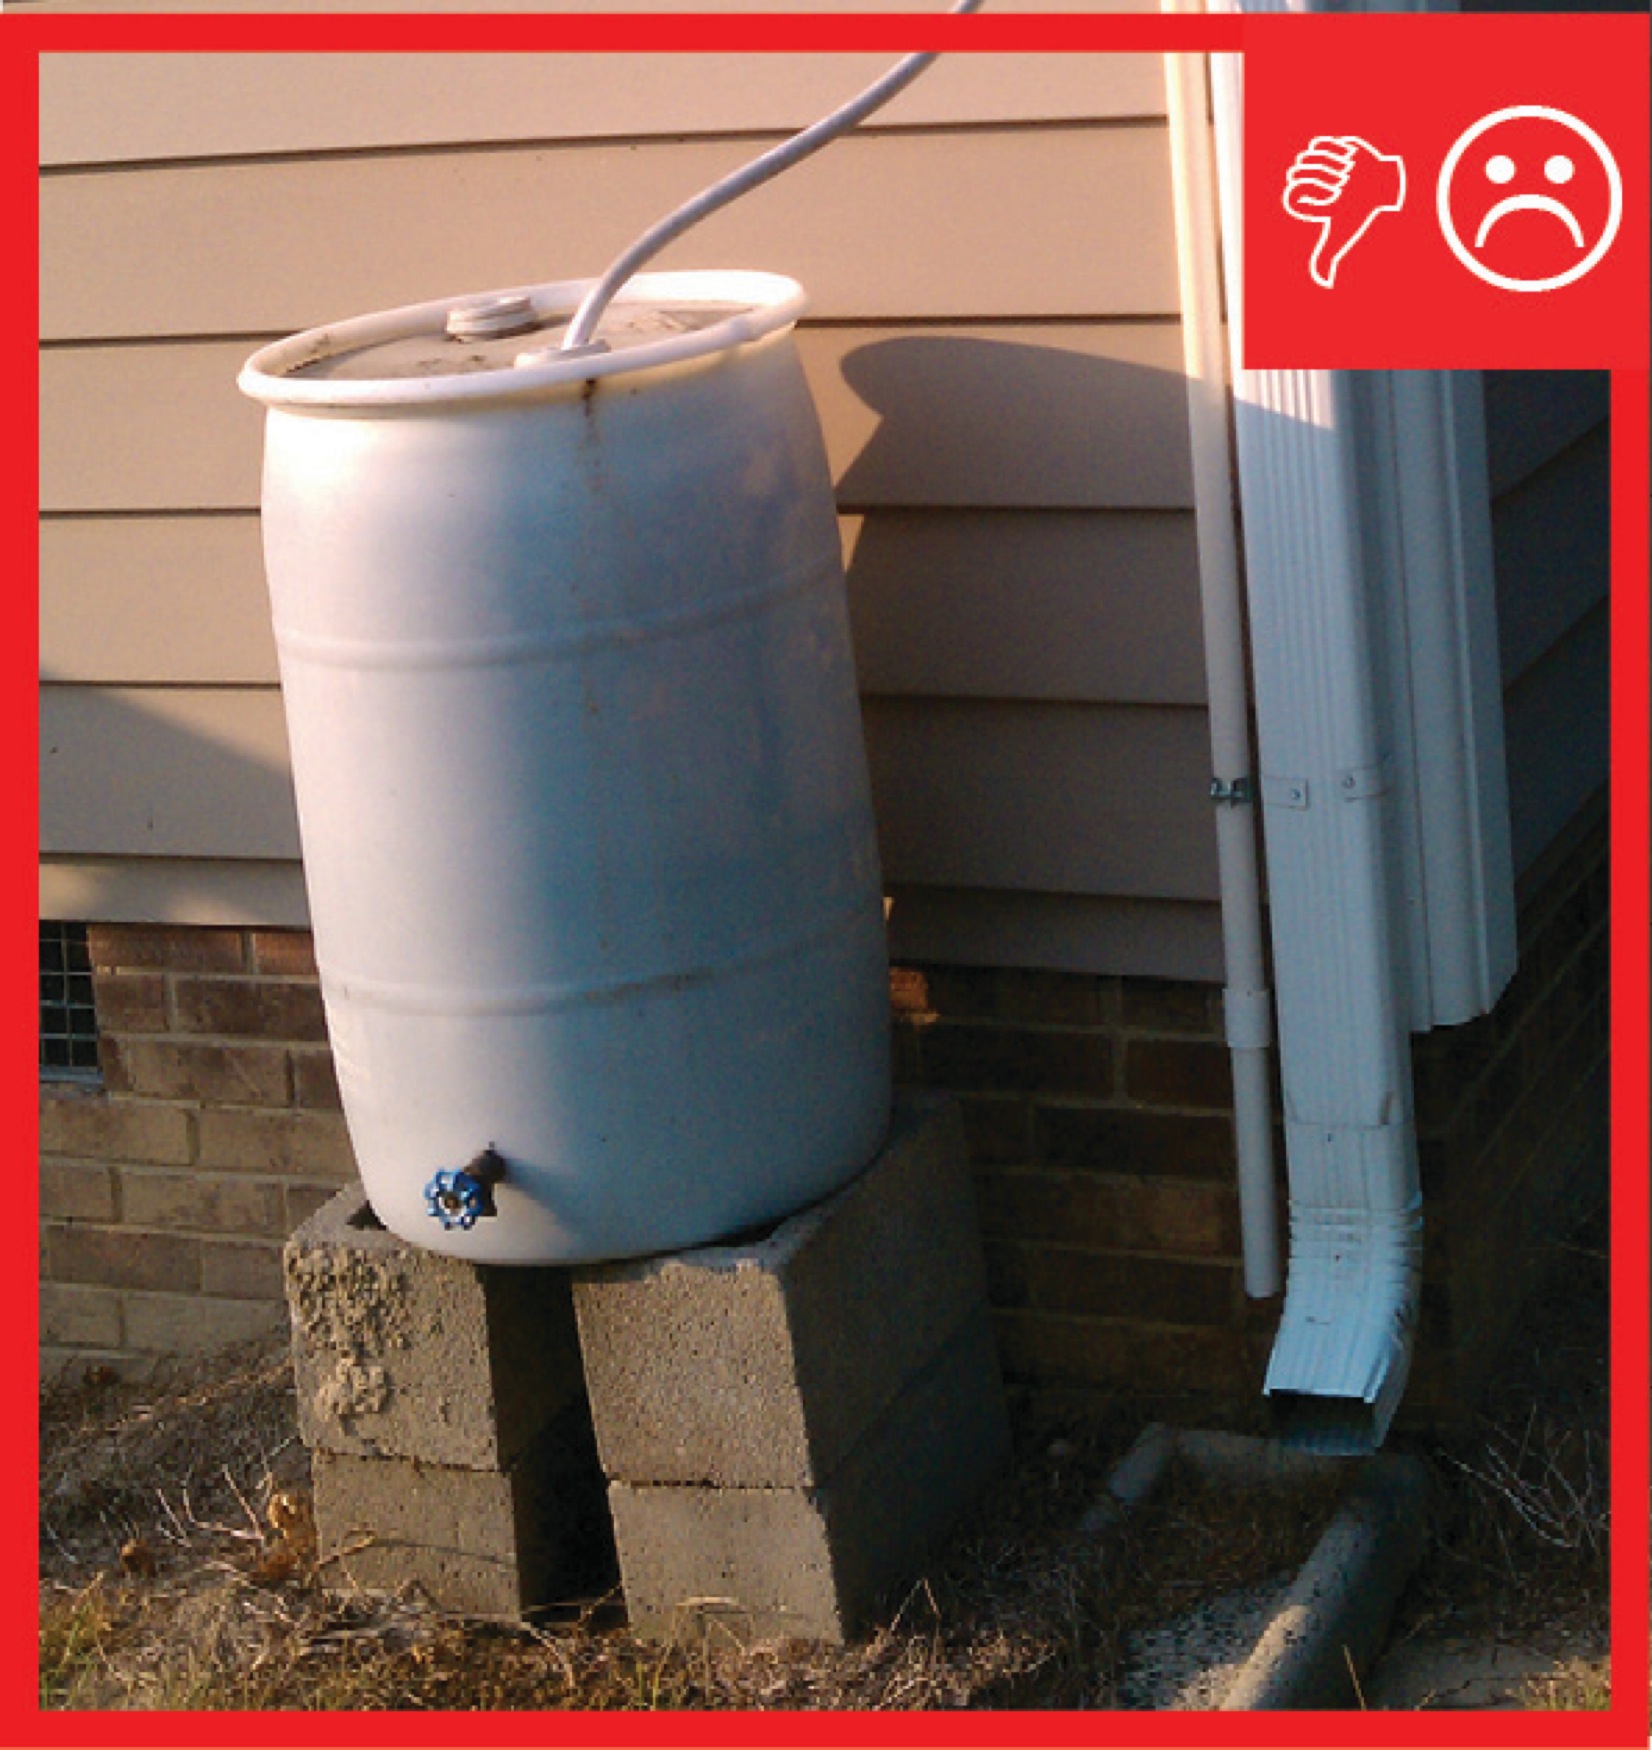
Wrong – Rain barrel installed without an overflow spout that terminates away from foundation
Image

Image

Image

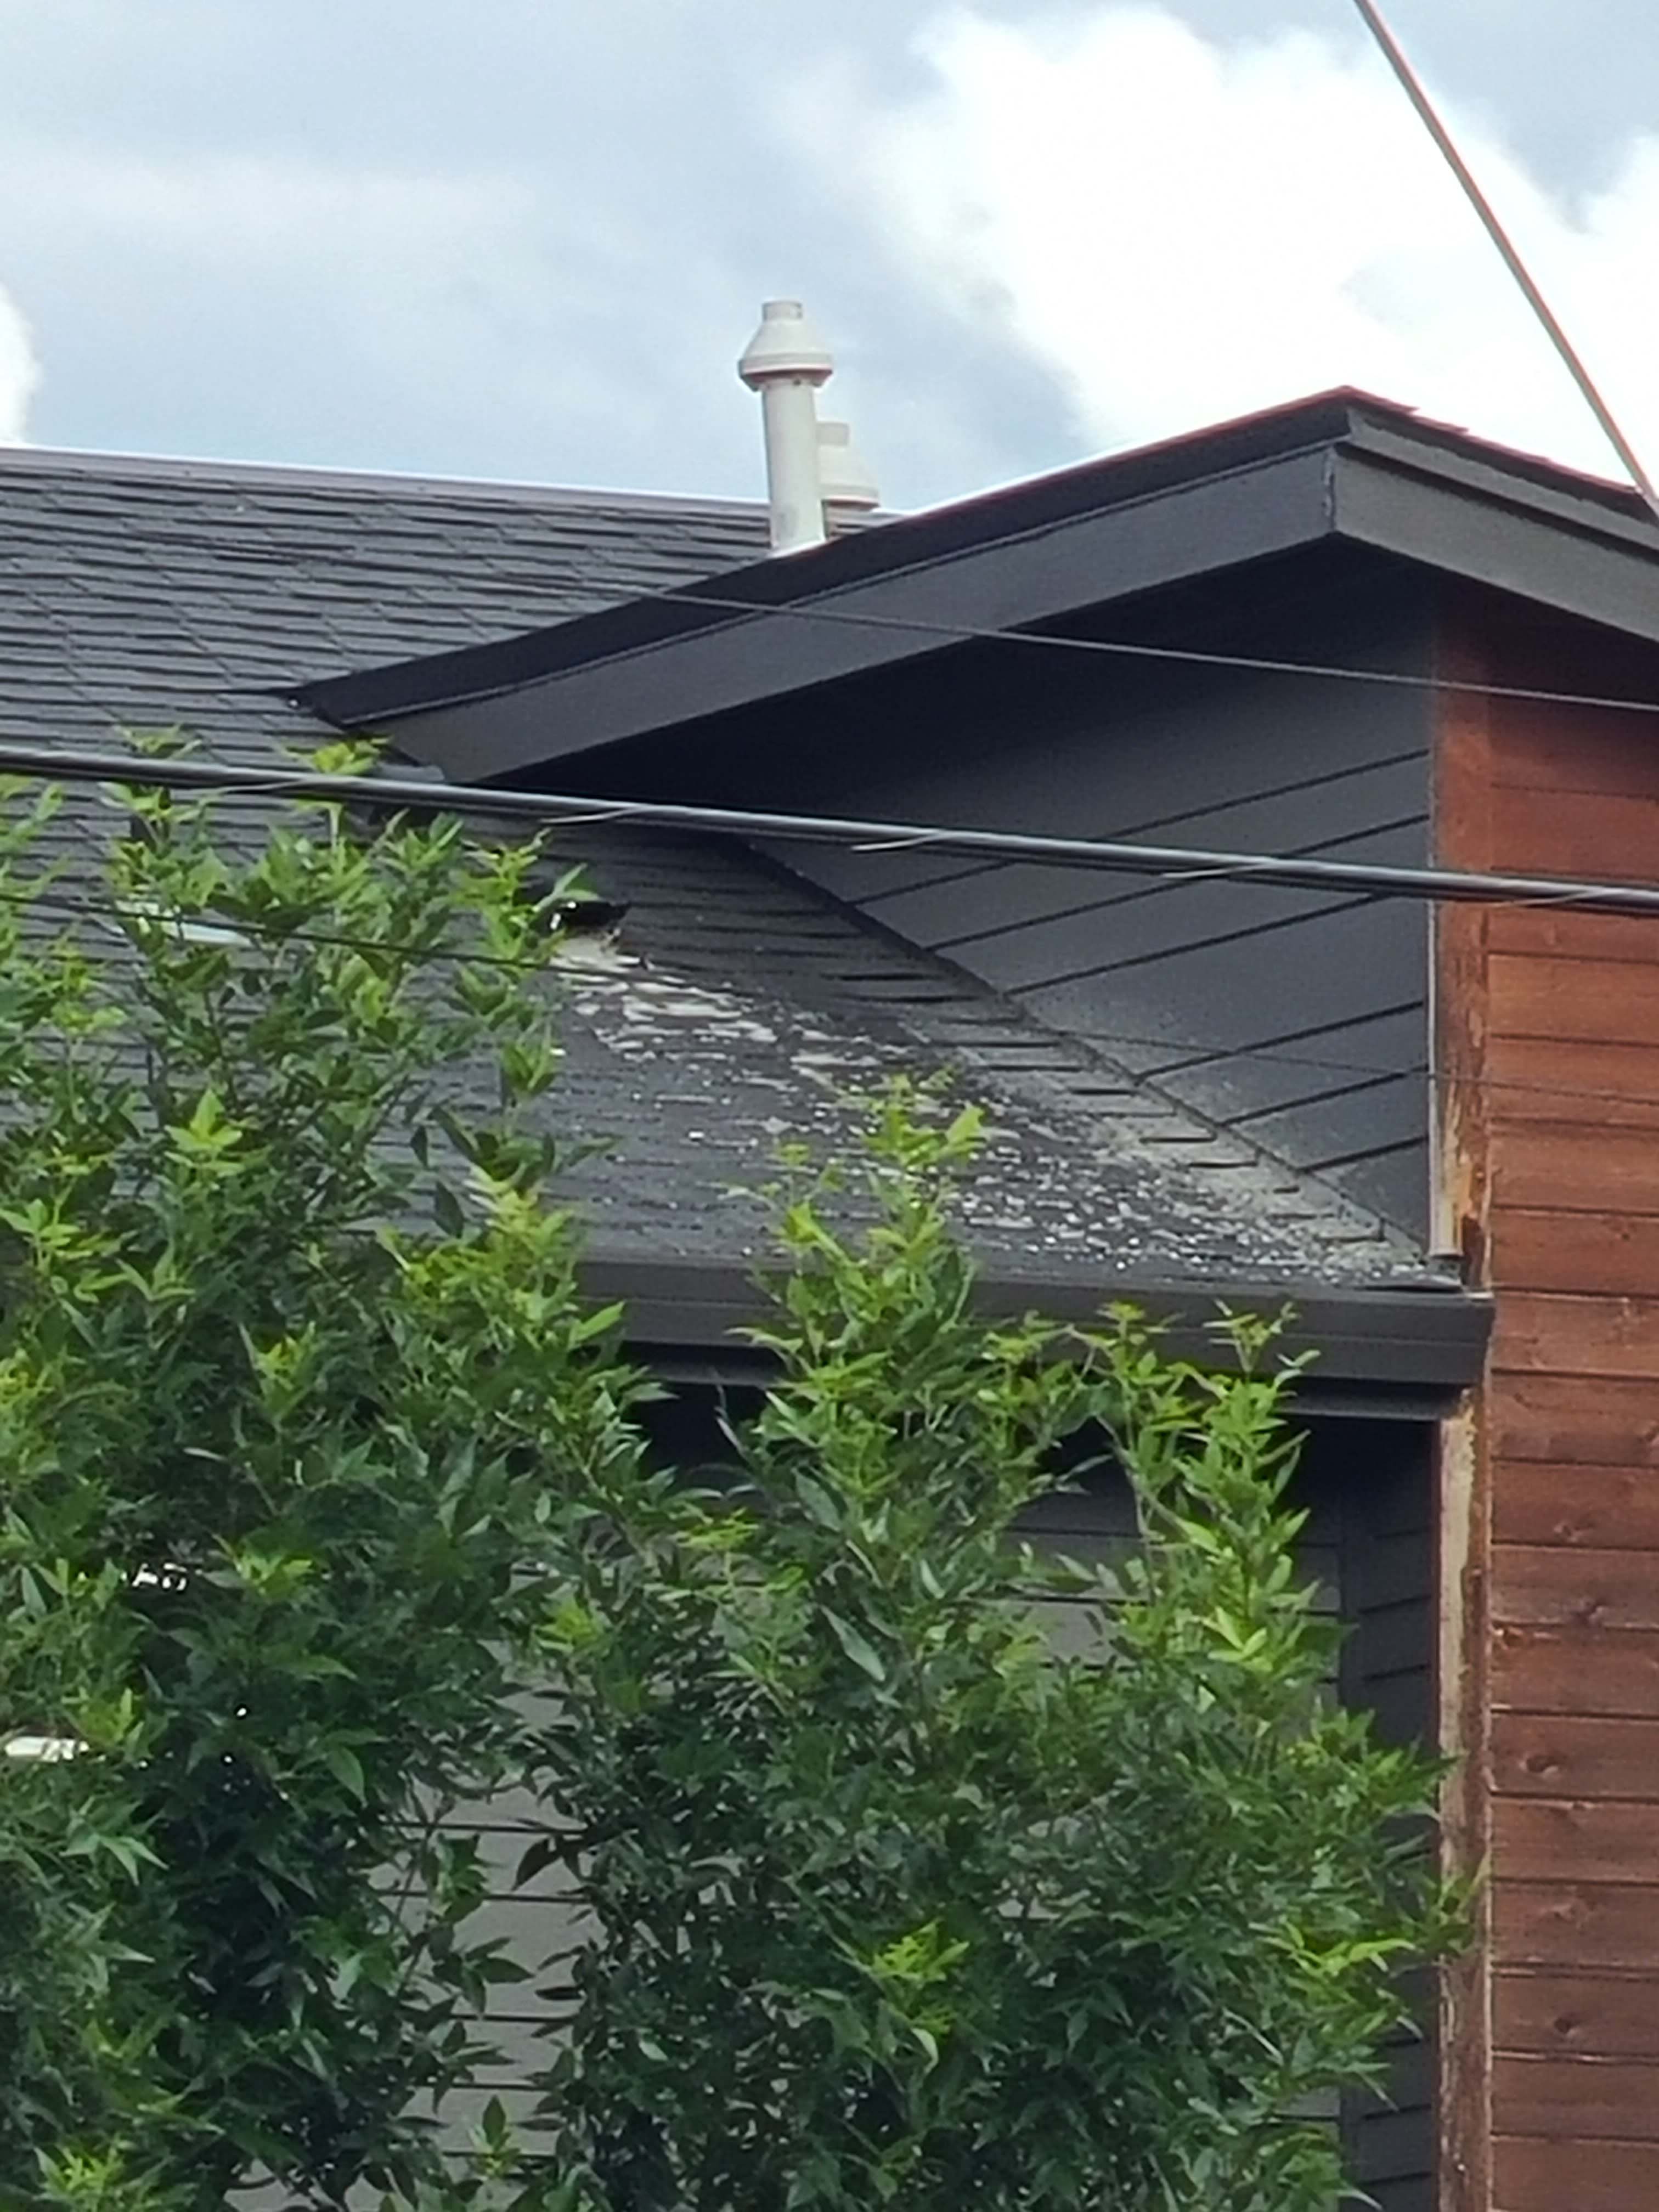
Wrong – The clips holding these metal roofing panels were set too far from the roof eave (above red line) and the panels lifted in strong winds
Image
Wrong – The corners are not properly flashed, leaving a vulnerable area in the drainage system
Image
Image
Wrong – The drain tile is cut and now does not extend around the entire foundation footing
Image
Wrong – The drain tile is not installed to terminate properly and will not transport water to the exterior
Image
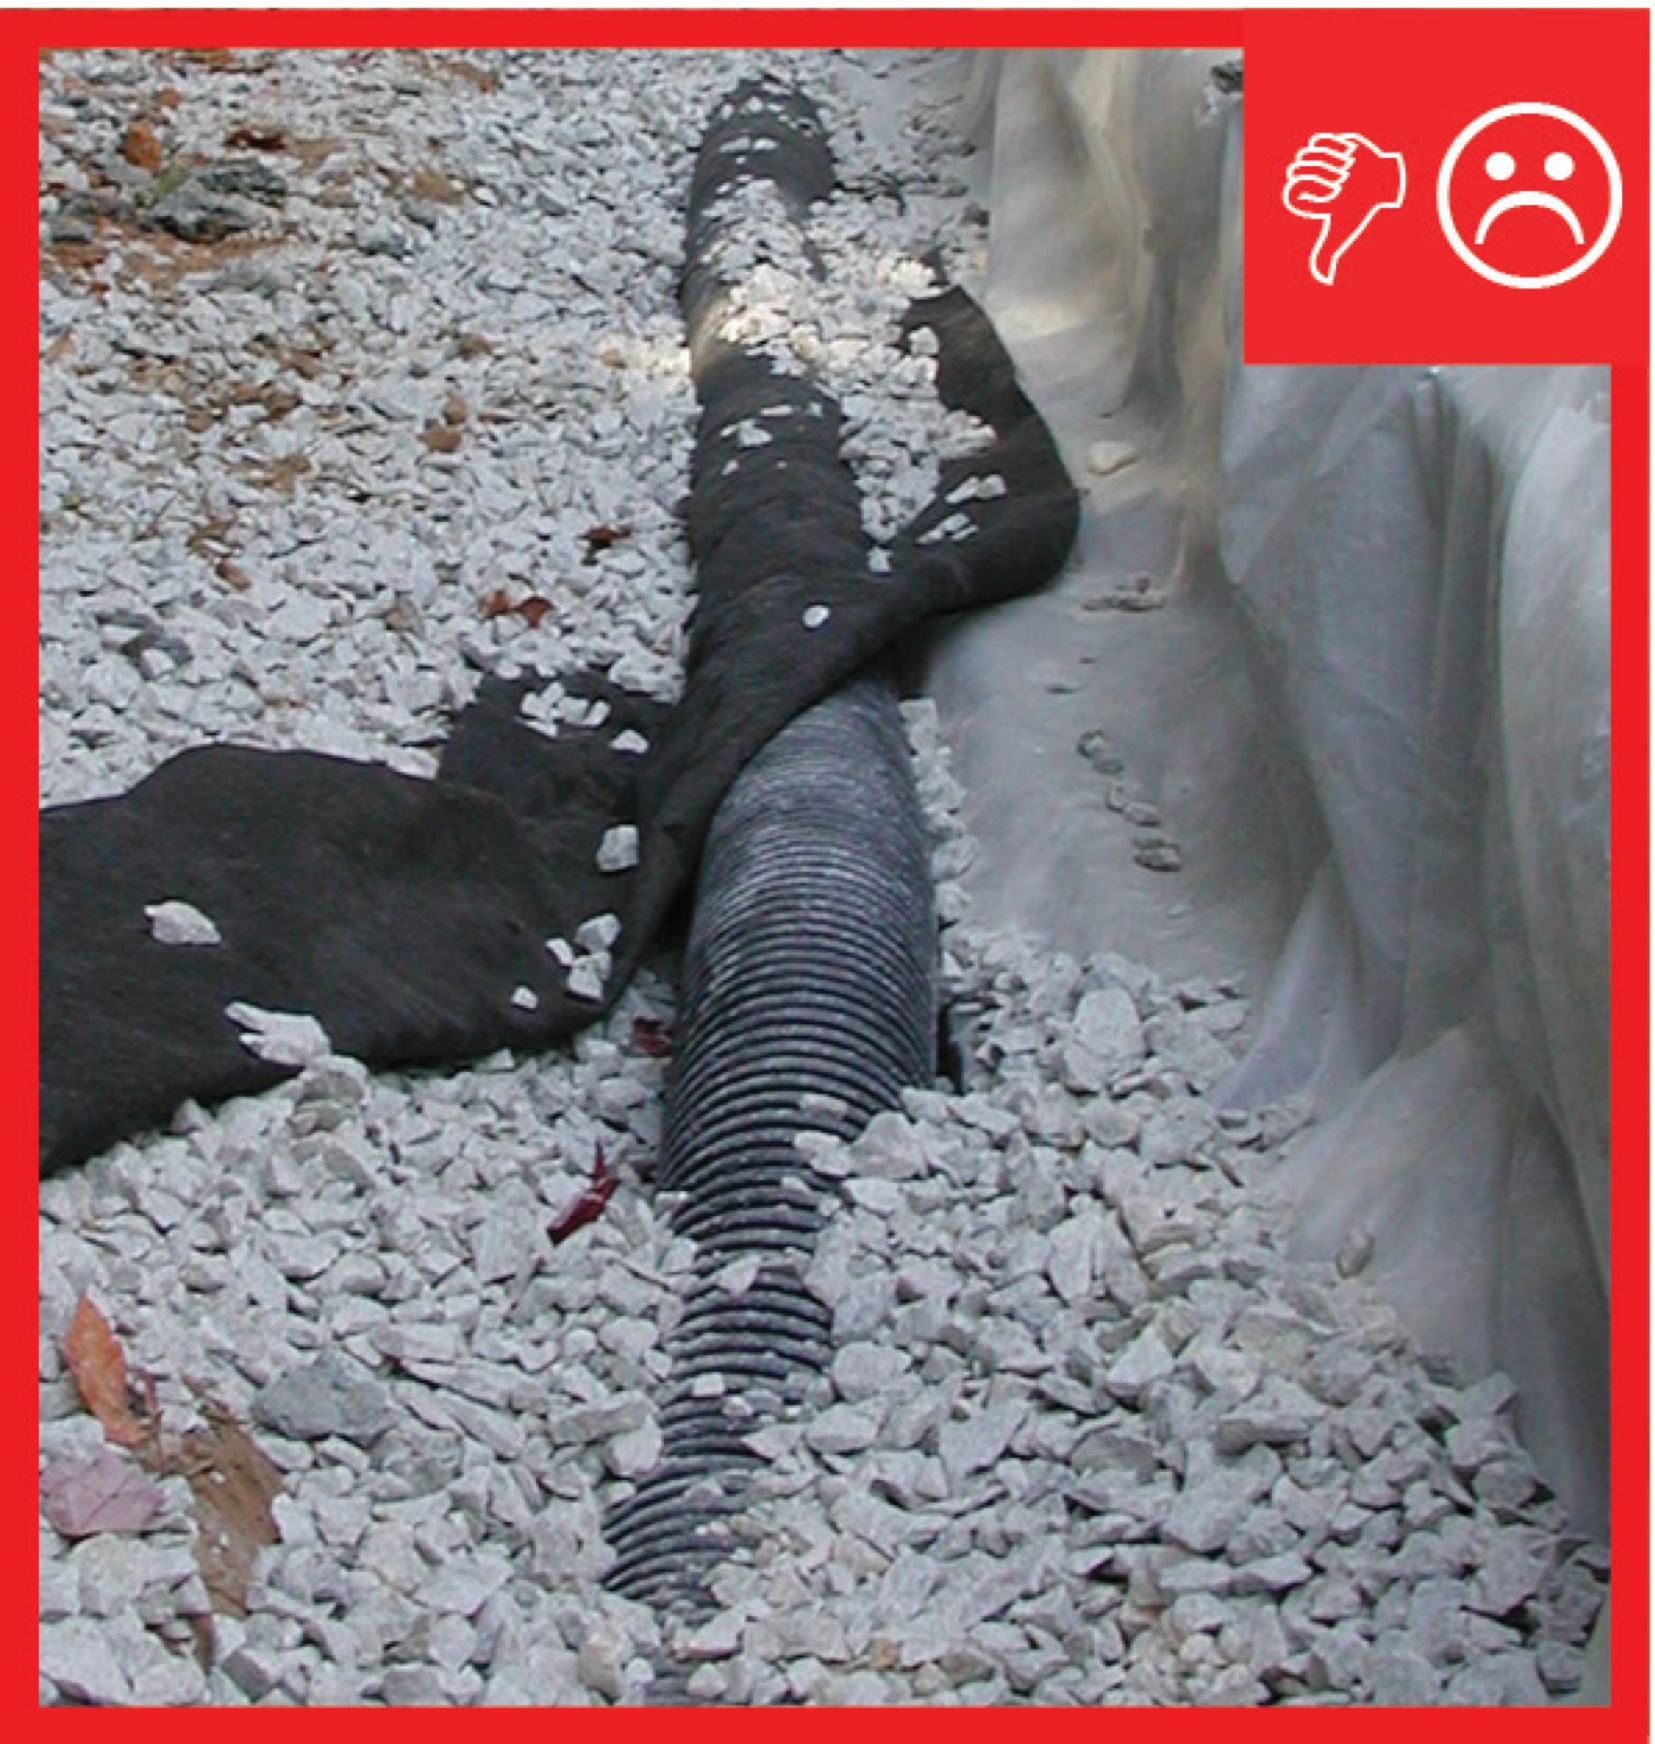
Wrong – The drain tile is not wrapped in fabric and could become clogged with debris
Image
Image
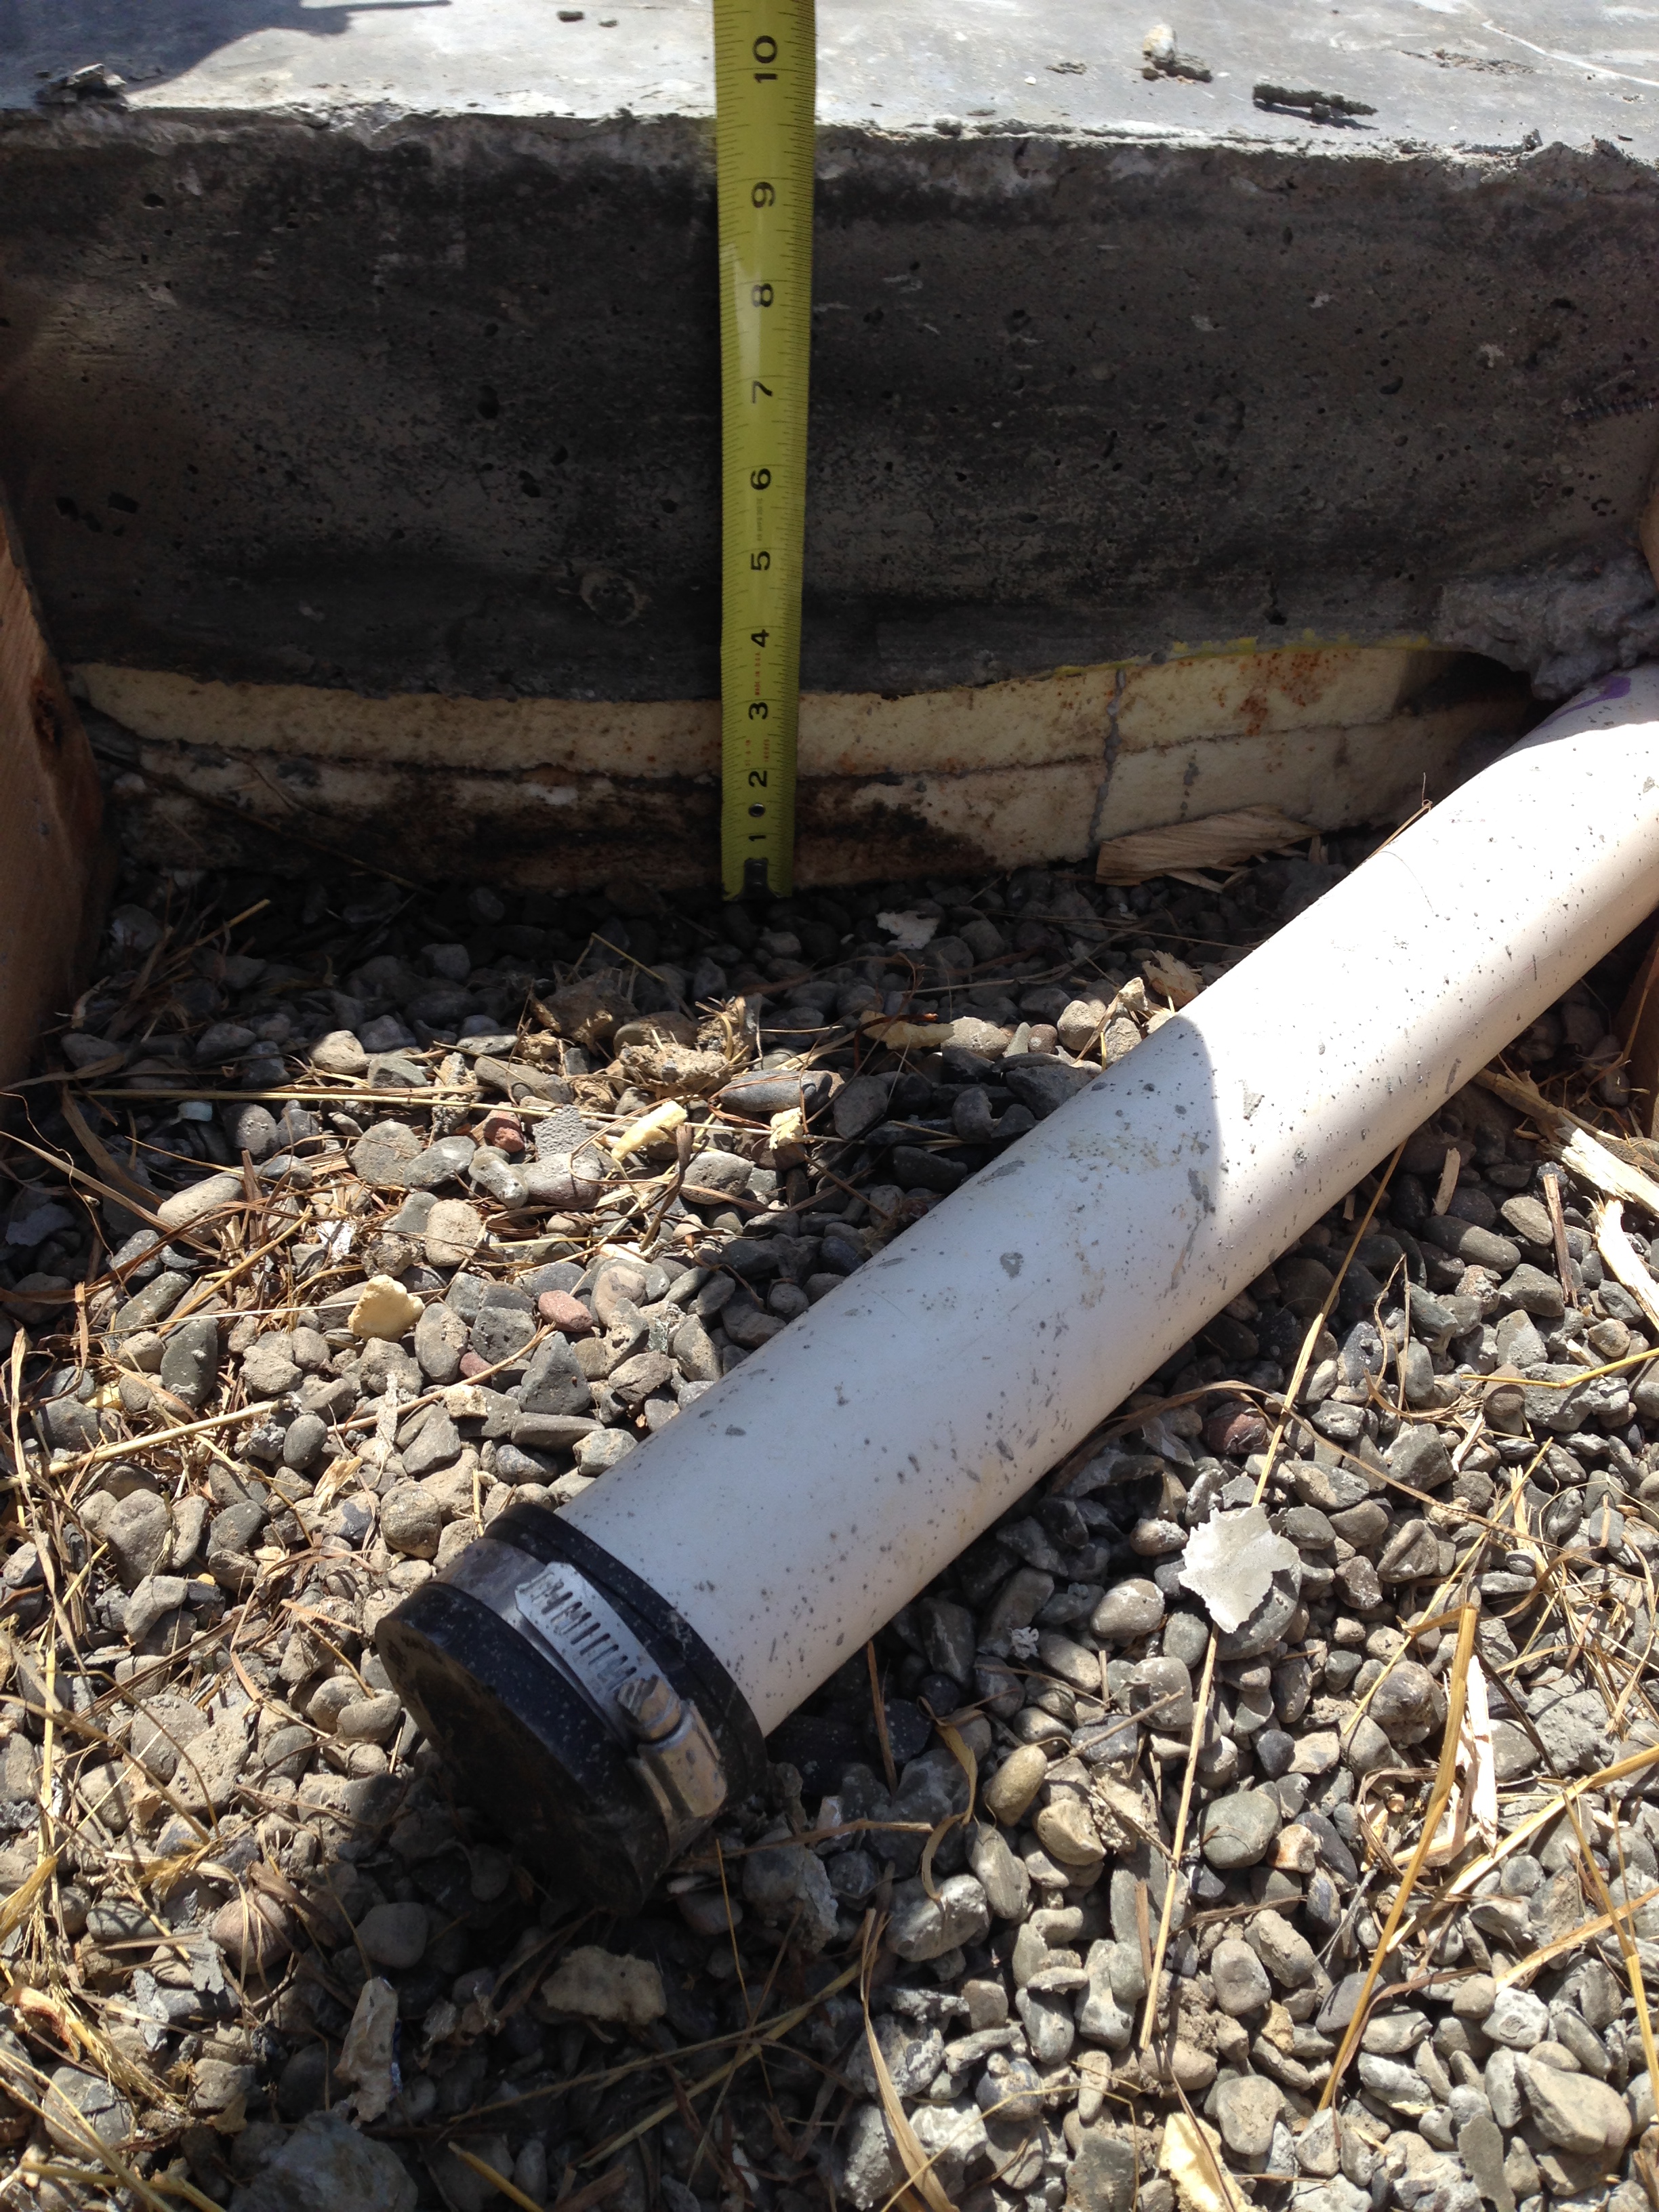
Wrong – The footing drain pipe should end at least 10 feet from the foundation if above ground or should drain into a drywell or storm sewer.
Image
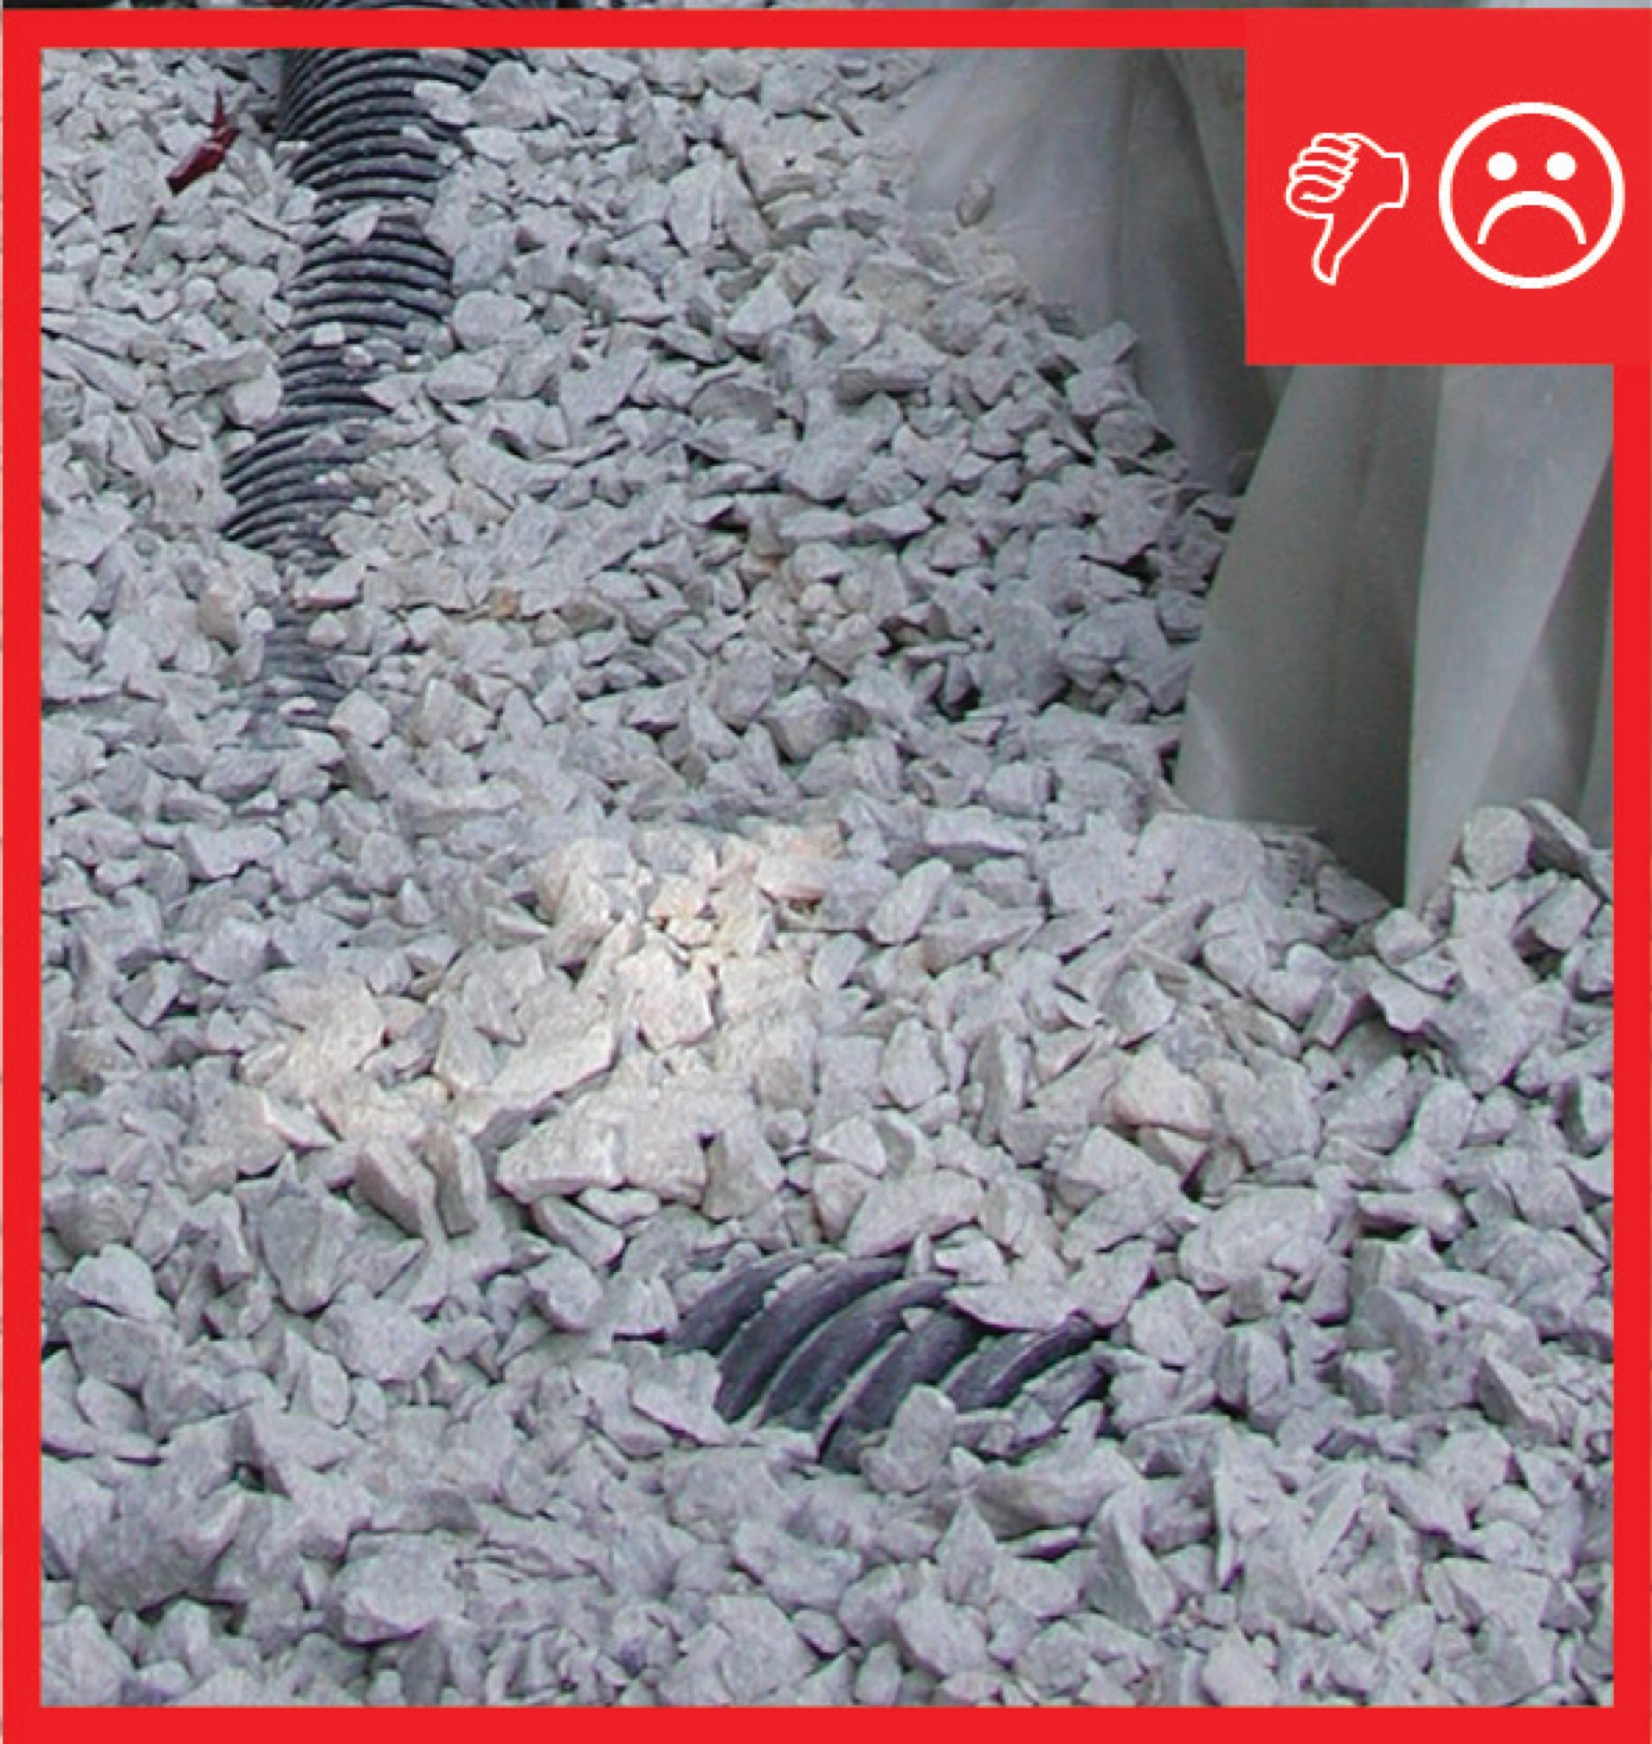
Wrong – The gravel surrounding the drain tile is too large and will let too much debris through
Image
Wrong – The insulated concrete forms at the foundation do not have a damp-proof coating
Image

Image
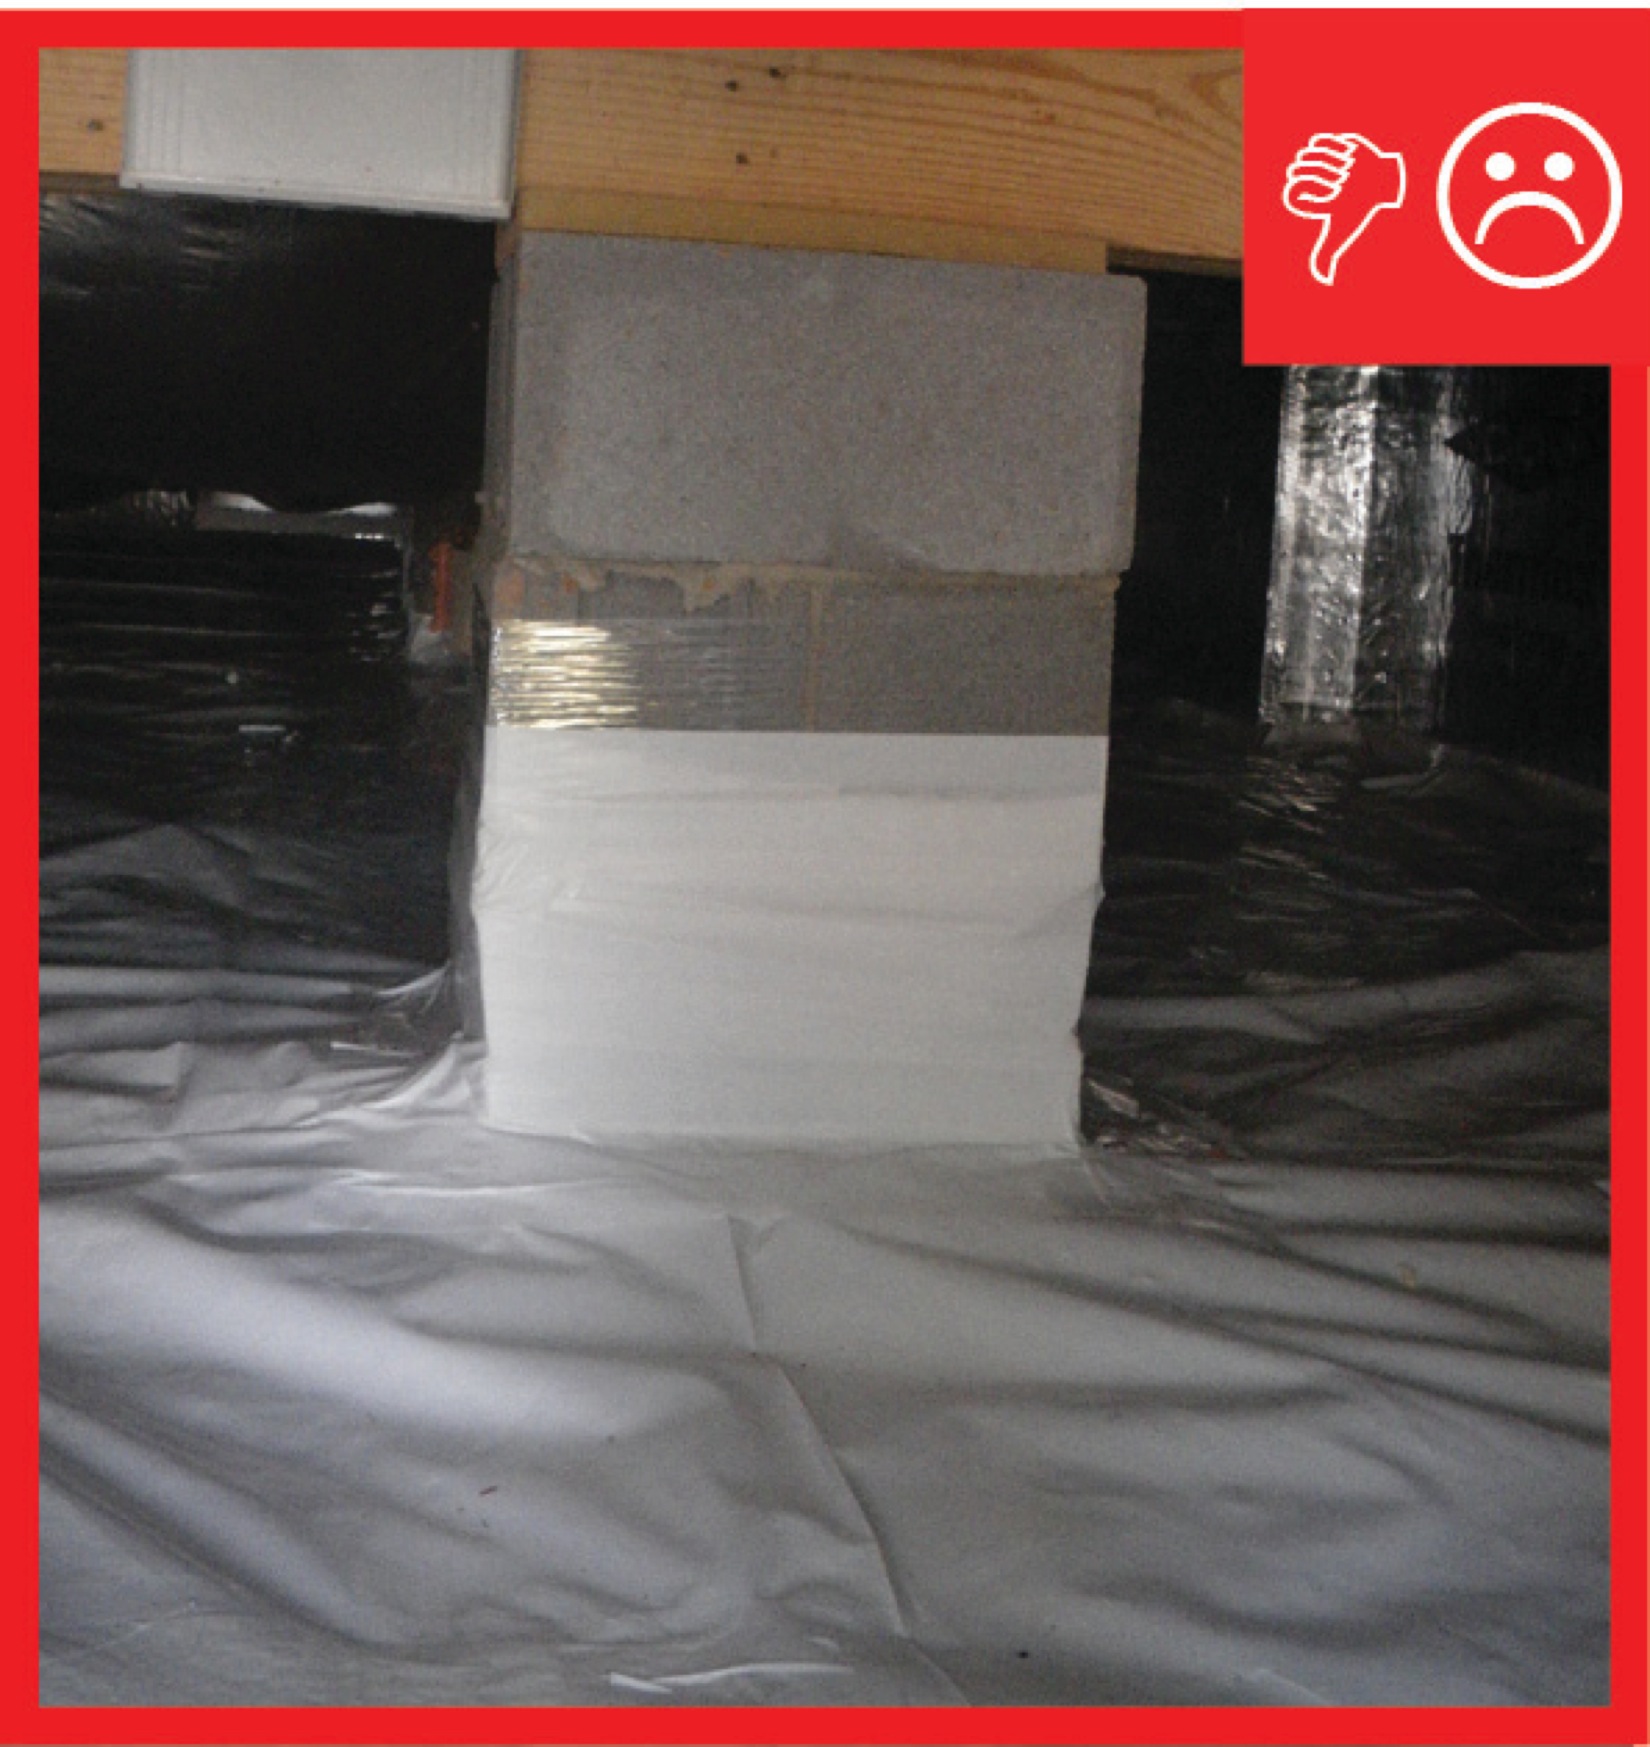
Wrong – The polyethylene sheeting vapor barrier is not attached to the piers with mechanical fasteners
Image
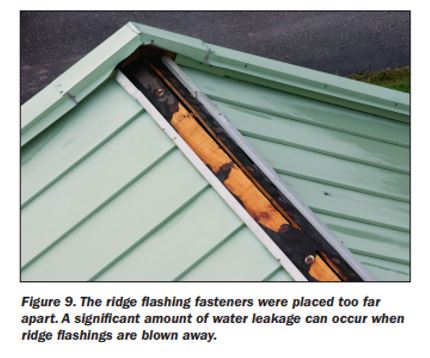
Wrong – The ridge flashing fasteners were placed too far apart and did not adequately hold the flashing in place
Image
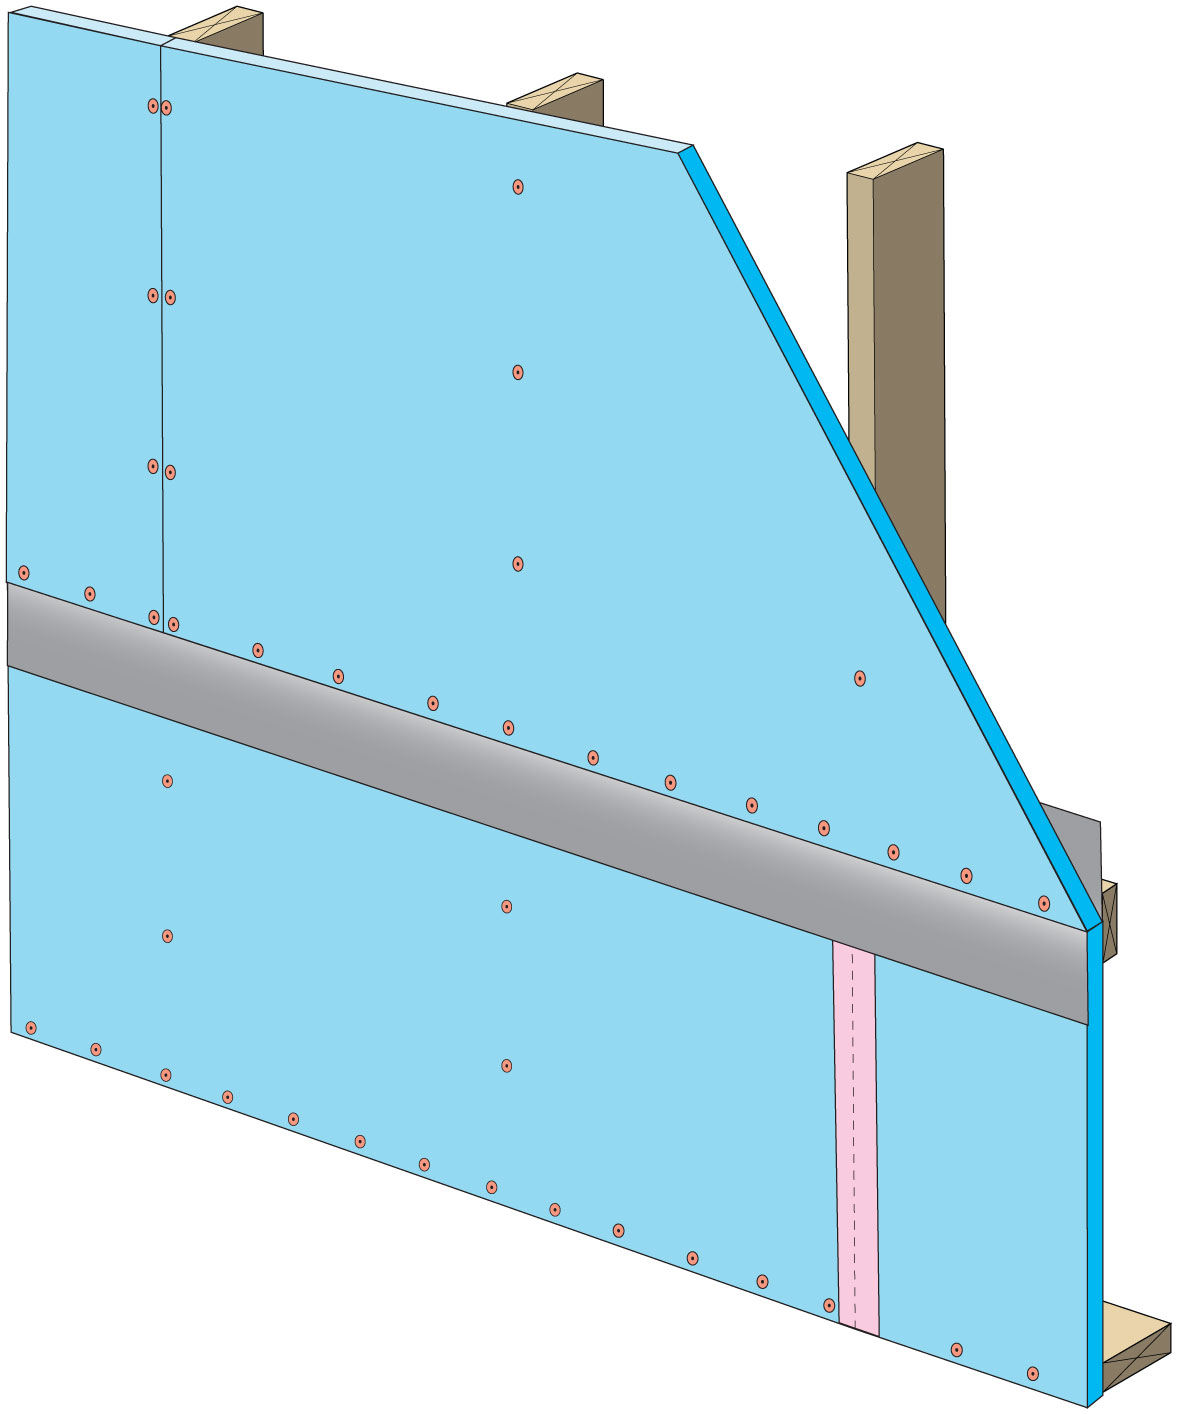
Wrong – The rigid sheathing seams are not taped and the gaps could cause moisture problems
Image
Image
Image
Image
Wrong – The underside of the first course of siding extends beyond the underlying sheathing leaving it vulnerable being pulled off by pressure from high winds.
Image
Wrong – The vapor barrier is not secured to the walls of this crawlspace.
Image
Wrong – The vinyl siding at this gable was installed over rigid foam instead of wood sheathing and neither had the structural strength to resist hurricane wind pressures.
Image
Image
Wrong – the water-resistant barrier is layered underneath the step flashing, which could allow water to get behind the step flashing and into the wall.
Image
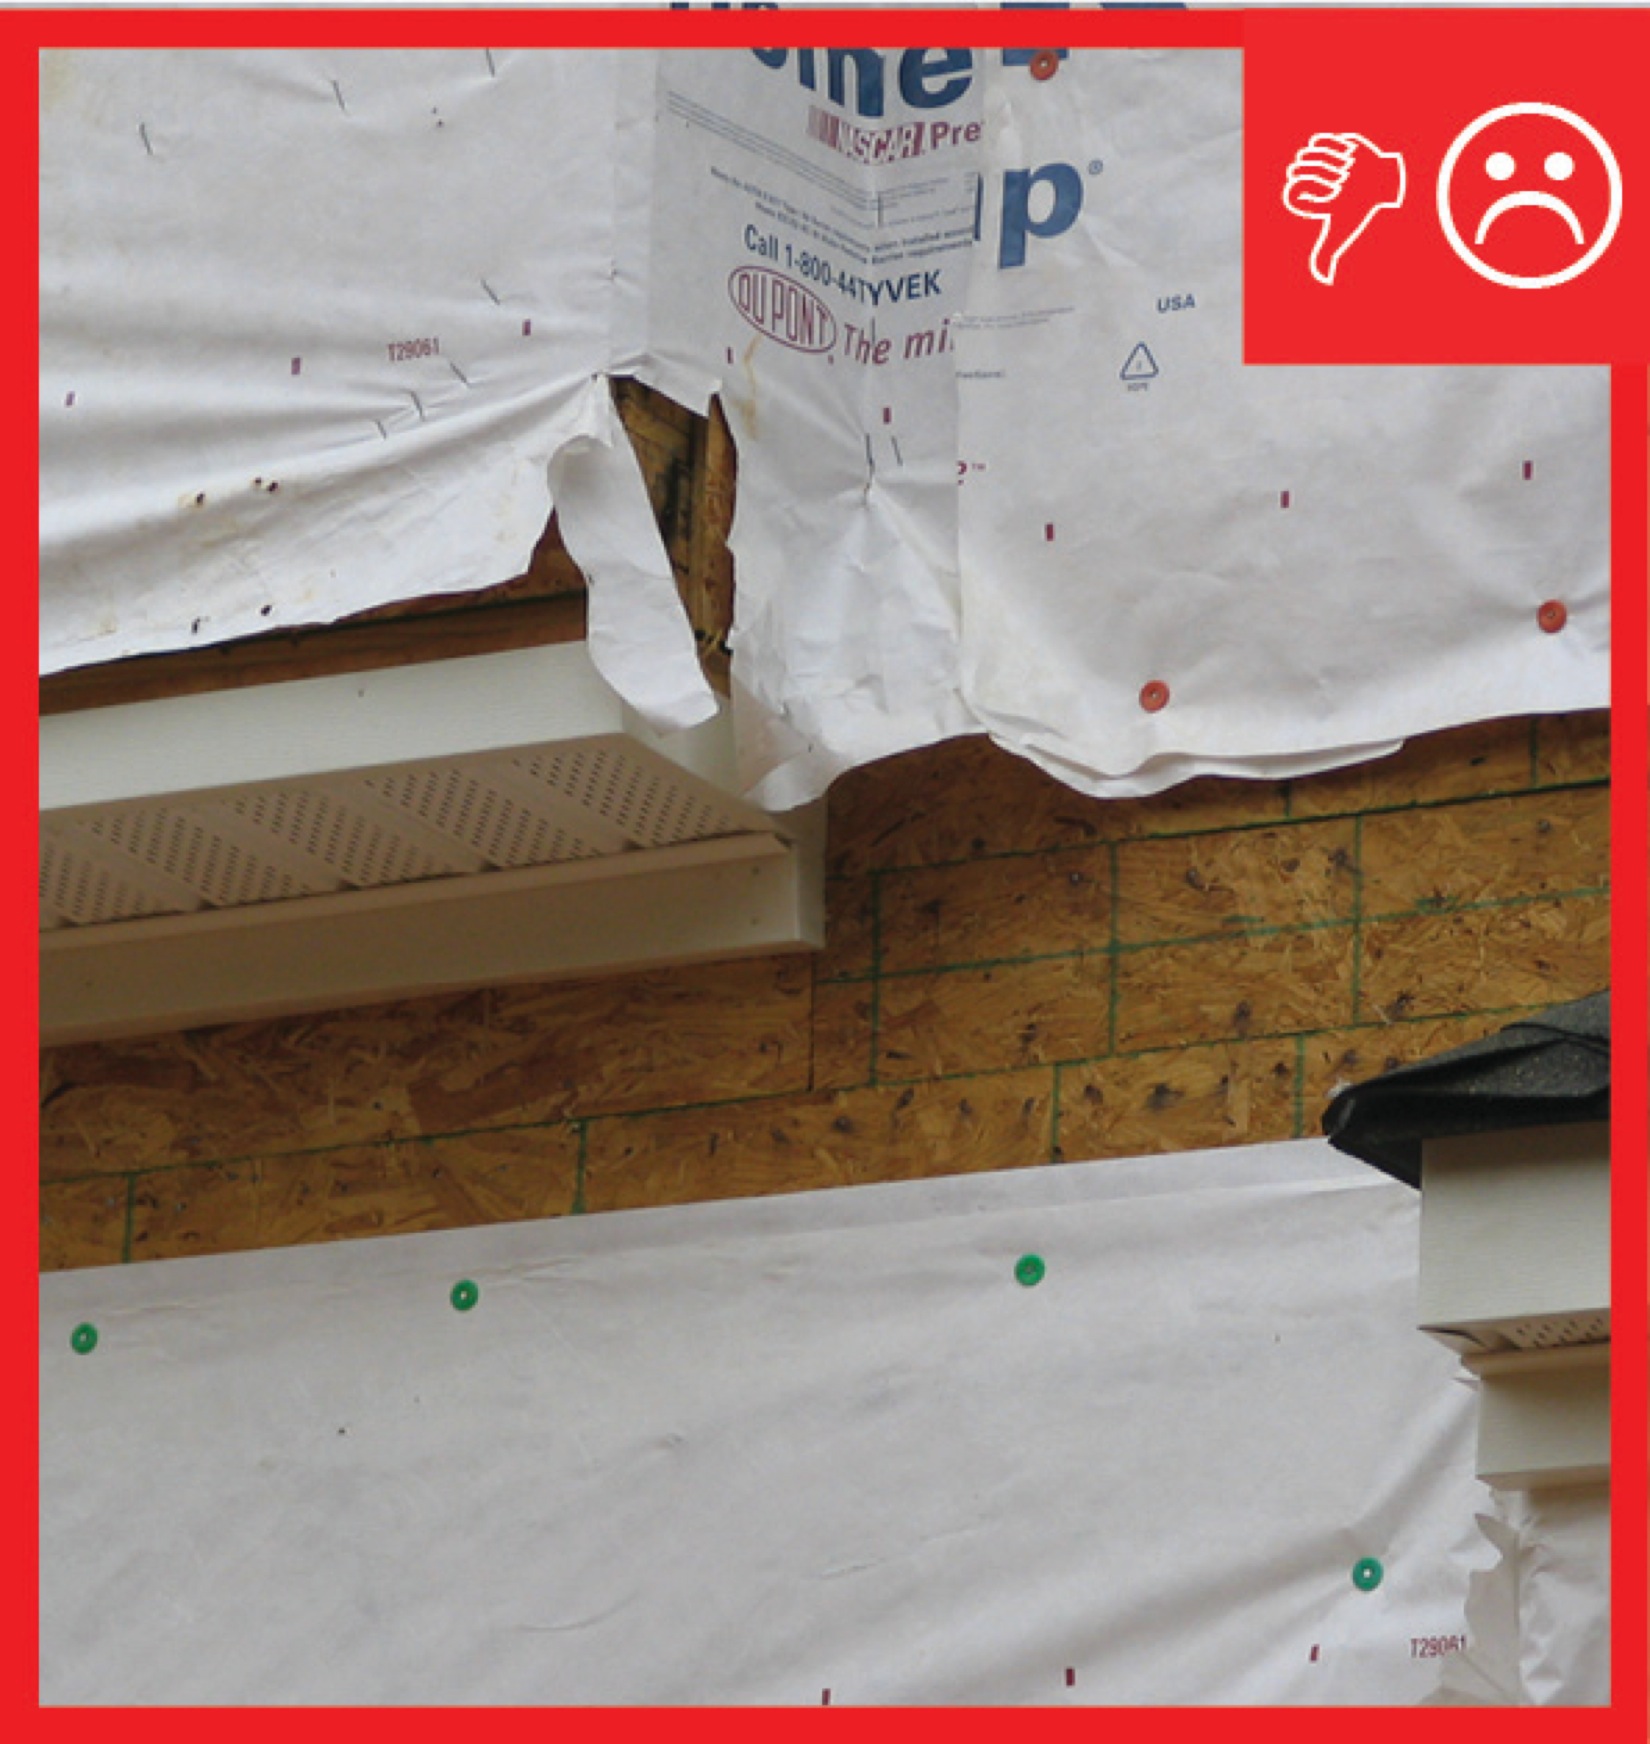
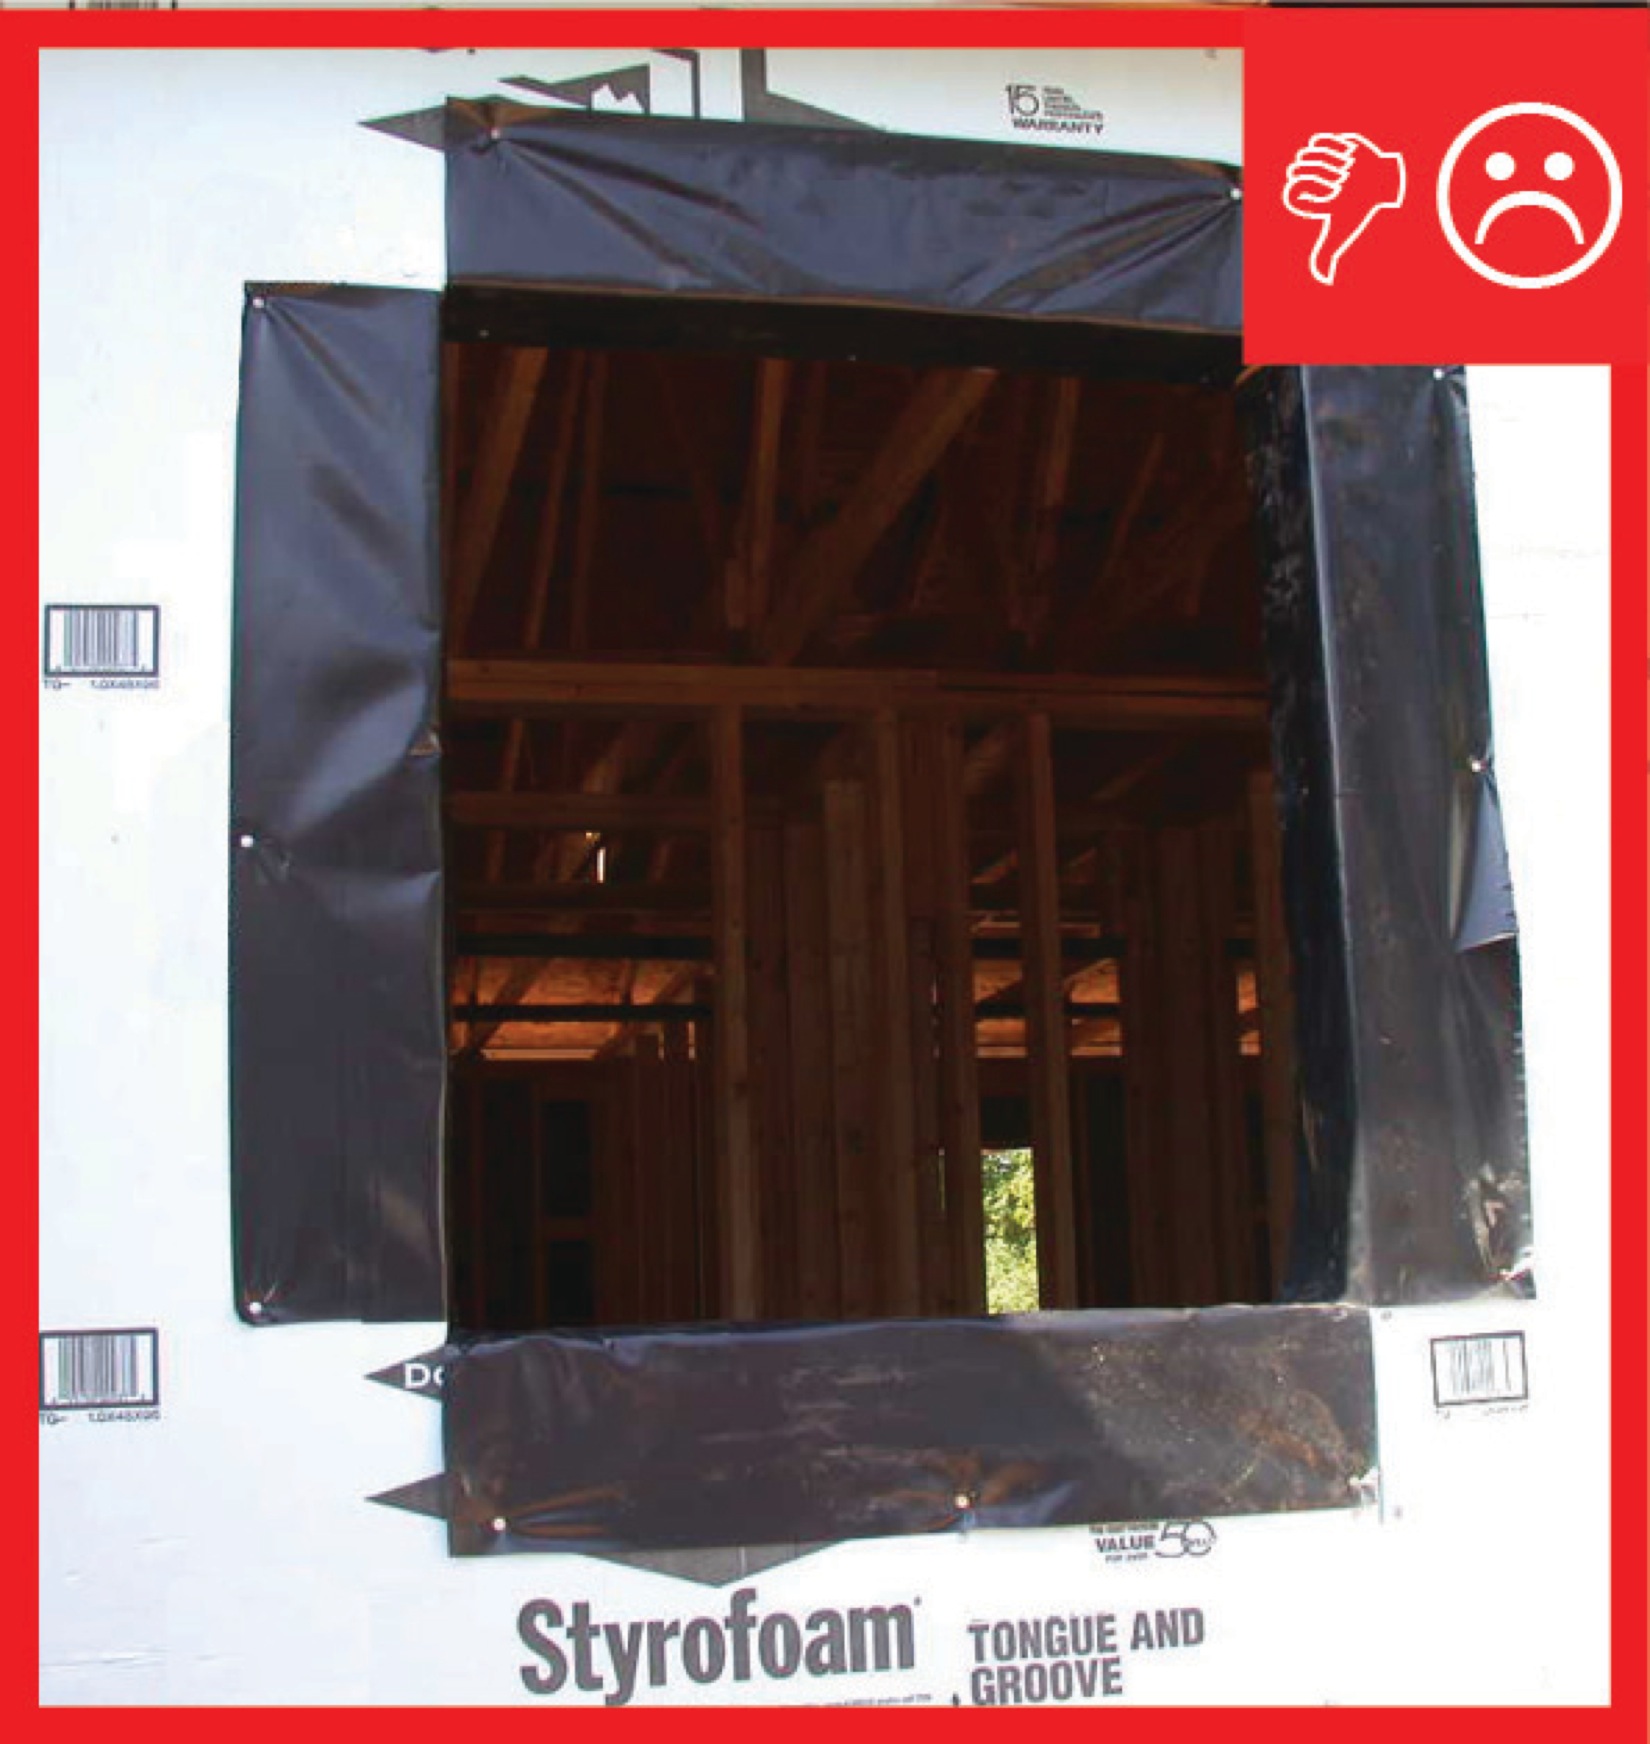
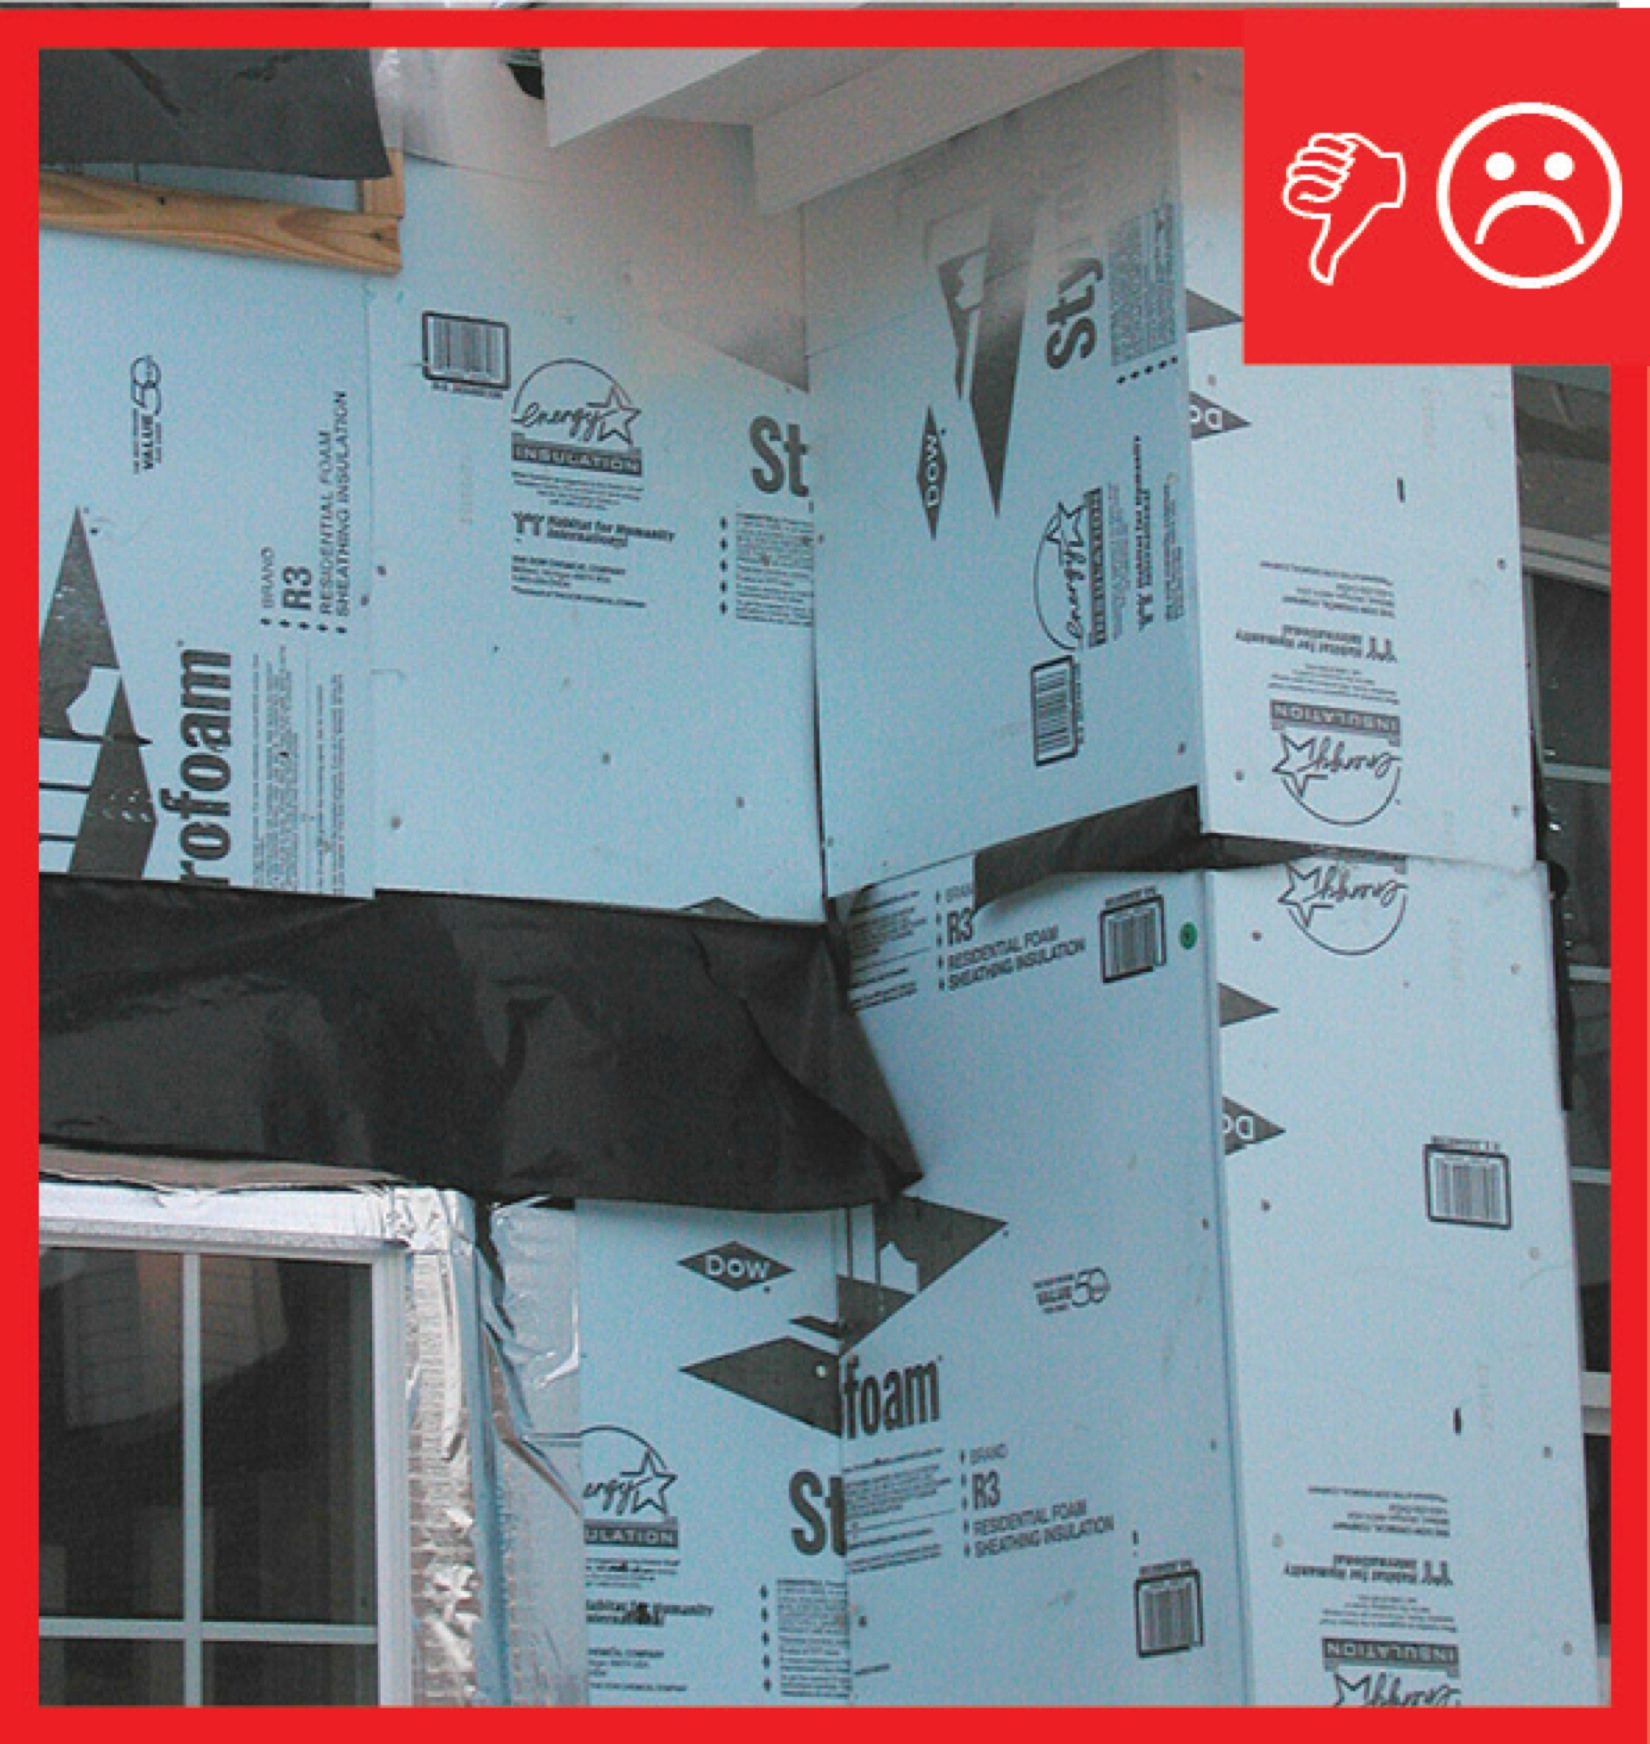
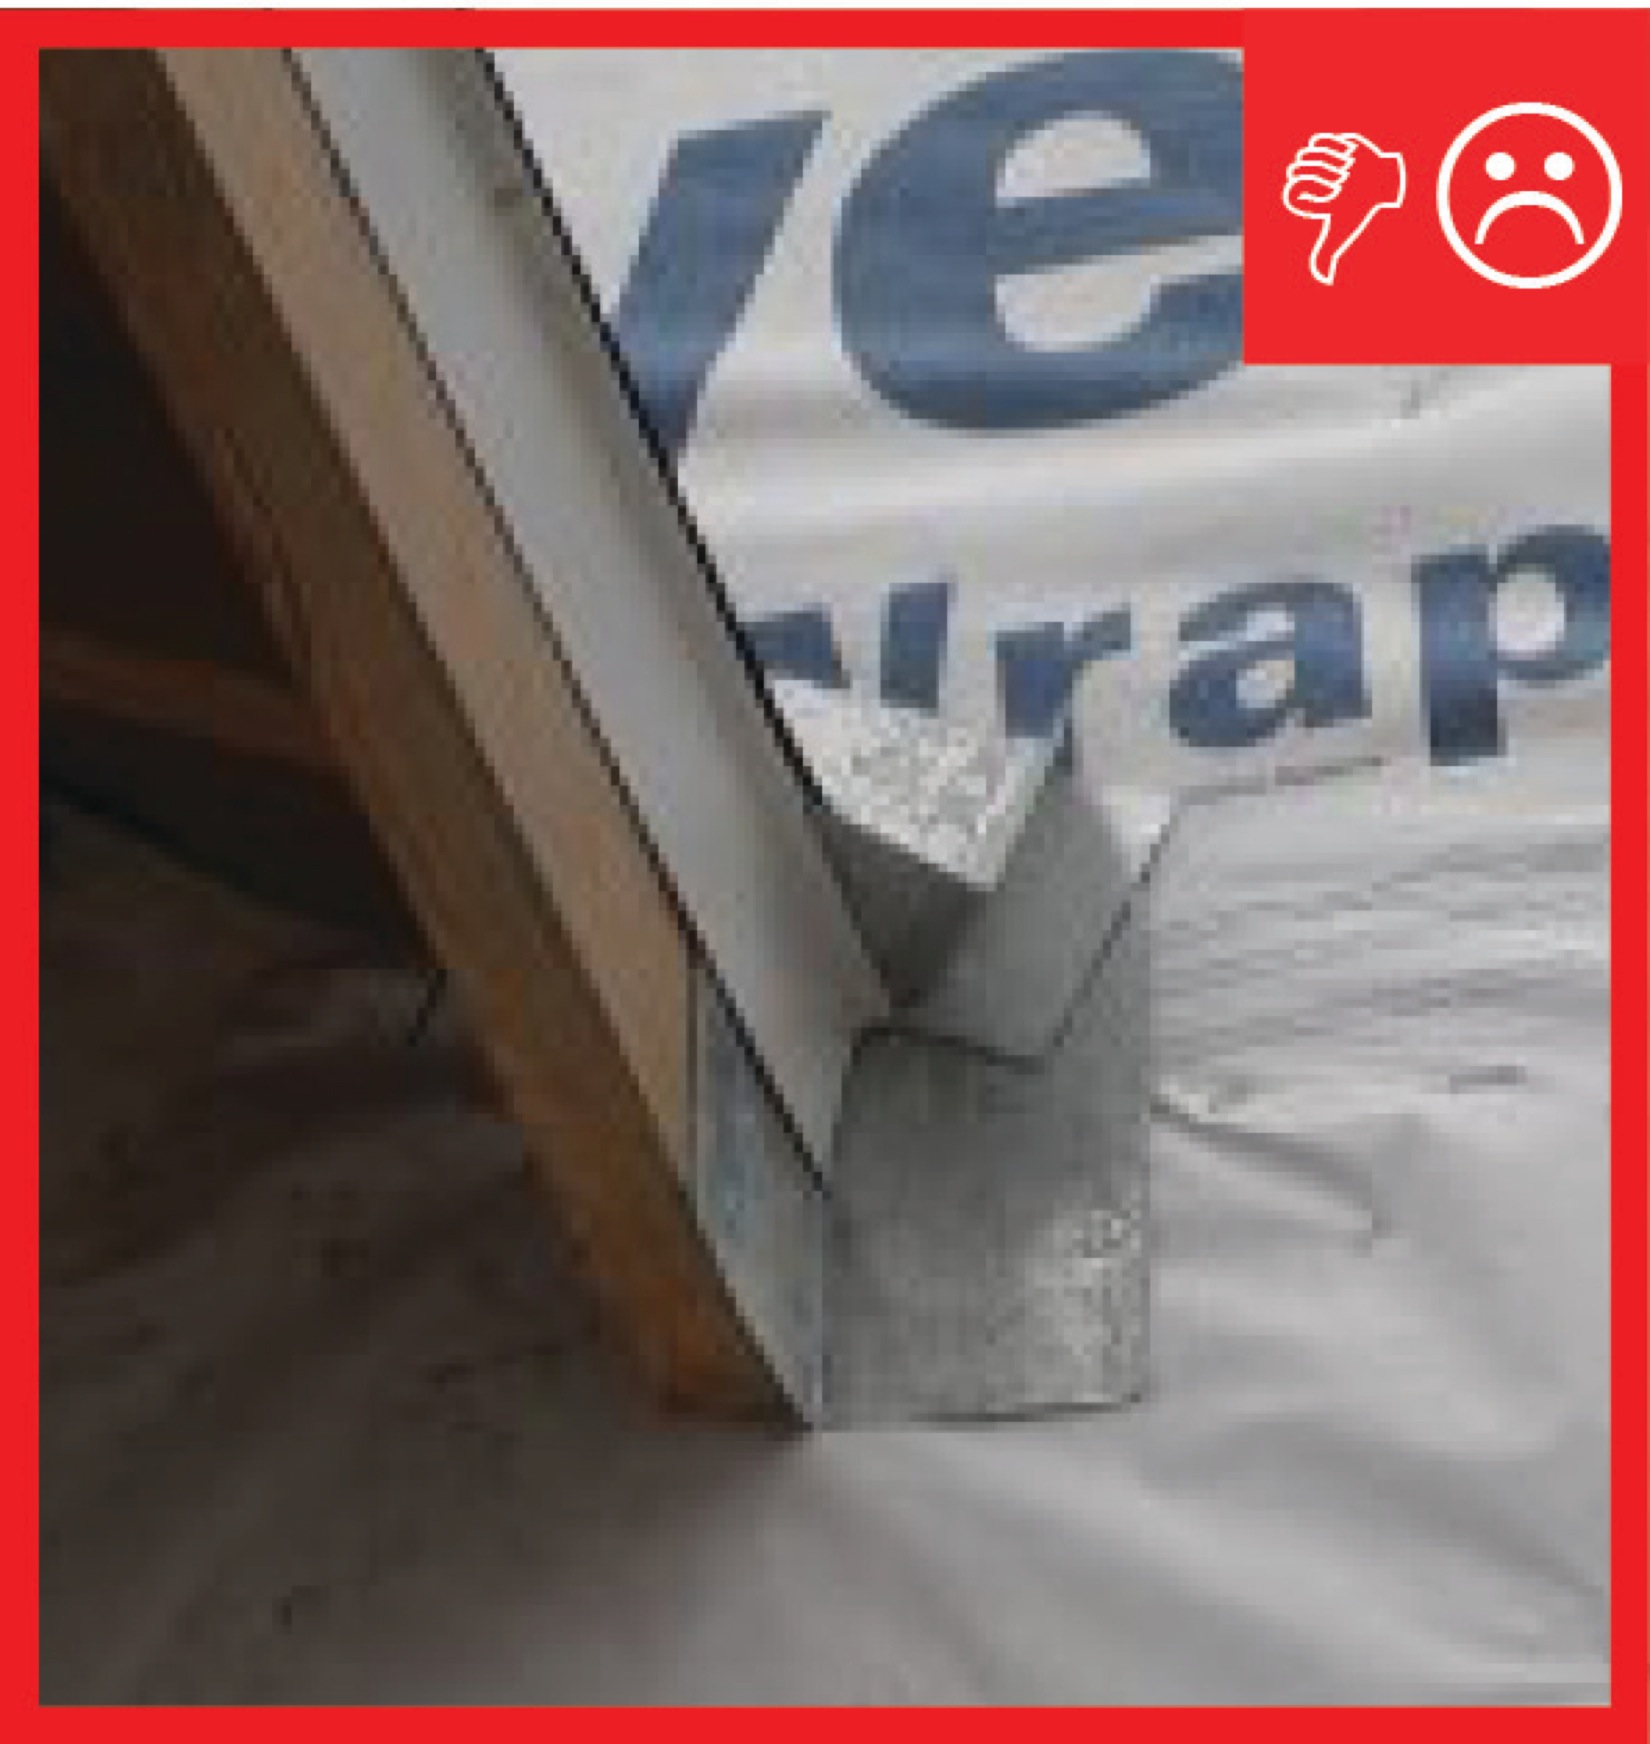
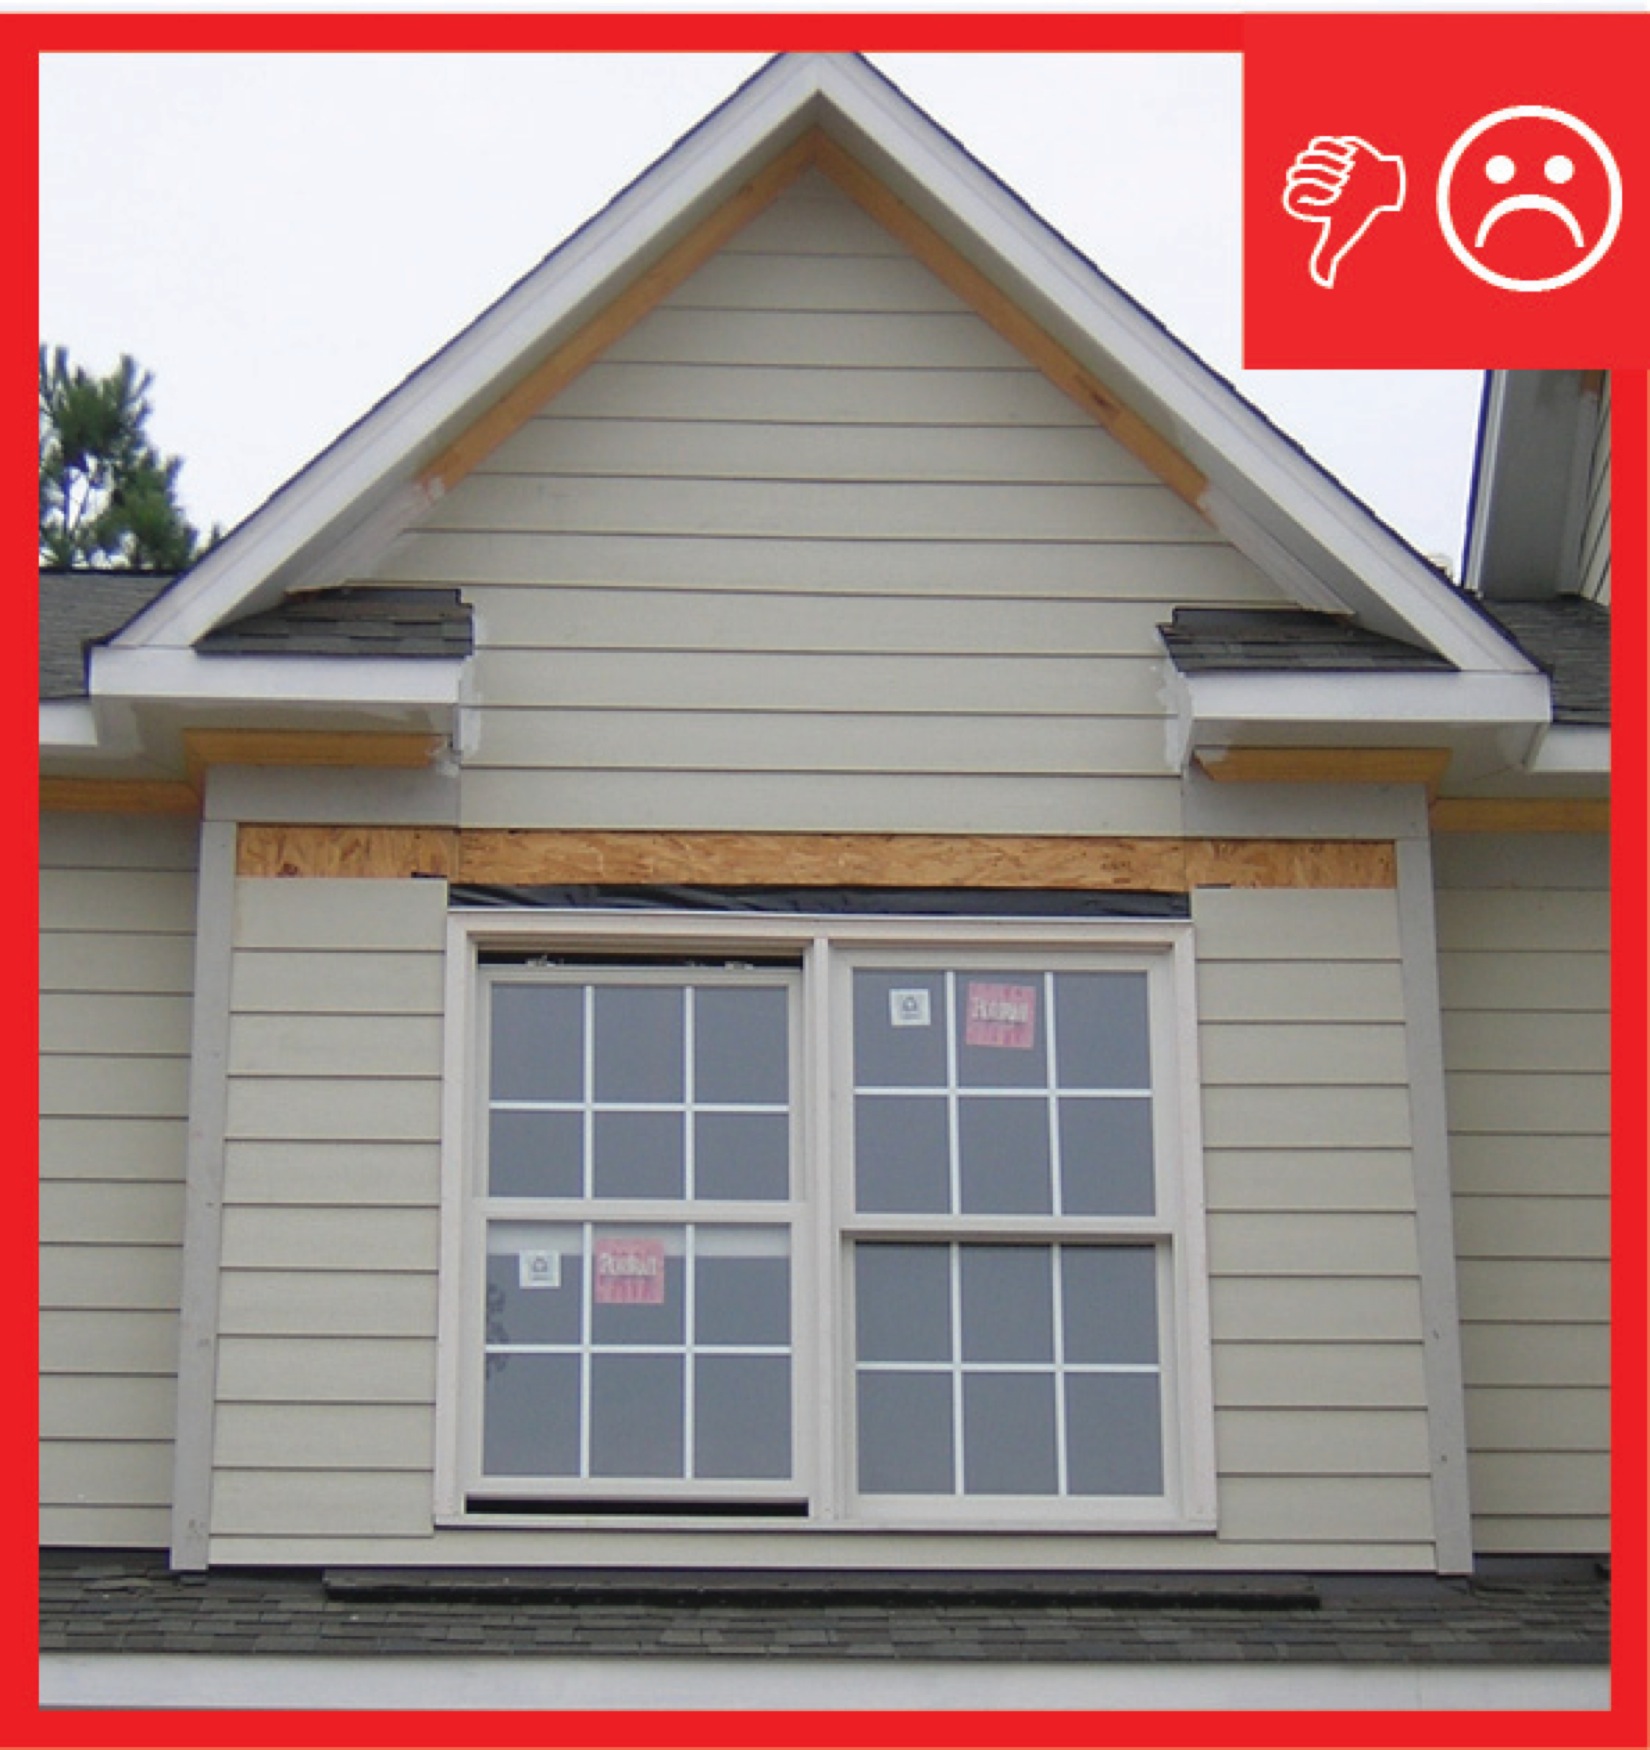
Wrong – The water-resistant barrier is not complete and the holes and gaps could cause moisture problems
Image
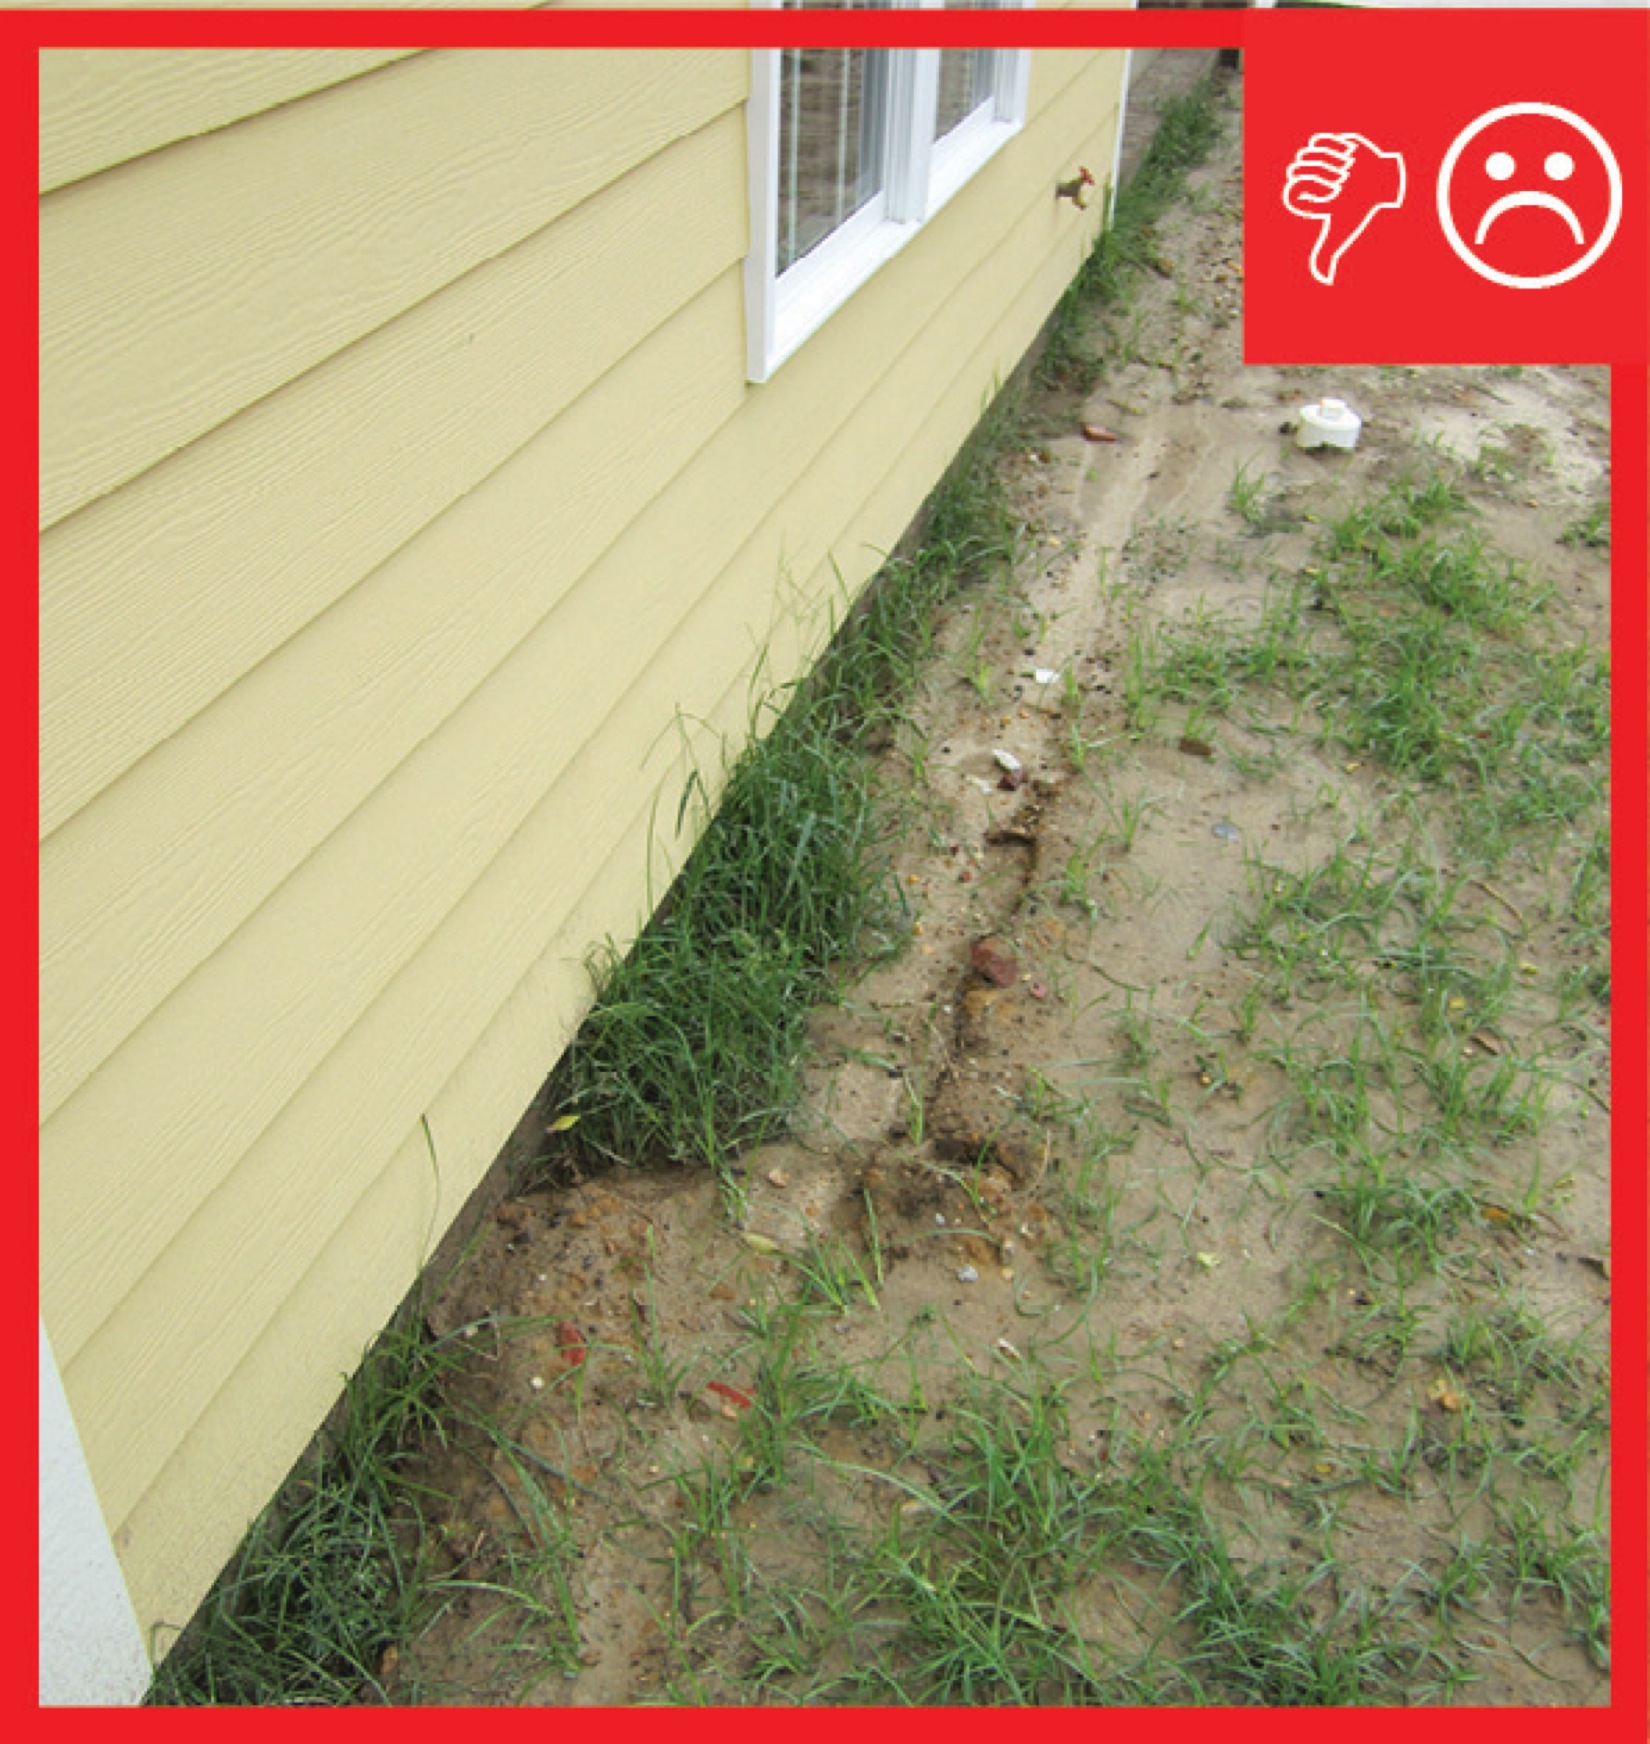
Wrong – There are no gutters installed and there is not a proper gravel bed located at the foundation
Image

Wrong – There is carpet installed too close to the plumbing fixtures in the bathroom
Image
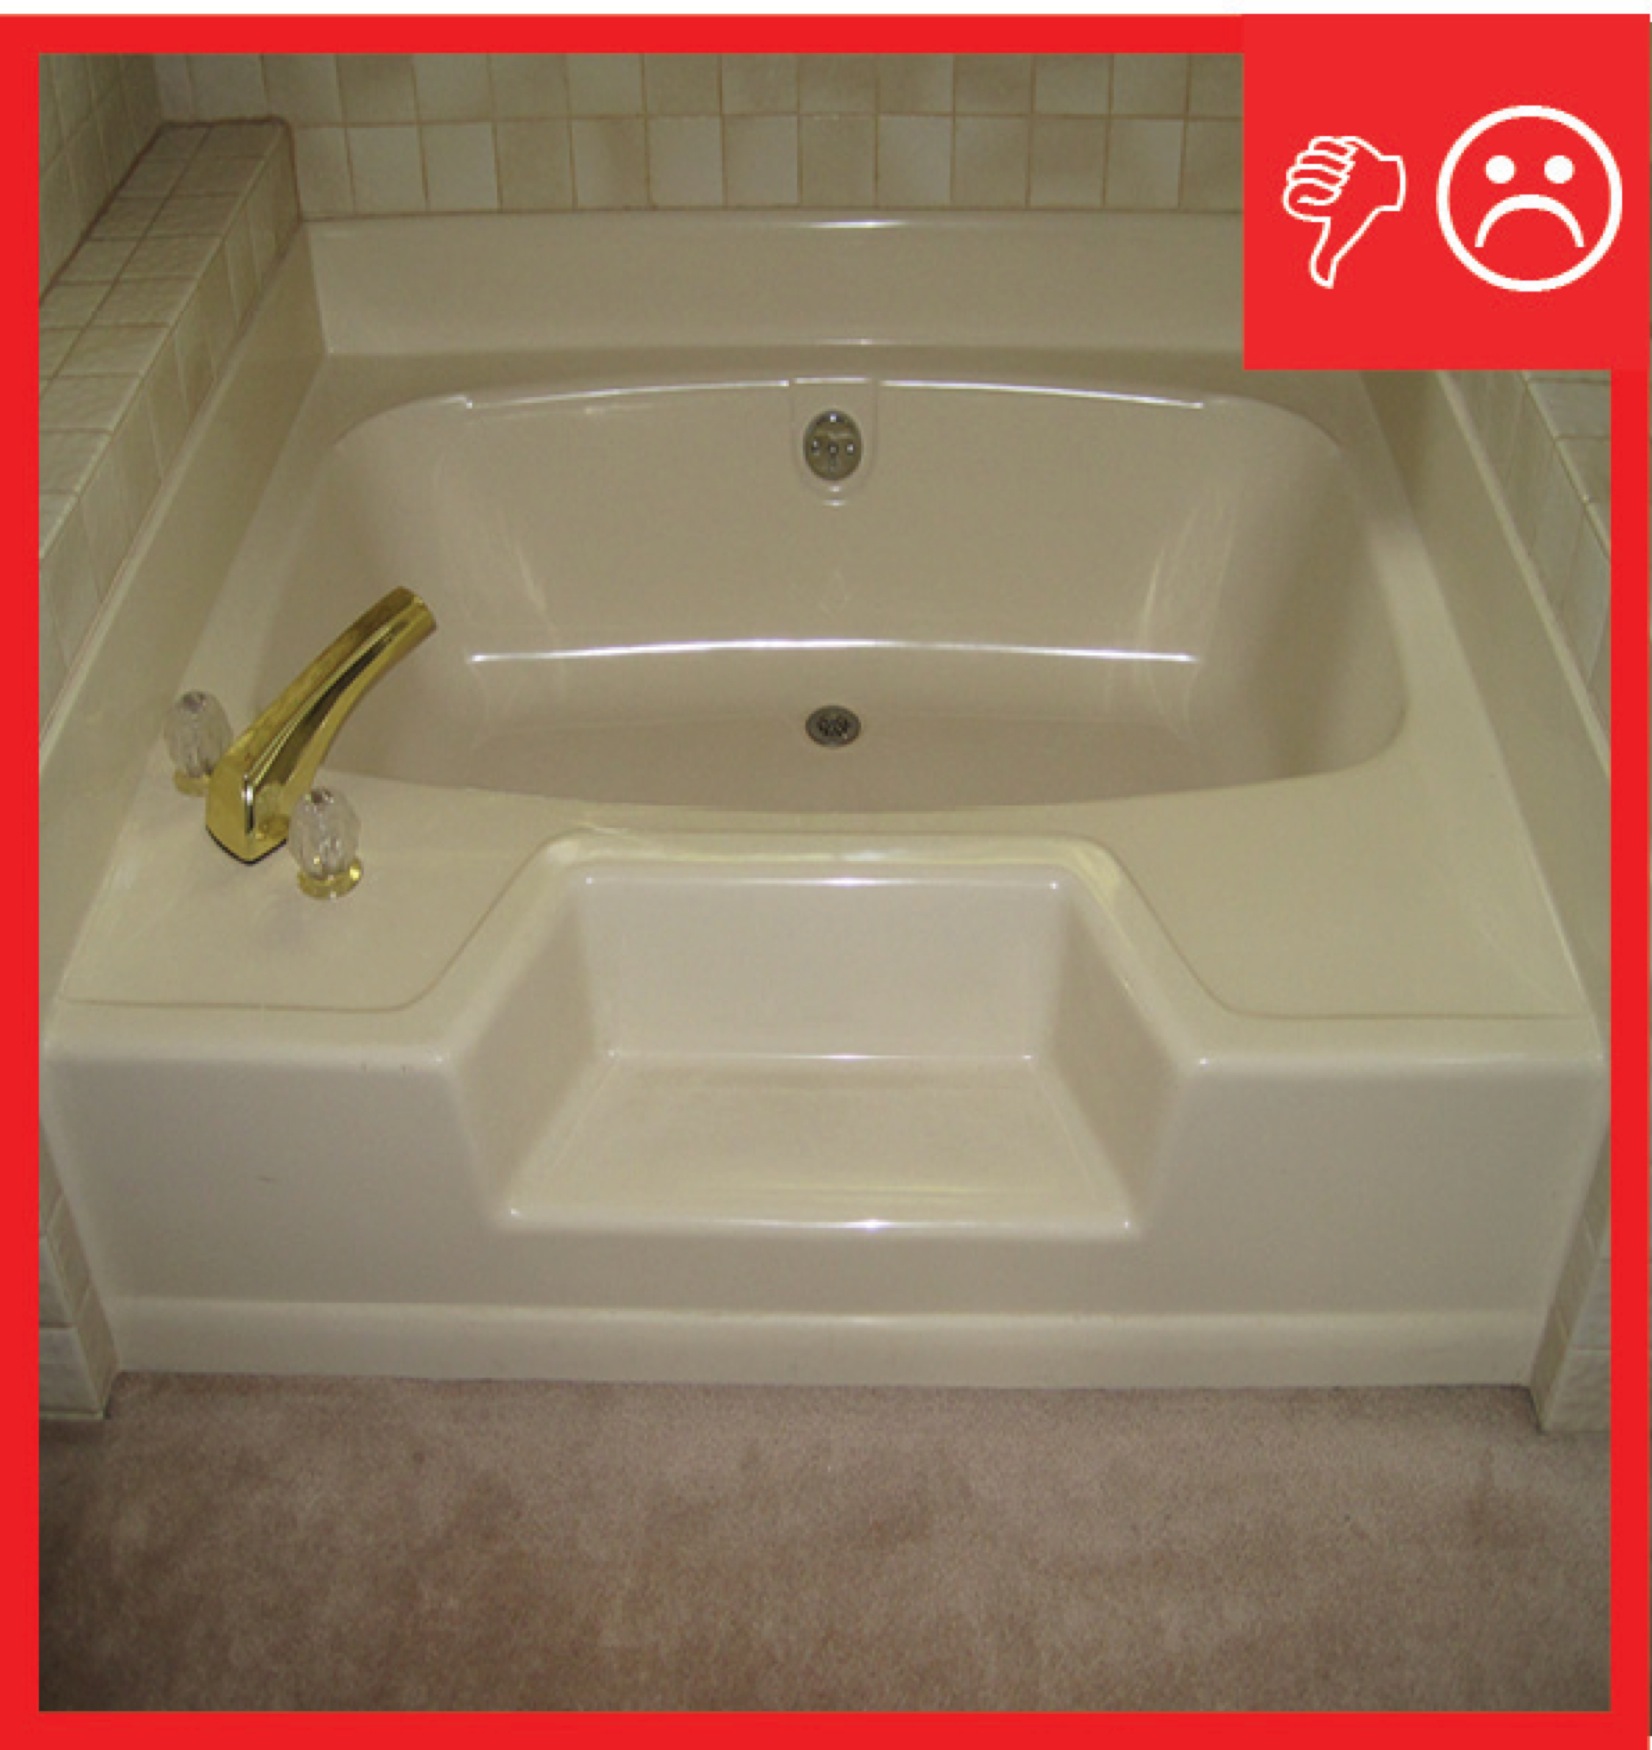
Wrong – There is carpet installed too close to the plumbing fixtures in the bathroom
Image

Image

Image
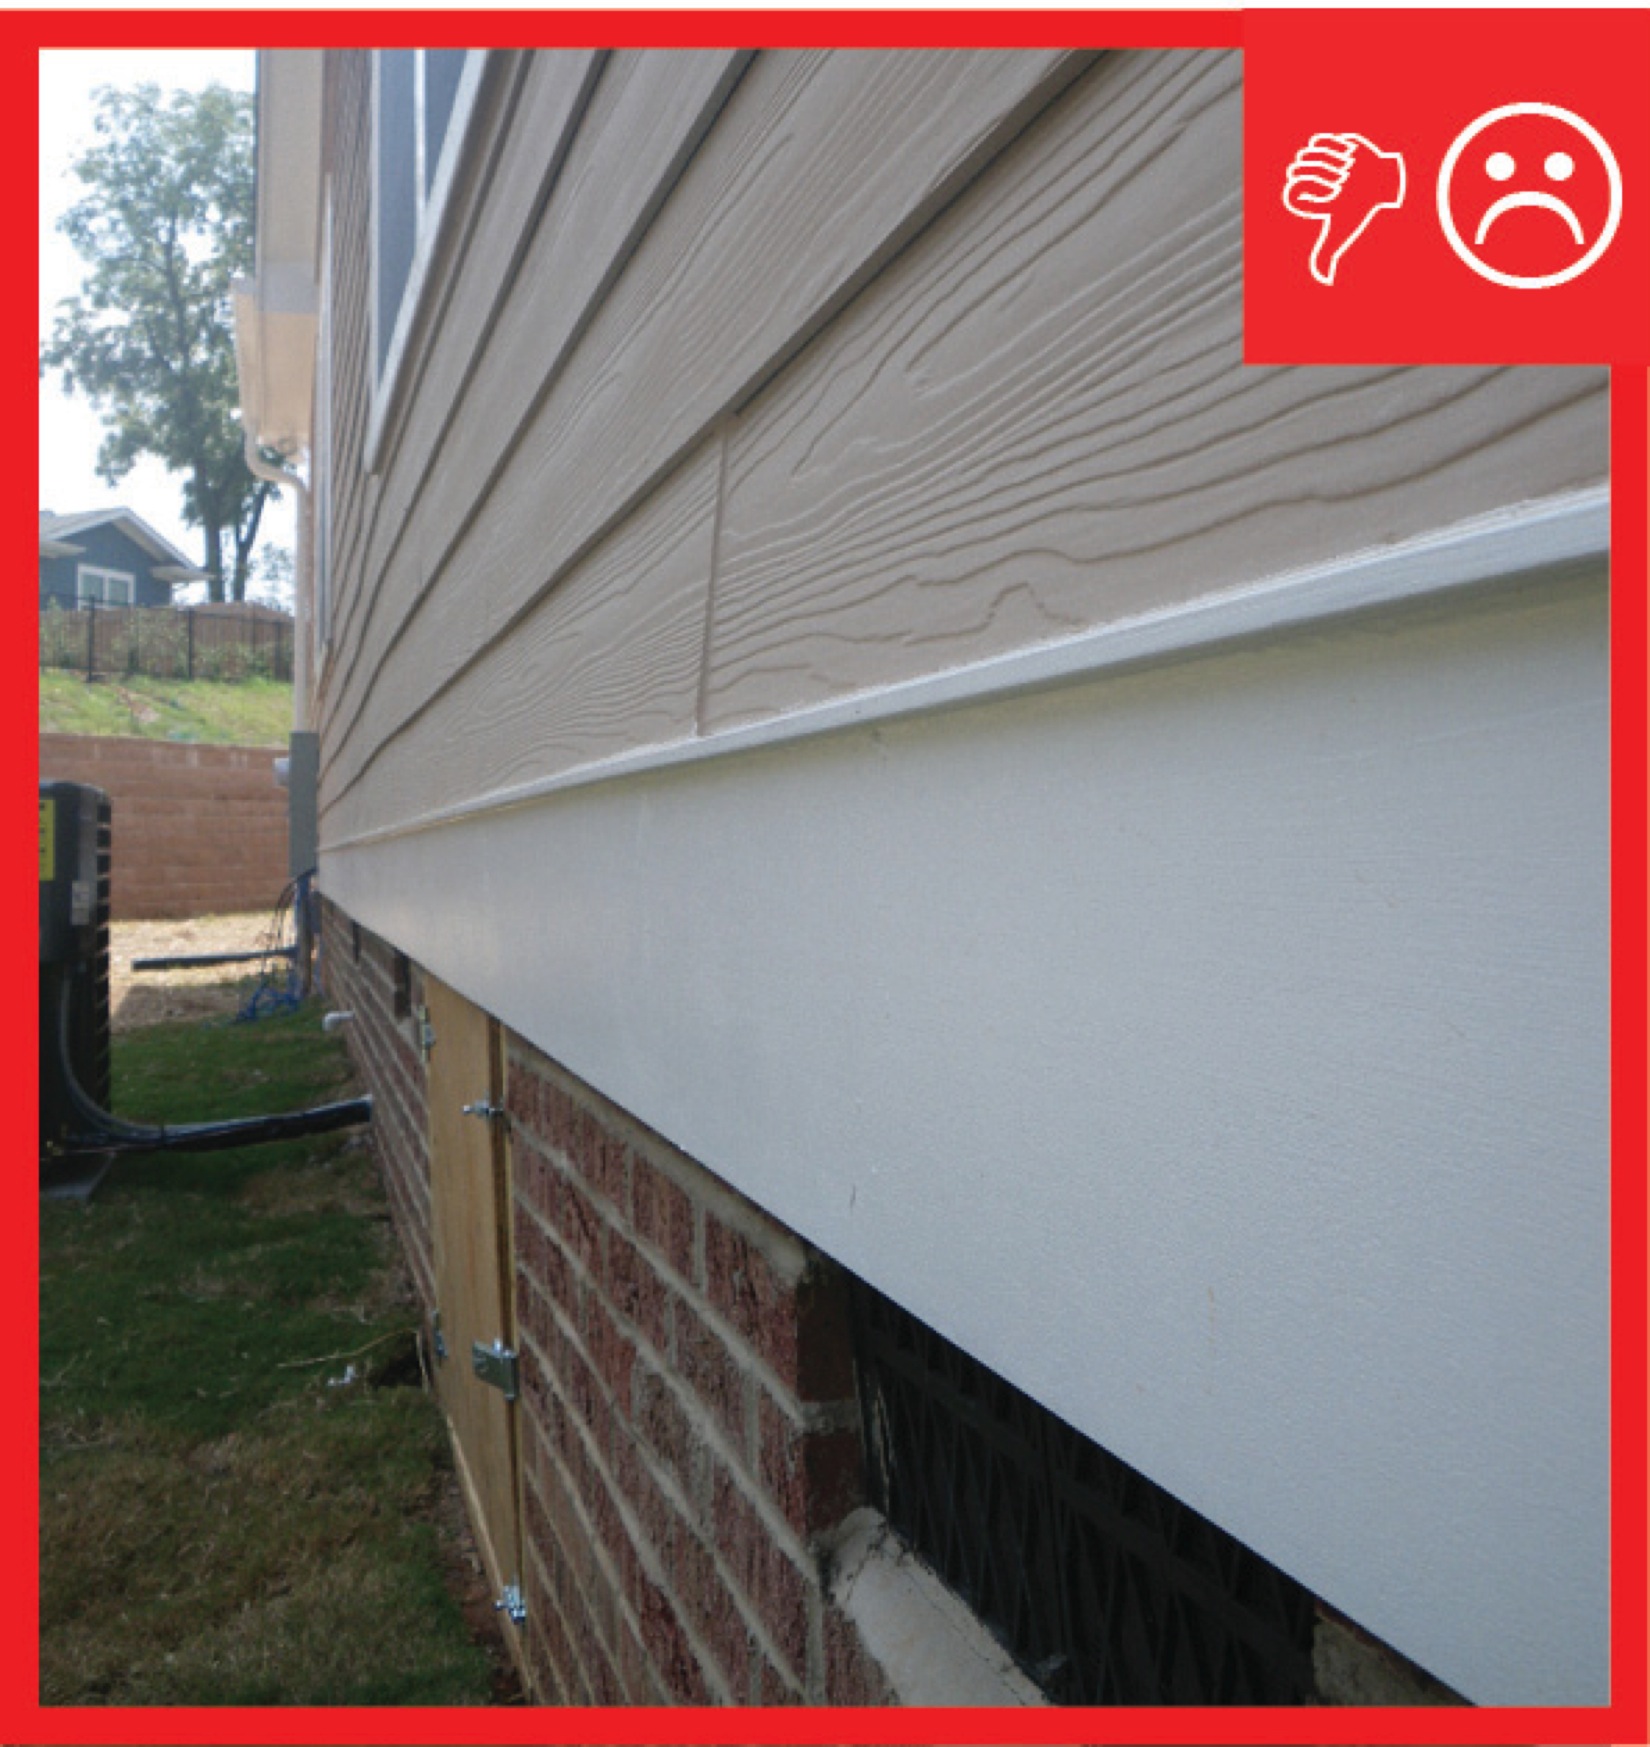
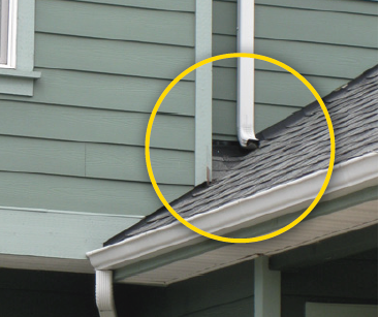
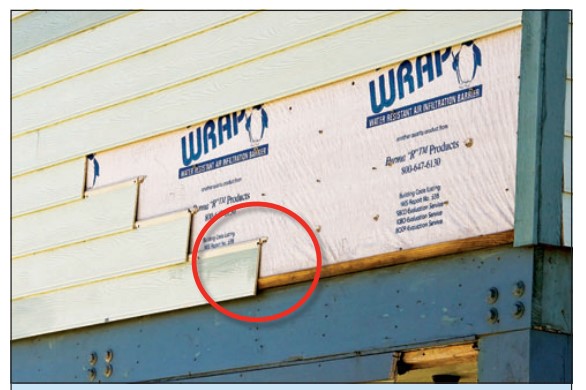
Wrong – There is no flashing installed at the bottom of the exterior walls to create a drainage system
Image
Wrong – There is no flashing installed at the bottom of the exterior walls to create a drainage system
Image
Image
Wrong – There is not a self-sealing bituminous membrane installed at the valley of the roof
Image
Wrong – There is not a water-resistant barrier installed underneath the exterior finish of the walls
Image
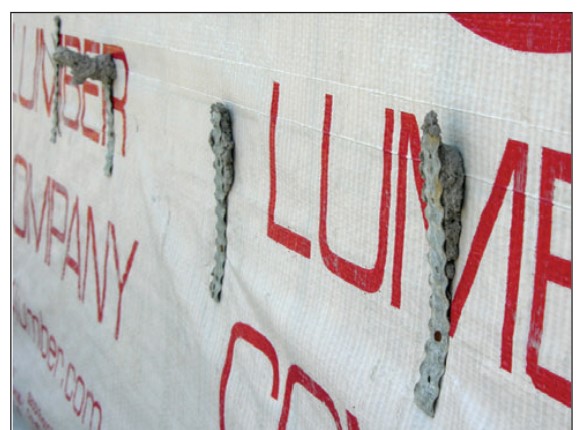
Wrong – These four ties were never embedded into the mortar joint, allowing the brick wall to be pulled away from the sheathing.
Image
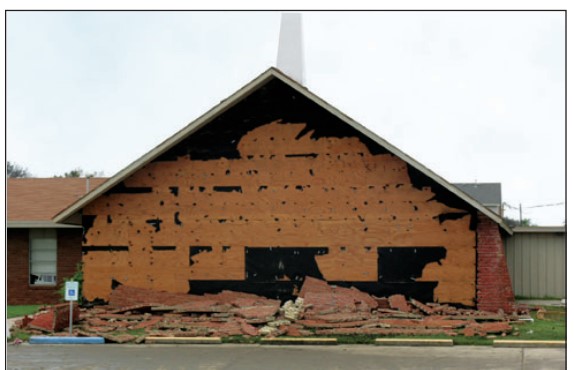
Wrong – This brick veneer failed in high winds (107 mph) because the ties pulled out of the substrate.
Image
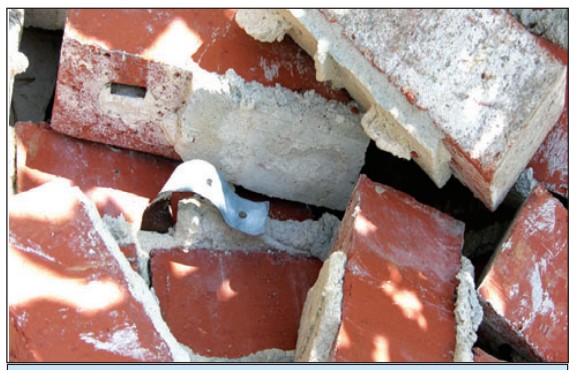
Wrong – This metal tie remained embedded in the mortar joint but the smooth-shank nail pulled out from the stud.
Image
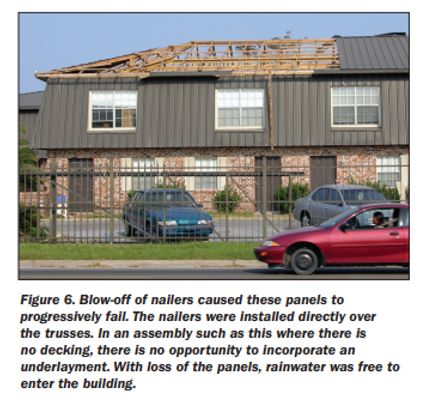
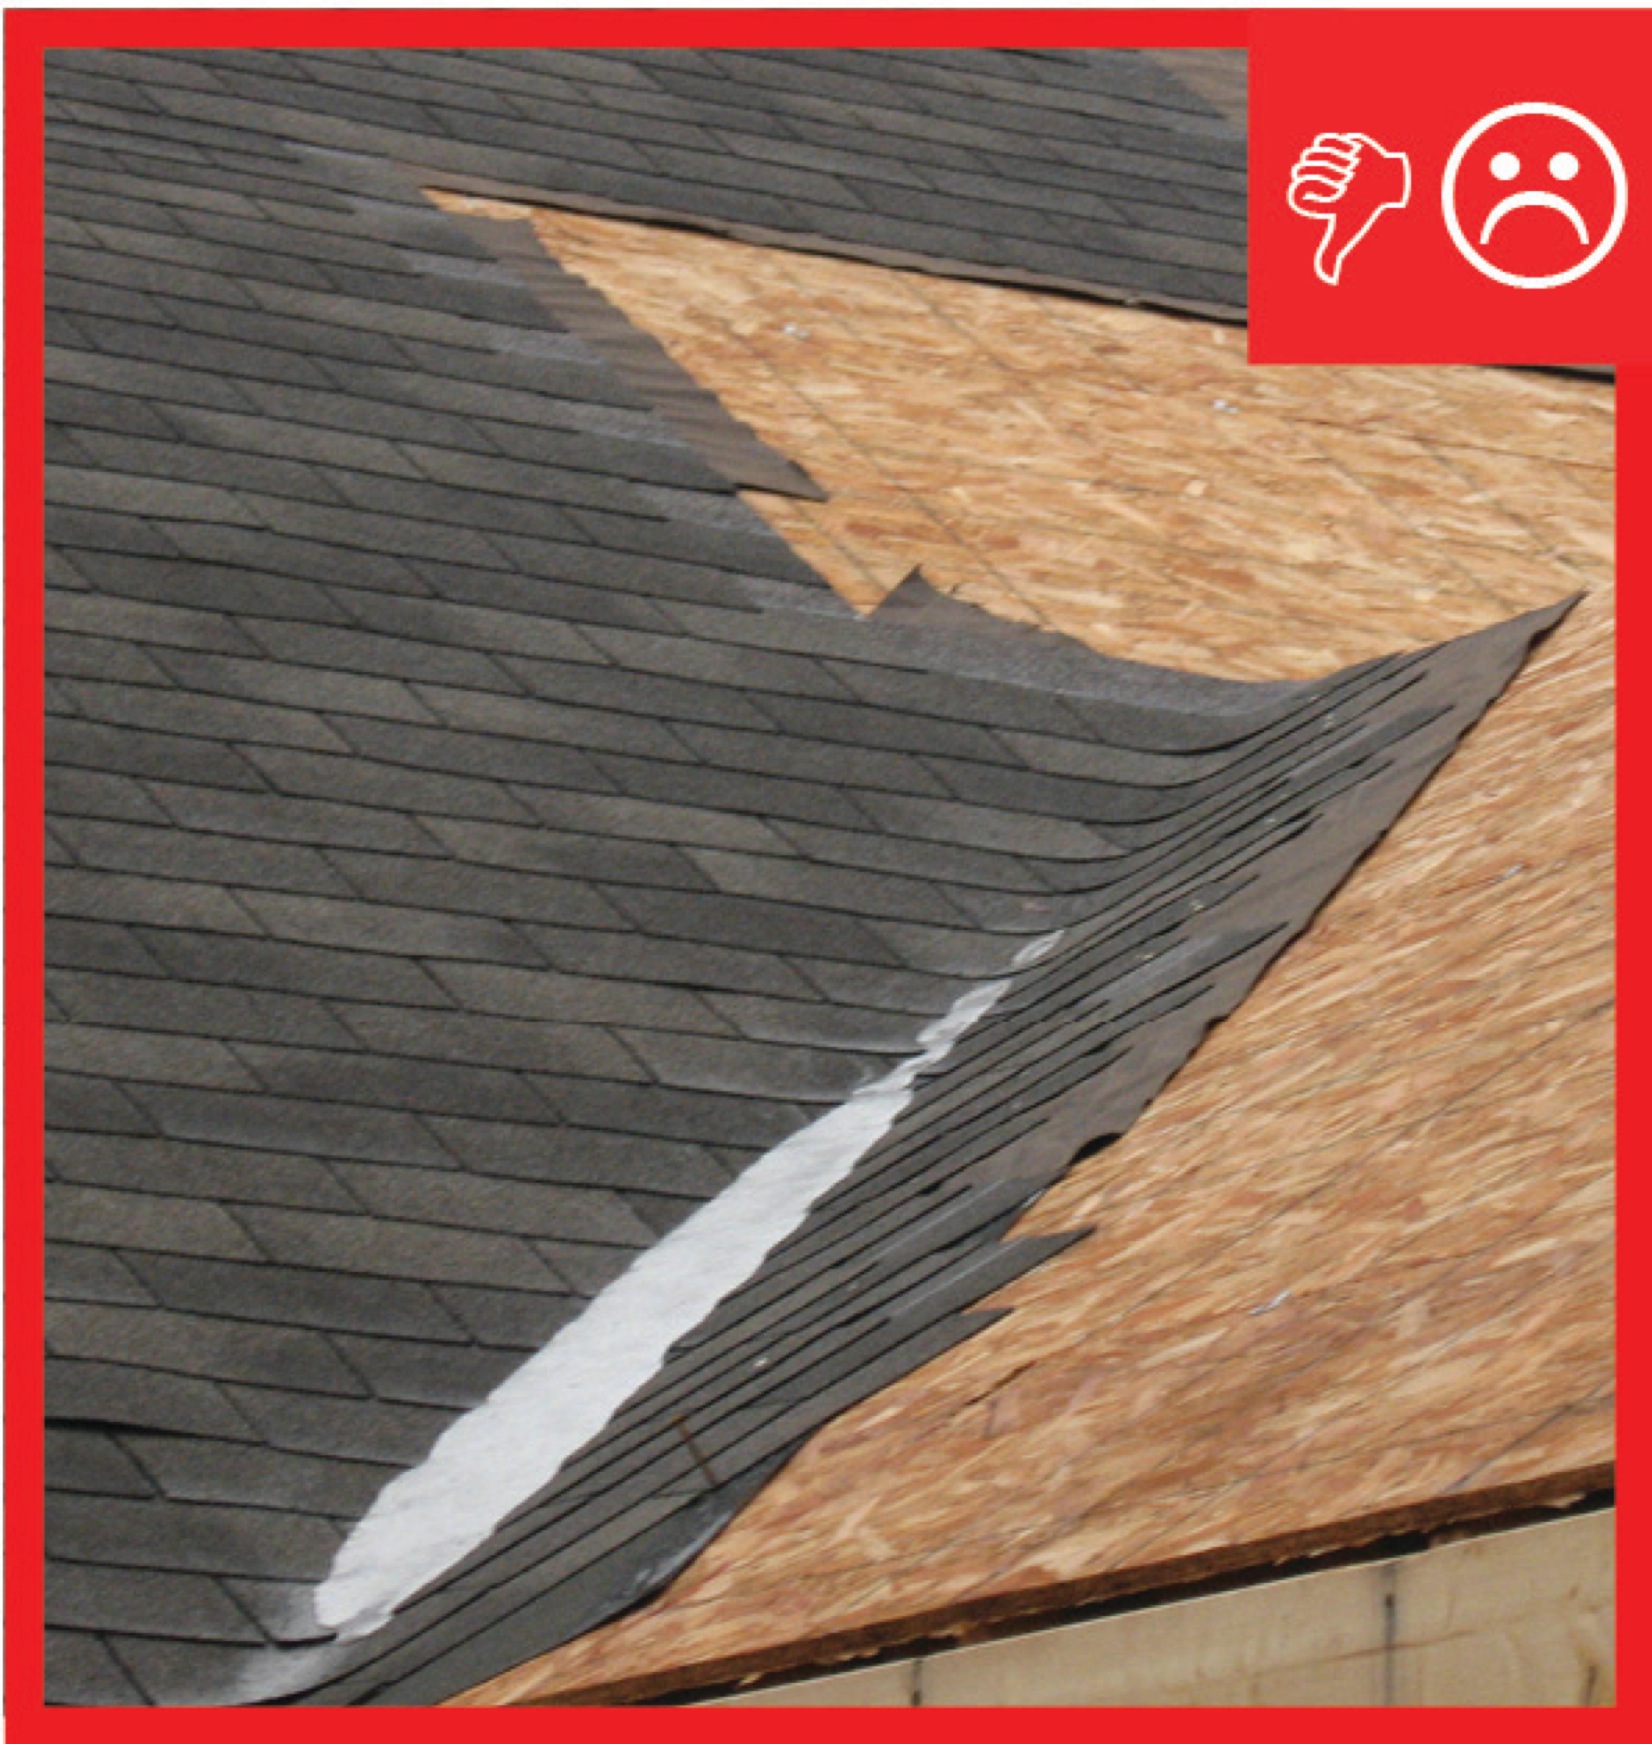
Wrong – This roof has no sheathing, when the metal panels blew off there was no secondary protection
Image

Wrong – This vented crawlspace has standing water because steps were not taken to address site conditions that led to bulk water flow into the crawlspace
Image
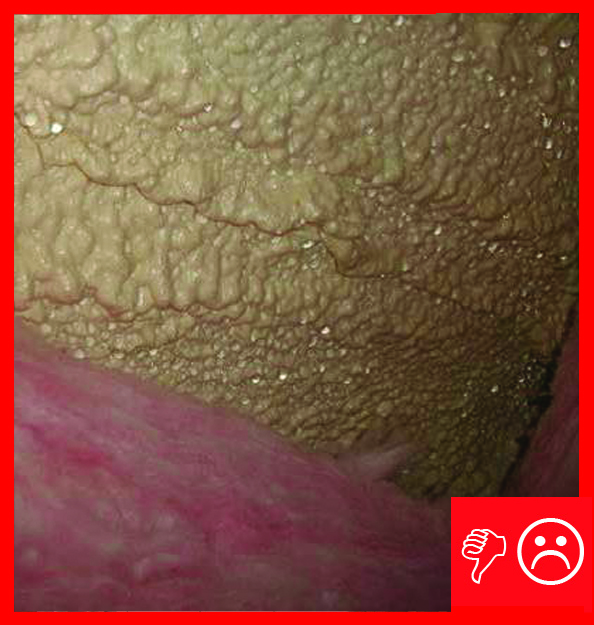
Wrong: Closed-cell spray foam roof insulation was not thick enough to meet IRC levels so the foam surface is colder than the dew point of the interior air and condensation formed on surface of the foam