

Scope
Install a new dishwasher in a new home.
- Select an energy-efficient dishwasher model.
- Look for ENERGY STAR-certified models.
- Install the new dishwasher.
See the Compliance Tab for links to related codes and standards and voluntary federal energy-efficiency program requirements.
Description
A dishwasher performs an automated sequence of operations to wash, rinse, and dry dirty dishes. Once loaded and started, a dishwasher boosts the temperature of incoming hot water, which is sprayed with detergent onto the dirty dishes. The hot water also dissolves the detergent, which mixes with the hot water and is sprayed onto the dishes in the wash cycle. The dirty water is then drained from the tub and the dishwasher rinses the dishes with clean, hot water. After rinsing, the dishes are either air dried or dried with an electric resistance element.
New dishwashers feature computer-controlled wash cycles that customize the wash duration, water temperature, and spray intensity to the quantity and dirtiness of the dishes, as determined by chemical or optical sensors. This allows the dishwasher to save energy and water when the user runs partial or lightly soiled loads. The most efficient ENERGY STAR-certified dishwasher models in the market consume approximately 30% less energy and 35% less water than models that just meet the Federal Standard, offering a viable opportunity for homeowners to save money over the product lifetime (Figure 1).
Source
The ENERGY STAR criteria are based on specific energy consumption and water consumption levels. The maximum energy consumption is measured in kilowatt hours per year (kWh/year) and the maximum water consumption is measured in gallons per cycle. To view the current criteria, visit ENERGY STAR Dishwashers Key Product Criteria.
The popularity of dishwashers has steadily grown. In 1980, 37% of U.S. homes had a dishwasher; in 1990, 45% had a dishwasher; in 2000, 52% had one; and in 2017, 67% of homes had a dishwasher, according to the Energy Information Administration (2015 Residential Energy Consumption Survey).
How to Replace a Dishwasher with an ENERGY STAR-Certified Model
1. Select a new energy-efficient dishwasher.
- Before choosing a new dishwasher (or helping the homeowner to choose a new dishwasher), use a tape measure to determine the space constraints in the spot designated for the dishwasher.
- Use a tape measure to determine the space constraints of doorways and hallways to ensure that the new model can be moved to its installation location.
- Choose a dishwasher model that meets the needs of the household. Options to consider include built-in or portable configurations, dimensions, capacity, style/design, features, and energy efficiency.
- Use the ENERGY STAR Product Finder to identify and determine the energy use of new ENERGY STAR-certified dishwasher models. You can also download data from the Product Finder to identify dishwasher models with connected functionality, which would allow the homeowner to save more money by engaging in demand response services from the utility company.
- Check the Database of State Incentives for Renewables & Efficiency or the ENERGY STAR Rebate Finder to determine whether a dishwasher model is eligible for a rebate or incentive in your area.
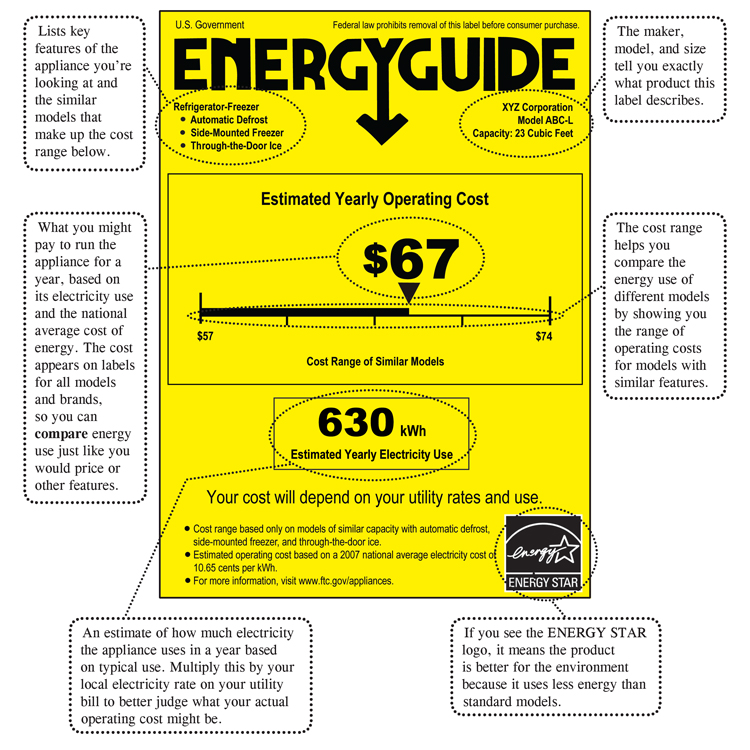
- Compare EnergyGuide labels (Figure 3) as another way to identify energy-efficient dishwasher models.
2. Install the new energy-efficient dishwasher.
- Many appliance vendors will install the new dishwasher. If you are installing it, use the following installation instructions or see the manufacturer’s installation instructions.
- Use a dolly or hand truck to move the new dishwasher to its bay. Before doing so, put floor mats or paper along the route to protect the floor. Sweep out the dishwasher bay to remove any dust or dirt.
- Remove the packaging from the dishwasher. Ask the homeowner to keep the box and packaging materials for a few days in case the dishwasher has to be returned for replacement or repair.
- Set up the water supply.
- Consider using a copper supply pipe since it will last longer than a braided steel pipe. In addition, consider using a tube-bending spring, which fits inside the pipe or around it and bends the pipe with even pressure to prevent kinking.
- Carefully uncoil the copper tubing and loosely thread it from the dishwasher bay through the cabinet side and up into the sink cabinet via one of the existing floor holes.
- Uncoil enough copper to get past the front of the bay. Using a tubing cutter, cut the line. Insert a narrow tube-bending spring inside the end of the copper nearest the hot water valve. Use the spring to shape the tubing toward the valve then down to the hole in the cabinet. Do not kink the tube.
- Slide a compression nut, then ferrule, over the end of the tubing at the valve. Hand-tighten the nut over the ferrule and onto the valve. Using an adjustable wrench, tighten it another quarter turn.
- Note: tube-bending springs can fit either inside or outside a pipe. Inside springs can only be used on a pipe’s ends, but they make tighter turns. Use outside springs to gently curve the middle of a pipe.
- Position water and electric lines.
- Find the two front-to-back clear paths on the underside of the dishwasher. These are meant to keep the copper tubing and electrical wiring away from the motor as they run from the back of the dishwasher bay to the front of the appliance. Measure the distance from these paths to the sides of the dishwasher. Transfer the measurements to the floor inside the bay using a pencil to mark lines on the floor. Note which side leads to the water hookup and which side is for wiring.
- Using an outside-bending spring, shape the copper pipe so it wraps down the cabinet side and along the mark for the water-pipe channel. Twist the electrical wire so it lies in the correct path. Use tape to secure both to the floor in position over their marked lines.
- Connect water supply.
- Lay down a tarp to protect the floor and tip the dishwasher on its back. Remove the cover panel at the bottom of the unit. Wrap Teflon around the water inlet’s threads. Screw a brass elbow (i.e., ‘dishwasher 90’ fitting) onto the inlet. Tighten it with an adjustable wrench.
- Stand the dishwasher up and put it into the bay. Check that the water and electrical lines are properly aligned. Feed the end of the drain line from the dishwasher through the side of the cabinet and up via the unused existing floor hole. Then have a helper guide the drain line as you slowly slide the dishwasher into place.
- Tighten the nut onto the inlet.
- Using the inside bending spring, turn the copper supply to the elbow. Cut off any excess pipe but leave two inches of straight copper pipe for the compression fitting.
- Slide a compression nut and ferrule over the end of the pipe and hand-tighten the nut onto the inlet. Using an adjustable wrench, tighten it another quarter turn. Tip: Never hold a dishwasher by its door as you move or tilt it.
- Make the electrical connection.
- Turn the power off at the breaker to the dishwasher. Place a piece of tape over the breaker switch to ensure no one turns it back on while you’re working.
- Clamp the MC armored cable to the junction box. Slide a cable clamp over the end of the exposed wires until it’s around the metal sheathing that bundles the wires together. Using a screwdriver, tighten down the clamping bracket over the sheathing to hold the wires in place.
- Unscrew the star-shaped nut on the clamp, then push the wires and threaded end of the clamp through the hole in the side of the unit’s junction box. Hand-tighten the nut back on the clamp from the inside of the box. Tighten the nut with pliers or a screwdriver.
- Line up like colors of wire together (white to white, black to black) and tighten them together with wire nuts. Connect the green ground wire to the dishwasher’s green or bare copper wire with a wire nut.
- Stuff the wires into the box, cover it with the metal cover plate, and screw the plate to the box.
- Attach the drain line.
- Take the cap off the drain line connection. A small amount of water may come out as most dishwashers are tested at the factory before shipment.
- Attach the drain line to the dishwasher. Using pliers, crimp the clamp around the drain line hose to secure it.
- Thread the drain line into the existing hole in the sink cabinet. Slip a hose clamp over the end of the dishwasher’s drain line and push the hose over the sink drain inlet, either branching off the drain tailpiece or the side of the garbage disposal. Take care not to kink the line or wrap it around the sink spray hose line. Slide the hose clamp over the connection and turn the screw to tighten it down.
- Wrap a loop of plumber’s strapping around the drain line with excess. Hold the hose and strapping against the back of the cabinet so it makes an arc that is higher than the drain inlet. Using a screwdriver, attach the strapping to the cabinet wall. This will prevent sink backflow from entering the dishwasher.
- Screw the dishwasher in place.
- Adjust the feet on the front of the dishwasher until the mounting brackets touch the underside of the counter. Open the dishwasher door. Holding a level against the inside top of the dishwasher, adjust the feet until it is level side to side.
- With the dishwasher level, fasten it to the underside of the countertop by driving screws through the mounting brackets. Replace the cover panel at the base of the unit.
- Turn on the water and power.
- Turn on the water beneath the sink. Turn the power on at the breaker. Connect the electrical cord into a grounded three-prong outlet. Do not remove the ground prong, do not use an adapter, and do not use an extension cord. Failure to follow these instructions can result in fire or electrical shock.
- Check for leaks at the water connections over the next few hours. If any appear, turn off the water and tighten the compression fittings slightly. If no leaks appear, test run the dishwasher.
3. Set up an Internet-connected dishwasher.
- The dishwasher manufacturer will have an app available for download on a smartphone, tablet, or other mobile device. Download the app on your (or the homeowner’s) preferred device. The app will guide you through all of the steps to connect the dishwasher. Below are some general steps.
- Open the app on the device and sign in or create a WiFi connect account. This will associate any connected appliances with the homeowner’s device.
- On the app, click “add an appliance” and choose “dishwasher.”
- On the dishwasher control panel, select the “ready to connect” mode. Now press “next” on your app.
- Press “start” on the dishwasher, which should then display the network name and password.
- In the app, type in the password found on the dishwasher display. You will be directed to join the network listed on the dishwasher display. This will start communication between the app and the dishwasher.
- After the app has connected to the dishwasher, choose your home WiFi network to connect your device back to the home network. The connecting process will start. The dishwasher is connected once the app says “connected.”
4. Provide product literature and instructions to the homeowner.
- Provide the home owner with any manufacturer product literature and warranty information.
- Submit, or supply to the homeowner to submit, paperwork for any applicable utility rebates or tax incentives.
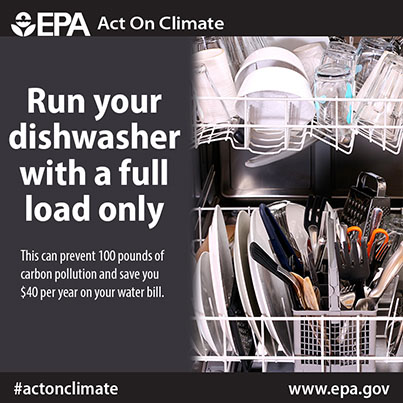
- Advise the homeowner that they can save energy and water by scraping off scraping food residue from plates with a rubber spatula instead of pre-rinsing their dishes at the sink. New dishwasher models have improved spray technologies so pre-rinsing is unnecessary. Advise the homeowner to load the dishwasher until its completely full, use the appropriate dish detergent, and let the dishwasher do the rest.
Ensuring Success
EPA WaterSense Inspection Protocol
For builders seeking certification through the U.S. Environmental Protection Agency's WaterSense program, a verifier will test all hot water delivery systems to ensure compliance with the HCO's WACM (WaterSense Approved Certification Method) requirements using the testing protocol described.
The verifier will verify that the installed dishwasher has an ENERGY STAR label. If no label is present, the inspector will check the brand and model number against ENERGY STAR's list of certified dishwashers.
Region
No climate-specific information applies.
Training
Right and Wrong Images

Source
Compliance
Retrofit
SCOPE
Install a new dishwasher as a replacement for an older dishwasher in an existing home.
- Select an energy-efficient, ENERGY STAR-certified dishwasher model.
- Remove and recycle the old dishwasher.
- Install the new ENERGY STAR-certified dishwasher.
- Please follow safe work practices as described in the U.S. Department of Energy’s Standard Work Specifications when removing or installing dishwashers in homes.
DESCRIPTION
Of homes with a dishwasher, more than 11% have a model that is 15 years old or greater. Homeowners with old dishwashers should consider planning ahead to purchase a new, ENERGY STAR-certified model to start saving money on energy bills before the current unit breaks down. By planning ahead, homeowners have the time to identify the model that meets their needs rather than rushing the purchase decision or having to hand wash dishes for an extended period of time.
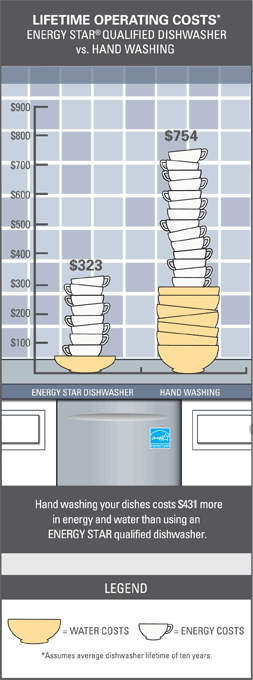
According to 2015 data from the Energy Information Administration (2015 Residential Energy Consumption Survey), 33% of U.S. households did not have a dishwasher. Hand washing dishes consumes considerably more hot water, and thus more energy, than a dishwasher uses. According to ENERGY STAR, households with no dishwasher that install an ENERGY STAR-certified dishwasher would save $431 on their energy bills over the typical ten-year lifetime of a dishwasher (Figure 2). That’s enough money to purchase a new ENERGY STAR-certified dishwasher.
How to Replace the Old Dishwasher with an ENERGY STAR-Certified Model
1. Select a new energy-efficient dishwasher
- See the Description tab for information on selecting the right model.
2. Remove the old dishwasher
- Plan ahead when helping homeowners remove and recycle their old dishwashers. Dishwashers contain metals and parts that can and should be recycled. In addition, depending on the area, improper disposal of appliances can be punishable by either a fine or jail time. Many municipalities offer curbside pickup of old appliances for little to no charge. Appliance recyclers will often remove and haul away an old dishwasher for a small fee. If the homeowner purchases a new dishwasher from a major retailer, the old dishwasher can often be hauled away at a small charge or for free when the new unit is delivered. The U.S. EPA Responsible Appliance Disposal (RAD) Program provides information on how to locate a recycler in the area.
- Begin the dishwasher disconnection and removal process by cleaning out the area in the sink cabinet. Remove the cabinet doors to provide better access.
- Shut off power to the dishwasher at the breaker panel and place a piece of tape over the breaker switch to ensure no one turns it back on while you’re working. If the dishwasher is not hard wired into an electrical circuit, find the electric cord that provides power to the dishwasher and unplug it. Close the hot water valve beneath the sink.
- Unscrew the panel to the dishwasher’s electrical box to expose the wiring. If the dishwasher is hard-wired into an electrical circuit, use a voltage meter to test the wires to ensure the power is still off from shutting off the breaker. Unscrew the wire nuts and pull apart the wires. Start with the green wires, then white, and then black.
- Disconnect the drain line from the dishwasher and the water supply line from the dedicated dishwasher connection. Be prepared with a bucket in case either line still has water in it.
- Open the door to the dishwasher, then remove the screws secured to the underside of the countertop. Place a drop cloth or piece of cardboard in front of the dishwasher. This will prevent scratches on the floor when you pull the unit out.
- Adjust the feet on the front of the dishwasher using a wrench so the mounting bracket is no longer touching the underside of the countertop.
- Slowly pull out the dishwasher from the bay, ensuring the wires are out of the way. The drain line should come out with the dishwasher from under the sink.
- Use a hand truck or dolly to move the dishwasher to the location where it will be hauled away. Consider using floor mats or paper to protect the floor. Consider wrapping blankets or other soft material around the dishwasher to protect doorways or cabinetry.
- Secure the dishwasher to the vehicle using tie-down straps.
3. Install the new dishwasher
- Many appliance vendors will install the new dishwasher. If you are installing it, use the installation instructions provided in the Description tab.
More Info
References and Resources
*For non-dated media, such as websites, the date listed is the date accessed.
Sales
High-Efficiency Dishwasher = High-Efficiency Dishwasher
Technical Description
High-efficiency dishwashers typically have earned the ENERGY STAR Qualified Appliance label. Ultra-efficient dishwashers are those that meet ENERGY STAR’s “Most Efficient” designation requirements.
Questions? Comments? Contact our webmaster.