Scope

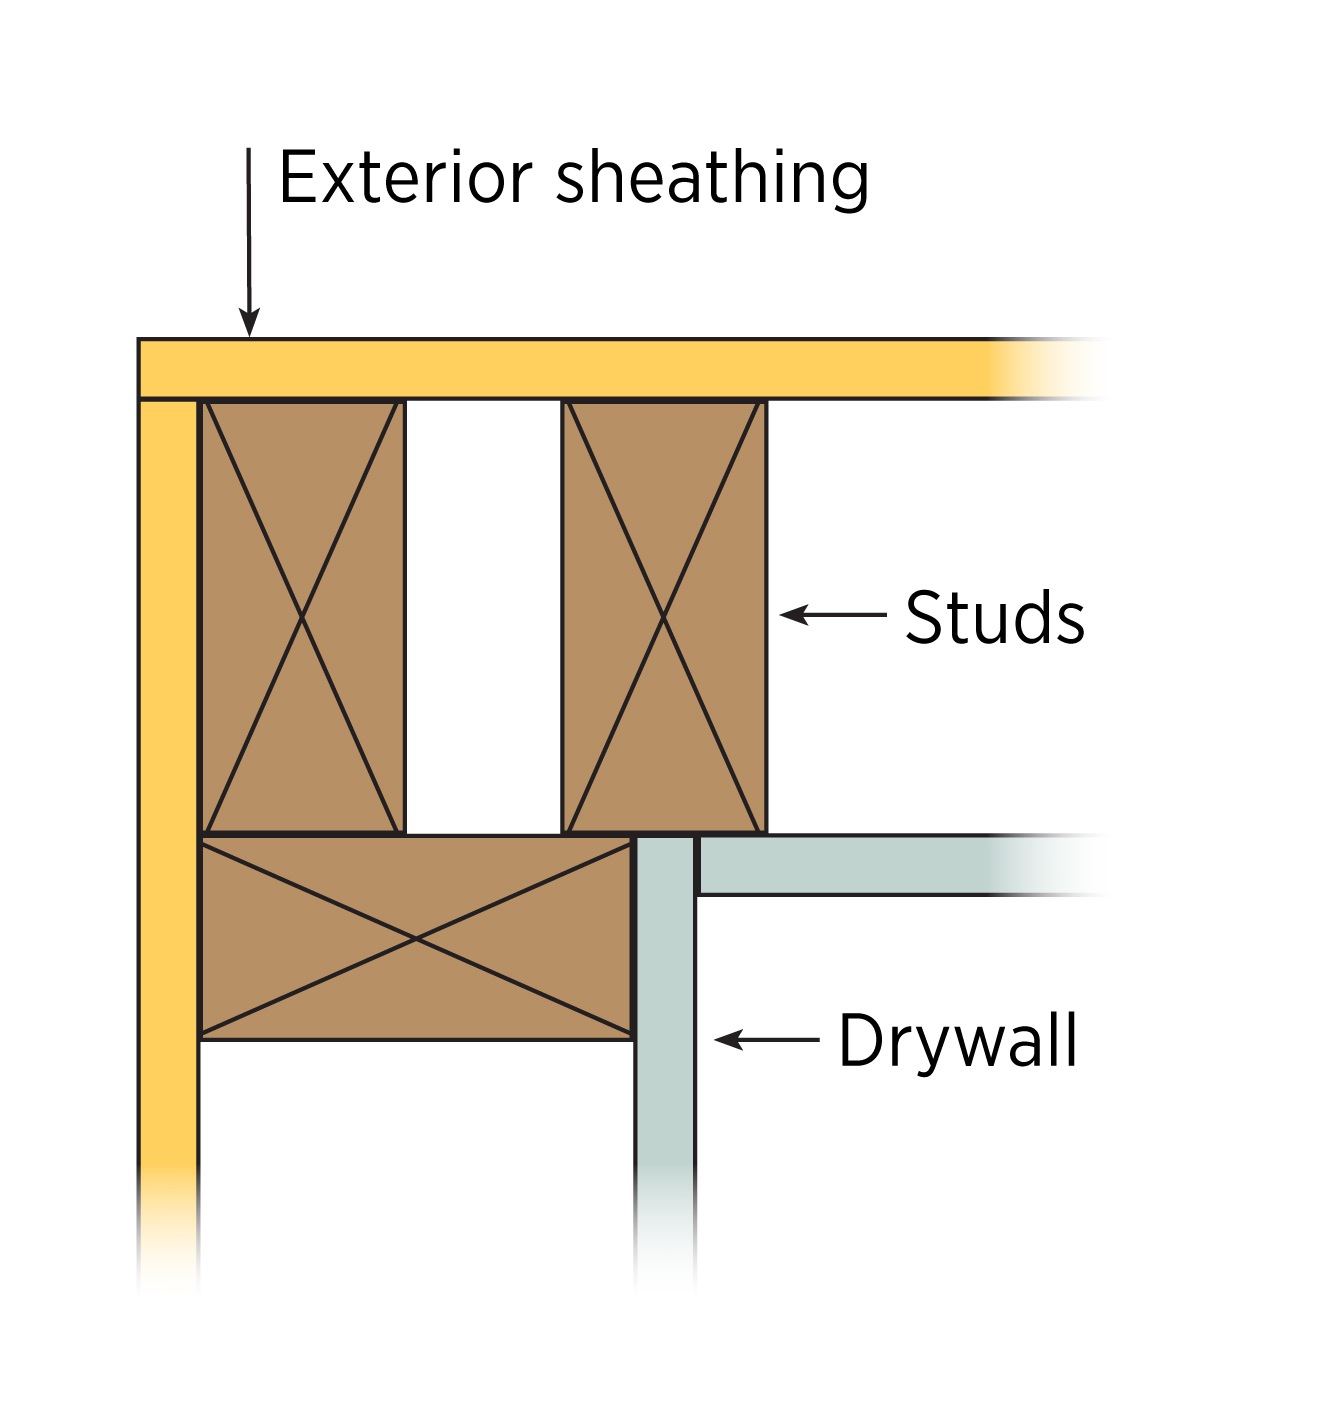
Advanced framing details include corners that are constructed with fewer studs or studs aligned so that insulation can be installed in the corner.

Construct framed walls using advanced framing details like insulated corners that reduce framing and thermal bridging and allow more space for insulation.

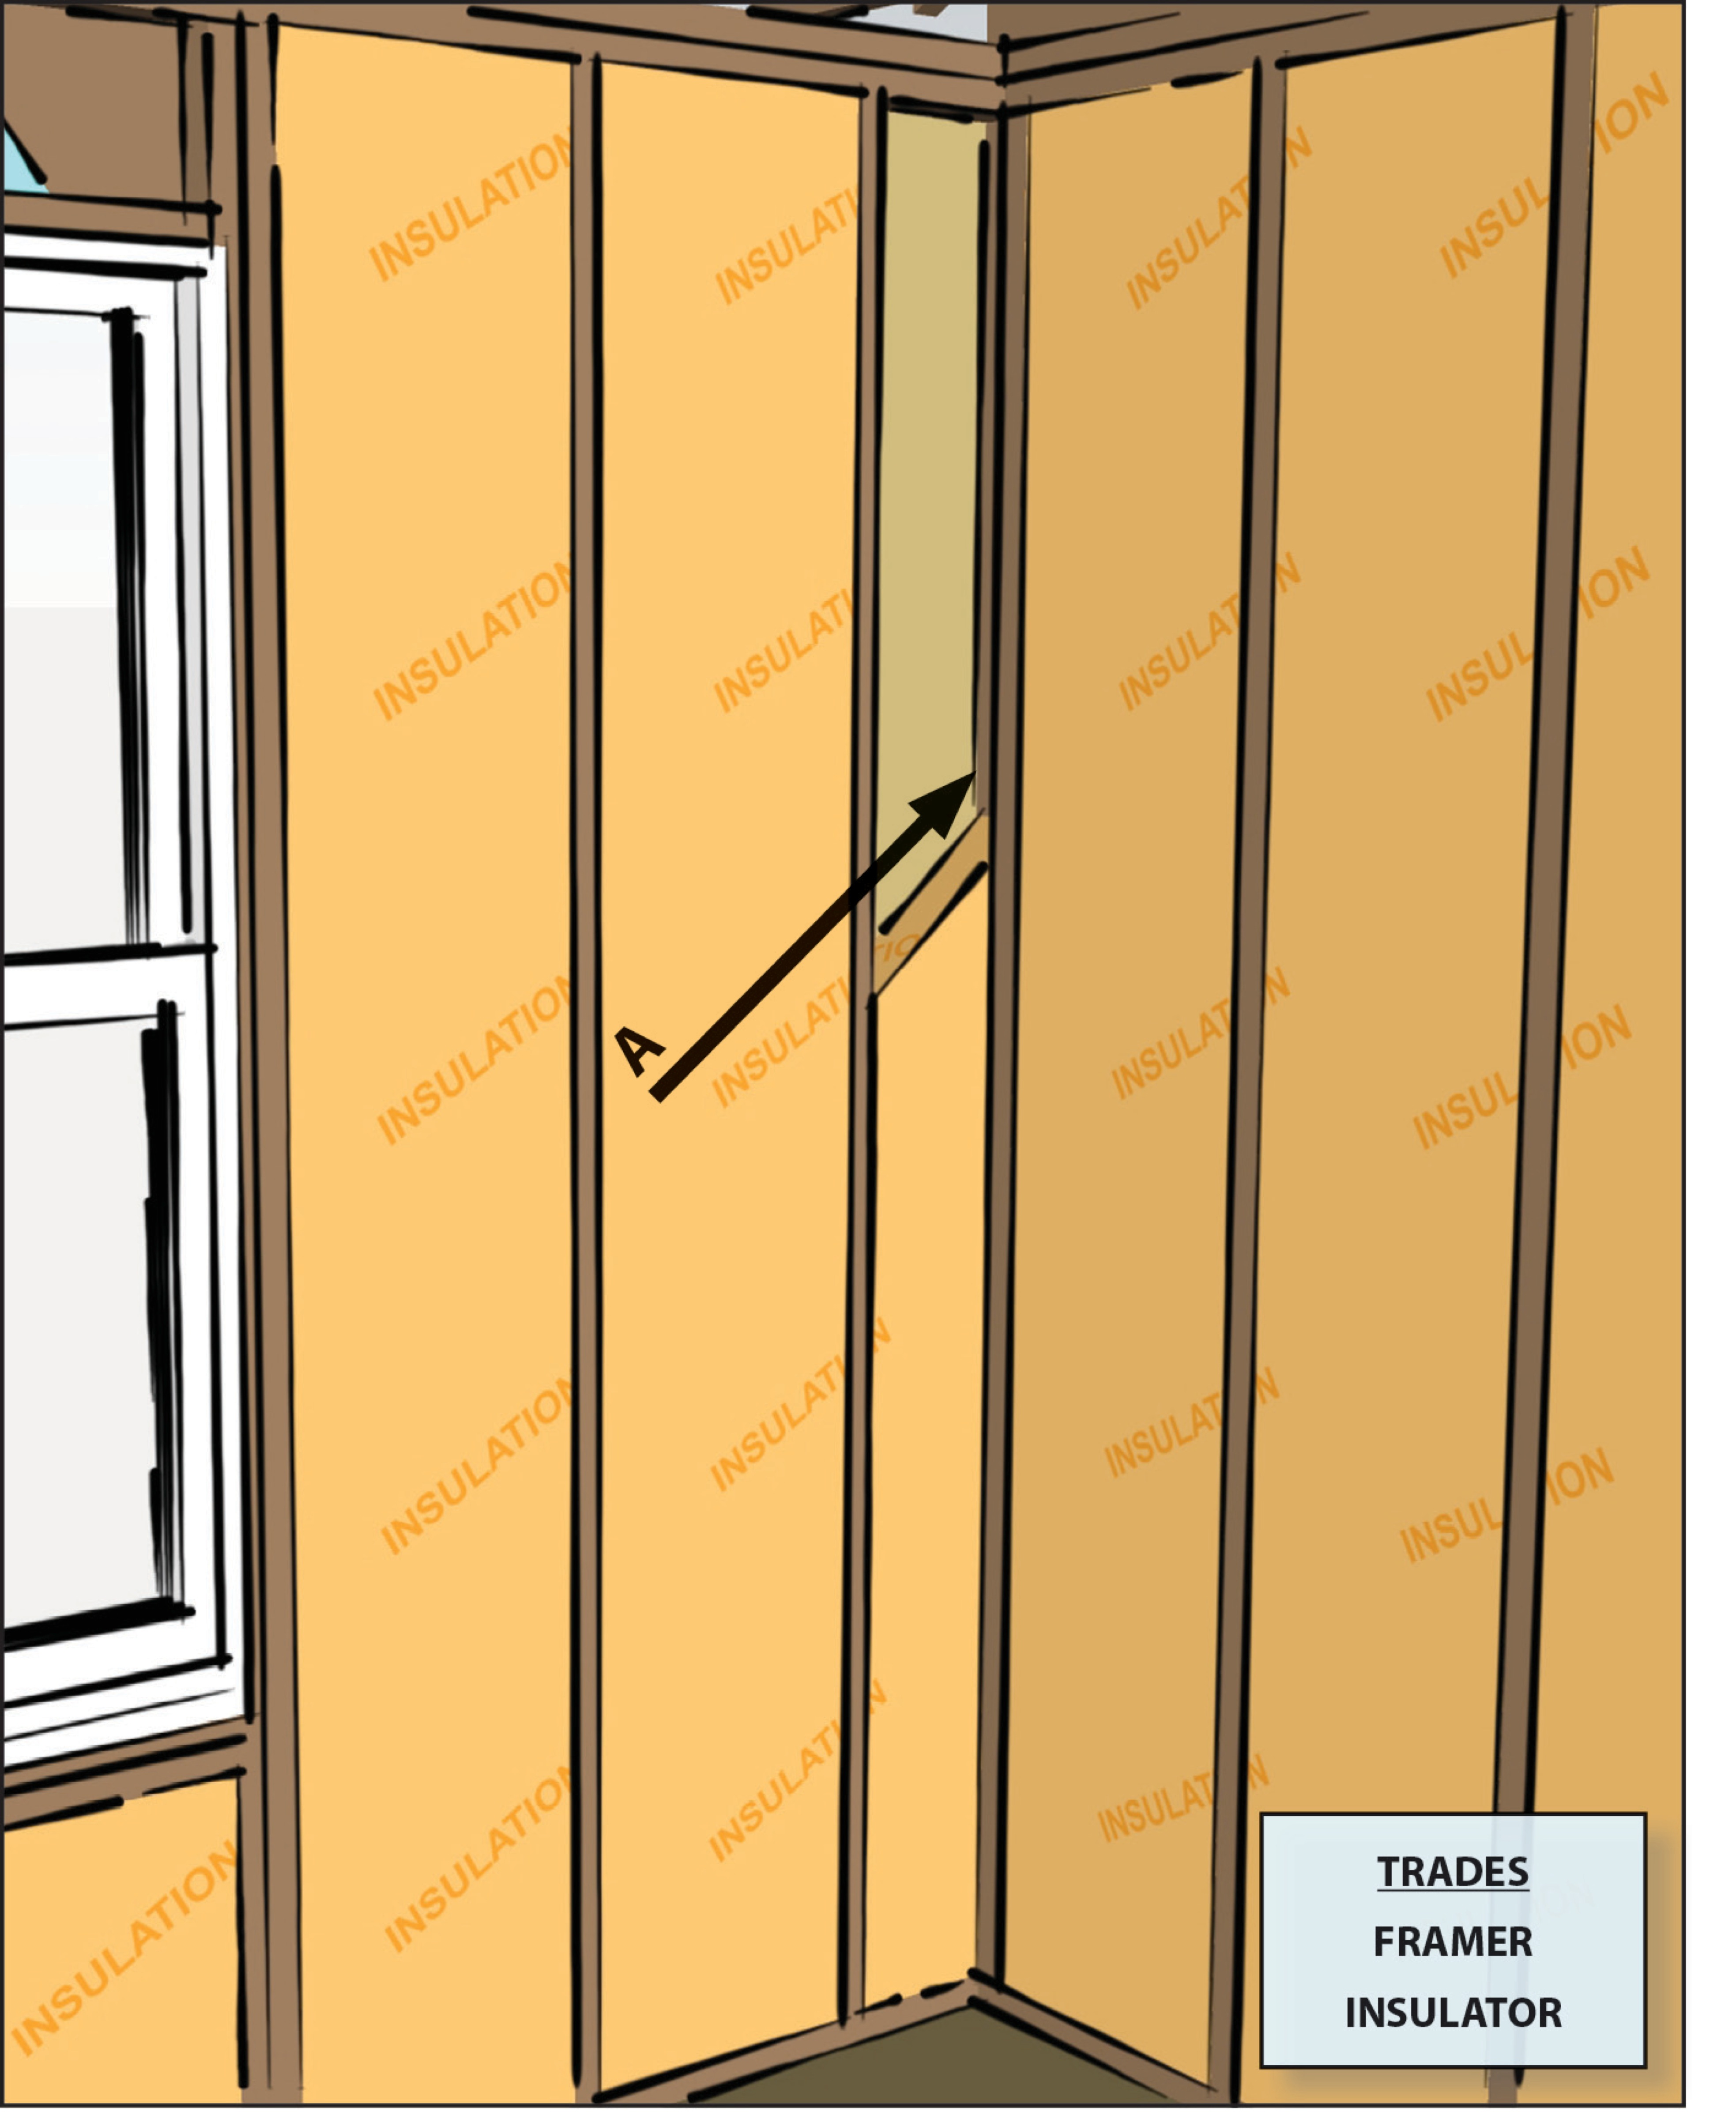
  • Construct corners with two studs or three studs aligned to allow more room for insulation along the exterior wall. 
  • Use drywall clips as needed to hold drywall in place.
  • ENERGY STAR requires that the space provided at the corner allow for at least R-6 of insulation (ENERGY STAR). 

See the Compliance Tab for links to related codes and standards and voluntary federal energy-efficiency program requirements.

Description

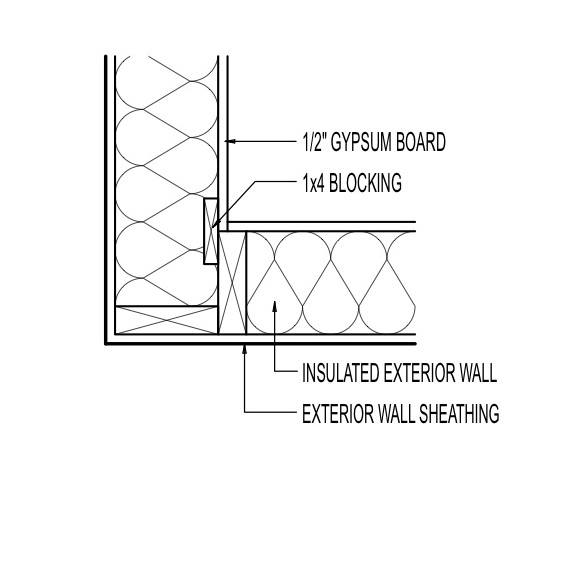
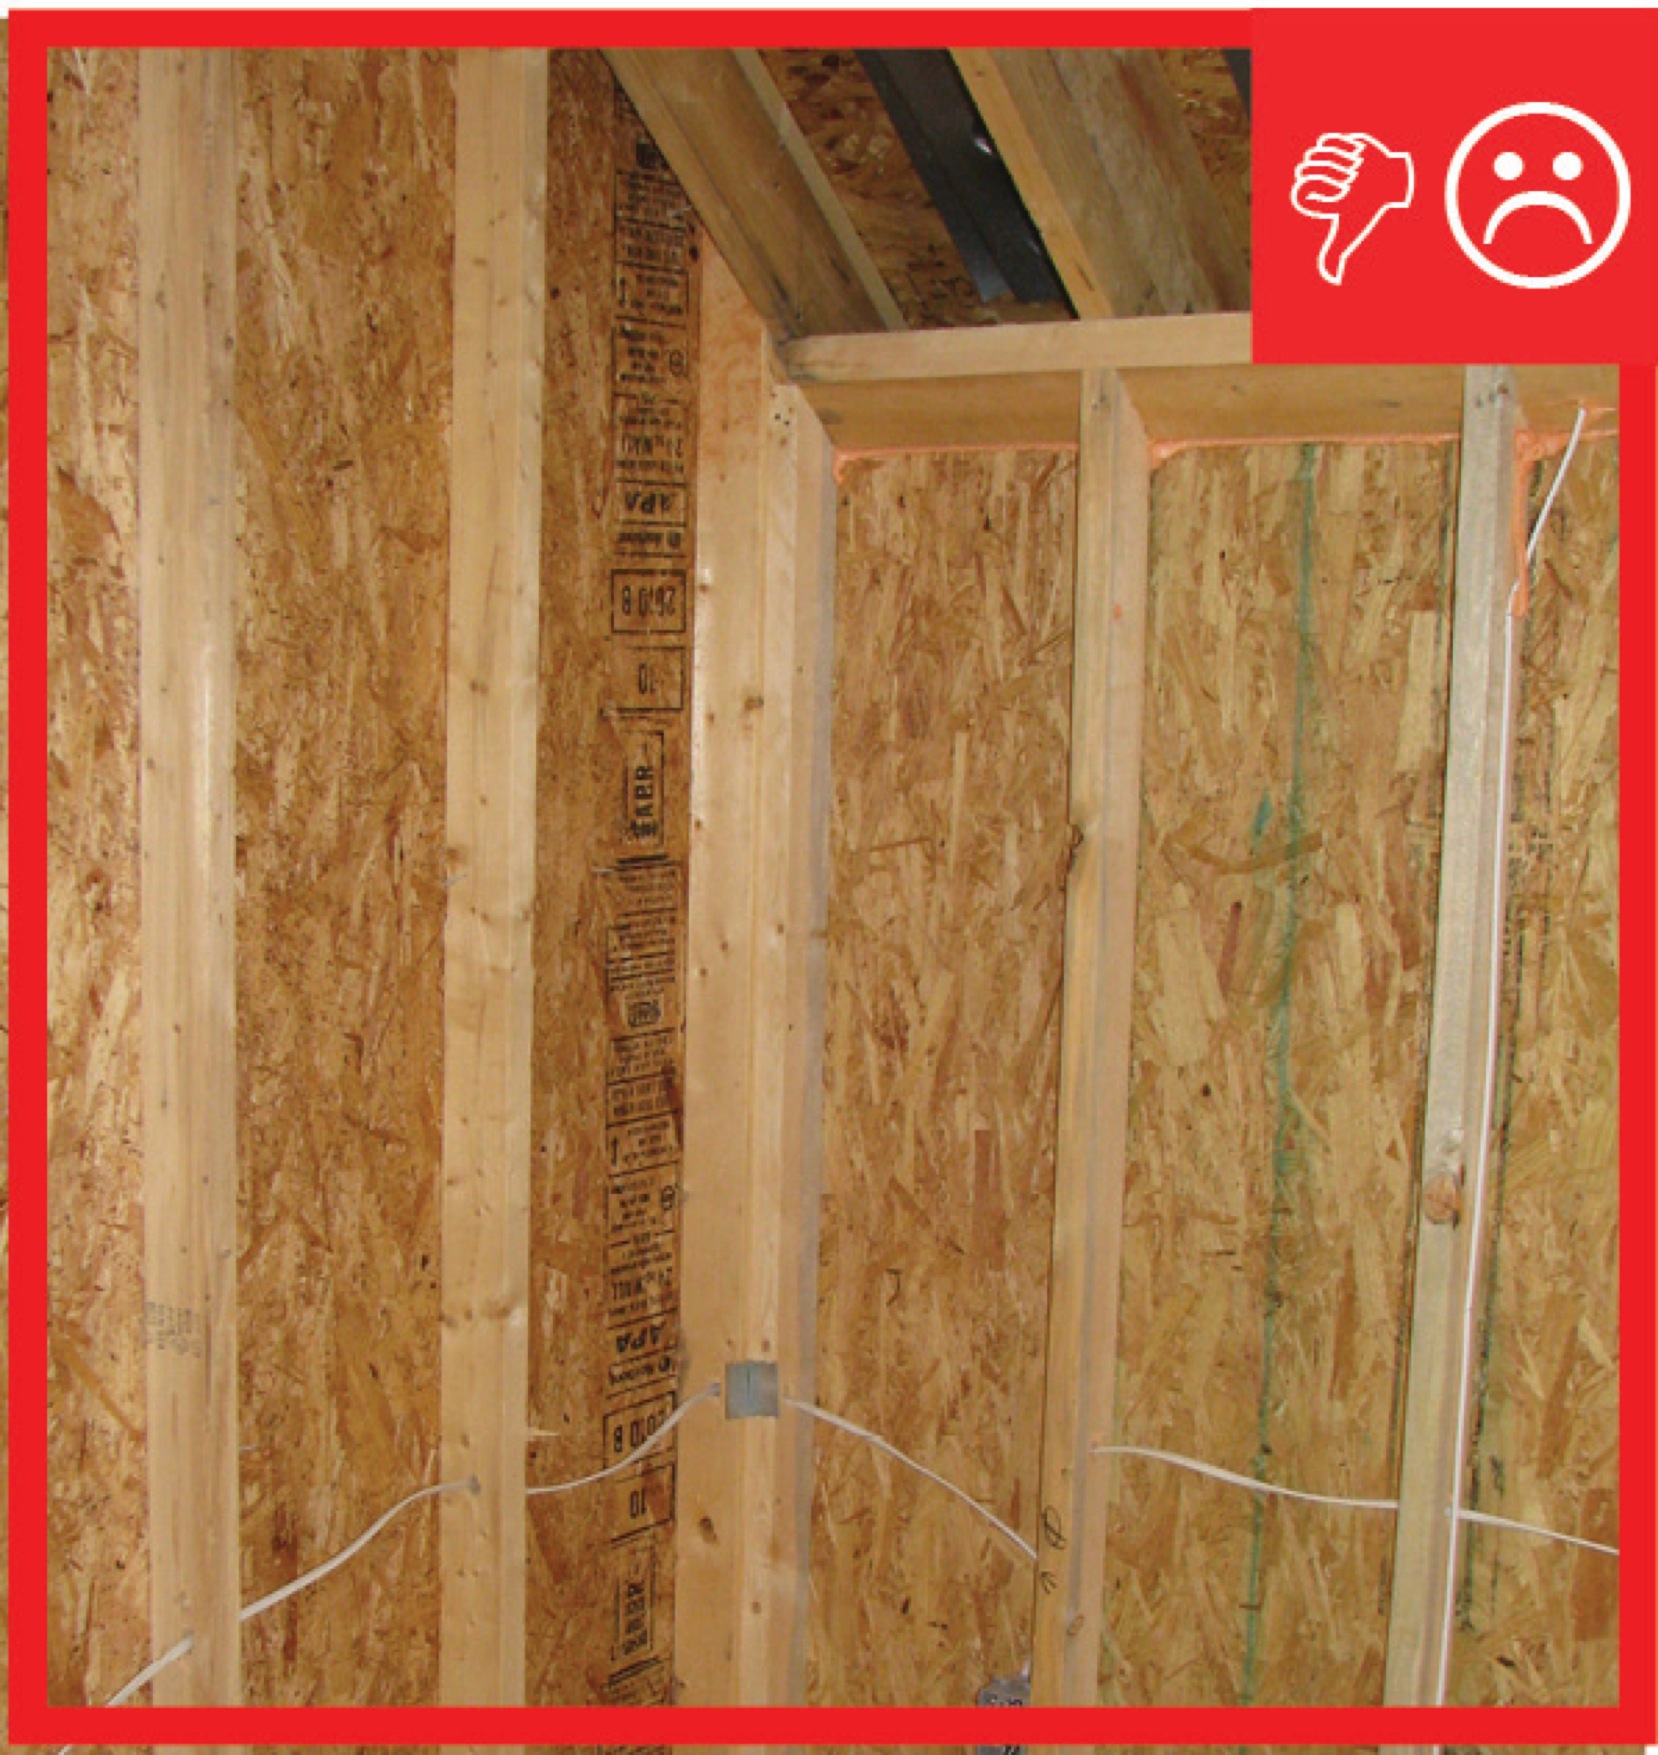
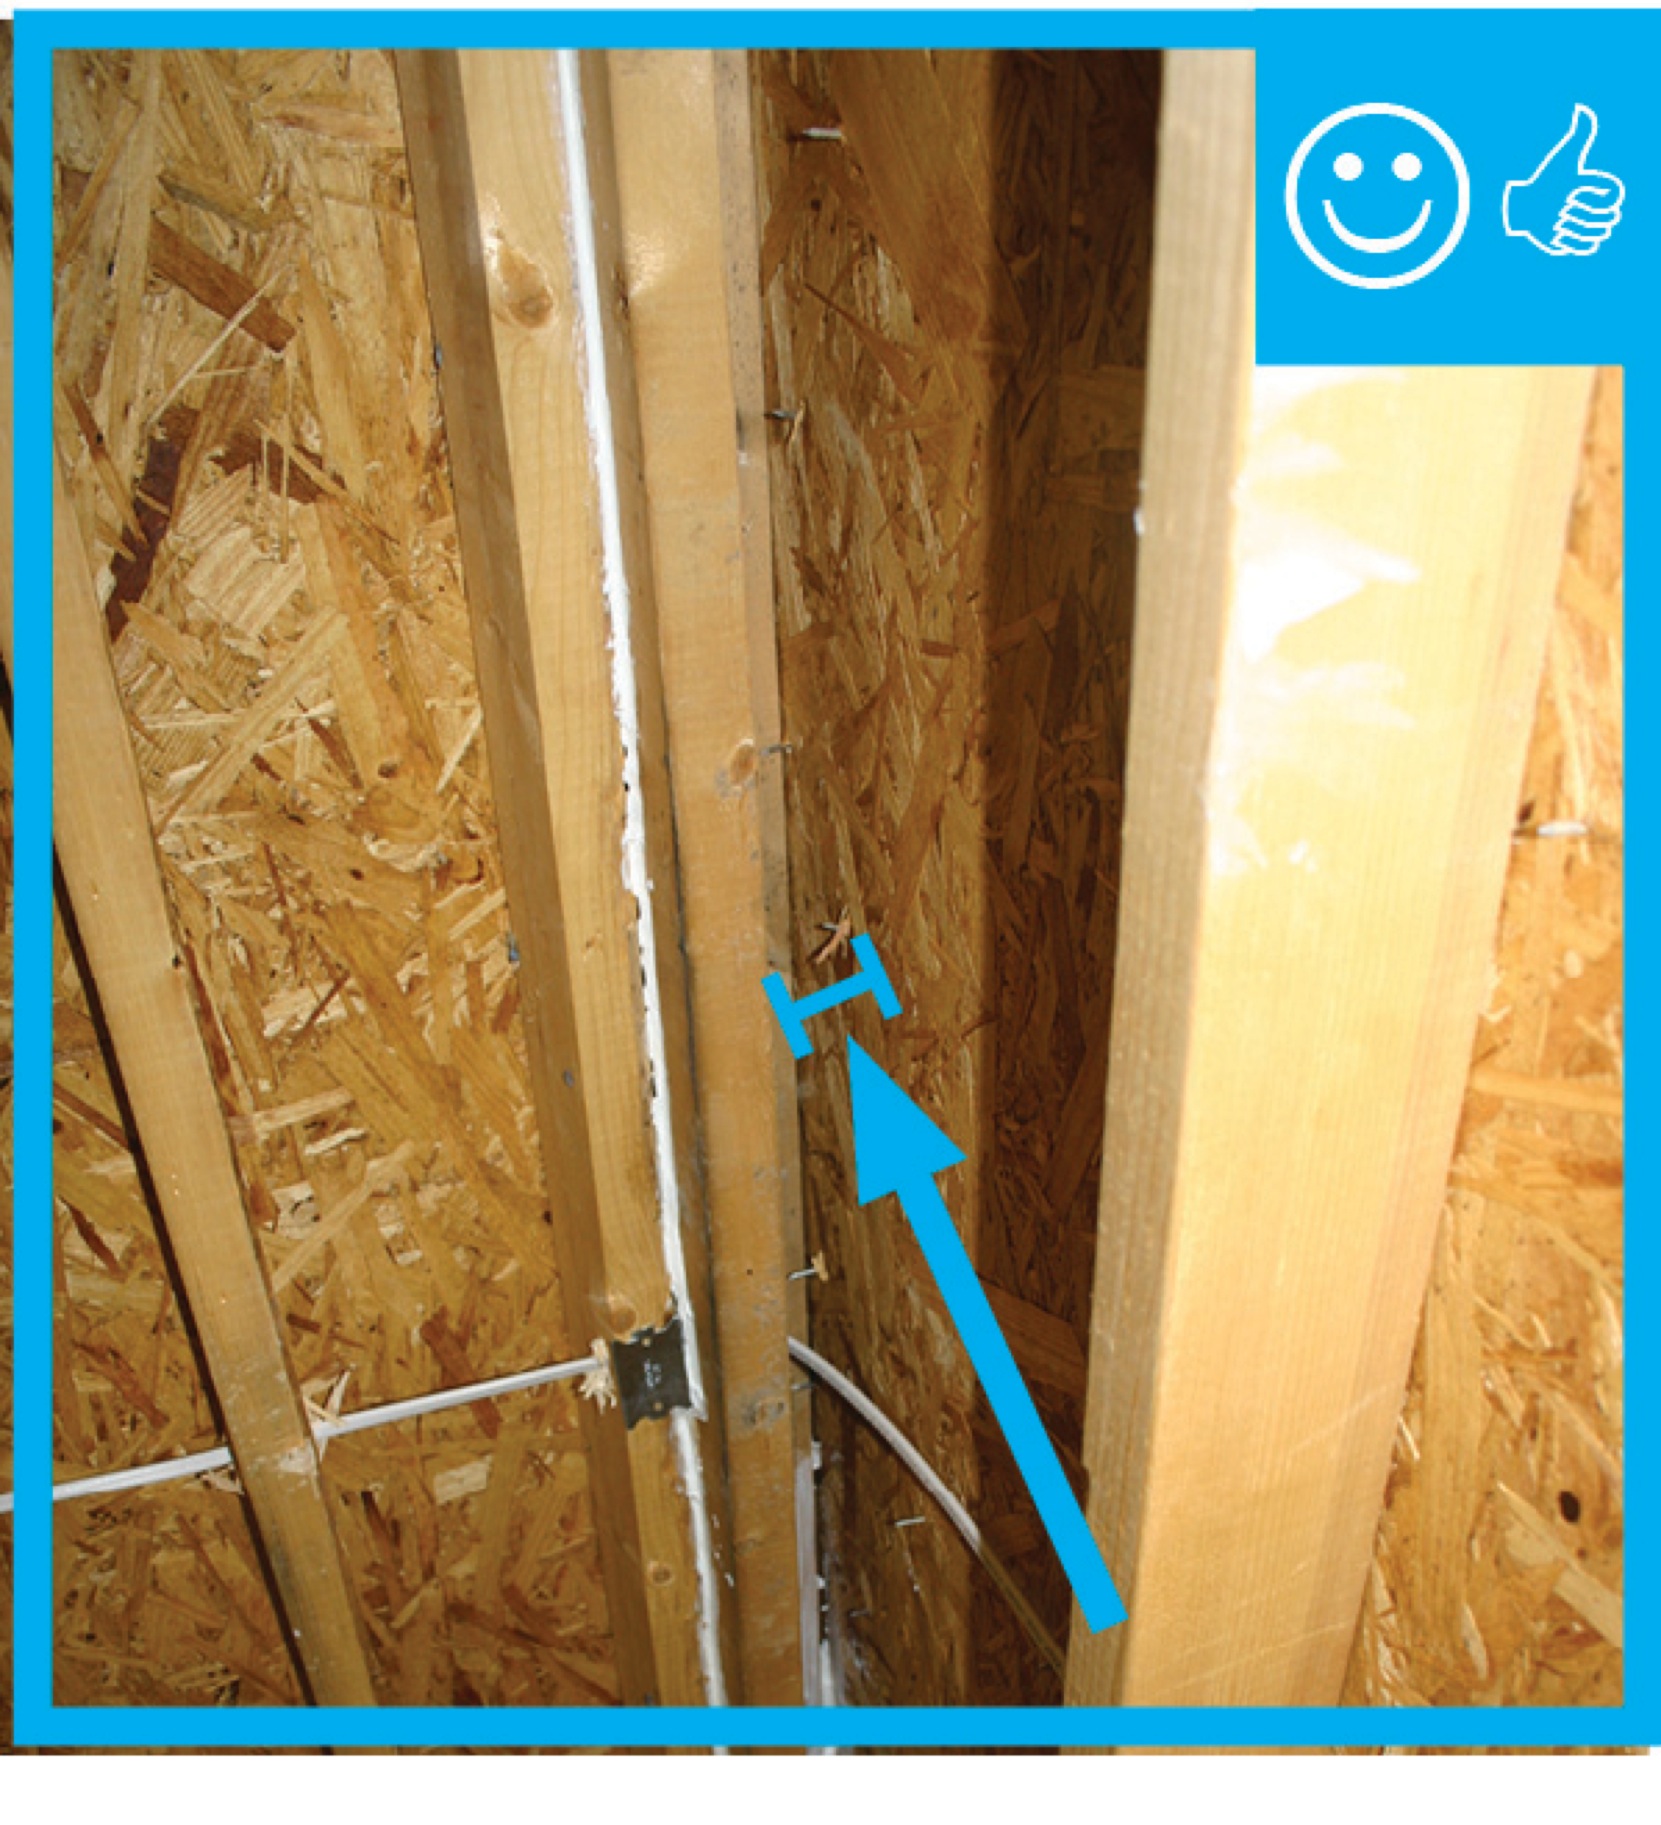
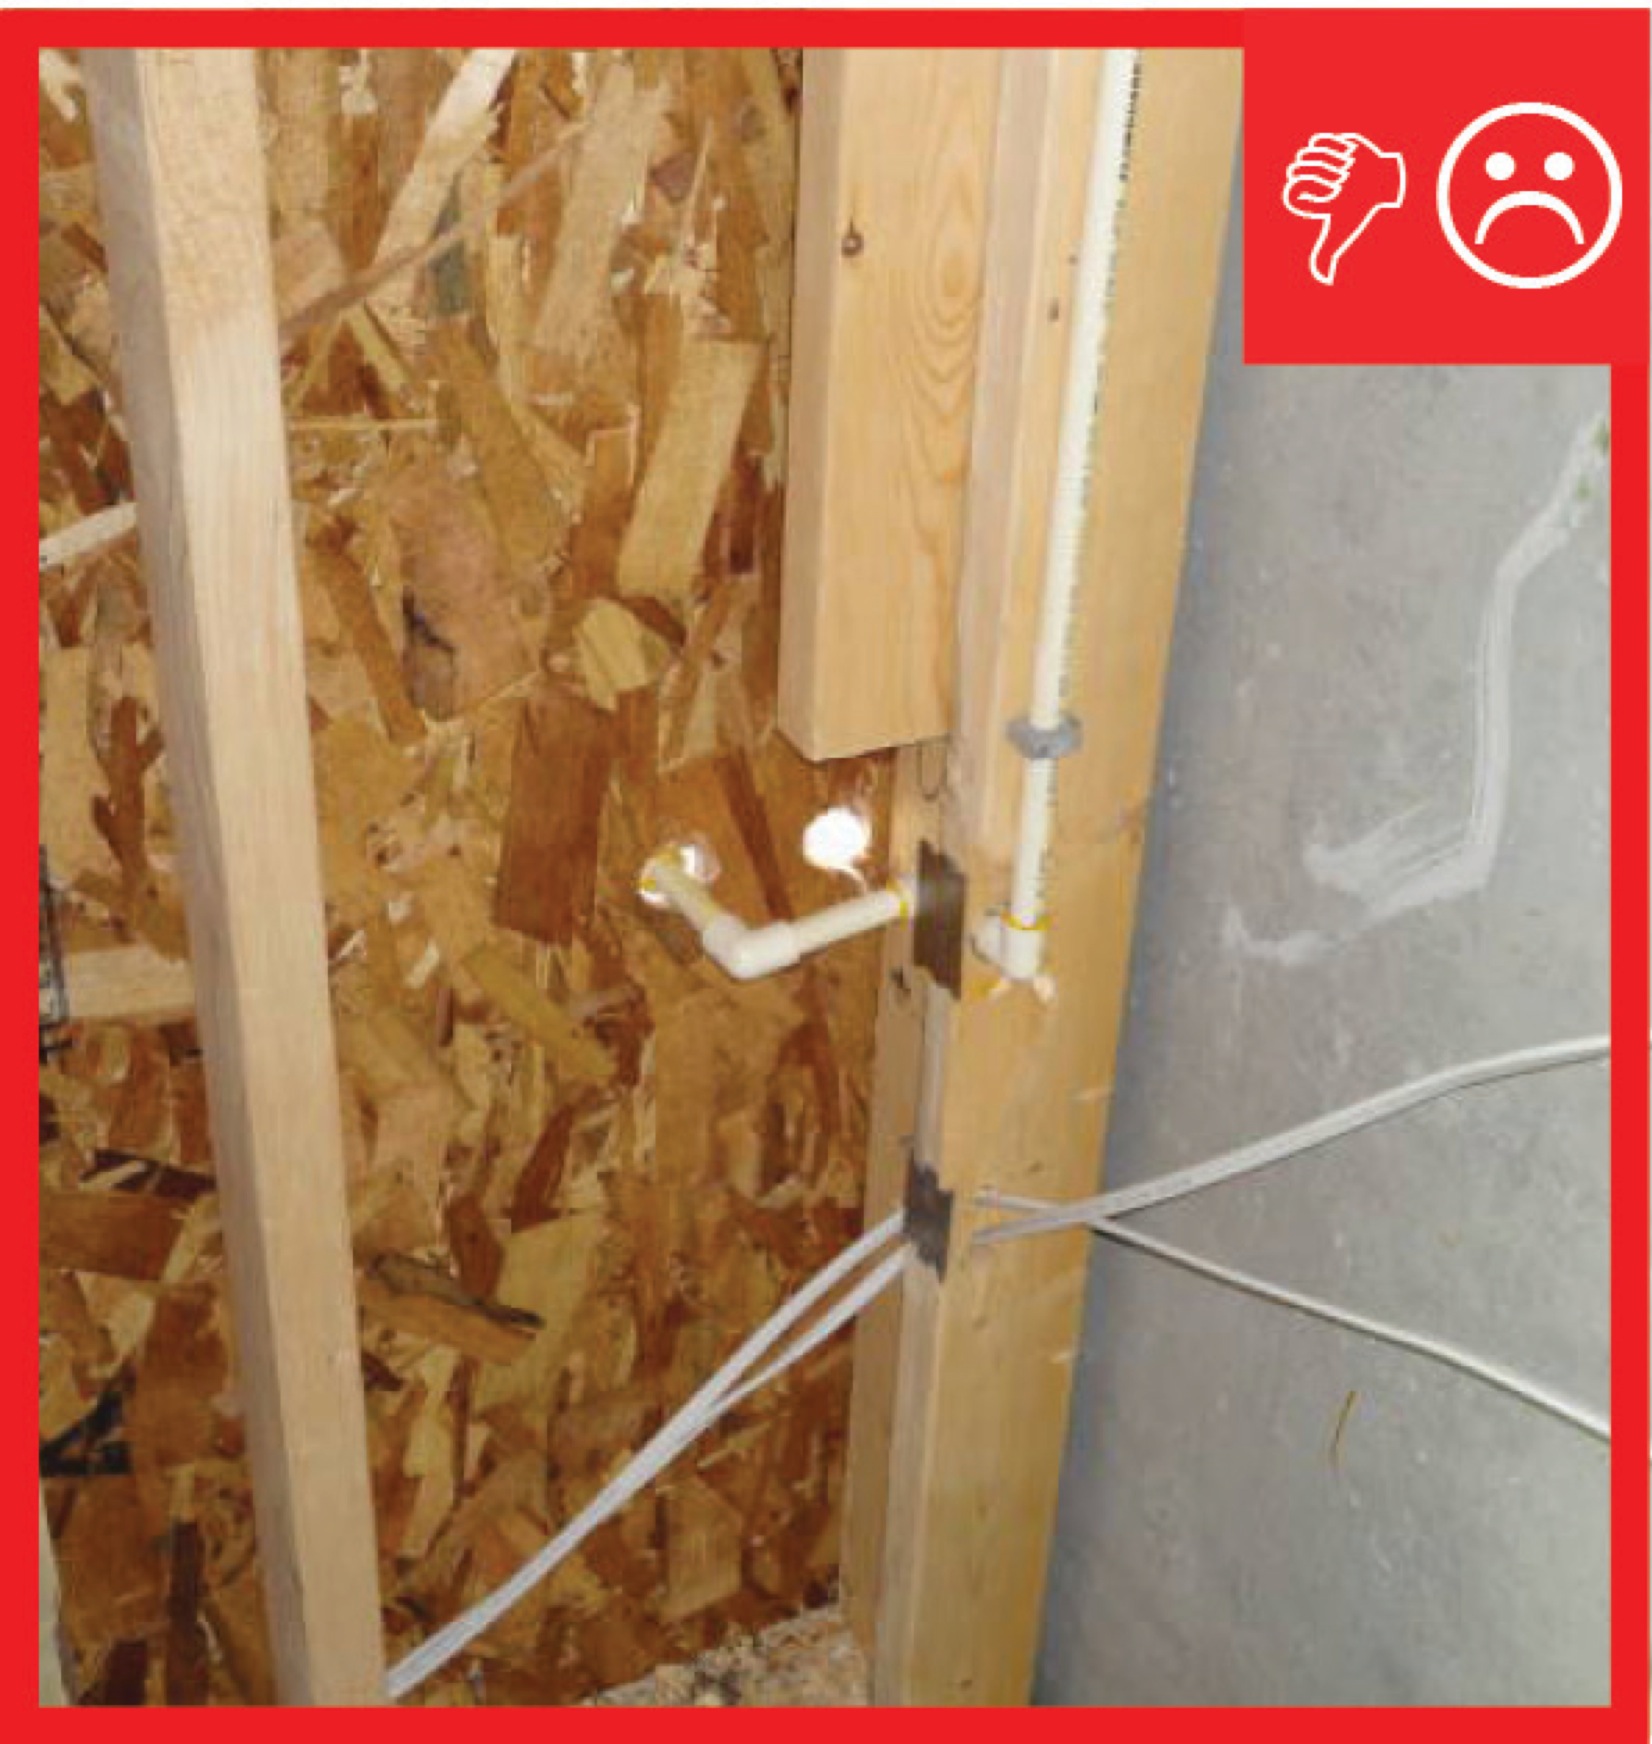
Exterior wall corners are typically framed with three studs. The third stud generally only provides a nailing edge for interior gypsum board and its typical placement blocks off the wall cavity, preventing insulation from being installed. If the third stud can be eliminated, there is more room inside the wall for insulation. Drywall clips, a 1x nailing strip, or a recycled plastic nailing strip can be used to create a two-stud corner that still provides a surface on which to hang the drywall. Using drywall clips also reduces opportunities for drywall cracking and nail popping, frequent causes of builder callbacks.

The designer should include the corner detail on building plans. It should be installed by the framer. If two-stud corners are used, they can be insulated by the insulation contractor. This task should be included in the contract for the appropriate trade, depending on the workflow at a specific job site. ENERGY STAR Version 3.0 requires that all exterior corners shall be constructed to allow access for the installation of ≥ R-6 insulation that extends to the exterior wall sheathing. See the Compliance tab for 2009 IECC-specified wall insulation levels.

How to Insulate Corners

Construct exterior corners to allow access for the installation of > R-6 insulation that extends to the exterior wall sheathing in one of the following ways:

  1. Construct a two-stud corner using a nailing strip or drywall clips, which allows the wall cavity at the corner to be insulated in sequence with the rest of the installation at full wall thickness.
  • When drywall clips are used, they should be installed above the level of the interior trim so trim nails will not interfere.
  • If installing trim, the noncoped trim piece should be installed first, against the drywall that bears on the clip, so that the coped trim piece can be nailed to the stud.
  • If rigid foam is used as the sheathing instead of OSB or another solid nailable sheathing, install a wood nailer strip behind the sheathing if necessary for attaching exterior trim or siding at the corner on the side that does not have a stud.
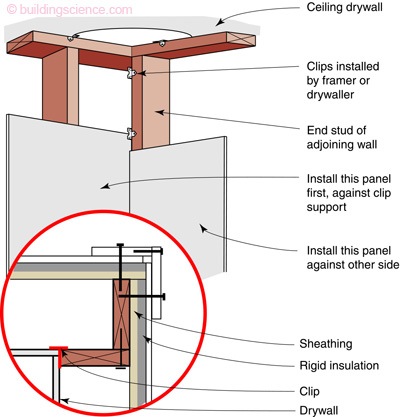
Two-stud corner using drywall clips; detail shows nail placement for exterior trim
Source
Courtesy Of
BSC
Figure 1. This side view shows drywall clips installed on studs at a two-stud corner (the second stud is not visible behind the first corner stud). The plan view in the detail shows the placement of nails for fastening exterior corner trim (Source: Building Science Corporation).
Conventional three-stud corners leave a cavity that must be insulated by the framers—not good
Source
Author(s)
Baechler Michael C,
et al.
Organization(s)
Pacific Northwest National Laboratory,
PNNL,
Oak Ridge National Laboratory,
ORNL,
U.S. Department of Energy,
DOE
Description

Guide describing measures that builders in the cold and very cold climates can take to build homes that have whole-house energy savings of 40% over the Building America benchmark with no added overall costs for consumers.
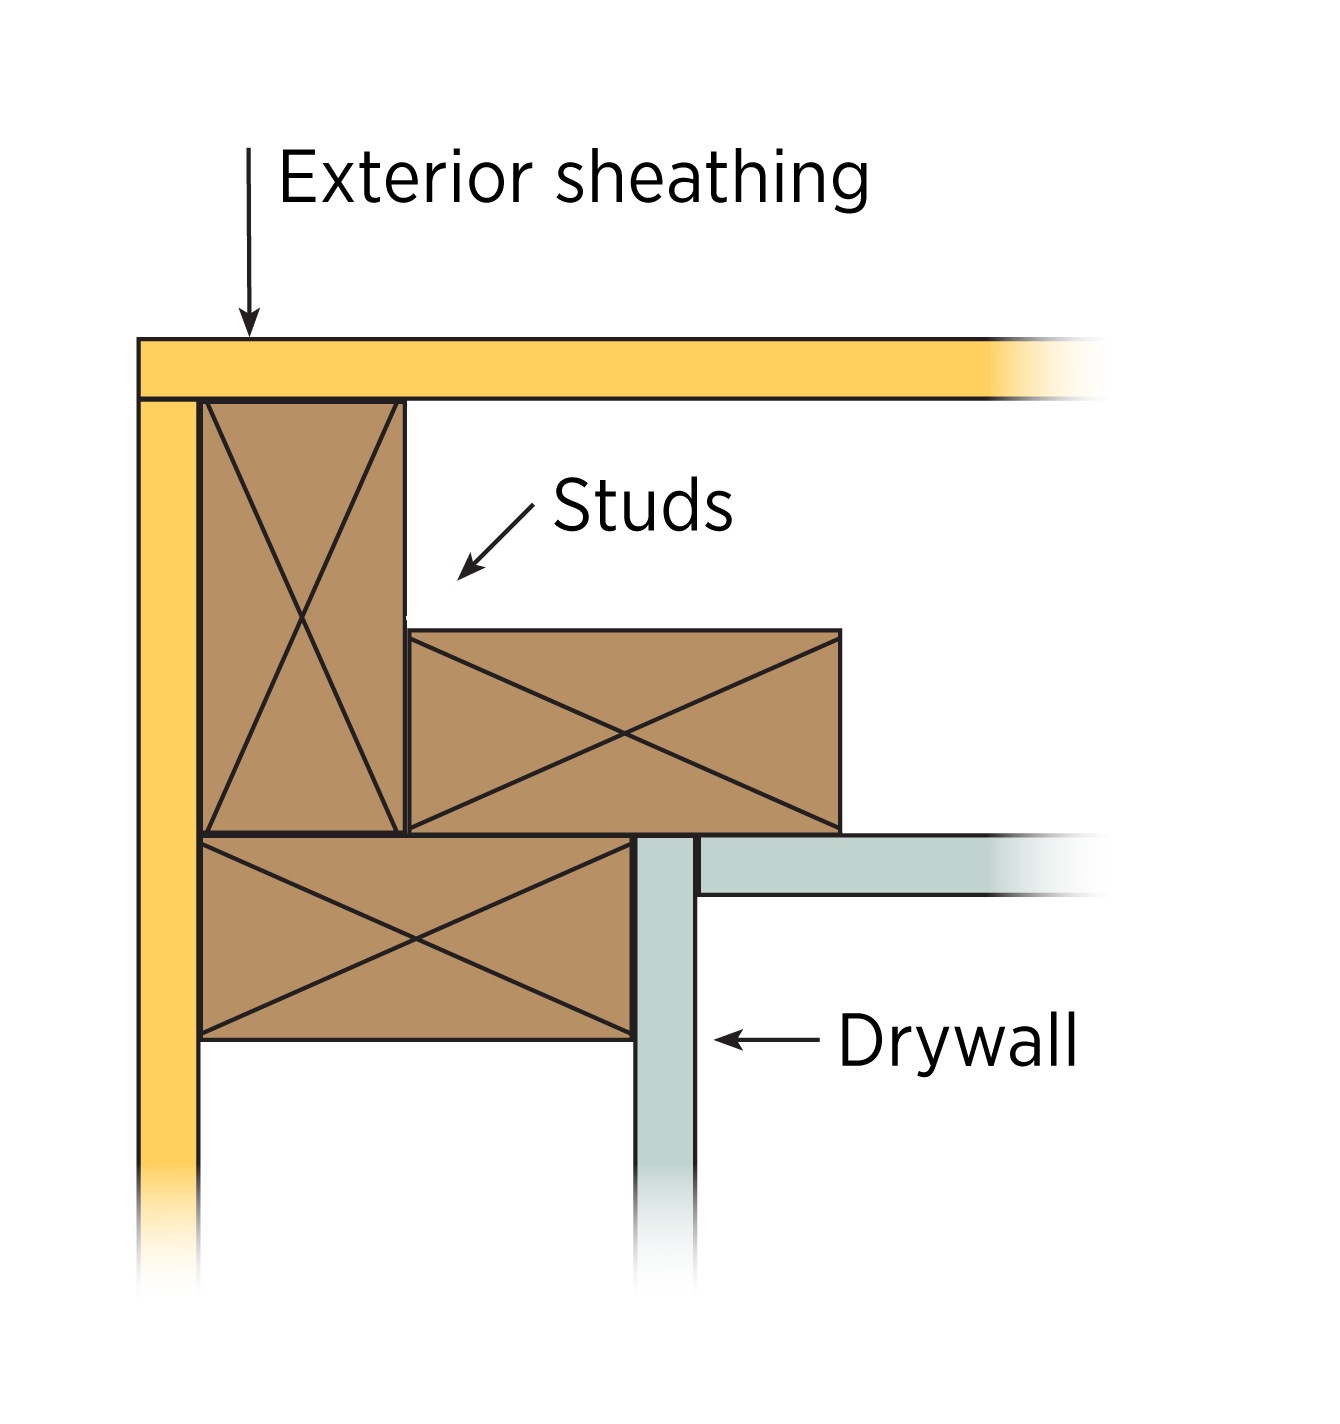
Figure 2. Conventional three-stud corners leave a cavity that must be insulated by the framers—not good (Source: Building America Best Practices Series Volume 12: 40% Whole-House Energy Savings in the Cold and Very Cold Climates 2011). 
The improved three-stud corner allows insulation to be installed later, in sequence
Source
Author(s)
Baechler Michael C,
et al.
Organization(s)
Pacific Northwest National Laboratory,
PNNL,
Oak Ridge National Laboratory,
ORNL,
U.S. Department of Energy,
DOE
Description

Guide describing measures that builders in the cold and very cold climates can take to build homes that have whole-house energy savings of 40% over the Building America benchmark with no added overall costs for consumers.
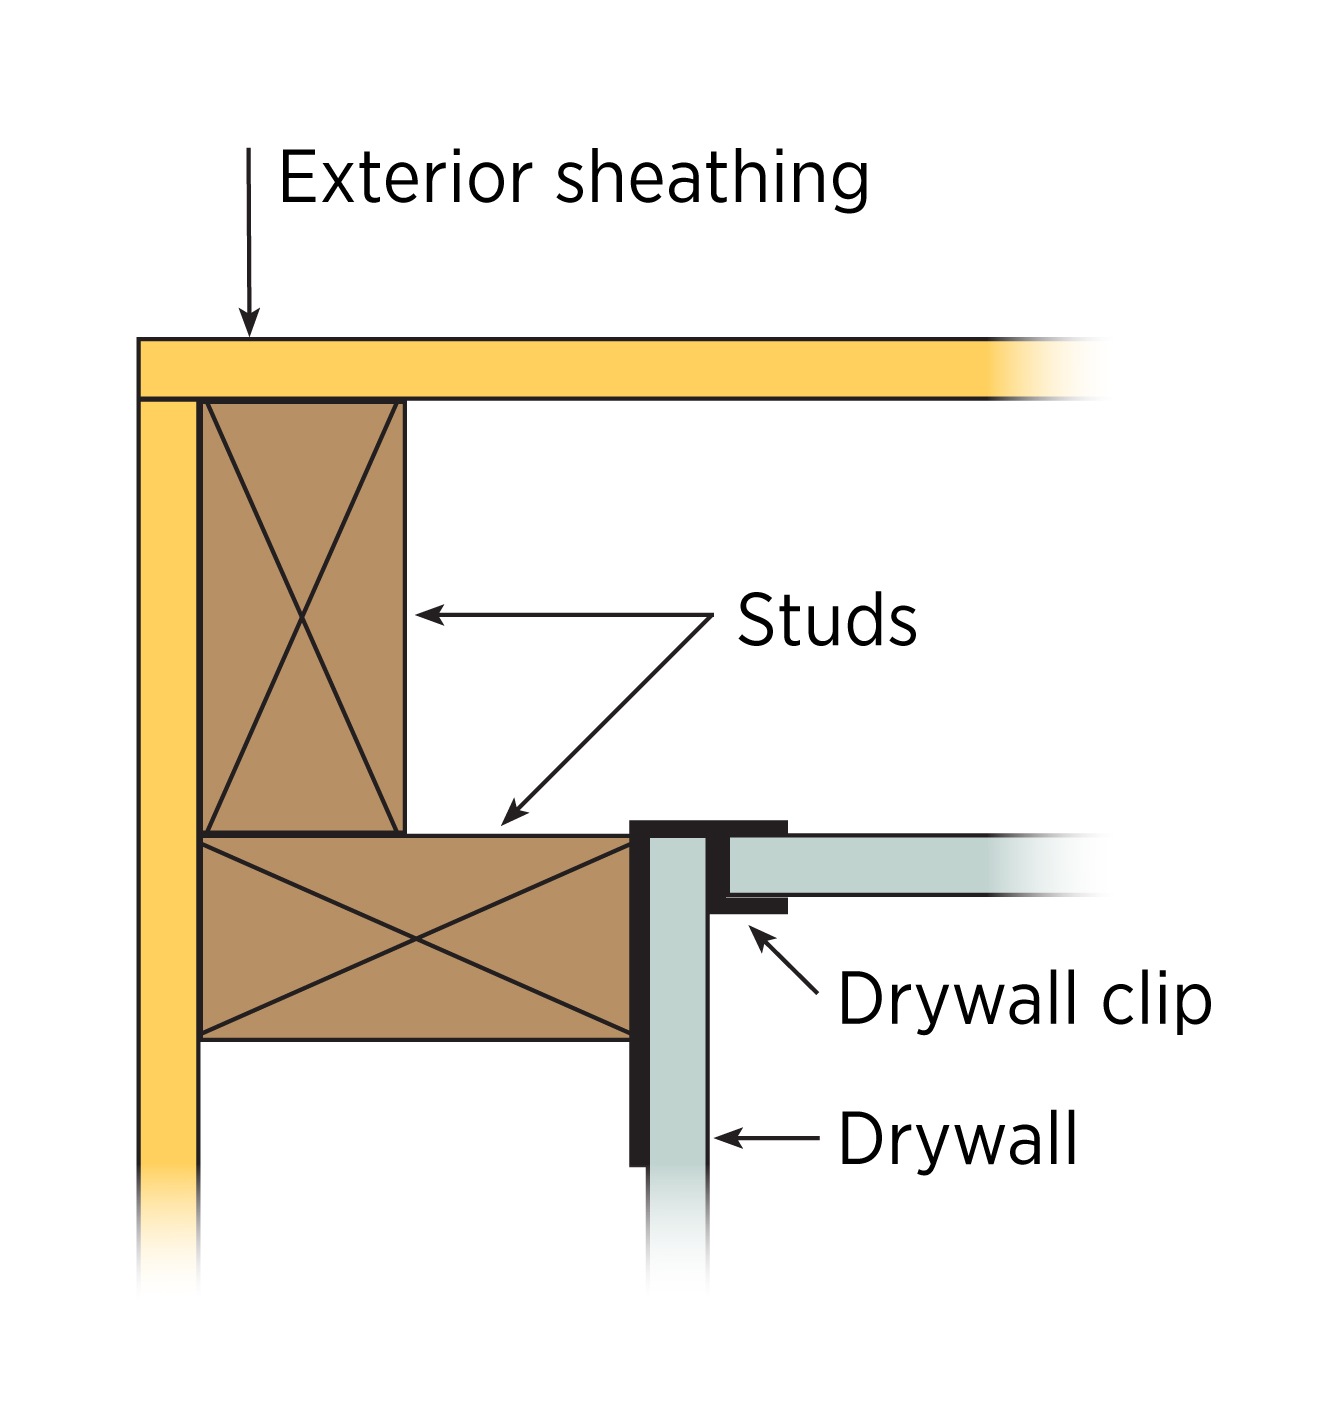
Figure 3. The improved three-stud corner allows insulation to be installed later, in sequence (Source: Building America Best Practices Series Volume 12: 40% Whole-House Energy Savings in the Cold and Very Cold Climates 2011). 
Two-stud corners with drywall clips use the least wood and give the best thermal performance
Source
Author(s)
Baechler Michael C,
et al.
Organization(s)
Pacific Northwest National Laboratory,
PNNL,
Oak Ridge National Laboratory,
ORNL,
U.S. Department of Energy,
DOE
Description

Guide describing measures that builders in the cold and very cold climates can take to build homes that have whole-house energy savings of 40% over the Building America benchmark with no added overall costs for consumers.

Figure 4. Two-stud corners with drywall clips use the least wood and give the best thermal performance (Source: Building America Best Practices Series Volume 12: 40% Whole-House Energy Savings in the Cold and Very Cold Climates 2011). 

Ensuring Success

The quality of the insulation installation should be visually inspected by the site supervisor before the drywall is installed. It may be possible to detect heat loss at the corners of exterior walls with an infrared camera, if a sufficient temperature difference exists between the outside and the conditioned space of the house.

Region

No climate specific information applies.

Training

Right and Wrong Images
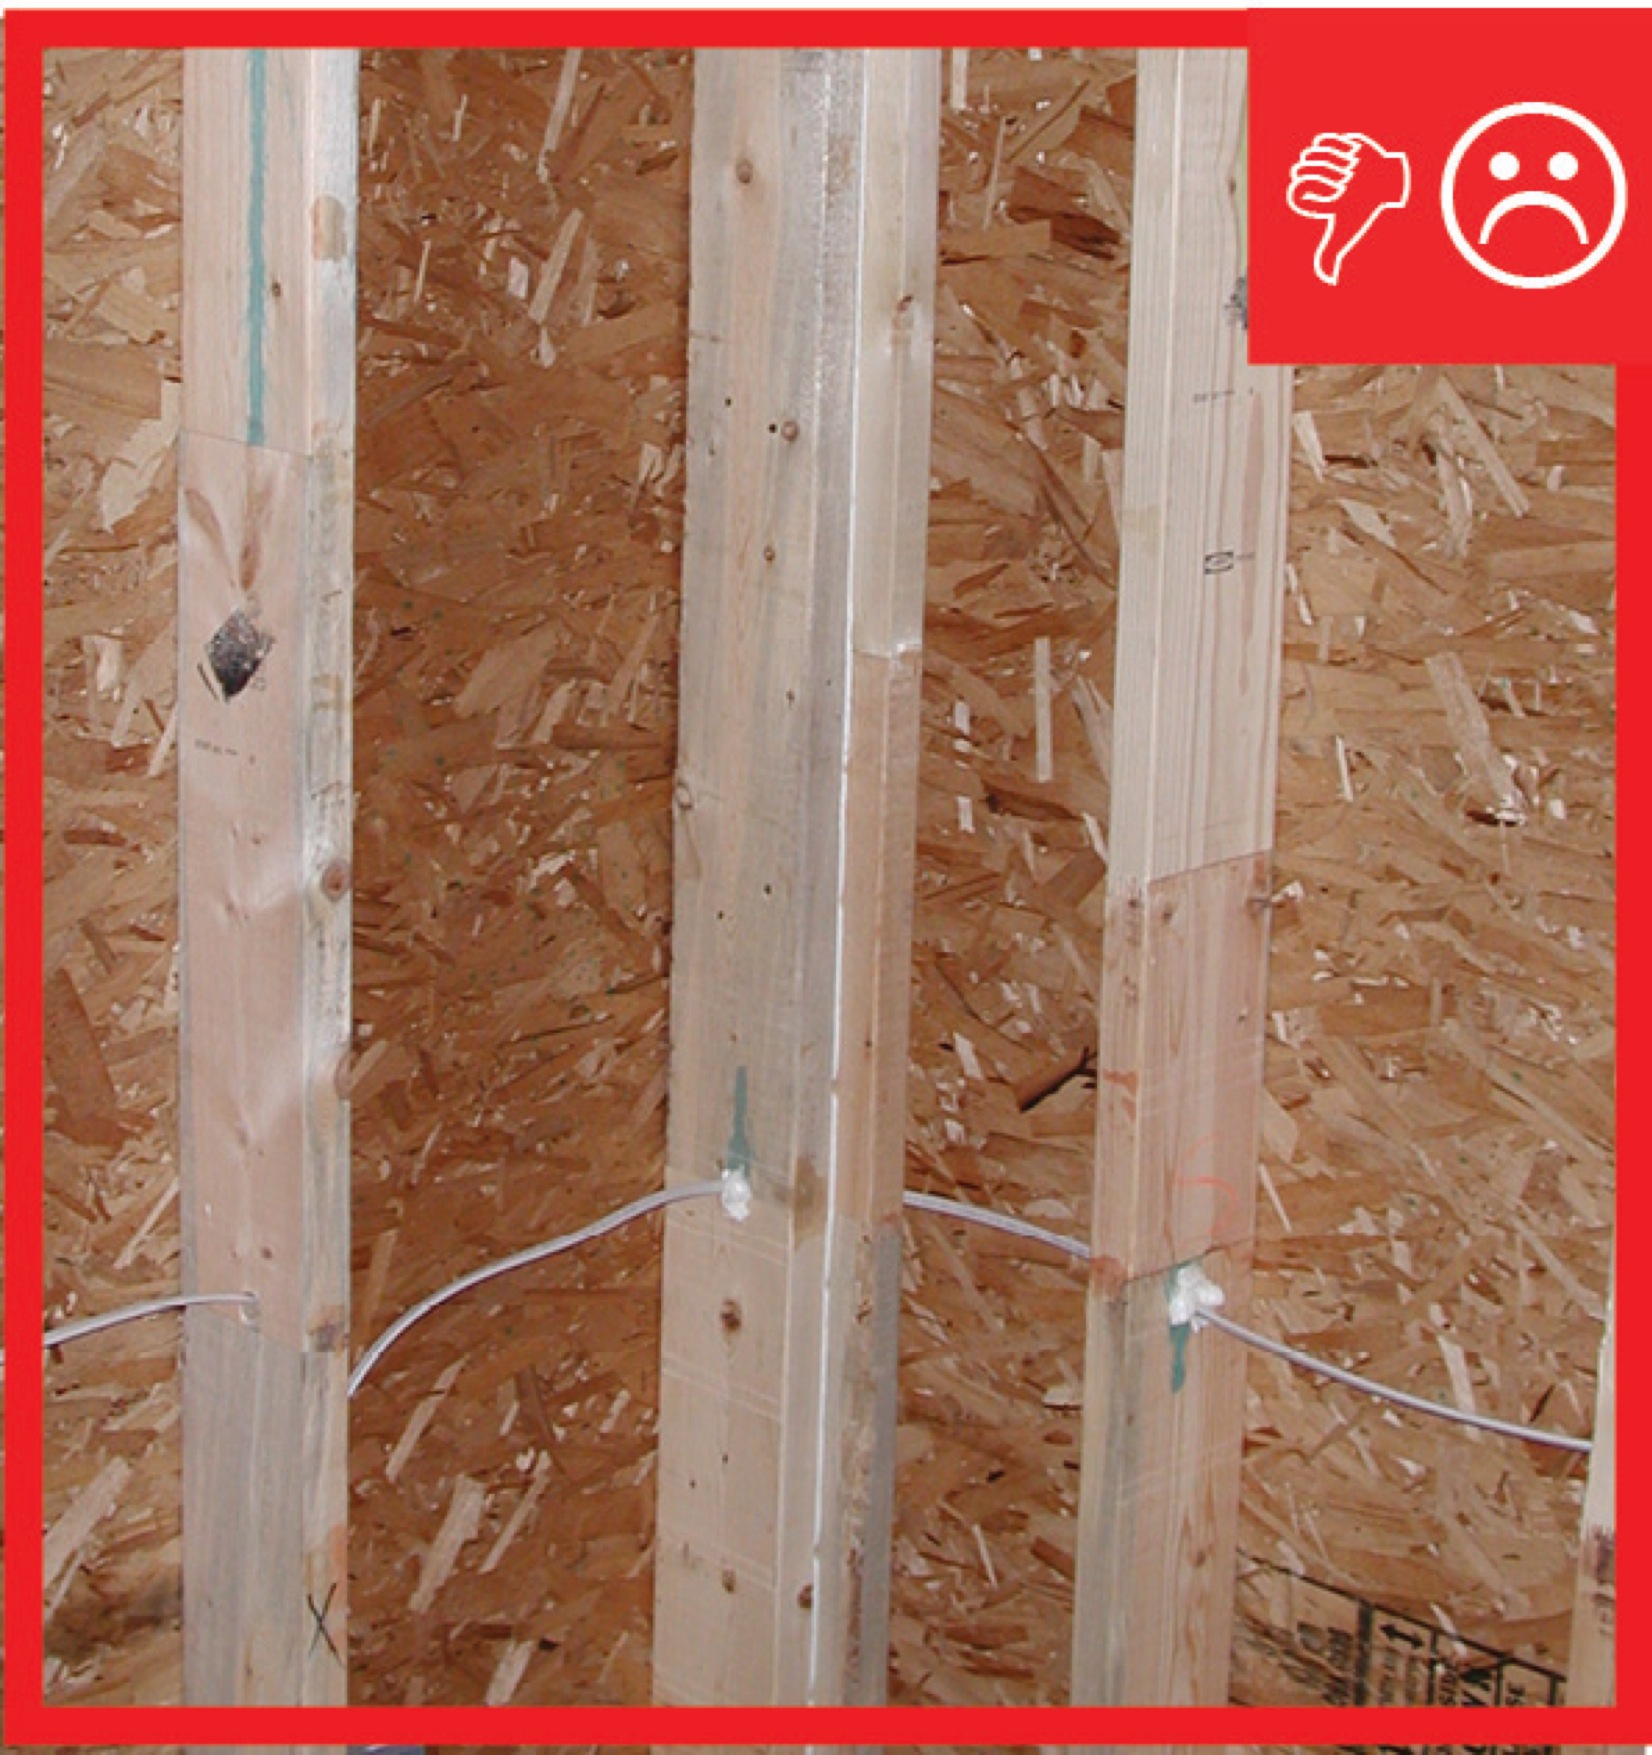
Wrong – Framing does not allow corner to be insulated
Source
Author(s)
U.S. Environmental Protection Agency,
ENERGY STAR
Organization(s)
EPA
Description

Guide describing details that serve as a visual reference for each of the line items in the Thermal Enclosure System Rater Checklist.
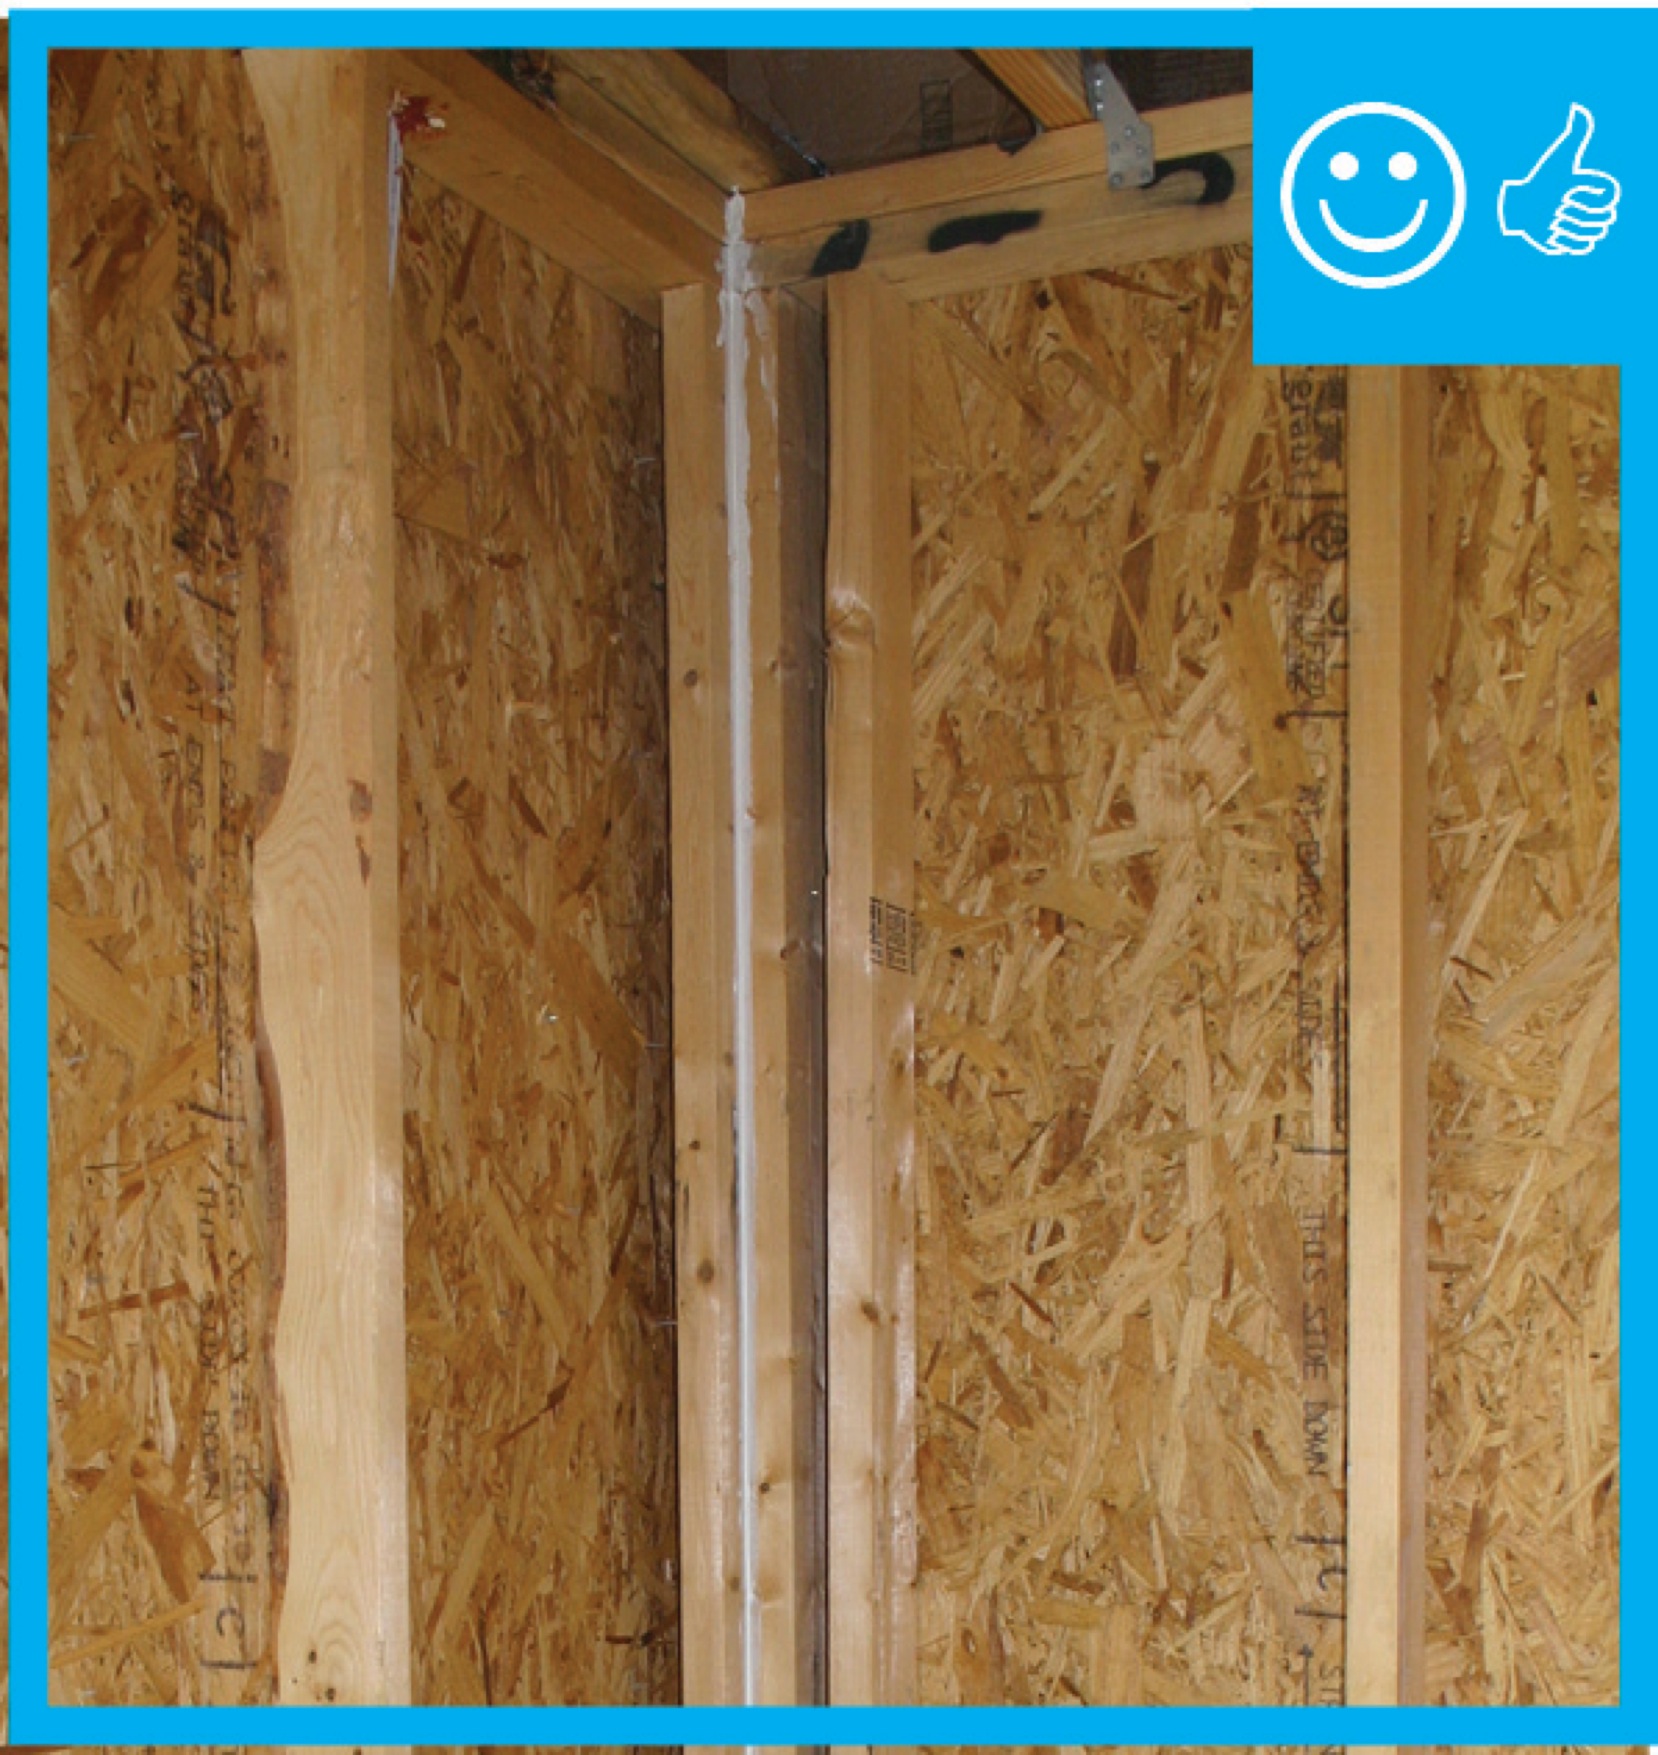
Right – Framing allows corner to be insulated
Source
Author(s)
U.S. Environmental Protection Agency,
ENERGY STAR
Organization(s)
EPA
Description

Guide describing details that serve as a visual reference for each of the line items in the Thermal Enclosure System Rater Checklist.
Wrong – Framing does not allow corner to be insulated
Source
Author(s)
U.S. Environmental Protection Agency,
ENERGY STAR
Organization(s)
EPA
Description

Guide describing details that serve as a visual reference for each of the line items in the Thermal Enclosure System Rater Checklist.
Right – Framing allows corner to be insulated
Source
Author(s)
U.S. Environmental Protection Agency,
ENERGY STAR
Organization(s)
EPA
Description

Guide describing details that serve as a visual reference for each of the line items in the Thermal Enclosure System Rater Checklist.
Wrong – Framing does not allow corner to be insulated
Source
Author(s)
U.S. Environmental Protection Agency,
ENERGY STAR
Organization(s)
EPA
Description

Guide describing details that serve as a visual reference for each of the line items in the Thermal Enclosure System Rater Checklist.
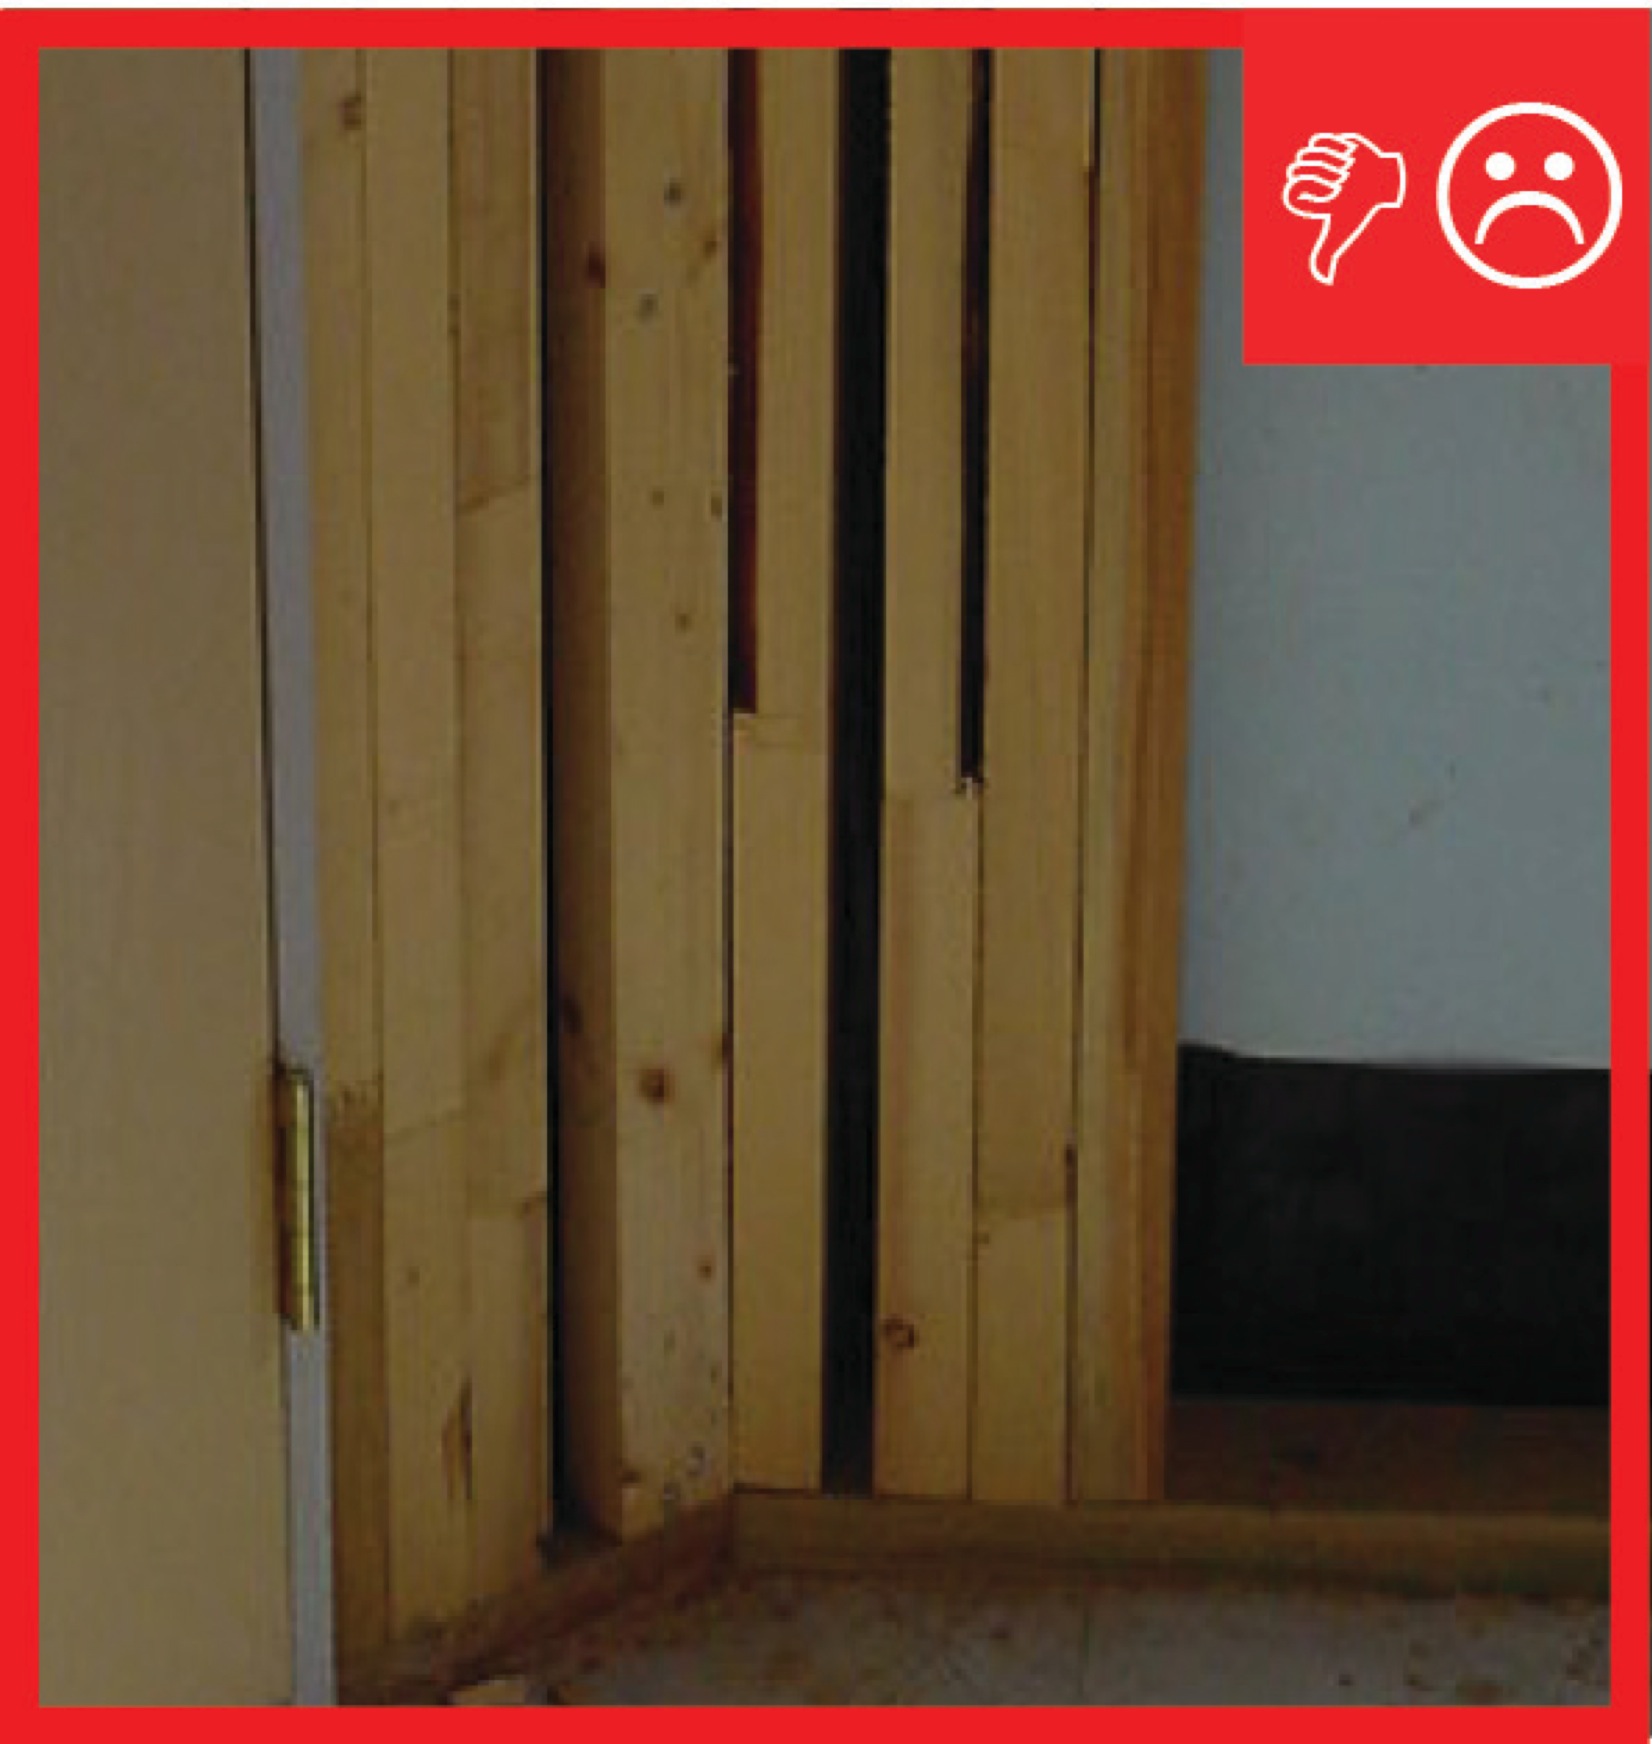
Wrong – Excessive framing will not allow corner to be insulated
Source
Author(s)
U.S. Environmental Protection Agency,
ENERGY STAR
Organization(s)
EPA
Description

Guide describing details that serve as a visual reference for each of the line items in the Thermal Enclosure System Rater Checklist.
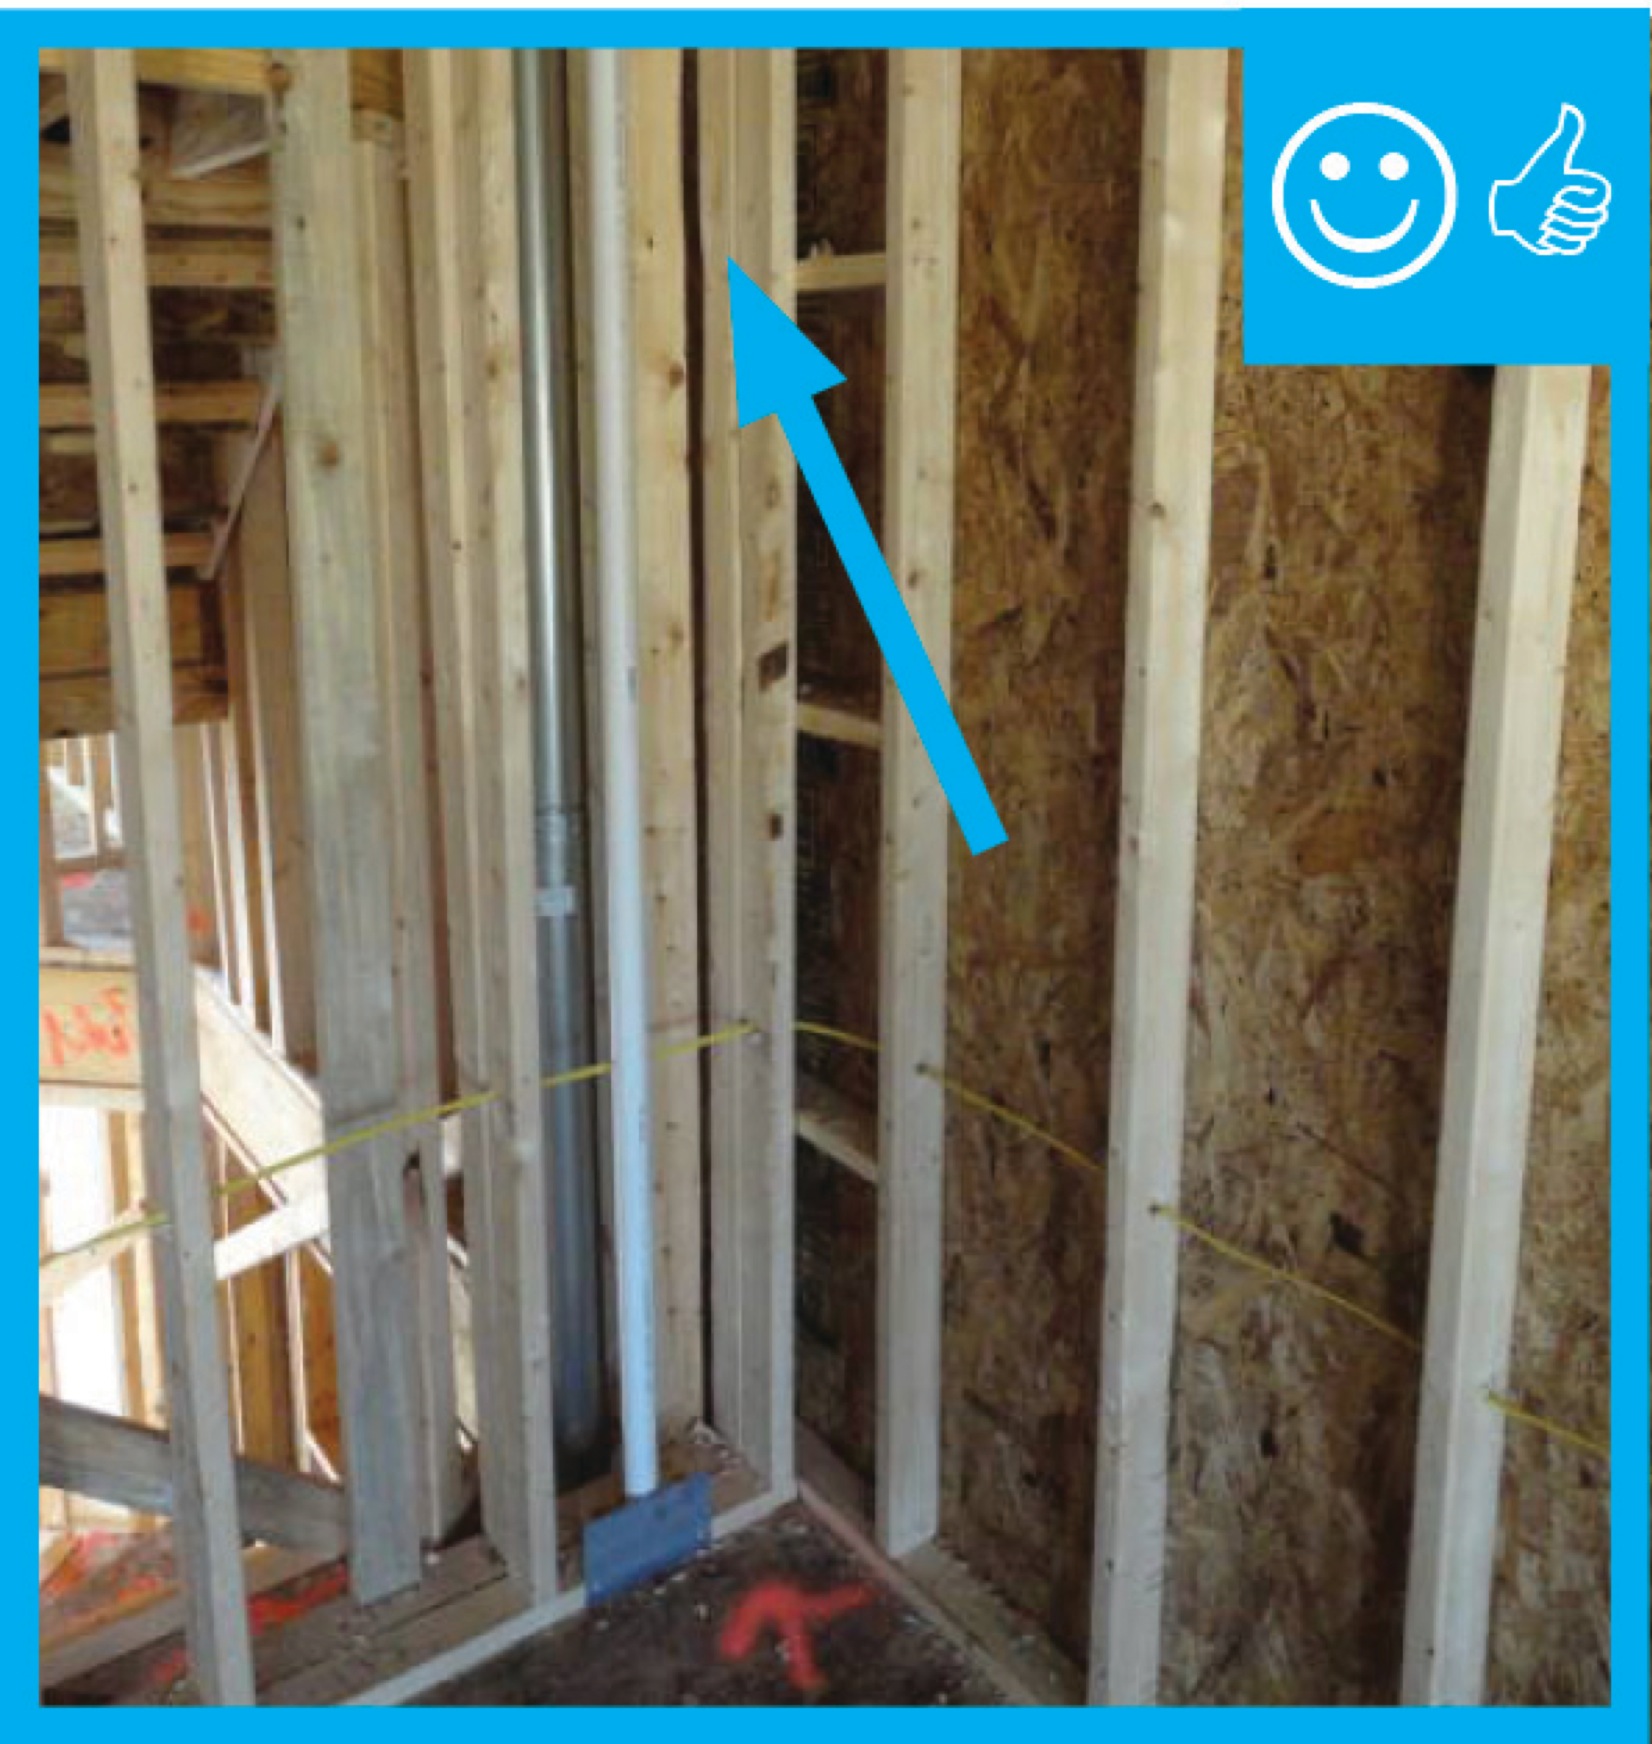
Right – Gap in framing will allow corner to be filled with insulation
Source
Author(s)
U.S. Environmental Protection Agency,
ENERGY STAR
Organization(s)
EPA
Description

Guide describing details that serve as a visual reference for each of the line items in the Thermal Enclosure System Rater Checklist.

Right – This three studs in this corner are positioned to allow insulation against more of the exterior wall than standard three-stud corners.
Source

Videos

Publication Date
·
Author(s)
Risinger
·
Organization(s)
Build with Matt Risinger
Description
Video describing traditional 2x4 16 inch on center framing versus advanced framing with 2x6 stud walls at 24 inch on center, insulated corners and headers, wall stud-ceiling joist alignment, etc. providing a strong wall with more room for insulation.

CAD Files

2-stud corner with drywall clips
Download: DWG PDF
2-stud corner with 1x4 backer
Download: DWG PDF
3-stud corner with rigid insulation
Download: DWG PDF
Conceptual 3D advanced framing drawing
Download: DWG PDF
Conceptual 2 foot module house drawing
Download: DWG PDF
Corner installed plywood or OSB as shear bracing
Download: DWG PDF

More Info

Case Studies

References and Resources

Publication Date
·
Author(s)
U.S. Environmental Protection Agency,
ENERGY STAR
·
Organization(s)
EPA
Description
Guide describing details that serve as a visual reference for each of the line items in the Thermal Enclosure System Rater Checklist.
Publication Date
·
Author(s)
Southface Energy Institute,
et al.
·
Organization(s)
NAHB,
SEI,
ORNL,
NREL
Description
Fact sheet describing advanced wall framing.
Publication Date
·
Author(s)
Baechler Michael C,
et al.
·
Organization(s)
Pacific Northwest National Laboratory,
PNNL,
Oak Ridge National Laboratory,
ORNL,
U.S. Department of Energy,
DOE
Description
Guide describing measures that builders in the cold and very cold climates can take to build homes that have whole-house energy savings of 40% over the Building America benchmark with no added overall costs for consumers.
Publication Date
·
Author(s)
Lstiburek Joseph W
·
Organization(s)
Building Science Corporation,
BSC
Description
Report describing advanced framing techniques, including discussion of cost and energy savings.
Publication Date
·
Author(s)
APA - The Engineered Wood Association
·
Organization(s)
American Plywood Association,
APA
Description
Guide describing advanced framing, a system of construction framing techniques designed to optimize material usage and increase energy efficiency.
Publication Date
·
Author(s)
ENERGY STAR
·
Organization(s)
ENERGY STAR
Description
Website showing compliance timelines for various versions of the ENERGY STAR Single-Family New Home program requirements with links to national program requirements documents and checklists.

*For non-dated media, such as websites, the date listed is the date accessed.

Contributors to this Guide

The following authors and organizations contributed to the content in this Guide.

Sales

Building Science-to-Sales Translator

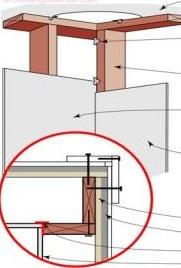
2-Stud Corner w/Drywall Clips = High-Efficiency Corner Framing
Image(s)

Technical Description

Traditionally built homes use three or more studs in exterior wall corners leaving minimal space for insulation, resulting in  thermal losses. By only using two studs and a clip to help hold the drywall, high-efficiency corner framing allows for insulation in the corners of a home and reduces heat loss. This in turn minimizes cold spots at corners while saving both energy and cost. It also helps minimize corner cracking because the two sheets of drywall that meet at the corner are effectively attached to the same stud, eliminating differential movement.

High-Efficiency Corner Framing
Sales Message

High-efficiency corner framing reduces the heat loss and gain though structural framing. What this means to you is less wasted energy along with enhanced comfort and quiet. Knowing there is one opportunity during construction to lock in quality construction, wouldn’t you agree advanced thermal protection is a great investment?

Last Updated

Questions? Comments? Contact our webmaster.

Disclaimer

This content is a work created with funding provided by the United States Department of Energy under Contract no DE-AC05-076RL01830 for the operation of Pacific Northwest National Laboratory. The information and guidance provided by Pacific Northwest National Laboratory (PNNL) in the content are intended solely for educational purposes only and do not constitute formal training or certification. It is provided with the explicit understanding that neither the United States Government nor the United States Department of Energy, nor the Contractor, nor any or their employees, nor any jurisdiction or organization that has cooperated in the development of these materials, makes any warranty, express or implied, or assumes any legal liability or responsibility for the accuracy, completeness, or usefulness or any information, apparatus, product, software, or process disclosed, or represents that its use would not infringe privately owned rights. Reference herein to any specific commercial product, process, or service by trade name, trademark, manufacturer, or otherwise does not constitute or imply its endorsement, recommendation, or favoring by the United States Government or any agency thereof, or Battelle Memorial Institute. The views and opinions of authors expressed herein do not necessarily state or reflect those of the United States Government or any agency thereof. Viewers assumes full responsibility for all actions that they may take from information provided in this content including ensuring the safety, code compliance, and proper functionality of any products they choose to install. Installation and use of such products should be performed in accordance with local regulations and manufacturer instructions.