Showing results 1 - 100 of 128
Image
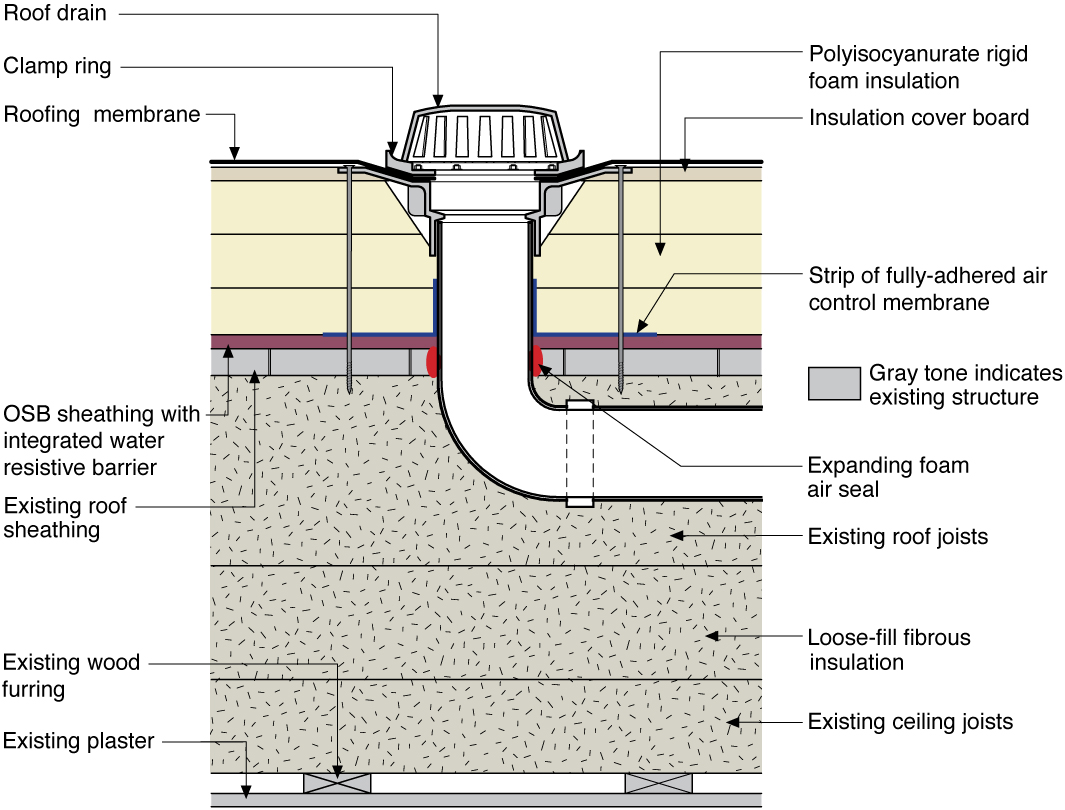
A roof drain is installed in an existing flat roof retrofitted with above-deck rigid foam insulation that is integrated with new air and water control layers
Image

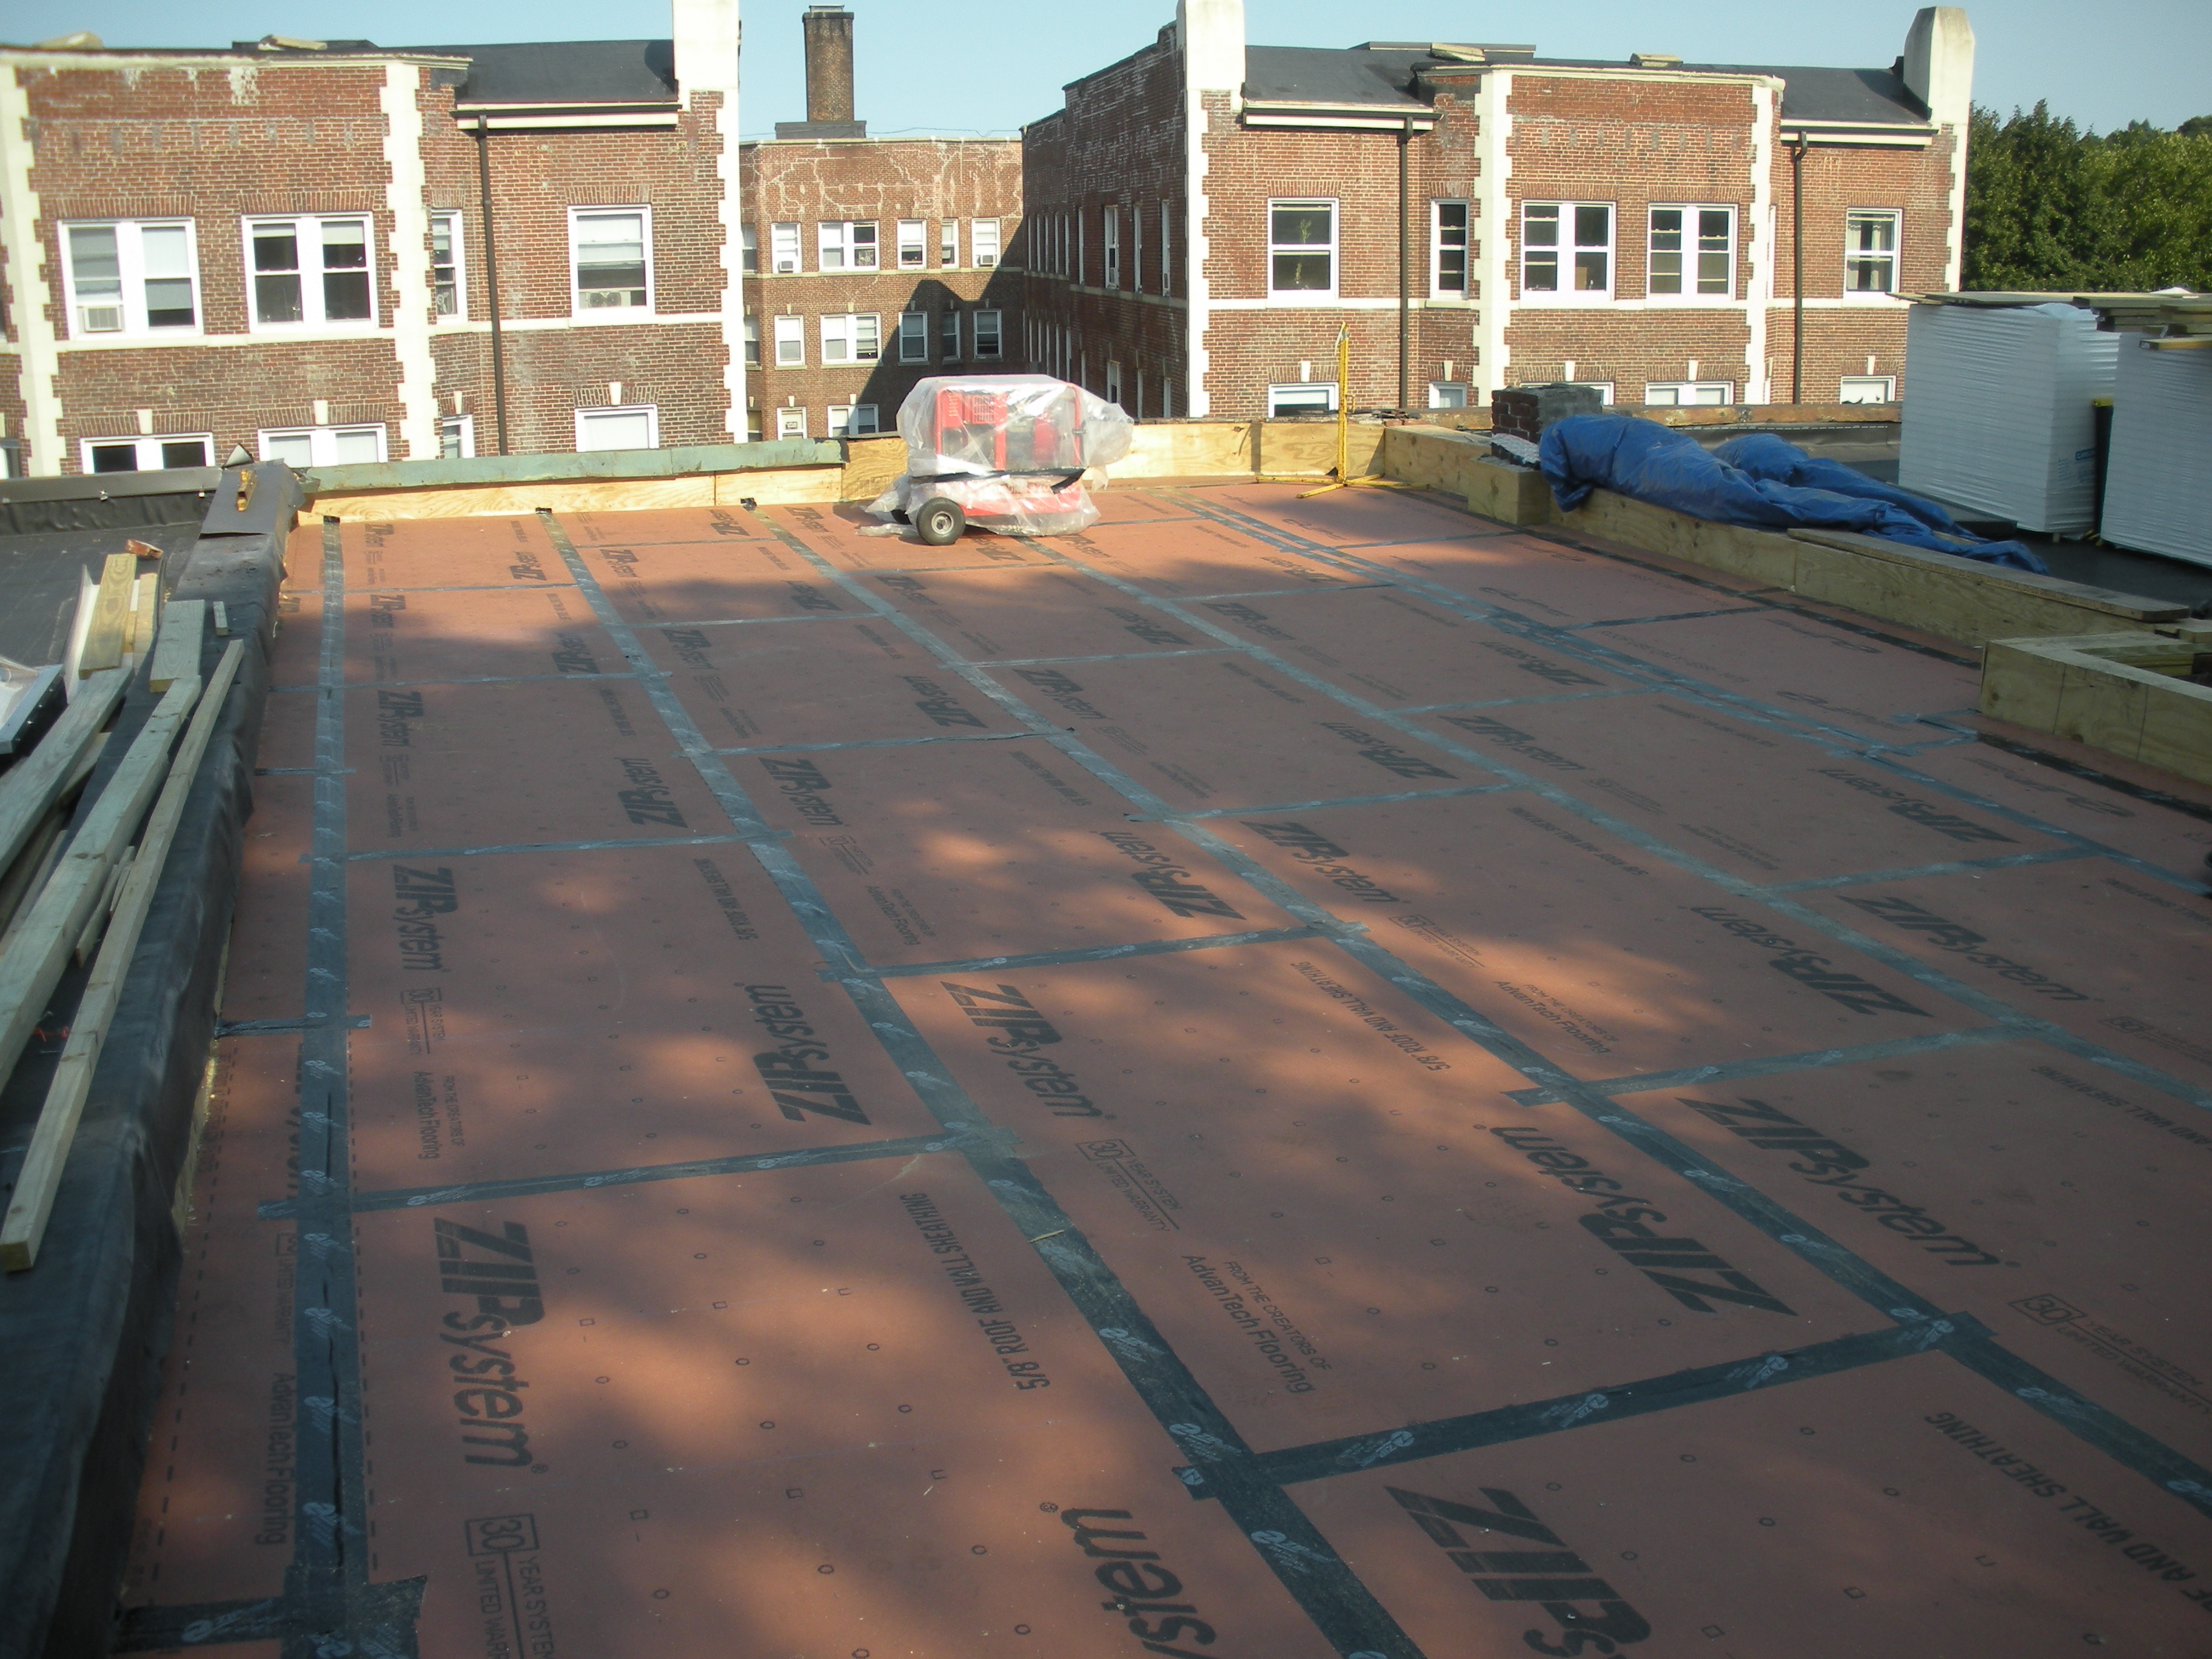
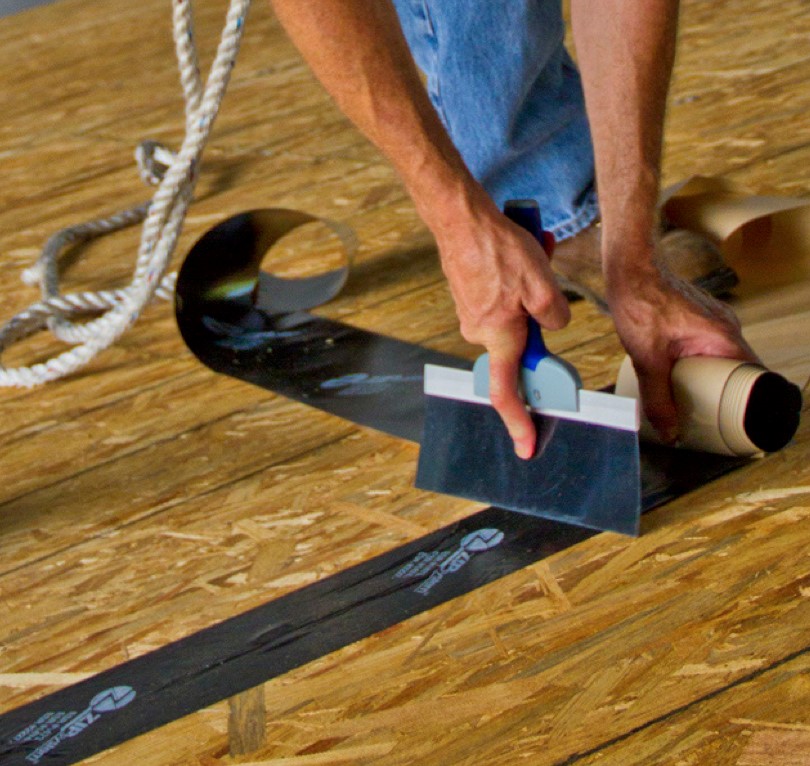
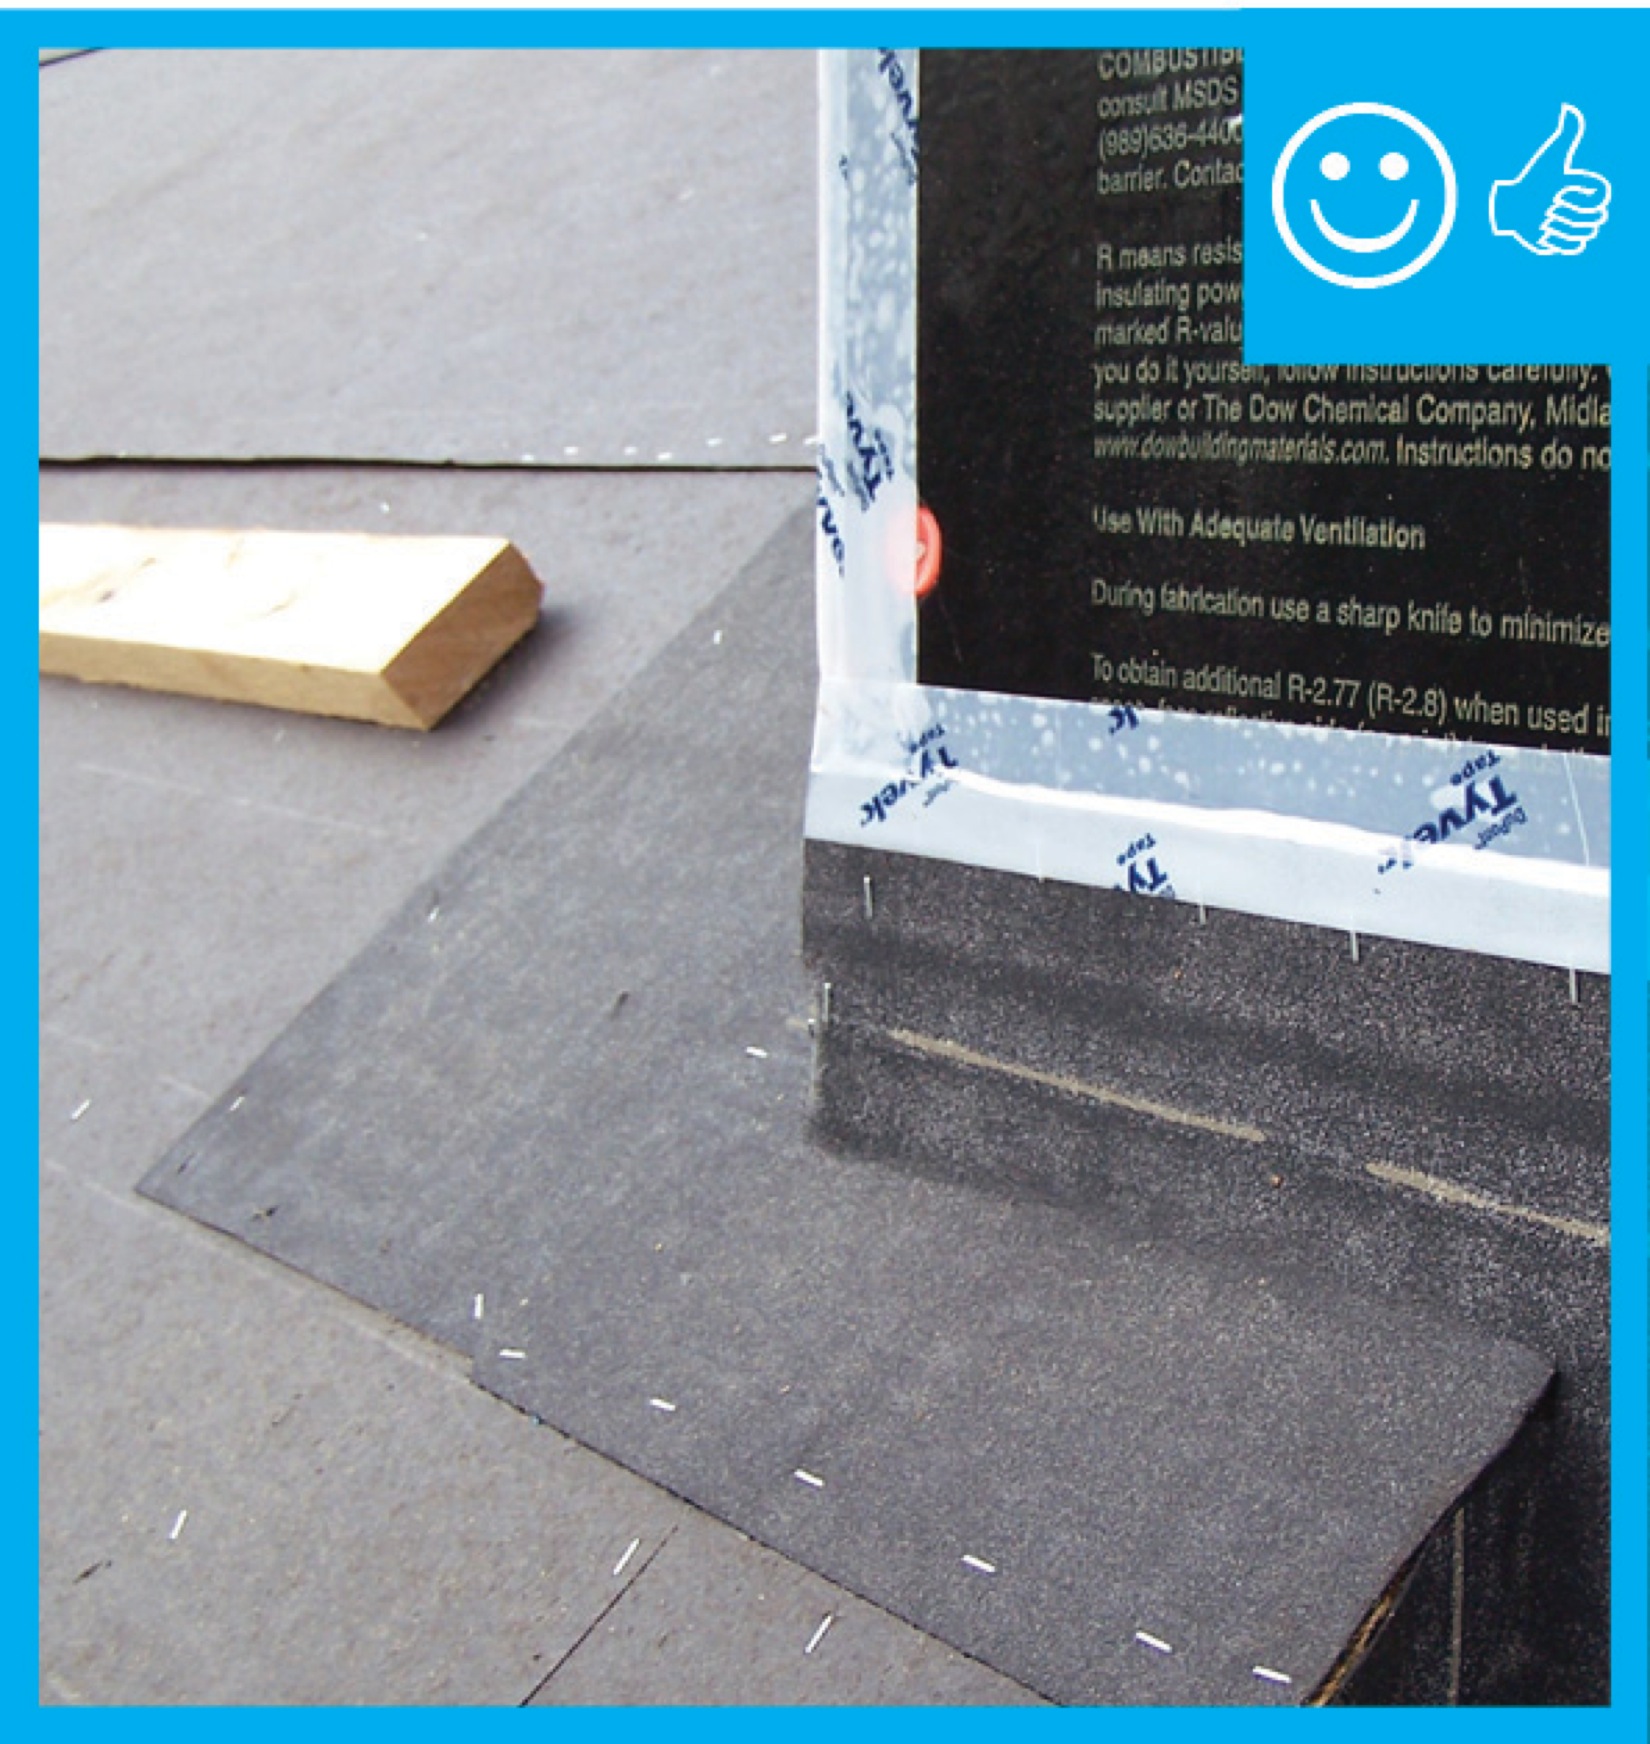
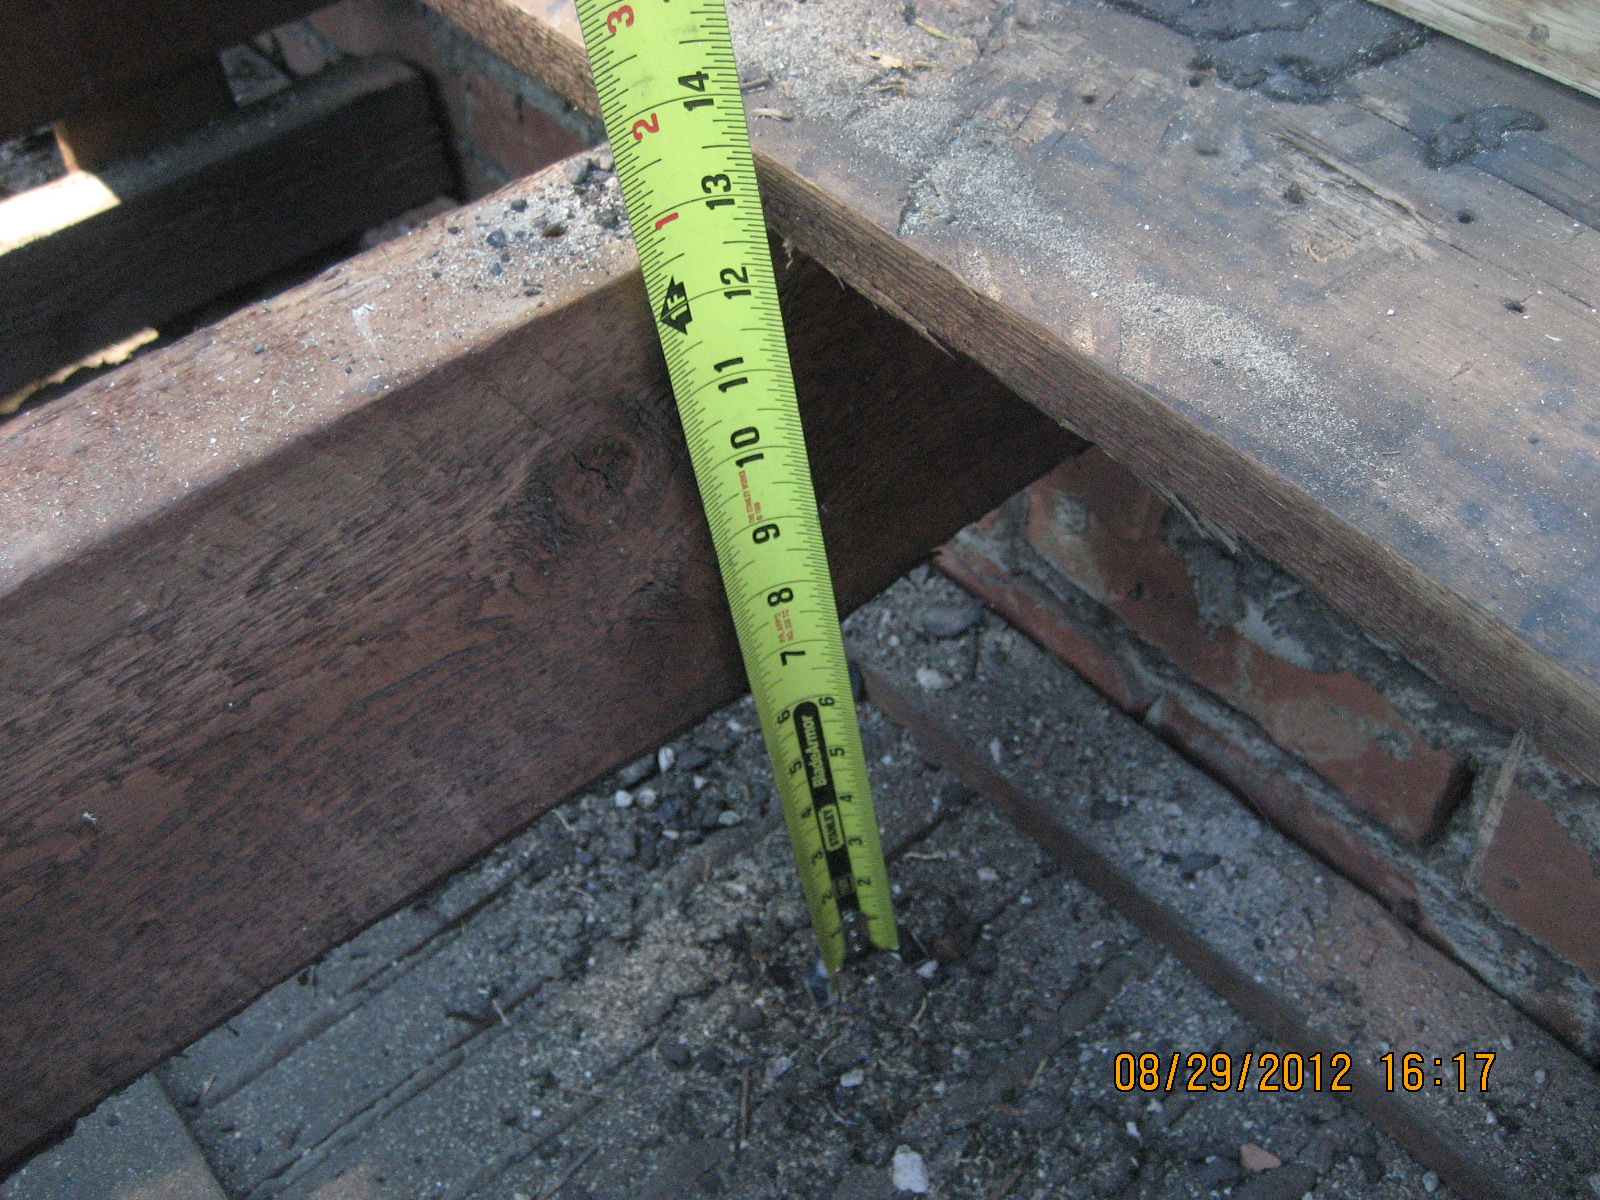
A strip of OSB sheathing is installed along the perimeter when retrofitting a flat roof with a parapet
Image
Image
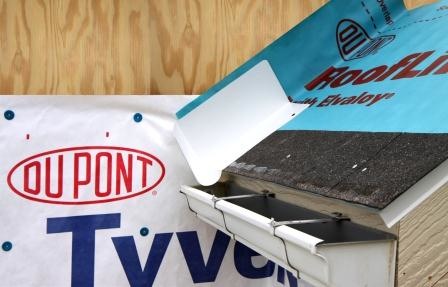
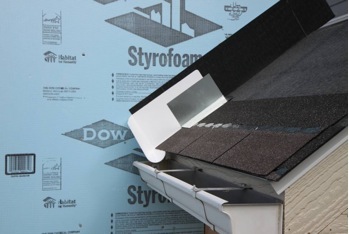
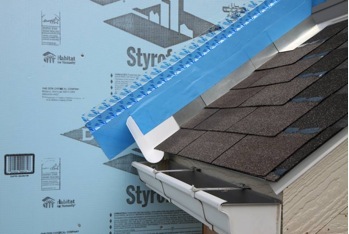
Apply self-adhesive flashing over top edge of the wall flashing, diverter, and housewrap
Image
Image
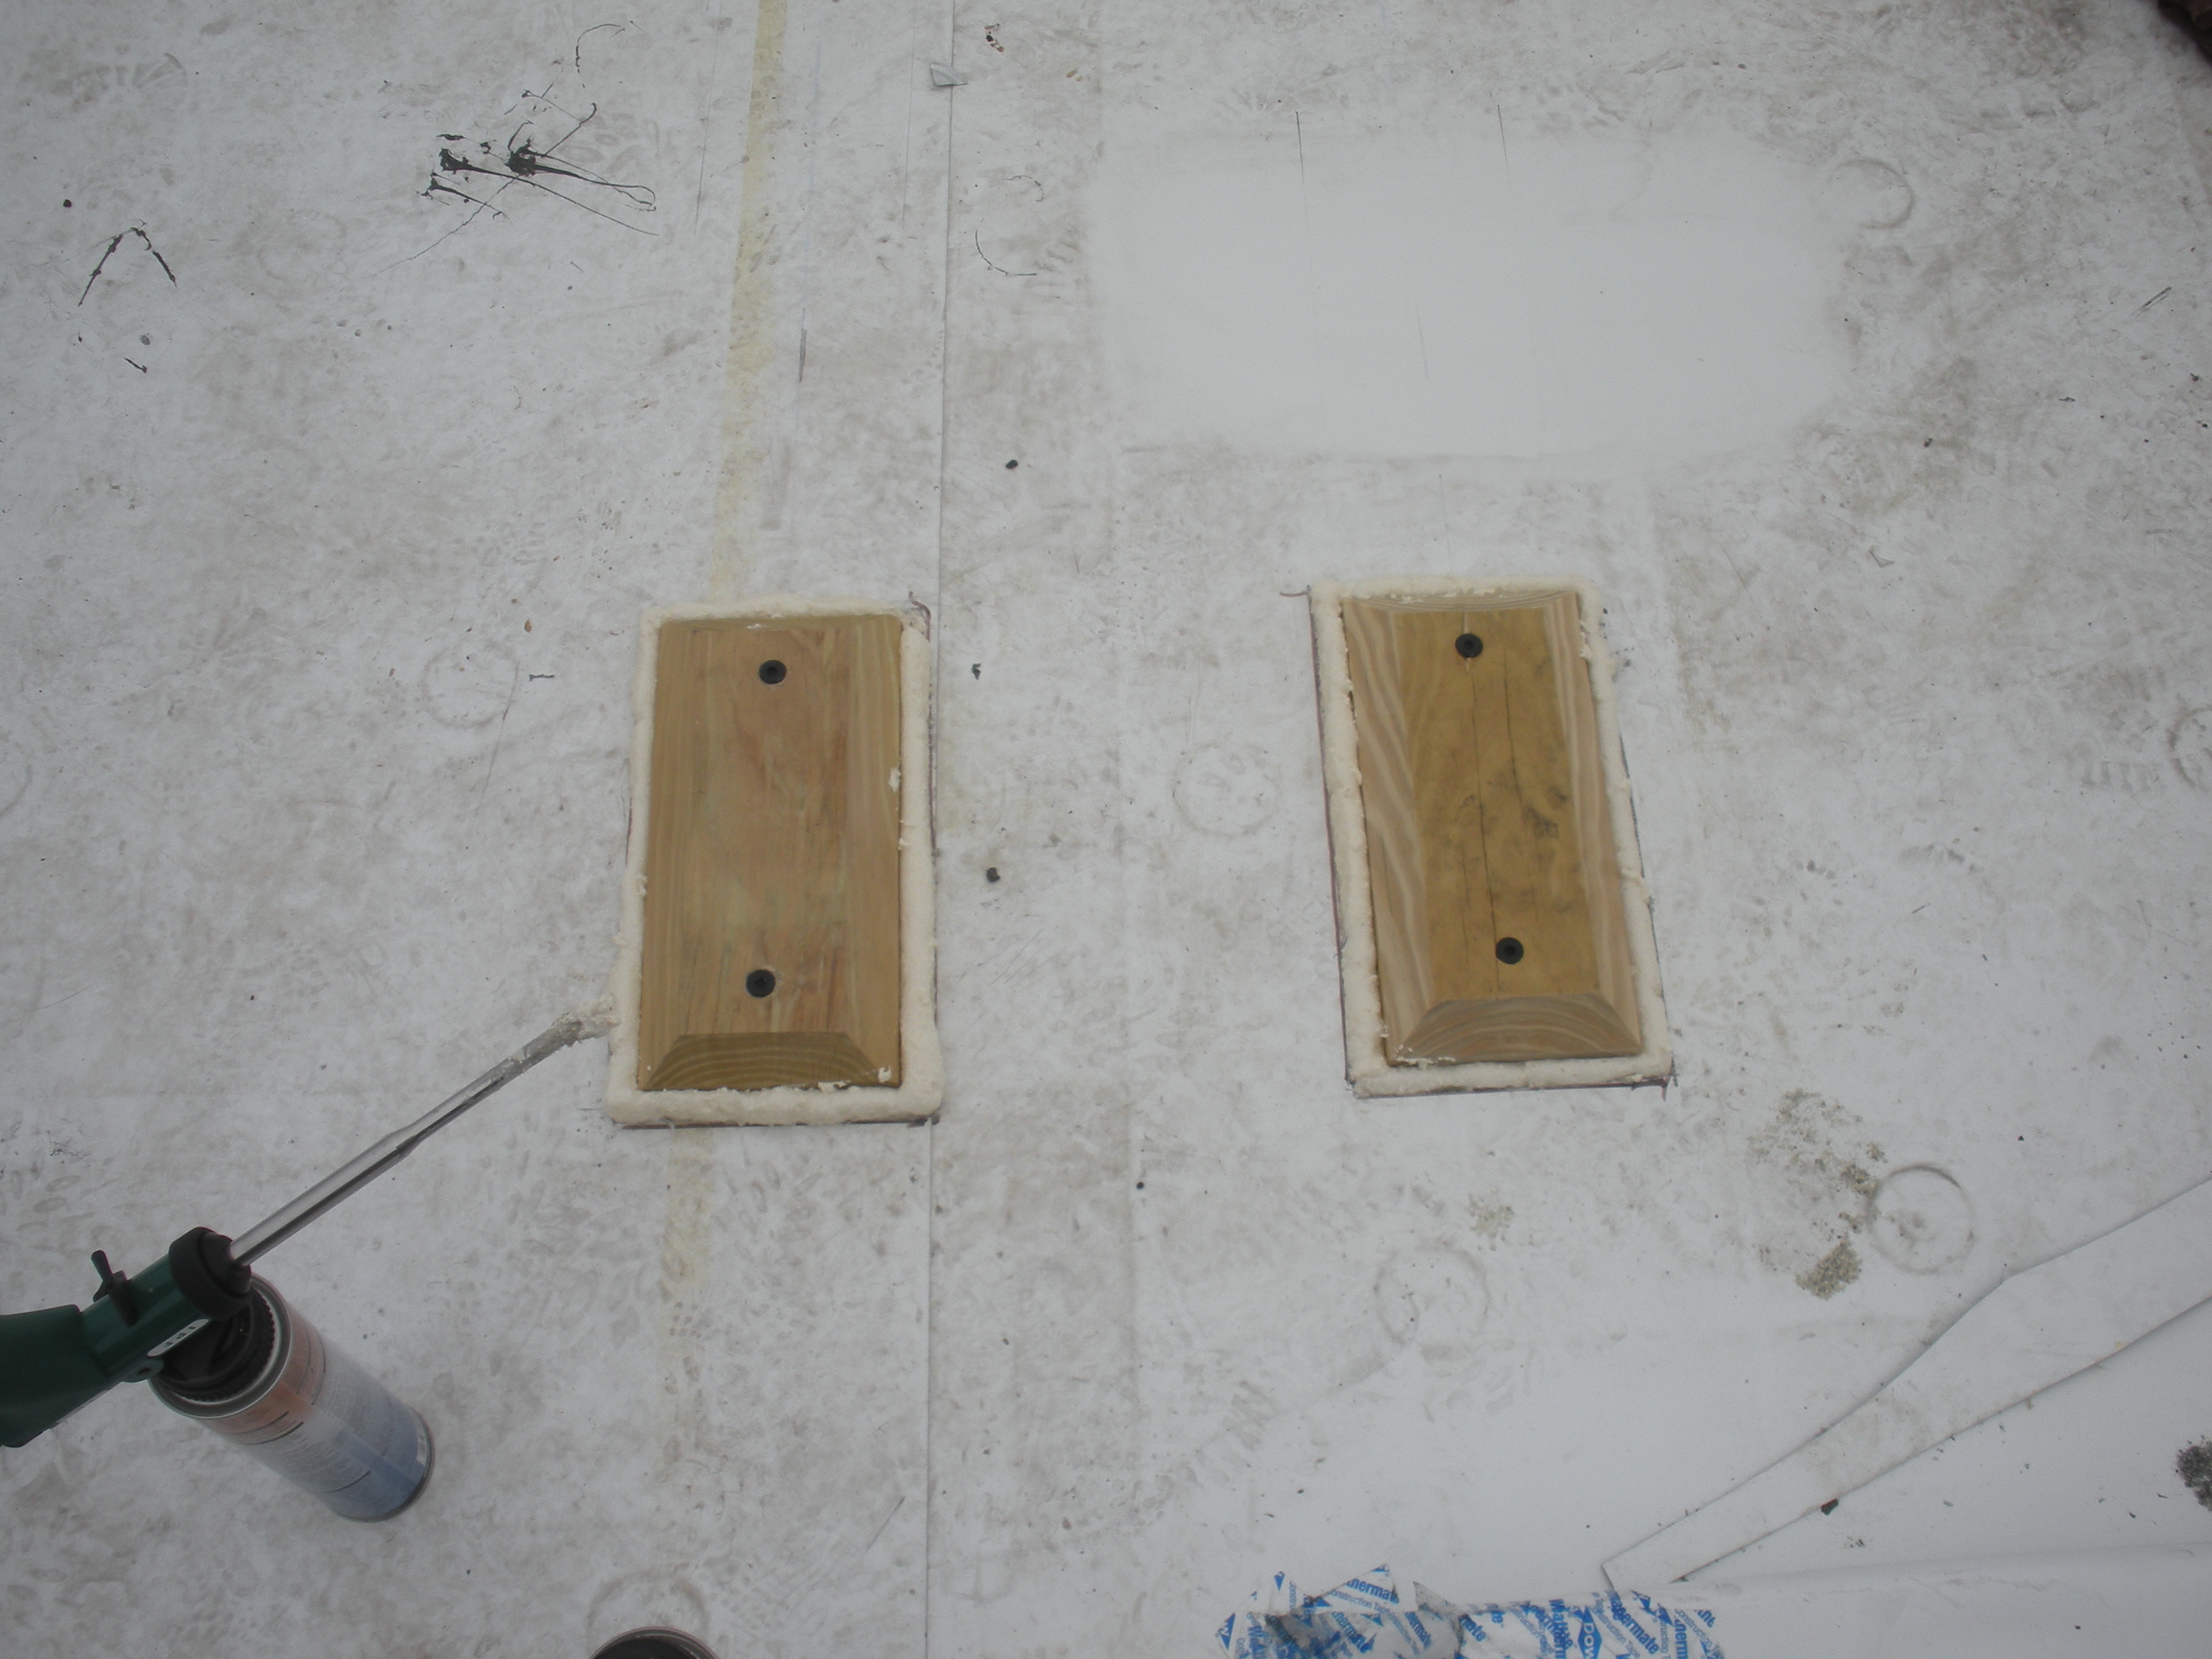
Blocking installed on a flat roof for a PV system rack is sealed around the edges with sealant then will be covered with self-adhering roof membrane to prevent water leakage
Image
Image
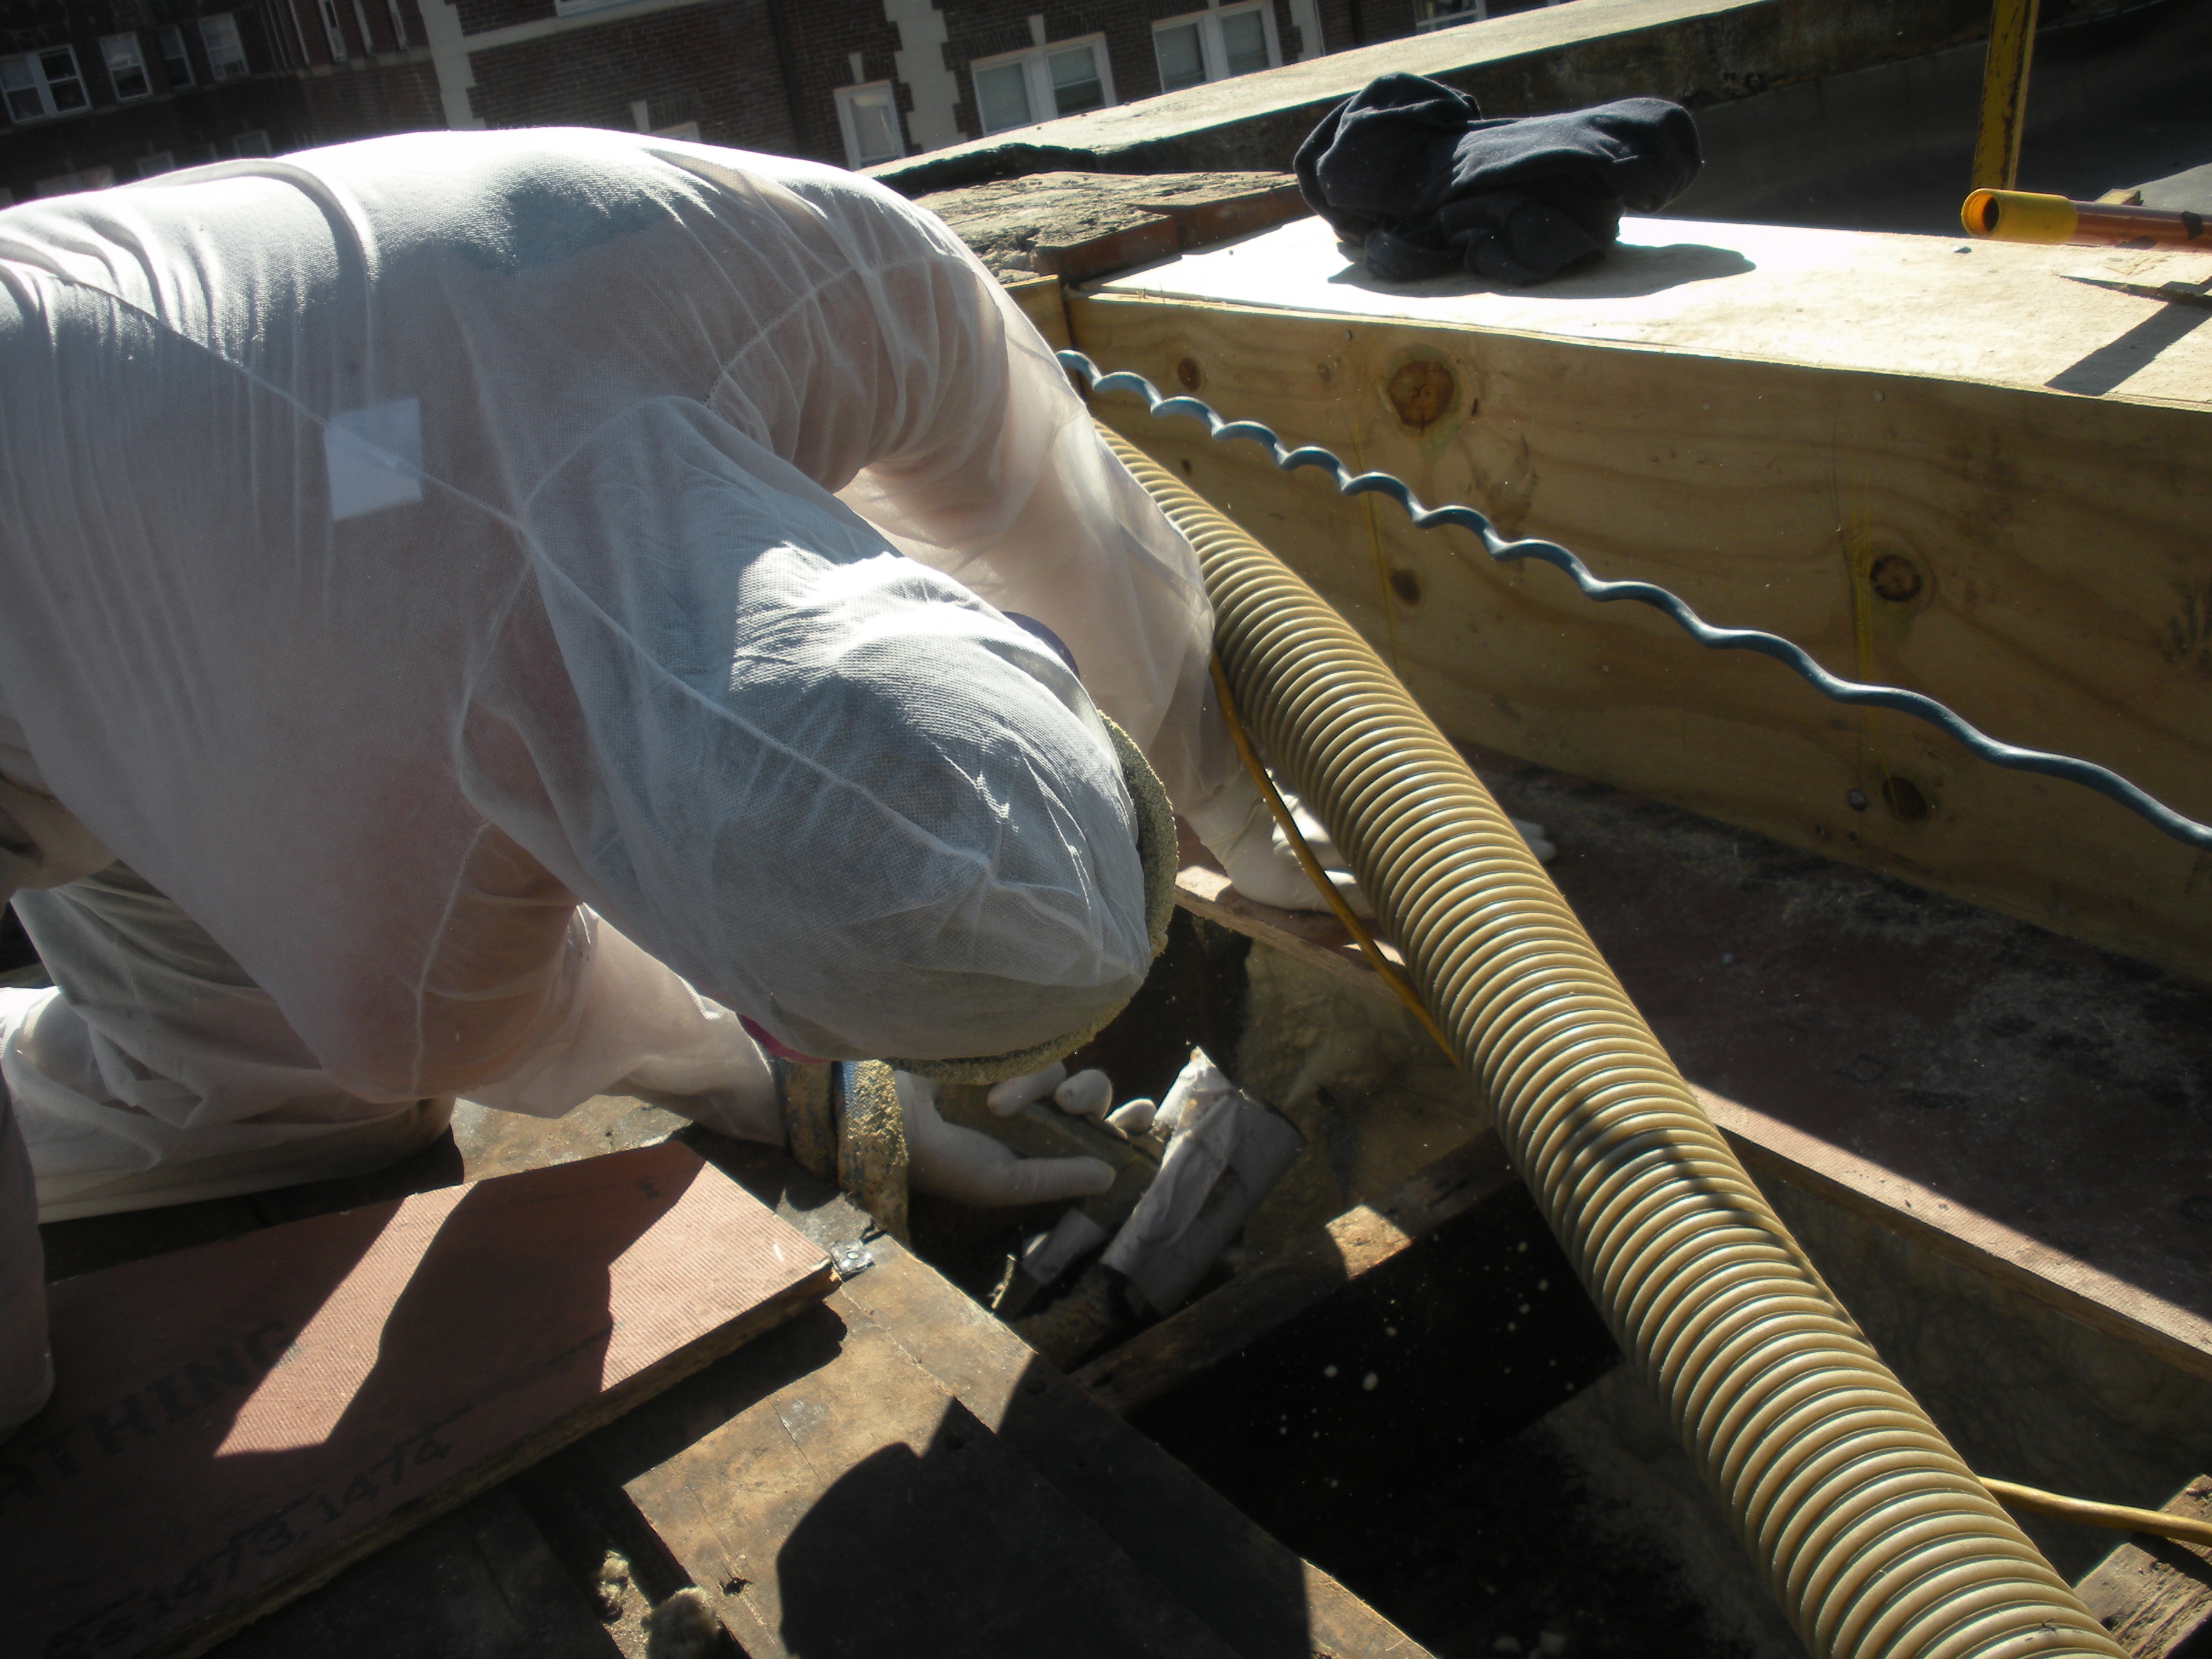
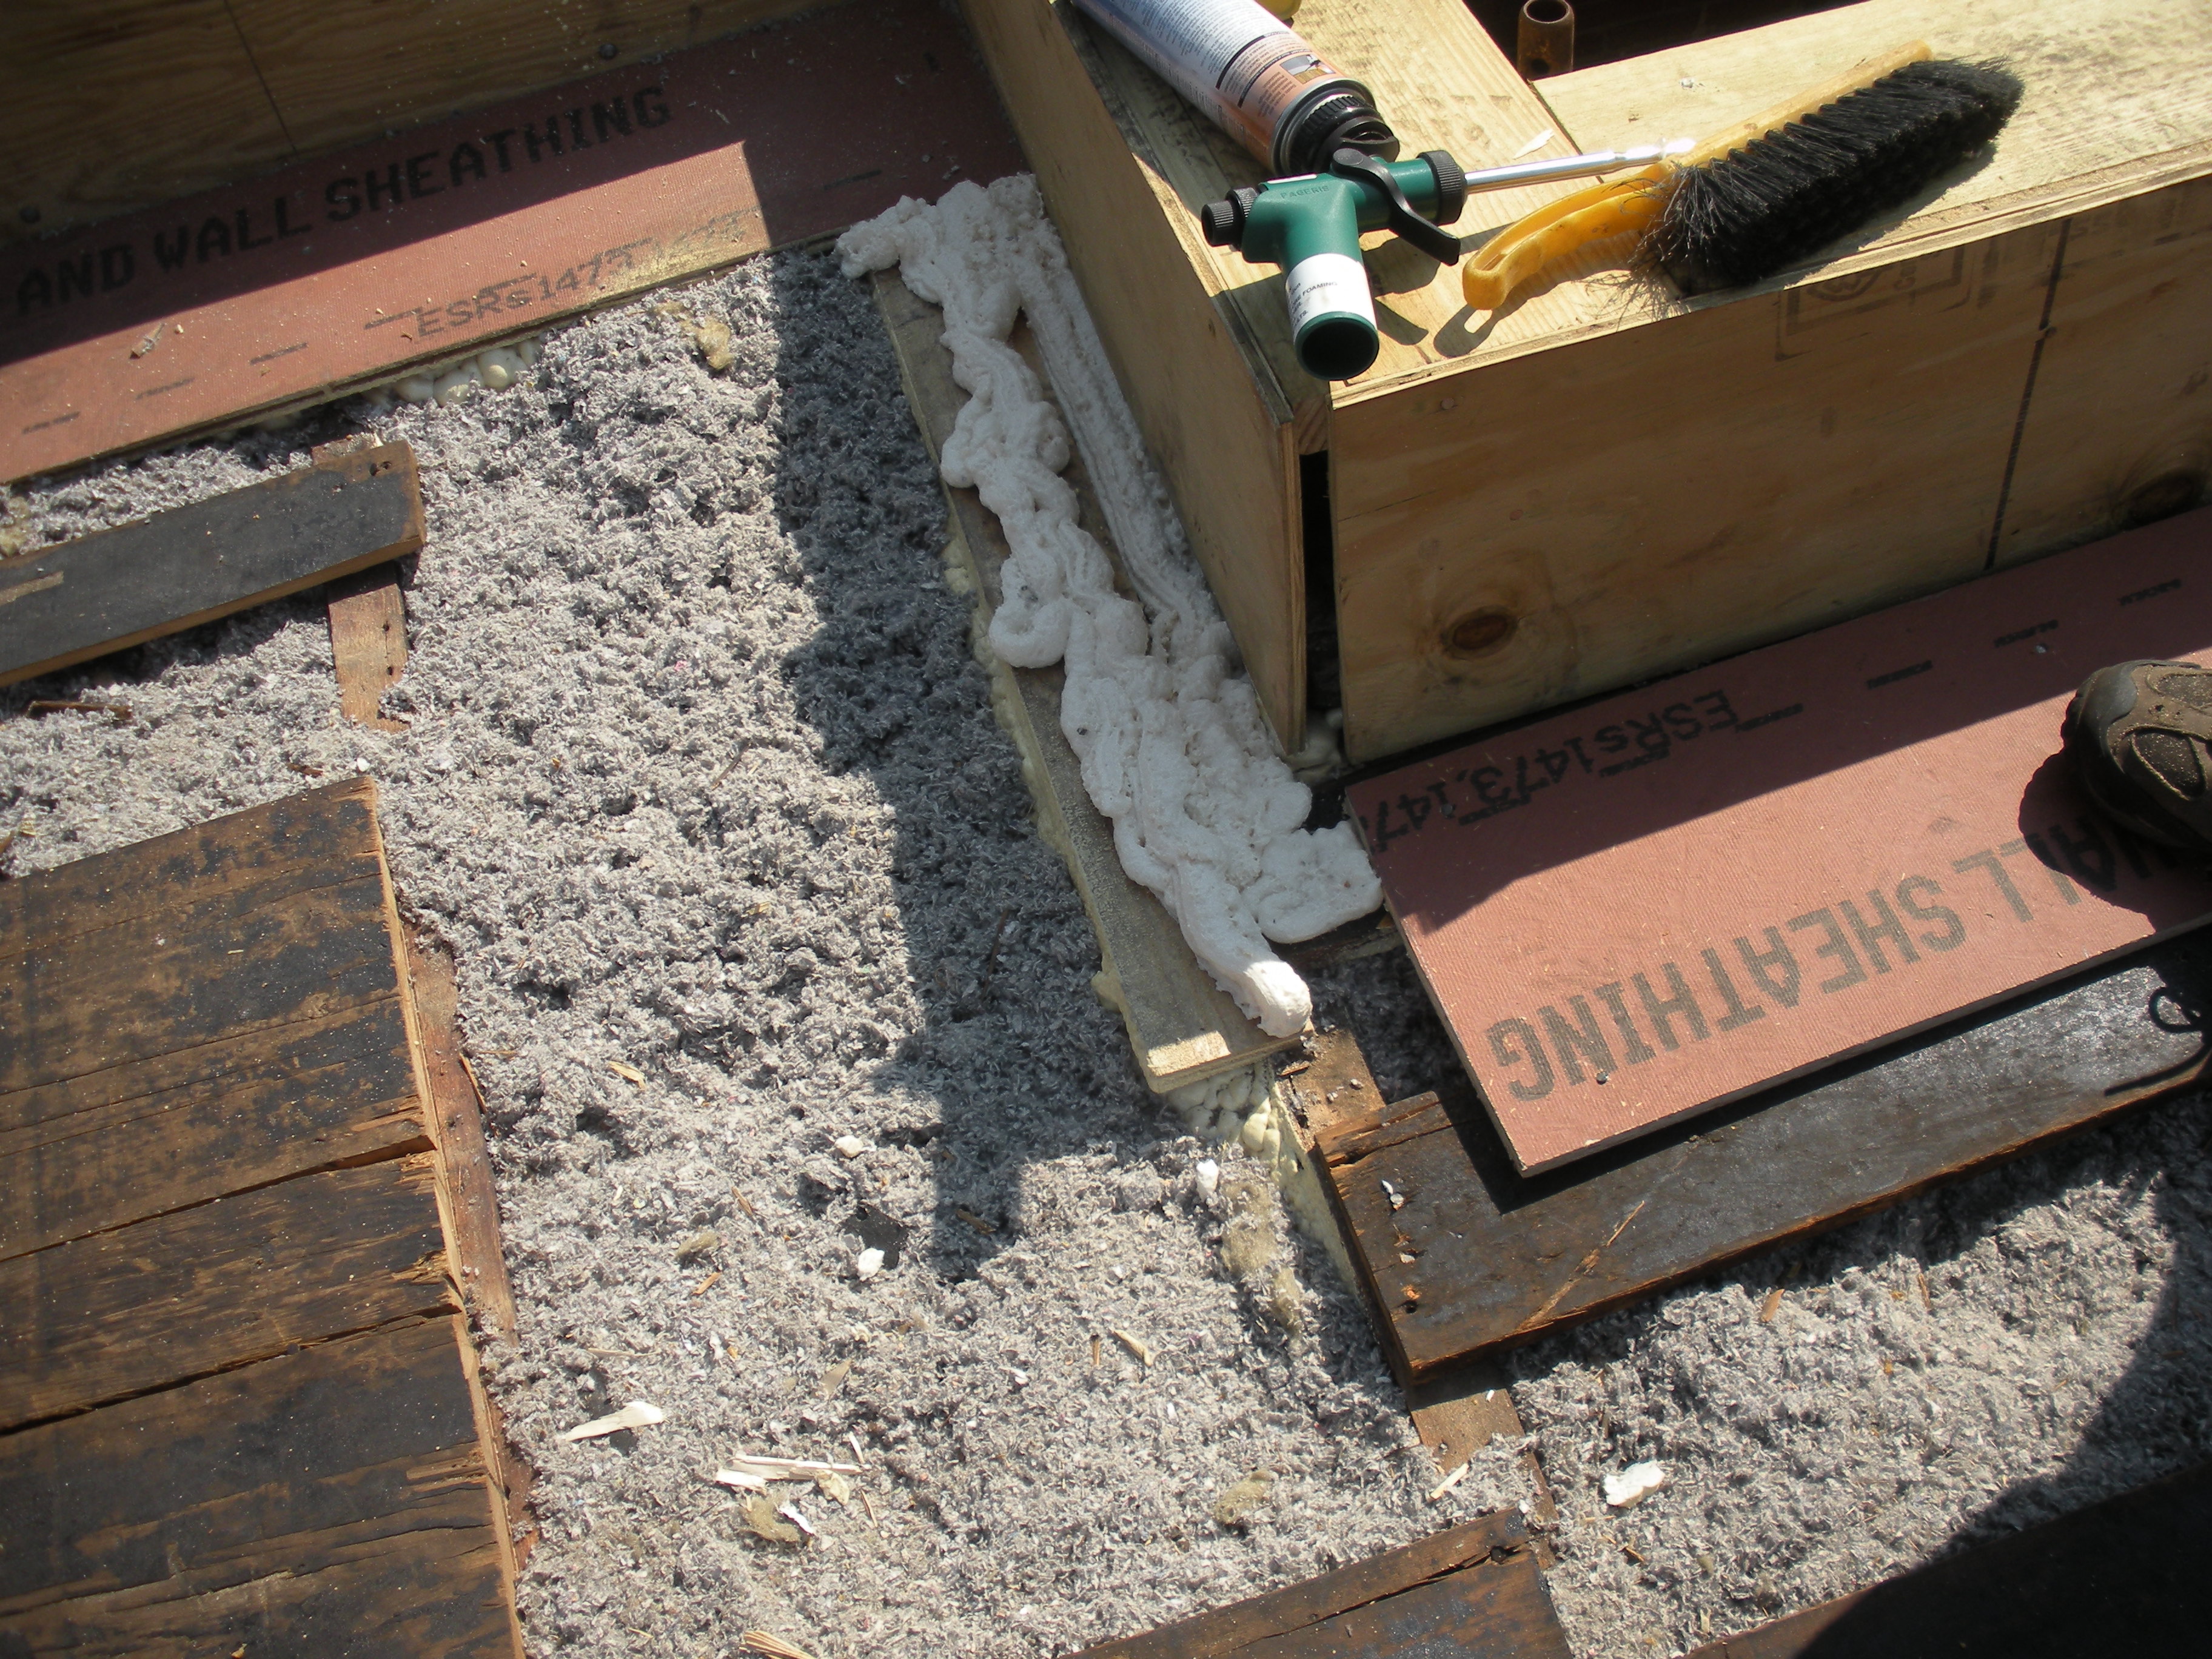
Closed-cell foam is sprayed into roof cavities along the masonry parapet wall to form a continuous air barrier between the wall and the sheathing of the flat roof
Image
Closed-cell spray foam fills the roof joist cavities forming an air barrier between the masonry parapet wall and the roof sheathing
Image
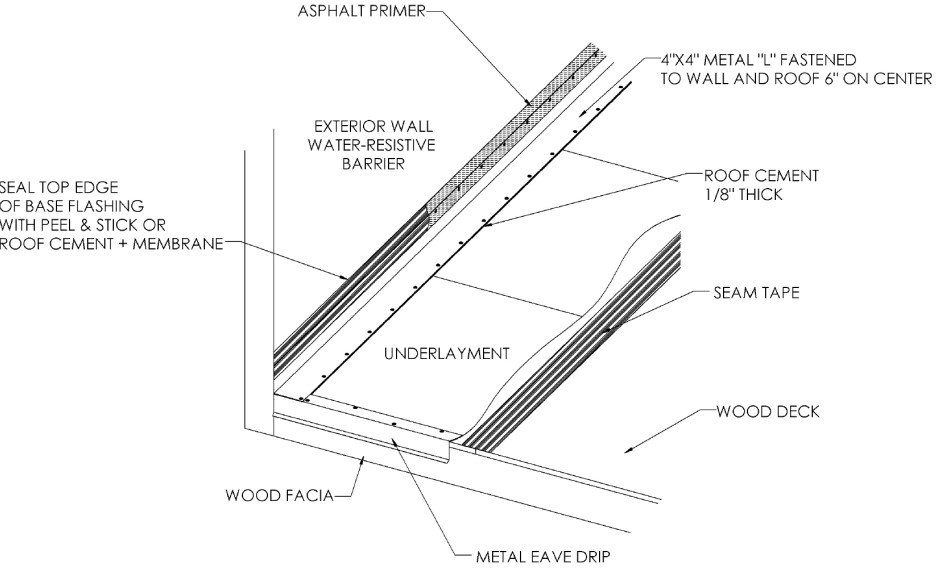
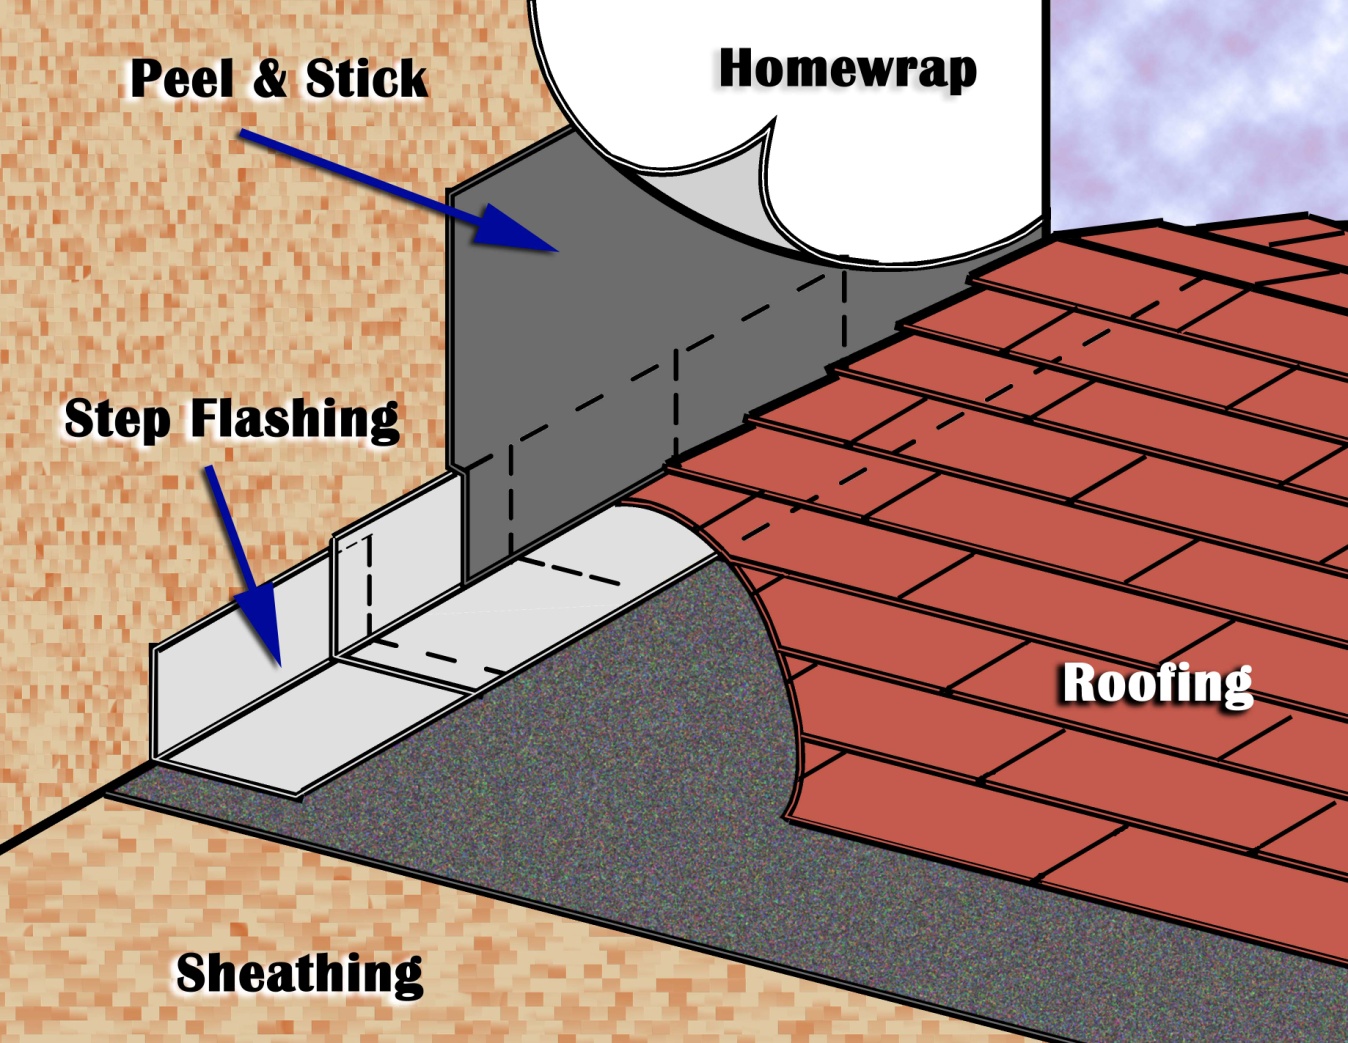
Continuous L-metal flashing integrated with underlayment at roof-wall intersections
Image
Image

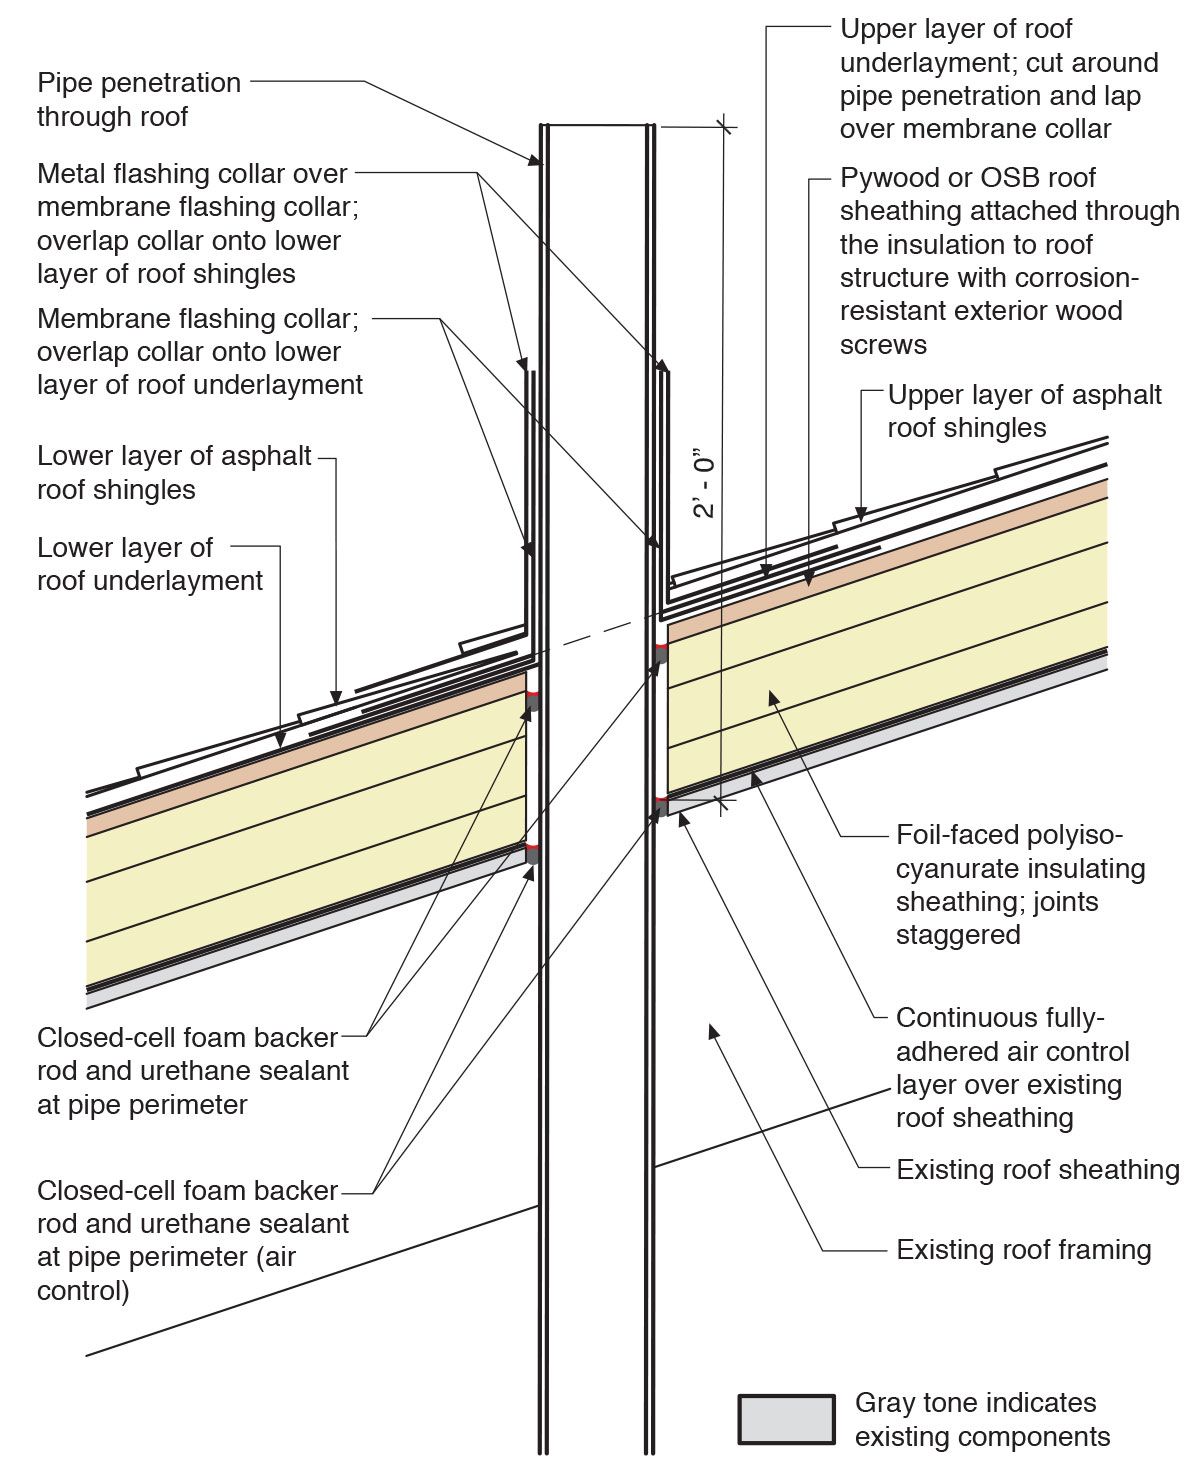
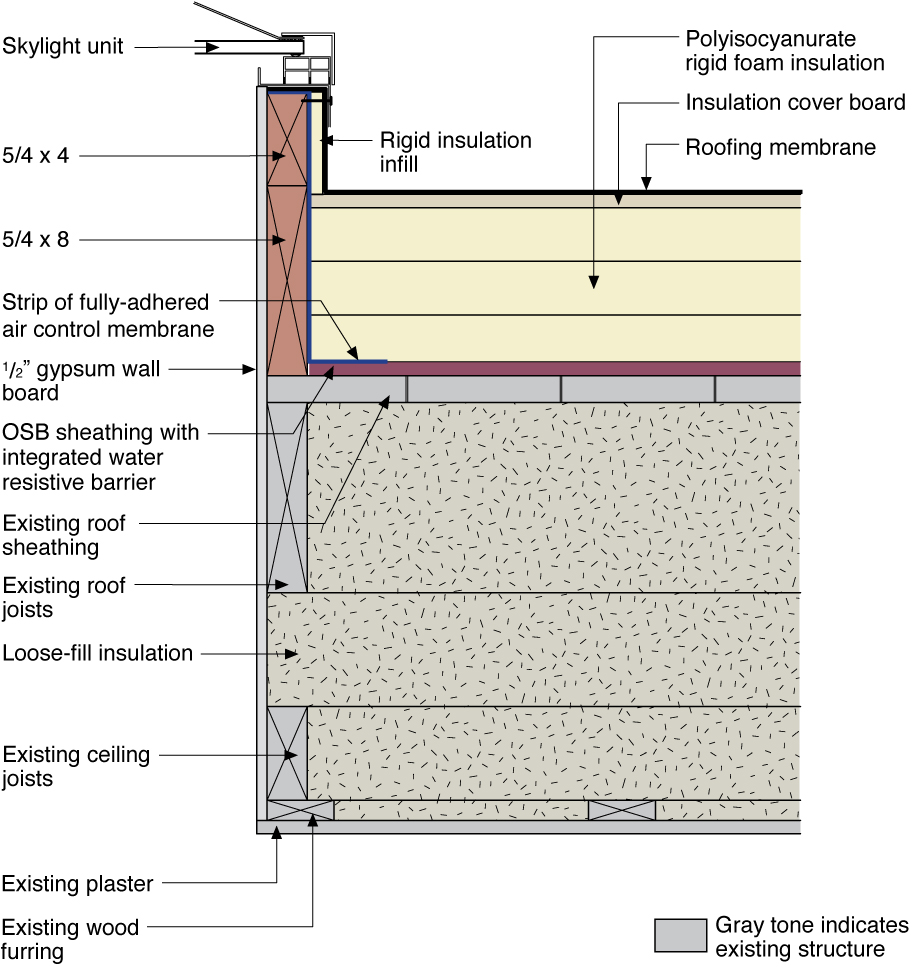
Existing flat roof and wood-framed walls are retrofitted with a new fully adhered air barrier membrane plus polyisocyanurate rigid foam insulation and a roofing membrane water control layer
Image
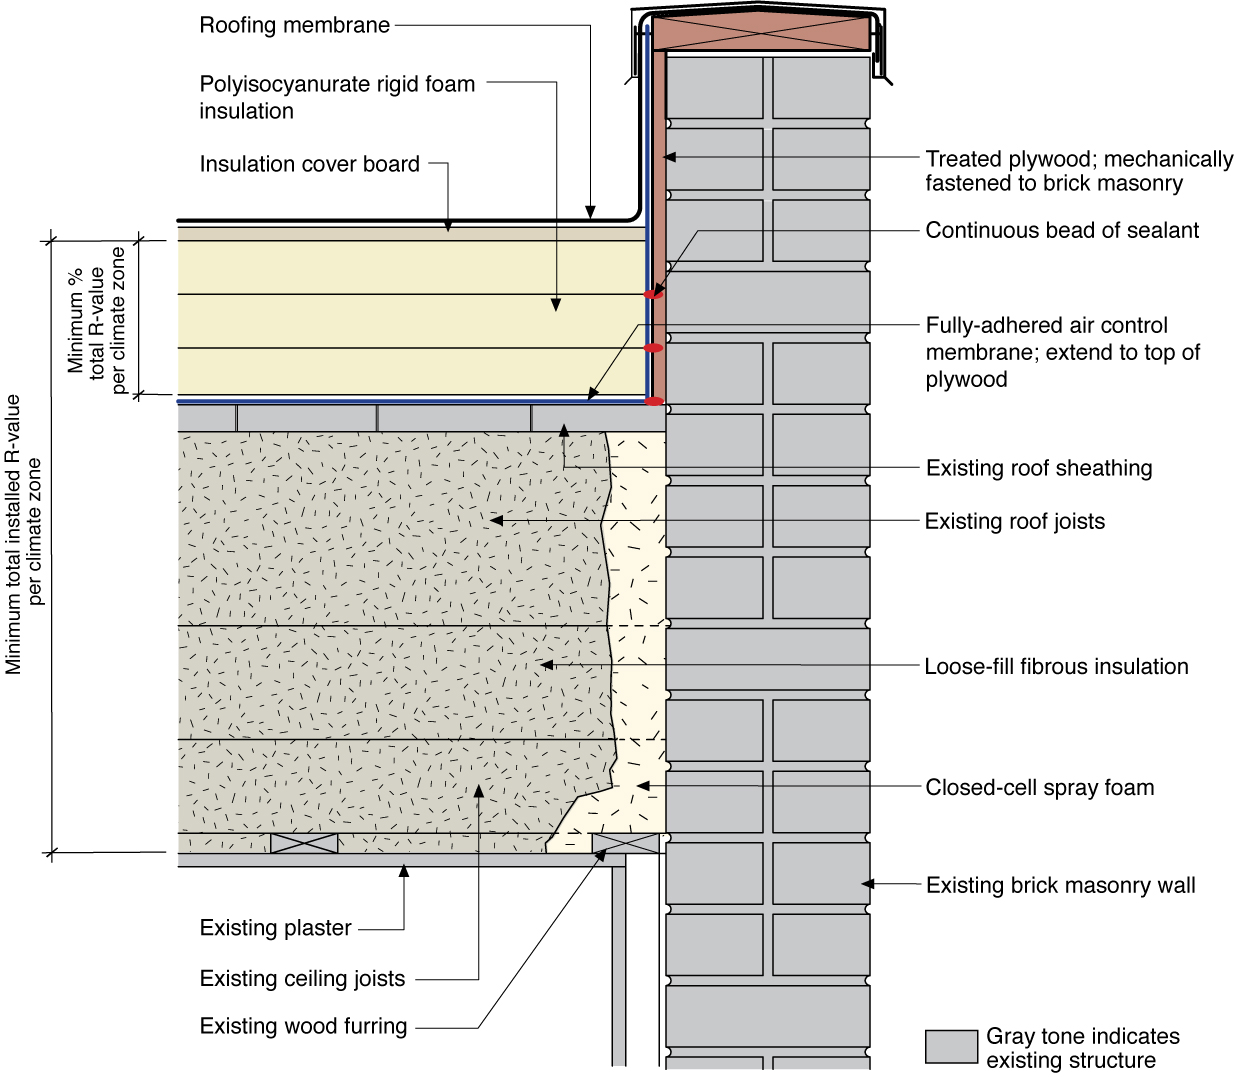
Existing low-slope (“flat”) roof and brick masonry walls with a new fully adhered air barrier membrane plus polyisocyanurate rigid foam insulation and a roofing membrane water control layer
Image
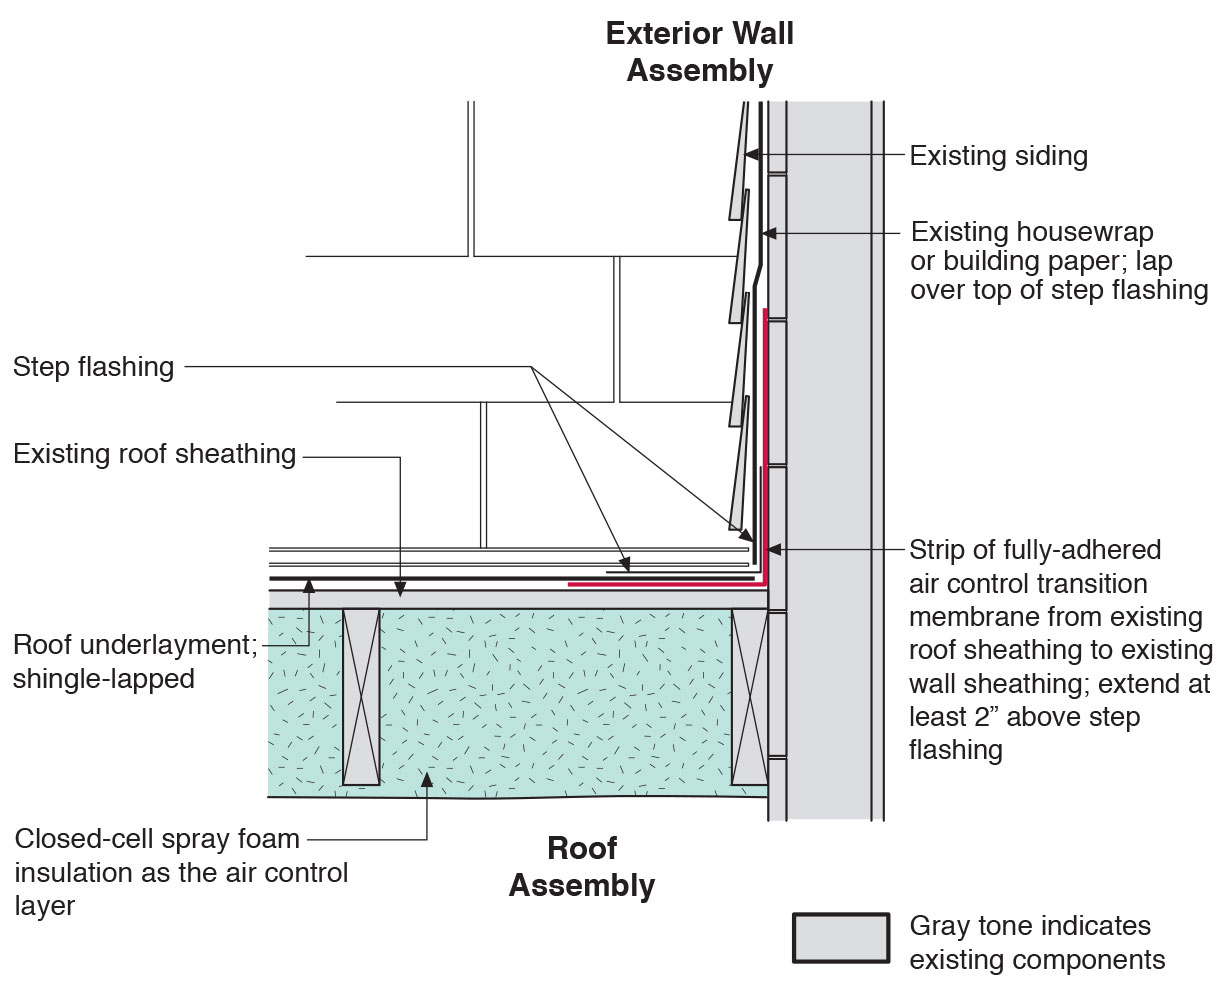
Existing wall-to-lower roof transition retrofitted with a new strip of fully adhered air control transition membrane, new step flashing, new roof underlayment, and new cladding
Image
Existing wall-to-lower roof transition with a new strip of fully adhered air control transition membrane, new step flashing, new roof underlayment, and new cladding – view from eave
Image
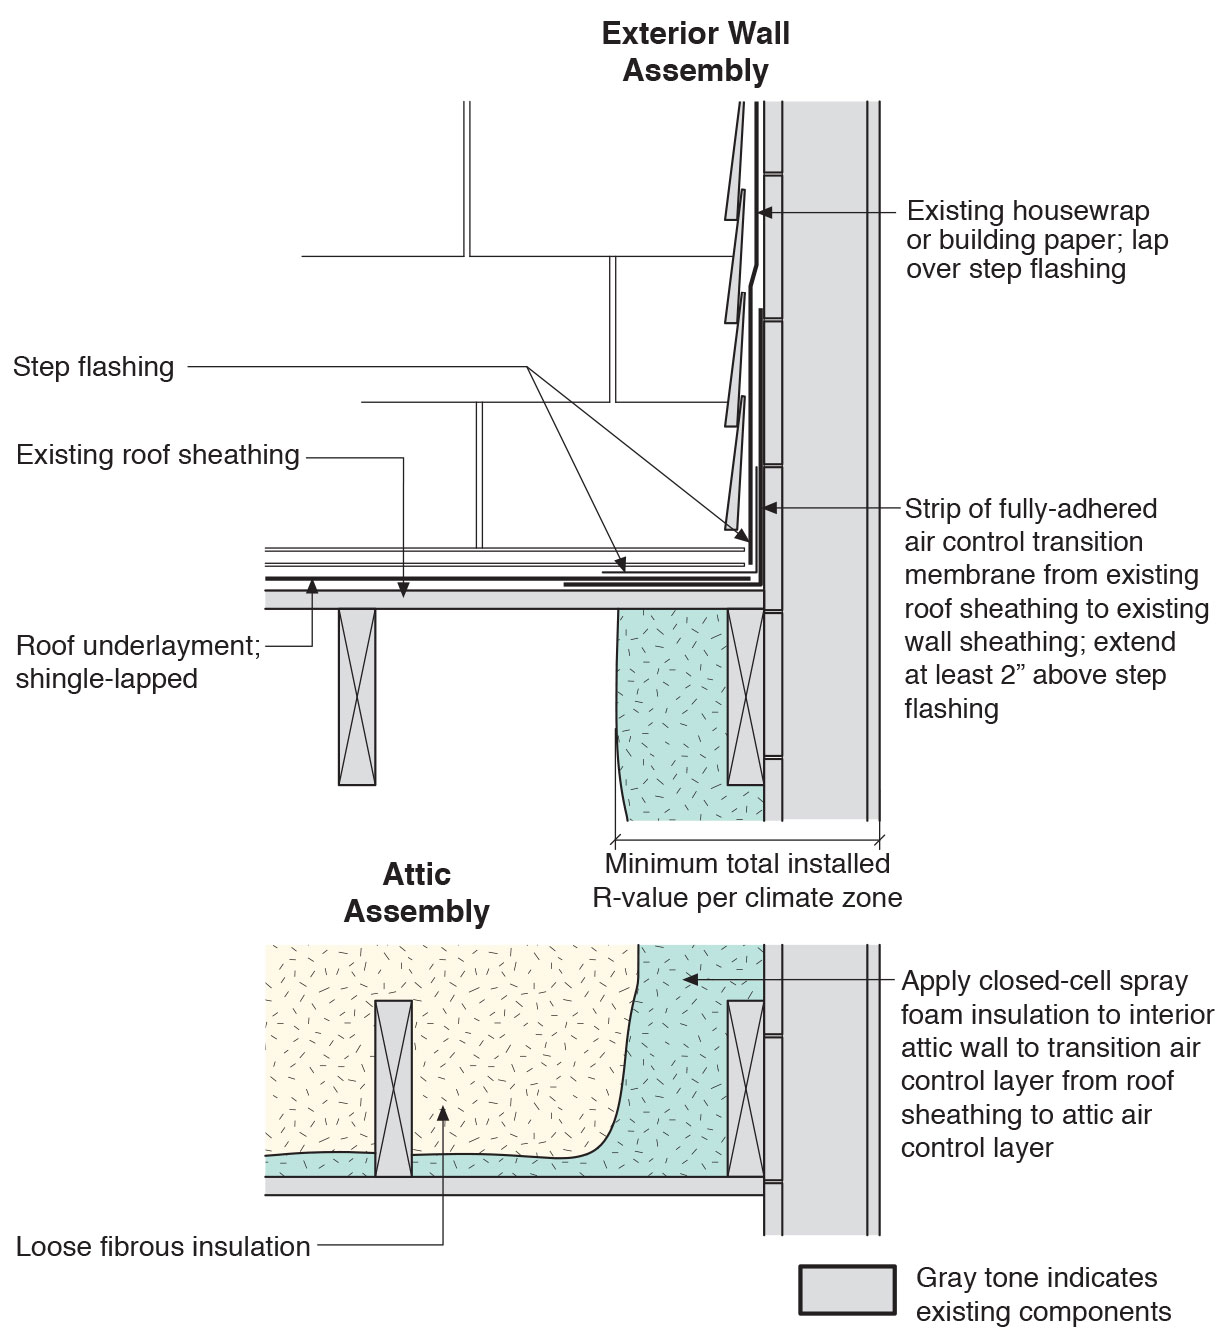
Existing wall-to-lower roof with attic transition with a new strip of fully adhered air control transition membrane, new step flashing, new roof underlayment, and new cladding – view from eave
Image
Image
Image
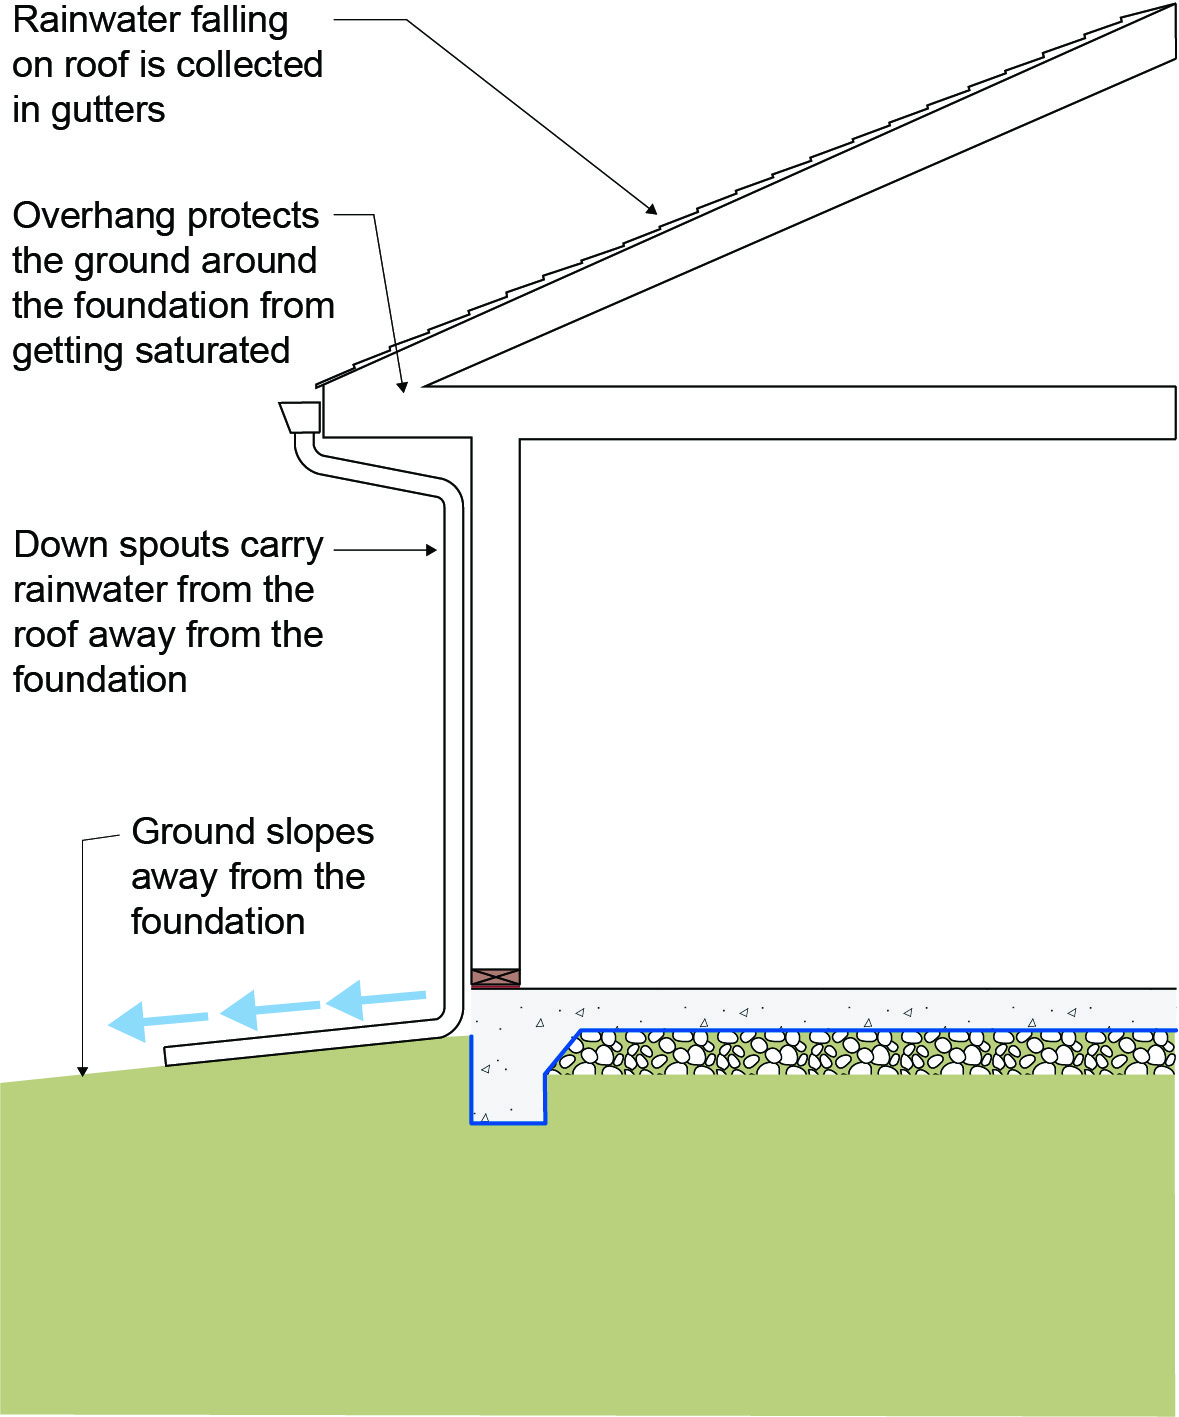
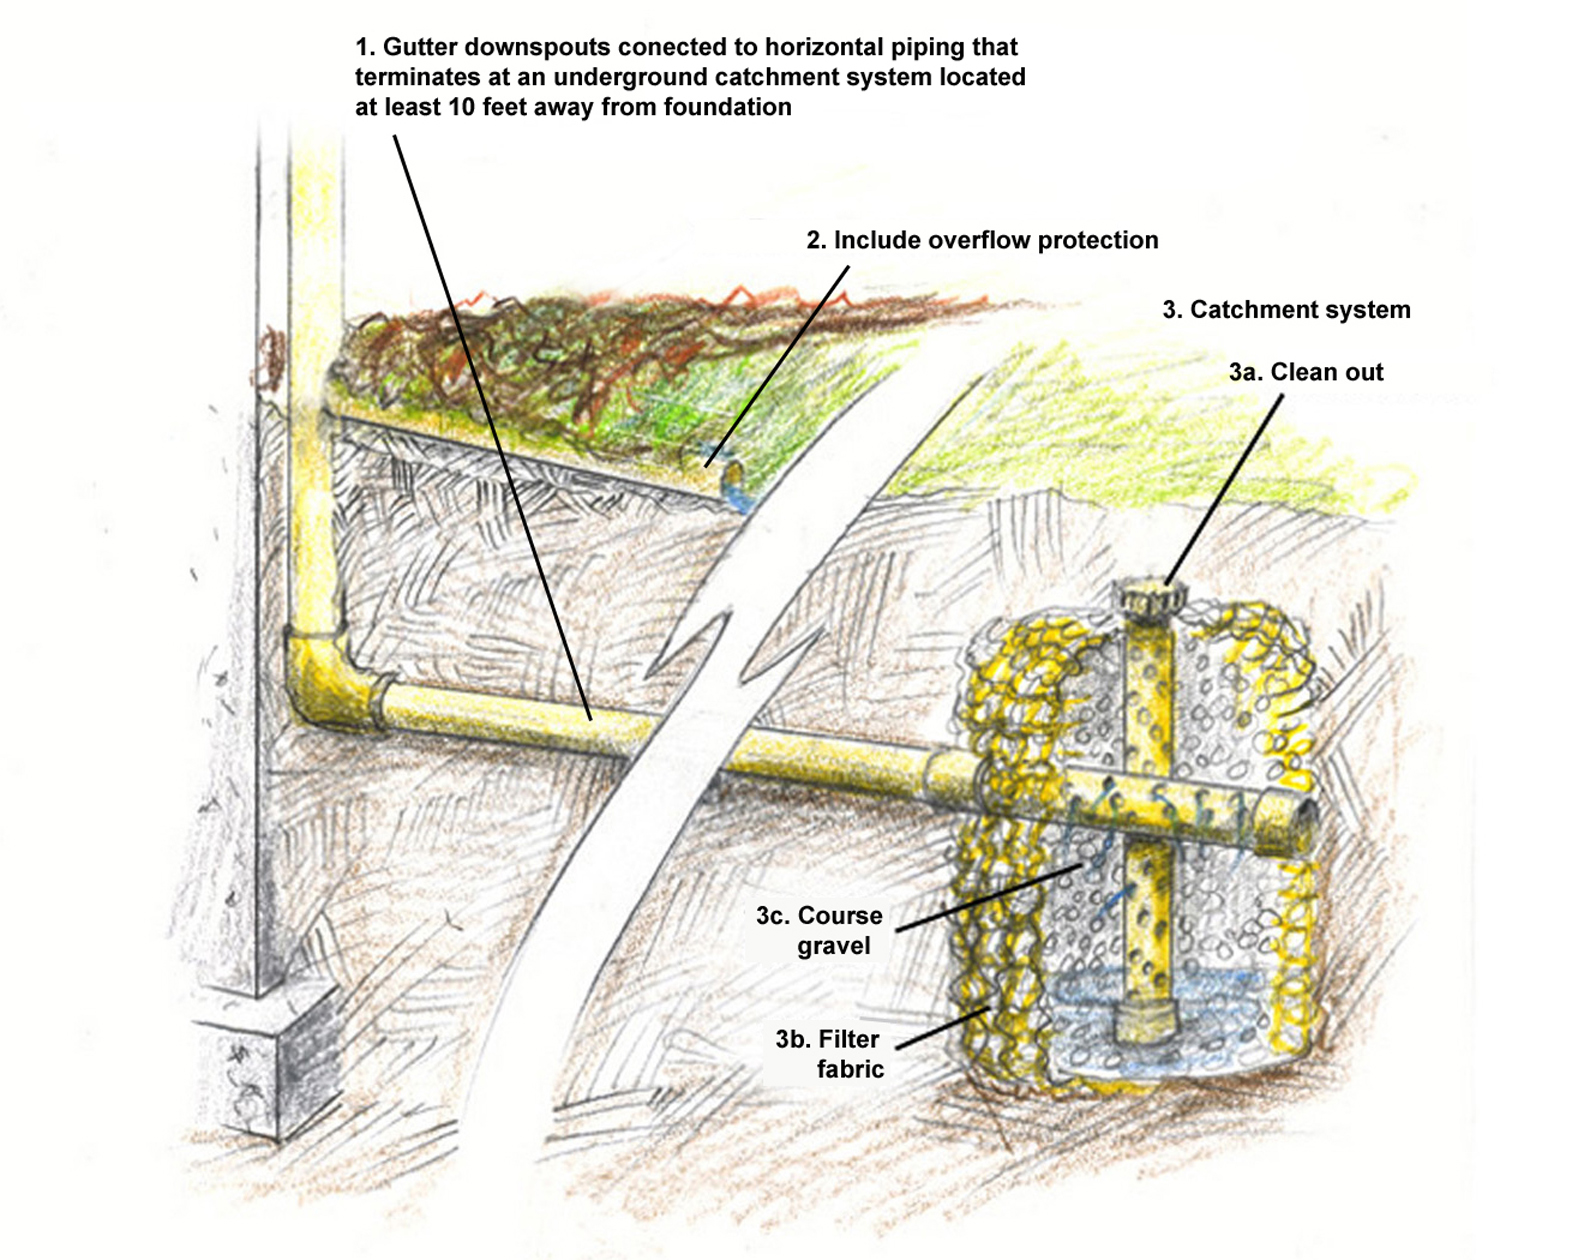
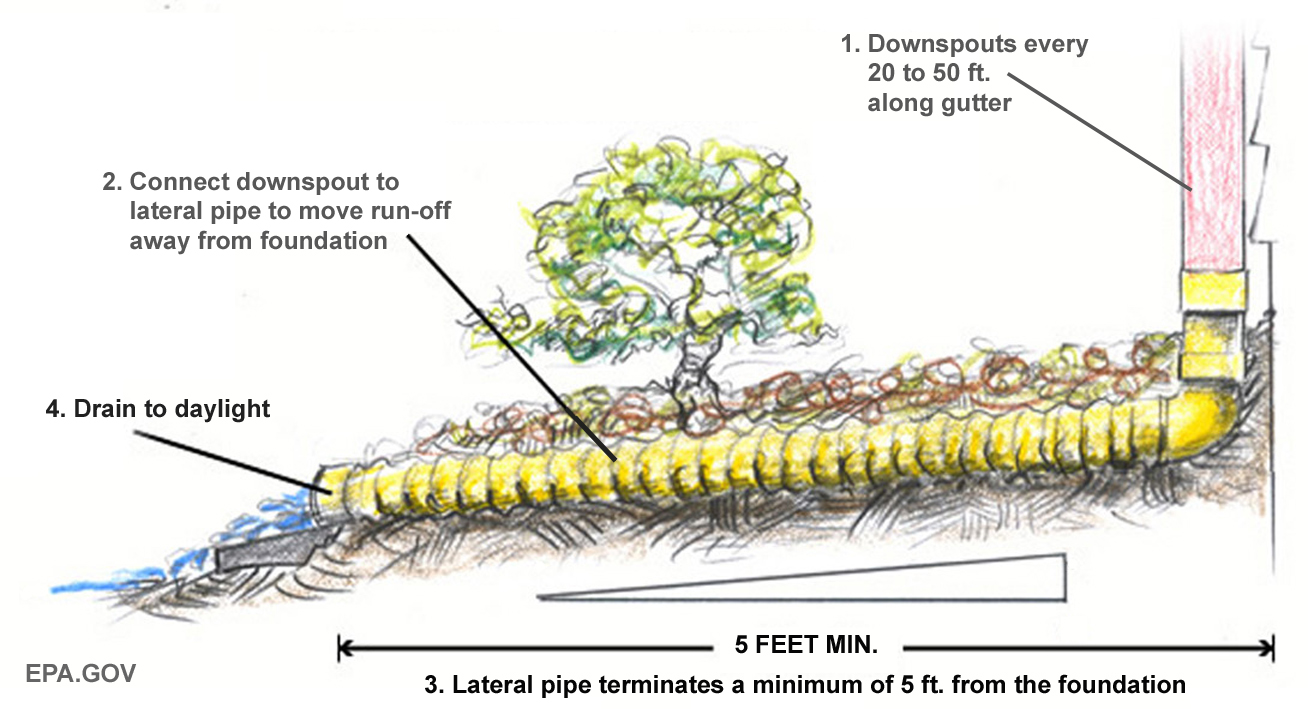
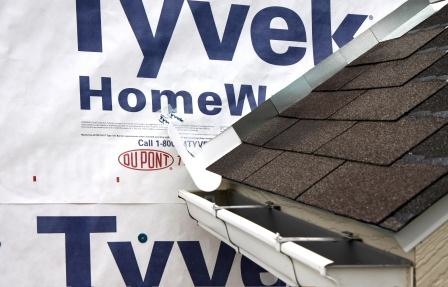
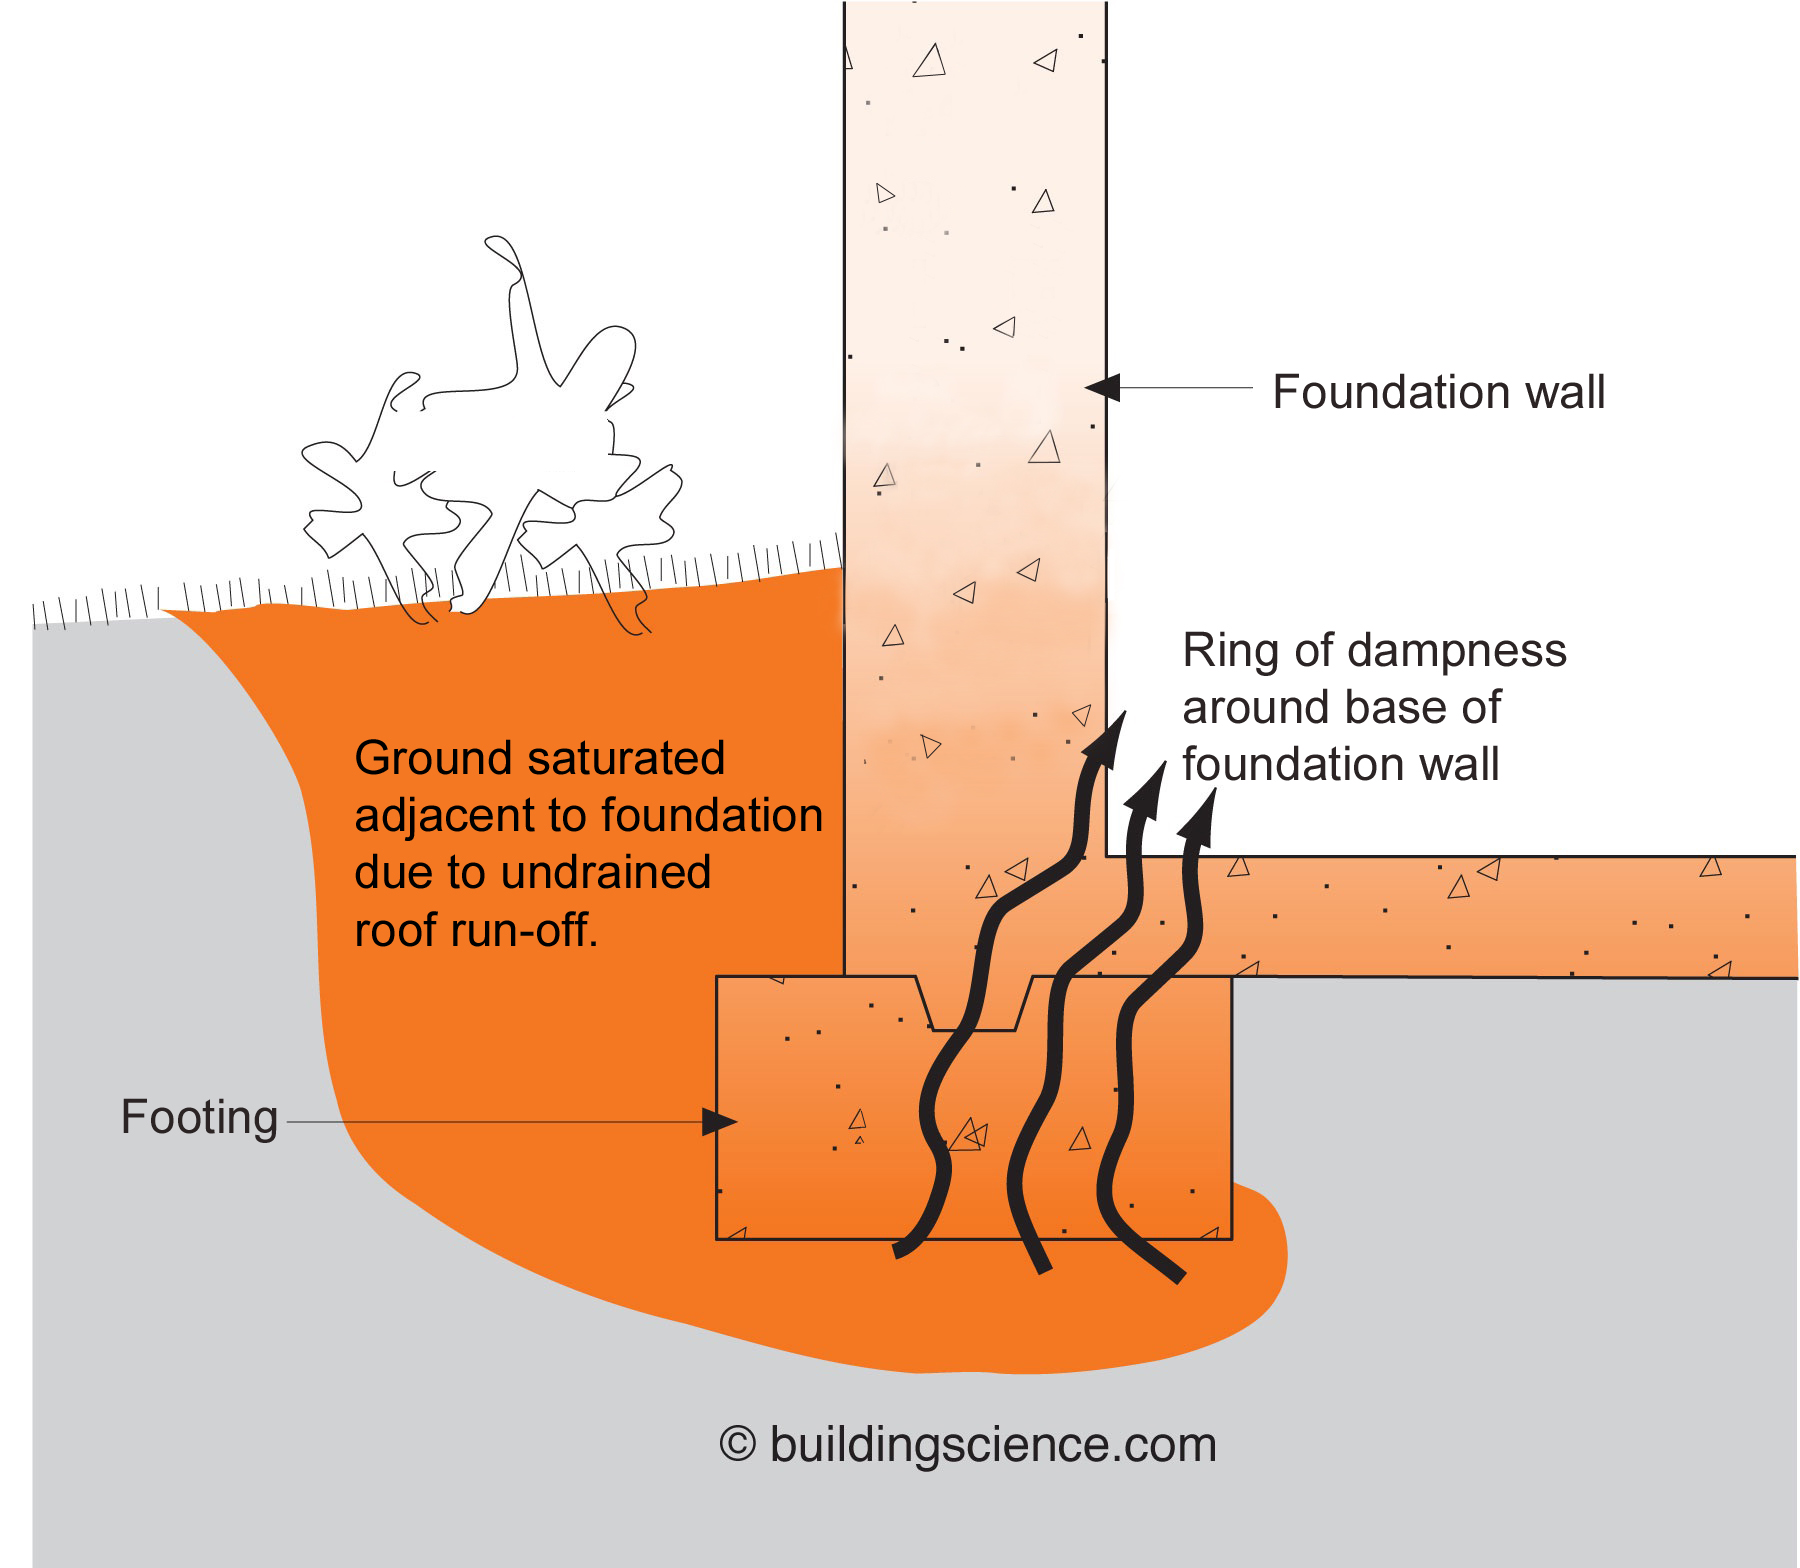
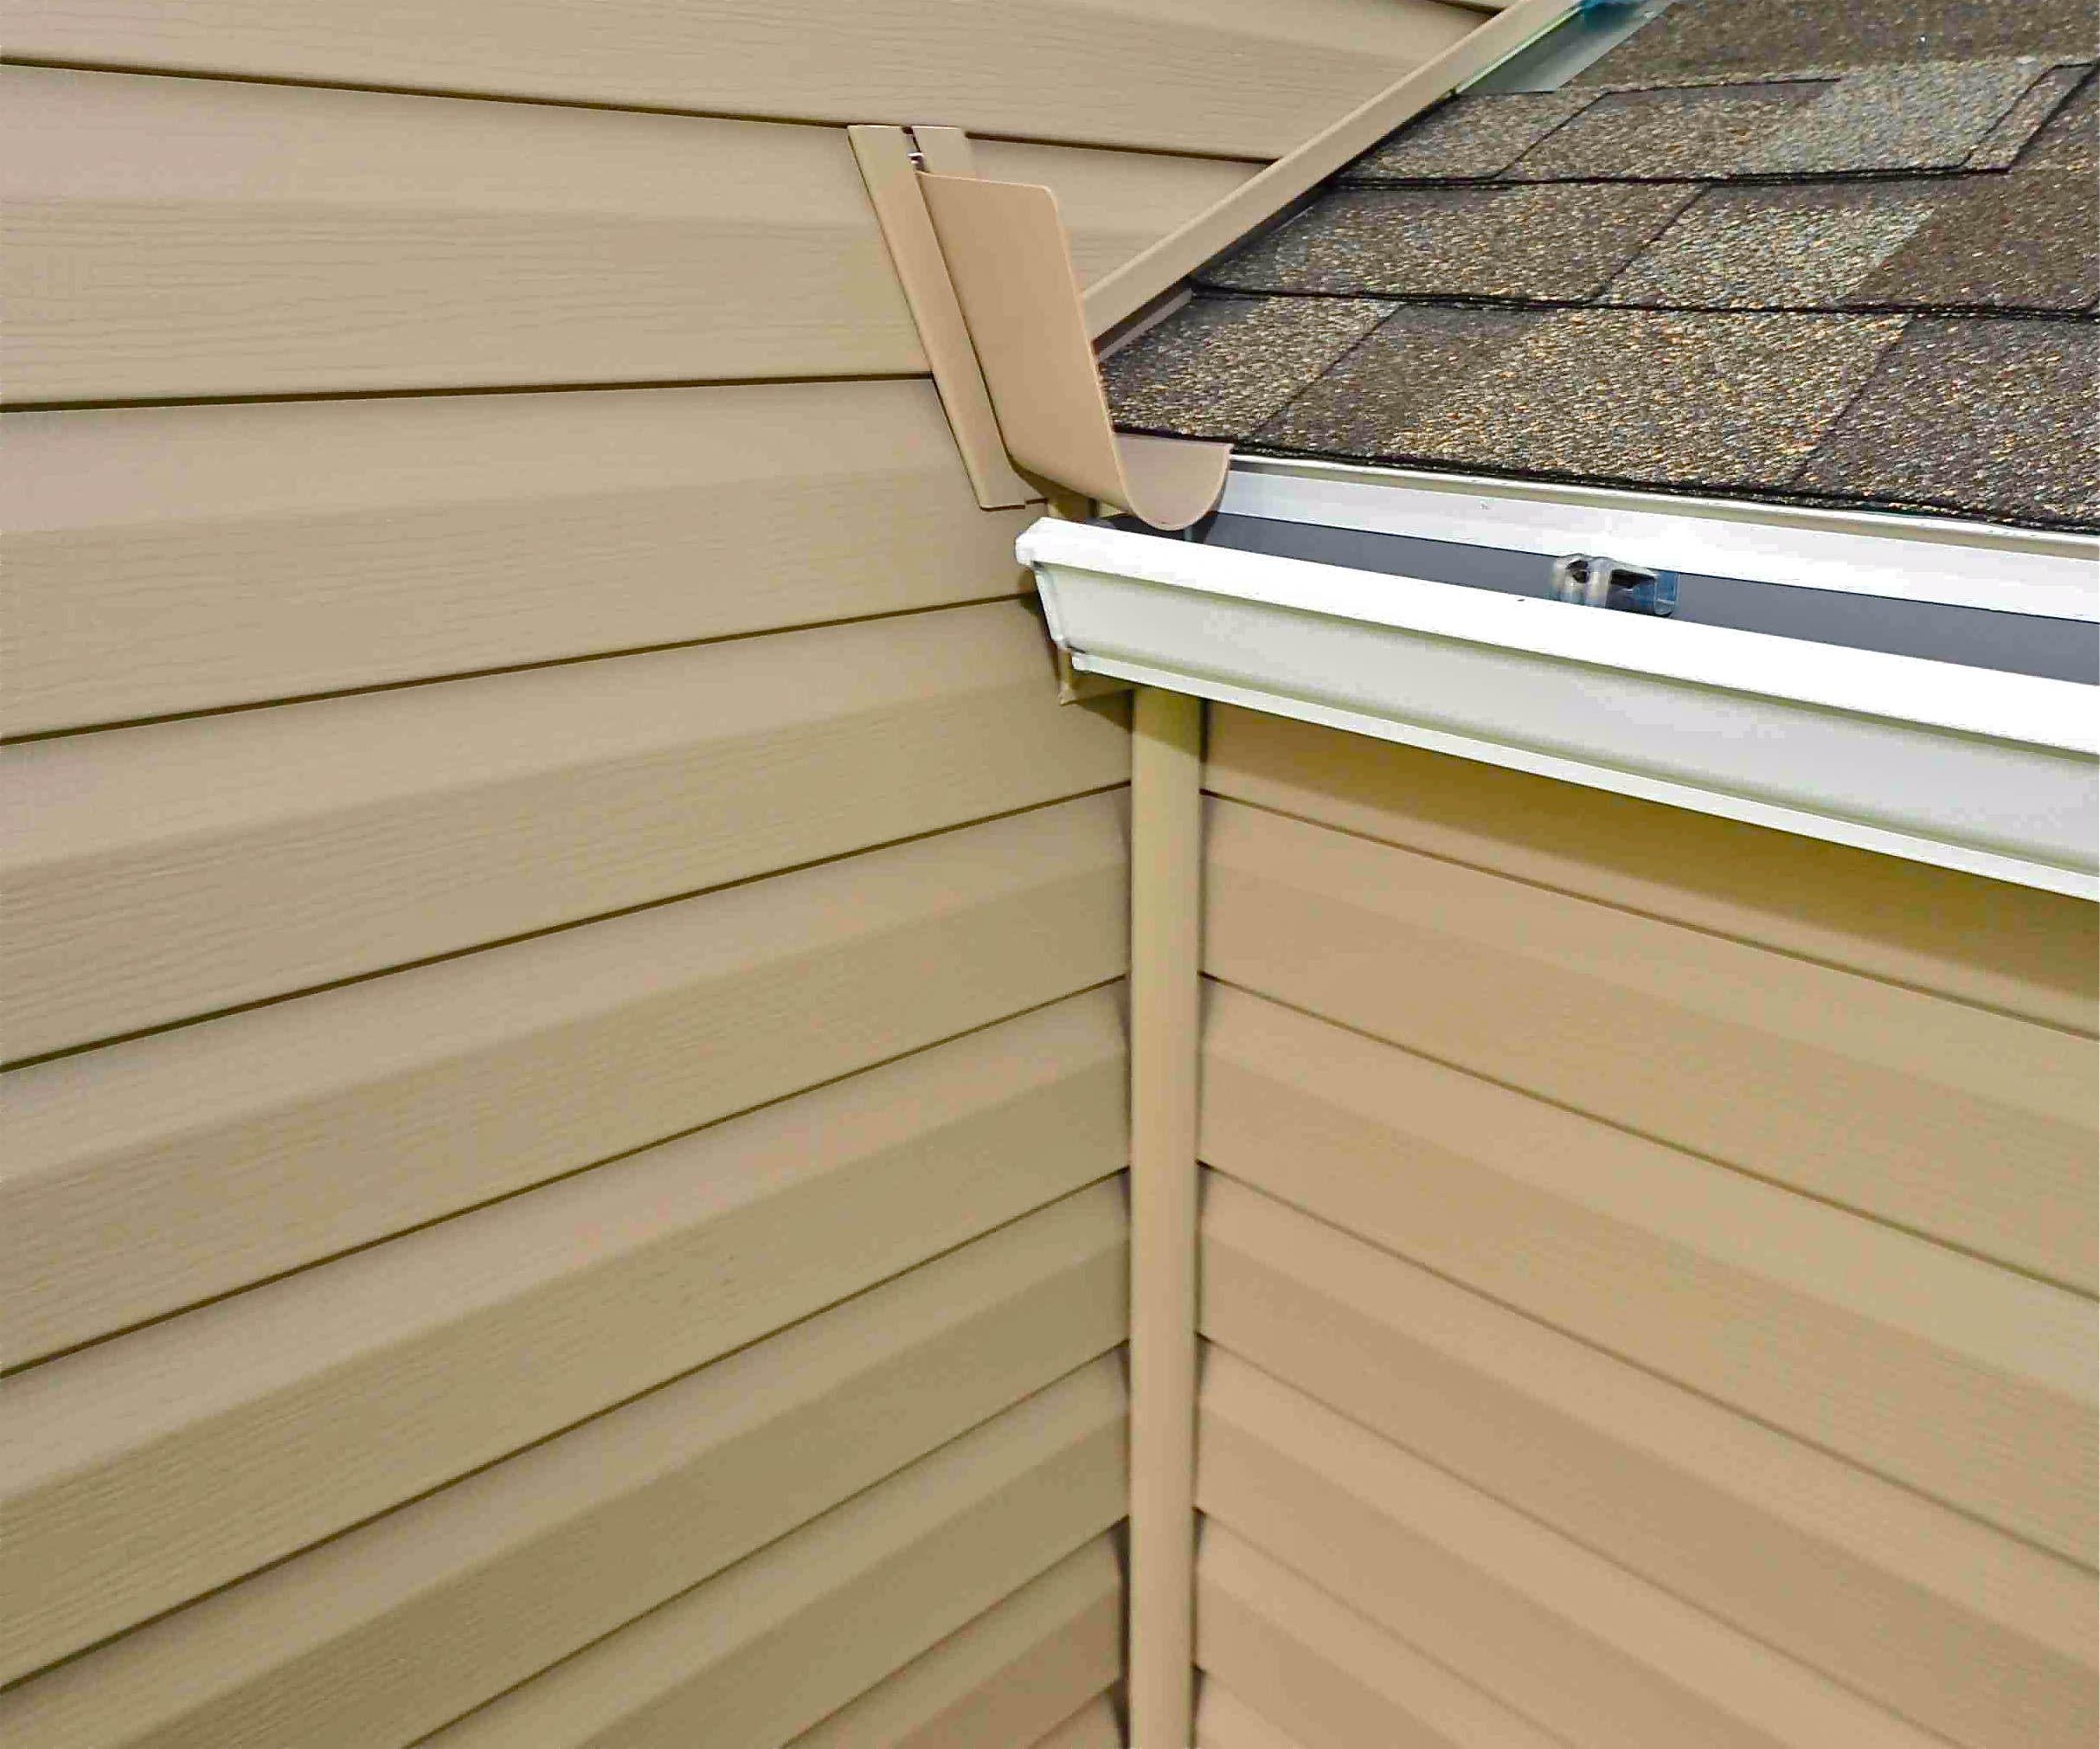
Gutters and downspouts direct rainwater down and away from buildings to keep building walls and foundations drier
Image
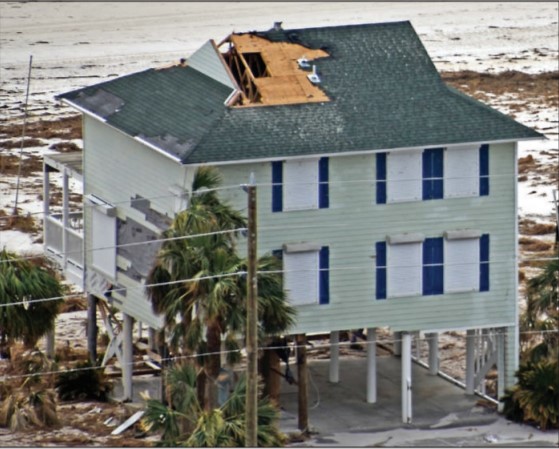
High winds pulled the asphalt shingles and sheathing panels off this coastal home, although storm shutters protected the windows
Image
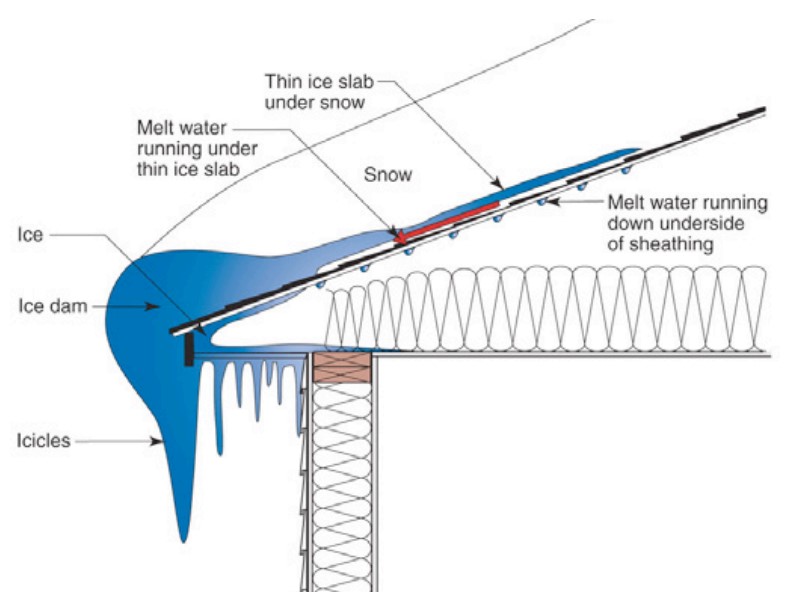
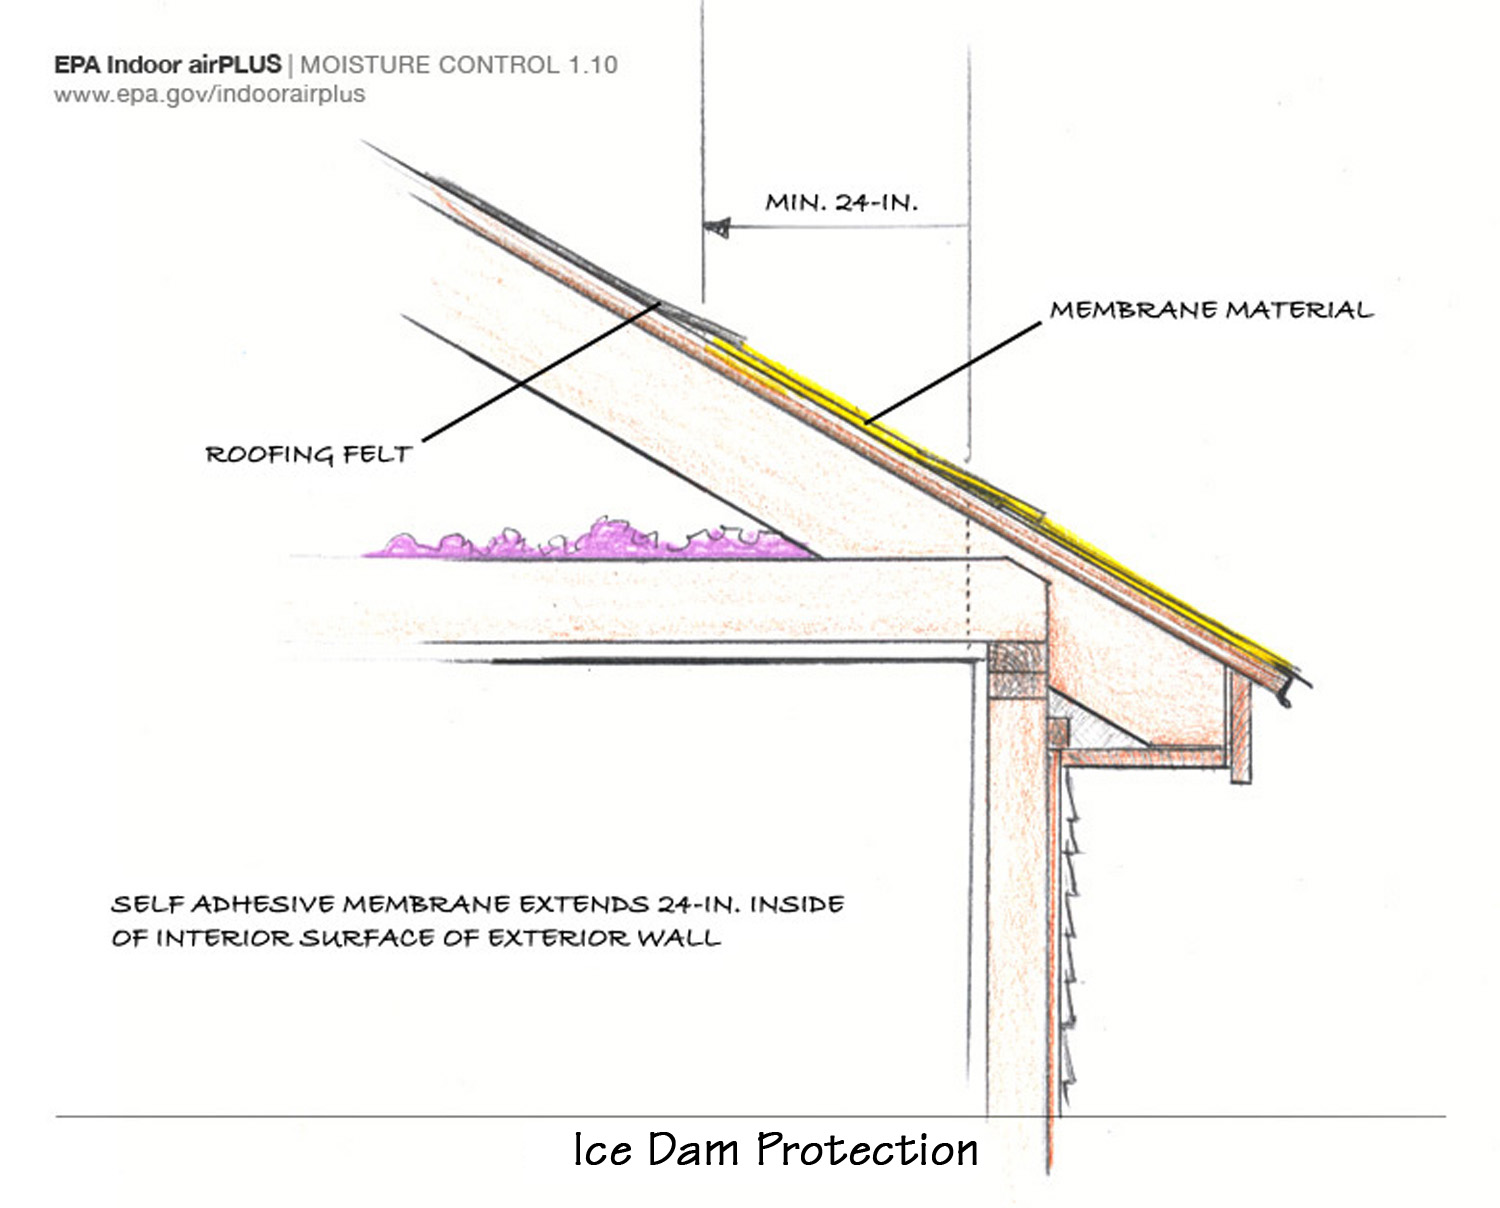
Ice dams form when warmth from the attic causes roof snow to melt and flow to roof eaves where it refreezes at the colder overhang and forms a buildup of ice causing more snowmelt to puddle where it can wick back through shingles and leak into the attic
Image
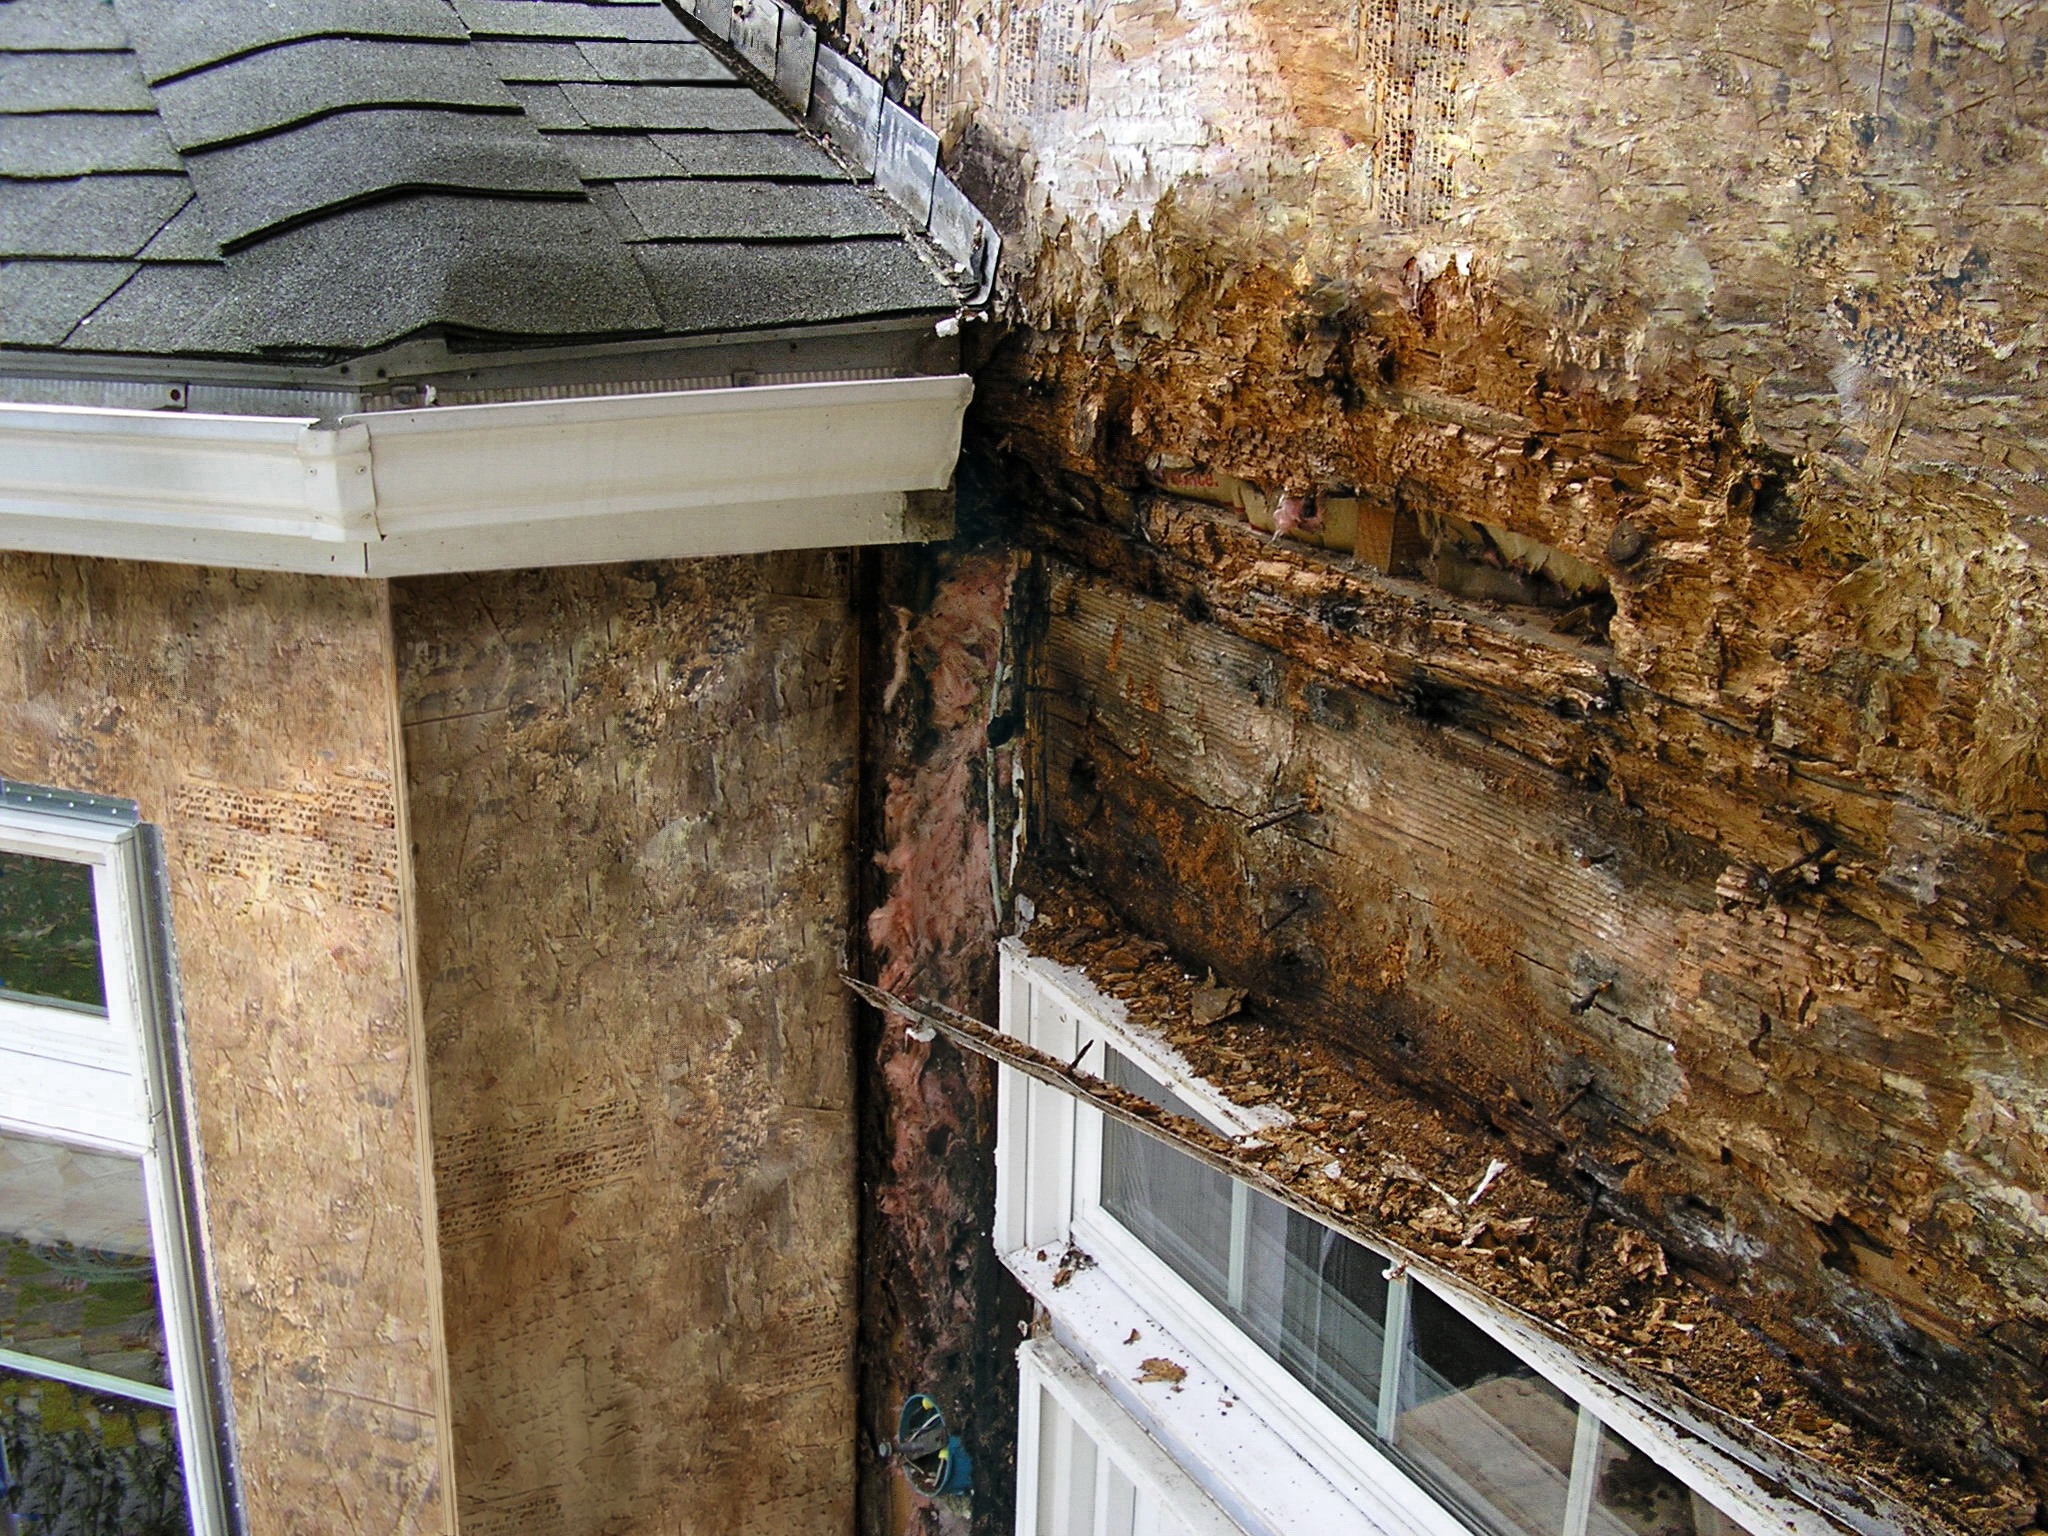
Improper flashing can allow rain water into walls, causing significant damage
Image
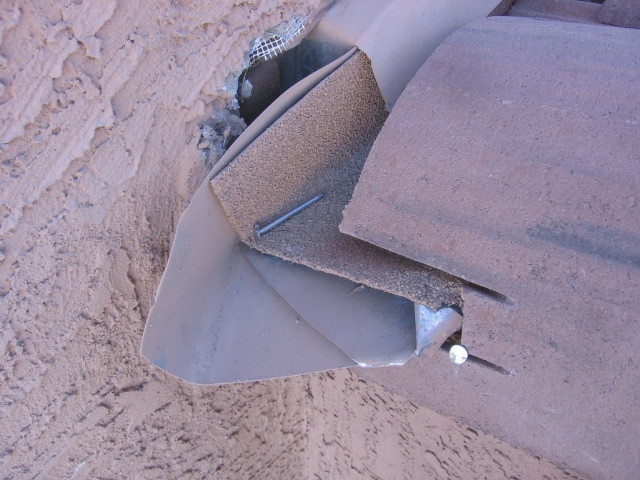
Improvised deflectors that are improperly integrated into the wall flashing and gutter are rarely sized to handle the volume of water that can run off the roof in a large downpour and they may contribute to water entry into the wall.
Image
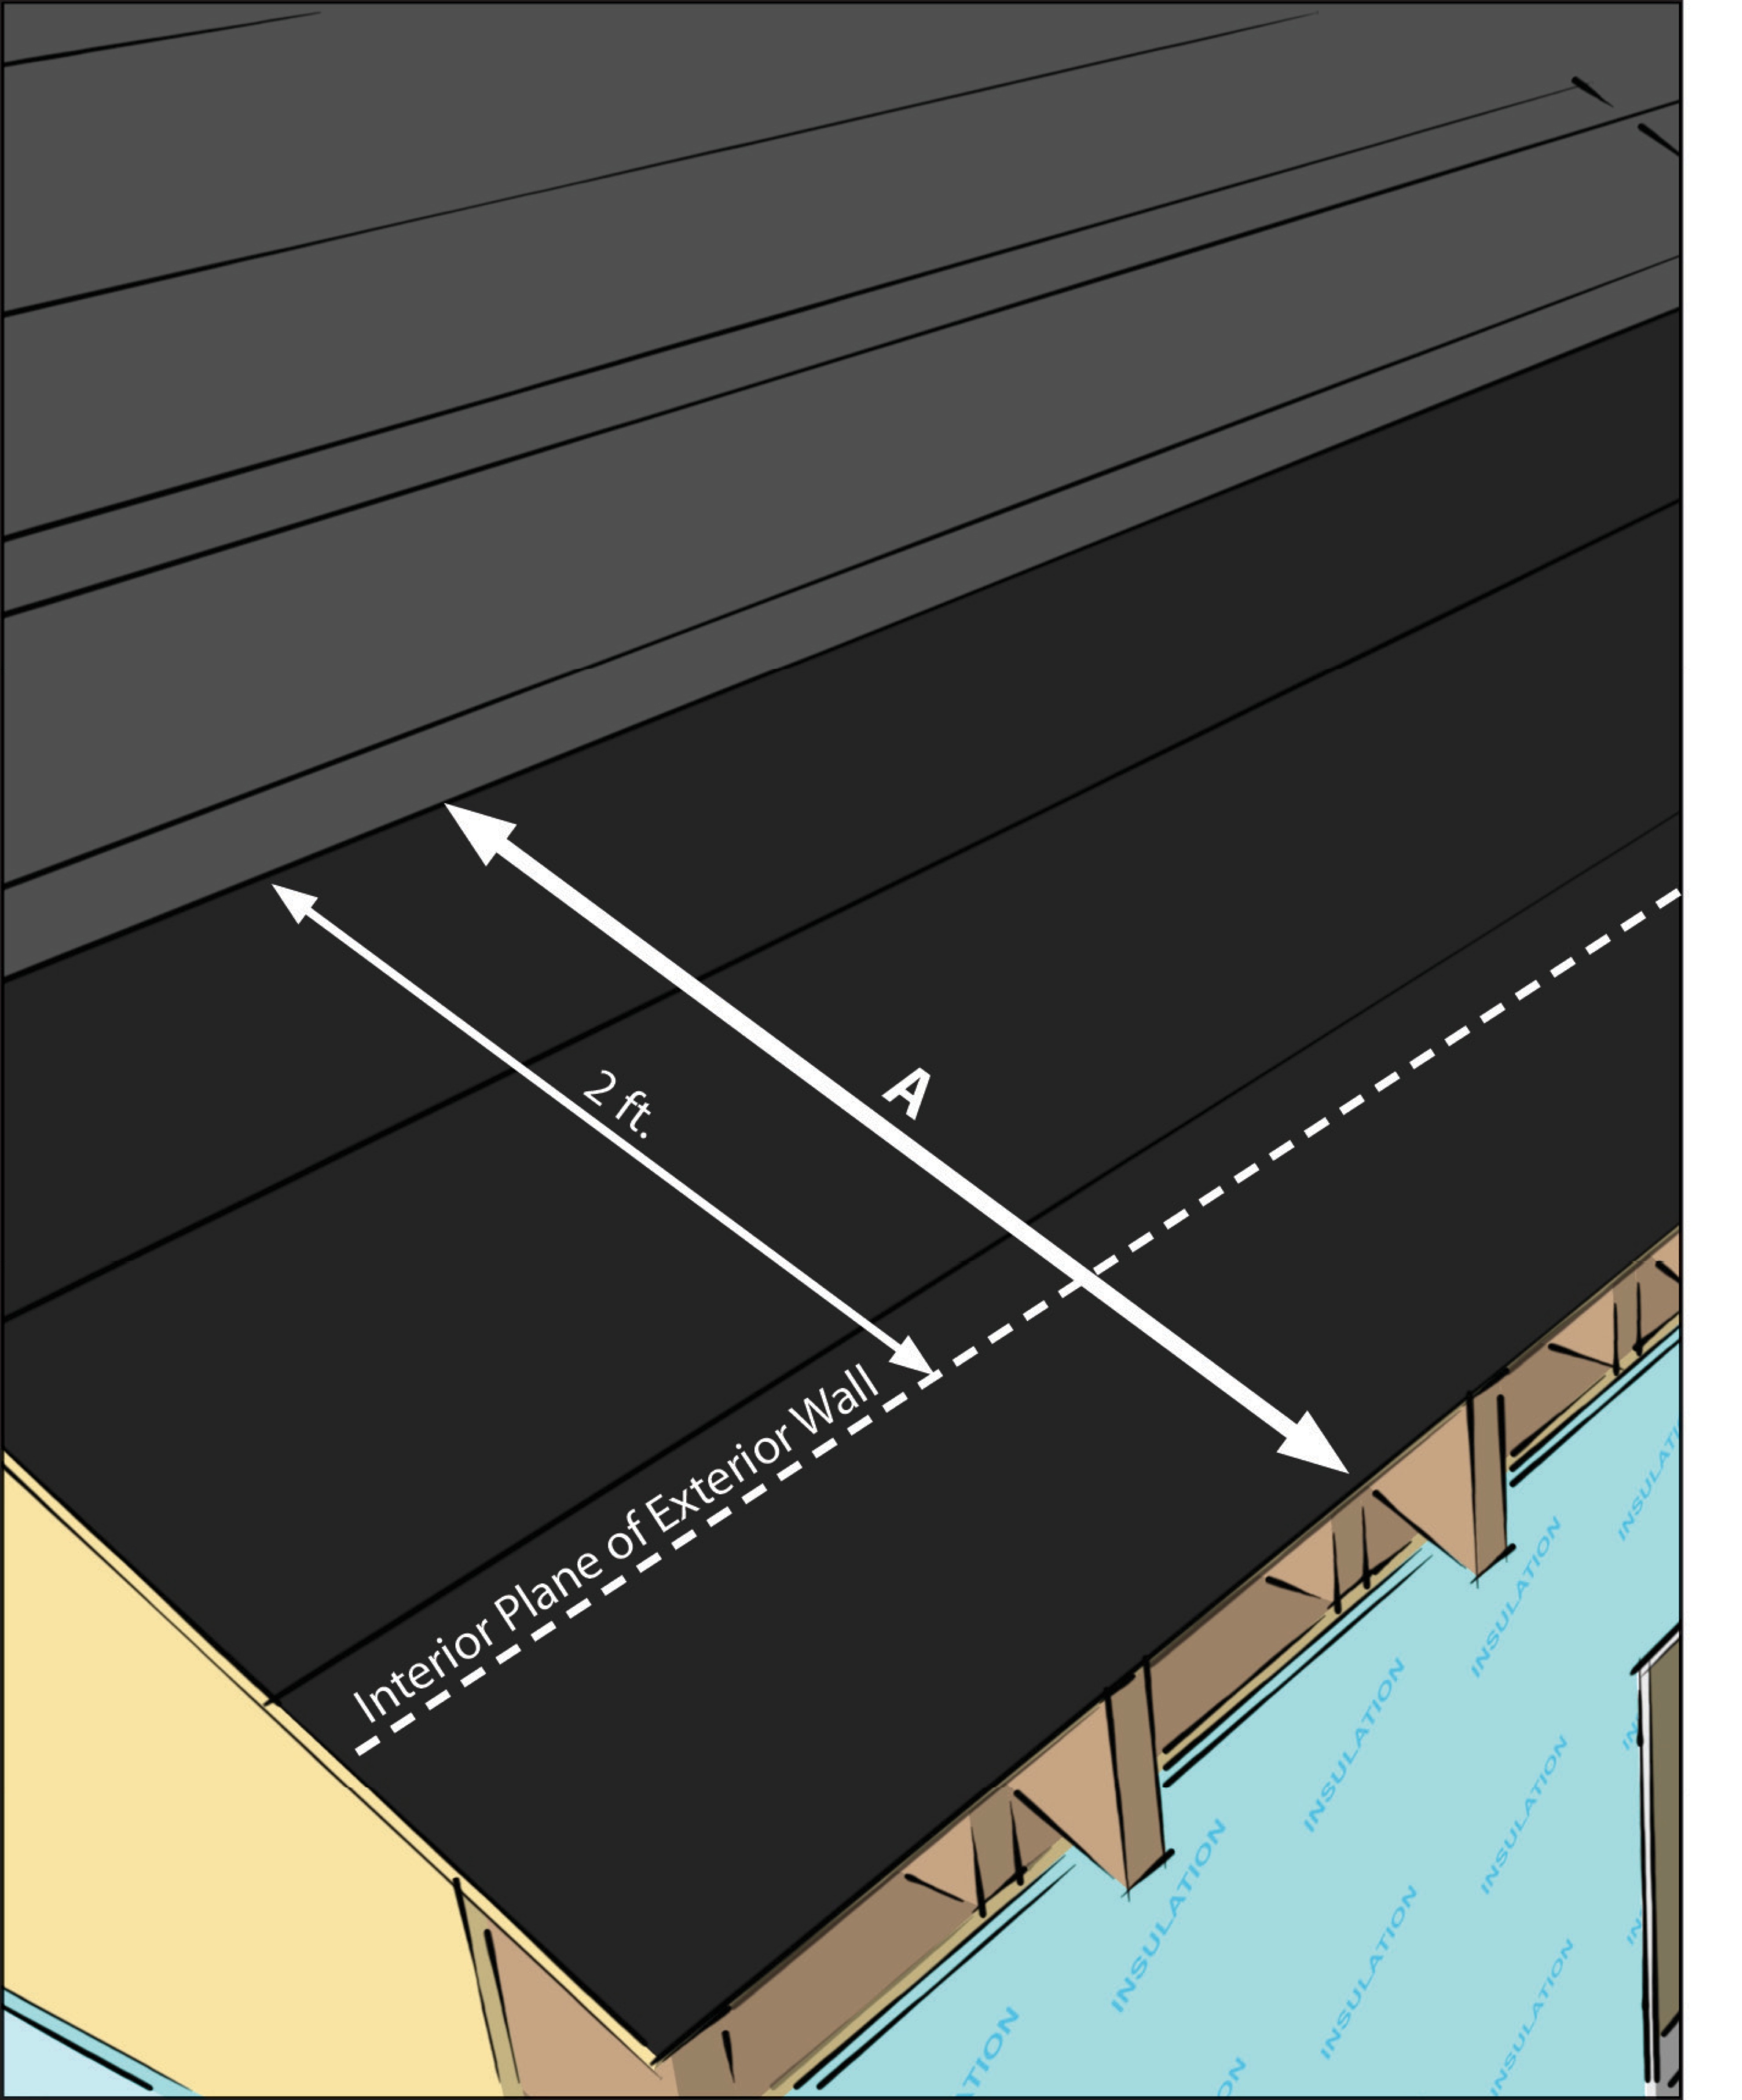
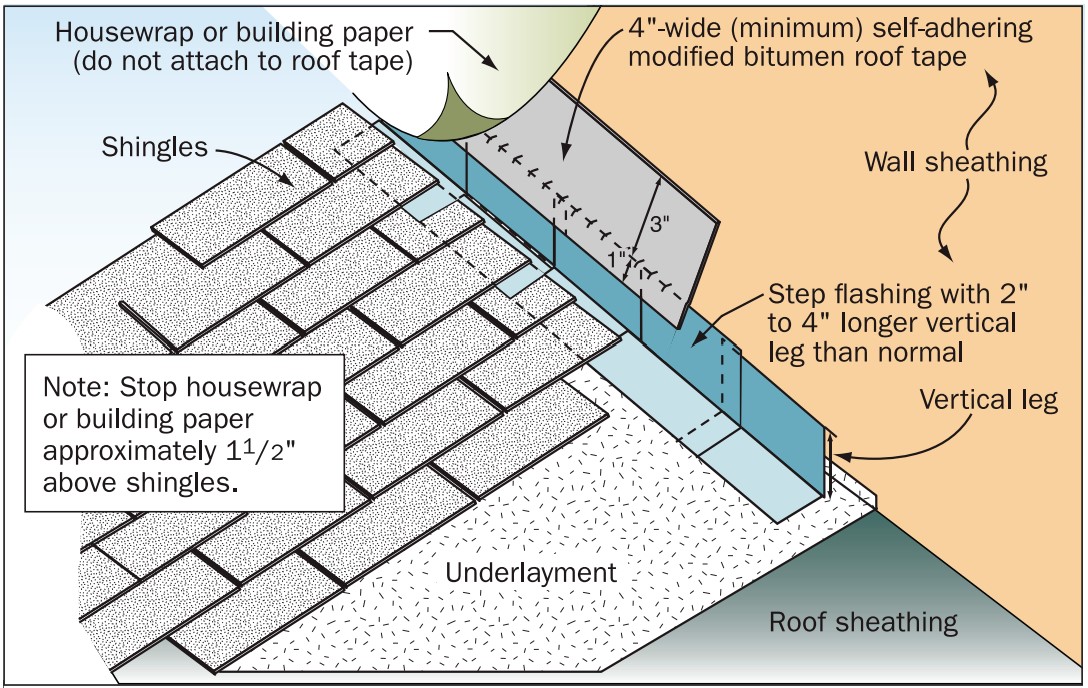
In 2009 IECC CZ 5 and higher, install self-sealing bituminous membrane or equivalent over sheathing at eaves from the edge of the roof line to > 2 ft. up roof deck from the interior plane of the exterior wall.
Image

Image
Image
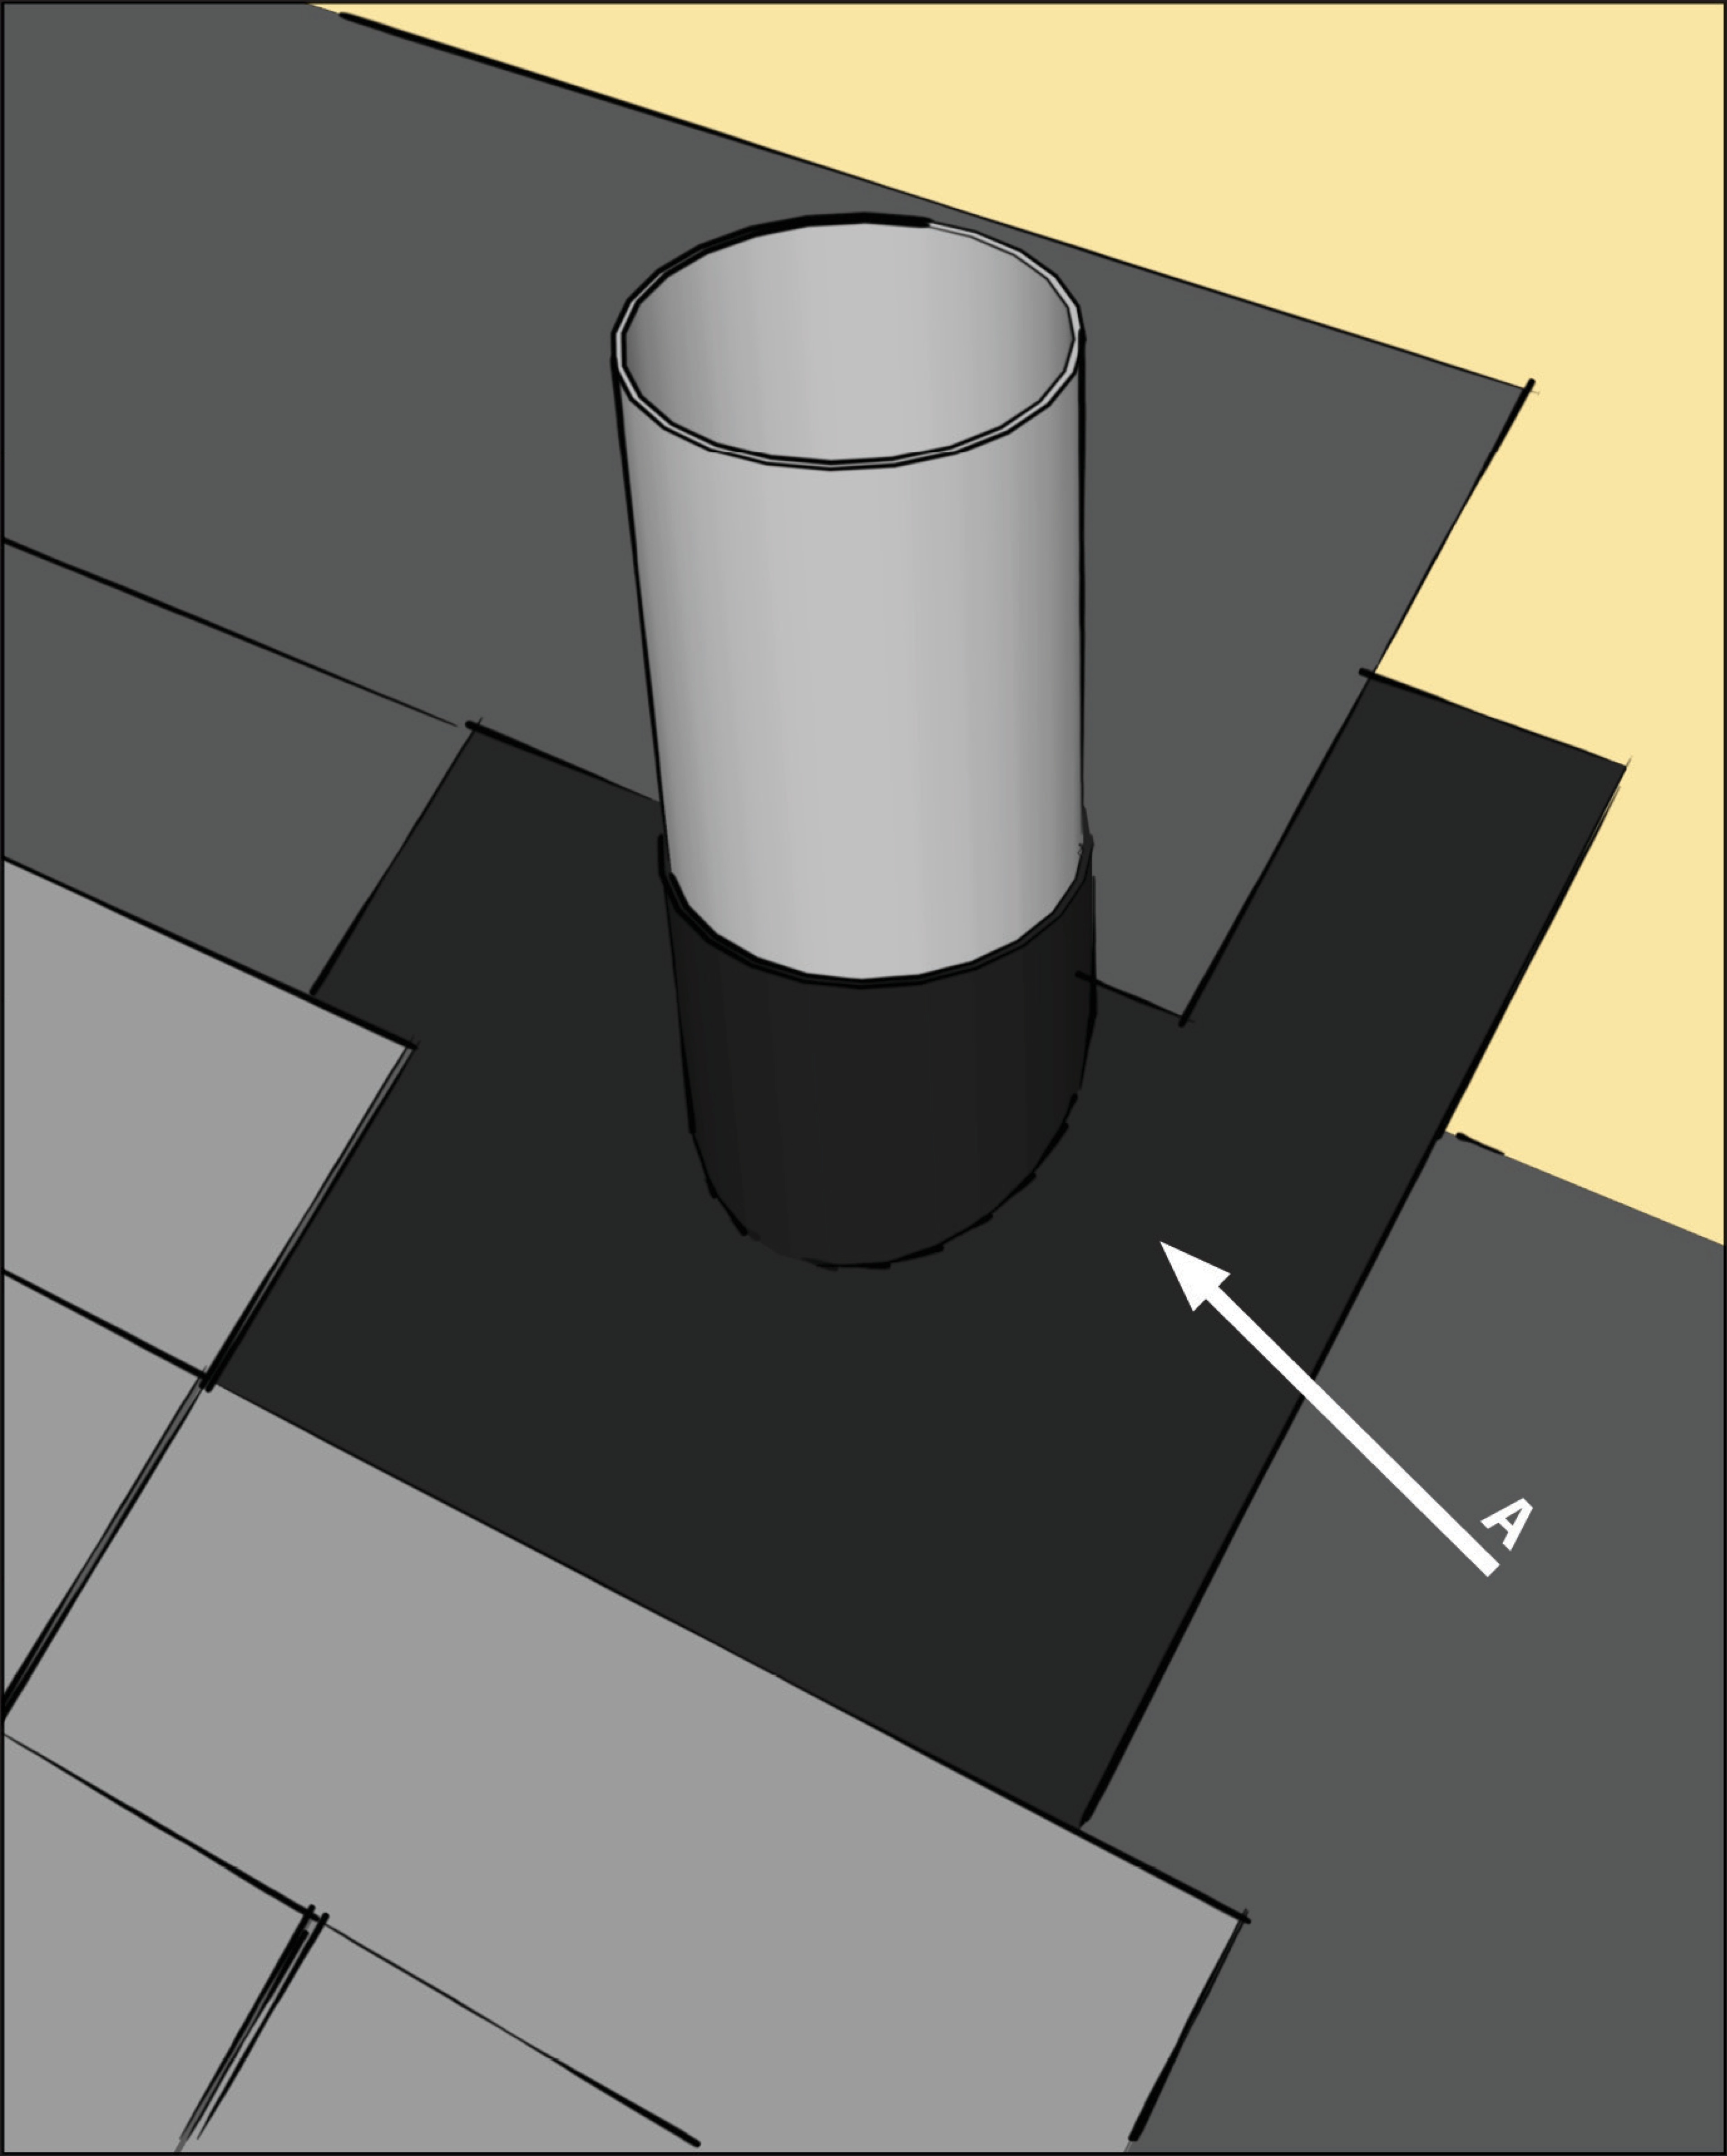
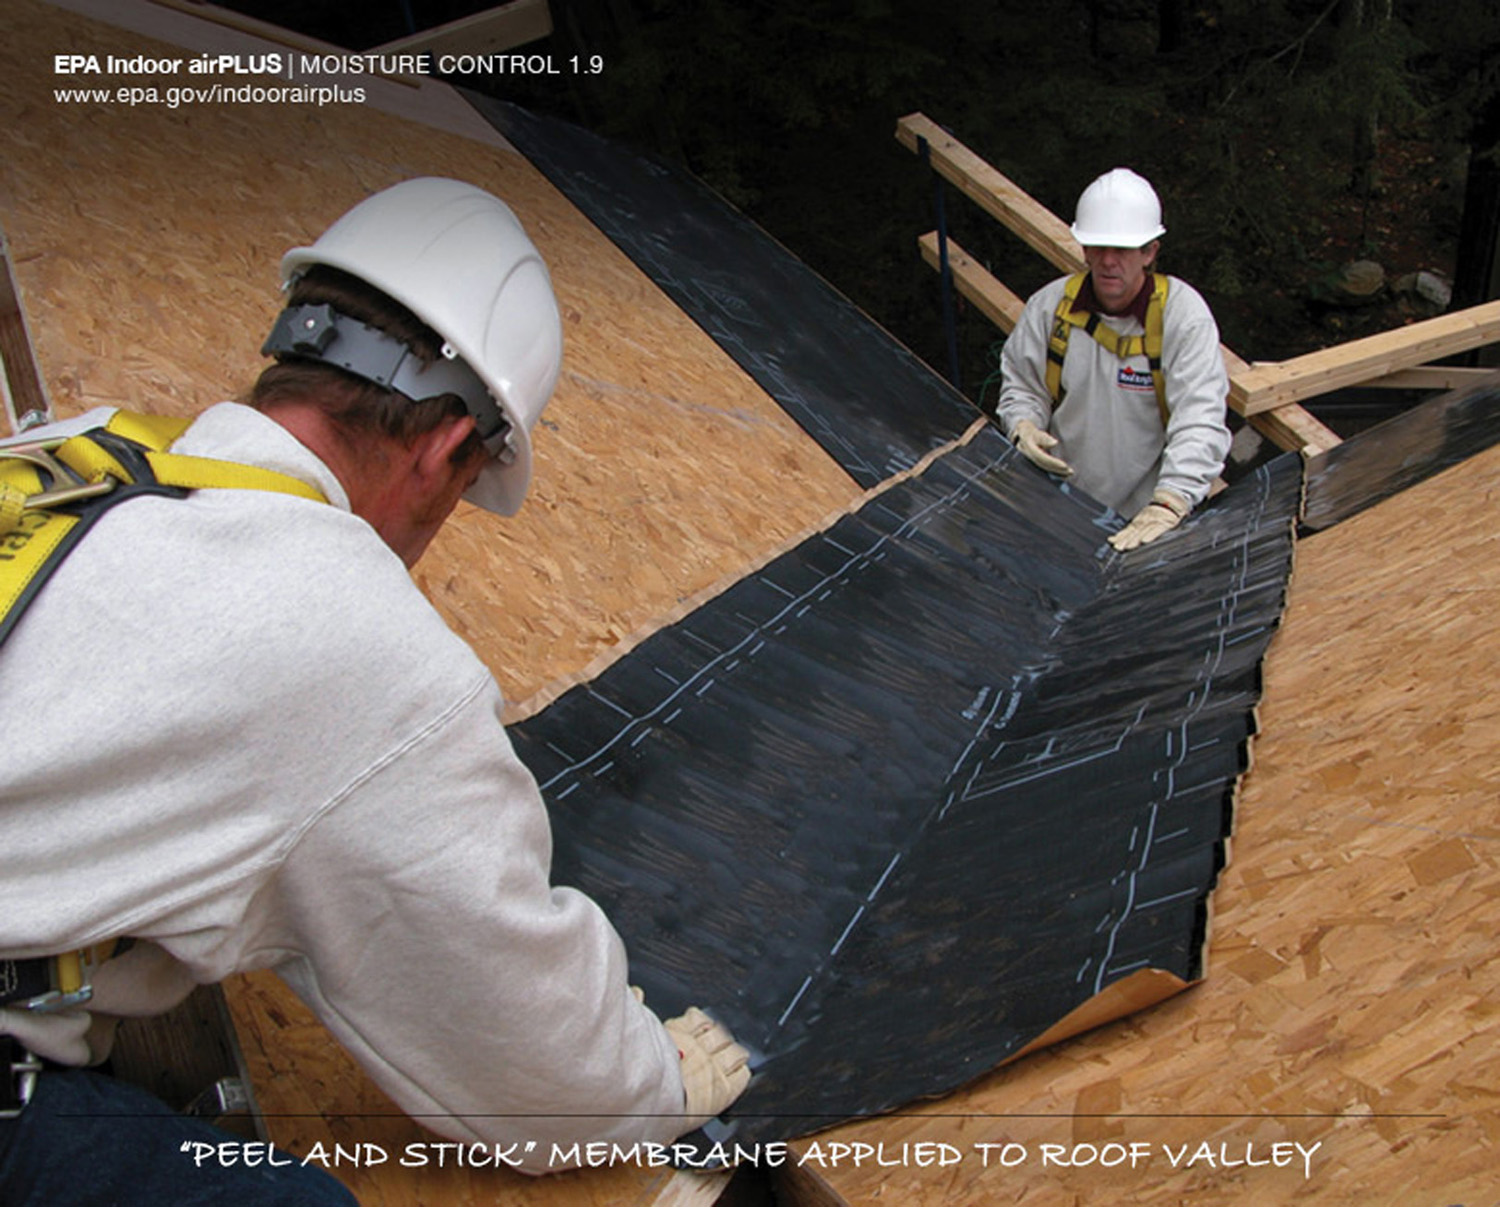
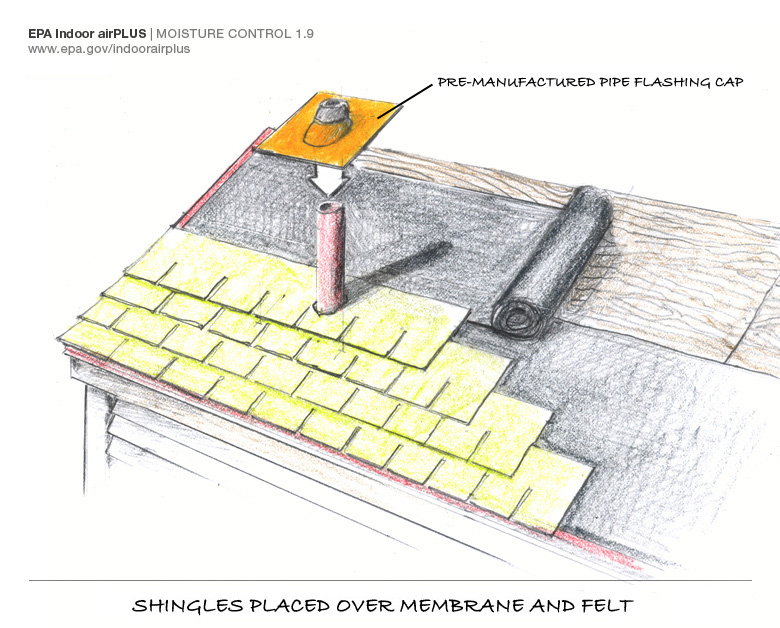
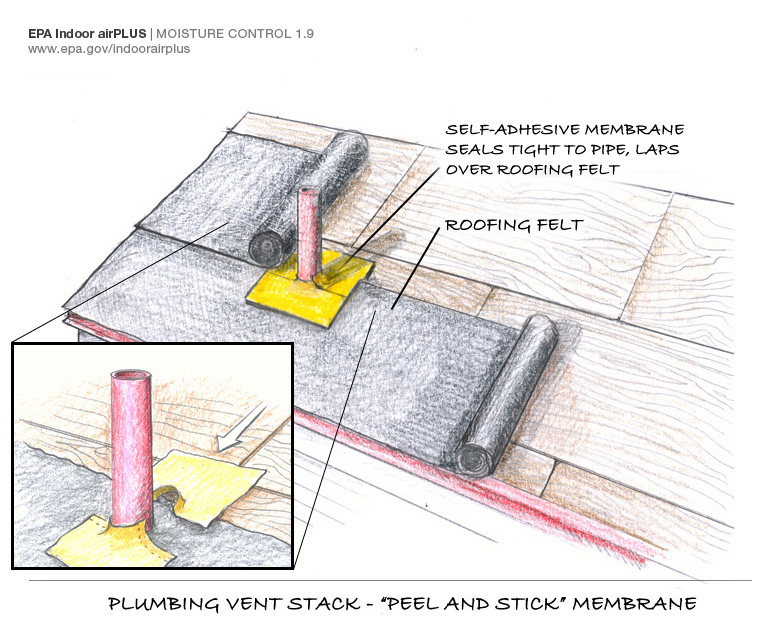
Install self-sealing bituminous membrane or equivalent at all valleys and roof deck penetrations
Image
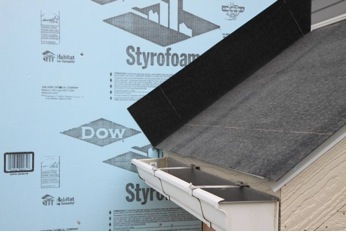
Install shingle starter strip then kick-out diverter; attach to roof deck but not sidewall
Image
Image

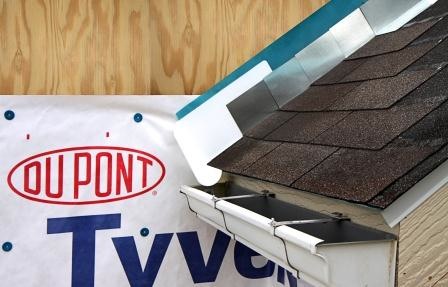
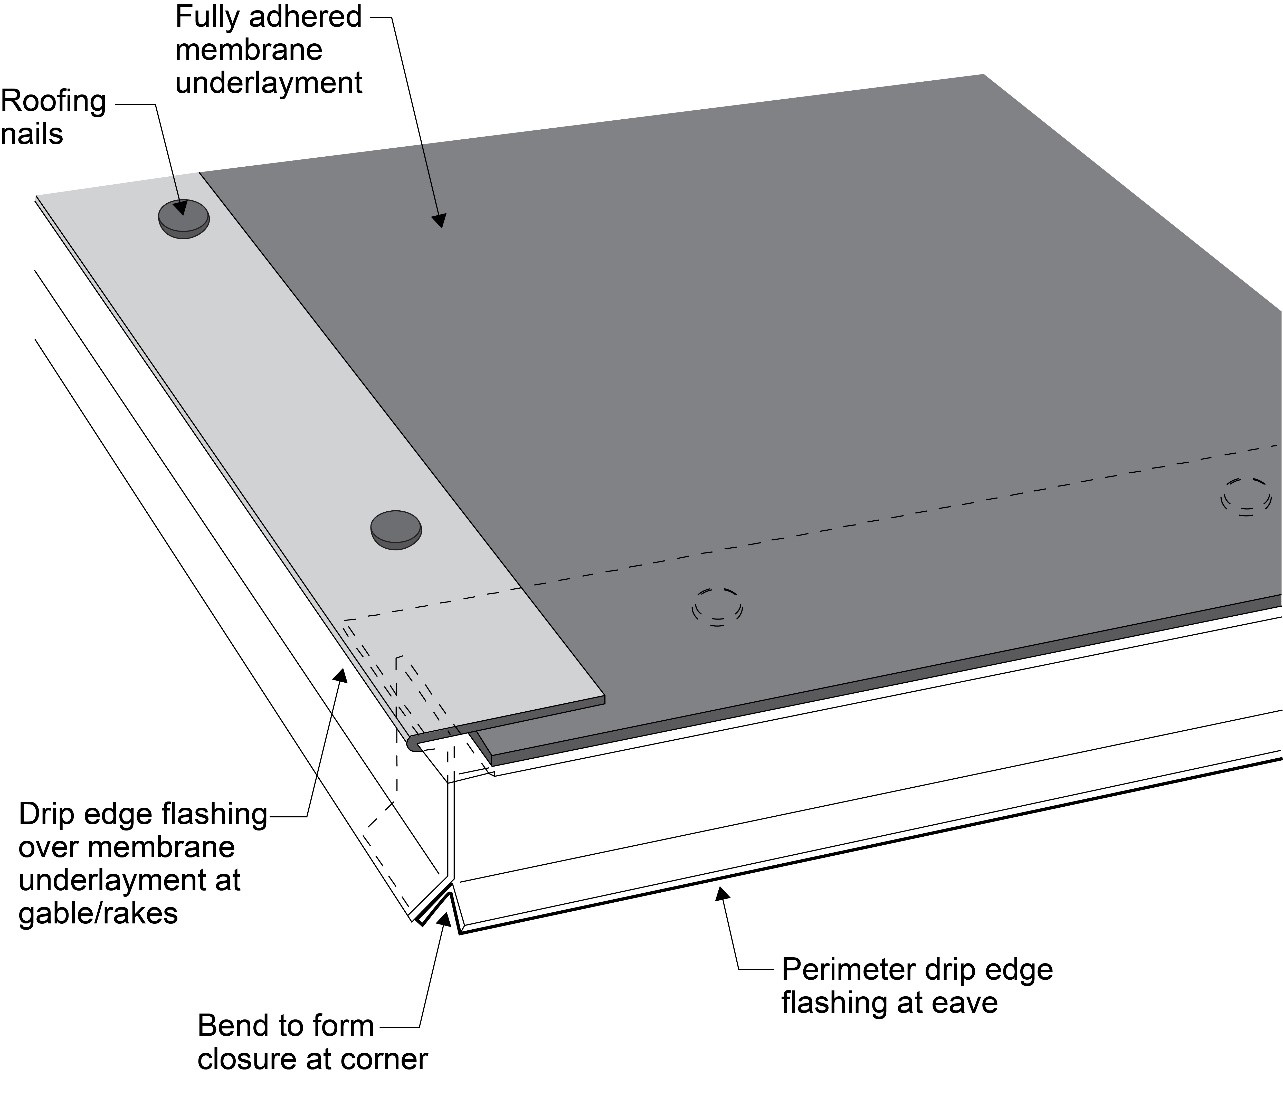
Installation of the Self-Sealing Bituminous Membrane in Relation to the Drip Edge and Roof Underlayment
Image
Image
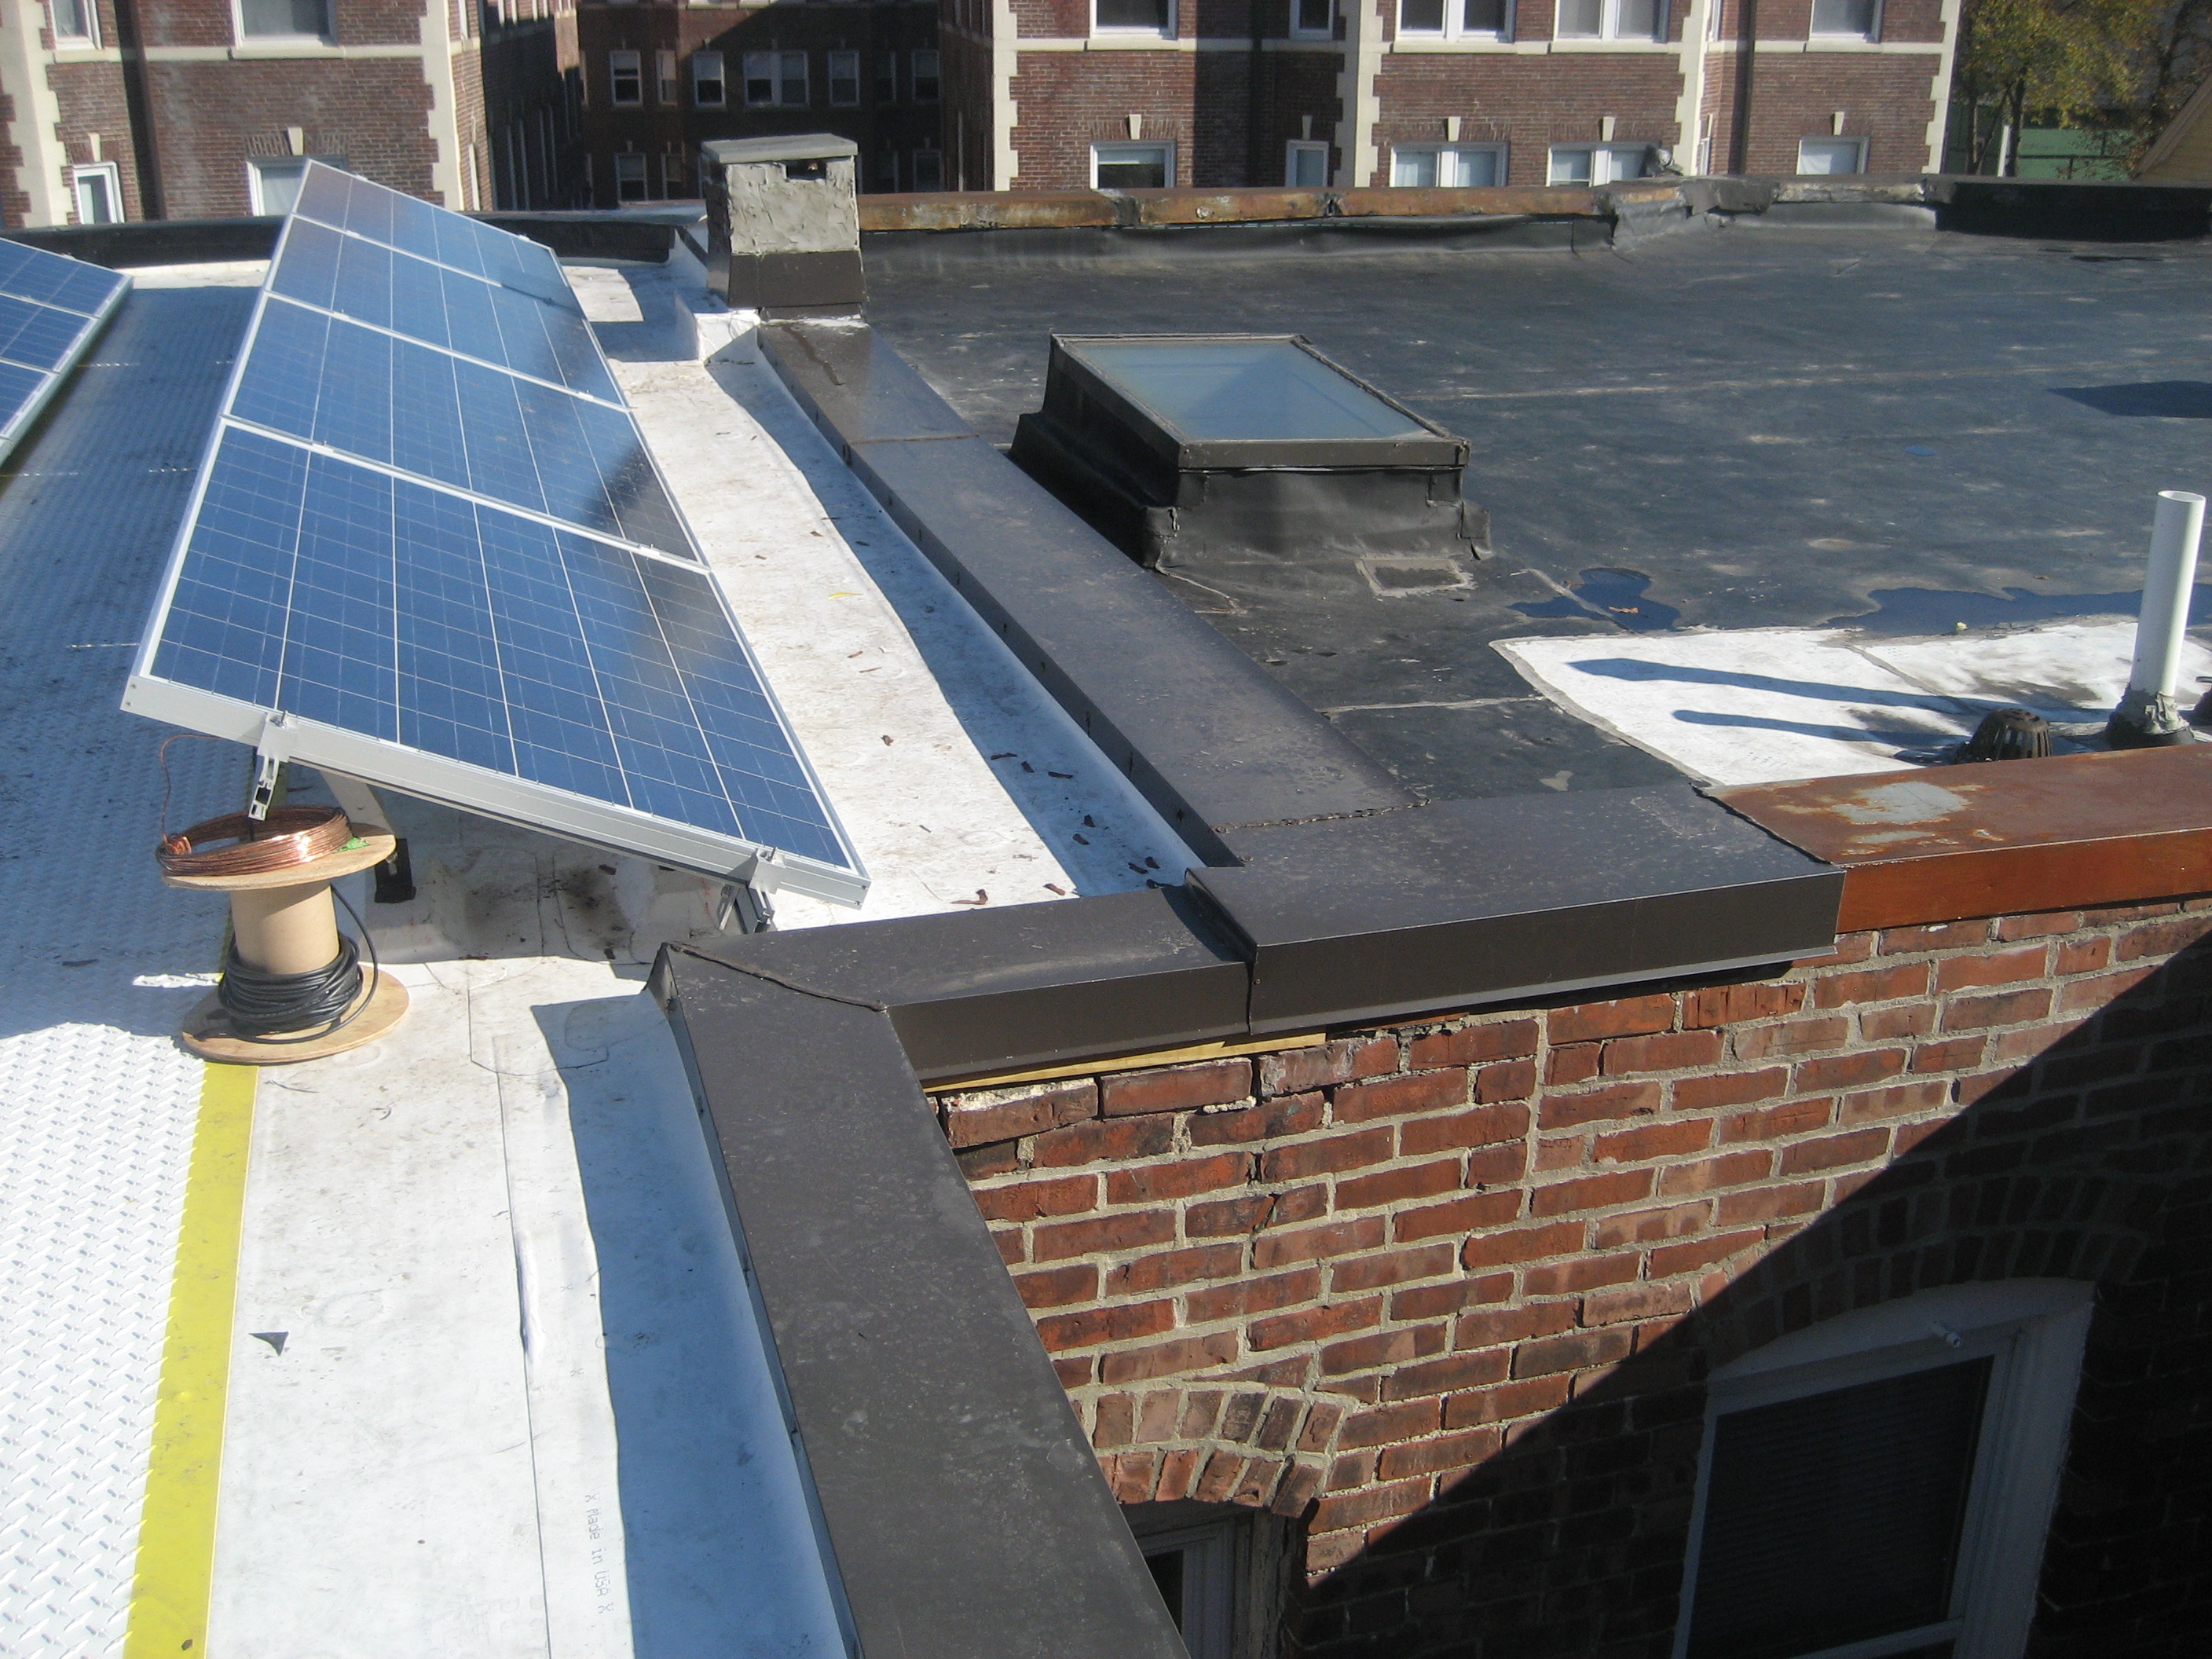
Metal cap flashing is installed over the roof parapet and extends down over the roofing membrane
Image
Image
New coated OSB roof sheathing is installed over the existing sheathing of the flat roof and taped at the seams to provide a continuous air barrier
Image
Image
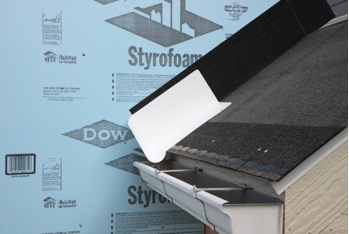
Place first shingle and next section of sidewall flashing over upper edge of diverter
Image
Image
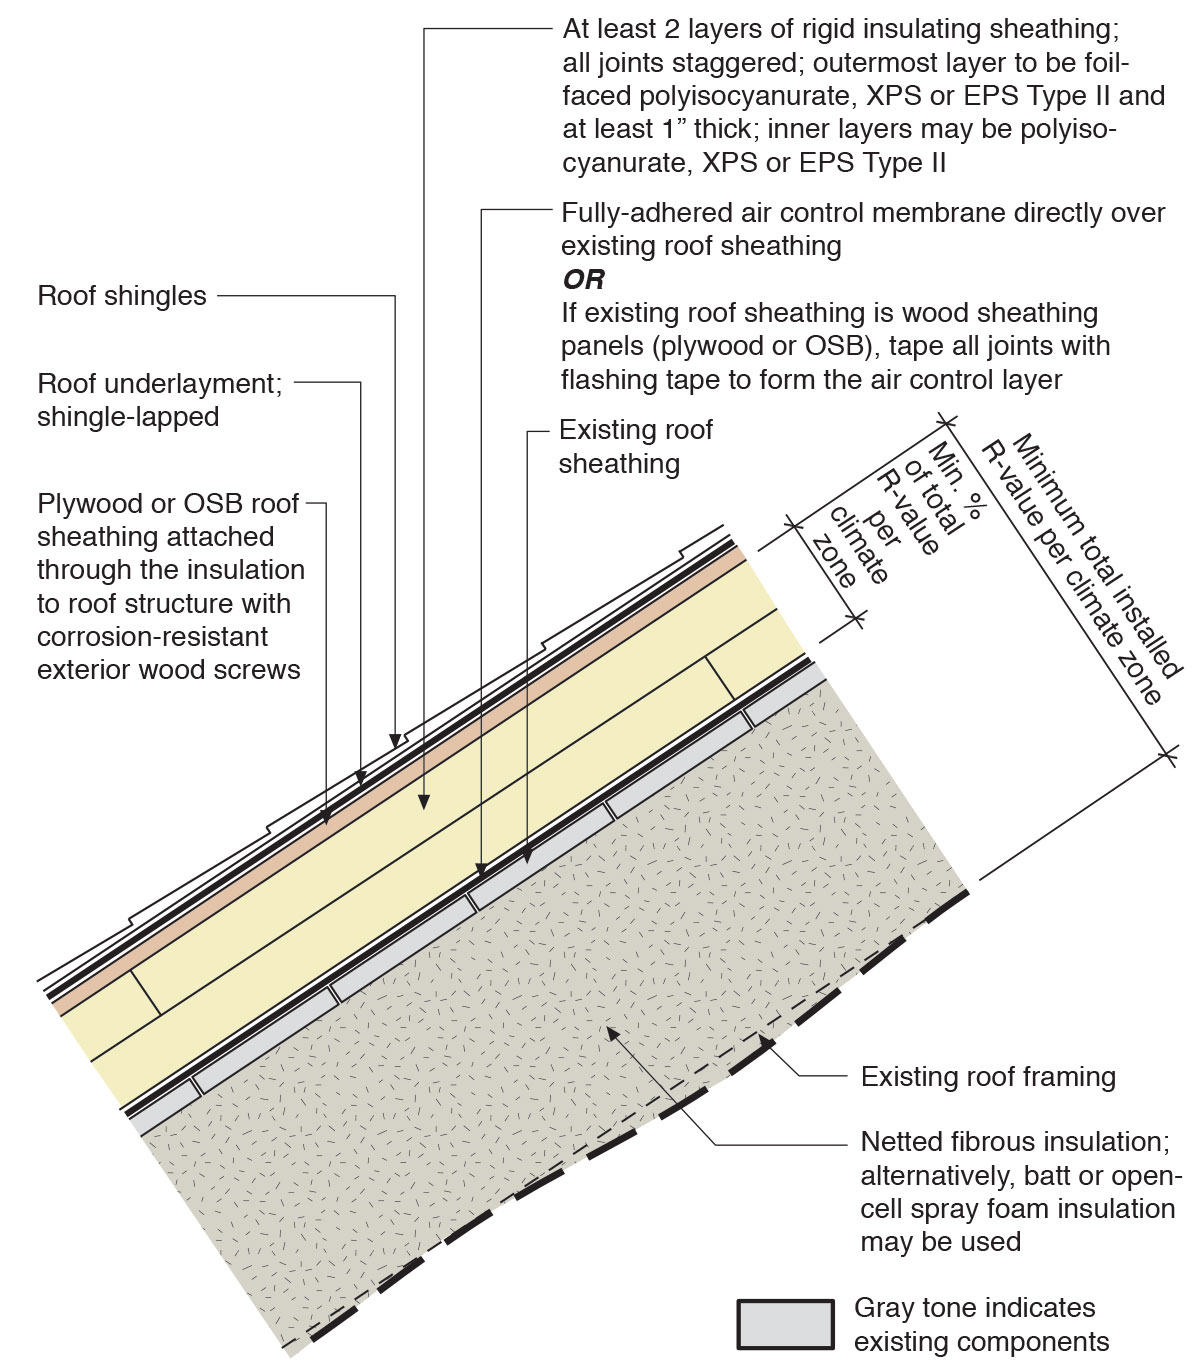
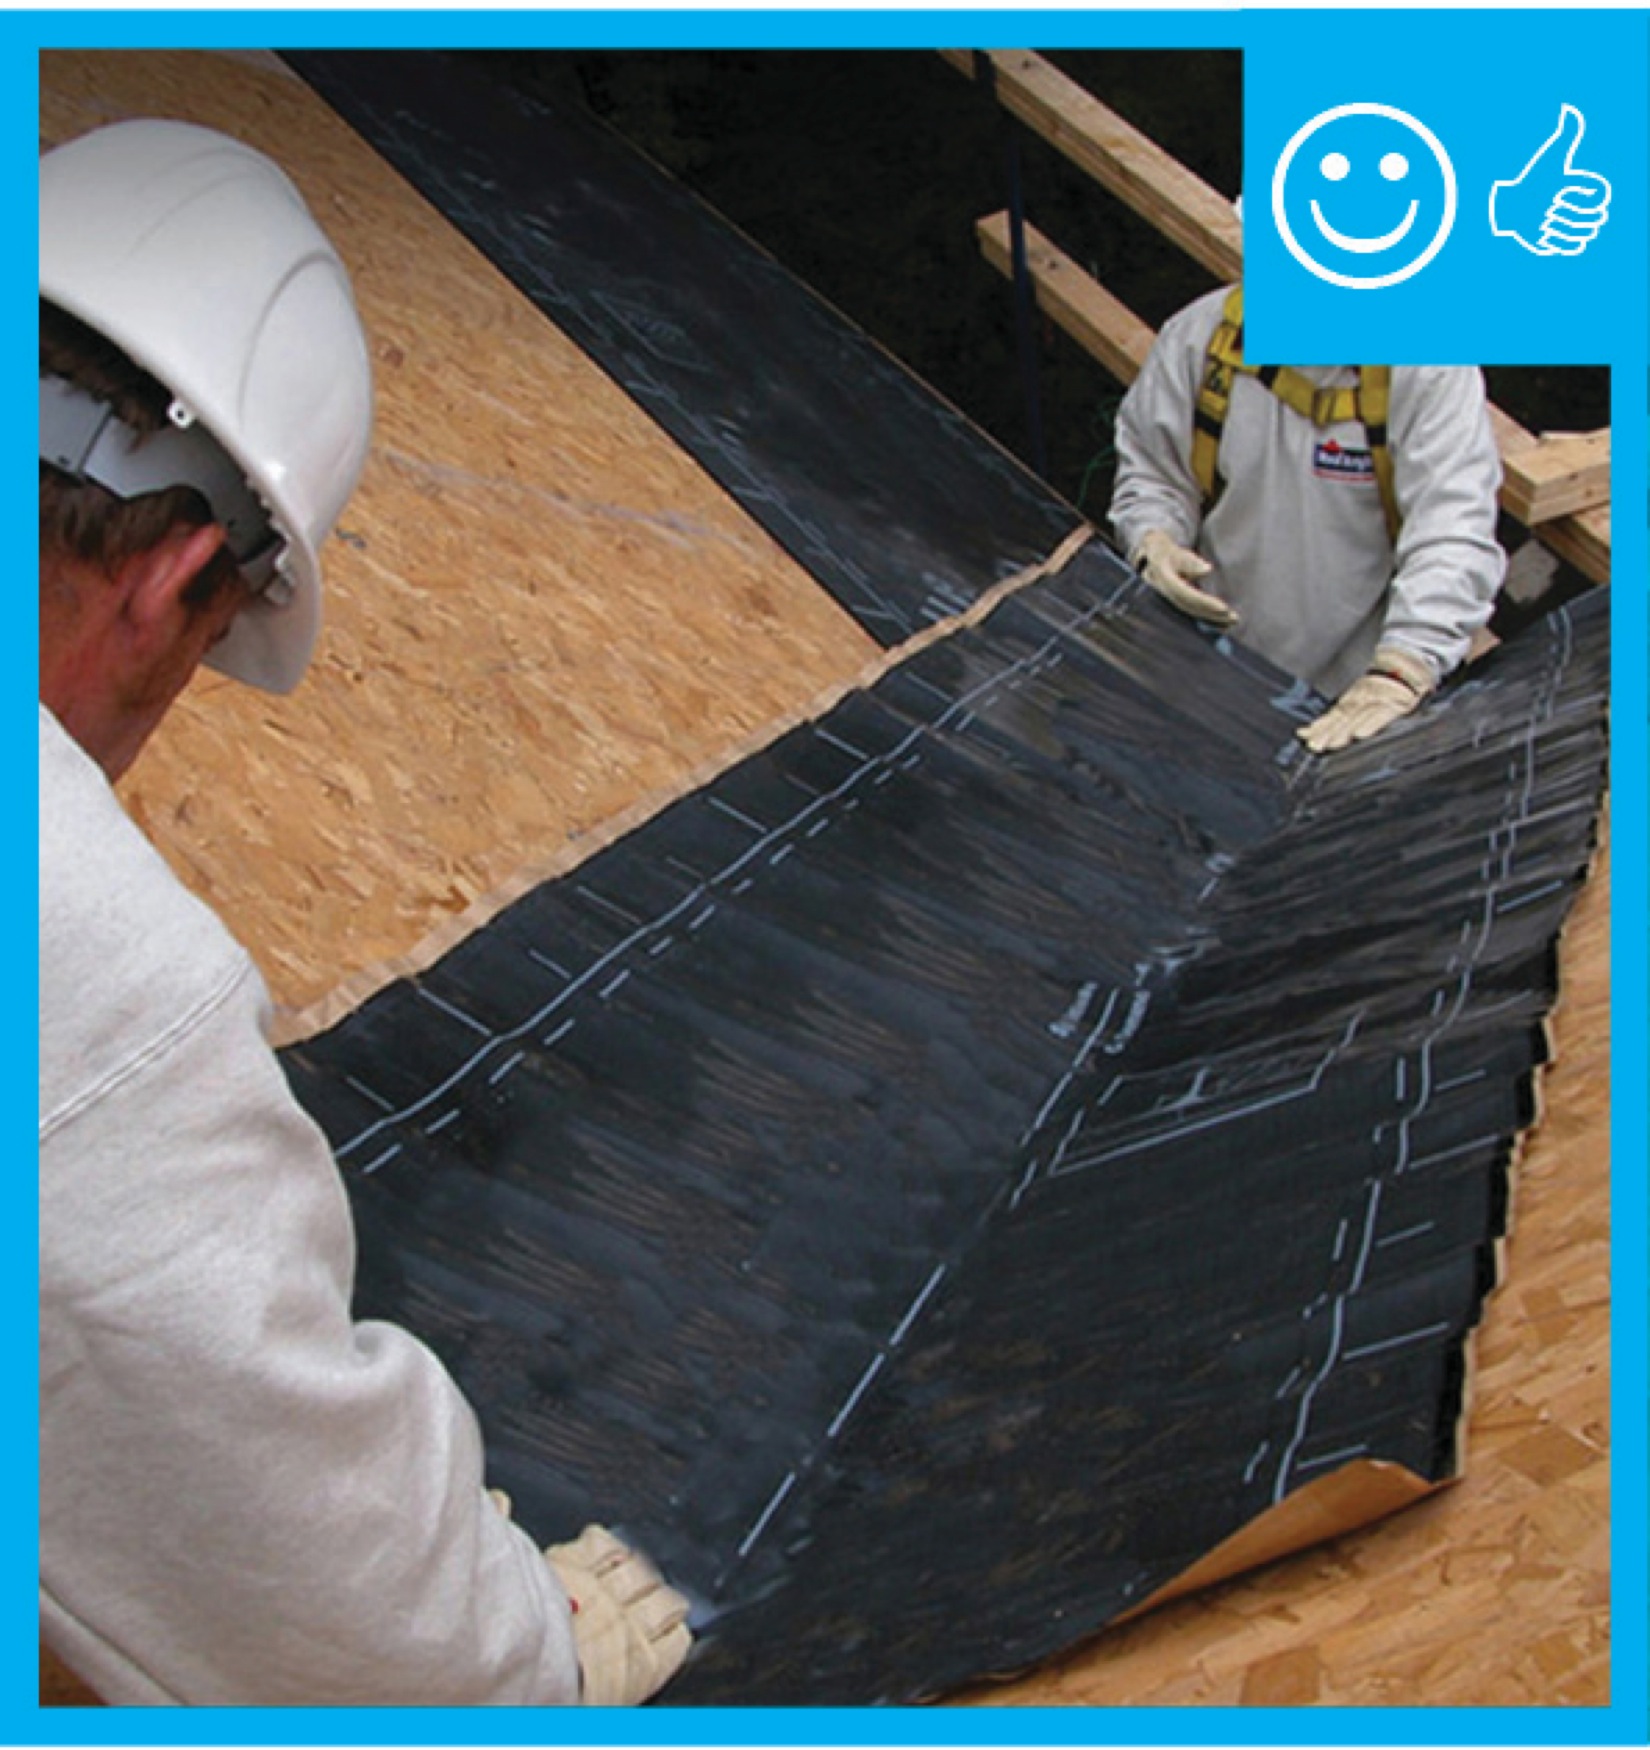
Polyisocyanurate rigid foam insulation is installed in multiple layers with staggered, taped seams over the flat roof
Image
Provide flashing and sealing integrated with the air and water control layers for vents and other roof penetrations
Image
Retrofit an existing roof by installing rigid foam, new moisture and air control layers, new sheathing, and new cladding plus cavity insulation in the roof rafters to create an unvented attic
Image
Right - A lattice of 1X4 furring strips provides a ventilation gap between the decking and metal roofing for this shed roof.
Image
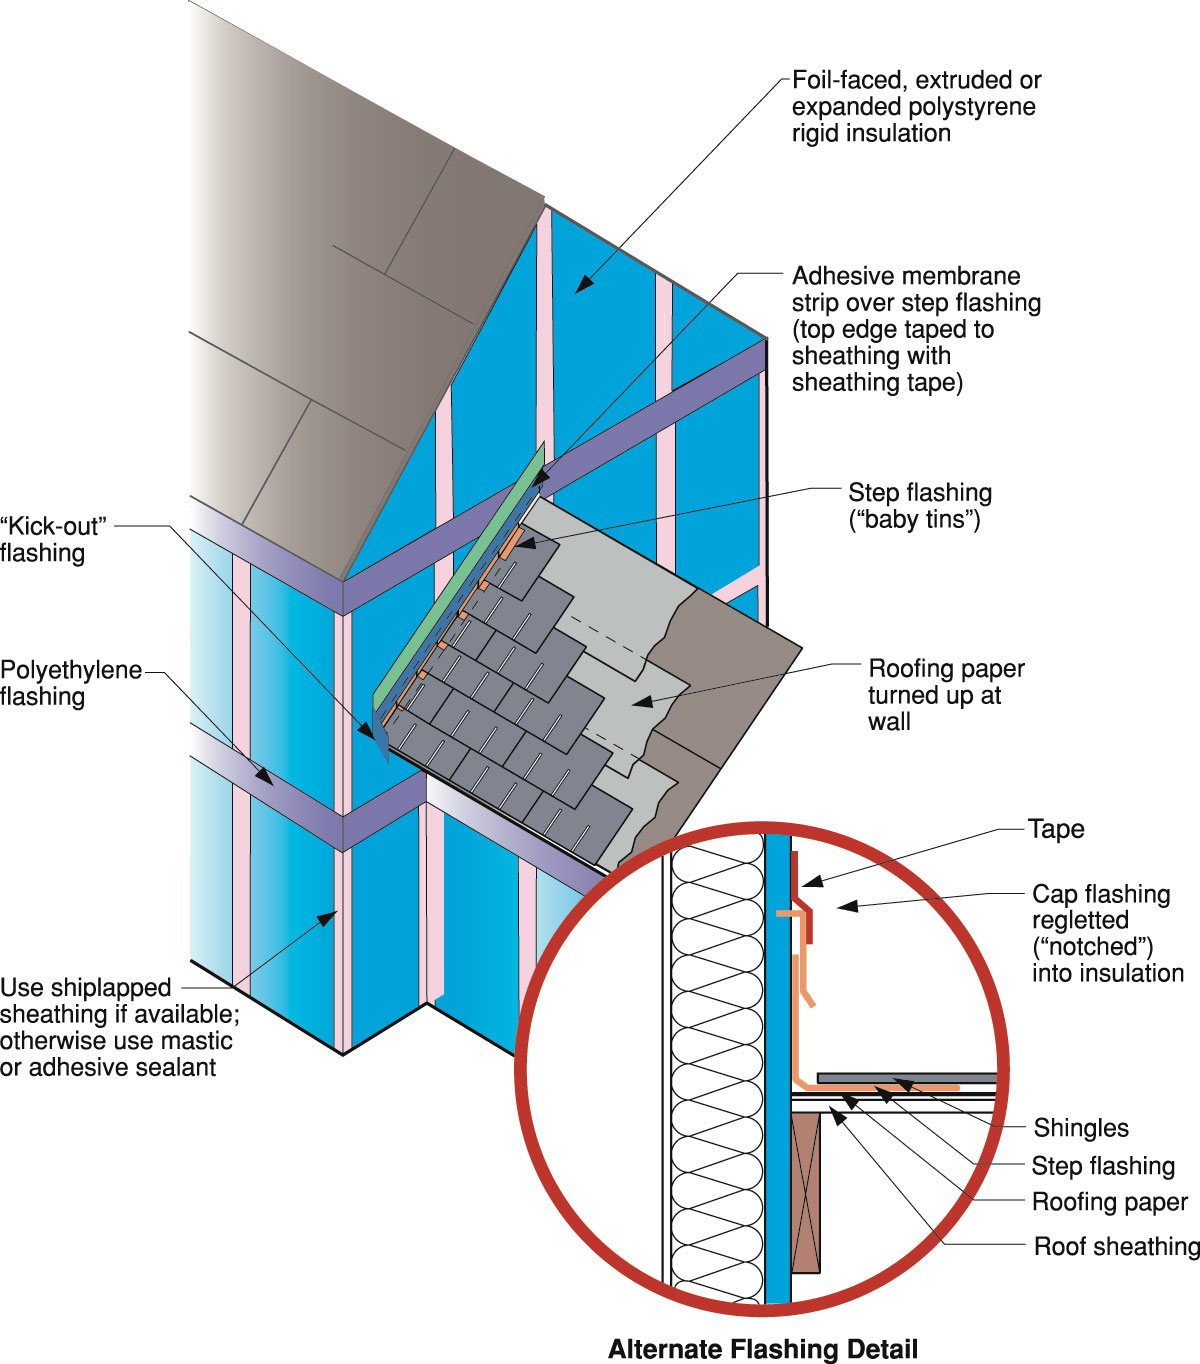
Right - Counterflashing tops a layer of step flashing which comes down above the asphalt shingle and a layer of L-shaped base flashing which comes down and extends below the shingle; the base flashing is adhered to the roof underlayment with mastic, shown
Image
Right - Here, air control is established by taping the seams of the plywood panel sheathing. The roof sheathing is also trimmed flush with the wall sheathing to allow a simple and airtight connection between the roof and wall assemblies
Image
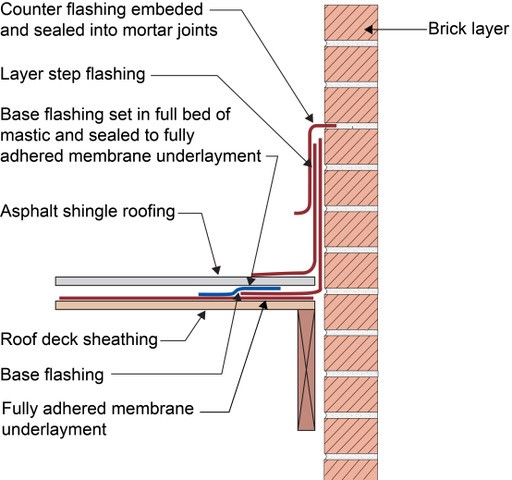
Right - Step flashing along a chimney is integrated in a layered manner with asphalt shingle roofing and topped with counterflashing that is embedded into brick mortar joint above
Image
Right - The air control membrane installed over the roof sheathing is continuous. It connects to the air control of the wall around the entire perimeter without interruption. The roof overhangs have been cut off to make this connection continuous
Image
Right - These roof insulation panels are installed in multiple layers with joints offset both vertically and horizontally. The plywood nail base fastened to the roof framing holds the insulation layers together snuggly thus minimizing gaps
Image
Right - This shed roof is constructed with 1X4 furring strips installed over the decking and underlayment for ventilation beneath the metal roofing.
Image
Right - This tiny house has a mono-sloped shed roof angled toward the sun to provide maximum space for solar panels.
Image
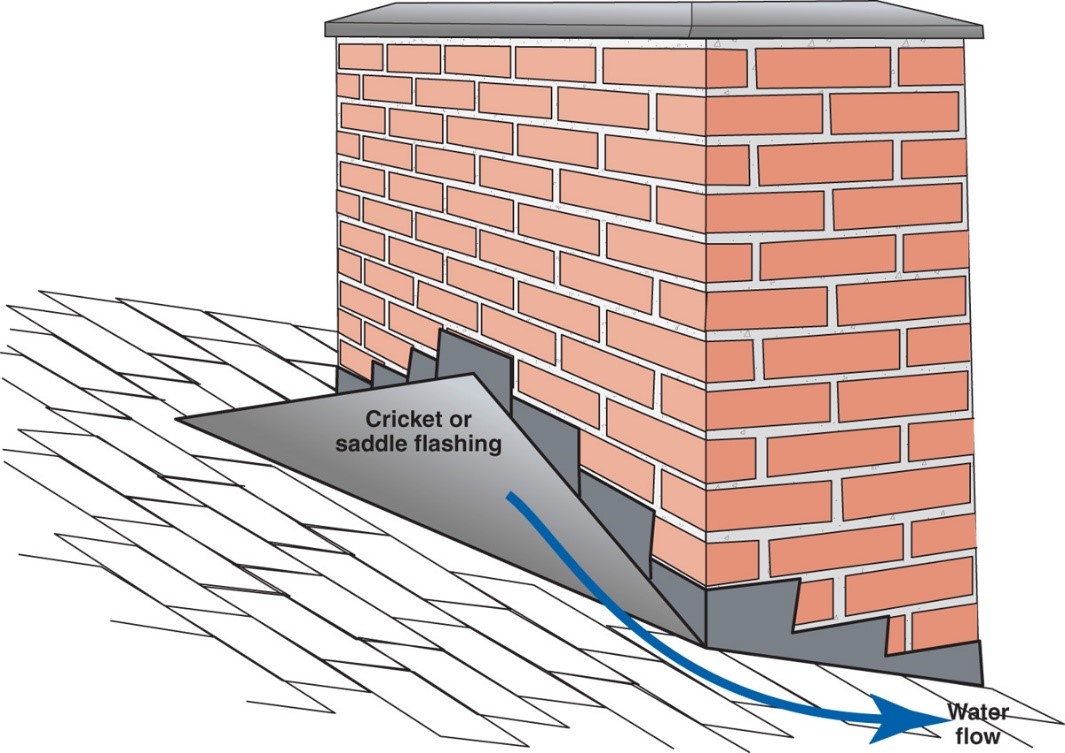
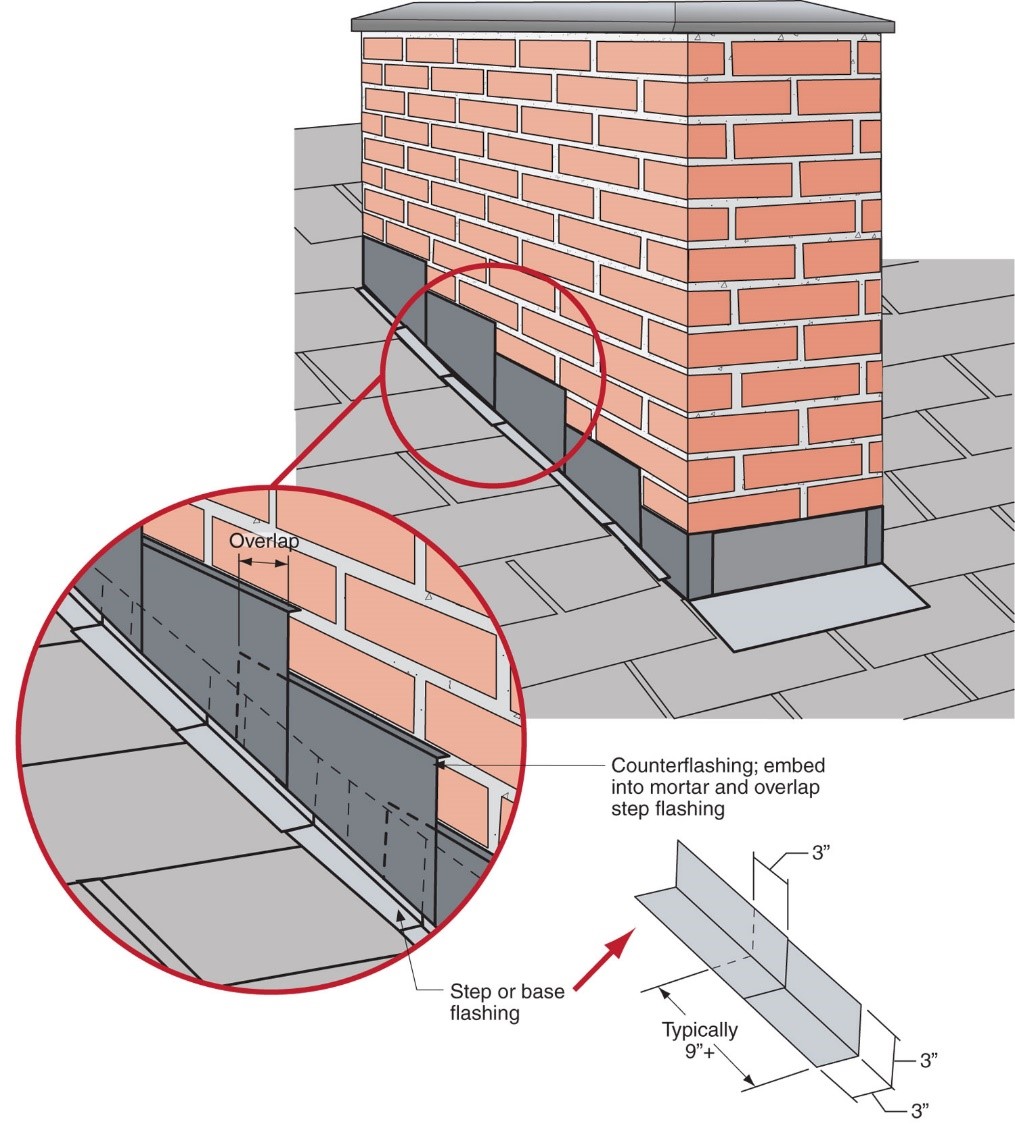
Right – A chimney cricket is installed and flashed to direct rainwater around the chimney
Image
Right – A fully adhered roof membrane provides thorough water and wind protection in this mountain top location.
Image
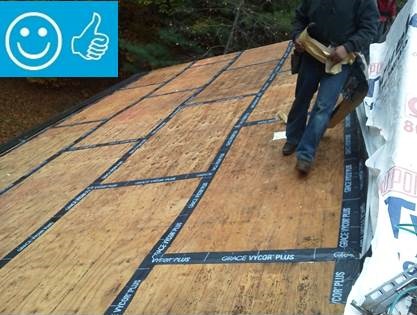
Right – A protective membrane has been installed in the valleys and at the eaves of this roof before installing underlayment.
Image
Image
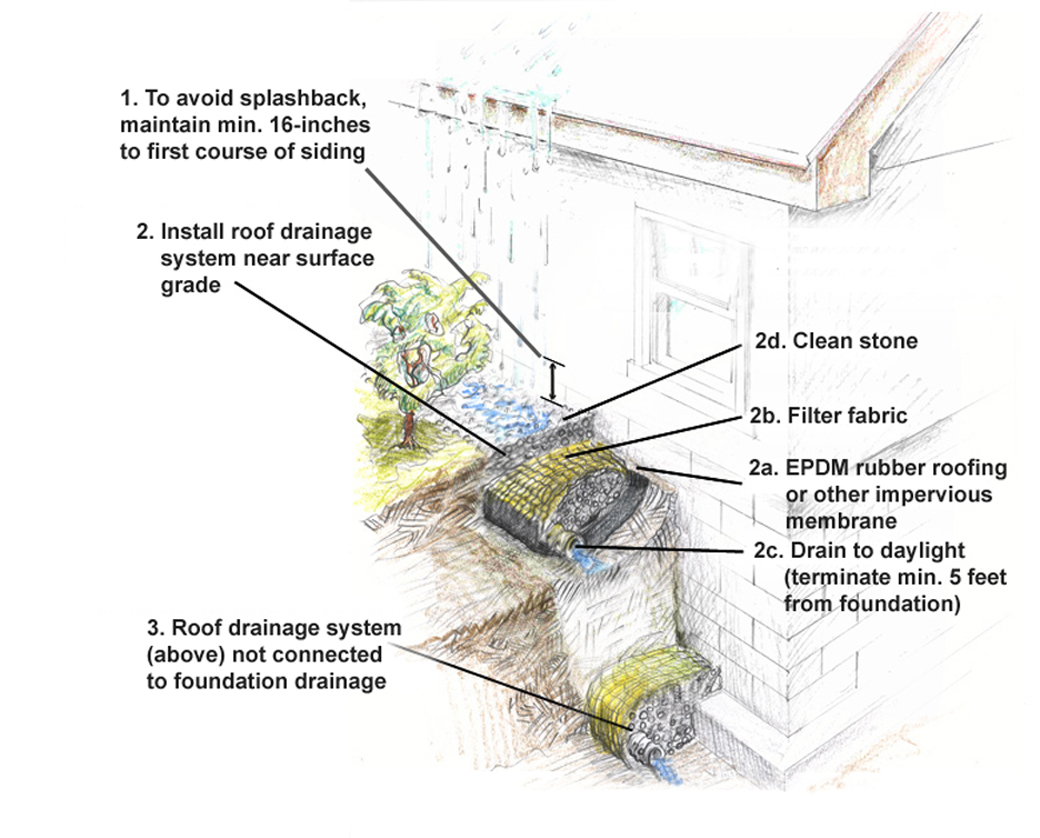
Right – House without gutters has waterproof liner, drain tile, and gravel bed extending more than 5 feet from foundation
Image
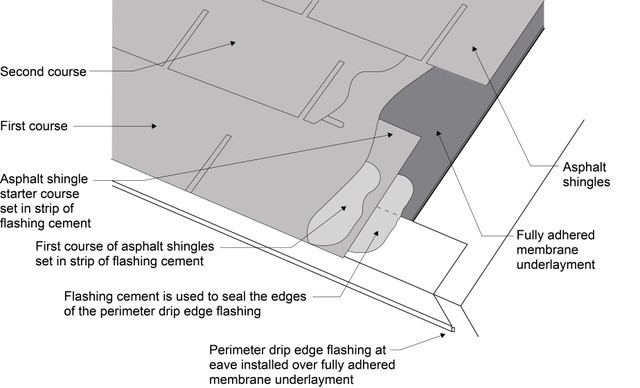
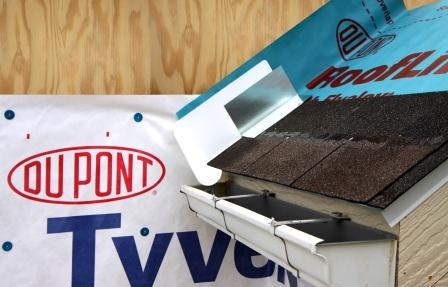
Right – If drip edge flashing is installed over fully adhered roof membrane at eaves, use flashing cement to seal the upper edge of the flashing
Image
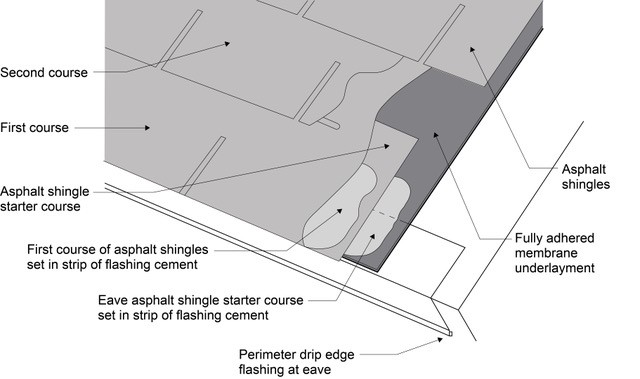
Right – Install asphalt shingles over a starter strip set in an 8-inch strip of flashing cement
Image
Image
Image
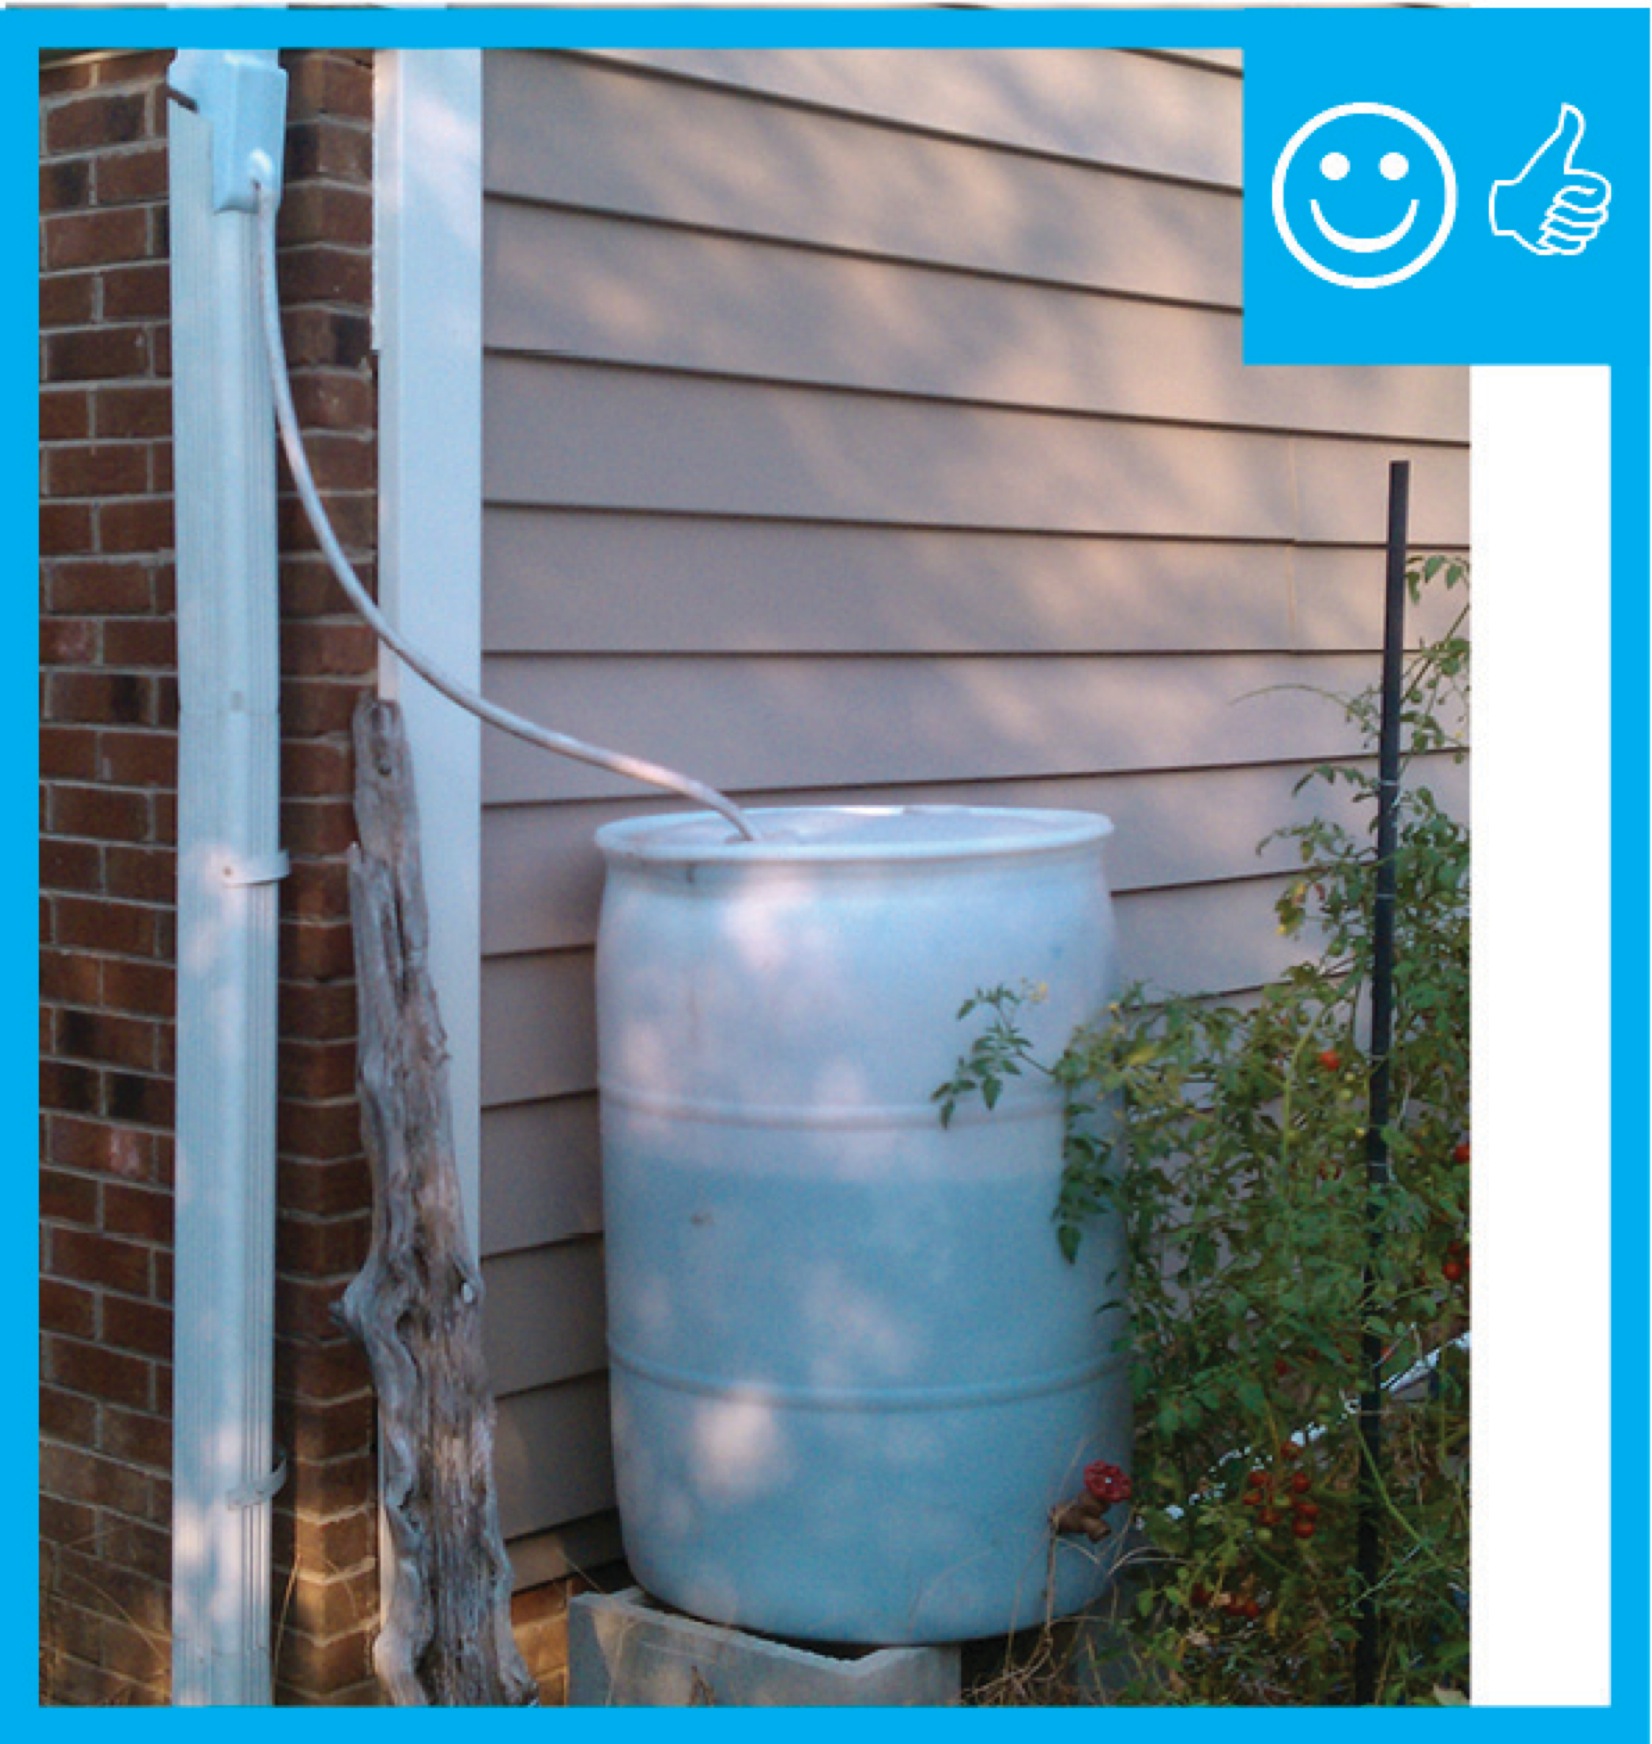
Right – Rain barrel installed with an overflow spout terminating at least 5 feet from foundation
Image
Image

Right – Start asphalt shingle installation with a starter strip set in an 8-inch strip of flashing cement
Image
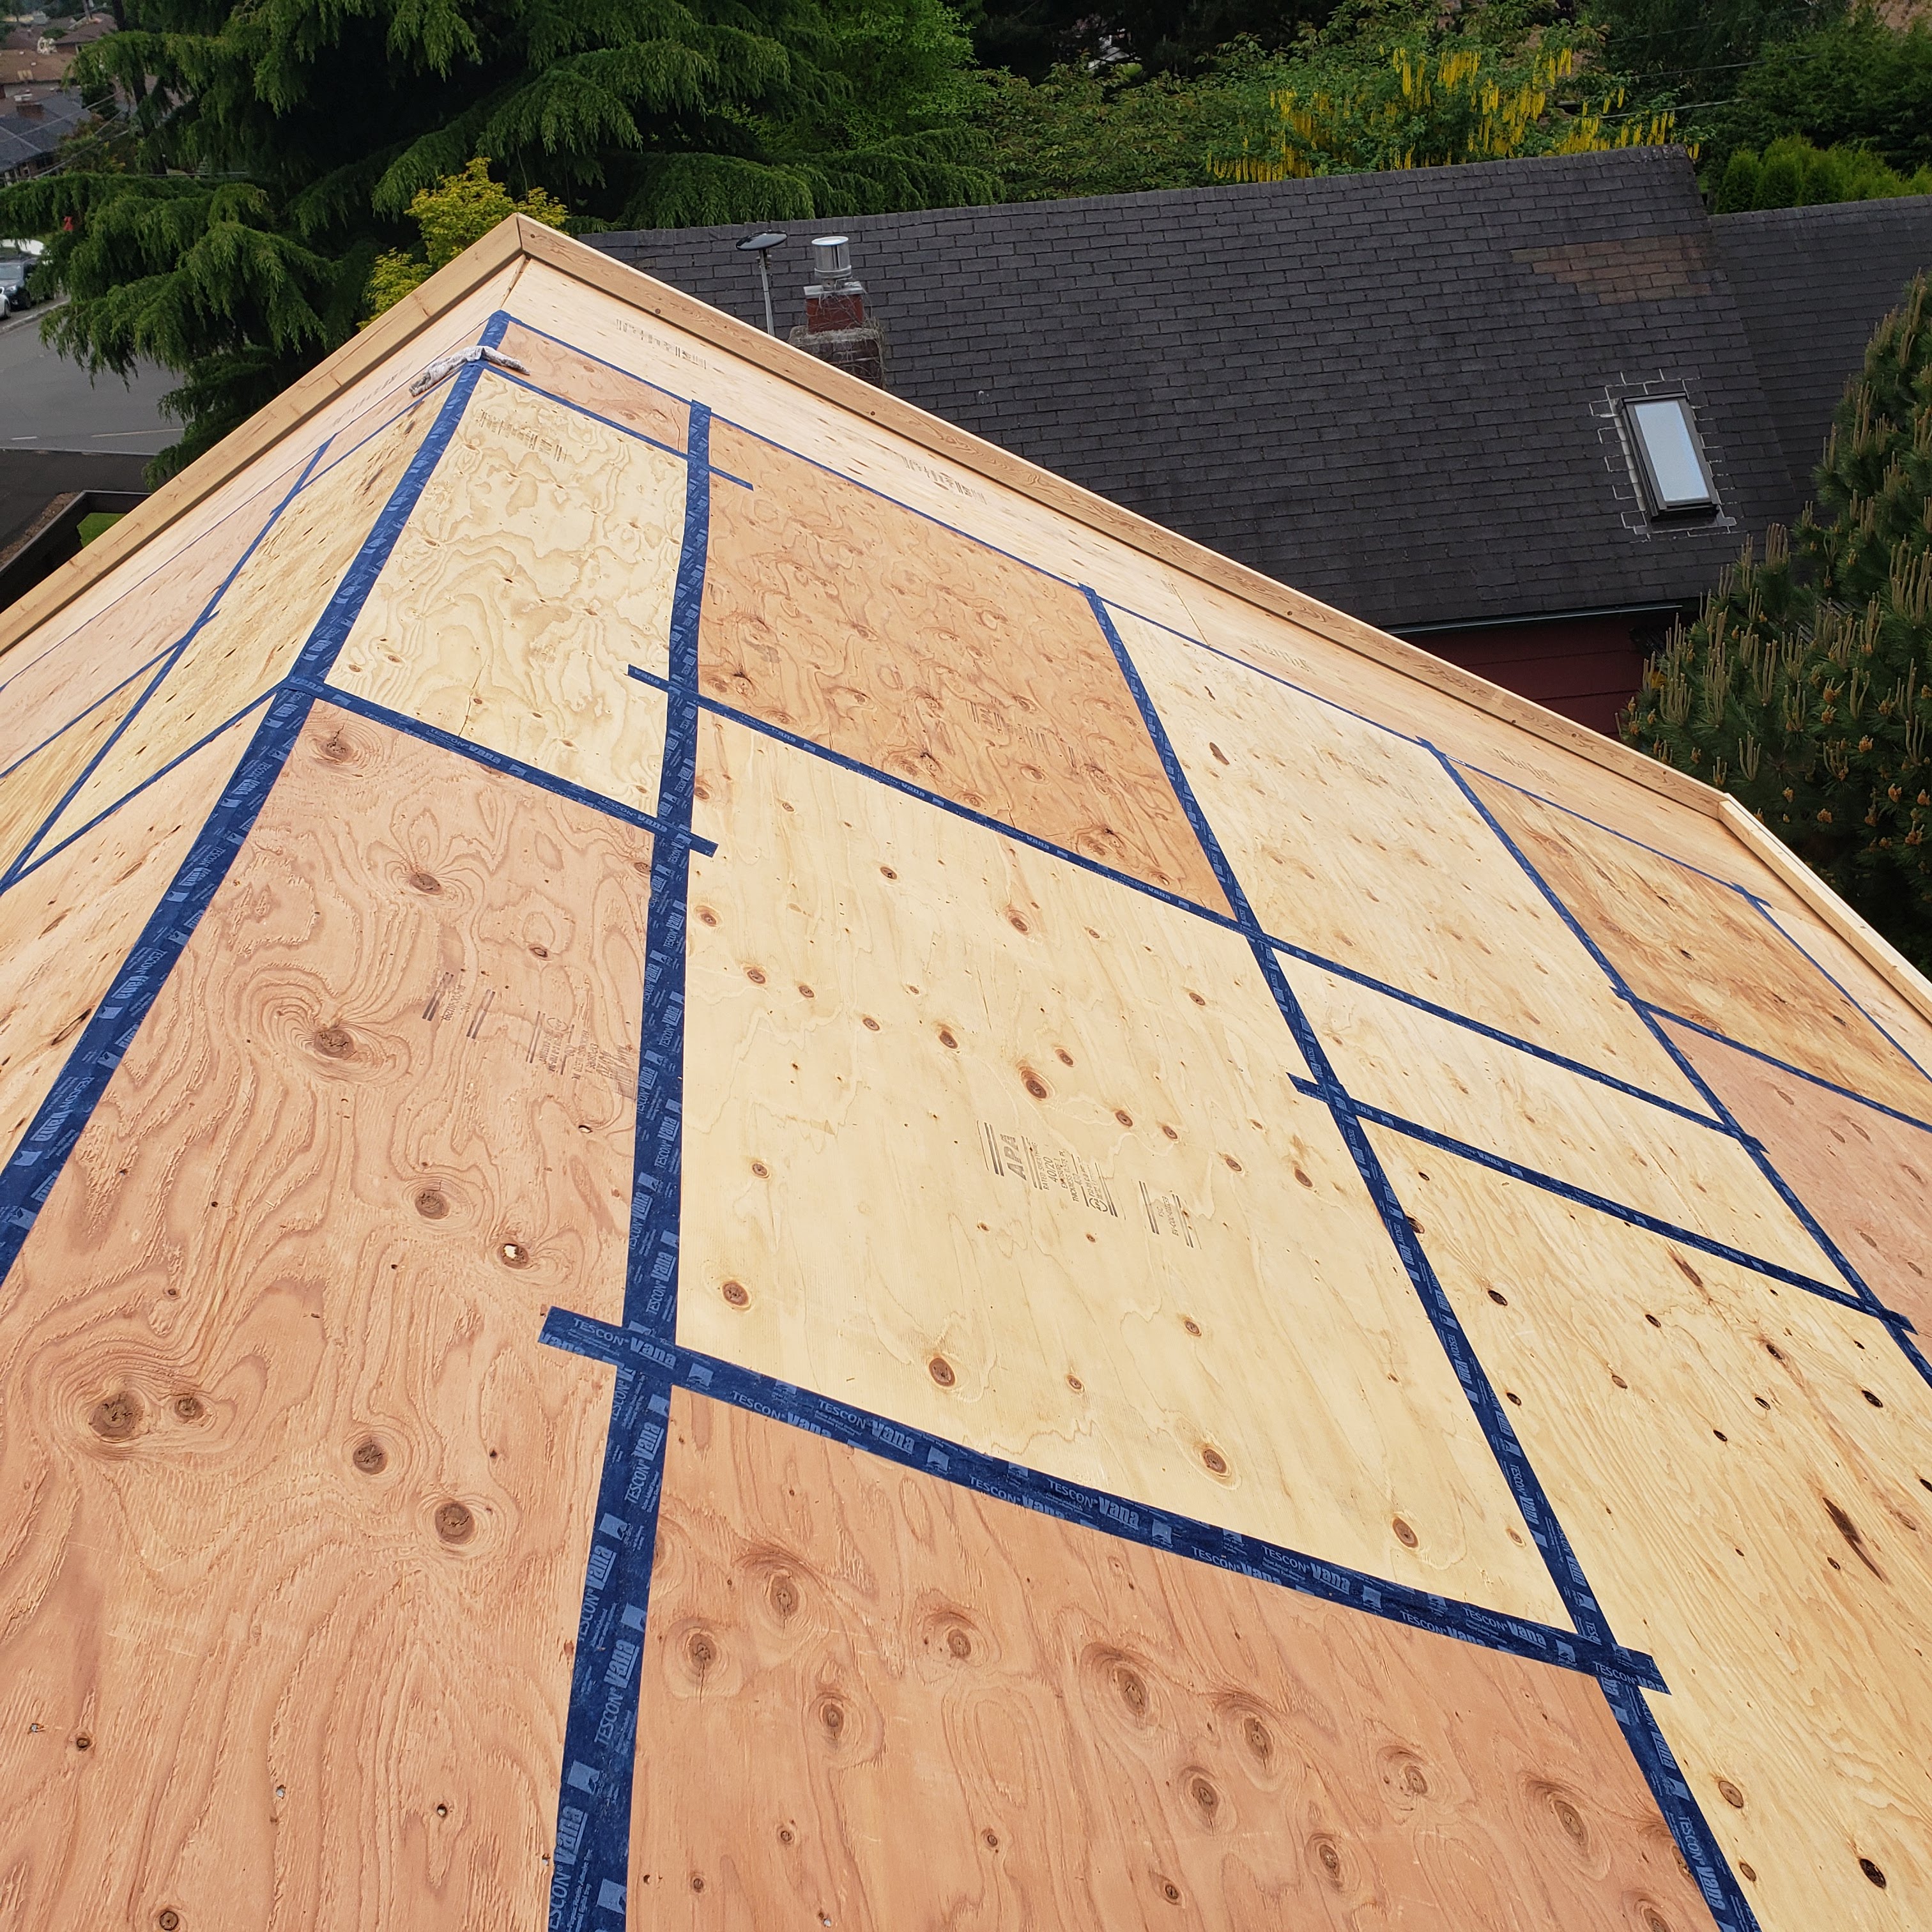
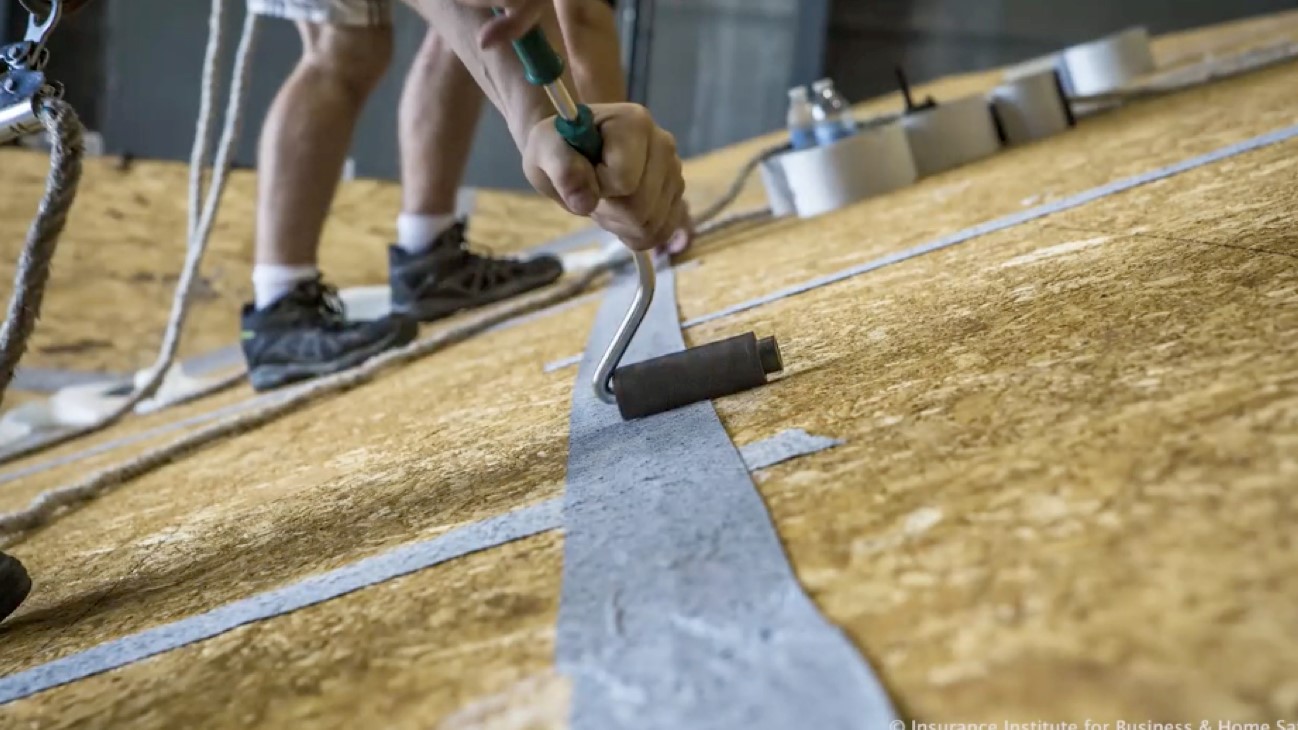
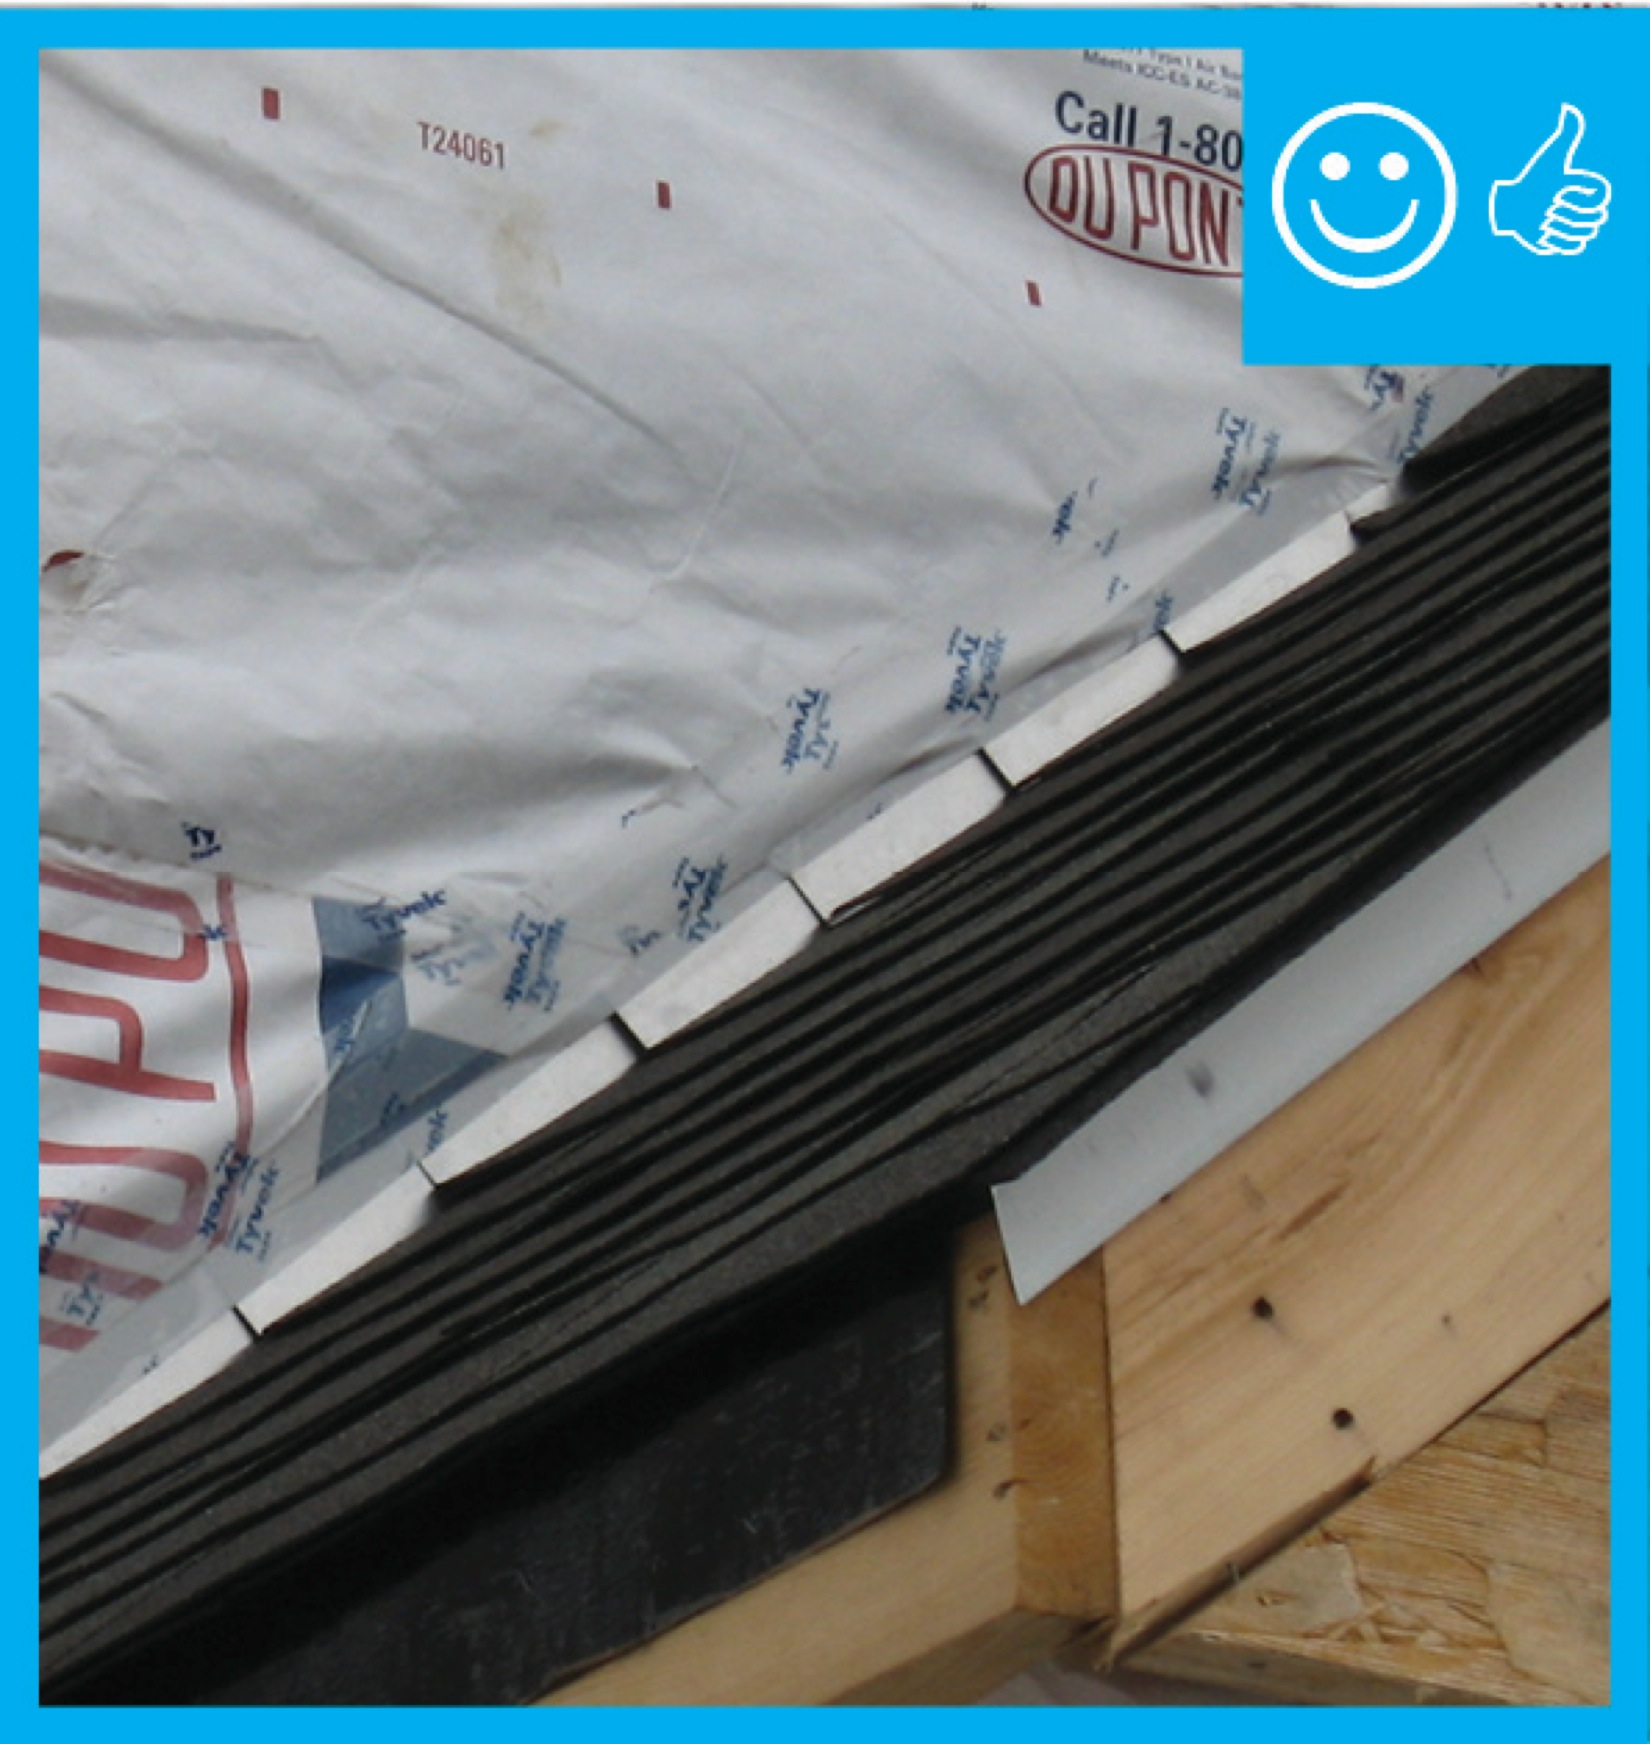
Right – Taping the roof sheathing seams can greatly decrease the likelihood of water infiltration into a home in the event of a hurricane.
Image
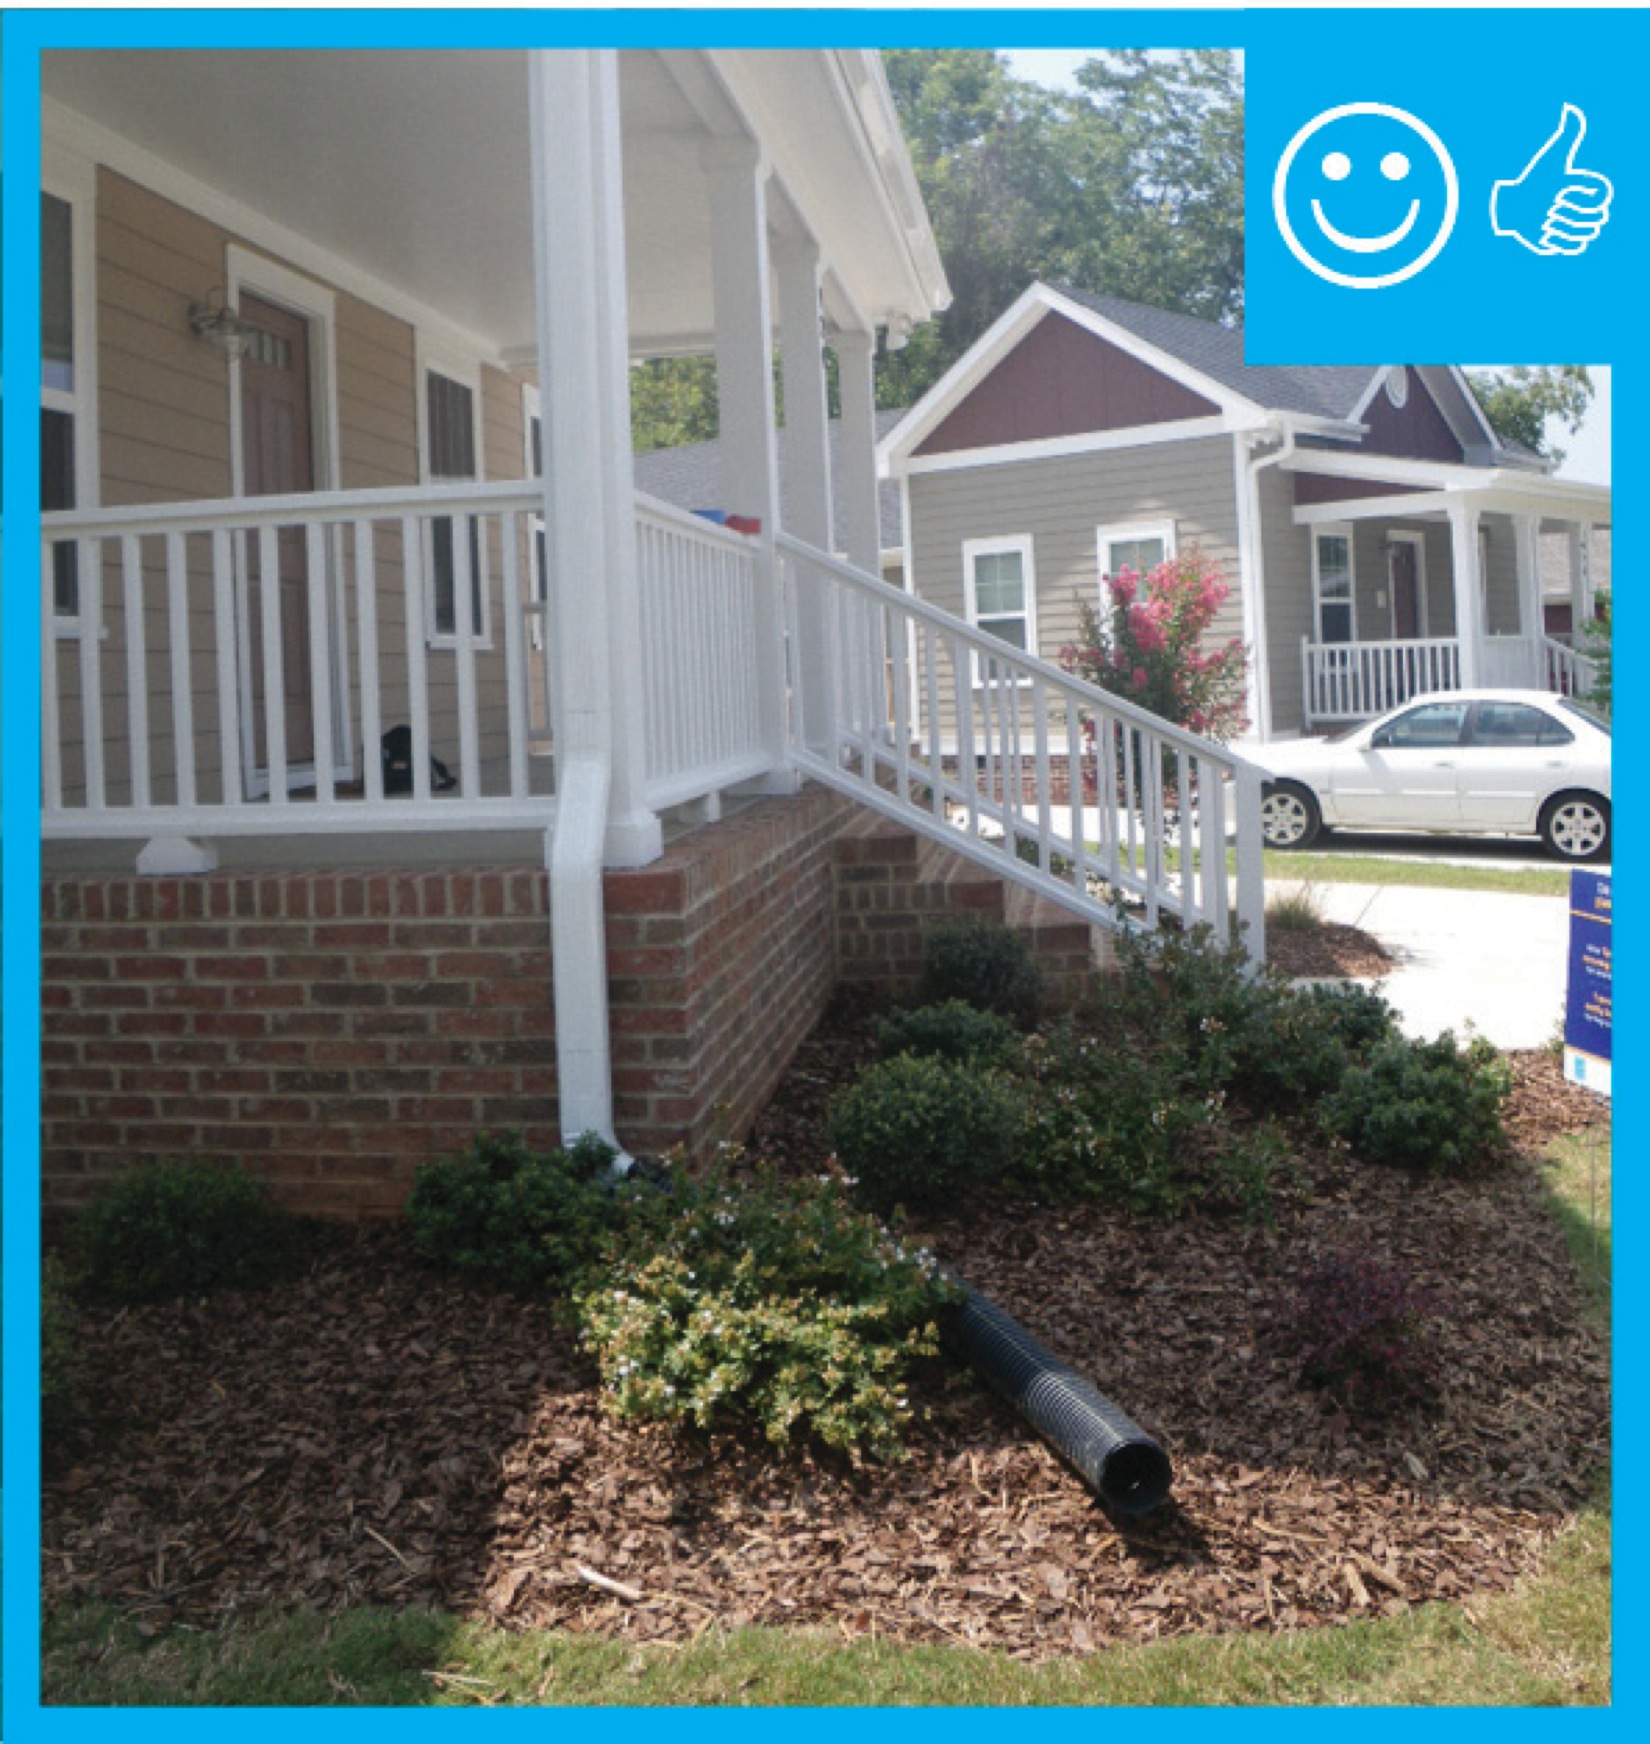
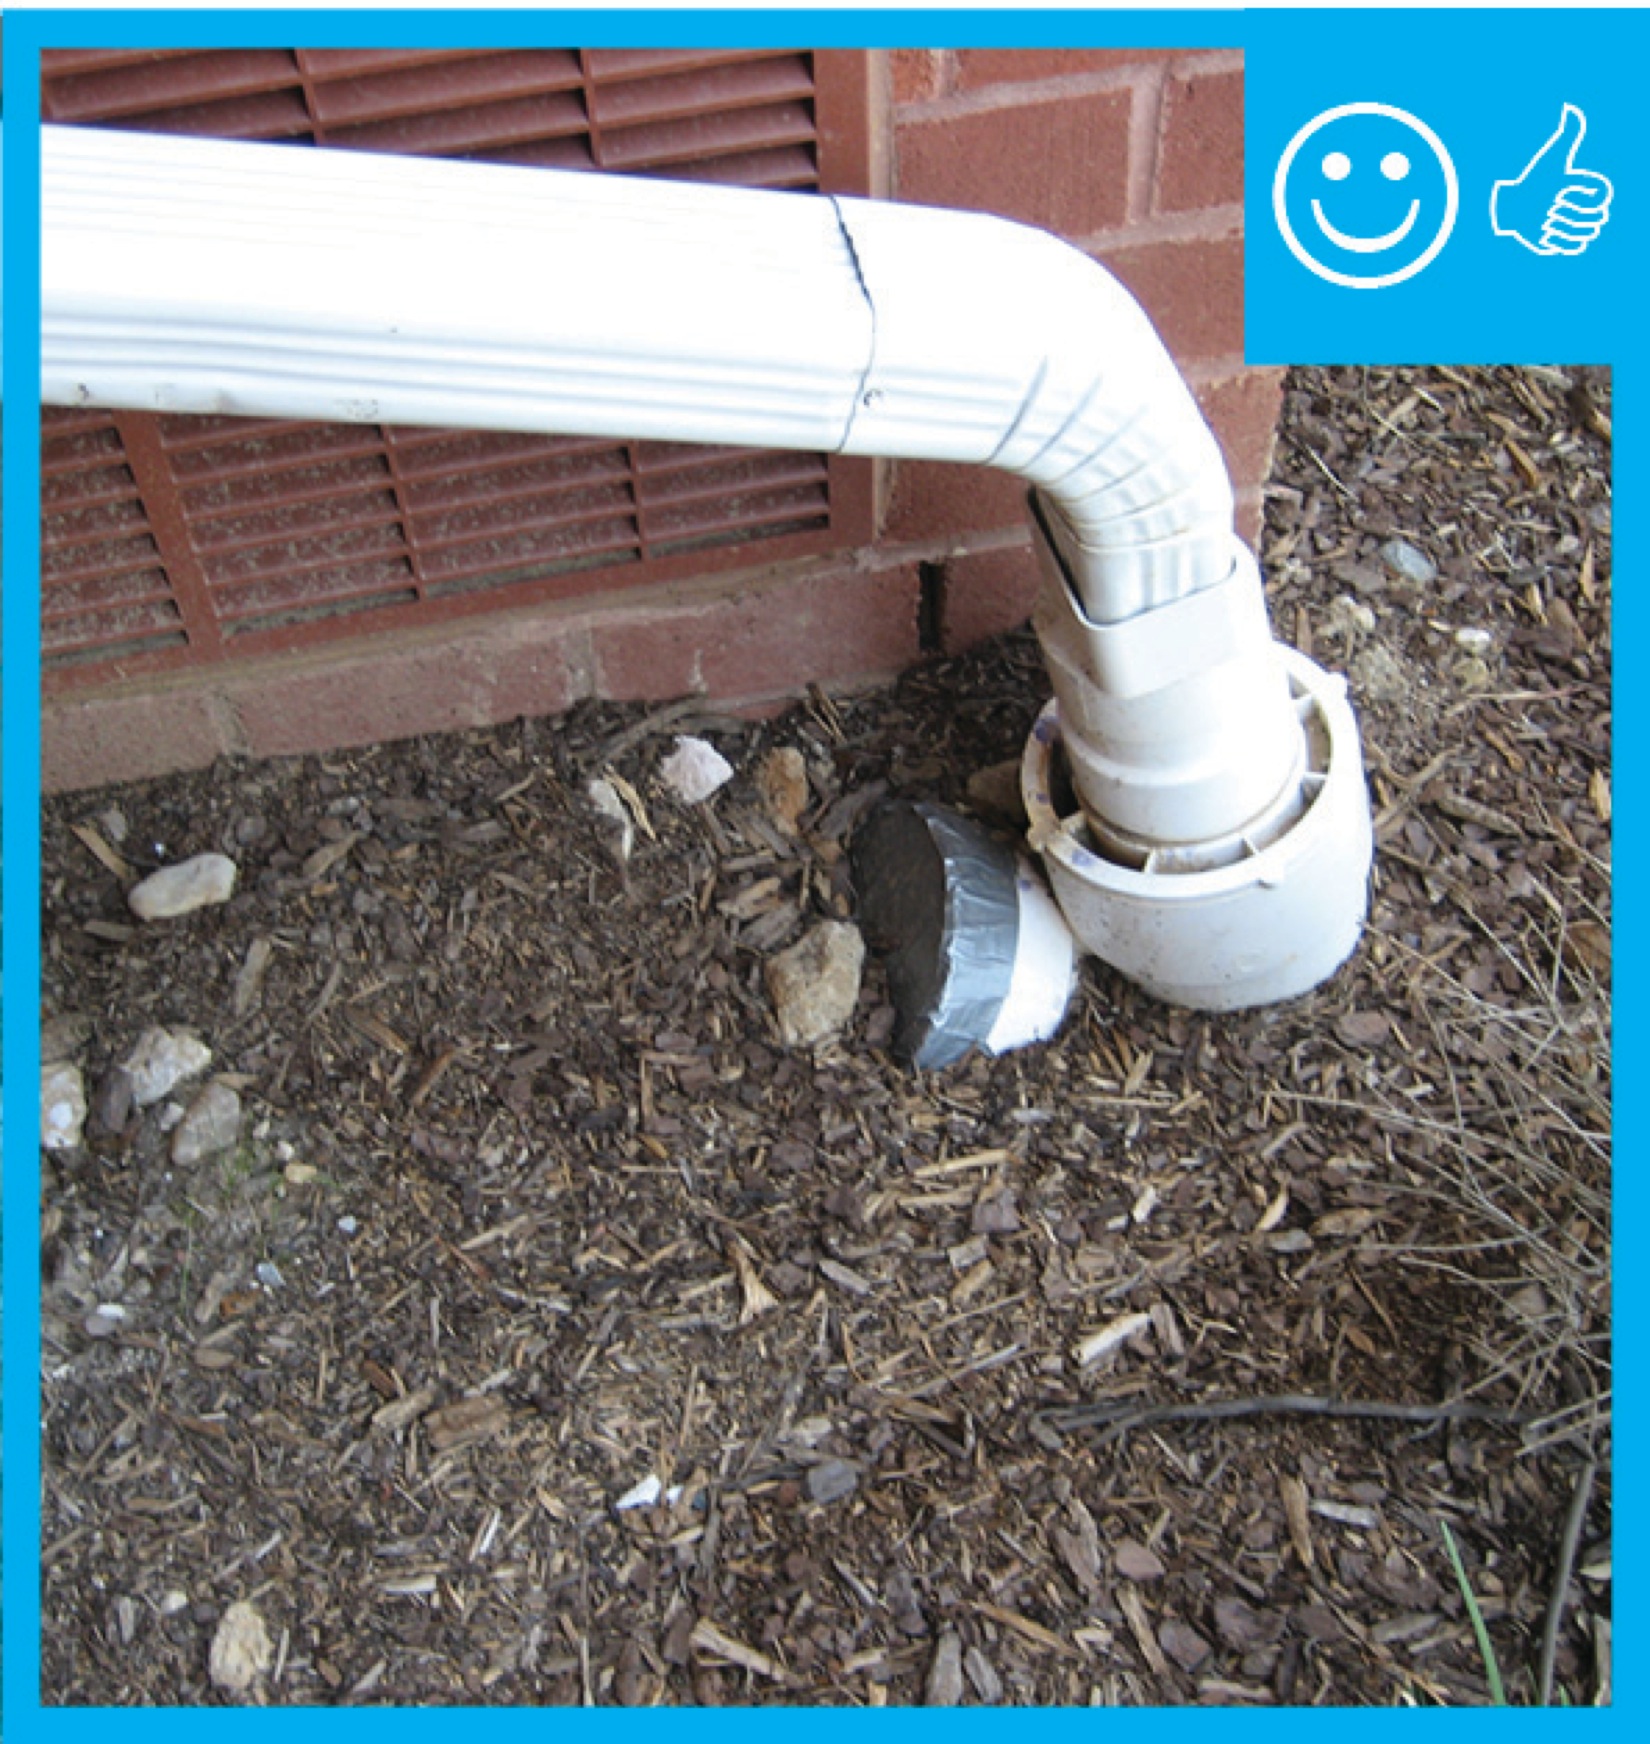
Right – The downspout pipe is far enough away from the foundation to prevent moisture problems
Image
Right – The downspout terminates into a catchment system that moves water away from the foundation of the house
Image
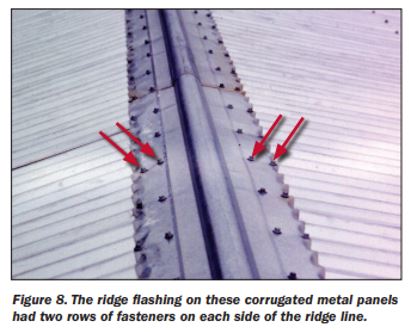
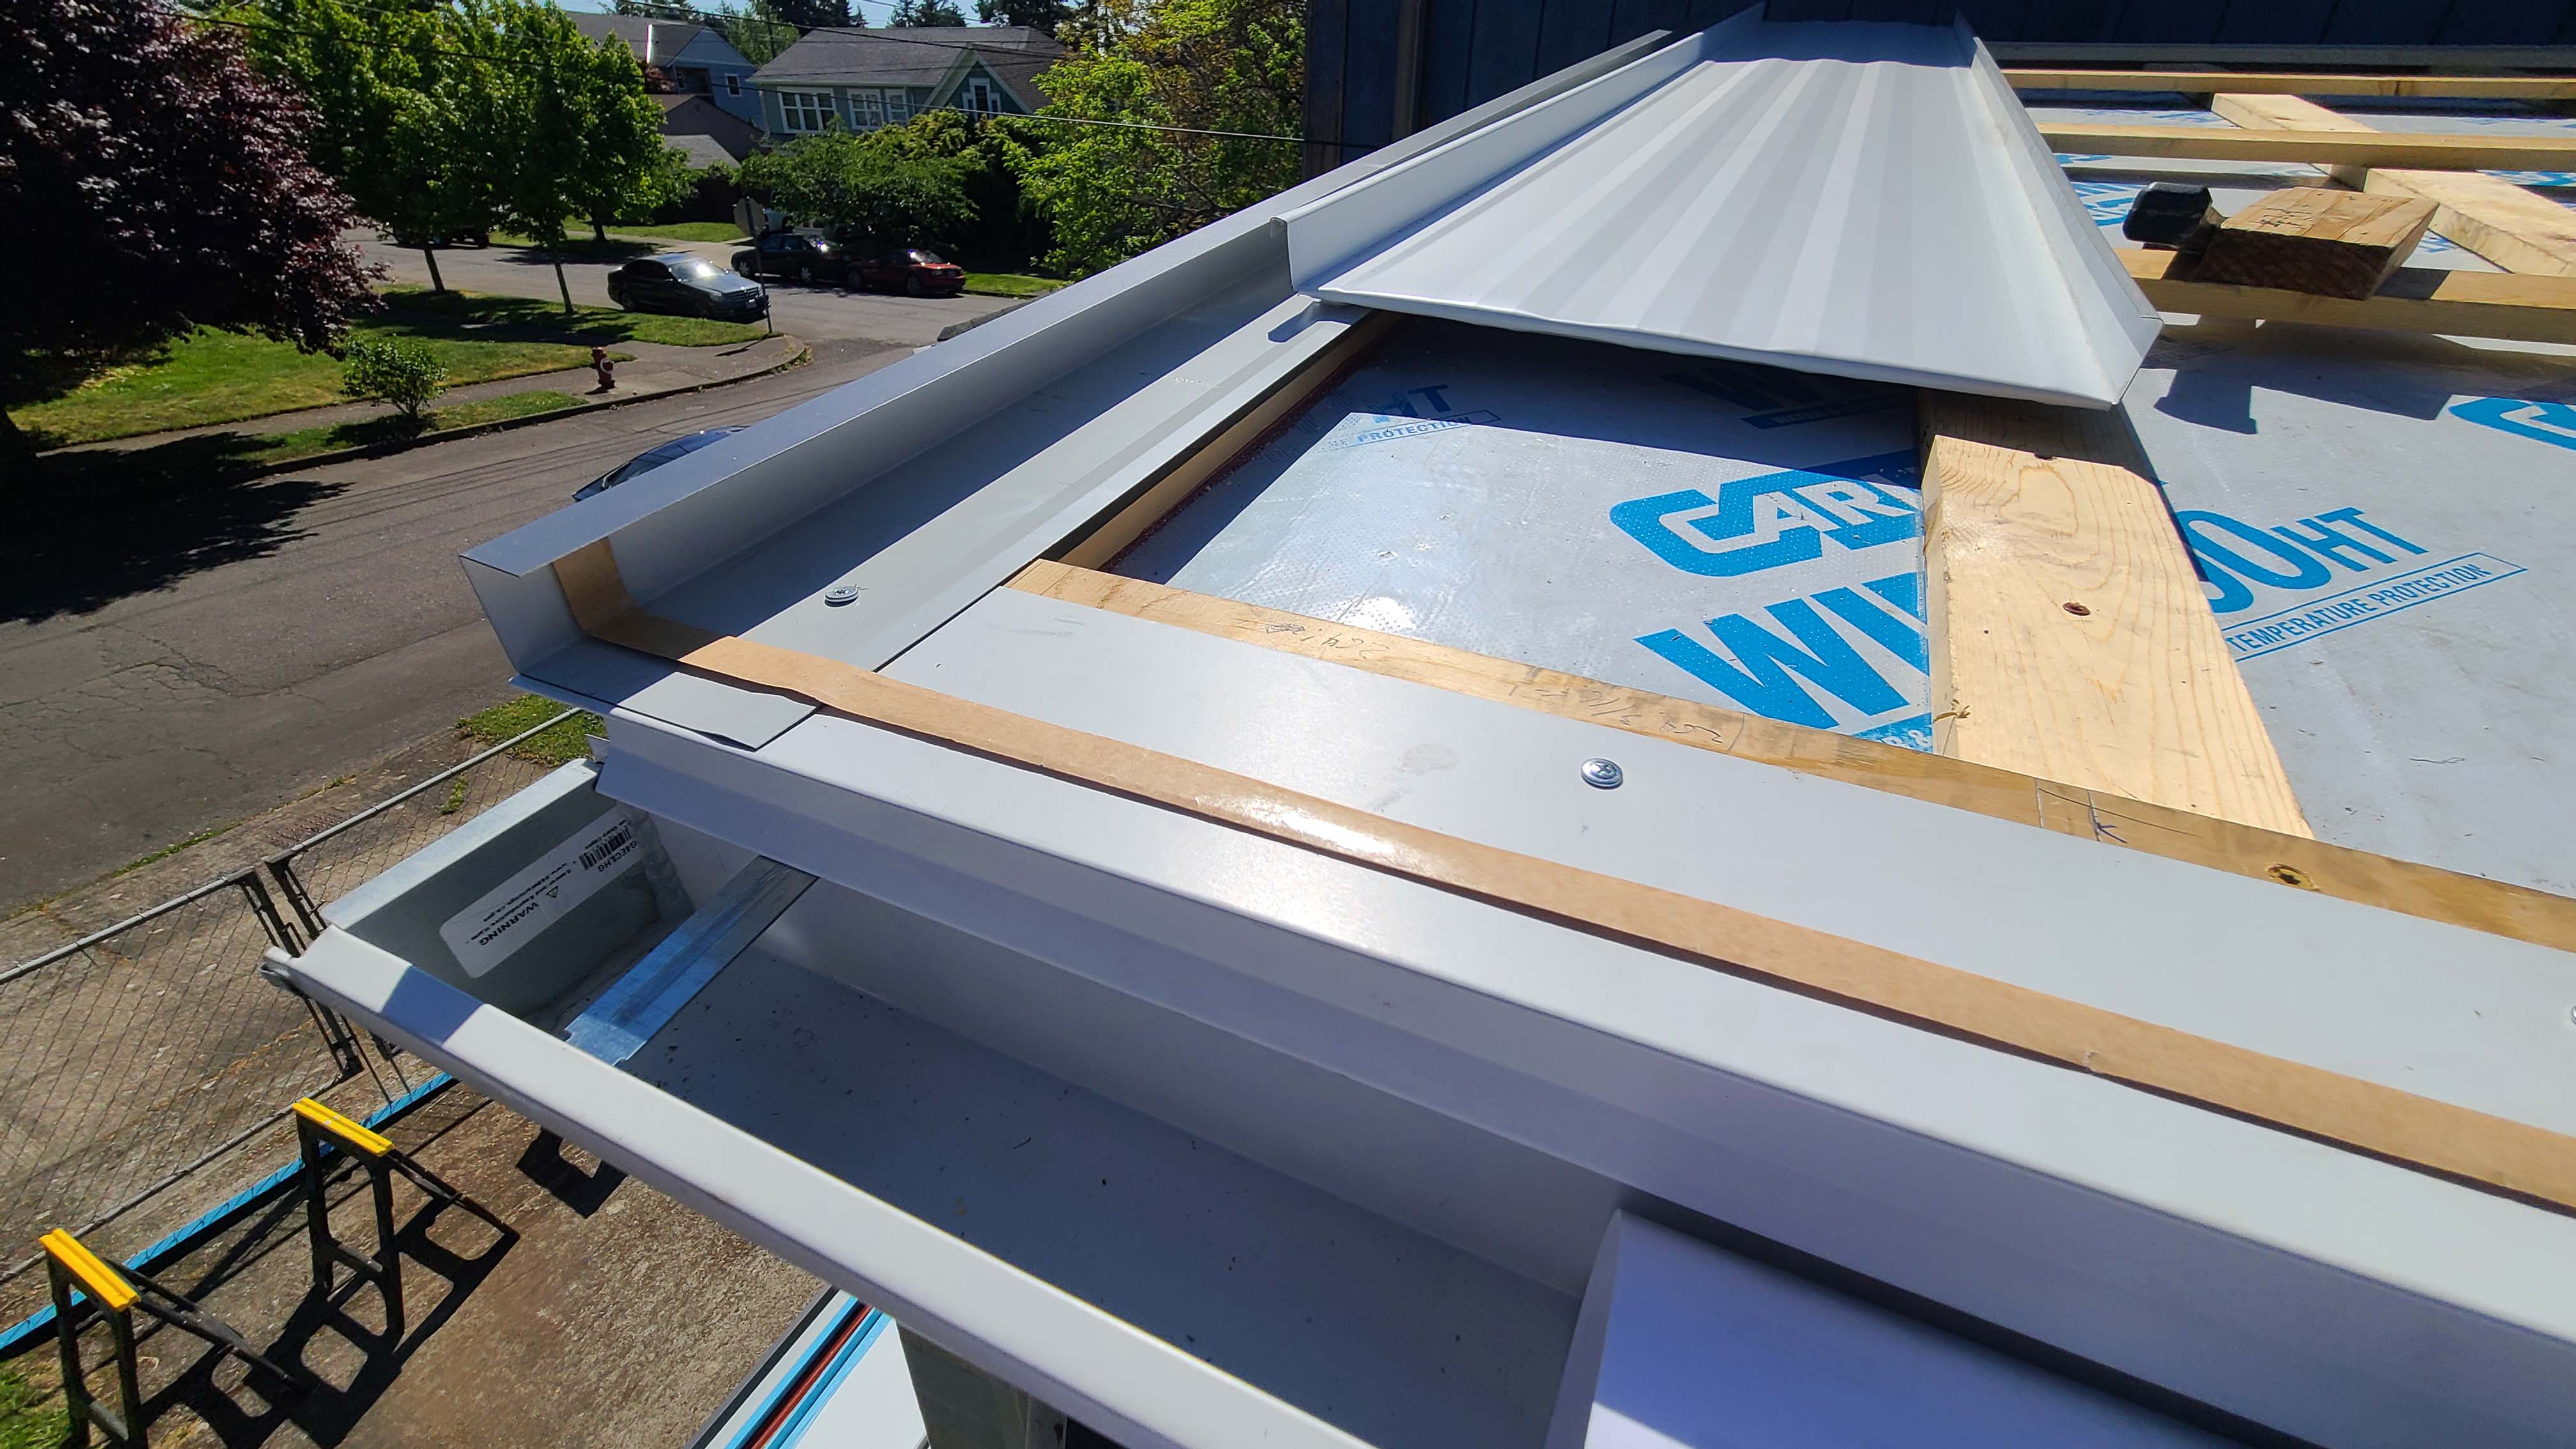
Right – The ridge flashing is secured with two rows of fasteners on each side of the ridge line
Image

Image
Right – The water-resistant barrier is layered over the step flashing to provide a complete drainage system
Image
Right – There is a properly installed and layered self-sealing bituminous membrane at the roof penetration
Image
Right – There is a self-sealing bituminous membrane installed at the valley of the roof prior to the roof felt
Image
Right – This low-slope flat roof assembly has continuity of both the air and water barriers
Image

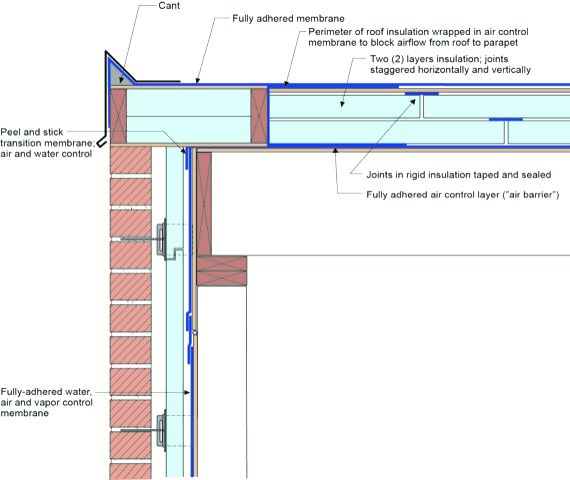
Right – This low-slope roof and parapet assembly has continuity of both the air and water barriers
Image
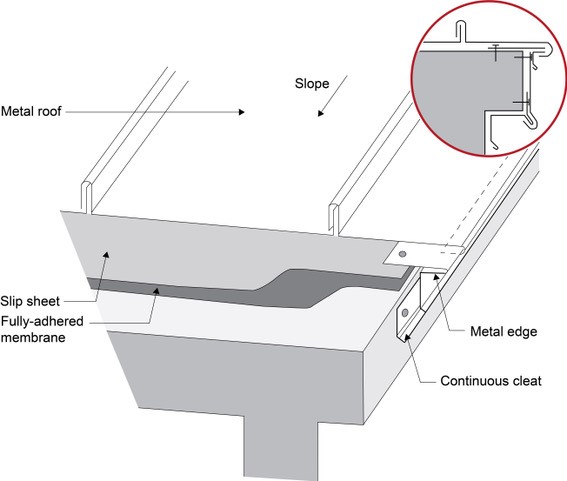
Right – Under metal roofing, sheathing is protected by metal edging over a fully adhered membrane and a slip sheet of loose laid building paper
Image

Image
Image
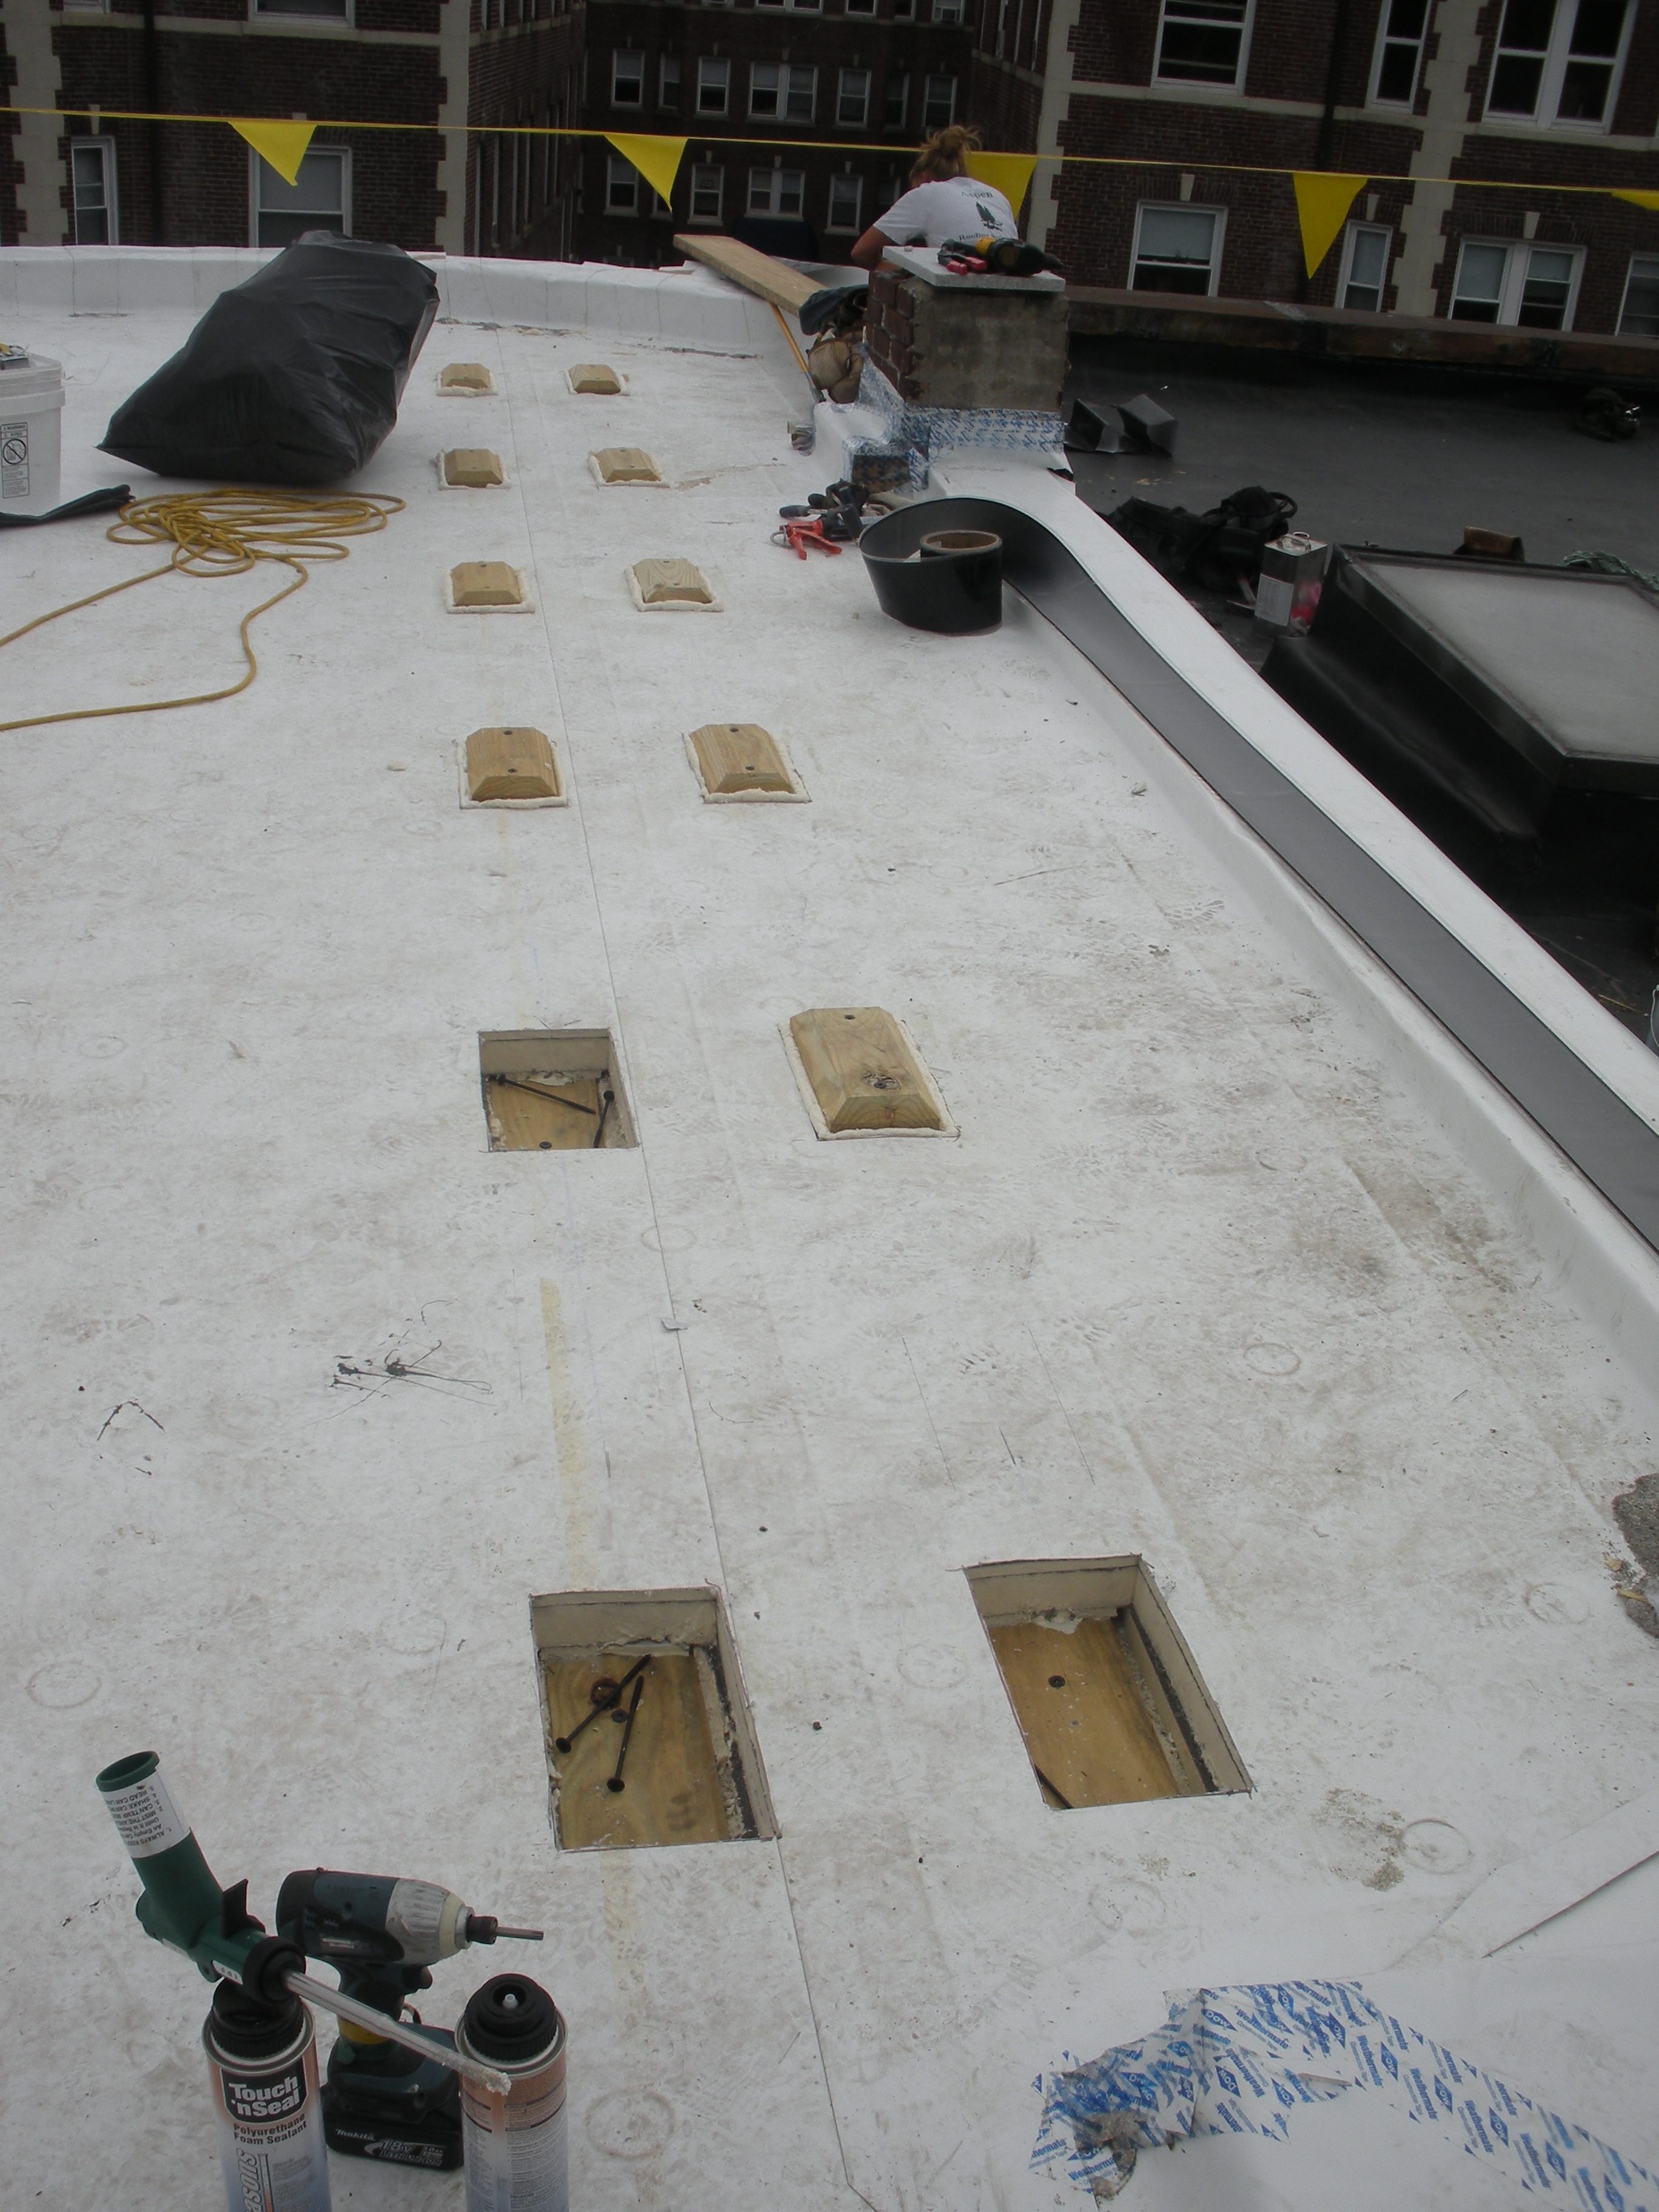
Roofing membrane is installed over polyisocyanurate rigid foam insulation and insulation cover board that has been cut to fit around locations for blocking for the PV system rack
Image
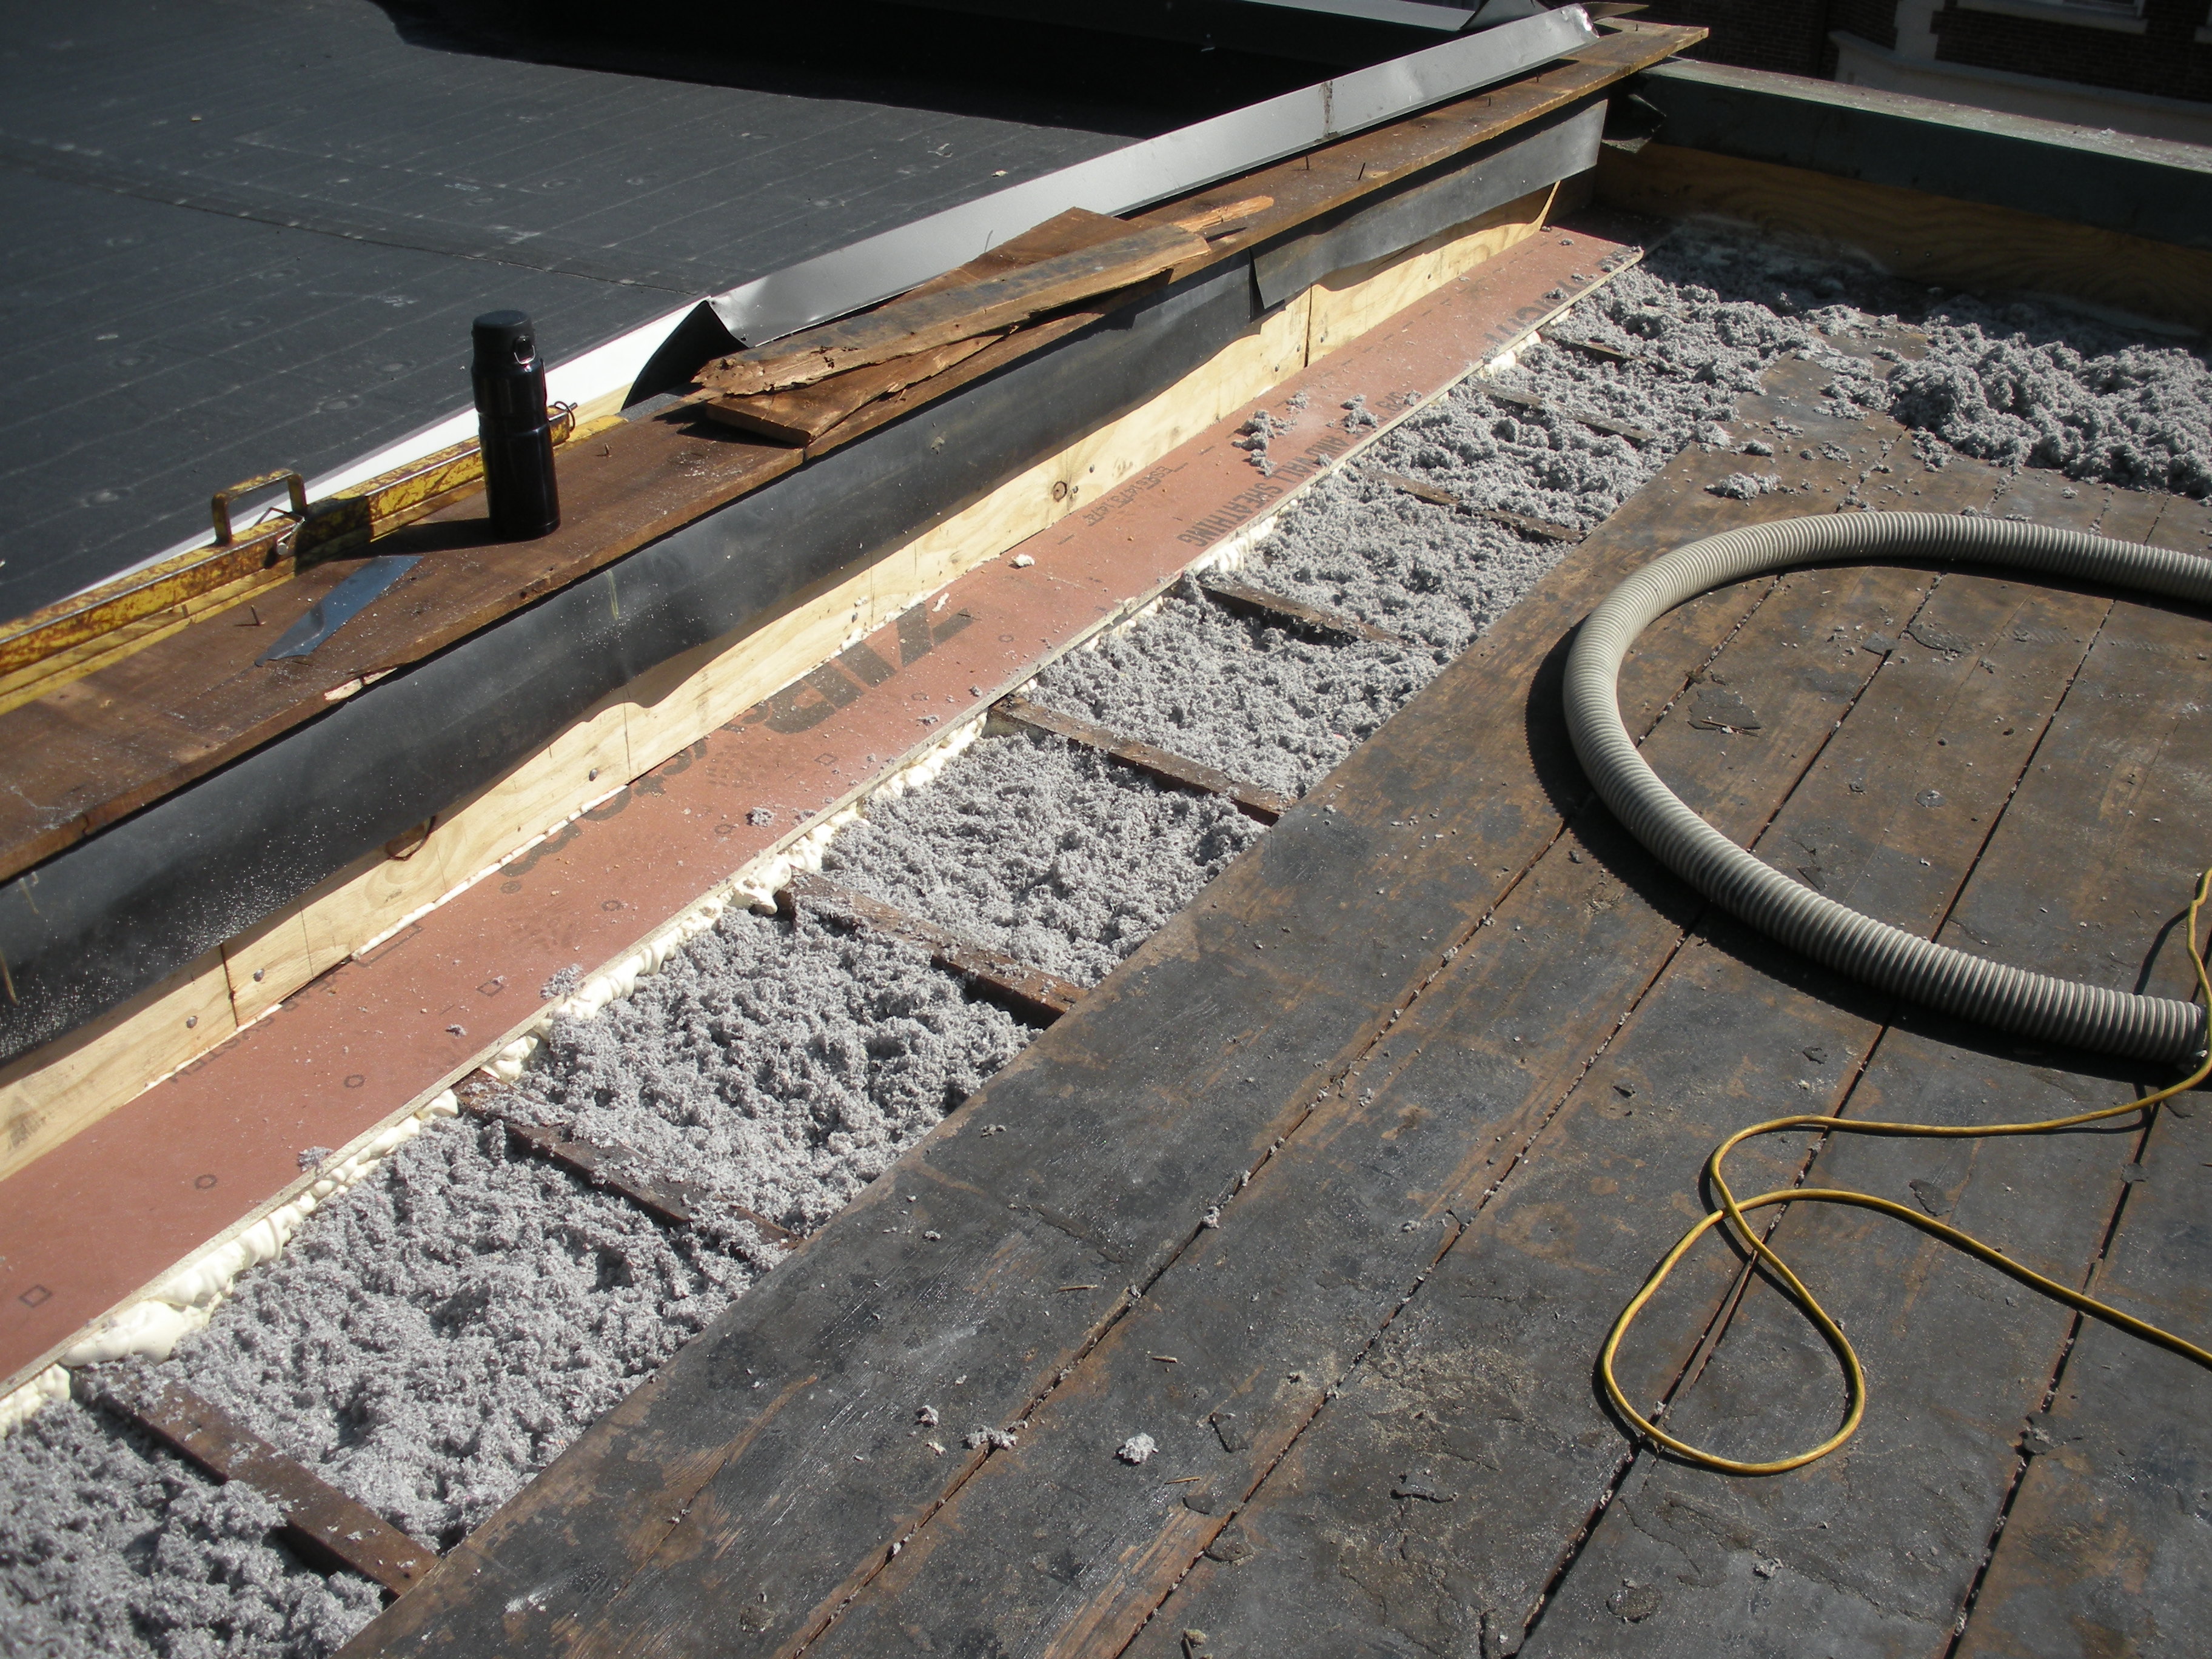
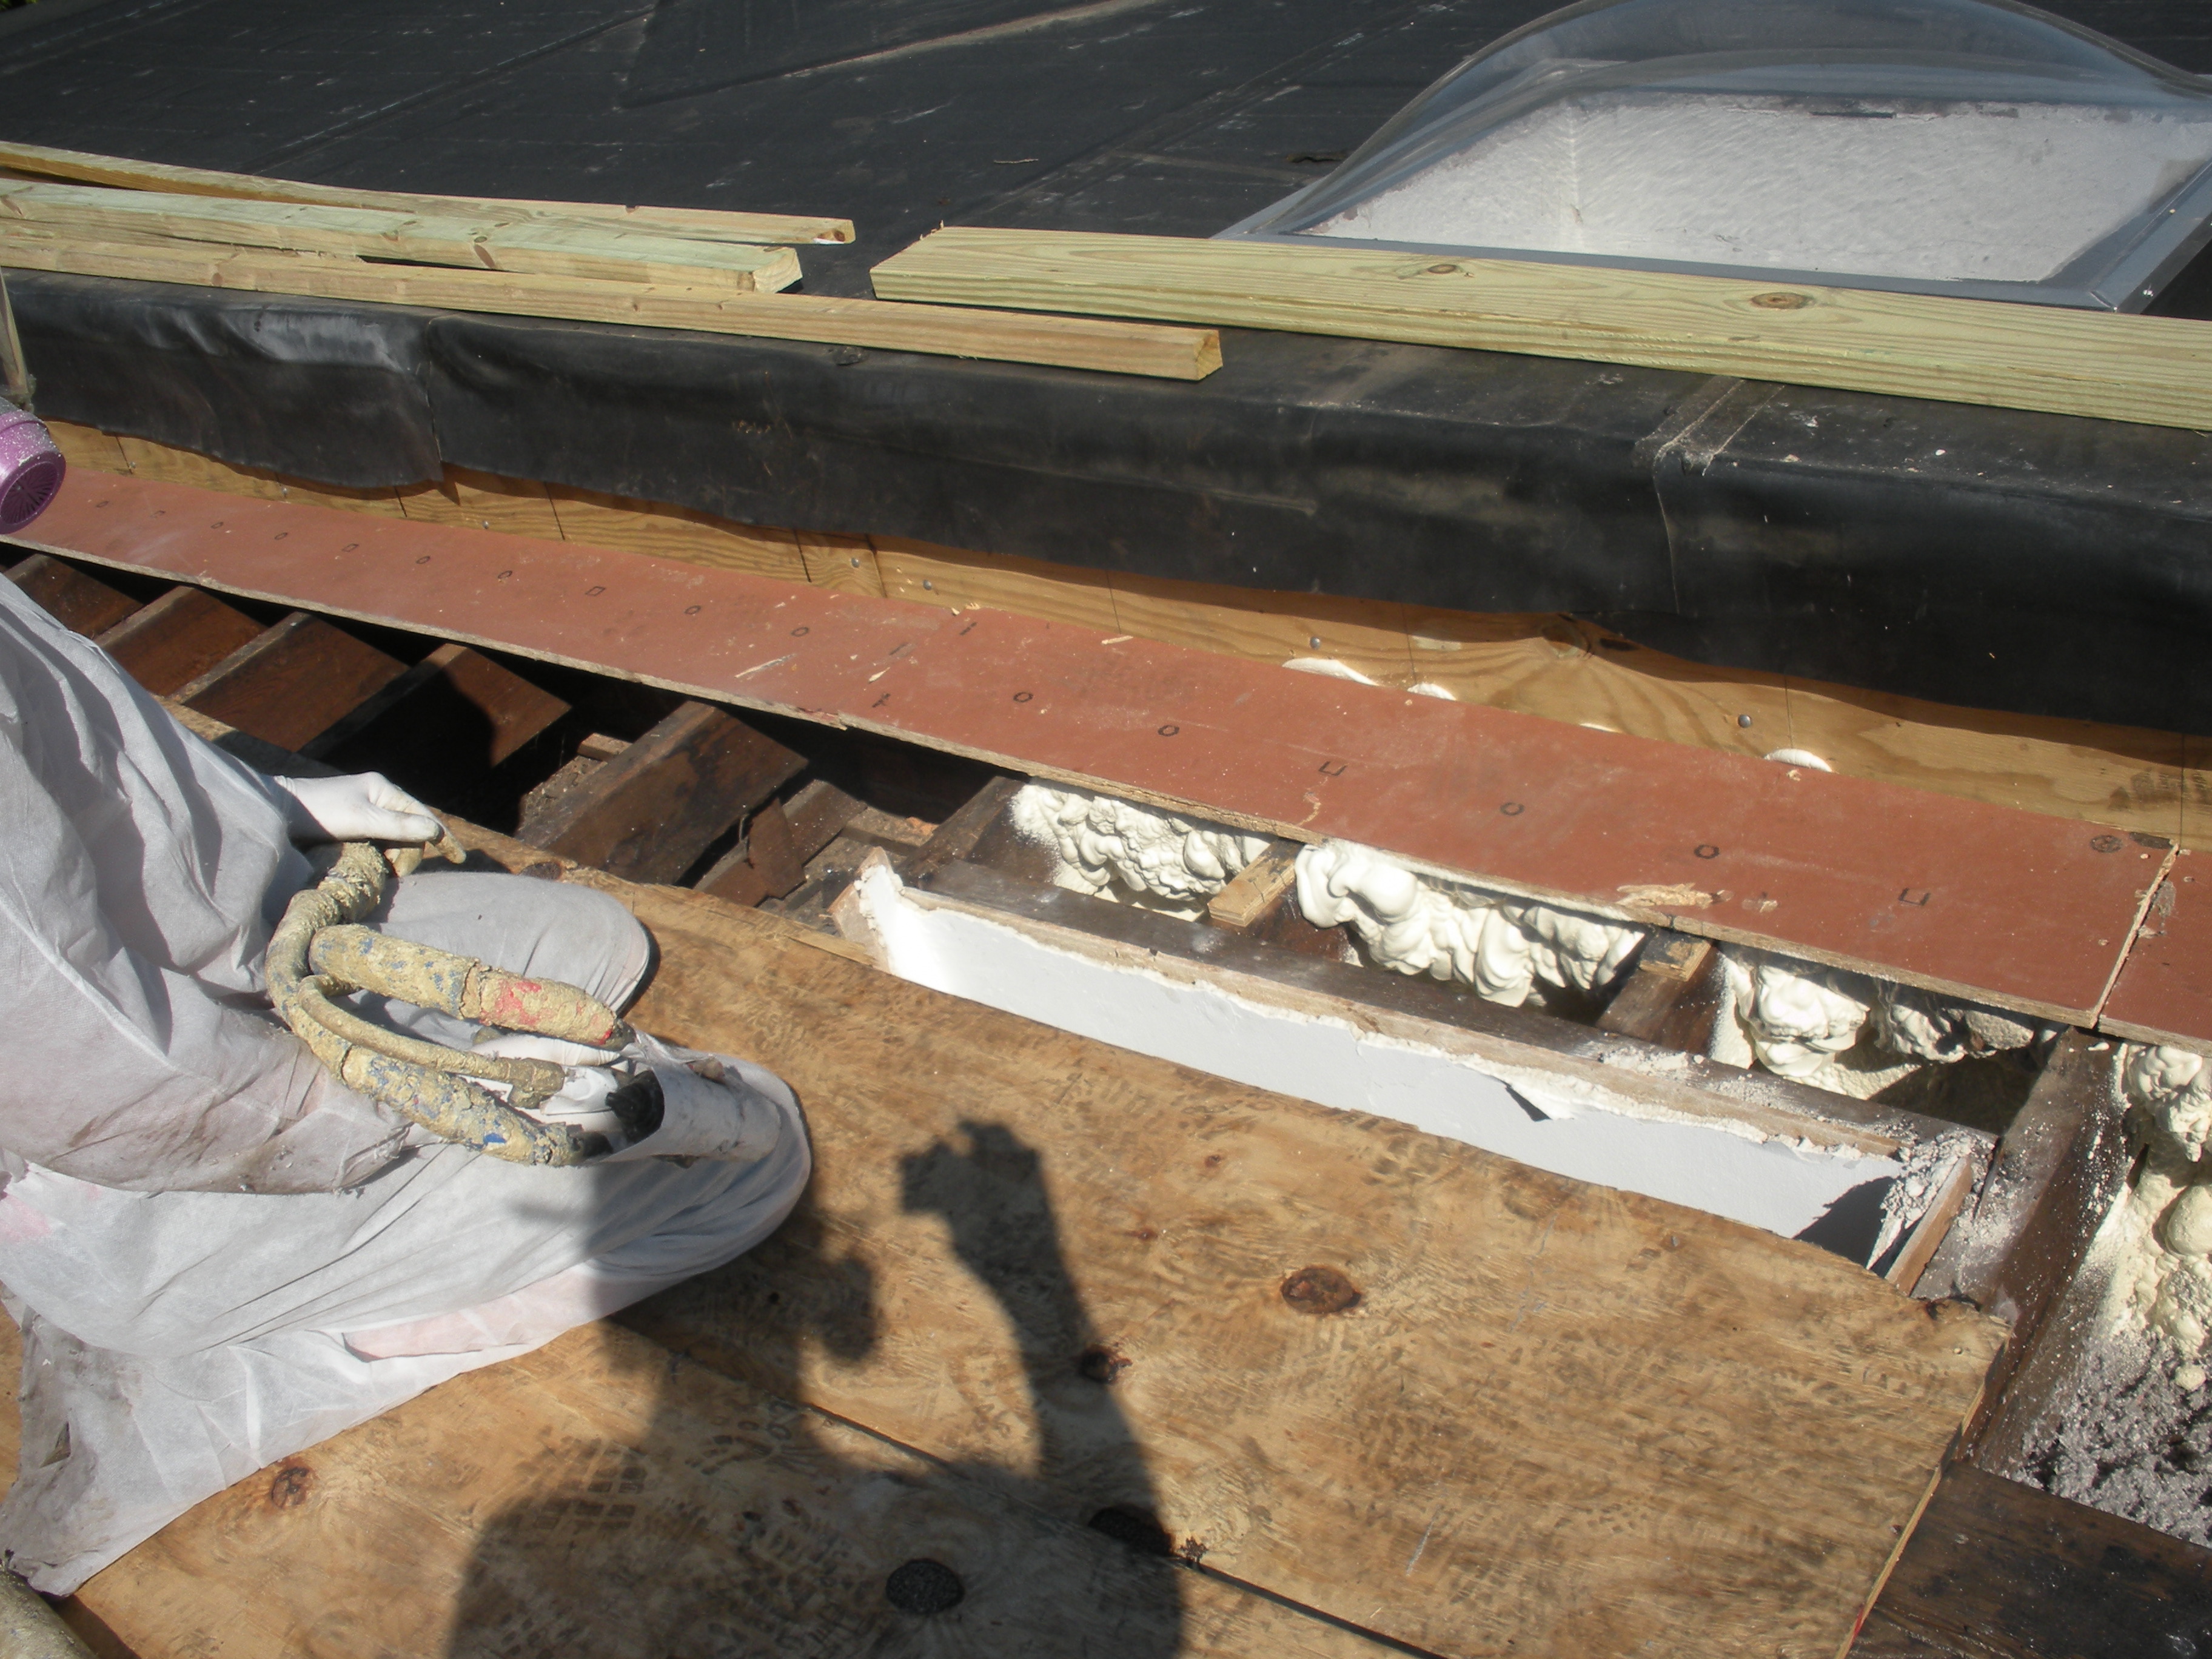
Roofing paper protects the top of the new plywood parapet while the base of the parapet is air sealed with spray foam and fibrous insulation is installed in the rafter cavities in this flat roof retrofit
Image
Image

Image
Image
Image
Image
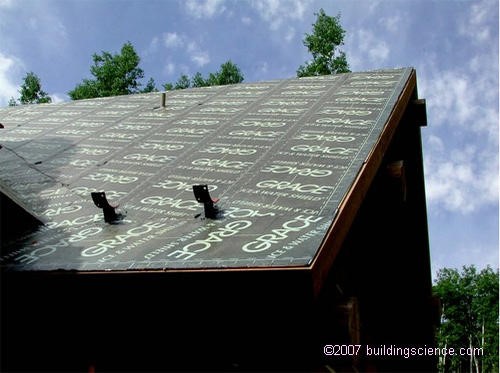
Self-adhering bituminous membrane covers the entire roof of this cold climate home, a practice common under metal roofs and also on complicated roofs
Image
Sheathing is removed from a flat roof to retrofit with air sealing, insulation, and water control layers
Image

Sleepers (tapered wood furring strips) are installed over the existing board sheathing to slope the new sheathing toward the drain in this flat roof retrofit
Image
Step 1. Apply roof underlayment over roof deck and up the sidewall over the rigid foam insulation
Image
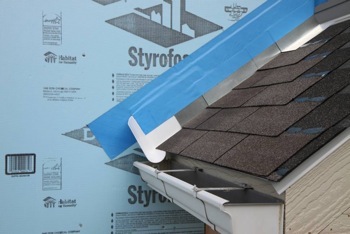
Step 2. Install shingle starter strip then kick-out diverter as first piece of step flashing.
Image
Step 3. Place the first shingle and the next section of sidewall flashing over upper edge of diverter
Image

Step 4. Install remaining sidewall flashing, appropriate counter flashing, and shingles
Image
Step 5. Apply self-adhesive flashing over top edge of the wall flashing, diverter, and rigid foam insulation
Image
Image
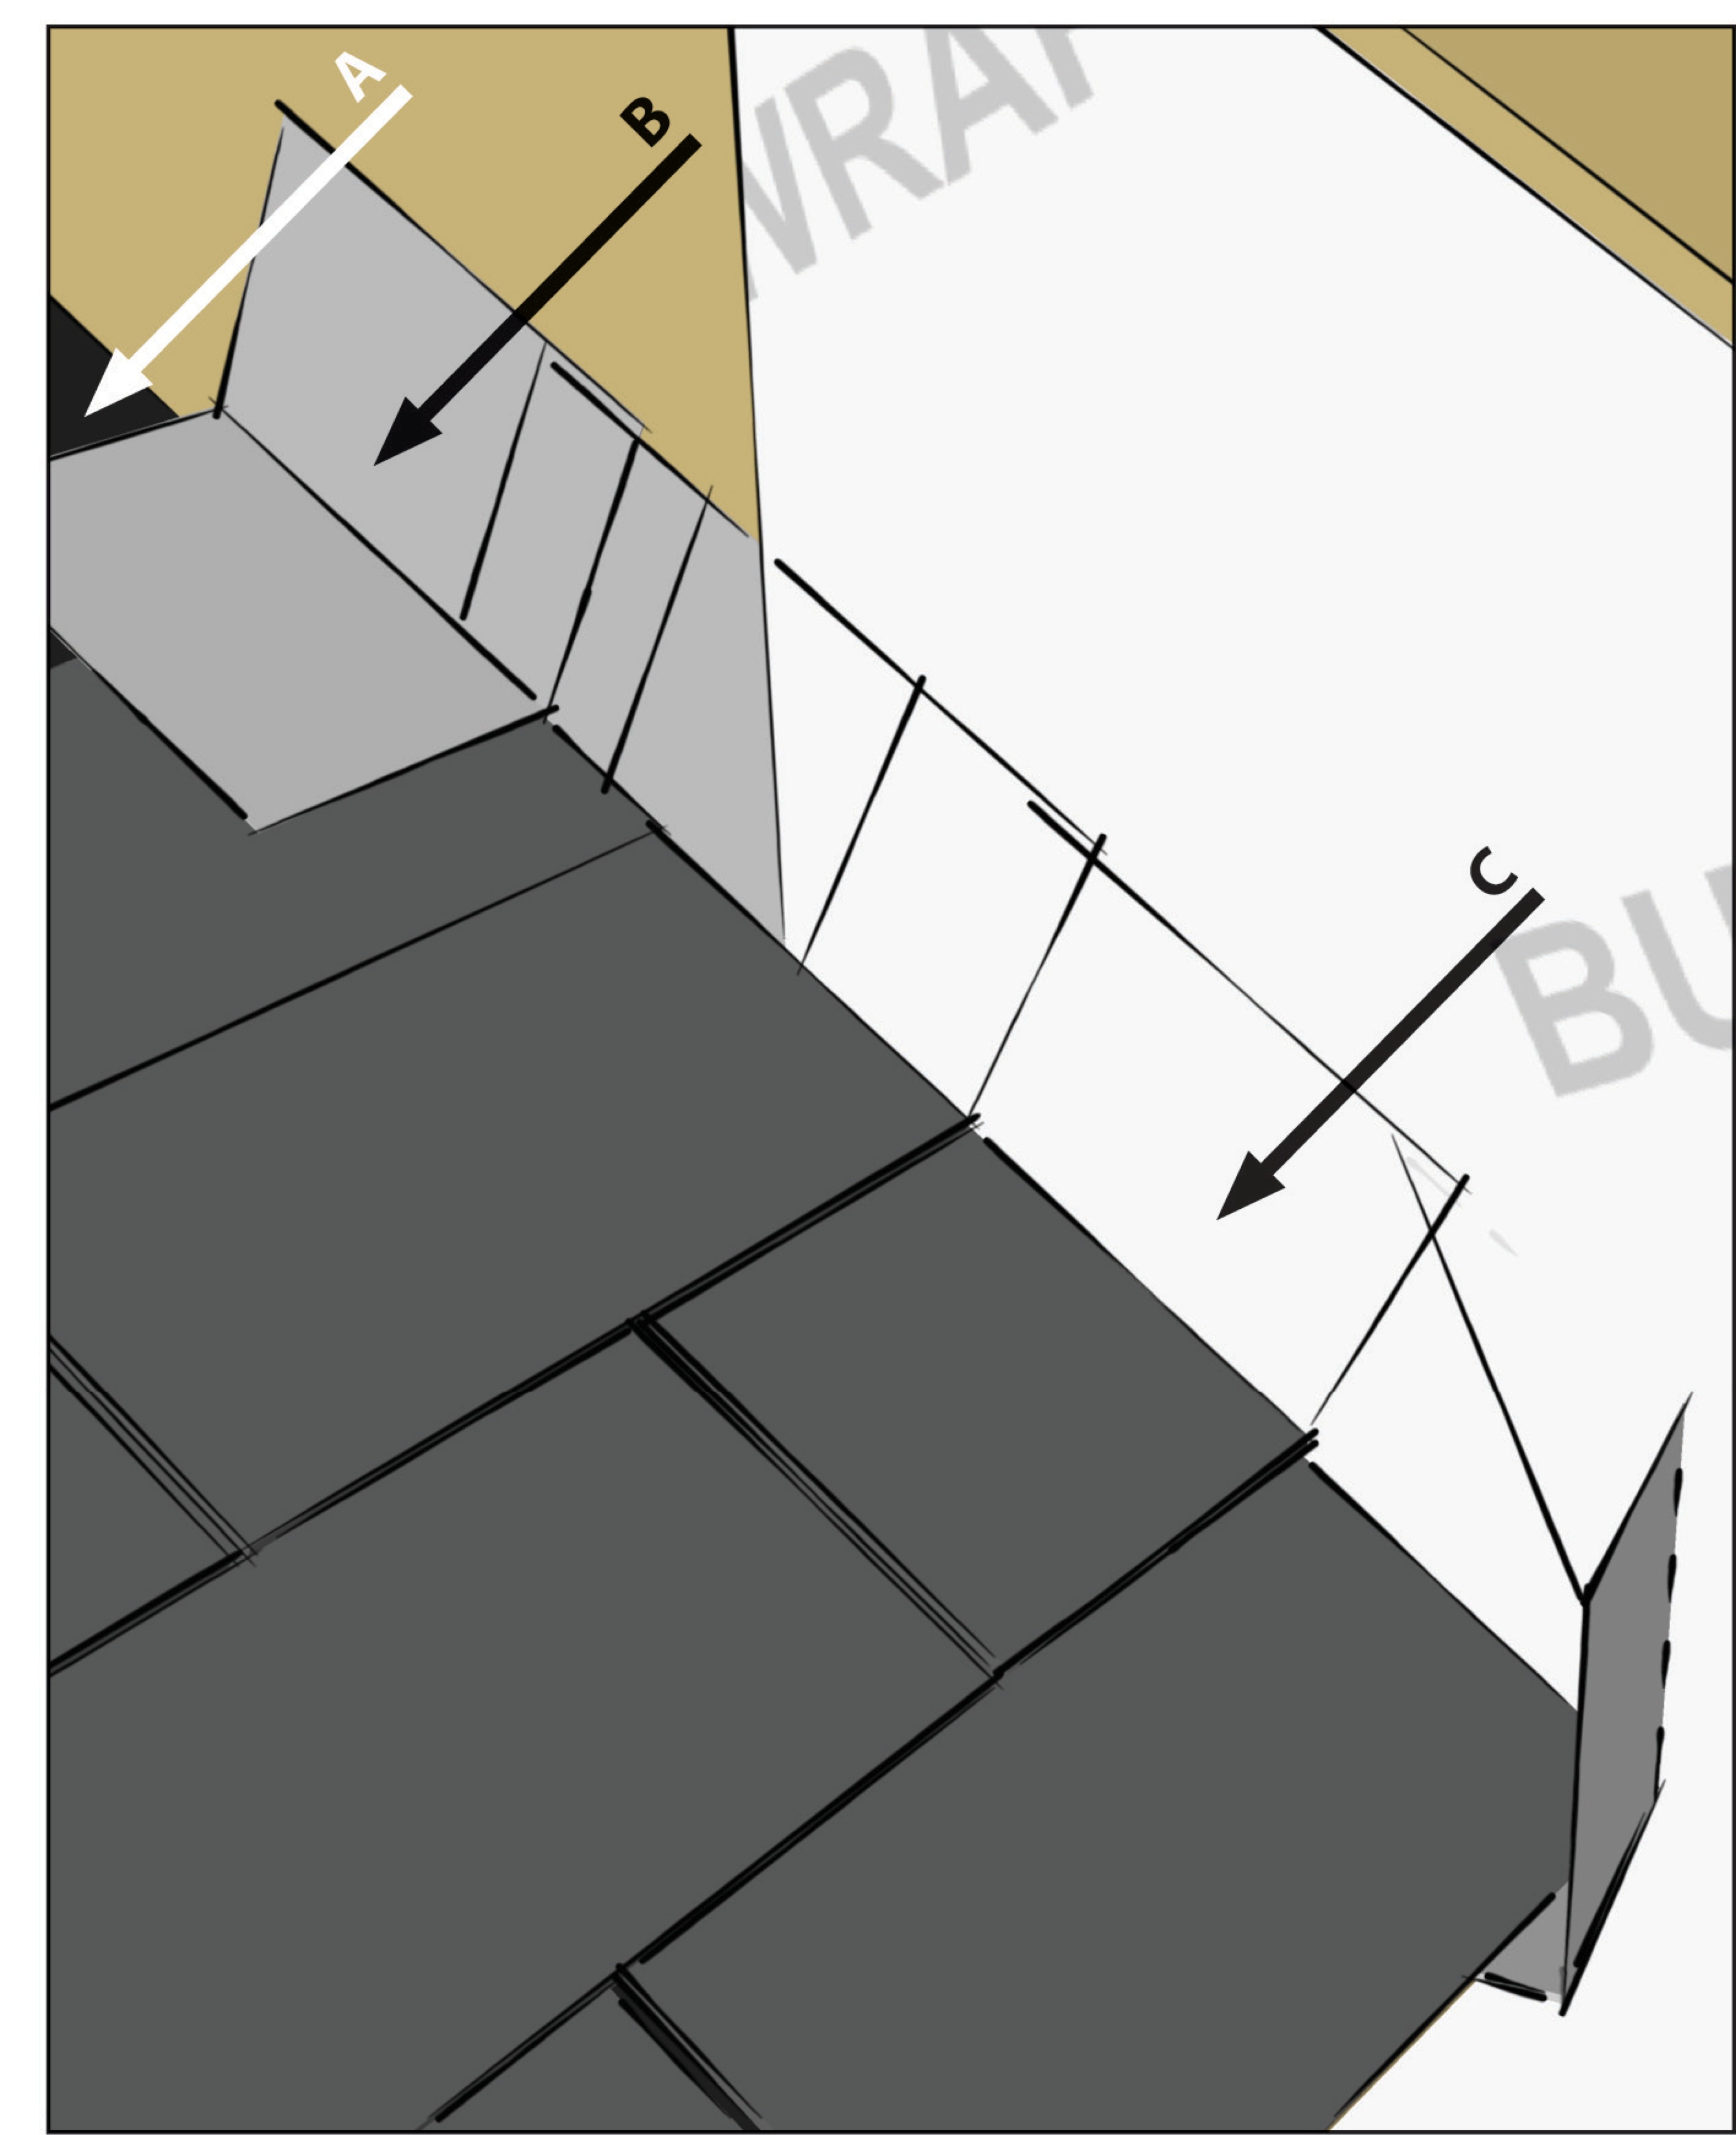
Step and kick-out flashing at all roof-wall intersections extending ≥ 4 in. on wall surface above roof deck and integrated with drainage plane above
Image

Strips of roofing membrane are used to flash around a skylight on a flat roof retrofit
Image
The base of the plywood parapet is air sealed with spray foam and fibrous insulation is installed in the rafter cavities in this flat roof retrofit
Image
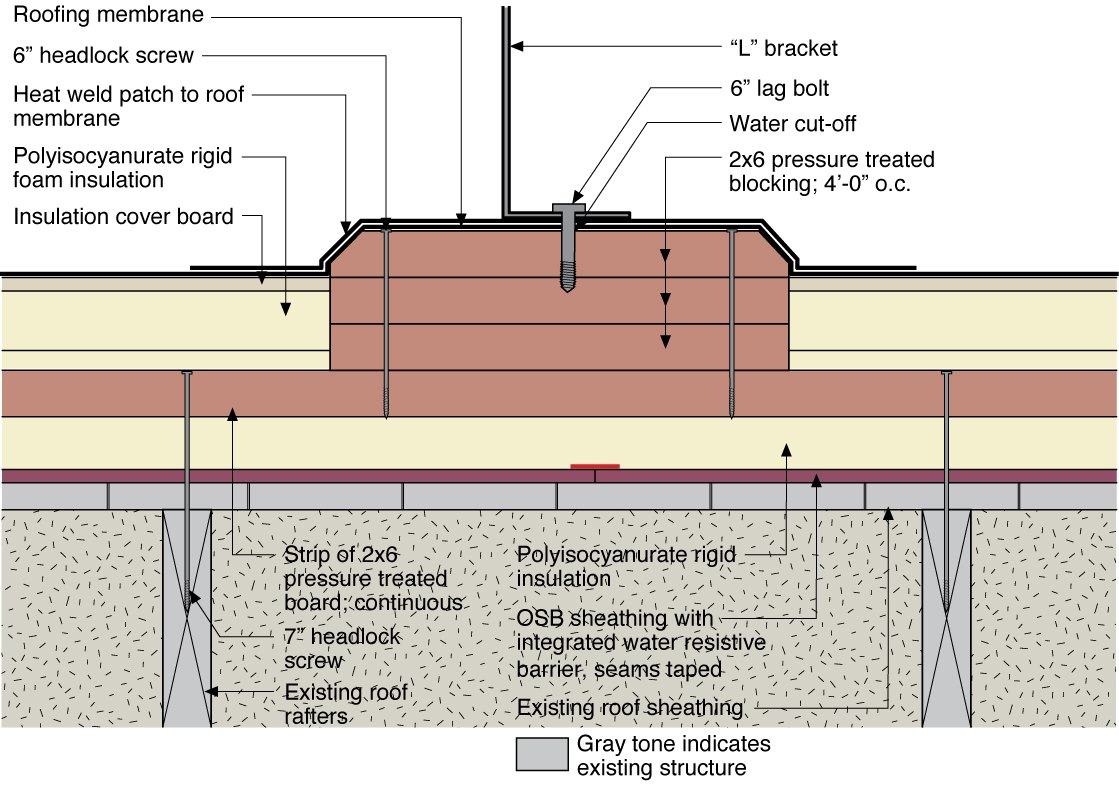
The blocking for a new PV roof-mounting system is integrated with new rigid foam and the air and water control layers installed over an existing flat roof
Image

The blocking is completely flashed with roofing membrane before the PV rack hardware is attached on a flat roof
Image
The diverter should be adequately sized to direct all of the water away from the wall and into the gutter.
Image
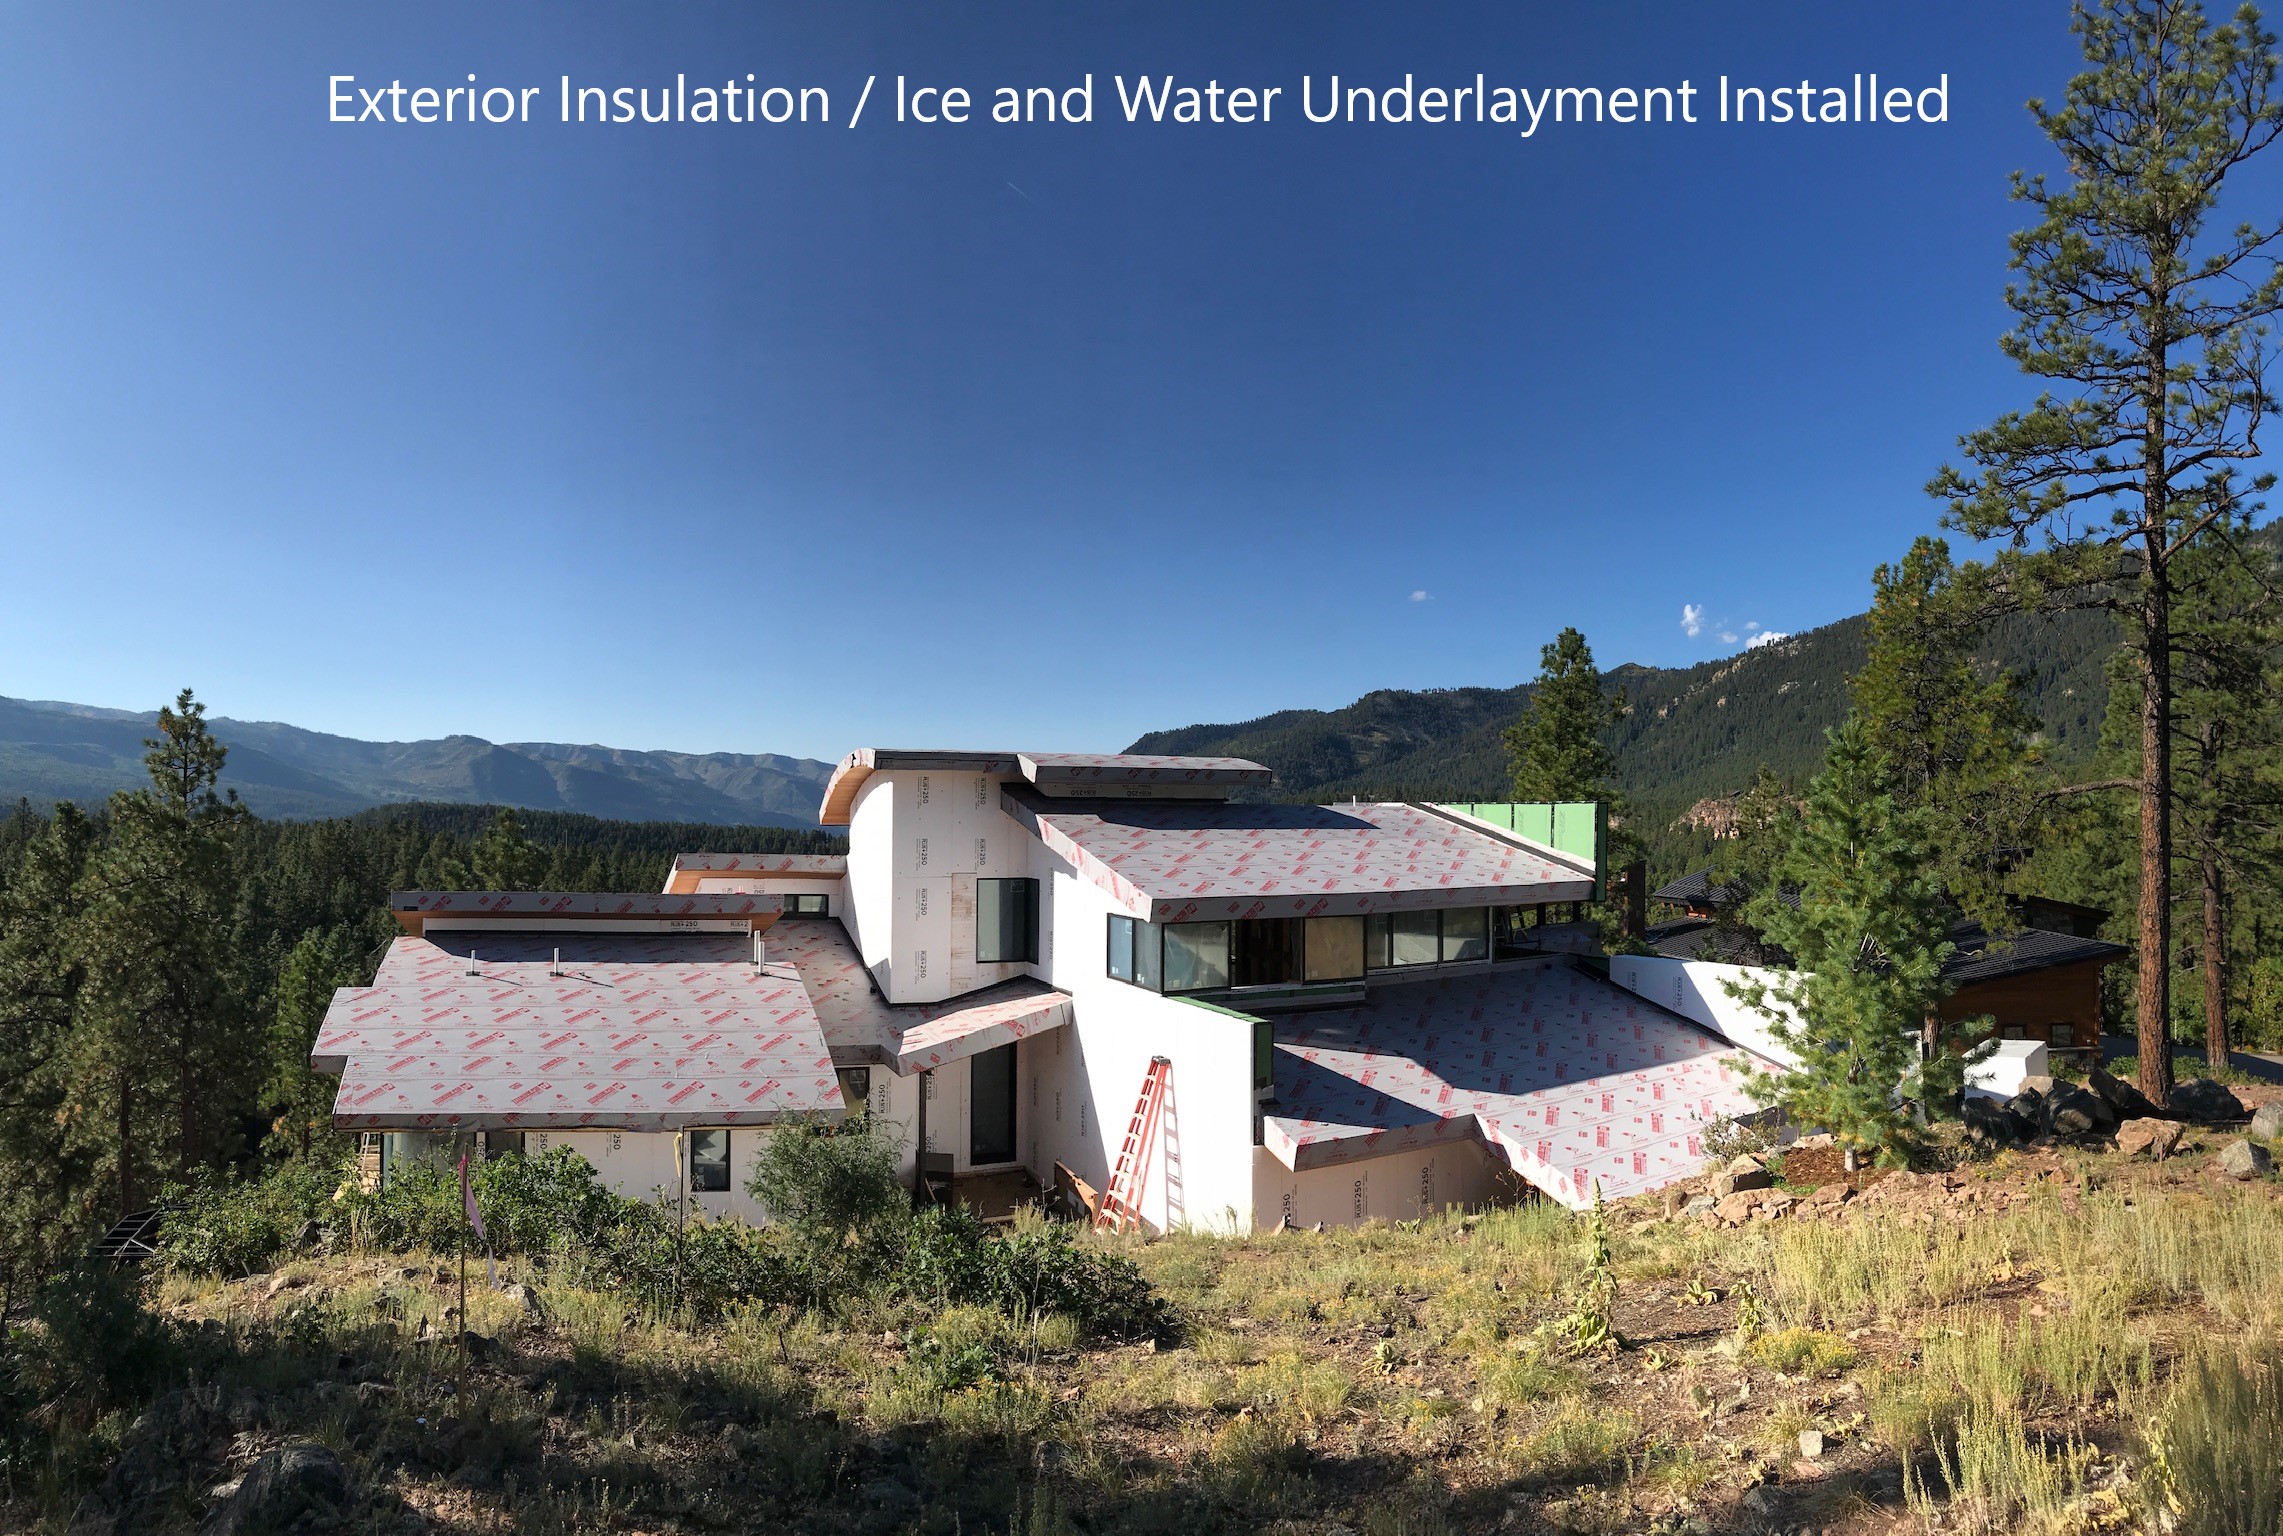
The entire roof of the home is covered with an ice-and-water shield to help protect against moisture damage.
Image
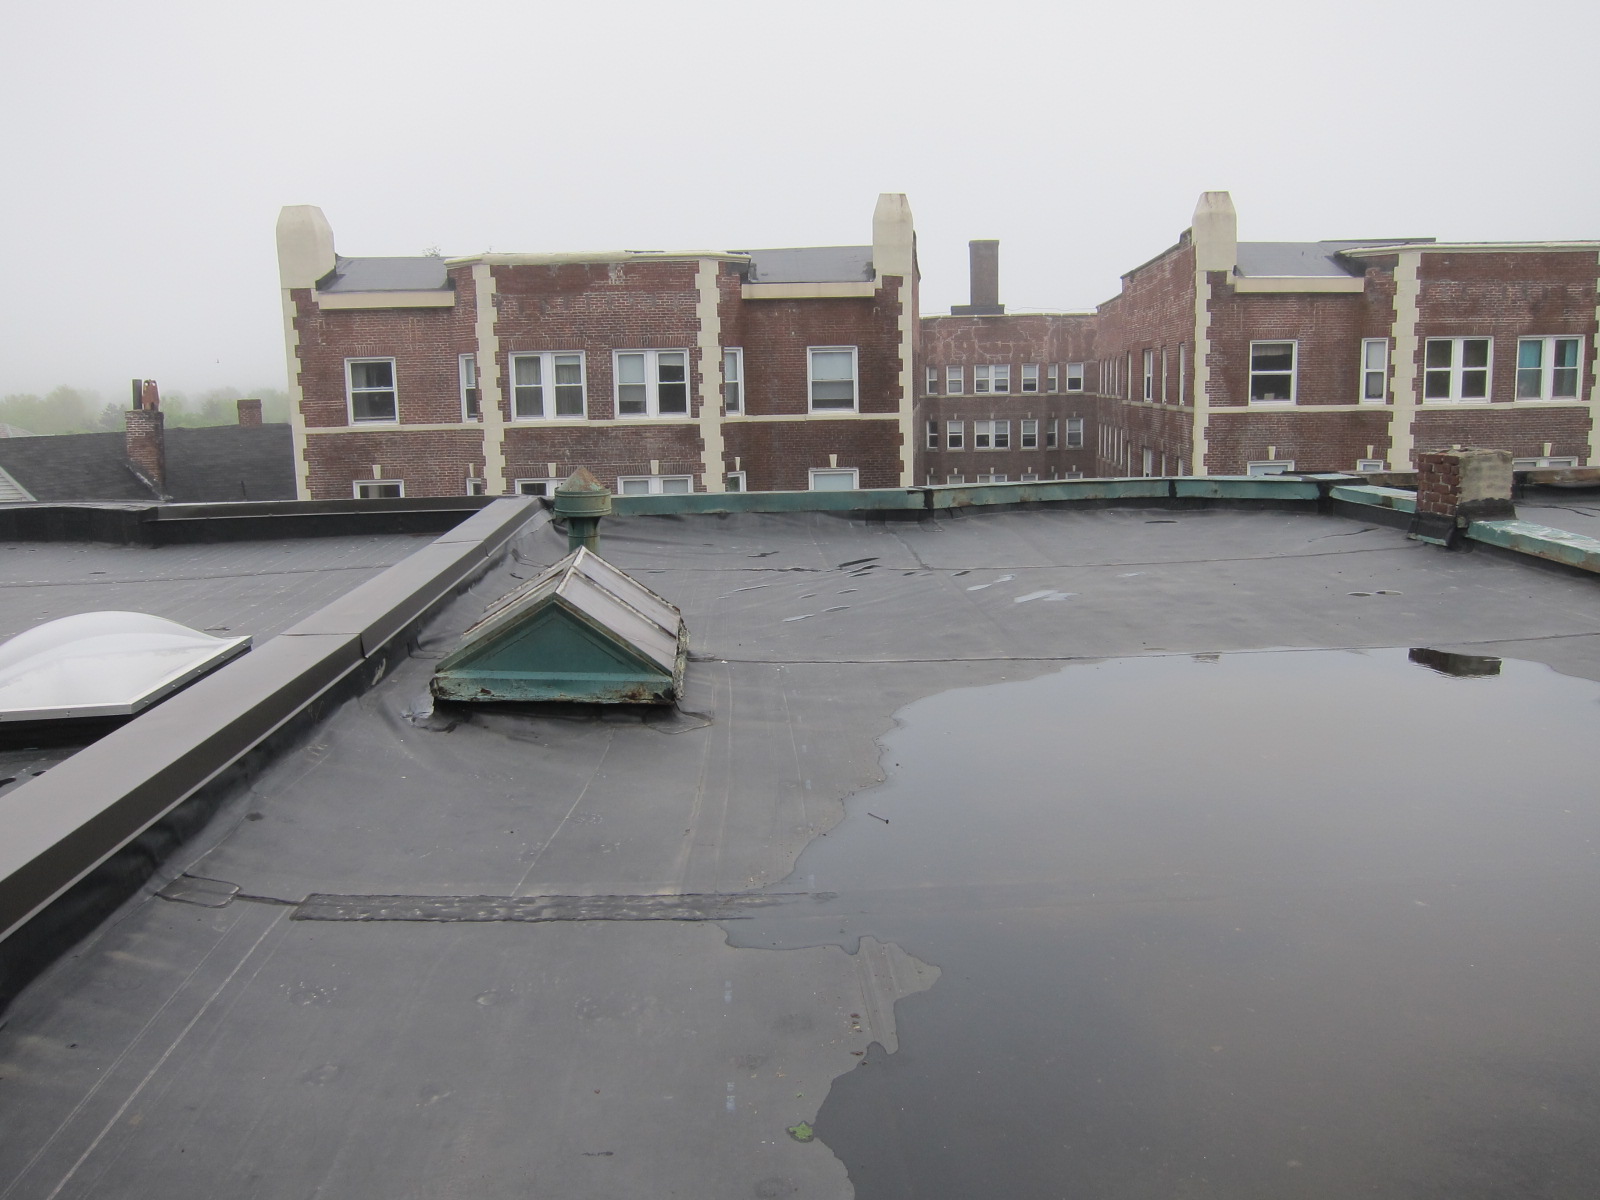
The existing flat roof before removal of membrane shows lack of slope allowing water to pool on the surface
Image
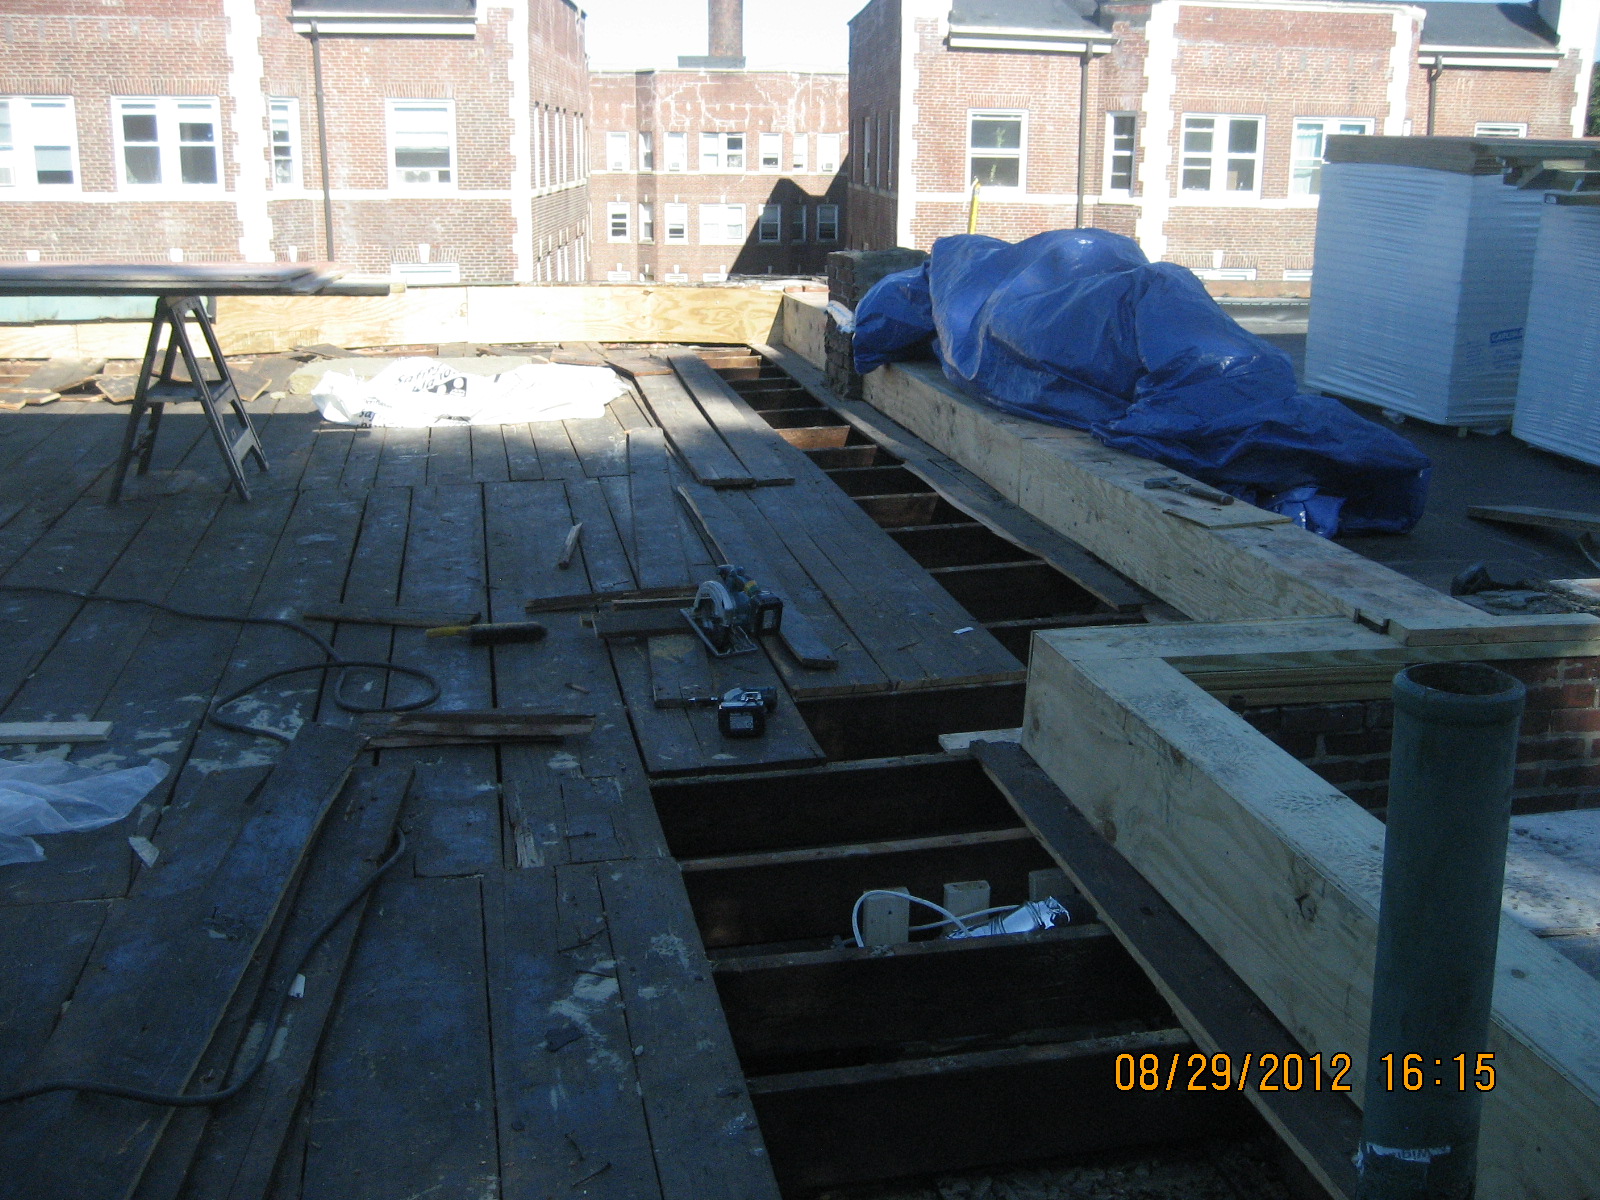
The existing sheathing boards are removed near the perimeter of the flat roof and pressure-treated plywood is installed at the vertical face of the parapet
Image
The mechanical curb for a skylight is integrated with the water management and air control layers on a flat roof retrofitted to include new above-deck rigid foam insulation
Image
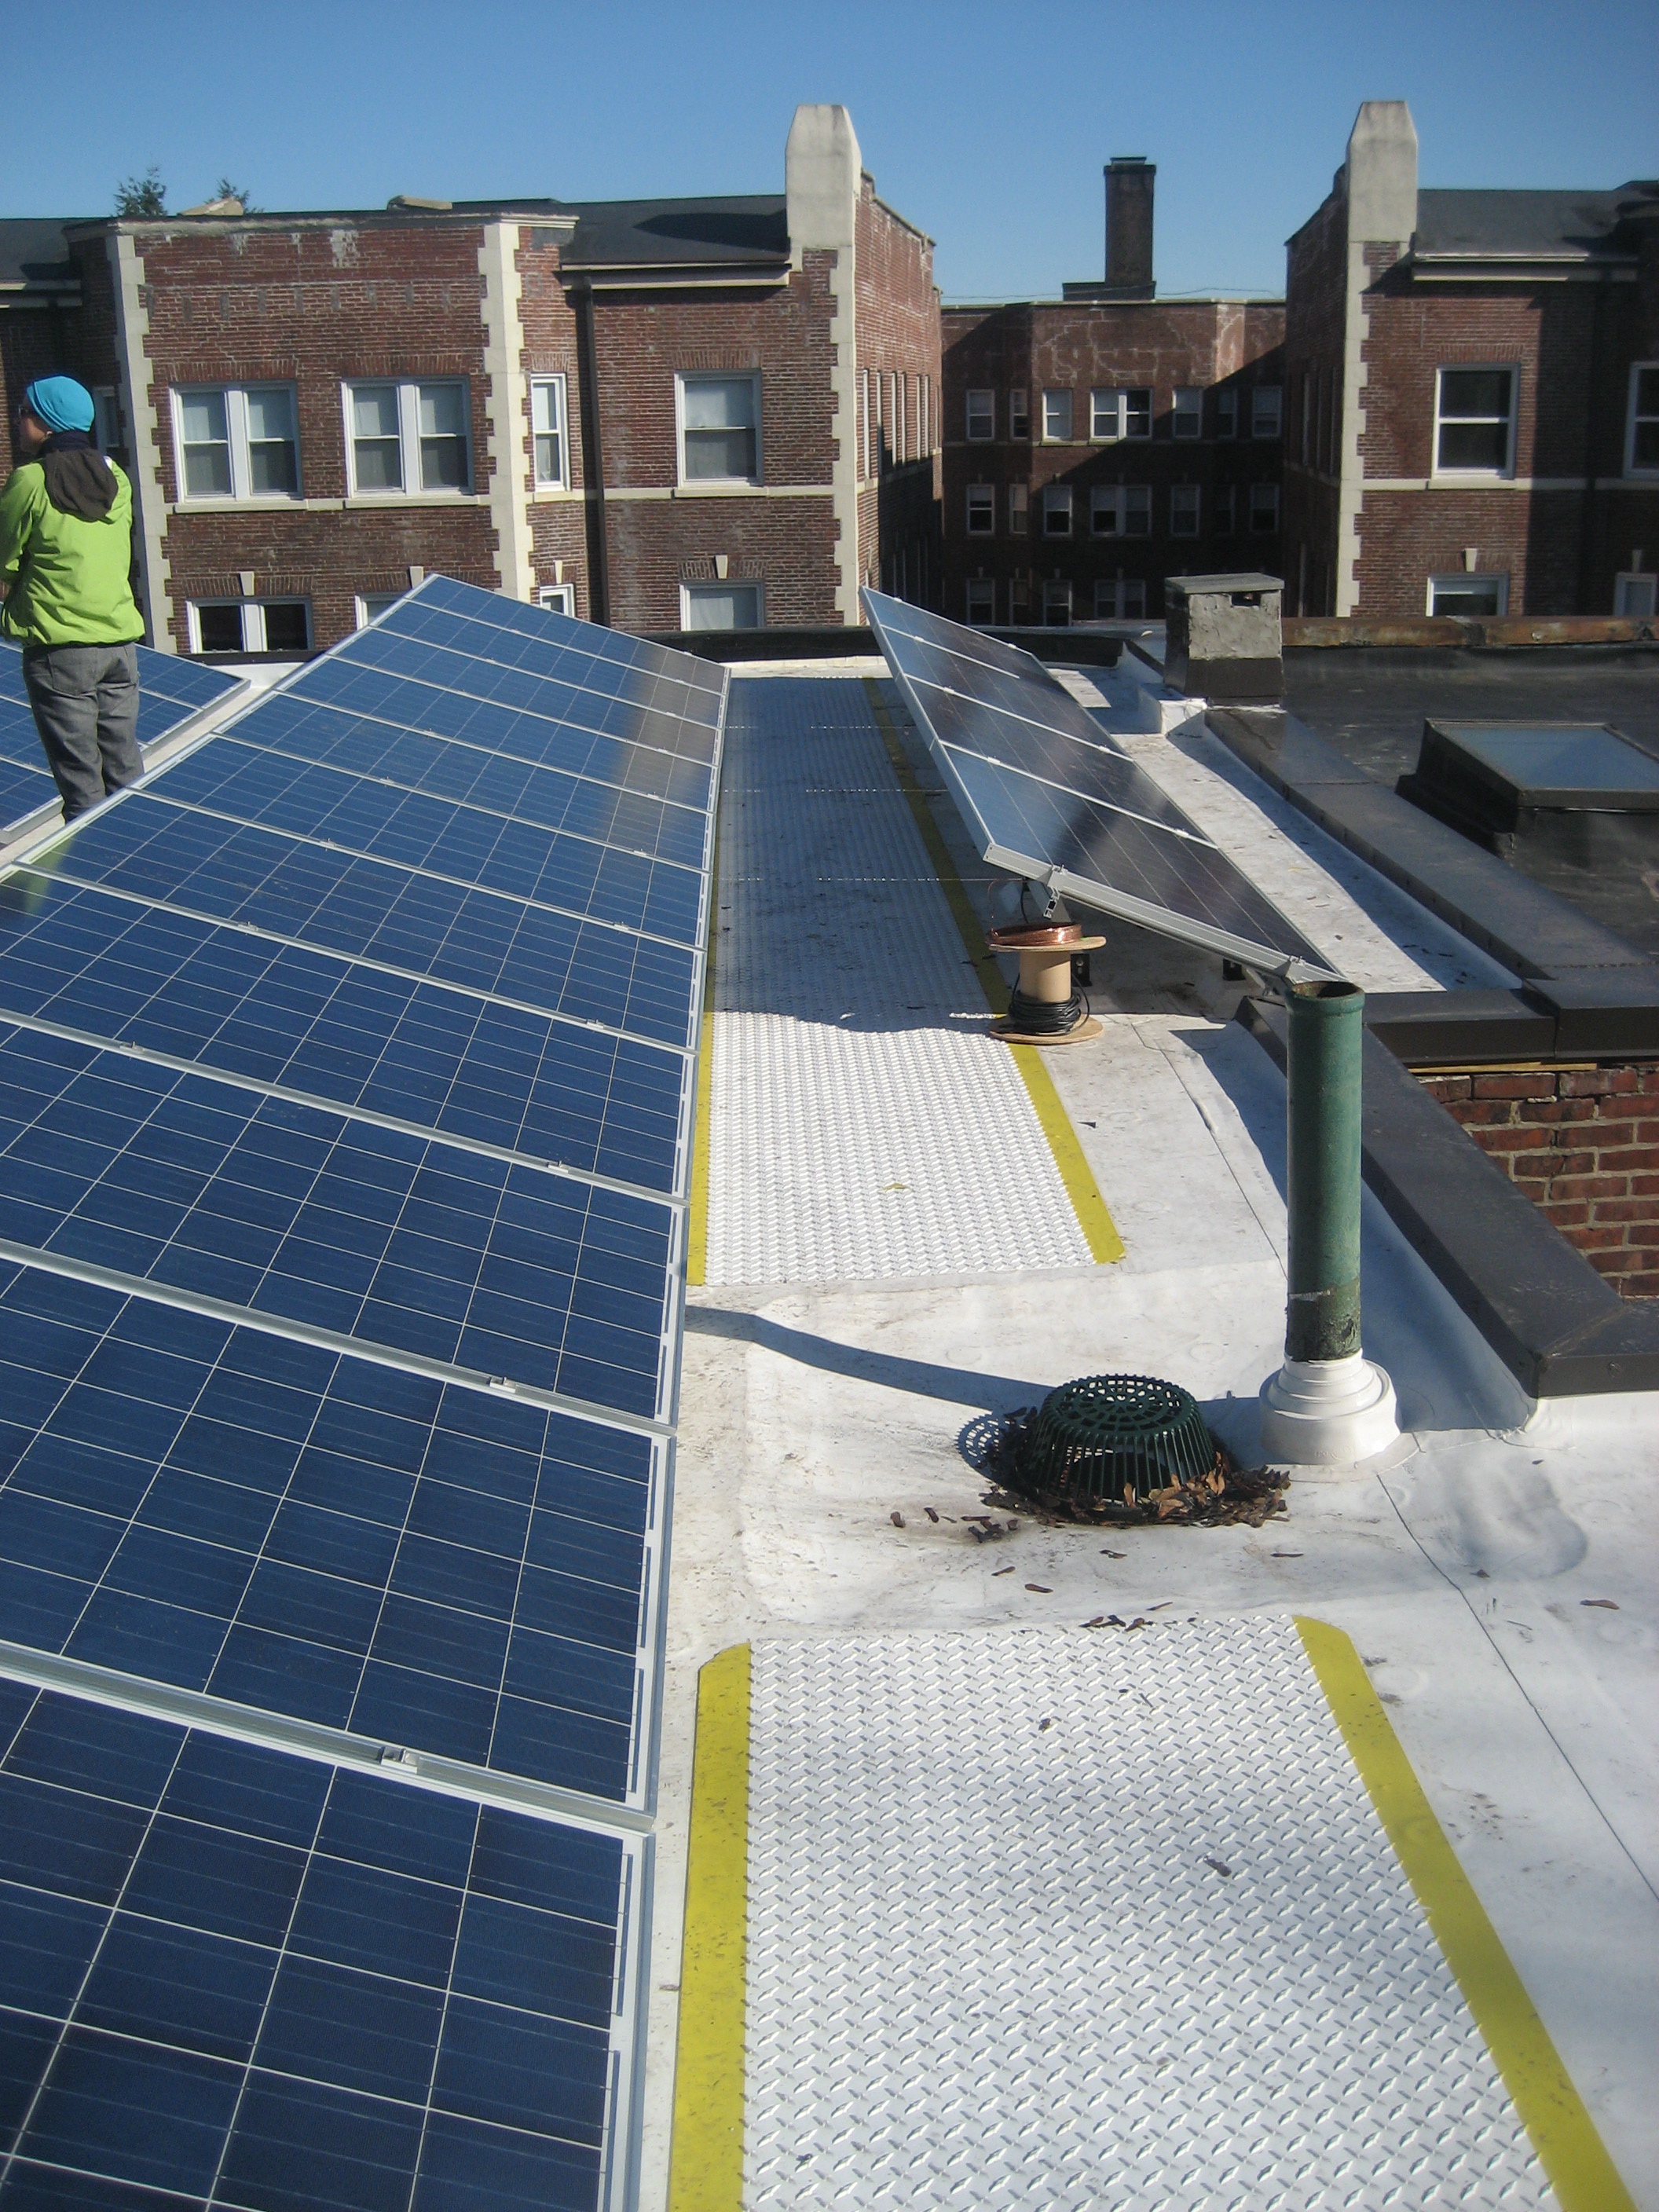
The retrofitted flat roof has PV panels and walking mats installed over the roofing membrane