

Scope

In flood-prone or seismic locations, elevate and secure water heaters to reduce the risk of damage:
- Elevate water heaters above the BFE (Base Flood Elevation).
- Anchor water heaters to wall framing with metal strapping.
See the Compliance tab for links to related codes and standards and voluntary federal energy-efficiency program requirements.
Description
In areas likely to flood, water heaters should be elevated at least 1 foot above the base flood elevation (BFE). In seismic areas as well as areas prone to coastal flooding, storm surge, and severe high winds, the water heater should be secured to prevent it from toppling.
Elevating a Water Heater above Flood Waters
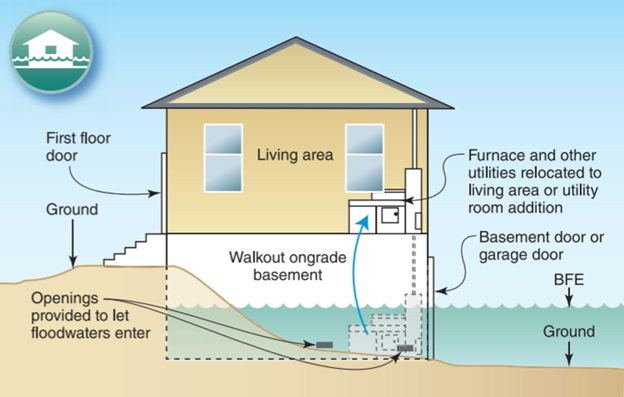
The water heater can be elevated above the floor on a solid masonry or concrete pad or on a framed wooden or steel platform (Home Innovation Research Labs 2012, FEMA P-312 2012). If the available overhead clearance in the room where the water heater is currently located does not allow enough room to elevate the water heater in place, then the water heater may need to be relocated to an upper floor (Figure 1) or an attic (FEMA P-312 2014). Another option may be to replace the tank water heater with a tankless water heater. These smaller, lighter units can often be located higher up on the wall.
While relocating a water heater to the attic protects it from flood damage, the heater should be equipped with a drip pan and an overflow sensor plus automatic shut off to avoid costly water damage in the event of leakage. If placed in the attic, it must be routinely inspected for leaks (FEMA P-312 2014).
Where water heaters are installed on a platform, the water heater base should be attached to the platform and the platform should be anchored to the floor. Required service and operation clearances should be maintained, and a, flexible service connections for water, electric, and gas lines to the water heater should be installed with enough slack to withstand significant tremors without pulling loose (Home Innovation Research Labs 2012).
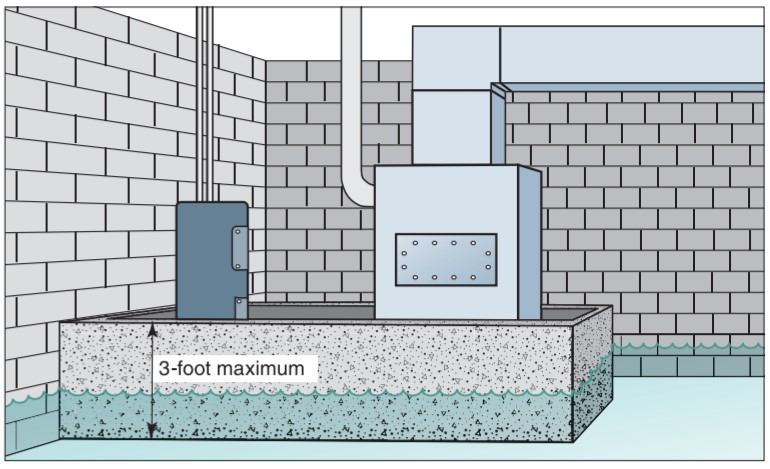
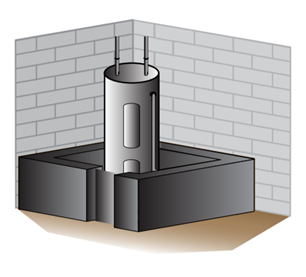
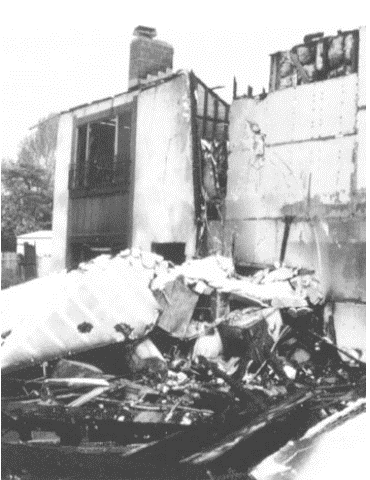
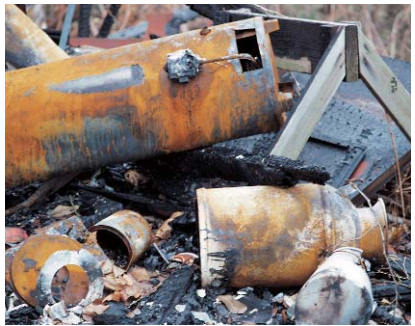
If the water heater cannot be elevated or relocated, permanent floodwalls can be constructed to protect the equipment (Figures 2 and 3). Concrete floodwalls can be built to surround one or more pieces of service equipment, such as a water heater and a nearby furnace (FEMA P-312 2014). In general, such barriers and shield walls are only practical when flood depths are likely to be less than 3 feet.
How to Elevate the Water Heater above the Base Flood Elevation
- Determine the local BFE for the home site using the flood maps described on the Climate tab.
- Determine if the equipment can be elevated above the BFE in its current location, for example in a basement or garage or whether it will need to be moved to a higher level in the home or to an outside platform next to the home.
- If elevation and relocation are infeasible or impractical, determine if the water heater can be protected in place with low floodwalls and shields and with anchors and tiedowns that prevent flotation.
- Install and secure the platform.
- Re-install and secure the water heater, as described below.
- Re-install service connections.
Bracing a Water Heater to Protect it from Seismic Activity
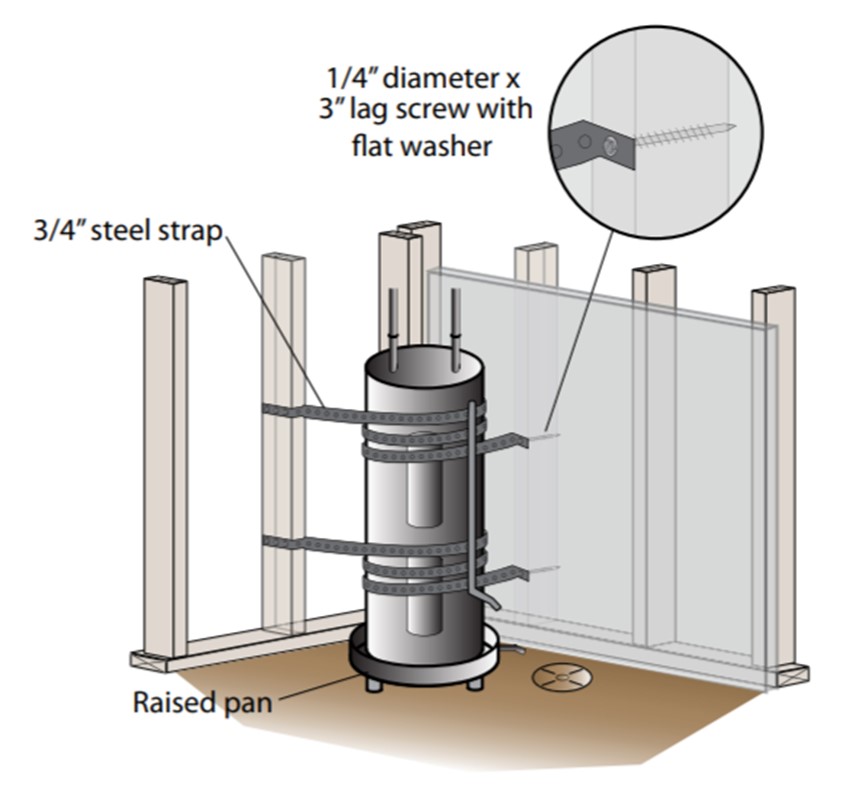
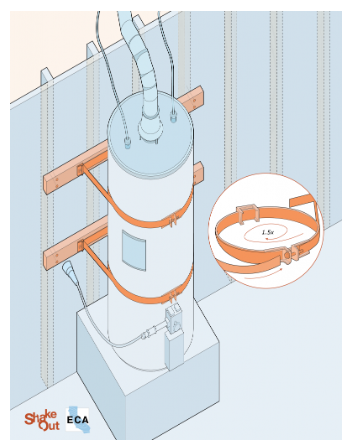
Water heaters should be secured to the wall’s studs to prevent tipping due to seismic activity, very strong winds, storm surges, or flood waters. Bracing is required for new water heater installations and is recommended as a retrofit priority for existing installations. To secure indoor water heaters, both the bottom and top of the water tank should be secured to the wall using heavy-gauge metal strapping and 3-inch lag screws. One strap across the top or middle of the tank is not adequate. If your water heater does not have two straps that wrap completely around it and are screwed into the studs or masonry of the wall, then it is not properly braced, according to the Earthquake Country Alliance (2020). To prevent the tank from tipping backwards, there should be very little space between the tank and the wall. If there is more than 1 to 2 inches of space, a wooden block should be attached to the wall to span the gap (WADOH 2008). Strapping can also serve as a restraint against wind when water heaters are housed on elevated structures outside of the home, such as balconies (Home Innovation Research Labs 2012).
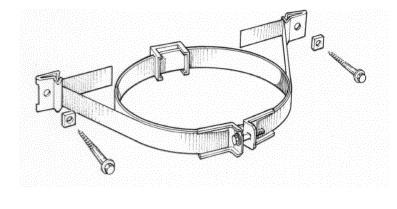
Bracing kits for securing existing water heaters can be found at hardware stores, complete with strapping, lag screws, washers, spacers, and tension bolts (WADOH 2008) (Figure 4). As an alternative to bracing kits, anchorage of the water heater can be achieved by using steel strapping fastened to perpendicular walls, if the water heater is installed in a corner, or both ends of the strap can be attached to the same wall if the water heater is attached along a straight wall (Home Innovation Research Labs 2012). Do not use plumbers tape, which has been shown to be too brittle to hold in an earthquake (Earthquake Country Alliance 2020; Figure 5). The ¾-inch steel strapping should be bolted to the wall studs or solid lumber blocking attached to the studs with ¼-inch lag screws that are 3 inches long and reinforced with a flat washer (Figure 6). If you are securing it directly into concrete, use 1/4-inch expansion bolts in place of the screws.
The water tank can be used as a source of fresh water in times of emergency by attaching a garden hose to the drain spout at the base of the water heater (Earthquake Country Alliance 2020).

How to Secure an Indoor Water Heater
- Wrap the heavy-gauge metal strapping around the water tank. Do not use plumbers tape. Start by attaching the strap to the studs in the wall at one side of the tank. Cross the strap across the front of the tank and attach to a stud on the other side of the tank (Figure 7). If the studs are not ideally positioned for fastening, attach a 2x4 across the studs and attach the strapping to the 2x4 (Figure 8). Wrap the heavy-gauge metal strapping 1½ times around the tank. Start by placing the strapping at the back of the tank. Bring it to the front and then take it around the tank and back to the wall on the other side of the tank(WADOH 2008, Earthquake Country Alliance 2020).
- Secure the strapping to the wall studs or to wood blocking that is secured to the walls with ¼-inch x 3-inch or longer lag screws and oversized fender washers or flat washers. If securing into concrete, use 1/4-inch expansion bolts in place of the lag screws (WADOH 2008).
- Use two sets of straps located at one-third from the top and one-third from the bottom of the tank with heavy strapping or kits intended for securing water heaters (Figure 7). The lower strap should be at least 4 inches above the water heater controls.
- Replace copper and metal piping for natural gas and water lines with flexible piping (WADOH 2008).
Ensuring Success
Follow local code requirements regarding anchoring of water tanks to the walls for seismic and storm protection.
Region
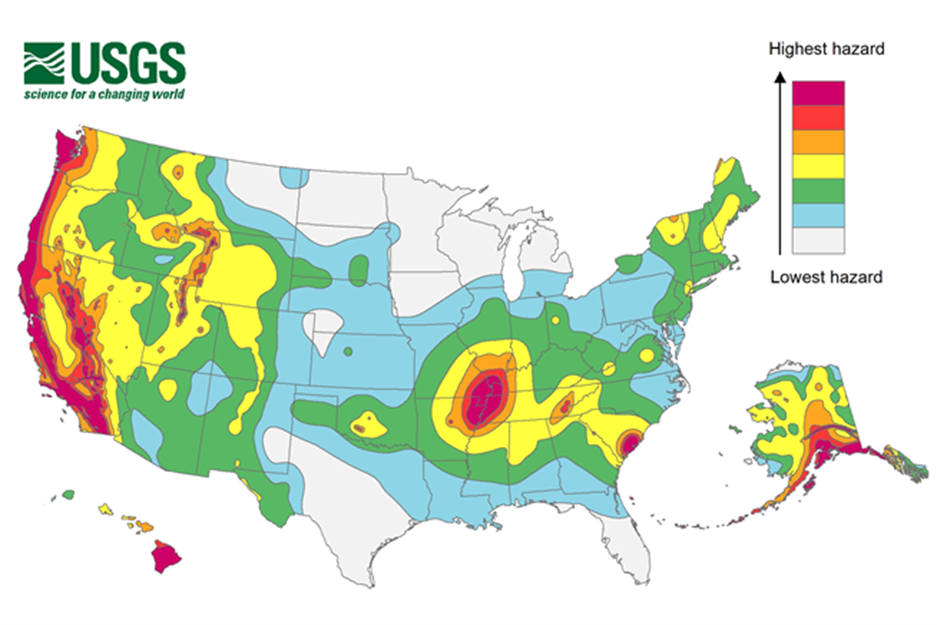
Earthquake Prone Areas
Reference the seismic map below to see if the home is located in an area prone to seismic activity.
Flood-Prone Areas
The flood-resistance approaches shown in this guide work in all climates. Understanding the flood risk at a particular location, however, is an important first step in designing and retrofitting for flood-resistance. Flood hazard risk areas are identified by FEMA as Special Flood Hazard Areas (SFHA) and can be found on Flood Insurance Rate Maps (FIRMs).
FEMA flood maps and related tools can be found on FEMA’s website. The National Flood Hazard Layer (NFHL) map is a searchable geospatial database containing current flood hazard information. Using the NFHL Viewer, accessed through FEMA’s website, you can find and print the FIRM for a specific location.
Figure 2 is an example of the flood hazard information shown on the NFHL Viewer for a specific location.
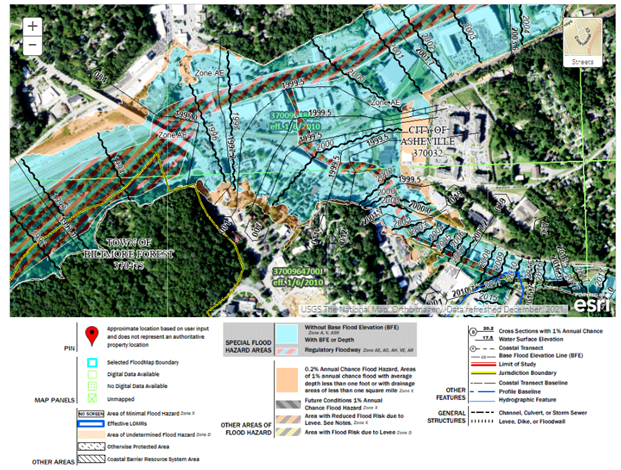
<>Figure 3 provides a closer view of one portion of the map in Figure 3. Note the SFHAs are designated by color and pattern and the BFEs are designated by wavy black lines.

Training
Right and Wrong Images
Source
Factsheet describing how to secure water heaters to resist seismic activity.
Source
Report describing ways to retrofit a home to make it more hurricane resistant.
Videos

Compliance
Retrofit
The guidance provided for new homes applies equally to existing homes.
More Info
References and Resources
*For non-dated media, such as websites, the date listed is the date accessed.
Contributors to this Guide
The following authors and organizations contributed to the content in this Guide.
Pacific Northwest National Laboratory
Questions? Comments? Contact our webmaster.