

Scope
Install a radiant barrier to reduce solar heat gain in the attic using one of the following approaches:
- Specify decking with a radiant barrier laminated to one surface.
- Install foil product to underside of decking prior to decking installation.
- Install foil product to underside of rafters or the top chord of roof trusses after decking is installed.
- Install radiant barrier over rafters or trusses prior to installation of decking.
See the Compliance Tab for links to related codes and standards and voluntary federal energy-efficiency program requirements.
Description
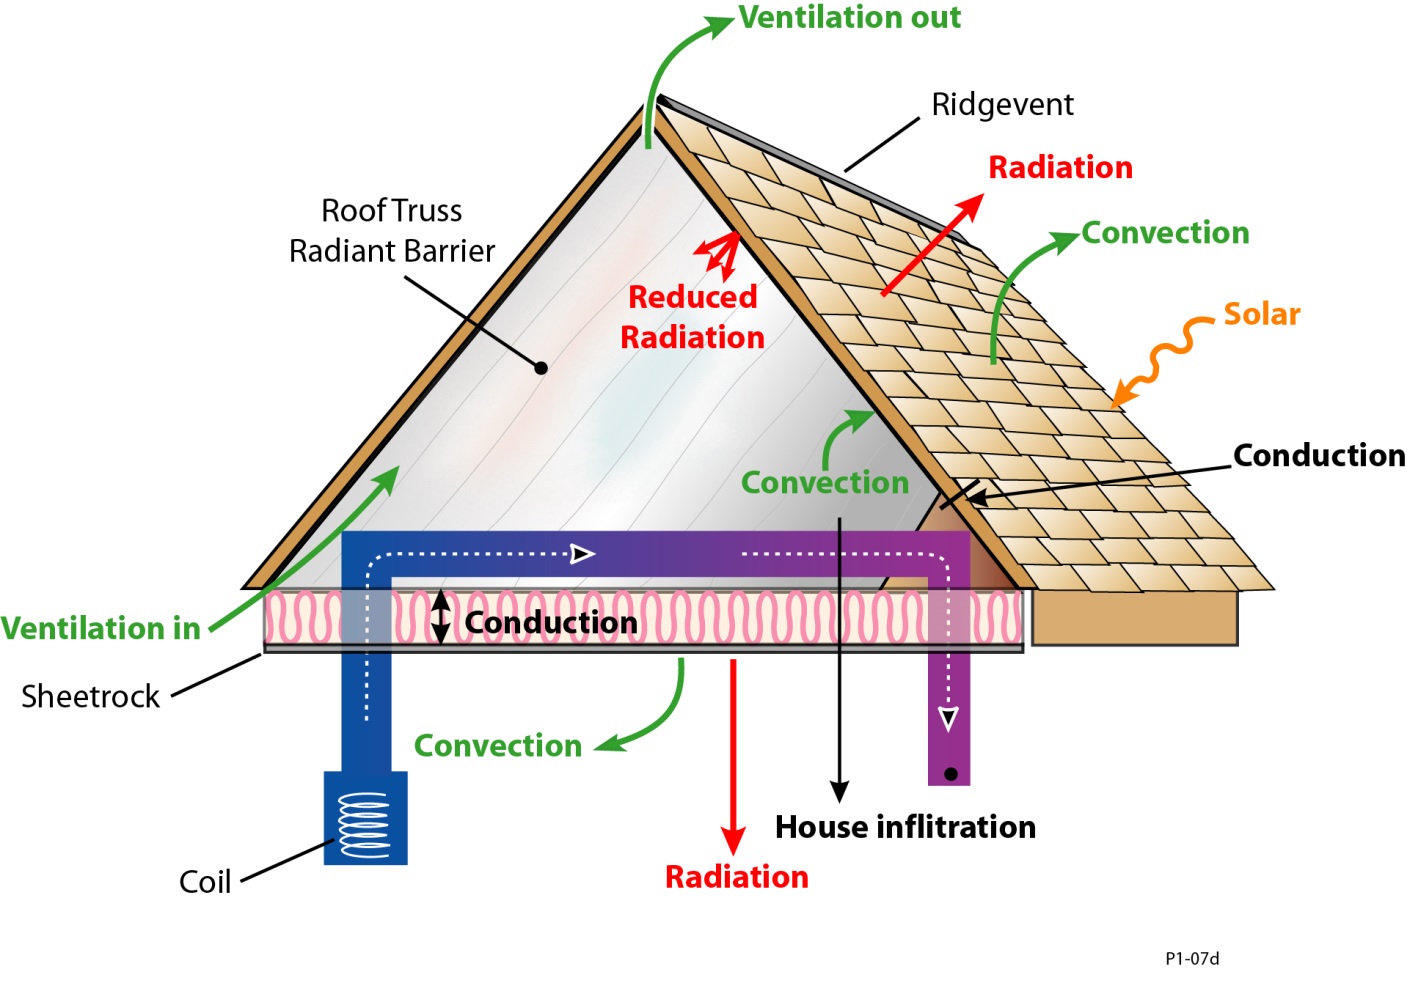
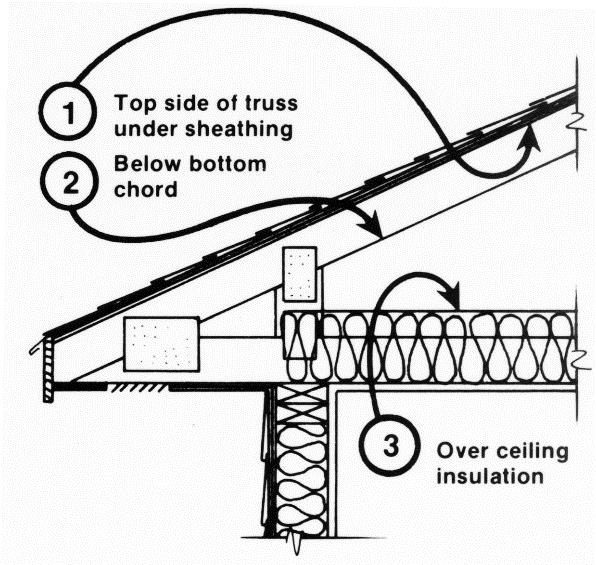
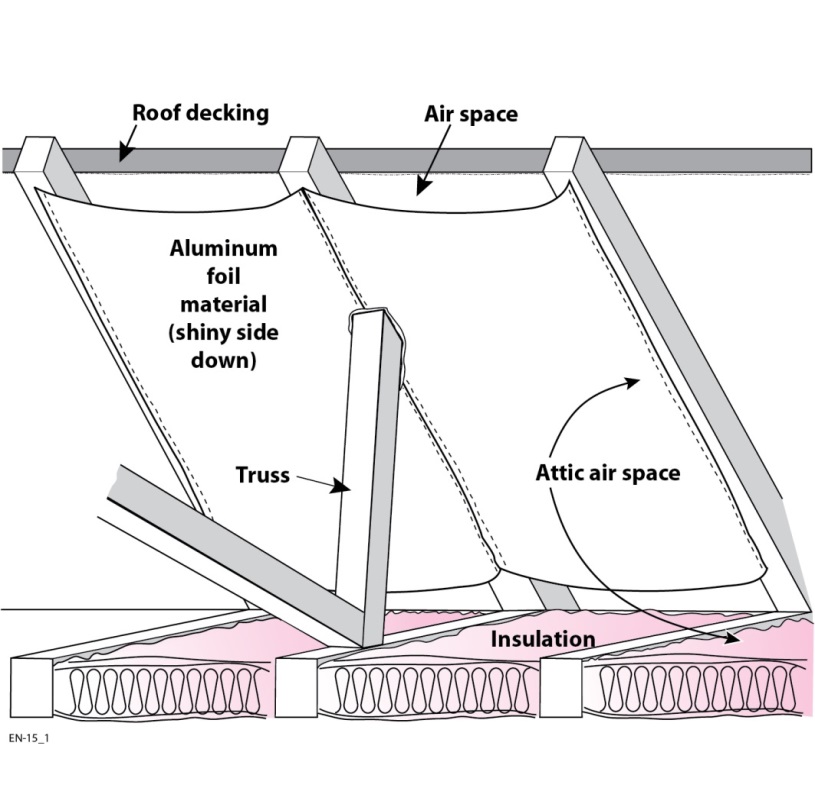
A radiant barrier is typically a layer of reflective aluminum foil material placed in the attic next to an air space to block radiant heat transfer between a heat-radiating surface (such as the underside of the roof deck) and a heat-absorbing surface (such as insulation at the attic floor). Figure 1 illustrates the locations in which a radiant barrier may be installed in an attic. Only locations 1 and 2 are recommended for sheet radiant barriers because dust will accumulate on the radiant barrier if it is installed at location 3. Other types of radiant barriers such as “chips”, foil faced air bubble-packing, and multi-layer products, are acceptable for location 3 (more below).
Source
Website with answers to some of the most commonly asked questions about attic radiant barriers.
Aluminum foil, the operative material in attic radiant barriers, has three physical properties of interest. First, it reflects thermal (long-wave infrared) radiation very well. Second, it emits (gives off) very little heat. Third, its vapor permeability is very low.
Two things affect the performance of a radiant barrier system: the level of insulation in the attic and the geographic location of the home. A radiant barrier system can reduce the heat flow into the house from the attic by approximately 40%. This does not mean a radiant barrier will reduce the homes’ energy use by 40%, as many advertisers claim. This means that the portion of the cooling load represented by the attic is reduced by 40%, which typically equates to 8% to 12% of the annual cooling costs.
Further clouding the savings question is the impact of attic insulation levels and geographic location. Attic insulation levels have a large impact on the amount of heat flow that is reduced by 40%; in other words, if you have little or no insulation in your attic, a 40% reduction is very significant, but if your attic is insulated to R-30 or better, there is very little heat flow to reduce. However, if the HVAC duct work is in the attic, a radiant barrier keeps it cooler during the summer, which can be a significant benefit. In climates where summer heat gain from the attic is minimal, the advantages of a radiant barrier diminish. A simple savings calculator tool is available here: Oak Ridge National Laboratory's Radiant Barrier Calculator.
Radiant barriers provide more than just energy savings in warm climates. They improve comfort inside the home, reduce wear on air-conditioning equipment, and extend the conditions in which an air-conditioning system can meet the cooling load. These benefits can be particularly valuable during heat waves, or extreme heat events.
Four generic types of radiant barrier are most common:
Foil sheet products: these products are available perforated (vapor permeable) and unperforated (vapor retarder). These products are available as single-sided or double-sided foils with another material as backing, such as craft paper, mylar, or polypropylene. Some products are further strengthened by fiber webbing sandwiched between the foil and the backing. The strength of the backing material is important since unreinforced foil tears very easily. In an attic ceiling or roof deck application (locations 1 and 2 in Figure 1) there is no significant performance difference found between single-sided foil and double-sided foil. The first layer of foil will reduce radiant heat gain by at least 90%, making the reduction provided by the second layer of foil insignificant.
Foil-faced roof sheathing materials (decking): these products come from the manufacturer with a foil facing adhered to one side of the sheathing. The main difference among these products is if and how the laminated foil surface is perforated. Some products laminate a non-perforated radiant barrier, some products laminate perforated radiant barrier, and some products perforate the product after the foil is laminated to the decking, penetrating the foil, glue, and substrate. The perforations are intended to allow the decking to “breath” allowing the passage of moisture. The efficacy of the decking’s ability to pass moisture is more important in humid climates.
Radiant barrier "chips": unlike sheet-type radiant barriers, these "chips" are blown onto the floor of the attic — typically to a depth of 3 or more inches. Properly installed chips act as a multi-layer product with many "trapped" air pockets. These air pockets cause this product to function somewhat like traditional fibrous insulation products, and allow vapor to pass. Even though this product may collect dust on its uppermost layer, the remaining layers and air spaces work to significantly reduce heat transfer through the ceiling assembly.
Foil-faced insulation: These products are best deployed as wall insulation. Foil-faced insulation products should not be installed at the roof deck unless the attic is sealed construction. If the attic space is vented, the thermal insulation will be separated from the attic’s air barrier, typically located at the interior ceiling drywall. Due to this, foil-faced insulations installed at the roof plane of a vented attic will not provide any advantage from their R-value. They will still perform as a radiant barrier; however they are more costly than single- and double-sided foil products. The insulating material may be
- polyisocyanurate
- polyethylene "air-bubble" packing
- multilayered foil systems.
Source
Website with answers to some of the most commonly asked questions about attic radiant barriers.
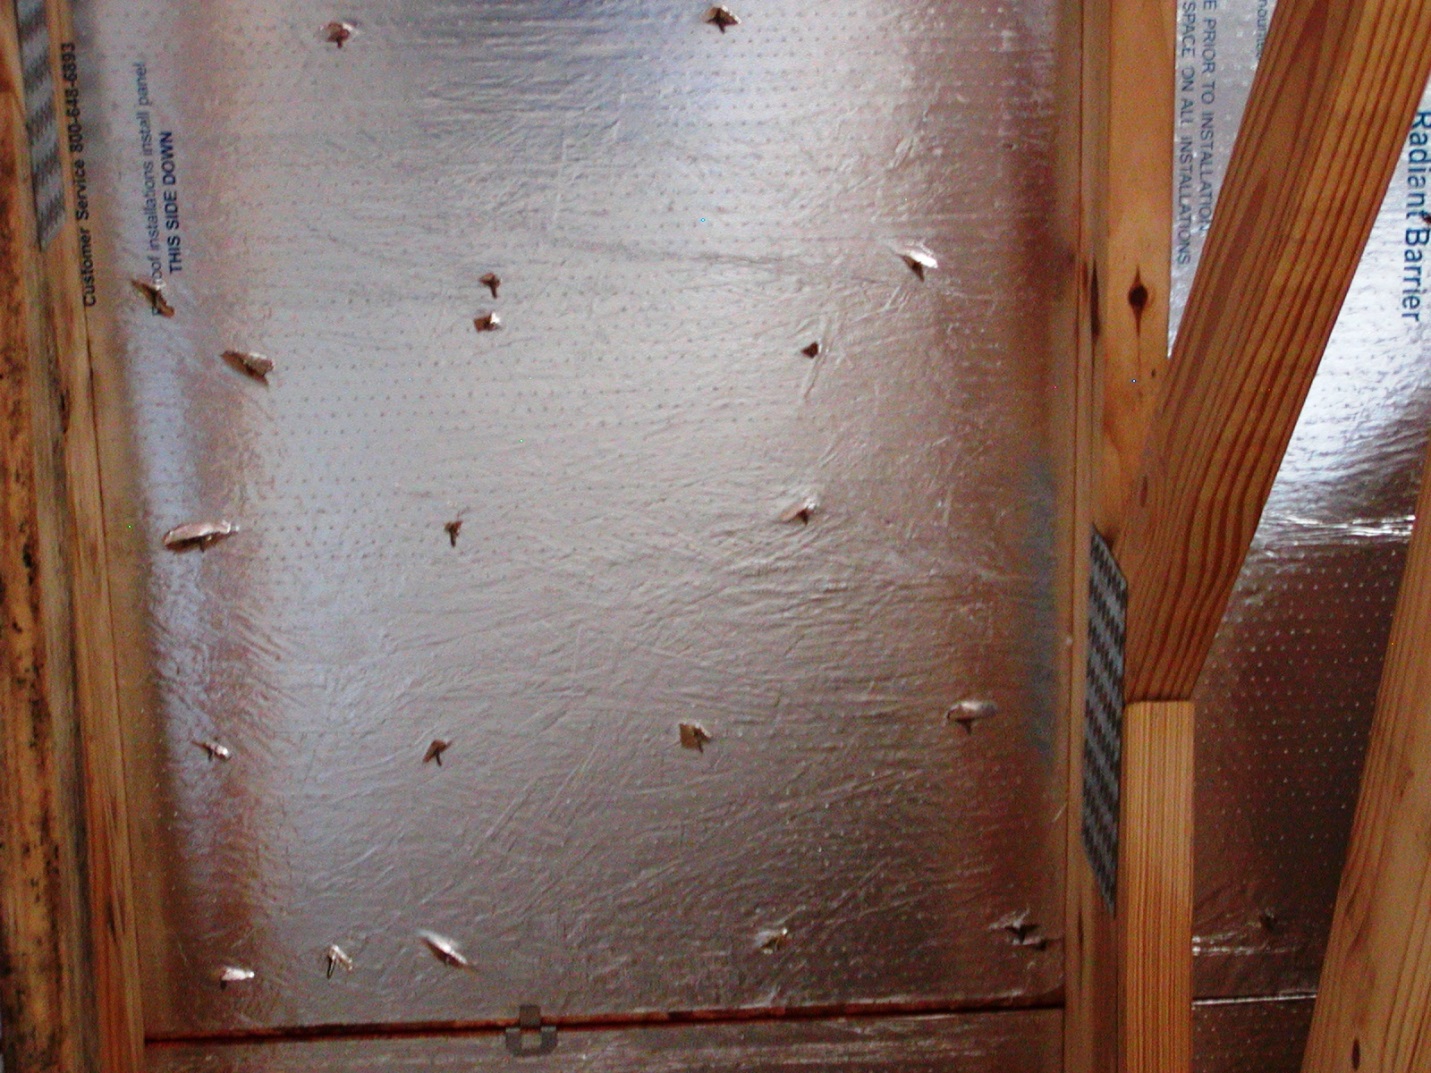
In attics, single-sided radiant barrier material should be installed with the foil side facing down.
The radiant barrier acts as a barrier against radiated, not convected, heat so there is no need to cut off air flow in the attic. In fact, to facilitate attic ventilation under a radiant barrier attached to the rafters, a gap should be left at the soffit and at the ridge. Small tears and holes will not significantly lessen the performance of the radiant barrier, so don't worry if you must cut and patch around obstructions such as vent stacks and truss supports.
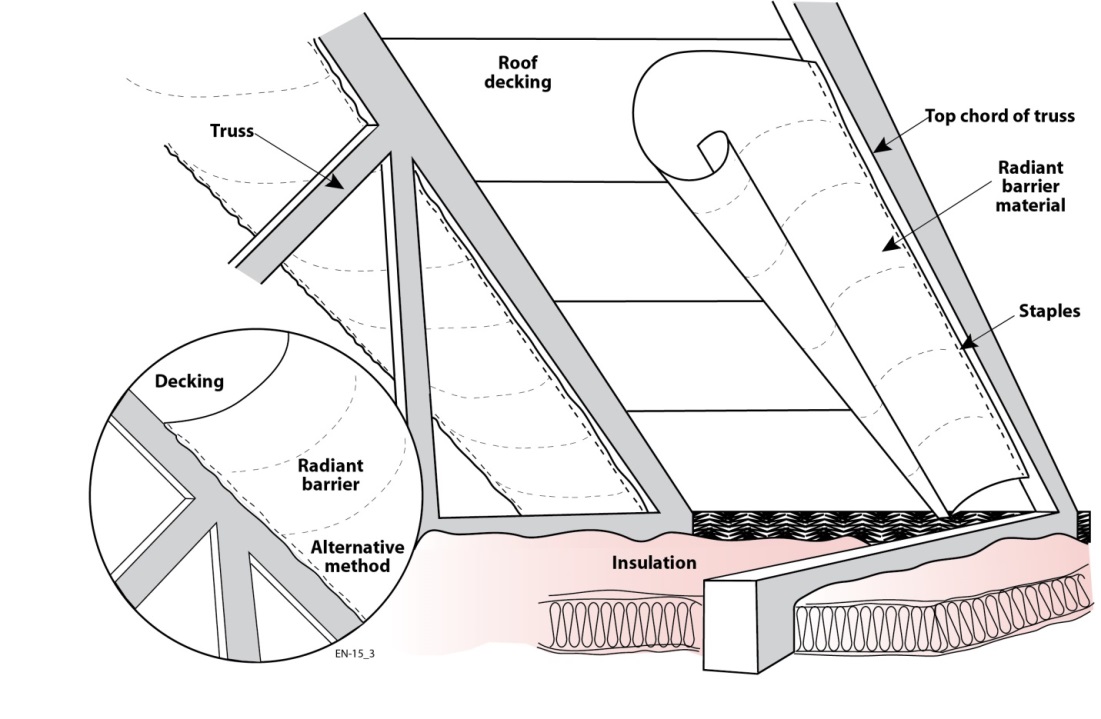
To install a foil radiant barrier in an existing attic, staple the foil material to the underside of the rafters, the top chord of the roof trusses, or to the underside of the roof decking (Figure 1). The air space above the radiant barrier is not critical to the system’s performance, so attaching directly to the underside of the decking is acceptable. An air space can be provided by allowing the radiant barrier to sag, as illustrated in the circled “Alternative Method” shown in Figure 1 above; this will allow the roof decking and shingles to be slightly cooler during the day.
How to Install a sheet-type Radiant Barrier in an Existing Home:
This work should be done with two people, for ease as well as safety.
- Measure the length of the attic roof from peak to soffit.
- Return to a stable surface to measure and cut the radiant barrier material to size. The material usually comes in rolls of 50 to several hundred feet. It's easiest to cut and reroll all the lengths you'll need before returning to the attic.
- Take pre-cut radiant barrier material back to the attic.
- Starting at one end of the attic, place the plywood or 1x12 as a stable surface across two of the attic truss members. Try to minimize compression of existing insulation. Provide one work platform at the peak and one at the soffit end so that both installers can work together. Safety reminder: Be extremely careful at the sides of your support surface. If you step on an edge, the surface can tilt and drop you through the ceiling drywall below.
- Unroll one length of the radiant barrier material from soffit to peak.
- Leaving one or two inches of free space at the roof peak to allow attic ridge-vent ventilation, staple one corner of the material to the underside of the top chord of the first roof truss.
- Continue stapling the edge of the radiant barrier material down the truss at 6- to 12-inch intervals, stopping 2 to 3 inches above the ceiling insulation to facilitate attic ventilation via the soffit vents.
- Next, staple the other edge of the material to the underside of the adjacent roof truss.
- Continue the process at adjoining trusses until the underside of the roof is no longer visible except for a one- or two-inch strip at the roof peak.
As an alternative, you may staple the radiant barrier material to the underside of the roof decking, adjacent to the top chord of the truss. The air space above the radiant barrier is not critical to the system’s performance, so attaching directly to the underside of the decking is acceptable. If an air space is provided above the radiant barrier, as illustrated, the roof decking and shingles will be slightly cooler during the day.
Source
Website with answers to some of the most commonly asked questions about attic radiant barriers.
It is not very easy to work in any attic, even one with a steep pitch. Always keep in mind that a misstep could be disastrous, since most attic "floors" are not floors at all, but rather 2x4s holding ceiling drywall topped by conventional insulation. You should consider safety first (see installation safety tips listed below).
Take care to avoid compressing existing insulation in the attic.
How to install an Attic Radiant Barrier in New Construction:
There are four widely accepted methods of installing attic radiant barrier systems in new construction:
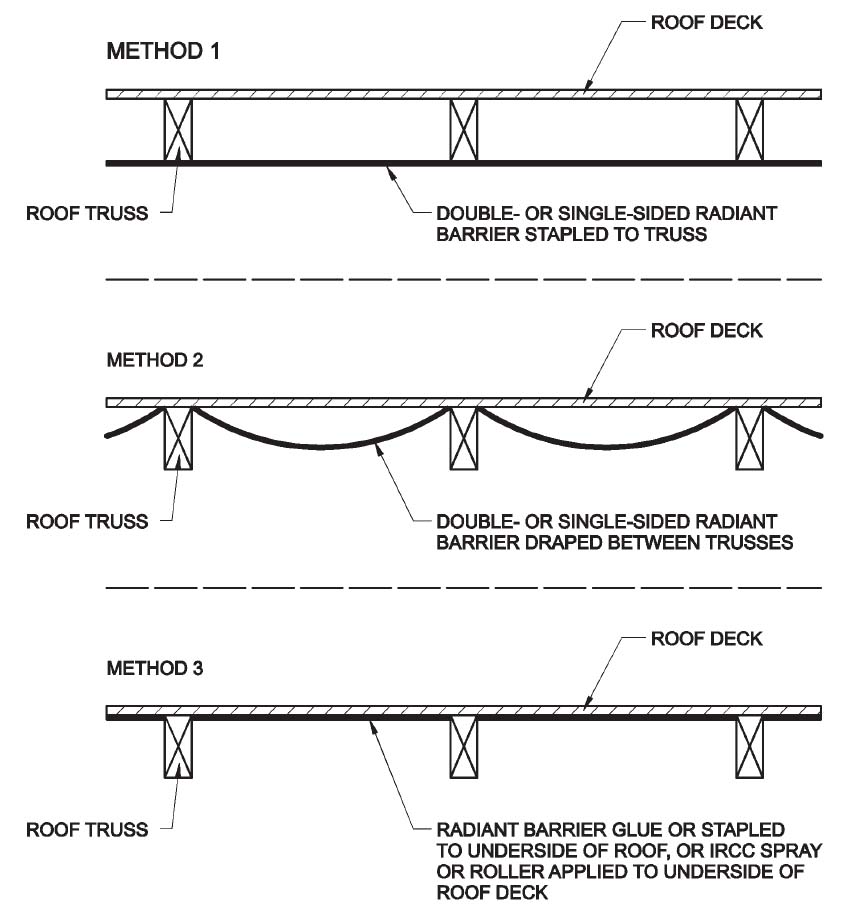
Method 1 – Install foil-faced radiant sheathing. Perhaps the easiest way to install a radiant barrier in a new house is to use one of the foil-faced roof sheathing materials on the market (see Figure 4 and the bottom illustration in Figure 5).
- The main difference among these products is if and how the laminated foil surface is perforated. Some products laminate a non-perforated radiant barrier, some products laminate perforated radiant barrier, and some products perforate the product after the foil is laminated to the decking, penetrating the foil, glue and substrate. The perforations are intended to allow the decking to “breath,” allowing the passage of moisture. The efficacy of the decking’s’ ability to pass moisture is more important in humid climates as the potential for moisture damage is more severe.
- The price increase for products should be minimal compared to non-radiant sheathing, and the installation does not differ from regular decking, except for a little additional care in the handling of the product.
Source
Method 2 - Attach the radiant barrier to the roof decking before it is installed on the trusses (see the bottom illustration in Figure 5).
- The decking must be handled carefully to avoid damaging the radiant barrier, often involving flipping the decking over on the roof.
Method 3 - Attach the radiant barrier to the roof deck or truss chords after the roof decking is installed (See middle and top illustrations in Figure 5). The radiant barrier could be a sheet product or a low-emittance paint, also known as an interior radiation control coating that is roller or sprayer applied.
Method 4 - Drape foil across the trusses prior to installing the decking on the roof (See middle illustration in Figure 5).
- Although quick, this approach is fraught with potential disasters; a small breeze at an inappropriate time can wreak havoc with the job. It also effectively hides the trusses as seen from above, possibly interfering with decking nailing.
Source
Building code for the state of Florida.
Ensuring Success
When selecting a radiant barrier, look for a few common-sense characteristics:
- Suitable material for application
- Emissivity (the lower the better)
- Fire rating (Uniform Building Code (UBC) Class I, or National Fire Protection Association (NFPA) Class A, as required by building codes)
- Ease of handling
- Strength of reinforcement
- Width appropriate for installation
- Low cost
Shingle warranties should not be subject to cancellation by the manufacturer on the basis of radiant barrier installation. However, it may be wise to review the warranty to be sure that work of this nature will not void it. You may want to inquire directly of the manufacturer. Any changes in warranty should be substantiated in writing.
Safety tips for installing an attic radiant barrier system:
- If you use a ladder for access to the attic, make sure it is stable and tall enough for easy entry and exit.
- Work in the attic only when temperatures are reasonable. Attic daytime temperatures can rise far above 100°F during much of the year in the Sunbelt. Install your radiant barrier system early in the morning or wait until cool weather sets in.
- Work with a partner. Not only does it make the job go faster, it also means that you'll have aid should a problem occur.
- Watch where you walk and use a movable support surface. Step only on the attic trusses or rafters and your working surface. Never step on the attic insulation or the ceiling drywall below it.
- Step and stand only on the center of your movable working surface. Don't step on the edge; it can cause the surface to tip.
- Watch your head. In most attics, roofing nails penetrate through the underside of the roof. If you bump your head, it can cause a serious cut or puncture. If your skin is punctured by a nail, an up-to-date tetanus vaccination is a must. Avoid potential problems by wearing a hard hat.
- Be especially careful around electrical wiring, particularly around junction boxes and older wiring. Never staple through or over electrical wiring.
- Make sure that the attic space is well ventilated and well lighted. Bring in fans and extra work lights if necessary.
- If your attic has blown-in insulation, direct fans upward, away from the insulation material.
- Avoid exposure to mineral fiber insulation. Wear goggles, long pants, a long-sleeved shirt, and a particle mask or kerchief over your nose and mouth. Wear gloves if you are sensitive to fiberglass.
- Wear a tool belt or utility apron to carry staples, staple gun, scissors, measuring tape, etc.
- Take frequent breaks and pace yourself. It's better to get the job done over a longer period than to risk an accident due to fatigue or to end up with a poor-quality installation.
Region
A simple savings calculator tool is available here: Oak Ridge National Laboratory's Radiant Barrier Calculator.
Extreme Heat
Radiant barriers provide more than just energy savings in warm climates. They improve comfort inside the home, reduce wear on air-conditioning equipment, and extend the conditions in which an air-conditioning system can meet the cooling load. These benefits can be particularly valuable during heat waves, or extreme heat events.
Retrofit
SCOPE
- Install radiant barrier to underside of roof trusses or decking.
See the following Building America Solution Center guides for more information:
- Pre-Retrofit Assessment of Attics, Ceilings, and Roofs
- Pre-Retrofit Assessment of Hazardous Materials
For more information, see the U.S. Department of Energy’s Standard Work Specifications regarding radiant barriers.
DESCRIPTION
Specify product type:
- Pre-laminated radiant barrier decking
- Single- or double-sided foil
- various materials used as laminate (kraft paper, polyester, Mylar, etc.)
- scrim reinforcement or not
- Foil-faced insulation (usually used as wall insulation)
- Multi-layered foil products (usually used as wall insulation).
- “Blown in” product installed on attic floor.
A radiant barrier is defined as a product with a long-wave infrared emittance of less than 0.1 as measured by ASTM C1371.
A related product, interior radiation control coating (IRCC), has an emittance of less than 0.25 as measured by ASTM C1371.
COMPLIANCE
See Compliance tab.
More Info
References and Resources
*For non-dated media, such as websites, the date listed is the date accessed.
Contributors to this Guide
The following authors and organizations contributed to the content in this Guide.
Florida Solar Energy Center, lead for the Building America Partnership for Improved Residential Construction (BA-PIRC), a DOE Building America Research Team
Sales
Radiant Barrier = Sun Barrier

Technical Description
In sunny climates, sun beating down on the roof can cause high attic temperatures and threaten the comfort of the adjoining rooms below. It can also cause air conditioning equipment to work harder, especially if the air conditioner or ducts are located in an uninsulated attic. A sun barrier consisting of a reflective foil blanket installed on the underside of the roof rafters or a foil coating adhered to the underside of the roof decking reflects radiant heat from the sun back toward the sky. This helps minimize solar heat gain while increasing comfort and energy savings.
Questions? Comments? Contact our webmaster.