Contents
Quick Start
RED Calc Pro is a significantly upgraded version of RED Calc Free, which has been available to energy analysts, home performance specialists, low-income weatherization (WAP) technicians, and researchers for many years.
RED Calc Pro is a web application, requiring a web browser to operate. Most common browsers have the advanced features to run RED Calc Pro, but some do not. Check the section below for Supported Browsers and Devices.
What is RED Calc Pro?
RED Calc Pro is a web application that runs inside most modern browsers. (See the supported list of browsers below.) The application stores any data your enter on your device and, when connected to the internet, will sync with a copy in the cloud. When not connected to the internet, RED Calc Pro will seamlessly switch to offline mode and will automatically sync with the cloud copy whenever an internet connection is re-established.
By using RED Calc Pro, the user agrees to the "terms of use".
Supported Browsers and Devices
As of September 2019, the supported browsers and devices are listed below. If the browser you are using is not supported, we suggest you consider upgrading to a later version that is supported; this is likely to have advantages in addition to the use of RED Calc Pro.
- Chrome
- Desktop/laptop for the latest version
- Mobile for Android (v4.4+)
- Not supported for iOS (iPhone and iPad)
- Safari
- Mac: 11.1+
- Mobile for iOS iPhone and iPad: iOS 12+
- Safari not supported for PCs
- Firefox
- Desktop/laptop: Latest version
- Opera
- Desktop/laptop: Latest version
- Internet Explorer
- Not supported, with no intention to support
- Edge
- Desktop/laptop for version 80 and higher
- Mobile for Android (v4.4+)
- Not supported for iOS (iPhone and iPad)
- Lumia
- Not supported (Windows phone)
Launching RED Calc Pro
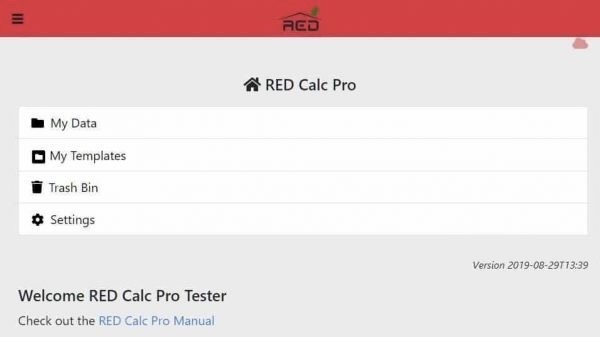
The first time you visit the RED Calc Pro web app, you'll need to click the "Register" link at the bottom to create a new account. Then return to the sign in page to log in. Once you're logged in, the application will automatically load and you should see the Home screen (see screenshot below).
Logging Out
Logging out has the effect of wiping the locally stored data and disconnecting the app from the RED Calc Pro cloud server. The primary scenario in which you may want to do this is if you logged in from a shared device, such as from a computer in a public library. In that case, you'll want to remove your data from the browser when you are done. Use the "Logout" menu option from the main menu at the top left of the app.
NOTE: You will not be allowed to log out if you have data that has not been saved to the RED Calc Pro cloud.
Bookmarks/Favorites
You may bookmark the RED Calc Pro Home screen. If you are logged out, you will be asked to provide your username (or email) and password.
You may also create a RED Calc Pro icon to your desktop or to the home screen of your mobile device. In effect, this icon is a bookmark that makes the Pro web app appear much like the other apps on your device. All you do is touch or click on the icon to go to the RED Calc Pro Home page. If you are logged out, you will be asked to provide your username (or email) and password.
On an Android device, the process of adding a webpage icon is called “Add App to Home Screen”. On an iOS (Apple) device, the process is referred to as “Add to Home Screen”. To do this, you might have to do a bit of research about the process for your particular device. Here is a link that covers a number of devices: www.howtogeek.com.
Tooltips
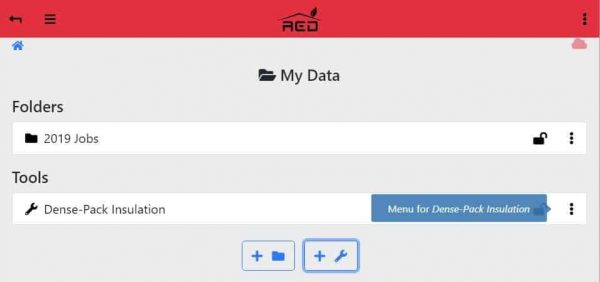
Tooltips appear when you hover over various parts of the app. You will not see these when using a touch device.
Notifications
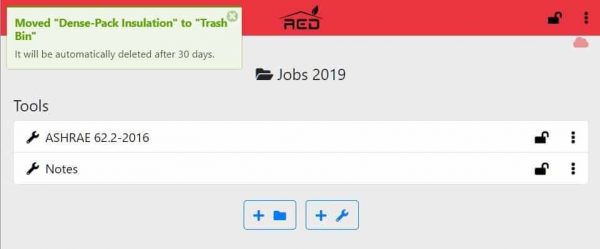
Notifications provide information about an action you have just taken that might not otherwise be apparent. For example, the screenshot below shows a notification that appeared just after sending a copy of the Dense-Pack Insulation tool to the Trash Bin. It informs you that you have 30 days in which to restore, copy, or move the tool before it is automatically deleted.
New Pro Version Notification
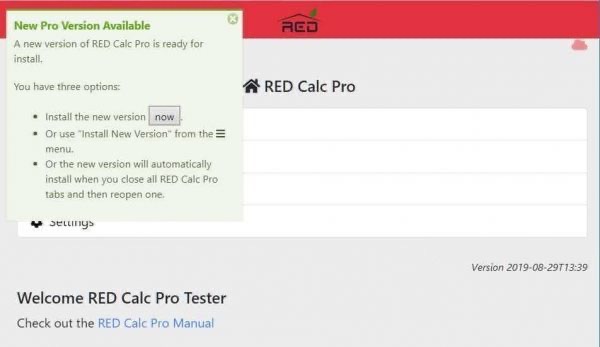
If a new version of the Pro app is available, you will see the notification in the upper left of the dialogue box of the screenshot below. If you regularly close all browser tabs with RED Calc Pro running, you might not see this notification very often because the new versions will automatically be installed for you.
Breadcrumbs
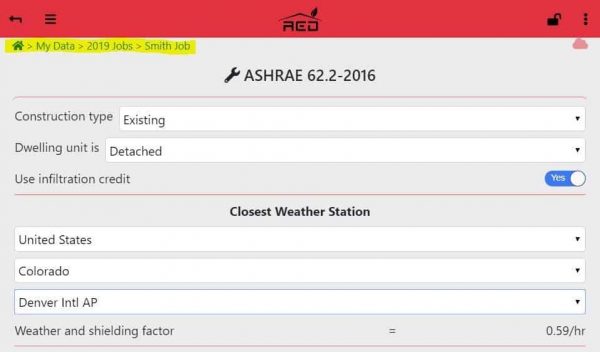
Just below the top red banner to the left, you will find a sequence of icons and/or names of folders separated by >. This gives you a visual indication of where you are within the RED Calc Pro folder hierarchy. These are the breadcrumbs, which help you move around in your folder system. You can click on any of the icons or folders to jump directly to that level. By clicking the ![]() icon in the top red banner, you can go back one level.
icon in the top red banner, you can go back one level.
The Home Screen
There are four—sometimes five—items listed on the home screen below ![]() RED Calc Pro:
RED Calc Pro:
- My Data is the top-level folder for organizing and storing your data.
- My Templates contains folders and/or tools you have pre-filled with data to be used as starting points for new folders and tools you add in My Data.
- Offline Data Recovery will show on the Home screen only under certain conditions described below.
- Trash Bin houses folders and tools that you’ve sent to the Trash.
- Settings is a collection of items that allow you to affect the way RED Calc Pro works for you.
More about each of these items below.

Main Menu 
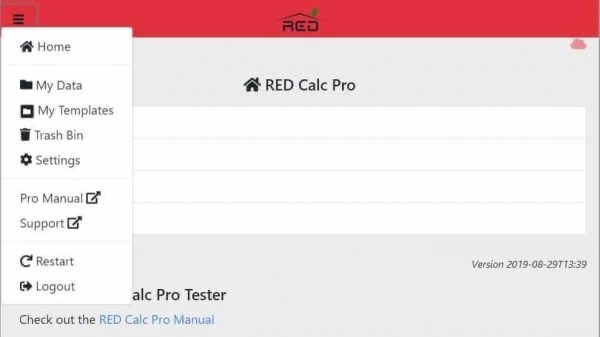
The main menu ![]() icon is always visible in the top red banner. This menu includes three items (these items do not change, as some content-sensitive
icon is always visible in the top red banner. This menu includes three items (these items do not change, as some content-sensitive ![]() menus do):
menus do):
- Home
- My Data
- My Templates
- Offline Data Recovery
- Trash Bin
- Settings
- Email for Support will attempt to open your default email client with the recipient set to redcalc@pnnl.gov.
- Pro Manual takes you to this document. This requires an internet connection.
- Restart resets your connection with the RED Cloud. This will ensure you have the latest version of the RED Calc Pro software and will synchronize your data. This can be a useful step if you are having problems with RED Calc Pro. (See Troubleshooting.) This requires an internet connection.
- Logout does what you expect: logs you out of RED Calc Pro. (See Logging out.) It also clears your locally stored data for security reasons. Logging out allows you to share your device with another RED Calc Pro user without getting your data mixed up. All your data will be loaded from the RED Cloud when you log in again. If you are not sharing your device with another user, you may prefer to remain logged in. The Logout menu item will not be available if you have offline changes that have NOT yet been saved to the RED Cloud.
RED Calc Pro Cloud 
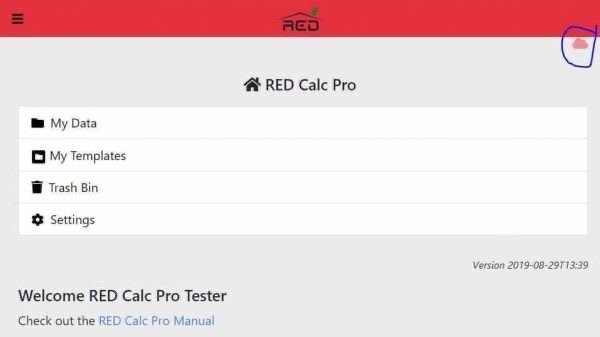
The light red cloud icon under the red banner indicates the status of the connection between the app and the RED Calc Pro server (in the cloud). The status can change very quickly, depending on what you are doing with the app. There are five possible conditions that are indicated by this icon:
- A plain cloud
 indicates the app is connected to the server but no data is being transferred.
 - An up arrow within the cloud
 indicates the app is transferring data to the server.
 - A down arrow within the cloud
 indicates that data is transferring from the server to the app.
 - A diagonal line through the cloud indicates that the app is working in offline mode. This happens whenever you do not have an internet connection. Any changes you make while working offline will be stored locally and then sent to the server whenever you re-acquire an internet connection.
My Data 
This includes all your folders and tools for your work with RED Calc Pro. We suggest you set up a folder structure that will help you organize your work and jobs with ease. You can copy/paste — move — and trash folders and tools at any time. You may also restore folders and tools from the Trash Bin. However, it is best to set up your initial folder structure in a manner that minimizes restructuring later.
What is a folder?
A folder in RED Calc Pro is a container that can hold any number of tools or subfolders. You will typically use folders within My Data to organize your work. How you do this is up to you.
For example, you could put all your jobs for 2019 inside a folder you call “2019 Jobs”. Then inside of the “2019 Jobs” folder, you can add a separate folder for each job, such as “Smith Job #1”. You can then put any tools you used on that job in this folder.

What is a tool?
Tools are the heart and soul of RED Calc Pro. A tool is used to:
- Collect, store, and document data, and
- Perform calculations on that data.
Reports are automatically generated for all tools, including the Notes tool.
My Templates 
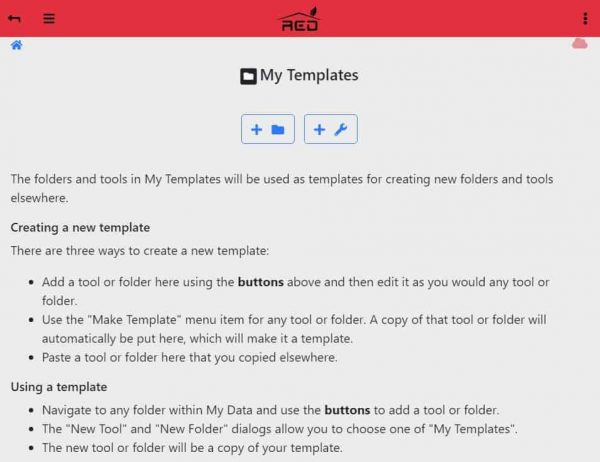
My Templates is a special folder that contains all your custom folder and tool templates. Templates are used to save time by pre-filling some of the inputs in a tool, or by pre-adding commonly-used tools to a folder. See Tool Templates and Folder Templates for more information.
Offline Data Recovery
NOTE: “Offline Data Recovery” will only show as an item on the Home screen if an offline-lockout or delete event occurs.
This folder is used in very special circumstances to avoid losing your data while working offline. Normally, any changes that you make while offline are stored locally and are synced with the server when you go back online. But if, while your device is offline, you access your account from another device and lock (“offline lockout”) or delete the folder you were working in (“delete event”), your changes cannot be saved in the original folder. If either of these unusual events occurs, we have you covered; a copy of your offline work is stored in Offline Data Recovery in a folder automatically named with the date of occurrence, such as 2019-09-28.
If this happens, “Grab” the folders and/or tools in this dated folder and “Copy Here” or “Move Here” anywhere you wish under My Data (see Folder Menu below for more information). Or, manually reconcile your offline/online data. After recovering your data, we suggest that you “trash” (more on this just below) the dated folder.
Trash Bin 
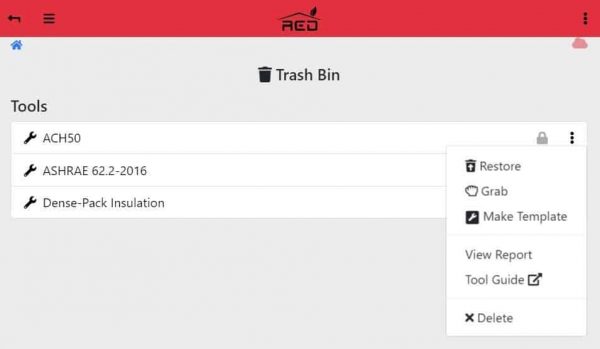
When you send a folder or tool to the Trash Bin, a notification will appear in the upper left corner of the RED Calc Pro screen. If you Trash a folder, tool, (or template), it is sent to the Trash Bin. All items in the Trash Bin are automatically locked. Once an item is in the Trash Bin, you have the following options from the folder or tool ![]() menu.
menu.
- Restore a trashed folder or tool back to its original location.
- Grab a trashed folder or tool and then navigate to another folder where you can select “Copy Here” or “Move Here” (see Folder Menu below for more information). This allows you to put a trashed folder or tool in ANY location of your choice.
- Make Template allows you to make a template of the trashed folder or tool. The folder or tool will be sent to “My Templates”. If you make a template from a trashed folder that contains tools, the tools will become part of the folder template.
- View Report takes you to the report for the particular tool. Note: This item menu item does not appear from folders in the Trash Bin.
- Tool Guide takes you to the instruction document for using a particular tool.
- Delete will permanently delete a trashed folder or tool. You will be asked to confirm your intent to delete an item; you may “OK” or “Cancel” your delete. If you delete a trashed item, no recovery is possible.
Note: If you put a folder or tool in the trash bin, it will automatically be permanently deleted after 30 days.
You may also delete all the folders and tools in the Trash Bin by using “Empty Trash” on the Trash Bin dropdown ![]() in the top red banner. You will be asked to confirm your intent to delete all Trash Bin items; you may “OK” or “Cancel” your Empty Trash choice. If you delete all the items in the Trash Bin with the Empty Trash selection, no recovery is possible.
in the top red banner. You will be asked to confirm your intent to delete all Trash Bin items; you may “OK” or “Cancel” your Empty Trash choice. If you delete all the items in the Trash Bin with the Empty Trash selection, no recovery is possible.
Settings 
Global-units default
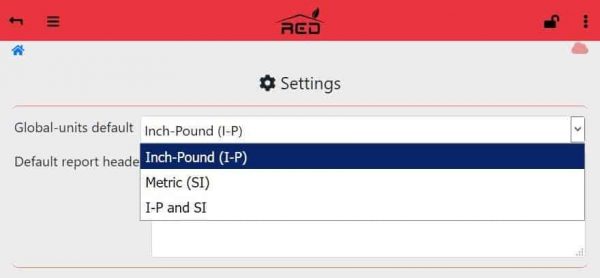
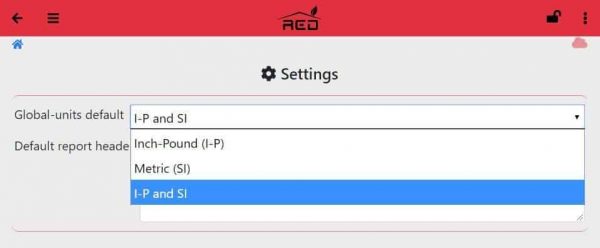
Notice in the screenshot below there is a dropdown for Global-units default with the three choices shown in the dropdown. (You can click on the input label to get context-sensitive popup help).
If you set Global-units default to:
- Inch-Pound (I-P), any tool you add after this will display I-P units (the system used in the US).
- Metric (SI), any tool you add after this will display metric units (this system used in all countries but the US).
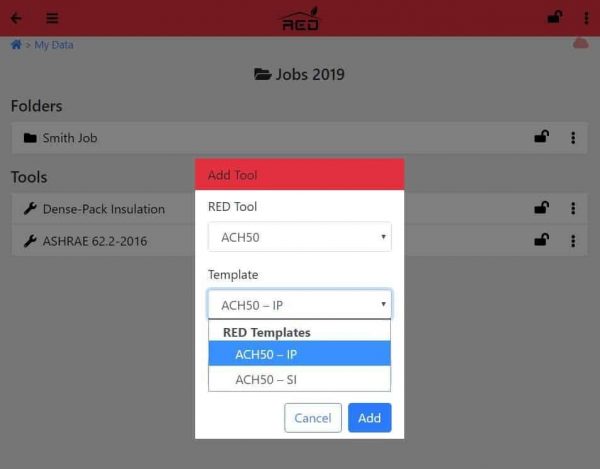
- I-P and SI, any tool you add after this will initially give a choice in the “Add Tool” dialogue of I-P or SI. If you set this as your default, each time you select a new tool, you will be given the choice of IP or SI units for that tool.
Default report header
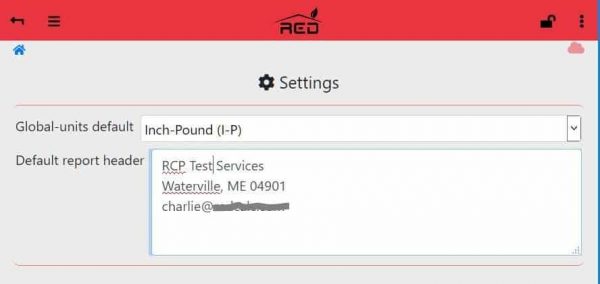
The text you include as the Default report header will be used as the initial value of the Report header input near the bottom of all tools added (from its default RED template). There are a few rules to keep in mind regarding Default report headers:
- You may edit the Default report header text for an individual tool in its Report header at any time.
- If you add or change the Default report header text in Settings, it will not affect tools that already exist in a folder; it will appear only in tools added after the change to the Default text.
- A tool added from a template in My Templates will have its Report header text set to match the template, NOT the Default report header text in Settings.
Working with Folders
The folder view shows all of its subfolders and all the tools contained in that folder.
Locking a Folder or Tool
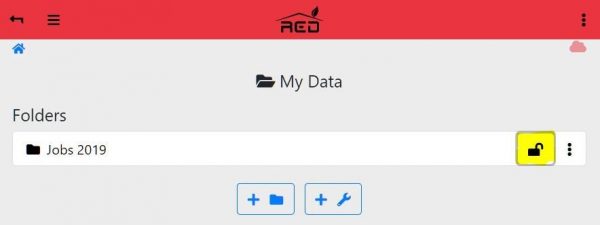
Clicking the ![]() or
or ![]() for a tool or folder will toggle between locked and unlocked states. A locked tool or folder can be viewed but not modified. Lock a tool or folder to indicate that you are finished with it and to avoid making accidental changes. You can lock/unlock an item inside a folder (see screenshot below) or you can use the lock icon in the top red banner to lock/unlock the currently opened tool or folder. Note: A subfolder or tool is automatically locked if any folder it is contained within is locked.
for a tool or folder will toggle between locked and unlocked states. A locked tool or folder can be viewed but not modified. Lock a tool or folder to indicate that you are finished with it and to avoid making accidental changes. You can lock/unlock an item inside a folder (see screenshot below) or you can use the lock icon in the top red banner to lock/unlock the currently opened tool or folder. Note: A subfolder or tool is automatically locked if any folder it is contained within is locked.
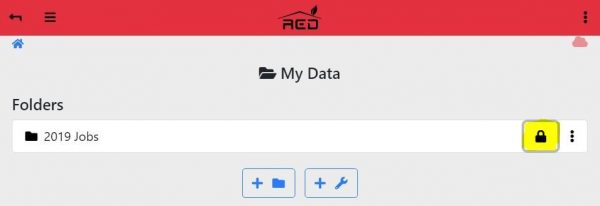
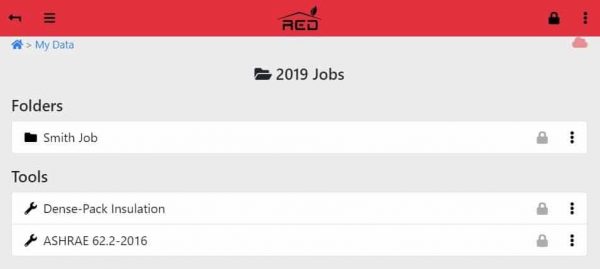
Because the “2019 Jobs” folder is locked in the screenshot below, the subfolder “Smith Job” and tools within this folder are also locked. In order to unlock these items, the “2019 Jobs” folder must be unlocked; you may not unlock the individual subfolder or tool. Notice the lock-status icon at the right in the top red banner. You may unlock the “2019 Jobs” folder and its contained folder and tools by clicking this lock, changing it to an unlocked-status icon.
An opened tool provides four indications that it is locked (all are demonstrated in the screenshot below):
- The lock icon in the red banner is in the locked state,
- You will not be able to enter or change any data,
- The data inputs are grayed out (disabled) and the toggle color is muted, and
- A lock icon will temporarily appear over an input box if you attempt to click into it, and in the “Floor area” input in the screenshot below.
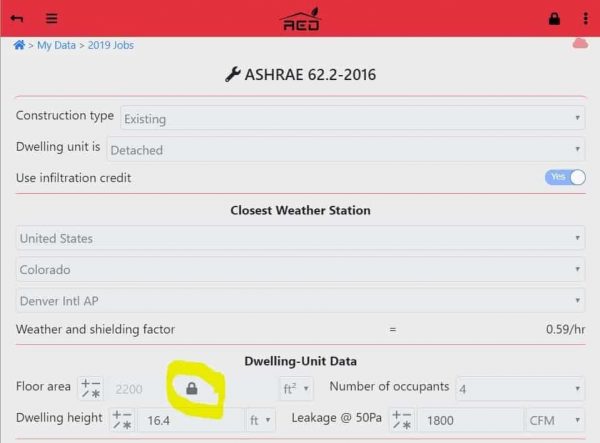
Notice the grayed-out lock icon in the top red banner in the screenshot of the tool above. Because the “2019 Jobs” folder containing this “ASHRAE 62.2-2016″ tool is locked, this lock icon will NOT allow you to unlock the tool. You must back up and unlock the “2019 Jobs” folder to unlock the tool.
Folder Menu 
An introductory note: All folders and tools must have unique names within their enclosing folder. If you attempt to give a name to a new folder or tool that is already assigned, the new folder or tool name will automatically be altered. For example, if you already have saved a tool template called “ASHRAE 62.2-2016 Smith” and you try to add another one by this name, the new tool template will be assigned the name “ASHRAE 62.2-2016 Smith (1)” to distinguish it from the other. You may change the name of any tool or folder at any time.
From the ![]() menu in the top red banner you will find:
menu in the top red banner you will find:
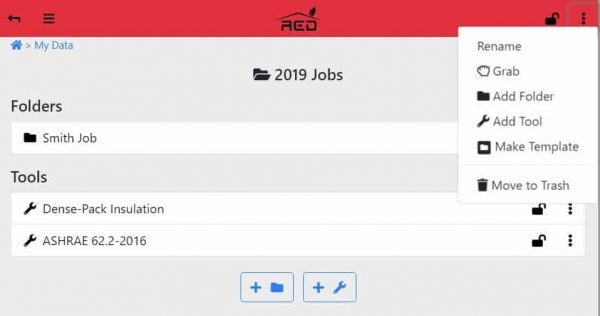
- Rename to rename the folder.
- Grab to copy folder to RED Calc Pro’s internal clipboard. You may then “Copy Here” or “Move Here” the copied folder (or tool) to any folder you wish.
- Copy Here to copy a folder or tool to another folder. This only appears in this menu if you have previously done a “Grab” of a folder or tool.
- Move Here to move a folder or tool to another folder. This only appears in this menu if you have previously done a “Grab” of a folder or tool.
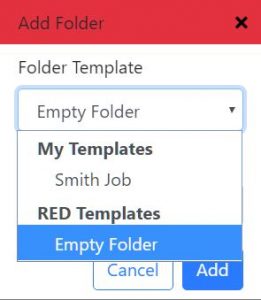
- Add Folder in order to activate the “Add Folder” dialogue box. You may select a Folder Template or Name your new folder, for example, “Sample folder”. Select “Add” to add your new folder, or “Cancel” or “X”. Note: If you have not added any folder templates, “Folder Template” will not appear in this dialogue box as a choice.
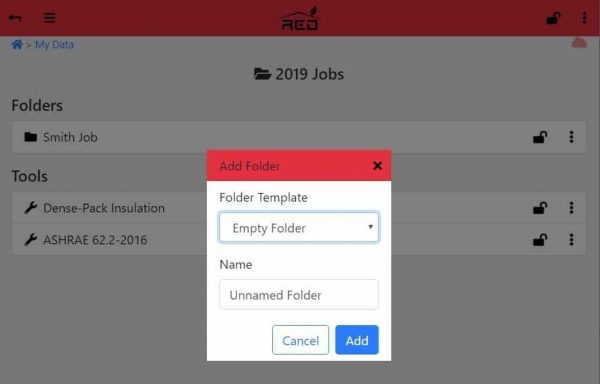
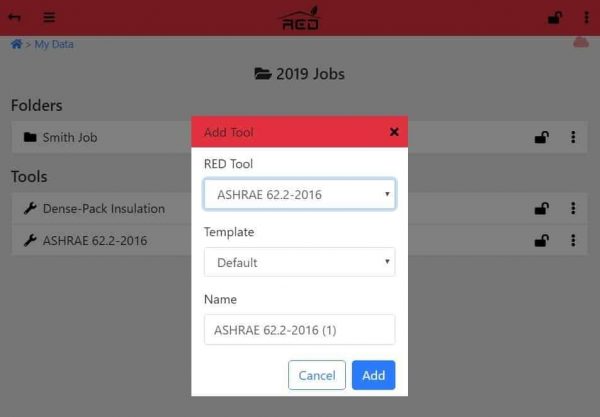
- Add Tool in order to activate the “Add Tool” dialog box. Within the dialog box,&
- Select a “RED Tool”, such as ASHRAE 62.2-2016,
- If you have previously saved one or more templates for this tool type, a “Template” input will appear. Select one of your templates to use as a starting point, or select the default RED template and,
- Enter the Name you want to use for the new tool copy.
- Note: If you have not added any tool templates of the type displayed in the “RED Tool” dropdown, “Template” will not appear in this dialogue box as a choice.
- Make Template allows you to turn the active folder into a template for later use (see Folder Templates below). This places a copy of the folder into My Templates. There is a similar choice in each tool menu.
- Move to Trash moves a folder and all of its contents, including subfolders and tools, to the Trash Bin. If you move folders or tools to the Trash Bin in error, don’t worry; you can go to the Trash Bin and “Restore” anything you put there by mistake. Refer to Trash Bin, above, for more information.
Adding a Folder
There are two ways to add a folder or subfolder:
- Use the add folder button under the last folder or tool.

- Use the “Add Folder” item in dropdown menu in the top red banner.
Folder Templates
When you make a folder into a template, you will see a notification similar to the one in the upper left of the screenshot below. In this case, the “Smith Job” with its included Dense-Pack Insulation and ASHRAE 62.2-2016 tools have been saved as a folder template.
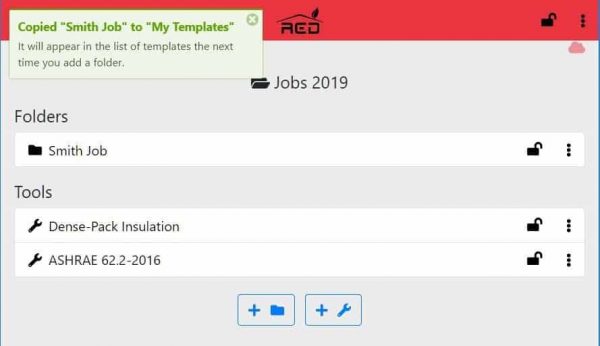
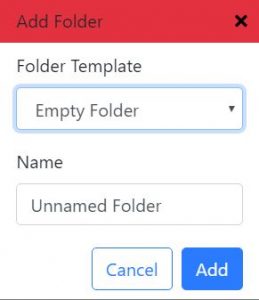
Folders added to My Templates can be used to add new subfolders. When you add a new subfolder to an existing folder, a New Folder dialog will appear and you will have the opportunity to choose a Folder Template (see screenshots below). You can either choose the built-in RED template called “Empty Folder” (an empty folder containing no subfolders or tools) and rename it under “Name”, or select a folder template of your own. If you select a folder template of your own, you may also rename it.
Example:
Suppose you frequently perform an ASHRAE 62.2 tool calculation together with a Depressurization tool calculation. You can add a new folder to My Templates, calling it “Depressing ASHRAE 62.2”. Open the new folder and add an ASHRAE 62.2 tool and a Depressurization tool. You can even enter inputs in the tools that will be there each time you use this folder/tools template. Now you can add your “Depressing ASHRAE 62.2” template anywhere in your “My Data” universe. The new folder will already have your two tools in it with the data you entered, making your next job data entry easier and faster.
Working with Tools
The RED Calc Pro tools are the reason for using the web application; they are the treasures! This section addresses the general methods of using tools. For detailed information for a particular tool, refer to that tool’s Tool Guide.
Context-Sensitive Help
If you mouse-over the label of any input or result, your mouse pointer will change to a “?”, which indicates that popup help is available. Click on the label to bring up a context-sensitive help dialogue. It is likely this content will answer most of your questions about inputs or results.

Results Info
If you click on a number result calculated by a tool, a Results info dialogue box will appear, showing the full mathematical digits of the calculated value. The screenshot below shows part of the ASHRAE 62.2-2016 tool with the Results info for the “Required mech vent, Qfan. The answer on the tool face is 33.9, whereas the more precise Results info shows 33.89513680429986, just in case you need precision. In the future, RED intends to add other useful information to this dialogue, including uncertainty values.

Math On-the-Fly
Most inputs that accept a number entry will allow you to perform a calculation within the input box. This allows you to leave an extra calculator in your desk drawer. We call this feature Math on-the-fly. Below is a sample screenshot with math on-the-fly NOT engaged for any of the three inputs where it is available. Notice the ![]() button to the left of three of the input boxes.
button to the left of three of the input boxes.

If you click or touch the  button, it turns blue
 ![]() and the input box shows related instructions below it. The available mathematical operations include “+” (addition); “-” (subtraction);”*” (multiplication); “/” (division); “^” (exponent); and “( )” parenthesis. Note that blank spaces are ignored by Math on-the-fly. For example:
and the input box shows related instructions below it. The available mathematical operations include “+” (addition); “-” (subtraction);”*” (multiplication); “/” (division); “^” (exponent); and “( )” parenthesis. Note that blank spaces are ignored by Math on-the-fly. For example:
- 4+5 = 9
- 4-5 = -1
- 4*5 = 20
- 4 * 5 = 20
- 4 / 5 = 0.8
- 4^2 = 16
- 4^3 = 64
- ((400*2)+(600*2))/4 = 500.
Notice in the screenshot below that a calculation has been entered in the “Floor area” input box.

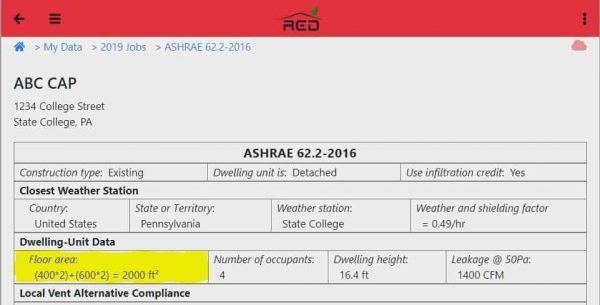
For this example, the “Floor area” input box includes “(500*2)+(600*2)” for a result of 2200 square feet. When you tab or click away from the input box, your equation will be replaced with the calculated result of “2200”. You can go back and edit the input box by clicking inside of it. You can toggle Math on-the-fly mode on or off by clicking on the ![]() button on the left of the input box. For some mobile devices, disabling Math-on-the-fly mode has the advantage of activating the number keyboard.
button on the left of the input box. For some mobile devices, disabling Math-on-the-fly mode has the advantage of activating the number keyboard.
Note that white space (blanks in your created equation) are ignored when your equation is solved, so enter blank spaces if you wish.
If you use the Math on-the-fly feature, your created equation and result will be displayed in the corresponding report. The screenshot below shows the created equation and result for “Floor area”, an input for the ASHRAE 62.2-2016 tool.
Step Controls for Inputs

When you enter an input value and Math on-the-fly is not active for that input box, on non-mobile devices, you will see an up/down arrow at the right end of the input box.
You can click on the up or down arrows to “step” (increase or decrease) your input value. We have set the step increment for each input to a reasonable value. For example, the step increment value for Floor area is 100 if the unit is set to ft2. On the other hand, if you change the unit to m2, the step increment is 10. Each time you increase or decrease your input value with a step arrow, your result(s) will recalculate immediately (if all other necessary input values are entered). This feature is very useful for determining the sensitivity of your result(s) to the input you are “stepping” or for finding out what your input(s) must be for a desired or predetermined result.
Input and Result Units
You can set “Global-unit defaults” in the “Settings” on the Home Screen. Please see the Settings section above under the title Home Screen. The “Global-unit defaults” you choose in Settings will set the units for any tool you add after you change this global setting.
The units may also be set at individual inputs or results where units are appropriate (some inputs and results are unit-less).
- Input box units: You may choose the units at each input box displaying units, but use caution. If you already have entered a number in the input box and then change the units setting, the input number will not change to reflect the change in units, however the newly selected units will be used in the calculated result(s). This is likely to give you an incorrect answer. So, change the unit in the input box before entering the corresponding value in that input box.
- Result units: You may change the result unit before or after the result is finally calculated. Changing the unit after the result is calculated will alter the answer in a manner that corresponds to the new unit.
Tool Menu
An introductory note: All tools and folders must have unique names. If you attempt to give a name to a new tool or folder tool that is already assigned, the new tools or folder name will automatically be altered. For example, if you already have saved a tool template called “ASHRAE 62.2-2016 Smith” and you try to add another one by this name, the new tool template will be assigned the name “ASHRAE 62.2-2016 Smith (1)” to distinguish it from the other. You may change the name of any tool or folder at any time.
From tool-line menu ![]() AND the
AND the ![]() menu at the right end of the top red banner, you will find menu list detailed below.
menu at the right end of the top red banner, you will find menu list detailed below.
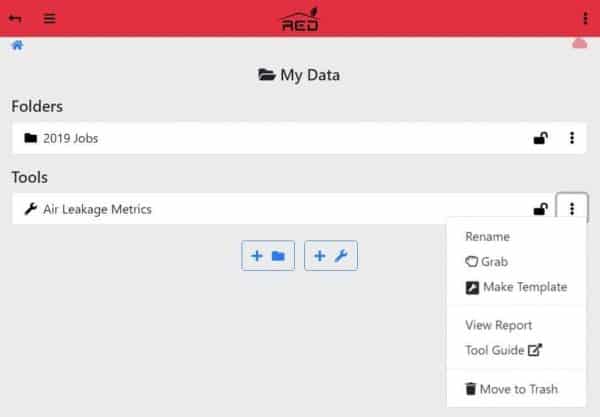
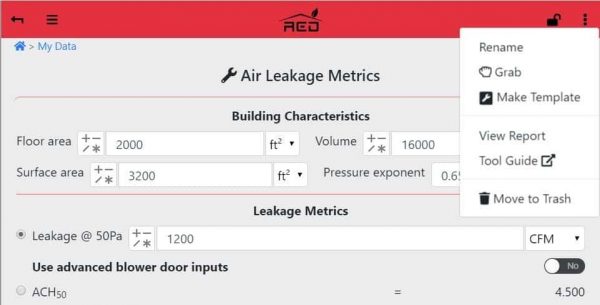
- Rename to rename any tool.
- Grab to copy a tool to RED Calc Pro’s internal clipboard. You may then “Copy Here” or “Move Here” the copied tool to any folder you wish.
- Make Template allows you to turn the active tool into a template for later use. This places a copy of the tool into My Templates.
- View Report allows you to view and make a PDF of the tool report.
- Tool Guide takes you to the guide for using the tool.
- Move to Trash moves a folder and all of its contents, including subfolders and tools, to the Trash Bin. If you move folders or tools to the Trash Bin in error, don’t worry; you can go to the Trash Bin and “Restore” anything you put there by mistake. Refer to Trash Bin, above, for more information.
Adding a Tool
There are two ways to add a tool:
- Use the add tool button under the last folder or tool.

- Use the “Add Tool” item in the
 menu at the right end of the top red banner. This is explained above in the Folder/Tool Menu section.
Whichever method you use to add a tool, the “Add Tool” dialog box will appear. Within the dialog box:
- Select a “RED Tool”, such as ASHRAE 62.2-2016,
- If you have previously saved one or more templates for this tool type, a “Template” input will appear. Select one of your templates to use as a starting point, or select the default RED template and,
- Enter the Name you want to use for the new tool copy.
Tool Report
From the tool menu for any tool, click on “View Report”. Then from the top-right dropdown ![]() menu, you will find: “Download PDF” to download a PDF version of the report.
menu, you will find: “Download PDF” to download a PDF version of the report.

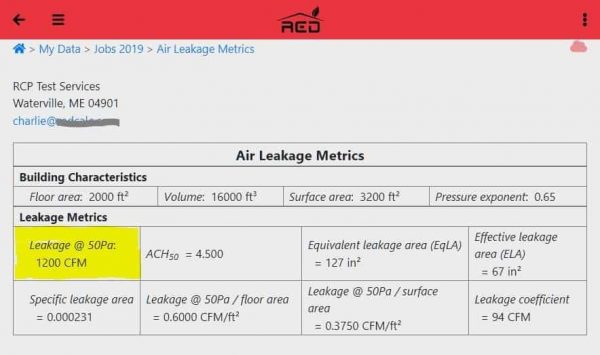
Click on the ![]() menu at the right of the top red banner to download or print the PDF file of the report.
menu at the right of the top red banner to download or print the PDF file of the report.
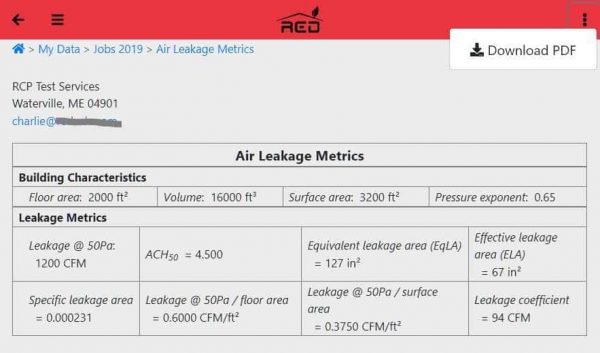
You may save or print the downloaded PDF file.
Report Info Sections
Each Pro tool has two Report Info sections at the bottom that has two text input boxes, as displayed in the screenshot below.
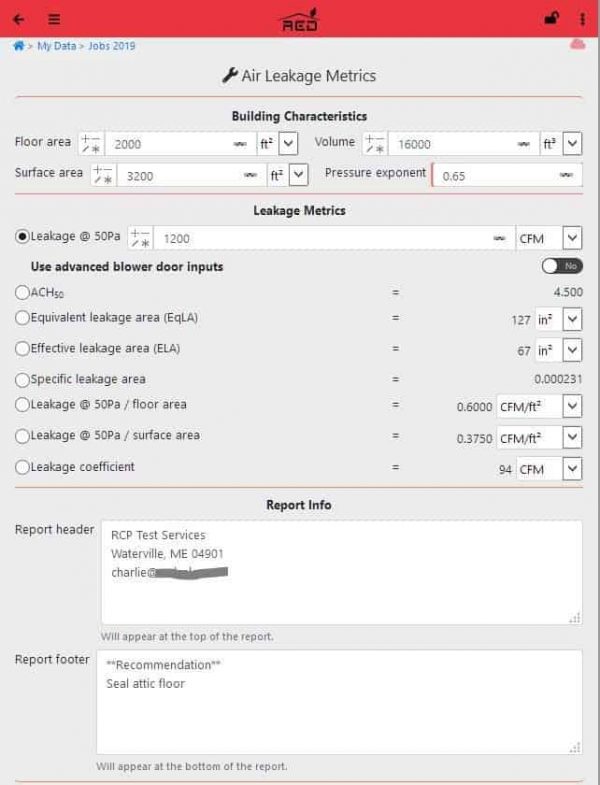
- Whatever you type in the “Report header” box will appear at the top of the tool’s report. For example, you can use this input box to display the name of your organization, your name, your contact information, and the date. Refer to Default Report Header under Settings for information about creating a default header for your reports.
- Whatever you type in the “Report footer” box will appear at the bottom of the tool’s report. For example, you could use this to display a list of recommendations.
The screenshot below is a rendering of the text included (with some Markdown code) in the Report Info above. Pre-filling these inputs in a template can be a big time saver.
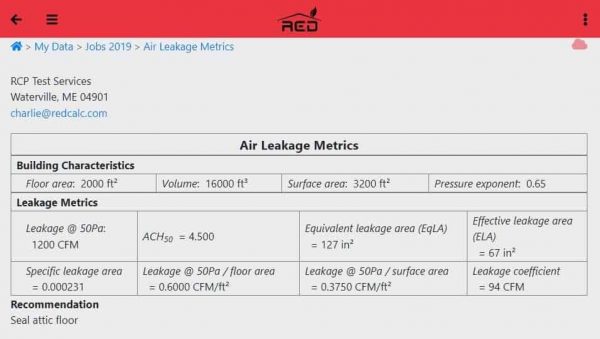
You may use Markdown, a formatting code, for the “Report header” and “Report footer” in your reports. More on this just below.
Using Markdown in Reports
The text you put in the Introduction and Comments boxes of the Report Info section of a tool can be easily formatted using Markdown, a quick and easy way to format text. For example, if you type **My Recommendations** in the Report header or Report footer of a tool, it becomes My Recommendations in your report. Here are some other examples of Markdown:
These may be used anywhere in a line of text:
32 ft^2^ becomes 32 ft2
2000 CFM~50~ becomes 2000 CFM50
**Bold** becomes Bold
*Italics* becomes Italics
***Bold Italics*** becomes Bold Italics
++Underline++ becomes Underline
~~Strikethrough~~ becomes Strikethrough
For a blank line in your text (for example, just before a new section of your report), insert “ ” without the quotation marks.
The following must start at the beginning of a line:
### Header becomes Header
#### Header becomes Header
##### Header becomes Header
###### Header becomes Header
– [x] Test becomes ![]() Test
Test
– [ ] Test becomes ![]() Test
Test
My unordered list of...
– Name
– Age
– Mary
– Lew
Becomes...
- Name
- Age
- Mary
- Lew
My ordered list of...
1. Name
2. Age
3. Address
4. Email
Becomes...
- Name
- Age
- Address
Once you get the hang of it, we think you will find it easy, fast, and powerful.
Tool Templates
Tools in My Templates can be used to initialize new tools you add in other folders. When you add a new tool to an existing folder, an Add Tool dialog will open and you will have the opportunity to choose a template for the tool. You can either choose the built-in RED template or one of your own. You may make a template of a tool in one of two ways:
- From the tool-line
 menu, select “Make Template”. This is shown in the first screenshot below, or
 - From the top red banner
 menu with the tool selected, select “Make Template”. This is shown in the second screenshot below. (The dropdown banner menu does not show in this screenshot.)
 - From My Templates, you may add a tool directly.
In the first screenshot, the ASHRAE 62.2-2016 tool-line ![]() menu item “Make Template” has been selected. (The dropdown tool-line menu does not show in this screenshot.) Notice the notification in the upper left indicating the ASHRAE 62.2-2016 tool been copied as a template in the My Template section of the home screen.
menu item “Make Template” has been selected. (The dropdown tool-line menu does not show in this screenshot.) Notice the notification in the upper left indicating the ASHRAE 62.2-2016 tool been copied as a template in the My Template section of the home screen.
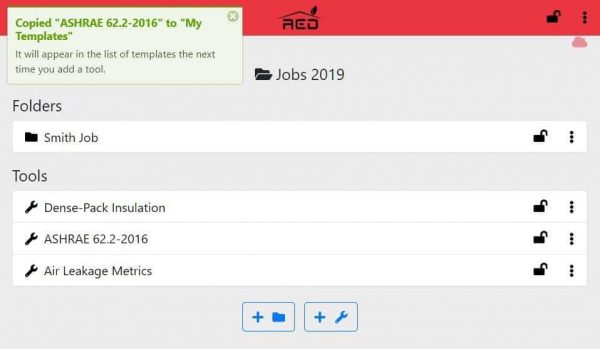
Any data entered in the copied tool—such as local weather data—will become part of the template tool, so consider naming it appropriately, for example, “ASHRAE 62.2-2016 Portland, Maine”. You may edit a tool template at any time by opening and changing it in My Templates.
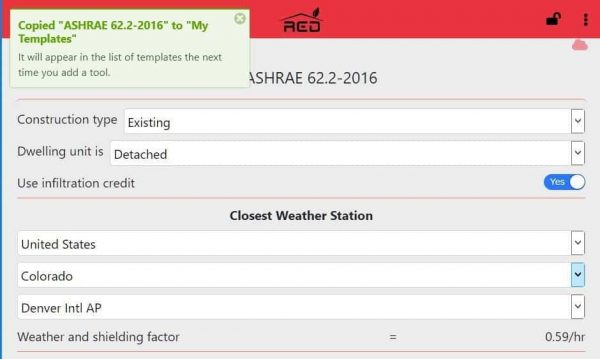
It is a good idea to add as many repeating inputs as possible before you make a tool template. This will save you significant time when you use the template.
Note: All folders and tools must have unique names. If you attempt to give a name to a new folder or tool that is already assigned, the new folder or tool name will automatically be altered. For example, if you already have saved a tool template called “ASHRAE 62.2-2016 Smith” and you try to add another one by this name, the new tool template will be assigned the name “ASHRAE 62.2-2016 Smith (1)” to distinguish it from the other. You may change the name of any tool or folder at any time.
If you have selected the Global-units default of “IP and SI” (see first screenshot below), an additional template choice will appear in the template menu (see second screenshot below). This gives you the option of selecting either I-P or SI units for each tool you use.
Notes Tool
The Notes tool, found in the tools menu, allows you to enter any text to be saved for future reference. (You can use Markdown for formatting the report. See the “Using Markdown in Your Report” section above.) This tool—yes, this is a tool, just like the other tools—can serve many purposes. You may:
- Name it “Customer Contacts” and put the customer’s contact information in it.
- Name it “Combustion Safety Test” and put your notes for your combustion safety test in it.
- Make one for any inspection that you perform.
- Name it “Recommendations” and include all your recommendations for the job.
Remember, you can make any tool—including the Notes tool—into a template for time-saving re-use. Below is a sample screenshot of a filled-in Notes tool, including the body (Notes), the Report header, and the Report footer. If you don’t include any text in a section, nothing will appear in the rendered report.
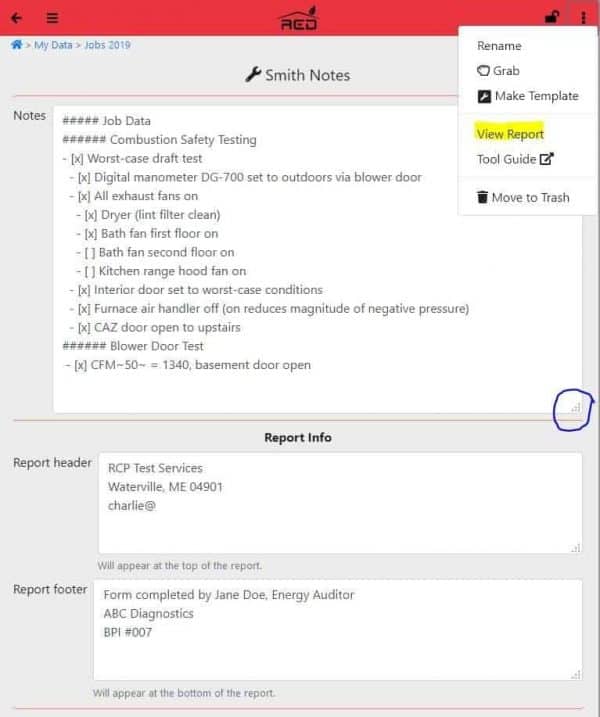
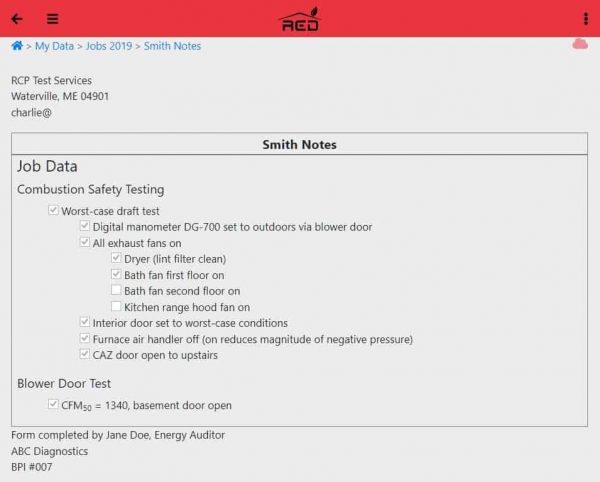
Creating tool templates from “Notes” with pre-filled boilerplate text for your common uses can be a significant time-saver. At RED we include a “note” with every folder including details about that folder and often include one for each tool.
Miscellaneous Topics
Working with Multiple Tabs or Windows
You may, at the same time, have more than one tab or window open with RED Calc Pro. Your changes between tabs/windows will be synchronized. It is important that the multiple tabs/windows are all using the same browser. Situations where this can be helpful include:
- Working with multiple tools. For example, you might want to have both the ASHRAE 62.2-2013 and ASHRAE 62.2-2016 tools open for comparison.
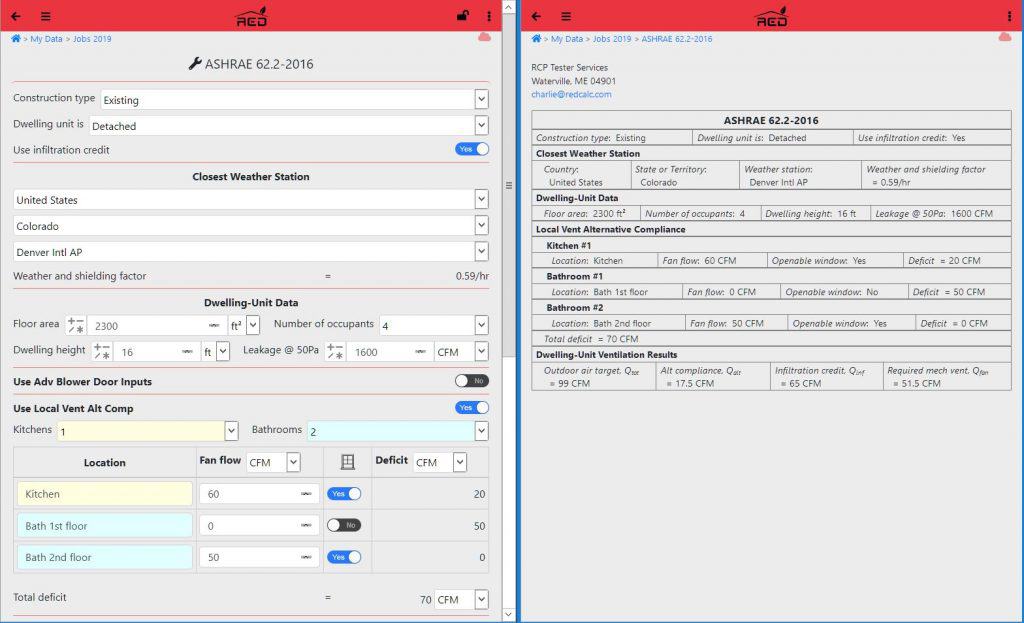
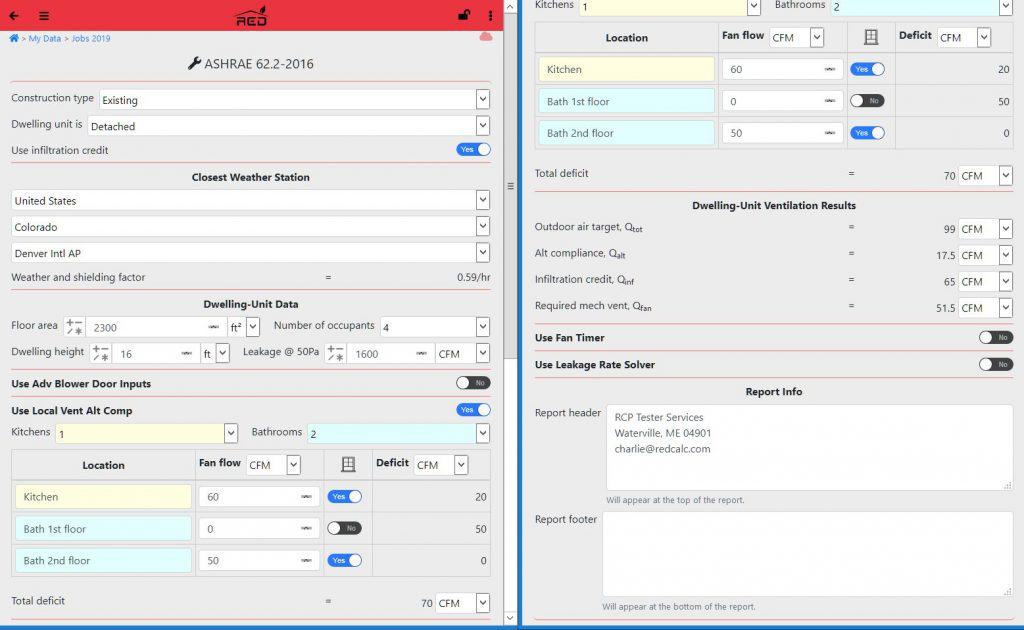
- For a tool that is too long to fit in a window without scrolling, you might find it useful to open two side-by-side windows with one window showing the top of the tool and the other showing the bottom of the tool. Note: One window or tab will sync with changes in the other. This is a very helpful feature.
- You can view a tool and its report in side-by-side windows. The report will immediately reflect any changes you make to the tool. You can also put a RED tool with its report side-by-side as you enter your text in the Report header or Report footer of any tool or the Notes section of the Notes tool. This is especially useful if you are using Markdown in a tool and want to make sure it is rendering correctly in your report.
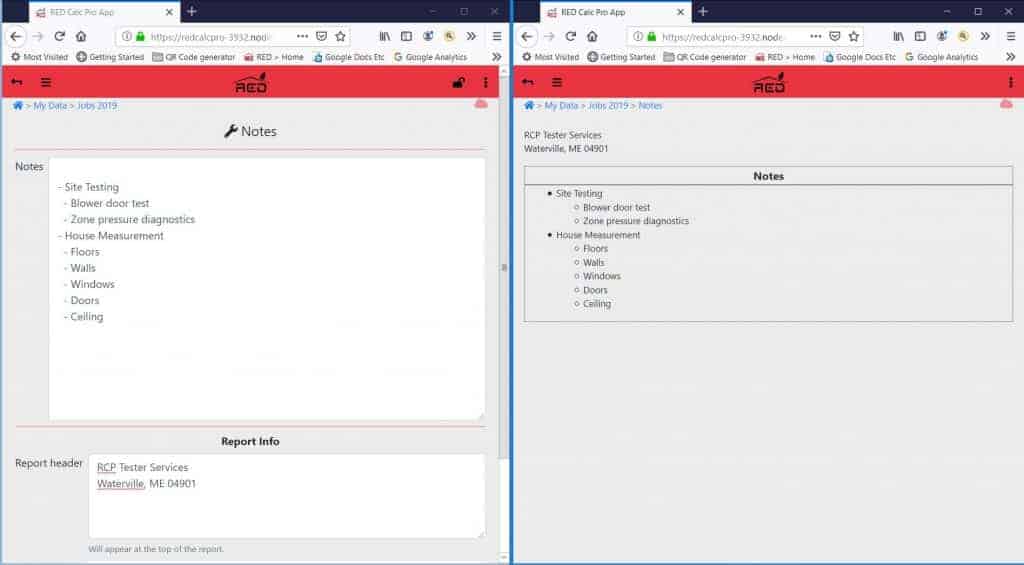
With Google Chrome, you may add a duplicate tab of a tool screen/view by right-clicking on the tab and selecting “Duplicate”. To duplicate a tab when using the Firefox browser, right-click on the tab and then select “Duplicate Tab”. Most other browsers work in about the same way for opening another copy of a RED Calc Pro tool or view.
Troubleshooting
Before you contact us, please try each of the simple fixes below. If none solve your issue, contact us.
- Do you have an internet connection? If not, you can work offline with the RED Calc Pro app, but some features will not function until you again have an internet connection.
- Does your internet browser work with the RED Calc Pro app? Not all of the cutting edge features of the RED app are supported by all browsers. Check Supported Browsers and Devices for a current list of compatible browsers and devices and use the real-time Test for Browser Compatibility widget.
- Check our Known Issues page for information.
- Try refreshing the browser window. This is done with most browsers by clicking
 .
. - Try “Restart” in the main RED Calc Pro app menu, indicated by
 in the top red banner. This menu icon is always visible.
 - Try closing all browser tabs/windows you are using for RED Calc Pro. Then re-launch RED Calc Pro in a new tab/window.
- Try Logging out and then logging back into the app.
- Send support emails to redcalc@pnnl.gov.