

There are many situations that may prompt a decision to replace or upgrade an existing HVAC system:
Poor Performance: The purpose of the HVAC system is to provide space conditioning and good indoor air quality (IAQ.) To accomplish this, the system must be designed to provide heating, cooling, and ventilation while providing for control of temperature, humidity, filtration, ventilation, distribution, and noise. The system must also be durable and operate cost-effectively to provide value to the home owner.
A general HVAC system assessment is recommended if you notice any of the following issues:
- poor comfort control due to fluctuating temperatures, uneven temperatures, or inability to reach or maintain temperature set points.
- poor comfort control due to drafts
- staleness or slow moisture and odor removal due to lack of ventilation
- excessive illness – coughs, colds, bronchitis, asthma, headaches, sore throat, dizziness
- poor humidity control – too dry or too moist
- excessive system noise
- high energy bills or sudden increases in energy use and run-time not due to weather.
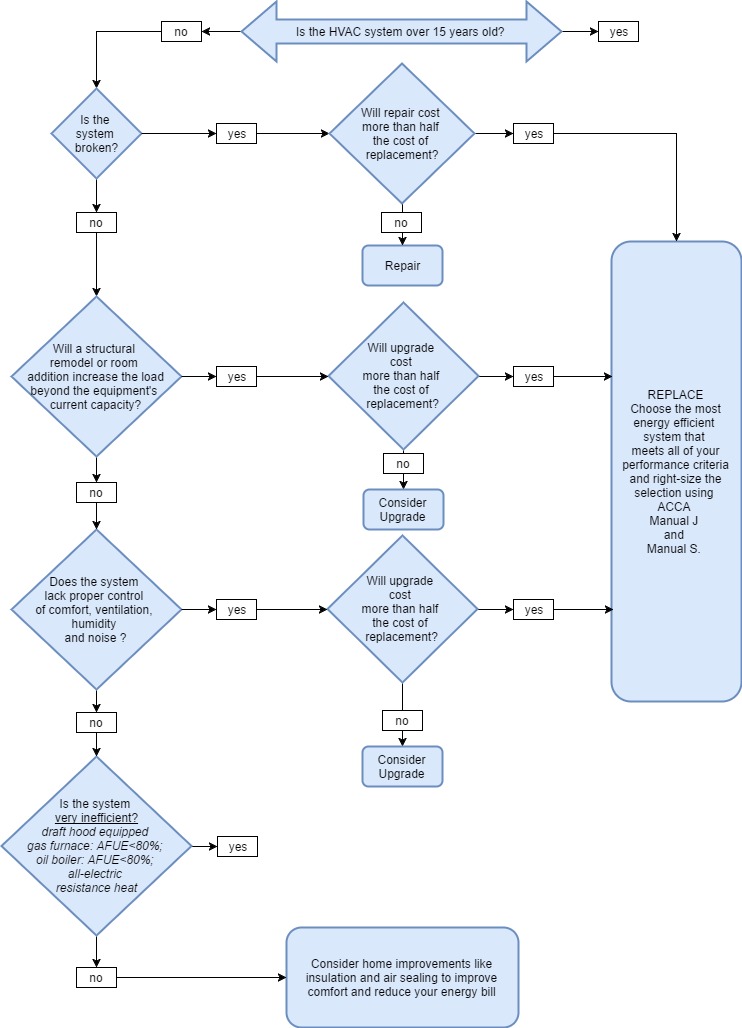
End-of-Life: Furnaces, air conditioners, boilers, and heat pumps have finite useful lifespans, like all mechanical equipment. When a piece of HVAC equipment breaks down, it needs to be repaired or replaced. Even if the equipment is still operating, it’s likely to need adjustment to operate efficiently as it ages. Signs that an HVAC system is nearing the end of its useful life include reduced comfort, increased energy use, or both. In some cases, newer equipment options may be available that are so much more efficient that it may make sense to replace existing equipment even if it is still functional. Generally, residential HVAC equipment more than 15 years old can be assumed to be near the end of its useful life. If performance falls off or if the equipment breaks down after this period, only minor, low-cost repairs are financially justifiable. Table 1 lists average lifespans for HVAC equipment and components.
| A/C Window Unit | 10 |
| Single or Split package unit | 15 |
| Air-to-Air Heat Pump | 15 |
| Electric Boiler | 15 |
| Burners | 21 |
| Furnace, gas or oil-fired | 18 |
| Unit Heater, gas or electric | 13 |
| Electric Radiant heaters | 10 |
| Hot Water Radiant heaters | 25 |
| Diffusers, grilles and registers | 27 |
| Ductwork | 30 |
| Dampers | 20 |
| Fans, centrifugal | 25 |
| Fans, axial | 20 |
| Fans, propeller | 20 |
| Coils, DX, water or steam | 20 |
| Coils, electric | 15 |
| Heat exchangers, shell and tube | 24 |
| Reciprocating compressors | 20 |
| Air-cooled condensers | 20 |
| Evaporative condensers | 20 |
| Insulation, molded | 20 |
| Insulation blanket | 24 |
| Pumps, sump and well | 10 |
| Pumps, condensate | 15 |
| Electric motors | 18 |
| Motor Starters | 17 |
| Electric Transformers | 30 |
| Controls, pneumatic | 20 |
| Controls, electronic | 16 |
| Controls, electric | 15 |
| Valve actuators, hydraulic | 15 |
| Valve actuators, pneumatic | 20 |
| Valve actuators, self-contained | 10 |
Addition and Expansion: When a structural addition is planned for a building, new equipment may be needed to meet the increased heating and cooling loads. If the expansion can’t be accommodated by, or coordinated with, the existing system, there are two options: 1) Replace the old system with a new, possibly different, type of system that can meet the load of the entire building including the new spaces; or 2) Install a dedicated system to independently heat and cool the new addition.
Building Energy Upgrade: Some renovations improve the performance of windows, walls, and roofs, which decreases the building’s annual energy use as well as its peak loads. Existing equipment may then be oversized and may run inefficiently at these new lower heating and cooling loads, resulting in poor comfort control and energy performance. Newer equipment is available in higher efficiencies and smaller capacities, and with the capability for part-load performance, which can help with “right-sizing” to better match the reduced loads. Another consequence of energy-efficiency improvements that can have significant impacts on HVAC equipment is tightening of the building envelope, which can reduce “natural ventilation” (previously occurring through air leaks). This could result in poor air quality and moisture problems, and might even cause combustion safety issues if naturally vented combustion appliances are located within the building envelope of the home. Correcting these issues may require adding venting and/or ventilation.
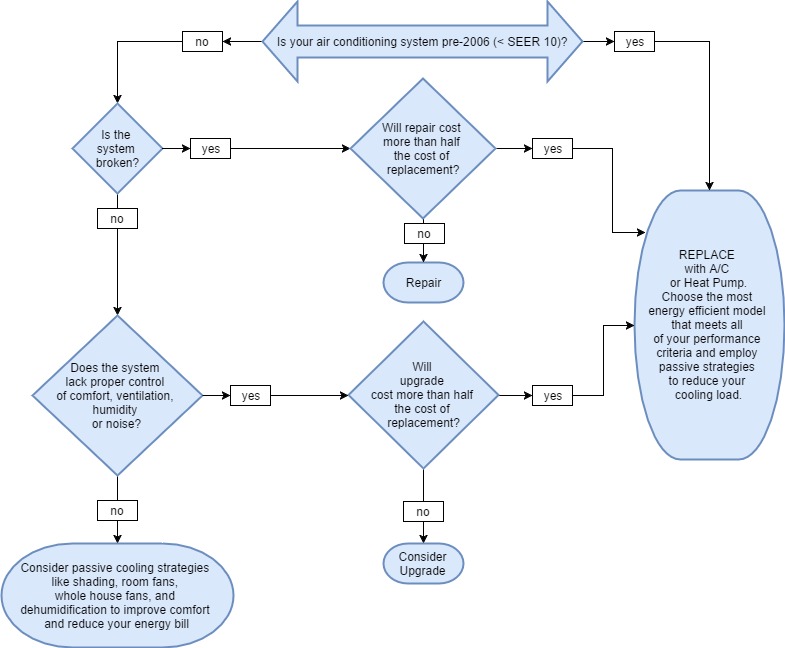
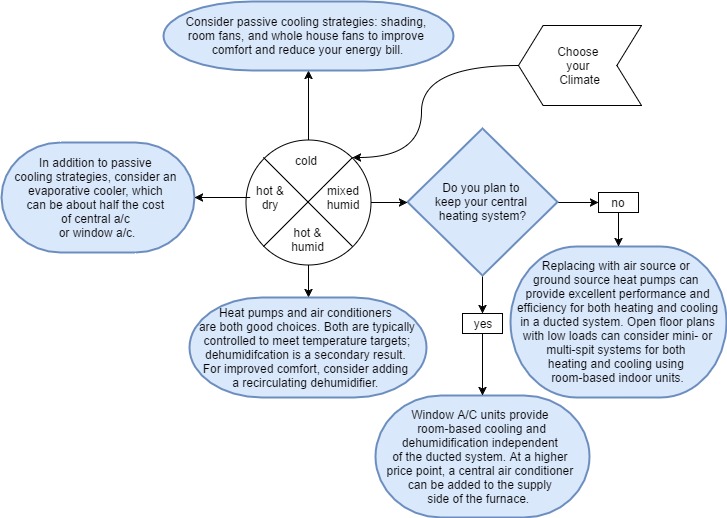
Often a homeowner is already primed for complete replacement. For an HVAC system that is clearly underperforming with respect to comfort and energy efficiency, it may not be necessary to conduct a detailed investigation of the existing equipment and distribution conditions to confirm that replacement is the right choice. In other cases, the choice is not as clear. Figures 1, 2, and 3 below are decision trees to help guide you through the thought processes for replacing or refurbishing heating and cooling systems.
Should I replace my existing HEATING system?
Should I replace my existing COOLING system?
Should I add COOLING to my existing system?
The least-cost option (from a first-cost although not life-cycle cost perspective) is to keep the existing system and tune it up. If the HVAC system does not need to be replaced entirely or substantially upgraded, there are still opportunities to improve comfort and energy performance through retro-commissioning and full system maintenance.
The first option is retro-commissioning. It’s important to verify that the system is operating in accordance with manufacturer specifications and to ensure that reasonable expectations for safety, durability, and energy efficiency are met. The equipment is only as good as the installation and startup, and it’s not uncommon for proper commissioning to have been neglected at the initial installation.
The following ENERGY STAR Checklists are helpful:
- ENERGY STAR HVAC Commissioning Checklist: 1. Commissioning Overview
- ENERGY STAR HVAC Commissioning Checklist: 2. Refrigerant Charge
- ENERGY STAR HVAC Commissioning Checklist: 3. Indoor HVAC Fan Airflow
- ENERGY STAR HVAC Commissioning Checklist: 4. Air Balancing of Supply Registers & Return Grilles
The second option is full system maintenance. Maintenance is often deferred by home owners who don’t understand the strong relationship between general maintenance and performance. The Air Conditioning Contractors of America Association, Inc. (ACCA) is one of the best sources for guidance on the installation, commissioning, and maintenance of HVAC equipment. Their free Quality Standards can be found on the ACCA website, The Indoor Environment & Energy Efficiency Association. Useful documents available for download from the ACCA website referenced above include the following:
- HVAC Quality Installation Specification (English)
- Existing Home Evaluation & Performance Improvement
- HVAC Quality Installation Verification Protocols
- Quality Maintenance of Residential HVAC Systems
- HVAC System Cleanliness & Restoration.
In the case where conditions do not quite meet the replacement criteria as outlined in the decision trees, it may make sense to upgrade or expand the home’s HVAC system. For example, if an addition is being added to the home, and the current HVAC system is only a few years old, it may be possible to just add ducts to extend conditioning to the addition. If considering this, confirm that the current heating and cooling equipment has sufficient capacity and that the trunk ducts are large enough to handle increased air flow. If the current system does not have available capacity, a stand-alone system can be installed to serve only the new space. If an otherwise functioning and reasonably efficient heating and/or cooling system lacks proper humidity control or doesn’t address ventilation needs, these deficiencies could be addressed by adding a dehumidifier or fresh air intake with controls to the forced-air system. For such cases, refer to the Building America Solution Center guides Whole-House Dehumidification and Whole-Building Delivered Ventilation.
Generally, residential HVAC systems more than 15 years old can be assumed to be near the end of their useful life. If HVAC equipment breaks down or performance falls off after 15 years, only minor, low-cost repairs are financially justifiable. See the decision trees in Figures 1 through 3 for replacing heating and cooling equipment. Individual components and the complex systems in which they are installed do not necessarily have the same expected useful life spans. Table 1 above gives the typical lifespans of many of these components.
Tables 2 and 3 provide typical purchase and installation costs, minimum federal efficiencies, and other useful information about common heating and cooling system options, and cost-saving estimates for replacing heating and cooling equipment. If the energy efficiency rating of the current system is known, use the calculators in Tables 4 and 5 to get an estimate of how much money can be saved in heating and cooling costs by upgrading to a higher efficiency system. The nameplate on the current equipment may list efficiency information, such as the seasonal energy efficiency ratio (SEER), energy efficiency ratio (EER), or annual fuel utilization efficiency (AFUE). If not, the manufacturer and model number can be searched on the internet.
| Fuel Type | Installed Costs * | Ducts or No Ducts | Central or Room Heating | Best Climates | Minimum Federal Efficiency Requirement | Expected Efficiency of High-Performing Models | ENERGY STAR Version 3.0 Minimum Efficiency ** | |
|---|---|---|---|---|---|---|---|---|
| Furnace | Natural Gas, Fuel Oil, Propane | $2,000 to $10,000 | Ducts | Central | Moderate-Cold | Gas: 80% AFUE Oil: 83% AFUE | 92% - 98% AFUE | Gas: 90% AFUE CZ 1-3 95% AFUE CZ 4-8 Oil: 85% AFUE |
| Electric Resistance | Electricity | $2,000 or less | Either | Either | Warm-Hot | - | 100% | NA |
| Air Source Heat Pump | Electricity | $2,000 to $10,000 | Ducts | Central | Moderate-Warm | 8.2 HSPF | 12-14 HSPF 200+% | 8.5 HSPF |
| Ground Source Heat Pump | Electricity | $10,000 or more | Ducts | Central | All | 8.2 HSPF 3.0 to 4.1 COP | 3-5 COP 300+% | 3.0 to 4.1 COP |
| Ductless Mini-Split Heat Pump | Electricity | $2,000 to $10,000 | No Ducts | Room Heating | All | 8.2 HSPF | 12-14 HSPF | 8.5 HSPF |
| Boiler (Steam or Hot Water) | Natural Gas, Fuel Oil, Propane | $4,500 to $10,000 | No Ducts | Central | Cold | Steam*** Gas: 80% AFUE Oil: 82% AFUE Hot Water*** Gas: 82% AFUE Oil: 84% AFUE | 90% - 95% AFUE | Gas: 90% AFUE Oil: 87% AFUE |
* See https://www.energysavers.gov Annual Fuel Utilization Efficiency (AFUE): AFUE is the amount of fuel converted to space heat in proportion to the amount of fuel entering the boiler or furnace, expressed as a percentage. It does not include the electricity consumption of the fan controls. Coefficient of Performance (COP): COP is a measure of efficiency for heat pumps in the heating mode that represents the ratio or total heating capacity to electrical energy input. For example, if a heat pump has a COP of 3, it will deliver three units of energy for every one unit of electricity consumed. Heating Seasonal Performance Factor (HSPF): HSPF is a measure of a heat pump's energy efficiency over one heating season. It represents the total heating output of a heat pump (including supplementary electric heat) during the normal heating season (in Btus) as compared to the total electricity consumed (in watt-hours) during the same period. | ||||||||
| Fuel Type | Cost1 | Ducts or No Ducts? | Central or Room Cooling | Operates as a Heater in Winter | Federal Minimum Efficiency Requirement2 | ENERGY STAR Minimum Efficiency (v5.0)3 | |
|---|---|---|---|---|---|---|---|
| Ducted Central AC (split) | Electricity | $1,500 to $4,5007 | Ducts | Central | No | SEER 13 SEER 144 SEER 12.25 EER 11.76 | SEER 15 EER 12.5 |
| Room Air Conditioning (window unit) | Electricity | $1,500 or less | No Ducts | Room | No | CEER 8.5 to CEER 9.72 | CEER 9.9 to CEER 12.1 |
| Air Source Heat Pump (split) | Electricity | $1,500 to $10,000 | Ducts | Central | Yes | SEER 144 EER 12.25 EER 11.76 | SEER 15 EER 12.5 |
| Ground Source Heat Pump (split) | Electricity | $10,000 or more | Ducts | Central | Yes | SEER 14 | EER 14.1 to 21.1 COP 3.0 to 4.1 |
| Ductless Heat Pump (mini-split) | Electricity | $4,500 to $10,000 | No Ducts | Room | Yes | SEER 14 | SEER 15 EER 12.5 |
1Estimated typical installed costs; does not include adding or repairing ducts. https://www.energysavers.gov Seasonal Energy Efficiency Ratio (SEER): SEER is a measure of equipment energy efficiency over the cooling season. It represents the total cooling of a central air conditioner or heat pump (in Btu) during the normal cooling season as compared to the total electric energy input (in watt-hours) consumed during the same period. Energy Efficiency Ratio (EER): EER is an efficiency rating for room air conditioners based on how many Btus of heat per hour the unit can remove for each watt of power it draws. This ratio is expressed in Btu per hour per watt (Btu/hr/watt). Combined Energy Efficiency Ratio (CEER): CEER is the new standard by which window air conditioners are rated by the DOE (Department of Energy) as of June 2014, which incorporates standby energy consumption. | |||||||
| Existing System AFUE | New/Upgraded System AFUE | ||||
|---|---|---|---|---|---|
| 75% | 80% | 85% | 90% | 95% | |
| 50% | $33 | $38 | $41 | $44 | $47 |
| 55% | $27 | $31 | $35 | $39 | $42 |
| 60% | $20 | $25 | $29 | $33 | $38 |
| 65% | $13 | $19 | $24 | $28 | $32 |
| 70% | $7 | $13 | $18 | $22 | $26 |
| 75% | - | $7 | $12 | $17 | $21 |
| 80% | - | - | $6 | $11 | $16 |
| 85% | - | - | - | $6 | $11 |
| 90% | - | - | - | - | $5 |
| * Assuming the same heat output | |||||
| Existing System SEER | New/Upgraded System SEER | |||||||
|---|---|---|---|---|---|---|---|---|
| 13 | 14 | 15 | 16 | 17 | 18 | 19 | 20 | |
| 10 | $23 | $29 | $33 | $38 | $41 | $44 | $47 | $50 |
| 11 | $15 | $21 | $27 | $31 | $35 | $39 | $42 | $45 |
| 12 | $8 | $14 | $20 | $25 | $29 | $33 | $37 | $40 |
| 13 | - | $7 | $13 | $19 | $24 | $28 | $32 | $35 |
| 14 | - | - | $7 | $13 | $18 | $22 | $26 | $30 |
| 15 | - | - | - | $6 | $11 | $17 | $21 | $25 |
| 16 | - | - | - | - | $6 | $11 | $16 | $20 |
| * Assuming the same heat output | ||||||||
If the decision is made to fully replace the home’s HVAC system, refer to the following Building America Solution Center guides for more information. Check the “Existing Buildings” tab in each guide for retrofit guidance:
Replacing with the Same Type of System
The easiest approach is to replace the system “in-kind” with a more modern version of the same type of equipment. Sometimes the distribution system – typically air ducts and registers and grilles - can be re-used as is, or modified to accommodate the new equipment’s capacity and airflow. When a major component in either the outdoor or indoor unit of a traditional heat pump system or air conditioner fails, both units should be replaced because newer equipment is carefully matched for optimal efficiency and operating pressures. Ideally, the line-set should also be replaced to avoid contamination of a new refrigerant with traces of incompatible fluids.
Replacing with a Different Type of System
Another approach is to change to a different type of system entirely, which could offer an improved or expanded range of performance capabilities. Note that changing to a completely different system is expensive, since it requires not only new equipment, but often a different distribution system, as well.
The following may be compelling reasons to make this choice, even if energy savings do not cover the entire cost of the change:
- Switch from site fossil fuels to electricity to reduce greenhouse gas emissions and/or take advantage of a solar photovoltaic system.
- Switch from electricity to site fossil fuels for resiliency or cost reasons.
- Improve comfort and coverage, and reduce noise.
- Eliminate room-based terminal devices for aesthetic reasons.
- Change from an air-based system to a radiant system.
- Add integrated cooling capability.
- Add integrated ventilation capability.
- Take advantage of a major renovation combined with the current system’s end-of-life.
- Switch from central forced air to mini-split heat pump system for zoned control of heating and cooling and greater efficiency.
- Switch to smaller or variable-capacity systems to better meet reduced load due to insulation and air sealing improvements.
If a complete HVAC system change is considered, be sure to choose the highest efficiency option that meets your needs and budget. Generally, a new HVAC system should always be equipped with a new, programmable thermostat. Table 6 lists several common heating and cooling systems and the pros, cons, and other factors to consider when switching from one system to another.
| If your ORIGINAL system is... | REPLACEMENT system is... | ||||||
|---|---|---|---|---|---|---|---|
| Furnace | Furnace with Central A/C | Air Source Heat Pump | Ground Source Heat Pump | Mini-split or Multi-split Heat Pump | Electric Resistance (baseboard convectors, radiant panels, unit heaters) | Hydronic Radiant (floor, ceiling panels, radiators) | |
| Furnace | - | Add cooling capability; likely able to re-use ducts | Adds outdoor unit; adds cooling capability; ductwork may be reusable with modification; switch to electric fuel source | Adds cooling; ductwork may be reusable with modification; high cost to add well-field; possible de-superheater for domestic water heating; switch to electric fuel source | Adds cooling; abandon ductwork in-place; adds individual space control; indoor units may be obtrusive; switch to electric fuel source | Remove or abandon ducts in-place; indoor units may be obtrusive; reduces drafts; adds room control; switch to electric fuel source; good for supplemental heat in added spaces without main system modification | Remove or abandon ducts in place; low noise; unobtrusive ceiling and floor installation; reduces drafts; adds room control; can switch to electric fuel source; radiant cooling or tempering is possible in dry climates with air-to-water or ground source heat pump |
| Furnace with Central A/C | Lose cooling capability; likely able to reuse ducts | - | Consolidates equipment; ductwork may be reusable with modification; switch to electric fuel source | Ductwork may be reusable with modification; high cost to add well-field; possible de-superheater for domestic water heating; switch to electric fuel source | Remove or abandon ducts in-place; adds individual space control; indoor units may be obtrusive; switch to electric fuel source | Lose cooling capability; remove or abandon ducts in-place; indoor units may be obtrusive; reduces drafts; adds room control; switch to elec; good for supplemental heat in added spaces without main system modification | Remove or abandon ducts in place; low noise; unobtrusive ceiling and floor installation; reduces drafts; adds room control; can switch to electric fuel source; radiant cooling or tempering is possible in dry climates with air-to-water or ground source heat pump; not a good cooling choice in humid climates |
| Air Source Heat Pump with Indoor Units | Lose cooling capability; may be able to reuse ducts with modifications; switch to site fossil fuel | May be able to reuse ducts with modifications; switch to site fossil fuel; some perceived comfort improvement in heating due to higher SA temp | - | Higher efficiency; high cost to add well field; ductwork may be reusable with modification; possible de-superheater for domestic water heating; switch to electric fuel source | Remove or abandon ducts in-place; adds individual space control; indoor units may be obtrusive | Remove or abandon ducts in-place; adds individual space control; reduces drafts; indoor units may be obtrusive | Remove or abandon ducts in place; unobtrusive ceiling and floor installation; reduces drafts; adds room control; radiant cooling or tempering is possible in dry climates with air-to-water or ground source heat pump |
| Ground Source Heat Pump with Indoor Units | Not recommended | Lower $; may be able to reuse ducts with modifications; switch to site fossil fuel; perceived comfort improvement in heating due to higher SA temp | Not recommended | - | Not recommended | Not recommended | Remove or abandon ducts in place; unobtrusive ceiling and floor installation; reduces drafts; adds room control; can use existing well-field; radiant cooling or tempering is possible in dry climates with air-to-water or ground source heat pump |
| Mini-split or Multi-split Heat Pump | Switch to site fossil fuel; lose cooling capability; perceived comfort improvement in heating due to higher SA temp | Switch to site fossil fuel; perceived comfort improvement in heating due to higher SA temp | Not recommended | Not recommended | - | Not recommended, except as independent, supplemental heat for distant spaces | Low noise; improves comfort; adds room control; higher initial cost; radiant cooling or tempering is possible in dry climates with air-to-water or ground source heat pump |
| Electric Resistance (baseboard convectors, radiant panels, unit heaters) | Switch to site fossil fuel | Switch to site fossil fuel; add cooling | Higher efficiency; may leave electric baseboards in place to serve as supplemental heating during peak conditions | Higher efficiency; may leave electric baseboards in place to serve as supplemental heating during peak conditions | Higher efficiency; may leave electric baseboards in place to serve as supplemental heating during peak conditions | - | Adds outdoor unit and piping; higher efficiency; radiant cooling is possible in dry climates with air-to-water or ground source heat pump |
| Hydronic Radiant (floor, ceiling panels, radiators) | Not recommended | Not recommended | Not recommended | Geothermal well-field, heat pump capabilities can improve efficiency of radiant system | A good addition (not replacement) for limited A/C and dehumidification | Not recommended | - |
Regardless of whether the HVAC system will be repaired, upgraded, or replaced, the first step is to perform a thorough assessment of the heating and cooling equipment, the distribution system, and the building conditions. This inspection must be based on federal, state, and local regulations and carried out by a licensed or certified contractor. HVAC equipment is generally installed in basements, crawlspaces, or attics, any of which may be vented, non-vented, or conditioned. See the following section on Potential Stop-Work Findings for a summary of the most critical conditions to look for. This assessment is adapted from Guide to Closing and Conditioning Ventilated Crawlspaces (Dickson Jan 2013, prepared by IBACOS for Building America).
Potential Stop-Work Conditions
If any of the following items are found during the inspection, they must be dealt with before proceeding with any work where the following conditions may affect the planned HVAC intervention. Check first for active knob and tube wiring, vermiculite or asbestos insulation, bathroom fans vented into attics, water leaks, unvented kerosene heaters or gas fireplaces, duct sweating, soft or deteriorated flooring, mold, and pests. These conditions should be corrected prior to, or in conjunction with, any major work on the HVAC system. Table 7 identifies remediation needed for these conditions. Included are links to other BASC assessment guides that are useful when doing work in various locations in a house. Additional information on these conditions and others follows the table.
| If active knob-and-tube wiring or exposed wiring that poses a safety threat is observed | Then the house should be rewired before work may begin. |
|---|---|
| If any moisture is apparent in the crawlspace, basement, or attic | Then a mold remediation professional may need to conduct an in-depth inspection and follow up with proper remediation of the affected areas. No work can proceed until the space has been certified clean by the mold professional. (See the EPA Protocols document.) Identify and address the source of the moisture. If mold is found in conditioned spaces, consider supplemental dehumidification. |
| If the HVAC equipment is in the attic | Then see the Pre-Retrofit Assessment of Attics, Ceilings, and Roofs. |
| If the HVAC equipment is in the crawlspace or basement | Then see the Pre-Retrofit Assessment of Crawlspaces and Basements. |
| If the house has a natural-draft combustion appliance | Then conduct calculations to ensure adequate makeup air is provided to the appliance. If renovations include sealing the crawlspace or basement, natural draft appliances will need to be removed and replaced with sealed combustion appliances that are vented to the outside or adequate supply air will need to be ducted to the natural-draft appliances from an outside source. (See the EPA Protocols document.) |
| If bathroom fans are vented into the attic | Then the bathroom fans must be vented to the outside prior to additional work. Check for mold near duct outlets. |
| If you suspect asbestos insulation, tape or fireproofing on existing HVAC | Then professional advice should be obtained before attempting removal. |
Survey and Inventory
Examine and describe the current HVAC system by conducting a full survey. Start a digital or paper notebook to map and inventory the system. Develop a line drawing of the house’s layout, including any proposed changes in geometry, and then walk through the home with measuring tape, camera, and notepad to locate and map the conditioning devices and equipment – this will help you understand the system type and the distribution network and will supplement your memory if you find that you’ve missed something. Make sure the homeowner knows the capabilities of the current system, and understands if changes or a new system will provide the same capabilities. As part of your survey, you’ll note the insulation levels, window types, orientation and sizes, and general construction attributes so that you can perform a load calculation for proper system sizing. Use the audit checklist at the end of this guide to help you gather information.
Photograph the components up close. Include a legible photograph of the equipment nameplate. Equipment nameplates include useful information such as the date of production, the manufacturer’s name, model and serial number, operating parameters and capacity. The model number can often be searched on the internet to obtain electronic versions of installation manuals and parts lists for discontinued equipment. Photograph the components from a distance, including other equipment or room features for reference; this will help with unit orientation, location, quantity and size of supply registers and return/exhaust grilles, materials used (such as flex duct versus sheet metal), and how duct collars are oriented. Photographs can often prevent return trips. Note important measurements, such as diameter, length, width and height, plus distance from major building components, in case the replacement equipment has different dimensions.
Take advantage of the homeowner’s knowledge – here are some sample questions to ask during the survey:
- How old is your house? How long have you lived here? How long do you plan to live here?
- Do you know how much insulation is in the walls and attic? Do you know the window efficiency ratings? Do you know the age of the current system?
- Do you have a full year or more of energy bills you can share?
- What do you like and dislike about the current system? What are you looking for in a new system or a system upgrade?
Stay safe during the inspection. If you must enter the attic or crawlspace, use safety equipment and proper precautions; wear gloves, eye protection, and a face mask if you suspect dangerous materials. Use a solid step ladder and bring a couple of short lengths of 2x6 or plywood to span rafters and create a safe place to stand or kneel. Don’t forget a flashlight. Watch out for hazards; in attics be aware of roofing nails penetrating the roof deck and rafters, and trusses and beams that may reduce head-height. Test all locations for solid footing before you shift your entire weight and don’t lean on or use piping, wiring, or ducts for support. Watch out for sharp edges around sheet metal work. Based on your initial survey, note any structural, moisture, or other problems that need correcting.
HVAC Assessment Checklist
As you are conducting your survey, use the following audit checklist to help gather information the homeowner can use in making an informed decision about what needs to be repaired or upgraded in their current equipment and whether to repair or replace their current system.
Furnaces
- Check for sufficient combustion air – the system may lack necessary transfer grilles (e.g., the furnace in a basement that was originally wide open but later enclosed when a wall was built around the furnace when the basement was finished).
- Vent (chimney): check condition and see if it needs a liner (for 80+% furnace, or water heater, or both) or vent connector modifications. Repair or replace if clogged, damaged, or poor-fitting.
- Gas piping requirements (e.g., drip leg and shut-off valve at furnace) and total capacity (e.g., may be insufficient if an instantaneous water heater was added).
- A cracked heat exchanger is a high-dollar item, and often indicates the furnace should be replaced.
Considerations when replacing an 80% or less AFUE gas furnace (Category I: natural draft or draft induced) with a 90+% AFUE condensing gas furnace (Category IV):
- Many 90+% AFUE furnaces can be installed as either a non-direct vent (1-pipe) furnace or as a direct vent (2-pipe) furnace. The direct vent option is always recommended to improve energy efficiency (e.g., from 90% for non-direct vent to 92% for direct vent) and to minimize combustion air concerns/requirements.
- Ensure that it is practical to install the PVC intake/exhaust vent piping from the furnace to outdoors, including vent termination location (e.g., with respect to windows or other forced air inlet), in accordance with building code and manufacturer requirements (e.g., may need to install vent piping through finished space to get to the outdoors).
- If the old furnace shared a chimney or vent with a natural draft water heater, the existing chimney or vent may now require a liner installed to meet current building code (i.e., the venting requirements found in the Fuel Gas chapter of the IRC). Note: a new 80% AFUE gas furnace and natural draft water heater may also require a chimney/vent liner in some cases).
- The 90+% AFUE condensing gas furnace will produce condensate that must be drained away in accordance with code requirements (e.g., condensate may freeze if drained to the outdoors in cold climates; furnaces installed where freezing may occur such as in vented attics may require freeze protection of the condensate drain and insulation for the exhaust vent pipe).
Motors
- Noisy fans and pumps typically indicate age and inefficiency.
- A fan motor or compressor can sometimes be replaced with a more efficient mode
Electrical
- Ensure equipment has the necessary electrical disconnects at air handler/furnace and outdoor unit.
- Ensure that the electrical wiring and over-current protection are sized properly.
Condensate
- Ensure proper drainage with either ¾” PVC properly sloped and trapped or a condensate pump (check functionality).
- Ensure the condensate pan is level and leak-free; check that the float and alarm are functional and any auxiliary condensate piping requirements are met.
Air Conditioner/Heat Pump
- A failed compressor may indicate improper initial installation (lack of proper system evacuation or filter-drier), acid in the lines (sometimes caused by system leaks) leading to heat and moisture that can cause failure. Flushing and drying of the system must be thorough to protect a new compressor. A “contaminated” line set may need replacement, which requires proper evacuation of the entire system, as does any opening of the closed refrigerant system.
- Use caution when working with refrigerants. Leaking refrigerant is a health hazard as well as bad for the environment.
- Low refrigerant charge can reduce efficiency – don’t just “top off” the system – locate and fix the leak(s) (pin holes in copper tubing, deteriorated gaskets and seals, faulty valves).
- Check for a level condenser pad and wall bracket; install if missing.
Controls
- Check the functionality of the existing thermostat. Unless the existing one is relatively recent and compatible, a new, programmable thermostat will likely save energy. Where occupancy does not vary during the day or week, programmability may be less important.
- Check ventilation, humidity, and zone controls for proper operation, as required.
Distribution
- Close and seal return grilles located in the garage or furnace room or closet, to preserve air quality and prevent back-drafting. In new buildings, code does not allow return air to pass through such spaces.
- Are supply registers selected and located to effectively mix the air to avoid stratification and stagnant zones without creating drafts (in the occupied zone) or excessive noise?
- Are return ducts and grilles designed to minimize noise (due to equipment, air velocity, and turbulence) and provide a low-resistance return air path for rooms? Consider transfer grilles for bedrooms without returns. Check return grille sizing to avoid high-velocity whistle.
- Observe air velocity limits (ACCA Manual D: Table A1-1 Air Velocity for Noise Control) for comfort.
- Air balance: consider dampers for individual supply branches, or supply trunks, as accessible.
- Check duct air leakage with a duct blaster test. Sealing ducts to reduce duct leakage can improve house infiltration, moisture, comfort, and IAQ.
- Are zone controls present? Electronically controlled dampers may improve occupant comfort.
- Rusted-out sheet metal ducts and ceiling registers indicate high indoor humidity or lack of duct insulation.
- Are ducts insulated? What amount? What quality of installation? Is a vapor barrier present? Uninsulated ducts lose heat that should be delivered to living spaces.
- Are ducts located inside the conditioned space? If not is it possible to move them into conditioned space or make the space they are in (e.g., attic or basement) part of the conditioned space of the home? Heat loss is directly related to the temperature differential; ideally, ducts should always be routed inside conditioned space.
- Are any rooms lacking supply registers? Are any registers blocked? Are any ducts disconnected?
- If flex ducts, are they sagging, crushed, crimped, lacking supports, or lacking mechanical fasteners to trunk collars or duct boots? See these Building America Solution Center guides for guidance on flex ducts.
Mechanical Ventilation
- As homes have become more energy efficient and air-tight, effective mechanical ventilation (source-exhaust and whole-house) has become more important to control humidity and maintain good IAQ.
- Check/measure or recommend whole-house mechanical ventilation, as required.
- Check/measure bath and kitchen exhaust fans. Do they exhaust outside, not into the attic? Consider adding dampers to reduce infiltration.
- Ensure that the dryer vent seals when the equipment is not operating, and check for lint accumulation. Clear blockages and adjust ducting to ensure a straight, clear path for venting.
Filtration
- Check and replace conditioning and ventilation system filters, as required.
- If considering replacement with a higher efficiency media filter, consider the additional pressure drop with respect to the existing system’s static pressure and air flow, as described in the guide Proper Installation of Furnace and Air-Handler Filters.
Whole-House Performance Assessment
A Home Performance Energy Assessment, also known as an Energy Audit, will cover not just the HVAC system, but the entire building envelope and the house’s interconnected systems. A final report will provide the homeowner with information to determine the most cost-effective approach to reducing their energy use and the resulting list of interventions may prioritize envelope over equipment solutions. See chapter 5 “The Home Performance Energy Assessment” of the Building America Best Practices Series Volume 14 - HVAC: A Guide for Contractors to Share with Homeowners
Code Compliance
Perform all work related to safety, inspection, demolition, disposal, and installation in accordance with applicable codes.
Safety
Follow all safety and health precautions during the site evaluation and any demolition or installation. Use standard precautions when working with building materials and equipment, and remedy any dangerous conditions prior to undertaking new work. Turn off all equipment at the electrical panel or equipment disconnect prior to conducting work.
When you suspect the presence of hazardous materials, see
- Pre-Retrofit Assessment of Hazardous Materials
- EPA’s Healthy Indoor Environment Protocols (radon and more)
The EPA requires proper refrigerant management practices be performed by certified technicians who have passed an EPA-approved test (https://www.epa.gov/section608/section-608-technician-certification-programs) given by an EPA-approved certifying organization. The Clean Air Act, Section 608 (40 CFR Part 82, Subparts A and F) discusses issues relevant to the disposal of refrigeration/AC equipment.
See also Construction and Demolition: How to Properly Dispose of Refrigeration and Air-Conditioning Equipment Section 608 of the Clean Air Act prohibits the knowing release of refrigerant during the maintenance, service, repair, or disposal of air-conditioning (AC) and refrigeration equipment. This work includes (but is not limited to):
- Adding refrigerant to or removing refrigerant from an appliance.
- Attaching and detaching hoses and gauges to and from an appliance to measure pressure.
- Any activity that violates the integrity of a motor vehicle air conditioner (MVAC)-like appliance or small appliance (other than disposal).
Demolition
Remove all debris and old mechanical equipment before staging and installing new equipment. Take special care with any equipment that may contain refrigerant and follow EPA guidelines, as discussed above.
Equipment Sizing
To ensure adequate capacity of the existing or new equipment, do an accurate load calculation for the building using ACCA Manual J. Equipment should be sized in accordance with ACCA Manual S. Be sure to discuss the sizing implications with the homeowner; gas and oil furnaces are often grossly over-sized, which means higher first-cost, comfort issues such as draft and high temperature differentials, and lower efficiencies due to short cycling during part-load situations.
Equipment Installation
Follow all manufacturer specifications and requirements when installing new equipment. Perform installation in a professional manner, remove all packaging materials from premises and replace or re-install any insulation, weather protection, or other architectural details to the same or better condition than prior to the work. Consider any safety requirements with newer, more efficient equipment, such as direct-venting to the outside and makeup air requirements. Commission the equipment per the manufacturer’s instructions and provide contact information to the homeowner for future servicing. Turn over all Operations & Maintenance and Installation manuals for the homeowner’s reference. Complete all required sales and installation details in the warranty paperwork and provide to owner for submission to the manufacturer. Inform homeowner of any available energy rebates or incentives the equipment may qualify for.
More Info
References and Resources*
* For non-dated media, such as websites, the date listed is the date accessed.
Contributors to this Guide
The following authors and organizations contributed to the content in this Guide.
Home Innovation Research Labs, a Building America research team.