

To minimize flood risks with new construction, homes should be built on high ground outside of high-risk flood areas and above the base flood elevation (BFE). New homes should be constructed in conformance with the National Flood Insurance Program (NFIP) and local floodplain management regulations. Existing homes could be elevated above the BFE or relocated to higher ground, although this is often impractical. Alternative retrofit options are presented below.
For definitions of commonly used flood-related terminology and an overview of NFIP, see the Flooding Overview guide.
Retrofit Approaches
Retrofit approaches described below include basement infill, abandoning the lowest floor, elevating the lowest interior floor, wet floodproofing, and dry floodproofing.
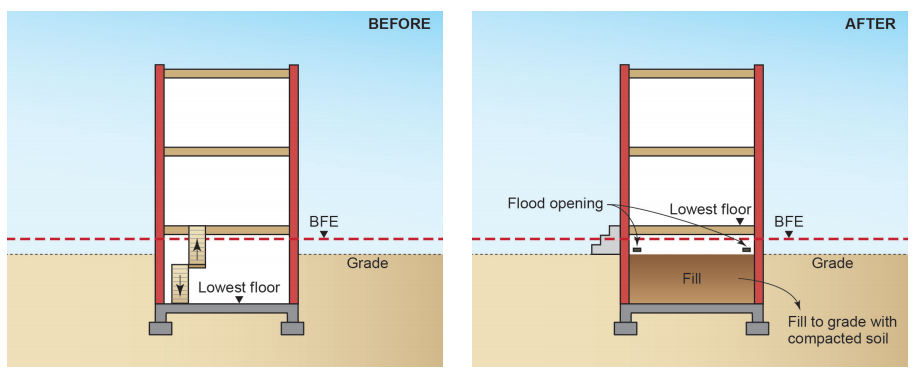
Basement Infill
This involves filling in a basement located below the BFE to grade (ground level) (Figure 1). Sections of the basement walls that remain above ground must be retrofitted with flood openings that allow automatic entry and/or exit of floodwaters. Any basement utility systems and associated equipment must be elevated to protect utilities from damage or loss of function from flooding.
Pros – This technique has proven effective at reducing damage to building elements located below the BFE.
Cons – Livable square footage is lost. Costs are considerable and may trigger a “Substantial Improvement” declaration.
Abandon Lowest Floor
This approach involves abandoning the lowest floor of a slab-on-grade residential building with more than 1 story (Figure 2). The lowest floor walls must be retrofitted with flood openings that allow automatic entry and exit of floodwaters. Additionally, any utility systems and associated equipment on the lowest floor must be elevated to protect utilities from damage or loss of function from flooding.
Pros – This technique has proven effective at reducing damage to building elements located below the BFE.
Cons – Livable square footage is lost. Costs are considerable and may trigger a “Substantial Improvement” declaration.

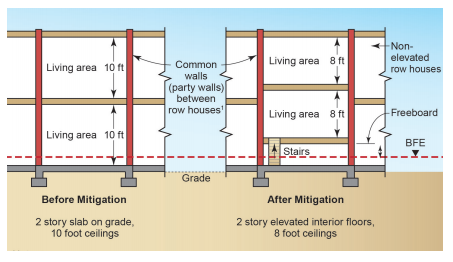
Elevate Lowest Interior Floor
This approach involves elevating the lowest interior floor within a residential building (Figure 3). The home must have high ceilings for this approach to work. The space below the lowest elevated interior floor must be either filled to create a stem wall or retrofitted with flood openings that allow automatic entry and/or exit of floodwaters. Additionally, any utility systems and associated equipment located below the lowest interior floor must be elevated to protect utilities from damage or loss of function from flooding.
Pros – This technique has proven effective at reducing damage to building elements located below the BFE.
Cons – Livable square footage is lost. Costs are considerable and may trigger a “Substantial Improvement” declaration.
New Construction and Retrofit Strategies
Wet Floodproofing
Wet floodproofing is a design strategy that includes choosing flood-resistant materials and allowing flood waters to enter the enclosed areas of a house at nearly the same rate at which the water level is rising outside of the house. Wet floodproofing is used for spaces that will be minimally damaged by flood water such as enclosures below elevated buildings, walkout-on-grade basements, below-grade basements, crawlspaces, or attached garages. Wet floodproofing is not a viable strategy to use for living spaces such as living rooms and bedrooms because all affected parts of the space must be resistant to damage from direct and possibly prolonged flood water contact. Many elements common in living spaces, like floor and wall coverings, finishing materials, furniture, appliances, and other items, are easily damaged by flood waters. Since these common elements are so easily damaged, it is imperative to install materials that will resist the bulk of the damage caused by flooding.
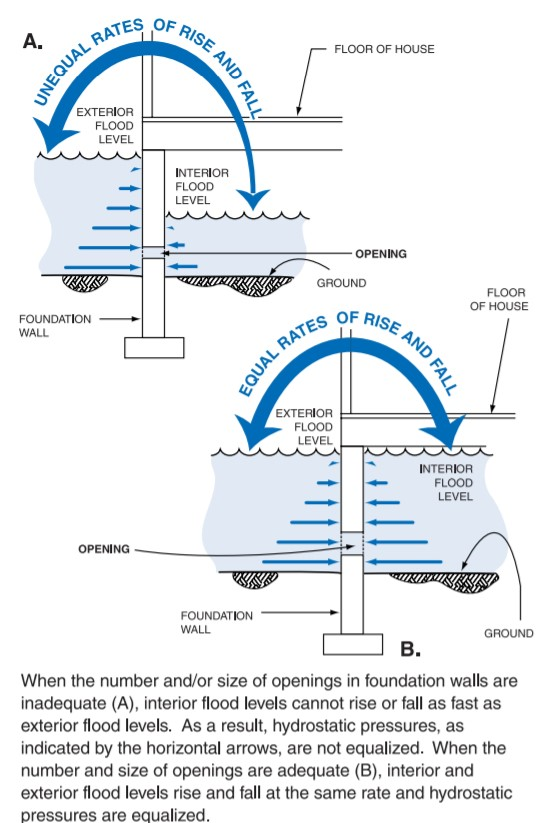
With wet floodproofing, flood water is allowed into the house through openings in the foundation level of the home to ensure that floodwaters can enter and exit the house, rising and falling at the same rate inside as outside the house, as shown in Figure 4. This equal rising and falling ensures hydrostatic pressure differences will be minimal, reducing the likelihood of damage to the structure. Openings must allow the flow of water both ways while not letting in debris or pests. They should not require manual operation to be opened.
See FEMA’s Flood Damage-Resistant Materials Requirements for detailed information on whether a home is eligible for wet floodproofing. Complying with these requirements when retrofitting an existing home or designing a new home may make homeowners eligible for national flood program funding and reduced NFIP flood insurance rates. The document also classifies building materials as either acceptable or unacceptable on a 1 to 5 scale, with 4 and 5 being acceptable materials and 1 to 3 being unacceptable.
FEMA document 551, Selecting Appropriate Mitigation Measures for Flood-Prone Structures (FEMA 551, 2007), describes wet floodproofing in Chapter 6.
Strategies for Wet Floodproofing
The following strategies for wet floodproofing are recommended by the Louisiana State University AgCenter. (See LSU AgCenter’s Wet Floodproofing video for additional tips.)
Raise Appliances:
If this is not possible, build individual flood walls around the appliances.
Use Flood-Resistant Building Materials:
- Use flood-resistant building materials, such as concrete, stone, masonry block, ceramic and clay tile, pressure-treated and naturally decay-resistant lumber, epoxy paints, and metal (FEMA P-312, 2021).
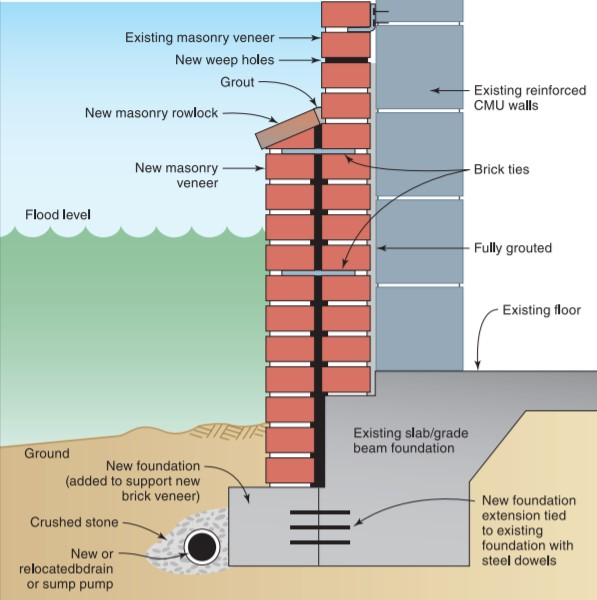
- Figures 5 and 6 illustrates this concept. The first level of the home uses masonry construction, a flood-resistant building material, while the second level is wood framed (BSC 2006).
- Avoid vulnerable materials including drywall, blown-in and fiberglass batt insulation, carpeting, and non-pressure-treated wood and plywood (FEMA P-312, 2021).
- Both paper-faced gypsum board and fiberglass cavity insulation are common building materials. However, both will be ruined by flood waters. Instead, use non-paper-faced gypsum board for interior wall surfaces (BSC 2006).
- If using non-flood-resistant materials, make sure they are easily removable if they do get wet.
Make Wall Cavities Accessible:
- Provide a way for walls or other building cavities to be drained, cleaned, and dried post-flood using moisture-resistant insulation and trim materials. See Figure 7.
Pros and Cons of Wet Floodproofing (FEMA 551, 2007)
Pros:
- Hydrostatic loads from water on the house over the course of a flood event are greatly reduced, reducing the threat of structural damage to the house.
- It is not an all-or-nothing system, contrary to dry floodproofing which relies on everything staying completely dry and structurally sound.
- It can be done in stages such as replacing flooring, elevating appliances, retrofitting walls, etc., based on budget and time available.
- It can be a relatively inexpensive option to implement.
- It is a good option when exterior walls are not strong enough to withstand flood forces, in older homes especially.
- It is a good option if you can’t build a reliable floodwall or elevate the home.
Cons:
- Contents that can be damaged must be moved before flood water enters the space. Sometimes floods will strike quickly or when no one is around, thus minimizing the effectiveness of the wet floodproofing measures.
- The process of cleaning up post-flood can be time-consuming, expensive, and difficult.
- There is the potential for damage and health concerns from hazardous materials within the flood waters, such as sewage, chemicals, fertilizers, etc.
- It does not protect against the hydrodynamic force of flowing water, erosion and scour, or the impact of flood-borne debris.
Dry Floodproofing
A dry floodproofed home is a watertight space designed to keep out all flood waters and to keep inside contents dry. This is accomplished by blocking all of the pathways where water can enter a building during a flood, such as doors, windows, and unsealed walls. Typically, dry floodproofing is used to protect living spaces such as kitchens, living rooms, and bedrooms, where flood water would damage or destroy the contents. Dry floodproofing is used as a retrofitting strategy for existing homes. It can also be used as a building strategy for new low-risk homes that may fall in the 100- to 500-year floodplains. Dry floodproofing can be considered permanent or temporary. Permanent dry floodproofing is done by constructing the wall with waterproof materials and ensuring the structural integrity of the wall. Temporary dry floodproofing involves installing an external waterproof barrier around the home to stop water before it touches the walls of the home. Dry floodproofing tactics that involve waterproofing the home’s walls can result in the home’s walls having to bear considerable hydrostatic force in the event of a flood, so ensuring that the walls are capable of handling this stress is of utmost importance.
Strategies for Dry Floodproofing:
Dry floodproofing requires the following three steps (see Figure 6). Dry floodproofing measures can be temporary or permanent as shown in Figures 8 and 9.
- Seal the walls with a waterproof coating that is sprayed or painted on, or install an impermeable membrane such as a roof deck adhesive membrane, or construct an additional layer of masonry or concrete
- Install a backflow valve to prevent sewer and drain backup.
- Install shields to cover openings such as doors and windows.


Dry Floodproofing Constraints:
- Properly constructed walls can typically withstand the pressure of up to 3 feet of water outside the house. For floods where water levels reach further up the walls, dry floodproofing is not effective.
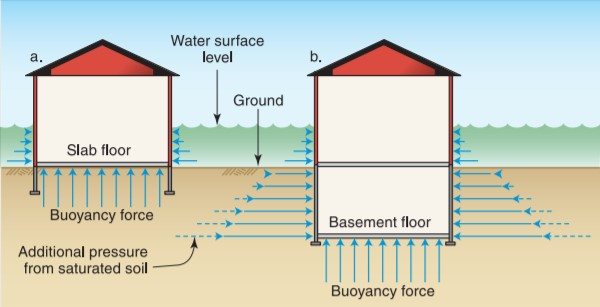
- Because of the buoyant force under the house from water in the soil, dry floodproofing should only be used for floods lasting 1 to 2 days. Any longer can risk damage to the home’s foundation as shown in Figure 10.
Pros and Cons of Dry Floodproofing (FEMA 551, 2007)
Pros:
- Less costly than elevating a home.
- Doesn’t require additional land that may be needed for levees or floodwalls.
- May be fundable under FEMA mitigation grant programs.
- Some measures can be temporary, eliminating unsightly barrier walls.
Cons:
- May not be used to bring a substantially damaged or substantially improved residential structure into compliance with the community’s floodplain management ordinances. (See FEMA Floodproofing.)
- Requires human intervention and adequate warning to install temporary protective measures.
- May not minimize potential damage from high-velocity flood flow and wave action.
- Ongoing maintenance is required.
- Flood shields are typically not considered aesthetically pleasing.
- Not recommended for floods lasting more than 1 to 2 days.
More Info
References and Resources*
* For non-dated media, such as websites, the date listed is the date accessed.
Contributors to this Guide
The following authors and organizations contributed to the content in this Guide.