Materials Cost: 1
Difficulty Level: 2

Introduction

Use heat-resistant caulk and sheet metal to air seal flues and chimneys in the attic.

Why

There are often gaps in ceiling drywall around flue pipes and chimneys that can allow conditioned air from the house to escape into the attic in winter and hot dusty attic air to come into the home in the summer, wasting energy and making your home uncomfortable. 

What You'll Need

  • Heavy Gloves
  • Eye Protection
  • Tin Snips
  • Aluminum flashing or sheet metal
  • Screwdriver and screws or staple gun and heavy metal staples
  • Fire-rated caulk
  • Rigid mineral wool insulation board
  • Box knife

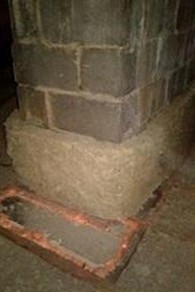
1. Locate chimneys and flue pipes.

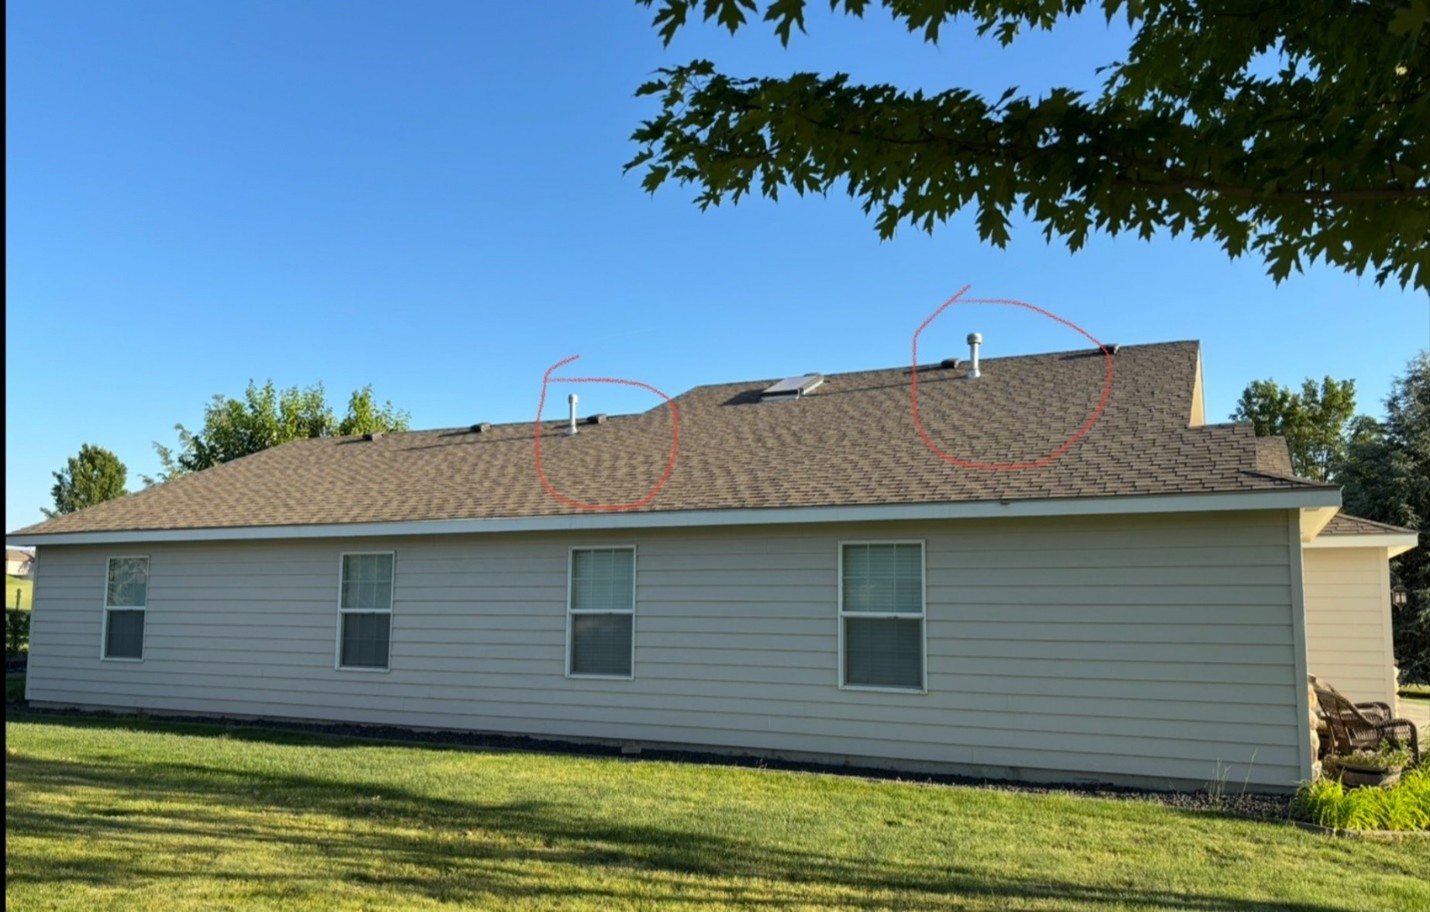
If you have a fireplace or woodstove, sketch or mentally note its location in reference to the closest exterior walls. You can also go outside and look for a chimney or large flue pipes exiting through the roof (Figure 1). Go into the attic and look in that location for a large round metal pipe or a brick square or rectangular column.

The location of furnace and water heater flues can be identified by going outside and looking for metal pipes coming through the roof.
Source
Figure 1. The location of furnace and water heater flues can be identified by going outside and looking for metal pipes coming through the roof (Source: PNNL).


If you have a gas furnace and/or a gas water heater located inside your home, look at the pipe coming out of the top of the furnace or water heater. Older gas furnaces and water heaters may have one large metal flue pipe coming from the top of the furnace or water heater that vents straight up through the attic and roof. Newer, sealed-combustion, direct-vent furnaces and water heaters may have a duct for intake air and a metal flue for exhaust air. These may exhaust through the attic or out through the wall. Newer high-efficiency condensing furnaces and water heaters will use PVC ducts instead of metal flues and typically vent out through a side wall rather than up through the attic.

If you have metal flues that exit the home through the roof, look at the flues where they enter the attic from the floor below or from the attic side to see if there are gaps between the sides of the flue and the surrounding drywall that need to be air sealed. If the attic is dark and the house lights are on, you may see light coming through the gaps around the flue. You may have to pull back attic insulation to look for gaps. Wear gloves and avoid touching the flue pipe as it will likely be warm if the furnace or water heater is running.


2. Install sheet metal around flue vent pipes.

Option A – Air Seal at the Bottom of the Framing

  1. Pull back any insulation (Figure 2).
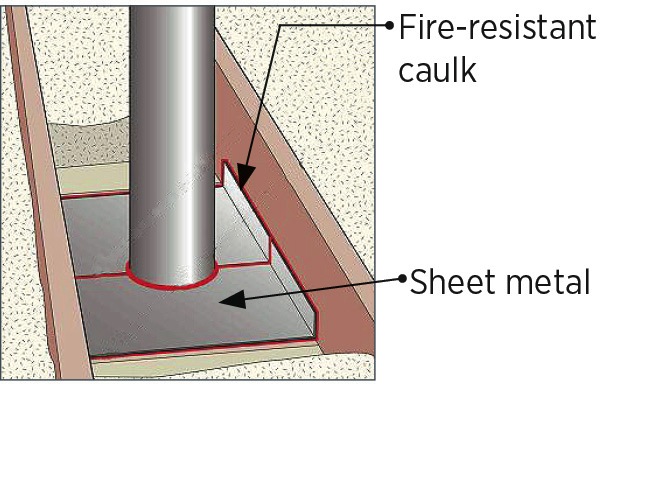
  2. Cut two pieces of sheet metal to cover the chase opening. Allow 1 inch of overlap around the flue pipe.
  3. Fasten the sheet metal to the framing with screws or heavy staples. 
  4. Seal all edges and seams in sheet metal with fire-rated caulk (Figures 3 and 4).
Ceiling opening for chimney pipe chase
Source
Figure 2. From the attic, identify the chimney or flue pipe in the chimney chase (Source: Building Science Corporation).
Cut sheet metal to cover the chase opening. Fasten sheet metal to framing and seal edges with fire-rated caulk.
Source
Courtesy Of
BSC
Figure 3. Cut sheet metal to cover the chase opening. Fasten sheet metal to framing and seal edges with fire-rated caulk (Source: Building Science Corporation).
. Install sheet metal to cover the gaps around a flue pipe in the attic; attach with screws or heavy staples, then seal seams with fire-rated caulk or foam
Install sheet metal to cover the gaps around a flue pipe in the attic; attach with screws or heavy staples, then seal seams with fire-rated caulk or foam
Source
Figure 4. Install sheet metal to cover the gaps around a flue pipe in the attic; attach with screws or heavy staples, then seal seams with fire-rated caulk or foam (Source: PNNL).


Option B – Air Seal at the Top of the Framing

  1. Pull back any insulation.
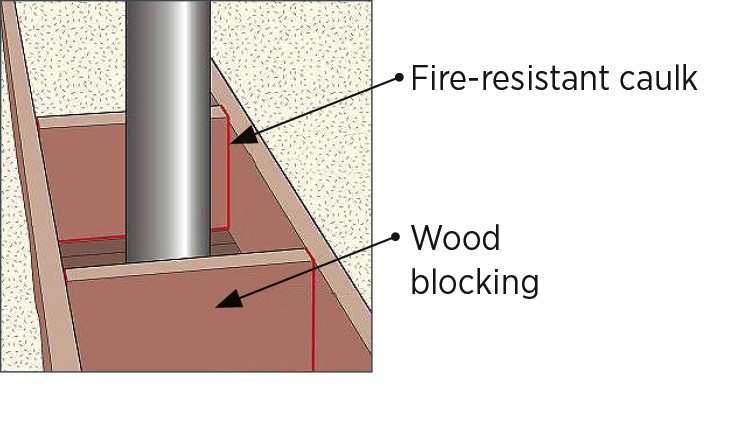
  2. If there are gaps larger than ¼ inch around the flue, install sheet metal to cover the openings. Cut two pieces of lumber equal in height to the ceiling joists (Figure 5). If the gaps are less than ¼ inch, seal them with fire-rated caulk, then proceed to Step 3.
  3. Fasten these wood cross pieces to the joists on either side of the flue pipe with screws, keeping at least 3 inches of clearance to the pipe. Caulk the joints between the wood blocking and the joists.
Cut wood blocking to fit between the ceiling joist framing on either side of the flue pipe; screw and caulk in place
Source
Courtesy Of
BSC
Figure 5. Cut wood blocking to fit between the ceiling joist framing on either side of the flue pipe; screw and caulk in place (Source: Building Science Corporation).
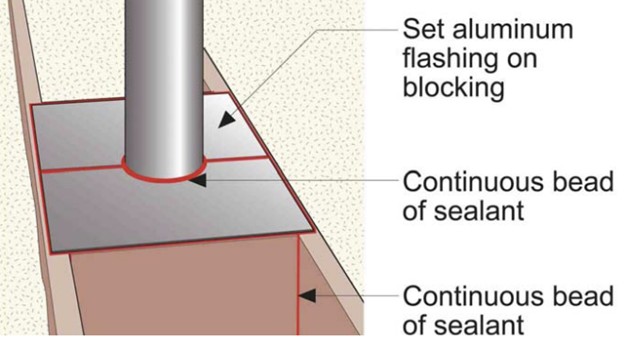
  1. Cut two pieces of sheet metal or aluminum flashing to fit around the chimney pipe with 1 inch of overlap. Make the pieces large enough to extend onto the joists and blocking without extending past the joists or blocking.
  2. Apply a generous bead of fire-rated caulk to the top of the joists and blocking and to all joints between the blocking and joists.
  3. Fasten the sheet metal to the top of the blocking and joists with screws or heavy staples and seal around the flue and at sheet metal overlap seams with fire-rated caulk (Figure 6).
Cut two pieces of sheet metal to fit around the flue
Source
Figure 6. Cut two pieces of sheet metal to fit around the flue (Source: Building Science Corporation).

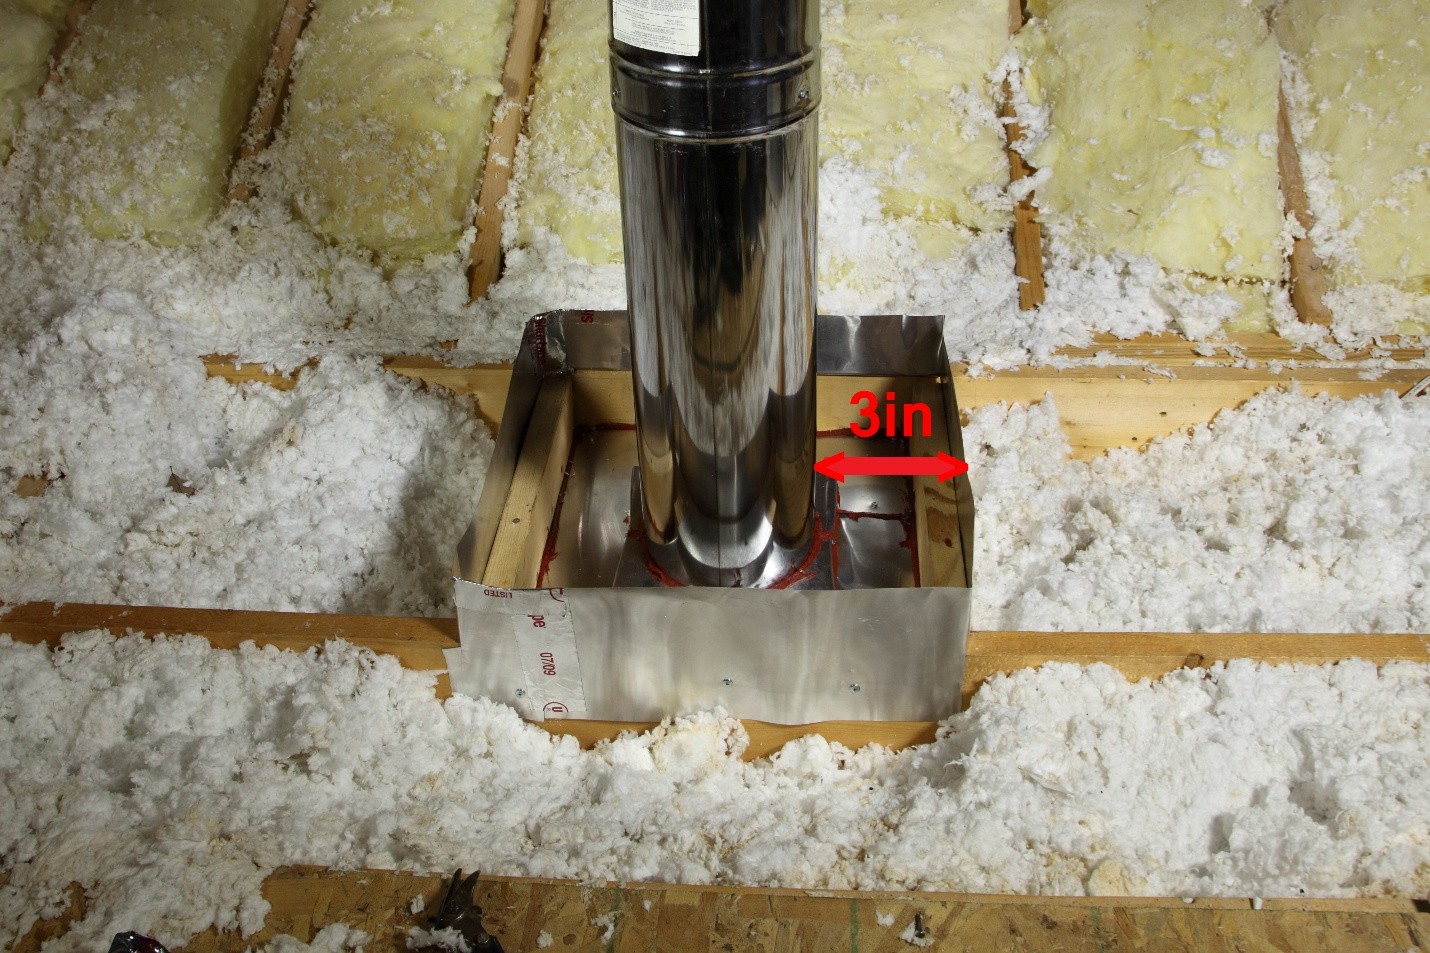
3. Make an insulation dam around the flue.

Create a dam around the flue pipe to keep insulation at least 3 inches away from the hot flue type. There are several options for making the dam. You can create a metal collar using sheet metal, or you can form a dam or wall of sheet metal, dry wall, or mineral wool board around the flue or chimney.

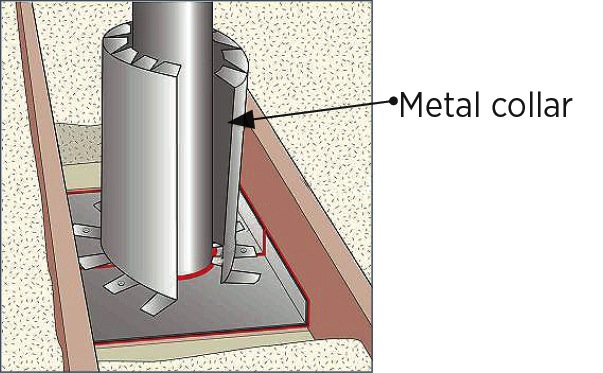
  1. Sheet metal collar – 
    1. Use tin snips to cut sheet metal to fit around the flue pipe with at least 3 inches of clearance all the way around. 
    2. Snip 3-inch tabs in the top edge and bottom edge. 
    3. Fold the tabs in at the top and alternate tabs folded in and out at the bottom to maintain a 3-inch clearance. With tabs folded, the shield should be 4 inches taller than the finished insulation level. Staple the side seam of the collar together with heavy metal staples or overlap and adhere the seam with fire-rated caulk.
    4. Fasten the tabs to the flat sheet metal installed at the bottom of the ceiling joist bay (Option A, Figure 7) or at the top of the ceiling joist bay (Option B, Figure 8) with heavy metal staples or screws. 
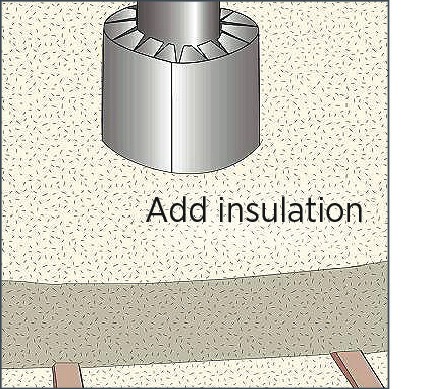
    5. Re-install insulation around the collar. Ideally the insulation in your attic should cover the rafters (Figure 9).
Form a sheet metal shield around the flue pipe
Source
Figure 7. Form a sheet metal shield for insulation 3 inches around the flue pipe and attach to sheet metal air sealing at the base of the ceiling joist bay (Source: Building Science Corporation).
Fill area around shield with insulation
Source
Courtesy Of
BSC
Figure 9. Fill area around the heat shield around the attic flue pipe with insulation (Source: Building Science Corporation).
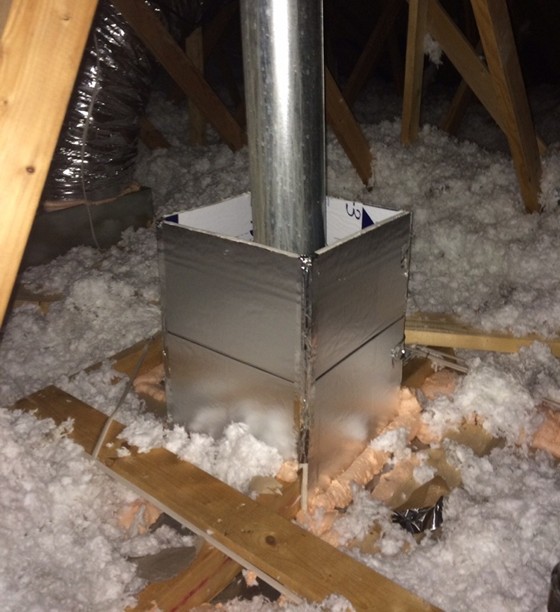
  1. Insulation dam or wall collar – 
    1. Form a dam or wall of sheet metal (Figure 10) or a heat-resistant material like gypsum dry wall or rigid mineral wool (Figure 11). 
    2. The dam should have at least 3 inches of clearance all the way around the flue pipe.
    3. The dam should be at least 4 inches higher than the finished insulation level.
Form an insulation dam of sheet metal around a flue pipe in the attic after air sealing around the pipe with sheet metal and fire-rated caulk or canned foam
Source
Figure 10. Form an insulation dam of sheet metal around a flue pipe in the attic after air sealing around the pipe with sheet metal and fire-rated caulk or canned foam (Source: PNNL).
Form an insulation dam of heat-resistant insulation with at least 3 inches of clearance around a flue pipe in the attic after air sealing around the pipe with sheet metal and fire-rated caulk or canned foam
Source
Figure 11. Form an insulation dam of heat-resistant insulation with at least 3 inches of clearance around a flue pipe in the attic after air sealing around the pipe with sheet metal and fire-rated caulk or canned foam (Source: PNNL).

4. Air seal around the chimney.

  1. Pull back any insulation.
  2. If there are gaps larger than ¼ inch around a chimney in the attic, install sheet metal to cover the openings. Cut pieces of sheet metal to fit around the chimney and extend to surrounding framing. Install blocking if needed to attach the sheet metal to. 
  3. Lay a thick bead of fire-rated caulk on the top of the framing.
  4. Place the sheet metal on the framing and fasten the sheet metal to the framing with screws or heavy staples. 
  5. Seal all edges and seams in the sheet metal and around the chimney with fire-rated caulk or spray foam (Figure 12).
If there are gaps larger than ¼ inch around a chimney in the attic, install sheet metal to cover the openings, secure the sheet metal to surrounding framing with screws or heavy staples, and seal all joints and seams with fire-rated caulk.
Source
Figure 12. If there are gaps larger than ¼ inch around a chimney in the attic, install sheet metal to cover the openings, secure the sheet metal to surrounding framing with screws or heavy staples, and seal all joints and seams with fire-rated caulk (Source: PNNL).

5. Wrap the chimney with mineral wool.

Wrap the chimney with fire-resistant unfaced mineral wool batt insulation to a height at least 4 inches above the expected insulation level to keep flammable substances such as the paper facing on batt insulation from contacting the chimney brick (Figure 13). Replace the attic insulation and add more if desired. 

Wrap the air-sealed chimney with mineral wool insulation to prevent contact with the warm brick when attic insulation is re-installed around the chimney
Source
Figure 13. Wrap the air-sealed chimney with mineral wool insulation to prevent contact with the warm brick when attic insulation is re-installed around the chimney (Source: PNNL).

Additional Info

Last Updated

Related Guides

Disclaimer

This content is a work created with funding provided by the United States Department of Energy under Contract no DE-AC05-076RL01830 for the operation of Pacific Northwest National Laboratory. The information and guidance provided by Pacific Northwest National Laboratory (PNNL) in the content are intended solely for educational purposes only and do not constitute formal training or certification. It is provided with the explicit understanding that neither the United States Government nor the United States Department of Energy, nor the Contractor, nor any or their employees, nor any jurisdiction or organization that has cooperated in the development of these materials, makes any warranty, express or implied, or assumes any legal liability or responsibility for the accuracy, completeness, or usefulness or any information, apparatus, product, software, or process disclosed, or represents that its use would not infringe privately owned rights. Reference herein to any specific commercial product, process, or service by trade name, trademark, manufacturer, or otherwise does not constitute or imply its endorsement, recommendation, or favoring by the United States Government or any agency thereof, or Battelle Memorial Institute. The views and opinions of authors expressed herein do not necessarily state or reflect those of the United States Government or any agency thereof. Viewers assumes full responsibility for all actions that they may take from information provided in this content including ensuring the safety, code compliance, and proper functionality of any products they choose to install. Installation and use of such products should be performed in accordance with local regulations and manufacturer instructions.