

Scope
Add lighting controls in multifamily buildings to reduce electricity consumption for building owners and occupants.
- Determine lighting needs and controls for dwelling unit space.
- Determine lighting needs and controls for common areas.
- Specify lighting fixtures and controls, in accordance with all relevant code requirements and consider efficiency program objectives.
See the Compliance Tab for links to related codes and standards and voluntary federal energy-efficiency program requirements.
Description
From basic on/off functionality to more advanced sensing and scheduling strategies, lighting controls provide a way for occupants to interact with the lighting in their homes and can contribute to energy savings by reducing or eliminating light output when and where it is not needed. In the United States, lighting consumes about 7% of electricity use in residential buildings (EIA 2024). Although electricity use for lighting has decreased in recent years with the increasing use of LED lighting, scheduling or automating lighting with controls can further reduce consumption for both interior and exterior fixtures.
Beyond energy savings, lighting controls also offer amenities to residents. Overall, lighting allows people to see and complete tasks, safely navigate their environments, and personalize or adjust the mood and ambiance of their living spaces. Flexibility and personal control of the lighting is particularly helpful when multiple tasks are performed in the same space.
Building energy codes require lighting controls in common spaces for multifamily buildings and in some cases may require controls in certain dwelling spaces.
Lighting Control Strategies
Dimming, scheduling, occupancy sensing, contact closures, and daylight-responsive controls are examples of lighting control strategies that might be used in single-family and multifamily buildings. A brief description of each control strategy is provided below. See the Compliance tab for more information on code requirements and be sure to review the most up-to-date information for your jurisdiction. State-specific code information is provided on this webpage: https://www.energycodes.gov/.
Dimming
Dimming is probably the most common lighting control strategy in residential buildings; it enables users to adjust light levels for the task at hand and saves energy by reducing wattage. Dimmable lighting and dimming controls that facilitate variable levels of light output can also be automated when controlled by timers or sensors. Many LED fixtures can be used with dimmers, but the fixture or lamp (light bulb) must be one that is made for dimming. Additionally, a compatible LED driver (device that operates the LEDs and is inside the fixture or lamp) and dimmer switch is required. Review the manufacturer’s website or accompanying product literature to determine if the product is dimmable and what equipment (e.g., dimmer) is compatible with the product. Not all combinations of LED light sources and LED drivers have been tested by the manufacturer, so if you are purchasing a large amount of lighting for a multifamily installation, it is best practice to test the equipment on site with a few fixtures before conducting the full-scale installation or retrofit, especially if dimming is desired. Signs of poor compatibility include a noticeable flicker or strobing of the light or no dimming when you attempt to dim the fixture.
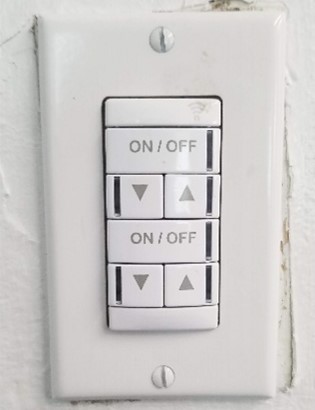
Dimmable lighting and controls in single-family homes or within dwelling units will most likely be controlled manually with a focus on providing flexibility for the resident. All light switches and dimmers should be installed on the latch side of the door – not the hinge side of the door (where, if the door is open, it blocks the switch). Occupants should be able to see the lighting they are controlling from the switch. Examples of dimmer switches are shown in Figure 1.
Source
In multifamily common areas like entry ways or hallways, dimming can be controlled by occupancy sensors or daylight sensors. For example, if the lighting in an entry or vestibule is controlled automatically by occupancy sensors, dimming easily allows the fixtures to reduce output when the space is unoccupied instead of turning the lighting off completely.
Scheduling
Lighting in interior and exterior environments can be scheduled to automatically turn on, turn off, or adjust output at specific times throughout the day. Timeclock control devices are typically installed near the electrical panel and are connected to one or more lighting control zones. Some timers are programmed manually at the device and have limited scheduling options, while others rely on a software interface and may facilitate more complicated schedules, including holidays or the ability to program for other special events. In general, scheduling works well in areas of predictable occupancy or for exterior environments.
Scheduling is not appropriate within multifamily dwelling units because occupancy is highly variable. However, scheduling may be used in multifamily buildings to increase or decrease light output at certain times of day and to control lighting in common areas. Within individual homes or dwelling units, residents may use schedules to make the home appear to be occupied when the resident is away from home for an extended period.
For exterior fixtures, astronomical timeclock devices are more suitable than simple timeclock controllers because they automatically adjust for the seasonal variation in sunrise and sunset. Otherwise, it is best practice to use a photocell that senses available daylight in combination with a simple timeclock controller. For example, decorative façade lighting or landscape lighting can be controlled at dusk and dawn via a photocell sensor, but could turn off overnight based on a schedule from midnight until 5 a.m.
Occupancy Sensing
Occupancy sensing provides energy savings and convenience by automatically turning lights on when a person enters a room and reducing or turning lights off when the space is no longer occupied. Occupancy sensors can be operated in one of two different modes: occupancy mode (automatic on and off) or vacancy mode (manual on, automatic off). Some products have field-programmable options for operating in occupancy mode (or vacancy mode), either via a dip switch on the product or via computer programming. Other products are factory set to always operate in occupancy or vacancy mode.
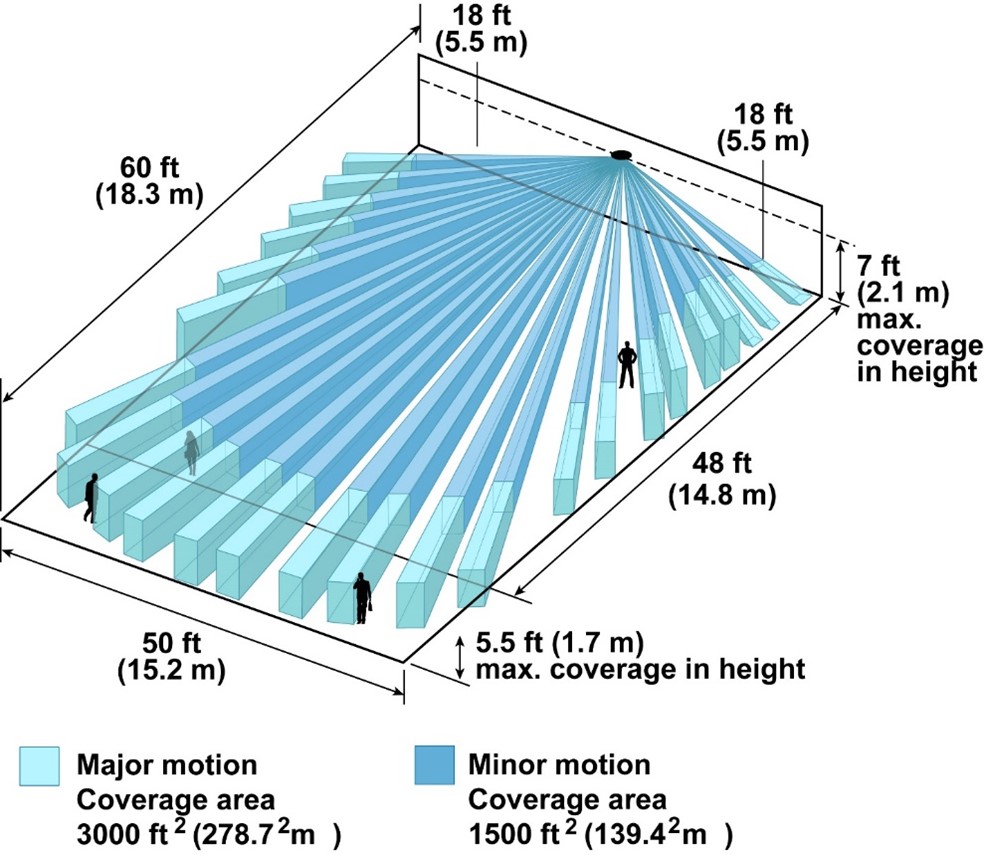
Occupancy sensors include passive-infrared (PIR) motion sensors, ultrasonic sensors, computer vision sensors, and combination sensors. PIR sensors require motion and line of sight from the sensor to the occupants to work. PIR sensors emit infrared beams (which are invisible to the eye). When a person, animal, or even a tree branch passes between two beams, the sensor detects motion. PIR can be used indoors or outdoors but have a nominal limit of about 15 feet and are more adept at detecting major motions such as occupants moving in and out of a room rather than small movements like someone sitting in a chair. There are some PIR sensor models that can work at distances greater than 15 feet, but with diminishing accuracy. A major limitation of PIR sensors is “line of sight,” meaning the beams cannot “see” around objects. Therefore, a wall, bathroom partition, large furniture, or other objects in the room can block the beams and render the sensor ineffective. PIR sensors are passive; they require very little power, which makes them an ideal sensor technology for wireless sensors. PIR wireless occupancy sensors can be powered by batteries or photovoltaic cells. Figure 2 shows the detection range for one model of wall-mounted PIR sensors.
Source
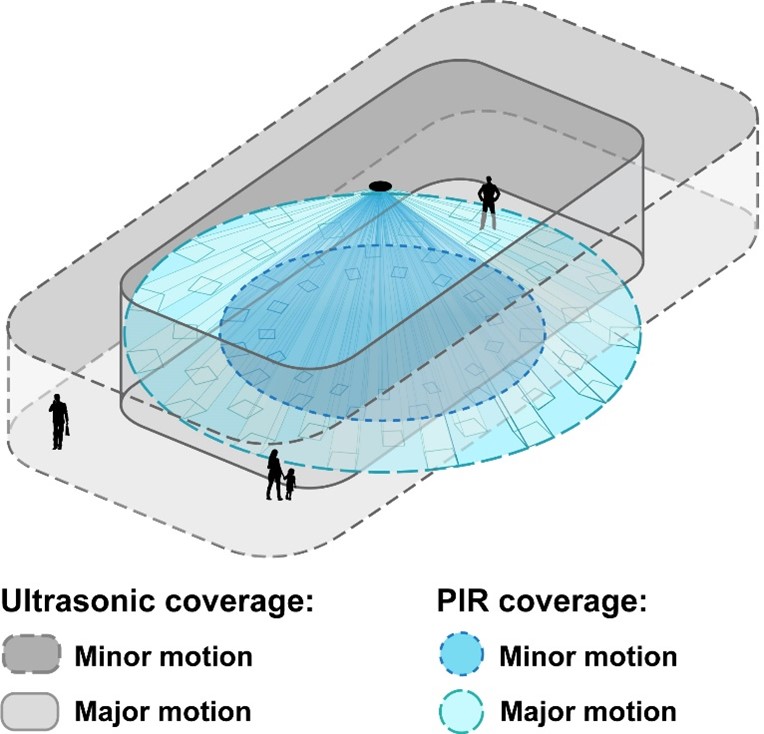
Ultrasonic sensors emit a high-frequency signal and monitor the frequency of the reflected signal. These sensors are more accurate than a PIR sensor; they can detect small motions and don’t require a direct line of sight. However, they can only be used indoors. Figure 3 compares typical detection fields for PIR sensors and ultrasonic sensors.
Source
Dual-technology (combined PIR and ultrasonic) occupancy sensors exist. These are not often deployed in residential applications, but they may be installed in multifamily common spaces where it would not be desirable to have the lights accidentally switch off when the space is occupied.
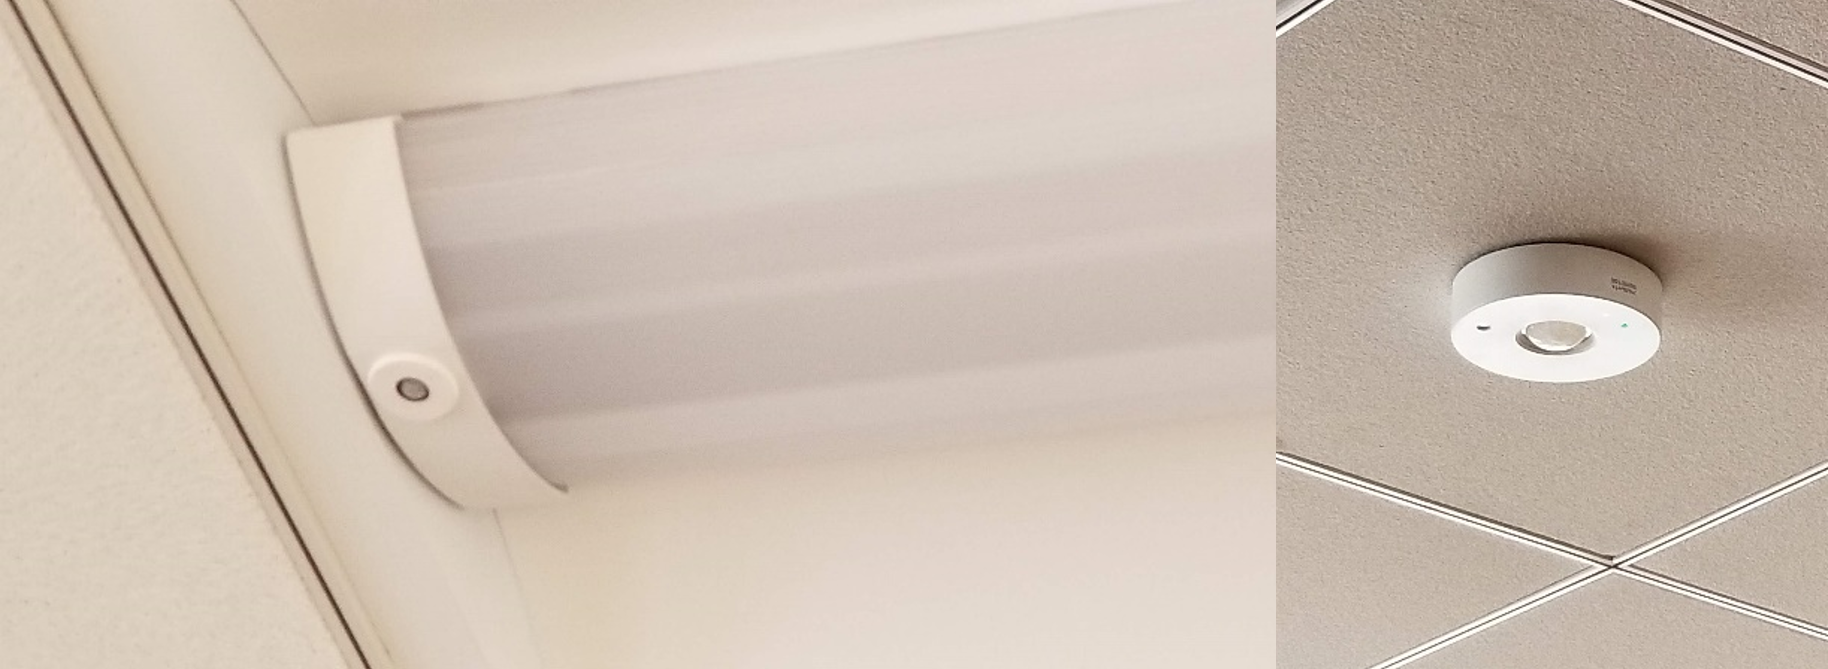
Occupancy sensors should be located where they will detect occupants or occupant activity in all parts of the room or area. Sensors may be part of the light fixture, part of a wall switch, or mounted to the wall or ceiling. Examples of sensor placement are shown in Figure 4. Sensors should be mounted in locations where they can’t be tampered with and where they are not blocked by doors, furniture, or other obstructions. In general, avoid placing an occupancy sensor within 8 feet of HVAC supply vents. The air current from the vent can falsely trigger PIR sensors and the noise may affect the return time for ultrasonic sensors.
Although motion-triggered lighting is most commonly used in common areas and outdoors, it may also be useful in closets or for undercabinet task lighting in kitchen areas. In these applications, motion sensors can turn on the lights when the space or countertop is being used and turn off the lights when the space is no longer occupied. In other environments, like parking lots or common corridors, occupancy sensors may be used to reduce the light output when no occupants are detected, but not completely turn off the lighting, to ensure some level of visibility and a sense of safety for occupants.
Source
Contact Closures
Contact closures are physical switches that are installed in a door, such as a closet, cabinet, or refrigerator door. When the door is closed, contact is made at the physical connection point where the switch is installed; this contact turns the light off. When the door is open, the connection is broken and the light comes on.
Daylight-Responsive Controls for Interior Fixtures
Daylight-responsive control – prioritizing daylight by dimming electric light – is mandated by energy codes for many interior spaces such as multifamily common spaces and other commercial spaces. Ambient light sensors or photocell sensors can automatically turn off or reduce electric light output when the available daylight exceeds the programmed target light level for the space. Figure 5 illustrates how daylight, as well as ambient light from other light fixtures and reflected light, contributes to the light reading collected at the sensor. Fixtures should be dimmable to allow a smooth adjustment between full on and full off based on the amount of light measured by the sensor. Sensors may be integral to the light fixture or mounted to the ceiling. Fixtures with integral sensors typically combine occupancy and daylight sensing capabilities. Field-adjustable settings related to daylight-responsive controls can vary greatly and can influence performance and energy savings.

Source
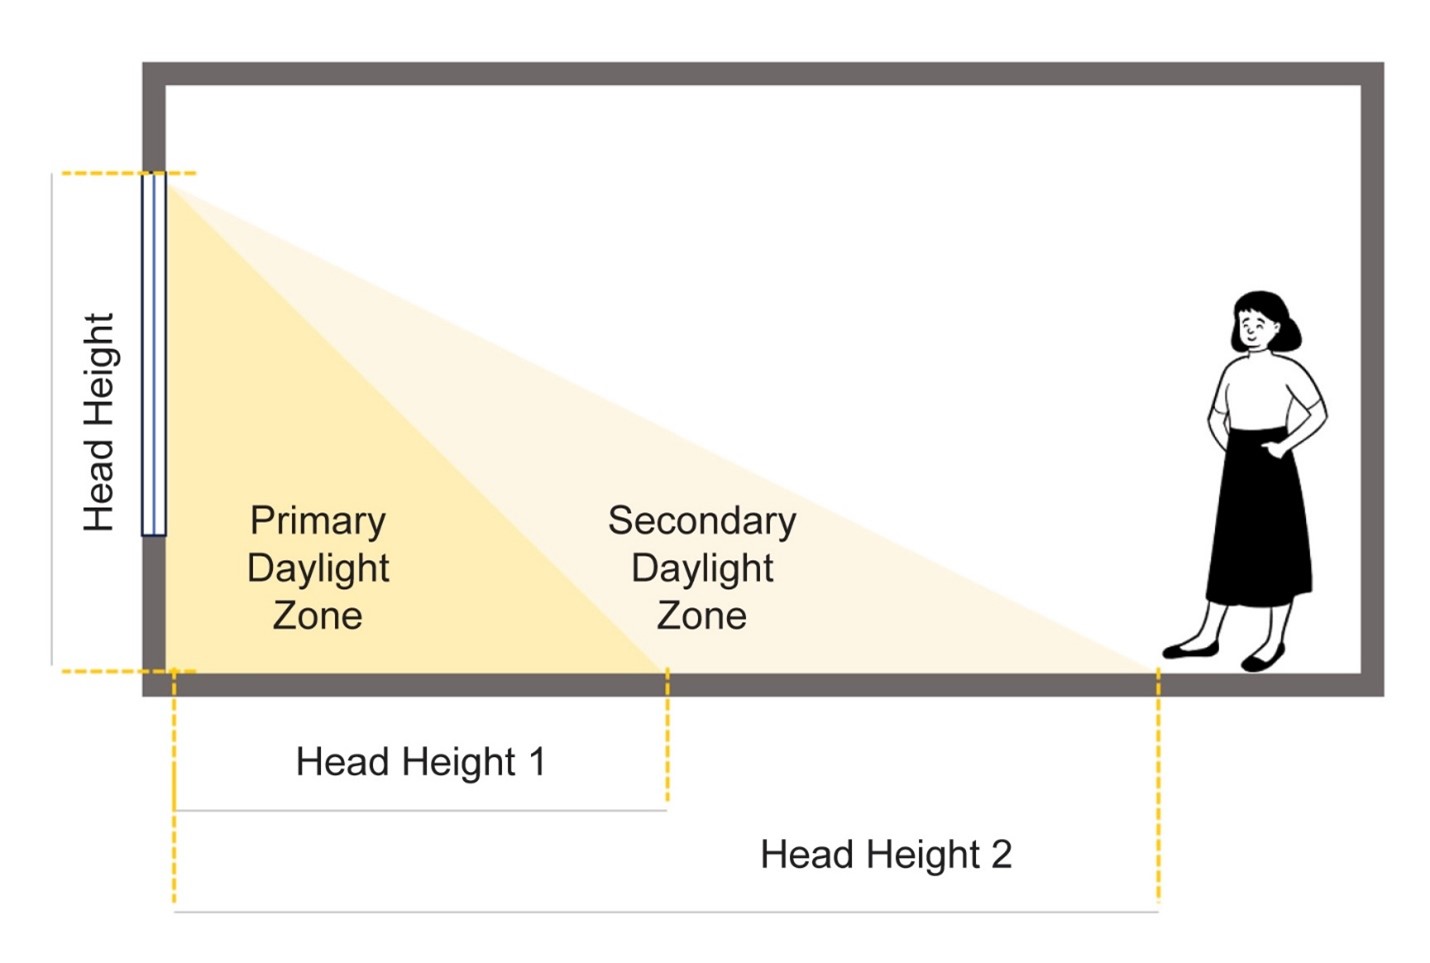
The room space next to a window that receives direct light from the window is called the daylight zone. Energy code requirements typically refer to the primary and secondary daylight zones. These zones are based on the height of the window - the taller the window, the further daylight can typically penetrate directly into the room. The primary daylight zone is adjacent to the window and is equal to the head height (HH) of the window. The standard head height for windows in a building with 8-foot ceilings is 6 foot, 8 inches. The secondary daylight zone is adjacent to the primary zone and is also equal to the height of the window. These zones are illustrated in Figure 6.
Source
Photocell sensors can also be used in exterior environments as the primary method of control to turn lighting on or off based on available daylight. Many exterior lighting fixtures have an integral photocell sensor and logic that turns lighting on at dusk and off at dawn.
Daylight-Responsive Controls for Exterior Fixtures
Photocells are often incorporated into exterior light fixtures. They trigger electric lights to turn on when the ambient lighting is low.
For exterior applications, residents often want a combination of controls including both photocells and motion sensors. The photocell prevents lights from coming on during the day and the motion sensor triggers the light to come on at night only when it senses movement. By combining both sensors, the exterior lights provide security and safety without keeping the lights on all night long (which may annoy neighbors and will definitely waste energy). Combination controls exist for both single-family residential and larger commercial-style multifamily applications.
Lighting Control Strategies for Common Spaces in Multifamily Buildings
Table 1 offers examples of which types of lighting control strategies to use in which types of common areas in multifamily buildings.
Table 1. Lighting Control Strategies for Specific Common Area Spaces
| Space Type | Common Control Strategies |
| Interior – Shared or Common Spaces | |
| Hallway, Stairwell, Lobby, or Vestibule | Use occupancy sensors in occupancy mode that increase lighting output when the space is occupied and reduce lighting output when no occupants are present. Do not allow sensors to turn the lighting off. Local controls are typically not provided in shared spaces that are in operation 24 hours a day. If the space is daylit, add daylight-responsive controls that allow the lighting to dim to a minimal output, but not turn off completely. |
| Laundry Room | Use occupancy sensors in occupancy mode. All lighting should turn off after a short timeout period (e.g., 5-10 minutes) when the space is unoccupied. Provide at least one local control station for occupant override in case the sensors fail. If the space is daylit, add daylight-responsive controls. |
| Restroom | Use occupancy sensors in occupancy mode. All lighting should turn off when the space is unoccupied. Consider using a relay to turn on ventilation when the space is occupied. Be sure to install sensors so that the entire space has adequate coverage and lighting will not turn off when only part of the space is in use. If the restroom is designed for a single occupant, a local control may be provided. Local controls are typically not provided in restrooms for multiple occupants. |
| Exercise and Day Care Areas | Use occupancy sensors in occupancy mode. All lighting should turn off when the space is unoccupied. Be sure to install sensors so that the entire space has adequate coverage and lighting will not turn off when only part of the space is in use. Provide at least one local control station for occupant override in case the sensors fail. If the space is daylit, add daylight-responsive controls. |
| Interior – Living Spaces | |
| Dwelling Unit/Single-Family Home | Provide dimming wherever feasible in bedrooms, dining, and living spaces. Fixture-integrated occupancy sensors that turn lighting off automatically may be useful for closets and kitchen or garage task lighting. |
| Exterior – Shared or Common Spaces | |
| Entry/Perimeter/Pedestrian Lighting | Lighting that allows residents to safely navigate their environment after dark can be controlled by an astronomical timeclock or a photocell sensor. Occupancy sensors may be used to reduce light output, but not turn lighting completely off, when no activity is detected. |
| Landscape/Decorative Lighting | Accent lighting that does not support safe navigation or illuminate signage should turn off based on a daily schedule. Code language suggests turning the lighting off at midnight. Lighting may turn on in the morning one hour before dawn, then turn off again based on an astronomical timeclock or photocell sensor. |
| Exterior – Living Spaces | |
| Dwelling Unit/Single-Family Home | Exterior lighting that is used by a single dwelling unit should be controlled locally. |
Local, Networked, and Smart Lighting Control Systems
Traditional lighting systems rely on localized controls, where wall switches or sensors are directly connected to the lighting zone or zones they control. These systems are also called room-based control systems because the communication between devices is limited to that room or space. In contrast, centralized or networked lighting controls facilitate broad-scale communication throughout the building and allow lighting to be controlled both locally and from a central control point, such as a building automation system or dedicated lighting control server. Networked systems means that the system can be controlled from one point in the building or in some cases, the system can communicate out of the building to the “cloud,” although connecting out of the building is not seen with all networked systems. “Hybrid” lighting control systems allow some spaces to be networked and controlled centrally while other systems rely on the local controls in that room or area. For example, in a multifamily structure, lighting in the hallways and lobby areas may be networked while individual dwelling units may have lighting fixtures that are controlled by local controls. Lastly, enterprise-level lighting control systems allow property managers with multiple buildings to connect individual networked lighting control systems to a central management system via the internet.
Local control systems have the lowest equipment cost, use a less sophisticated commissioning process, and require little oversight during operation. Networked lighting controls and enterprise-wide systems are likely to be more expensive, have a more sophisticated commissioning process typically completed by a contractor or manufacturer technician, and will require oversight during operation. For example, networked lighting control systems will require software and firmware updates throughout their lifetime. Requirements will vary from system to system; however, some systems require each device to have its software or firmware updated individually, which can take anywhere from 10 to 45 minutes per device.
Wired versus Wireless Controls
Lighting control devices can be hard-wired to the fixtures or may communicate wirelessly via radio frequency (RF). Wired controls use low-voltage communication wire to transmit a signal between devices locally while wireless controls leverage specific RF protocols. All of the lighting system’s wireless control devices need to use the same RF protocol. A device called a gateway, hub, or bridge may act as a translator between the central server or building automation/management system (BAS/BMS) and individual control devices. RF communication does have distance limits; however, the radio signal can be amplified and repeated if necessary. Review manufacturer documentation for the number of devices the control system can support and the distance the signal can travel.
Wireless controls may save substantial labor cost and installation time for most projects, but particularly for retrofit scenarios because they eliminate the need to install control wiring. However, power sources for the devices need to be considered. Keypads that don’t need a battery and generate enough energy in “flipping the switch” do exist. However, sensors will require an actual battery or will need to be hard-wired to a power source. Many wireless sensors that are powered by batteries include 10-year batteries, but it is good to verify. Other wireless equipment requires a hard-wired power source. This means the power supply is wired to a building circuit or physically plugged into a wall electrical outlet. Battery-powered wireless sensors can be mounted to walls or ceilings where wiring would be impractical or impossible to install. Physical wiring of zones requires an electrician, can be costly, and is difficult to change after installation.
Wired lighting control systems can communicate via digital or analog methods. All wireless systems utilize digital communication. Digital communication can relay a signal to individual fixtures instead of larger groups of fixtures typically determined by physical wiring. This provides an additional layer of programming flexibility because lighting control zones are not limited by physical wiring and zoning can be changed in the future as needed. Wired analog systems do not offer this degree of flexibility and any future changes require rewiring the system.
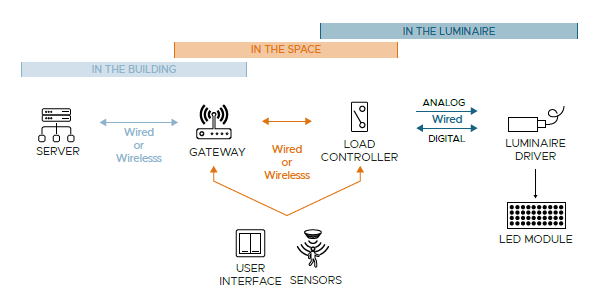
Most lighting control manufacturers offer a suite of products to create a complete control system from a single supplier. Components may include load controllers, transformers, user interfaces, occupancy sensors, ambient light sensors or photocells, timeclock controllers, gateways for extending communication, servers for storing control settings and other data, and in some cases, other software applications.
Figure 7 shows the typical components found in a networked lighting control system, communication and wiring options, and the location of each component. Note that not all control systems, even networked controls, require all of the components shown in the diagram.
Source
Document serving as a resource to assist decision-makers in understanding how networked lighting control system attributes can satisfy project objectives at an appropriate cost and functionality
Smart Lighting Controls in Individual Dwelling Units
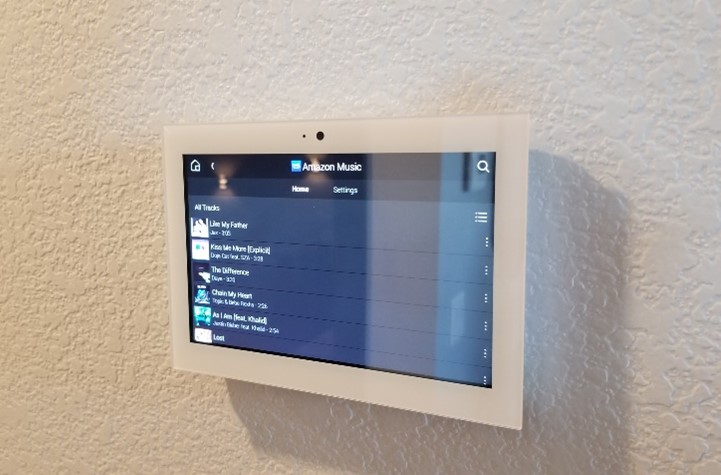
In multifamily dwelling units, it is common for building owners to provide permanently installed light fixtures in the entry, kitchen, bathrooms, hallways, and often bedrooms. These fixtures are not networked or connected to a central building automation system or a building-wide networked lighting system. Additional lighting is typically added at the discretion of the residents. Some building owners may provide an upgraded dwelling unit lighting control system as an amenity to residents. An upgraded system of this nature may provide remote control of lighting from a mobile app, the ability to turn all lighting on or off from a central control location, scheduling options, window shade controls, and other non-lighting features such as home security or alarm capabilities, sound control, and temperature control. An example control interface is shown in Figure 8. This type of system would be purchased by the building owner and installed during building construction or renovation.
Source
Although slightly less sophisticated and lacking integration with all of the permanently installed lighting, residents with simple lighting controls may decide to purchase “smart” lamps (light bulbs) or light fixtures with embedded communication capability that can be installed by the resident into permanently installed light sockets or moveable light fixtures provided by the resident. Many of the same features are available, such as remote control from a mobile app, central control of all smart or connected devices, and scheduling capabilities. These systems typically include a device called a gateway or hub, shown in Figure 9, that a resident can install and connect to their individual internet connection.
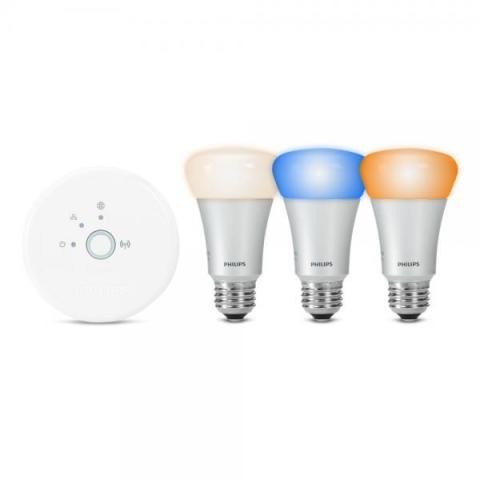
Source
Applications for Local, Networked, and Smart Controls
Table 2 shows examples of local, networked, and smart lighting controls in single-family and multifamily buildings.
Table 2. Applications for Local and Networked Lighting Control Systems in Single-Family and Multifamily Buildings
Lighting Control System | Single-Family/Duplex | Multifamily | |
Common Spaces | Individual Dwelling Unit | ||
| Local Control | Non-networked, local room-based controls. May have dimming and timers plugged into outlets (typically installed by resident). | Non-networked lighting system. Any sensors, timers, or other control devices can be wired or wireless, but will be limited to the lighting control zone or space in which they are located. | Non-networked, local room-based controls. May have dimming and timers plugged into outlets (typically implemented by the resident). |
| Networked Controls | Allows control of all lighting from a single interface; may include operation of window blinds, and scheduling of exterior lighting. Installed by a contractor, electrician, or manufacturer technician. | Allows for centralized control of all networked lighting from a central system and integration with other building automation systems. Networked controls provide flexibility for the future and easily support wireless control devices. | Some building owners may provide a networked lighting control system in individual dwelling units, but this system will not communicate beyond each unit. Networked lighting controls may facilitate integration with other systems such as security, sound, blinds, or temperature control and may support centralized control of all lighting via a mobile app or user interface in the unit. |
| Smart Lighting Controls | Installed by owner or resident. May have remote access via a mobile app. May include other controls like operation of window blinds, sound, security… | N/A | Installed by owner or resident. May have remote access via a mobile app. May include other controls like operation of window blinds, sound, security… |
Code Requirements
Both ASHRAE and the International Energy Conservation Code(IECC) have separate code requirements for multifamily dwellings over three stories and single-family homes and multifamily structures less than three stories tall. For both standard codes, multifamily structures over three stories reference commercial building codes, while residential codes apply to structures less than three stories as well as single-family homes.
Relevant code requirements are excerpted and summarized below. Note that the IECC standard is organized by control function, while the ASHRAE 90.1 standard lists required control functions by space type. For exact code language, refer to the applicable code. It is best to check with your local code authority as local amendment at adoption can result in requirements that vary greatly from these standards.
In all cases, lighting that is required for occupant safety and security in common areas of multifamily structures should not be controlled manually and should not be set to automatically turn off completely.
ASHRAE/IES Standard 90.1 Energy Standard for Sites and Buildings Except Low-Rise Residential BUIldings
9.1.1 Scope (2022, 2019, 2016, 2013, 2010, 2007) – This section states that the code applies to lighting equipment and systems servicing new buildings, additions, and alterations of the interior or exterior. See code language for specific criteria and definitions for alterations.
9.4.1 Lighting Control (2022, 2019, 2016, 2013) – Specific lighting control functions must be applied to each interior or exterior space type. While the number and specific functionality required may change between code years, the control functions may reference manual control of lighting, occupancy sensor control, time-based control, or daylight-response control.
9.4.3 Dwelling Units (2022) – This section provides specific guidelines for lighting within dwelling units in multifamily structures three stories or taller. It states that lighting equipment should meet the following provisions:
9.4.3.2 Dwelling Unit Interior Lighting Controls: 50% of permanently installed luminaires shall be controlled with dimmers or shall automatically turn off within 20 minutes of all occupants leaving the space.
9.4.3.3 Dwelling Unit Exterior Lighting Controls: Permanently installed exterior lighting dedicated to a dwelling unit shall have manual controls as well as automatic controls that shut off exterior lighting based on time of day, available daylight, or when no activity has been detected for 15 minutes.
9.4.1 (2022, 2019, 2016, 2013, 2010, 2007) also states that no other provisions of Section 9 apply to dwelling units or state that interior and exterior lighting are excluded from the scope entirely.
Table 9.4.2-2 Individual Lighting Power Allowances for Building Exteriors Applications (2022) – Provides exterior lighting control requirements for each exterior area, such as building facades, stairways, walkways, and building entrances. See the code for specific requirements. The code may require daylight-responsive controls that turn lighting off when sufficient daylight is available, time-based controls that turn off or reduce decorative light output overnight, or occupancy sensors that reduce light output when no activity has been detected for 15 minutes.
9.4.1.4 Exterior Controls (2019, 2016, 2013, 2010) – all exterior lighting apart from lighting for signage should facilitate certain control strategies, including automatic shut off when sufficient daylight is available, automatic shutoff of decorative lighting overnight, and occupancy sensors that reduce light output when no activity has been detected for 15 minutes.
9.4.1.4 Exterior Controls (2007) – All exterior lighting should automatically turn off when sufficient daylight is available or when exterior lighting is not required. Refer to the code for specific device requirements.
Table 9.5.2.1-1 Space-by-Space Lighting Power Density Allowances and Minimum Control Requirements Using Either Method (i.e., space-by-space or building method) (2022, 2019, 2016, 2013) – This table provides the control requirements that need to be provided for each space type. The table references the control strategies outlined in the subsections following 9.4.1. Automatic shutoff is not required for spaces that are continuously lit or that operate 24 hours a day, like a common area corridor in a multifamily structure. Several space types commonly found in multifamily structures are listed below:
- Corridors – daylight-responsive controls are required; automatic light output reduction (based on occupancy) is required.
- Laundry – local control is required; multilevel control (dimmable lighting) is required; daylight response is required; automatic full off (based on occupancy) is required. Add either partial automatic on (based on occupancy) or restrict the lighting controls to manual on control only.
- Lobby – daylight-responsive controls are required. 2013 version also required automatic light output reduction (based on occupancy).
- Stairwell – daylight-responsive controls are required; automatic light output reduction (based on occupancy) is required. Multilevel control (dimmable lighting) is required in the 2019, 2016, and 2013 versions.
- Day care or gym/exercise area – local control is required; multilevel control (dimmable lighting) is required; daylight-responsive controls are required. 2016 and 2013 require either partial automatic on (based on occupancy) or restrict the lighting controls to manual on control only.
9.4.1 Lighting Controls (2010 and 2007) – Prior to 2013, the control requirements are not listed by space type in a table. This section states that automatic lighting shutoff is not required in spaces that are used continuously. The 2007 standard states that each lighting zone (group of lights controlled together) should be controlled manually by occupants or automatically by sensors. The 2010 version adds that multilevel control (dimmable lighting) is required in all spaces except for corridors, electrical or mechanical rooms, public lobbies, and stairwells. Daylight-response controls are also required in spaces larger than 250 ft.2. Lighting in stairwells should have a control device that automatically reduces lighting based on occupancy.
9.9.1 (2022 and 2019); 9.4.3 (2016 and 2013); 9.4.4 (2010) Verification and Testing – This section states that the operation of control devices should be tested to verify that the associated hardware and software are calibrated, adjusted, and programmed appropriately. Testing and verification procedures are provided for occupancy sensors, automatic time switches, and daylight-responsive controls.
ASHRAE 90.2-2018 Energy-Efficient Design of Low-Rise Residential buildings
This standard applies to one- and two-family structures as well as multifamily structures that are less than three stories tall. Lighting in dwelling units must comply.
7.5.2 Efficiency and Controls (2018) – Except for lighting for safety and security, all permanently installed lighting fixture or lamps should be controlled by dimmers or automatic shutoff controls.
7.5.4 Multifamily structures (2018) – This section states that the common areas of low-rise multifamily structures such as stairwells, and lobbies, as well as exterior spaces, should follow the high-rise multifamily codes in ASHRAE 90.1, which are listed above.
International Energy Conservation Code (IECC) and International Residential Code (IRC)
Residential Energy Efficiency
IECC R404.1 (2021, 2018, 2015, 2012, 2009) and IRC N1104.1 (2021) Scope – The following information applies to new construction, alterations, or additions to residential buildings including dwelling units. See code language for specific criteria and definitions for alterations.
R404.2 (2021) and IRC N1104.2 (2021) Interior lighting controls – permanently installed fixtures shall be controlled with either a dimmer, an occupancy sensor, or other control device that is integral to the light fixture. Lighting for safety and security, dwelling unit bathrooms, and dwelling unit hallways do not apply.
R404.3 (2021) and IRC N1104.3 (2021) Exterior lighting controls – if exterior lighting is less than 30 watts, lighting shall be controlled by a manual switch with automatic shut off (based on time or occupancy). If exterior lighting is greater than 30 watts, lighting shall be automatically shut off when daylight is available. Override controls are not allowed unless the override control returns to normal operation within 24 hours.
IECC Commercial Energy Efficiency
C405.1 (2021, 2018, 2015, 2012) General – The following information applies to new construction, alterations, or additions to multifamily residential buildings greater than three stories tall. See code language for specific criteria and definitions for alterations. Lighting for dwelling units should comply with R404.1 or C405.2.5 (Specific application controls) as applicable.
C405.2 (2021, 2018, 2015) Lighting controls – Lighting controls listed in the following sections are not required for security lighting or areas that are required to be continuously lighted.
C405.2.1.1 (2012 and 2009) Interior lighting controls – Each area enclosed by walls or full height partitions should have at least one manual control. Areas that are continuously lit or for means of egress in stairwells or corridors do not require manual controls.
C405.2.1 (2021, 2018, 2015) Occupant sensor controls – Occupancy sensors are required in public restrooms, storage rooms, and other spaces 300 ft.2 or less enclosed by walls or full height partitions.
C405.2.2.2 (2012) Occupancy sensors – Occupancy sensors are required in public restrooms and other spaces 200 ft.2 or less enclosed by walls or full height partitions.
C405.2.1.1 and C405.2.1.4 Occupant sensor control functionality – See code language for specific functional requirements. Automatic-on controls (based on occupancy) are permitted in common area corridors, stairwells, restrooms, lobbies, and where manual operation would endanger occupant safety.
C405.2.2 (2021, 2018, 2015) Time-switch controls – Each area that is not provided with occupancy sensors should be controlled by a time-switch. Spaces intended for continuous operations or where automatic shutoff would endanger occupant safety do not apply. The automatic time switch should include and override manual switching device.
C405.2.2.1 (2012) Automatic time-switch control devices – automatic time switches should be installed in all areas except egress lighting and spaces controlled by occupancy sensors. The automatic time switch should include and override manual switching device.
C405.2.2.1 (2021, 2018, 2015) Time-switch control function – Time-switches should automatically turn lighting off when the space is scheduled to be unoccupied. See code language for specific functional requirements.
C405.2.3.1 (2021); C405.2.2.2 (2018, 2015); C405.2.1.2 (2012); C505.2.2.1 (2009) Light-reduction control function – Spaces shall have a manual control that allows the occupant to reduce the light output by at least 50%. Not required where there are daylight-responsive controls.
C405.2.5 (2021); C405.2.4 (2018) Specific application controls – permanently installed luminaires within dwelling units shall be provided with controls complying with C405.2.1.1 (Occupancy sensor control functionality) or C405.2.3.1 (Light-reduction control function).
C405.2.2 (2012, 2009) Additional lighting controls – apart from spaces intended for continuous operation, further lighting controls may be necessary. See code language for specific criteria and control requirements.
C405.2.4 (2021); C405.2.3 (2018 and 2015) Daylight-responsive controls – Daylight-responsive controls should be provided in side- or top-lit spaces exceeding the wattage criteria. See code for specific criteria.
C405.2.2.3 (2012); C505.2.2.3 (2009) Daylight zone control – Lighting in daylight zones should be controlled independently of general area lighting. Control may be automatic or manual.
C405.2.6 (2021); C405.2.5 (2018); C405.2.2.3 (2015) Manual controls – Where required, manual controls should be readily accessible to occupants and should be located so that the occupants can see the lighting they are controlling.
C405.2.1 (2012) Manual controls – Manual controls should comply with requirements in C405.2.1.1 (occupancy sensor control functionality) or C405.2.1.2 (Light-reduction control function).
C405.2.7 (2021); C405.2.6 (2018); Exterior lighting controls – Lighting controlled from within dwelling units do not apply, all common area exterior lighting should comply with section C405.2.7.1 (daylight shutoff), C405.2.7.3 (lighting setback), and C405.2.7.4 (exterior time-switch control function)
C405.2.7.1 (2021); C405.2.6.1 (2018) Daylight shutoff – Lighting should automatically turn off when sufficient daylight is present.
C405.2.7.3 (2021); C405.2.6.3 (2018) Lighting setback – All exterior lighting, including landscape lighting or building façade lighting, should be controlled so that the light output is reduced by at least 50% (at least 30% in 2018 version) between midnight and 6 a.m., or during periods of inactivity (based on occupancy).
C405.2.7.4 (2021); C405.2.6.4 (2018) Exterior time-switch control function – If a time-switch is used to accomplish exterior lighting capabilities, see code for specific operating requirements.
C405.2.5 (2015) Exterior lighting controls – All exterior lighting apart from building entrances should be provided with a control that automatically turns the lighting off. See code for specific operating criteria.
C405.2.4 (2012); C505.2.4 (2009) Exterior lighting controls – Lighting not designated for dusk-to-dawn operation shall be controlled by either a photosensor and time switch or an astronomical time switch. Lighting designated for dusk-to-dawn operation should be controlled by an astronomical time switch or photo sensor.
Who Does the Work?
A licensed electrician must complete installation of control wiring and control devices. A general contractor or electrician may be responsible for setup and programming after the initial electrification. Some advanced systems will require a manufacturer representative onsite to complete system programming. Smart lighting systems installed in individual dwellings with a mobile app may be set up by a professional or by the resident themselves. If the system is set up by a professional, the professional should review the programmed settings with the resident.
How to Select, Install, and Verify a Lighting Control System
- Select a lighting control system.
- The architect, electrical engineer, or building owner will most likely select the control system. If you are responsible for selecting the control system, review Kelly, Taylor, & Blitzer 2023 or follow these steps:
- Based on local code requirements and the owner’s goals, determine which capabilities are required for your lighting control system.
- Based on project scale and building characteristics, develop system architecture properties that support the project goals and provide the easiest installation.
- Review manufacturer documentation and system specifications to determine which products meet your specifications.
- Install devices according to manufacturer instructions.
- Some lighting control components are integrated into the light fixtures and others will be standalone. Install all light fixtures and associated controls components according to architectural drawings or manufacturer documentation.
- If using a networked lighting control system, install relevant gateways or servers required by the specific system. Gateways are typically located throughout the building according to range and quantity specified by the manufacturer. A server may be located locally on site in a utility room or closet or may be managed offsite and accessed through intra/internet.
- System Programming and Performance Verification
- After initial electrification, complete system programming according to manufacturer documentation. For some advanced systems, a representative from the manufacturer may be responsible for initial system programming.
- Complete any testing or performance verification after the system has been programmed and adjust settings if necessary.
Ensuring Success
- Because of the proprietary nature of many networked lighting control systems today, consult with an electrical engineer or a manufacturer representative for help designing and specifying an appropriate lighting control solution.
- Be aware of the ongoing maintenance including software and firmware updates that will need to happen over the lifetime of the system.
- Be sure to locate occupancy sensors so that the room or space is adequately covered.
- Commission lighting controls by verifying performance of the occupancy sensors, schedules, and daylight sensors at installation to avoid occupant complaints.
- Lighting controls that are installed as a retrofit will most likely involve disturbing the ceiling. Be aware if asbestos or other hazardous materials are present. Wireless lighting controls may be a solution to avoid disturbing the ceiling in some cases.
Testing Requirements
The ANSI/ASHRAE/IES Standard 90.1 references verification and testing procedures to ensure control devices are programmed and operating properly. Refer to the Standard for specific procedures for verifying the performance of occupancy sensors, timeclock controls, and daylight responsive controls. Identifying programming or operational issues early on can reduce complaints from occupants and minimize the need for device troubleshooting.
Manufacturers’ documentation may include information on verifying performance for their specific devices and field-adjustable settings. Language and terminology can vary between manufacturers for different settings, so refer to the actual product’s documentation during installation, verification, or adjustment.
Additional Training
Several organizations offer lighting control training programs for contractors or licensed electricians to become a certified installer. Lighting control manufacturers also offer training for specific product lines. Here are some organizations that offer lighting controls training.
- California Advanced Lighting Controls Training Program (CALCTP) (https://www.calctp.org/)
- DesignLights Consortium (DLC) – Advanced Lighting Control Systems Training Program (https://www.designlights.org/our-work/networked-lighting-controls/lighting-controls-training-programs/)
- Lighting Controls Association (LCA) (https://aboutlightingcontrols.org/EducationExpress/)
Region
No climate‐specific information applies.
Training
Presentations


Videos

Compliance
Retrofit
The information in this guide applies to new and existing residential buildings. Some energy codes require additional lighting controls to be installed during a retrofit or major renovation. Existing in-line wired controls such as occupancy sensors embedded in wall switches or time clock controls wired to a lighting zone can still operate if new lighting fixtures are installed. Likewise, new control devices can be added to existing light fixtures as long as the light fixtures are compatible with the new lighting controls. If a networked lighting control system is selected, the system will most likely require all new control devices that are compatible with the new lighting control system.
Unknown conditions behind the ceiling in existing buildings may make the installation of new lighting control wiring challenging or expose contractors completing the work to hazardous materials, such as asbestos. Wireless control systems that use radio communication to connect control devices eliminate the need for control wiring and ceiling access which can simplify the installation. Wired controls can significantly increase the labor cost for retrofit applications.
More Info
References and Resources
*For non-dated media, such as websites, the date listed is the date accessed.
Questions? Comments? Contact our webmaster.