

Introduction
Determine if you can benefit from replacing your old thermostat with a new smart thermostat.
Why
A smart thermostat might add convenience, control, new features, and improved energy efficiency to operation of your home’s HVAC (heating, ventilation, and air conditioning) but, before embarking on this DIY project, you may want to consider whether the benefits a smart thermostat can provide are actually features you can use. You’ll also want to make sure your home’s wiring and your HVAC equipment are compatible with a smart thermostat before you purchase one.
What You'll Need
- Drill
- Drill bits
- Small flathead screwdriver
- Philips screwdriver
- Hammer
- Wire stripper
- Smart thermostat
1. Ask yourself “Are the features offered by a smart thermostat features that I will benefit from?”
The most important question you need to answer before embarking on this DIY project is “Why do you want to replace your current thermostat with a smart thermostat?” Smart thermostats can offer many features, but given your home’s set up and your family’s schedules, you may not be able to benefit from them. We’ll address wiring and equipment compatibility issues in Steps 2 and 3 but first let’s look at smart thermostat features and whether they are beneficial for your circumstances. Depending on brand and model, many smart thermostats provide the following features:
- The ability to remotely check on and change the temperature setpoint and mode (heat/cool/off) of the thermostat.
- The ability to increase comfort by having one or more remote (battery-powered) temperature sensors send additional data to the thermostat about the temperature of the home.
- The ability to program in the utility’s time-of-use energy schedule and have the thermostat automatically reduce energy usage during hours when the electricity is expensive.
- The ability to save energy by having the thermostat learn when you are home or not home based on the location of your smartphone with the thermostat app downloaded, occupancy sensor data, and programmed schedule. When you are not home, the thermostat could be set to allow the home to rise to a higher temperature in the summer and a lower temperature in the winter, thus reducing the energy used.
- The ability to define how many degrees from the setpoint the indoor temperature can deviate before the heating and cooling equipment turns on. Increasing this value from the default, which is typically 1°F, can improve efficiency by reducing frequent on/off cycling at the cost of slightly decreased comfort.
- The ability to have the thermostat learn how long it takes for the home to heat up or cool down. This is useful if, for example, you have a nighttime setback scheduled so that overnight the heat won’t turn on until the indoor temperature falls to 68°F; however, at 7 AM you want the indoor temperature to be back to 72°F. A smart thermostat can learn what time to begin the heat up process so that by 7 AM the temperature is actually at 72°F. A thermostat without this intelligence would just start the heating process at 7 AM when the scheduled setpoint changes.
- The ability for the thermostat to check the hourly forecast and begin cooling the house earlier in the day if the forecasted afternoon peak temperatures will be very hot, thus improving comfort. Without this weather forecast-aware precooling/preheating feature, a home’s heating or cooling system might not be ready on an extremely hot or cold day.
- The ability to participate in a utility energy savings program, which could result in some energy bill savings at the small cost of some decrease in comfort.
Situations where a smart thermostat will provide limited benefits:
- If your home is occupied during the day and you have a desire to keep it at a steady temperature such as 72°F throughout the day and night, the amount of energy savings and improved comfort a smart thermostat can offer will be small.
- A smart thermostat is not a good idea if you, and other members of your household, don’t have the time or desire to learn how to use a new user interface and learn about how new features work. There is a bit of a learning curve with smart thermostats.
- If your home doesn’t have consistent Wi-Fi for the smart thermostat to use, it may not save as much energy as expected. Many smart thermostats utilize weather forecast data to improve decisions on when to begin heating or cooling.
- If you have large temperature differences between one part of the home and another, for example, between the upstairs and the downstairs, a smart thermostat will not be able to reduce these temperature differences. Big temperature differences in different parts of the home are not due to the thermostat (unless you have more than one thermostat controlling different zones in your home). The causes of such comfort problems are more likely to be due to:
- Problems with the duct system in the home, ex: broken or kinked duct connections or poorly designed or installed ducts.
- Lack of adequate air returns to the HVAC system.
- Missing or inadequate insulation.
- Air leakage in one part of the home.
- Old poorly insulating windows.
- Lack of shade or window coverings.
2. Determine if the wiring to your current thermostat is compatible with a smart thermostat.
The wiring in your home that goes from your HVAC system to your current thermostat may not be compatible with the wiring needed for a new smart thermostat. Here’s how you can check the wiring and rewire if needed to achieve the correct wiring necessary, depending on what smart thermostat model you purchase.
To access the wiring to the current thermostat:
- Power off your HVAC system by toggling the light switch next to the air handler or by flipping the HVAC circuit breaker to off at the electric panel.
- Confirm the system is off by waiting a few minutes and seeing that there is no heat being emitted from the vent or baseboards during the winter, or cool air from the vent during summer.
- Remove the thermostat from the wall, many thermostats just pop off or unclip with some pulling. Try pulling straight out or pulling from one edge. Some thermostats have one or more small screws that are accessed from the side, bottom, or top that need to be removed before the thermostat will come off.
Look at the size and number of wires connecting the thermostat to the wall:
Most smart thermostats require a low-volage circuit that is 24 VAC (volts alternating current) and a connection that has four available electric wires. Below are some scenarios you may encounter and how to address them, if you choose to install a smart thermostat. If you do not feel comfortable working with electric wiring, call an electrician.
120/240 VAC Wiring - Many thermostats are connected to low-voltage 24 VAC thin wiring (Figure 1). If you encounter thick wires behind your thermostat, these typically indicate standard house voltages of 120 or 240 VAC. There are only a few smart thermostats on the market that can work with line voltage (120/240 VAC); most models require 24 VAC. If your current thermostat is a line voltage thermostat, you’ll need to look for and purchase a smart thermostat that specifically works with line voltage. There are no thermostats that are compatible with both 24V and 120/240V AC, they are always one or the other.

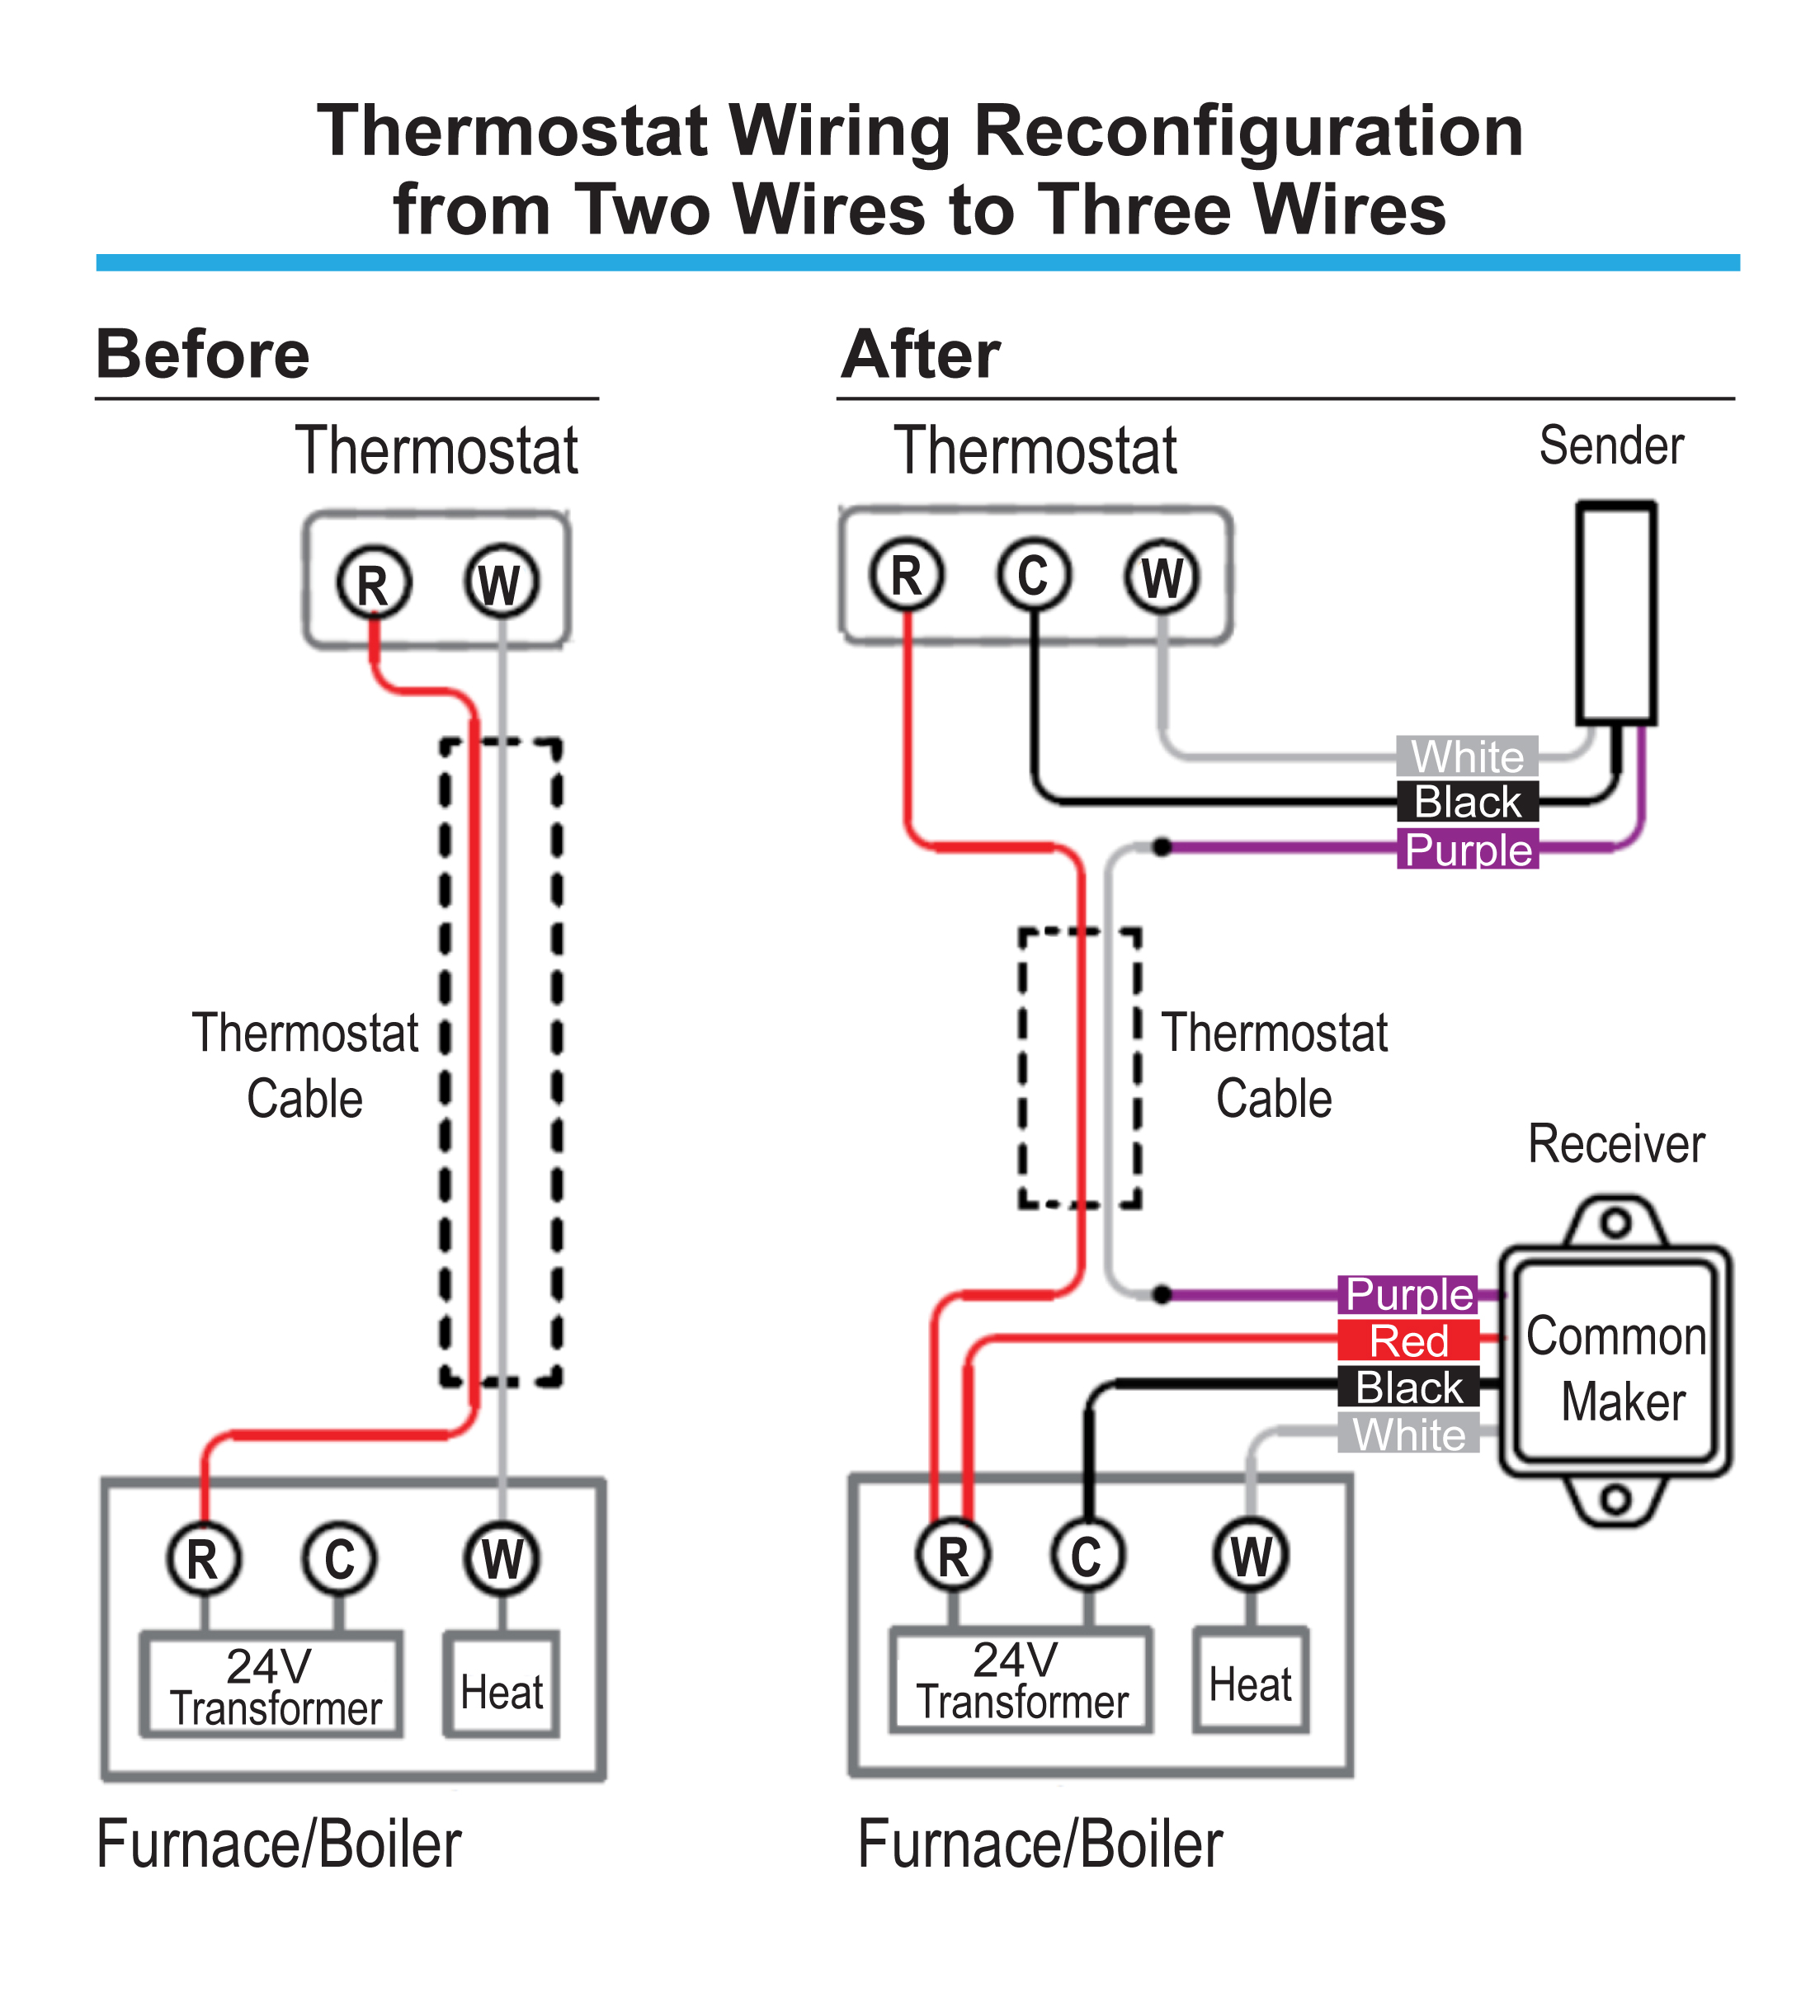
Only Two Wires – Most smart thermostats require four wires, but can be wired to work with three wires. If behind your thermostat there are only two wires and no additional wires available in the wall, you will need to purchase additional equipment to make this setup work with a smart thermostat. Typically, this will involve installing an AC power adapter or a third-party device (for example, the Common Maker made by Fast-Stat, see Figure 2).
Source
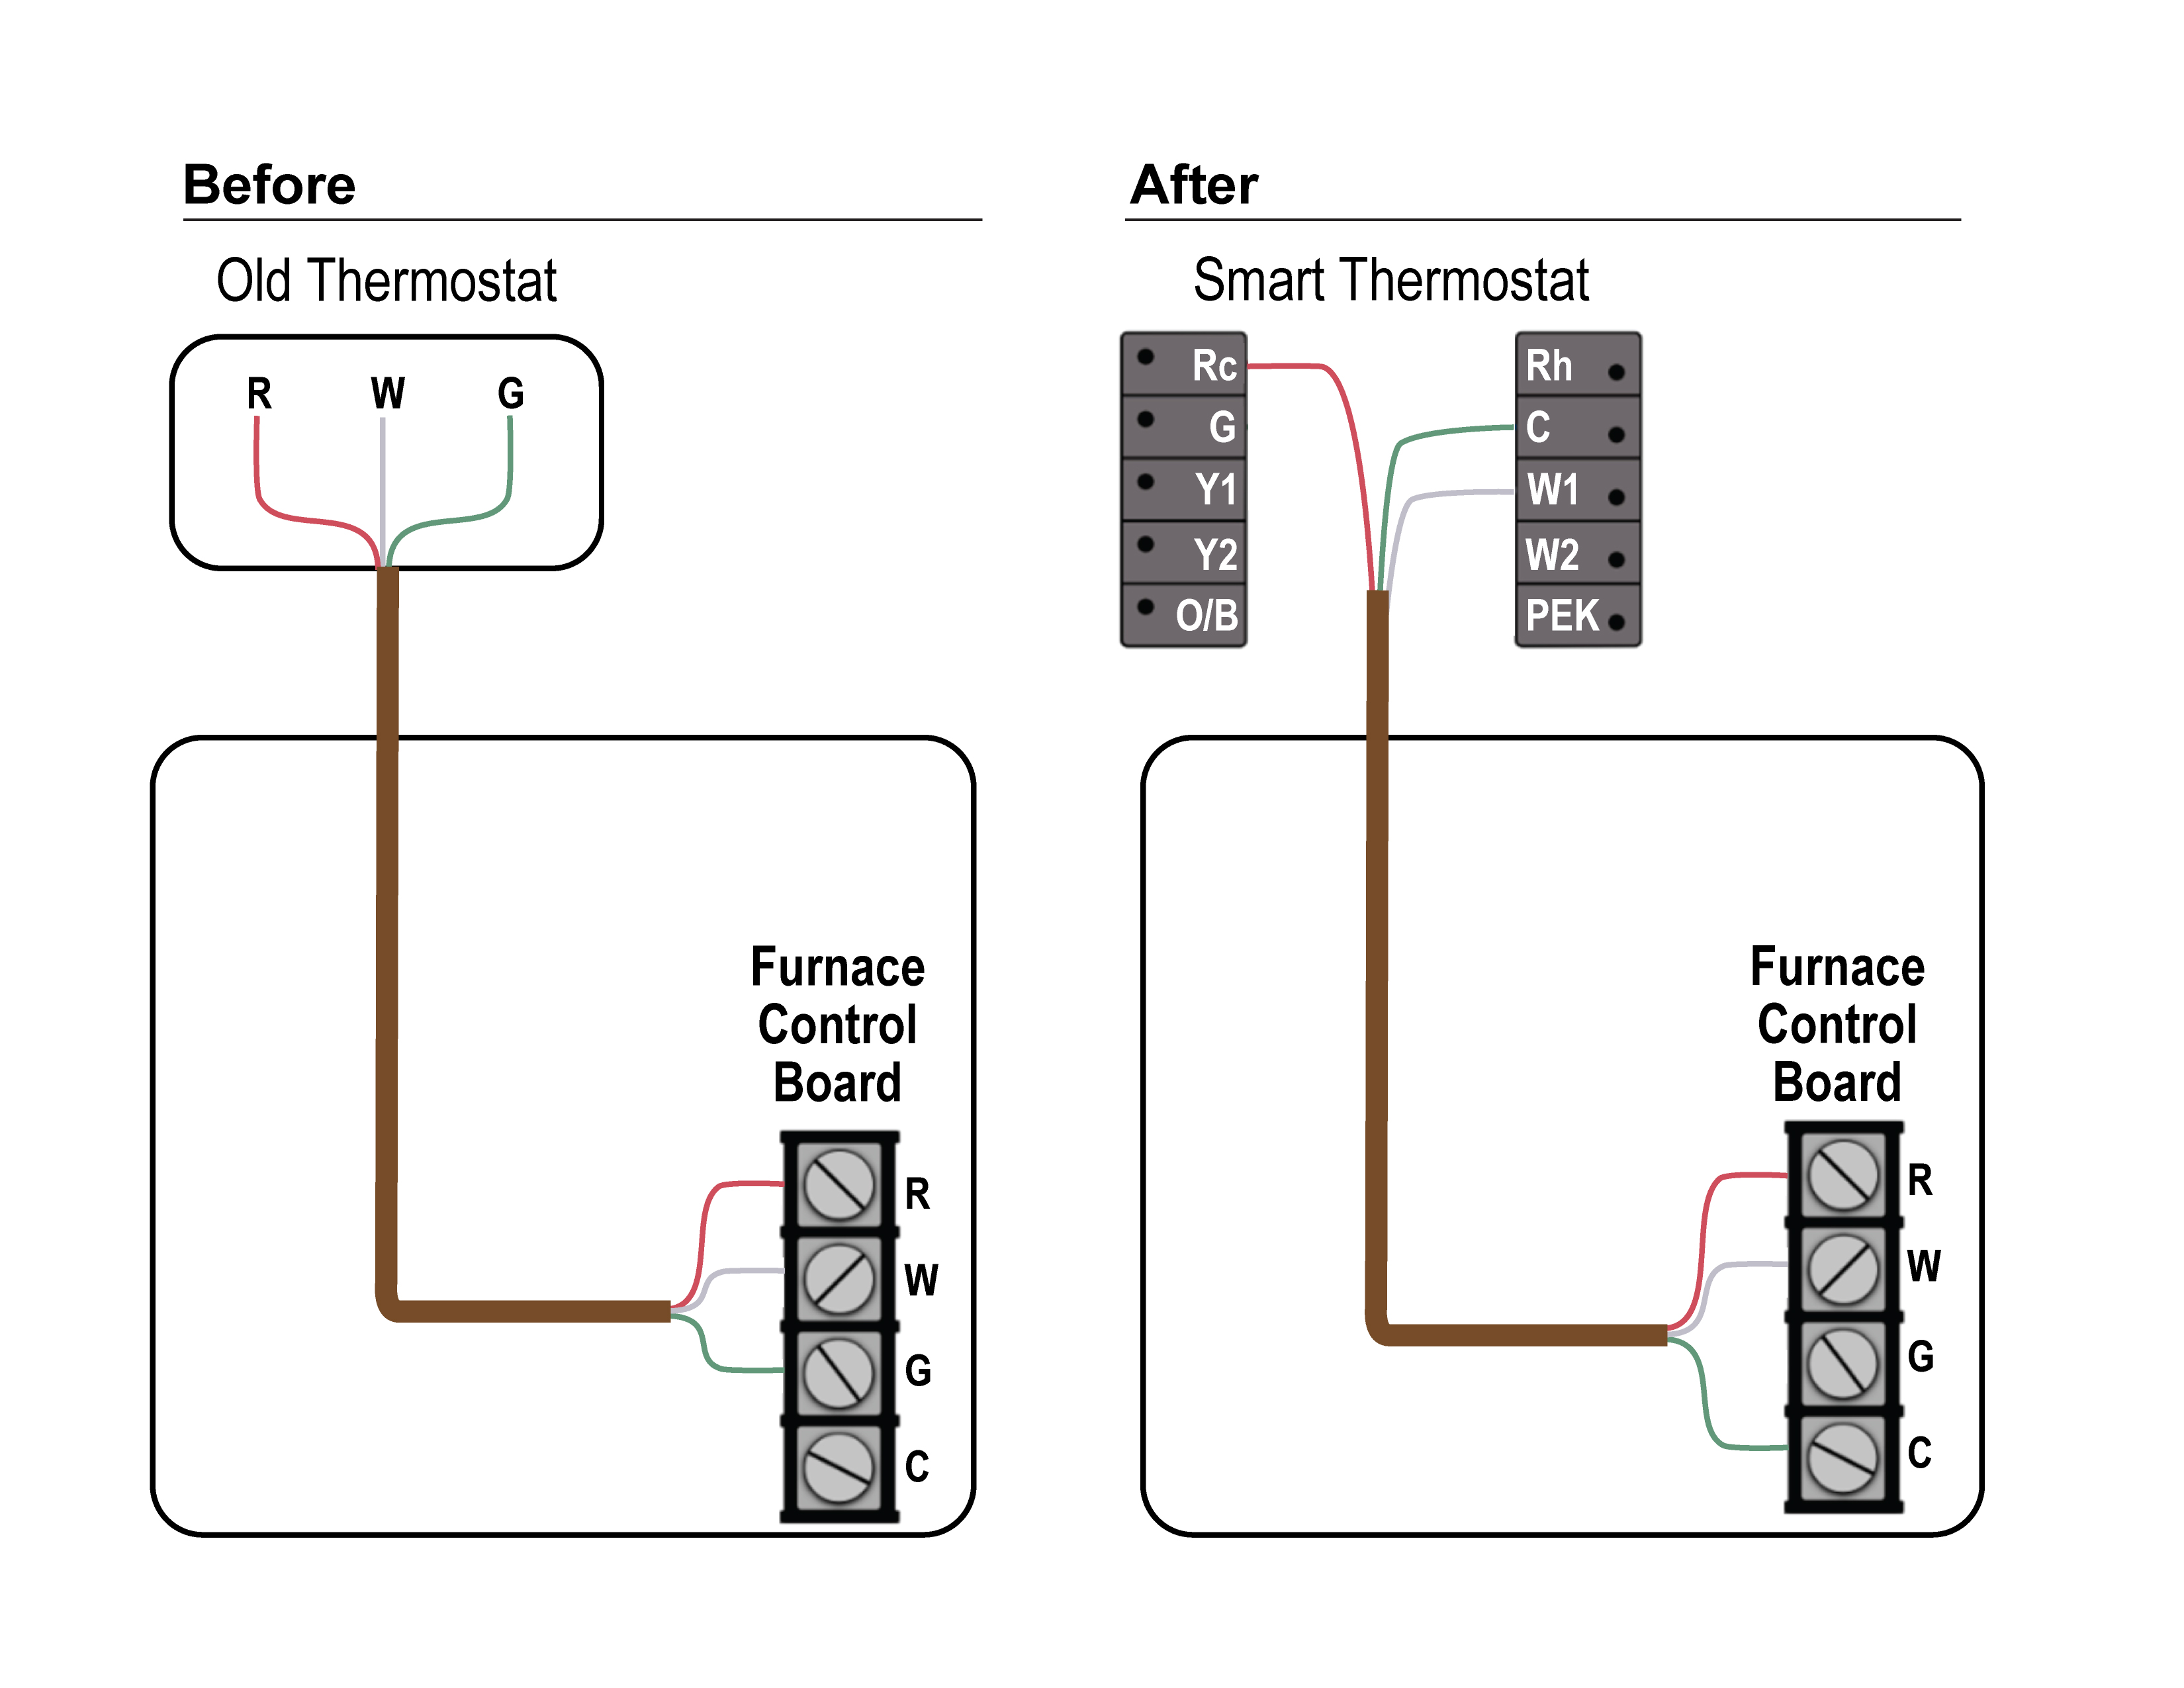
Only Three Wires – Most smart thermostats require four wires. If behind your thermostat there are only three wires and no additional wires available in the wall, most smart thermostats can be wired to work with only three wires, if you are ok with no longer having independent control of the fan. The solution is to repurpose the G wire (fan control) by moving it to C on both the thermostat and equipment side (Figure 3).
Source
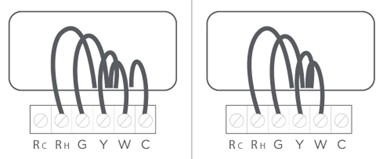
Four Wires - If your thermostat has four or more wires, then it is compatible with most smart thermostats following standard installation instructions (Figure 4).
Source
3. Determine if your HVAC equipment can be connected to a smart thermostat.
Some HVAC systems come with proprietary thermostats and those thermostats must be used with the HVAC equipment to get full functionality from the HVAC system. If your home has a heat pump that is an inverter-driven VRF (variable refrigerant flow) heat pump, there is a chance it uses a communicating thermostat made by the same brand; Figure 5 shows one example. The brand’s proprietary thermostat should be installed to run the heat pump for the most efficient operation with the most functionality. Some inverter-driven VRF heat pumps can be rewired and reconfigured to work with a third-party smart thermostat but the result is often a loss of features and possibly worse efficiency.

Source
4. How to find detailed installation instructions for a smart thermostat.
Most smart thermostats come with minimal printed instructions included in the product packaging. To access a complete set of installation instructions you typically must do one of the following:
- Scan a code with your smartphone either on a printed sheet of paper or on the screen of the thermostat to take you to a website with installation instructions, video(s) with instructions, or to a PDF to download containing detailed instructions.
- Almost all smart thermostats have an app to download onto your smartphone. That app sometimes includes step-by-step installation instructions.