Materials Cost: FREE
Difficulty Level: 1

Introduction

To maximize the life of your refrigerator, ensure your refrigerator cools your food down quickly, and save energy, it is important to clean the condenser coils behind or below the refrigerator every 6 to 12 months.

Why

Refrigerators utilize heat exchangers, commonly referred to as condensers, to facilitate the transfer of heat from refrigerant to the surrounding air. Refrigerant fluid must be cooled because it absorbs heat from within the refrigerator chamber, providing a cooling effect. Refrigerators work by circulating refrigerant through tubes in the walls of your refrigerator. As this refrigerant moves around the refrigerator compartments, it picks up heat, then carries that heat outside of the refrigerator where it is released to the air from the condenser coils on the back or underside of your refrigerator. If those coils are covered with dust and debris, it’s harder for the heat to be released to the air. Cleaning your coils regularly improves the efficiency, performance, and lifespan of your refrigerator.

What You'll Need

•    Vacuum (preferred), broom, or dust brush
•    Condenser coil brush  or other cleaning brush
•    Rag, warm water, dish cleaning liquid
•    Dust mask (if sensitive to dust)


1. Unplug refrigerator.

Unplug the refrigerator before cleaning the coils. You may need to move the refrigerator to access the outlet.


2. Locate condensing coils.

In newer refrigerator models, the condensing coils are usually located on the front of the refrigerator, at the bottom, below the door, behind a grill (Figure 1). These grills typically snap into place, but some are held in place with screws that will need to be unscrewed. In older models of refrigerators, the coils are often located on the back of the refrigerator; you may need to move the refrigerator forward to access them. Consult the instruction manual for your refrigerator model or search online to find detailed instructions on cleaning the condenser coils on your model.
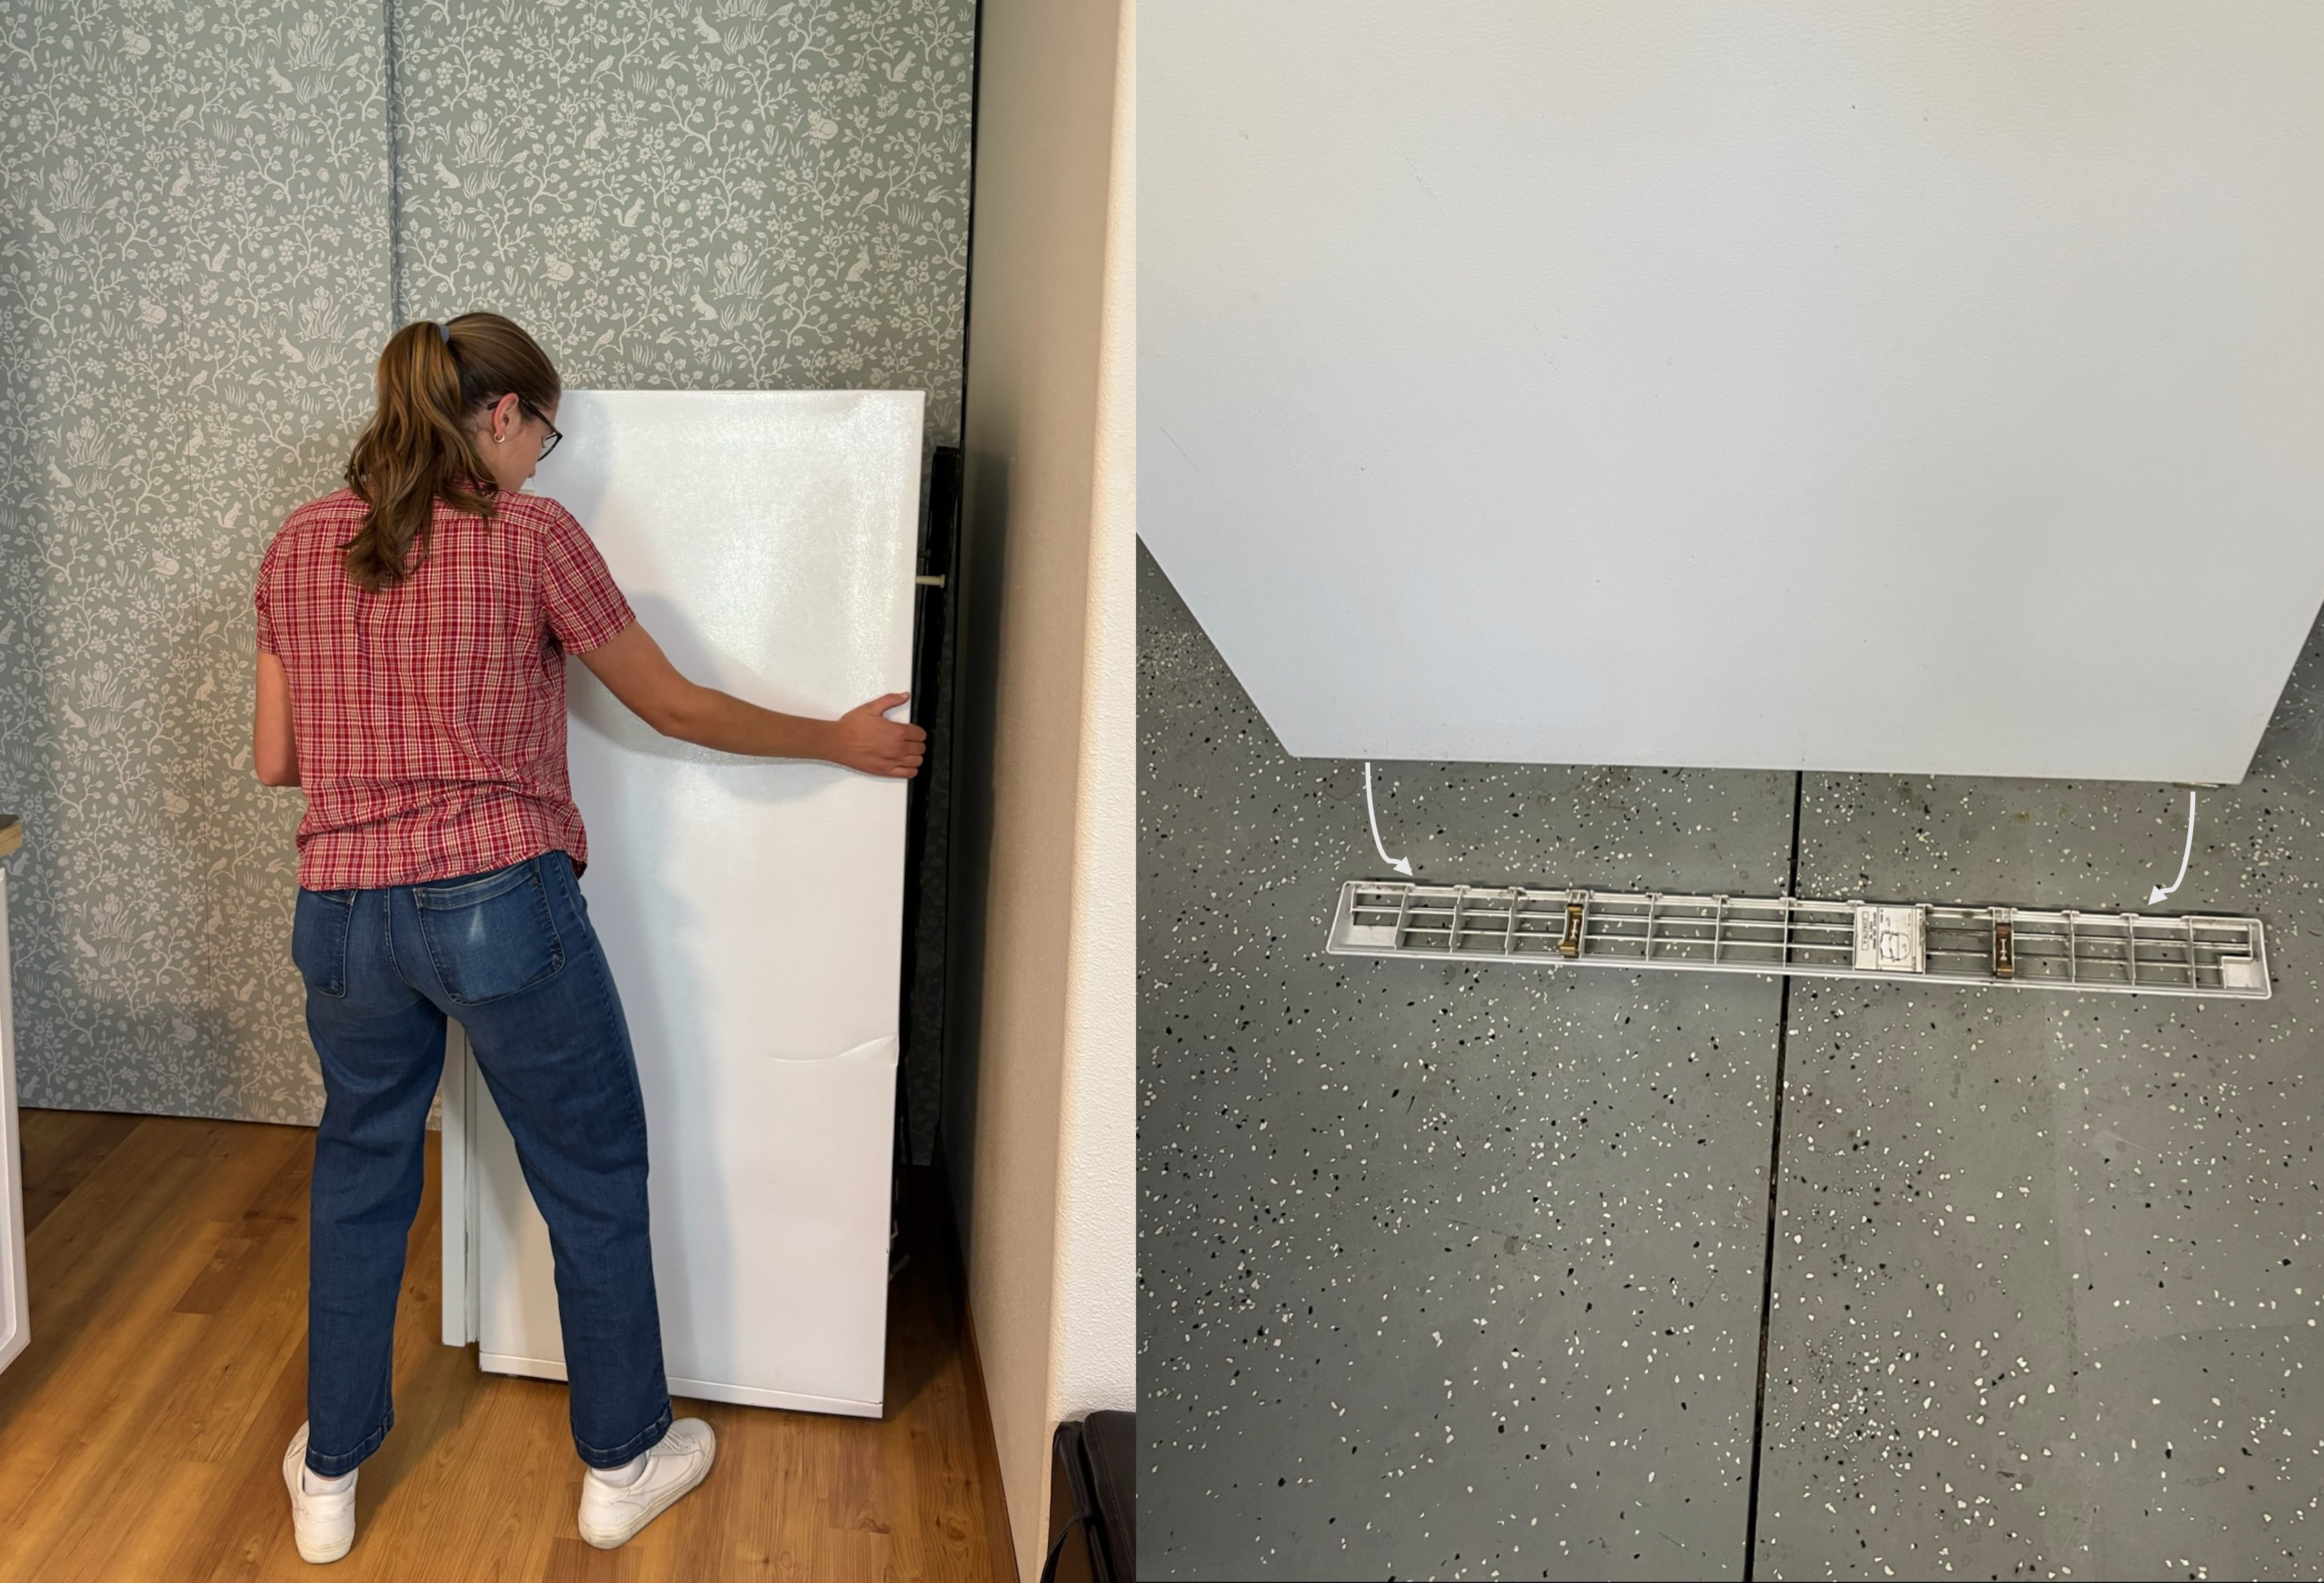
To access the refrigerator condensing coils, either move the refrigerator away from the wall for coils located on the back of the fridge (left) or remove the front grill on the bottom of the fridge (right).
Source
Figure 1. To access the refrigerator condensing coils, either move the refrigerator away from the wall for coils located on the back of the fridge (left) or remove the front grill on the bottom of the fridge (right) (Source: PNNL).

3. Vaccuum coils.

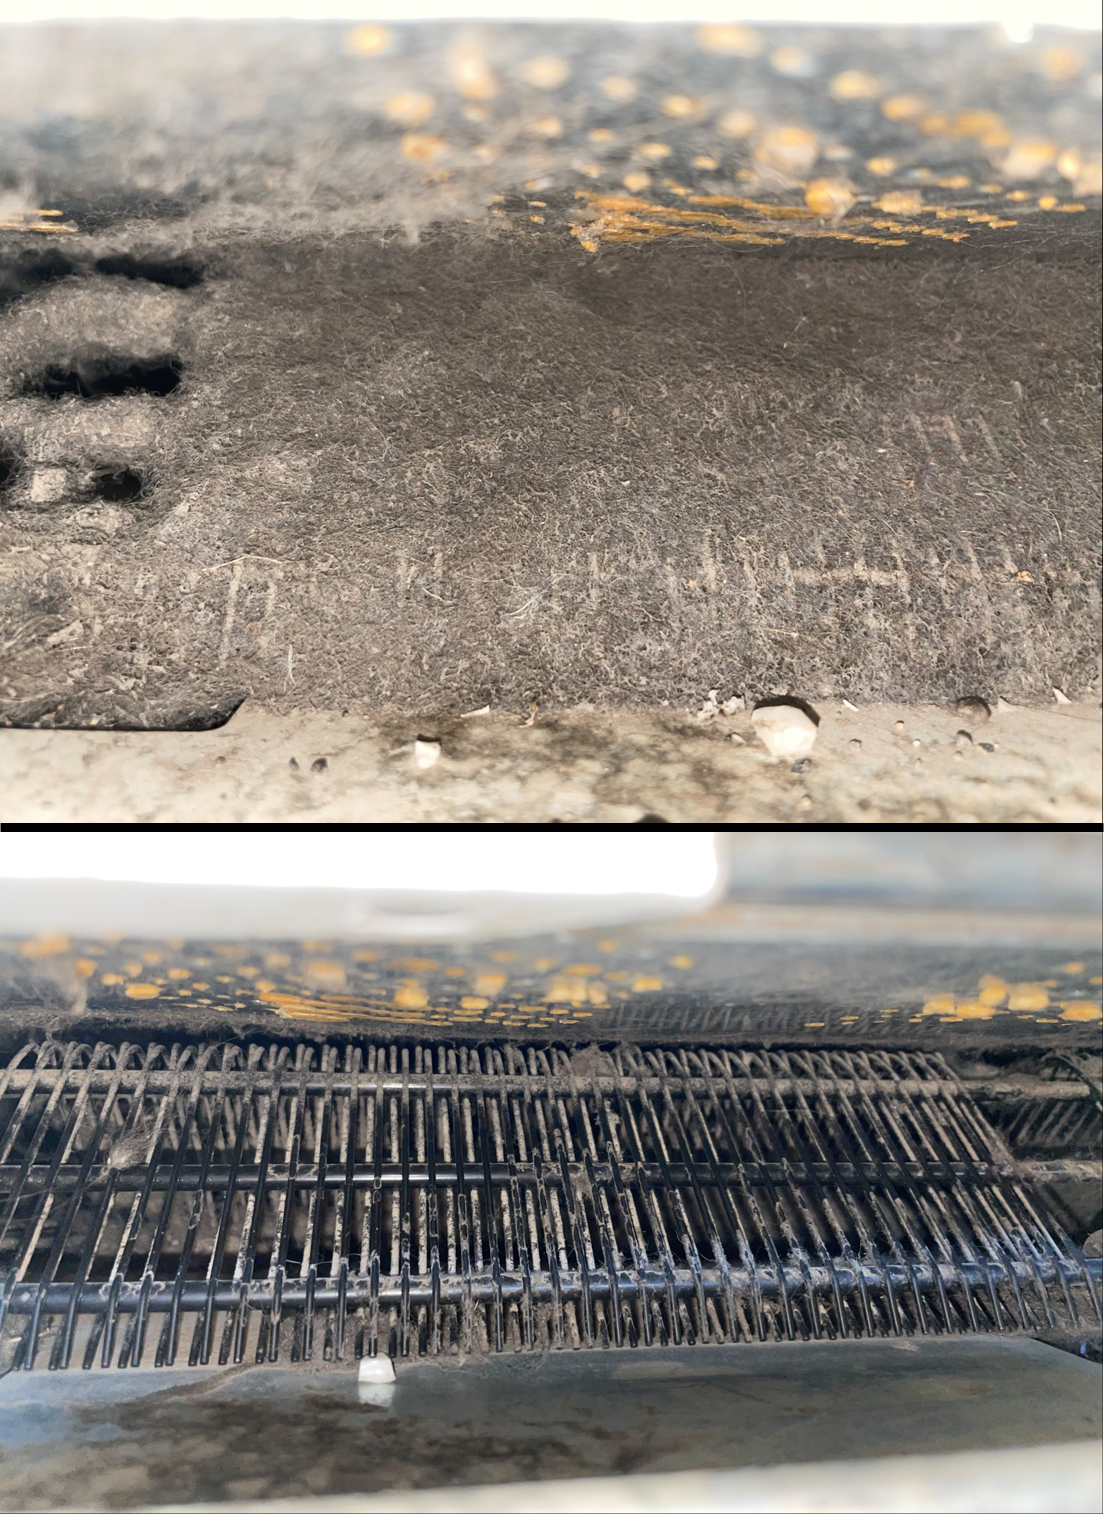
Remove as much dust as possible, ensuring the full area of the heat exchanger has been cleaned. You may want to alternate between brushing the coils and vacuuming the disturbed dust. Figure 2 shows dust being vacuumed from condenser coils located on the back of the refrigerators. Figure 3 shows dust being vacuumed from coils located beneath the refrigerator. Figure 4 shows below- condenser coils located beneath a refrigerator before and after vacuuming. Vacuum or sweep up any released dust.
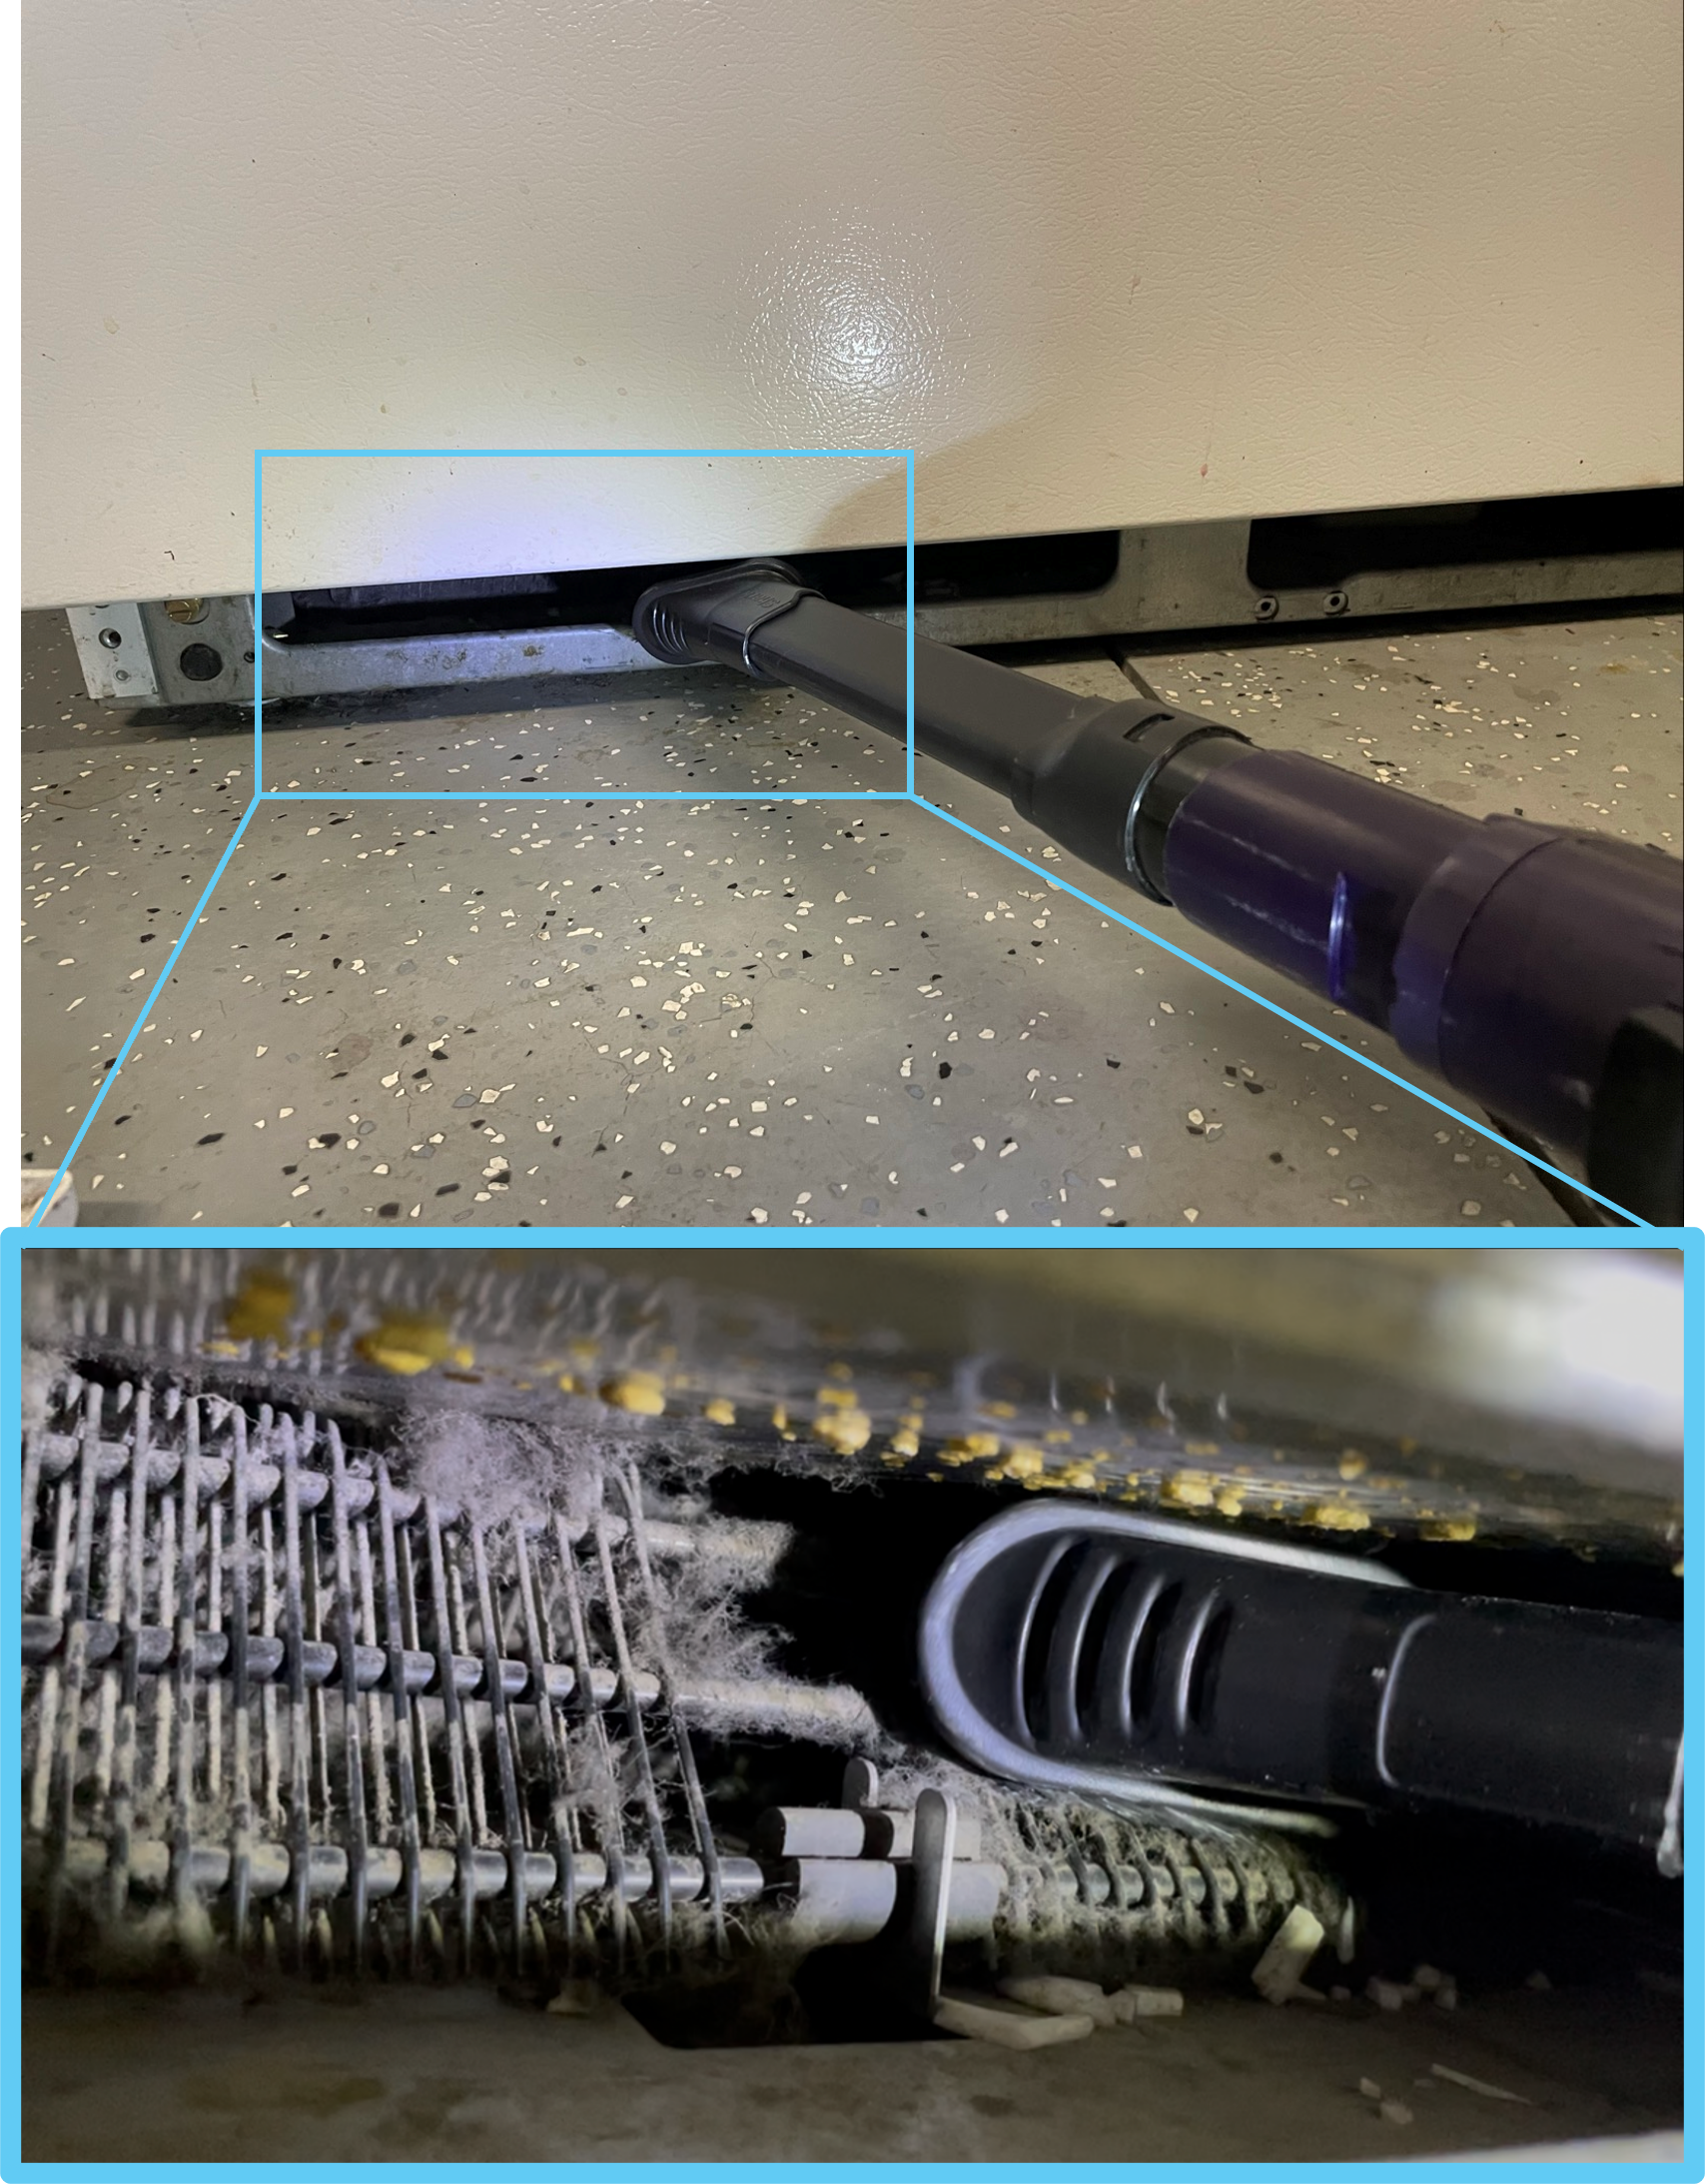
Use a vacuum with a brush attachment to reach condenser coils located underneath the refrigerator
Use a vacuum with a brush attachment to reach condenser coils located underneath the refrigerator.
Source
Figure 3. Use a vacuum with a brush attachment to reach condenser coils located underneath the refrigerator (Source: PNNL).
Refrigerator condenser coils before (top) and after (bottom) being vacuumed.
Source
Figure 4. Refrigerator condenser coils before (top) and after (bottom) being vacuumed (Source: PNNL).

4. Wipe coils.

If you can reach the condenser coils, after vacuuming wipe them down with a damp rag soaked in warm water with a few drops of dish washing liquid to remove stubborn dust and debris (Figure 5). Allow the coils to air dry.
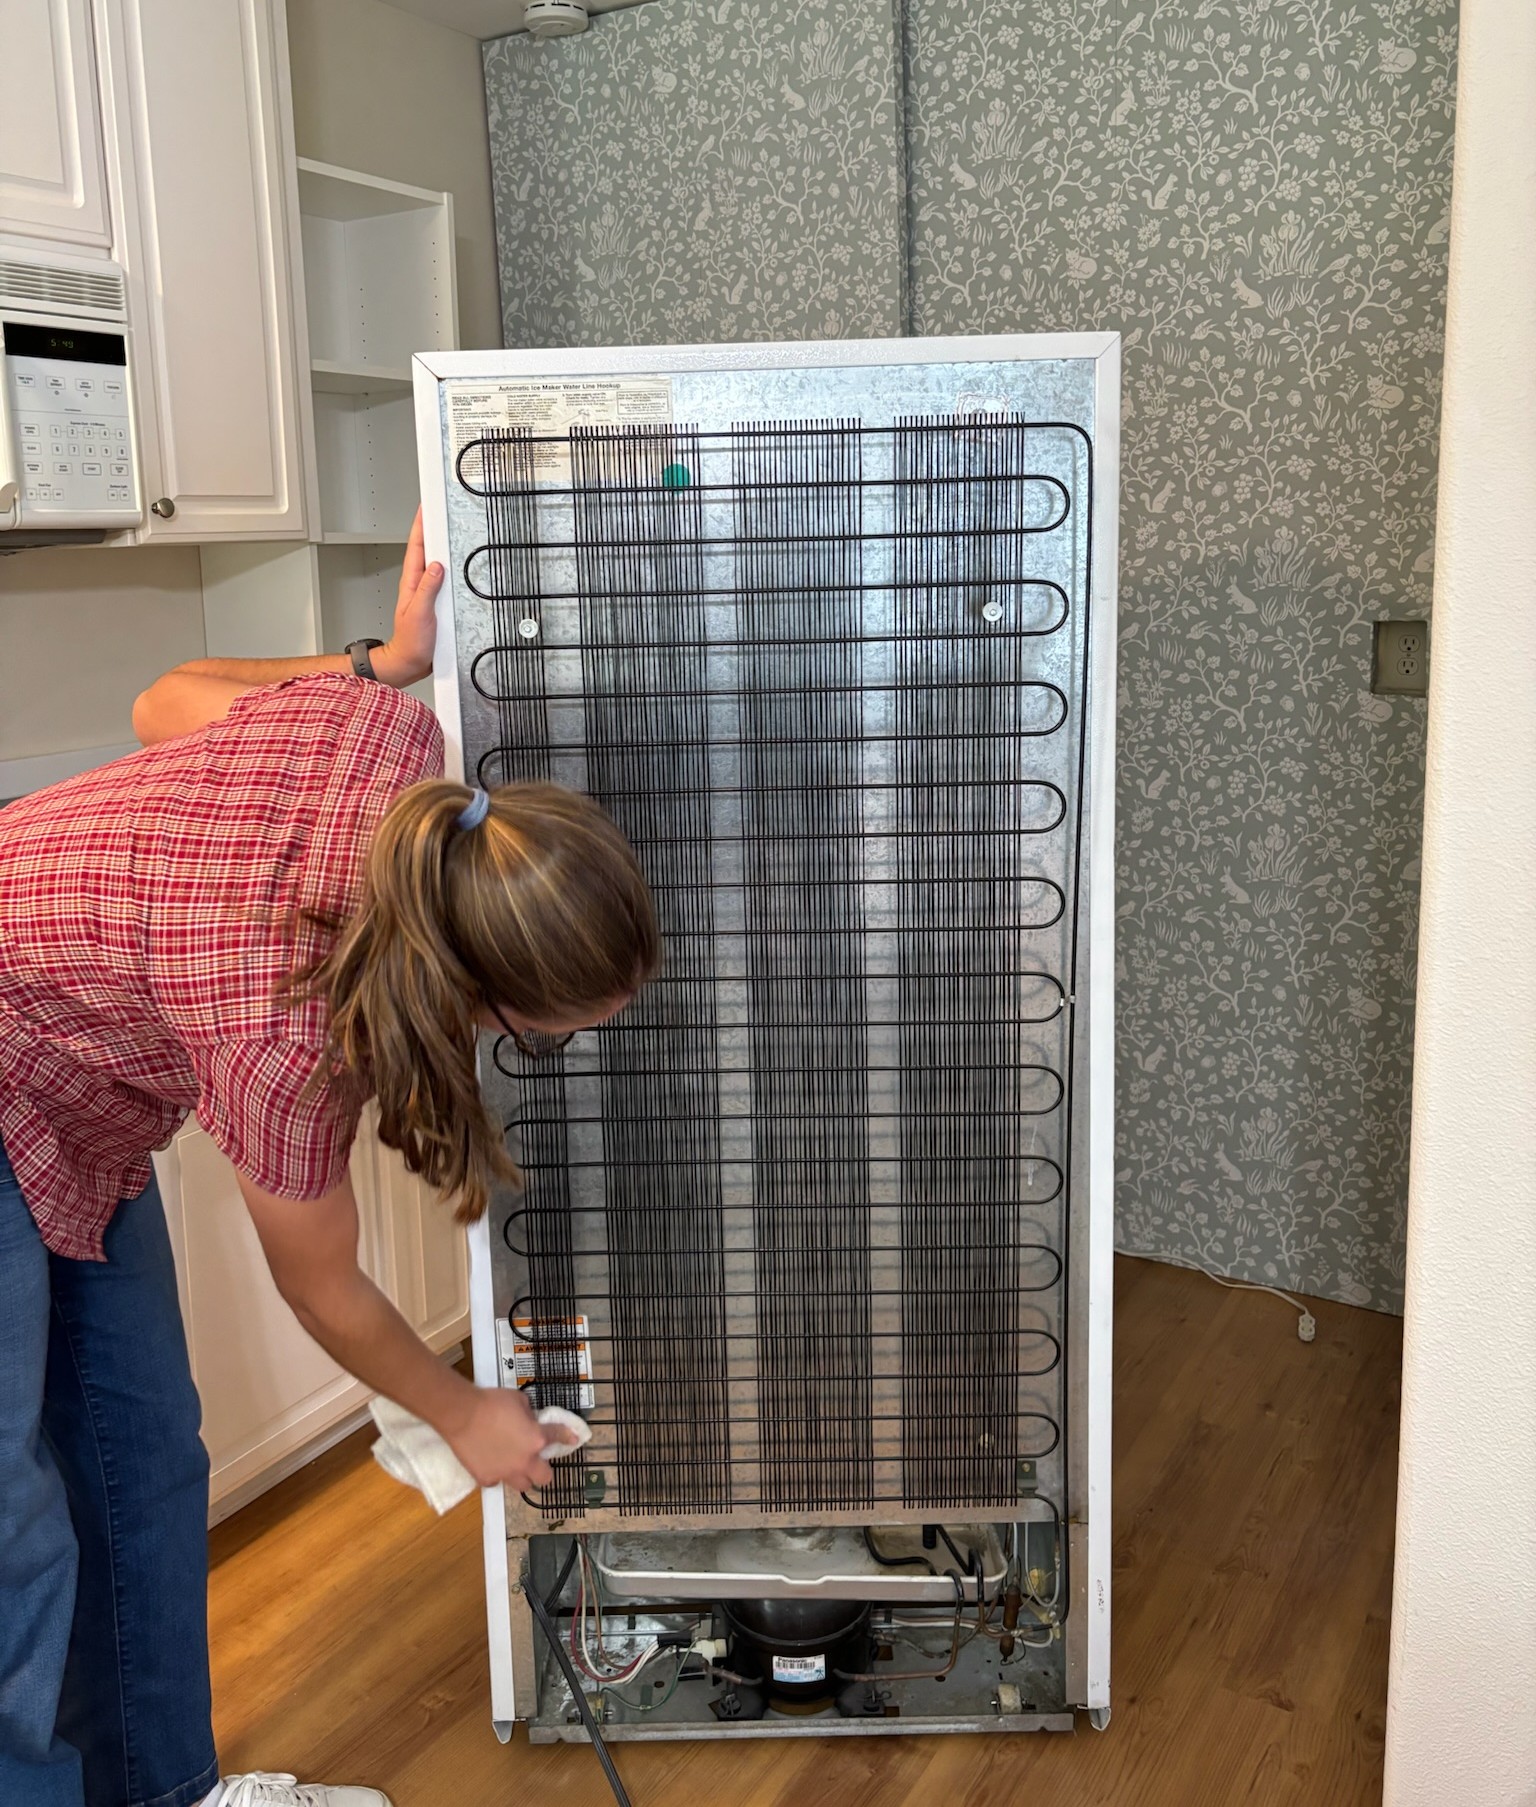
Wipe refrigerator condenser coils with a slightly damp rag to remove stubborn dust from the coils.
Source
Figure 5. Wipe refrigerator condenser coils with a slightly damp rag to remove stubborn dust from the coils (Source: PNNL).

5. Plug In.

Plug in the refrigerator. If your model had the coils on the back, move it back into position.


6. Re-install grill.

If your model has the coils in the front, you’ll need to re-install the grill. Before you re-install the grill, now would be a good time to clean that as well. You can soak the grill in the bath tub in warm water with a few drops of dish soap; scrub with a soft-bristle brush, sponge, or rag; rinse and allow to air dry before re-installing.

Plan to complete the cleaning process within two hours to ensure food doesn’t spoil.


Additional Info

Last Updated

Disclaimer

This content is a work created with funding provided by the United States Department of Energy under Contract no DE-AC05-076RL01830 for the operation of Pacific Northwest National Laboratory. The information and guidance provided by Pacific Northwest National Laboratory (PNNL) in the content are intended solely for educational purposes only and do not constitute formal training or certification. It is provided with the explicit understanding that neither the United States Government nor the United States Department of Energy, nor the Contractor, nor any or their employees, nor any jurisdiction or organization that has cooperated in the development of these materials, makes any warranty, express or implied, or assumes any legal liability or responsibility for the accuracy, completeness, or usefulness or any information, apparatus, product, software, or process disclosed, or represents that its use would not infringe privately owned rights. Reference herein to any specific commercial product, process, or service by trade name, trademark, manufacturer, or otherwise does not constitute or imply its endorsement, recommendation, or favoring by the United States Government or any agency thereof, or Battelle Memorial Institute. The views and opinions of authors expressed herein do not necessarily state or reflect those of the United States Government or any agency thereof. Viewers assumes full responsibility for all actions that they may take from information provided in this content including ensuring the safety, code compliance, and proper functionality of any products they choose to install. Installation and use of such products should be performed in accordance with local regulations and manufacturer instructions.