Materials Cost: 1
Difficulty Level: 1

Introduction

For homes with heating registers in the ceiling or floor, air seal where the duct boots meet the ceiling drywall or the flooring to prevent heat loss around the register.

Why

For homes with central air handlers and heating/cooling registers installed in the ceilings or floors, there is a good chance the duct boots are not air-sealed to the drywall or subfloor, allowing heated or cooled air to leak into the attic or crawlspace or basement, or the space between the floors in a two-story house (Figure 1). These leaky spots can also allow attic or crawlspace air into the living area of your house, which can bring with it dust, humidity, and soil gases and can contribute to energy losses and drafts.
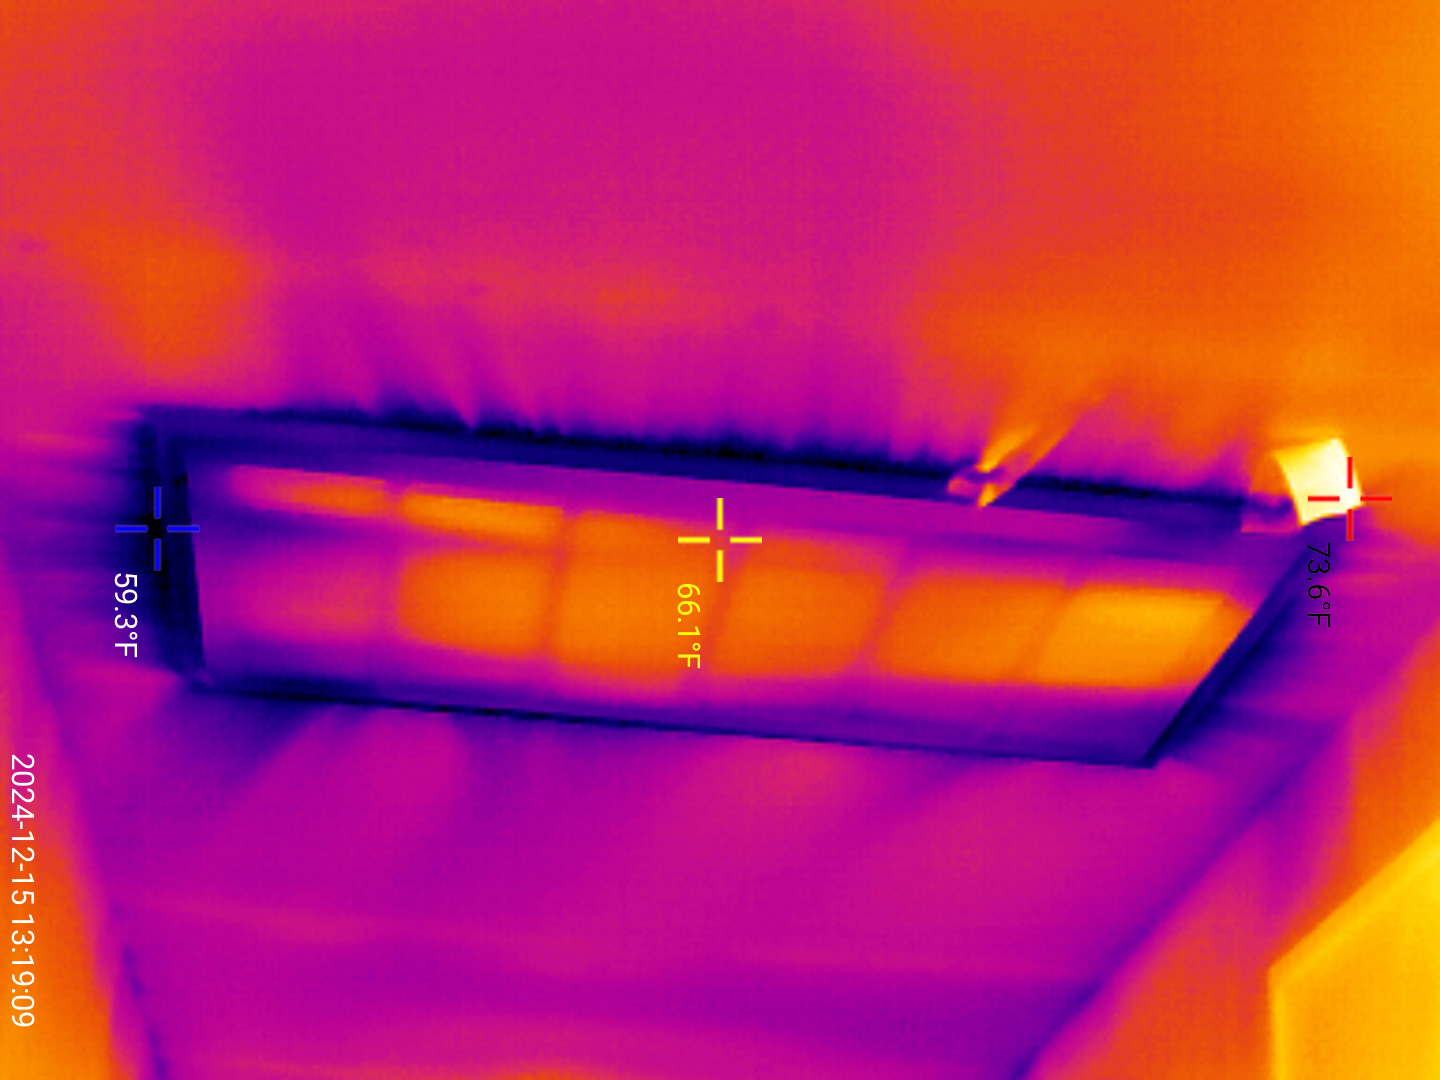
Figure 1. The dark streaks seen in this infrared camera image of a return vent in a ceiling indicate cooler air is leaking in around the vent (Source: PNNL).

What You'll Need

  • Caulk OR metal tape (such as a UL 181 designated tape) OR fiberglass mesh tape and mastic
  • Ladder or step stool
  • Eye protection
  • Screwdriver and screws or heavy staples
  • Vacuum (optional)
  • Cloth and dish soap and water (optional)

1. Air Seal from Inside the House

If the HVAC registers are in the ceiling, get a ladder or step ladder. Wear eye protection to keep falling debris out of your eyes. Remove the register, which is usually screwed in place. Use a dust brush or vacuum with dust brush attachment to remove any loose debris around the edges of the vent. Caulk the gap between the sheet metal of the duct boot and the drywall of the ceiling. If the gap is larger than ¼ inch (Figure 2), you can use screws or a heavy staple gun to attach the sheet metal to the framing around the duct boot before caulking and/or seal the gap with UL 181 tape or fiberglass mesh tape and mastic (Figures 3, 4, 5, and 6).
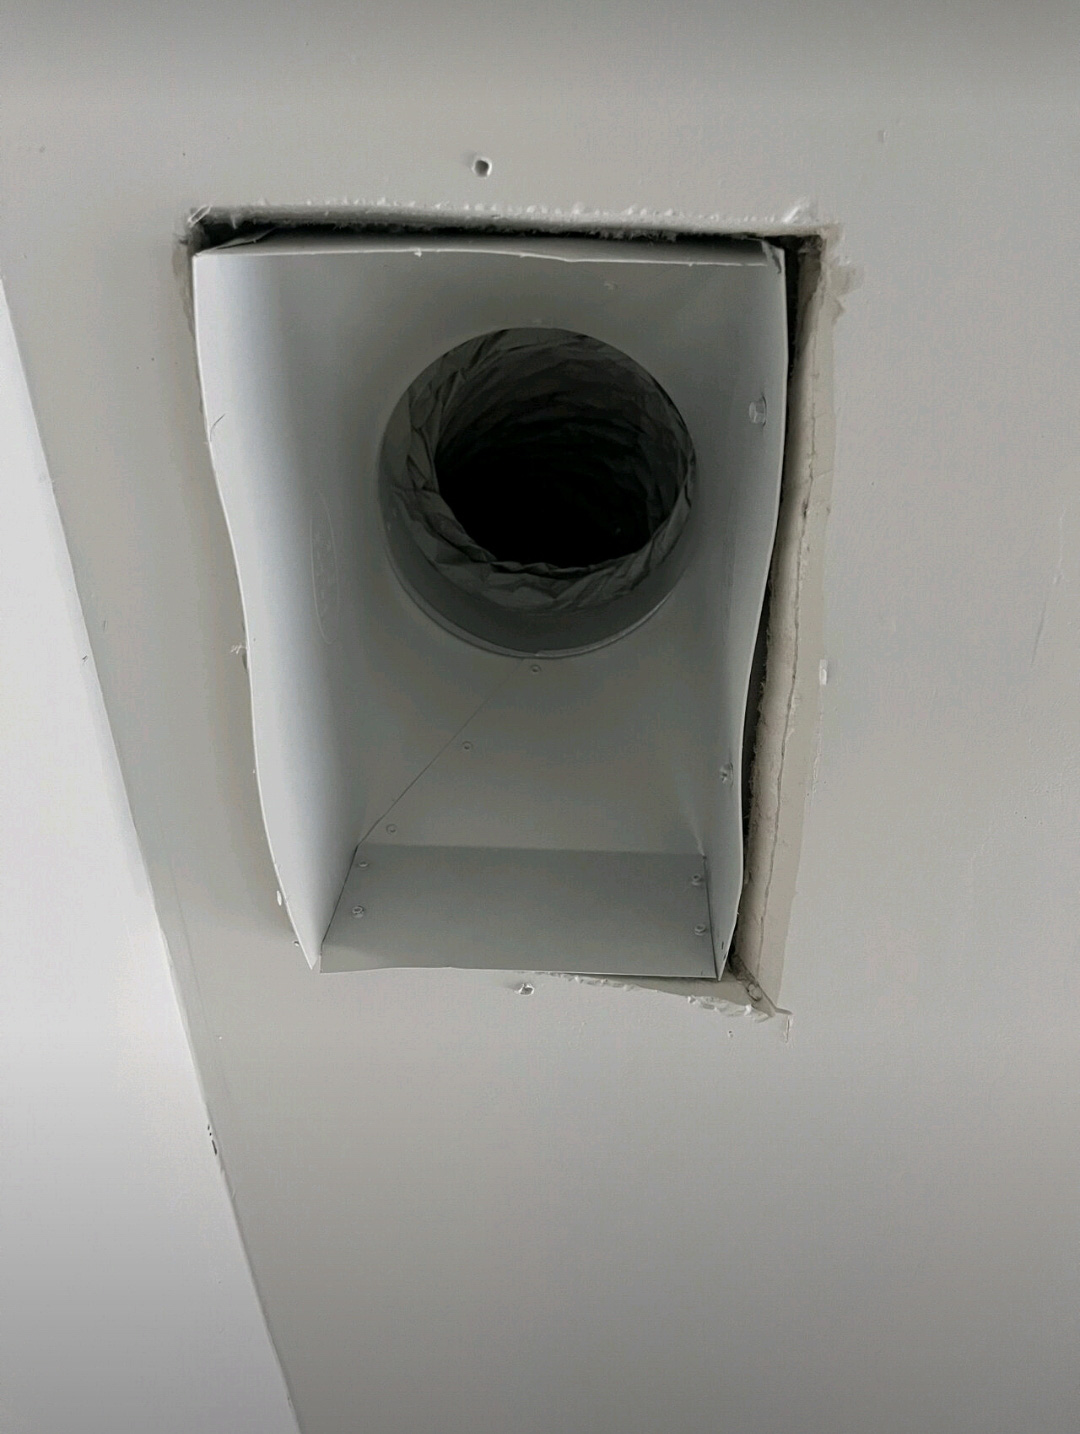
 

Figure 2. With the register grill removed, very large gaps are visible around the edges of this duct boot between the duct boot and the drywall; the gaps can be closed with screw or heavy staples then sealed with caulk, mastic, or metal tape (Source: PNNL).
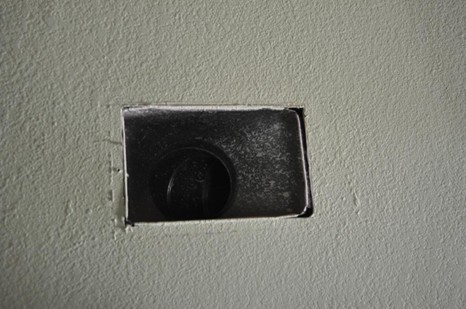
Figure 3. The gaps between the sheet metal of the duct boot and the drywall are clearly visible in this image (Source: Energy Smart Academy).
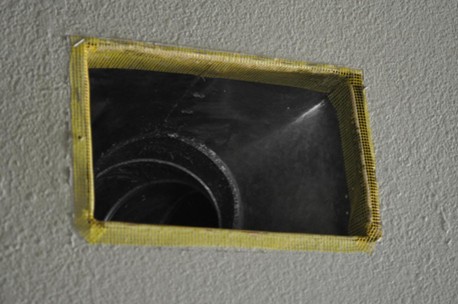
Figure 4. The gap between the duct boot and the drywall is air sealed by covering the seam with fiberglass mesh tape and mastic (Source: Energy Smart Academy).
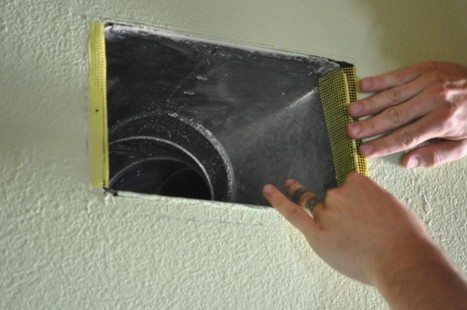
Figure 5. Fiberglass mesh tape is installed around a duct boot in preparation for air-sealing the seams with mastic (Source: Energy Smart Academy).
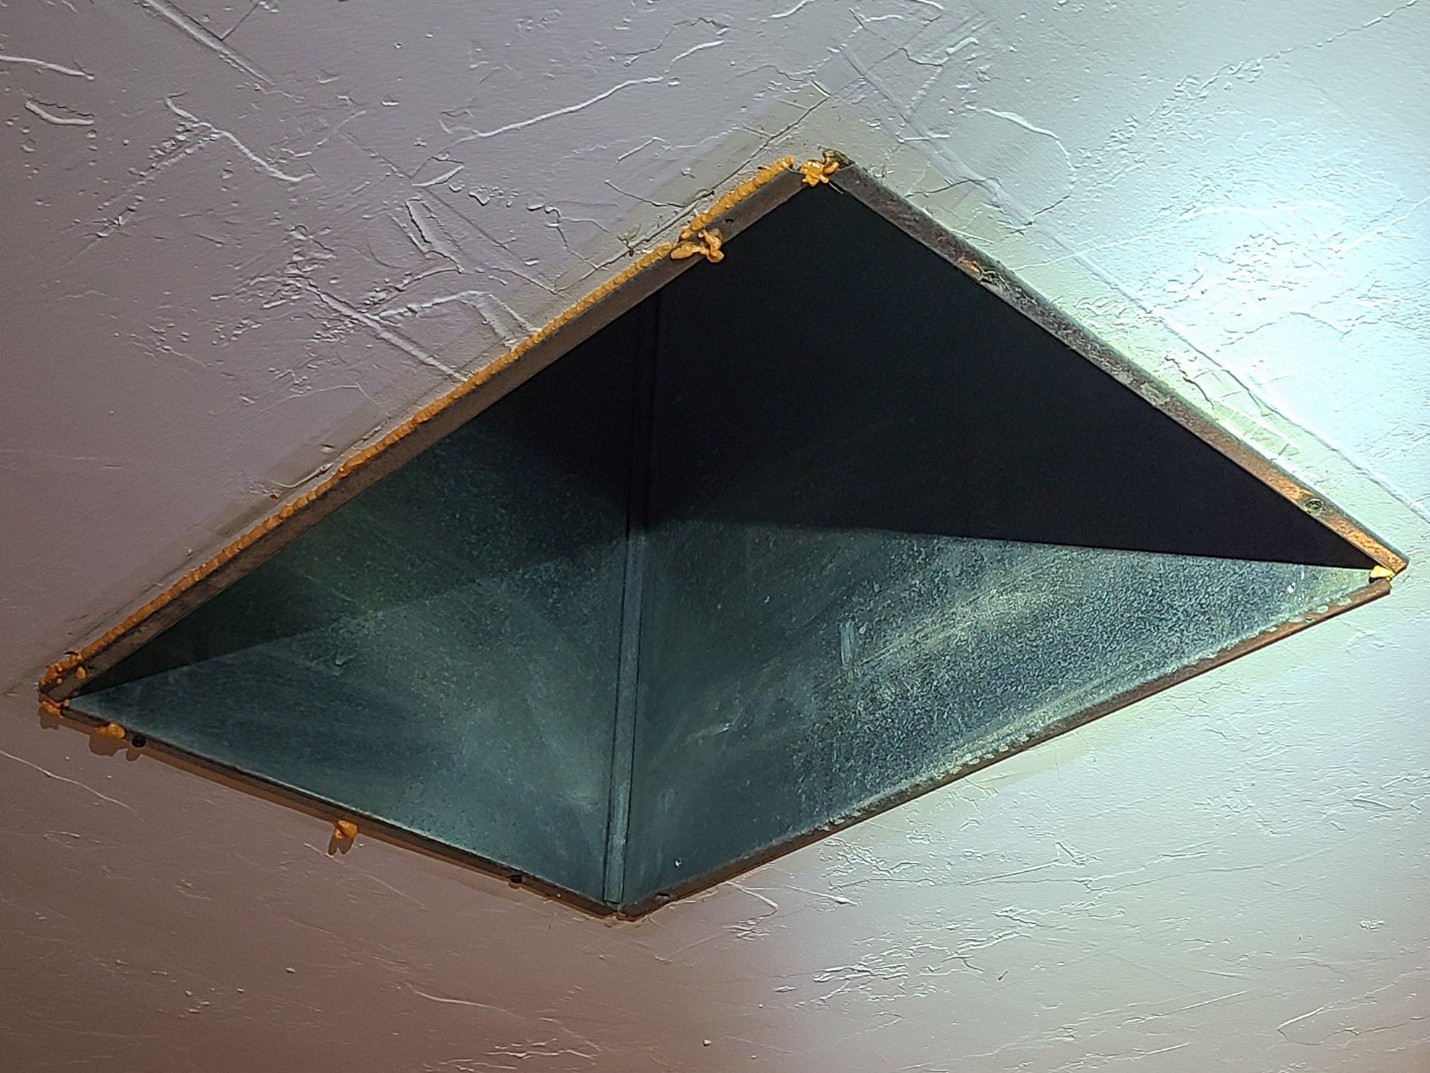
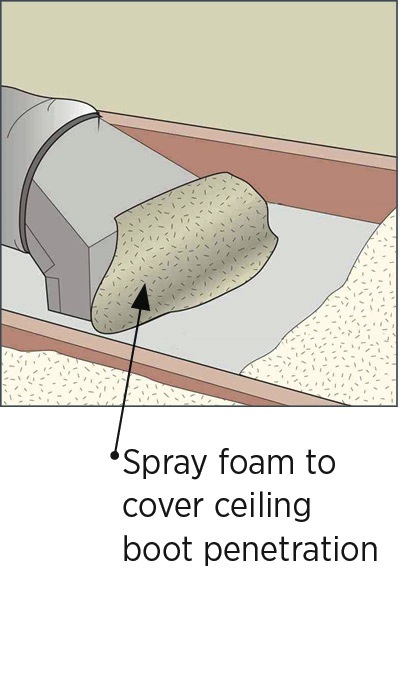
Figure 6. The gaps around this duct boot are sealed with canned spray foam (Source: Building Science Corporation 2009).


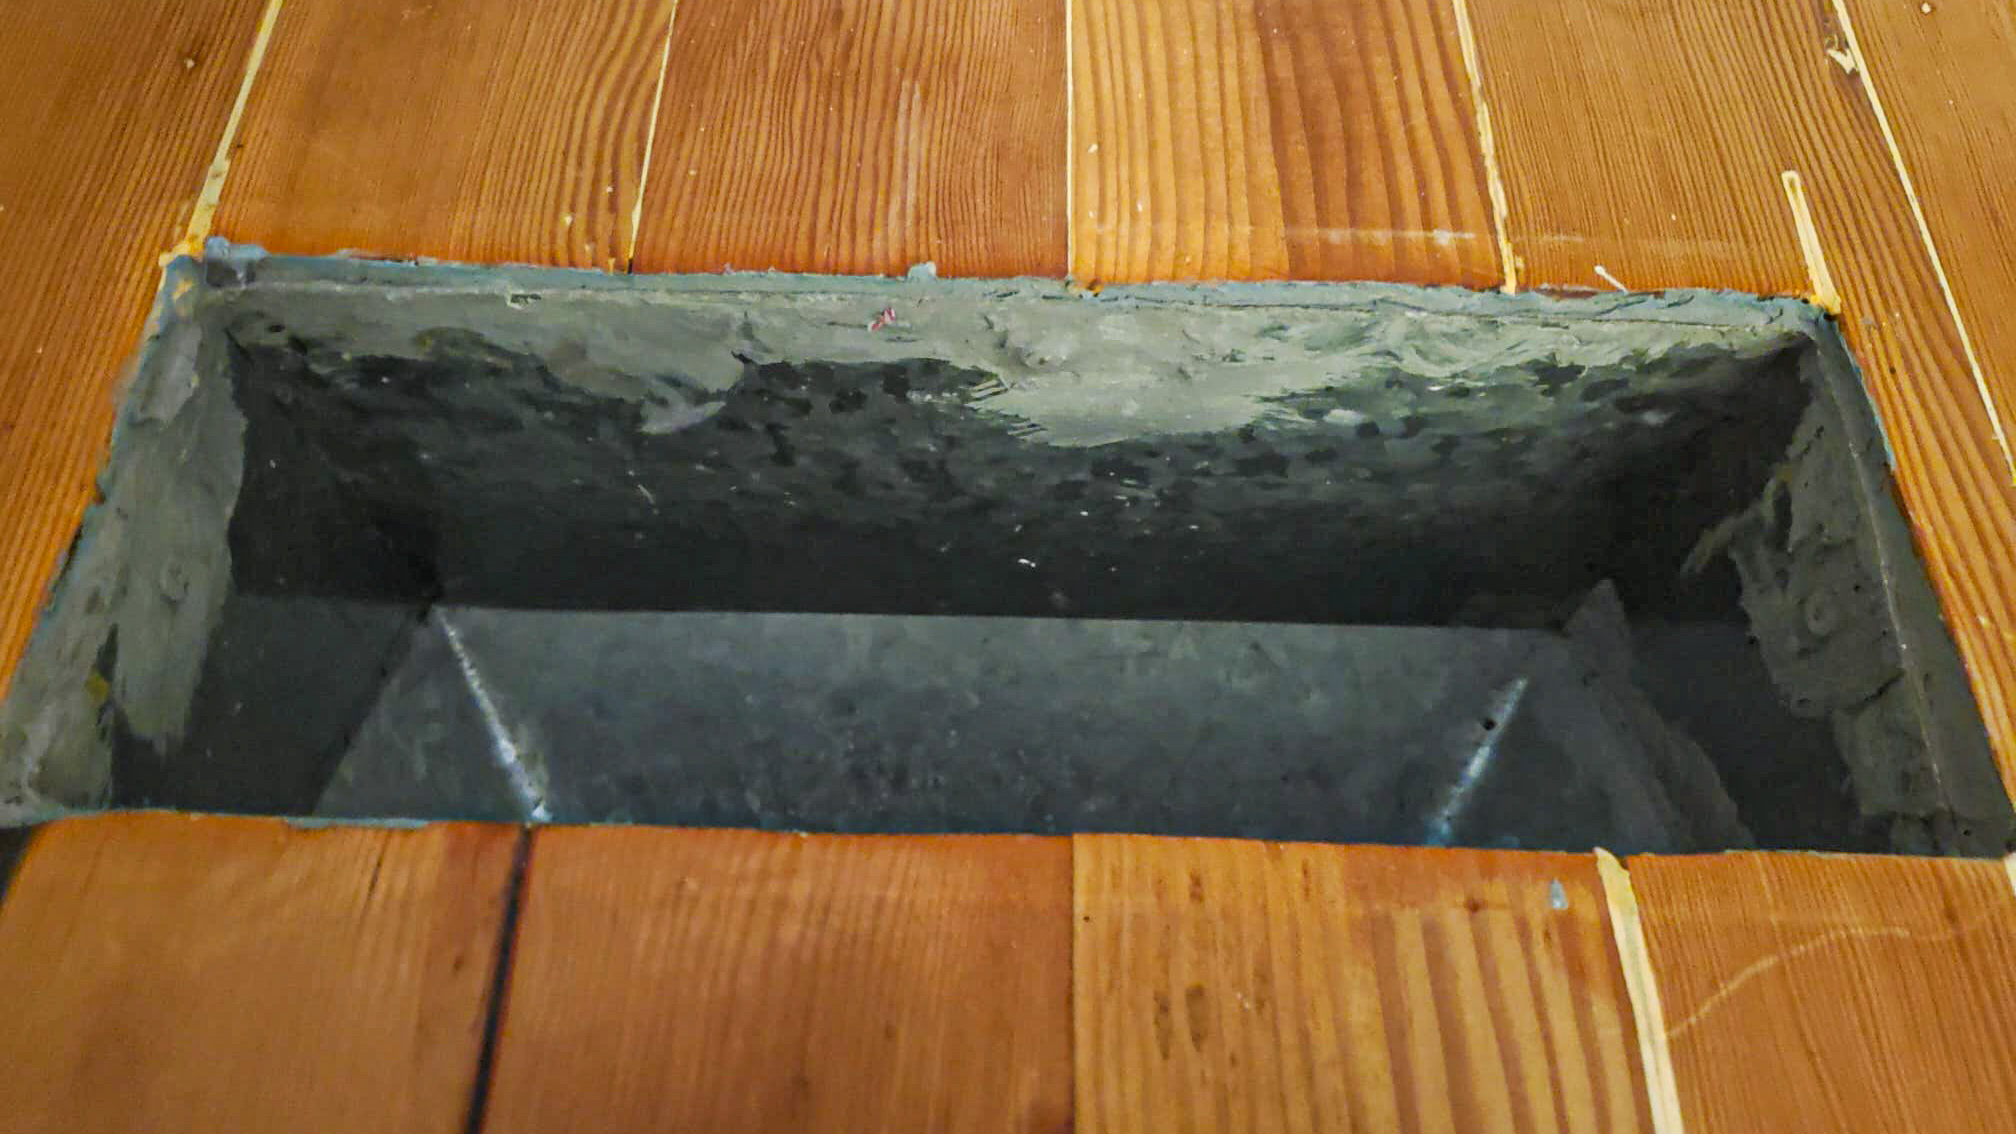
If the registers are in the floor, unscrew the register grill (if screwed in). Caulk the gap between the sheet metal of the duct boot and the plywood subfloor or solid wood framing below the flooring (Figures 7 and 8). If the gap is larger than ¼ inch, you can use screws or a heavy staple gun to attach the sheet metal to the framing around the duct boot before caulking and/or seal the gap with UL 181 tape or fiberglass mesh tape and mastic.
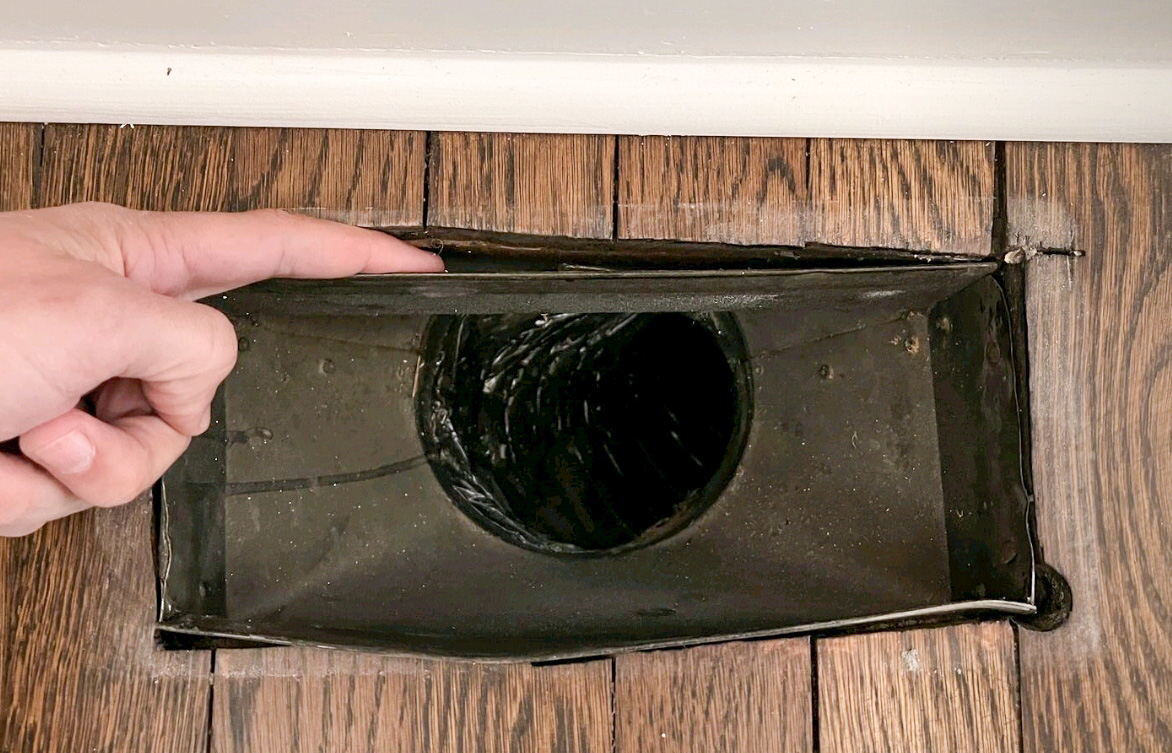
 

Figure 7. This air register has noticeable gaps between it and the floor; use canned spray foam to fill in the gaps (Source: PNNL).
Figure 8. The seam between this duct register and the wood flooring is sealed with caulk to prevent air leakage into the house from the crawlspace below (Source: PNNL).


If the duct registers are in the wall, unscrew the register. Caulk the gap between the sheet metal of the duct boot and the drywall (Figure 9). If the gap is larger than ¼ inch, you can use screws or a heavy staple gun to attach the sheet metal to the framing around the duct boot before caulking and/or sealing the gap with caulk, canned spray foam, UL 181 tape, or fiberglass mesh tape and mastic.
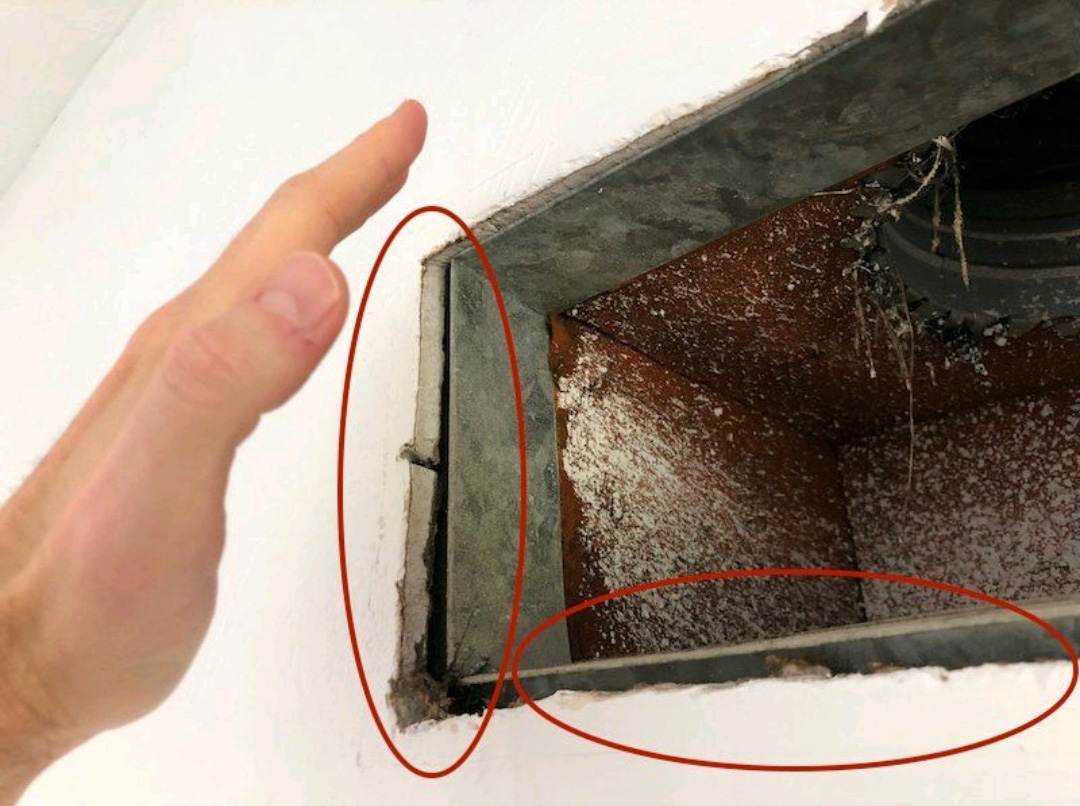
 

Figure 9. The hole in the drywall was cut overly large for this heating register, allowing air to leak into or out of the wall cavities (Source: PNNL).

While the registers are removed, you may want to take this opportunity to clean the register grills. Vacuum or wipe them with a damp cloth. If the registers are very dirty, soak them in a pan of water with dish soap; clean with a sponge, cloth, or soft-bristle brush; and lay them on towel to air dry. Re-install once dry. If your duct registers are in the floor, you may want to vacuum the accessible part of the duct while the register grill is removed.


2. Air Seal from Attic or Crawlspace/Basement

If the duct boots are in the attic: This method is best done as part of a comprehensive attic air-sealing and insulation or re-insulation project where existing attic insulation is vacuumed out, all duct boots, top plates, electric boxes, flues, and pipes are air-sealed, and new insulation is installed. 

  1. Access the attic. 
  2. Follow the ducts to find the boots. Laying 2x6 boards or quarter sheets of plywood across the trusses or rafters can provide a safer surface to work from. 
  3. Push back the insulation around the boots and use a dust brush or shop vac or insulation vacuum to vacuum around the duct boots.
  4. Use canned spray foam or caulk to air seal around the perimeter of each boot at the boot-to-drywall seam (Figures 10, 11, and 12). 
  5. When the foam has dried, redistribute the attic insulation around the duct boot. 

If the duct boots are in the basement or crawlspace and if they are accessible, use a dust brush or rag to clear away any cobwebs and dust, then use canned spray foam to air seal around the perimeter of each boot at the boot-to-subfloor seam.

If the ducts are installed between floors, the duct boots will likely be inaccessible.
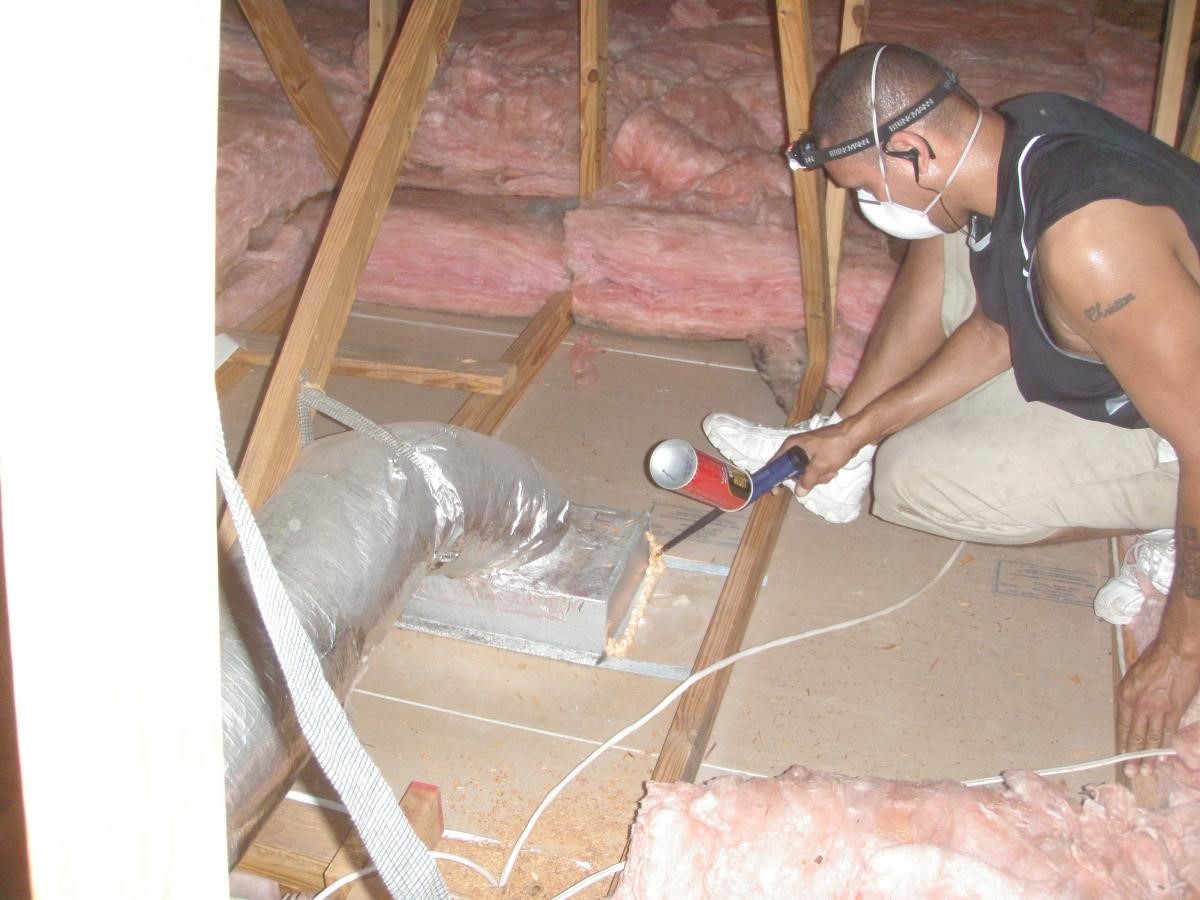
Duct boots and other ceiling penetrations are air-sealed using spray foam
Source
Figure 10. After clearing existing insulation, spray foam around the duct boot at the drywall seam (Source: Steven Winter Associates, Inc.).
Spray foam air seals the boot to the ceiling
Source
Courtesy Of
BSC
Figure 11. Spray foam air seals the boot to the ceiling (Source: Building Science Corporation).
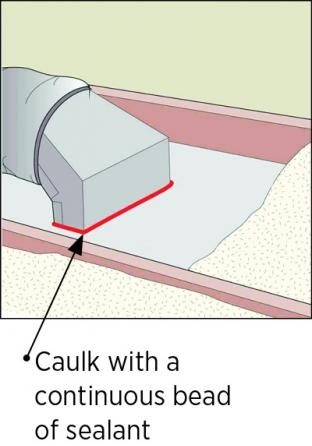
Caulk air seals the boot to the ceiling
Figure 12. Caulk is used to air seal the boot to the ceiling, and is then covered with insulation (Source: Building Science Corporation).

Additional Info

References

Publication Date
·
Author(s)
Air Duct Council
·
Organization(s)
ADC
Description
Standard for use and reference by designers, architects, engineers, contractors, installers and users for evaluating, selecting, specifying and properly installing flexible duct in heating and air conditioning systems.
Publication Date
·
Author(s)
Aldrich Robb,
Puttagunta Srikanth
·
Organization(s)
Consortium for Advanced Residential Buildings,
CARB,
National Renewable Energy Laboratory,
NREL,
Steven Winter Associates,
SWA
Description
Report describing the sealing and insulating of HVAC duct systems in existing homes.
Publication Date
·
Author(s)
Robinson Bill
·
Organization(s)
Journal of Light Construction,
JLC
Description
Article describing various types of caulks and sealants, their formulas and best uses.
Last Updated

Related Guides

Disclaimer

This content is a work created with funding provided by the United States Department of Energy under Contract no DE-AC05-076RL01830 for the operation of Pacific Northwest National Laboratory. The information and guidance provided by Pacific Northwest National Laboratory (PNNL) in the content are intended solely for educational purposes only and do not constitute formal training or certification. It is provided with the explicit understanding that neither the United States Government nor the United States Department of Energy, nor the Contractor, nor any or their employees, nor any jurisdiction or organization that has cooperated in the development of these materials, makes any warranty, express or implied, or assumes any legal liability or responsibility for the accuracy, completeness, or usefulness or any information, apparatus, product, software, or process disclosed, or represents that its use would not infringe privately owned rights. Reference herein to any specific commercial product, process, or service by trade name, trademark, manufacturer, or otherwise does not constitute or imply its endorsement, recommendation, or favoring by the United States Government or any agency thereof, or Battelle Memorial Institute. The views and opinions of authors expressed herein do not necessarily state or reflect those of the United States Government or any agency thereof. Viewers assumes full responsibility for all actions that they may take from information provided in this content including ensuring the safety, code compliance, and proper functionality of any products they choose to install. Installation and use of such products should be performed in accordance with local regulations and manufacturer instructions.