Materials Cost: 2
Difficulty Level: 1

Introduction

Using storm windows can increase your home’s energy efficiency, reduce drafts and glare, block out outside noise, and make your home feel more comfortable.

Why

Windows are less insulating than the rest of the wall. Older single-pane and clear-glass double-pane windows can be drafty, feel cold when you sit next to them, and get condensation and even frost build-up in winter. Adding interior storm windows can help block heat transfer so your home will feel warmer in winter and cooler in summer. They can also cut drafts, glare, and outside noise, making your home more comfortable as well as more efficient.

What You'll Need

  • New high-performance interior storm windows 
  • Interior-grade caulk or sealant
  • Screws and screw driver
  • Ladder or step stool

1. Examine existing windows.

Before buying new interior storm windows, examine the condition of the existing windows. 

  • If the existing window shows excessive deterioration or damage, then full window replacement may be required. Note that while interior storm windows will greatly improve thermal performance (Figure 1), air leakage, and sound control, they will not provide protection for existing windows (Figure 2) from exterior conditions the way exterior storm windows will.
  • Peeling paint, cracks, or rotten wood at the sills or window trim is often a sign of water intrusion somewhere above or around the window. If you’re seeing signs like this, plan to remove the trim to investigate. You may need to remove the window to do repairs and re-install or replace the window.
  • To reduce the potential for condensation between the existing window and the storm window, minimize air transfer by making the existing window as airtight as possible. Examine seals and weatherstripping around the window perimeter and replace or repair as needed.  
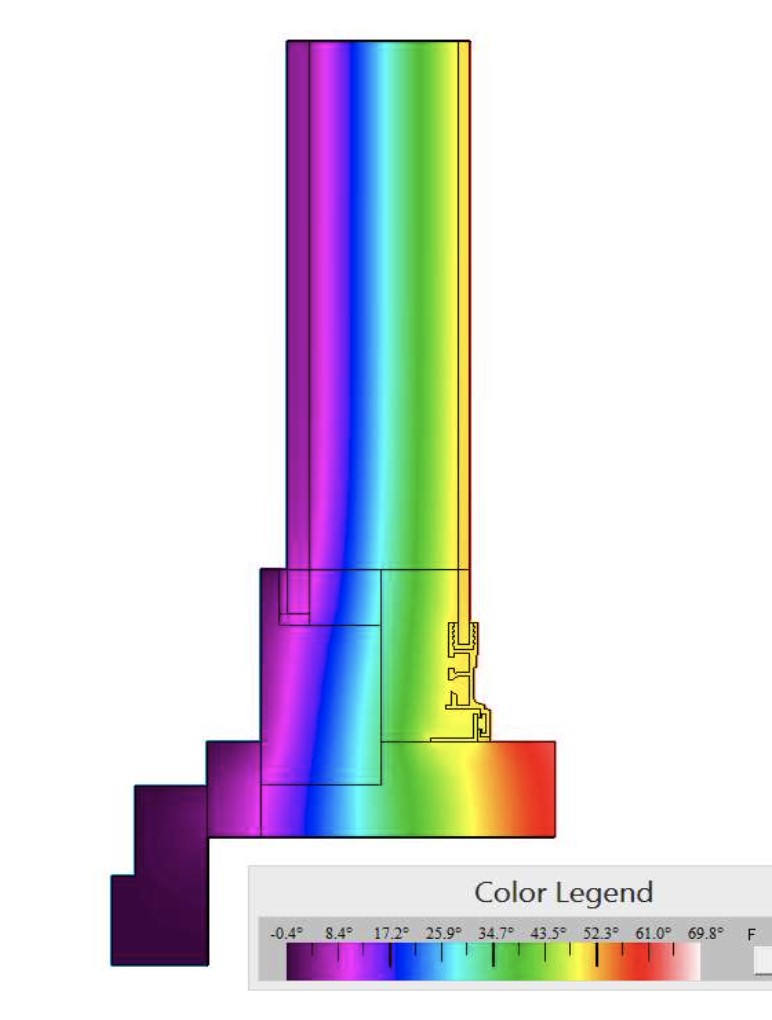
This thermal image of an interior storm window shows how much temperature change occurs between the interior storm window panel on the right, at 50F and the existing glass on left at approximately 0F
Source
Courtesy Of
Figure 1. This thermal image of an interior storm window shows how much temperature change occurs between the interior storm window panel on the right, at 50°F and the existing glass on left when the outside temperature is 0°F (Source: PNNL).
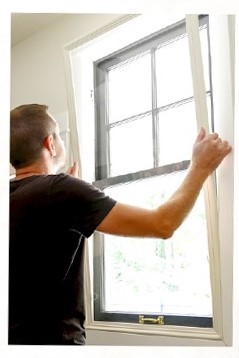
Modern interior storm windows include new technology and sleek design features that offer an easy-to-install, cost-effective method for upgrading the energy efficiency of existing windows
Source
Figure 2. Modern interior storm windows include new technology and sleek design features that offer an easy-to-install, cost-effective method for upgrading the energy efficiency of existing windows (Source: Indow Windows).

2. Consider your options.

Storm windows can be installed on either the interior or exterior of the existing window. Some storm windows are fixed glass, meaning they can’t be opened. Some storm windows are operable, meaning they can be raised and lowered or slid to the side like the existing window. There are permanent or removable varieties as well.

  • Interior storm windows are typically acceptable for most historic preservation projects because they do not alter the exterior appearance of the window and because they are easy to remove. They are considered a reversible retrofit, which is a desirable and sometimes required feature when dealing with historic homes.
  • Low-emissivity (low-E) windows have one or more very thin, transparent layers of metal coating on the glass. This metal coating is nearly invisible but effective at blocking heat transmission, significantly improving the thermal performance of the window and reducing the amount of solar heat gain through the window (Figure 3). Low-E storm windows cost about the same as standard storm windows but are about 50% more energy efficient than traditional uncoated storm windows (Cort 2013). They will also reduce the potential for condensation between storm windows and existing windows. 
  • Consider models that are certified by ENERGY STAR and the Attachment Energy Rating Council (AERC) for your climate zone (Figures 4 and 5). Note that plastic or acrylic storm windows can’t receive ENERGY STAR designations since they won’t take a low-E coating.
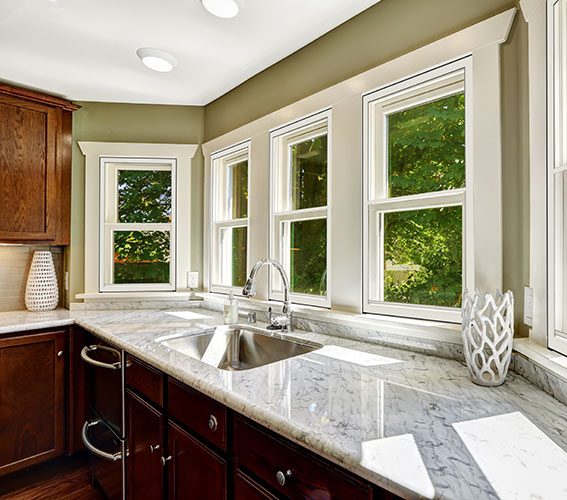
These interior storm windows have low-emissivity coatings to let in light while keeping out heat in the summer and keeping heat in in the winter
Source
Figure 3. These interior storm windows have low-emissivity coatings to let in light while keeping out heat in the summer and keeping heat in in the winter (Source: Larson).
The Attachments Energy Rating Council (AERC) uses this label to indicate certified low-E storm window products.
Source
Author(s)
Attachments Energy Rating Council
Organization(s)
AERC
Description

Website developed by the Attachments Energy Rating Council to provide consumers with credible, relevant, and comparable information about window attachments and their performance.
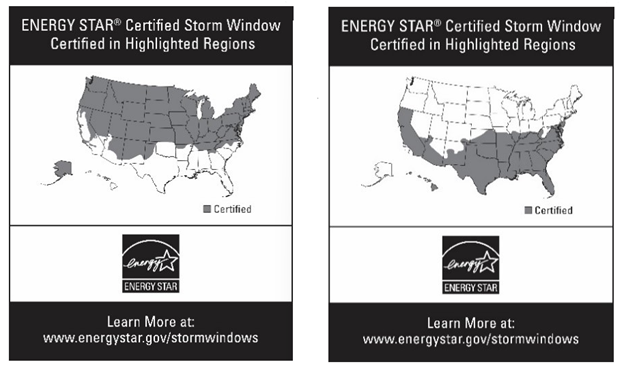
Figure 4. Look for this label from the Attachments Energy Rating Council (AERC) for storm windows that have been certified as meeting certain window performance requirements (Source: AERC 2023).
Figure 5. ENERGY STAR storm window certifications indicate whether the window is certified for warmer or colder climates (Source: ENERGY STAR, modified by PNNL).

3. Install.

  1. Select models that have built-in weatherstripping and/or gaskets between the storm window and the existing window frames. 
  2. Follow manufacturer’s installation instructions, typically: 
    • Use the storm window manufacturer’s instructions for measuring and ordering the windows (Figure 6). 
    • Match the current opening style of your existing windows to ensure operability and egress (every bedroom needs a window or door that opens to the outside).
    • Place the window into the opening to ensure proper fit, then set aside.
    • Mount and screw the storm window into place following manufacturer guidance.
    • Installation will vary based on the specific product type. 
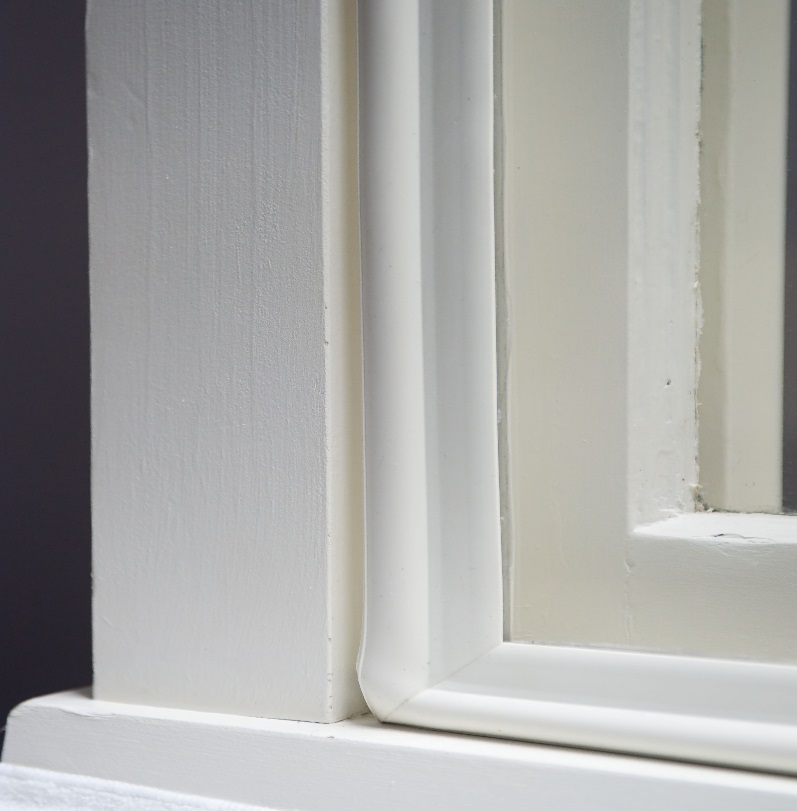
      1. For pressure-fit or magnetic storm windows, press the windows into place. For example, plastic interior storm windows (referred to as panels) are light weight and may have flexible gasket-like material around the frame (Figure 7) allowing the windows to be simply friction fit in place or they may employ magnetic attachments.
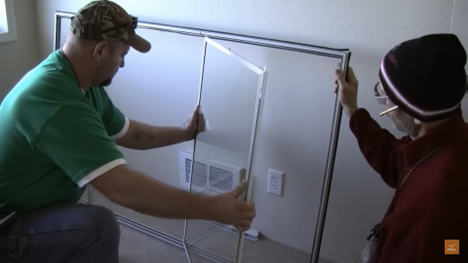
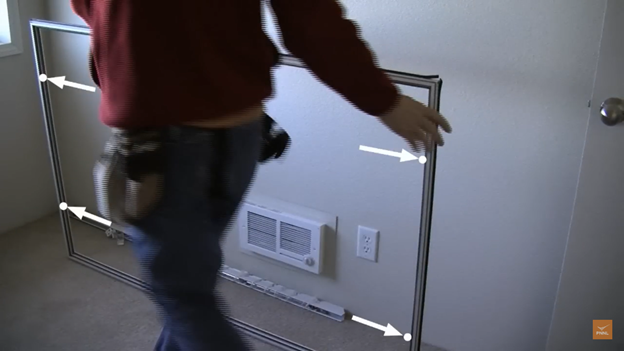
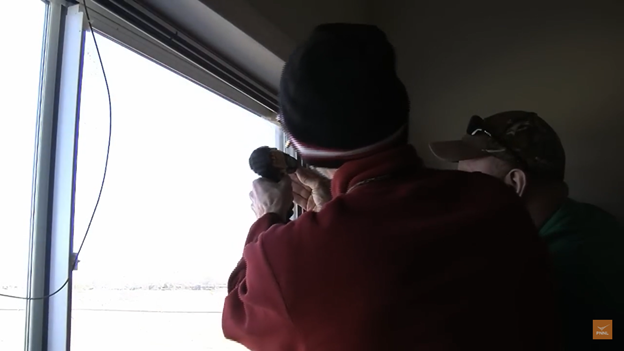
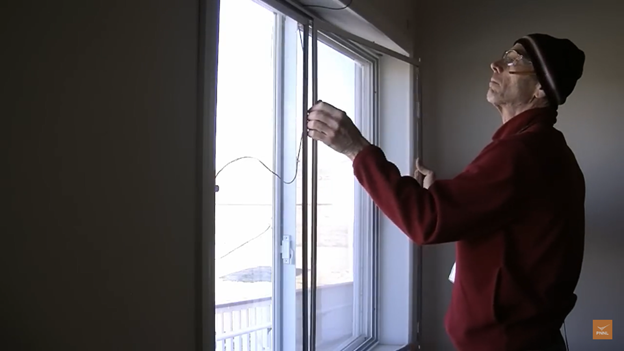
      2. For mechanically attached storm windows intended to be permanently placed, apply caulk or sealant to the existing window frame where the sides, top, and bottom of the storm window will be mounted (there are no weep holes on interior storm windows). Mount and screw the storm window into place, following the manufacturer's instructions. They may recommend removing the glass panels (Figure 8), screwing the frame into place (Figures 9 and 10), then reinserting the glass panels taking care that the low-e surface faces towards the outside not the inside of the home (Figure 11). 
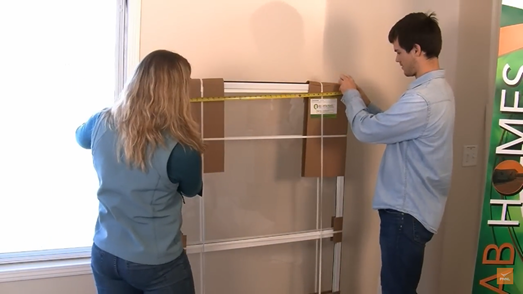
Figure 6. Measure the storm window to ensure it will fit the intended opening (Source: PNNL).
Interior removable storm windows should fit snuggly into the window frame
Source
Figure 7. Plastic interior storm windows with flexible gasket frames are friction fit to stay in place within the window frame (Source: Indow Windows).
Figure 8. Typically, you will remove the glass panels from the frame before installation; check the manufacturer’s instructions (Source: PNNL).
Figure 9. Locate the holes on the sides of the panel frame that will allow it to be screwed into place (Source: PNNL).
Figure 10. Screw the storm window frame into the existing window’s wood casing to secure it (Source: PNNL).
Figure 11. Re-install the storm window panels, ensuring that the low-E coating is facing outwards (Source: PNNL).

4. Maintain performance.

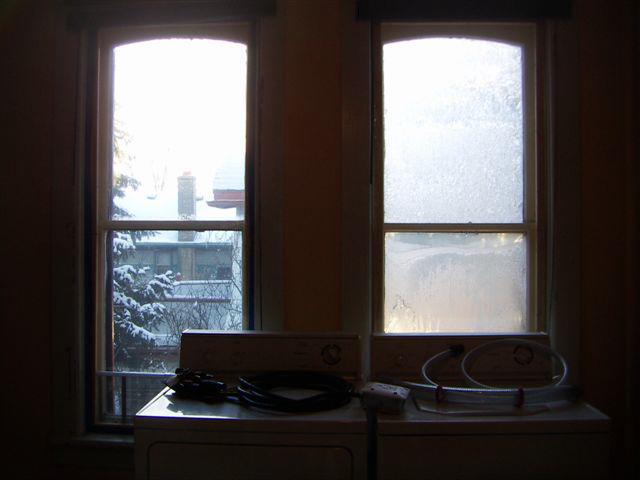
An interior storm window reduces the potential for condensation on the room side of the window system by providing a warmer, more insulated surface. However, there is the potential for condensation to form between the interior storm window and the original exterior window if the interior storm window or panel is not airtight, allowing the passage of humid indoor air into the space between the two panes where it can condense on the inside surface of the outer pane of glass. Also consider alternate air leakage pathways, such as through the pulleys for the sash weights of older windows, that can lead to moisture problems even if the interface between the storm window and window frame is perfectly airtight (see the DIY guide Air Seal Wood Single Pane Windows for more information on sash weight retrofits). 

If condensation does appear on the storm windows, take the following steps:

  • First, attempt to improve the seal of the storm window (Figure 12). 
  • If that does not work, try making the exterior window incrementally slightly leakier until the problem is resolved. This could be done by slightly gapping the lower sash at the sill with a shim or removing the lower sash sill gasket if it exists.

If condensation persists, consider the following additional steps to control indoor sources of humidity:

  • Install bathroom exhaust fans if you don’t have them. Add timers or humidity sensors to bath exhaust fans and advise occupants to run exhaust fans when showering or cooking.
  • Dry clothes outside or in the clothes dryer; hang-drying clothes indoors adds a considerable amount of moisture to the indoor air.
  • Ensure that the exhaust fans and clothes dryer are ducted to the outside, not into the attic or crawlspace.
  • Consider foundation moisture issues.
    • If you have a crawlspace, make sure the crawlspace floor is completely covered with a plastic vapor barrier sheet that covers the entire floor and is secured to the walls.
    • If you have a sump pump in your basement or crawlspace, make sure the basin is covered with a tight-fitting lid. 
    • Address any basement moisture issues.
  • Run a dehumidifier if needed.
Condensation can form between the interior removable storm window and the existing window if the storm window is not air tight
Source
Courtesy Of
BSC
Figure 12. Condensation can form between the interior removable storm window and the existing window if the storm window is not airtight, as seen in the window on the right (Source: Building Science Corporation).

Additional Info

Videos

References

Publication Date
·
Author(s)
Cort Katherine A,
Culp Thomas D
·
Organization(s)
Pacific Northwest National Laboratory,
PNNL,
Birch Point Consulting,
BPC
Description
Research study evaluating energy savings and cost effectiveness of installing low-emissivity (low-e) storm windows over existing windows in residential homes in all climate zones.
Publication Date
·
Author(s)
Petersen Joseph M
·
Organization(s)
Pacific Northwest National Laboratory,
PNNL
Description
Report describing a research study of the performance of interior low-E storm windows in two test houses at Pacific Northwest National Laboratory in Richland, WA.
Publication Date
·
Author(s)
ENERGY STAR
·
Organization(s)
ENERGY STAR,
U.S. Environmental Protection Agency,
EPA
Description
Website providing a listing of ENERGY STAR certified interior and exterior storm windows
Publication Date
·
Author(s)
ENERGY STAR
·
Organization(s)
U.S. Environmental Protection Agency,
EPA,
ENERGY STAR
Description
ENERGY STAR webpage describing the benefits of storm windows and a link to a product list.
Publication Date
·
Author(s)
ENERGY STAR
·
Organization(s)
ENERGY STAR
Description
Webpage providing an ENERGY STAR climate zone map and criteria for ENERGY STAR storm windows per climate zone.
Publication Date
·
Author(s)
Efficient Window Coverings
·
Organization(s)
Building Green,
U.S. Department of Energy,
DOE,
Lawrence Berkeley National Laboratory,
LBNL
Description
Website sponsored by DOE to provide consumers with intelligent and unbiased guidance on the best window covering for your climate, your needs, and your windows.
Publication Date
·
Author(s)
Attachments Energy Rating Council
·
Organization(s)
AERC
Description
Website developed by the Attachments Energy Rating Council to provide consumers with credible, relevant, and comparable information about window attachments and their performance.
Publication Date
·
Author(s)
Baker Peter
·
Organization(s)
Building Science Corporation,
BSC,
National Renewable Energy Laboratory,
NREL,
U.S. Department of Energy,
DOE
Description
Document providing information and guidance about rehabilitating, retrofitting, and replacing wood window assemblies in residential construction.
Last Updated

Disclaimer

This content is a work created with funding provided by the United States Department of Energy under Contract no DE-AC05-076RL01830 for the operation of Pacific Northwest National Laboratory. The information and guidance provided by Pacific Northwest National Laboratory (PNNL) in the content are intended solely for educational purposes only and do not constitute formal training or certification. It is provided with the explicit understanding that neither the United States Government nor the United States Department of Energy, nor the Contractor, nor any or their employees, nor any jurisdiction or organization that has cooperated in the development of these materials, makes any warranty, express or implied, or assumes any legal liability or responsibility for the accuracy, completeness, or usefulness or any information, apparatus, product, software, or process disclosed, or represents that its use would not infringe privately owned rights. Reference herein to any specific commercial product, process, or service by trade name, trademark, manufacturer, or otherwise does not constitute or imply its endorsement, recommendation, or favoring by the United States Government or any agency thereof, or Battelle Memorial Institute. The views and opinions of authors expressed herein do not necessarily state or reflect those of the United States Government or any agency thereof. Viewers assumes full responsibility for all actions that they may take from information provided in this content including ensuring the safety, code compliance, and proper functionality of any products they choose to install. Installation and use of such products should be performed in accordance with local regulations and manufacturer instructions.