Introduction
Install a high-efficiency ENERGY STAR-certified clothes washer.
Why
Installing a high-efficiency clothes washer is a great way to save money on electricity and water and sewer bills. ENERGY STAR-labeled clothes washers typically use 20% less energy and 30% less water than non-ENERGY STAR products. ENERGY STAR certified front-load washers are even more energy efficient, using about 45% less energy and 50% less water than a top-load agitator washer. In the past decade or so, top-load impeller washers, which have a low-profile cone or disc instead of an agitator, have become popular as a more energy- and water-efficient option compared to traditional top load washers. However, compared to a top-load impeller washer, front load washers are still about 25% more energy and water efficient. Additionally, high-efficiency clothes washers spin the clothes much dryer, resulting in faster dry times and thus saving energy and wear-and-tear on your clothes dryer as well.
When selecting a high-efficiency clothes washer, it is also a good opportunity to consider new technologies such as a combo washer dryer (heat pump) unit. These combo units can make doing laundry more convenient if you just do a few loads a week since they wash and dry in one load. However, if your household does multiple loads of laundry back-to-back, the overall laundry time may be longer. Combo washer-dryer (heat pump) units are ventless so they can also add a little bit to overall heating and cooling savings. Since they are not exhausting conditioned household air to the outside, this also means they aren’t depressurizing the house, which can encourage unconditioned outside air to leak into the home through any cracks in the building envelope. Also, because combo washer-dryers leave the drum dry at the end of a cycle, mildew and mold in the door gasket (a problem for some front-loading washers) is a thing of the past.
What You'll Need
What you will need:
- Tape measure
- Bubble level
- Adjustable pliers
- Furniture sliders
- Braided stainless steel hoses with 90-degree elbows
- Two water hammer arresters if there aren't already some built into the washing machine outlet box
- For front load washers consider anti-vibration pads that raise the washer 2 to 3 inches above the floor to make it easier to catch the water when cleaning the drain pump filter
- Drain pan
- Bath towel
- Dolly, hand truck, or shoulder moving straps
- Two 4-ft lengths of 2-inch or 3-inch PVC or ABS pipe
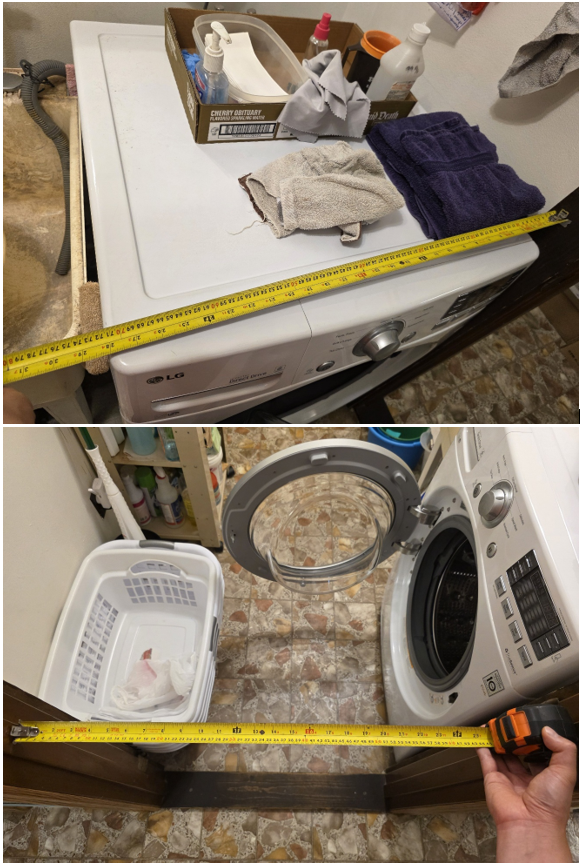
1. Measure door openings and washer space.
Measure door opening widths and the width and depth of the space where the new clothes washer will be installed (Figure 1). Be mindful of obstructions and constraints such as door trim and door swing space and determine whether these elements will cause a problem.
Source
2. Check the size before purchasing.
Check the dimensions for the unit you are considering before you purchase, and allow some extra room (Figure 2). For example, if the narrowest point of the narrowest doorway is 27.00 inches, a 27 inch wide unit will not fit.
Source
3. Prepare for the installation.
Many appliance vendors will deliver the new unit to the location where it is being installed, even if that location is upstairs, and for an additional fee many will offer to install the new clothes washer and haul away the old unit. This is usually money well spent – appliance vendors have the equipment to move these heavy appliances safely, reducing your risk of injury. Even if they are installing and hauling away, there are some things you can do ahead of time to make the installation go smoother.
Days before delivery…
- Purchase new hot and cold water hoses if the existing hoses look worn or brittle or are very short (your new clothes washer may be taller). Consider hoses with 90-degree elbows if the space will be tight. Look for braided stainless steel hoses for more durability.
- Purchase two water hammer arrestors if there aren't already some built into the washing machine outlet box.
- Consider purchasing a washing machine drain pan if the washer is being installed in a location where water damage would be catastrophic in the event of equipment malfunction.
- For front-load washers, consider purchasing anti-vibration pads that raise the washer 2 to 3 inches above the floor to make it easier to catch the water when cleaning the drain pump filter.
- Purchase furniture sliders for hard floors or carpet to protect flooring surfaces the washer will be moved across.
Hours before delivery…
- Unplug the old clothes washer.
- Shut off the water.
- Disconnect the hot and cold lines to the old washer.
- Move the old washer out of the way if there is room in the laundry room to move it and if you can move it safely. Use furniture sliders to reduce injury to you and to the floor.
- Clean the floor and walls that are normally inaccessible.
- If you’re giving away, selling, or hauling away the old washer yourself, use a dolly, hand truck, or shoulder moving straps to move the old washer. Have a second person available to help.
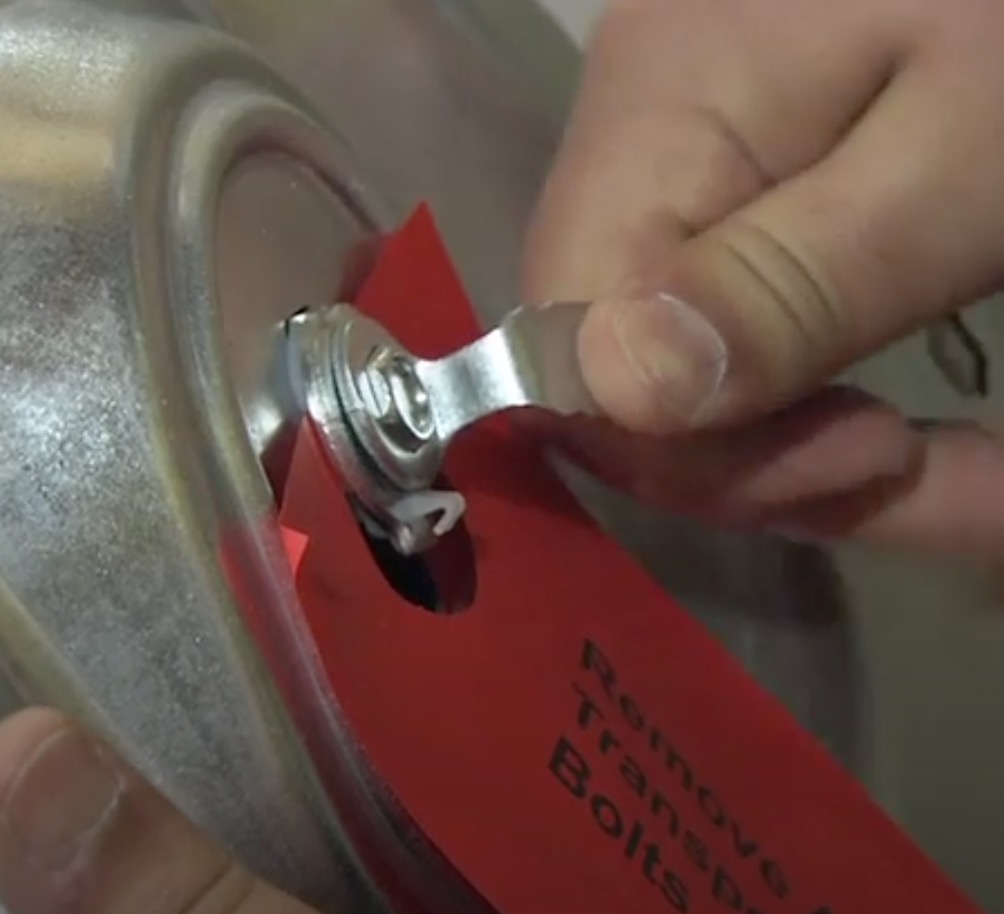
4. If you are installing the clothes washer yourself, remove the shipping bolts.
If you are installing the new clothes washer yourself, use the following installation instructions and also check the manufacturer’s installation instructions, which will provide model-specific details such as how to remove the shipping bolts if applicable. Some units will come with a wrench for removing the shipping bolts while others require you to find a socket of the right size (Figure 3).
Source
5. Install the washing machine drain pan.
If you decided to purchase a washing machine drain pan (Figure 4), you can place that in the location for the new washing machine.
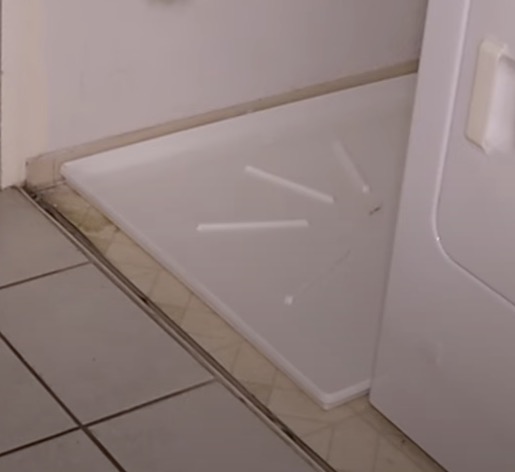
Source
6. Roll the washer onto the drain pan using two pieces of PVC or ABS pipe.
- Use two pieces of PVC or ABS pipe, with a bigger diameter than the height of the drain pan and cut to about 1 inch shorter than the width of the drain pan. Place both pipes under the washer several inches apart and parallel to the side of the drain pan you intend to move the washer over.
- Roll the washer forward until about one-third of its length is over the edge of the drain pan.
- Lean it slightly forward and take the pipe furthest from the drain pan out from under the washer and place it in the drain pan an inch or so from the side the washer is hanging over (Figure 5).
- Roll the washer forward on both pipes as far as you can, then lean it forward and take the roll that is outside of the pan and place it under the front edge of the washer to roll the washer forward until it’s centered over the drain pan.
- Once in place, remove both pipes and settle the washer in the drain pan.
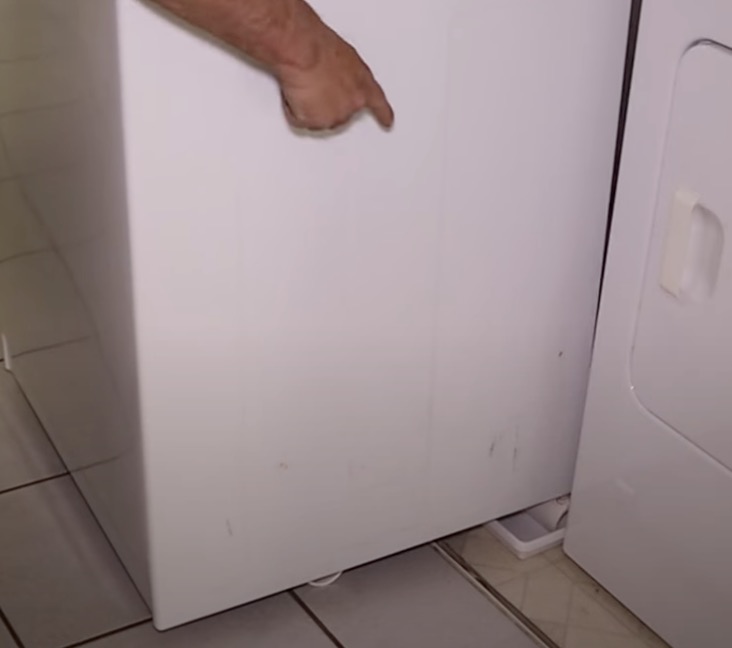
Source
7. Install raised vibration pads.
Tip or tilt the washer forward and back or side to side to install the raised vibration pads if desired (Figure 6). They can help your washer operate more quietly, especially if the floor is slightly uneven. They can also make it easier to catch the water when cleaning the drain pump filter because they raise the washer 2 to 3 inches above the floor.
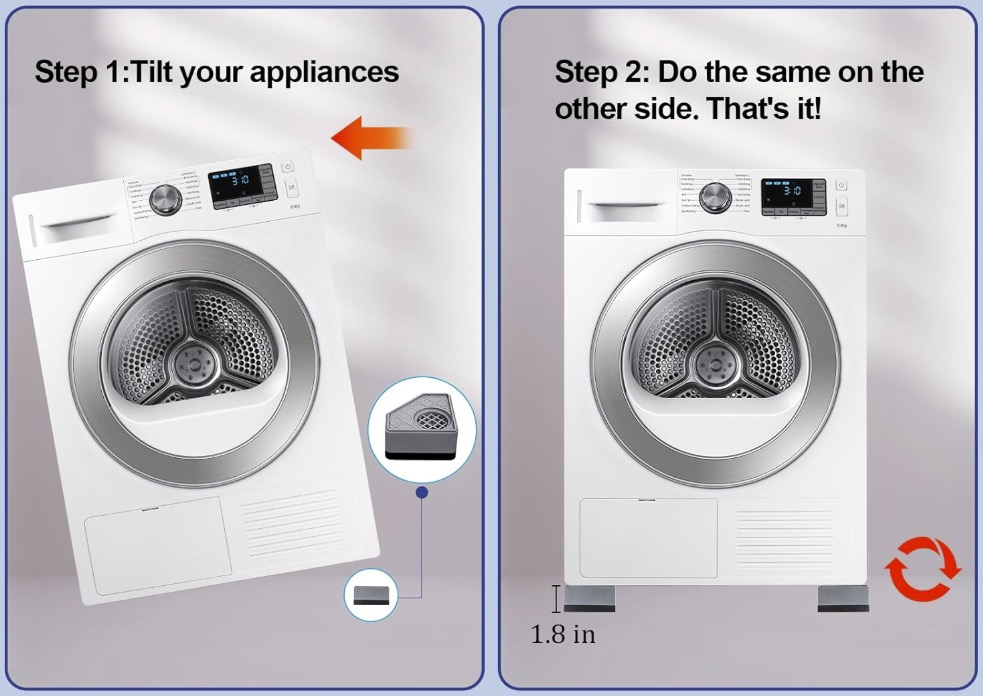
Source
8. Install the water hammer arresters to the washing machine if applicable.
Modern washing machines have fast-acting, automatic shutoff valves. When these valves close, they abruptly stop the high-speed flow of water, creating a pressure surge. A water hammer arrestor contains a sealed air chamber or piston that absorbs this shock wave (Figure 7). This prevents the water from slamming against the pipes and creating a loud banging or rattling noise in the wall. Without an arrestor, the repeated pressure surges from a washing machine can weaken pipe joints and connections over time, potentially leading to leaks or other damage.
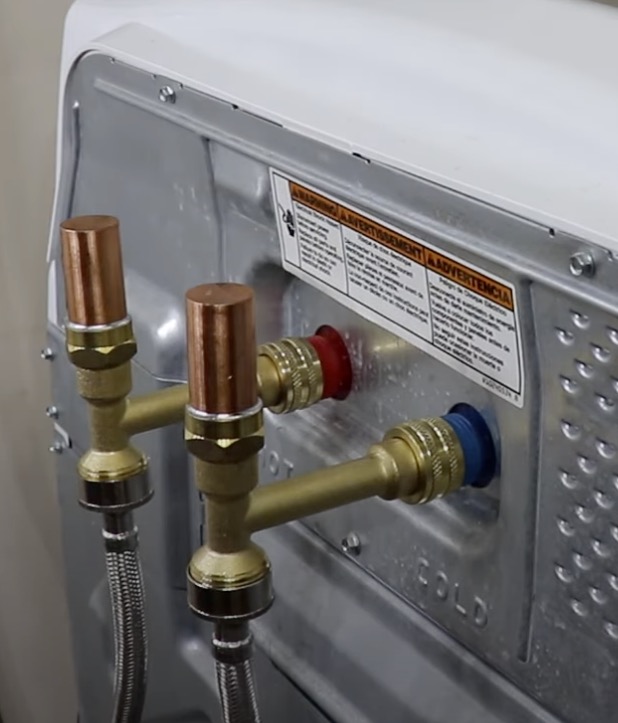
Source
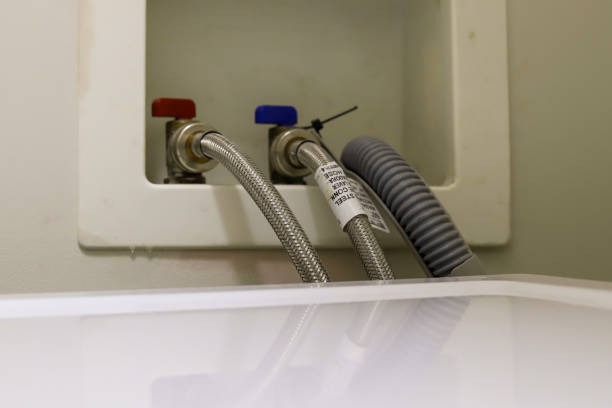
9. Connect the hot and cold washer hoses and the drain hose.
Connect the hot and cold water hoses and the drain hose (Figure 8). Note the washer drain hose only needs to be about 6 inches into the drain. Do not insert excess drain hose into the drain – there needs to be an air gap in the drain so that water doesn’t get siphoned back into the washer. Instead, cut off any excess pipe length.
Source
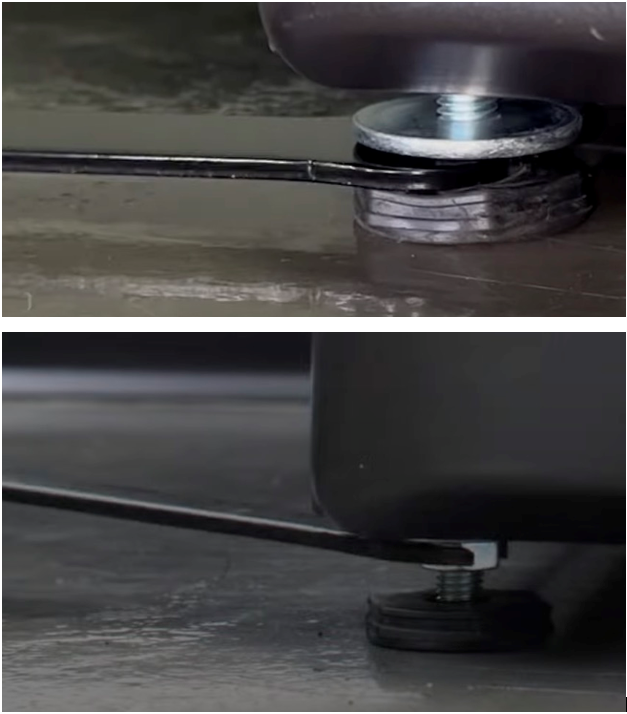
10. Level the washer.
Use a bubble level to check that the washer is level, front to back and side to side. Also hold onto two corners of the clothes washer and try to rock it left and right, front and back, and corner to corner. If it rocks at all, then at least one of the washer’s leveling feet needs to be adjusted. Note some units have a nut to raise and lower the level foot and an additional locking nut. Some washers will come with a thin wrench for adjusting the leveling feet (Figure 9).
Source
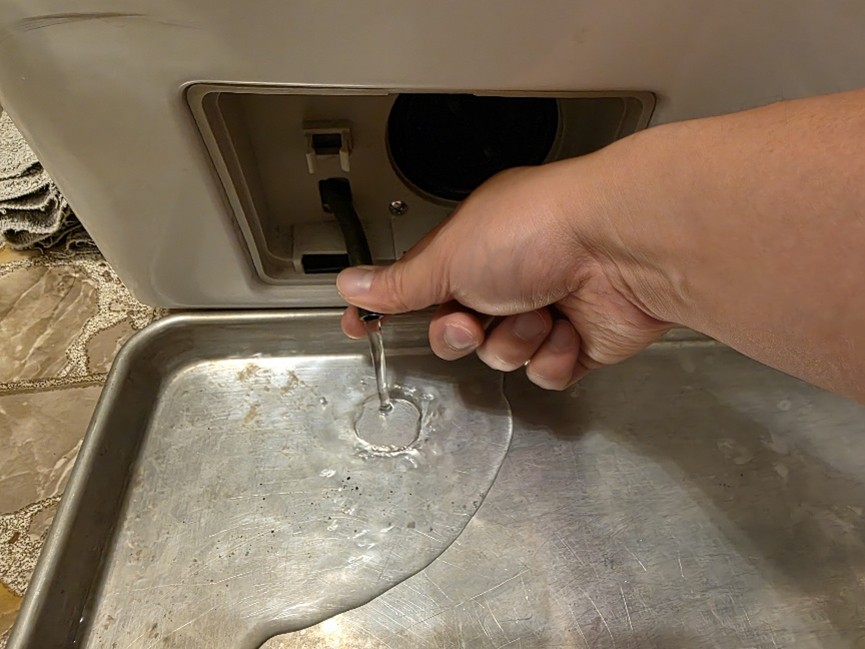
11. Check the drain pump filter.
Some front-loading clothes washer have a drain pump filter. It may be located in a small hatch accessible at the front bottom right corner of the washer, or it may be a mesh screen fitted onto the hose that drains water out of the machine; check your owners manual for type and location of the filter.
- Place a rimmed baking sheet on the floor under the filter or have a bucket and towel handy to catch any water that drains from the emergency drain hose (you can expect 1 to 2 cups of water to drain when the hose is disconnected).
- Remove and examine the filter. If the filter is removable, you can soak it in warm water with dish soap then scrub it clean with a soft-bristle brush like an old tooth brush. For nonremovable filters, clean away the lint with a soft brush.
- Slide or twist the filter back into place and return the cap or shut the hatch.
- Double check that the emergency drain hose is secure.
- Run an empty wash cycle using hot water. If your machine has a pre-programmed cleaning cycle, you can run this instead.
- Repeat this drain pump filter check and cleaning every 3 to 4 months to keep your clothes washer draining properly.