
Materials Cost: 3
Difficulty Level: 3

Introduction

Replace an electric-resistance water heater with a heat pump water heater for energy savings.

Why

Heat pump water heaters are over three times as efficient as an electric-resistance water heater. Since water heating is typically the second highest energy user behind space conditioning (heating and cooling), reducing this energy use by two-thirds can result in hundreds of dollars in annual energy savings. Heat pump water heaters achieve this impressive energy savings by moving heat instead of creating it. The heat pump pulls heat from the air outside the home and moves it into the water tank to heat water rather than creating heat from electrical energy. Unlike the combustion emissions of a gas water heater, the only byproduct of a heat pump water heater is cool air, which can actually supplement your air conditioning during the warmer months. During the winter months, the cool air generated by a heat pump water heater is not as desirable; however, since water heaters are often located in basements, utility rooms, or garages, the effect on indoor temperatures usually doesn’t cause a problem.

What You'll Need

  • Tape measure
  • Adjustable pliers
  • Plumbers tape
  • Water heater connection hoses (do not reuse old connection hoses)
  • Wire nuts
  • Non-contact voltage tester/detector
  • Phillips and straight screwdrivers
  • Towel
  • Water heater drip pan
  • Expansion tank (if applicable)
  • Water pressure test gauge
  • Hand truck and/or hoisting net lifting straps; consider renting a stair-climbing hand truck if there will be stairs
  • Two pieces of 2 in. or 3 in. PVC/ABS pipe each 12-14 inches in length
  • Two ratcheting straps
  • Water transfer pump
  • Garden house
  • Washing machine hose
  • Ratcheting PVC pipe cutter
  • Foam pipe insulation
  • ¾ in. CPVC pipe typically sold in 10-ft lengths
  • ¾ in. Male Pipe Thread (MPT) to CPVC stainless steel adapter
  • CPVC cement (typically orange color)
  • ¾ in. barb x 3/4 in. MIP 90-degree elbow (for condensate management, many alternative solutions are also suitable)
  • ¾ in. PVC clear vinyl tubing (for condensate management, many alternative solutions are also suitable)

1. Evaluate the feasibility of installing a heat pump water heater in your water heater location.

  • Space feasibility: Heat pump water heaters are about 16 to 18 inches taller than a standard electric resistance water heater (Figure 1). Measure the available height in the water heater tank area to see if it can accommodate the taller tank and check the height specification of the heat pump water heater you want to install.
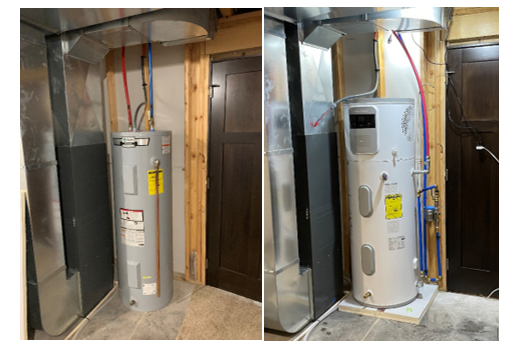
Size comparison between two 50-gallon water heaters: a traditional electric-resistance-only water heater on the left and a heat pump water heater on the right
Source
Figure 1. The electric resistance water heater on the left was replaced by a heat pump water heater on the right; although the new water heater is taller, there is still adequate space in a room with 8-ft ceilings (Source: Larson Energy Research).
  • Condensate feasibility: Heat pump water heaters generate some condensate. Evaluate whether it is possible to pipe the condensate to a floor drain or sink or existing condensate pump. It is also possible to install a new condensate pump to pump away the condensate.
  • Air volume feasibility: Heat pump water heaters get their efficiency by extracting heat from the surrounding ambient air and moving it to heat water. To do this efficiently, a minimum of 450 ft3 to 700 ft3 of air volume is needed. Measure the height, width, and length (in feet) of the room where the water heater will be located and multiply them together to see if there is enough air volume. If not, see if a door can be kept open or removed or if louvers can be installed in the door to connect the room to an adjacent space so that there is enough air volume.
  • Noise feasibility: Heat pump water heaters make some noise, about 45 to 55 decibels, which is equivalent to the noise level of a dishwasher, microwave, or bathroom exhaust fan. That’s not terribly noisy but you probably wouldn’t want it in your bedroom or living room. 

2. Select a heat pump water heater with adequate capacity.

Choose a tank size that will deliver enough hot water. Consider whether your household takes short showers or long showers, baths or showers, and how many people will typically be bathing one after another or in multiple bathrooms at the same time. Table 1 provides a rough idea of what sized tank to choose based on your home’s highest water usage period.


Table 1. Water heater tank size based on household water uses
Tank SizeBathing shortly after another or at the same time
50 Gallon2 long showers; 1 bath; 3 short showers
65 Gallon3 long showers; 2 baths; 4 short showers
80 Gallon4 long showers; 3 baths; 5 short showers 

If your current water heater has the hot and cold water connections on top of the water heater (which is typical of most electric-resistance water heaters), then select a heat pump water heater model with the hot and cold water connections on top for easier installation (Figure 2).


Examples of heat pump water heaters with water pipe connections on top.
Source
Figure 2. Examples of heat pump water heaters with water pipe connections on top (Source: PNNL).

3. Check the expansion tank.

If your home’s water system has an expansion tank, it might be due for replacement. Expansion tanks typically have a 5- to 10-year life. 

  1. Remove the cap and depress the tire valve with the corner of a screwdriver for a second. If air comes out, that is a good sign that the bladder inside is still good. If water comes out, then the expansion tank is bad and needs replacement. 
  2. Check to see if there is a date written on the expansion tank to indicate when it was installed. If the expansion tank needs to be replaced because of age or failure, purchase a replacement of the same size. It is good timing to replace the expansion tank at the same time as the water heater, because both require that the water supply to the water heater be shut off. 
  3. Use a tire inflator or bicycle pump to inflate the bladder on the new expansion tank to the same pressure as the water pressure. You can test your home’s cold water pressure by attaching a water pressure test gauge to one of your outdoor garden hose spigots (Figure 3). 
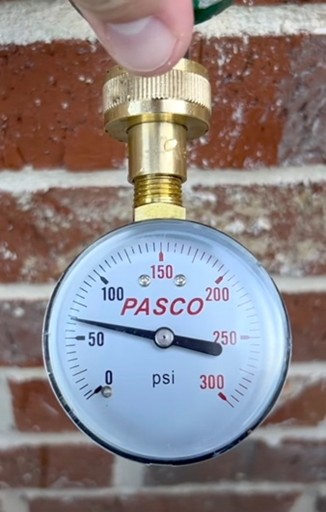
Use a water pressure gauge to check the house's cold water pressure at a garden hose spigot.
Source
Figure 3. Use a water pressure gauge to check the house’s cold water pressure at a garden hose spigot (Source: PNNL).
  1. Use a pressure gauge to check the expansion tank’s air pressure at the tank’s “tire” valve (Figure 4).
Check the air pressure of the water heater's expansion tank using an air pressure gauge (shown) and adjust it using an air pump to match the home's cold water pressure.
Source
Figure 4. Check the air pressure of the water heater’s expansion tank using an air pressure gauge (shown) and adjust it using an air pump to match the home’s cold water pressure (Source: PNNL).

4. Shut off power and water.

Shut off power to the water heater at the circuit breaker and shut off the water by closing the valve on the cold water inlet pipe to the water heater (Figure 5).
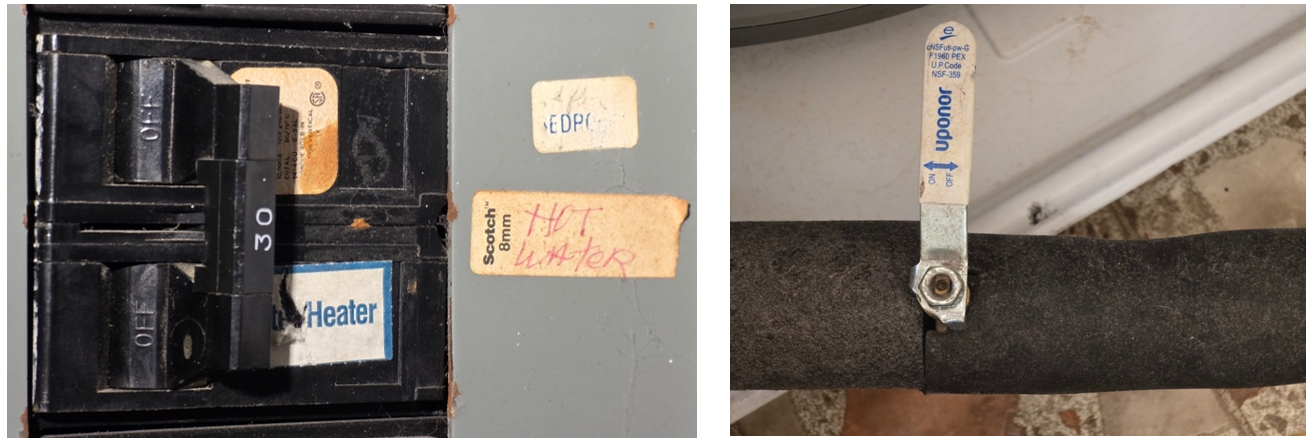
Before replacing a water heater, flip the breaker on the water heater (left) to turn off power to the water heater and close the valve on the cold water inlet (right) to turn off the water supply to the water heater.
Source
Figure 5. Before replacing a water heater, flip the breaker on the water heater (left) to turn off power to the water heater and close the valve on the cold water inlet (right) to turn off the water supply to the water heater (Source: PNNL).

5. Drain the water out of the old water heater.

To drain the old water heater tank quickly use a transfer pump:

  1. Open one or two faucets in the house to the hot setting. 
  2. Hook up one end of the washing machine hose to the drain port of the water heater (Figure 6 left image).
  3. Hook up the other end of the washing machine hose to the inlet of the transfer pump (Figure 6 right image).
  4. Hook up a garden hose to the outlet of the transfer pump and route the garden hose to an area outside that is ok to receive a water heater tank’s worth of warm water with some sediments.
  5. Open the valve of the water heater drain port.
  6. Turn on the transfer pump and check that water is flowing out of the garden hose.
Use a transfer pump to quickly drain a water heater for repair or replacement by attaching a clothes washer hose to the drain valve of the water heater and the other end to the inlet of the transfer pump, and using a garden hose from the pump to a drain.
Source
Figure 6. Use a transfer pump to quickly drain a water heater for repair or replacement by attaching a clothes washer hose to the drain valve of the water heater (left), attaching the other end to the inlet of the transfer pump (right), and using a garden hose from the outlet side of the transfer pump to a drain (Source: PNNL).

6. Disconnect the water and electricity.

  1. Disconnect the hot and cold water connections. It is safe to do this after the transfer pump has run for a minute or two. The pump will have pumped enough water out of the home’s hot water lines that only a minimum amount will drip out of the hot water connection. Use a bath towel to catch drips. The whole tank does not need to be empty before disconnecting the water lines. 
  2. Disconnect the electrical connection (Figure 7). You will need to use a screwdriver to open the electrical junction box on the water heater tank. Use a non-contact voltage tester/detector to verify that the electricity has in fact been turned off before disconnecting the wires and wire nuts.
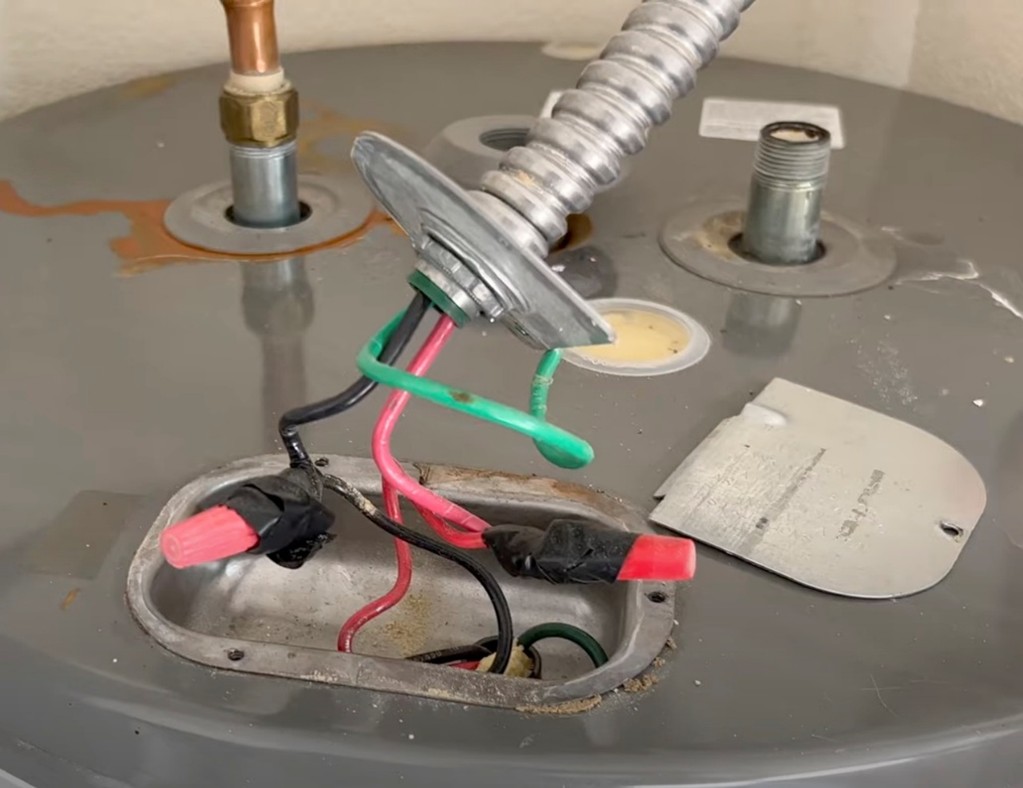
Use a non-contact voltage tester to verify the electricity is off, then disconnect the electrical and water connections of the old water heater tank.
Source
Figure 7. When replacing a water heater, disconnect the electrical and water connections from the old tank. Use a non-contact voltage tester to verify that the electricity is indeed off before attempting to disconnect the electric wiring (Source: PNNL).
  1. If there are earthquake straps, loosen the bolt and separate the two halves of the straps.
  2. Disconnect the piping to the temperature and pressure (T&P) valve. You may need to use a pipe cutter if it isn’t a simple straight section of pipe that can be loosened with a wrench and removed.  

7. Remove as much water as possible.

With the connections disconnected from the old water heater tank, tip the tank (Figure 8) to help drain out the last gallons of water before turning off and disconnecting the transfer pump. Use a bath towel to catch drips. Elevate the garden hose while carrying it outside to allow gravity to drain any residual water to the outside.
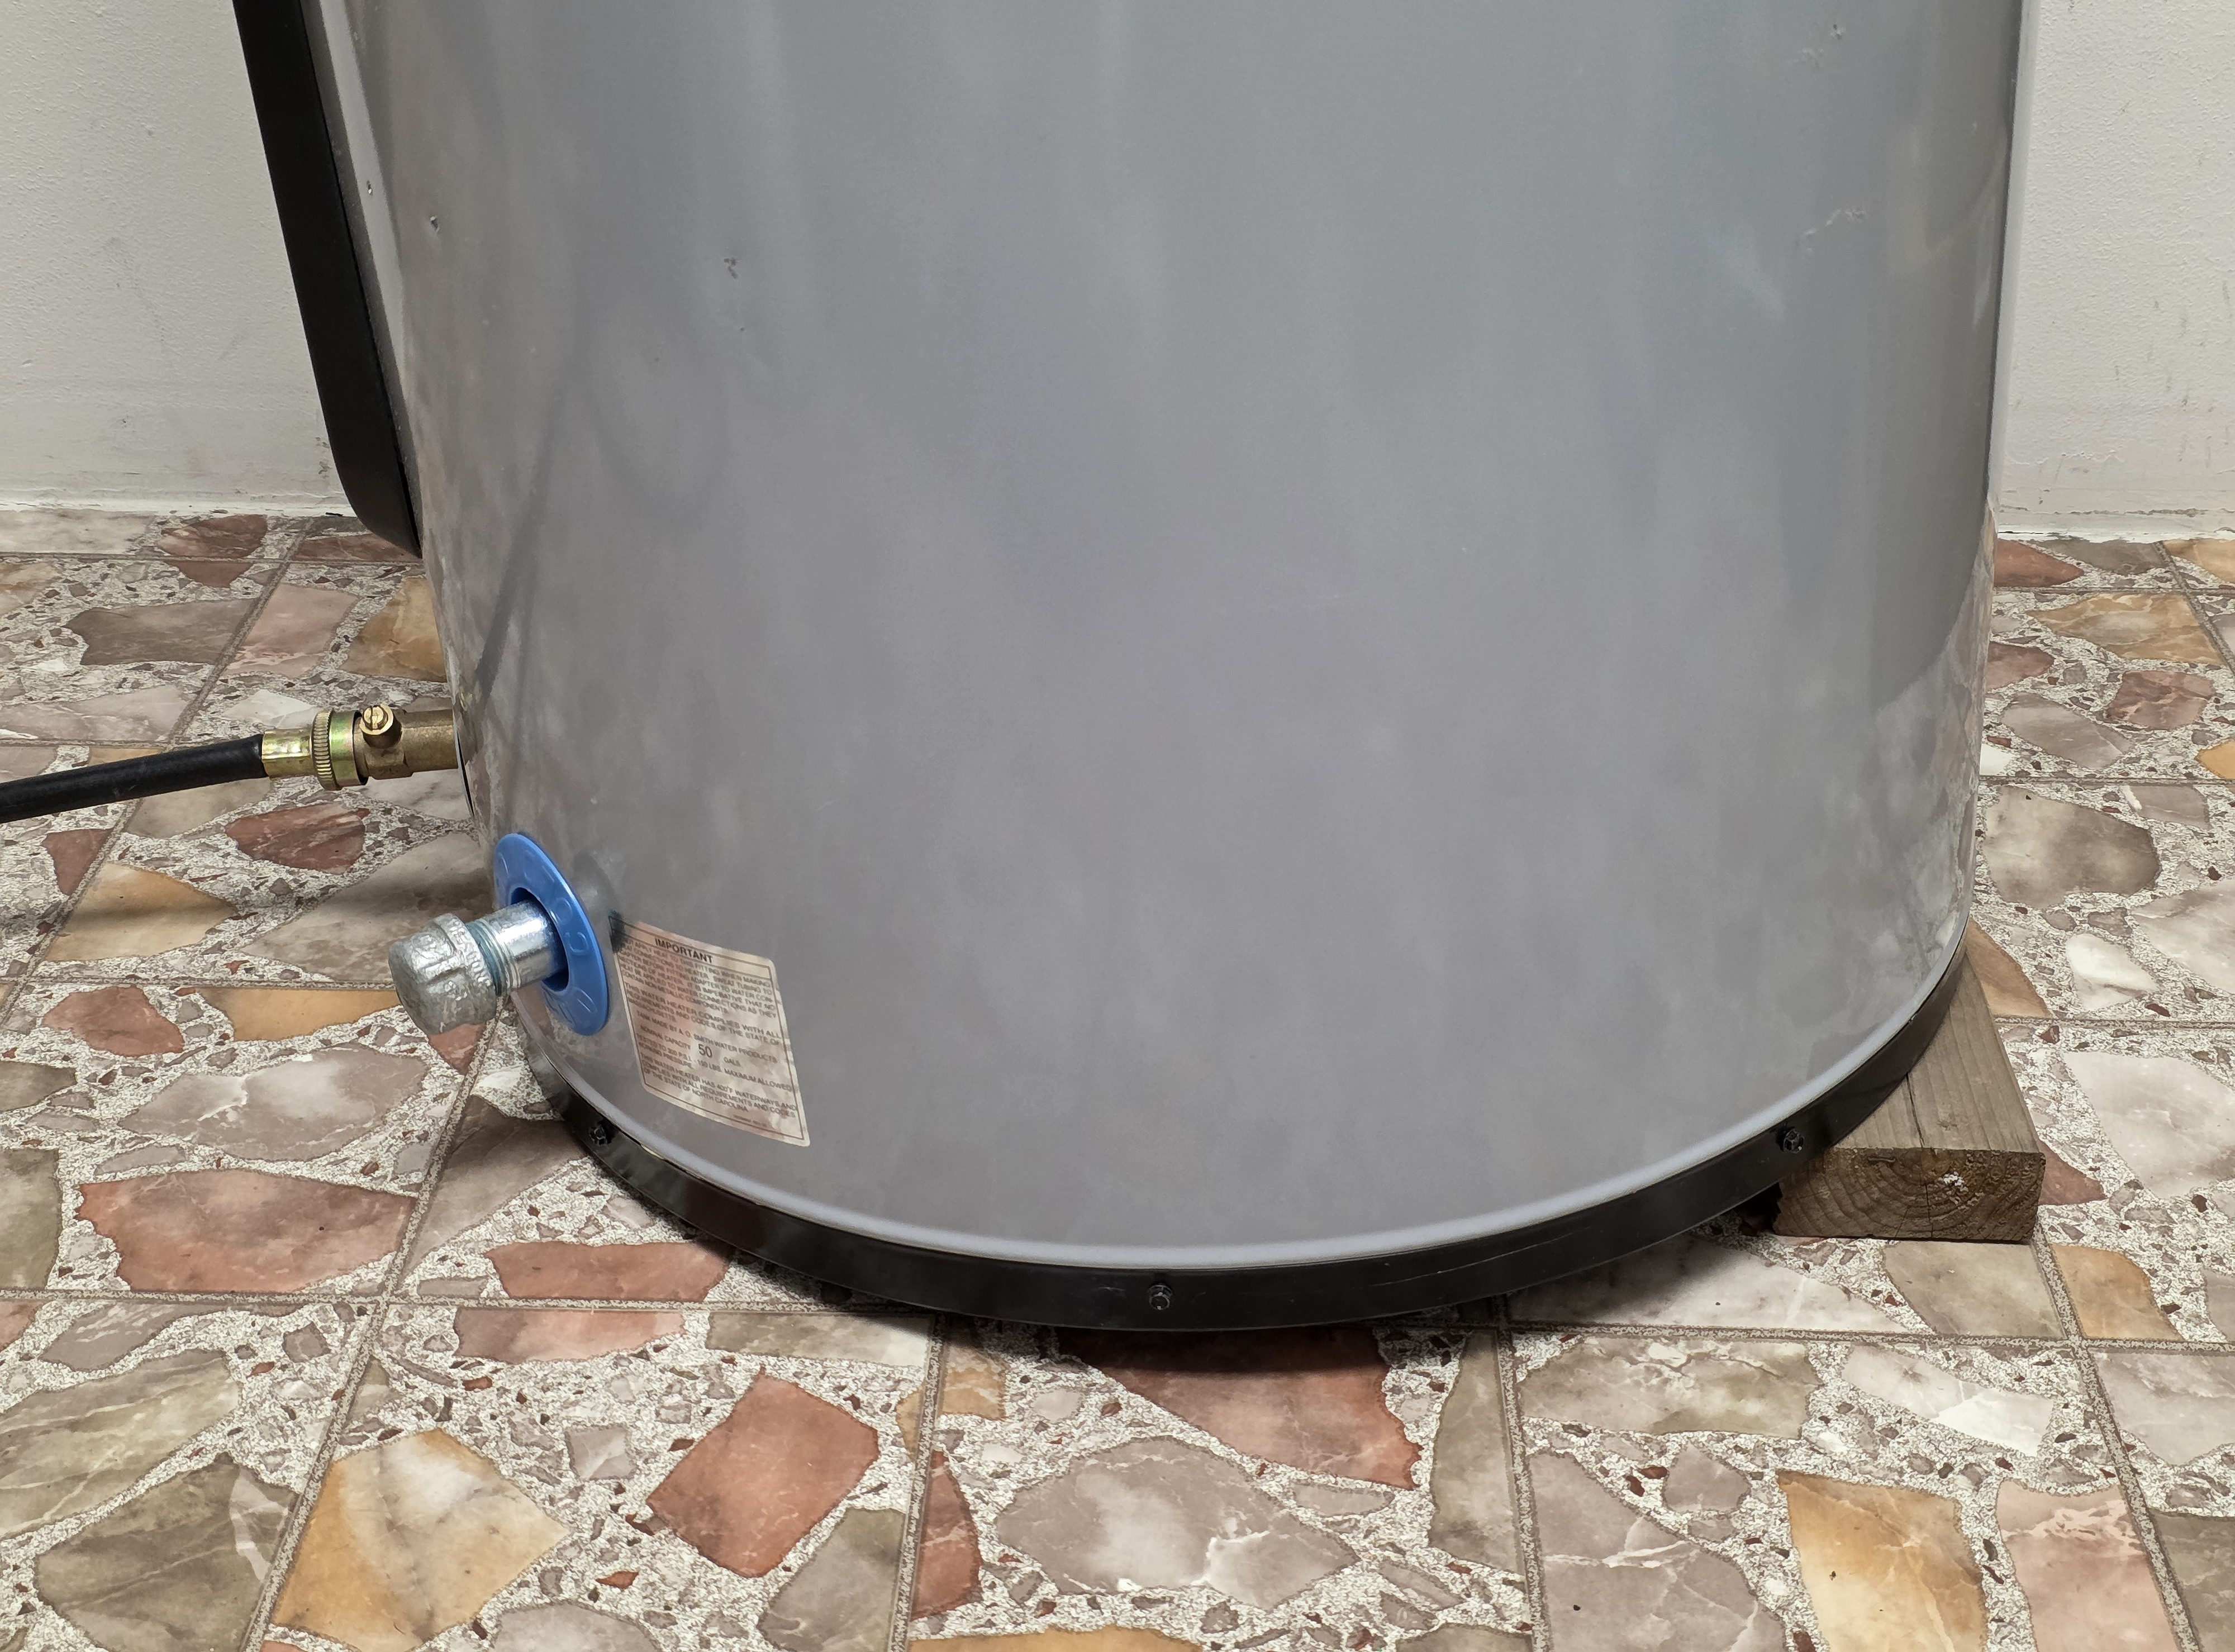
When the water heater is mostly drained, tip the water heater so that the remaining water in the tank slopes towards the drain valve; a scrap piece of wood can help to hold it at an angle.
Source
Figure 8. When the water heater is mostly drained, tip the water heater so that the remaining water in the tank slopes towards the drain valve. Use a scrap piece of wood to hold it at an angle (Source: PNNL).

8. Remove the old water heater tank.

Moving water heaters is the hardest part of a water heater replacement project and the step most likely to result in injury. If the water heater can be moved directly using a dolly or hand truck, then do that. Below are some tips for moving a water heater out of a pan and out of a pedestal or alcove.

If the water heater is inside a water heater pan:

  1. Tip it to one side and place a piece of 12- to 18-inch-long, 2- to 3-inch- diameter PVC or ABS pipe into the pan. 
  2. Place another piece outside of the pan. 
  3. Balance the water heater tank on the pipe and use it to help roll the tank out and over the lip of the pan (Figure 9). 
  4. Another method is to tip the water heater to install a hoisting net lifting strap under the water heater and use two people to lift it out of the pan (Figure 9). 
To move a water heater, you can use two pieces of PVC or ABS pipe to roll it or a hoisting net lift to lift and carry it.
Source
Figure 9. To move a water heater, you can use two pieces of PVC or ABS pipe to roll it or a hoisting net lift to lift and carry it (Source: PNNL).

If the water heater is sitting in an elevated pedestal or alcove: 

  1. Use a ratcheting strap and a hand truck to lift it out. 
  2. Wrap the ratchet strap around the top of the hand truck and wrap the other end to the drain valve on the water heater. 
  3. Tighten the strap and then tip the water heater from the top along with the hand truck (Figure 10). 
  4. As soon as the water heater clears the platform or lip, stop and lower the water heater to sit on the nose plate of the hand truck. 
  5. Before moving the water heater any distance using the hand truck, be sure to secure it using a ratcheting strap. The round shape of the water heater can easily roll off the hand truck if unsecured.
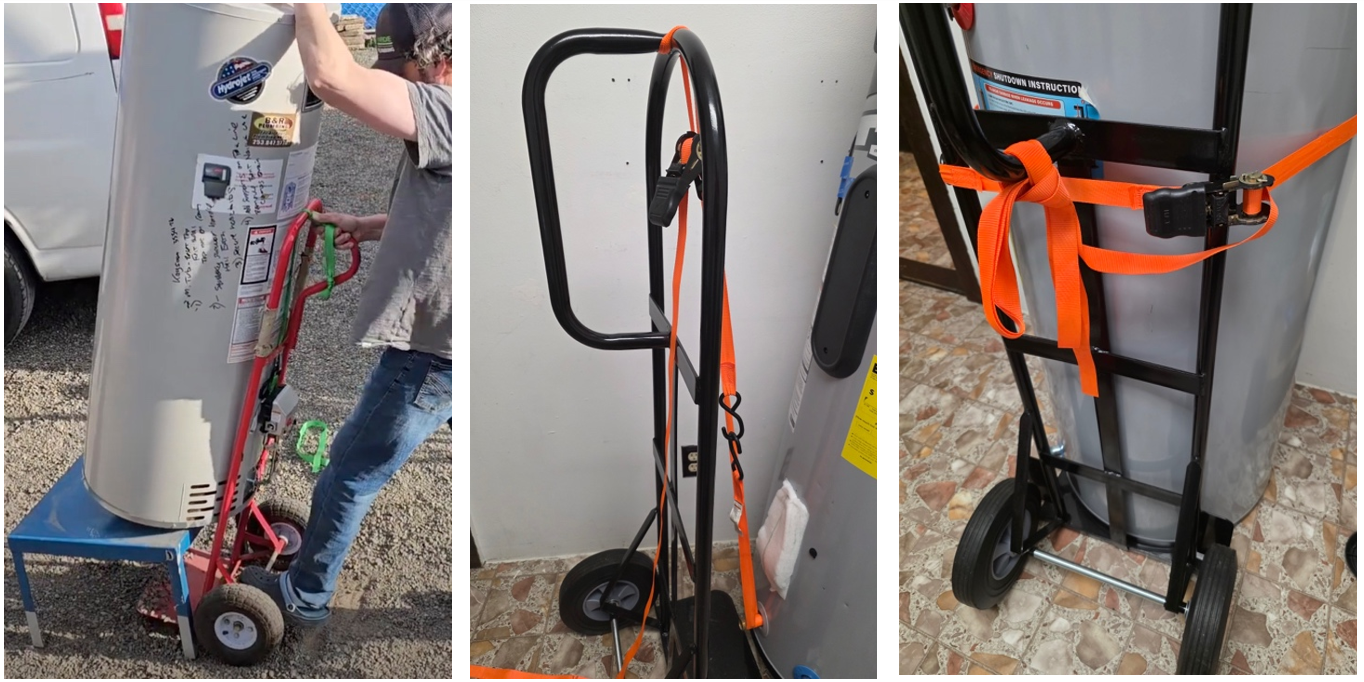
To move a water heater off a platform, wrap one end of a ratchet strap around the top of a hand truck and the other end to the water heater drain valve, tighten the strap, tip the water heater, and when the tank clear the platform, tighten the strap.
Source
Figure 10. To move a water heater off a platform, wrap one end of a ratchet strap around the top of a hand truck and the other end to the drain valve on the water heater. Tighten the strap and then tip the water heater from the top along with the hand truck. When the water heater clears the platform, stop and lower the water heater to sit on the hand truck. Wrap the strap around the tank to secure it to the hand truck before moving it (Source: PNNL).

9. Place the new heat pump water heater.

Heat pump water heaters are heavier than electric resistance water heaters and they are top heavy. Use the same techniques described in the previous step to safely move and set the new heat pump water heater into place. Rotate the tank to a position that takes the following into consideration:

  • Ease of making the hot and cold-water connections
  • Ease of making the electrical connection
  • Ease of making the condensate drain line connection 
  • Ease of access to the air filter
  • Ease of access to the display screen
  • Ensuring the side discharge fan won’t blow directly against a wall.

The heat pump water heater installation shown in Figure 11 balances these criteria.
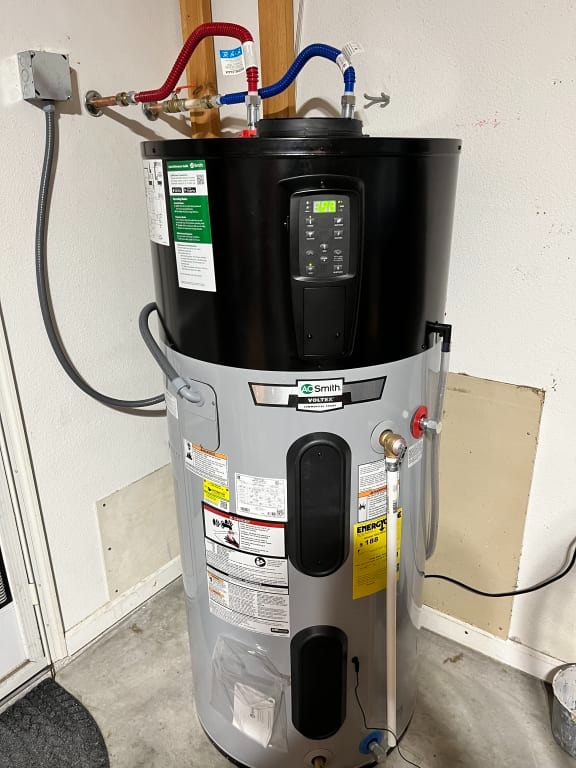
When placing a heat pump water heater, things to consider include the ease of making connections for the water, electrical, and condensate line; accessing the air filter and display screen; and ensuring that a side discharge fan won’t blow against a wall.
Source
Figure 11. When placing a heat pump water heater, things to consider include the ease of making connections for the water, electrical, and condensate line; accessing the air filter and display screen; and ensuring that a side discharge fan won’t blow directly against a wall (Source: PNNL).

10. Hook up the water and electricity.

Hook up the hot and cold water lines using new connection hoses. Use two wrenches as is shown in Figure 12, one wrench to hold the connection on the HPWH to keep it from rotating while the other wrench is used to turn the water heater connection fitting. Hook up the electrical connection. Note, if you see a white wire, color it red or black using a permanent marker or electrical tape. Do not turn on the circuit breaker until the tank is full of water.

After getting a new water heater into place, reattach the hot and cold water (left) and the electricity (right).
Source
Figure 12. After getting a new water heater into place, reattach the hot and cold water connections (left) and the electrical connection (right) to the water heater (Source: PNNL).

11. Fill the tank with water.

Open the cold water valve to begin filling the tank with water while one or two faucets are open to the hot setting to let the air escape (Figure 13). Shut off the faucets once the tank is completely filled with water as indicated by the transition from air coming out of the faucets to a steady stream of water.

When filling a water heater tank, open the cold water valve (on left) to begin filling the tank and turn on one or two faucets for hot water (right), allowing air to escape from the tank.
Source
Figure 13. When filling, or refilling, a water heater tank, open the cold water valve (on left) to begin filling the tank and turn on one or two faucets for hot water (right), allowing air to escape from the tank until the water level has reached high enough for water to start flowing from the tank (Source: PNNL).

12. Install a condensate drain pipe.

Install and route the condensate drain pipe so that it drains to a good location such as a floor drain, sink, laundry drain, or condensate pump. Some heat pump water heaters come with a fitting pre-installed from the factory to make it easier to route the condensate while others require you to purchase a fitting to make the condensate connection (Figure 14). Figure 14 (middle) shows a typical fitting for connecting a drain line to the condensate port on a heat pump water heater. This fitting is a ¾-inch male pipe thread (MPT)-to-barb on a 90-degree elbow.
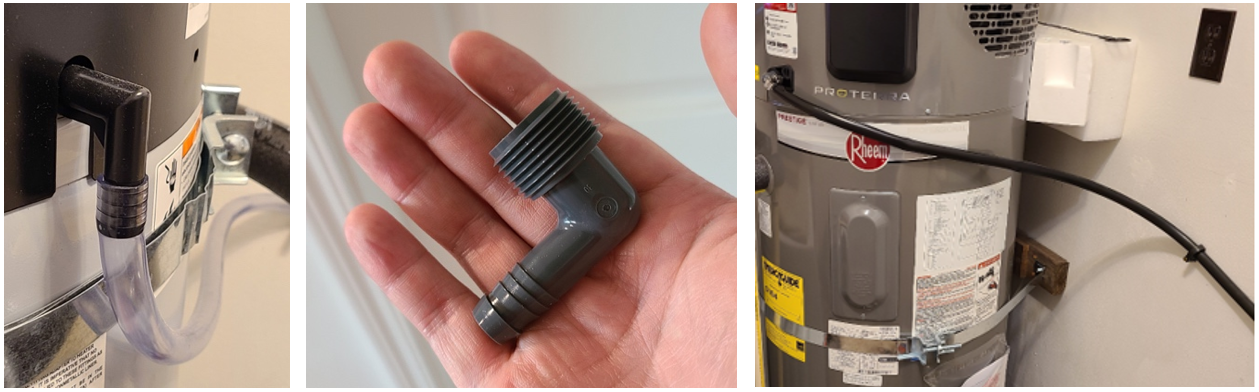
Heat pump water heater condensate can be addressed through factory fittings (left) or after market fittings (center), and then routing the condensate to a drain.
Source
Figure 14. Heat pump water heaters will discharge condensate; the heat pump water heater on the left comes from the factory with a condensate line fitting already installed, the middle image shows a typical fitting you can purchase to connect the drain line to the condensate port, and the right image shows a condensate line routed to a utility sink (Source: PNNL).

13. Install pipe insulation.

Cover the hot water pipes with pipe insulation (Figure 15).

The hot water pipe on this heat pump water heater has been insulated with pipe insulation.
Source
Figure 15. The hot water pipe on this heat pump water heater has been insulated with pipe insulation (Source: PNNL).

14. Install pipe for temperature and pressure (T&P) valve.

A water heater's T&P relief valve is a vital safety device that automatically opens to release excess water and steam when the tank's temperature or pressure becomes dangerously high, preventing catastrophic failures like explosions. The valve is located near the top of the tank with a discharge pipe that extends down the side of the tank to no more than 6 inches above the floor or drain. The T&P valve will open to release pressure if the water inside the water heater reaches a pressure of 150 psi or a temperature of 210°F. These temperatures will melt PVC pipe so CPVC or copper piping must be used (Figure 16).
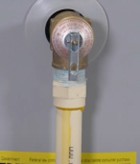
The discharge pipe on this water heater’s temperature and pressure (T&P) relief valve is made of CPVC pipe.
Source
Figure 16. The discharge pipe on this water heater’s T&P relief valve is made of CPVC pipe (Source: PNNL).

15. Install seismic straps (if applicable).

Install seismic straps if the water heater is being installed in a region that is at risk of earthquakes. If the old water heater had seismic straps, you may be able to reuse these straps for the new heat pump water heater. The two straps should wrap around the tank portion of the heat pump water heater, not the heat pump portion (Figure 17).

Heat pump water heaters should be seismically braced around the tank portion and not the water heater portion (left) but padding is okay if close to a wall (right).
Source
Figure 17. Seismic straps are installed around the tank portion (left) and not the heat pump portion of this heat pump water heater; if the heat pump water heater is pressed against a wall, install some padding between the heat pump and the wall (right) to prevent vibrations from the compressor from propagating into the wall (Source: PNNL).

16. Turn on power.

Turn on the power from the circuit breaker (Figure 18). A heat pump water heater can take up to 10 minutes to complete its startup self-test and checks. When you hear the fan and compressor start, those are good signs that the heat pump water heater is working correctly.

Turn on power to the water heater from the circuit breaker.
Source
Figure 18. Turn on power to the water heater from the circuit breaker (Source: PNNL).

17. Download the app to connect the heat pump water heater to the internet (optional).

This is an optional step that can enable you to get reminder notifications on your phone to check and clean the heat pump water heater air filters and can give you the ability to change the mode and temperature setpoint of the water heater from your phone. Other features include the ability to schedule what times to avoid running the heat pump and when to prioritize running the heat pump. Reasons for using this scheduling feature could include the following: 

  1. You have time-of-use electricity rates, resulting in expensive electricity at certain hours and cheap electricity at other times.
  2. Your heat pump water heater is located in a part of the house where the noise or cool air generated is undesirable at certain hours of the day.
  3. You don’t use hot water at certain hours of the day and want to save a few additional dollars per year and thus want to program the water heater to allow the tank temperature to cool down more during the hours of non-use.
  4. You use a lot of hot water at certain hours of the day and want the water heater to heat the tank up a little hotter so that more hot water is available during the hours of heavy use. 

Additional Info

Last Updated

Disclaimer

This content is a work created with funding provided by the United States Department of Energy under Contract no DE-AC05-076RL01830 for the operation of Pacific Northwest National Laboratory. The information and guidance provided by Pacific Northwest National Laboratory (PNNL) in the content are intended solely for educational purposes only and do not constitute formal training or certification. It is provided with the explicit understanding that neither the United States Government nor the United States Department of Energy, nor the Contractor, nor any or their employees, nor any jurisdiction or organization that has cooperated in the development of these materials, makes any warranty, express or implied, or assumes any legal liability or responsibility for the accuracy, completeness, or usefulness or any information, apparatus, product, software, or process disclosed, or represents that its use would not infringe privately owned rights. Reference herein to any specific commercial product, process, or service by trade name, trademark, manufacturer, or otherwise does not constitute or imply its endorsement, recommendation, or favoring by the United States Government or any agency thereof, or Battelle Memorial Institute. The views and opinions of authors expressed herein do not necessarily state or reflect those of the United States Government or any agency thereof. Viewers assumes full responsibility for all actions that they may take from information provided in this content including ensuring the safety, code compliance, and proper functionality of any products they choose to install. Installation and use of such products should be performed in accordance with local regulations and manufacturer instructions.