Materials Cost: 1
Difficulty Level: 1

Introduction

Installing cellular blinds on your windows can provide privacy, shade, and style, while reducing cooling and heating energy costs. consumption, improve comfort, reduce glare, and improve a home’s resistance to extreme heat events.

Why

Installing cellular blinds can save energy in the summer by blocking heat from the sun. They can also save energy in the winter by providing an insulating layer at night. Studies show they are twice as effective as vinyl miniblinds at stopping heat transfer through the window. They improve comfort, provide privacy, and stop glare. Installation will vary depending on manufacturer, so manufacturer’s instructions should be followed. Below is one example of an installation. This example shows concepts that can apply to all installations.

What You'll Need

  • Cellular shade kit, precut to fit the desired window
  • Manufacturer’s installation instructions
  • Step stool or ladder to reach the top of the window from the inside
  • Measuring tape
  • Pencil
  • Level
  • Drill with drill bit (see manufacturer’s instructions for bit size) 
  • Screwdriver, socket wrench, or other device for screwing in screws

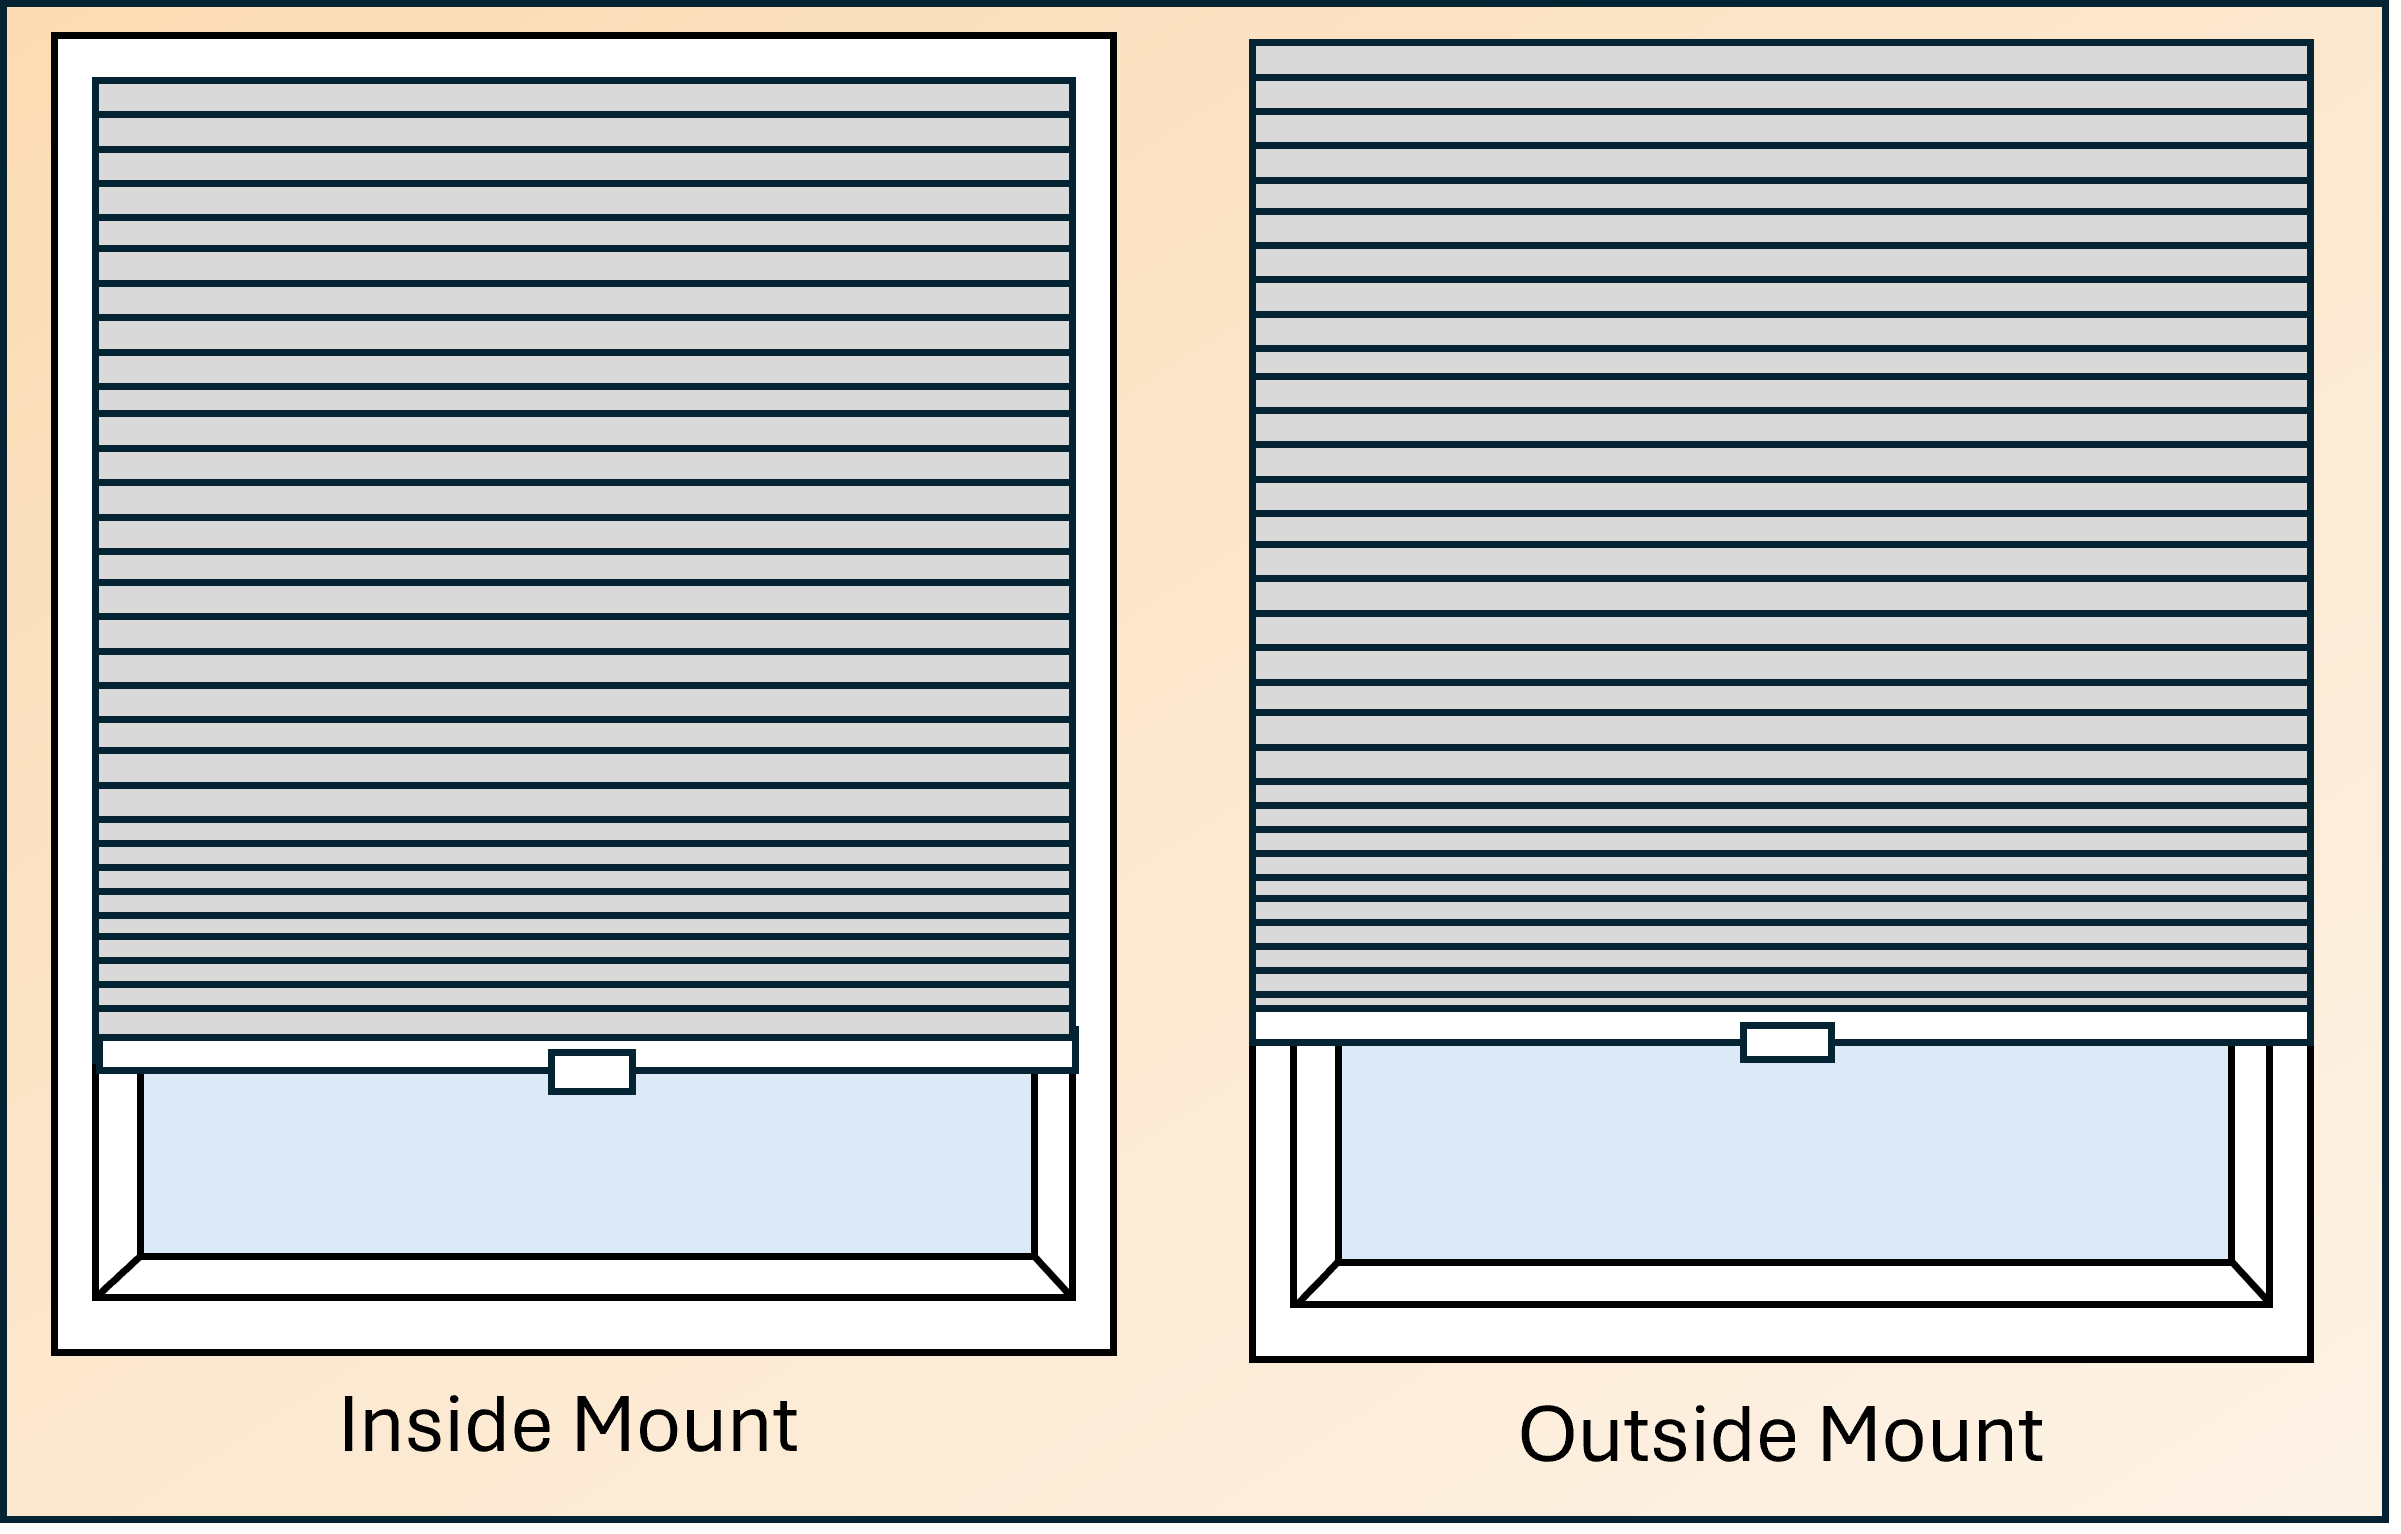
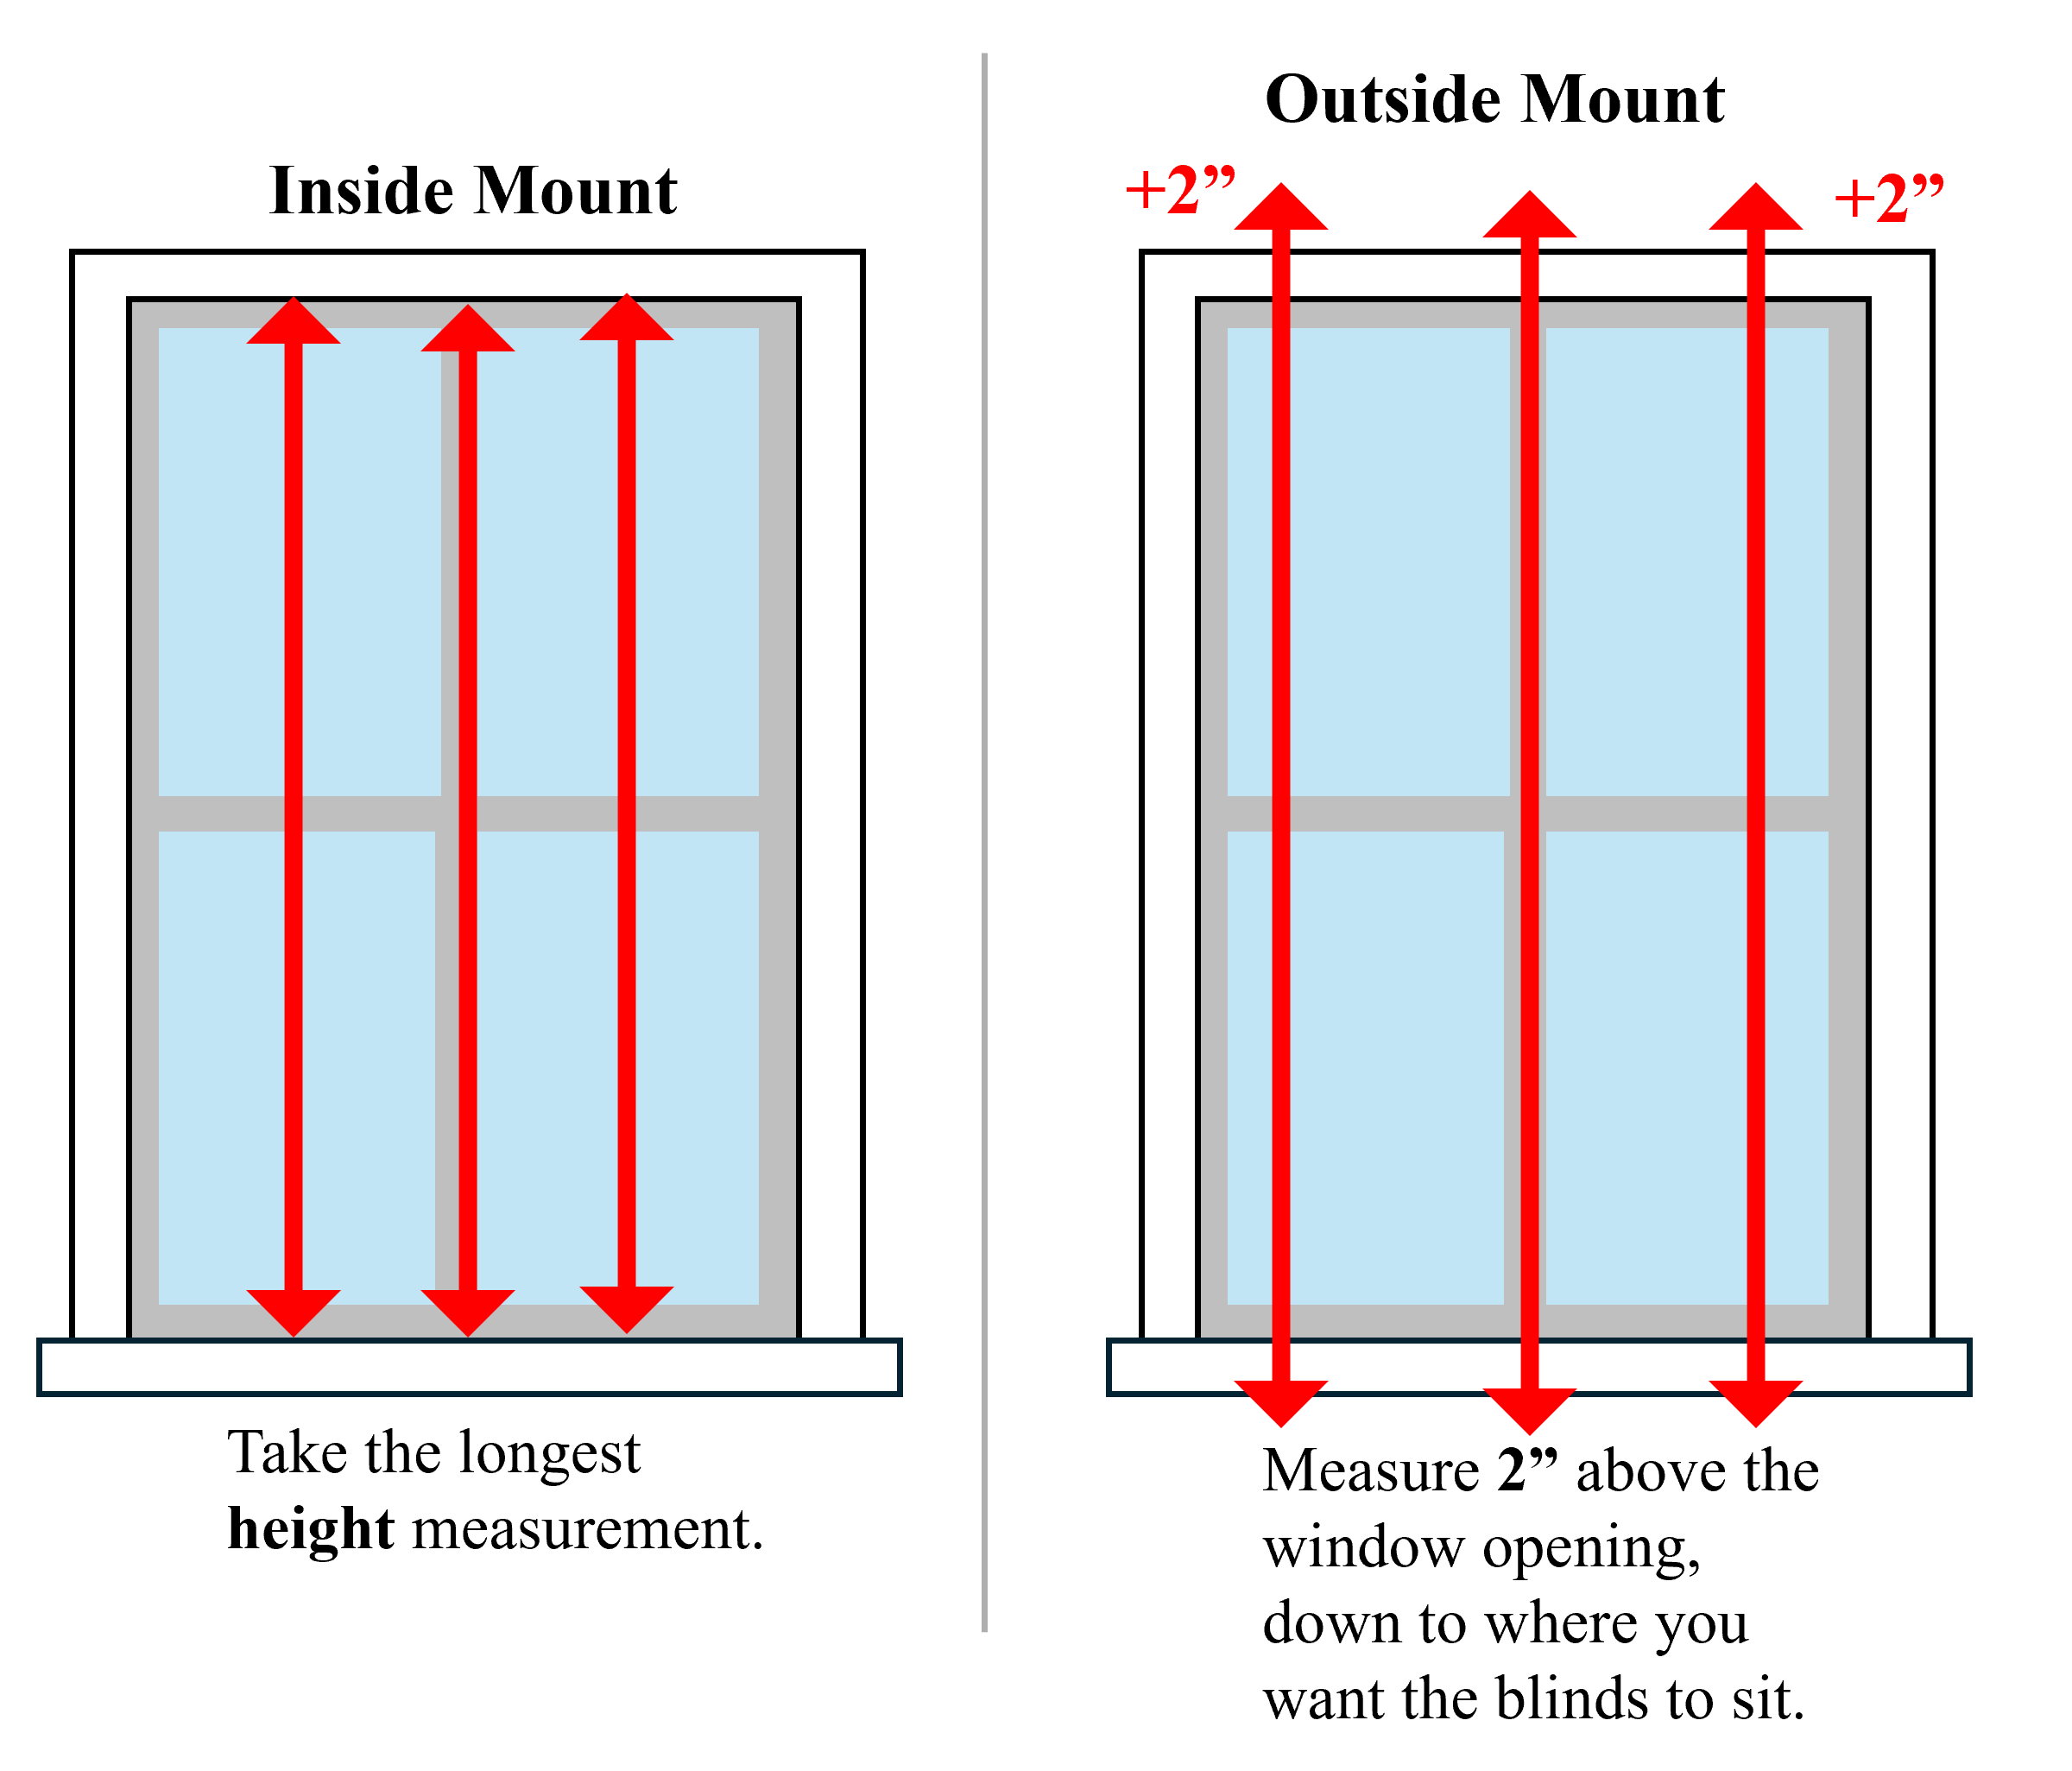
1. Determine inside or outside mount.

Decide whether the blinds will be mounted on the inside or outside of the window well. Both are inside the home; the difference is whether the blinds are mounted inside or outside of the window well (Figure 1). The example in this guide is for an inside mount installation.

Cellular blinds can be mounted either inside or outside of the window well.
Source
Figure 1. Cellular blinds can be mounted either inside or outside of the window well (Source: PNNL).

2. Measure window well.

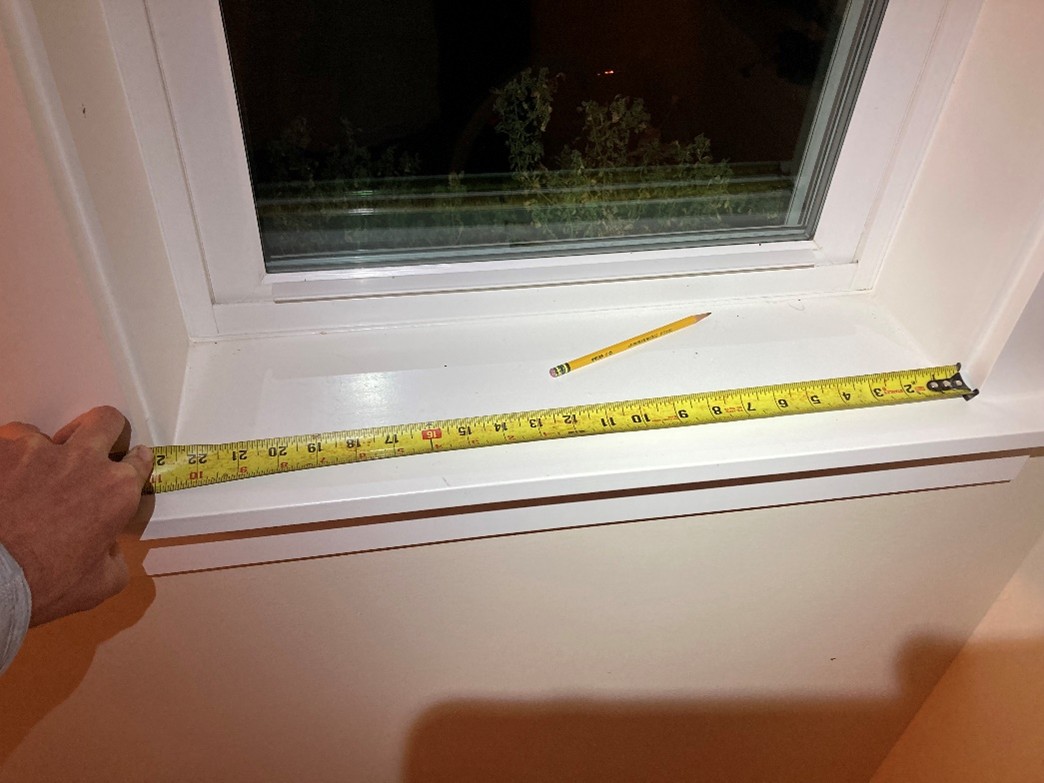
Because this example is for an inside-mount installation, measure the inside dimensions of the window opening and write them down (height and width). 

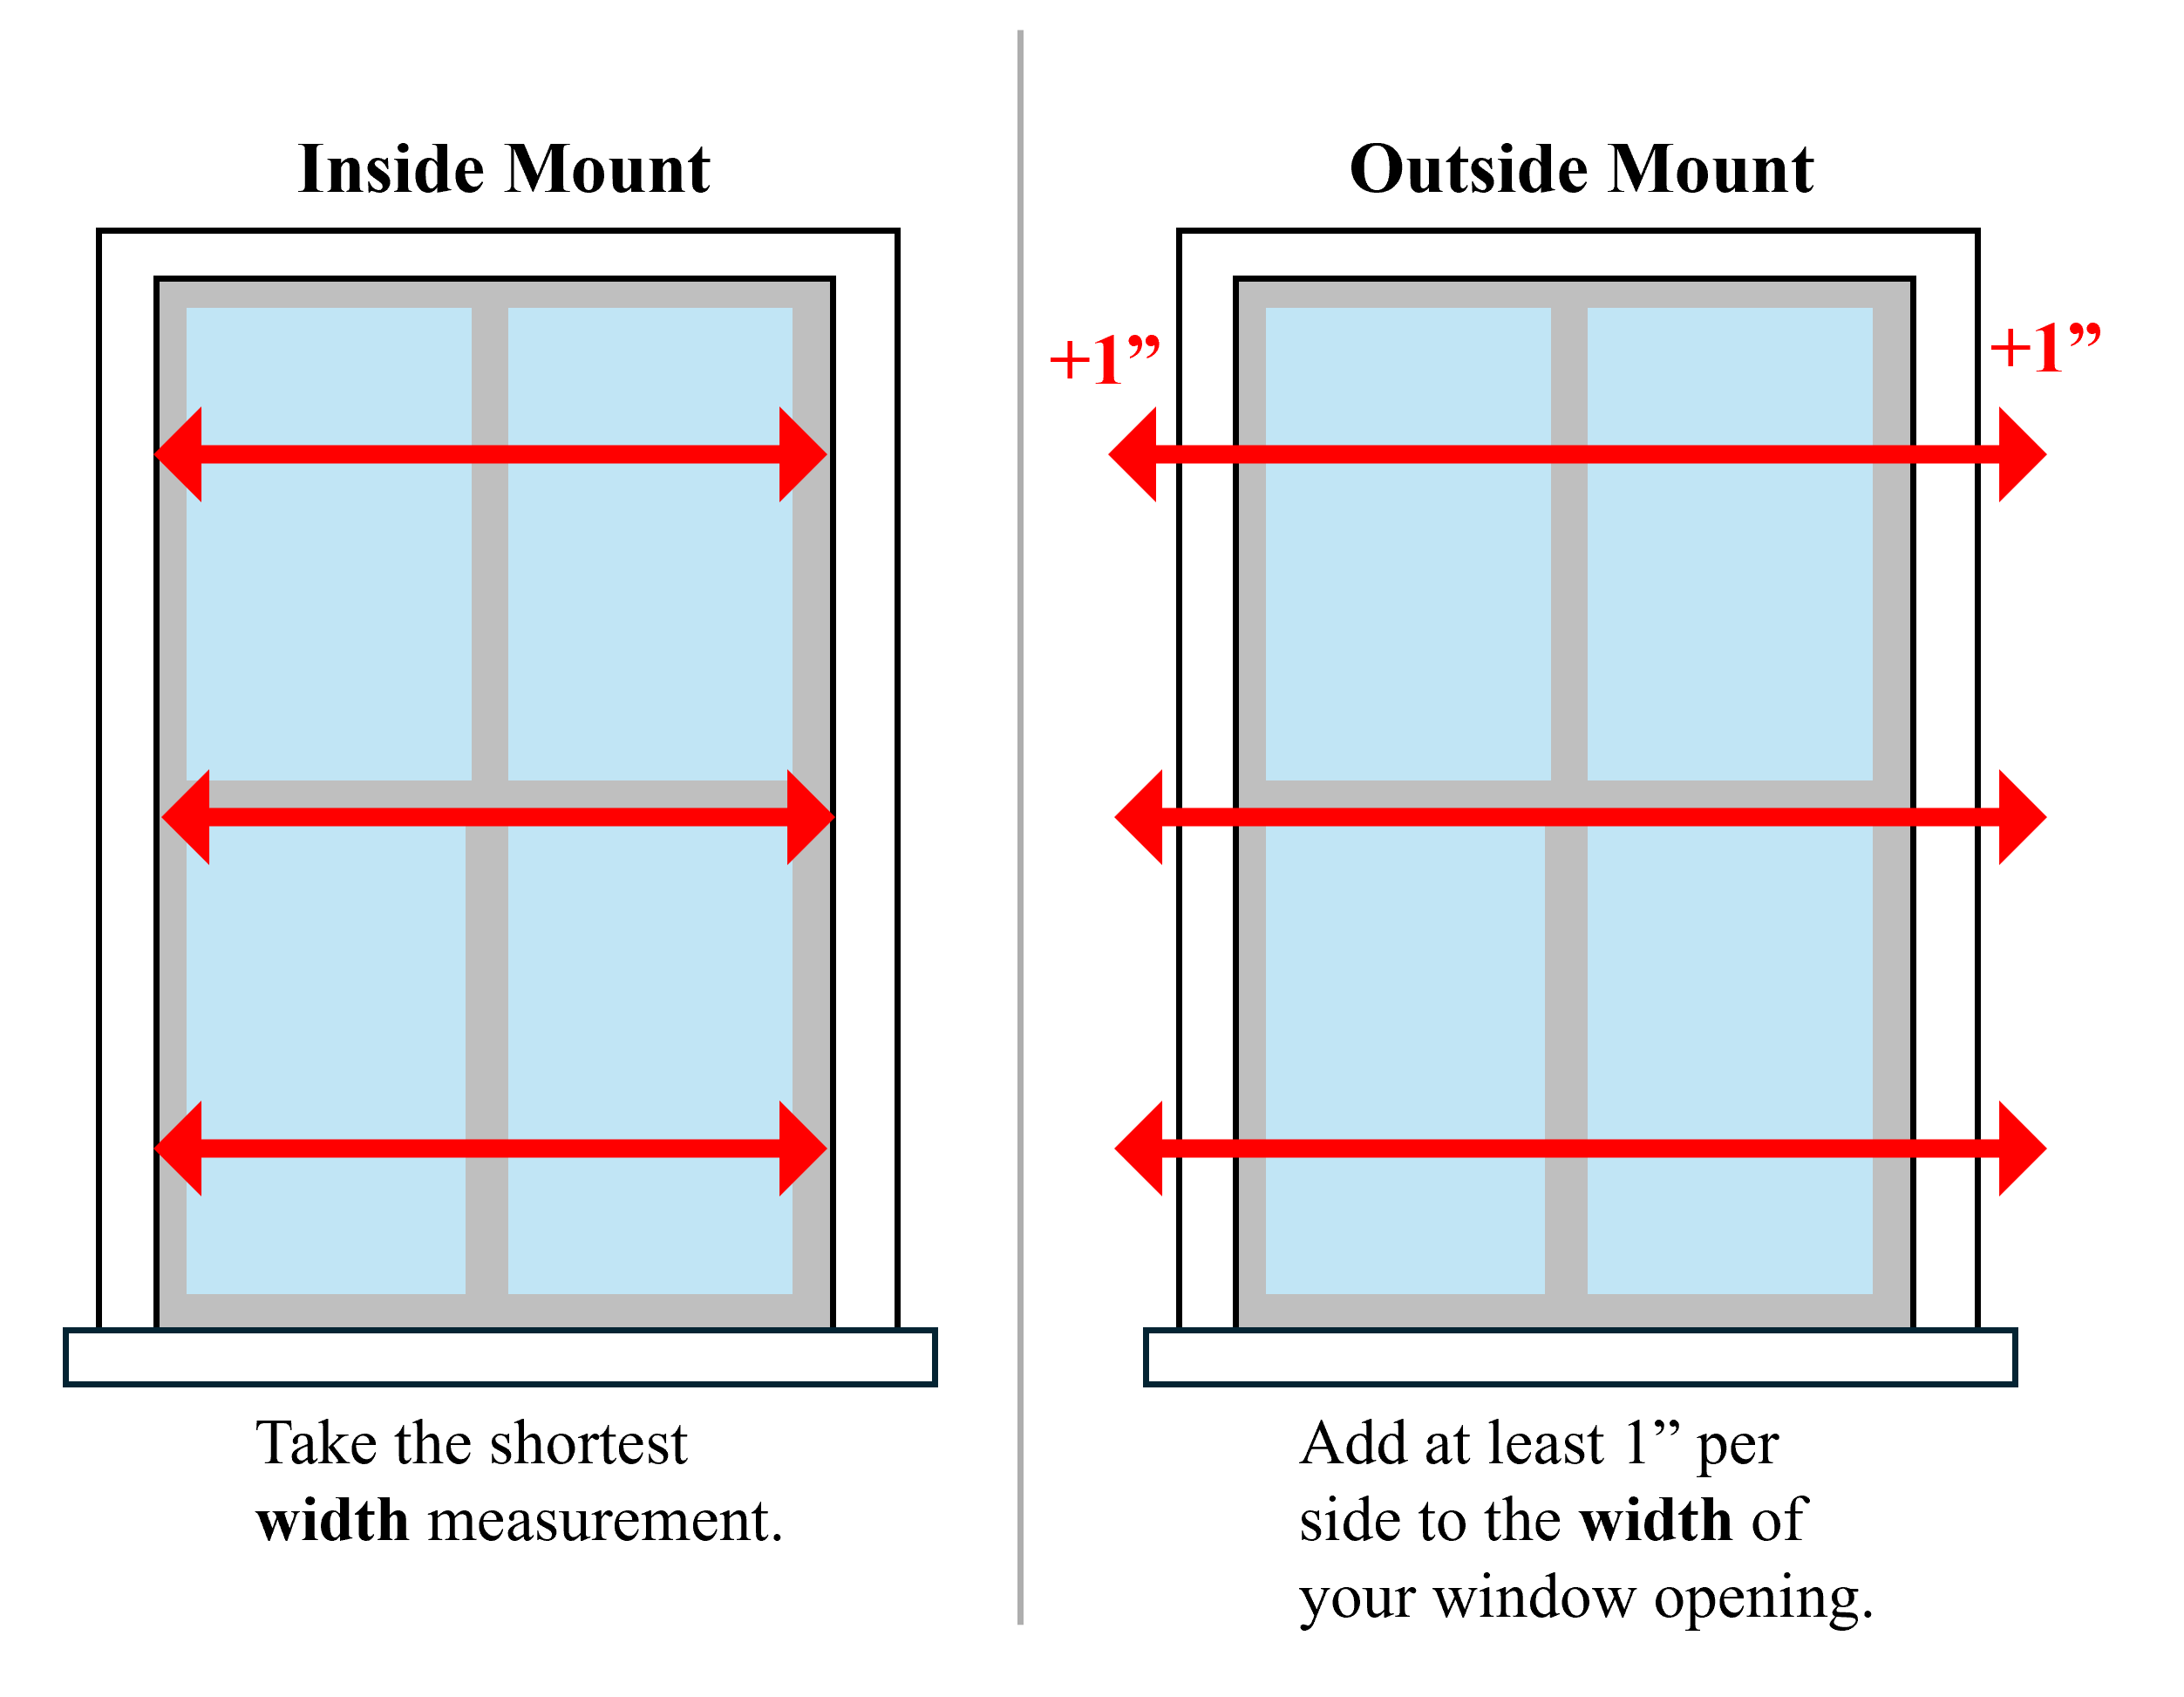
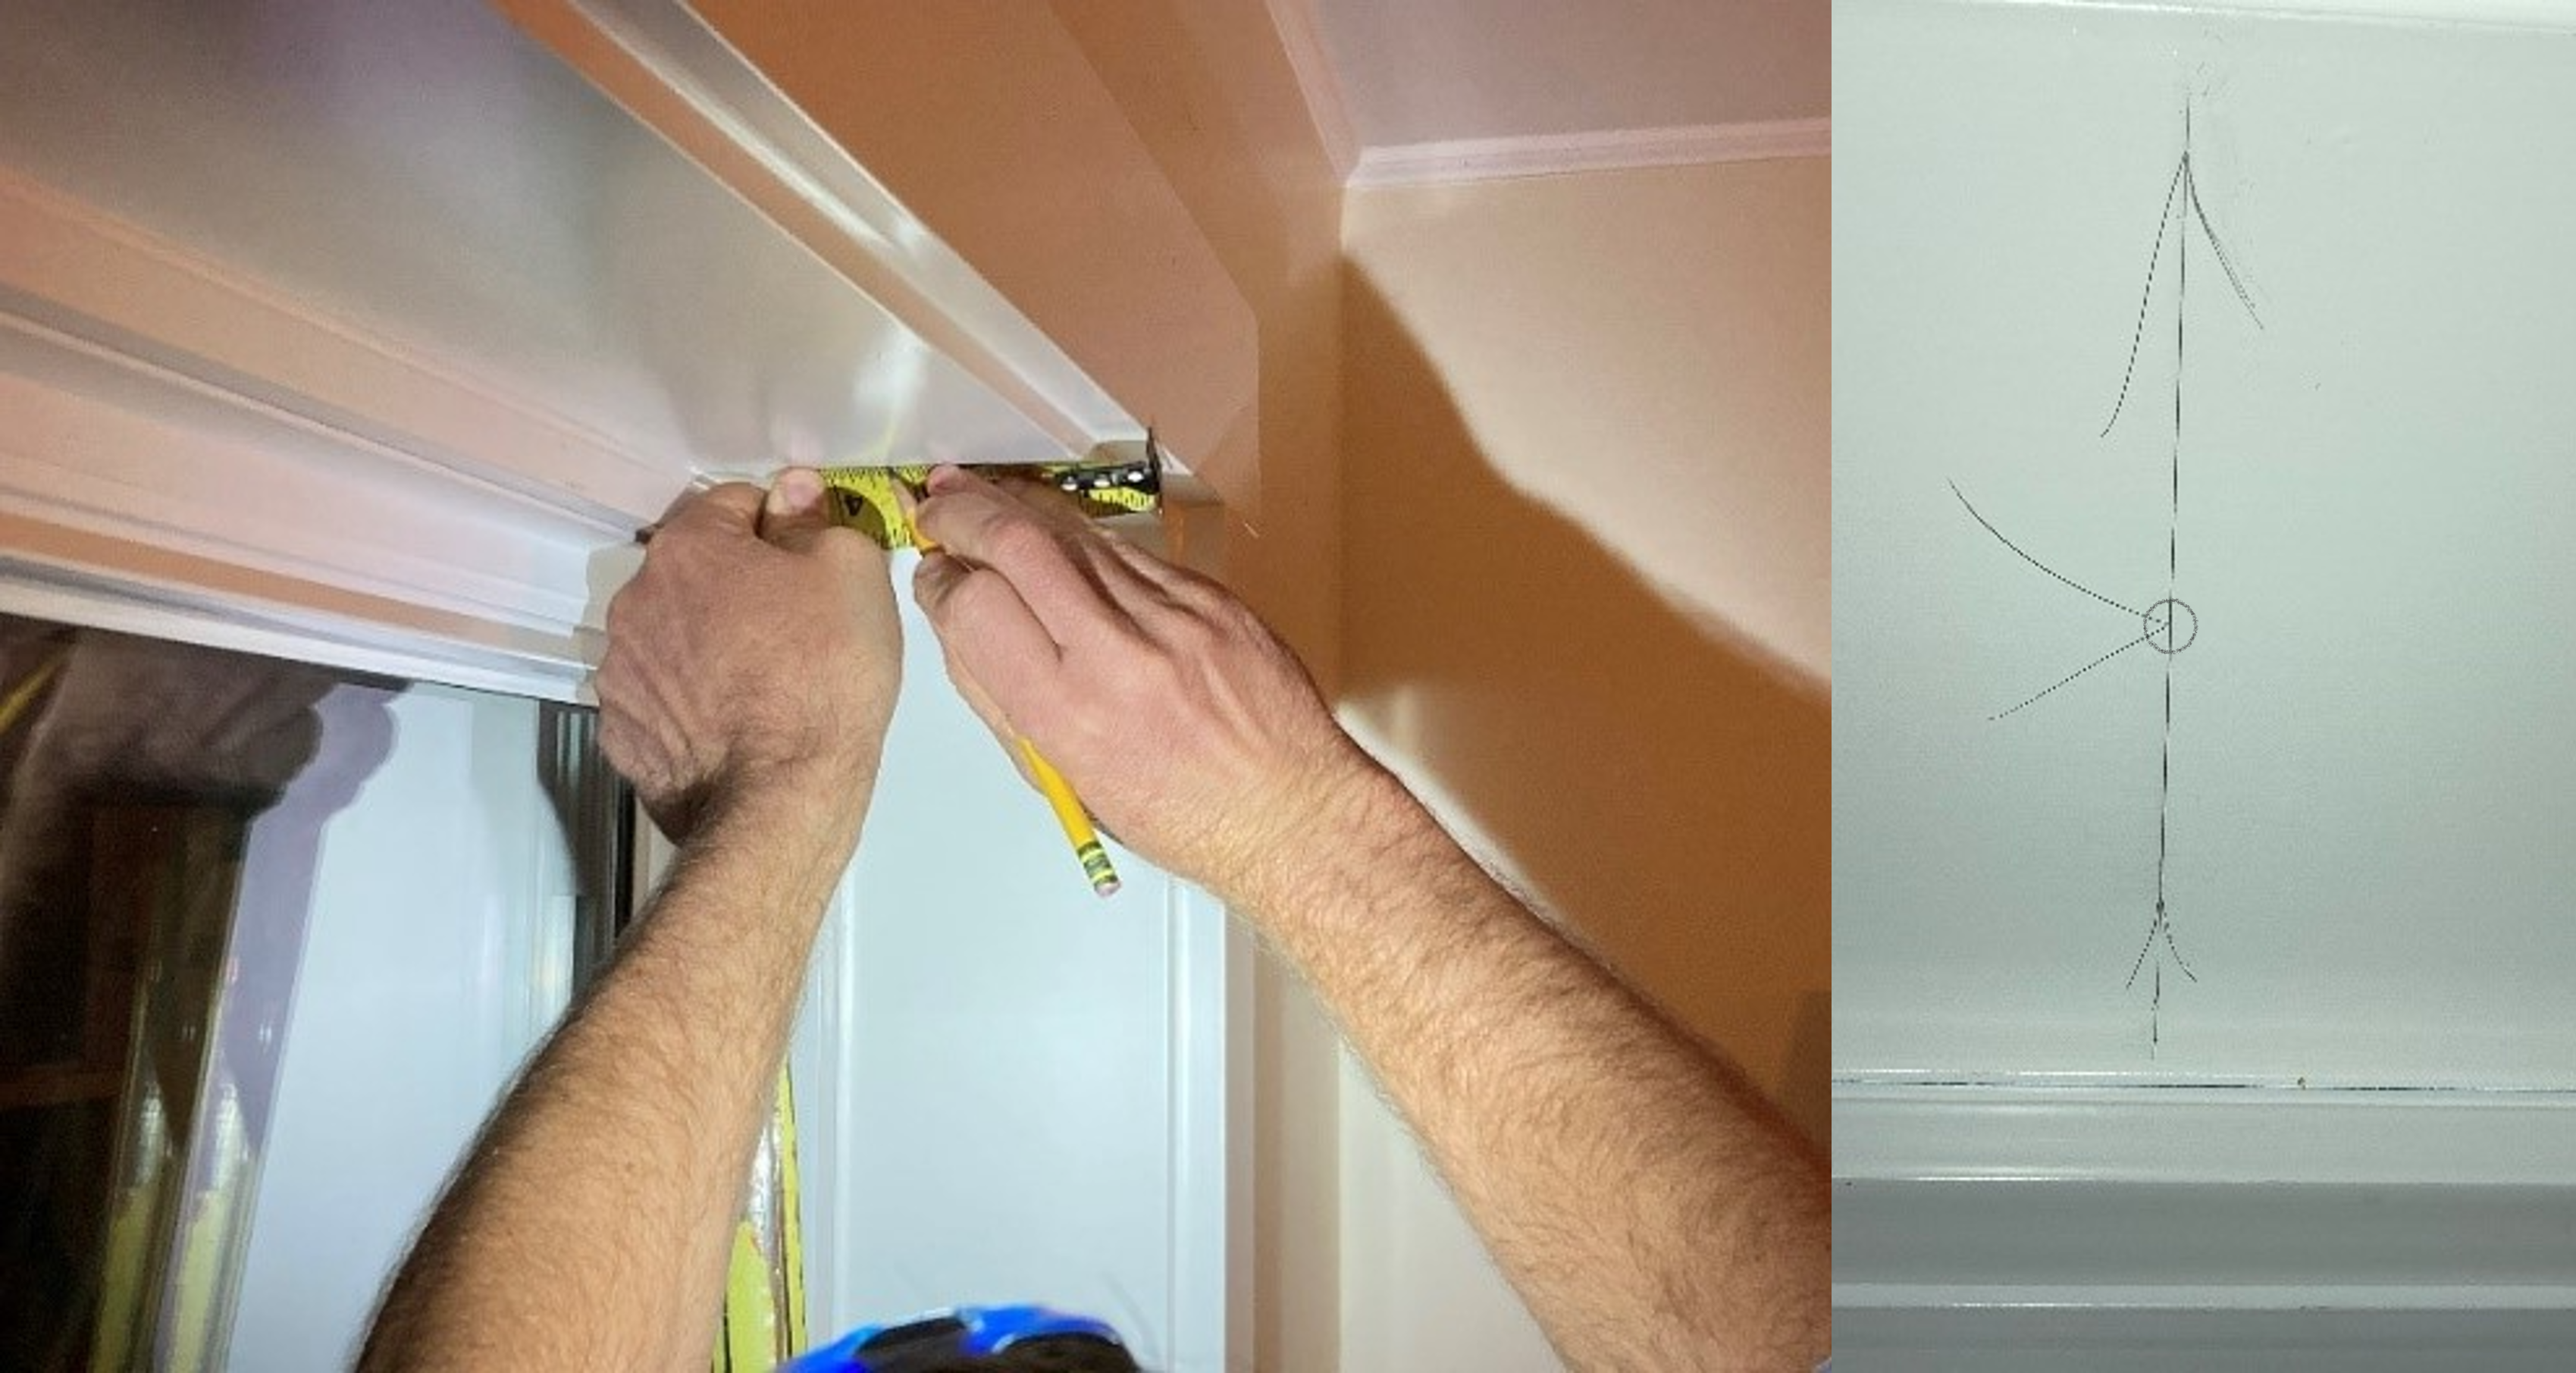
  • For width, measure across the top, middle, and lower third of the window opening from one side of the opening to the other and use the shortest measurement (Figures 2 and 3). 
  • For height, measure from the top inside edge of the window to the sill; take three measurements and use the longest (Figure 4). Add at least 2 inches for height measurements (some manufacturers recommend starting 3 inches above the top of the trim and extending 2 inches below the bottom of the trim or to the sill if you have a protruding sill). If needed, use a ladder or step stool to reach the top of the window. 
  • For outside mounts, add at least 1 inch per side to the width measurement (some manufacturers recommend 2.5 inches);.
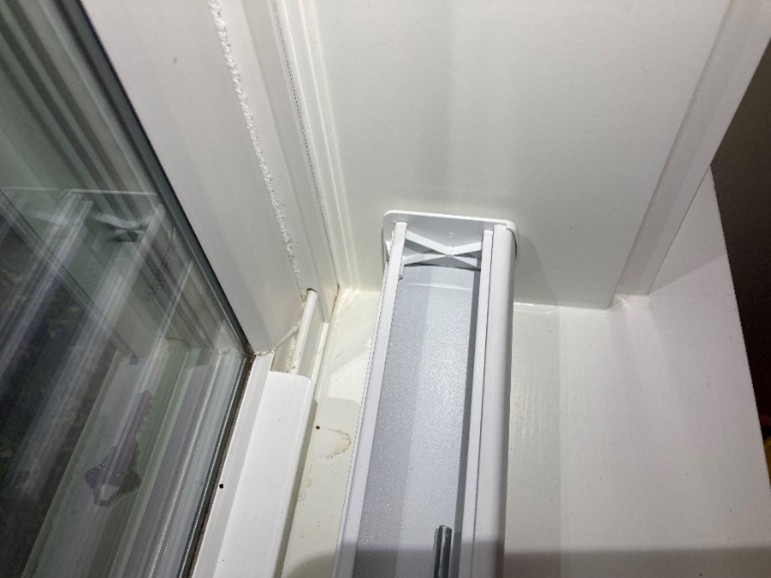
  • If you are hoping mount the blinds inside the window opening, also measure the depth of the window opening from the glass to the wall, taking into account any latches or handles, then look at the depth specifications for the product you hope to install to ensure there will be enough room for an inside mount. If not, you’ll need to do an outside mount.

Measure every window you intend to purchase blinds for. While windows may appear to be identical in size, variations of more than 1/8-inch can affect the look and fit of the final product. When ordering, give the exact measurements with no deductions. Cellular blinds can be ordered from numerous hardware and housewares stores as well as online. Some large hardware stores have store brands in stock and in-store services to cut the blinds to the proper width while you wait. Cellular blinds come in various colors and options like light-filtering or light-blocking (with an inner foil layer). They also come in styles that use a cord to raise and lower the blind, or styles that pull-down/push-up from the bottom only and those that can pull-down/push up from the bottom and top. These style variations don’t impact the installation recommendations here.

Measure the inside dimensions and depth of the window opening when ordering inside-mount cellular blinds.
Source
Figure 2. Measure the inside dimensions and depth of the window opening when ordering inside-mount cellular blinds. (Source: PNNL).
When ordering window blinds, take width measurements in three locations and use the shortest width measurement.
Source
Figure 3. When ordering window blinds, take width measurements in three locations and use the shortest width measurement (Source: PNNL).
When ordering window blinds, take height measurements in three locations and use the longest height measurement; add at least 2 inches for outside-mount blinds.
Source
Figure 4. When ordering window blinds, take height measurements in three locations and use the longest height measurement; add at least 2 inches for outside-mount blinds (Source: PNNL).

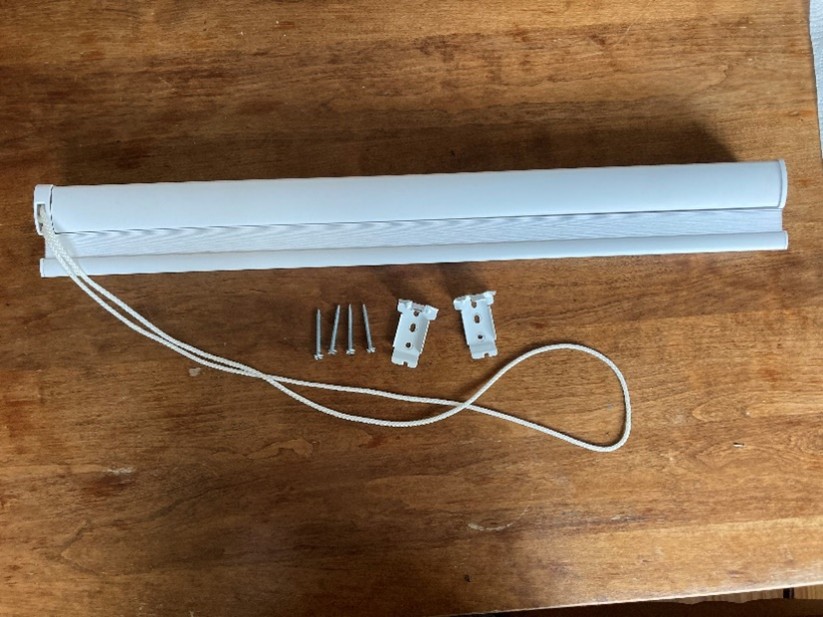
3. Account for parts.

When the blinds arrive, account for all of the parts (Figure 5). The package should contain the blinds assembly, mounting brackets, mounting screws, and mounting hardware for the pull cord (if the blinds use a pull cord). The blinds assembly includes a metal headrail, the shading material, a bottom rail, and a pull chord. Do a quick check that inside-mount blinds will fit by holding the blinds assembly in the window opening at the depth where it will be installed and lifting and lowering the assembly the full length of the space to make sure it doesn’t get stuck anywhere. If it does, you may need to return it to the store for adjustment.

Insulating cellular blinds purchased from a manufacturer should contain a blinds assembly, mounting brackets, and mounting screws.
Source
Figure 5. Insulating cellular blinds purchased from a manufacturer should contain a blinds assembly, mounting brackets, and mounting screws (Source: PNNL).

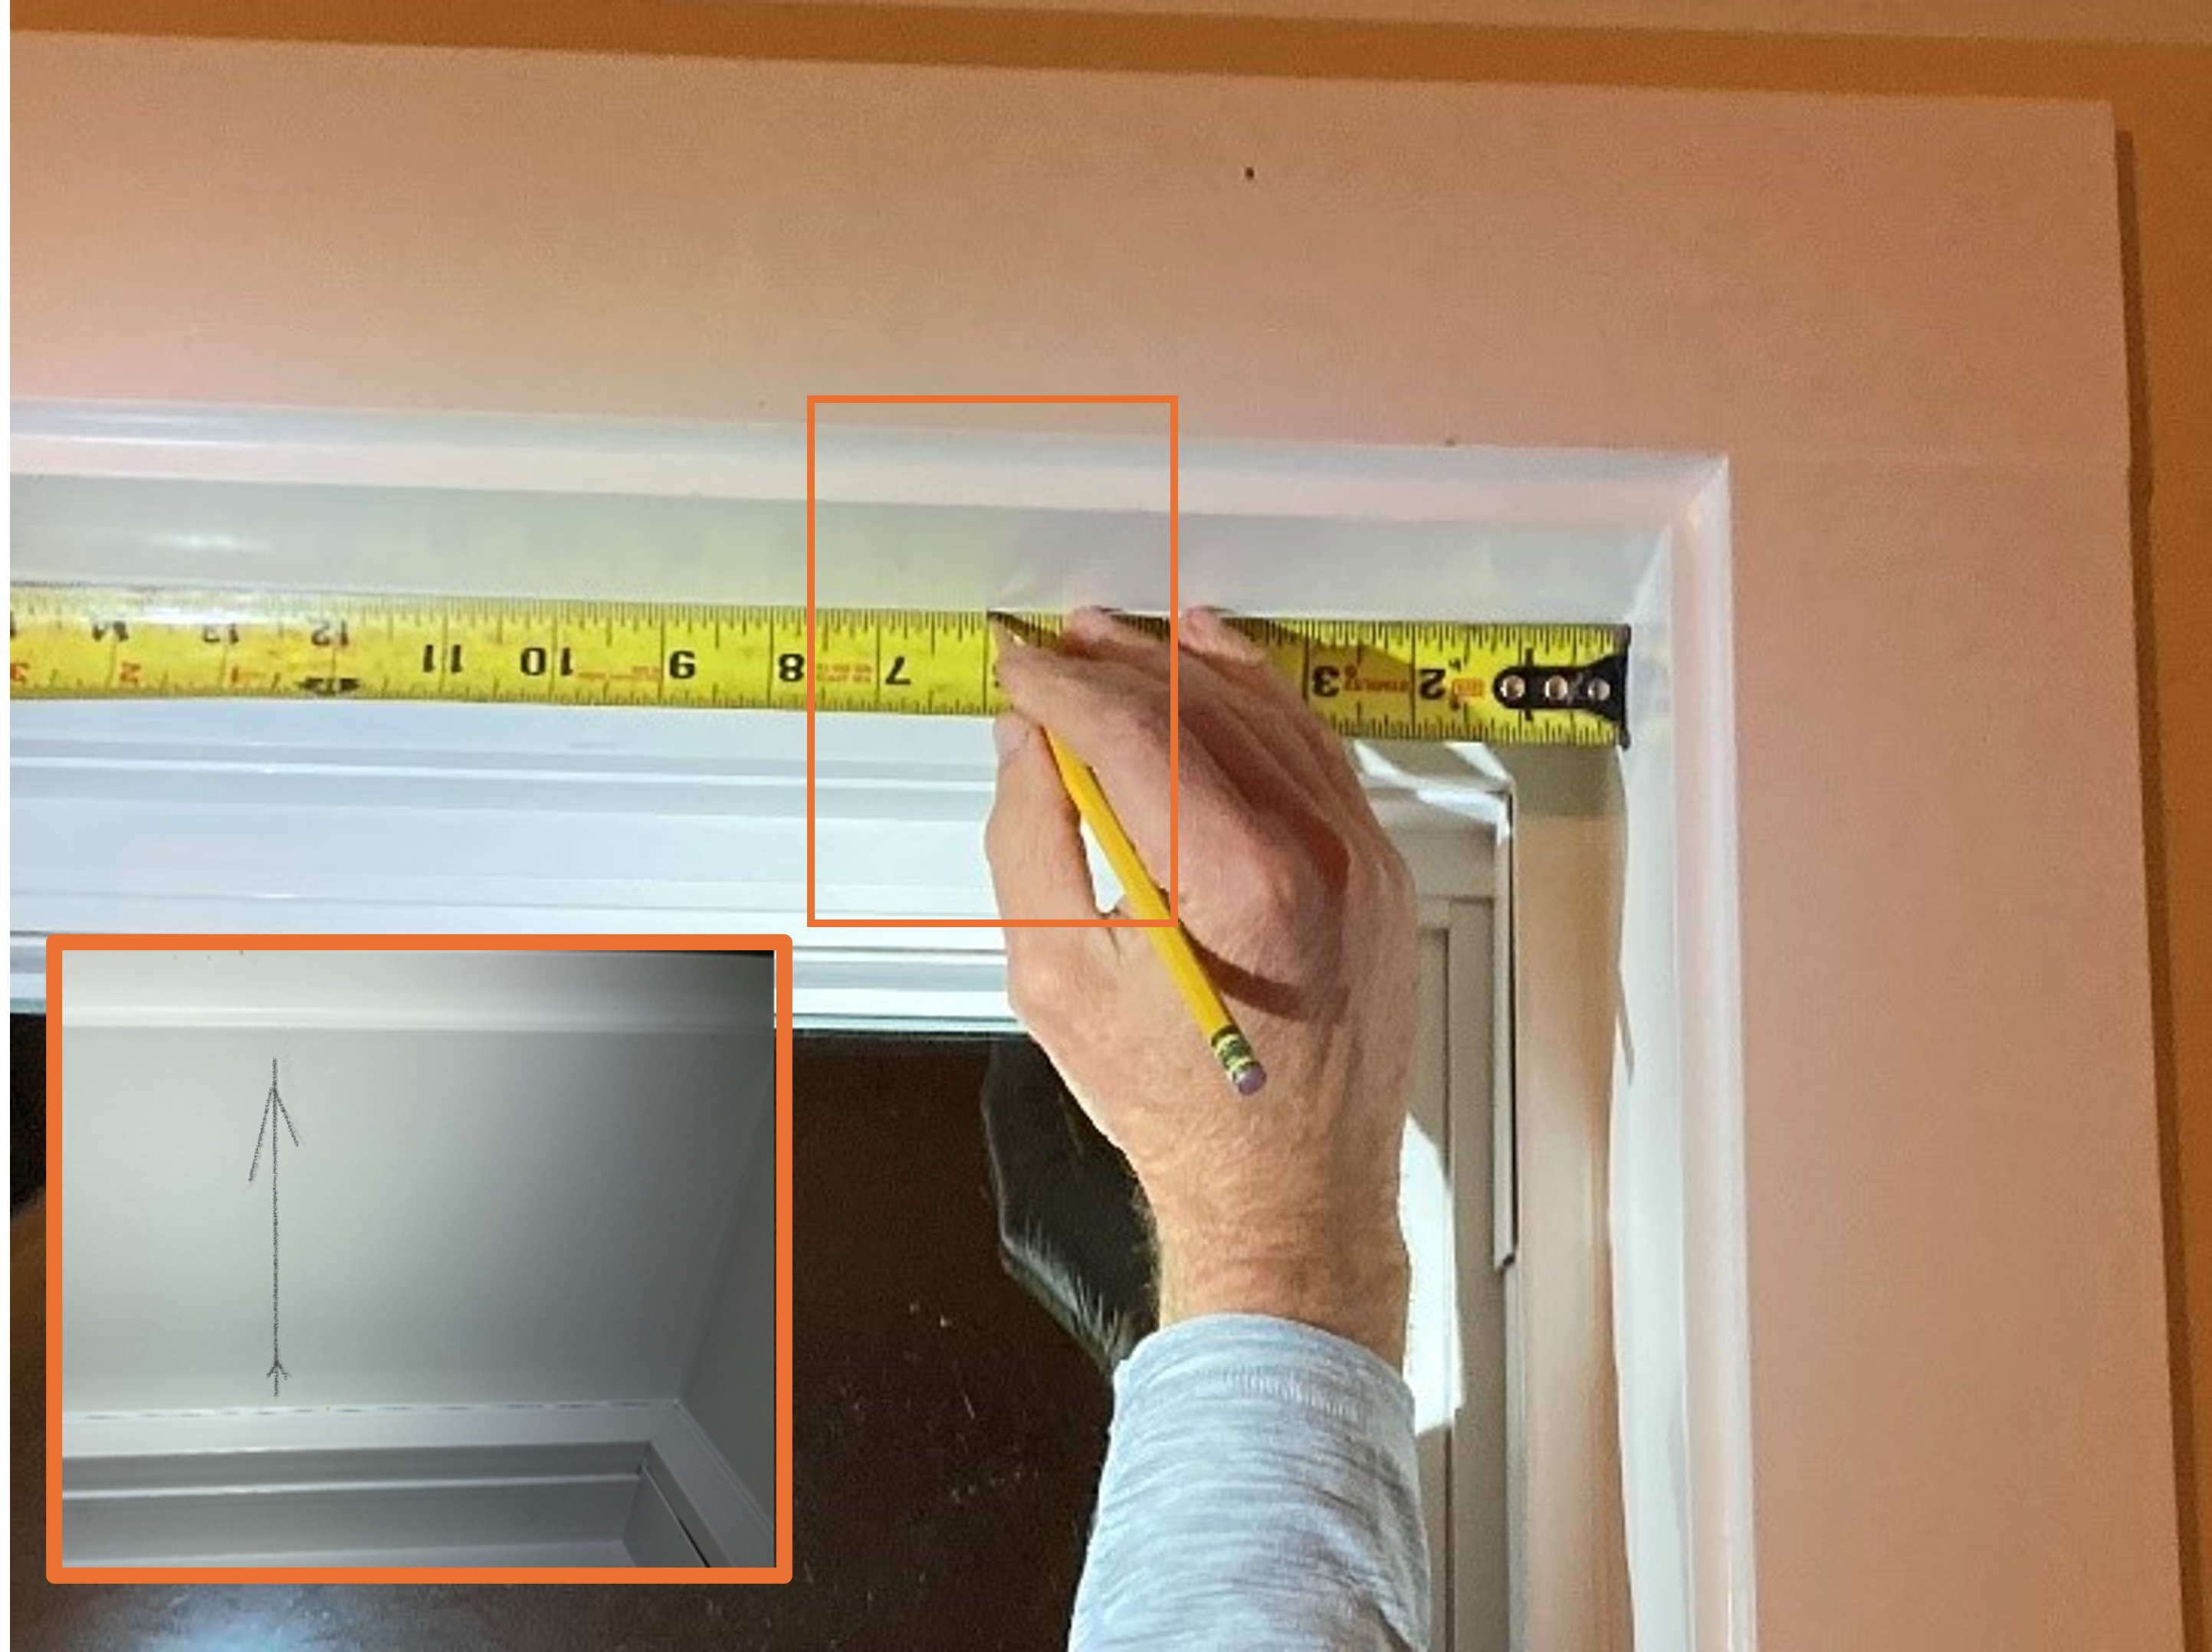
4. Mark mounting bracket locations.

  1. Use the manufacturer’s instructions to determine the spacing of the mounting brackets widthwise along the headrail of the blinds assembly. 
  2. hen measure and mark these locations at the top of the window well. Be sure to account for a small gap between the blinds and the side of the window well. 
  3. Make two marks for each mounting bracket location: one close to the window, and one closer to the room. 
  4. Use a straight edge to draw a light pencil line between the two marks. The light pencil line will be perpendicular to the window (Figure 6). You will erase this later.
When installing blinds, use the manufacturer’s instructions to mark the locations of the mounting brackets at the top of the window with a perpendicular line.
Source
Figure 6. When installing blinds, use the manufacturer’s instructions to mark the locations of the mounting brackets at the top of the window with a perpendicular line (Source: PNNL).

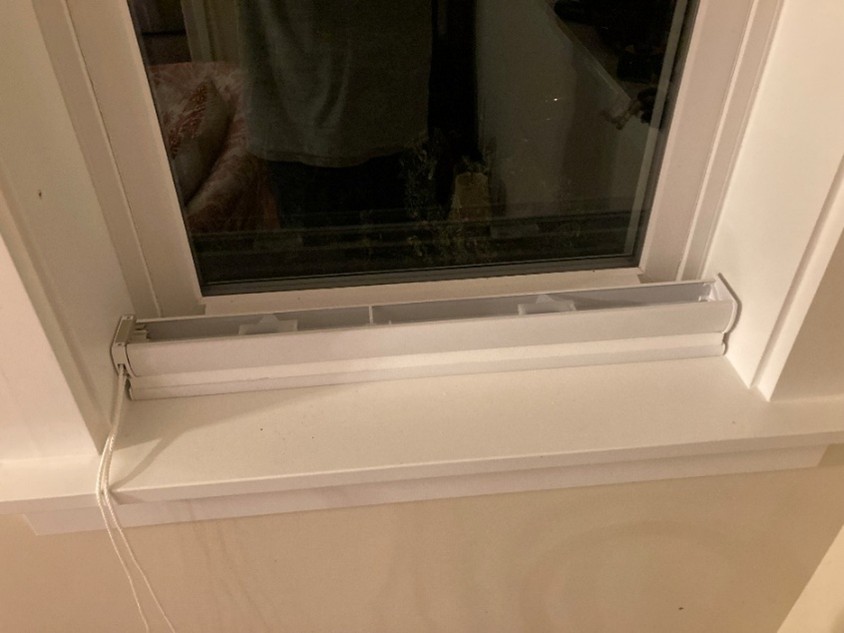
5. Pre-arrange blinds assembly.

  1. Set the blinds on the windowsill. Place them at exactly the depth on the window sill where you would like the blinds to land when lowered. Be sure the blinds are parallel with the outside of the sill (Figure 7).
Before installing blinds, place them on the sill where you would like the bottom of the blinds to land when lowered, ensuring the blinds are parallel with the outside of the sill
Before installing blinds, place them on the sill where you would like the bottom of the blinds to land when lowered, ensuring the blinds are parallel with the outside of the sill.
Source
Figure 7. Before installing blinds, place them on the sill where you would like the bottom of the blinds to land when lowered, ensuring the blinds are parallel with the outside of the sill (Source: PNNL)
  1. Ensure there is enough space between the blinds and the window to allow free movement up and down the length of the window without hitting any window latching hardware or handles (Figure 8). Ensure there is enough space on the room side of the blinds to attach the pull-chord hardware or other hardware that comes with the blinds.
Ensure there is enough space between the blinds and window to allow for free movement.
Source
Figure 8. Ensure there is enough space between the blinds and window to allow for free movement (Source: PNNL).

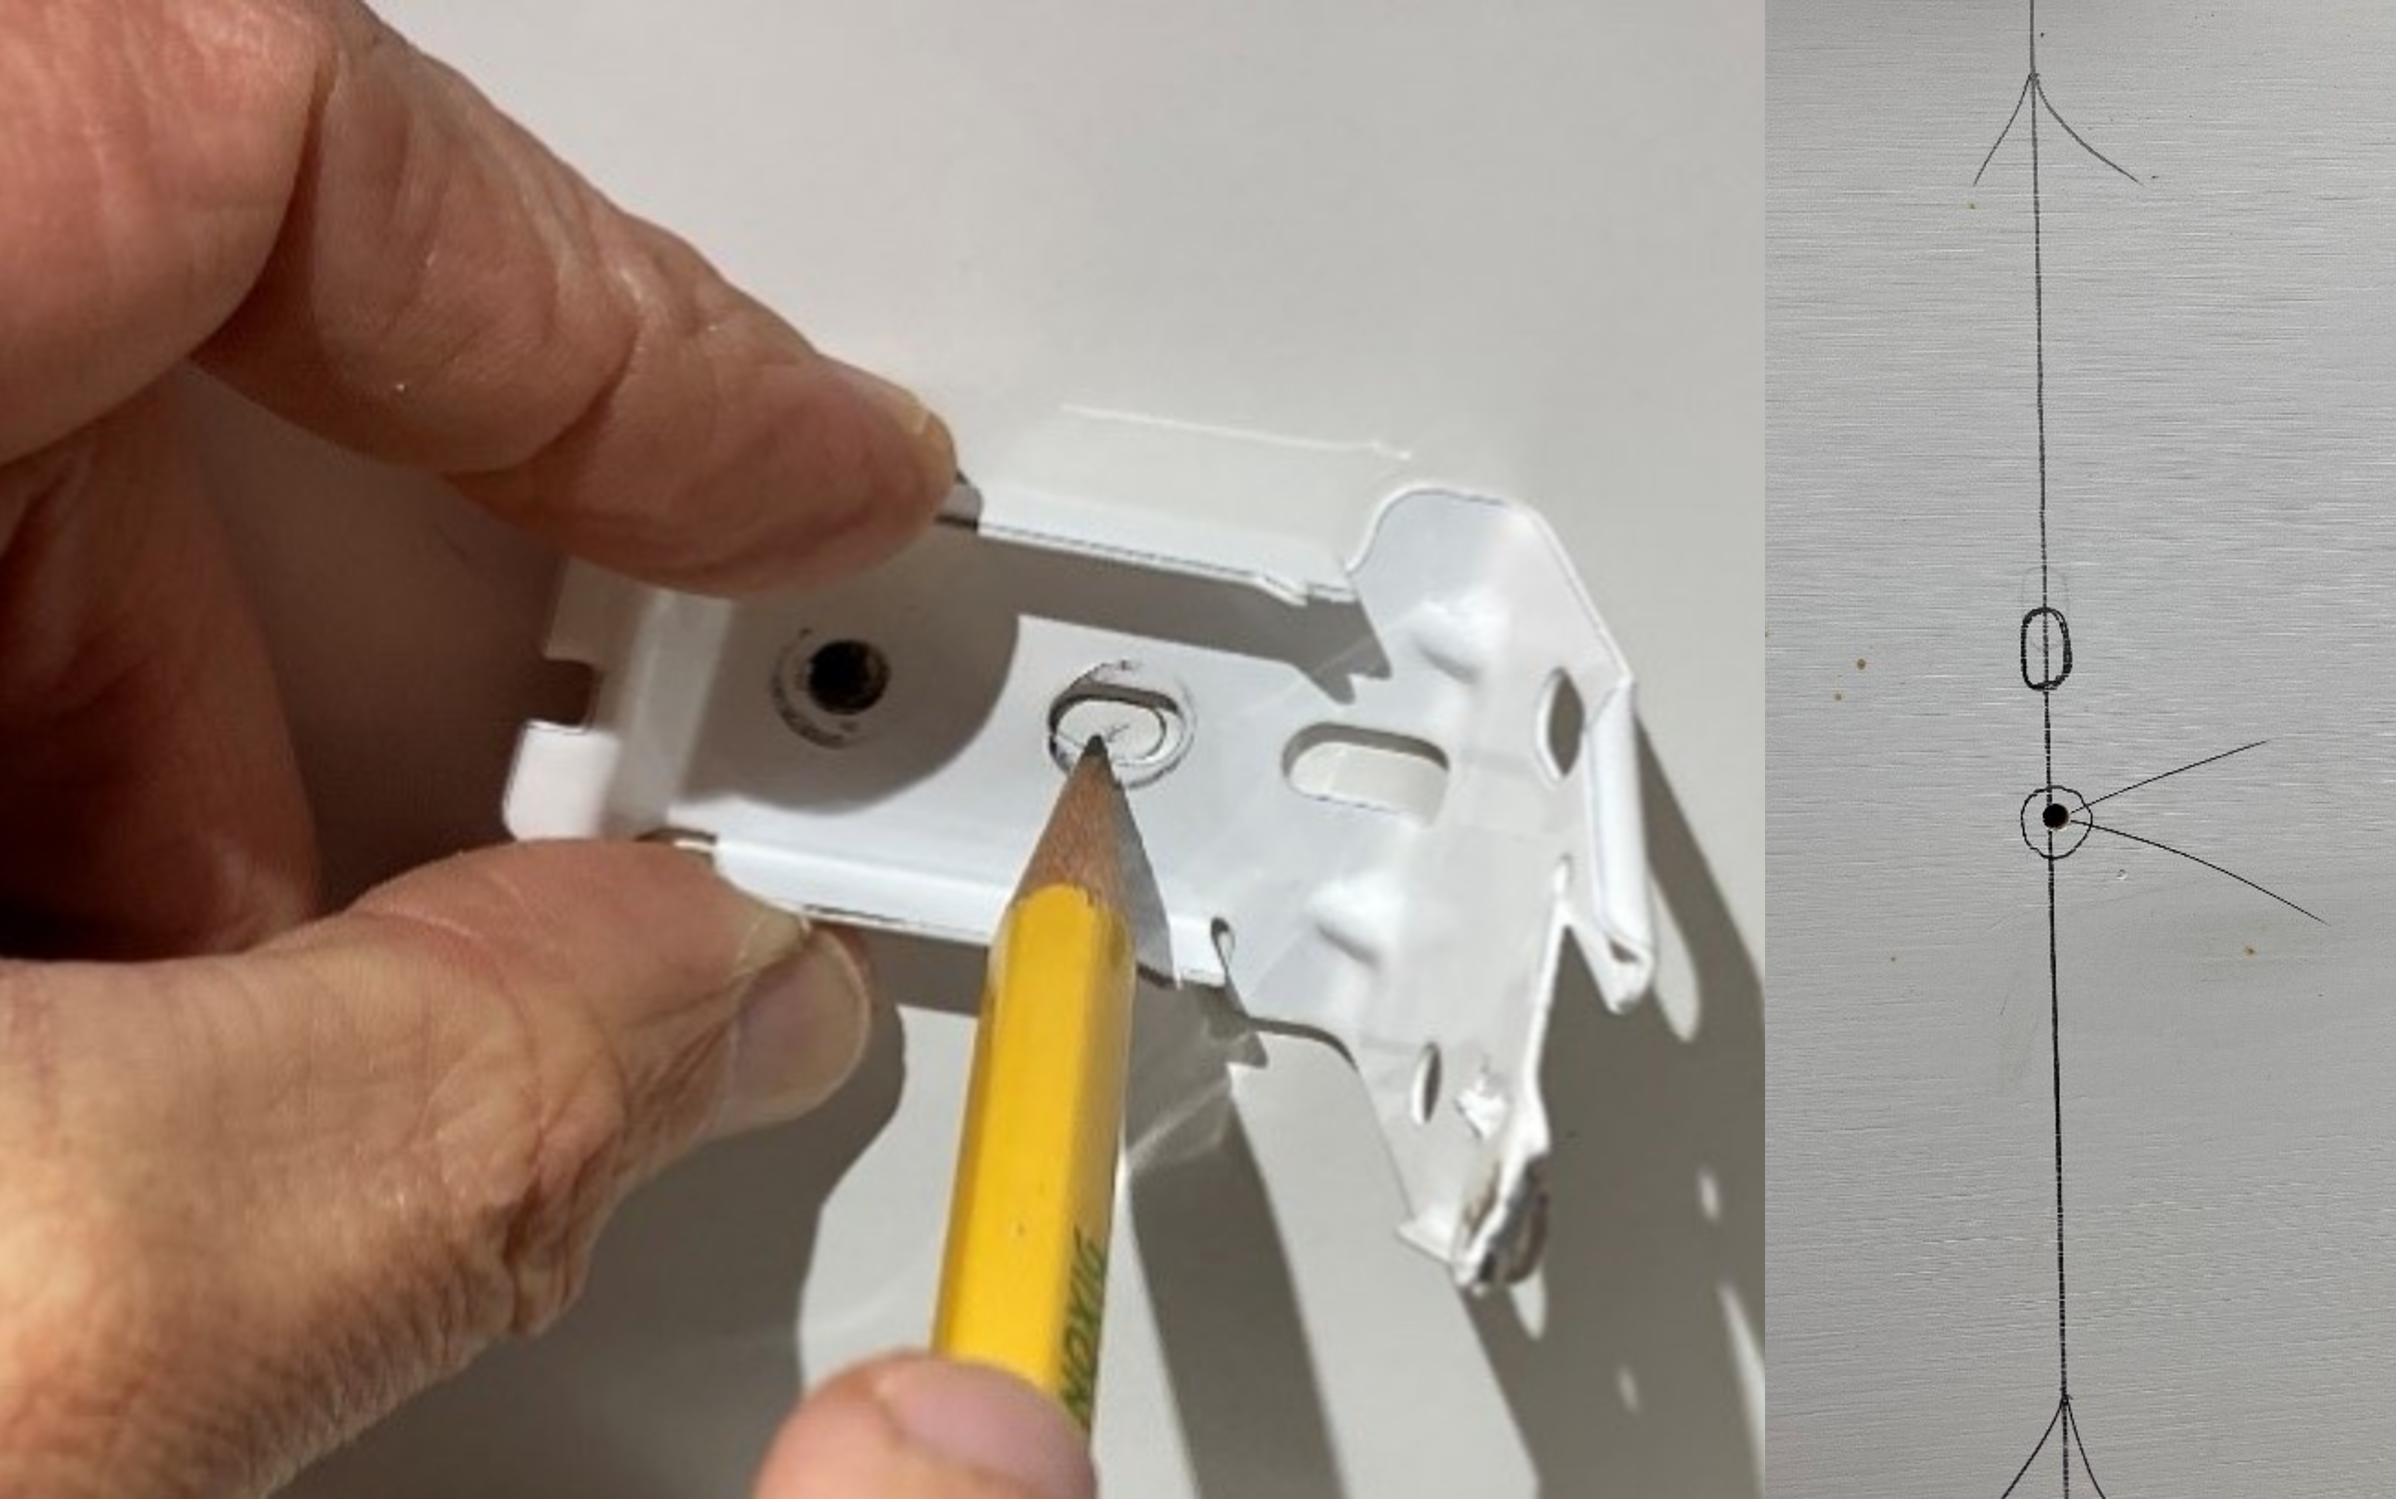
6. Mark pilot hole locations for mounting screws.

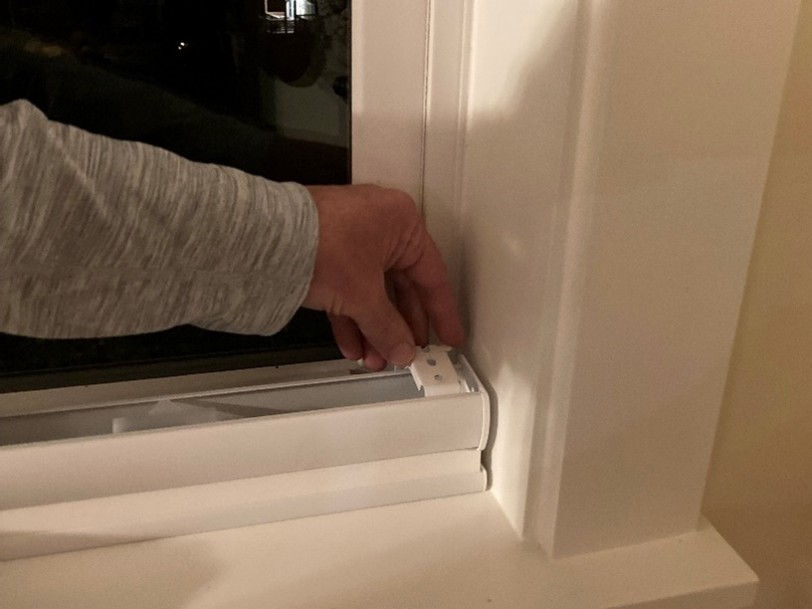
  1. Temporarily place a mounting bracket near one end of the headrail (Figure 9).
With the blinds assembly placed in desired location, temporarily place a mounting bracket near one end of the headrail.
Source
Figure 9. With the blinds assembly placed in desired location, temporarily place a mounting bracket near one end of the headrail (Source: PNNL).
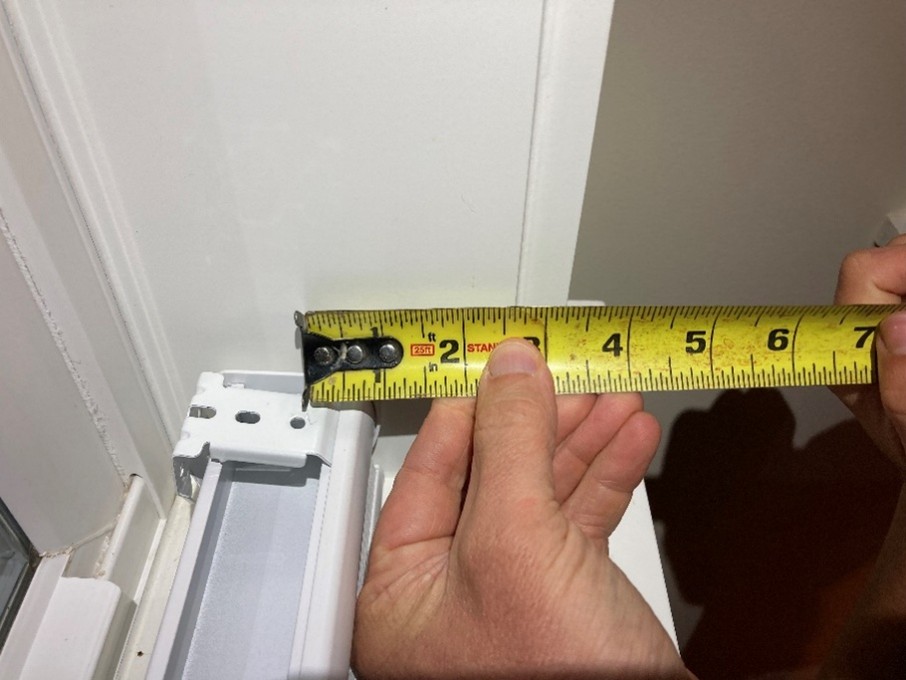
  1. Measure from a screw hole in the mounting bracket to the outside of the window well (Figure 10). Record this measurement. Do the same on the other side of the window. The measurements should be the same.
Measure the distance from the center of the screw hole for the mounting bracket to the outside of the window well, ensuring the measurements are the same on both sides of the window.
Source
Figure 10. Measure the distance from the center of the screw hole for the mounting bracket to the outside of the window well, ensuring the measurements are the same on both sides of the window (Source: PNNL).
  1. Transfer these measurements to the top of the window well, at the mounting bracket locations (Figure 11). Mark the measurement directly on each light pencil line created in Step 3. Circle that mark. This is where you will pre-drill for the mounting screws. At this point, you will only have one pre-drilling location marked for each mounting bracket.
Mark the distance from the center of the mounting bracket screw hole to the outside of the window well on the top of the window frame to determine where to drill pilot holes.
Mark the distance from the center of the mounting bracket screw hole to the outside of the window well on the top of the window frame to determine where to drill pilot holes
Source
Figure 11. Mark the distance from the center of the mounting bracket screw hole to the outside of the window well on the top of the window frame to determine where to drill pilot holes (Source: PNNL).

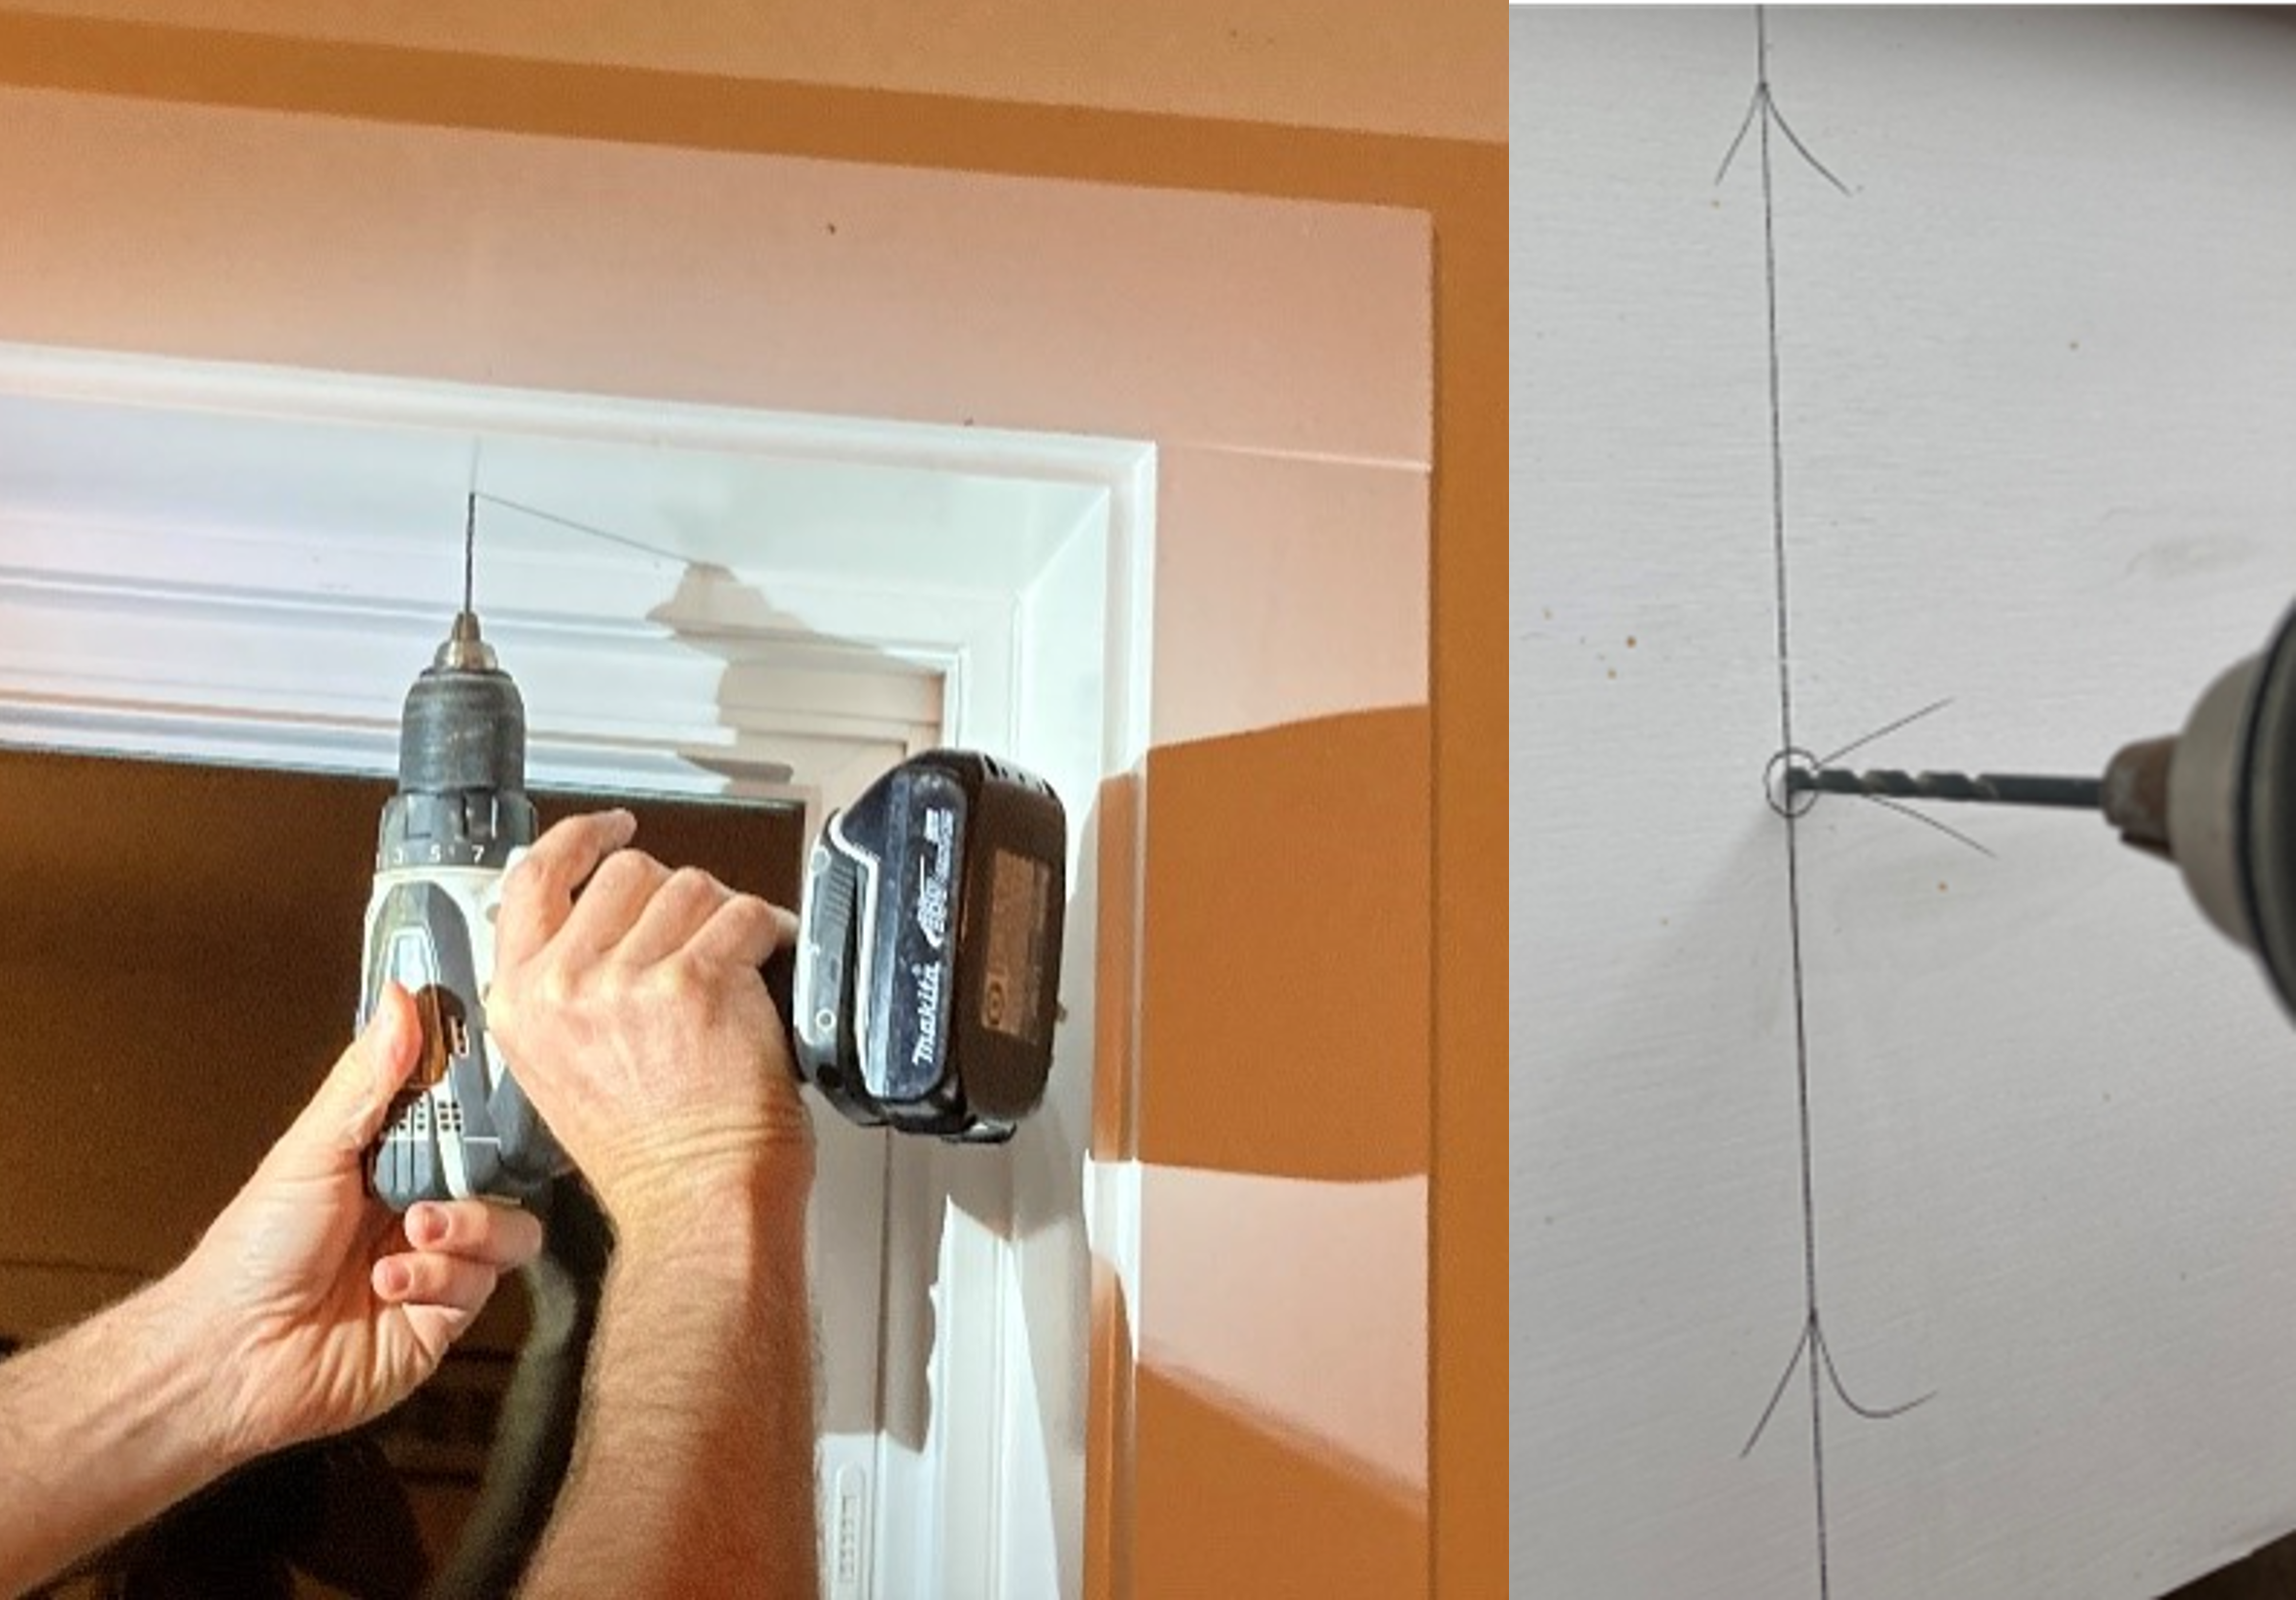
7. Drill pilot holes.

  1. Using the correct size drill bit per manufacturer’s instructions, drill holes at each mark made in the previous step (Figure 12).
Using a drill bit slightly smaller than the screw, drill pilot holes at marks indicating the placement of the mounting bracket.
Source
Figure 12. Using a drill bit slightly smaller than the screw, drill pilot holes at marks indicating the placement of the mounting bracket (Source: PNNL).
  1. Hold the mounting bracket where it will go, lining up the hole in the mounting bracket with the pre-drilled hole. With the bracket aligned exactly where it should go, mark the outline of the other screw hole(s) in the mounting bracket (Figure 13). Alternate: instead of holding the bracket by hand, install the first screw in the pre-drilled hole to hold the bracket in place, then mark the other hole.
Mark other holes in the mounting bracket by holding the bracket in place. Drill pilot holes for these marks.
Source
Figure 13. Mark other holes in the mounting bracket by holding the bracket in place. Drill pilot holes for these marks (Source: PNNL).
  1. Pre-drill a hole in the center of the other screw hole outline. After pre-drilling all the holes, you can erase all the pencil marks.

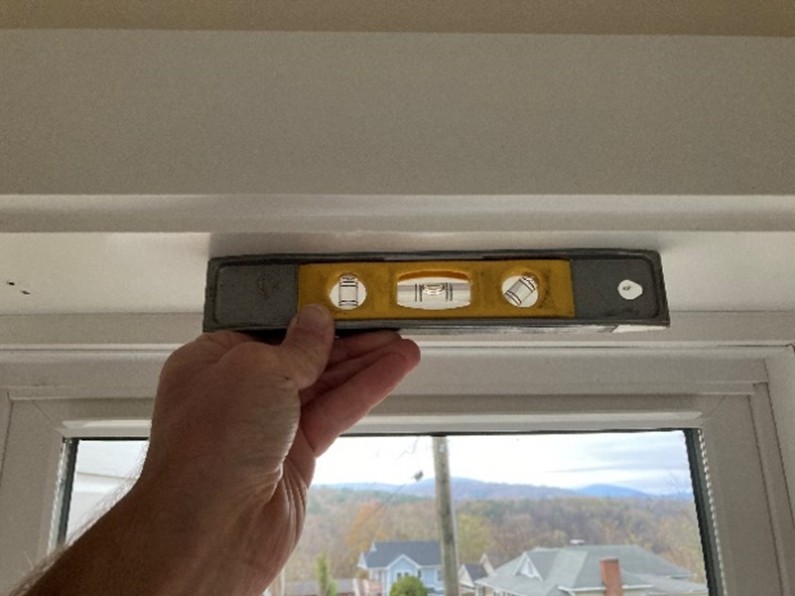
8. Check that top of window well is level.

Check the top of the window well to make sure it is level (Figure 14). Use the longest level that will fit inside the window well. A level that is too long can also be used by carefully lining up the level with the window well by sight.

Ensure that the top of the window well is level prior to installing blinds.
Source
Figure 14. Ensure that the top of the window well is level prior to installing blinds (Source: PNNL).

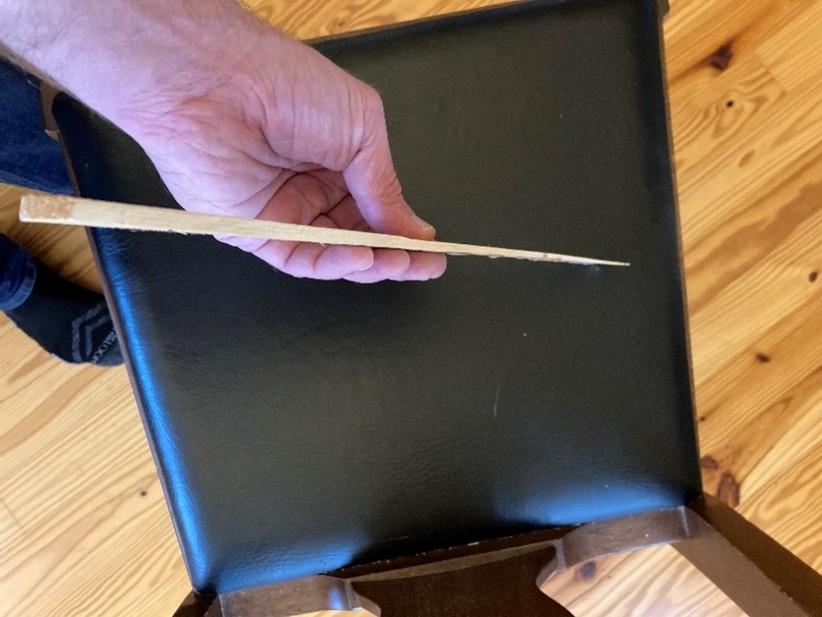
In this example the top of the window opening is level, as shown by the level bubbles in Step 7. However, if the top of the window opening is not level, you will need to use shims to ensure the mounting brackets are installed level to one another. Shims are small spacers placed between the bracket and the mounting surface to lower the level of the bracket. The bracket located at the lowest part of the window well will not need a shim. The other brackets will use shims to make them level with the un-shimmed bracket. You can estimate how thick your shims will need to be by holding the level against the top of the window well and then tilting the high side of the level downward until the bubble shows level. The gap between the edge of the level and the mounting surface indicates how thick the shim should be. Wooden shims can be purchased and are wedge-shaped so you can use exactly the thickness you need. Cut out a section of the right thickness and slightly larger in area than the mounting area of the bracket (Figure 15). 

If the top of a window opening is not level, a shim can be cut to ensure mounting brackets installed for blinds are level to one another.
Source
Figure 15. If the top of a window opening is not level, a shim can be cut to ensure mounting brackets installed for blinds are level to one another (Source: PNNL).

9. Install mounting brackets and blinds.

  1. Install each mounting bracket with the screws provided by the manufacturer. Use a screwdriver, socket wrench, or impact driver, as needed (Figure 16). 
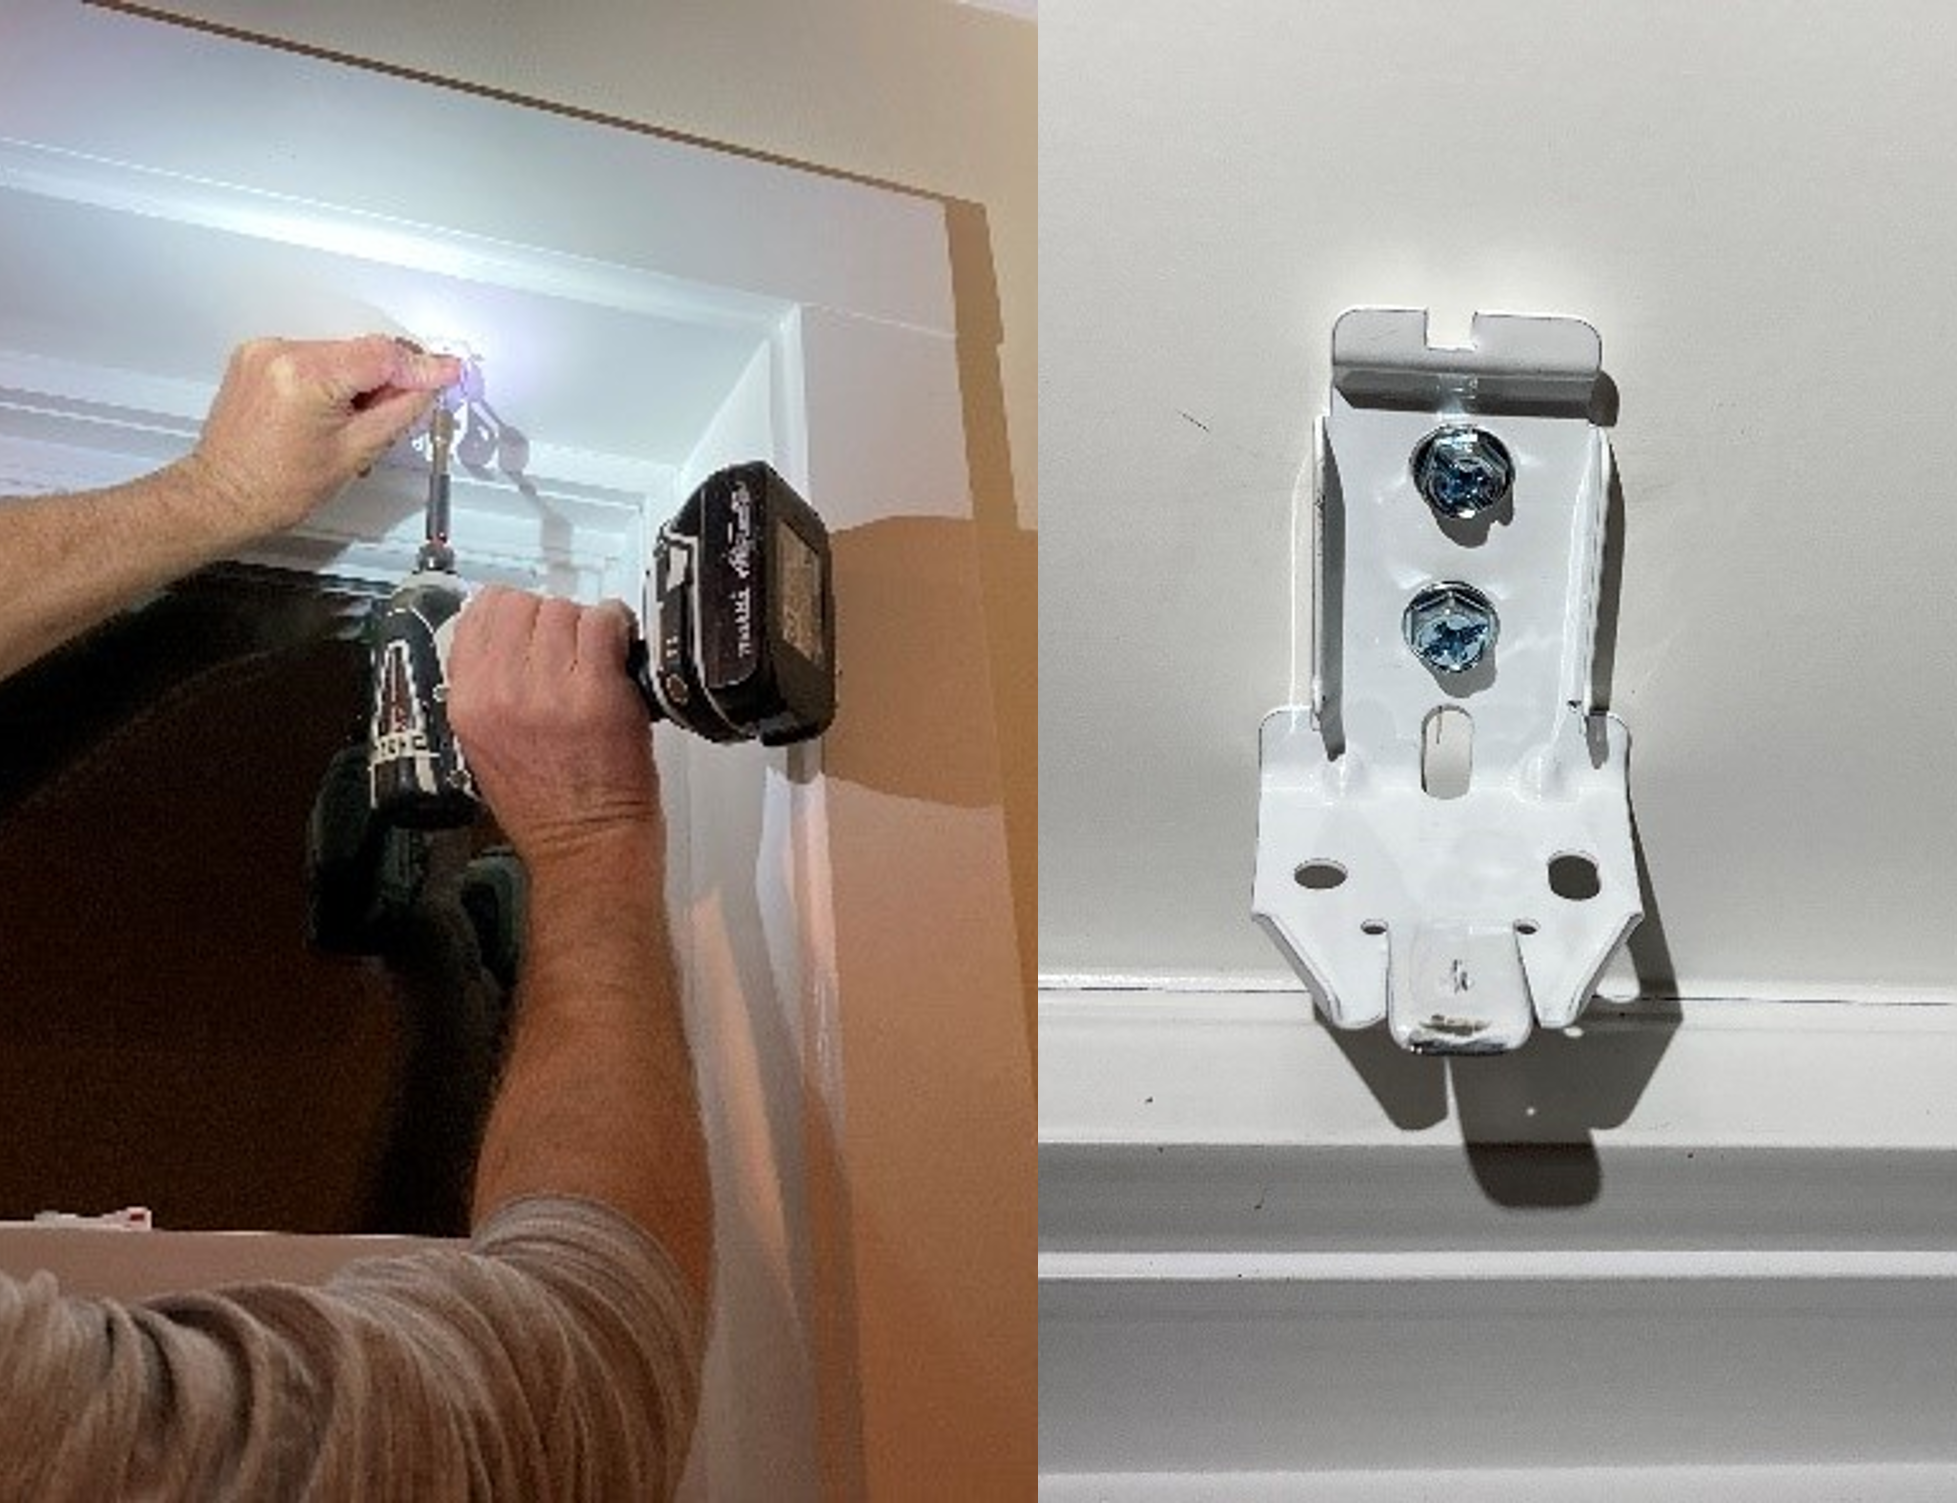
Install mounting brackets for blinds using a screwdriver, socket wrench, or impact driver as needed for the type and size of screws installed.
Source
Figure 16. Install mounting brackets for blinds using a screwdriver, socket wrench, or impact driver as needed for the type and size of screws installed (Source: PNNL).
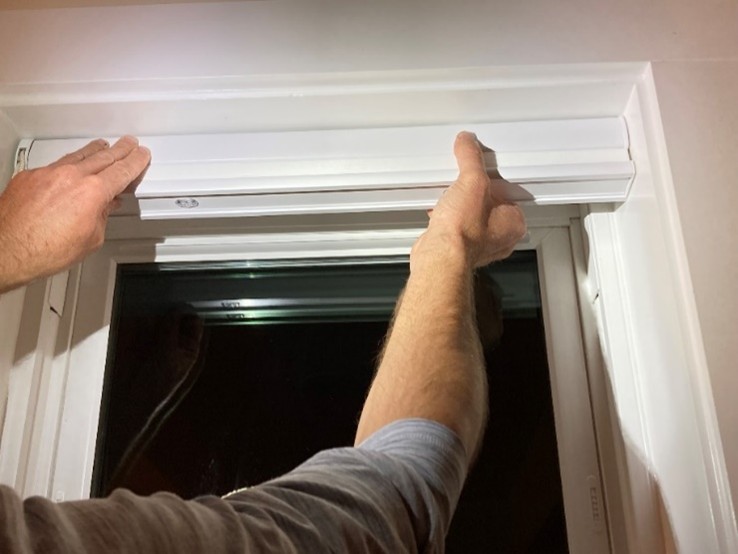
  1. Attach the blind assembly to the mounting brackets per the manufacturer’s instructions. In this example, the headrail simply snaps into the brackets with mild pressure (Figure 17).
  2. Install pull-chord hardware or other hardware per manufacturer’s instructions.
Press the blind assembly into the mounting brackets per manufacturer’s instructions.
Source
Figure 17. Press the blind assembly into the mounting brackets per manufacturer’s instructions (Source: PNNL).

Additional Info

Last Updated

Disclaimer

This content is a work created with funding provided by the United States Department of Energy under Contract no DE-AC05-076RL01830 for the operation of Pacific Northwest National Laboratory. The information and guidance provided by Pacific Northwest National Laboratory (PNNL) in the content are intended solely for educational purposes only and do not constitute formal training or certification. It is provided with the explicit understanding that neither the United States Government nor the United States Department of Energy, nor the Contractor, nor any or their employees, nor any jurisdiction or organization that has cooperated in the development of these materials, makes any warranty, express or implied, or assumes any legal liability or responsibility for the accuracy, completeness, or usefulness or any information, apparatus, product, software, or process disclosed, or represents that its use would not infringe privately owned rights. Reference herein to any specific commercial product, process, or service by trade name, trademark, manufacturer, or otherwise does not constitute or imply its endorsement, recommendation, or favoring by the United States Government or any agency thereof, or Battelle Memorial Institute. The views and opinions of authors expressed herein do not necessarily state or reflect those of the United States Government or any agency thereof. Viewers assumes full responsibility for all actions that they may take from information provided in this content including ensuring the safety, code compliance, and proper functionality of any products they choose to install. Installation and use of such products should be performed in accordance with local regulations and manufacturer instructions.