Materials Cost: 1
Difficulty Level: 3

Introduction

Seal and repair your central heating system’s ducts to make sure heated or cooled air gets to all the rooms of your house as efficiently as possible.  

Why

Many homes have central forced air heating and cooling systems. These systems rely on supply ducts to carry the heated or cooled air to all of the rooms of your home and return ducts to return stale air back to the furnace or air handler for filtering and reheating or recooling. If the seams and joints in the ducts aren’t air sealed, conditioned air can leak into crawlspaces or attics, and dust, soil gasses, insulation fibers, and humidity can be pulled into the home. Ducts can also suffer from poor installation problems, like installing the ducts with too many sharp turns, too much sagging, or excessive length. Ducts can also suffer damage after installation, like getting accidentally crushed, punctured, or disconnected. These issues can result in poor delivery of conditioned air making some rooms of your house constantly hotter or colder than desired. Depending on how bad the ducts are to begin with, air sealing and repairing your ducts can result in HUGE gains in energy efficiency, utility bill savings, and improvements in comfort and indoor air quality, while helping to extend the life of your furnace or heat pump.

Air sealing and repairing ducts doesn’t require expensive, specialized tools, but it does require patience and attention to detail and it may require working in an attic or crawlspace, depending on where your ducts and HVAC equipment are located. 

What You'll Need

  • A ladder long enough to go into the attic if the ducts are in the attic
  • Coverall protective suit
  • N95 or better mask
  • Headlamp
  • Heavy work gloves
  • Short magnetic ¼-inch nut driver
  • Battery-powered impact driver
  • #7 x ½-inch self-drilling sheet metal screws (typically sold in containers of 50, 100, or 1,000 screws)
  • Black woven duct strap
  • Scissors
  • Duct saddle (not typically available locally, order online ($1-$3 each); a typical home needs about30)
  • Heavy-duty staple gun
  • UL (Underwriters Laboratory) 181 fiber-reinforced duct sealant mastic paste (commonly sold in 1-gallon tubs)
  • Chip brush
  • Nylon cable tie tensioning and cutting tool
  • 36-inch black nylon ties (known as cable ties or zip ties)
  • UL-181 foil mastic tape
  • Scrim tape or kraft insulation or FSK (reinforced aluminum) duct tape
  • 30-gauge sheet metal (purchase only if large holes are found that need to be sealed)
  • Aviation snips (needed if sheet metal needs to be cut)
  • Diagonal cutter (for cutting the wire in flex duct after using scissors to cut the rest of the duct)
  • 5-blade hand crimper sheet metal tool
  • Outward-clinch heavy-duty staple gun
  • 9/16-inch (14mm) outward-clinch staples (typically sold in boxes of 4,000 staples per box)

1. Locate your ducts.

Find the supply registers where heated and cooled air enters the rooms of your home. These registers typically have 4x10 inch rectangular louvered metal covers. If you have a one-story home and the supply registers are in the ceiling, your ducts are likely in the attic and they should be accessible from the attic. If the registers are in the floor, your ducts are in the basement or crawlspace. If you have a crawlspace or unfinished basement, the ducts should be accessible. 

If you have a finished basement, the ducts may be in soffits hanging from the basement ceiling around the perimeter of rooms or above cabinets and covered with drywall; in this case they will be inaccessible. If you have a two-story home and the ducts are in the ceiling of the first story or in the floor of the second story, then the ducts are likely running through soffits in the first-story ceiling or between the floor joists beneath the second story. In either case, they will be inaccessible. 

If your ducts are inaccessible, you can still seal around duct boots from inside your home. See the DIY guide “Air seal duct boots to floors or ceiling drywall.” 

If, after taking that step, you are still concerned about poor heating or cooling in some rooms or poor airflow to some registers (test by holding your hand in front of the register to feel for airflow while the system is running), then call a contractor who does duct air sealing. They can test your home with a duct air leakage testing device called a duct blaster. If they find significant leakage, they can test individual registers to attempt to identify the leakiest ducts and take steps to fix them. One technique they may try is to use an aerosolized acrylic product that is sprayed into the ducts while they are pressurized with the duct blaster. The flowing air forces the acrylic beads into any holes in the ducts, sealing them off in the process. 

If your ducts are accessible, see the steps below. Several potential issues are identified for various types of duct systems, along with possible solutions for improving the ducts. Many of these solutions can be implemented by experienced do-it-yourselfers. You can also hire an HVAC company to make the repairs.  


2. Identify and Fix Problems with Flexible Ducts

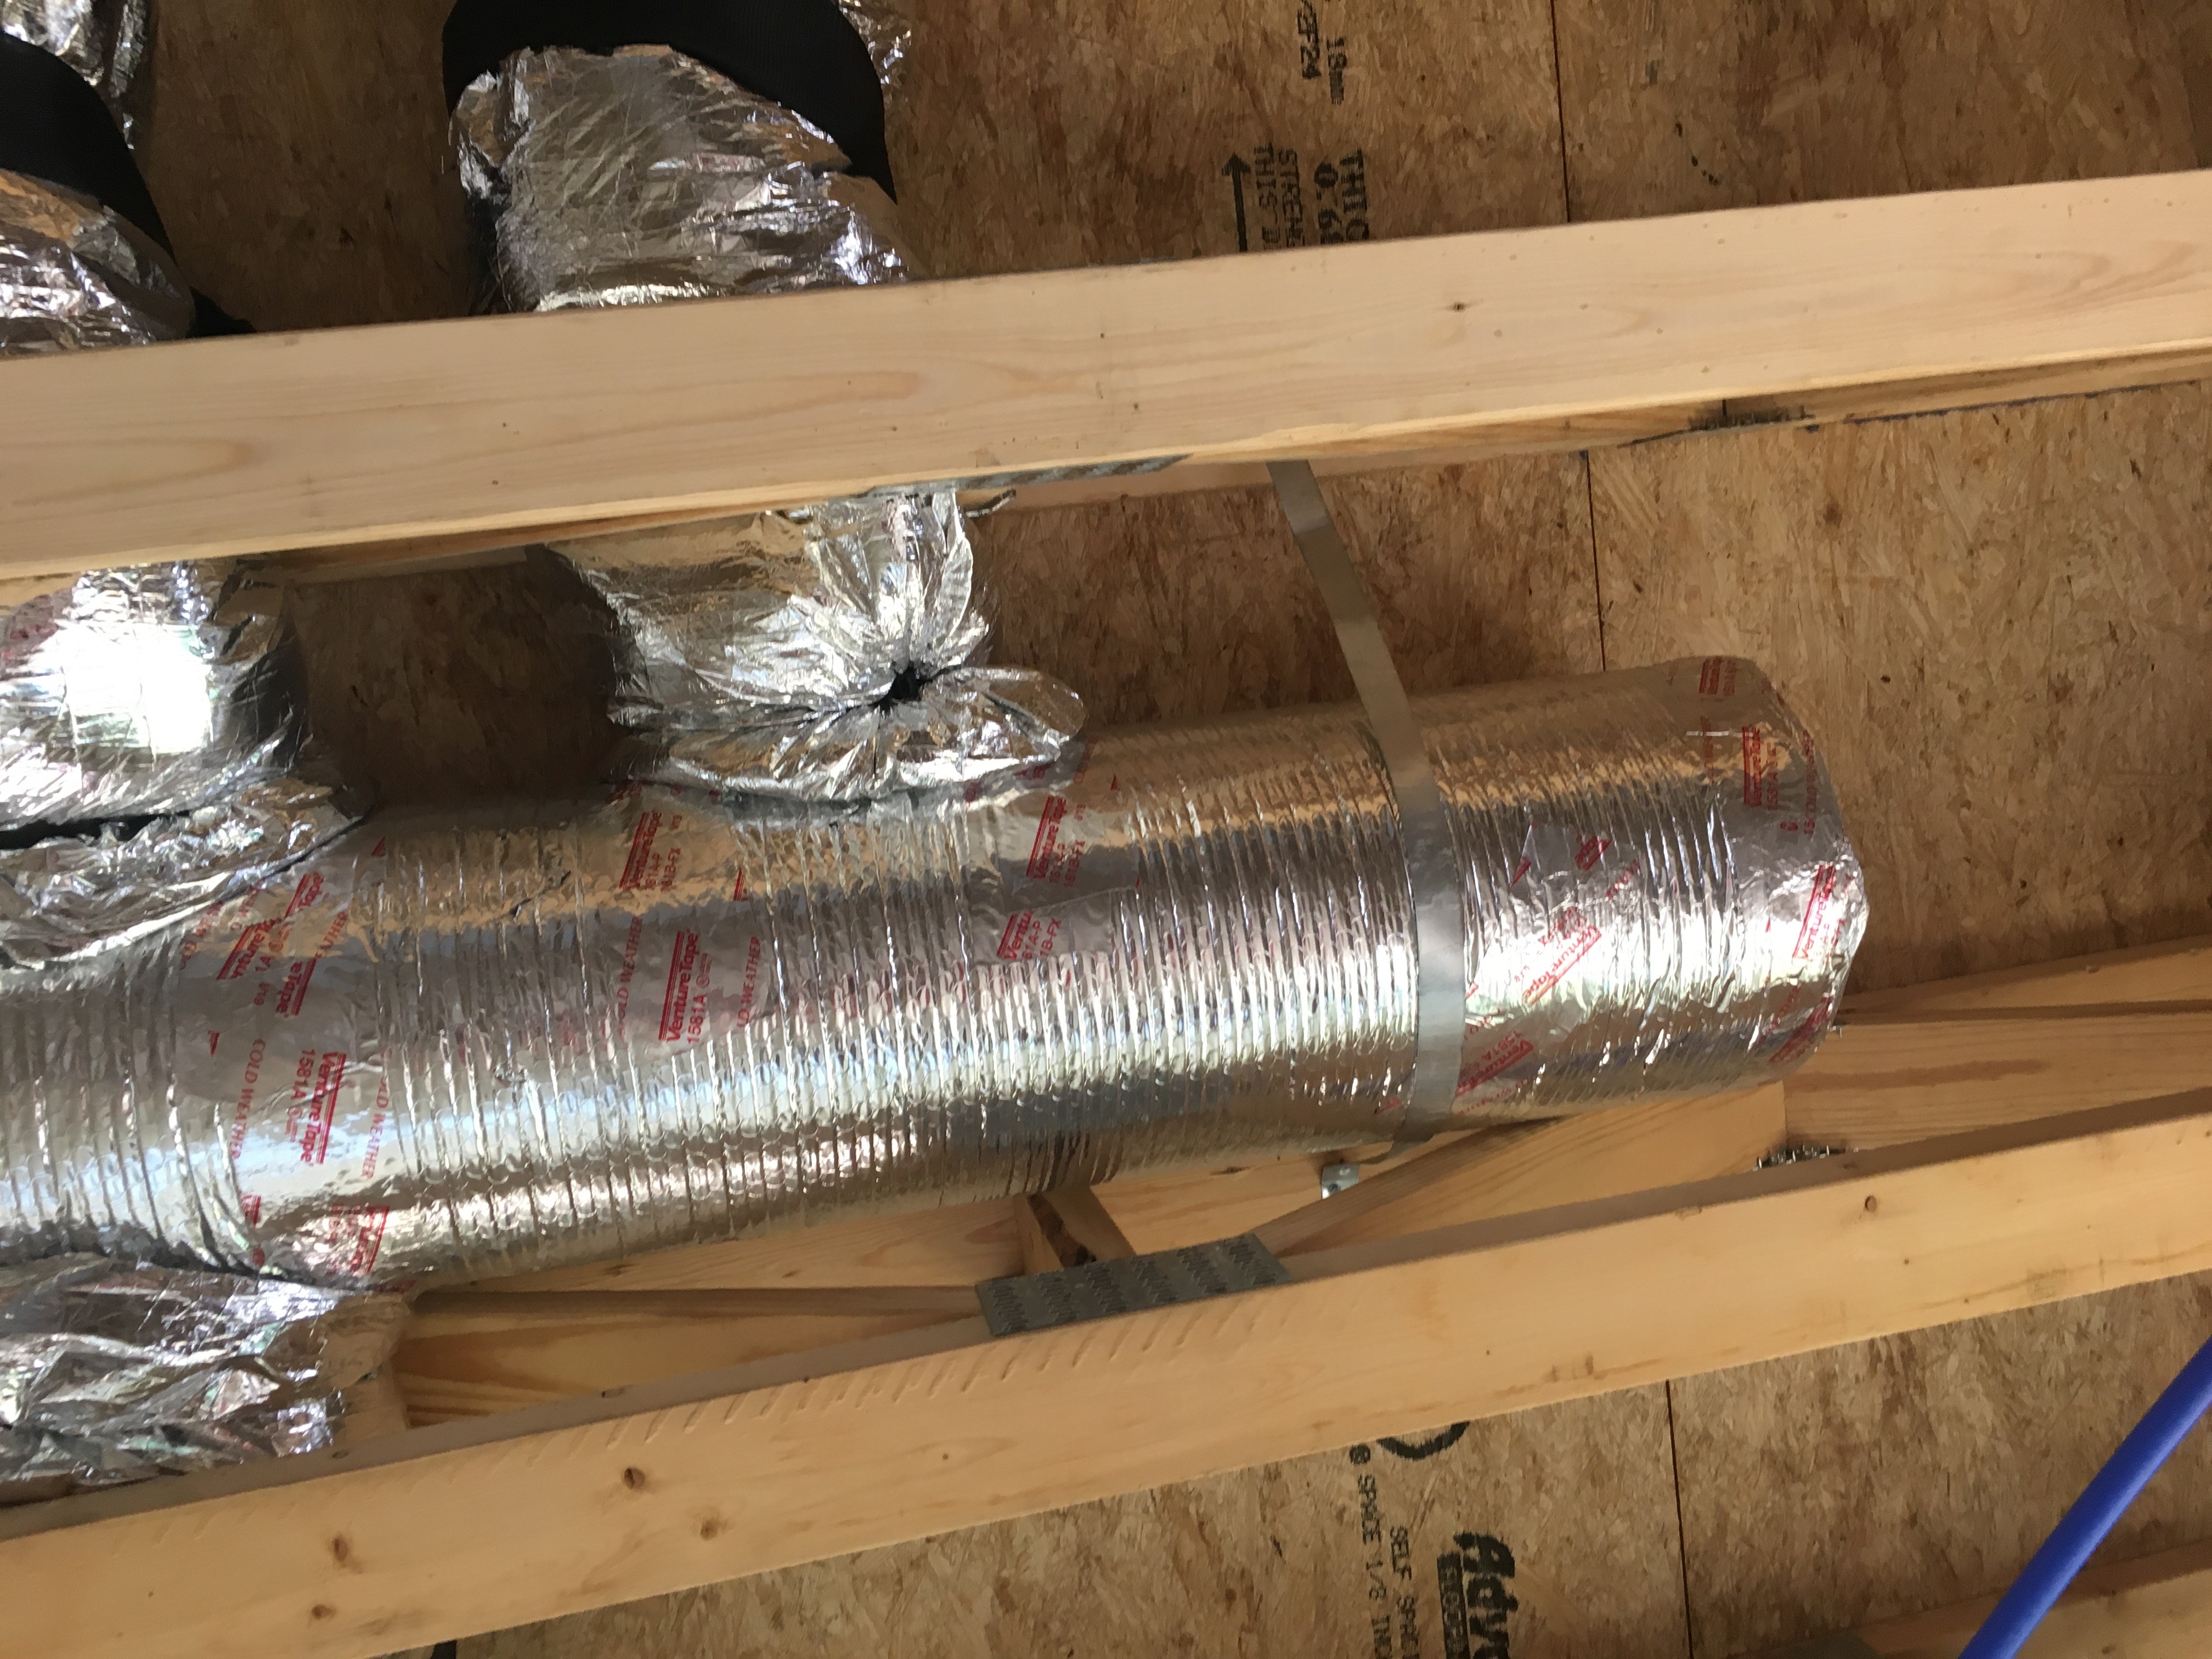
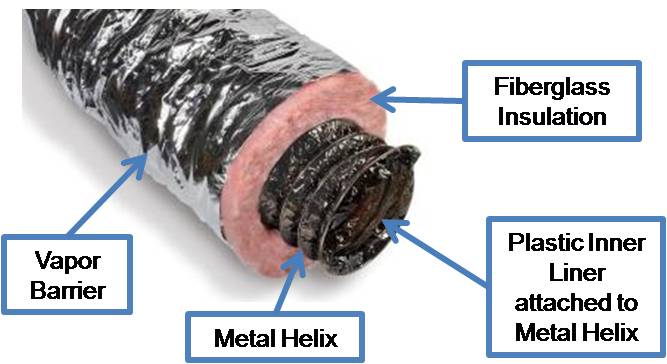
Flexible ducts (sometimes called flex ducts) consist of a plastic sheeting layer wrapped around a wire metal coil, providing a very flexible duct material for carrying heated or cooled air from the furnace or heat pump through the attic, crawlspace, or between floors to the supply registers located in the floors or ceilings of your home. HVAC ducts are typically 8 inches in diameter and come wrapped in a layer of fiberglass covered with a foil or plastic vapor barrier (Figure 1). While its light weight and flexibility makes flex duct easy to work with, it is not very durable and can easily be squished, crushed, or punctured. To perform best, it should be pulled taut and well supported to avoid sagging and laid out in duct runs that are as short and straight as possible with few bends and turns. Here are examples of some common problems with flex duct and how to fix them.
Flexible Duct Materials & Assembly
Source
Figure 1. Flexible or flex duct consists of a plastic sheeting wrapped around a metal coil, then covered with a fiberglass blanket insulation layer and a plastic or foil vapor barrier (Source: PNNL).

Fixing Sags and Kinks in Flexible Ducts

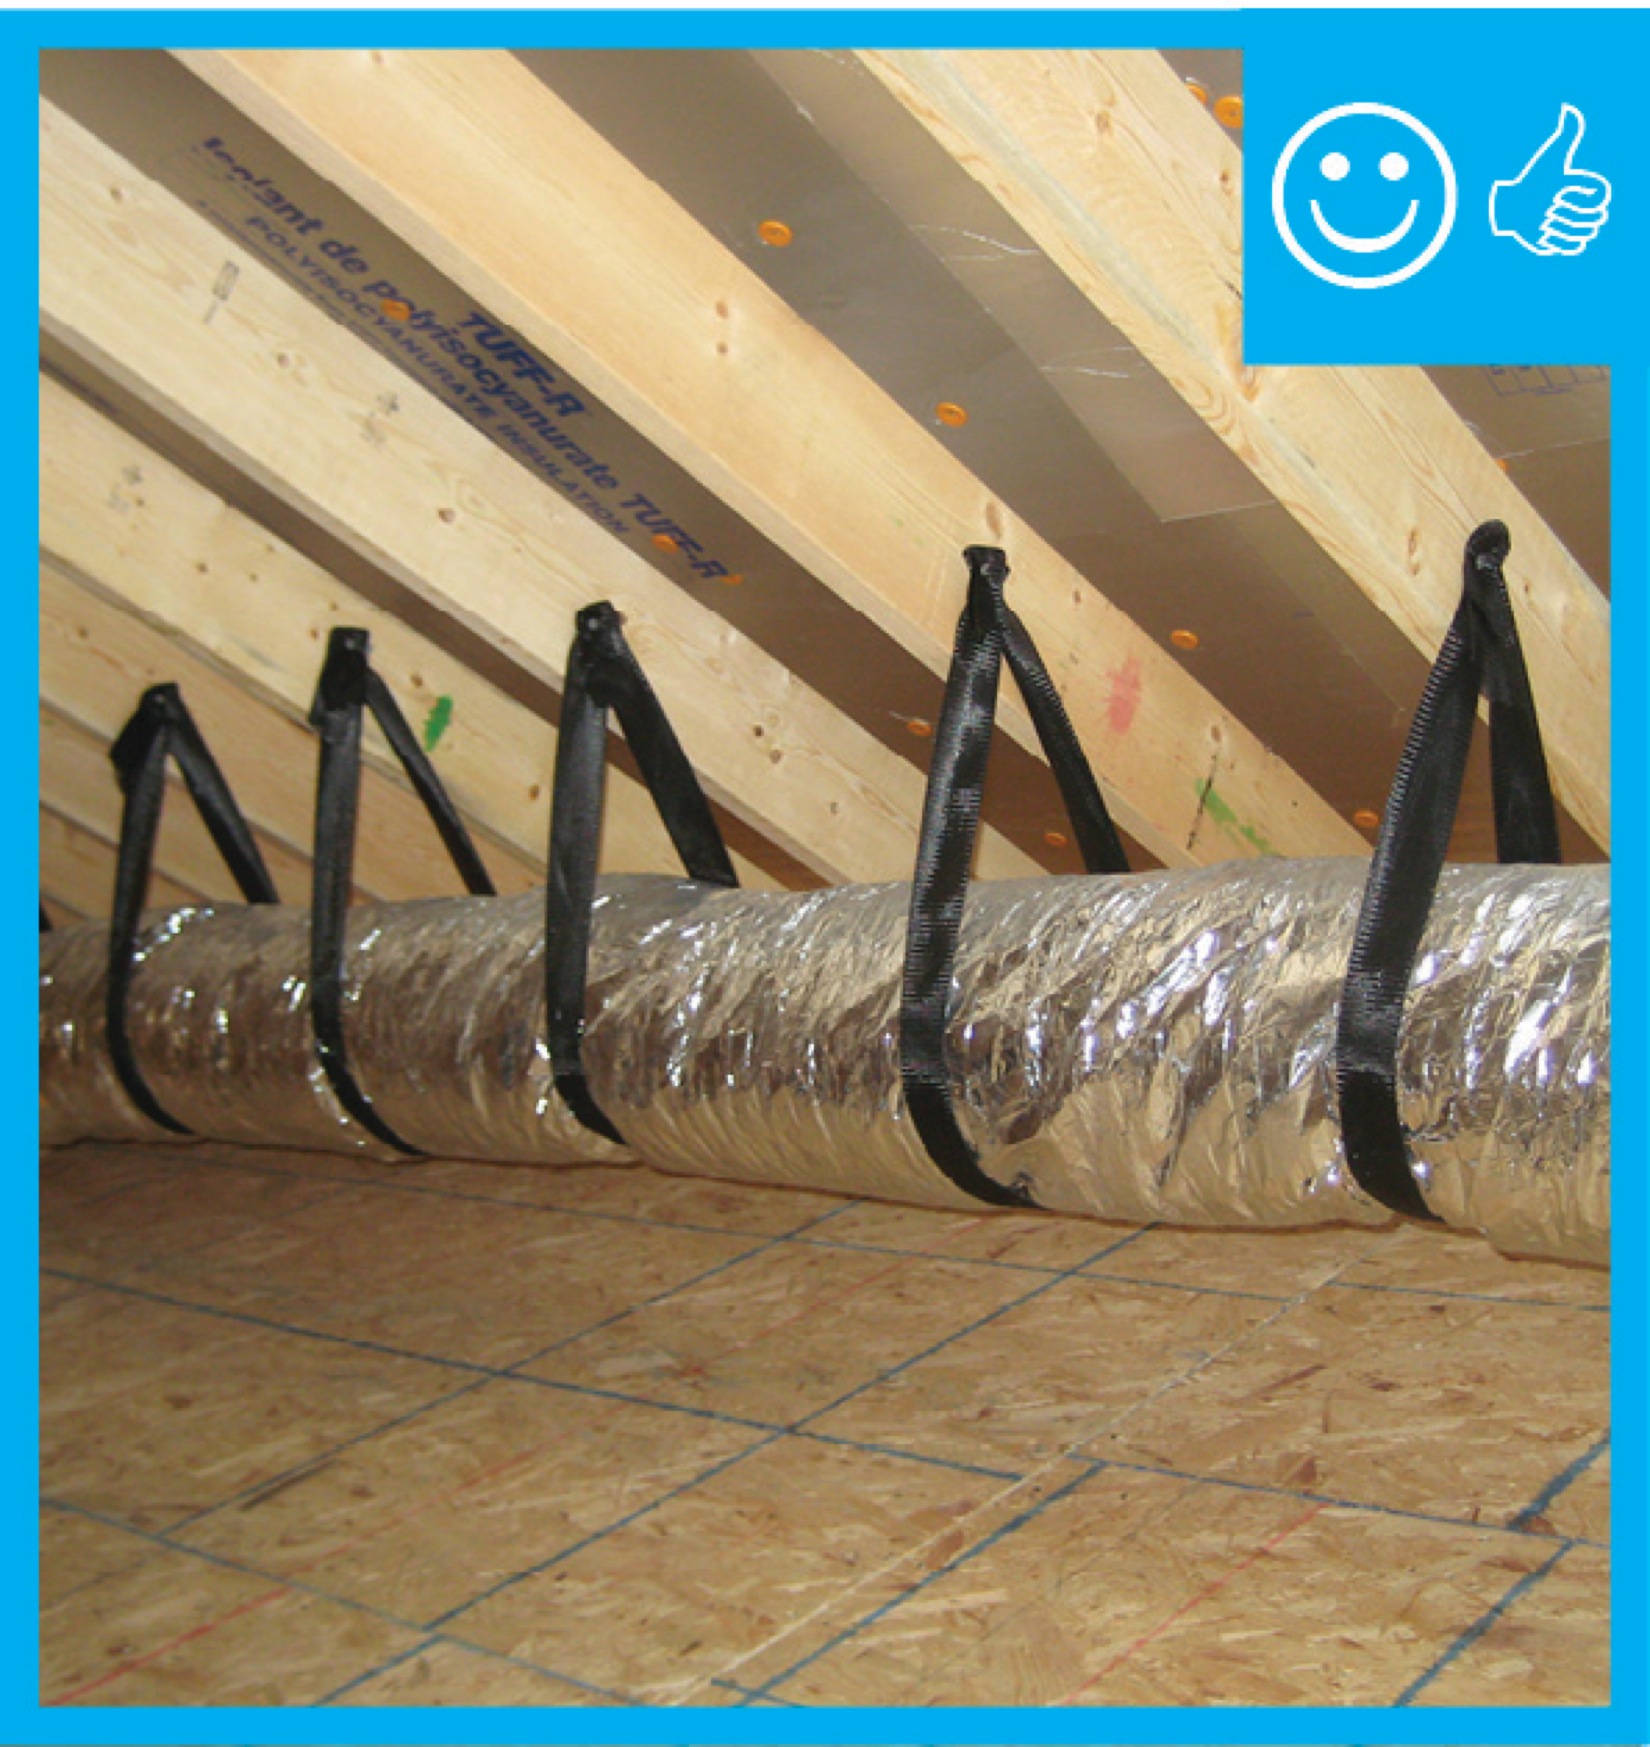
In an attic the best place to install flex ducts is to lay the insulated ducts on the floor of the attic and cover them with attic insulation. But ducts in crawlspaces, and sometimes ducts in attics, need to be suspended from the ceiling. Suspended ducts need adequate support to keep from sagging. They should be supported by straps or by saddles (which look a bit like crutches). There should be at least one support every 4 feet (Figures 2 and 3) and one at each side of a bend. Straps should be at least 1.5 inches wide. 
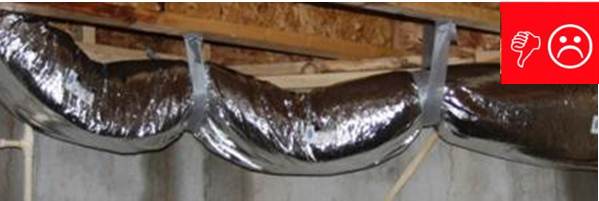
Flex ducts are compressed
Source
Figure 2. The support straps for this flex duct are too tight and too far apart to adequately support the flex duct (Source: PNNL).
Ducts well supported
Source
Courtesy Of
EPA
Figure 3. This duct is well supported with wide straps that are less than 4 feet apart (Source: U.S. EPA).

Fixing Excessively Long Flexible Ducts

Flex ducts that are longer than needed to get from the trunk duct to the supply register will often have extra bends in them (Figure 4) as well as more friction from the coils in the duct both of which reduce airflow in the ducts compared to a flex duct that is pulled taut. If you find a flex duct that is too long, disconnect the duct from either the duct boot or the trunk, route the duct to run as straight as possible, and pull it tight. Use scissors or a utility knife and wire cutters to cut the duct to the correct size, then reconnect properly as described below in the section on how to make a secure flexible duct connection.
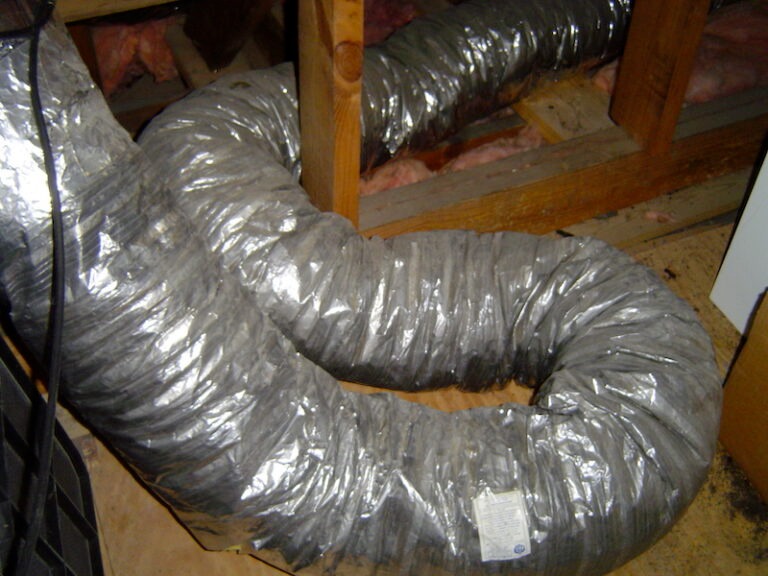
This flex duct is much longer than it needs to be; the extra loops greatly decrease air flow in the duct.
Source
Figure 4. This flex duct is much longer than it needs to be; the extra loops greatly decrease air flow in the duct (Source: Allison Bailes)

Rerouting or Adding a Fitting to Flexible Duct to Fix a Kink

If you find a flexible duct that has a sharp bend or kink in it (Figure 5), reroute it to achieve a more gradual turn, adding duct straps and saddles where needed for support. Alternatively, depending on the space available, you could cut the flexible duct and insert a rigid metal elbow to enable the turn without kinking the duct. 
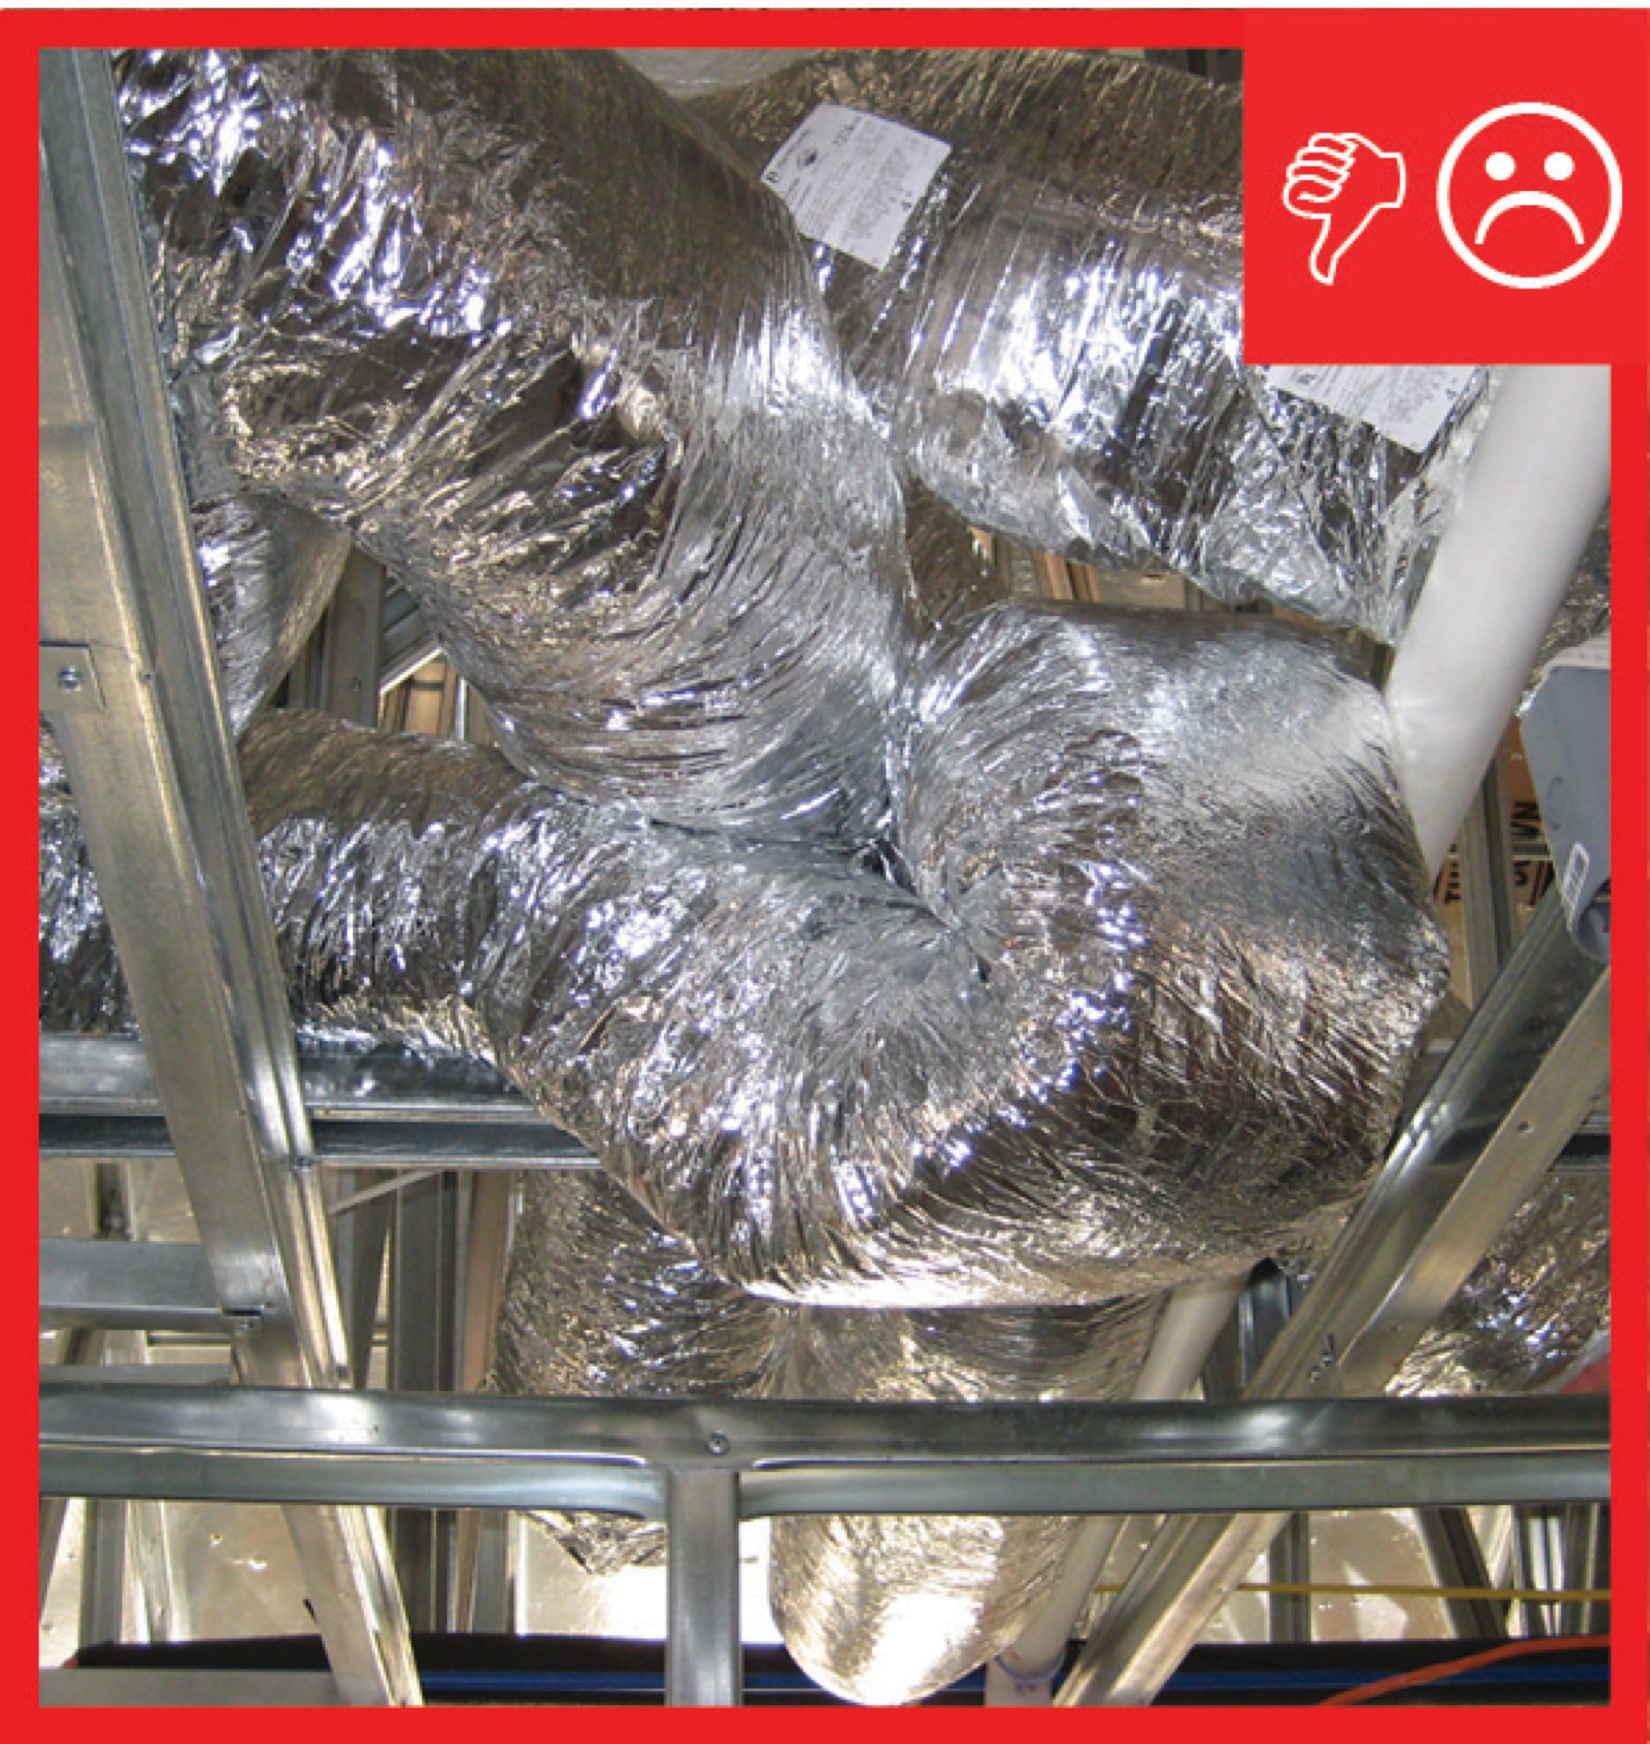
Ducts crammed into cavity, kinked and sharply bent
Source
Courtesy Of
EPA
Figure 5. This flex duct has a sharp bend in it that severely limits air flow (Source: U.S. EPA).

Re-Connecting Flex Duct Connections

If you find a flex duct connection that has disconnected, it is likely that it wasn’t connected well when it was originally installed. Below is a method to re-connect or re-do a flex duct connection so that it is air-tight and will stay air-tight and connected for the life of the duct system.

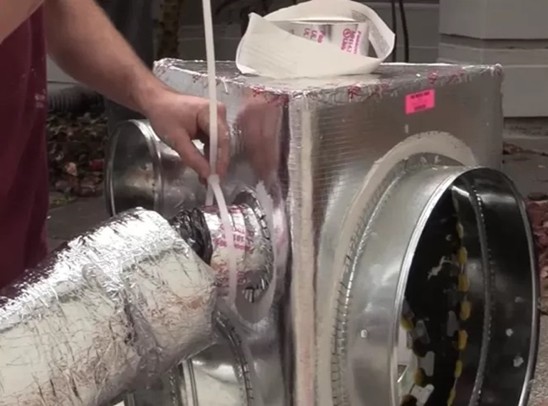
  1. Tape the flex duct core to the take-off collar using UL-181 foil mastic tape (Figure 6). Be sure to rub the tape down to get the tape’s adhesive pressed into the material it is bonding to.
  2. Install a nylon tie on top of the tape and tension and trim it using the tensioning tool (Figure 7).
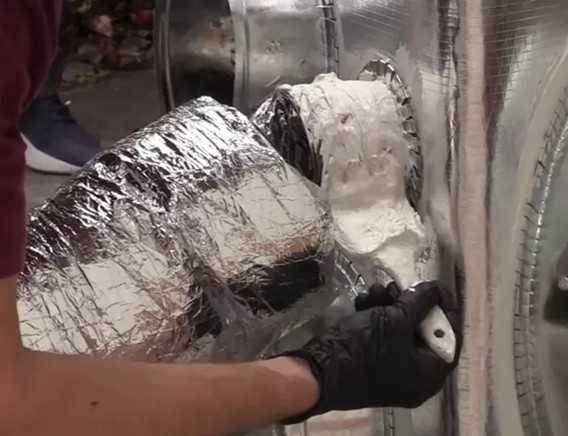
  3. Apply UL-181 fiber-reinforced duct-sealant mastic paste to cover the tape and the flex duct core all the way to the take-off collar (Figure 8). The mastic paste should be applied to a minimum thickness of a nickel coin.
  4. Since this is a DIY project, there is time to wait a day or more for the mastic paste to dry before taping together the insulation and vapor barrier (outer most layer).
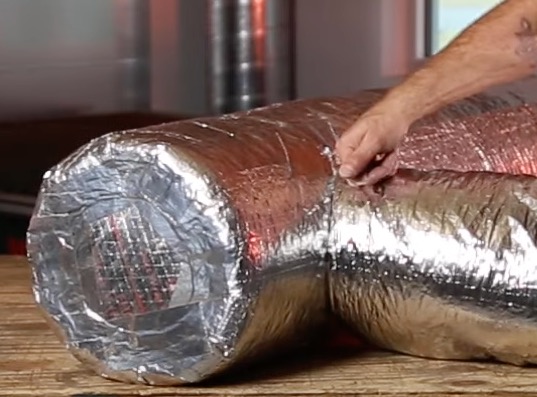
  5. Tuck and roll the vapor barrier over the fiberglass insulation to provide a firmer surface onto which the Foil-Scrim-Kraft (FSK) duct tape will be applied (Figure 9). 
  6. Apply the Foil-Scrim-Kraft (FSK) duct tape in short (5-inch) sections (Figure 10). Frequently this tape comes in 3-inch-wide rolls. You can overlap two pieces of tape to create approximately 5-inch by 6-inch pieces of tape to better span the connection and air-seal the vapor barrier to the trunk duct. Use enough tape to seal around the whole duct connection contouring the tape to the duct as you go.
  7. Apply UL-181 fiber-reinforced duct-sealant mastic paste to cover the tape and 1 to 2 inches beyond (Figure 11). The mastic paste should be applied to a minimum thickness of a nickel coin. This will prevent the tape from coming apart due to time. These steps will secure the connection. You do not need to install a nylon cinch tie over the connection. Doing so will compress the fiberglass insulation and could create a cold spot that might lead to condensation during hot humid conditions. 
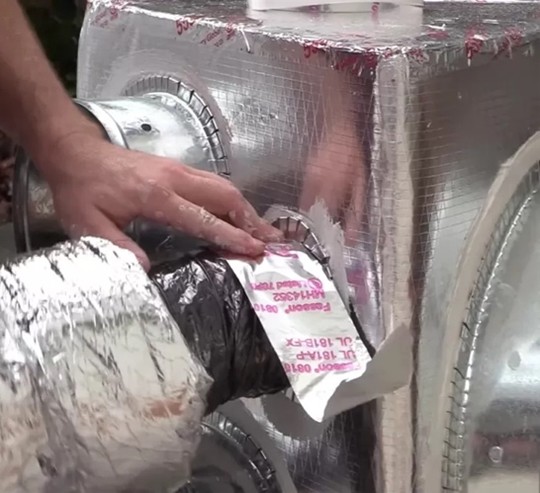
Tape the flex duct core to the take-off collar using UL-181 foil mastic tape.
Source
Figure 6. Tape the flex duct core to the take-off collar using UL-181 foil mastic tape (Source: Kalos Services-Florida).
Apply a nylon tie on top of the tape.
Source
Figure 7. Apply a nylon tie on top of the tape (Source: Kalos Services-Florida).
Apply a thick layer of UL-181 fiber reinforced duct sealant mastic paste spanning over the polyester film of the flex duct core, the tape, and nylon tie, to the take-off collar.
Source
Figure 8. Apply a thick layer of UL-181 fiber reinforced duct sealant mastic paste spanning over the polyester film of the flex duct core, the tape, and nylon tie, to the take-off collar (Source: Kalos Services-Florida).
Tuck any extra vapor barrier around and under the insulation and pull it tight to the connecting duct or boot to create a firmer surface to apply tape.
Source
Figure 9. Tuck any extra vapor barrier around and under the insulation and pull it tight to the connecting duct or boot to create a firmer surface to apply tape (Source: AGL Mechanical Tips).
Tape over the seam connecting the flex duct to the trunk duct; in this case two 3-inch-wide pieces of tape were put together then laid over the seam.
Source
Figure 10. Tape over the seam connecting the flex duct to the trunk duct; in this case two 3-inch-wide pieces of tape were put together then laid over the seam (Source: AGL Mechanical Tips).
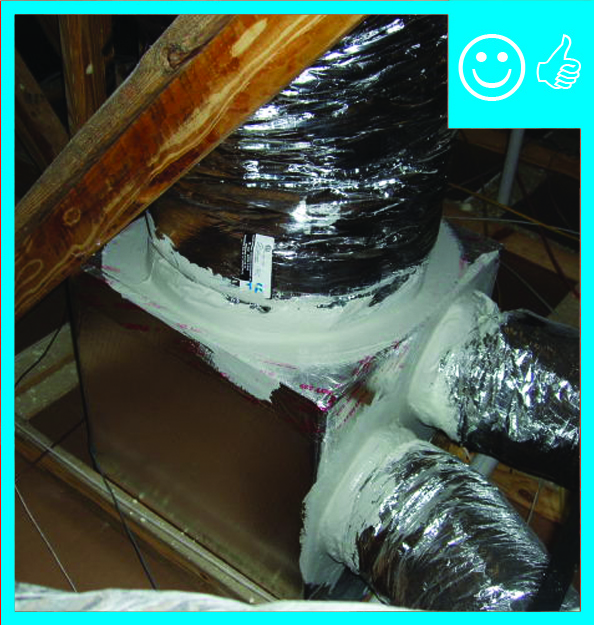
Right – Flex duct is mastic sealed at junction box
Source
Courtesy Of
BSC
Figure 11. Apply UL-181 fiber-reinforced mastic to cover all of the tape and 1 to 2 inches beyond; apply the mastic paste to a thickness equal to a nickel coin (Source: PNNL).
Wrong – Insulation should not be pinched where flex ducts connect to the trunk duct as compression of the insulation here can lead to cold spots and condensation on the duct surface.
Source
Figure 12. Do not apply a nylon cinch strap over the duct insulation – compressing the insulation here can lead to cold spots and condensation on the duct surface (Source: Healthy Communities).

Insulating Boxy Duct Components

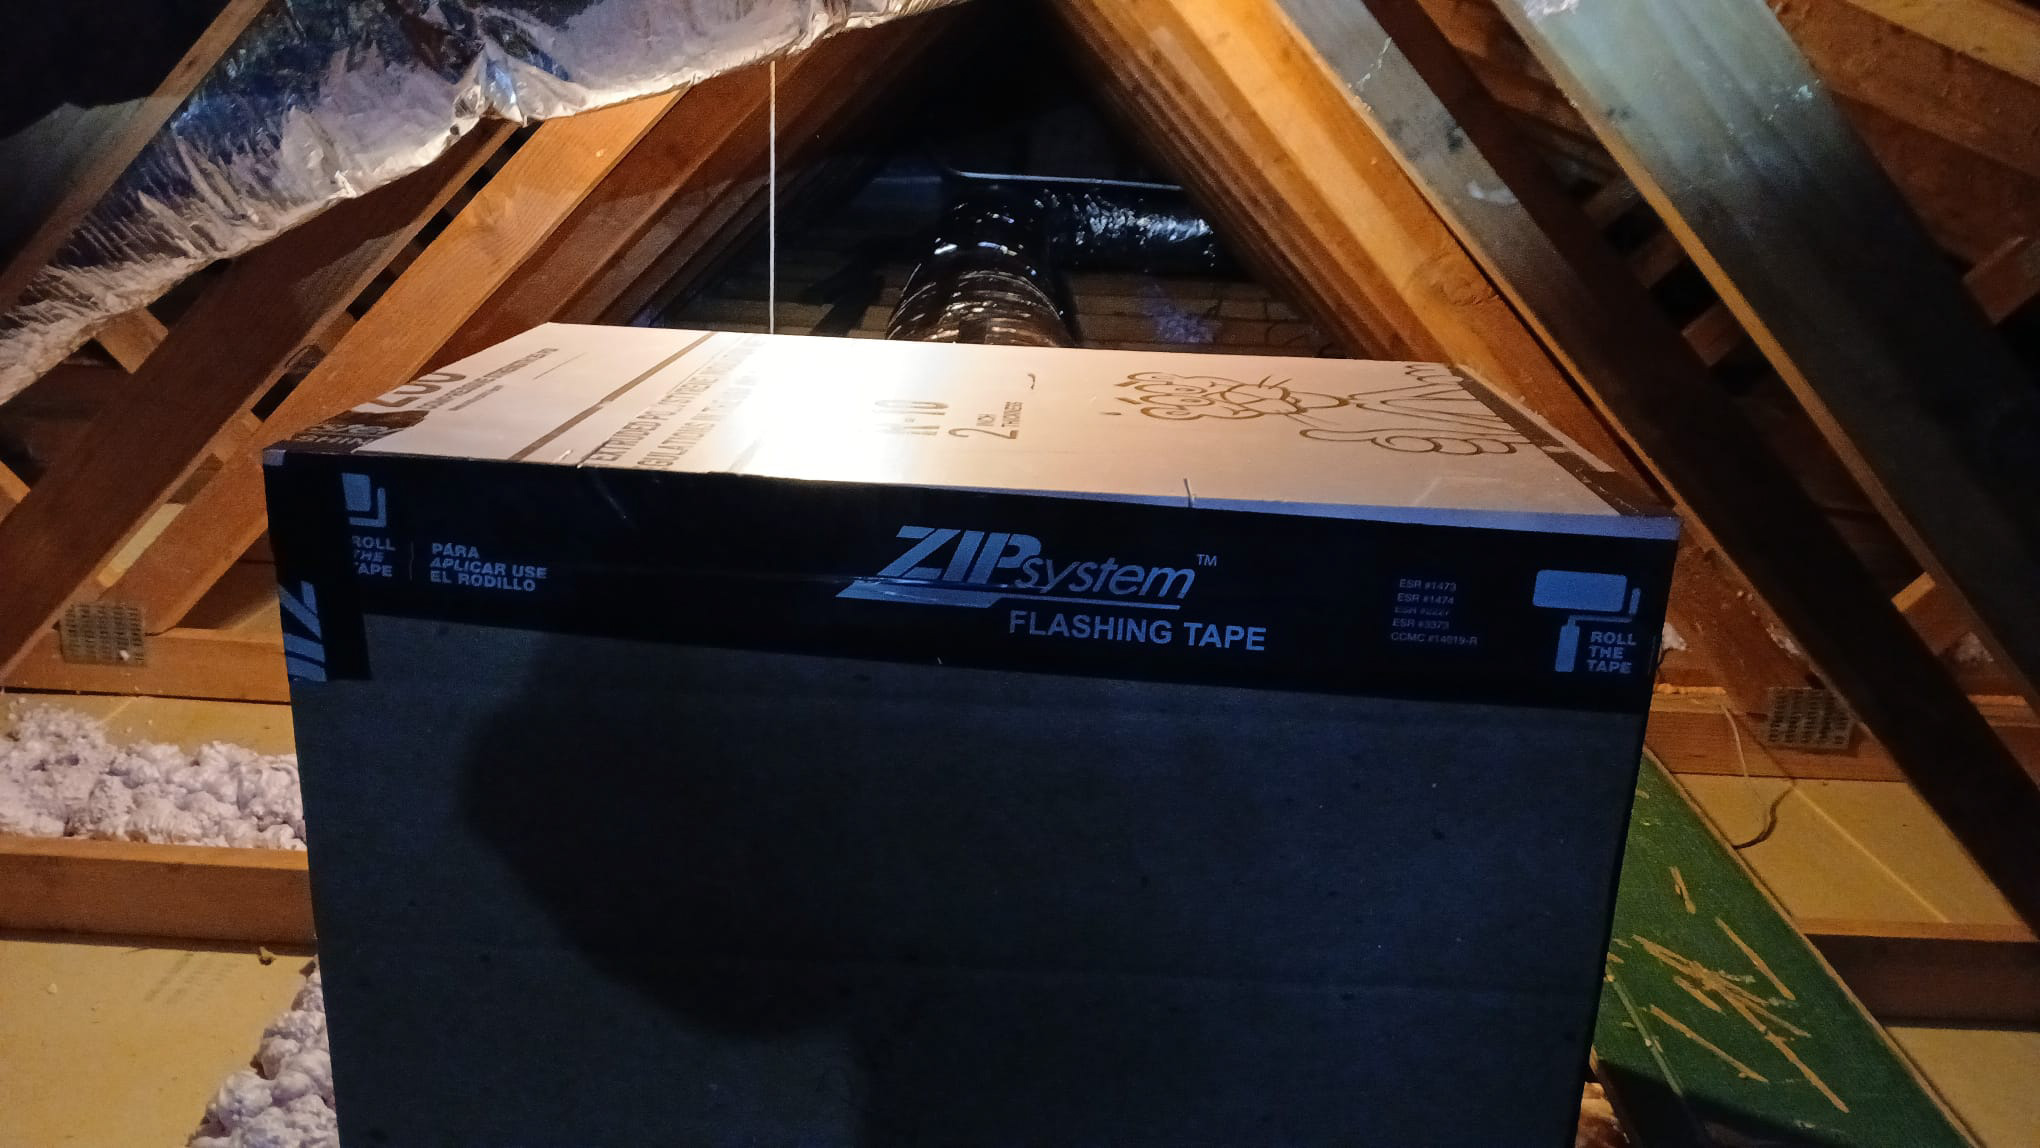
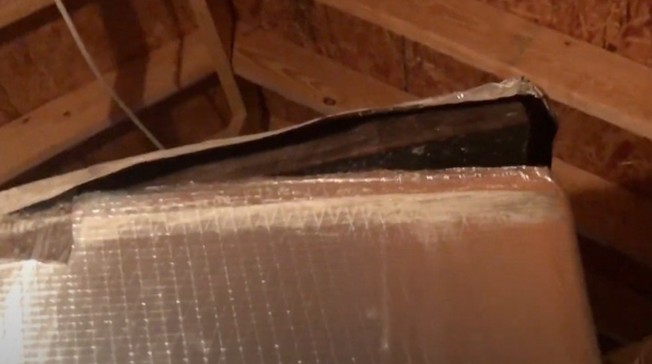
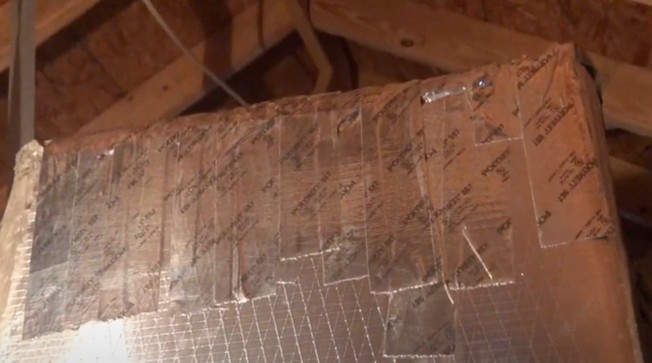
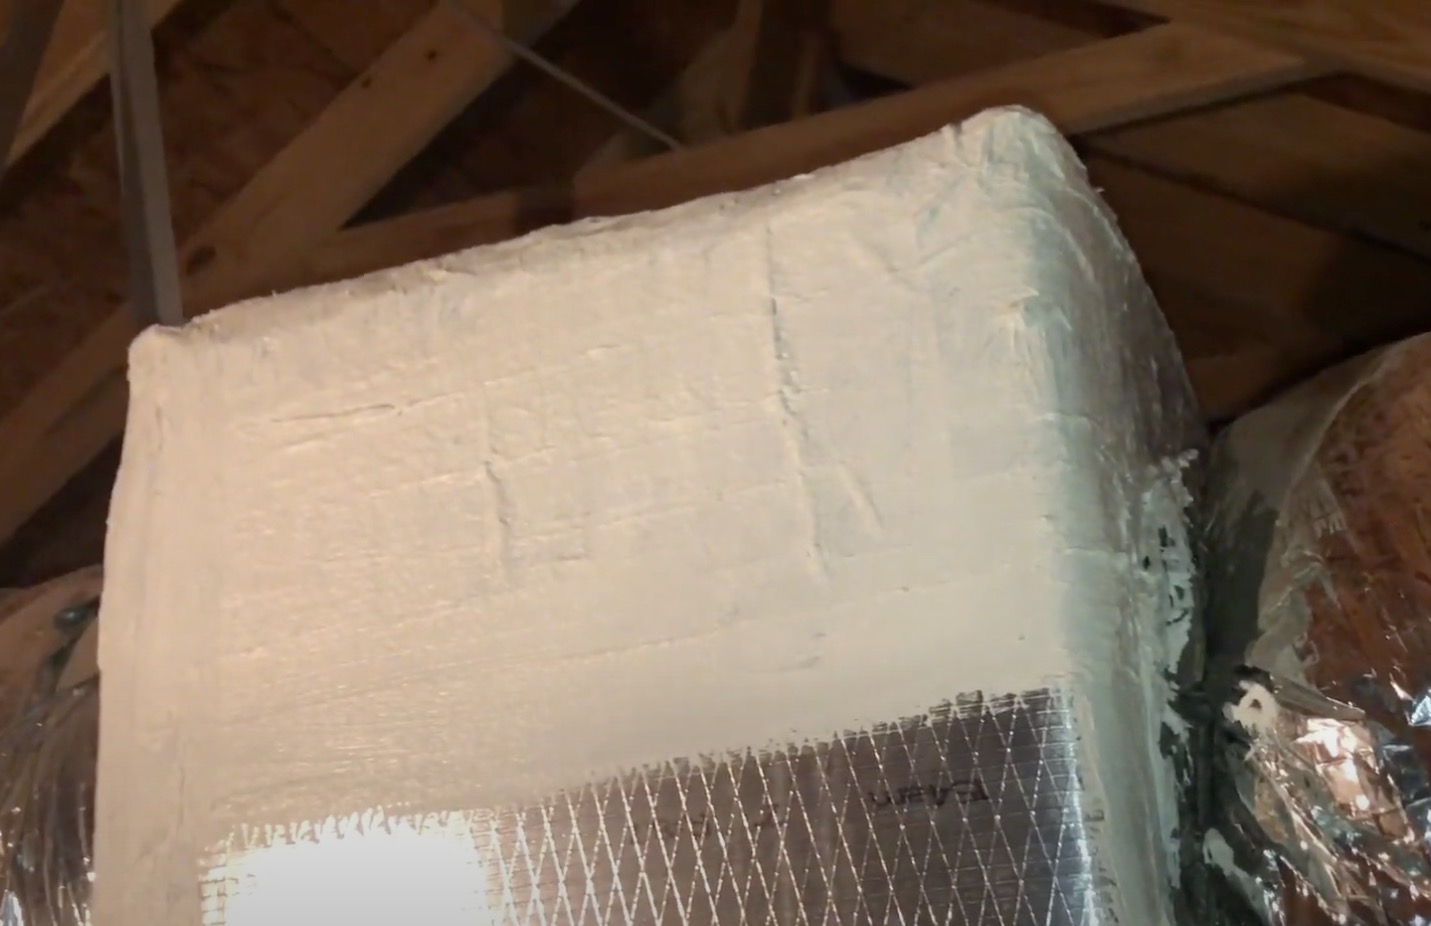
Consider using rigid insulation foam boards to insulate boxy duct components such as a return plenum box. Use construction sheathing tape to tape the pieces of the foam board together. The rigid insulation foam boards can be cut to size using a utility knife, kitchen knife, table saw, or circular saw.
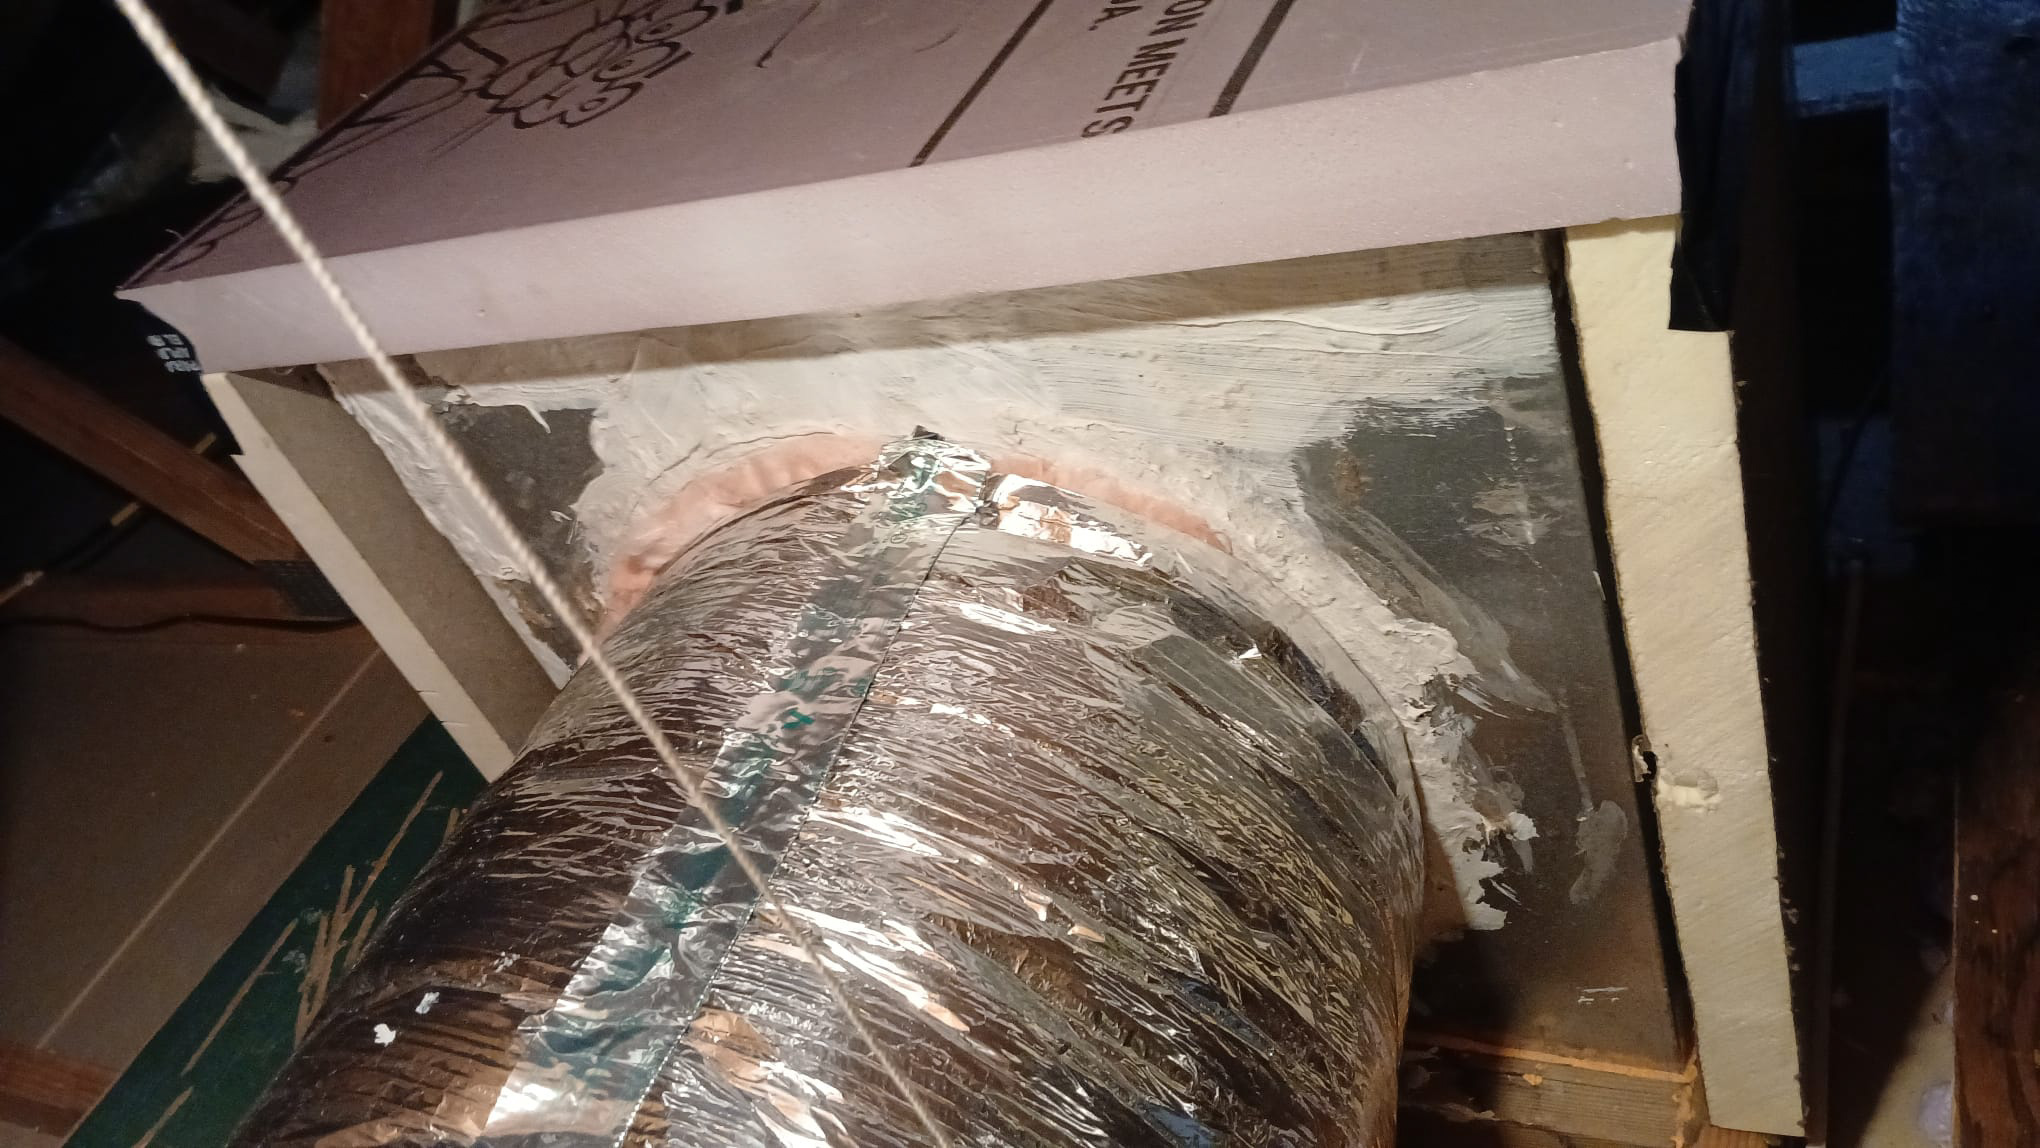
Rigid foam was used to insulate this return plenum attached to this flex duct.
Source
Figure 13. Rigid foam was used to insulate this return plenum attached to this flex duct (Source: PNNL).
A box was constructed of rigid foam and sheathing tape to insulate this return plenum in the attic.
Source
Figure 14. A box was constructed of rigid foam and sheathing tape to insulate this return plenum in the attic (Source: PNNL).

Even though it is less expensive and faster to insulate ducts with unfaced fiberglass batts, don’t do it. Humidity can travel through the unfaced fiberglass batts and condense onto the metal surface of ducts. The result will be wet insulation and a wet drywall ceiling if the ducts are in the attic (Figure 15). Besides the possibility of water damage, mold can also grow in the wet environment.
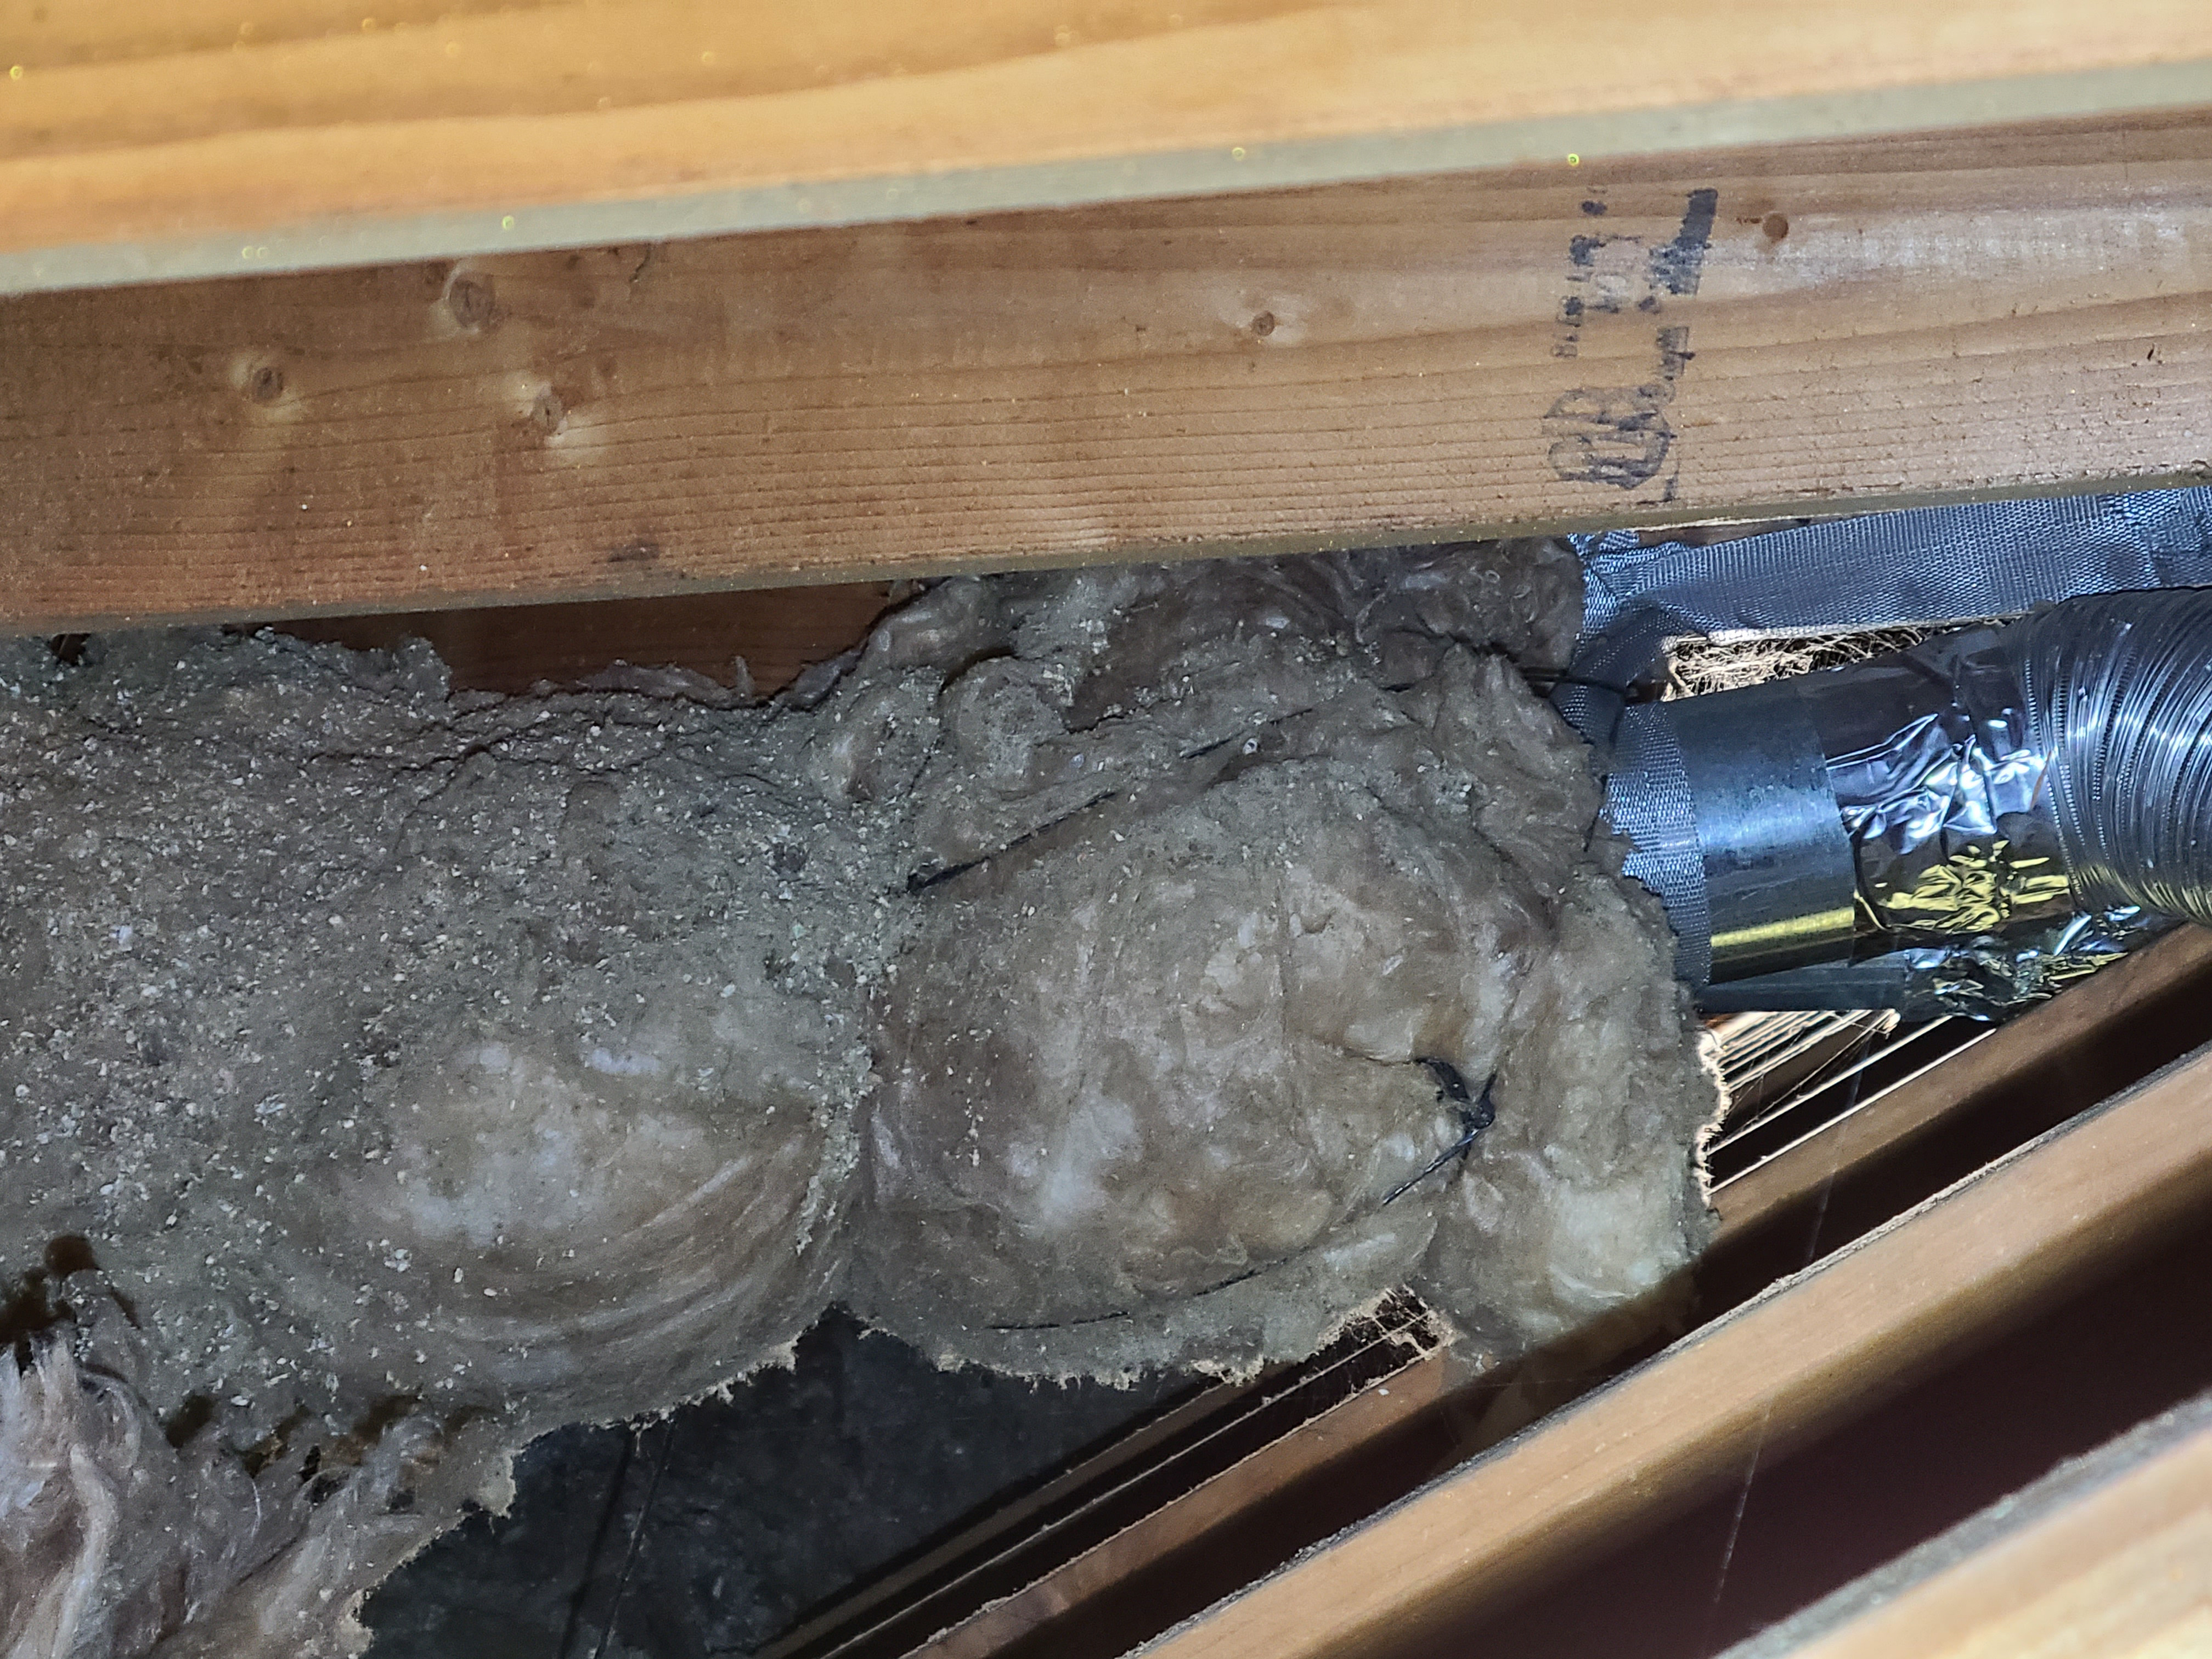
Return boxes and duct boots that attach to the ducts should be insulated with rigid foam not fiberglass batt because humidity can travel through the unfaced fiberglass batts and condense onto the metal causing mold and moisture damage to insulation and ceiling drywall
Return boxes and duct boots that attach to the ducts should be insulated with rigid foam not fiberglass batt because humidity can travel through the unfaced fiberglass batts.
Source
Figure 15. Return boxes and duct boots that attach to the ducts should be insulated with rigid foam not fiberglass batt because humidity can travel through the unfaced fiberglass batts and condense onto the metal causing mold and moisture damage to insulation and ceiling drywall (Source: PNNL).

3. Identify and Fix Problems with Rigid Ducts

Step 3. Identify and Fix Problems with Rigid Ducts

Rigid ducts are round or rectangular metal ducts made of sheet metal that comes to the shop in prefabricated pieces; although some pieces are fabricated to size in the shop, and some may be formed on site. Connections and seams are the weak spots where proper installation is needed to form lasting, air-sealed seams between pieces.

Loose/Disconnected Duct Take-offs

If you find loose or disconnected duct take-offs from a trunk duct or duct boot (like the one shown in Figure 16), check to see if there is a take-off collar. If there is not a take-off collar, disassemble the connection to install a take-off collar. There are different take-off collars available at home improvement stores for connecting to flat sheet metal ducts (rectangular ducts) as well as round sheet metal ducts. (See Figures 17 and 18 below).
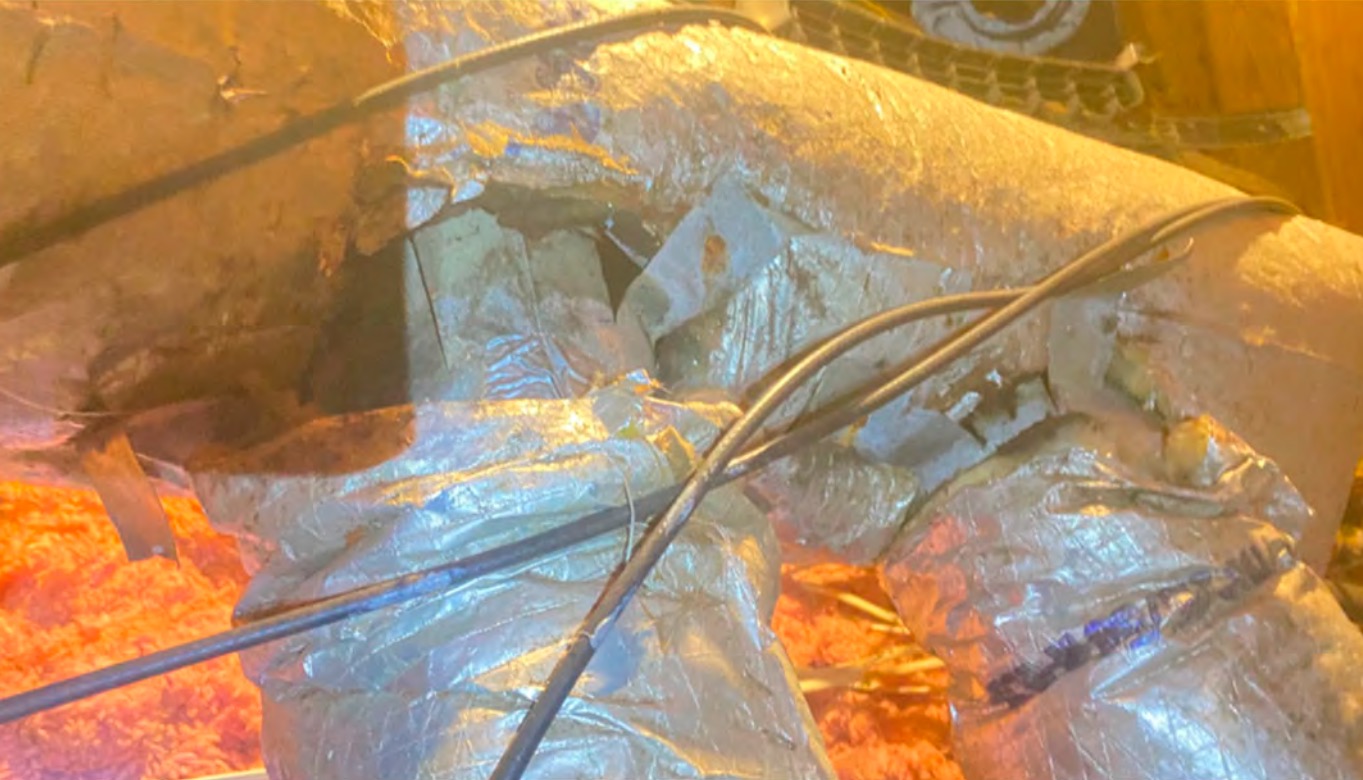
This duct became disconnected from the trunk duct because the duct take-off was poorly installed.
Source
Figure 16. This duct became disconnected from the trunk duct because the duct take-off was poorly installed (Source: Entergy Mississippi).

Secure the take-off collar by installing some #7 half-inch self-piercing, self-drilling sheet metal screws (Figure 19). If there is a take-off and it is just loose because it was never secured using self-piercing/self-drilling sheet metal screws, resecure the take-off collar by adjusting and bending the sheet metal tabs to be more secure (Figure 20), installing self-piercing/self-drilling sheet metal screws (Figure 21), and applying UL 181 fiber reinforced duct sealant mastic paste to complete cover the seam around the duct (Figures 22 and 23).
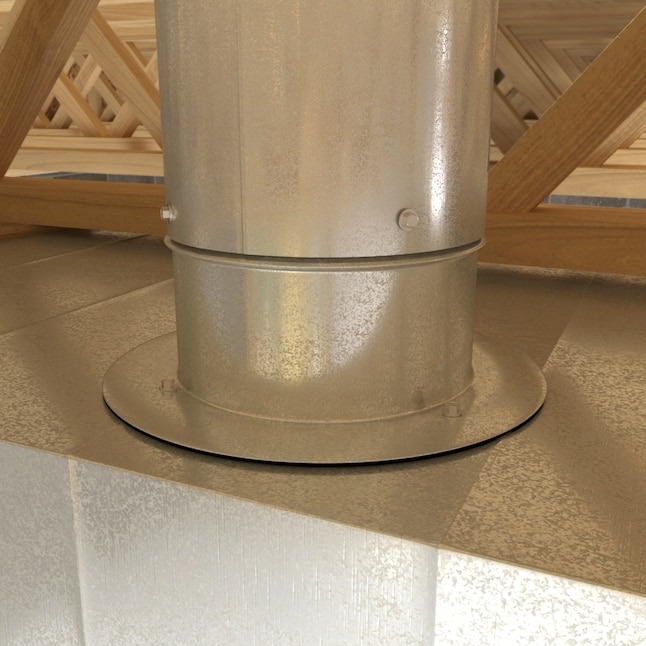
This is a take-off collar for connecting a round metal duct to a flat sheet metal trunk duct.
Source
Figure 17. This is a take-off collar for connecting a round metal duct to a flat sheet metal trunk duct. (Source: GAF Master Flow).
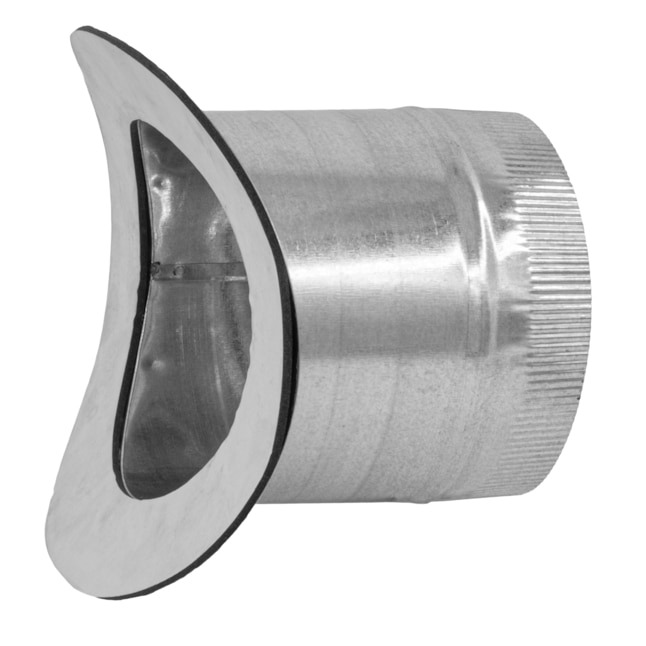
This saddle take-off collar is used to connect a round sheet metal duct to another round sheet metal duct.
Source
Figure 18. This saddle take-off collar is used to connect a round sheet metal duct to another round sheet metal duct (Source: GAF Master Flow).
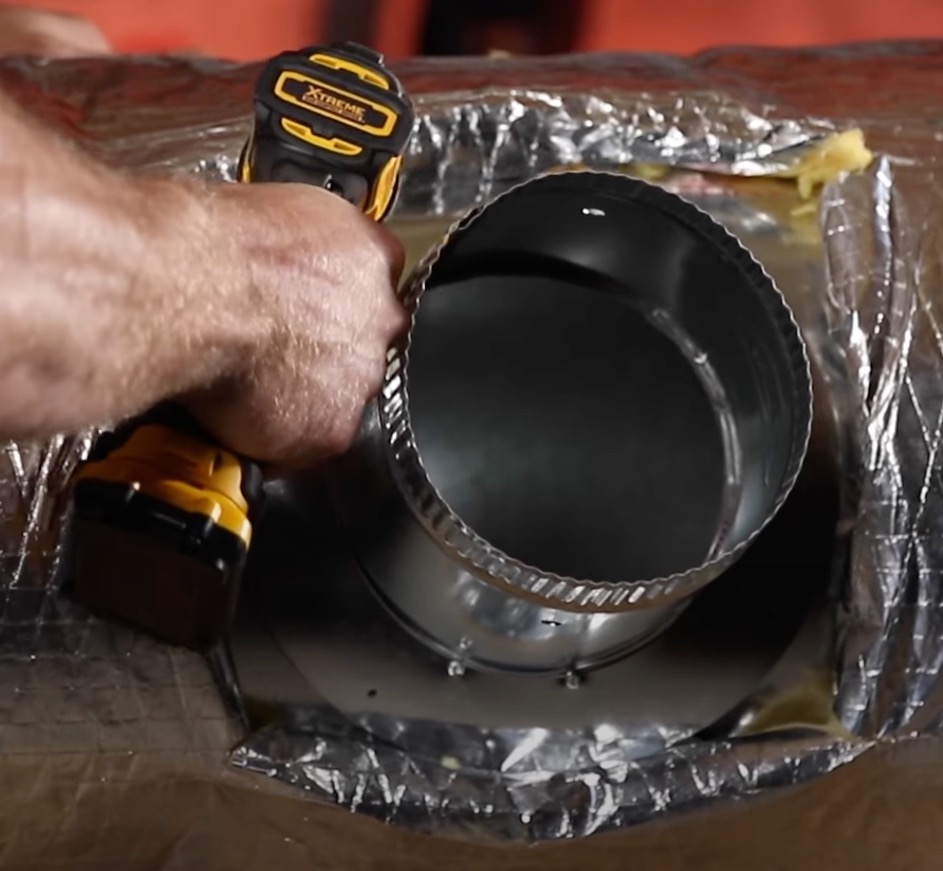
This take-off collar for a round metal duct is secured to the HVAC plenum using #7 x ½-inch self-piercing/self-drilling sheet metal screws.
Source
Figure 19. This take-off collar for a round metal duct is secured to the HVAC plenum using #7 x ½-inch self-piercing/self-drilling sheet metal screws (Source: AGL Mechanical Tips).
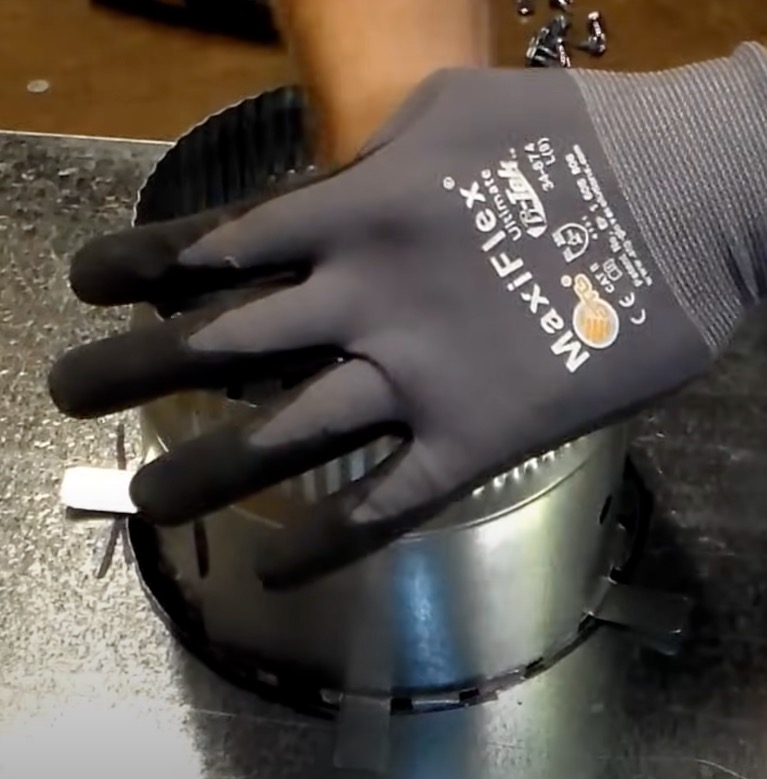
This duct take-off collar had become loose so the sheet metal tabs are being re-bent to make the collar more secure.
Source
Figure 20. This duct take-off collar had become loose so the sheet metal tabs are being re-bent to make the collar more secure (Source: The Sheet Metal Kid).
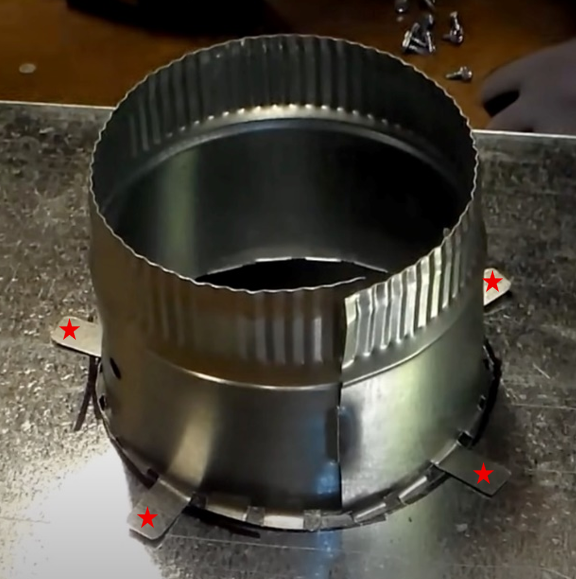
Self-piercing/self-drilling sheet metal screws are installed on the four tabs (indicated by red stars) to secure the take-off collar to the rectangular metal duct.
Source
Figure 21. Self-piercing/self-drilling sheet metal screws are installed on the four tabs (indicated by red stars) to secure the take-off collar to the rectangular metal duct (Source: The Sheet Metal Kid).
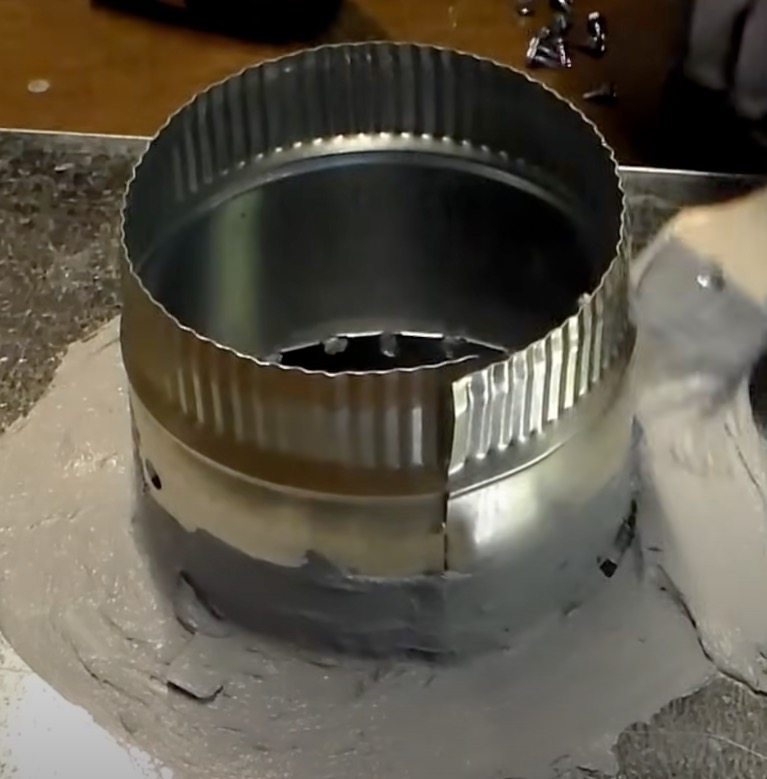
After connecting with sheet metal screws, this take-off collar is then air sealed and further secured using UL 181 fiber-reinforced duct sealant mastic paste.
Source
Figure 22. After connecting with sheet metal screws, this take-off collar is then air sealed and further secured using UL 181 fiber-reinforced duct sealant mastic paste (Source: The Sheet Metal Kid).
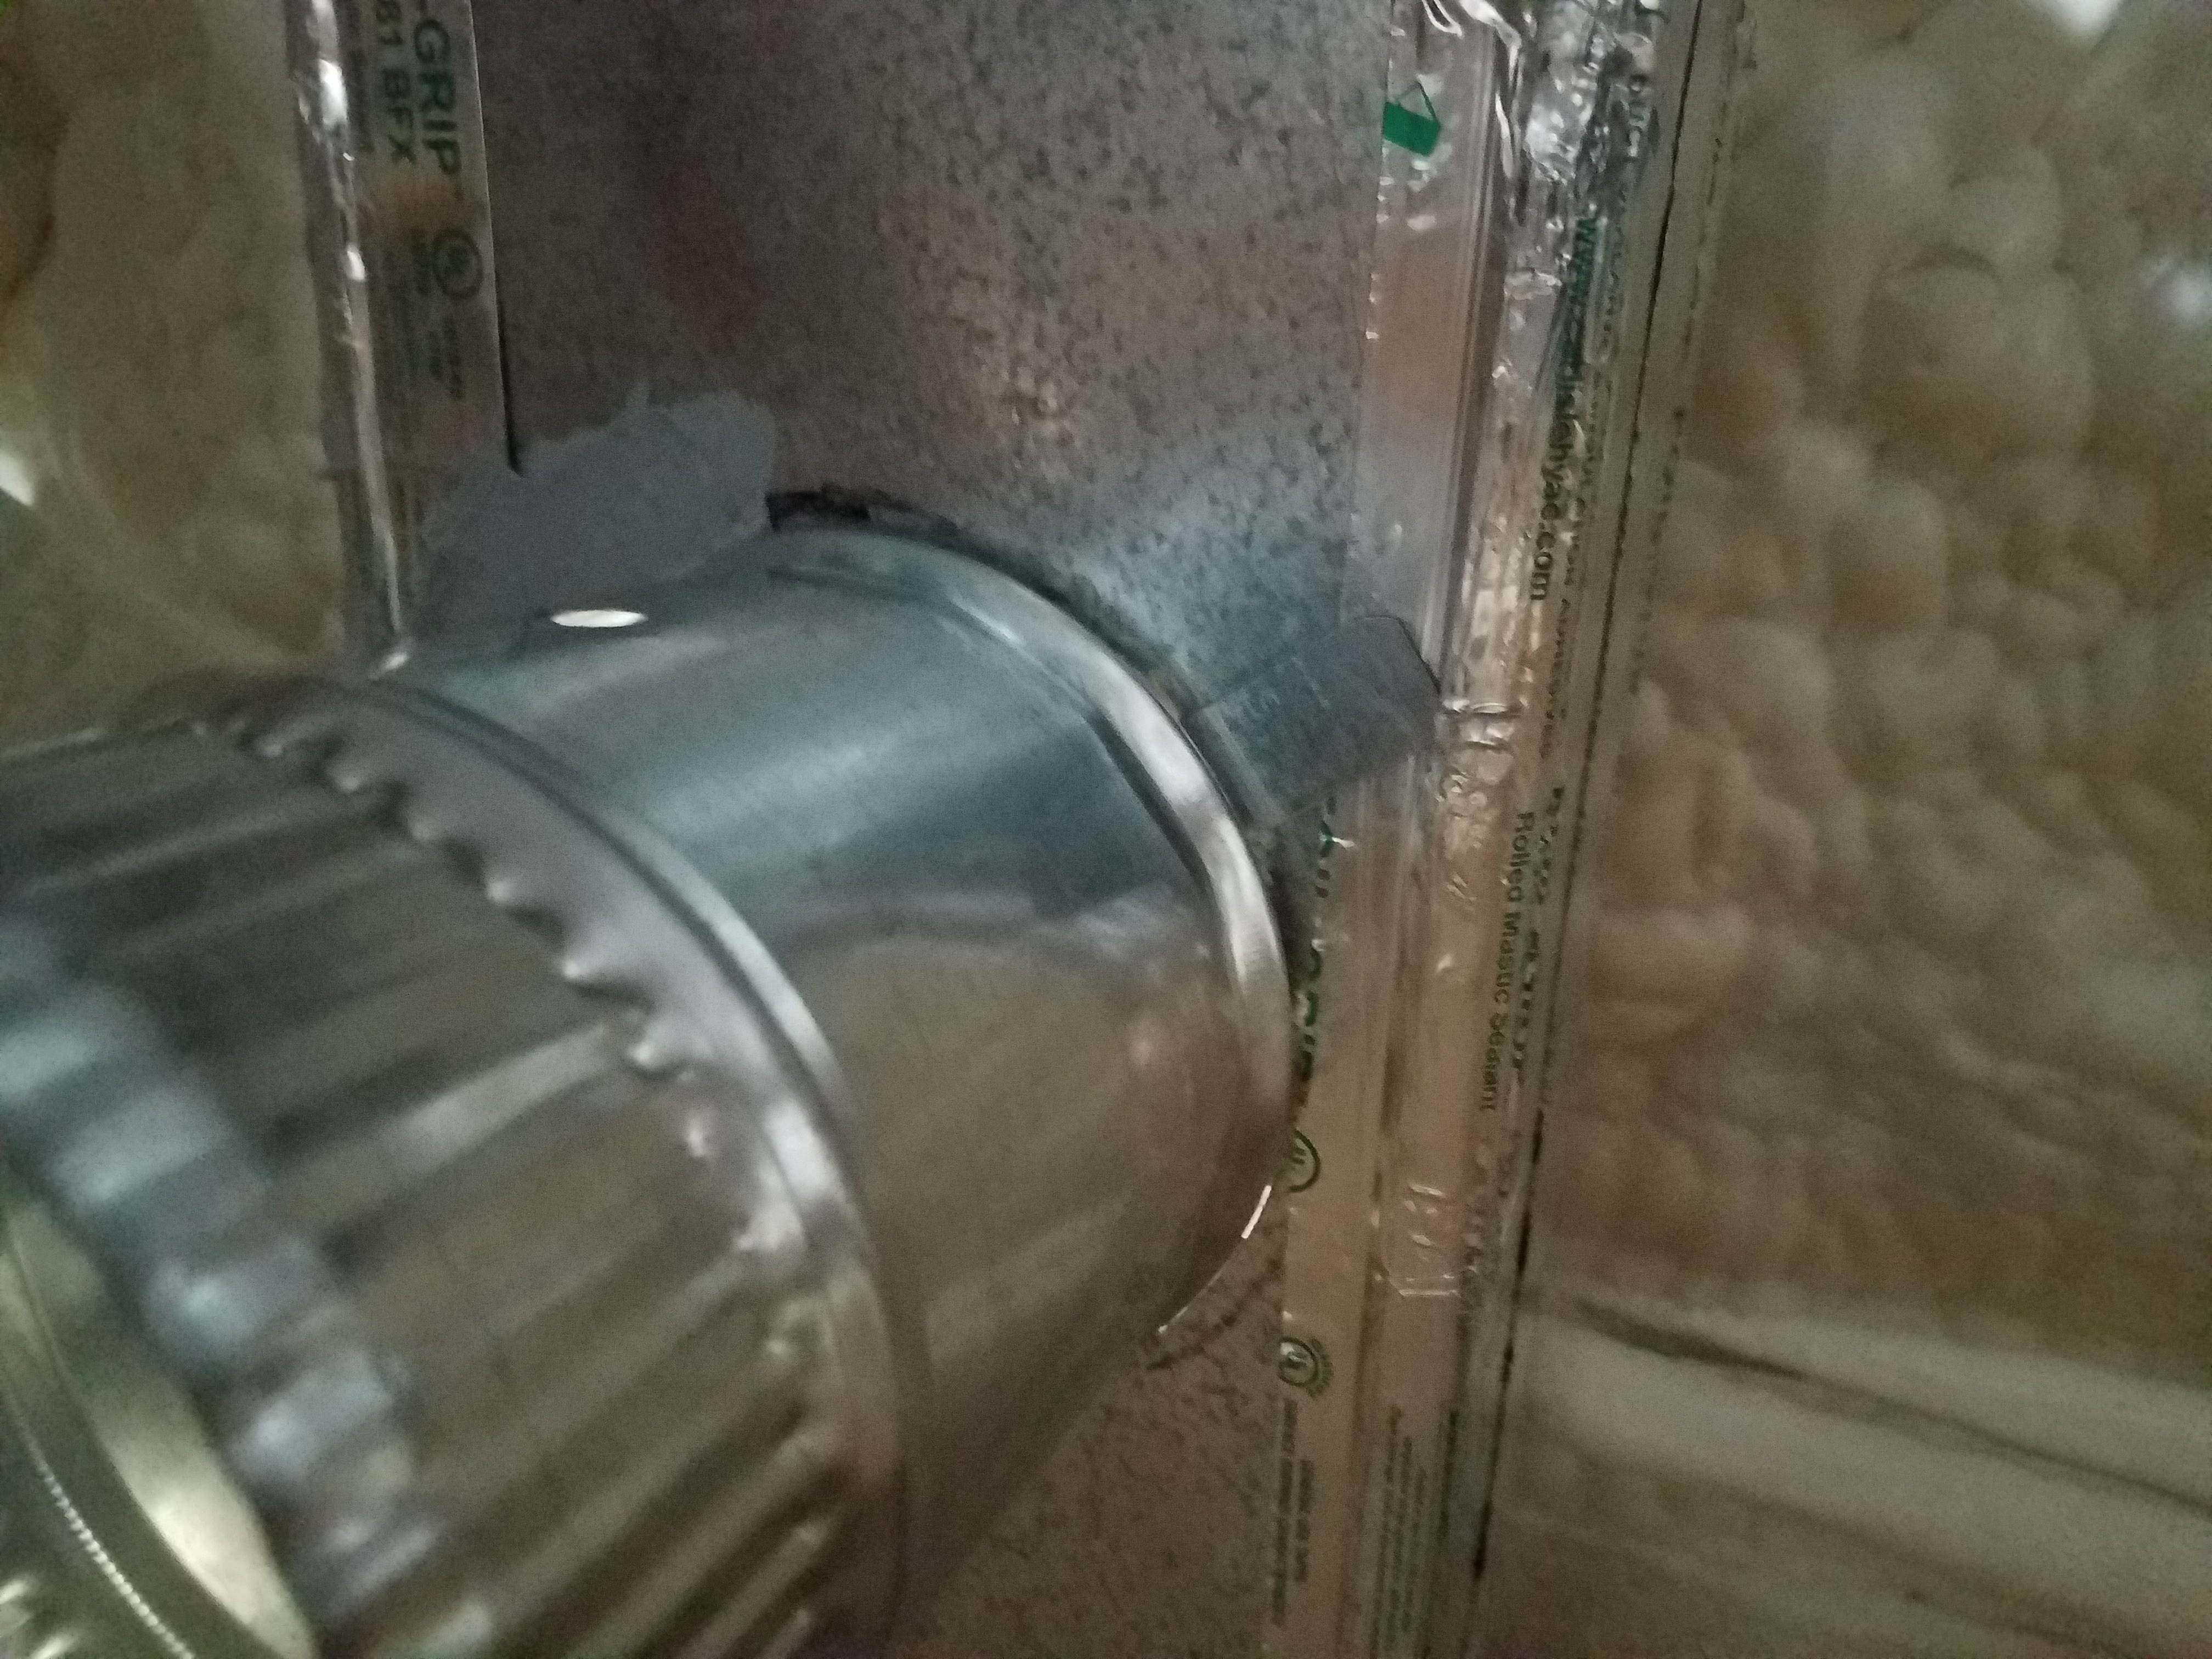
Wrong - The seam around the duct boot where the duct boot enters the trunk duct has not been completely sealed with mesh tape and mastic.
Source
Figure 23. The seam around this duct boot where the duct boot enters the trunk duct has not been completely sealed with mesh tape and mastic (Source: S.D. Jessup Construction).

Re-Connecting Rigid Duct Connections

  1. Remove old loose tape (Figure 24).
  2. Secure the duct connection using at least three #7 x ½-inch self-piercing/self-drilling sheet metal screws.
  3. Apply UL-181 fiber-reinforced duct sealant mastic paste to the connection. The mastic paste should be applied to the minimum thickness of a nickel coin. (Figure 25).
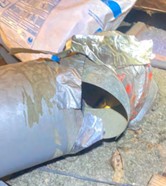
This rigid metal duct connection was taped with regular duct tape and became disconnected when the tape adhesive failed
Source
Figure 24. This rigid metal duct connection was taped with regular duct tape and became disconnected when the tape adhesive failed (Source: Entergy Mississippi).
This rigid duct connection was repaired using self-piercing/self-drilling sheet metal screws to mechanically secure the connection; then it was air sealed using UL-181 fiber-reinforced duct sealant mastic paste
Source
Figure 25. This rigid duct connection was repaired using self-piercing/self-drilling sheet metal screws to mechanically secure the connection; then it was air sealed using UL-181 fiber-reinforced duct sealant mastic paste (Source: Entergy Mississippi).

Sealing Leaky Rigid Duct Seams and Connections

Rigid ducts are more durable than flex ducts but there are more seams to air seal and they take more time and labor to insulate since they do not come pre-insulated. Use UL-181 fiber-reinforced duct sealant mastic paste to seal all accessible seams and connections. Figure 26 shows the location of seams to seal. Note it is not comprehensive and your home’s duct system will have unique elements and situations. The mastic paste should be applied to a minimum thickness of a nickel coin. For larger gaps, apply UL-181 foil mastic tape to cover and seal the gap and then apply mastic paste to cover the taped area and a minimum of 1-2 inches beyond. If there are even larger gaps and holes to seal, use an aviation snip to cut a piece of 30-gauge sheet metal to size and secure it with self-piercing/self-drilling sheet metal screws before sealing seams with tape and mastic paste.
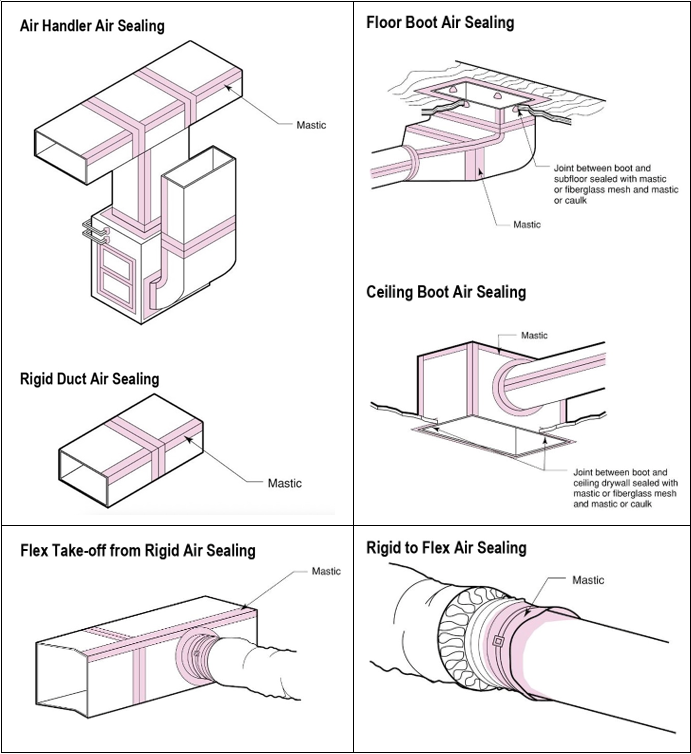
Seams and connections in rigid metal ducts are air sealed using tape or mastic.
Source
Courtesy Of
BSC
Figure 26. Seams and connections in rigid metal ducts are air sealed using tape or mastic (Source: Building Science Corporation).

An example of a large gap in an air handler box cabinet that was covered with 30-gauge sheet metal cut to size is shown in Figure 27.
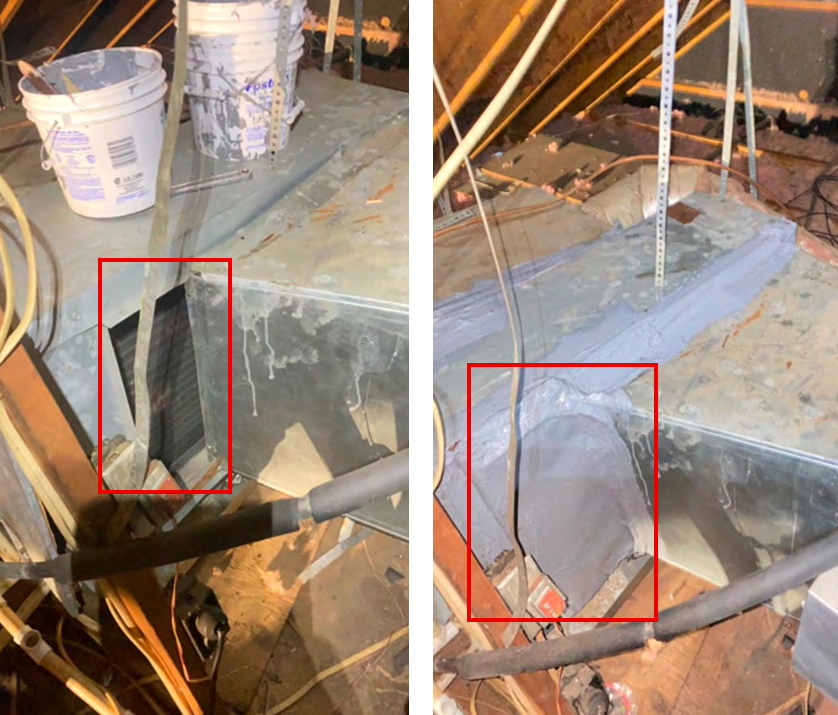
The hole in the air handler box, on left, was covered with a piece of 30-gauge sheet metal that was cut to size and sealed in place with screws and mastic.
Source
Figure 27. The hole in the air handler box, on left, was covered with a piece of 30-gauge sheet metal that was cut to size and sealed in place with screws and mastic (Source: Entergy Mississippi).

Insulating Rigid Ducts

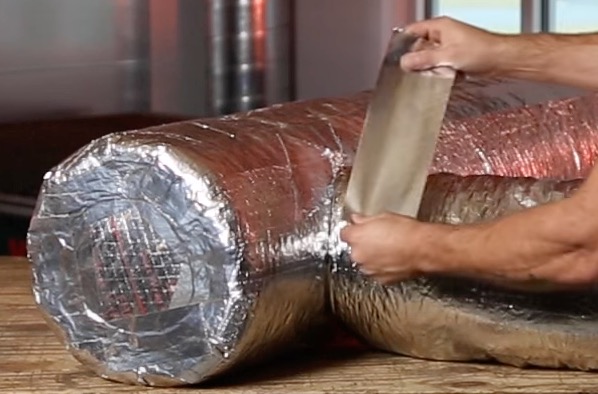
Many old ducts are either not insulated, or the insulation R-value is less than ideal (R-8 is the modern minimum), or the insulation has degraded due to tape failure or other reasons. If the ducts are rigid ducts and they are in good condition and have been air sealed, then insulating them is worth it. If they are flexible ducts, it is typically more economical and labor efficient to replace the old flex duct with new pre-insulated R-8 flex ducts than to re-insulate the old flex duct. Duct insulation comes in large rolls with a Foil-Scrim-Kraft (FSK) vapor barrier attached to the fiberglass insulation from the factory, as shown in Figure 28. The insulation needs to be cut to length and width for the application. When you shop for duct insulation, you will find thin products that look like silver bubble wrap. Some will be advertised as having an R-8 insulation value. Do not buy them. If it looks thin, then it is impossible to be R-8. Refer to the video links below by AGL Mechanical Tips for tips on how to measure and make insulation patterns that fit well onto duct fittings when installed. You may want to go to the home improvement store to buy a fitting that matches the fitting in the attic or crawlspace so you can use it to measure and cut the insulation pattern in a more comfortable location (Figure 29) and then carry the insulation to where it is needed.

  1. Cut the insulation to size, keeping in mind areas where you want some extra FSK vapor barrier to overlap.
  2. Use an outward-clinch stapler to mechanically fasten the seams.
  3. Tape the seam using FSK duct tape.
  4. Apply UL-181 fiber-reinforced duct-sealant mastic paste at a minimum nickel thickness to cover the tape and 1-2 inches past the tape.
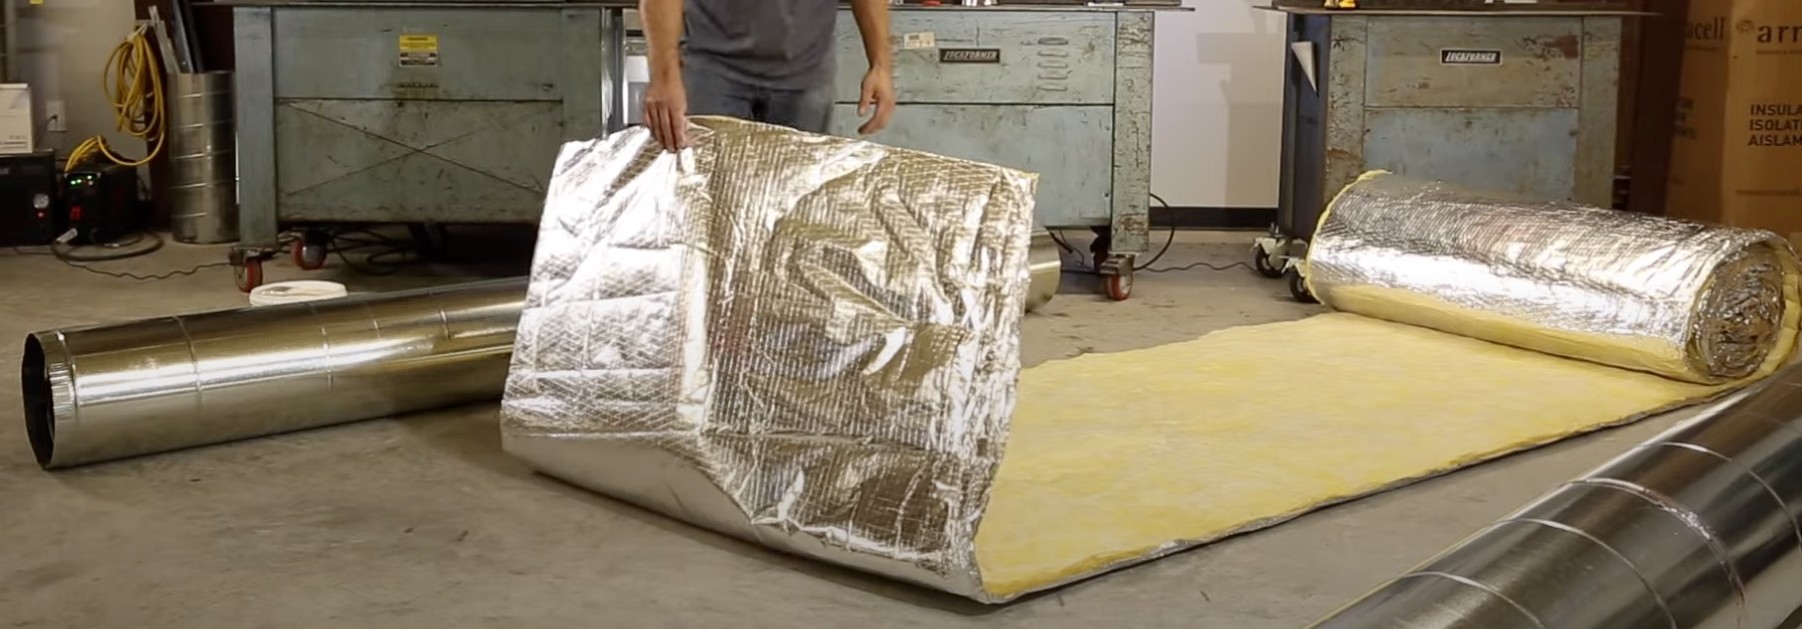
Insulation for rigid ducts comes in large rolls like this 4-ft x 50-ft roll consisting of a Foil-Scrim-Kraft (FSK) vapor barrier attached to the fiberglass insulation.
Source
Figure 28. Insulation for rigid ducts comes in large rolls like this 4-ft x 50-ft roll consisting of a Foil-Scrim-Kraft (FSK) vapor barrier attached to the fiberglass insulation (Source: AGL Mechanical Tips).
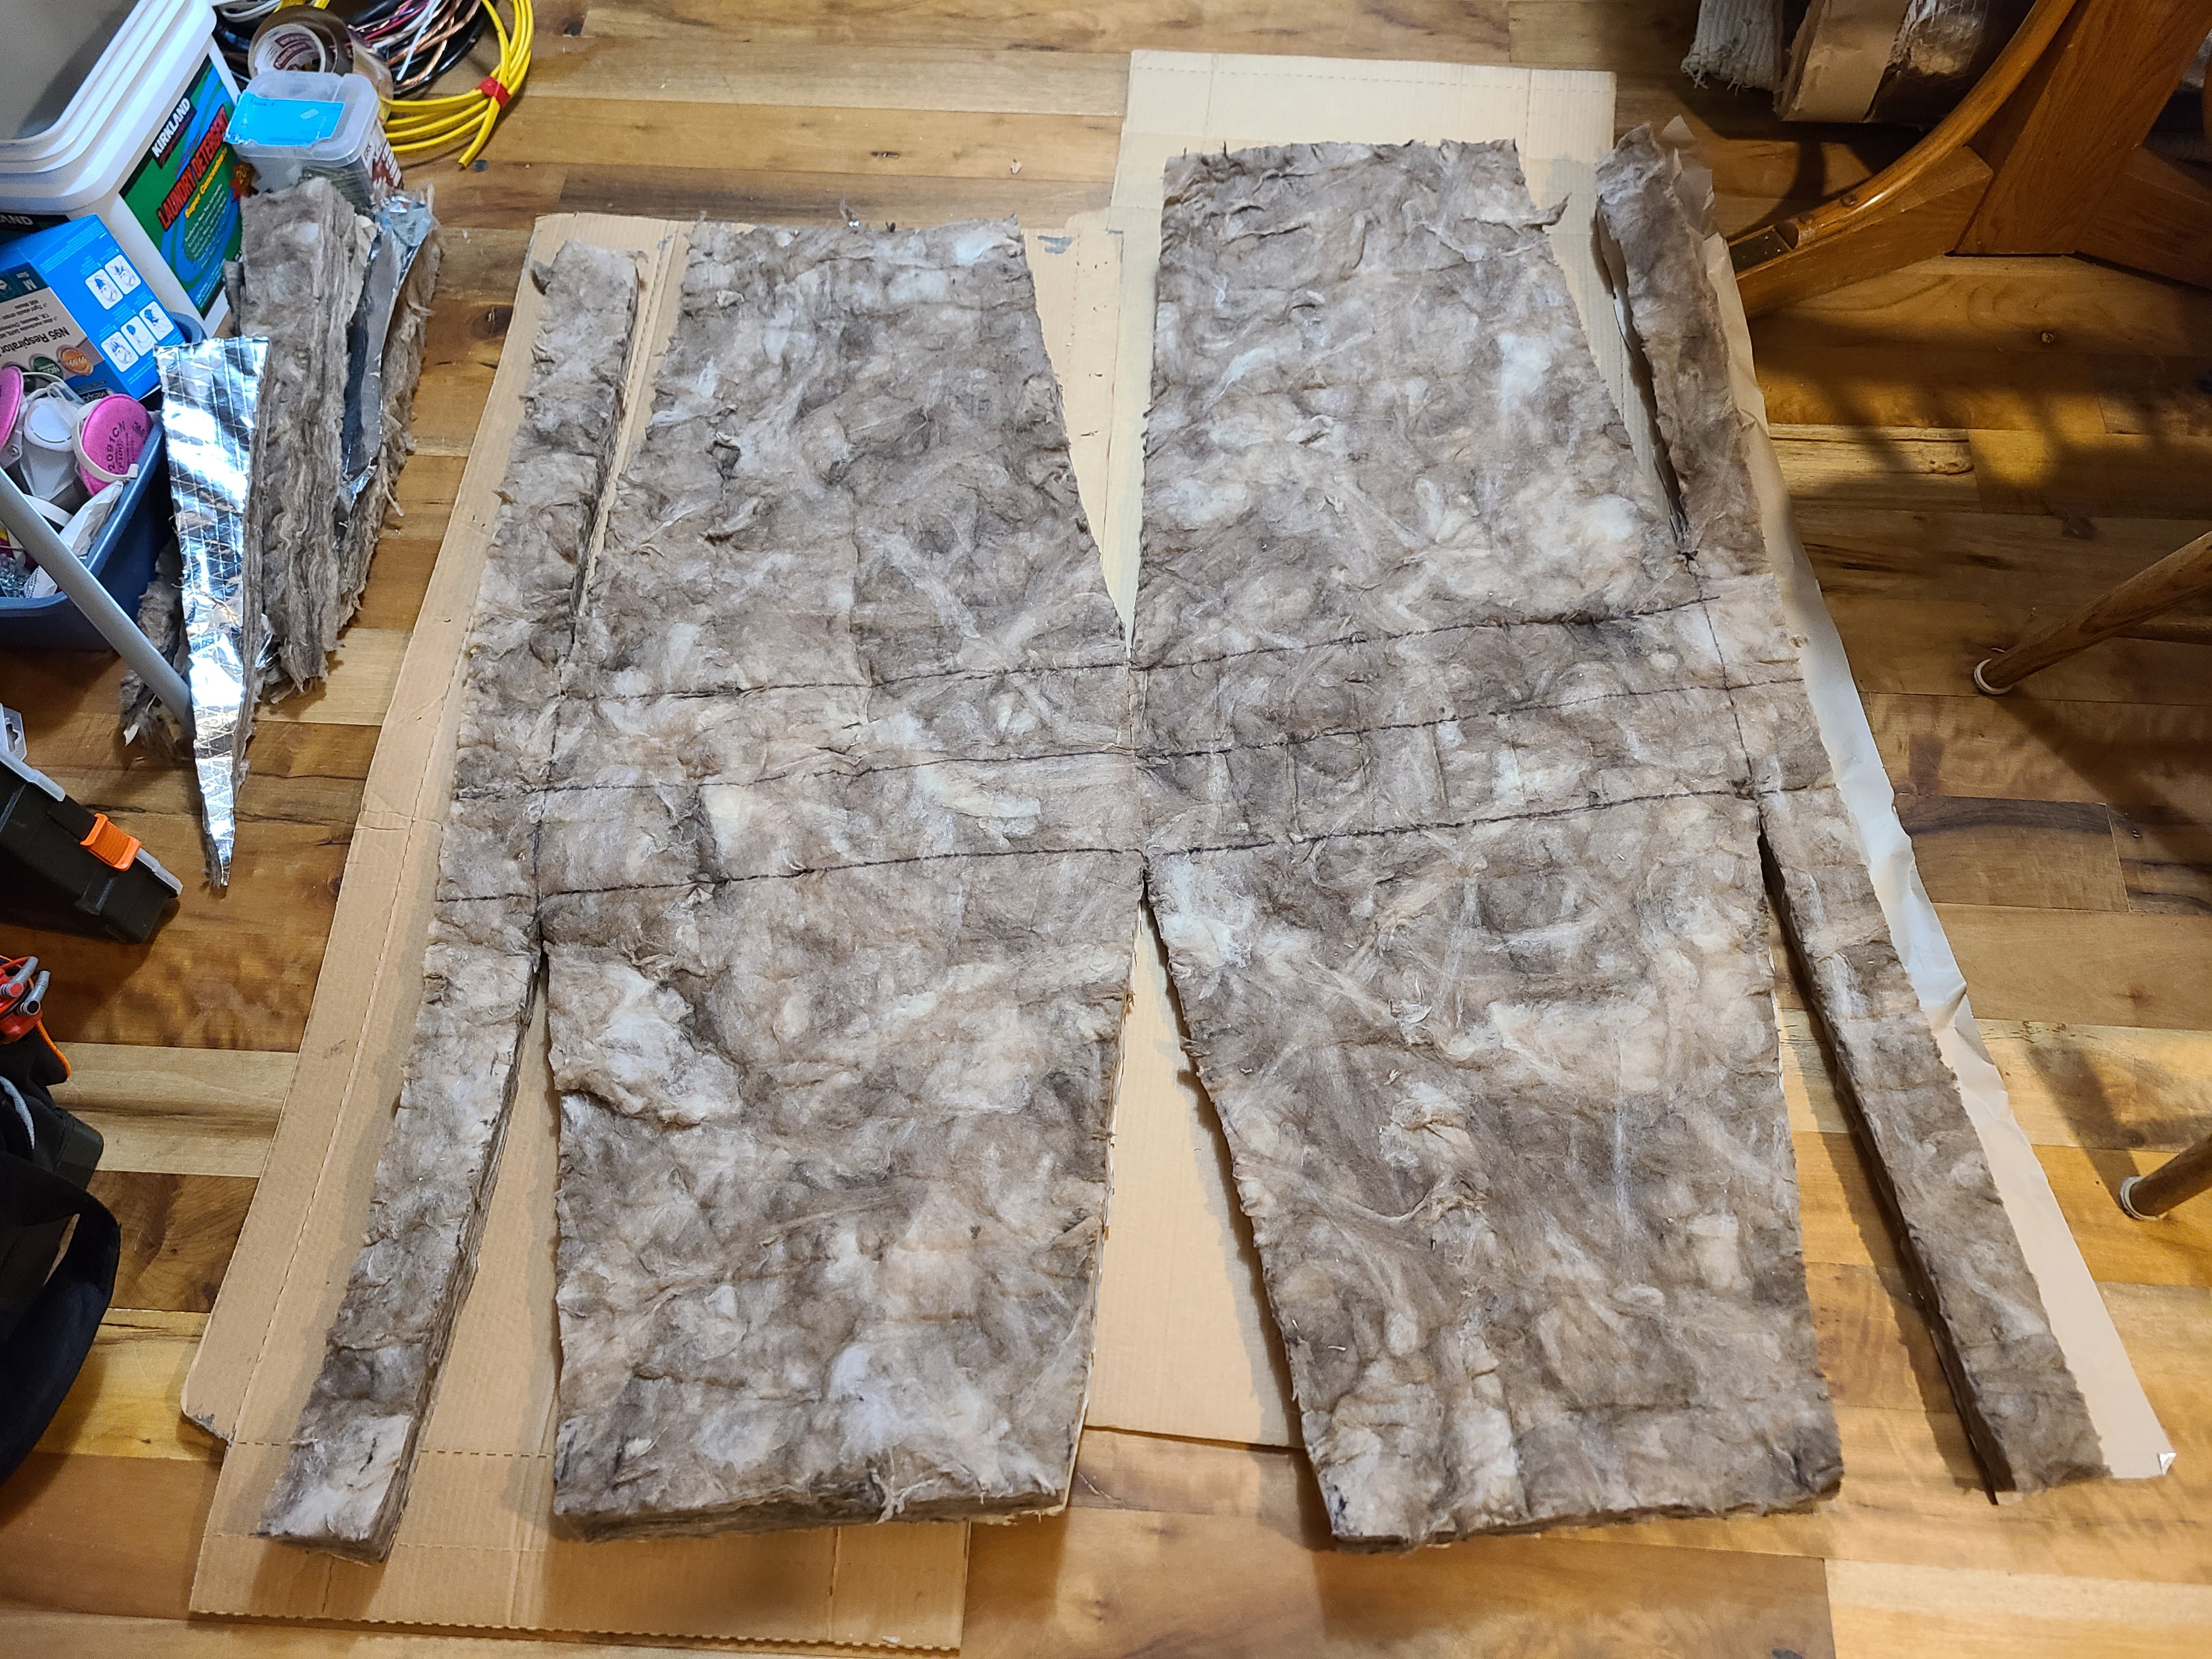
This is an example of an insulation pattern for rigid metal ducts that has been measured and cut in a comfortable location before being carried into the attic.
Source
Figure 29. This is an example of an insulation pattern for rigid metal ducts that has been measured and cut in a comfortable location before being carried into the attic (Source: PNNL).

4. Identify and Fix Problems with Fiber Board Ducts

The fiber board for ducts consists of resin-bonded strands of fiberglass that are formed into flat sheets, typically 4x10 or 4x8 feet and in thicknesses of 1, 1.5, or 2 inches. The exterior surface of the sheet is covered with a reinforced foil laminate air and vapor barrier and the interior fiberglass surface is covered with an antimicrobial coating (Figure 30).
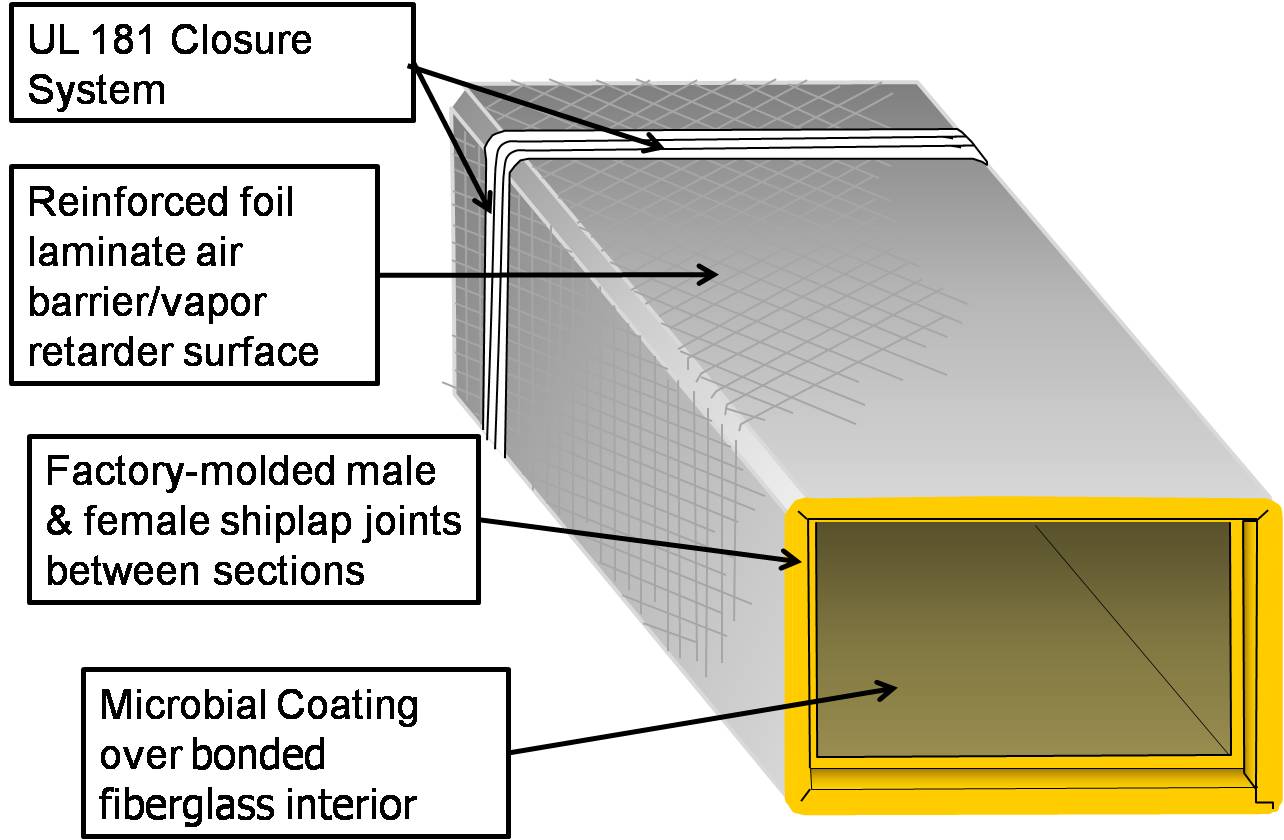
Assembled section of fiber board duct
Source
Figure 30. Fiberboard ducts (Source: Calcs Plus).

Sealing Leaky Duct Board Seams

Duct board cannot be mechanically held together using screws. Instead, it is assembled and held together using tape. Over time the adhesive of the tape can fail, resulting in air leaks (Figures 31 and 32). To repair, clean the dust off the duct board and apply a robust amount of Foil-Scrim-Kraft (FSK) duct tape (Figure 33). Then apply UL-181 fiber-reinforced duct sealant mastic paste to cover the tape and beyond (Figure 34).
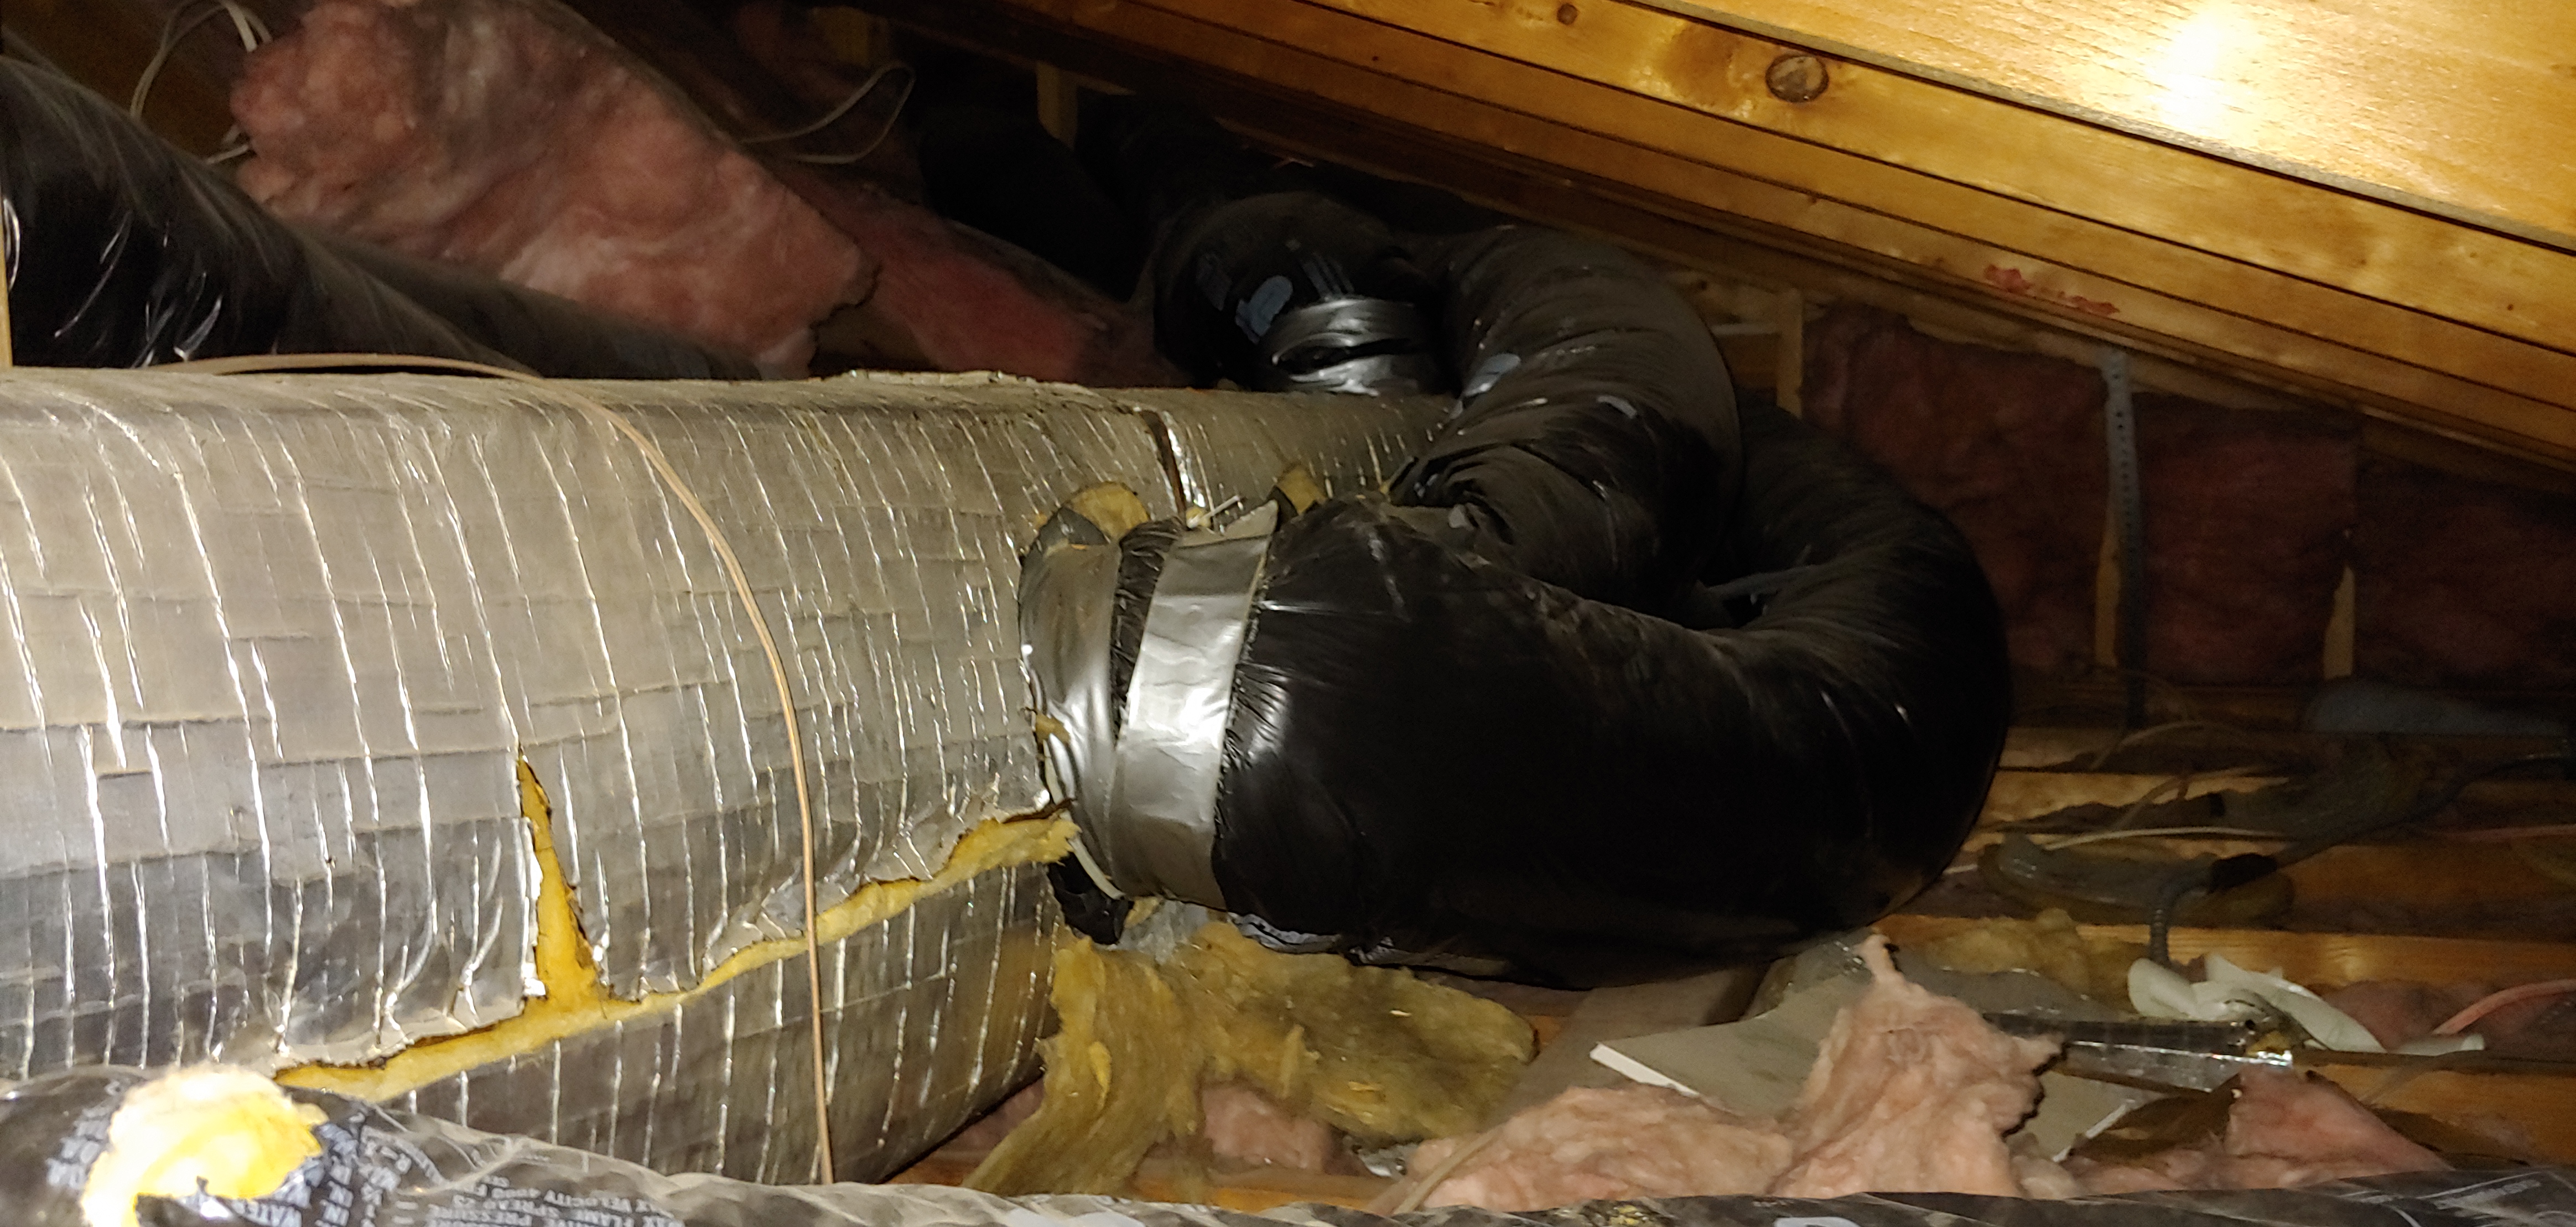
Wrong – Fiber board duct is not sealed at seams; flex duct is sealed with duct tape not mastic tape or UL-181 metal tape.
Source
Figure 31. The seams in this fiber board duct are no longer sealed with tape, the juncture with the flex duct is also not sealed, and the flex duct is taped with regular duct tape not mastic or UL-181 metal tape (Source: United Way of Long Island).
This duct board seam failure is due to the failed tape adhesive.
Source
Figure 32. This duct board seam failure is due to the failed tape adhesive (Source: TedCookHVAC).
Clean the dust off the duct board where the tape will be applied. Apply a robust amount of Foil-Scrim-Kraft (FSK) duct tape.
Source
Figure 33. Clean the dust off the duct board where the tape will be applied. Apply a robust amount of Foil-Scrim-Kraft (FSK) duct tape (Source: TedCookHVAC).
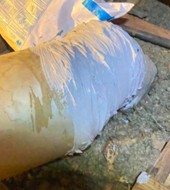
Apply a robust amount of UL-181 fiber reinforced duct sealant mastic paste to cover well past the edges of the tape.
Source
Figure 34. Apply a robust amount of UL-181 fiber reinforced duct sealant mastic paste to cover well past the edges of the tape (Source: TedCookHVAC).

Additional Info

Last Updated

Disclaimer

This content is a work created with funding provided by the United States Department of Energy under Contract no DE-AC05-076RL01830 for the operation of Pacific Northwest National Laboratory. The information and guidance provided by Pacific Northwest National Laboratory (PNNL) in the content are intended solely for educational purposes only and do not constitute formal training or certification. It is provided with the explicit understanding that neither the United States Government nor the United States Department of Energy, nor the Contractor, nor any or their employees, nor any jurisdiction or organization that has cooperated in the development of these materials, makes any warranty, express or implied, or assumes any legal liability or responsibility for the accuracy, completeness, or usefulness or any information, apparatus, product, software, or process disclosed, or represents that its use would not infringe privately owned rights. Reference herein to any specific commercial product, process, or service by trade name, trademark, manufacturer, or otherwise does not constitute or imply its endorsement, recommendation, or favoring by the United States Government or any agency thereof, or Battelle Memorial Institute. The views and opinions of authors expressed herein do not necessarily state or reflect those of the United States Government or any agency thereof. Viewers assumes full responsibility for all actions that they may take from information provided in this content including ensuring the safety, code compliance, and proper functionality of any products they choose to install. Installation and use of such products should be performed in accordance with local regulations and manufacturer instructions.